


INSTRUCTION
MANUAL
OSCAR MX
HMV501
IMPORTANT - Keep these instructions for future
reference.
READ ALL INSTRUCTIONS CAREFULLY BEFORE ASSEMBLY AND USE OF THIS
STROLLER. THE CORRECT USE AND MAINTENANCE OF THIS PRODUCT IS
Suitable from children 6 months to 20 kg (or newborn to 20kg with
and New Zealand standard AS/NZS 2088:2013 and European EN
ALWAYS FOLLOW THE MANUFACTURERS INSTRUCTIONS.
ESSENTIAL.
the Newborn Insert Cushion accessory).
Independently safety tested for compliance to the Australian

WARNINGS Australia/NZ
WARNINGS!: TO AVOID
INJURY OR DEATH:
• ALWAYS APPLY THE BRAKES WHEN THE
STROLLER IS STATIONARY.
• DO NOT LEAVE CHILDREN UNATTENDED.
• SECURE THE CHILD IN THE HARNESS AT ALL
TIMES.
• DO NOT CARRY EXTRA CHILDREN OR BAGS ON
THIS STROLLER.
• MAKE SURE CHILDREN ARE CLEAR OF ANY
MOVING PARTS IF YOU ADJUST THIS STROLLER.
• USE THE HARNESS AT ALL TIMES.
• USE THE STRAP TO STOP THE STROLLER
ROLLING AWAY.
• DO NOT USE THE BASSINET ONCE THE CHILD
CAN SIT UP UNAIDED.

WARNINGS Europe
WARNING!: TO AVOID
INJURY OR DEATH:
• Ensure that all the locking devices are engaged
before use.
• Never leave your child unattended.
• To avoid injury ensure that your child is kept
away when unfolding and folding this product.
• Do not let your child play with this product.
• Always use the restraint system.
• Check that the pram body or seat unit or car seat
attachment devices are correctly engaged before
use.
• This product is not suitable for running or skating.
• It is only safe to use the main seat with a newborn
baby when the seat is at full recline angle AND
with the newborn liner (sold separately).

GENERAL WARNINGS (cont.)
WARNING!: TO AVOID
INJURY OR DEATH:
• THE MAXIMUM WEIGHT OF THE CHILD USING THIS STROLLER
IS NOT TO EXCEED 20KG.
• THE MAXIMUM WEIGHT OF THE CHILD USING THIS STROLLER
WITH THE CAR SEAT CAPSULE ATTACHMENT IS NOT TO
EXCEED 13KG.
• THE MAXIMUM WEIGHT OF THE CHILD USING THIS STROLLER
WITH THE CARRY COT/BASSINET ATTACHMENT IS 9KG.
• THE MAXIMUM WEIGHT CAPACITY OF THE STORAGE BASKET
IS 5KG.
• THE MAXIMUM WEIGHT CAPACITY OF THE SEAT POCKET IS
1KG.
• THE SEAT IS ONLY SUITABLE FROM NEWBORN WHEN USING
THE NEWBORN INSERT CUSHION ACCESSORY. OTHERWISE IS
IT SUITABLE FROM 6 MONTHS.
• Do not carry extra children or bags on this stroller.
• Accessories not approved by Edwards & Co shall not be used with
this stroller.
• Do not use any other mattress in the Carry Cot/bassinet other than those
supplied by Edwards & Co.
• Do not place or attach weight on the handle or side of the stroller as it will
impact the stability of the frame.
• The stroller is not intended to be a substitute baby cot or bed. It is only
designed to enable safe transportation of children.
• Always take your child out of the stroller when on stairs.
• This stroller is designed for use on flat and gentle sloping surfaces. Take
care on higher sloping or uneven surfaces as there is a risk of the stroller
tipping over.
• There is a risk of fingers being jammed in moving parts when folding or
unfolding the stroller. Take care of fingers and NEVER let children fold or
unfold the stroller.
• Salt water or excessive moisture may cause corrosion on the fastenings
and moving parts of this stroller. Store your stroller in a sheltered
dry place and avoid beach use where possible. Corrosion caused by
environmental factors is not covered by the manufacturer warranty.

GENERAL WARNINGS (cont.)
WARNING!: TO AVOID
INJURY OR DEATH:
• Keep away from fire and extreme heat. Do not store in areas that
may get particularly hot in summer like roof space or beside shed
walls.
• Do not place heavy weights on the handle of the stroller as it will
impact the stability of the frame.
• The stroller is not intended to be a substitute baby cot or bed. It
is only designed to enable safe transportation of children.
• Always take your child out of the stroller when on stairs.
• To avoid serious injury, always use the safety harness when your
child is in the stroller. Always adjust the straps to suit the size of
your child’s body and to fit it firmly. A loose restraint or harness
is DANGEROUS.
• Never leave a harness connected when not fitted to a child in the
stroller. The harness can form loops which may be a strangulation
hazard.
• The buckle SHOULD ALWAYS be easily accessible. It is
important that your child can be released quickly in the event of
an emergency.
When jogging:
• Jogging with the stroller can be dangerous. We do not
recommend jogging over 8kph with this stroller.
• Only jog with a child that can sit up unaided.
• Always use the front wheel locked in fixed position.
• Always use the handle bar safety strap.
• Only jog on flat terrain, away from traffic or areas with dangerous
hazards.
• Change direction with small adjustments. Never turn the direction
of the stroller at speed at this risks the stroller tipping.
• Always have your child strapped to the seat tightly with bumper
bar installed..
• Always use the stroller in forward-facing position, with the seat
upright.
• Do not jog using the car seat or carry cot accessory.
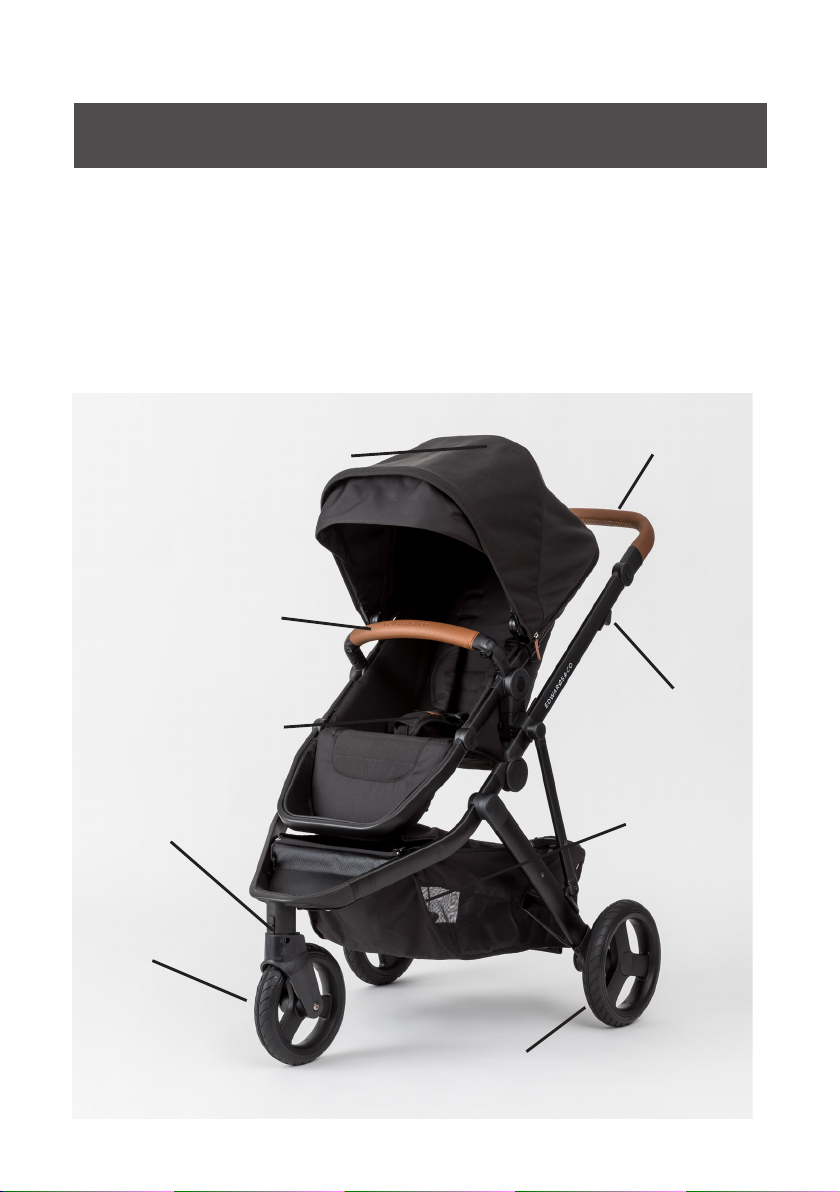
STROLLER COMPONENTS
The product should come with the following:
Main components
• Stroller frame.
• Seat unit with harness and bumper bar.
• Three wheels.
• Sun canopy.
• Storage basket.
Bumper bar
Swivel lock
Front wheel
Sun canopy
Buckle
Handlebar
Folding trigger
Brake
Rear wheel
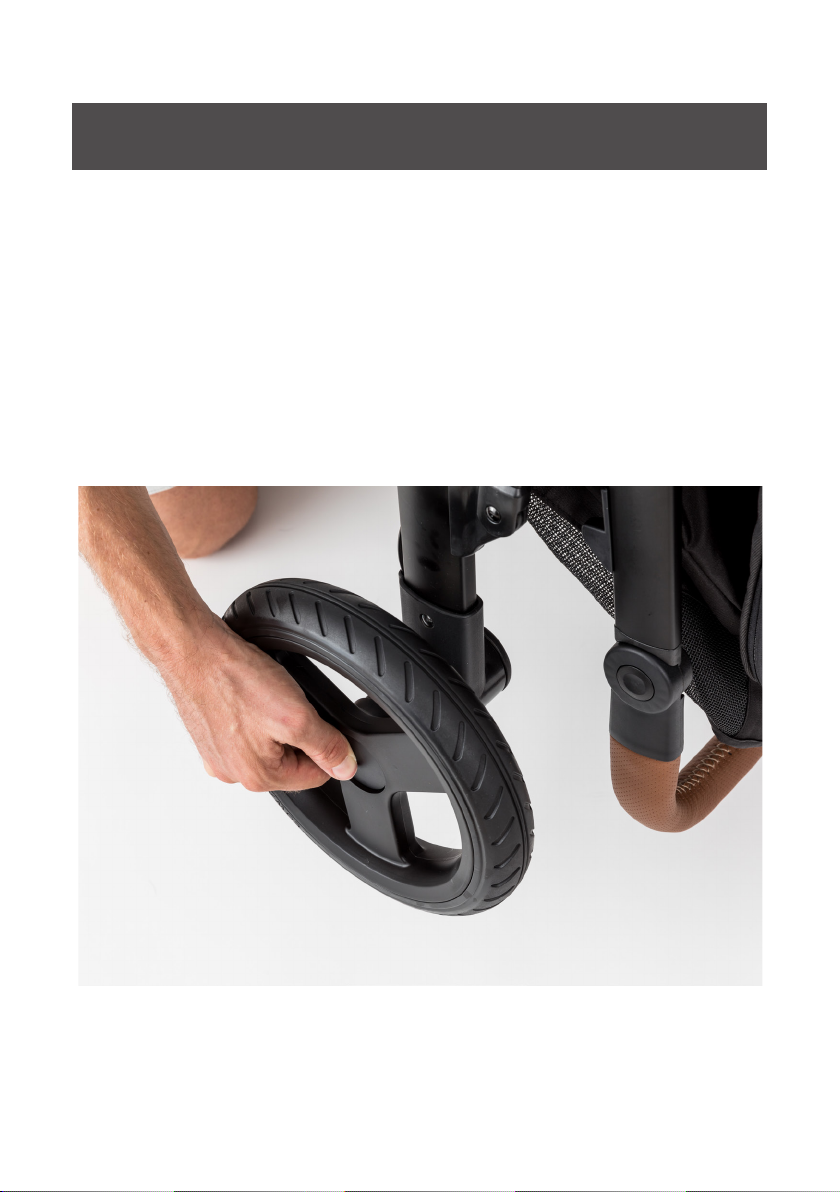
ASSEMBLY: Wheel installation and removal
Rear wheels: Removal
Press the release button located on the wheel hub and pull the wheel
outwards.
Rear wheels: Installation
Locate the metal rod on the wheel. Whilst pressing the wheel hub
release button, insert the rod into the rear wheel housing located on
the axle. The wheel has successfully installed when you hear a CLICK!
Once installed, pull the wheel to confirm a proper connection.
ASSEMBLY: Wheel installation and removal
Front wheels: Removal
Push the button on the back of the wheel housing and pull outwards.
Front wheels: Installation
Insert the wheel rod into the front wheel housing until you hear a
CLICK!
Once installed, pull the wheel to confirm a proper connection.
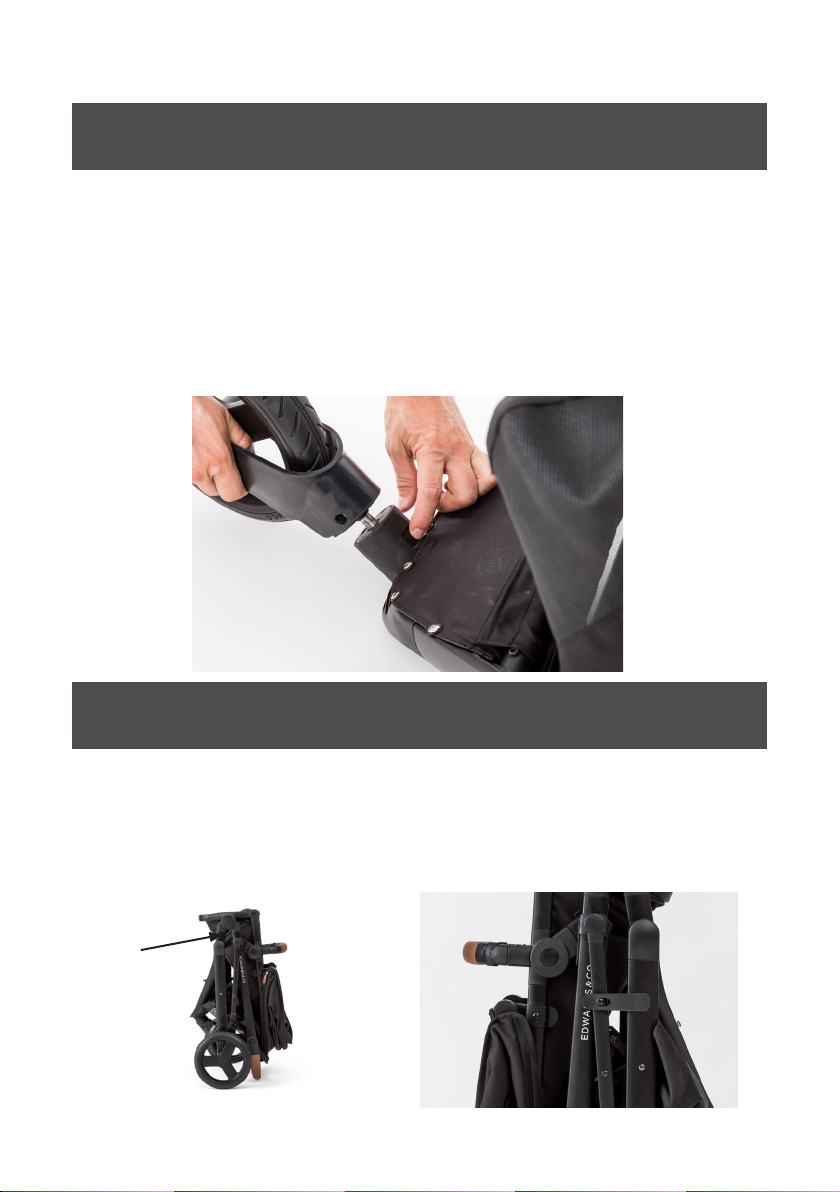
CARRYING THE STROLLER
We recommend lifting the stroller by grabbing the area near the fold
hinge.
ALWAYS make sure the fold lock is secured before lifting or carrying
the stroller.

ASSEMBLY: Unfolding the stroller
Unfolding:
1. Make sure the brake is engaged.
2. Stand the stroller upright.
3. Lift the fold lock located on the right hand side of the frame away
from the catch clip.
4. Slowly pull the handle of the stroller upwards.
5. The stroller will unfold and CLICK! into place.

FOLDING THE STROLLER
Folding:
Note - the seat unit must be in forward facing position, or removed, to
fold.
1. Apply the brakes.
2. Adjust the seat recline to an upright position.
3. Locate the two folding triggers. With both hands, slide the
triggers towards you.
4. Push the handlebar towards the floor until the fold lock engages.
The fold lock prevents the stroller from unfolding when carrying.
5. For a more compact fold, adjust the footrest.

ATTACHING & REMOVING THE SEAT
Attaching
1. To install the seat unit, insert the tongues on the seat unit into the
stroller frame adapter housing. You can install the seat in forward
or reverse position.
Removing
1. There are two buttons located on the stroller frame, just
underneath where the seat unit’s tongue connects . Press one of
the release buttons until it depresses (it will stay depressed).
2. Press the second release button on the other side until it
depresses. You do not need to press each button simultaneously.
3. Lift the seat unit up as pictured.

SEAT RECLINE
To adjust the recline, press the buttons on each side of the seat unit
and raise or lower the seat to the desired position. There are three
height settings.
1. Upright - suitable from 6 months +
2. Reclined - a sleeping position from
6months+.

SEAT RECLINE
3. Lie Flat- suitable from newborn only
when used with the Newborn Insert
Cushion (sold separately). See next
page.
FOOT REST
To raise or lower the leg rest, press the two buttons on both sides of
the leg rest hinge and move to your desired position.

USING THE NEWBORN INSERT CUSHION
The Newborn Insert Cushion converts the seat unit into an approved
safe surface suitable for newborn babies.
This accessory can be purchased from Edwards & Co or your nearest
retailer.
The Newborn Insert Cushion should only be used with the seat unit
in fully reclined position. NEVER use the liner in a semi-reclined or
upright position.
To install:
1. Remove the seat unit’s shoulder pads and crotch pads.
2. Adjust the shoulder strap height to the lowest position.
3. Thread the shoulder belts through the liner, through the loop on
the back of the head hugger, through the shoulder pads and finally
connect them to the buckle.
4. Pull the lumbar and crotch belts through the liner and connect
them to the buckle.
5. The final installation is pictured below.

ATTACHING & REMOVING THE CARRY COT
Attaching
1. Insert Carry Cot’s adapter tongues into the stroller frame adapter
housing. We only recommend installing the Carry Cot in reverse
facing position (with baby looking at you).
Removing
1. There are two buttons located on the stroller frame, just
underneath where the Carry Cot’s tongue connects . Press one of
the release buttons until it depresses.
2. Press the second release button on the other side until it
depresses. You do not need to press each button simultaneously.
3. Lift the Carry Cot up as pictured.
IMPORTANT - Only the Edwards & Co Carry Cot (M Series) can be connected
with the Edwards & Co Oscar Mx. Do not use other brands.
WARNING - DO NOT USE THE CARRY COT WHEN BABY CAN SIT UP
UNAIDED OR WHEN THEIR WEIGHT EXCEEDS 9KG. WHATEVER IS EARLIER.

ATTACHING & REMOVING AVERY CAR SEAT
Attaching
1. Insert Avery’s adapter tongues into the stroller frame adapter
housing. We only recommend installing the Avery car seat in
reverse facing position (baby looking at you).
Removing
1. There are two buttons located on the stroller frame, just
underneath where the car seat’s tongue connects . Press one of
the release buttons until it depresses.
2. Press the second release button on the other side until it
depresses. You do not need to press each button simultaneously.
3. Lift the car seat up as pictured.
IMPORTANT - Only the Edwards & Co Avery Car Seat (FA0062) can be
connected with the Edwards & Co Oscar Mx.
IMPORTANT - The maximum weight capacity of the car seat is 13kg.
IMPORTANT - The car seat is not a subsitute for a bassinet or bed. Do not
leave your child unattended in the car seat.

ATTACHING A MAXI-COSI STYLE CAR SEAT
Attaching the adapters
1. Locate your Maxi-Cosi/Universal Car Seat adapter (sold separately).
2. Identify the Left and Right adapter (stamped on the underside with either
L or R). Left side = Left side when standing at the handlebar. Right side
= Right side when standing at the handlebar.
3. Connect the appropriate adapter to the stroller’s seat housing.
Removing the adapters
1. There are two buttons located on the stroller frame, just underneath
where the adapter connects . Press one of the release buttons until it
depresses. Lift out the adapter.
2. Press the second release button on the other side until it depresses. Lift
up the adapter.
Attaching & removing the car seat
1. To attach the car seat, place the car seat’s adapter housing on top of the
adapters until you hear a CLICK!
2. To remove the car seat, simultanously release the buttons on the side of
the car seat shell and lift upwards (for more information please refer to
your car seat’s instruction manual).

BUMPER BAR
Attaching
1. Insert the tongue on the bumper bar into the housing on the seat
until it clicks. Pull the bar to ensure it’s connection.
Removing
2. Press the button underneath the bumper bar and pull out
simultaneously.
HANDLEBAR HEIGHT ADJUSTMENT
Press the buttons on the outside of the handlebar and raise or lower
as required.

BUCKLE
Locking the buckle
1. Insert each tongue into the buckle until you hear a CLICK!
2. Repeat for each tongue x 4.
Unlocking the buckle
1. Press the button at the centre of the buckle.

SHOULDER STRAP HEIGHT
There are three height slot positions for the shoulder straps. As your
child grows, you will need to move the straps according to your
child’s height. The correct height is where the straps are about level
or just above your child’s shoulders. The picture on the next page
demonstrates the correct installation.
To adjust the height - find the harness loops inside behind the seat.
Remove and insert the hooks into the loops.

TIGHTENING & LOOSENING STRAPS
To tighten and loosen the harness, pull the straps through the toggle
on the shoulder strap and/or the crotch strap as pictured.
The straps should be firm but not too tight around your child. You
should be able to fit two fingers in between the harness and your
child.
WARNING! Never leave a harness
connected when not fitted to a child in the stroller. The
harness can form loops which may be a strangulation
hazard.

PARKING BRAKE & SWIVEL LOCK
Parking brake:
To engage the brake, depress the rear of the red brake pedal
downwards. Give the stroller a small jiggle to ensure it engages.
This brake locks both rear wheels.
To release the brake, repeat by pressing the pedal downwards.
Front wheel swivel lock:
The swivel lock is located on the front wheel housing.
To lock the swivel, depress the slider downwards.
To free the wheel, lift the slider upwards.

CARE & MAINTENANCE
Important information
• We recommend storing your stroller indoors to avoid corrosion.
• We recommend regular inspection and maintenance of locking
devices and security of essential components. Please follow our
Servicing Guide (next page)
• Regularly check all parts for wear and tear.
• To clean the lining and/or sun canopy, we recommend sponging
with a damp cloth that has been soaked in a small amount of
mild detergent (such as laundry liquid). DO NOT SOAK.
• NEVER tumble dry.
• NEVER machine wash.
• NEVER clean with abrasive, ammonia-based, bleach-based or
spirit-based cleaners.
• If the wheels become damaged or worn, discontinue use and
replace.
• Avoid sun exposure for long periods to prevent fading and
damage to the fabric.
• Salt and moisture can be extremely damaging to the moving
parts of this stroller. Even salty atmospheric conditions can
enter into the mechanisms of the product. If you use the product
near salt water, please refer to our Servicing Guide found next
page. Corrosion is not covered under our warranty.
• NEVER wring any fabrics.
• Dry thoroughly before storage.
• Store in a well-ventilated area, away from direct sunlight which
could damage or fade your car seat.
• Store in a safe place when it is not being used. Avoid placing
heavy objects on top of it.
• NEVER allow the seat to come into contact with corrosive
substances such as battery acid or petroleum products.

SERVICING GUIDE
Just like your car, regular service extends
the life of your Edwards & Co stroller.
Below are some helpful tips to keep your wheels smooth and
enjoyable to use. We recommend servicing your stroller at least every
6 months and an inspection at least once a month.
Here’s how to service your stroller at home:
• Inspect all the rivets and
screws that connect your
stroller together. They should
be clean, tight and secure.
• Remove the wheels (back and
front) and wipe them clean with
a clean rag to remove any dirt,
sand or other debris. Wipe out
the wheel housing. Rear wheels
only: Spray the wheel pins with
some WD-40 to keep the wheel
release running smoothly.
• Make sure the fold joints are
free of dirt and debris. Wipe
clean with a damp cloth. We
suggest cleaning the fold
joints when the stroller frame
is folded. Apply some WD-40
or Silicone spray (available at
Bunnings, Mitre 10 or your local
supermarket) to the moving
hinges.
• To prevent the metal
components from rusting, wipe
down your stroller frame with
a damp clean rag after beach
or rain use, especially when
used in windy & exposed areas.
Always store in a dry place. Do
not store your stroller in a damp
environment that is not well
insulated (such as an unfinished
basement or outdoor shed).
• If you live or use the stroller
within 2kms of the beach or
sea, every 2 months liberally
spray a rag with some WD-40
and wipe it over the rivets and
screws to add an additional
coating layer against corrosion.
• If you do find some corrosion
forming on the rivets or
screws, you can wipe it clean
with a damp cloth and Jif. Dry it
overnight, then liberally apply a
layer of WD-40 as above.

WARRANTY
All Edwards & Co products are guaranteed for two years from the
date of purchase against defects in material and workmanship.
If we determine that the product has a manufacturing fault, we will
repair or replace it free of charge to you. The decision to repair
or replace is solely at the discretion of Edwards & Co. Proof of
purchase must be provided.
The warranty is “return to base” and not a free in-home service. This
means the customer is responsible for any inwards freight charge to
return the product to an Edwards & Co representative for warranty
or service.
Our warranty excludes claims resulting from misuse, abnormal use,
overloading, general wear and tear, child outgrowing the product,
not following instructions, transportation damage (including airline
or freight damage), poorly maintained product, dropped goods,
negligence, second-hand product, modified product, colour fading,
over inflation, mould, damage to handle foam in use or fabric
cuts and tears. Our warranty also does not cover tyre punctures
or corrosion to frames or fasteners as a result of atmospheric or
environmental conditions.
Any replacement will not give the right for the warranty period to
be extended.
Edwards & Co does not cover warranty if the product has been
purchased second hand or from an unauthorised reseller.
For the complete terms and conditions of our warranty, please visit
our website - edwardsandcobaby.com/warranty
Edwards & Co
52 Anvil Road
Silverdale 0932
NEW ZEALAND
e: hello@edwardsandcobaby.com
p: 0800 ED AND CO
(0800 33 263 26) or +64 21 661 171

 Loading...