


Instruction
manual
oscar™ g3
Keep for future reference.
To reduce the risk of serious injury or death, read this owner’s
manual prior to using this stroller.
Suitable for newborn babies up to children weighing 20 kg.
Independently safety tested by for compliance to the Australian and
New Zealand standard AS/NZS 2088:2013.

Introduction
Hey there!
Firstly, thanks for choosing Edwards & Co - we’re excited you’ve
chosen oscar to discover the joy of motion with your little tyke!
We have put a great deal of eort into ensuring that your buggy
is safe and durable. Please take the time to carefully read this
instruction manual in order to learn proper use and care tips.
Following these instructions will keep your child as safe as possible
for all the journeys to come.
We’d love it if you kept in touch. You can sign up for our website
newsletter or follow us on Facebook. If you need anything, we’re a
simple phone call or email away.
Enjoy!
Regards
Mark Edwards Warwick Edwards
edwardsandcobaby.com
facebook.com/edwardsandcobaby

GENERAL WARNINGS
To greatly reduce the risk of injury or death, please read this
owner’s manual before installing and using this buggy to ensure
proper use.
Buggy
• NEVER LEAVE YOUR CHILD UNSUPERVISED IN THE BUGGY.
• ALWAYS APPLY THE PARKING BRAKE WHEN YOU PARK THE
BUGGY OR WHEN TAKING YOUR CHILD IN/OUT OF THE
BUGGY.
• Make sure children are clear of any moving parts when adjusting
the buggy, otherwise they may be injured. Care should be taken
whilst folding and unfolding the buggy to prevent fingers being
trapped.
• This buggy is suitable for one child only. Do not carry extra
children or bags on this buggy.
• Do not place heavy weights on the handle of the buggy as it will
impact the stability of the frame.
• The seat is suitable from birth up to 20 kg.
• The buggy is not intended to be a substitute baby cot or bed. It
is only designed to enable safe transportation of children.
• Always take your child out of the buggy when on stairs.
Harness
• To avoid serious injury, always use the safety harness when your
child is in the buggy. Always adjust the straps to suit the size of
your child’s body and to fit it firmly. A loose restraint or harness
is DANGEROUS.
• Never leave a harness connected when not fitted to a child
in the buggy. The harness can form loops which may be a
strangulation hazard.
• The buckle SHOULD ALWAYS be easily accessible. It is
important that your child can be released quickly in the event of
an emergency.
3

GENERAL WARNINGS (cont.)
Accessories
• Use the safety strap located on the handle at all times.
• When installing the seat unit, carry cot or capsule in the buggy,
ensure the parking brake is engaged at all times.
• It is unsafe to use accessories other than those supplied by
Edwards & Co.
• Do not inflate the tyres any more than 26 PSI.
When jogging:
• Always use the front wheel locked in fixed position.
• Always use the safety strap.
• Only run on flat terrain, away from trac or areas with
dangerous hazards.
• Change direction with small adjustments. Never turn the
direction of the stroller at speed at this risks the stroller tipping.
• Always have your child strapped to the seat tightly.
• Always use the stroller in forward-facing position, with the seat
upright.
• Do not jog using the capsule or carry cot accessory.
• Running with the stroller can be dangerous. Edwards & Co
accepts no liability for any injuries, accidents or death that could
occur while jogging with the stroller.
Storage
• Keep away from fire and extreme heat. Do not store in areas
that may get particularly hot in summer like roof space or
beside shed walls.
Edwards & Co buggies are manufactured and tested to the highest
durability and quality standards. By following instructions as well
as care tips, your buggy will last for many years to come.
If in doubt, please contact Edwards & Co or your retailer.
4

Stroller components
In this manual we will help you with putting your oscar g3
together. The product should come with the following:
Main components
• buggy frame
• seat unit
• 3 pneumatic tyres (1 front + 2 back)
• bumper bar
Bonus features
• rain cover
• tyre hand pump
5

Wheel installation and removal
Rear wheels:
To install a wheel, press the release button on the wheel and simply
insert the rod on the wheel hole located on each wheel strut until you
hear a CLICK!
To remove a wheel, press the button on the wheel hub cab and pull
outwards.
6

Wheel installation and removal
Front wheel:
To install the wheel, insert the wheel rod into the frame hole as
pictured until you hear a CLICK!
NOTE- ensure the front wheel lock lever is disengaged beforehand so
the wheel connects (see page 11).
To remove the wheel, push the lever located at the top of the wheel
and hold inwards (towards the buggy) as indicated by the arrow.

Unfolding and folding the stroller
Unfolding:
1. Stand the buggy upright (as pictured above left) or on the
ground with the handle facing upwards (as pictured below).
2. Lift the black clip (as pictured above left) located on the right
hand side of the frame away from the catch clip and pull the
handle of the buggy upwards.
3. The buggy will unfold and CLICK! into place.
Folding:
1. Pull the two sliding levers (as pictured above right) just
below the handle hinge (on the frame) then push the handle
downwards towards the floor.
NOTE - For compact folding, fold the buggy with the seat unit
removed or with the seat unit facing forwards. The collapsed
buggy should look as pictured below.
8
Seat unit installation and removal
To install the seat unit, insert the locking adaptors into the frame
and push downwards (do not press the release buttons when
installing).
WARNING – Ensure the seat unit is locked into the buggy frame
before use.
To remove the seat unit, press the two release buttons at the same
time and lift upwards (as pictured above).
NOTE - The seat unit can be installed in a front or rear-facing
position.
9

Bumper bar installation and removal
To install the bumper bar, insert the rods on each end of the bar
into the bumper bar retaining bracket until you hear a CLICK!
To remove the bar, press the release buttons located on the
underside of the bumper bar retaining bracket (as pictured below).
Note - use this step to install your limited edition canopy hoods.
Canopy installation and removal
1. Locate the canopy hood hinge (as pictured).
2. Using a phillips screwdriver, remove the two screws on one
of the canopy hood hinges.
3. Pull out the hood frame tubes from it’s housing in the hinge.
4. Remove the fabric canopy.
5. Thread the new fabric canopy through the hood tubes (the front
of the canopy threads through the slightly bent tube).
6. Re-insert tubing and screw back into place.

Seat, leg rest and handle adjustment
Seat recline:
To adjust the recline, pull up the black plastic lever at the rear
of the seat upwards and raise or lower the seat to the desired
position (lie flat, reclined or seated).
Leg rest height:
To raise or lower the leg rest, press the two buttons on both sides
of the leg rest hinge (as pictured below) until you hear it CLICK!
into position.
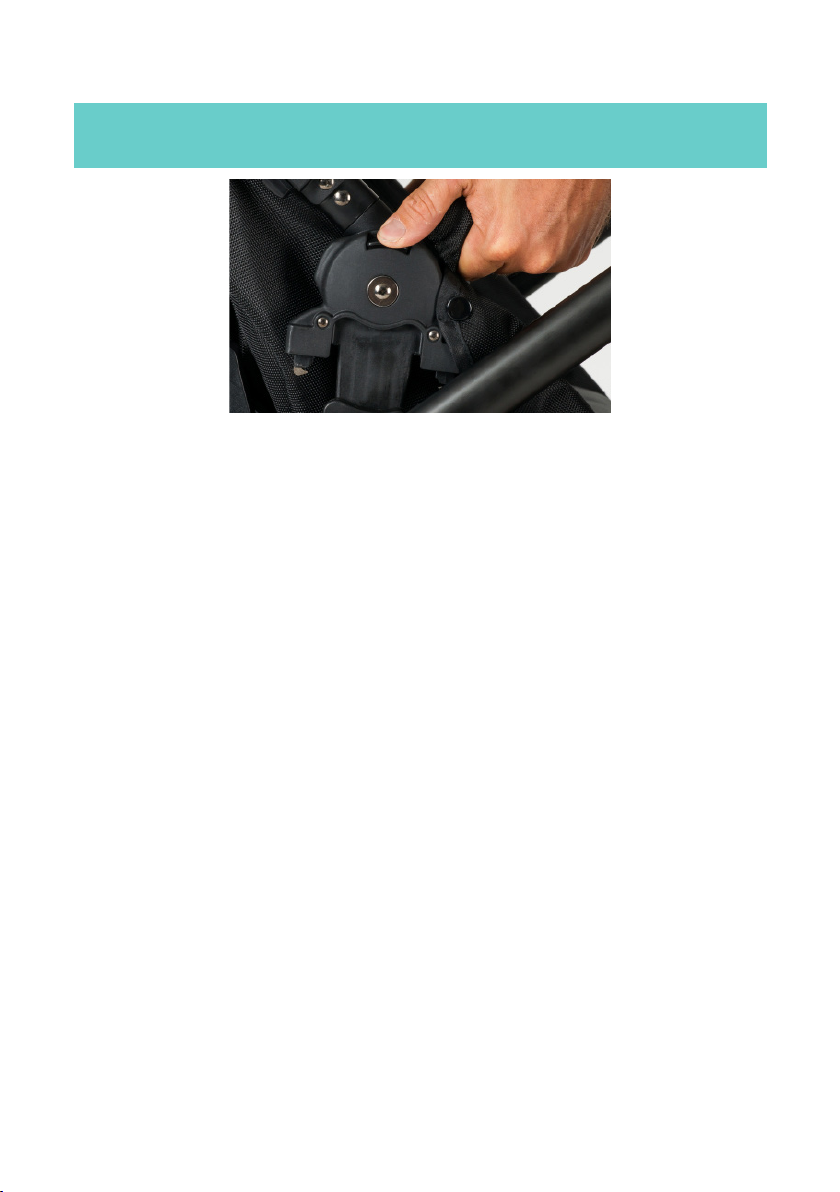
Handle height:
To adjust the handle height, press the two buttons on the inside of
the handle hinge and raise or lower (as pictured below).
11

Useing the seat harness
Securing the harness:
1. Place your child in the seat. Make sure that your child’s back and
bottom are flat against the seat. This will maximise comfort and
allow the harness to properly secure your child.
2. Position the height of harness according to your child’s height.
The harness straps should be level with their shoulders.
3. To fit the harness, link the two right hand fittings together and
then CLICK! into the buckle. Do the same for the two left hand
fittings. Check that the buckle is secure by pulling the buckle.
There should be a strong connection.
Unlocking the harness:
1. To remove the harness, press the large button on the front of the
buckle until it releases (as pictured below).
Shoulder strap height
There are three height slot positions for the shoulder straps. As
your child grows, you will need to move the straps according to your
child’s height.
IMPORTANT - The shoulder straps should be positioned so that they
sit level with your child’s shoulders.
12

Parking brake and front wheel lock
Parking brake:
To engage the brake, push the red lever located on the right hand
wheel strut downwards until you hear a click. Give the buggy
a small jiggle to ensure it engages. This brake locks both rear
wheels.
To release the brake, press the brake downwards until you hear a
click. The releases the brake.
Front wheel lock:
The swivel lock is located at the top of the handle on the right
hand side of the buggy.
To lock the swivel, press the small button located on the outside
of the lock and simultaneously lower the lever. This locks the
swivel and holds the wheel in a straight position.
To free the wheel, raise the lever upwards until you hear a CLICK!
13

Caring for your stroller
Important information
• We recommend storing your buggy indoors to avoid corrosion.
• We recommend regular inspection and maintenance of locking
devices and security of essential components.
• Regularly check all parts for wear and tear. Lubricate if tight
with a silicone based product. Do not use spray petroleum
lubricants such as ‘CRC’.
• The fabric is washable. To clean the liner, we recommend
sponging with warm soapy water and a mild detergent. A mild
disinfectant may be used if desired.
• NEVER tumble dry.
• NEVER clean with abrasive, ammonia-based, bleach-based or
spirit-based cleaners.
• If the wheels become damaged or worn, discontinue use and
replace.
• Avoid sun exposure for long periods to prevent fading and
damage to the fabric.
• Avoid submersing the product in salt water. If you do expose
it to salt water, ensure you wash the frame (particularly moving
parts) in cold fresh water.
• NEVER wring any fabrics.
• Dry thoroughly before storage.
• Store in a well-ventilated area, away from direct sunlight which
could damage or fade your car seat.
• Store in a safe place when it is not being used. Avoid placing
heavy objects on top of it.
• NEVER allow the seat to come into contact with corrosive
substances such as battery acid or petroleum products.
oscar was a legacy in our family and we hope his memory lives on
with yours. Please take great care of him and he will do the same
for you!
14

Warranty information
All Edwards & Co products are guaranteed for two years from the
date of purchase against defects in material and workmanship.
If we determine that the product has a manufacturing fault, we will
repair or replace it free of charge to you. The decision to repair
or replace is solely at the discretion of Edwards & Co. Proof of
purchase must be provided.
The warranty is “return to base” and not a free in-home service. This
means the customer is responsible for any inwards freight charge to
return the product to an Edwards & Co representative for warranty
or service.
Our warranty excludes claims resulting from misuse, abnormal use,
overloading, general wear and tear, child outgrowing the product,
not following instructions, transportation damage (including airline
or freight damage), poorly maintained product, dropped goods,
negligence, second-hand product, modified product, colour fading,
over inflation, mould, damage to handle foam in use or fabric
cuts and tears. Our warranty also does not cover tyre punctures
or corrosion to frames or fasteners as a result of atmospheric or
environmental conditions.
Any replacement will not give the right for the warranty period to be
extended.
Edwards & Co does not cover warranty if the product has been
purchased second hand or from an unauthorised reseller.
For the complete terms and conditions of our warranty, please visit
our website - edwardsandcobaby.com/warranty
Edwards & Co
PO Box 35-445
Browns Bay, Auckland 0753
NEW ZEALAND
e: hello@edwardsandcobaby.com
p: 0800 ED AND CO
(0800 33 263 26)
15

edwardsandcobaby.com
 Loading...