

Page 1
LABORATORY MICROSCOPE
MICROSCOPE DE LABORATOIRE
MICROSCOPIO DE LABORATORIO
800
#5F60948
Page 2
Need help? Call us toll-free at 855-863-4426.
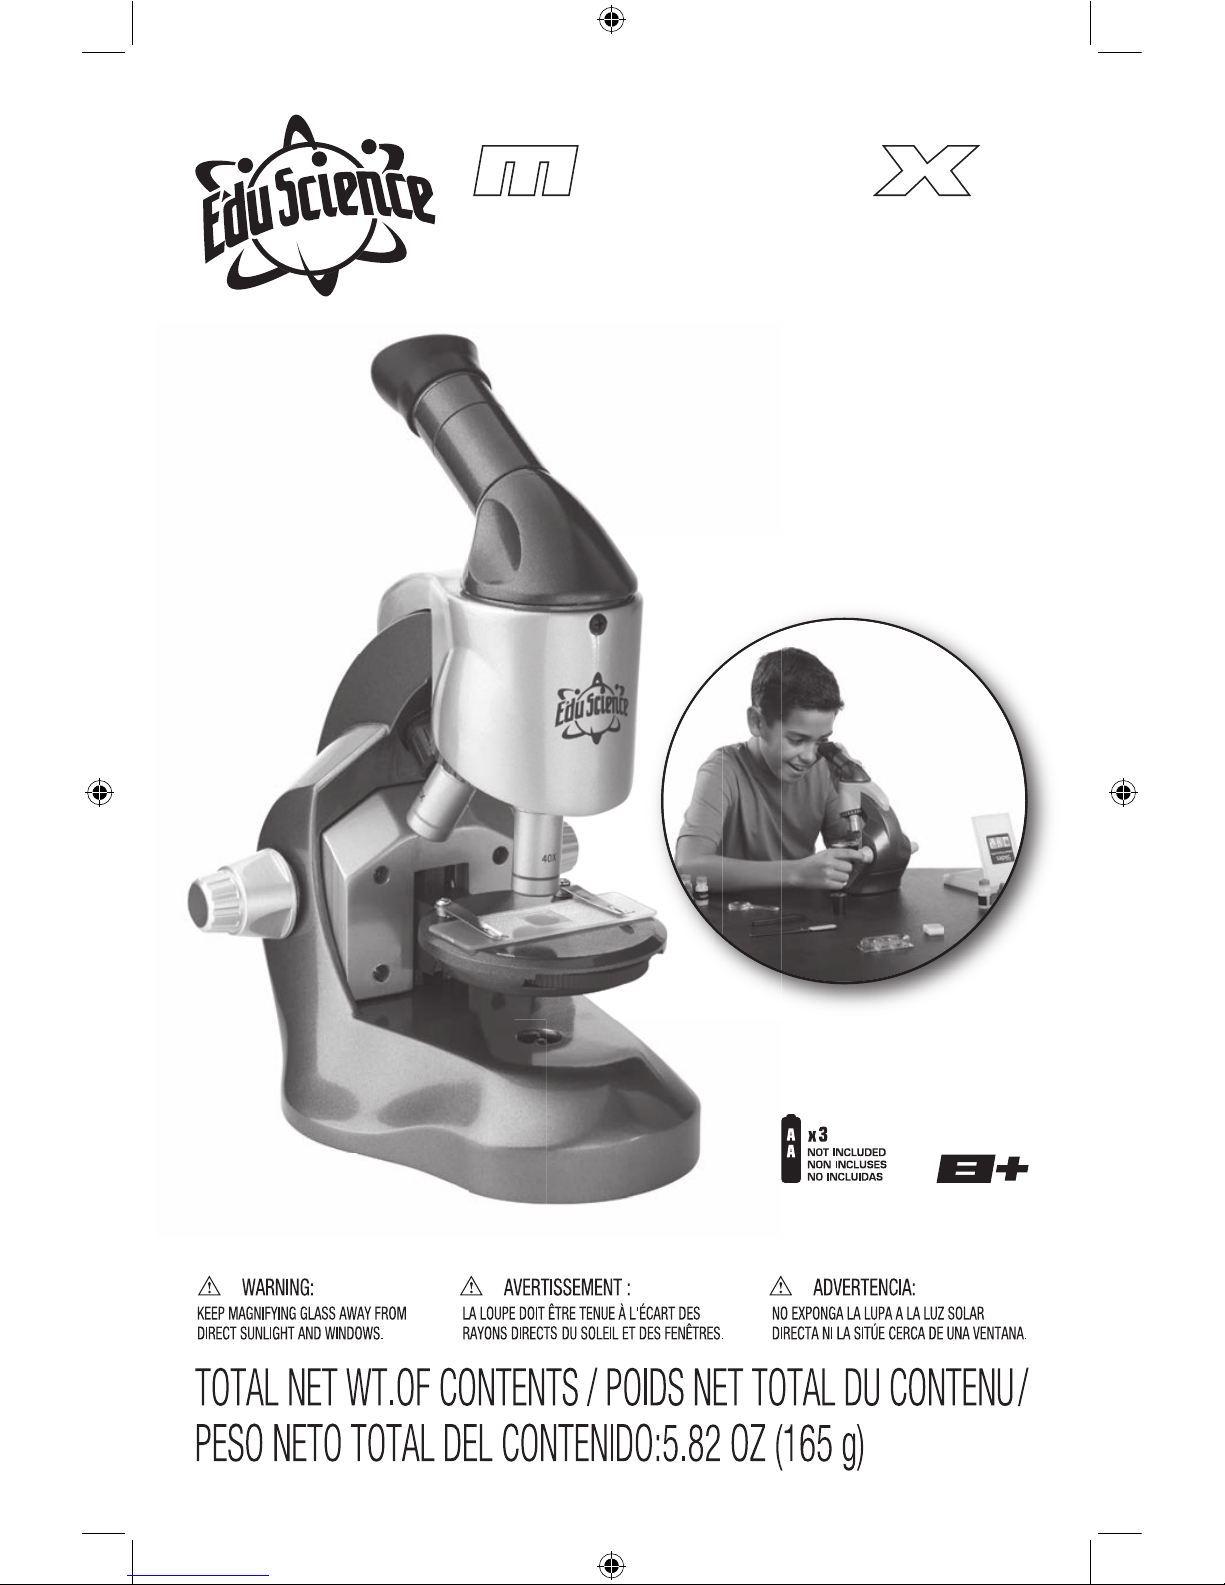
M800x Microscope Set
Supervision by Adults
Read and follow the instructions, safety
rules and rst aid information.
This Microscope set is intended for
children over the age of 8 years. Children
should only use this device under
adult supervision. Never leave a child
unsupervised with this device.
Accessories in this experimental kit may
have sharp edges and tips. Please store
the device and all of its accessories and
aids out of the reach of young children
when not being used due to a risk of
INJURY.
This device contains electronic
components that are powered by
batteries. Batteries should be kept out of
children’s reach. When inserting batteries
please ensure the polarity is correct.
Insert the batteries according to the
displayed +/- information.
Fire/Danger of Explosion!
Do not expose the device to high
temperatures. Use only battery types
recommended. Never mix old and new
batteries (replace all batteries at the
same time). Never mix Alkaline, standard
(Carbon Zinc) or rechargeable batteries.
Never short circuit the device or batteries
or throw into a re. Exposure to high
temperatures or misuse of the device
can lead to short circuits, re or even
explosion! Leaking or damaged batteries
can cause injury if they come into contact
with the skin. If you need to handle such
batteries please wear suitable safety
gloves.
Chemicals
Any chemicals or liquids used in
preparing, using, or cleaning should
be kept out of reach of children. Do not
drink any chemicals! Hands should be
washed thoroughly under running water
after use. In case of accidental contact
with the eyes or mouth rinse with water.
Seek medical treatment for ailments
arising from contact with the chemical
substances and take the chemicals with
you to the doctor for treatment.
RISK of material damage
Never take the device apart. Please
contact our service center and send the
device in for repair as needed.
Do not subject the device to temperatures
exceeding 140˚F.
TIPS on cleaning
Remove batteries from device before
cleaning.
Microscope Care
Clean the exterior of device with a dry
cloth. Do not use cleaning uids so as
to avoid causing damage to electronic
components. Clean the lens (objective
and eyepiece) only with a soft lint-free
cloth (e.g., micro ber). Do not use
excessive pressure - this may scratch
the lens. Protect the device from dust and
moisture. Store the device in its original
packaging. Batteries should be removed
from the device if not used for a long
period of time.
DISPOSAL
Keep packaging materials (plastic bags,
rubber bands, etc.) away from children.
There is a risk of SUFFOCATION.
Dispose of the packaging materials
as legally required. Consult the local
authority on the matter if necessary.
DISPOSAL
Dispose of the packaging materials
properly, according to their type, such as
paper or cardboard. Contact your local
waste-disposal service or environmental
authority for information on the proper
disposal.
Please take the current legal regulations
into account when disposing of your
device. You can get more information on
the proper disposal from your local
waste-disposal service or environmental
authority.
Contents:
• Microscope
• Slide case
• 5 Prepared slides
• 18 Blank slides
• 18 Slide covers
• 18 Labels
• 4 Collection vials
• Red-dye vial
• Green-dye vial
• Pipette
• Tweezers
• Magnifying glass
• Graduated cylinder
• Spatula
• Shrimp hatchery
• Shrimp eggs
• Carrying case
Product Manual Visit
www.exploreone.com/pages/product-manuals
Page 3

Need help? Call us toll-free at 855-863-4426.
M800x Microscope Set
The Parts of Your Microscope:
1 (2) Exchangeable Wide Field
Eyepiece (WF10x, WF20x)
2 Soft Rubber Eye Cups
3 Rotating Eyepiece Head
4 Coarse and Fine Focus Knob
5 Stage
6 Metal Stage Clips
7 Color Filter Wheel
8 Objective Turret
9 4x, 10x 40x Objectives
10 LED Lower Illumination
11 LED Upper Illumination
12 Base with Battery Compartment
13 3 Position Illumination Switch
14 Microscope Arm
15 Carrying Case
Additional Contents:
16 (5) Prepared Glass Slides
17 (18) Blank Glass Slides
18 (18) Slide Covers
19 (18) Labels
20 (4) Collection Vials
21 Red-Dye Vial
22 Green-Dye Vial
23 Pipette
24 Tweezers
25 Magnifying Glass
26 Graduated Cylinder
27 Spatula
28 Shrimp Hatchery
29 Shrimp Eggs
Congratulations! You’ve chosen one
of the highest quality microscopes
available for young explorers. Read
the following instructions carefully
to get the greatest bene t from your
precision instrument. Then try out the
experiments to begin your investigation
of the fascinating world around you.
How do I use my microscope?
Before you use your microscope, make
sure that the table, desk or whatever
surface that you want to place it on is
stable, and is not subject to vibration. If
the microscope does need to be moved,
use the arm and base for support while
carefully transferring it.
Install three “AA” batteries (not included)
in the battery compartment on the
bottom of the microscope. Open battery
door on the bottom of the microscope
and insert the batteries according to the
displayed +/- information. Snap-close
the battery compartment door.
Once the microscope is in a suitable
location and batteries installed, check
the light sources to make sure that
they both illuminate by toggling the
light switch (Fig. 13) to the ALL position
(indicated by the I,ʽʽ0ʼʼ, and II). Use a
cleaning cloth (e.g., micro ber) to gently
wipe the lenses off. If the stage (Fig. 5)
is dirty with dust or oil, carefully clean
it off.
The stage is raised and lowered only by
using the focus adjustment knob (Fig 4).
How do I operate the LED illumination?
This microscope is equipped with
two modern LED lights (light-emitting
diodes) that illuminate the specimen
from the top and below the stage
(Fig. 5) You can use different lighting
techniques to illuminate objects and
specimens from opaque to transparent.
Locate the light switch (Fig. 13) on the
base of the microscope. Toggle the
switch to the rst position (indicated
by the I), and the lower LED light (Fig.
10) will illuminate. Move the Toggle to
the second position (indicated by the
0) to turn off all illumination. Move the
toggle to the nal position (indicated by
II), and both LED lights (Fig. 10 & 11)
will illuminate.
The color lters wheel (Fig. 7) is
located below the microscope stage
(Fig. 5). Filter wheels help you observe
very bright or clear specimens. Using
these lters (blue, yellow, red and
clear), you can choose from various
colors. The lters wheel also has
four different size apertures so you
can adjust the brightness levels on
objects / specimens. Filter wheels help
you better recognize components of
colorless or transparent objects (e.g.,
grains of starch, protozoa). Rotating the
lter wheel in combination with toggling
the lower light or both lights on/off will
allow you to view the object / specimen
and achieve the desired effect.
How do I adjust my microscope
correctly?
Place on a suitable location as
described above and sit in a
comfortable viewing position. This
microscope includes a rotating head
(Fig. 3), which allows for easy viewing
in multiple positions as well as sharing
with others the amazing images you
have discovered with your microscope.
Always start each observation with
the lowest magni cation. Adjust the
microscope stage (Fig. 5) so that the
stage is in the lowest position. Turn
the objective turret (Fig. 8) until it clicks
into place at the lowest magni cation
(Objective 4x). Note: Before you
change the objective setting, always
move the microscope stage (Fig. 5)
to its lowest position by rotating the
focus knob (Fig. 4). Lowering the stage
by rotating the focus knob will avoid
causing any damage to the specimen
slide or microscope. When starting an
observation always start with the WF
10X eyepiece (Fig. 1) in the rotating
head (Fig. 3).
Quick Fact - The highest magnifi cation
is not always the best for every specimen!
Exchangeable WF Eyepieces
16
17
24
25
26
222321
18
19
20
27
28
29
Page 4

M800x Microscope Set
How do I observe the specimen?
Sitting in your location with adequate
illumination chosen from the color
lter wheel, the following basic rules
should be observed: Start with a simple
observation at the lowest magnication.
Position the object or specimen in the
middle of the stage under the stage
clips (Fig. 6), centered over the lower
LED light (Fig. 10). Focus the image by
rotating the focus knob (Fig. 4) until a
clear image appears in the eyepiece.
NOTE: The higher the magnication,
the more light you will require for a
good image quality.
Quick Fact - The item you want to
observe with the microscope is known
as the object or specimen.
Place the prepared slide directly under
the objective on the microscope stage
(Fig. 5) securing with the stage clips
(Fig 6). The prepared slide should
be located directly over the lower
illumination (Fig. 10). Look through the
eyepiece and carefully turn the focus
knob (Fig. 4) until the image appears
clear and sharp. Now you can select
a higher magnication by changing
the WF eyepiece to the 20X (Fig. 1).
When the WF 20X lens is inserted
in the barrel of the rotating head, the
magnication is doubled. Higher levels
of magnication can be achieved by
turning the objective turret (Fig. 8) to
a higher setting (10x or 40x). For best
results, return the WF 10x eyepiece
to the lowest power of magnication
before changing the power on the
turret. Replacing the WF 10x eyepiece
upon every rotation of the turret allows
for easier transitions in magnication.
Following this procedure creates
a steady increase of magnication
without overpowering the view of the
object. The following magnications
should be considered: 40x, 80x, 100x,
200x, 400x, then 800x.
Each time the magnication changes
(due to an eyepiece or objective change),
the image sharpness must be readjusted
with the focus knob (Fig. 4). When doing
this, be careful because if you move
the microscope stage too quickly, the
objective and the slide could come into
contact and cause damage to the slide
or microscope.
For transparent objects (e.g., protozoa),
light is projected by the lower LED light,
traveling from below the stage, through
the objective and eyepiece, and nally
into your eye. This process of light
transmission is known as microscopy.
Many microorganisms found in water,
plant components, and the smallest
animal parts are transparent in nature.
Opaque specimens, on the other hand,
will need to be prepared for viewing.
Opaque specimens can be made
transparent by a process of treatment
and penetration with the correct
materials (media), or by slicing. You can
read more about creating specimens in
the following experiment sections.
Cleaning Tips
Ensure your microscope has a long
service life. Clean the lens (objective
and eyepiece) only with a soft lint-free
cloth (e.g., microber). Do not press
hard as this might scratch the lens. Ask
your parents to help if your microscope
is really dirty. The cleaning cloth should
be moistened with cleaning uid
and the lens wiped clean using little
pressure. Make sure your microscope
is always protected against dust and
dirt. After use, leave it in a warm room
to dry, then return it to the carrying case
provided.
This microscope can be the gateway
to a fun, creative, learning process
and will open the door to advanced
knowledge of the world around you.
Allowing you to explore the various
elds of science from Biology to Botany
to Chemistry and beyond, so have fun
exploring the exciting world of science.
Experiment Instructions
WARNING!
• Keep chemicals and corrosive liquids
out of the reach of children!
• Do not Ingest any chemicals!
• Wash your hands with soap thoroughly
under running water after use!
Introduction
Here are a few tips about how to take
a better look at the wonderful world
of microorganisms and crystals. For
example, you’ll learn how to prepare
your object / specimen so that you
can look at it with the microscope.
The numerous experiments described
should make you curious and want to
use your microscope more.
What Kind of Objects?
With a magnifying glass, you can
look at non-transparent (i.e. opaque)
objects, for example, small animals,
parts of plants, tissues, etc. Here,
the light falls onto the object and is
reected back through the magnifying
lens and into your eye. With your
microscope, however, you can also
observe transparent objects, in which
the light from the lamp goes through the
opening on the stage and the prepared
specimen. Then, it passes through the
objective, the body of the microscope
and through the eyepiece into the eye.
Many microorganisms in water, parts of
plants and the tiniest animal parts are
naturally transparent. For other things,
you must make them transparent
through a treatment or penetration with
the right materials (media), or by taking
the thinnest slices from them using
your hand or a specimen slicer (not
included) to be able to examine them
with your microscope. You’ll now nd
out how this is done.
How to Produce Thin Specimen Slices
WARNING:
Only do this with an adult’s supervision!
Ask your parents to help you! As already
mentioned, you need to get the thinnest
slices possible from an object so that
they are transparent and can be looked
at under the microscope. First, you’ll
need a simple candle. Place the wax
from the candle in an old pot and heat
it on the stovetop until it becomes liquid.
Now, use tweezers (Fig. 24) to dip the
object in the liquid wax a few times.
Attention: The wax is very hot! Be
careful. After each dip, allow the wax to
harden and then dip the object into the
wax again. When the wax around the
object has hardened completely, you
can use a specimen slicer to cut thin
slices from it. These slices are to be laid
on a slide and covered with a cover slip
or slide cover (Fig. 18).
The Production of Specimens
There are two basic types of specimens:
Permanent specimens and short-term
specimens.
Short-term Specimens
Short-term specimens are produced
from objects that you want to look at,
but don’t want to keep in your specimen
collection. These specimens are only
meant to be observed for a short period
of time, after which they are disposed
of. For short-term specimens, place the
object on the slide and place a cover
slip on top of it. After looking at the
object, clean the slide and the cover
slip. One of the secrets of successful
observation with your microscope is
the use of clean slides and cover slips.
Spots or stains would only distract you
when looking at an object.
Need help? Call us toll-free at 855-863-4426.
No recognizable image
No Image
No Light
Turn on light
Readjust focus
Start with the
Lowest power objective (4X)
Lowest power Eyepiece (10X)
Center object on slide under
Start with the
Lowest power objective (4X)
Lowest power Eyepiece (10X)
Replace batteries
Check on/o position
Troubleshooting Table
Problem Solution
Page 5

M800x Microscope Set
Permanent Prepared Specimens
Permanent specimens are those
produced from objects that you would
like to look at again and again. The
preparation of dry objects (pollen, the
wings of a y, etc.) can only be done
with special glue. You’ll nd such glue
at a local hobby store, identied as
“gum media.” Objects that contain liquid
must rst have the liquid taken out of
them.
How to Prepare a Dry Object
First, place the object in the middle of a
clean slide and cover it with a drop of glue
(gum media). Then place a cover slip on
the object. Lightly press the cover slip, so
that the glue spreads to the edges. Then
let the specimen harden for 2-3 days.
When the specimen is rmly glued, you
will be able to use it.
How to Prepare Smear Specimen
For a smear specimen, a drop of the
liquid to be observed (e.g., water from
a puddle in the forest) is placed on the
end of the slide using a pipette. Then
you can smear the liquid across the
slide with the help of a second slide.
Before observing, let the substance dry
together for a few minutes.
Experiments
Experiment No. 1:
Black and White Print
Objects:
1. A small piece of paper from a
newspaper with a black and white
picture and some text.
2. A similar piece of paper from a
magazine.
In order to observe the letters and the
pictures, produce a short-term slide from
each object. Now, set your microscope
to the lowest magnication and use the
specimen from the newspaper. The
letters on the newspaper look frayed
and broken, since they are printed
on raw, low-quality paper. The letters
on the magazine look smoother and
more complete. The pictures in the
newspaper are made up of many tiny
dots, which appear slightly smudgy.
The halftone dots of the magazine
picture are clearly dened.
Experiment No. 2:
Color Print
Objects:
1. A small piece of color printed
newspaper.
2. A similar piece of paper from a
magazine.
Make short-term specimens from the
objects and observe them with the lowest
magnication. The colored halftone
dots of the newspaper often overlap.
Sometimes, you‘ll even notice two colors
in one dot. In the magazine, the dots
appear clear and rich in contrast. Look at
the different sizes of the dots.
Experiment No. 3:
Textile Fibers
Objects and accessories:
1. Threads from various fabrics (e.g.,
cotton, linen, wool, silk, rayon, nylon,
etc.).
2. Two needles.
Each thread is placed on a slide and
frayed with the help of the two needles.
Next, wet the threads and cover them
with a cover slip. Set the microscope
to one of the lower magnications.
Cotton bers come from a plant, and
look like a at, twisted ribbon under
the microscope. The bers are thicker
and rounder at the edges than in the
middle. Cotton bers are basically long,
collapsed tubes. Linen bers also come
from a plant, and they are round and
run in one direction. The bers shine
like silk and exhibit countless bulges on
the thread. Silk comes from an animal
and is made up of solid bers that are
small in diameter, in contrast to the
hollow plant-based bers. Each ber is
smooth and even and looks like a tiny
glass tube. The bers of the wool also
come from an animal. The surface is
made of overlapping sleeves that look
broken and wavy. If possible, compare
wool from different weaving mills. In
doing so, take a look at the different
appearance of the bers. Experts can
determine which country the wool
came from by doing this. Rayon is a
synthetic material that is produced by
a long chemical process. All the bers
have solid, dark lines on the smooth,
shiny surface. After drying, the bers
curl into the same position. Observe the
differences and the similarities.
Experiment No. 4:
Table Salt
Object: Common table salt.
First, place a few grains of salt on a
slide and observe the salt crystals with
the lowest setting of your microscope.
The crystals are tiny cubes and are all
the same shape.
Experiment No. 5:
Production of Salt Crystals
Objects and accessories:
1. Table salt.
2. A graduated cylinder lled halfway
with warm water to dissolve the salt.
3. Cotton thread.
4. Paper clips.
5. A matchstick or pencil.
Add salt to the water until it no longer
dissolves. You now have a saturated
salt solution. Wait until the water has
cooled. Fix a paper clip to the end
of the cotton thread. The paper clip
serves as a weight. Tie the other end
of the cotton thread into a knot around
the match, and dip the end with the
paper clip in the salt solution. Place
the match horizontally on top of the test
tube. It prevents the cotton thread from
slipping all the way down into the test
tube. Now, place the tube in a warm
place for 3-4 days. If you take a look
at the glass after a few days under the
microscope, you can see that a little
colony of salt crystals has formed on
the cotton thread.
Experiment No. 6:
How do you raise Brine Shrimp?
Accessories (from your microscope set):
1. Shrimp eggs.
2. Sea salt.
3. Hatchery.
4. Yeast. (not included)
Brine Shrimp, or “Artemia Salina” as
they are called by scientists, have
an unusual and interesting life cycle.
The eggs produced by the female are
hatched without ever being fertilized by
a male shrimp. The shrimp that hatch
from these eggs are all females. In
unusual circumstances (e.g., when the
marsh dries up), the male shrimp can
hatch. These males fertilize the eggs
of the females and from this mating,
special eggs are produced. These
eggs, called “winter eggs,” have a
thick shell, which protects them. The
winter eggs are very resistant and
capable of survival, even if the marsh
or lake dries out, killing off the entire
shrimp population. The winter eggs can
exist for 5-10 years in a “sleep” status
and will only hatch when the proper
environmental conditions occur. These
are the type of eggs you have in your
microscope set.
The Incubation of the Brine Shrimp
In order to incubate the shrimp, you
rst need to create a salt solution that
corresponds to the living conditions of
the shrimp. For this, put a half liter of
rain or tap water in a container. Let the
water sit for approx. 30 hours. Since
the water evaporates over time, it is
advisable to ll a second container with
water and let it sit for 36 hours. After the
water has sat stagnant for this period
of time, add half of the included sea
salt to the container and stir it until all
of the salt is dissolved. Now, put a few
eggs in the container and cover it with
a dish. Place the glass container in a
bright location, but don‘t put it in direct
sunlight. Since you have a hatchery,
you can also add the salt solution
along with a few eggs to each of the
four compartments of the tank. The
temperature should be around 77º F
(25ºC). At this temperature, the shrimp
will hatch in about 2-3 days. If the water
in the glass evaporates, add some
water from the second container.
Need help? Call us toll-free at 855-863-4426.
Page 6

M800x Microscope Set
The Brine Shrimp under the Microscope
The animal that hatches from the egg is known by
the name “Nauplius Larva.“ With the help of a pipette,
you can place a few of these larvae on a glass slide
and observe them. The larvae will move around in the
salt water by using their hair-like appendages. Take a
few larvae from the container each day and observe
them under the microscope. In case you’ve hatched
the larvae in a hatchery, simply take off the cover of
the tank and place the tank on the stage. Depending
on the room temperature, the larvae will be mature
in 6-10 weeks. Soon, you will have raised a whole
generation of brine shrimp, which will constantly grow
in numbers.
Feeding your Brine Shrimp
In order to keep the brine shrimp alive, you must feed
them. This must be done carefully, since overfeeding
can make the water become foul and poison your
shrimp population. The feeding is done with dry yeast
in powdered form. A little bit of this yeast every second
day is enough. If the water in the compartments of the
hatchery or your container turns dark, that is a sign
that it has gone bad. Take the shrimp out of the water
right away and place them in a fresh salt solution.
Warning! The shrimp eggs and the shrimp are not
meant to be eaten!
Experiment No. 7:
How does bread mold develop?
Object: An old piece of bread.
Put the bread on a slide and lightly moisten it with
water. Place the bread into a sealed container, and
keep it warm and out of harsh light. Within a short
time, the black bread mold forms. When the mold
takes on a white, shining appearance, observe it with
your microscope. It will look like a complicated mass
of thread, forming the fungus body, which is called the
mycelium. Each thread is known as a hypha. These
threads, or hyphae, grow like long, slim stacks, ending
in a small, white ball, called a sporcap. Inside the
sporcap is a spore that will eventually be released to
start new colonies of mold. With your microscope you
can watch this amazing transformation unfold.
Experiment No. 8:
Observing stem and root sections
Objects:
1. A celery stalk.
2. A carrot.
With an adult’s supervision, cut several very thin
slices from the middle of the celery (a stem) and
from the middle of the carrot (a root). Make a “wet
mount” by placing a drop of water on the slide. Then
put the specimen on the water-covered slide, and
top with a cover slip. The water will help support the
sample. It also lls in the space between the cover
slip and the slide. Start by viewing them at the lowest
magni cation and then increase the magni cation for
more detailed observation.
Page 7

Besoin d'aide? Appelez-nous gratuitement au 855-863-4426.
Ensemble de microscope M800x
Sous la supervision d’adultes
Lire et suivre les instructions, règles
de sécurité et autres informations de
premiers soins.
Ce microscope est destiné aux enfants
de plus de 8 ans. Les enfants ne
doivent utiliser cet appareil que sous
la supervision d’un adulte. Ne jamais
laisser l'enfant sans surveillance lors
de l'utilisation de cet appareil.
Les accessoires de cet ensemble
expérimental peuvent être pointus et
tranchants. Pour prévenir tout risque
de BLESSURES, veiller à ranger cet
appareil ainsi que tous ses accessoires
et outils hors de portée des enfants
lorsqu'il n'est pas utilisé.
Cet appareil contient des composants
électroniques qui sont alimentés par
des piles. Les piles doivent être tenues
hors de portée des enfants. Au moment
d'insérer les piles, veiller à respecter
la polarité, en se rapportant aux
symboles +/-.
Incendie / Risque d'explosion!
Ne pas exposer l'appareil à de hautes
températures. Utiliser uniquement
les types de piles recommandés. Ne
jamais mélanger des piles neuves et
usagées (remplacer toutes les piles en
même temps). Ne jamais mélanger des
piles alcalines, standards (carbone-
zinc) et rechargeables. Ne jamais
court-circuiter l'appareil ou les piles,
ni jeter au feu. L'exposition à des
températures élevées ou l'utilisation
abusive de l'appareil peut entraîner des
risques de courts-circuits, d'incendie
ou même d'explosion! Des piles
endommagées ou qui fuient peuvent
causer des blessures en cas de contact
avec la peau. Veiller à porter des gants
de protection adaptés avant de les
manipuler.
Produits chimiques
Tout produit chimique ou liquide utilisé
à des ns de préparation, d'utilisation
ou de nettoyage de l'appareil doit
être tenu hors de portée des enfants.
Ne pas boire de produits chimiques!
Se laver abondamment les mains à
l'eau claire après utilisation. En cas
de contact accidentel avec les yeux
ou la bouche, rincer à l'eau courante.
Consulter un professionnel de santé
pour toute affection par contact avec
la peau, les yeux ou les muqueuses
et amener le(s) produit(s) chimique(s)
avec vous aux ns de traitement.
RISQUE de dommages matériels
Ne jamais tenter de démonter l'appareil.
Contacter et envoyer l'appareil à notre
Centre de service pour tout besoin de
réparation.
Ne pas soumettre l'appareil à des
températures supérieures à 60 °C
(140 °F).
CONSEILS de nettoyage
Retirer les piles de l'appareil avant le
nettoyage.
Entretien du microscope
Nettoyer l'extérieur de l'appareil avec
un chiffon sec. Ne pas utiliser de
liquides de nettoyage a n d'éviter
d'endommager les composants
électroniques. Nettoyer les lentilles
(objectif et oculaire) uniquement à
l'aide d'un chiffon doux non pelucheux
(ex : micro bre) Faire attention de ne
pas exercer trop de pression; cela
pourrait rayer les lentilles. Veiller à
protéger l'appareil de la poussière et de
l'humidité. Ranger l'appareil dans son
emballage d'origine. Retirer les piles de
l'appareil si celui ne doit pas être utilisé
pendant une période prolongée.
MISE AU REBUT
Tenir les matériaux d'emballage (sacs
en plastique, élastiques, etc.) hors de
portée des enfants. Ils présentent des
risques d'ÉTOUFFEMENT.
Éliminer les matériaux d'emballage
selon la législation en vigueur.
Consulter les autorités locales en la
matière si nécessaire.
MISE AU REBUT
Éliminer les matériaux d'emballage par
type (c.-à-d. papier ou carton, etc.) selon
les modalités prévues. Contacter la
déchetterie, le service de collecte des
déchets ou l'autorité environnementale
locale pour toute information relative à la
mise au rebut.
Veiller à respecter la réglementation en
vigueur lors de l'élimination de votre
appareil. Pour davantage d'information sur
la mise au rebut, contacter la déchetterie,
le service de collecte des déchets ou
l'autorité environnementale de votre
localité.
Contenu :
• Microscope
• Étui à lames
• 5 lames préparées
• 18 lames vides
• 18 couvercles de lame
• 18 étiquettes
• 4 acons de prélèvement
• Flacon de colorant rouge
• Flacon de colorant vert
• Pipette
• Pincettes
• Loupe
• Cylindre gradué
• Spatule
• Écloserie de crevettes
• OEufs de crevette
• Étui
Manuel du Produit Visite:
www.exploreone.com/pages/product-manuals
Page 8

Besoin d'aide? Appelez-nous gratuitement au 855-863-4426.
Ensemble de microscope M800x
Les di érentes parties de ton
microscope:
1 (2) oculaires à grand champ
interchangeables (Grand champ
WF 10 x et WF 20 x)
2 Œilletons en caoutchouc souple
3 Tête rotative
4 Bouton de focalisation à mises au
point rapide/précise
5 Platine porte-échantillon
6 Pinces métalliques
7 Roue à ltres de couleur
8 Tourelle d'objectif
9 Objectifs 4 x, 10 x, 40 x
10 Source électroluminescente
inférieure
11 Source électroluminescente
supérieure
12 Pied et compartiment à piles
13 Interrupteur à 3 positions
14 Bras
15 Boîte de transport
Contenu additionnel
16 (5) lames de verre préparées
17 (18) lames en verre vides
18 (18) lamelles
19 (18) étiquettes
20 (4) acons de prélèvement
21 Flacon de colorant rouge
22 Flacon de colorant vert
23 Pipette
24 Pincettes
25 Loupe
26 Éprouvette graduée
27 Spatule
28 Écloserie de crevettes
29 Œufs de crevettes
Félicitations! Tu as choisi ce qui ce fait de
mieux en matière de microscopes pour
jeunes explorateurs. Lis attentivement
les instructions suivantes a n de tirer
le meilleur pro t de ton instrument de
précision. Ensuite, lance-toi dans les
expériences pour commencer à étudier
le monde fascinant qui t'entoure.
Comment utiliser mon microscope?
Avant d'utiliser ton microscope, assuretoi que la table, le bureau ou la surface
sur laquelle tu souhaites le poser soit
stable et qu'elle n'est pas soumise à
des vibrations. Si tu devais changer ton
microscope de place, prends bien soin
de le transférer en le tenant par le statif
(ensemble bras-platine-pied).
Insère trois piles AA (non incluses)
dans le compartiment à piles situé dans
le pied du microscope. Pour ce faire,
ouvre le compartiment à pile et insère
les piles en respectant la polarité +/- tel
qu'indiqué. Referme le couvercle du
compartiment à piles.
Une fois le microscope installé à un
emplacement approprié et les piles
mises en place, véri e les sources
de lumières a n d'être sûr qu'elles
fonctionnent toutes deux en plaçant
l'interrupteur (Fig. 13) sur la position
TOUS (indiquée par le I, « 0 », et II).
Utiliser un chiffon doux propre (ex :
micro bre) pour nettoyer les lentilles.
Si la platine (Fig. 5) est souillée par de
la poussière ou de l'huile, nettoyez-la
soigneusement.
La platine est relevée et abaissée à
l'aide du bouton de focalisation (Fig. 4).
Comment allumer la source
électroluminescente?
Le microscope est équipé de deux
diodes électroluminescentes (DEL)
qui éclairent l'échantillon par dessus
et par dessous la platine (Fig. 5). Tu
peux utiliser différentes techniques
d'éclairage pour mettre en lumière
les objets et les échantillons opaques
autant que transparents. Repère
l'interrupteur Marche/Arrêt (Fig. 13) à la
base du microscope. Mets l'interrupteur
sur la position 1 (indiquée par le I), et
la source électroluminescente inférieure
(Fig. 10) s'éclairera. Mets l'interrupteur
sur la position 2 (indiquée par le 0) pour
éteindre la source lumineuse. Mets
l'interrupteur sur la dernière position
(indiquée par le II) et les deux DEL (Fig.
10 & 11) s'éclaireront.
La roue à ltres (Fig. 7) est située en
dessous de la platine porte-échantillon
(Fig. 5) du microscope. La roue à ltres
te permet d'observer des échantillons
transparents ou très clairs. Tu peux
choisir différentes couleurs de ltres
(bleu, jaune, rouge et neutre). La roue
à ltres possède également quatre
tailles d'ouverture différentes a n que tu
puisses régler les niveaux de luminosité
sur les objets ou échantillons.
La roue à ltres t'aide à mieux
reconnaître les composants d'objets
sans couleur ou transparents (ex :
grains d'amidon, protozoaires). La
rotation de la roue à ltres combinée
à l'éclairage de la source inférieure ou
des deux sources électroluminescentes
te permettra d'observer ton objet ou ton
échantillon selon l'effet désiré.
Comment régler correctement mon
microscope?
Positionne ton microscope à un
emplacement approprié tel que décrit
ci-dessus et installe-toi confortablement
pour regarder. Ce microscope est doté
d'une tête rotative (Fig. 3) qui facilite
la visualisation dans de multiples
positions et permet de partager les
images étonnantes de tes découvertes
avec d'autres personnes. Commence
toujours toutes tes observations avec
le grossissement le plus faible. Ajuste
la hauteur de la platine du microscope
(Fig. 5) à sa position la plus basse.
Tourne la tourelle d'objectif (Fig. 8)
jusqu'à atteindre le cran d'arrêt et le
grossissement le plus faible (Objectif
4 x). Remarque : Avant de changer
d'objectif, veille à toujours abaisser la
platine du microscope (Fig. 5) à fond en
16
17
24
25
26
222321
18
19
20
27
28
29
Page 9

tournant le bouton de focalisation (Fig.
4). Abaisser la platine à l'aide du bouton
de focalisation permettra d'éviter tout
dommage à la lame et au microscope.
Commence toujours toutes tes
observations au microscope en plaçant
l'oculaire à grand champ WF 10 X (Fig.
1) dans la tête rotative (Fig. 3).
En bref - Le plus fort grossissement
n'est pas toujours le meilleur pour tous
les échantillons!
Comment observer un échantillon?
Une fois correctement installé
et le ltre lumineux de couleur
approprié sélectionné, les règles
élémentaires suivantes doivent être
observées : Commence par une
simple observation avec le plus faible
grossissement. Positionne l'objet ou
l'échantillon au milieu de la platine,
sous les pinces métalliques (Fig. 6),
et centre-le au-dessus de la source
électroluminescente (Fig. 10). Travaille
la mise au point à l'aide du bouton de
focalisation (Fig. 4) jusqu'à ce que
l'image apparaisse clairement dans
l'oculaire.
REMARQUE : Plus le grossissement
est important, plus tu auras besoin
de lumière pour obtenir une image de
bonne qualité.
En bref - Ce que tu souhaites observer
à l'aide du microscope s'appelle l'objet
ou l'échantillon.
Dispose la lame préparée directement
sous l'objectif de la platine du
microscope (Fig. 5) en la xant à l'aide
des broches (Fig. 6). La lame préparée
doit être située directement au-dessus
de la source électroluminescente
inférieure (Fig. 10). Regarde à travers
l'oculaire puis tourne délicatement
le bouton de focalisation (Fig. 4)
jusqu'à ce que l'image soit claire et
nette. Tu peux maintenant passer à
un plus fort grossissement et utiliser
l'oculaire à grand champ WF 20 X
(Fig. 1). Lorsque la lentille WF 20 X
est insérée dans le barillet de la tête
rotative, le grossissement est deux
fois plus important. Des niveaux plus
importants de grossissement peuvent
être obtenus en positionnant la tourelle
d'objectif (Fig. 8) sur une valeur
plus élevée (10 x ou 40 x). Pour de
meilleurs résultats, réduit d'abord le
grossissement de l'oculaire WF 10 x
avant de changer le grossissement au
niveau de la tourelle. Repositionner
l'oculaire WF 10 x avant de tourner
la tourelle facilite les changements
Ensemble de microscope M800x
de grossissement. Cette procédure
permet d'obtenir une augmentation
régulière du grossissement sans perdre
le contrôle sur l'observation de l'objet.
Les grossissements suivants doivent
être pris en compte : 40 x, 80 x, 100 x,
200 x, 400 x, puis 800 x.
À chaque changement de grossissement
(que ce soit au niveau de l'oculaire
ou de l'objectif), la netteté de l'image
doit être réajustée à l'aide du bouton
de focalisation (Fig. 4). Sois prudent
lorsque tu fais ceci. Si tu déplaces la
platine du microscope trop rapidement,
l'objectif et la lame peuvent se toucher
et s'endommager mutuellement.
Dans le cas d'objets transparents (ex :
les protozoaires), la lumière, projetée
par la source électroluminescente
située en dessous de la platine,
passe à travers l'objectif puis à
travers l'oculaire avant d'atteindre ton
œil. Ce processus de transmission
lumineuse s'appelle microscopie. De
nombreux micro-organismes présents
dans l'eau, des éléments végétaux
et certaines des plus petites parties
des animaux sont transparents à l'état
naturel. Contrairement à ceux-ci, les
échantillons opaques devront subir une
préparation pour pouvoir être observés.
Les échantillons opaques peuvent être
rendus transparents par un processus
de traitement et d'imprégnation à l'aide
de matières appropriées (milieu), ou
bien en les découpant en tranches.
Tu peux en apprendre davantage
concernant la création d'échantillons
dans les sections suivantes qui
comprennent des expériences.
Conseils de nettoyage
Pour garantir la longévité du
microscope : Nettoyer les lentilles
(objectif et oculaire) uniquement à l'aide
d'un chiffon doux non pelucheux (ex :
microbre). Faire attention de ne pas
exercer trop de pression sur les lentilles,
cela pourrait les rayer. Demande à tes
parents de t'aider si ton microscope est
vraiment très sale. Le chiffon doit être
humidié avec du liquide de nettoyage
et la lentille nettoyée en n'exerçant que
très peu de pression. Assure-toi que ton
microscope est correctement protégé
de la poussière et de la saleté. Après
utilisation, laisse-le sécher dans une
pièce chauffée, puis replace ensuite
dans l'étui de transport fourni.
Ce microscope t'ouvre les portes d'un
processus d'apprentissage amusant
et créatif et te permettra d'avoir accès
à une connaissance avancée du
monde qui t'entoure. Ceci te permettra
d'explorer divers champs de la science,
qu'il s'agisse de la biologie, de la
chimie et plus encore. Alors, amusetoi à explorer le monde palpitant de la
science!
Instructions expérimentales
AVERTISSEMENT!
• Conserver les produits chimiques et
les liquides corrosifs hors de portée des
enfants!
• Ne pas ingérer de produits chimiques!
• Savonne-toi abondamment les mains
sous l'eau courante après utilisation!
Introduction
Voici quelques conseils an de mieux
observer le monde merveilleux des
micro-organismes et des cristaux. Tu
apprendras par exemple à préparer ton
objet ou ton échantillon pour pouvoir
les observer au microscope. Les
nombreuses expériences proposées
devraient aiguiser ta curiosité et te
pousser à utiliser encore davantage ton
microscope.
Quels genres d'objets?
Avec une loupe, tu peux regarder
des objets non transparents (c.-à-d.
opaques), par exemple, des petits
animaux, des parties de plantes, des
tissus, etc. Dans ce cas, la lumière
atteint l'objet et est rééchie à travers
la loupe, puis dans ton œil. Or, avec
ton microscope, tu peux également
observer des objets transparents,
alors que la lumière de la lampe passe
par l'ouverture de la platine et de
l'échantillon préparé. Elle passe ensuite
à travers l'objectif, puis à travers le corps
du microscope, puis à travers l'oculaire
avant d'atteindre œil. De nombreux
micro-organismes présents dans
l'eau, ainsi que certaines minuscules
parties des plantes et des animaux
sont naturellement transparents. Pour
ce qui est des autres objets opaques,
tu dois les rendre transparents grâce à
un traitement ou une imprégnation avec
des matières adéquates (milieu). Tu
peux également prélever de minuscules
coupes de manière manuelle ou à l'aide
d'une coupeuse d'échantillon (non
incluse) an de pouvoir les examiner
au microscope. Voyons à présent
comment faire.
Comment obtenir de nes coupes
d'échantillon
AVERTISSEMENT :
Cette opération doit toujours être
Besoin d'aide? Appelez-nous gratuitement au 855-863-4426.
Page 10

réalisée sous la supervision d'un adulte!
Demande à tes parents de t'aider!
Comme mentionné précédemment,
tu dois obtenir les plus nes coupes
possible d'un objet an que celui-ci
soit transparent et puisse être observé
au microscope. Avant toute chose,
procure-toi une simple bougie. Mets
la cire d'une bougie dans un vieux
pot et place celui-ci sur le feu de la
cuisinière jusqu'à ce que la cire soit
liquide. Puis, trempe l'objet plusieurs
fois dans la cire liquide à l'aide des
pincettes (Fig. 24). Attention : La cire
est très chaude! Sois prudent. Après
chaque trempage, laisse la cire se
solidier avant de retremper l'objet
dans la cire. Lorsque la cire autour de
l'objet s'est complètement solidiée,
utilise une coupeuse d'échantillons an
de prélever de nes coupes de celui-ci.
Ces coupes doivent être posées sur
une lame et recouvertes à l'aide d'une
lamelle couvre-objet ou d'une autre
lame (Fig. 18).
La préparation d'échantillons
Il existe deux types d'échantillons :
les échantillons permanents et les
échantillons temporaires
Échantillons temporaires
Les échantillons temporaires sont
réalisés à partir d'objets que tu
souhaites observer mais que tu
ne désires pas conserver dans ta
collection. Ces échantillons sont
faits pour être observés pendant
quelques instants, après quoi ils sont
éliminés. Pour préparer un échantillon
temporaire, place l'objet sur une
lame puis recouvre-le d'une lamelle
couvre-objet. Une fois ton observation
terminée, nettoie la lame et la lamelle.
L'un des secrets d'une observation au
microscope réussie consiste à toujours
utiliser des lames et des lamelles
propres. Toute tache ou trace ne
pourrait que distraire l'œil et altérer ton
expérience.
Les échantillons permanents préparés.
Les échantillons permanents sont
réalisés à partir d'objets que tu
souhaites observer encore et encore.
La préparation d'objets secs (pollen,
ailes de mouche, etc.) nécessite le
recours à une colle spéciale. Tu peux
te procurer cette colle aussi appelée
« gomme à milieux de montage » («
gum media » en anglais) soit en ligne,
soit dans un magasin de loisirs créatifs.
Les objets qui contiennent des liquides
devront d'abord en être débarrassés au
préalable.
Comment préparer un objet sec?
Commence par placer l'objet au centre
d'une lame puis recouvre-le d'une
goutte de colle (« gomme à milieux de
montage »). Place ensuite une lamelle
au-dessus de l'objet. Appuie légèrement
sur la lamelle de sorte à ce que la colle
se répande jusqu'aux bords. Laisse
l'échantillon durcir de 2 à 3 jours. Une fois
l'échantillon solidement collé, tu pourras
l'utiliser.
Comment préparer un échantillon
de frottis
Pour un échantillon de frottis, place une
goutte du liquide à observer (p. ex. de
l'eau prélevée dans une aque dans
la forêt) à extrémité de la lame à l'aide
d'une pipette. Puis étale le liquide sur
l'ensemble de la lame à l'aide d'une
seconde lame. Avant d'observer, laisse
la substance sécher pendant quelques
minutes.
Expériences
Expérience N° 1 :
Impression noir et blanc
Objets :
1. Un morceau de page de journal
comportant une image et du texte en
noir et blanc
2. Un morceau de page de magazine
Pour pouvoir observer les lettres et
les images, il va te falloir préparer
deux montages temporaires entre
lame et lamelle. Règle à présent ton
microscope au grossissement le plus
faible et utilise l'échantillon de papier
journal. Les lettres du papier journal
paraissent irrégulières et discontinues
étant donné qu'elles sont imprimées
sur du papier rugueux de piètre qualité.
Les lettres imprimées sur le magazine
paraissent au contraire plus lisses et
nettes. Dans les journaux, les images
sont constituées d'une multitude de
petits points, d'où leur aspect. Les
points de trame de l'image de magazine
sont quant à eux clairement dénis.
Expérience N° 2 :
Impression couleur
Objets :
1. Un morceau de page de journal
imprimé en couleurs
2. Un morceau de page de magazine
Réalise des échantillons temporaires à
partir de ces objets et observe-les avec
le plus faible niveau de grossissement.
Les points de trame de couleur du
journal se chevauchent souvent.
Parfois, tu remarqueras même deux
couleurs dans un même point. Sur le
magazine, les points semblent plus
clairs et riches en contraste. Observe
les différentes tailles de points.
Expérience N° 3 :
Fibres textiles
Objets et accessoires :
1. Fils de différents types de tissus
(ex : coton, lin, laine, soie, rayonne,
nylon, etc.)
2. Deux aiguilles
Place chaque l sur une lame et
efloche-le à l'aide des deux aiguilles.
Mouille les ls puis recouvre-les d'une
lamelle. Règle le microscope sur l'un
des plus faibles grossissements. Les
bres de coton sont issues d'une plante
et présentent l'aspect d'un ruban plat
et tordu lorsque tu les observes au
microscope. Les bres sont plus nes et
rondes sur les bords qu'au centre. Les
bres de coton sont essentiellement de
longs tubes affaissés. Les bres de lin
proviennent également d'une plante,
elles sont rondes et toutes orientées
dans le même sens. Les bres brillent
comme de la soie et présentent de très
nombreuses bosses. La soie provient
d'un animal et est constituée de bres
fermes qui sont de faible diamètre
comparé aux bres creuses issues
de plantes. Chaque bre est lisse et
régulière, comme si chacune d'entre
elles était un minuscule tube de verre.
Les bres de laine proviennent
également d'un animal. La surface est
constituée de gaines qui se chevauchent
et présentent un aspect irrégulier et
ondulé. Si possible, compare de la
laine provenant de différents fabricants.
Ainsi tu pourras observer les différents
aspects que présentent les bres. Les
experts réussissent de cette manière
à déterminer de quel pays provient la
laine.
La rayonne est une matière synthétique
qui est obtenue au terme d'un long
processus chimique. Toutes les bres
possèdent des lignes foncées sur
leur surface lisse et brillante. Après
séchage, les bres se recourbent
dans la même position. Observe les
différences et les similarités.
Expérience N° 4 :
Sel de table
Objet : Sel de table ordinaire
Tout d'abord, place quelques grains de
sel sur une lame et observe les cristaux
de sel avec le niveau de grossissement
le plus faible de ton microscope. Les
cristaux sont de minuscules cubes et
présentent tous la même forme.
Expérience N° 5 :
Fabrication de cristaux de sel
Objets et accessoires :
1. Sel de table
2. Une éprouvette graduée remplie à
moitié d'eau tiède pour dissoudre
le sel
3. Fil de coton
4. Trombones
5. Une allumette ou un stylo
Ajoute du sel dans l'eau jusqu'à ce qu'il
ne se dissolve plus. Tu as à présent une
solution saturée en sel. Attends que
l'eau ait refroidi. Attache un trombone à
l'extrémité du l de coton. Le trombone
sert de lest. Fais un nœud autour de
l'allumette avec l'autre extrémité du
l de coton et trempe le bout avec le
trombone dans la solution saline. Place
l'allumette horizontalement au-dessus
Besoin d'aide? Appelez-nous gratuitement au 855-863-4426.
Ensemble de microscope M800x
Page 11

d'un tube à essai. Cela permet d'éviter que le l de coton
ne glisse dans le fond du tube à essai. À présent, place
le tube dans un endroit chaud pendant 3 à 4 jours. Si tu
regardes le verre au microscope après quelques jours, tu
verras qu'une petite colonie de cristaux de sel s'est formée
sur le l de coton.
Expérience N° 6 :
Comment élever des crevettes de saumure?
Accessoires (inclus dans ton ensemble) :
1. Œufs de crevettes
2. Sel de mer
3. Écloserie
4. Levure (non fournie)
Les crevettes de saumure, ou « Artemia salina » comme les
appellent les scienti ques, ont un cycle de vie intéressant
et inhabituel. Les œufs produits par la femelle éclosent
avant même d'être fertilisés par une crevette mâle. Les
crevettes qui sortent de ces œufs sont toutes des femelles.
Sous certaines circonstances inhabituelles (p. ex. lorsque
le marais est asséché), des crevettes mâles peuvent
éclore. Ces mâles fertilisent les œufs des femelles. Des
œufs particuliers résultent de cette fécondation. Ceux-ci,
appelés « œufs de durée » possèdent une coquille épaisse
qui les protège. Ces œufs de durée sont très résistants et
capables de survivre même si le marais ou le lac s'assèche,
ce qui entraîne la mort de l'ensemble de la population de
crevettes. Les œufs de durée peuvent survivre pendant
5 à 10 ans en « diapause » et n'éclosent que lorsque les
conditions du milieu le permettent. C'est le type d'œufs que
tu as dans ton ensemble de microscope.
L'incubation des crevettes de saumure
A n d'incuber les crevettes, tu dois d'abord réaliser une
solution saline correspondant aux conditions de vie de
la crevette. Pour ce faire, verse un demi-litre d'eau de
pluie ou d'eau du robinet dans un récipient. Laisse l'eau
reposer pendant environ 30 heures. Étant donné que l'eau
s'évapore au l du temps, il est recommandé de remplir
un deuxième récipient d'eau et de le laisser reposer
pendant 36 heures. Après que l'eau soit restée stagnante
pendant cette durée, verse la moitié du sel de mer dans
le récipient et remue jusqu'à ce que le sel soit entièrement
dilué. À présent, place quelques œufs dans le récipient
et recouvre celui-ci avec une assiette. Place le récipient
en verre dans un endroit bien éclairé, mais non exposé
à la lumière directe du soleil. Étant donné que tu as une
écloserie, tu peux également verser la solution saline avec
quelques œufs dans chacun des quatre compartiments
du bac. La température doit avoisiner les 25 ºC (77 °F). À
cette température, les crevettes écloront au bout de 2 ou 3
jours environ. Si l'eau du récipient s'évapore, rajoute un peu
d'eau du deuxième récipient.
La crevette de saumure au microscope
L'animal qui éclot de l'œuf est connu sous le nom de « larve
nauplius ». À l'aide de la pipette tu peux mettre quelques
unes de ces larves sur une lame de verre et les observer.
La larve va se déplacer dans la solution saline en utilisant
ses appendices semblables à des cheveux. Prélève
quelques larves du récipient tous les jours et observe-les
au microscope. Si la larve a éclos dans l'écloserie, retire
simplement le couvercle du bac et place celui-ci sur la
platine. Suivant la température ambiante, la larve arrivera
à maturité au bout de 6 à 10 semaines. Bientôt, tu auras
élevé une génération entière de crevettes de saumure, dont
la population augmentera sans cesse.
Nourrir tes crevettes de saumure
A n de maintenir tes crevettes de saumure en vie, tu
dois les nourrir. Tu dois faire attention car une nourriture
trop abondante peut polluer l'eau et empoisonner ta
population de crevettes. L'alimentation est constituée de
Ensemble de microscope M800x
levure sèche sous forme de poudre. Une petite quantité
de cette levure tous les deux jours est suf sante. Si
l'eau des compartiments du couvoir ou de ton récipient
devient sombre, cela veut dire qu'elle est polluée. Sors les
crevettes de l'eau immédiatement et mets-les dans une
solution saline propre.
Avertissement! Les crevettes et leurs œufs ne doivent
pas être mangés!
Expérience N° 7 :
Comment les moisissures du pain se développent-elles?
Objet : Un morceau de pain rassis
Place le pain sur une lame et mouille-le légèrement avec
de l'eau. Place le pain dans un récipient fermé et conservele dans un endroit chaud à l'abri de toute lumière vive. Au
bout de peu de temps, de la moisissure noire se forme.
Lorsque le moisi prend un aspect blanc et brillant, observele avec ton microscope. Tu verras une masse entremêlée
de ls, qui forment le corps du champignon, appelé
mycélium. Chaque l est connu sous le nom d'hyphe. Ces
ls, ou hyphes, se développent comme de longues et nes
colonnes qui se terminent par une un petite boule blanche
appelée sporocarpe. À l'intérieur du sporocarpe se trouve
une spore qui nira par se détacher pour former une
nouvelle colonie de moisissure. À l'aide de ton microscope
tu peux observer le déroulement de cette fantastique
transformation.
Expérience N° 8 :
Observation des sections de tige et de racine
Objets :
1. Une branche de céleri
2. Une carotte
Sous la supervision d'un adulte, prélève plusieurs coupes
très nes au centre du céleri (une tige) et au centre d'une
carotte (une racine). Réalise un « montage humide »
en plaçant une goutte d'eau sur la lame. Puis place
l'échantillon sur la lame couverte d'eau, et recouvre d'une
lamelle. L'eau permet de soutenir l'échantillon. Elle comble
également l'espace entre la lamelle et la lame. Commence
par les observer avec le grossissement le plus faible, puis
augmente-le a n d'obtenir une observation plus détaillée.
Page 12

¿Necesita ayuda? Llámenos al número gratuito 855-863-4426.
Juego de microscopio M800x
Bajo supervisión de un adulto
Leer y respetar las advertencias,
instrucciones de seguridad y la
información sobre primeros auxilios.
Este juego de microscopio está
pensado para niños mayores de 8 años.
Los niños deben usar este dispositivo
únicamente bajo supervisión de un
adulto. Nunca dejar que un niño use
este dispositivo sin supervisión.
Los accesorios de este kit experimental
pueden tener puntas y bordes a lados.
Cuando no se estén utilizando, el
dispositivo y todos sus accesorios y
complementos deben guardarse fuera
del alcance de niños pequeños para
evitar riesgo de LESIONES.
Este dispositivo contiene componentes
electrónicos que funcionan con pilas.
Las pilas deben mantenerse fuera del
alcance de los niños. Al colocarlas,
asegurarse de que se hace con la
polaridad correcta, según la indicación
+/- que se muestra.
¡Fuego/peligro de explosión!
No exponer el dispositivo a altas
temperaturas. Utilizar solamente pilas
del tipo recomendado. No mezclar
pilas viejas y nuevas (cambiar todas
las pilas al mismo tiempo). No mezclar
pilas alcalinas, estándar (carbonozinc) y recargables. No provocar
cortocircuitos en el dispositivo ni en
las pilas; no arrojar las pilas al fuego.
La exposición a altas temperaturas
o un mal uso del dispositivo puede
originar cortocircuitos, incendios y
hasta explosiones. Las pilas dañadas
o con fugas pueden causar lesiones
si entran en contacto con la piel. En
caso de tener que manejar pilas en
tales condiciones, habrá que ponerse
guantes de seguridad apropiados.
Sustancias químicas
Todos los líquidos o productos químicos
usados para los preparar, utilizar o
limpiar el equipo deben mantenerse
fuera del alcance de los niños. ¡No
ingerir productos químicos! Tras su
uso, lavarse las manos bien con agua.
En caso de contacto accidental con
los ojos o la boca, enjuagar con agua.
Buscar atención médica en caso de
afecciones derivadas del contacto
con sustancias químicas y llevar la
sustancia química al doctor para
facilitarle el diagnóstico.
RIESGO de daño del material
No desmontar el dispositivo. Ponerse
en contacto con nuestro centro de
asistencia y enviar el dispositivo para
repararlo si fuera necesario.
No exponer el dispositivo a temperaturas
superiores a 60 °C (140 °F).
CONSEJOS de limpieza
Antes de limpiar, sacar las pilas del
dispositivo.
Cuidado del microscopio
Limpiar el exterior del dispositivo
con un paño seco. No usar líquidos
de limpieza para evitar daños en los
componentes electrónicos. Limpiar la
lente (objetivo y ocular) únicamente
con un paño suave antipelusas (por
ejemplo, de micro bra). No ejercer
demasiada presión, ya que podría
partir la lente. Proteger el dispositivo
del polvo y la humedad. Guardar el
dispositivo en su embalaje original.
Retirar las pilas si no se va a utilizar el
dispositivo durante un largo período de
tiempo.
RECICLAJE
Mantener el embalaje (bolsas de
plástico, gomas y demás) lejos de los
niños. ¡Existe riesgo de ASFIXIA!
Deshacerse del embalaje según la
legislación pertinente. Consultar con
las autoridades locales al respecto si
fuera necesario.
RECICLAJE
Desechar el embalaje de forma apropiada
según el tipo de material (papel, cartón,
etc.). Ponerse en contacto con el
servicio de recogida de residuos o con
las autoridades medioambientales para
obtener información sobre cómo proceder
para el reciclaje.
Respetar la normativa vigente al
deshacerse del dispositivo. Se puede
obtener más información sobre un
reciclaje adecuado a través del servicio
de reciclaje de desechos local o de las
autoridades medioambientales.
Contenido:
• Microscopio
• Carcasa portaobjetos
• 5 portaobjetos preparados
• 18 portaobjetos vacíos
• 18 cubreobjetos
• 18 etiquetas
• 4 viales de recogida
• Vial de tinte rojo
• Vial de tinte verde
• Pipeta
• Pinzas
• Lupa
• Cilindro graduado
• Espátula
• Criadero de gambas
• Huevos de gambas
• Maletín de transporte
Manual del Producto Visita
www.exploreone.com/pages/product-manuals
Page 13

¿Necesita ayuda? Llámenos al número gratuito 855-863-4426.
Juego de microscopio M800x
Las partes del microscopio:
1 (2) Lentes de campo amplio
(WF10x, WF20x)
2 Oculares de goma blanda
3 Cabezal giratorio de lente
4 Mando de enfoque preciso y
aproximado
5 Platina
6 Pinzas metálicas de platina
7 Rueda de ltros de color
8 Torreta de objetivos
9 Objetivos de 4x, 10x y 40x
10 Iluminación LED inferior
11 Iluminación LED superior
12 Base con compartimento de pilas
13 Interruptor de iluminación de 3
posiciones
14 Brazo de microscopio
15 Estuche de transporte
Contenido adicional:
16 (5) portaobjetos de cristal
preparados
17 (18) portaobjetos de cristal vacíos
18 (18) cubreobjetos
19 (18) etiquetas
20 (4) viales de recogida
21 Vial de tinte rojo
22 Vial de tinte verde
23 Pipeta
24 Pinzas
25 Lupa
26 Tubo graduado
27 Espátula
28 Incubadora de artemias
29 Huevas de artemia
¡Enhorabuena! Has elegido uno de
los mejores microscopios del mercado
para los jóvenes exploradores.
Lee detenidamente las siguientes
instrucciones para sacar el máximo
partido a tu instrumento de precisión.
Luego prueba los experimentos para
empezar a investigar el fascinante
mundo que te rodea.
¿Cómo se usa el microscopio?
Antes de utilizar el microscopio,
asegúrate de que la mesa, el escritorio
o la super cie donde lo vayas a poner
sea estable y no esté sometida a
vibraciones. Si hay que mover el
microscopio, usa el brazo y la base
como apoyo mientras lo trasladas con
cuidado.
Coloca tres pilas “AA” (no incluidas)
en el compartimento que hay en la
parte inferior del microscopio. Abre
la tapa de las pilas de la parte inferior
del microscopio y colócalassegún
la indicación +/- mostrada. Vuelve a
colocar la tapa del compartimento de
las pilas.
Una vez que el microscopio esté en
un lugar adecuado y con las pilas
puestas, comprueba las fuentes de
luz para asegurarte de que ambas
funcionen; para ello, pon el interruptor
de iluminación (Fig. 13) en todas las
posiciones (I, "0" y II). Usa un paño
de limpieza (p. ej., de micro bra) para
limpiar las lentes con suavidad. Si la
platina (Fig. 5) está manchada de polvo
o aceite, límpiala con cuidado.
La platina se sube y baja únicamente
con el mando de enfoque (Fig. 4).
¿Cómo se activa la iluminación LED?
Este microscopio va equipado con dos
modernos LED (diodos emisores de luz)
que iluminan la muestra desde arriba y
desde abajo de la platina (Fig. 5). Para
iluminar los objetos y muestras, puedes
usar distintas técnicas de iluminación,
desde opaca hasta transparente.
Encuentra el interruptor de iluminación
(Fig. 13) en la base del microscopio.
Ponlo en la primera posición (indicada
con I) para que se encienda la luz LED
inferior (Fig. 10). Selecciona la segunda
posición (0) para apagar todas las
luces. Selecciona la última posición (II)
para que se enciendan las dos luces
LED (Fig. 10 y 11).
La rueda de ltros de color (Fig. 7) está
debajo de la platina del microscopio
(Fig. 5). Sirve para observar mejor
muestras transparentes o muy
brillantes. Usando estos ltros (azul,
amarillo, rojo y transparente), puedes
elegir entre varios colores. La rueda
de ltros también cuenta con cuatro
tamaños de apertura distintos para
que puedas ajustar los niveles de brillo
sobre los objetos/muestras.
Los ltros de la rueda te ayudan a
reconocer mejor componentes sin color
u objetos transparentes (ej., granos
de fécula, protozoos). Gira la rueda al
tiempo que enciendes y apagas las dos
luces o la luz inferior para conseguir el
efecto deseado y poder ver el objeto/
muestra.
¿Cómo se ajusta el microscopio
correctamente?
Colocarlo en un lugar adecuado, como
se indicó anteriormente, y siéntate en
una posición cómoda que te permita
observar. El microscopio incluye un
cabezal giratorio (Fig. 3) que facilita
la visión en varias posiciones y,
además, permite compartir con los
demás las asombrosas imágenes que
has descubierto. Empieza siempre
cada observación con el aumento
más pequeño. Ajusta la platina del
microscopio (Fig. 5) de modo que
esta quede en la posición más baja.
Activa la torreta de objetivos (Fig. 8)
con el aumento más pequeño (objetivo
4x) hasta que oigas el clic que indica
que está en posición. Nota: antes de
cambiar el ajuste del objetivo, mueve
siempre la platina del microscopio (Fig.
5) a la posición más baja girando el
mando de enfoque (Fig. 4). Al bajar la
platina, evitarás dañar el portaobjetos
con la muestra o el propio microscopio.
Al iniciar una observación, empieza
siempre por la lente de campo amplio
de 10x (Fig. 1) del cabezal giratorio
(Fig. 3).
Dato interesante: el mayor aumento
no siempre es el mejor para todas las
muestras.
16
17
24
25
26
222321
18
19
20
27
28
29
Page 14

Juego de microscopio M800x
¿Cómo se observa la muestra?
Una vez sentado con suciente luz
y seleccionado el ltro de la rueda,
deben respetarse las siguientes reglas
básicas: empieza con una observación
sencilla y el aumento más pequeño.
Coloca el objeto o muestra en el centro
de la platina bajo las pinzas (Fig. 6),
centrado sobre la luz LED inferior (Fig.
10). Gira el mando de enfoque (Fig. 4)
hasta que aparezca una imagen nítida
en la lente.
NOTA: Cuanto mayor sea el aumento,
más luz necesitarás para tener una
buena calidad de imagen.
Dato interesante: lo que pretendes
observar con el microscopio se conoce
como objeto o muestra.
Pon el portaobjetos preparado justo
debajo del objetivo de la platina del
microscopio (Fig. 5) sujetando con
las pinzas de la platina (Fig. 6). El
portaobjetos preparado debe colocarse
directamente encima de la luz inferior
(Fig. 10). Mira por el ocular y gira con
cuidado el mando de enfoque (Fig. 4)
hasta que aparezca una imagen nítida.
Entonces ya puedes seleccionar un
aumento mayor cambiando la lente de
campo amplio a 20x (Fig. 1). Cuando
la lente 20x está en el tubo del cabezal
giratorio, el aumento se duplica. Se
pueden lograr mayores niveles de
aumento girando la torreta de objetivos
(Fig. 8) a ajustes más altos (10x o 40x).
Para lograr los mejores resultados,
vuelve a poner la lente 10x a la mínima
potencia de aumento antes de cambiar
la potencia en la torreta. Al volver a
seleccionar la lente 10x en cada giro de
la torreta, se facilitan las transiciones
entre aumentos. Si se sigue este
procedimiento, el aumento asciende
de manera uniforme sin sobrecargar
la visión del objeto. Deben seguirse los
siguientes aumentos: 40x, 80x, 100x,
200x, 400x y luego 800x.
Cada vez que se varíe el aumento (al
cambiar de lente o de objetivo), debe
reajustarse la nitidez de la imagen
con el mando de enfoque (Fig. 4). Al
hacerlo, ten cuidado porque si mueves
la platina del microscopio demasiado
deprisa, el objetivo y el portaobjetos
podrían tocarse, lo cual dañaría el
portaobjetos o el microscopio.
Con objetos transparentes (ej.,
protozoos), el LED inferior proyecta la
luz que sale de debajo de la platina,
pasa por el objetivo y, por último, llega
al ojo. Este proceso se conoce como
microscopia de transmisión de luz.
En la naturaleza son transparentes
muchos microorganismos que se
encuentran en el agua, partes de
plantas y de los animales más
pequeños. En cambio, las muestras
opacas tendrán que prepararse para
su observación. Estas pueden volverse
transparentes mediante un proceso
de tratamiento y penetración con los
materiales adecuados (medios) o
diseccionándolas. Encontrarás más
información sobre cómo crear muestras
en el apartado de los experimentos, a
continuación.
Consejos de limpieza
Asegúrate de que tu microscopio tenga
una larga vida útil. Limpia la lente
(objetivo y ocular) únicamente con un
paño suave antipelusas (por ejemplo,
de microbra). No frotar fuerte o podrías
arañar la lente. Pide a tus padres
que te ayuden si tu microscopio está
muy sucio. El paño de limpieza debe
humedecerse con líquido de limpieza
y la lente debe frotarse con suavidad
hasta quedar limpia. Asegúrate de que
tu microscopio esté siempre protegido
del polvo y la suciedad. Cuando
termines de usarlo, déjalo en una
habitación cálida para que se seque y
luego vuelve a meterlo en el estuche de
transporte facilitado.
Este microscopio puede un punto de
partida a un proceso de aprendizaje
divertido y creativo y abrirte las puertas
de un conocimiento avanzado del
mundo que te rodea. Te permitirá
explorar diversos campos de la ciencia,
como la biología, la química y la
botánica, entre otros, así que disfruta
descubriendo el mundo de la ciencia.
Instrucciones para los experimentos
¡ADVERTENCIA!
• ¡Mantener los productos químicos y
líquidos corrosivos fuera del alcance
de los niños!
• ¡No ingerir productos químicos!
• Después de usar, lavarse bien las
manos con jabón y agua.
Introducción
He aquí algunos consejos sobre cómo
observar mejor el maravilloso mundo
de los microorganismos y cristales.
Por ejemplo, aprenderás a preparar
tu objeto/muestra para poder mirarlo
por el microscopio. Los numerosos
experimentos descritos deberían
despertar tu curiosidad y el deseo de
usar más el microscopio.
¿Qué clase de objetos?
Con una lupa puedes ver objetos no
transparentes (esto es, opacos), por
ejemplo, animales pequeños, partes
de plantas, tejidos, etc. En esos
casos, la luz incide sobre el objeto
y se reeja por la lupa hasta llegar
a tu ojo. Con el microscopio, sin
embargo, puedes observar también
objetos transparentes a los que la luz
de la lámpara llega por la abertura
de la platina y la muestra preparada.
Luego, pasa por el objetivo, el cuerpo
del microscopio y la lente hasta llegar
al ojo. Muchos microorganismos
acuáticos, partes de plantas y partes
de los animales más pequeños son ya,
por naturaleza, transparentes. Otras
cosas hay que volverlas transparentes
mediante tratamiento o penetración
con los materiales adecuados (medios)
o cortando trozos muy nos con la
mano o un diseccionador de muestras
(no incluido) para poder examinarlos
con el microscopio. Ahora descubrirás
cómo se hace.
Cómo hacer láminas de muestra
nas
ADVERTENCIA:
Esto solo se debe hacer bajo la
supervisión de un adulto. ¡Pide a
tus padres que te ayuden! Como ya
hemos mencionado, necesitas cortar
láminas de un objeto lo más nas
posibles para que sean transparentes
y puedan mirarse por el microscopio.
En primer lugar, necesitarás una vela
normal y corriente. Pon la cera de la
vela en un cazo viejo y caliéntala en un
fogón hasta que se derrita. Luego, usa
las pinzas (Fig. 24) para sumergir el
objeto en la cera líquida varias veces.
Atención: ¡La cera estará muy caliente!
Ten mucho cuidado. Tras sumergir el
objeto, deja que la cera se endurezca
y luego vuelve a sumergir el objeto.
Cuando la cera alrededor del objeto
se endurezca del todo, puedes usar el
diseccionador de muestras para cortar
láminas nas. Tienes que poner dichas
láminas en un portaobjetos y taparlas
con un cubreobjetos o cubierta de
cristal (Fig. 18).
Producción de muestras
Hay dos tipos básicos de muestras:
permanentes y de corta duración.
Muestras de corta duración
Son las producidas a partir de objetos
que quieres mirar pero que no deseas
mantener en tu colección de muestras.
Están preparadas para observarse solo
durante un breve periodo de tiempo,
tras el cual serán desechadas. En el
caso de muestras de corta duración,
pon el objeto en el portaobjetos y
coloca encima el cubreobjetos. Tras
examinarlo, limpia el portaobjetos y
el cubreobjetos. Uno de los secretos
de una buena observación con el
¿Necesita ayuda? Llámenos al número gratuito 855-863-4426.
Page 15

Juego de microscopio M800x
microscopio es usar portaobjetos y
cubreobjetos limpios. Las manchas o
impurezas son una distracción a la hora
de mirar un objeto.
Muestras preparadas permanentes
Son aquellas que proceden de objetos
que deseas mirar una y otra vez. La
preparación de objetos secos (polen,
las alas de una mosca, etc.) solo
puede hacerse con un pegamento
especial. Encontrarás dicho adhesivo
en una tienda de aeromodelismo o de
coleccionismo con la denominación
“gum media”. En el caso de objetos
que contengan humedad, esta debe
extraerse primero.
Cómo preparar un objeto seco
Primero, coloca el objeto en el centro de
un portaobjetos limpio y cúbrelo con una
gota de pegamento (gum media). Luego,
coloca un cubreobjetos sobre el objeto.
Presiona ligeramente el cubreobjetos
para que el pegamento se extienda hasta
los bordes. Luego debes dejar que la
muestra se endurezca durante 2 o 3 días.
Hasta que la muestra no esté pegada con
rmeza, no podrás usarla.
Cómo se prepara la muestra para
extenderla
Para extender una muestra, se vierte
con la pipeta una gota del líquido que
se vaya a observar en un extremo del
portaobjetos (p. ej. agua recogida de
un charco del bosque). A continuación,
puedes extender el líquido con ayuda
de un segundo portaobjetos. Antes
de la observación, debes dejar que
la sustancia se seque durante unos
minutos.
Experimentos
Experimento nº 1:
Impresión en blanco y negro
Objetos:
1. Un trozo pequeño de papel de un
periódico con parte de una
fotografía en blanco y negro y
algunas letras.
2. Un trozo de papel similar de una
revista.
Para poder observar las letras y las
imágenes, debes elaborar a partir
de cada objeto una muestra de corta
duración. A continuación, debes
seleccionar en tu microscopio el
aumento más pequeño y utilizar la
muestra hecha a partir del periódico.
Las letras del periódico parecen
deshilachadas y entrecortadas, ya que
están impresas en un papel basto y de
poca calidad. Las letras de la revista
parecen más renadas y completas. La
imagen del periódico se compone de
muchos puntos pequeños que tienen
un aspecto como emborronado. Las
mediatintas de la imagen de la revista
están nítidamente denidas.
Experimento nº 2:
Impresión en color
Objetos:
1. Un trozo pequeño de un periódico
impreso en color.
2. Un trozo de papel similar de una
revista.
A partir de los objetos se elaboran
muestras de corta duración y se
observan con el aumento más
pequeño. Las mediatintas en color del
periódico se sobreponen a menudo
unas sobre otras. A veces, se puede
reconocer incluso dos colores en uno
solo punto. En la revista, los puntos
se ven nítidos y llenos de contrastes.
Observa los diferentes tamaños de los
puntos.
Experimento nº 3:
Fibras textiles
Objetos y accesorios:
1. hilos de diferentes tejidos (p.
ej. algodón, lino, lana, seda, seda
articial, nailon, etc.).
2. Dos agujas.
Cada hilo se coloca sobre un
portaobjetos de cristal y se deshilacha
con ayuda de las dos agujas. Luego,
humedece los hilos y tápalos con un
cubreobjetos. El microscopio debe
ajustarse a un aumento pequeño.
Las bras de algodón son de origen
vegetal y a través del microscopio se
ven como una cinta plana torneada.
Por los bordes son más gruesas y
redondeadas que por el centro. Las
bras de algodón son como pequeñas
cañitas alargadas.
Las bras de lino también son de
origen vegetal, son redondeadas y
discurren en una sola dirección. Brillan
como seda y presentan incontables
protuberancias en el hilo. La seda
es de origen animal y se compone de
bras macizas, de un diámetro más
pequeño en comparación con las
bras vegetales huecas. Cada bra es
lisa y regular y tiene la apariencia de
una minúscula barra de cristal. Las
bras de la lana también son de origen
animal y su supercie se compone de
cáscaras que se superponen entre sí
y que parecen rotas y onduladas. Si
es posible, compara bras de lana de
distintos tejidos. Observa la apariencia
diferente de las bras. A partir de
esas diferencias, un experto podría
incluso determinar el país de origen
de la lana. La seda articial, como su
propio nombre indica, está fabricada
por la mano del hombre a través de un
largo proceso químico. Todas las bras
muestran líneas duras y de color oscuro
sobre la supercie lisa y brillante.
Después de secarse, las bras se rizan
y quedan en el mismo estado. Observa
las similitudes y diferencias.
Experimento nº 4:
Sal de mesa
Objeto: sal de mesa común.
Primero coloca unos granitos de
sal sobre un portaobjetos y, a
continuación, observa los cristales de
la sal con el aumento más pequeño
de tu microscopio. Los cristales son
cubitos diminutos y tienen todos la
misma forma.
Experimento nº 5:
Elaboración de cristales de sal
Objetos y accesorios:
1. Sal de mesa.
2. Un tubo graduado medio lleno con
agua caliente para disolver la sal.
3. Hilo de algodón.
4. Clips sujetapapeles.
5. Una cerilla o lápiz.
Echa en el agua la sal suciente para
que no se disuelva. Ahora ya tienes una
solución salina saturada. Espera hasta
que el agua se haya enfriado. Sujeta el
clip a un extremo del hilo de algodón.
El clip sirve de peso. En el otro extremo
del hilo de algodón, ata la cerilla con
un nudo y mete dicho extremo en la
solución salina. Coloca la cerilla en
posición horizontal sobre la boca del
tubo de ensayo y evita que se hunda
el hilo de algodón. A continuación,
deja el tubo 3 o 4 días en un sitio de
tu casa donde haga calor. Transcurrido
ese tiempo, vuelve a examinar con
el microscopio y verás que en el hilo
de algodón se ha formado toda una
colonia de cristales de sal.
Experimento nº 6:
¿Cómo se crían artemias en agua salada?
Accesorios (de tu juego de microscopio):
1. Huevas de artemia.
2. Sal marina.
3. Incubadora.
4. Levadura (no incluida).
La “Artemia Salina” es el nombre
cientíco de un tipo de crustáceo que
tiene un ciclo de vida tan inusual como
interesante. Las huevas producidas por
las hembras se incuban sin necesidad
de haber sido fecundadas nunca por
las artemias macho. Las artemias
que salen de estas huevas son todas
hembras. En circunstancias poco
habituales (p. ej. cuando el pantano
se seca), es posible que salgan de las
huevas artemias macho. Estos machos
fecundan las huevas de las hembras,
y de este apareamiento surgen
huevas especiales. Dichas huevas,
conocidas como “huevas de invierno”,
presentan una cáscara gruesa que las
protege. Las huevas de invierno son
muy resistentes y se mantienen con
vida incluso cuando el pantano o el
lago se secan y toda la población de
artemias perece. En este estado “de
hibernación”, pueden perdurar entre 5 y
10 años; las huevas se incuban cuando
vuelven a darse las condiciones
medioambientales propicias Estas son
las huevas que puedes encontrar en tu
juego de microscopio.
¿Necesita ayuda? Llámenos al número gratuito 855-863-4426.
Page 16

Juego de microscopio M800x
La incubación de las artemias
Para incubar las artemias, en primer lugar hay que elaborar
una solución de sal que reproduzca las condiciones de
vida de estas. Para ello tienes que llenar un recipiente con
medio litro de agua del grifo o de lluvia. Después debes
dejar reposar dicha agua aprox. 30 horas. Dado que el
agua se evapora con el paso del tiempo, se recomienda
llenar con agua un segundo recipiente del mismo modo
y dejarla reposar durante 36 horas. Una vez que el agua
ha reposado durante este tiempo, debes echar la mitad
de la sal marina suministrada en el recipiente y removerlo
hasta que se disuelva por completo. Luego, echa algunas
huevas en el recipiente y cúbrelo con un plato. Coloca el
recipiente de cristal en un sitio donde haya claridad, pero
evita exponer el recipiente a la luz directa del sol. Dado
que dispones de una incubadora, también puedes echar la
solución salina junto con algunas huevas en cada uno de
los cuatro compartimentos de esta. La temperatura debe
ser de unos 25 °C (77 °F). A esa temperatura, la artemia
sale de la hueva aproximadamente al cabo de 2 o 3 días.
Si durante este tiempo se evapora el agua del recipiente,
puedes añadirle agua del segundo recipiente.
La artemia bajo el microscopio
El animal que sale de la hueva se conoce con el nombre
de Nauplius larva. Con la ayuda de la pipeta, puedes
colocar algunas de estas larvas en un cristal portaobjetos
y observarlas. La larva se mueve por el agua salada
ayudándose de sus protuberancias en forma de pelo. Toma
cada día algunas larvas del recipiente y obsérvalas con el
microscopio. Si has puesto las larvas en una incubadora,
solo tienes que levantar la tapa superior del recipiente y
colocarlo sobre la platina. Dependiendo de la temperatura
ambiente, la larva se habrá desarrollado en un plazo de
entre 6 y 10 semanas. Pronto habrás criado toda una
generación de artemias, cuyo número irá creciendo de
forma constante.
Cómo alimentar a tus artemias
Para mantener con vida a las artemias, es necesario
echarles alimento de vez en cuando. Esto debe hacerse
con cuidado, ya que una sobrealimentación conllevaría un
deterioro del agua y tu población de artemias resultaría
intoxicada. Lo mejor es alimentarlas con levadura seca
en polvo. Basta con un poco de esta levadura cada dos
días. Cuando el agua que hay en los compartimentos de la
incubadora o de tu recipiente se ponga oscura, es síntoma
de que se está deteriorando. Saca inmediatamente las
artemias del agua e introdúcelas en una solución salina
fresca.
¡Advertencia! ¡Las huevas de artemia y las artemias no
son aptas para el consumo!
Experimento nº 7:
¿Cómo se desarrolla el moho del pan?
Objeto: un trozo de pan duro.
Pon el pan en un cubreobjetos y humedécelo un poco
con agua. Pon el pan en un recipiente cerrado y mantenlo
caliente y sin que le dé ninguna luz fuerte. En poco tiempo,
se formará el moho negro del pan. Cuando el moho se
vuelva blanco, con una apariencia brillante, obsérvalo con
tu microscopio. Presentará el aspecto de una compleja
masa de hilos, que forman el cuerpo vegetativo del hongo,
llamado micelio. Cada hilo recibe el nombre de hifa. Estos
hilos o hifas crecen como lamentos largos y delgados
que acaban en una bola pequeña y blanca denominada
cubierta de espora. Dentro de dicha cubierta hay una
espora que acabará liberándose para comenzar nuevas
colonias de moho. Con tu microscopio puedes ver cómo se
produce esta asombrosa transformación.
Experimento nº 8:
Observar partes de un tallo y de una raíz
Objetos:
1. Un tallo de apio.
2. Una zanahoria.
Bajo la supervisión de un adulto, corta varias láminas nas
del medio del apio (un tallo) y del medio de la zanahoria
(una raíz). Haz un “preparado húmedo” poniendo una gota
de agua en el portaobjetos. Luego, pon la muestra en el
portaobjetos cubierto de agua y tápalo con un cubreobjetos.
El agua ayudará a mantener la muestra. También rellenará
el espacio entre el cubreobjetos y el portaobjetos. Empieza
mirando con el aumento más pequeño y luego selecciona
un aumento mayor para observar con más detalle.
Do not mix old and new batteries.
Do not mix alkaline, standard (carbon-zinc),
or rechargeable batteries.
Ne mélangez pas les piles neuves et usées.
Ne pas mélanger des piles alcalines, standard
(au carbone-zinc) piles ou rechargeables.
No mezcle pilas nuevas con pilas usadas.
No mezcle pilas alcalinas,
estándar (carbono-zinc) ni recargables.
Contents and colors may vary.
Le contenu et les couleurs peuvent varier.
El contenido y los colores pueden variar.
EDU SCIENCE IS A MARK OF (EST UNE MARQUE DE/ES UNA MARCA DE)
GEOFFREY, LLC, A SUBSIDIARY OF (UNE FILIALE DE/UNA SUBSIDIARIA DE)
TOYS“R”US, INC.
© 2014 GEOFFREY, LLC
MADE IN CHINA (FABRIQUÉ EN CHINE/FABRICADO EN CHINA)
DISTRIBUTED IN THE UNITED STATES BY (DISTRIBUÉ AUX ÉTATS-UNIS
PAR/DISTRIBUIDO EN LOS ESTADOS UNIDOS POR) TOYS“R”US, INC.,
WAYNE, NJ 07470 IMPORTED BY (IMPORTÉ PAR/IMPORTADO POR)
TOYS“R”US (CANADA) LTD. (LTÉE), 2777 LANGSTAFF ROAD, CONCORD, ON
L4K 4M5 DISTRIBUTED IN AUSTRALIA BY (DISTRIBUÉ EN AUSTRALIE
PAR/DISTRIBUIDO EN AUSTRALIA POR) TOYS“R”US (AUSTRALIA
(AUSTRALIE)) PTY LTD.(LTÉE), REGENTS PARK NSW 2143
www.toysrus.com www.toysrus.ca
 Loading...