

Page 1

Announcement
Dear users:
Thank you for purchasing and using our products. For the sake of your safety and interests, before using the
products, please carefully read the product specifications as well as all the materials attached to the PC. If you
don’t operate and use the products according to the product specifications, we shall not assume any
responsibility for any personal harmony, assets or other losses incurred.
The product specifications (hereinafter referred to a specifications ):
The proprietary of the specifications belongs to our company;
The proprietary of trademark and trade name mentioned in the specifications belongs to their respective
owners;
If the content of specifications doesn’t conform to that of the actual product, the actual product shall be
binding.
If you have any misunderstanding or objection about any content or article & clause in the specifications,
please put forward a written objection within 7days after purchasing the PC. Otherwise, it shall be deemed
that you have agreed to, understood and accepted all the contents of the specifications.
User’s Manual
Product Name:
Window Tablet
Model Name: EAS23
version :1.0
Release Date:2016.02
Page 2

Catalogue
1.0Productoverview.......................................................................................................................................4
1.1Introduction...............................................................................................................................................4
1.2 Unpacking and inspection.........................................................................................................................4
1.3 Introduction to parts & components..........................................................................................................5
2.0Basiccommonknowledgeoncomputeroperation......................................................................................7
2.1 Stop the computer......................................................................................................................................7
2.2 Function of keyboard.................................................................................................................................7
2.4 Display screen...........................................................................................................................................8
2.5 Electromagnetic-screen..........................................................................................................................8
2.6 The use of the electromagnetic pen........................................................................................................9
3.0SetupofBIOS(basicinput&outputsystem)..............................................................................................10
3.1 Method on use of BIOS setup.................................................................................................................10
3.2 Boot Menu...............................................................................................................................................11
3.3 Main.........................................................................................................................................................12
3.4 Advanced.................................................................................................................................................13
3.5 Security......................................................................................................................................................0
3.6 Exit............................................................................................................................................................1
4.0Installationofdriverprogram.......................................................................................................................2
5.0Specialnotice.................................................................................................................................................3
5.1 Special hint............................................................................................................................... .................3
5.2Please be sure to read the important hints for using Tablet PC..................................................................3
5.3 Special notice.............................................................................................................................................4
5.4 Please be sure to read the instructions on the Power of Tablet PC............................................................5
5.5 Instructions on safety.................................................................................................................................6
6. 0Faultanalysisandelimination......................................................................................................................7
6.1 Problem on sound......................................................................................................................................7
6.2 Problems on monitor.................................................................................................................................7
7.0SpecialDeclaration........................................................................................................................................8
8.0AnnexA:ProductSpecifications..................................................................................................................... 9
Page 3

1.0 Product overview
1.1 Introduction
Product name: Window Tablet
Series and type: EAS23
Characteristics of product performance: The Window Table ado
pts the latest mobile computation
technology of INTEL and has a better performance.
Clear LCD:The Window Table has a TFT, which brings you clear and bright colorful words and images.
Use only the power adapter that comes with your device. Using a different power adapter may damage your
device.
The input voltage range between the wall outlet and this adapter is AC 110V–240V, and the output voltage of
this adapter is DC 12V, 3.0A.
To prolong battery life, fully charge the battery ,when using the tablet PC for the first time and whenever
the battery, power is fully depleted.
The tablet PC uses the Windows 8.1 system, Specific about the Windows 8.1 operating system and
application, please refer to Microsoft's release of 《Windows 8.1 User's Guide》
1.2 Unpacking and inspection
Please carefully remove the package and take out the tablet PC and other accessories. If any loss and missing are
found, please immediately contact distributors .Please store the original packing materials for replacing goods
Generally, you will have the following parts& components
1. Laptop computer
2. Keyboard
3. Power adaptor
4. User’s manual
5. Disk on driver program
6. Warranty card
7. Quality certificate
Page 4
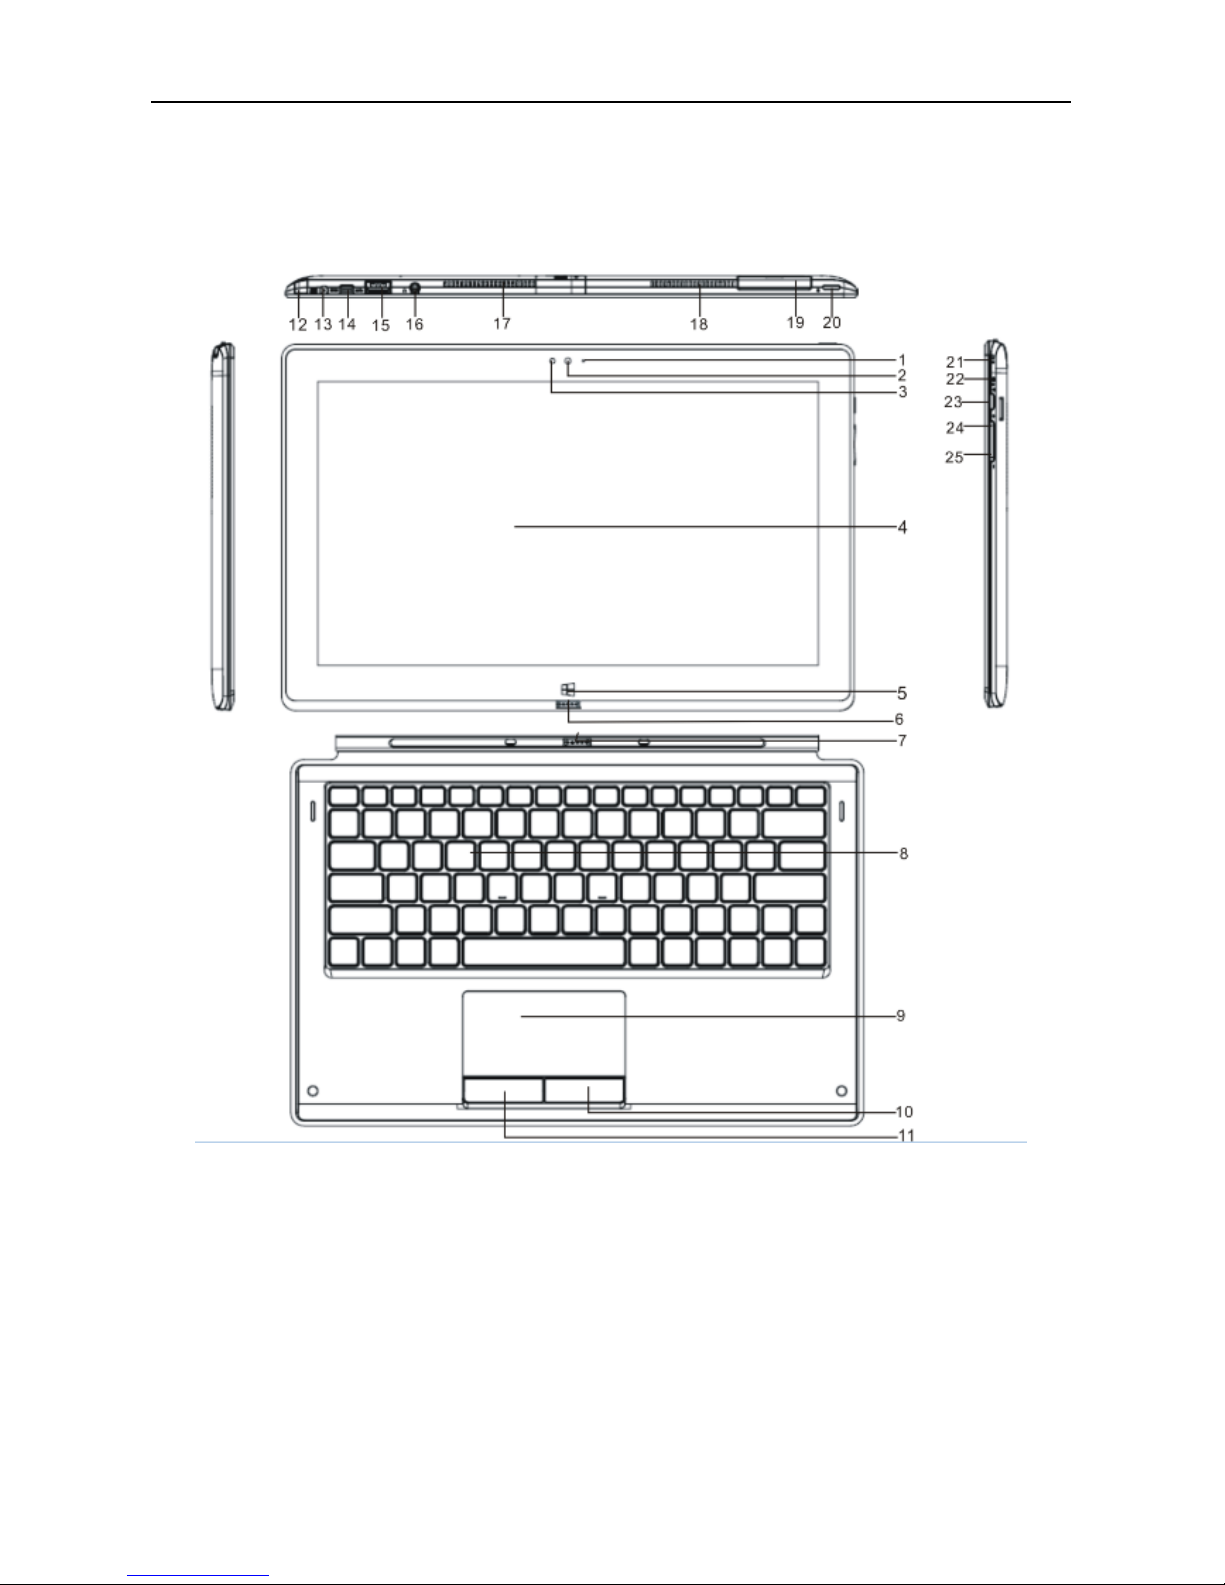
1.3 Introduction to parts & components
(Note: The following images are schematic diagrams and the real objects shall be binding)
Page 5
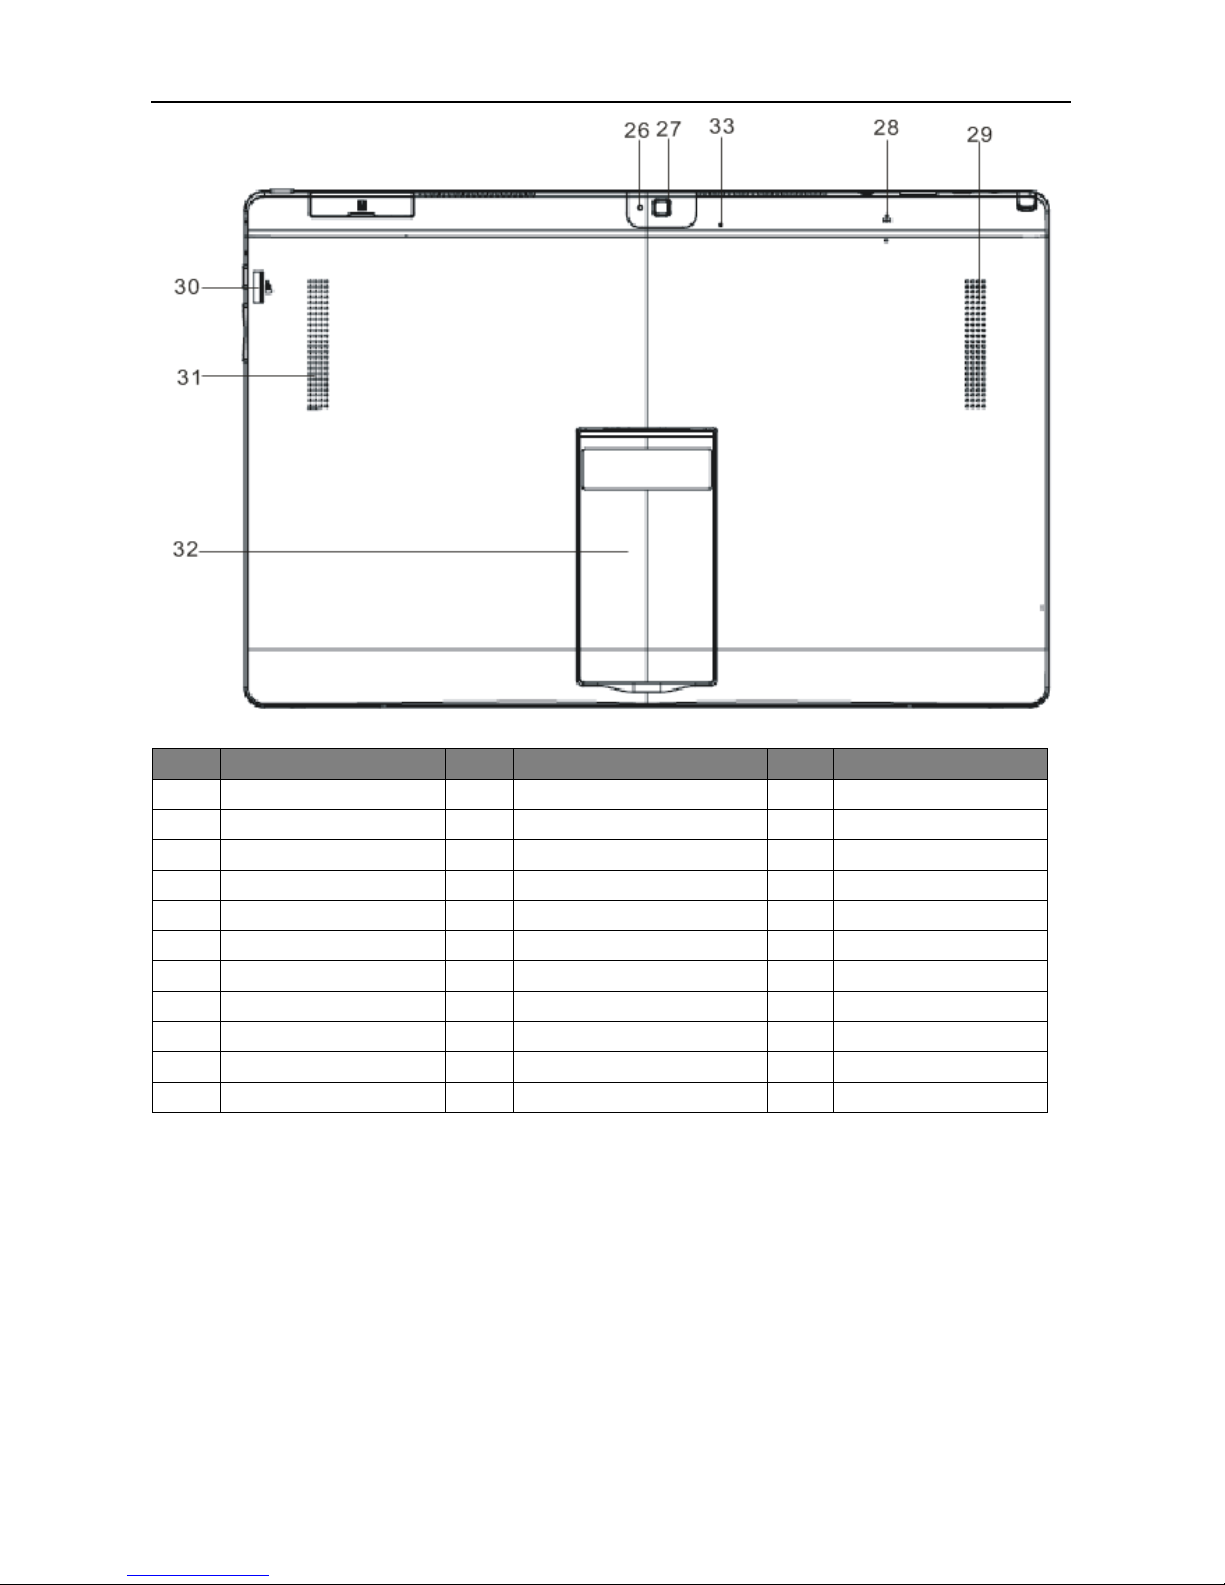
NO. NAME NO. NAME NO. NAME
1 Front camera Light
12 PEN 23
Rotary locking button
2 Front camera
13
Power adapter jack
24
Volume Increase key
3 Light Sensor
14 MINI HDMI port 25
Volume Decrease key
4 Screen+Touch Panel
15
USB port
26
Back camera Light
5 HOME KEY
16
Earphone input port
27
Back camera
6 Right key of mouse
17
Thermal import(Option)
28 Reset
7 Magnetic strip(UP)
18
Thermal export(Option)
29
Speaker
8 Magnetic strip(DW)
19
Socket(Option)
30
Mirco HDMI Port
9 Touchpad
20
Power button
31
Speaker
10 Right click button
21
Power Indicators
32
Support
11
Left click button
22
Charge Indicators
33 Built-in microphone
【Note】:
In the DOS mode, press rotation / lock button, the system will enter the BIOS feature set
Page 6
2.0 Basic common knowledge on computer operation
2.1 Stop the computer
When you finish your work, you can shut off the computer power or let the computer enter the mode of
Sleeping or hibernation.
Mode of stopping method Method on re-starting or usage
Directly sh
ut off the
power
Please follow the program for shutting the operating
system. By doing so, you can avoid the losses of data or
damages of software. If the system is halted due to the
problems on hardware or software , you can use the
power button to shut off the computer.
Using the power button
Sleeping
Accordin
g to your setup of Windows, the system will
enter the sleeping status according to following method:
A, Close the Keyboard button;
B, Use the power button.
Using the power button
Hibe
rnation
According to your setup of Windows, the system will
enter the hibernation status according to following
method:
A, Close the keyboard cover;
B, Use the power button.
Using the power button
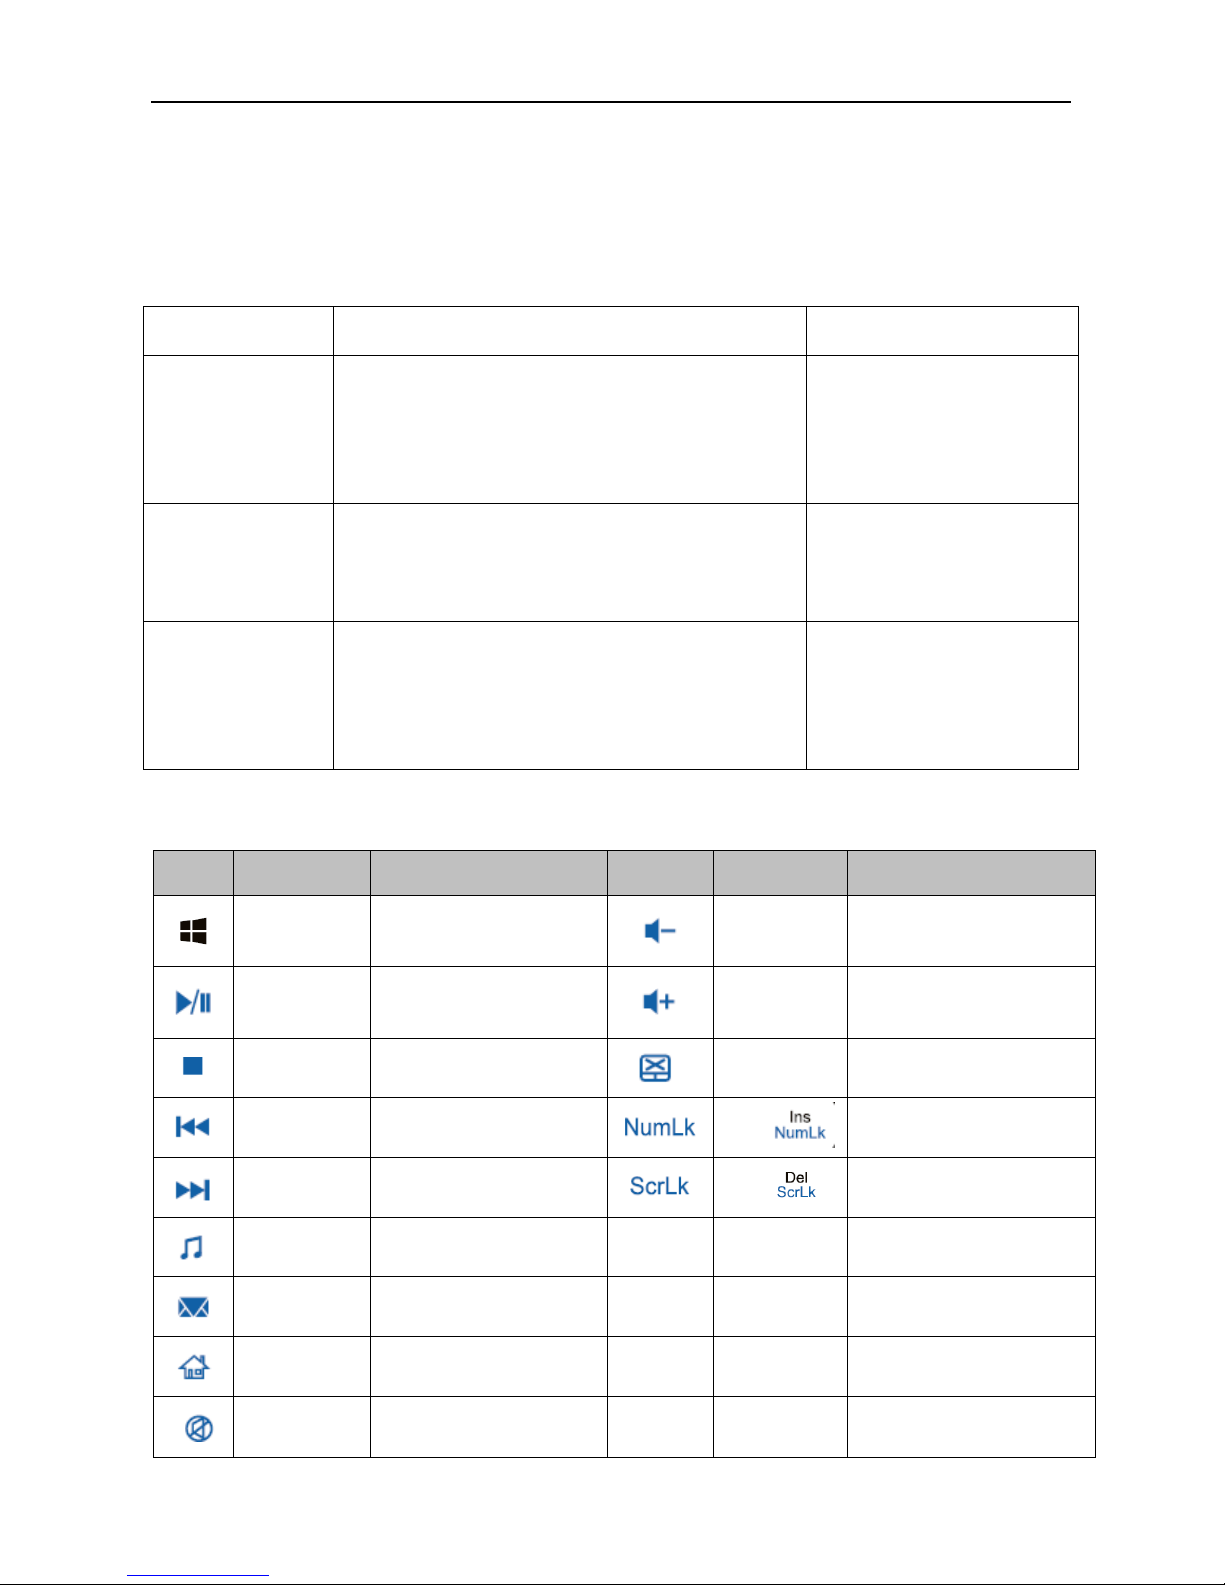
2.2 Function of keyboard
Icon Function The function Icon Function The function
Windows key
To return Windows 8.1
main screen
Fn+F10
V
olume Decrease key
Fn+F2 Play / Pause
Fn+F11 V
olume Increase key
Fn+F3 Stop playing Fn+F12 Close the touchpad
Fn+F4 Previous song
Fn+
Open the num Lock
Fn+F5 Next song
Fn+
Open the scroll Lock
Fn+F6 Play music Home FN+Home Skip to Home
Fn+F7 Open the Email End FN+End Skip to footer
Fn+F8 Open the IE browser Page Up FN+Page Up Page up
Fn+F9 Mute ke
y
Page
Down
FN+Page
Down
Page down
Page 7

2.3 Touch pad
The built-in touch pad of keyboard is a position device. You can fell the movement on its surface. Move your
finger on the surface of touch pad, the cursor will follow.
2.4 Display screen
In order for the comfort of your eyes, your laptop computer is equipped with LED LCD, which supports high
resolution and real color function. It brings marvelous visual excitement.
To prolong the lifespan of lifespan of display screen.
T o obey the follow i ng rules can pro lo ng th e lifes pa n of display scr een .
To adjust the brightness of screen into the minimum brightness, which is comfortable to you eyes.
When using it on the table, please connect an external monitor and shut off the display screen of the laptop
computer.
Don’t close the option of entering the pause mode in shutting off the power management.
If the AC power is used and there is no external monitor, please don’t switch to the pause mode when not
using it.
[Note]
In order to prolong the life time, adjust the brightness to the minimum degree under the precondition of
comfortable visual enjoyment. In this way, the internal light source can use less power.
2.5 Electromagnetic-screen
The Window
Table has a new electromagnetic-screen technology to bring us back to basics "original
handwriting” input experience, and integrated electromagnetic board to write on the screen by an electromagnetic
pen, whether it is E-mail or meeting shorthand and classroom, can be done it. In addition, the electromagnetic
screen technology can bring us the real paintings, drawings and other applications.
Unlike ordinary capacitive screen technology, the electromagnetic screen technology with a rear-mounted
design, make the picture quality and brightness is completely free from electromagnetic board with a precise touch,
is to ensure the performance of the best screen image display.
The high transmittance for the art drawing, photography, production and other areas of expertise, can bring the
most realistic color quality, and better able to provide better and more intuitive operation support. Electromagnetic
pen directly on the screen, as obtained in the paper on the real painting experience, allowing users to hand from the
eye can be the most intuitive operating experience.
The electromagnetic plate includes highly sensitive reaction speed, zero delay shows the precise handwriting
speed, and every inch of the 2048 line wide pen diameter thickness recognition performance, precision depict the
different thickness of the pen diameter. Echo each other with the Z-axis detection sensing capabilities, in addition
to the simulation include writing, signature, can provide natural, real hand-painted experience, to better meet the
Page 8

needs of professional drawing, digital animation field.
In addition, the electromagnetic pen with the mainstream 2048 Order handwriting pressure sensitivity, able to
pass a more accurate handwriting mode, simulate more real pen to write pen diameter thickness effect. We will
experience the most realistic, accurate original handwriting input experience.
2.6 The use of the electromagnetic pen
The use of the electromagnetic pen:
Before using the electromagnetic pen, touch the pen tip for the display screen, the electromagnetic pen to
enter the working state. When the electromagnetic pen stopped working 5 minutes will be automatically
converted to hibernation.
Left key of mouse
Click touch screen, then the electromagnetic pen will be enter the left mouse button functions.
Right key of mouse
A) The electromagnetic pen nib long-pressure touch screen for about 3 seconds, the electromagnetic pen
will be switched to the right mouse button.
B) When the electromagnetic pen in working condition, Press the button of the electromagnetic pen, the
electromagnetic pen will be switched to the right mouse button
Working indicator:
Electromagnetic pen in working condition, the blue indicator point is on.
Low voltage indicator:
Electromagnetic pen in working condition, the red indicator point is on, indicating the battery voltage is
low, and please immediately charged.
Indicator charge:
Electromagnetic pen is charging, the red indicator point is on, The electromagnetic pen will stop working.
When the battery is fully charged, the electromagnetic pen charging indicator light will go off
Page 9

3.0 Setup of BIOS (basic input & output system)
In this chapter, we will teach you how to enter the BIOS setup program as well as the setup of control options for
all kinds of hardware. You will also learn how to use the setup of the built-in protection.
The setup of common program is a hardware status program built in the BIOS of the laptop computer. It can
execute and maintain many hardware functions. It’s a software enabling operation with the menu mode and
allowing the easy setup and change of set value.
BIOS contains with the ex-works pre-set values of laptop computer. However, you still have a lot of opportunity to
modify the pre-set values in BIOS. When the hardware is altered, such as upgrading , in case of temporary
conditions, or when you decide to self-determine the set value of hardware so as to meet the special needs, it may
be necessary for you to start the BIOS setup program.
BIOS can restrict the access by uses by setting up passwords. This is important function because the laptop
computer usually keeps a lot of materials and the unauthorized access can be prevented.
3.1 Method on use of BIOS setup
The cases where you must execute the BIOS setup:
In case of any problem founding in the booting test, some information will appear on the screen, requiring you
to execute the BIOS setup.
You need to resume the default value.
You need to change the setup value according to the specific hardware.
You need to change the setup value in order to acquire the optimum system
If you plan to execute the BIOS setup, when starting the computer , press the
"Rotary locking button" (the
buttons are located on the right side of the tablet PC)
How to select
For one option, you only complete the setup through two-level options. The majority of these options must pass
three-level options: menu title, drop-down menu and sub-menu.
Page 10

3.2 Boot Menu
Edit Boot Order: Edit Boot Order
Windows Boot Manager: Windows Boot option
Page 11

3.3 Main
Syste
m Date: Setup of the system data
System Time: Setup of the system time
System Information:Setup of the system information
Page 12

3.4 Advanced
Select La
nguage:Selects the display language for the BIOS
Page 13

0
3.5 Security
Accou
nt's Password Status: Clear the account or password
Page 14

1
3.6 Exit
Exi
t Saving Changes: Save Settings exit
Exit Discarding Changes: Do not save your settings and exit
Load Setup Defaults:Load the default settings
Discard changes: Do not save your settings
Save Changes: Save Settings
Page 15

2
4.0 Installation of driver program
The laptop computer support Windows8.1
Open CD on any external CD-drive via USB, operation procedures, illustrated as follows:
(Note: The following images are schematic diagrams and the real objects shall be binding)
Driver inst
allation of WIN8.1
Click on the corresponding chart icon, and then follow the prompts to complete installation.
Page 16

3
5.0 Special notice
5.1 Special hint
In order to facilitate understanding and arouse your attention, as for product safety or information needing special
attention to, we will give you the hints in this chapter or the chapters that follows according to the following levels
and special warning words. These special warning words are expressed as follows:
[Danger]---indicating cautions against high risks;
[Warning]---indicating cautions against medium risks;
[Note]---indicating that attention should be paid to light risks;
[Prohibition]---indicating that dangerous operation should be prohibited;
[Reminder]---indicating that attention should be paid to safety or other contents;
This chapter doesn’t provide all the safet y information. For the sake of your safety and inte rests, we put the safety
information on parts of the products in the subsequent chapters as needed. No matter where these safety information
are located, you should carefully read them.
Similarly, besides the special notices expressed with special warning words, you should give same attention to other
contents and introduction in the specifications.
5.2Please be sure to read the important hints for using Window Table
Window Tables belong to high
-tech and precision products. Please be sure to carefully read the following use hints.
1) Maintenance of LCD
Don’t put any heavy things on the Window Table.
When using suitcase or backpack, please make sure that there aren’t too much things inside and no
additional pressure is put on the Window Table bag and the back part of LCD.
Please don’t scratch, twist or strike the touchpanel.
Don’t place the screen of LCD in an environment where the temperature exceeds 40 Celsius degrees or the
humidity exceeds 90%.
Don’t expose the screen of LCD to direct sunlight or strong fluorescence.
Don’t place any things on the touchpanel , such as pencil, documents and so on, which will destroy or
scratch LCD screen.
Please don’t use corrosive detergent to wipe LCD screen, which will destroy screen.
2)Please don’t open the Window Table shell when the system is running because this will lead to data loss or destruction.
The formatting of HD can delete all the data in HD. Please back up the data in advance. As for important data,
please make sure that they have been timely backed up in other storage mediums. The company shall not assume
any responsibility for the data losses incurred.
3)The safe use of power
The power supply should be stable and be free from interference. When you are not clear about the local
specifications on electric appliance, please consult your distributors or your local power company.
When plugging off the power, you should avoid pulling off the electric wire directly by pulling.
Page 17

4
Please make sure to pull from the root of socket so as to guarantee safety.
Please don’t disco nne ct the power ada ptor.
Please don’t use the power adaptor not attached to the Window Table because this will damage the Window Table.
4) This product can only be disassembled by authorized service staff of agent company. Please make sure to keep
the sealing strip intact. Otherwise, the warranty or three guarantees service may be influenced.
5)
If you have set up a password, please keep it in mind. Otherwise, your Window Table can not be started. If you have
forgotten the password, please contact the supplier or authorized maintenance station. However, this may destroy
all of your data.
5.3 Special notice
1) Applicable group
[Note]You should master a certain basic common language on Window
Table in order to operate the
Window Table. Meanwhile, the Window Table is not suitable for independent operation by children. If
necessary, children must be accompanied by adults.
2) Working environment
[Danger] In order to prevent accidental failure, the Window Table should run within the following defined
e
nvironmental scope:
Content Scope of application Remarks
Temperature of storage and transportation -20℃ - 50℃
Relative humidity of storage and transportation 20% - 93%(40℃)
Atmospheric pressure 86kPa – 106kPa
Adaptation capability of power 220V±22V,50Hz±1Hz
Working humidity 35% - 80%
Working temperature 10℃ - 35℃
[Warning] In order to prevent the Window Table from being harmed by the environment (dampness, dust, food,
liquid, direct exposure to sunlight etc ), the Window Table should be placed in a dry place with good ventilation.
In order to prevent the Window Table from being disturbed and damaged by the magnetic field, please keep it away
from
other household electric appliances (such as Television set, air conditioner etc).
[Warning]Please don’t splash liquid
o
r other impurities into the Window Table. Otherwise, it may lead to short-
circuiting of its internal components, which will further give rise to electric shock or fire accidents.
[No
te] If the Window Table is switched
on and started when the low temperature condition hasn’t been resumed,
it may lead to unrepairable faults on the Window Table. Therefore, before using the Window Table, please firstly
make sure that the Window Table is resumed for over 2 hours under the room temperature (above 10 Celsius
degrees).
[Note]Ask an airline personnel if you want to use your Window Table onboard an aircraft. Most airlines have
restrictions for using electronic Window Tables. Most airlines allow electronic use only between and not during
takeoffs and landings.
3)Before being used
[Warning] After the Window Table is stored and transported under the environment of lower than 10℃, the
Window
Table should be placed for over 2 hours under the room temperature condition of 10℃ - 35℃ before being
used in order to prevent the Window Table temperature from getting excessively low, which thus give rise to
electrified damages. Please don’t disassemble the package during the period. Let the Window Table resume its
temperature naturally and avoid the
Page 18

temperature increasing excessively quickly, which thus leads to electrified damages.
[Note] Before using the Window Table,
please make sure that the Window Table connection, power use and
other affairs conform to the requirements in the specifications.
Removal, transportation and storage
[Note] When moving the Window Table, special care should be taken.
The Wind
ow Table should be placed in the original packing box in case of transportation. You should pile and
place the packing box according to the symbol and indication of packing & transportation diagram. You should also
use closed cases in case of removal.
[Note]In case of storage, the packing materials should be placed beyond children’s reach in order to prevent the
occurrence of unsafe conditions.
[Note]According to the relevant interpretation of GB/T9813-200
0 General Specifications of Micro-Window Table,
after the Window Table is stored and transported under the environment of lower than 10℃, before using the Window
Table, please place the Window Tablefor over 2 hours under the room temperature condition of 10-35 Celsius
degrees in order to avoid electrified damages due to excessively low Window Table temperature. Please don’t
disassemble the package during the period. Let the Window Table resume its temperature naturally and avoid the
temperature increasing excessively quickly, which thus leads to electrified damages due to Window Table frosting
and dewing.
Battery
If you inten
d
to use battery power, be sure to fully charge your battery pack before going on long trips. Remember
that the power adapter charges the battery pack as long as it is plugged into the computer and an AC power source.
Be aware that it takes much longer to charge the battery pack when the Tablet PC is in use.
Remember to fully charge the battery (8 hours or more) before first use and whenever it is depleted to prolong battery
life. The battery reaches its maximum capacity after a few full charging and discharging cycles.
[Note] To replace the Polymer battery of Window
Table incorrectly may give rise to explosion risks. Please make
sure that the replacement and installation of Polymer battery be done by professional maintenance staff. Only
battery products of same or equivalent types recommended by manufacturers can be used for replacement. The
proper discarding of battery will lead to serious environmental pollution. Please dispose of the consumed battery in
a proper way or return the waste & used battery to the post-sales & maintenance department for treatment so as
to avoid environmental pollution.
5.4
Please be sure to read the instructions on the Power of Window Table
1) Power
[Danger]
You need to use quality power plug and socket, If you replace standard power lines without authorization, it may
lead to serious results. Meanwhile, the maximum length of power lines shouldn’t exceed 4.5 meters.
Before using the power, you should confirm that the power conforms to the requirements of Window
Table
, use according to the specifications of power plug and socket. Quality power is important guarantee for
the normal running of the Window Table. Otherwise, it may lead to serious results.
[Danger]
During the thunderstorm period, the use of products may harm the safety of your b
ody and other assets.
Therefore, during the weather of thunderstorm, please avoid using the Window Table, disconnect the telephone
line,
Page 19

6
network line, power line and other conducts which are connected with outside. In case of thunder, please don’t
insert and pull these lines & cables.
[Note]
Carefully examine the AC power line attached when pu
rchasing the Window Table. In case of any problems,
please contact relevant dealer.
The power line used for micro Window Table must con
form to the following safety regulations:
Conformity to CCC certification
The power plug should be inserted in the safety of the final good power supply
The power plug must conform to GB15934-2008
5.5 Instructions on safety
1) The power plug hole should be installed near the equipment or places easy for operation. When inserting and
pulling the power line, avoid directly pulling out the power line by pulling and dragging. Please be sure to pull
from the root of plug so as to guarantee the safety and caution against electric shock. Please don’t disassemble
the power adaptor.
2) Not to place the product in places with easy access to water.
3) In case of installation, please place the product on a stable supporting foundation. This product may fall off due
to un-stable placement, which leads to serious damages.
4) Not to place the products in places where there are frequent flow of people so as to avoid trampling the electric
wire. Please make sure that no articles are placed on the electric wire.
5) Follow all the warning information and indication on the products.
6) If you don’t plan to use the product for a long period, please pull off the power plug so as to avoid excessive
transient voltage, which can cause damages.
7) Please don’t splash any liquid on the product. This action may lead to risks of fire accidents or electric shock.
8) In case of the following conditions, it should be serviced by professionals:
The power line or socket has been destroyed or torn off.
The liquid is splashed to the product.
The product is drenched by raining or splashed by water.
When you follow the instructions on operation, the product is still unable to run normally.
If the product once fell off or its shell has been destroyed.
If the product has apparent damages.
9) For the usage and storage temperature of this product, please refer to the product specification in annex A. If
the product is not used and stored within the defined temperature scope, it may lead to permanent damages on
the product.
10) Please don’t use the power adaptor where it’s near to water or other liquids. Please don’t splash liquid to the
power adaptor.
Note:
All the photos & diagrams in this manual are schematic diagrams and can only be used for reference. The actual
use should be based on the object.
Page 20

7
6. 0 Fault analysis and elimination
In this chapter, you will learn how to solve general problem on hardware.
Your Window Tab
le must pass a Window Table test and conform to the system specification before being
delivered. However, incorrect operation or negligence during the conveyance process will lead to the
occurrence of p
roblems.
This chapter will provide reference and identification information for general problems on hardware and
software you may encounter.
In case of an y proble m, you can firstly try to el iminate it according to the description in this chapter. If the cases
of error continue to emerge, consult your distributors for service information.
6.1 Problem on sound
1) Without sound
press the volume mode "+" key so as to adjust to increase the volume.
most of the problems on sound are related to software .If your Window Table has a normal sound
previously, the reason may be that
the software setup is incorrect.
6.2 Problems on monitor
1)
Black screen in
case of system booting
Please make sure that the Window Table is not in [hibernation] or [sleeping] mode. Under these modes, the
monitor will be shut off so as to conserve energy sources.
2)
Screen flashing
When you start or shut the Window Table, the screen will flash for several times. This is a normal
phenomenon.
3) Damaged point of screen
Due to the restriction of LCD manufacturing process, some image points cannot normally display a certain
colors on LCD (i,e the generally-called damaged point). This is normal phenomenon. You can feel assured. For
details, please refer to GB/T9813-2000.
The relevant contents on the national standards are as follows.
Inspection shall be conducted under the following condition:
Ambient temperature:20℃-25℃
Light: 300Lux-700Lux
Visual distance: 35cm
Distance for visual observation: the visual line and screen surface form 90 degrees.
Page 21

8
7.0 Special Declaration
This Window Table can support several peripheral Window Tables & hardware, such as mouse, keyboard. As for the
peripheral equipment accompanied with the Window Table,the Window Table doesn’t guarantee the
compatibility and reliability of its products. When users use the products, they must conform to the contents
in the specifications. If consumers purchase the peripheral equipment from third parties, which will be
connecting to the Window Table, please conform to the equipment specifications, correctly connecting the
peripheral equipment and Window Table, and installing corresponding driver program under the operating system
supporting the equipment. As there are a lot of peripheral equipment manufacturers on the market, in order to
guarantee the benefits of consumers, we recommend consumers to purchase quality-guaranteed products from
famous manufacturers. In case that the third-party peripheral equipment are incompatible to the Tablet PC,
consumers should contact the third-party manufacturers.
As for software presented with the Win
dow Table (all the pre-installed software are presented software with the
Window Table, they are free of charge for users), the company can guarantee the functionality and compatibility
of its software. Users should refer to the user’s guide for correctly using the special requirement by the
software, most genuine software on the market, except for the special requirement by the software, most genuine
software can run normally on the Window Table. In order to guarantee the consumers’ benefits, users are advised to
purchase genuine software from official channels. As for any third-party software independently purchased and
installed by users, users should follow the specifications for correct. In case that the third-party software is
incompatible to the Window Table, consumers should contact the third-party manufacturers.
It recommend that before users purchase hardware or software from third parties, they can only purchase after the
third-party manufacturers or distributors pass relevant test in order to guarantee their interests. As for problems
on third-party hardware or software, the Window Table cannot guarantee customers’ requirement for goods
returning and changing .The company can supply technical support.
Page 22

9
8.0 Annex A:Product Specifications
System
Windows 8.1
CPU
Intel(R) Core(TM) I5/I3Series(I5-4202)/celeron® pentium® cpu Series
(3560)
System memory
On board 2G/4G (Option)
Storage
SSD: 32G/64G/128G (Option)
Panel
11.6” TFT LED screen resolution of1366*768/1920*1080 (Option)
Electromagnetic
Electromagnetic screen + Electromagnetic pen(Option)
Touchpanel
11.6 ”capacitance Touchpanel
Card Reader
Support Micro SD Card
Wireless network
80
2.11 b/g/n
Digital Camera
front Camera:1.0M;
Rear Camera:1.0M
Sensor
G-Sensor
Gyroscope
E-compass
Ambient light sensor
Power Supply
12V/3.0A power adapter
Battery
6000mAH Lithium Battery
Size
296.3x189.75x11.4MM
Weight
About 822g(Bare Machine)/892g (Electromagnetic screen + pen)
Note: As the specifications and configuration of the computer are being updated quickly, there shall be no prior
notice if there is any change on the product specifications. The configuration of computer purchased by users shall be
the final result.
Page 23

FCC NOTE:
This device complies with Part 15 of the FCC Rules.
Operation is subject to the following two conditions: (1) this device may not cause
harmful interference, and (2) this device must accept any interference received,
including interference that may cause undesired operation.
THE MANUFACTURER IS NOT RESPONSIBLE FOR ANY RADIO OR TV
INTERFERENCE CAUSED BY UNAUTHORIZED MODIFICATIONS OR
CHANGE TO THIS EQUIPMENT. SUCH MODIFICATIONS OR CHANGE
COULD VOID THE USER’S AUTHORITY TO OPERATE THE EQUIPMENT.
RF:exposure statement
This equipment complies with FCC radiation exposure limits set forth for an
uncontrolled environment .The device has been evaluated to meet general RF
exposure requirement. The device can be used in portable exposure condition without
restriction.
Le présent appareil est conforme aux CNR d'Industrie Canada applicables aux appareils
radio exempts de licence. L'exploitation est autorisée aux deux conditions suivantes:
(1) l'appareil ne doit pas produire de brouillage, et
(2) l'utilisateur de l'appareil doit accepter tout brouillage radioélectrique subi, même si le
brouillage est susceptible d'en compromettre le fonctionnement.
This equipment has been tested and found to comply with the limits for a Class B digital
device, pursuant to Industry Canada’s licence-exempt RSSs.. These limits are designed
to provide reasonable protection against harmful interference in a residential installation.
This equipment generates, uses and can radiate radio frequency energy and, if not
installed and used in accordance with the instructions, may cause harmful interference to
radio communications. However, there is no guarantee that interference will not occur in a
particular installation. If this equipment does cause harmful interference to radio or
television reception, which can be determined by turning the equipment off and on, the
user is encouraged to try to correct the interference by one or more of the following
measures:
-- Reorient or relocate the receiving antenna.
-- Increase the separation between the equipment and receiver.
-- Connect the equipment into an outlet on a circuit different from that to which the
receiver is connected.
-- Consult the dealer or an experienced radio/TV technician for help.
RF exposure statement
This equipment complies with Industry Canada’s radiation exposure limits set forth for an
uncontrolled environment .The device has been evaluated to meet general RF exposure
requirement. The device can be used in portable exposure condition without restriction.
 Loading...