

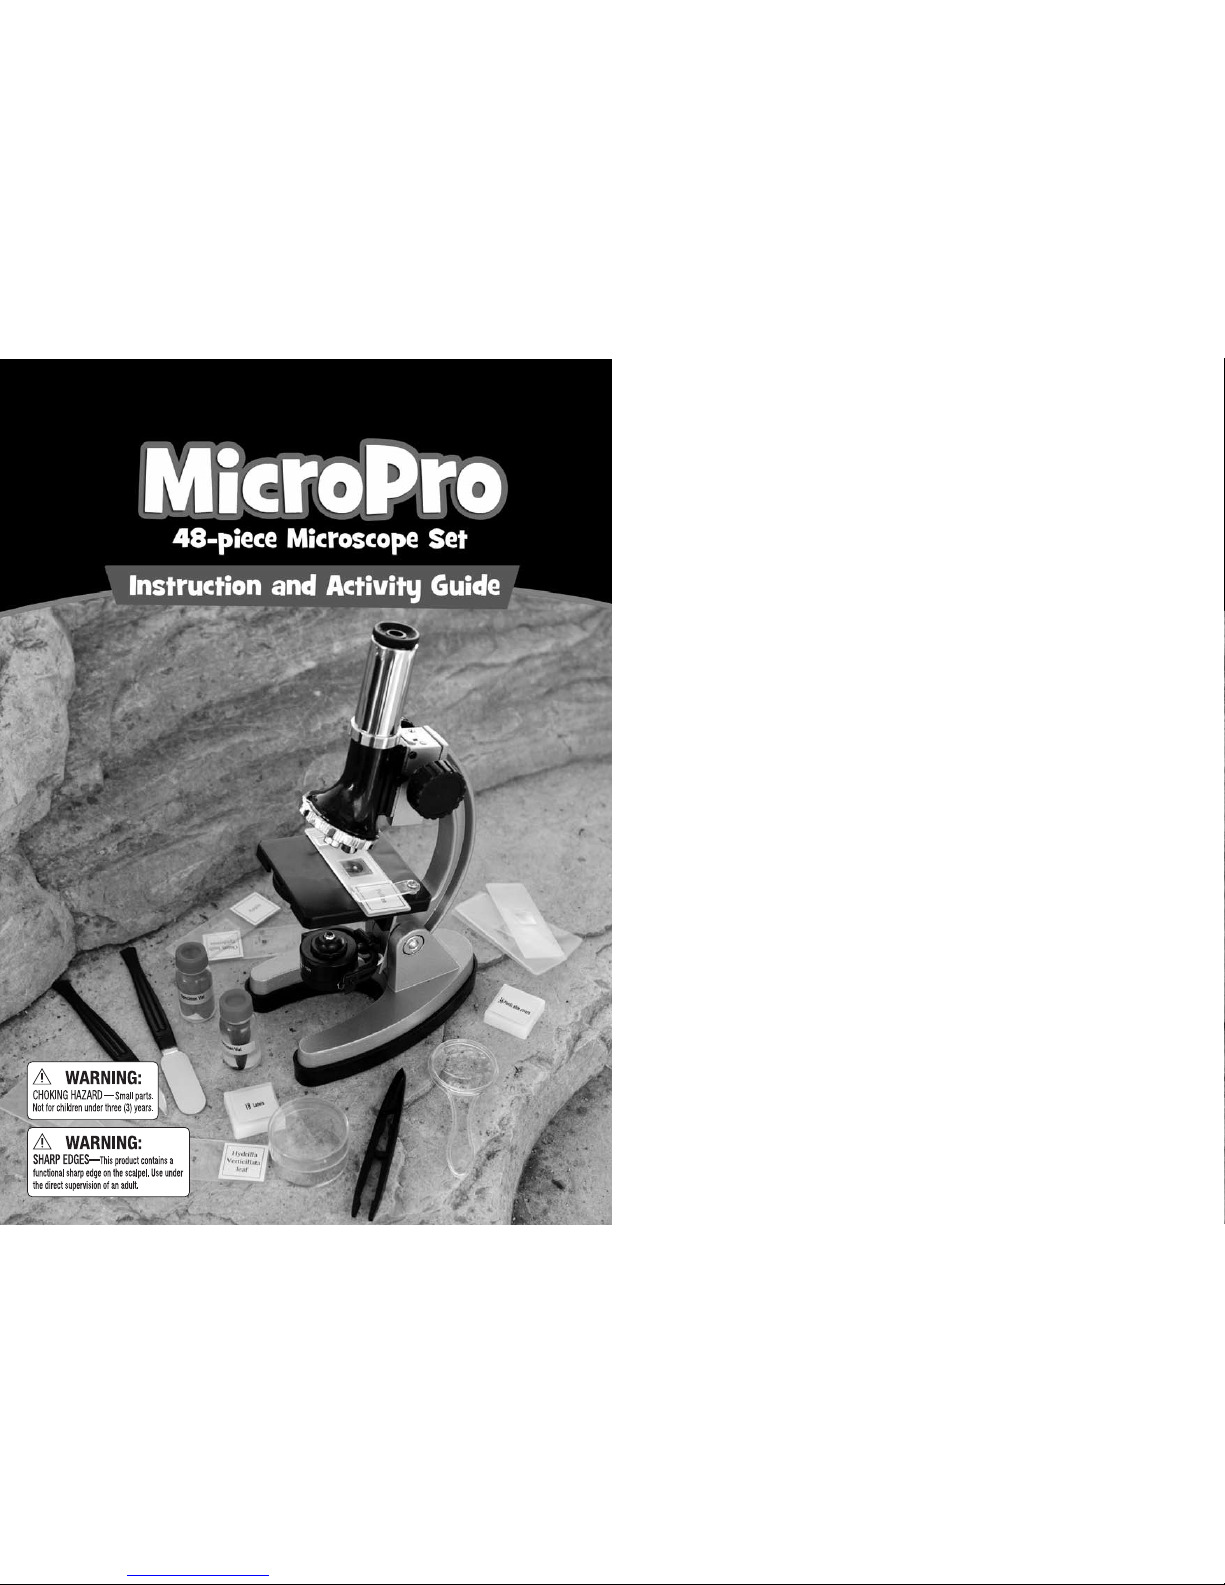
Educational Insights MicroPro EI-5301 Instruction And Activity Manual
EI-5301
Grades 3+
Ages 8+

1
2
Welcome to the Microscopic World
Welcome to the hidden world of the microscope. Your new microscope is an
instrument with lenses for making very small objects appear much larger so
they can be studied. There are millions of tiny living plants and animals that can
be easily seen with your microscope.
In today’s technological world, every field of science utilizes microscopes.
Microscopes are used by biologists for studying microorganisms, by geologists
for studying rocks and minerals, by archaeologists for studying ancient artifacts,
and by astronomers for studying fallen meteorites.
Your microscope set contains the following parts:
1 – Die-cast Metal Microscope
1 – 10X Eyepiece
1 – 20X Eyepiece
1 – Scalpel
1 – Spatula
1 – Stirring Rod
1 – Tweezers
1 – Test Tube with Cap
1 – Petri Dish
1 – Pipette
3 – Specimen Vials
3 – Prepared Slides
8 – Blank Slides
8 – Slide Labels
16 – Slide Covers
Instruction and Activity Guide
What are all of these things for?
a) Microscope – The microscope holds samples of very small things on
clear slides. It shines a bright light through the small sample, and then
lenses make the sample look very big. Your microscope can make things
look 50 times, 100 times, 150 times, 300 times, or even 600 times larger
than the way you see them with your own eyes.
b) Eyepieces – These eyepieces are special magnifying lenses that work
with your microscope’s other lenses.
c) Scalpel – A scalpel is a sharp blade used to cut very thin pieces of
material so you can look at them with your microscope.
d) Spatula - The spatula has a large flat blade, but it is not as sharp as the
scalpel. The spatula is used for scraping off bits of material for testing and
to mash and flatten soft samples.
e) Stirring Rod – Use this rod to mix fluids until they are well blended. An
example is when you mix salt and water.
f) Tweezers – The tweezers are used to pick up small specimens and to handle
samples that you don’t want to touch with your hands – like slimy mold!
g) Test Tube with Cap – This thin, clear tube, used to hold liquid samples,
makes it easy to observe if anything is happening, such as when a
sample changes color.
h) Petri Dish – This round, flat dish with a clear cover is used to grow and
observe samples, such as molds.
i) Pipette – This is a plastic device that you can dip into a liquid to transfer
drops to a slide for examination.
j) Specimen Vials – These are little plastic bottles with tight fitting lids. They
are used to carry your samples from where you collected them to where
you have your microscope set up.
k) Prepared Slides – These slides have samples on them that have been
prepared by professionals for you to examine.
l) Blank Slides – These are the clear slides that you will place prepared
samples on for examination under your microscope.
m) Slide Labels – These are little pieces of paper with sticky backs. You can
write on them and stick them on your slides to record information such as
when the sample was prepared.
n) Slide Covers – These are little squares made of thin, clear plastic. They
are used to cover very small samples on a slide. See the instructions in
this guide for making temporary and permanent slides.
3
4
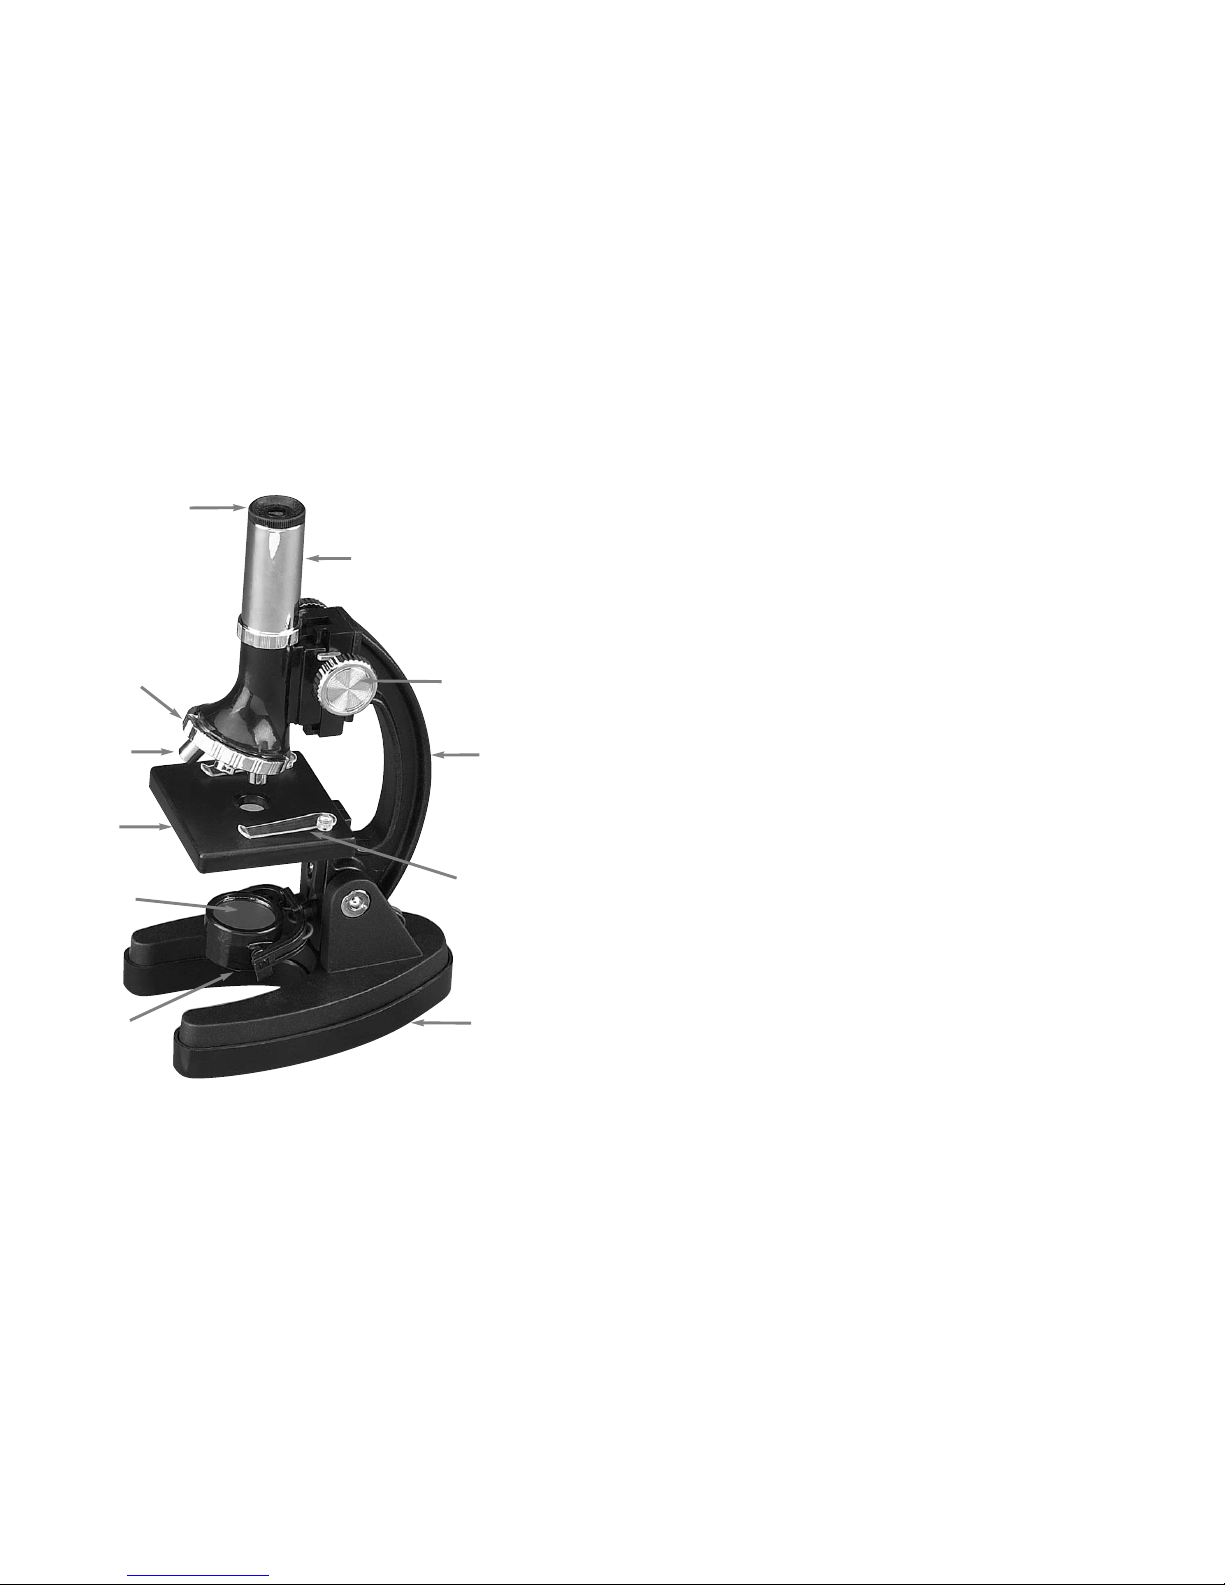
Getting Acquainted with Your Microscope Learning About Your Microscope
1. Eyepiece – The eyepiece is where you look into the microscope. It is a
small magnifying lens that collects the image projected up by the three
objective lenses. Your microscope comes with two different eyepieces.
The 10X eyepiece makes an image look 10 times larger. The 20X
eyepiece makes an image look 20 times larger.
2. Body Tube – This is the main tube of the microscope. The image from the
sample travels up this tube to the eyepiece.
3. Focusing Knob – Turn these knobs very slowly to bring the image of
your sample into focus so you can see it clearly.
4. Rotating Turret – The turret holds the three objective lenses. Turn the
turret so that each lens clicks into position.
5. Objective Lenses – The objective lenses are the lenses closest to the
objects you are examining. Your microscope has three objective lenses,
each with a different magnifying power. The shortest lens has the lowest
magnifying power (5X). The longest lens has the highest magnifying
power (30X). The third lens has a magnifying power between the two
(15X). The objective lenses work with the eyepieces to give your
microscope a range of magnifications. With the 10X eyepiece in place,
your microscope makes samples look 50 times (50X), 150 times (150X),
and 300 times (300X) larger than they appear to your eyes. With the 20X
eyepiece in place, your microscope makes samples look 100 times
(100X), 300 times (300X), and 600 times (600X) larger than you can see
them with your own eyes.
6. Arm – This curved piece is the “backbone” of the microscope and holds
everything together. You can tilt the arm backward to get a more
comfortable viewing position.
7. Stage – The stage is the flat platform where your slides are held
for studying.
8. Clips – The two clips on the stage hold your slide in position so that it
doesn’t move around while you are looking at it.
9. Mirror – The mirror aims light from a bright source, like a sunlit window or
a table lamp, up through the slide you are studying so you can see the
specimen more clearly.
10. Illuminator Lamp – When there is not enough light available for the
mirror to do its job, turn the mirror over and the bright electric LED
illuminator will light your sample.
11. Base - The bottom of the base has a rubber cover to help prevent your
microscope from slipping on a smooth tabletop.
1. Eyepiece
3. Focusing Knob
2. Body Tube
4. Rotating Turret
6. Arm
7. Stage
8. Clips
9. Mirror
10. Illuminator
Lamp with
LED
11. Base
5. Objective
Lenses
5
6
Microscope Safety Tips
Keep these safety tips in mind as you enjoy hours of fun projects and
experiments with your microscope.
• Read all instructions before use. Follow them and keep them for
future reference.
• Keep small children and animals away from any experiments or projects.
• When working with samples, keep your hands away from your mouth and
eyes. Eye protection is not included.
• Always wash your hands carefully after handling any samples and always
dispose of any samples in a safe manner.
• Handle the prepared slides carefully. They are made of glass.
• Store your microscope set out of reach of small children.
Taking Care of Your Microscope
• Always handle the microscope with two hands—one hand around the arm
and another around the base.
• Always remove and clean the slides from the microscope stage after
each use.
• Place the microscope in a case, or cover it with a plastic bag after
each use.
• Clean your microscope with a damp or dry cloth—do not immerse or spray
liquid or water on the microscope.
A Special Reminder About Lenses
The most important parts of your microscope are the lenses. Handle them
with care. If the lenses are dirty or dusty, you can clean them with a soft
cotton cloth or a special lens cleaning tissue. Do not wipe them with a
finger or a regular facial tissue. Avoid any direct contact between the
viewing lenses and the stage. When changing eyepieces, work carefully,
but quickly, to avoid introducing dust into your microscope. Always return
the lens cap to the eyepiece when finished.
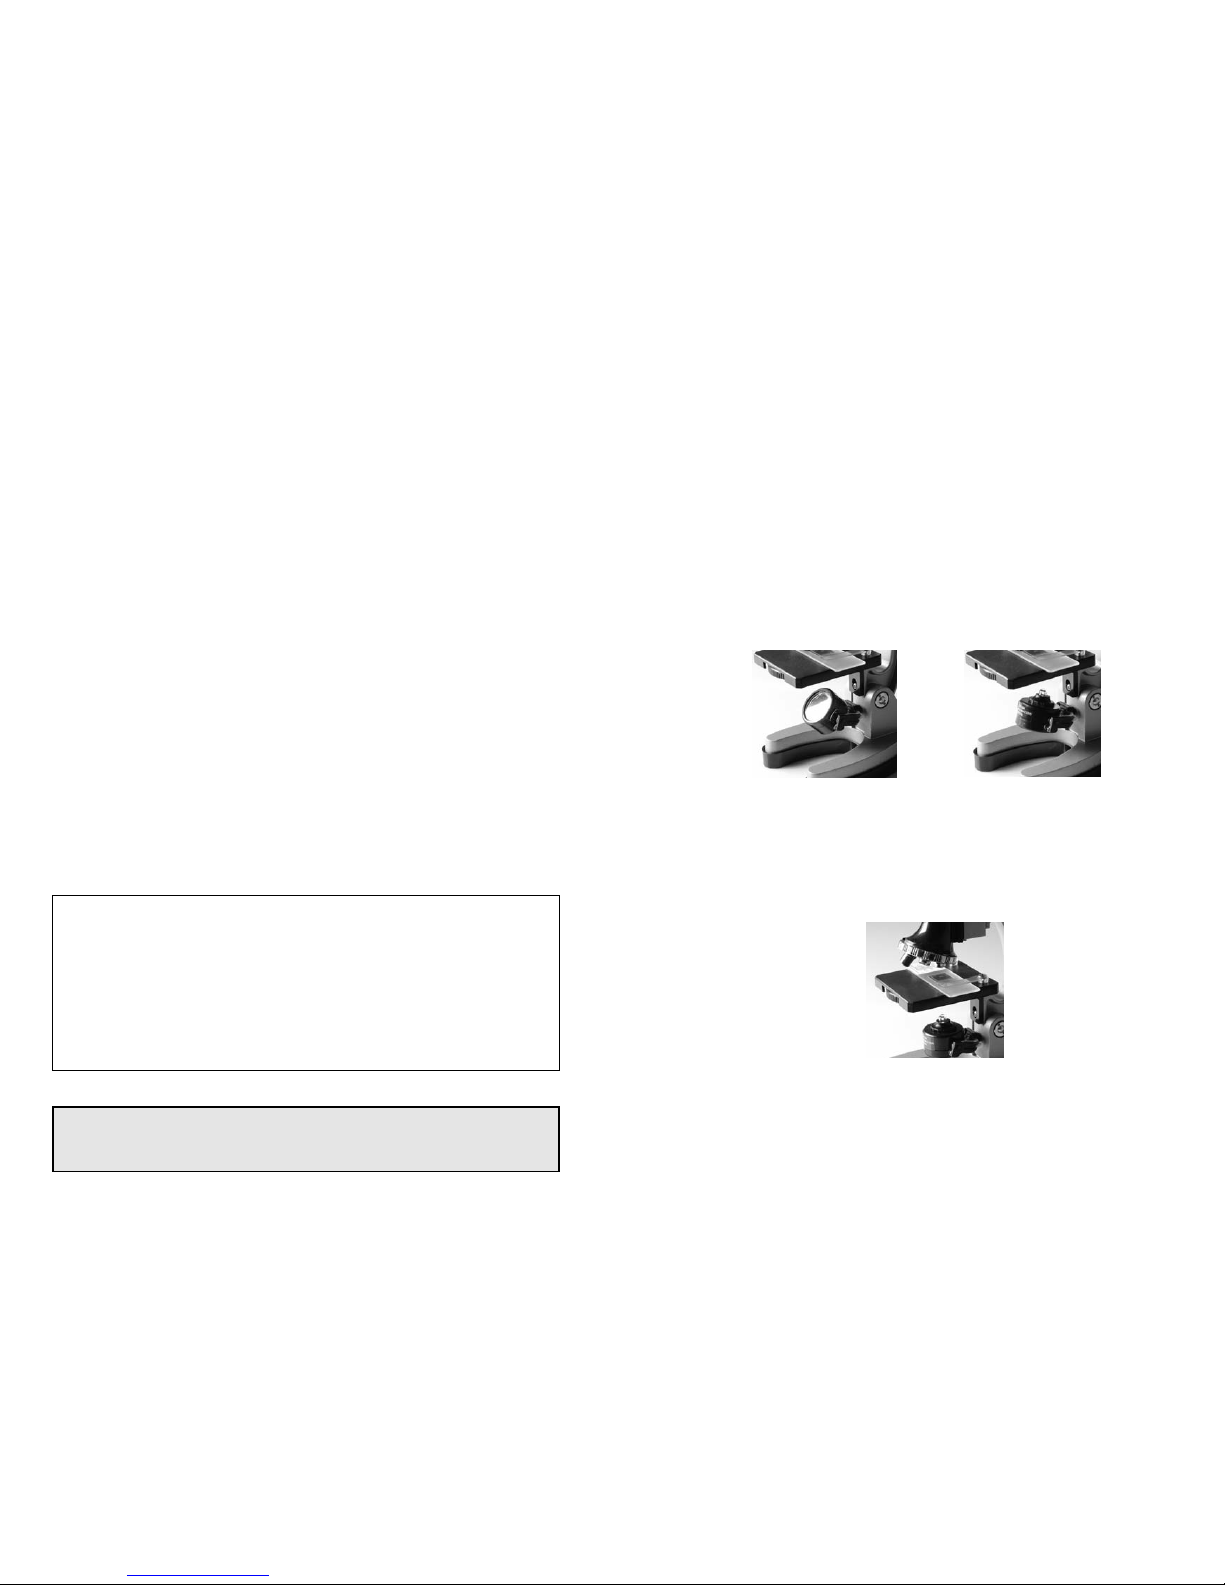
Getting Started
1) Insert two AA batteries into the base of the microscope, following the
instructions on page 18.
2) Place the microscope on a flat surface near a bright light or, in the daytime,
a window. Locate the mirror and adjust the angle so that when you look
into the eyepiece you see a bright circle of light. Do not point the mirror
towards the sun as eye damage may result. If there is no bright light
available, or if the room lighting is poor, use the microscope’s electric
illuminator lamp. To turn on the illuminator lamp, flip the mirror over so
that the light bulb is aimed upward. The light will come on by itself. Look
through the eyepiece and adjust the angle of the light until you see a
bright circle.
3) Once you can see a bright circle of light in the eyepiece, your microscope
is ready for use.
4) Choose one of the prepared sample slides from your set. Place it under
the two spring clips on top of the stage.
5) Next, choose the magnifying power you want to use. Your microscope can
provide magnifying powers of 50X, 100X, 150X, 300X, and 600X.
Remember that the longer objective lenses used with the higher
magnification 20X eyepiece provide the higher powers. For optimal
viewing, start at the lowest power and work your way upward. Most
observing is done at low power.
We constantly improve and update our products. Sometimes, as a result of these
improvements, what is seen on the package or in the instructions may differ somewhat
in color or content from the product in the package.
 Loading...