

EDTM GC3000 User Manual

GLASS-CHEK PRO
Glass Thickness Meter and Low-E Coating Detector
MODEL# GC3000
To scroll through the menu, gently touch
the back of the meter (see Figure 1).
Figure 1
To select an option, push the meter’s button. To exit the menu, touch the back of the
meter until the arrow points to “EXIT” and
push the button. The following screen will
appear.
To choose your mode: In the Setup Mode
menu, select the “MODE” option. (Normal
resolution is the factory default setting.)
Touch the back of the meter to scroll between the “NORMAL,” “HIGH RES” and
“PVB WITH LOW-E” options. Press the
button to select your desired mode. Save
your changes when you exit the menu.
setting and push the button to select it.
PLEASE NOTE, if the STANDARD option
is selected in inches, the glass thickness
designations will always be shown in fractions. If decimal inches are chosen, only
the air space thickness and overall IG unit
thickness will be shown in decimal inches.
Next, choose your ACTUAL setting. If this
setting is activated, your meter will display
actual dimensions without rounding. If your
dimensions are set to inches, you will have
the options: FRACTION, DECIMAL or OFF.
If your dimensions are set to millimeters,
you will have the options: ON or OFF. Touch
the back of the meter to nd your desired
setting and push the button to select it.
NOTE: STANDARD and ACTUAL cannot
both be set to OFF. If they are both activated, the measurements will alternate on the
screen after a measurement has been
taken. For an illustration of this feature,
see the “Measurement Examples” section.
GENERAL DESCRIPTION
The Glass-Chek PRO enables you to measure glass and air space thickness of triple
pane windows from a single side (also
compatible with double and single pane).
Furthermore, the GC3000 allows you to
determine the presence, location and type
of invisible Low-E coatings.
This manual will outline how to use the
meter, including choosing language and
measurement settings, explanations of
“results” screens, proper use, and maintenance of the meter. Additionally, it will
outline appropriate applications, technical
details and warranty information.
USING SETUP MODE
There are various selectable options available in the GC3000 meter. To access these
options, you must use Setup Mode.
Push and HOLD DOWN the button to turn
on the meter. Continue to hold the button
down as the following two messages are
displayed:
Release the button after the following
message is displayed:
NAVIGATING THROUGH SETUP MODE
After releasing the button (as outlined in
the previous step), the following message
will briey appear:
This message explains how to navigate
through the menu system in setup mode.
When you enter setup mode, a menu will
appear, and a small arrow will be next to
one of the options. In the illustration below,
the arrow is next to the “MODE” option.
As shown in Figure 1, gently touch the back
of the Glass-Chek PRO to scroll through
the menu options. Touching the back of
the meter will advance the arrow to the
next line. Do not hit or tap the meter with
excessive force. Push the meter’s button
to make a selection.
CHOOSE YOUR LANGUAGE IN SETUP
MODE
In the Setup Mode menu, select the “LANGUAGE”
option.
Touch the back of the meter to scroll
through the available languages. Push the
button to select your desired language
when it appears on the display. Save your
changes.
WARNING: Once the meter’s language is
changed, the menu will immediately change
to the language selected. If you choose
the wrong language and can’t get back to
your desired language, stop navigating the
menu and allow the meter to automatically
power down after about a minute of inactivity. When the meter powers back up, it will
display the previously selected language.
The following languages are available in
the GC3000: English, German, French,
Spanish (Latin America), Dutch and Italian.
CHOOSE FROM NORMAL, HIGH RESOLUTION AND LOW-E LAMINATE MODES:
Mode 1: Normal resolution — slightly less
accurate than High Resolution, but it enables the meter to take quicker measurements.
Mode 2: High Resolution — more accurate
than normal resolution, but measurements
take longer. Accuracy differences are outlined in the Technical Details section.
Mode 3: PVB WITH LOW-E — used to
identify the location of a Low-E coating
against the PVB inner layer of laminated
glass (see page 4).
CHOOSING YOUR DISPLAY UNITS:
The GC3000 can display thickness measurements in various units. You also have
the option of rounding measurements to the
nearest “Glass Thickness Standard” (Refer to GC3000 Standards chart on page 4).
To choose the display units appropriate for
your application, follow these steps:
In the Setup Mode menu, select the “DISPLAY UNITS” option. The following submenu will be displayed:
Display Units Sub-Menu:
First, select the “DIMENSIONS” option.
This option will determine whether your
meter will display measurements in milli-
meters or inches. Touch the back of the
meter to nd your desired setting. Push
the button to select it.
Next, determine whether you want the
meter to: 1.) round measurements to the
nearest Standard, 2.) display the actual
dimensions, or 3.) display both standard
and actual. For more information about
rounding to Standards, see the “GC3000
Standards Table” in this manual. To turn
Standard rounding on or off, select the
“STANDARD” option. If your dimensions
are set to inches, you will have the options: FRACTION, DECIMAL or OFF. If
your dimensions are set to millimeters, you
will have the options: ON or OFF. Touch
the back of the meter to nd your desired
745 Capital Commons Drive
Toledo, Ohio 43615 USA
PHONE: (419) 861-1030
FAX: (419) 861-1031
www.EDTM.com
1
Email: sales@edtm.com
© Copyright 2012 Electronic Design to Market, Inc. All rights reserved.
When you exit the Display Units menu, the
meter will show an example of what a
reading will look like according to your
selections. This will help you determine
whether you chose the correct options.
Push the button to exit the example display.
PROPER OPERATION OF THE GLASSCHEK PRO
Place the meter on the window to be tested. Press and release the button to turn
the meter on and take a measurement. As
the initial message is displayed, the meter
is already taking a reading. Do not hold the
button down, as this will cause you to enter setup mode.
In all other instances, the meter will indicate it is taking a reading with the “TAKING
READING” message. The “TAKING READING”
screen also indicates the amount of
voltage remaining in your battery. Continuing
to hold the button down at this time will
turn the meter off.
TURNING THE METER OFF
Hold the button down for several seconds
to turn off the meter. A message will display
on the screen notifying you that the meter
is about to power down. Continue holding the button down until the screen goes
blank. If the meter is left unused for a
period of time, the unit will automatically
shut off. To conserve battery life, it is recommended to turn the meter off manually
when you are nished using it.
KEEP THE COMPETITIVE
EDGE WITH PRODUCTS
FROM EDTM, INC.
glass & air space laser meters,
tempered glass detectors,
solar, visible, & uv meters Low-E
type detectors, 4 point sheet resistance meters, tin side detectors, self-clean coating detectors,
sales kits, temperature guns &
sales kit accessories
SHGC
,
GUIDELINES FOR MOST ACCURATE RESULTS:
• Hold the meter steady and at against
the test surface during measurement
• Do not touch the glass with your hand
while taking the reading
• Take readings at the bottom center of
the window for best thickness accuracy
(see explanation below)
• Take multiple readings to verify results
• Make sure the window being measured
is clean
• Make sure the two lenses on the back of
the GC3000 are clean. Use only clean,
compressed air to clean the lenses. Only
use a lint free cloth if absolutely necessary to clean smudges, ngerprints, etc.
•
Make sure nothing is touching the far side
surface of the window during the reading
Figure 2: Back of GC3000 meter with the two lenses
circled. Use clean compressed air to clean the lenses.
• It is best to test windows in free air (not
resting on a tabletop surface).
4 OPTIMAL TEST LOCATIONS FOR MOST ACCURATE RESULTS:
Recommended placement of meter:
•
Hold the meter steady AND FLAT against
the glass during measurement.
• The meter should be centered on one of
the four edges of the window with the bot-
tom edge of the meter placed parallel to
the edge of the window (please see the
image to the left). This will minimize the
effect of a concave window. As you move
away from the edge of a window, many
windows will bow inward (concave). Because the sensor runs parallel to the bot-
tom edge of the meter, it is important to
place the bottom edge of the meter along
the edge of the window as shown.
•
DO NOT touch the glass with your hand
while taking readings. Note the hand
placement used in the picture at left. The
user’s thumb is resting on the GC3000
without touching the glass being measured. Also, be sure there are no other
metallic objects touching the glass
• DO NOT hold down the button while taking a reading.
•
Place your index nger next to the button.
Incorrect placement for accurate results:
• DO NOT hold the button down while
taking a measurement. This will cause
the meter to turn off. Rest your index
nger next to the button as shown.
• DO NOT touch the glass with your hand
while taking readings. This could cause
incorrect results for the Low-E measurement.
IMPORTANT SAFETY CONSIDERATION
The GLASS-CHEK family of glass thickness and air space
meters use a Class 2M laser to take its measurements.
Do NOT push the power button and point the instrument
laser at a persons’ eyes. Always check the other side of
the window being tested to ensure that no one will be
looking directly into the laser.
APPLICATIONS
WILL TEST …
• Flat glass applications
•
Clear glass or glass with Low-E coatings,
self-clean coatings or other specialty
coatings as long as the glass/coating is
transparent
WON’T TEST …
• Glass coated with reective (mirror-like)
coatings
• Tinted glass with visible light transmission value at approximately 35% or below
• Laminated glass with Low-E coatings
positioned against the laminate (see
page 4)
• Tinted glass as long as it has a visible
light transmission value of approximately 35% or above
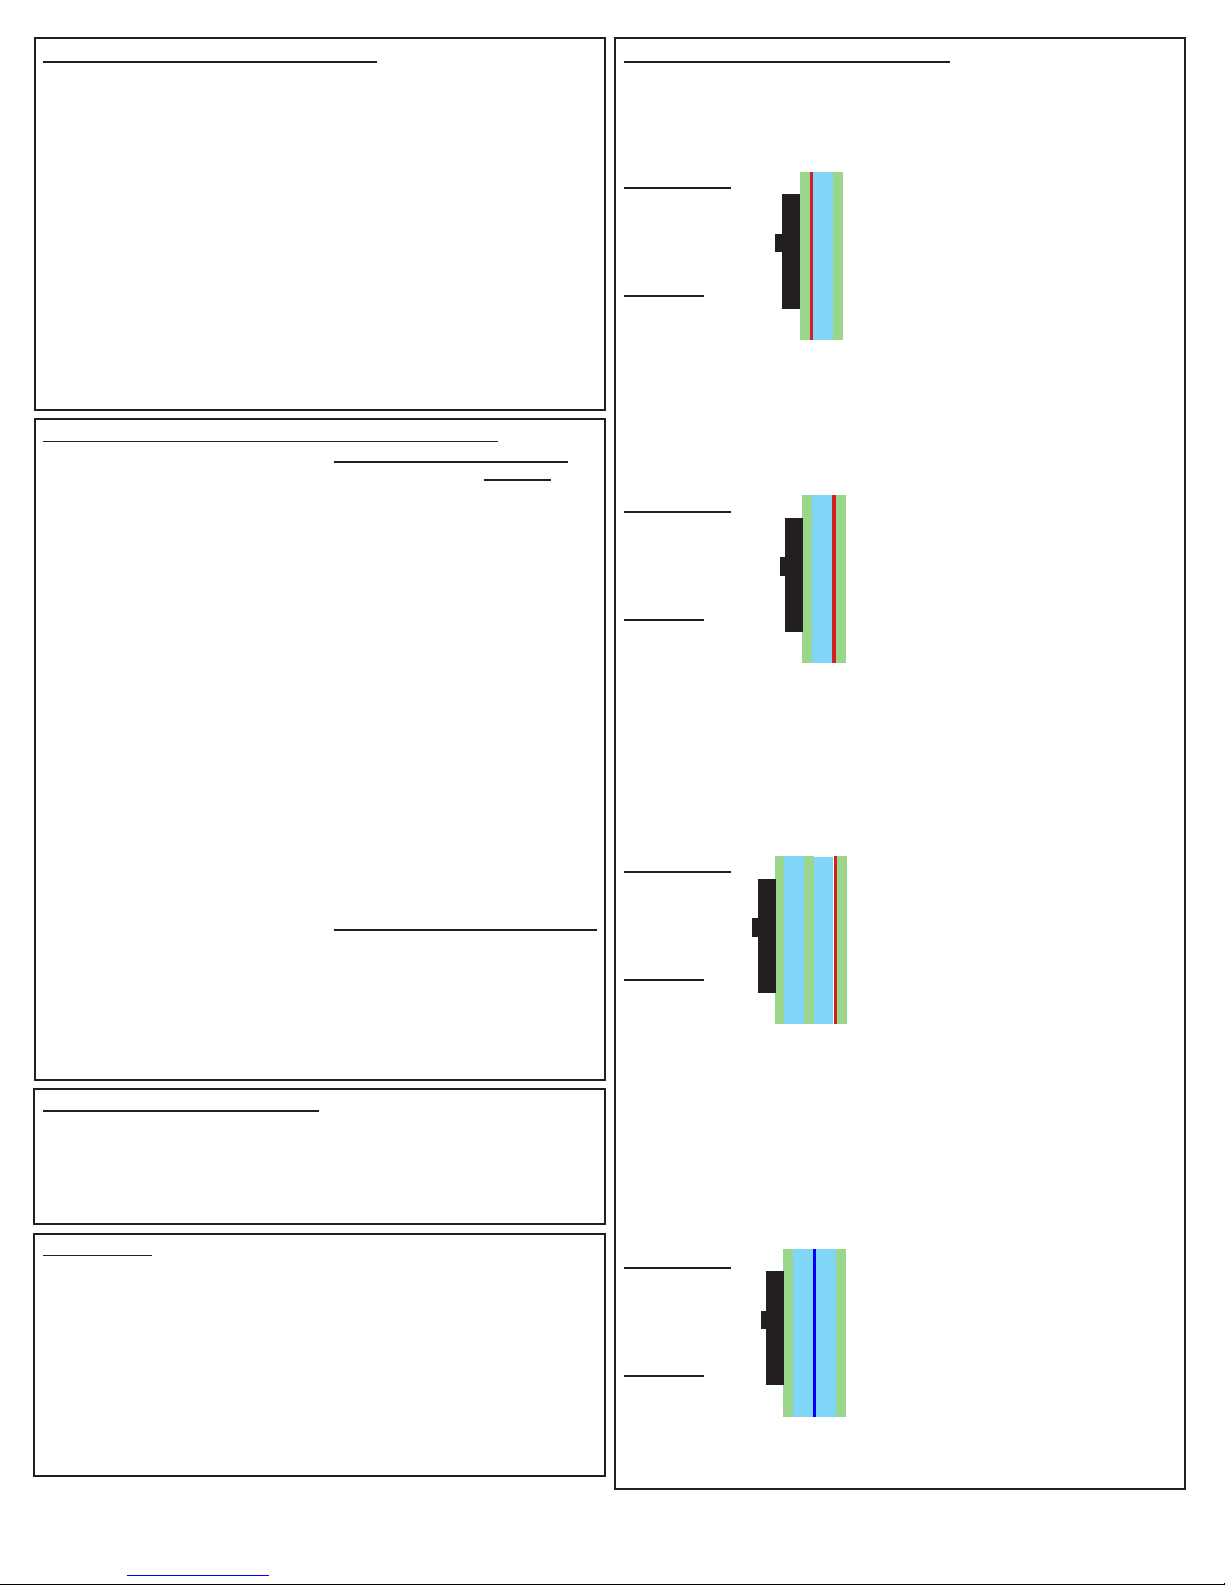
EXPLANATION OF MEASUREMENT DISPLAYS
The Glass-Chek Pro offers various display formats. The following illustrations are examples of measurement displays with explanations of the application being tested and
how the display format was congured.
— Measurement Display Example One —
Display Format
• Dimensions: Inch
• Standard: Fraction
• Actual: Decimal
Low-E
Resulting Measurement Displays: Due to the ap-
(
plication and display format, the measurement will
alternate the following three messages:
SURFACE 2
1) 2) 3)
Display 1 shows fractional inches rounded to the
PANE 1
PANE 2
Application
• Double pane
window
• Soft Coat Low-E
on surface 2
Double Pane
nearest standard. Display 2 shows the actual measurements in decimal inches. Notice how the actual measurements in 2 are slightly different than the
AIR SPACE
measurements in 1 because Display 1 shows the
readings rounded to the nearest standard. Display
Window
3 shows that the Low-E coating is on surface 2, and
it indicates that the coating properties are soft coat
and have the performance of double-silver Low-E.
— Measurement Display Example Two —
Low-E
Resulting Measurement Displays: Due to the ap-
Display Format
• Dimensions: MM
• Standard: ON
• Actual: OFF
Application
• Double pane
window
• Hard Coat Low-E
on surface 3
(
PANEL 1
AIR SPACE
Double Pane
Window
plication and display format, the measurement will
alternate the following two messages:
1) 2)
SURFACE 3
Display 1 shows millimeters rounded to the nearest
PANEL 2
standard. Since the “Actual” setting is set to OFF,
there is no display showing the actual dimensions
of the glass - only the dimensions rounded to the
nearest standard. Display 2 shows that the Low-E
coating is on surface 3 or 4. This means that the
meter is only indicating that the coating is on the
second pane of glass. To verify the exact location
of the coating, the user must test the window from
the opposite side. The meter also indicates the coating
is a hard coat Low-E.
— Measurement Display Example Three —
Low-E
Resulting Measurement Displays: Due to the ap-
PANE 1
(
plication and display format, the measurement will
alternate the following three messages:
SURFACE 5
1) 2) 3)
**NOTE** On triple pane measurement displays, “P” =
PANE 3
PANE 2
Glass, and “A” = Air Space.
Display 1 shows fractional inches rounded to the nearest
standard. Display 2 shows the actual measure-
AIR SPACE 2
AIR SPACE 1
ments in decimal inches. Notice how the actual measurements
in 2 are slightly different than the mea-
Display Format
• Dimensions: Inch
• Standard: Fraction
• Actual: Decimal
Application
• Triple pane
window
• Low-E on
surface 5
Triple Pane Window
surements in 1 because Display 1 shows the readings rounded to the nearest standard. Display 3
shows that the meter did not detect a Low-E coating on pane 1 or pane 2. Since the GC3000 only
detects coatings on the rst 2 panes, you may be
required to test both sides of a triple pane window
to verify the presence of Low-E.
— Measurement Display Example Four —
Display Format
• Dimensions: MM
• Standard: OFF
• Actual: ON
Application
• Double pane
window
• No Low-E coating
• Suspended Film
between panes
Suspended Film
Double Pane
with Suspended
Resulting Measurement Displays: Due to the ap-
(
plication and display format, the measurement will
alternate the following two messages:
1) 2)
Display 1 shows the actual dimensions of the win-
PANE 2
PANE 1
dow in millimeters. Since the “Standard” setting is
set to OFF, the standard dimensions are not displayed. The word “FILM” indicates suspended lm
AIR SPACE 2
AIR SPACE 1
between the two panes of glass. Display 2 indicates
both panes of glass are “CLEAR” of any Low-E
Film
coating, but there is a suspended lm between the
panes.
2
EXPLANATION OF ERROR MESSAGES
Error Messages: Explanations:
This error indicates a problem with the measurement. Be sure you are following the guidelines for most
accurate results outlined on Page 2, and attempt to take the reading again.
If the window area under test is excessively dirty or contaminated, the Glass-Chek PRO may give
improper thickness or Low-E results or issue an error message. The window area under test must be
CLEAN as well as the lenses on the back of the meter. Clean the lenses on the back of the GC3000
with compressed air. Use a lint-free cloth if absolutely necessary to clean smudges, ngerprints, etc.
The Glass-Chek PRO uses a light/laser beam to measure the thickness of
the glass and air space. The unit may be affected by extremely bright lights
or facing the sun directly. The screen will display this error message if this
condition occurs. Simply move to a different location, go to the other side of
the window, or shade the laser aperture. If the window is operable you may
be able open the window and reach through the opening to block the incident
light from the back side of the meter.
This error message indicates that your application is most likely out of the
maximum thickness range for Low-E measurement. See the “Specications” section of this manual for
more details on the GC3000’s maximum thickness ranges.
Battery and replacement: The GC3000 meter is powered by a 9-volt alkaline battery. When the battery
is starting to get low, an error message will appear that recommends replacing the battery soon. This
gives the user plenty of warning that a battery replacement is needed, and the meter will still function
for a period after this initial warning. Once the battery voltage gets below a dangerous level that could
impact the performance of the instrument, an error message appears that tells you to replace the battery
immediately. The instrument will NOT be able to take measurements once it reaches this level.
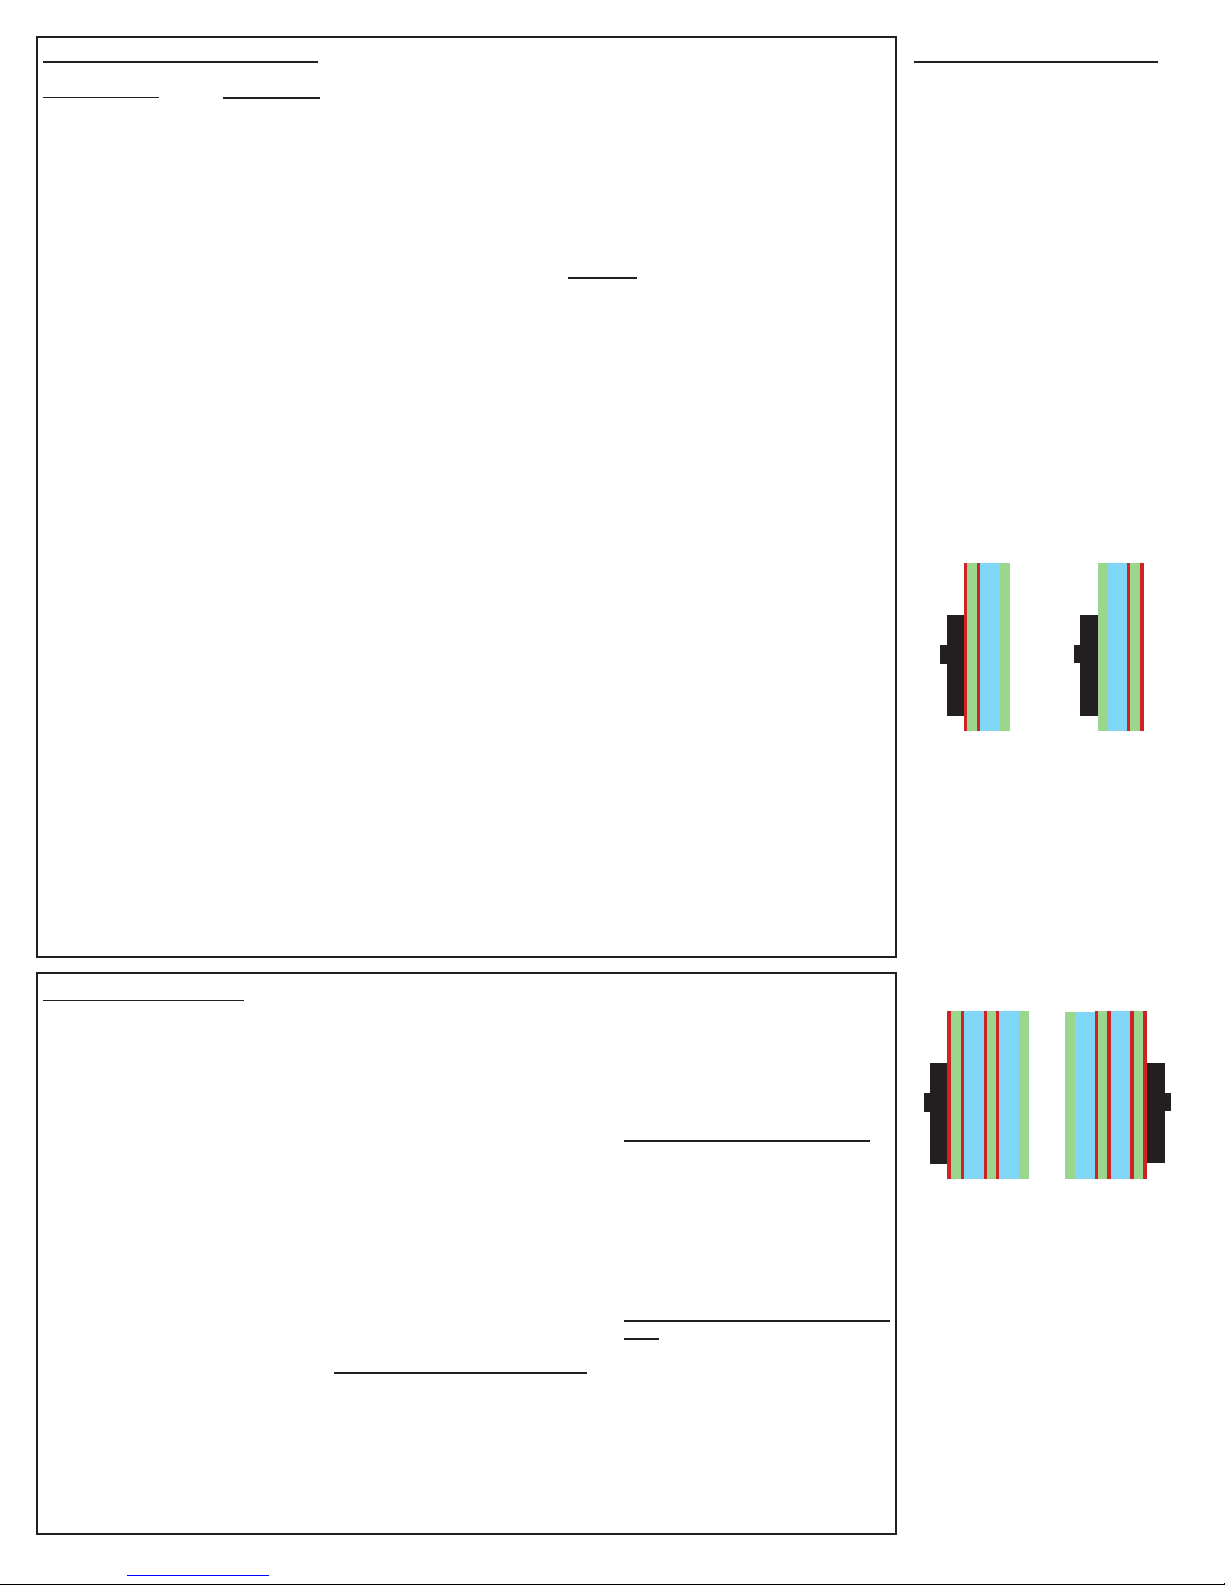
LOW-E DETECTION CAPABILITIES
The electronics that detect the presence
of the Low-E coatings are impacted by the
surroundings of the meter. This has been
explained previously in the manual by
showing proper hand placement on the
meter and positioning of the glass when
testing. The Low-E detection circuitry is
affected by conductive materials that are
detected by the meter. Conductive materials could include the metal spacer in the
window or muntin bars (grid) inside the
window itself, just to name a few. Keeping the meter at least two inches away
from any metal/conductive material when
taking measurements will result in the
most accurate Low-E measurements.
The GC3000 detects the presence and
location of Low-E coatings on the following applications:
Double Pane Windows
The GC3000 will specify if the coating is
located on Surface 1, Surface 2, or Surface 3 or 4. By moving to the other side
of the window, the meter can differentiate
between surface 3 and 4.
Please remember to ALWAYS replace the battery with a 9-volt ALKALINE battery.
On rare occasions, the user settings (determined in setup mode) will reset to the factory default. Follow
the directions on Page 1: “Using Setup Mode” to re-select your user settings.
This message means your Glass-Chek PRO must be re-calibrated. Please contact us prior to send-
ing your meter for re-calibration to receive a RMA# (Return Merchandise Authorization). International Users: When returning equipment for repair, recalibration, or simply returning product, the
customer must clearly state on the commercial invoice that the product is being returned for repair. The
commercial invoice must also clearly state that the invoice is for “CUSTOMS PURPOSES ONLY”, and
that the goods have “NO COMMERCIAL VALUE”. If you must put a commercial value on the products,
place $1 or $10 value on it so there will be no customs impact. Please note that the manufacturer will
not be responsible for any customs or government processing fees. Any amount that the manufacturer
is charged for receiving the goods, will be added to the cost of the repair.
If you are having difculty obtaining an accurate reading, please follow the corrective action steps outlined in the Troubleshooting Guide below.
TROUBLESHOOTING GUIDE
If you are having difculty obtaining an
accurate reading, please follow these steps:
1. Be sure you are following the guide-
lines for most accurate results outlined
on Page 2 of this manual.
2. Ensure that the Glass-
Chek PRO is placed
at against the glass
surface and that you
are testing at one of
the four optimal loca-
tions detailed on Page
2. The meter must be used with the
surface opposite the Power button
against the window. Using the small
end surface of the unit or tilting the unit
away from the surface will give improper results.
3. Clean the glass surface or move to a
cleaner area of the glass.
4. Remove dust particles from the two
lenses on the back of the Glass-Chek
PRO.
To clean the lenses:
WE STRONGLY RECOMMEND USING
CLEAN COMPRESSED AIR ONLY TO
CLEAN THE LENSES. However, if there
are ngerprints or other smudge marks
on the lenses that can not be removed
in any other way, a lint free cloth can
be used to wipe off the smudges.
5. Check that the two window surfaces
are relatively parallel to each other and
the Glass-Chek PRO unit.
6. If only a partial reading occurs, move
to another location on the glass or take
a reading from the other side.
7. Be sure nothing is touching
the glass while taking readings. Placing
your hand or a metallic
object against the lite
of glass you are testing
may cause the Glass-Chek PRO to
yield improper Low-E results. Remove
your hand or object. Do not touch any
part of the glass with your hand while
taking readings.
8. Verify the operating temperature range.
For operating in cold temperatures:
1. Keep the unit in a warmer environment
until you are ready to take the readings.
The meter will record accurate readings
until the point the electronics reach the
temperature below the operating range.
Depending on the degree of coldness,
this will allow for several readings to be
taken.
SURFACE 2
SURFACE 1
SURFACE 3
PANE 1
Double Pane
Window
SURFACE 4
PANE 2
AIR SPACE
SURFACE 2
SURFACE 1
SURFACE 3
PANE 1
AIR SPACE
Double Pane
Window
SURFACE 4
PANE 2
Triple Pane Windows
The GC3000 will specify if the coating is
located on Surface 1, Surface 2, or Surface 3 or 4. By moving to the other side of
the window, the meter can specify Surface 5 and Surface 6. The GC3000 detects the presence of Low-E coatings on
the inner pane of a triple pane unit, but it
will not specify which surface the coating
is on. If there are multiple Low-E coatings, the GC3000 will only identify the
2. Carry the meter in your pocket or in
nearest coating.
some other manner which will keep
the unit near a warmer temperature.
3. When temperature is only slightly below the temperature range, operate
SURFACE 1
SURFACE 2
SURFACE 3
SURFACE 4
SURFACE 5
SURFACE 6
SURFACE 1
SURFACE 2
SURFACE 3
SURFACE 4
SURFACE 5
SURFACE 6
the unit several times repeatedly in attempt to warm up the laser.
For operating in hot temperatures:
PANE 1
PANE 2
PANE 3
PANE 2
PANE 3
PANE 1
Keep the unit in a cooler environment
until you are ready to take the readings. The meter will record accurate
readings until the point the electronics
reach the temperature above the oper-
AIR SPACE
Triple Pane
Window
AIR SPACE
AIR SPACE
Triple Pane
Window
AIR SPACE
ating range. Depending on the degree
of heat, this will allow for several readings to be taken.
If measurements seem to take a long
time:
The amount of time it takes the GC3000
to complete a measurement will vary by
application. This does not mean your
meter is defective, it simply takes varying amounts of time depending on the
application. Be sure to hold the meter
steady against the window until the results are displayed.
3
IDENTIFYING THE TYPE OF LOW-E:
In addition to identifying the location of Low-E coatings, the GC3000 determines the
type of Low-E on your glass application. The meter will specify it as “hard coat” or “soft
coat.” If soft coat, the meter will also specify the number of silver-layers as single,
double, or triple, based on the coating’s energy performance. If you happen to know
the manufacturer of the glass, in many cases you can identify the exact type of Low-E
coating used to make the window. Here are some examples:
Triple Silver
- Cardinal 366
- PPG SolarBan 70
- Guardian ClimaGuard 62/27
SOFT COAT (sputtered)
Double Silver
- Cardinal 270 & 272
- PPG SolarBan 60
- AFG TIPS, TIR, & TIAC
- Guardian ClimaGuard 71/38
Single Silver
- Cardinal 179
- PPG Sungate 100
- Guardian ClimaGuard 75/68
HARD COAT (pyrolytic)
- Pilkington Energy Advantage
- PPG Sungate 500
- AFG Comfort E2
GLASS THICKNESS RANGE
• Minimum Glass Thickness Allowed: 0.080 inch or 2.0mm
• Minimum Air Space Allowed: 0.187 inch or 4.7mm
• Glass Thickness Allowed for Low-E Readings: up to 0.5 inch or 12.7mm
Triple Pane Windows
The GC3000 will display the thickness of each pane of glass,
the thickness of each air space, and the total IG thickness. Depending on the thickness of the glass, the maximum allowable
range for the total IG thickness changes according to the data
below:
PANE 3
PANE 1
PANE 2
AIR SPACE
AIR SPACE
Glass Thickness
3/32” or 2.5 mm
5/32” or 4 mm
1/4” or 6 mm
1/2” or 12 mm
Double Pane Windows (including win-
Maximum Overall Thickness Range
1.9” or 48 mm
2.0” or 50 mm
2.1” or 53 mm
2.5” or 63 mm
Suspended Film
dows with suspended lm)
The GC3000 will display the thickness of
each pane of glass, the thickness of each
air space, and the total IG thickness. Depending on the thickness of the glass, the
PANE 2
PANE 1
maximum thickness range for the total IG
thickness changes according to the data
below. **Note** these same dimensions
AIR SPACE
apply when measuring a double pane
window with suspended lm.
Glass Thickness
3/32” or 2.5 mm
1/4” or 6 mm
1/2” or 12 mm
Maximum Overall Thickness Range
1.9” or 48 mm
2.0” or 50 mm
2.2” or 55 mm
Single Pane Glass
The GC3000 will display the thickness of single panes of glass
up to 2.75 inches or 70mm thick.
SINGLE LITE GLASS
Suspended Film
(
Laminated Glass
The GC3000 will measure the overall thickness as long as
there is no Low-E coating against the laminate inner-layer. The
laminate assembly can be a single piece or combined into an
insulating unit. The GC3000 will NOT measure the PVB innerlayer or the individual pieces of glass making up the laminated
GLASS
GLASS
glass; it will simply give the overall thickness of the laminated
piece.
PANE 1
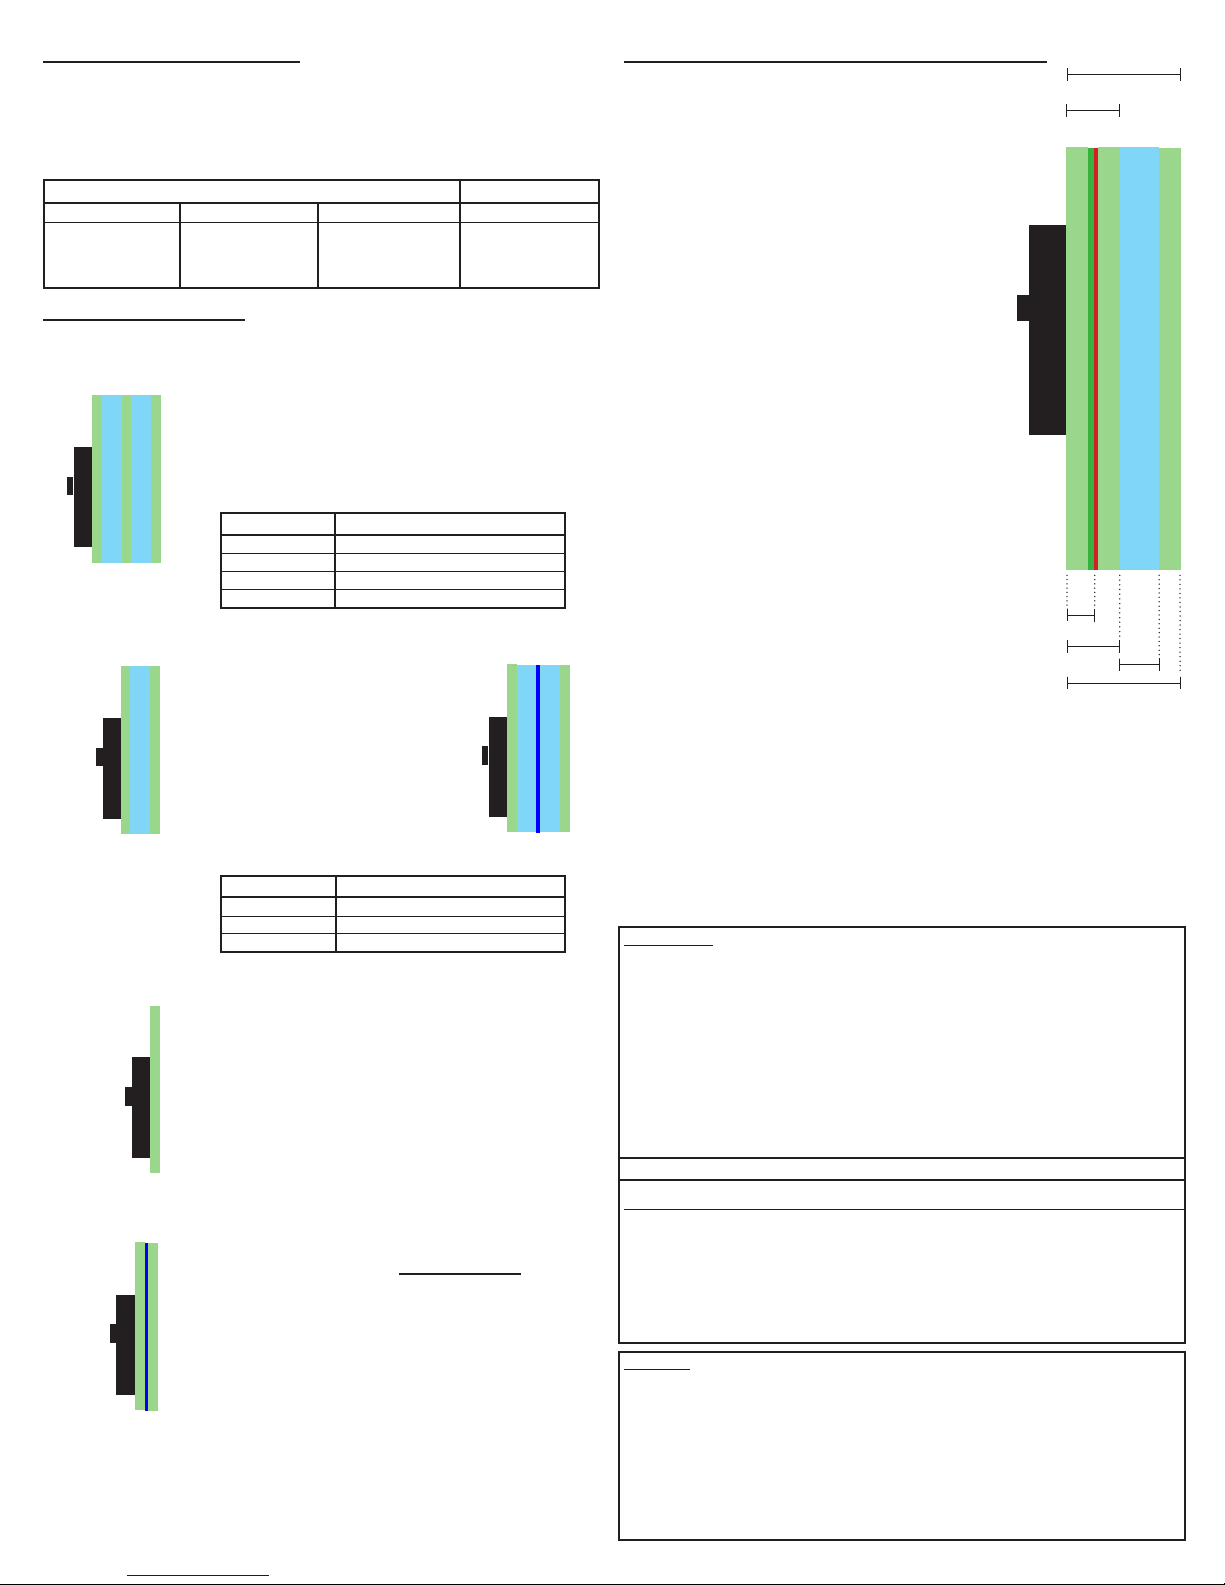
PVB WITH LOW-E MODE (LAMINATED GLASS WITH LOW-E)
When working with laminated glass that has a Low-E coating placed against the PVB inner-layer, the Glass-Chek
PRO is capable of helping you identify which surface has
the Low-E coating. To perform this function, the meter must
be switched into “PVB WITH LOW-E” mode (see page 1).
Laminated
PVB Layer
(0.35”)
Whole Window
Glass
(
Low-E
(
When testing laminated glass with Low-E, the meter will test
laminated pieces of glass alone, and it will also test laminated
Low-E glass that has been built into a double pane
window assembly. For double pane window assemblies,
the GC3000 meter must be placed against the side of the
window that contains the laminated Low-E piece of glass.
The rst screen that appears will show the thickness of the
overall laminated piece of glass, the air space, the second
pane of glass thickness, and also the overall thickness of
the double pane window assembly. The second screen will
show the make-up of the laminated Low-E piece of glass.
The meter has been designed to add the thickness of the
PVB layer to the thickness of the glass that contains no LowE coating. For the piece of glass coated with Low-E, the
meter will display the actual thickness of the glass itself.
LAMINATED PANE 1 (0.124”)
LAMINATED PANE 2 (0.124”)
AIR SPACE (0.5”)
WINDOW PANE 2 (0.124”)
This means that the piece of glass that has an abnormal (larger) glass thickness (caused by adding the
PVB layer thickness to the glass thickness) will be the
pane that is clear of any Low-E coating.
The piece of glass that is displayed as a “normal”
Glass
Surface # 1 2 3 4 5 6
thickness (0.124” for example) is the pane that has the
Low-E coating on it.
Pane 1 (0.124”) + PVB Layer (0.035”) = 0.159” on near side of coating (Screen 2 Line 1)
Pane 1 (0.124”) + PVB Layer (0.035”) + Pane 2 (0.124”) = 0.283” total laminated glass thick-
(
ness (Screen 1 Line 1 and Screen 2 Line 4)
Air Space Thickness (.500”) (Screen 1 Line 2)
Total Window Thickness (0.907”) (Screen 1 Line 4)
The display examples below correspond with how the meter would read the example
at right. Screen 1 displays the thickness of the entire window. The “PANE 1” result on
the rst screen refers to the thickness of the laminated Low-E glass assembly. Screen
2 displays the details of the laminated Low-E glass assembly only. Screen 3 conrms
PANE 2
the presence of a Low-E coating and displays the type of Low-E.
AIR SPACE
AIR SPACE
The “normal” thickness of .124” (Screen 2 / Line 3) indicates the Low-E coating is on
the 2nd pane (surface 3) of the laminated portion of the window.
1) 2) 3)
SPECIFICATIONS
POWER SOURCE 9 volt alkaline battery (NEDA 1604A) only
PHYSICAL DIMENSIONS 3.5” x 5.5” x 1.7 inch (89 x 140 x 43mm)
WEIGHT 0.75 pounds
MAXIMUM LASER OUTPUT <1mW (2M laser product)
LASER WAVELENGTH 650 - 680 nm
STORAGE TEMPERATURE -10 to +60 degrees Celsius
OPERATING TEMPERATURE 0 to +40 degrees Celsius
DISPLAY 4 lines X 20 characters
ACCURACY:
-High Resolution Mode -Low Resolution Mode (Default)
Pane 1 0.004 inch (0.1mm) Pane 1 0.008 inch (0.2mm)
Air Space 0.012 inch (0.3mm) Air Space 0.012 inch (0.3mm)
Pane 2 0.006 inch (0.15mm) Pane 2 0.012 inch (0.3mm)
This product complies with IEC 60825-1 and FDA regulation 21 CFR 1040.10.
The thickness tolerance is calibrated to NIST traceable standard No. 821/268634-03.
AMERICAN SOCIETY FOR TESTING AND MATERIALS (ASTM) -- Tolerance specications for at glass
When operating the GC300 in “STANDARD” mode, the measurements will be rounded to the nearest standard according to the table below:
TRADITIONAL
DESIGNATION
3/32 in. (single)
1/8 in. (double)
5/32 in.
3/16 in.
1/4 in.
5/16 in.
3/8 in.
1/2 in.
WARRANTY
The manufacturer warrants all models of the GC3000 to be free from defects in material and workmanship
under normal use and service as specied within the operator’s manual. The manufacturer shall repair or
replace the unit within twelve (12) months from the original date of shipment after the unit is returned to the
manufacturer’s factory, prepaid by the user, and the unit is disclosed to the manufacturer’s satisfaction, to be
thus defective. This warranty shall not apply to any unit that has been repaired or altered other than by the
manufacturer. The aforementioned provisions do not extend the original warranty period of the unit which has
been repaired or replaced by the manufacturer. Batteries are not covered by warranty.
The manufacturer assumes no liability for the consequential damages of any kind through the use or misuse
of the GC3000 product by the purchaser or others. No other obligations or liabilities are expressed or implied.
All damage or liability claims will be limited to an amount equal to the sale price of the GC3000, as established
by the manufacturer.
4
DESIGNATION TOLERANCE
mm
inches
0.09
0.12
0.16
0.19
0.23
0.32
0.39
0.50
mm min.
11.91
2.5
3
4
5
6
8
10
12
2.16
2.92
3.78
4.57
5.56
7.42
9.02
mm max.
2.57
3.40
4.19
5.05
6.20
8.43
10.31
13.49
inches min.
0.085
0.115
0.149
0.180
0.219
0.292
0.355
0.469
inches max.
0.101
0.134
0.165
0.199
0.244
0.332
0.406
0.531

GLASS-CHEK PRO
Mesureur D’épaisseur de Verre et Détecteur
de Revêtement à Faible Émissivité
MODÈLE GC3000
Pour dérouler le menu, touchez doucement
l’arrière du mesureur (voir Figure 1).
revêtement à faible émissivité contre la
couche interne de PVB du verre laminé
(voir page 8).
Pour choisir votre mode: Dans le menu
Mode de para métrage, sélectionnez l’option «MODE». (Le paramètre par défaut est
Résolution normale.)
désiré et poussez le bouton pour le sélectionner. VEUILLEZ REMARQUER, que si
l’option STANDARD est sélectionnée en
pouces, les désignations d’épaisseur du
verre seront toujours afchées en fractions.
Si les pouces décimaux sont sélectionnés, seules l’épaisseur de la lame d’air et
l’épaisseur générale du double vitrage apparaîtront en pouces décimaux.
Pour sélectionner une option, appuyez sur
bouton du mesureur. Pour quitter le menu,
touchez l’arrière du mesureur, jusqu’à ce
que la èche se trouve en regard de «SOR-
DESCRIPTION GÉNÉRALE:
Mesureur d’épaisseur de verre et détecteur
de revêtement à faible émissivité Le GlassChek PRO vous permet de mesurer l’épaisseur du verre et de la lame d’air de fenêtres
à triple vitrage depuis un seul côté (également compatible avec le simple et double
vitrage). En outre, le GC3000 vous permet de
déterminer la présence, l’emplacement et le
type de revêtement invisible à faible émisivité.
Ce manuel détaillera comment utiliser le mesureur, y compris le choix de la langue, les
paramètres de mesure, l’explication des
écrans de résultat, la bonne utilisation et
l’entretien du mesureur. Les informations
relatives aux applications appropriées, aux
détails techniques et à la garantie sont également fournies.
UTILISER LE MODE DE PARA MÉTRAGE
Le mesureur GC3000 permet de sélectionner différentes options disponibles. An d’accéder à ces options vous devez activer le
mode Para Métrage.
Poussez et maintenez enfoncé le bouton pour
activer le mesureur. Continuez de maintenir
le bouton enfoncé tandis que les deux messages suivants sont afchés :
Relâchez le bouton après l’apparition du message
suivant :
NAVIGUER DANS LE MODE DE PARA
MÉTRAGE
Après avoir relâché le bouton (comme cela
est détaillé à l’étape précédente), le message
suivant apparaîtra brièvement :
Ce message explique comment parcourir le
menu système dans le mode para métrage.
Lorsque vous activez le mode para métrage, un menu apparaîtra, avec une petite
èche en regard de l’une des options. Dans
l’illustration ci dessous, la èche est en regard de l’option «MODE».
TIR» et poussez sur le bouton. L’écran suivant apparaîtra.
Comme cela est illustré (Figure 1), touchez
doucement l’arrière du Glass-Chek PRO pour
dérouler les options du menu. Le fait de toucher l’arrière du mesureur fera avancer la
èche à la ligne suivante. N’exercez pas de
force trop importante quand vous touchez
ou manipulez le mesureur. Poussez le bouton du mesureur pour effectuer une sélection.
CHOISIR VOTRE LANGUE DANS LE MODE
PARA MÉTRAGE
Dans le menu Mode de para métrage, sélectionnez l’option «LANGUE».
Touchez l’arrière du mesureur pour faire déler les langues disponibles. Poussez sur le
bouton pour sélectionner la langue désirée
dès qu’elle apparaît à l’écran. Enregistrez vos
modications.
AVERTISSEMENT: Une fois que vous avez
modié la langue du mesureur, le menu
passe immédiatement à la langue sélectionnée. Si vous avez choisi la mauvaise
langue et que vous ne pouvez pas revenir
à la langue désirée, arrêtez de parcourir le
menu et laisser le mesureur se mettre automatiquement à l’arrêt après environ une
minute d’inactivité. Lorsque le mesureur est
remis en marche, il afchera la langue sélectionnée précédemment.
Les langues suivantes sont disponibles dans
le GC3000: anglais, allemand, français, espagnol (Amérique Latine), néerlandais et
italien.
CHOISIR LES MODES REVÊTEMENT NORMAL, HAUTE RÉSOLUTION OU FAIBLE
ÉMISSIVITÉ:
Mode 1: Résolution normale
ment
moins précis que la Résolution élevée, mais il permet au mesureur de prendre
des mesures plus rapidement.
Mode 2: Résolution élevée
que la résolution normale, mais les mesures
sont
plus longues. Les différences de précision sont détaillées dans la section Détails
techniques.
Mode 3: PVB AVEC FAIBLE ÉMISSIVITÉ
—
Utilisé pour identier la position d’un
Figure 1
—
—
le
légère-
plus précis
Touchez l’arrière du mesureur pour naviguer
entre les options «NORMAL» «RÉS. SUP.»
et «PVB AVEC É-BAS»). Appuyez sur le
bouton pour sélectionner le mode désiré.
Enregistrez vos modications lorsque vous
quittez le menu.
CHOISIR LES UNITÉS D’AFFICHAGE :
Le GC3000 peut afcher les mesures
d’épaisseur dans différentes unités. Vous
pouvez également arrondir les mesures
à la «Valeur Standard d’épaisseur la plus
proche» (Voir le tableau de valeurs Standard GC3000 de la page 8). Pour sélectionner les unités d’afchage appropriées à
votre application, suivez ces étapes:
Dans le menu Mode de para métrage, sélectionnez
l’option «UNITÉ AFFICHAGE». Le
sous-menu suivant apparaîtra :
Sous-menu unités d’afchage:
Sélectionnez tout d’abord l’option «DIMENSIONS». Cette option déterminera si votre
mesureur doit afcher les mesures en milli-
mètres ou en pouces. Touchez l’arrière du
mesureur pour faire déler les paramètres
désirés. Poussez le bouton pour le sélectionner.
Ensuite, déterminez si vous voulez que le
mesureur: 1.) arrondisse les mesures à la
valeur Standard la plus proche, 2.) afche
les dimensions réelles ou, 3.) afche la valeur standard et la valeur réelle. Pour plus
d’informations sur la valeur arrondie des
mesures, reportez-vous au «Tableau de valeurs Standard du GC3000» dans ce manuel.
Pour activer ou désactiver l’arrondi, sélectionnez l’option «STANDARD». Si vos dimensions sont en pouces, vous aurez les
options: FRACTION, DÉCIMAL ou ON. Si
vos dimensions sont en millimètres, vous
aurez les options: On ou OFF. Touchez l’arrière du mesureur pour dénir le paramètre
745 Capital Commons Drive
Toledo, Ohio 43615 USA
TÉLÉPHONE: (419) 861-1030
TÉLÉCOPIE: (419) 861-1031
5
www.EDTM.com
Courriel: sales@edtm.com
Copyright 2012 Electronic Design to Market, Inc. Tous droits réservés.
Ensuite, choisissez vos paramètres RÉELLE.
Si ce paramètre est activé, votre mesureur
afchera les dimensions réelles sans arrondi. Si vos dimensions sont en pouces, vous
aurez les options: FRACTION, DÉCIMAL ou
OFF. Si vos dimensions sont en millimètres,
vous aurez les options: ON ou OFF. Touchez
l’arrière du mesureur pour dénir le paramètre désiré et poussez le bouton pour le
sélectionner.
REMARQUE: Il n’est pas possible de désactiver STANDARD et RÉELLE en même
temps. S’ils sont tous deux activés, les mesures alterneront à l’écran après avoir pris
la mesure. Pour une illustration de cette fonction,
voir la section «Exemples de mesure».
Lorsque vous quittez le menu Unités d’afchage, le mesureur afche un exemple de
ce que vous verrez à l’écran en fonction de
vos choix. Ceci vous aidera à déterminer
si vous choisissez les bonnes options. Appuyez sur le bouton pour quitter l’afchage
de l’exemple.
BON FONCTIONNEMENT DU
GLASS-CHEK PRO
Placez le mesureur sur la fenêtre à tester.
Appuyez et relâchez le bouton pour mettre
le mesureur en marche et prendre une mesure. Alors que le message initial (en bas
à gauche) est afché, le mesureur effectue
déjà une lecture. Ne maintenez pas le bouton enfoncé, car vous activeriez le mode
para métrage.
Dans tous les autres cas, le mesureur indiquera qu’il effectue une mesure en afchant
le message «EXÉCUTION MESURE» à
droite. L’écran «EXÉCUTION MESURE»
indique également le niveau de charge
dans votre pile. Une pression continue sur
le bouton arrêtera le mesureur.
ARRÊTER LE MESUREUR
Maintenez le bouton enfoncé pendant plusieurs secondes pour arrêter le mesureur.
Un message apparaîtra à l’écran vous
informant que le mesureur va bientôt s’arrêter. Continuez d’appuyer sur le bouton
jusqu’à ce que l’écran s’éteigne. Si le mesureur n’est pas utilisé pendant un certain
temps, il s’arrêtera automatiquement. Pour
préserver la durée de vie de la pile, il est recommandé d’éteindre l
lement dès que vous n’en
CONSERVEZ UNE LONGUEUR
D’AVANCE SUR LA
CONCURRENCE GRÂCE AUX
PRODUITS D’EDTM, INC.
Mesureurs laser de verre et lame d’air, détecteurs
de verre trempé, détecteurs de revêtement à
faible émissivité avec mesure de fsg, lumière
solaire, visible et UV, esureur de résistivité par
méthode 4 pointes, détecteurs de face étain,
détecteurs de revêtement autonettoyant, kits
de vente, pistolet de mesure de température
et accessoires de kits de vente.
e mesureur manuel-
avez plus besoin.
 Loading...