

Page 1

DS - 200
User Manual
Version 2.21
ENSCONCE DATA TECHNOLOGY
100 Market Street, Suite 400
Portsmouth, NH 03801 USA
T: 877.338.6246 (U.S. Toll Free)
T: 603.766.3830 (Outside U.S.)
F: 603.766.3833
www.deadondemand.com
Page 2

Page 3

DS-200 DIGITALSHREDDER User Manual
1
TABLE OF CONTENTS
INTRODUCTION TO THE DIGITAL SHREDDER METHODOLOGY ...................................... 3
When Should I Use the DS-200?..................................................................................................... 3
Creating a Data Disposal Methodology for your Organization..................................................... 4
INTRODUCTION TO THE DS-200 DIGITAL SHREDDER.......................................................... 6
Getting to Know the DS-200 ........................................................................................................... 6
Setting up Your DS-200 ................................................................................................................... 7
Entering Data into your DS-200 ...................................................................................................... 7
Login Screen ..................................................................................................................................... 7
System Config Screen ...................................................................................................................... 8
Setting Up Date and Time................................................................................................................ 9
Enabling/Disabling Auto-Logout .................................................................................................. 11
Edit User Screen ............................................................................................................................. 11
Permission Levels ........................................................................................................................... 13
Adding a User ................................................................................................................................. 13
Default Ops Screen ......................................................................................................................... 13
Drive Operations Screen ................................................................................................................ 16
Inserting a Drive ............................................................................................................................. 17
Viewing Drive Status ..................................................................................................................... 18
Viewing Drive Sectors ................................................................................................................... 19
Overriding Defaults ........................................................................................................................ 19
Processing a Drive .......................................................................................................................... 20
Removing a Drive........................................................................................................................... 21
History Screen................................................................................................................................. 22
History Search Screen .................................................................................................................... 23
Search Fields................................................................................................................................... 24
Exporting History Data .................................................................................................................. 27
OTHER ACTIVITIES ........................................................................................................................ 29
Turning the DS-200 Off ................................................................................................................. 29
Testing the Printer .......................................................................................................................... 29
Printer Supplies............................................................................................................................... 31
Imaging a Drive .............................................................................................................................. 31
Reprinting a Certification Label .................................................................................................... 32
Backing Up and Restoring your Digital Shredder Software........................................................ 32
Updating Digital Shredder Software ............................................................................................. 33
Accessories For Your DS-200 ....................................................................................................... 35
Troubleshooting .............................................................................................................................. 36
Where To Get Help ........................................................................................................................ 37
INDEX ................................................................................................................................................. 38
© 2008 Ensconce Data Technology Inc. All rights reserved . US patents pending. Printed in USA. ‘Digital Shredd er’ a nd ‘De ad On
Demand’ a re tra dem arks o f Ensconce Data Tec hnology Inc. All other trademarks and registered trad ema rks in this manual are the
prope rty of their respective companies. Specifications and other data ar e subject to chang e without notice.
Page 4

DS-200 DIGITALSHREDDER User Manual
2
Limited Warranty
This Ensconce Data Technology, Inc. Product is warranted to be free from defects in materials and
workmanship for 90 days from the date of purchase. Within this period, EDT will at its sole option, repair
or replace any components that fail in normal use. Such repairs or replacements will be made at no charge
to the customer for parts or labor, provided that the customer shall be responsible for any transportation
cost. This warranty does not cover failures due to abuse, misuse, accident or unauthorized alteration or
repairs.
THE WARRANTIES AND REMEDIES CONTAINED HEREIN ARE EXCLUSIVE AND IN LIEU OF
ALL OTHER WARRANTIES EXPRESS OR IMPLIED OR STATUATORY, INCLUDING ANY
LIABILITY ARISING UNDER ANY WARRANTY OF MERCHANTABILITY OR FITNESS FOR A
PARTICULAR PURPOSE, STATUATORY OR OTHERWISE. THIS WARRANTY GIVES YOU
SPECIFIC LEGAL RIGHTS, WHICH MAY VARY FROM STATE TO STATE.
IN NO EVENT SHALL EDT BE LIABLE FOR ANY INCIDENTAL, SPECIAL, INDIRECT OR
CONSEQUENTIAL DAMAGES, WHETHER RESULTING FROM THE USE, MISUSE, OR
INABILITY TO USE THIS PRODUCT OR FROM DEFECTS IN THE PRODUCT. Some states do not
allow the exclusion of incidental or consequential damages, so the above limitations may not apply to you.
EDT retains the exclusive right to repair or replace the unit or software or offer a full refund of the
purchase price at its sole discretion. SUCH REMEDY SHALL BE YOUR SOLE AND EXCLUSIVE
REMEDY FOR ANY BREACH OF WARRANTY.
To obtain warranty service, contact your local authorized EDT reseller, or call EDT Customer Support at
one of the numbers shown below for shipping instructions and an RMA tracking number. The unit should
be securely packed with the RMA number clearly written on the outside of the package. The unit should be
sent freight charges prepaid. A copy of the original sales receipt is required as the proof of purchase for
warranty repairs.
Ensconce Data Technology, Inc.
100 Market Street, Suite 400
Portsmouth, NH 03801
T: 877.338.6246 x702 (U.S. Toll Free)
T: 603.766.3830 x702 (Outside U.S.)
Lithium Battery Caution
WARNING
Caution: There is a danger of explosion if battery is installed incorrectly. Observe the correct polarity when
changing the lithium battery. Replace only with the same or equivalent type recommended by the
manufacturer. Dispose of used batteries according to the manufacturer’s instructions and local disposal
requirements.
NOTE: This equipment has been tested and found to comply with the limits for a Class A digital device,
pursuant to Part 15 of the FCC rules. These limits are designed to provide reasonable protection against
harmful interference when the equipment is operated in a commercial environment. This equipment
generates, uses, and can radiate radio frequency energy and, if not installed and used in accordance with the
instruction manual, may cause harmful interference in which case the user will be required to correct the
interference at his or her own expense.
Page 5

DS-200 DIGITALSHREDDER User Manual
3
IN TRODUCTION TO THE DIG ITAL SH RED DE R
METHODOLOG Y
Thank you for purchasing the EDT DS-200 Digital Shredder. This appliance will allow
your organization to properly sanitize hard drives for reuse, recycling, or removal.
The DS-200 eliminates data using one of two methods. The first and most powerful
method is Secure Erase. Secure Erase is performed by executing firmware level
command contained in most modern ATA/IDE/EIDE/Ultra ATA and SATA and PATA
drives. In the event that Secure Erase is not available for your particular model of drive,
the Digital Shredder will default to using an overwrite algorithm.
The Digital Shredder™ has many advantages over other data excising approaches:
• Dedicated platform means no workstation downtime, no software installation, no
software licensing and no boot floppies.
• Unlike rack-mounted, or cumbersome test bench equipment, the DS-200 is self-
contained and portable allowing for field tech support.
• Your drive can be quickly erased, then partitioned and reformatted for immediate
reuse.
• With Secure Erase, the erasure process is completed in a fraction of the time of
traditional overwriting.
• Up to three drives can be processed simultaneously without any degradation of
speed and performance using Secure Erase.
• Erasure Certification Labels and a detailed internal Event Log provide a
defendable audit trail.
When Shoul d I Use the D S-200?
There are many occasions when drives should be sanitized, some of which may be new to
you. The importance of all scenarios are highlighted by new legislative acts, including:
• Fair and Accurate Credit Transaction Act (FACTA)
• Family Education Rights and Privacy Act (FERPA)
• Federal Information Security Management Act (FISMA)
• Financial Services Modernization Act (AKA Gramm-Leach-Bliley, GLBA)
• Health Insurance Portability and Accountability Act (HIPAA)
• Payment Card Industry Data Security Standard (PCI DSS)
• Public Company Accounting Reform and Investor Protection Act (AKA
Sarbanes-Oxley, SOX)
• Resource Conservation and Recovery Act (RCRA)
The need for proper equipment disposal is an obvious occasion for sanitizing a hard
drive. In addition, the below circumstances also require a failsafe methodology for
sanitizing hard drives:
Page 6

DS-200 DIGITALSHREDDER User Manual
4
Mainframes and Storage Networks:
• Storage transfers to a new user
• Storage transfers to a new server
• Maintenance
• Return at end of lease
Individual User PCs and Workstations:
• Tech refresh or return at end of lease
• Upgrading a new computer or higher capacity drive
• Completion of a project
• Cleaning a workstation for a new user
• Departure of an employee from an organization
• Returning a hard drive for warranty
• Returning computer for warranty
• Protection from unauthorized access
• A virus that is detected
• Attack from a hacker
Anytime there is any risk of your Organization’s data being released to the public, or
even to other people within the Organization that may not have proper authorization, the
DS-200 should be used to ensure that no residual data is left behind by eradicating data
beyond forensic reconstruction.
You can also use the Digital Shredder to prepare a drive for reuse by scripting the DS200 to partition and reformat the drive. The DS-200 also provides the user the ability to
copy a binary image of one drive to another.
Cr ea ting a Da ta Dispos al M ethodol og y for your O rg aniz ati on
Many companies already have policies and procedures in place for the handling and
destroying of sensitive paper documents. Unfortunately, due to a glaring lack of solutions
that provide continuous care, custody, and control, few companies have implemented
similar policies regarding the disposal of their digital media.
Legislation surrounding the ownership and maintenance of customer and employee
records requires that organizations have a strong, auditable process for destroying
sensitive digital data.
This goal can be achieved by using the advanced features of the DS-200. The Digital
Shredder was designed by industry professionals to be a process that organizations can
adopt to protect themselves from improper data disposal. This process includes:
• Required user logins so that every drive can be traced back to the operator
responsible for its erasure.
Page 7

DS-200 DIGITALSHREDDER User Manual
5
• A tamper-resistant chassis design that locks the drive bay while an operation is
taking place. Any attempt to disrupt the operation will abort the operation and no
certification record will be produced.
• Certification labels that are printed upon the successful completion of an erasure
process. These labels indicate the hard drive serial number, the operator
username, the erasure process used, the date and the beginning and end time of
the operations performed.
• Administrators can access the internal log to generate reports showing all drives
erased, which operator erased them and when they were processed. Now
administrators can ensure that drives were properly erased and not just moved
somewhere else.
• Secure Erase is the strongest method available for sanitizing hard drives in a non-
destructive manner. It utilizes the hard drive’s existing firmware purge-level
command to eradicate all the disk’s data beyond forensic reconstruction. It is
superior to overwrite techniques and is also up to 18 times faster.
Page 8

DS-200 DIGITALSHREDDER User Manual
6
IN TRODUCTION TO THE DS-200 DIG IT AL S H RED DE R
Getti ng to Know the DS-200
1. The DS-200 has been designed for ease of use and portability.
2. Touch screen interface (no external keyboard or mouse are needed).
3. Power button turns the unit ON and OFF.
4. ESD ground strap connector.
5. Stylus and stylus holder for entering data on the touch screen.
6. Personality Blocks, our proprietary cable-free hard drive connection technology, hold
the subject drive in place during operation.
7. LED Indicator Lights in each drive bay show the status of the drive:
OFF:
Bay is empty and available
Green:
Drive is inserted and awaiting command
Green (blinking):
Drive has successfully completed last process
Red:
Process is being executed
Red (blinking):
A processing error has been encountered
Orange:
Drive is being reformatted or imaged
8. Drive Bays (3) - Up to three drives can be processed simultaneously. Drives can be of
mixed interface and format. Drive bays are hot swappable.
9. Stylus – For use on touch screen; you may also use your finger. Never use anything
sharp which may damage the screen such as a pen or pencil.
10. Carrying Handle - Integrated carrying handle on the top of the Digital Shredder
allows the device to be transported in the field.
11. Power Connector – Units accepts standard PC power cord. Power supply will accept
120VAC or 240VAC power supply.
12. USB Port – Used to connect label printer and USB drives. USB drives are connected
to update the DS-200 software and to download the internal event log.
13. Laminate Label Printer -Used to create certification labels that can be applied directly
to processed drive.
Page 9

DS-200 DIGITALSHREDDER User Manual
7
Setting up You r DS-2 00
Carefully remove the Digital Shredder from packaging. Plug the power cord into the
Digital Shredder and then into wall power (120 VAC). Insert printer battery according to
included printer set-up instructions. Connect the supplied printer to the unit via the
supplied USB cable and plug the printer into wall power. The printer may also be
powered by the internal battery. Be sure to load the label tape into the printer to prepare it
for first time use. Please refer to the printer manual for instructions on loading the label
tape.
Warning: Opening the case to the Digital Shredder voids the warranty.
Warning: Be sure your Digital Shredder is powered ON before inserting drives for
processing. Unpredictable behavior may result if this procedure is not followed.
Warning: Do not transport the Digital Shredder with hard drives in any of the bays.
NOTE: Depressing the Power button while the DS-200 is processing a drive will NOT
result in a shutdown of the unit. The DS-200 cannot be powered down while a drive is
being processed. Loss of power during any drive process may leave the drive in an
unusable state. Never unplug the unit while it is processing a drive. Also, it is
recommended that the DS-200 be connected to a Uninterruptible Power Supply (UPS) to
avoid unintended loss of power.
Press the power button. As the machine powers up, the EDT Dead on Demand™ logo will
appear. When the boot sequence is complete, you will be presented with the login screen.
Ente ri ng Data into your DS-2 00
The included stylus should be used to enter data into the DS-200. It is allowable to press
the screen with your finger but using the stylus is generally faster and more accurate.
Never use a pen, pencil or other object as a substitute for the stylus. Such objects will
damage the screen.
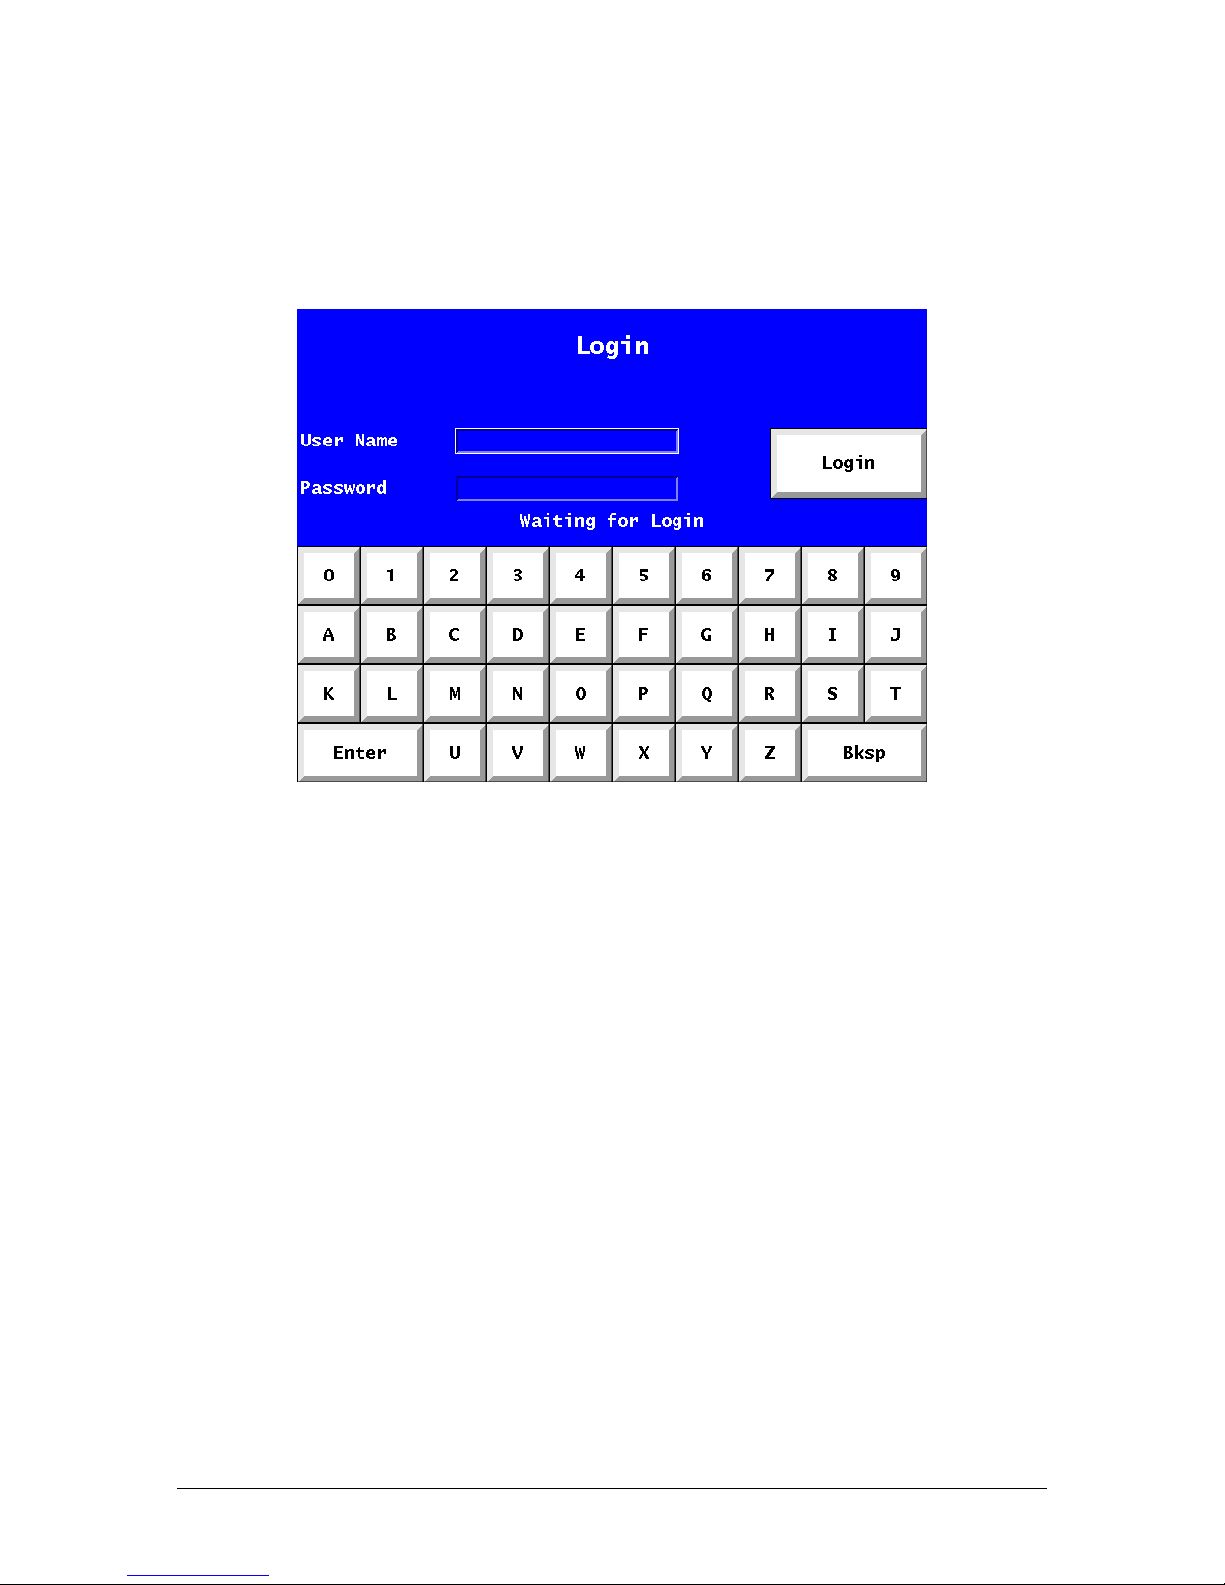
Login Scr een
Enter your username and password into the Login Screen (see Figure 1). When you first
receive the unit it is set-up with a default username and password. It is recommended that
you change the password for this user upon first use.
The default username is ‘admin1’, and the default password is ‘shredder’.
Enter “admin1” in the User Name field and select ENTER.
Enter “shredder” in the Password field and select LOGIN.
Page 10
DS-200 DIGITALSHREDDER User Manual
8
Note that any user of the Digital Shredder is logged out after five minutes of inactivity.
All active processes continue and complete normally after the automatic logout. All event
log entries will be stamped with the last login value. Once a user logs back in they can
proceed as normal.
Figure 1. Login Screen
Syste m C onf ig Scr ee n
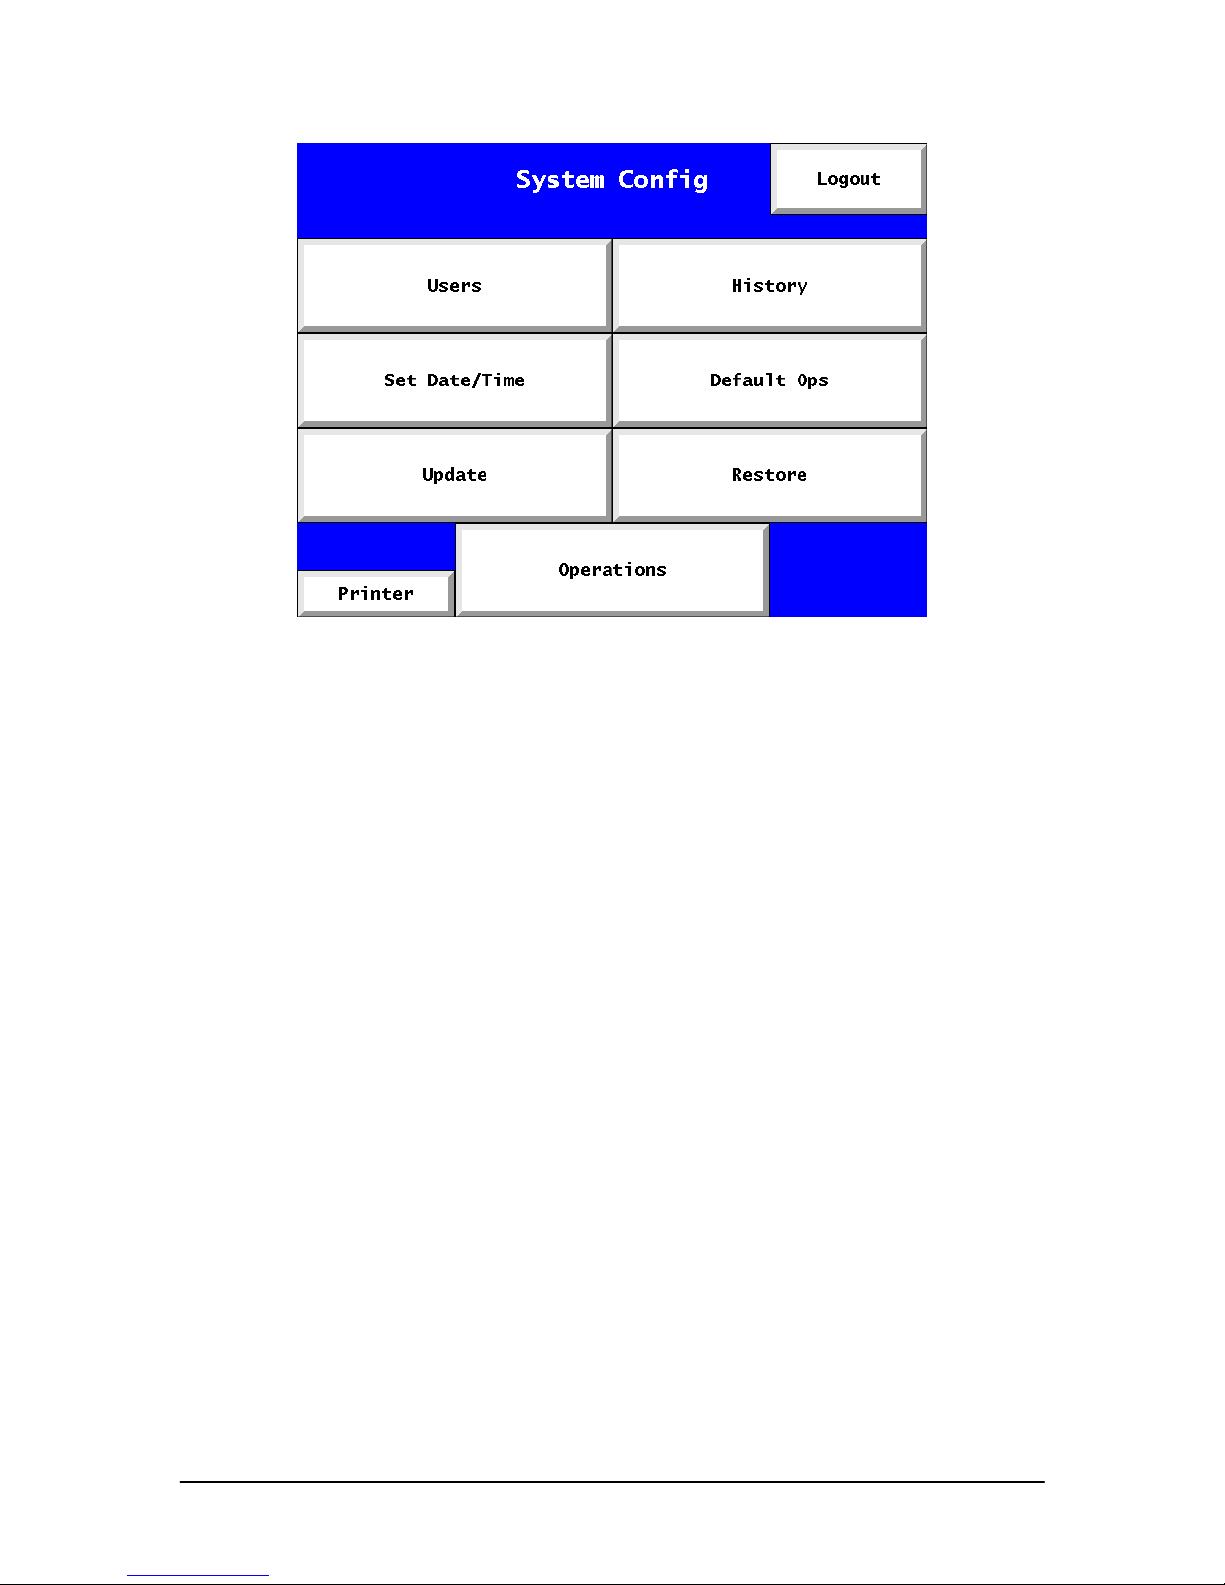
Once you have successfully logged in you will be presented with the System Config
screen (see Figure 2). This is the system’s Home Screen.
Page 11
DS-200 DIGITALSHREDDER User Manual
9
Figure 2. System Config Screen
This screen is used to access all Digital Shredder functionality:
Users:
Add/ Edit / and Delete user accounts
Printer:
Verify printer operation by printing a test label
Update:
Update the DS-200 software
History:
View / Print / Export audit records
Default Ops:
Set default drive processing options
Restore:
Restore DS-200 Software to a previous version
Logout:
Log out of user account
Set Date/Time
Set system date and time
Operations:
Proceed to Drive Bay Status Screen
The first thing you should do is change the password of the Admin1 account and setup
other User Accounts for operators. To do this, select the “Users” option (see the ‘Editing
a User’ section).
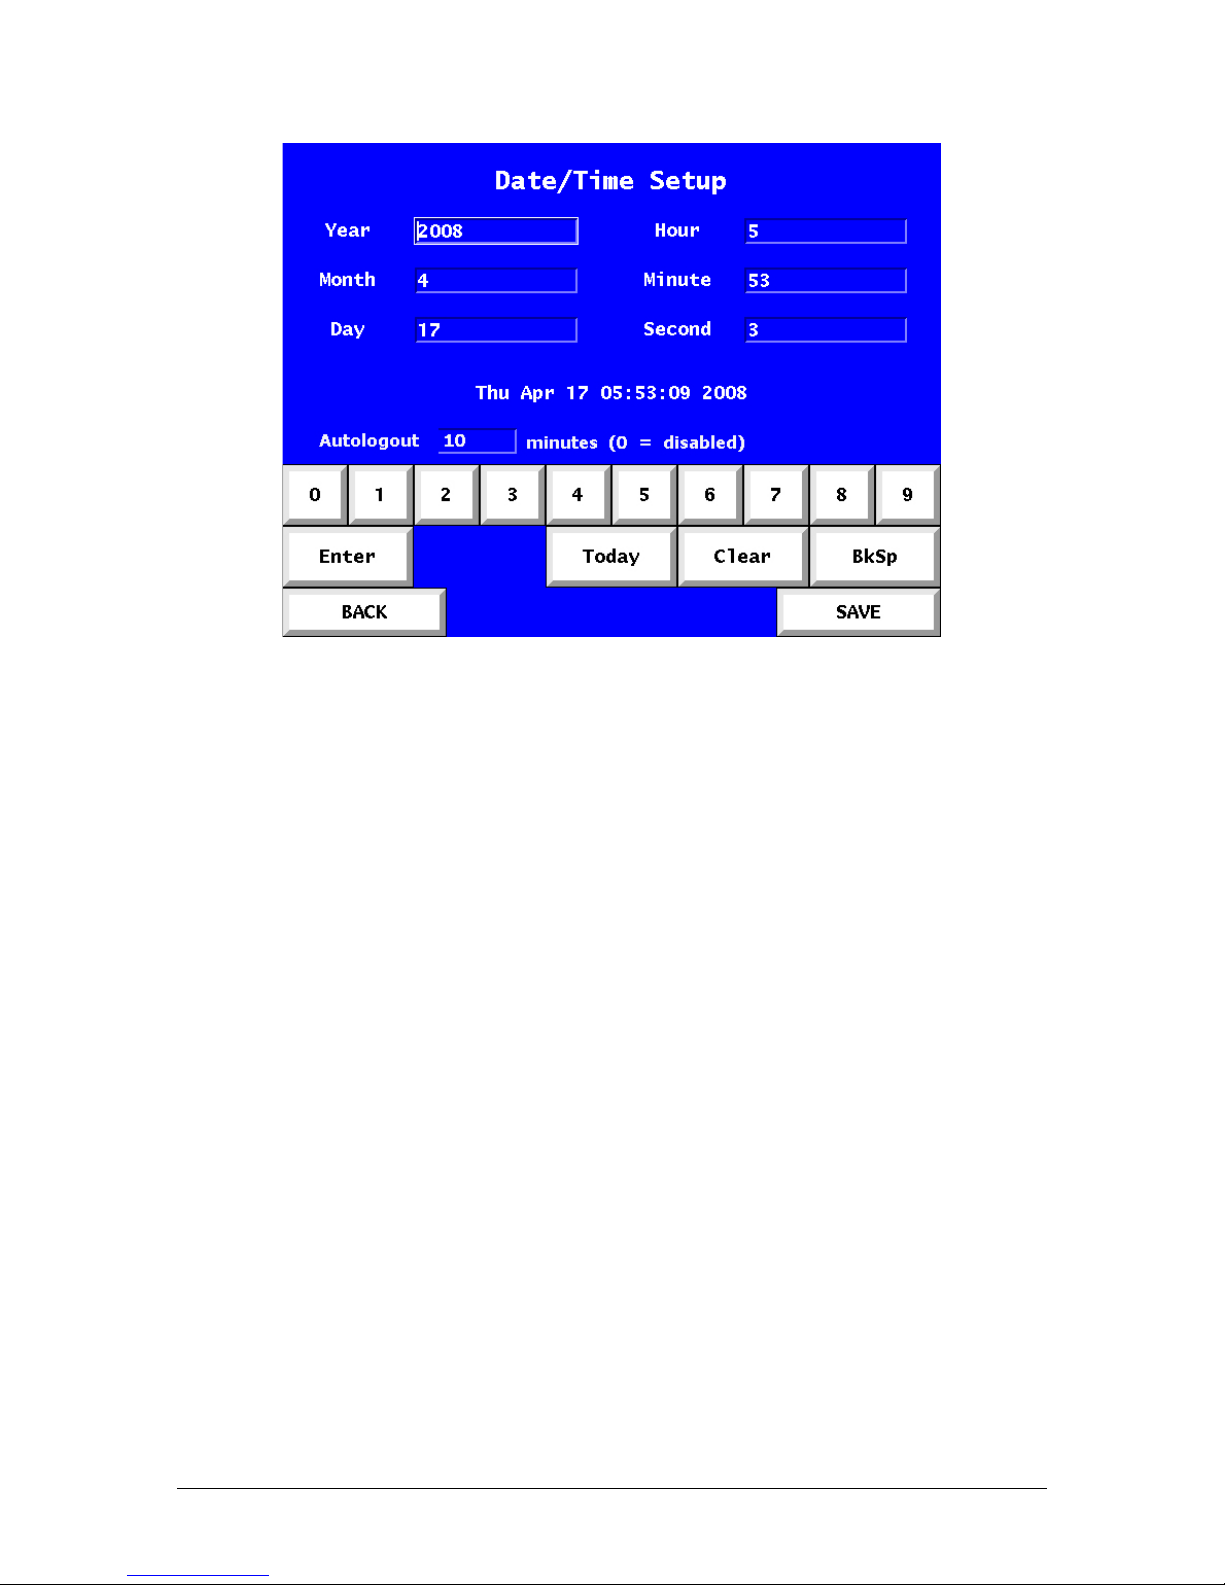
Setting Up Da te and Ti me
Before starting to process drives, it is important to set the date and time on your DS-200
so that the event log records will have the correct date/time stamp.
To do this select the Set Date / Time option from the System Config screen (see Figure
3).
Page 12
DS-200 DIGITALSHREDDER User Manual
10
Figure 3. Date/Time Setup Screen
Use the keyboard to enter the required fields as described below:
0-9 Number keys
Enter Move to next field
Today Fills in fields with today’s date as maintained by the DS-200
Clear Clear existing field
Bksp Delete last character entered
Back Return to previous screen
Save Save values and return to previous screen
Year 4 digit year
Month 2 digit month
Day 1 or 2 digit entry representing day of the month
Hour 2 digit hour (military time, 15 = 3PM)
Minute 1 or 2 digit entry (0-59)
Second 1 or 2 digit entry (0-59)
Page 13
DS-200 DIGITALSHREDDER User Manual
11
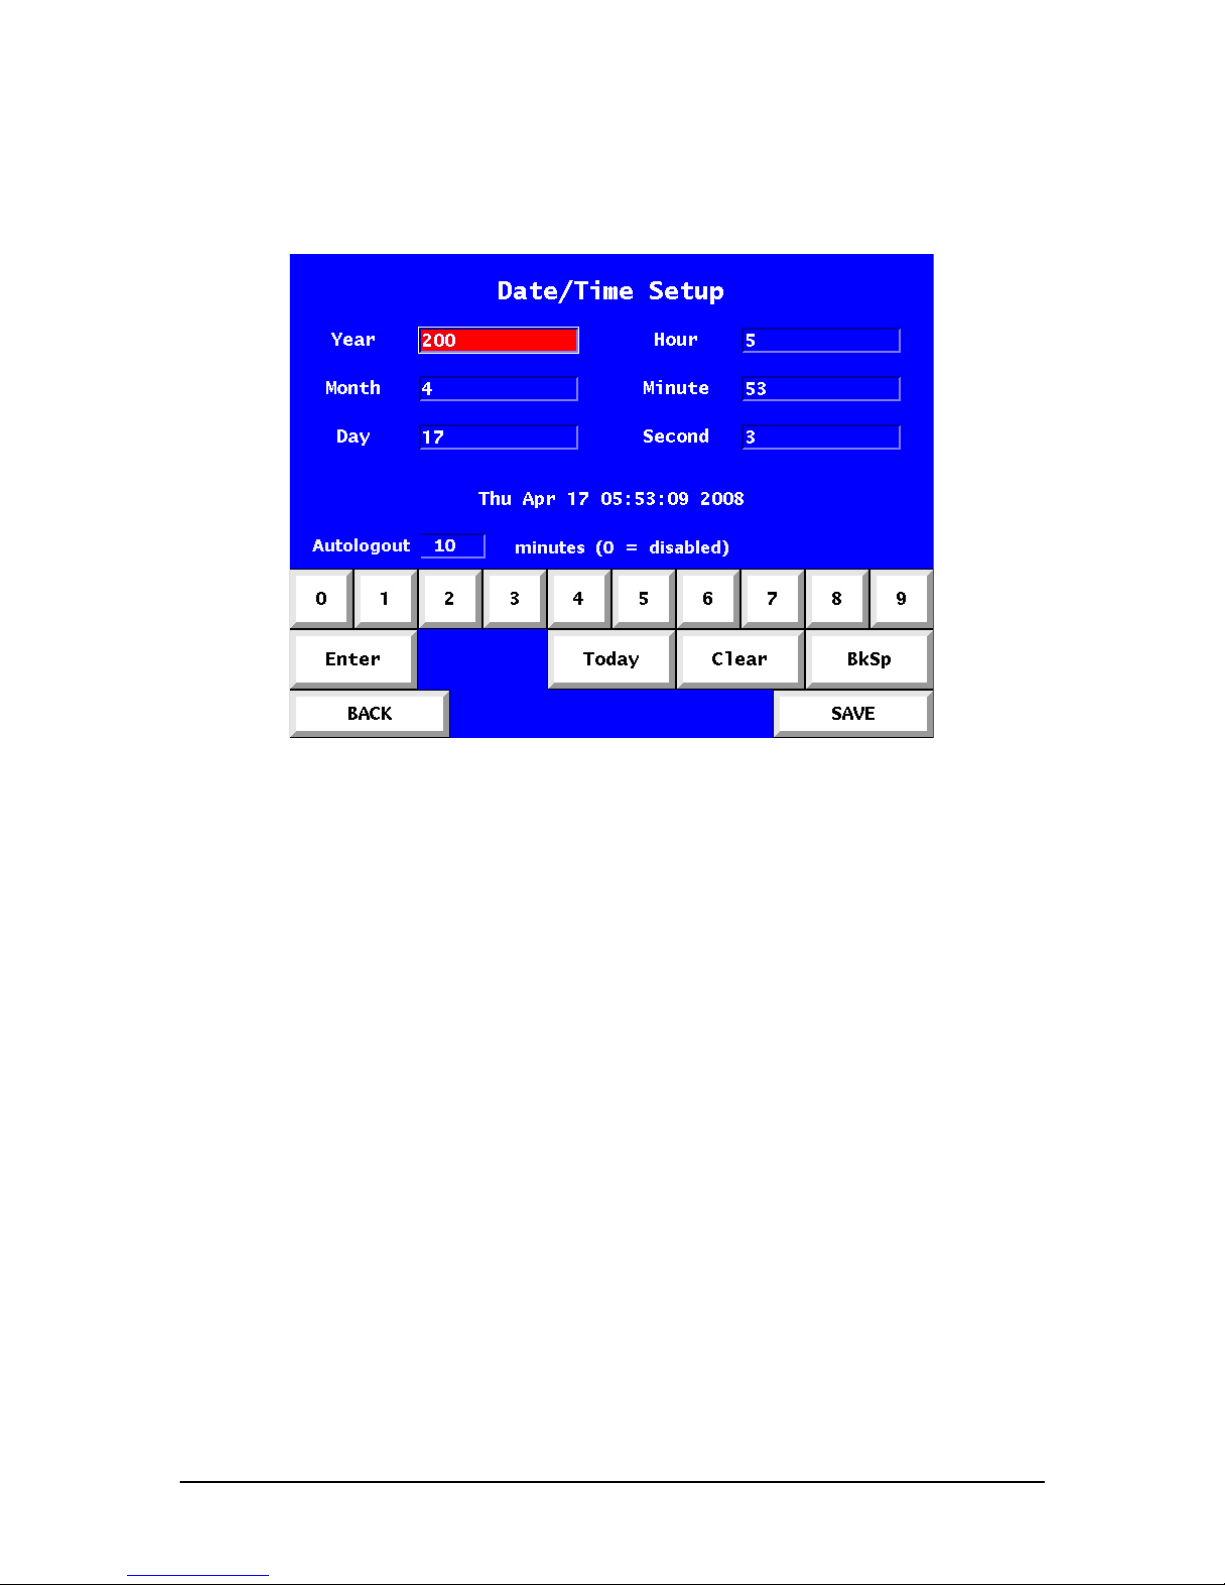
If any of the fields fail to meet editing requirements an error screen will be displayed
highlighting the incorrect value (see Figure 4).
Figure 4. Date/Time Setup Screen
Ena bli ng/Dis abli ng Auto-Logout
Within the Date/Time Setup Screen is the Auto-logout field. The user may disable this
feature by inputting “0”. To enable auto-logout, simply input the desired minutes and
select SAVE.
Edit User S cree n
From the System Config Screen select the Edit Users screen to add, edit, or remove users
(see Figure 5). To edit or remove an account, simply touch the account to highlight it,
then touch the action button. To change the administrator account password, select the
administrator by touching it, then select the EDIT option.
Page 14

DS-200 DIGITALSHREDDER User Manual
12
Figure 5. Edit User Screen
Touching the EDIT button on the Edit User Screen takes you to the User Maintenance
Screen (see Figure 6). Here you can change the user password or permission level.
Figure 6. User Maintenance Screen
Page 15

DS-200 DIGITALSHREDDER User Manual
13
Per miss ion Levels
There are two permission levels, administrator and operator. Administrators have full unit
control including the ability to export event log data, set process defaults and create other
users. Generally, there should only be a few administrators.
Adding a Us er
Touching the ADD button from the Edit User Screen takes you to the Add User Screen
(see Figure 7).
Figure 7. Add User Screen
Simply enter the user name and password, select the appropriate permission level and
select “OK”. To abort adding a user, select the “BACK” option
NOTE: User names and passwords must be at least 6 characters in length.
Defaul t Ops S creen
While you are logged in as an Administrator, it is helpful to setup the default processes
that will be performed each time a drive is inserted and processed. This will save
considerable time when processing multiple drives.
Page 16

DS-200 DIGITALSHREDDER User Manual
14
To do this from the Home Screen select the Default Ops option to access the Defaults
screen (see Figure 8).
Figure 8. Defaults Screen
Simply select the items that you like to use as defaults. Selections are indicated by a red
box. Options available are:
Use Secure Erase if Possible - It is recommended that you always leave this item
selected. This instructs your unit to check every drive to see if it can be Secure Erased.
Use Default Overwrite Method – If this is ON and the drive cannot be secure erased,
then the selected overwrite method will be used as the default erasure method. If for some
reason you have configured your unit to not look for secure erase compatibility, then this
will be the default erasure method for every drive. Keep in mind that this is only a default
setting and can be modified at run time. Currently, the DS-200 supports triple-overwrite
and a single-pass overwrite (see Figure 9). For single-pass overwrite, three additional
options are available: Random pattern, all bits zero and all bits one (see Figure 10). The
triple-pass overwrite employs a first-pass of all zeros, a second-pass of all ones and a
third-pass of random bits.
Page 17

DS-200 DIGITALSHREDDER User Manual
15
Figure 9. Defaults Screen – Overwrite Methods
Figure 10. Defaults Screen – Overwrite Options
Create Default Partition – If this option is selected then after erasure is completed the
drive will be partitioned. Partitioning assumes that the entire drive is a single partition. If
you desire multiple partitions then you will need to place the drive into a PC to perform
the partitioning. If you select the partition option, then you may also (optionally) choose
to have the partition formatted by selecting the Format Disk option.
Format Disk – This will format the partition with the selected file system. The Digital
Shredder currently supports FAT16, FAT32, NTFS, EXT1 and EXT2.
Page 18

DS-200 DIGITALSHREDDER User Manual
16
Disk Image – Assuming you have chosen to partition and format the disk, you can also
configure the DS-200 to copy the contents of a source drive to the drive being processed.
The source drive must be located in bay C (far right drive bay). The target drive can be
located in either bay A or B.
Print Certificate – Turning this option ON will provide a printed certificate upon
completion of the erasure process (the printed label includes the hard drive serial
number). If this option is OFF, the label will not be printed automatically. However, the
information is stored in the DS-200 event log and can be printed at a later time. The
event log contains the following information:
• Hard drive serial number
• Operator username
• Type of erasure method used
• Date and time of the beginning and end of the operations
Now that you have successfully created your users and have set your default options, you
are ready to begin erasing drives.
Dri ve Ope ra tions Screen
The Operations Screen shows you the current status of all three drive bays. When the unit
has no drives inserted, the bay LED’s will be OFF, and the Operations Screen will show
that each bay is EMPTY (see Figure 11).
Figure 11. Drive Ops Screen
Page 19

DS-200 DIGITALSHREDDER User Manual
17
Inse rti ng a Drive
Warning: Be sure your Digital Shredder is powered ON before inserting drives for
processing. Unpredictable behavior may result if this procedure is not followed.
Drives are attached to Personality Blocks, which are in turn inserted into Drive Bays.
Your DS-200 shipment includes three Personality Blocks. Personality Blocks are NOT
all universal. Due to a lack of manufacturing standards concerning hard drives, there are
variations in the backplane of different drives. Each Personality Block has an indicator on
the front of it, describing the family of drives it serves. For example, the block ATA 1.3.5
is the first ATA block that is designed to fit 3.5” drives from certain manufacturers who
have created drives with that particular backplane. The ATA 1.2.5 block is the first ATA
block for 2.5” drives and so on. A Hardware Compatibility List can be found on EDT’s
corporate website: (www.deadondemand.com/support/hcl.php).
Check the status of the Personality Block before removing it. If the LED is OFF the block
is safe to remove. If the light is GREEN or blinking GREEN, the bay is safe to open but
may still be locked, in which case you should select the “EJECT” option on the Bay
Screen to unlock the bay (see Figure 12).
To remove the Personality Block from the Drive Bay simply raise the lever on the face of
the Personality Block, and gently pull it toward you. Remove the block completely from
the bay.
To connect a drive, unfold the Personality Block and lay the edge of the drive flat on the
Personality Block guide. Be sure that the pin and power connectors are roughly aligned
with the power connector and pins on the drive. Slowly push the drive toward the
Personality Block, checking the alignment and fit of the connectors. If for any reason the
pins do not align, stop immediately and try a different Personality Block.
Once your drive is connected to the block, align the bottom rail of the block to the
channel of the bay and slide the drive in. Press down on the lever to engage the block
with the power connector located at the inside top of the bay. You will know that the
block is engaged correctly when the lever is fully depressed and the bay indicator light is
lit.
Upon successful insertion the Digital Shredder will automatically lock down the selected
bay, recognize the drive and present its information on the Operations Screen within a
few seconds (see Figure 12).
Page 20

DS-200 DIGITALSHREDDER User Manual
18
Figure 12. Drive Ops Screen
Vi ewing Drive Sta tus
When you insert a drive into the Digital Shredder you will be presented with a screen
showing you a visual representation of all three bays (see Figure 12).
Figure 13. Drive Ops Screen
Page 21

DS-200 DIGITALSHREDDER User Manual
19
All hard drives inserted will display the manufacturer serial number of the drive (see
Figure 13). Empty bays are indicated by the word ‘Empty’ (see Figure 12). Drives that
are being processed will display the percentage completed (see Figure 13). Drives
completed, will display “Done” (see Figure 13).
Vi ewing Drive Se ctor s
The Data Viewer screen is only enabled for a particular drive once it has successfully
completed an erasure process (see figure 14).
The user can browse sectors one by one or jump to a particular sector using the Set Sector
button.
Figure 14. Data Viewer Screen
Ove rriding D ef aults
Select a bay that has a drive inserted by touching that specific bay on the screen. This will
take you to the Overrides Screen, listing the default actions to be taken (see Figure 15).
These defaults are established by the Administrator but may be overridden by a user on
any drive that is inserted into the Digital Shredder.
Page 22

DS-200 DIGITALSHREDDER User Manual
20
Figure 15. Overrides Screen
Pro ces si ng a Dr iv e
CAUTION: ATTEMPTING TO REMOVE A PERSONALITY BLOCK WHILE A
DRIVE IS IN PROCESS CAN RESULT IN DAMAGE TO THE DIGITAL
SHREDDER.
Now that your option selections are made, begin processing the drive by selecting the
“RUN” option (see Figure 16).
Page 23

DS-200 DIGITALSHREDDER User Manual
21
Figure 16. Drive Process Status Screen
The Status Field will indicate the drive’s progress. Remember that most erasure activities
are lengthy processes, taking anywhere from a half hour to several hours depending on
the size of the drive and the erasure method selected.
During processing, the Personality Blocks are locked down by solenoid locks that are
engaged upon block insertion. This precaution ensures that the erasure process is not
interrupted and allows the operator to safely leave the machine in a running state. When
the process has completed, the screen will revert to the Drive Ops screen and the EJECT
button can be used to unlock the drive bay and remove the drive.
During the erasure process the indicator LED will turn RED.
During the erasure process, you may continue to process other drives in the other
available bays.
Removing a Dr ive
To remove a drive, you must first select the “Eject” option located at the top of each bay
status area on the Drive Ops Screen (see Figure 17).
Page 24

DS-200 DIGITALSHREDDER User Manual
22
Figure 17. Drive Ops Screen
Selecting the “Eject” option will unlock the bay and allow for device removal. Drives
may be removed at any time, however, if you select “Eject” while the drive is being
processed, it may take several seconds for the DS-200 to suspend operations and release
the drive. In this event, no certificate will be printed for the drive and the audit log will
contain entries showing that the process was aborted prematurely.
History S cr een
The History Screen is used to access the audit log of the DS-200. Numerous activities are
logged by the DS-200 including login, logout, and drive operation status messages. This
log can be reviewed in chronological order or searched using several parameters (see
Figure 18).
Page 25

DS-200 DIGITALSHREDDER User Manual
23
Figure 18. History Screen
Back Return to System Config Screen.
Purge Erase the current audit log, this function is limited to administrator level
users only. You should always conduct an Export before using this
function.
Search Allows user to review selected records based on User-Entered criteria.
Export Copy entire contents of audit log to external USB drive (see explanation in
the ‘Exporting History Data’ section).
History Se a rc h S c re en
The History Search screen can be used to view a subset of the event log by filtering the
log based on a date range, a hard drive serial number, or a specific user (see Figure 19).
These results are displayed on screen only and cannot be exported. Only a system
administrator may perform an export, and only the entire log can be exported.
Page 26

DS-200 DIGITALSHREDDER User Manual
24
Figure 19. History Search Screen
Back Return to History Screen
Clear Reset all search fields to blank and OFF
OK Run Search
Sea rc h Fi el ds
All of the search fields can be enabled or disabled. Enabled fields are used in
combination. For example, specifying a date range and a user ID will give you all records
for that user during the specified date range.
Date – Selecting the keyboard icon next to the Date field will bring up the History Date
Search screen (see Figure 20). Entering only a start date will result in all records greater
than the date, entering only an end date will result in all records less than the date.
Page 27

DS-200 DIGITALSHREDDER User Manual
25
Figure 20. History Search Date Screen
Serial Number – Selecting the keyboard icon next to the Serial Number field will bring
up the Drive Serial Number Entry screen (see Figure 21). Partial strings are acceptable.
Figure 21. Drive Serial Number Entry Screen
User – Selecting the keyboard icon next to User field will bring up User Identity Entry
screen (see Figure 22). Using the keypad, enter the User ID.
Page 28

DS-200 DIGITALSHREDDER User Manual
26
Figure 22. User Identity Entry Screen
Type – Selecting the Type button bring up a drop down list (see Figure 23). Using the
drop down list select the type of event to search or select ALL to include all records.
Figure 23. History Search Screen
Page 29

DS-200 DIGITALSHREDDER User Manual
27
Exporti ng H istory Data
Select History from the System Config screen and then the Export button to get to the
Export History screen (see Figure 24).
Figure 24. History Data Export Screen
You will be prompted to insert a USB drive into the USB port in the back of the unit.
Once the USB drive is recognized, you will see the following screen (see Figure 25).
Figure 25. History Data Export Screen
Page 30

DS-200 DIGITALSHREDDER User Manual
28
Now select the “EXPORT” option. The entire audit log will be copied to the USB drive
in CSV format. The file name will be based on the current date. (e.g. 20060904-224207log.csv).
Once the export is complete, please remove the USB drive from the unit. You may now
load this file into Excel or another program to create custom reports.
Page 31

DS-200 DIGITALSHREDDER User Manual
29
OTHER ACT IVITIES
Tu rn ing the DS-2 00 Of f
Never unplug the DS-200. Always use the Power button to power down the DS-200.
When the DS-200 is idle, depressing the Power button will cycle the unit OFF.
Depressing the Power button while the DS-200 is processing a drive will NOT result in a
shutdown of the unit. The DS-200 cannot be powered down while a drive is being
processed. Loss of power during any drive process may leave the drive in an unusable
state. It is recommended that the DS-200 be connected to an Uninterruptible Power
Supply (UPS) to avoid unintended loss of power.
Warning: Do not transport the Digital Shredder with hard drives in any of the bays.
Tes ting the Pr inte r
You may want to test the printer before processing any drives. This test can be useful to
perform if the DS-200 has been relocated, or the printer cartridge has been changed.
From the System Config screen, select the “Printer” option and the Printer Setup screen
will appear (see Figure 26).
Figure 26. Printer Setup Screen
Select the “Test Print” option to send a label format test to the connected printer.
Page 32

DS-200 DIGITALSHREDDER User Manual
30
Figure 27. Printer Setup Screen
Select “OK” once you have confirmed that the printer is connected and power is on.
Figure 28. Printer Setup Screen
It may take up to 30 seconds to complete this test; please be patient and do not repeat the
test until this time has elapsed or you will get multiple test labels.
Page 33

DS-200 DIGITALSHREDDER User Manual
31
Printe r Suppli es
The supplied Brother PT-18R printer uses standard ½” TZ tape cartridges which are
available at most office supply stores.
Im aging a D ri ve
An image created using the DS-200 is an exact binary copy of a source drive to a target
drive. The image process includes not only ALL files but partition information as well.
To image a drive you need two drives, a source drive and a target drive. The target drive
must be at least the same size as the source drive in order to make a complete copy. The
target drive should be high level formatted (most drives are today). It does not matter if
the target and source drives are the same manufacturer or model number. In fact they can
even be different formats (3.5” v 2.5”).
The imaging process will overwrite any existing partitions on the target drive. This is a
necessary part of creating an exact image of the source drive. If the target drive is much
larger than the source drive, this can result in a significant amount of ‘unpartitioned’
space on the target drive.
Place the source drive in Bay C (far right drive bay), as this is the default bay for source
drives and cannot be changed. Whenever you are imaging drives, the source drive must
go in Bay C. Place the target drive in either Bay A or B.
It is also possible to image a target drive without executing an erasure process. This is
recommended as a time saving measure to be used when the target drive is new or
previously erased.
Simply place the source drive in Bay C as usual, and the target drive in Bay A or B,
select the target drive from the Drive Ops screen once it is recognized, then call up the
Options screen. Turn off all activities except the Image option, exit the screen and run the
process.
The progress indicator will show you an estimate of how much longer until completion.
When the process is complete, remove the two drives.
Page 34

DS-200 DIGITALSHREDDER User Manual
32
Repr inti ng a C ert ifi ca tion L abe l
Go to the System Config and select the “History” option. Then go to the Search screen
and enter in the search criteria for the drive in question. Select the Run Complete record
from the results screen by touching it, then select the “REPRINT” option. Note that the
REPRINT option is only available for drives that have successfully completed an erasure
process. Additionally, multiple certificates may be printed by default by selecting the
number of certificates in the Default Screen.
Ba ck ing Up and Restor ing your Digital Sh red der Sof twar e
The Update Process automatically creates a backup of the currently installed version
before proceeding with the update process. In the event the Update Process results in an
error, or for any other reason you need to restore your DS-200 to the prior version of the
software, simply go to the Restore Screen. Once you have confirmed that the backup
exists select the “Restore” option (see Figure 29).
Figure 29. Software Backup Screen
Page 35

DS-200 DIGITALSHREDDER User Manual
33
Updating Digita l Shredde r So ftwa re
To begin the update process you must first download the most recent version of the
software from EDT’s Corporate website at www.deadondemand.com/support/update.php
and then follow the instructions below:
1. Download the most recent version of the software and save it to your computer.
2. Connect USB Drive to your computer.
*USB DRIVE REQUIREMENTS: The USB drive MUST BE at least 256MB in size,
MUST NOT contain any existing data and MUST NOT be a "smart" USB drive. "Smart"
USB drives are those that contain pre-installed software such as U3 and others.
3. Extract the update package to the folder called "edtds-update". This folder should
be located in the root directory of the USB Drive. If you have not updated your
software previously, you will need to create this folder.
4. Insert the USB drive to the USB port on the back of the Digital Shredder and
navigate to the Software Update Screen by selecting Update from the System
Config Screen. Be sure that all drive bays are empty before inserting the USB
drive. Upon insertion, the new version of the software (as well as any older
versions stored on the drive) should be displayed (note that the “UPDATE” option
is only enabled when a valid update version is present on the USB drive).
Highlight the version to be installed and select the “UPDATE” option to begin the
update procedure (See Figure 30).
5. After the Digital Shredder has installed the software from the USB drive, the
device will reboot in order to complete the update process.
6. Once the unit has rebooted, please remove the USB drive.
Page 36

DS-200 DIGITALSHREDDER User Manual
34
Figure 30. Software Update Screen
If a prior Update operation has created a backup copy of the prior software version, or a
user request was made to create a backup copy, this backup must be removed so the
update can proceed. If you get the following error:
“Cannot do update while backups exist. Would you like to remove backups?”
To remove backups, select “OK.” To abort, select “CANCEL” (See Figure 31).
After removing backups, you will return to the Software Update screen where you can
resume the Update process.
Page 37

DS-200 DIGITALSHREDDER User Manual
35
Figure 31. Remove Backups Screen
The update process automatically creates a backup of the current version so that the prior
version can be restored if necessary. To restore a previous software version, select the
“Restore” option on the System Config Screen. Previous backups will be displayed if
present on the USB drive, from which you can highlight a specific backup version and
select “OK” to execute the software restoration.
When you have completed your backup or update procedure, select the “EJECT” option
to remove the USB drive safely.
Ac c ess ori es Fo r You r DS- 200
There are several useful accessories for your DS-200, including a hard shell travel case,
and a variety of Personality Blocks for different drive interfaces and form factors. Please
visit www.deadondemand.com to learn more.
Page 38

DS-200 DIGITALSHREDDER User Manual
36
Tr oubl eshooting
Topic
Solution
Digital Shredder Will Not Power On:
For those units equipped with a power supply that
allows for the manual switching of the voltage
input, please ensure the unit is set to the appropriate
voltage for your location before connecting the
power cord.
Check Power Cord Connection. Ensure that the
outlet in use is active and functional.
Printer Will Not Power On:
Make sure battery is properly installed. (Consult
Printer Manual) Ensure A/C adapter is connected to
printer and functional wall outlet. Confirm that
Printer is Not “Asleep” in Power Save Mode.
Printer is Connected Properly, but failed to Print
Certificate:
Printer will go into an Automatic Power Save mode
after five (5) idle minutes on battery power, and
after sixty (60) idle minutes on A/C power. Power
button must be pressed to reactivate Printer.
Additionally, check the level of the tape cartridge.
Replace if required.
Hard Drive Does Not Fit Personality block:
Try the drive in another block. Never force the
drive. If no block in your possession works, please
consult your Sales Representative to see if another
block is available for your drive type.
Note: Some pre-2000 drives may not be compatible
with available Personality Blocks.
Hard Drive Failed to be Recognized:
Remove the block with the hard drive in question.
Reconnect the drive to the block confirming a firm
connection. Reinsert the block and attached drive to
the unit.
USB Drive Connectivity:
Some USB drives may experience lack of
connectivity with the Digital Shredder, impeding a
Software Update or Log Export. Linux Certified
USB drives are recommended.
Date/Time is Not Correct in Log or Certificate:
Proceed to the DS-200 Main Menu. Select the
Date/Time button. Enter the correct Date/Time in
the appropriate fields. Correct Date/Time will now
be reported.
Lost Username/Password:
If a User-level username and/or password is lost,
please have an Administrator reset this account.
If all Admin-level users are unable to log-in, please
contact your Service Representative.
Unit Will Not Power Down:
All active processes must be completed before the
unit will power down.
Page 39

DS-200 DIGITALSHREDDER User Manual
37
Where To G et H elp
Please visit EDT’s website to review The Digital Shredder’s Frequently Asked Questions
page at www.deadondemand.com/products/digitalshredder/faqs.php.
If you have a specific technical question or need to report a problem with your Digital
Shredder, please contact EDT’s Technical Support Team:
T: 877.338.6246 x701 (U.S. Toll Free)
T: 603.766.3830 x701 (Outside the U.S.)
support@deadondemand.com.
If you own a DS-200 and are interested in purchasing additional units please contact
EDT’s Sales Team:
T: 877.338.6246 x702 (U.S. Toll Free)
T: 603.766.3830 x702 (Outside the U.S.)
sales@deadondemand.com.
Specifications
Voltage:
100-240VAC
Current:
5A RMS @ 115 VAC, 2.5A RMS @ 230 VAC
Watts:
575W
Frequency:
47-63Hz
Temperature Range:
Operating: 0° to 35°C (32° to 95°F)
Storage: -40° to 65°C (-40° to 149°F)
Relative Humidity:
Operating: 10% to 90% (non-condensing)
Storage: 5% to 95% (non-condensing)
Altitude (maximum):
Operating: -15.2 to 3,048m (-50 to 10,000ft)
Storage: -15.2 to 10,668m (-50 to 35,000ft)
Page 40

DS-200 DIGITALSHREDDER User Manual
38
IN DE X
Accessories .........................................................................................................................................................................................................35
Customer Support
Toubleshooting .............................................................................................................................................................................................36
Where to Get Help ........................................................................................................................................................................................37
Digital Shredder Overview
Entering Data .................................................................................................................................................................................................. 7
Features Overview ..........................................................................................................................................................................................6
Personality Blocks ........................................................................................................................................................................................17
Setting Up....................................................................................................................................................................................................... 7
Functions
Adding a User ............................................................................................................................................................................................... 13
Auto-Logout .................................................................................................................................................................................................11
Backing Up Software .................................................................................................................................................................................... 32
Creating a Partition.......................................................................................................................................................................................15
Disk Image.................................................................................................................................................................................................... 16
Drive Operations...........................................................................................................................................................................................16
Editing a User ...............................................................................................................................................................................................11
Exporting History Data.................................................................................................................................................................................27
Format Disk ..................................................................................................................................................................................................15
History Search .............................................................................................................................................................................................. 23
Imaging a Drive ............................................................................................................................................................................................31
Inserting a Drive ........................................................................................................................................................................................... 17
Logging In ......................................................................................................................................................................................................7
Overriding Defaults ......................................................................................................................................................................................19
Overwrite Routines....................................................................................................................................................................................... 14
Printer Supplies............................................................................................................................................................................................. 31
Printer Test ...................................................................................................................................................................................................29
Printing a Certificate..................................................................................................................................................................................... 16
Processing a Drive ........................................................................................................................................................................................ 20
Remove a Drive ............................................................................................................................................................................................21
Reprinting a Certification Label.................................................................................................................................................................... 32
Restoring Software ....................................................................................................................................................................................... 32
Secure Erase ................................................................................................................................................................................................. 14
Setting Permission Levels............................................................................................................................................................................. 13
Setting Up Date and Time............................................................................................................................................................................... 9
Turning the DS-200 Off ................................................................................................................................................................................ 29
Updating Software ........................................................................................................................................................................................33
Viewing Drive Sectors.................................................................................................................................................................................. 19
Viewing Drive Status.................................................................................................................................................................................... 18
Screens
Add User....................................................................................................................................................................................................... 13
Data Viewer.................................................................................................................................................................................................. 19
Date/Time Setup ...........................................................................................................................................................................................10
Default – Overwrite Methods........................................................................................................................................................................15
Default – Overwrite Options......................................................................................................................................................................... 15
Defaults ........................................................................................................................................................................................................14
Drive Ops...................................................................................................................................................................................................... 16
Drive Process Status ..................................................................................................................................................................................... 21
Drive Serial Number Entry ...........................................................................................................................................................................25
Edit User.......................................................................................................................................................................................................12
History .......................................................................................................................................................................................................... 23
History Data Export ......................................................................................................................................................................................27
History Search .............................................................................................................................................................................................. 24
History Search Date ......................................................................................................................................................................................25
Login ..............................................................................................................................................................................................................8
Overrides ......................................................................................................................................................................................................20
Printer Test ...................................................................................................................................................................................................29
Software Backup...........................................................................................................................................................................................32
Software Update ...........................................................................................................................................................................................34
System Config ................................................................................................................................................................................................9
User Identity Entry........................................................................................................................................................................................ 26
User Maintenance .........................................................................................................................................................................................12
Specifications...................................................................................................................................................................................................... 37
Page 41

DS-200 DIGITALSHREDDER User Manual
39
ENSCONCE DATA TECHNOLOGY
100 Market Street, Suite 400
Portsmouth, NH 03801 USA
T: 877.338.6246 (U.S. Toll Free)
T: 603.766.3830 (Outside U.S.)
F: 603.766.3833
www.deadondemand.com
 Loading...