

Edsal MRWB52COS User Manual
Heavy Duty Work Bench
Heavy Duty 5’
Work Bench
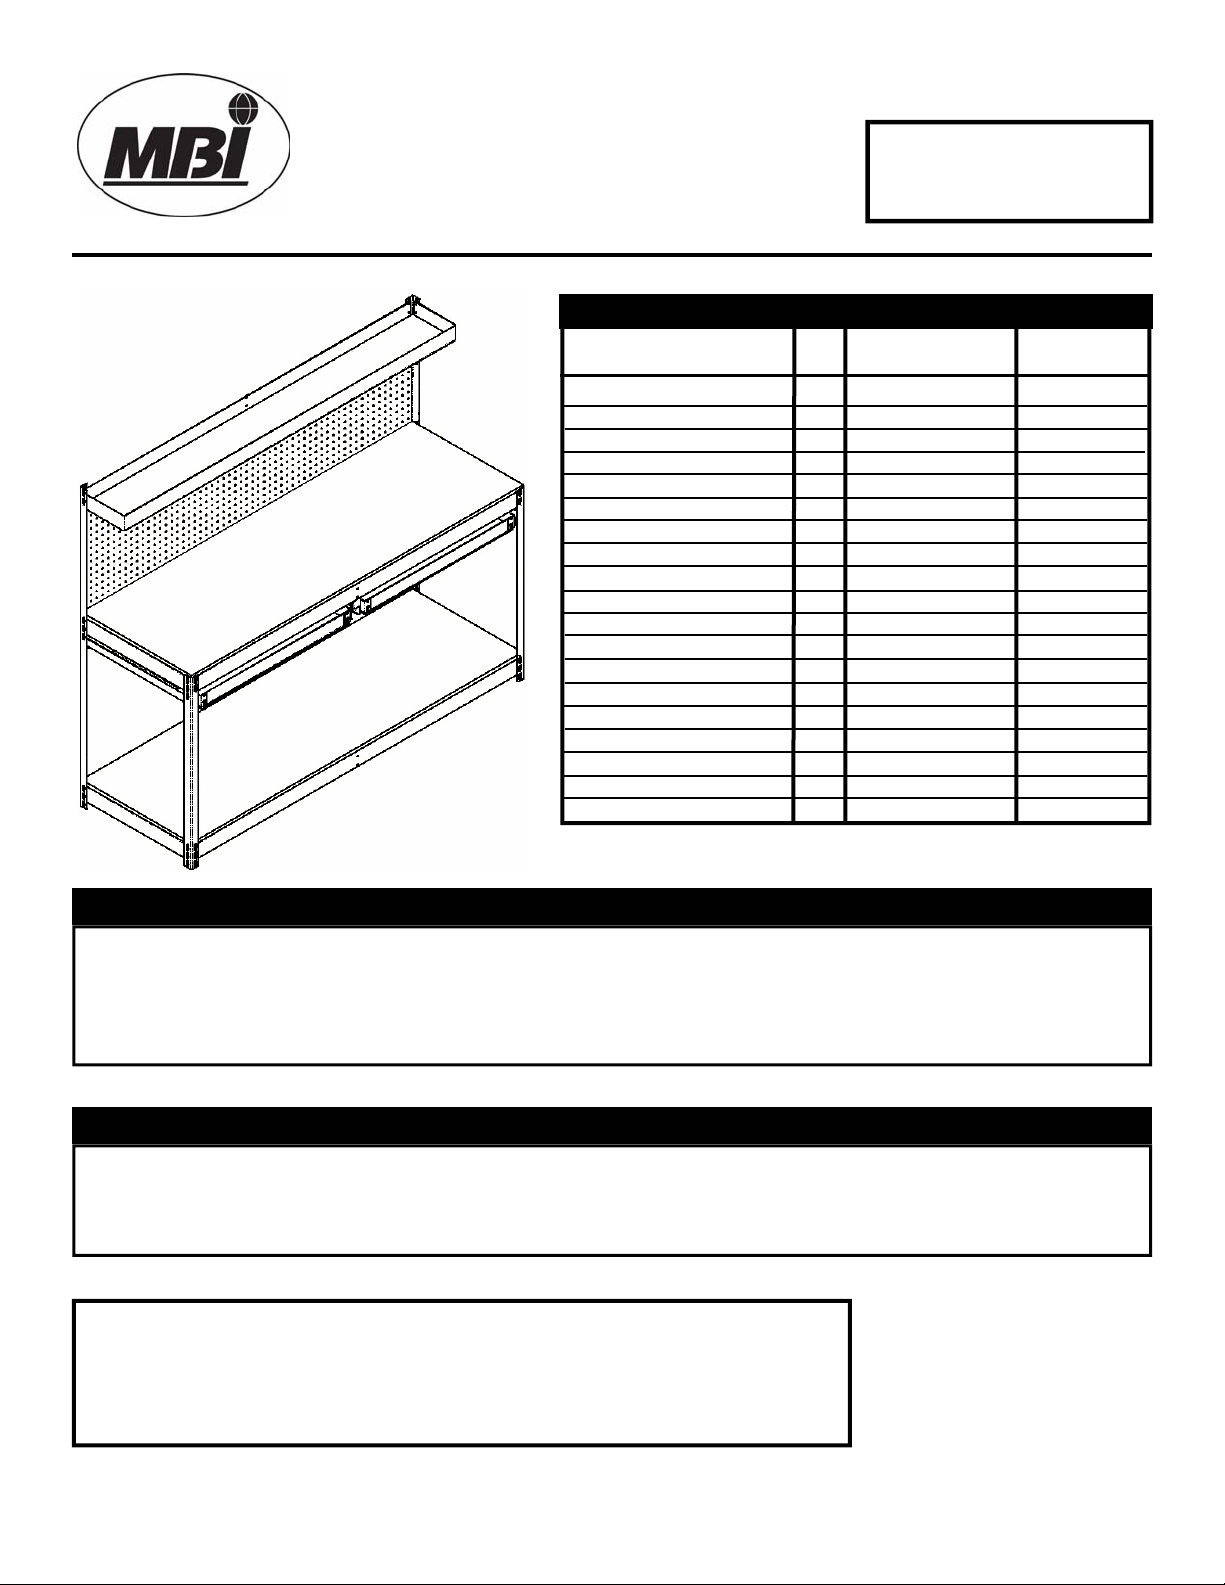
MODEL NUMBER
MRWB52COS
MRWB52COS 3 Shelf 2 Drawer
MRWB52COS 3 Shelf 2 Drawer
MRWB52COS 3 Shelf 2 Drawer
Description
Long Post
Brace
Beam
Short Post
Shelf Support
Top Shelf Beam
Drawer Mount
Drawer Slide
Drawer Shelf Brace
Peg Board
Bottom Wood Shelf
Center Bracket
Center Drawer Mount
Peg Board Bracket
Drawer Wood Shelf
Top Wood Shelf
Work Surface Top
Hardware
Light Fixture
Qty.
2
4
5
2
2
1
2
4
4
1
1
2
2
2
2
1
1
12
1
-
60”h x 24”d x 60”w
-
60”h x 24”d x 60”w
-
60”h x 24”d x 60”w
Part Number
RUPT6002
RWBE2303
RWBE6003
RUPT3602
RWSB2801 M
RWSS7702
RWDM2305
RWDS2003
RWDB2502SLV
PGBD6020
RLPB2460
RWBR0303
RWDM2303
RWPB0401
RPB2617
RPB0960
ST2460
NB12
N/A
Part Size
60”
24”
60”
36”
N/A
N/A
N/A
N/A
26”
20” x 60”
24” x 60”
N/A
N/A
N/A
26” x 17”
9” x 60”
24” x 60”
#10-24
N/A
Safety Instructions
Safety Instructions
Safety Instructions
These units should be placed on a level surface. Failure to do so can result in poor product performance or create a
possible safety hazard. This unit should be securely anchored to a wall or floor with suitable fasteners, which are not
included. Do not use this unit for anything other than the manufactures intended purpose. DO NOT STAND ON ANY
PART OF THE UNIT, OR USE IT AS A LADDER. Evenly distribute the weight on each level and always keep the
heavier loads on the bottom. Use care when working with metal parts.
General Instructions
General Instructions
General Instructions
Assembly is done with the rivets of the beams and braces fitting into the slots of the post. A rubber mallet may be used
on the beams and braces to seat the rivets properly. A hammer can also be used, providing one uses a cloth or a block
of wood between the hammer head and the parts to prevent damage. Tap gently and be sure the rivets are straight and
fully engaged.
Should you have any comments, damage, missing parts, or problems with assembly of this unit please feel
free to contact our MBI / Edsal Manufacturing facility at, (773) 475-3000 and request customer service.
We can also be reached on the internet at the following email address : customerservice@edsal.com.
To obtain replacement parts, please provide the following information :
- Model # - Part # & Description - Location Purchased - Date Purchased
MBI Consumer Products Division
Edsal Manufacturing Company
4400 South Packers Avenue
Chicago, IL 60609
www.edsal.com
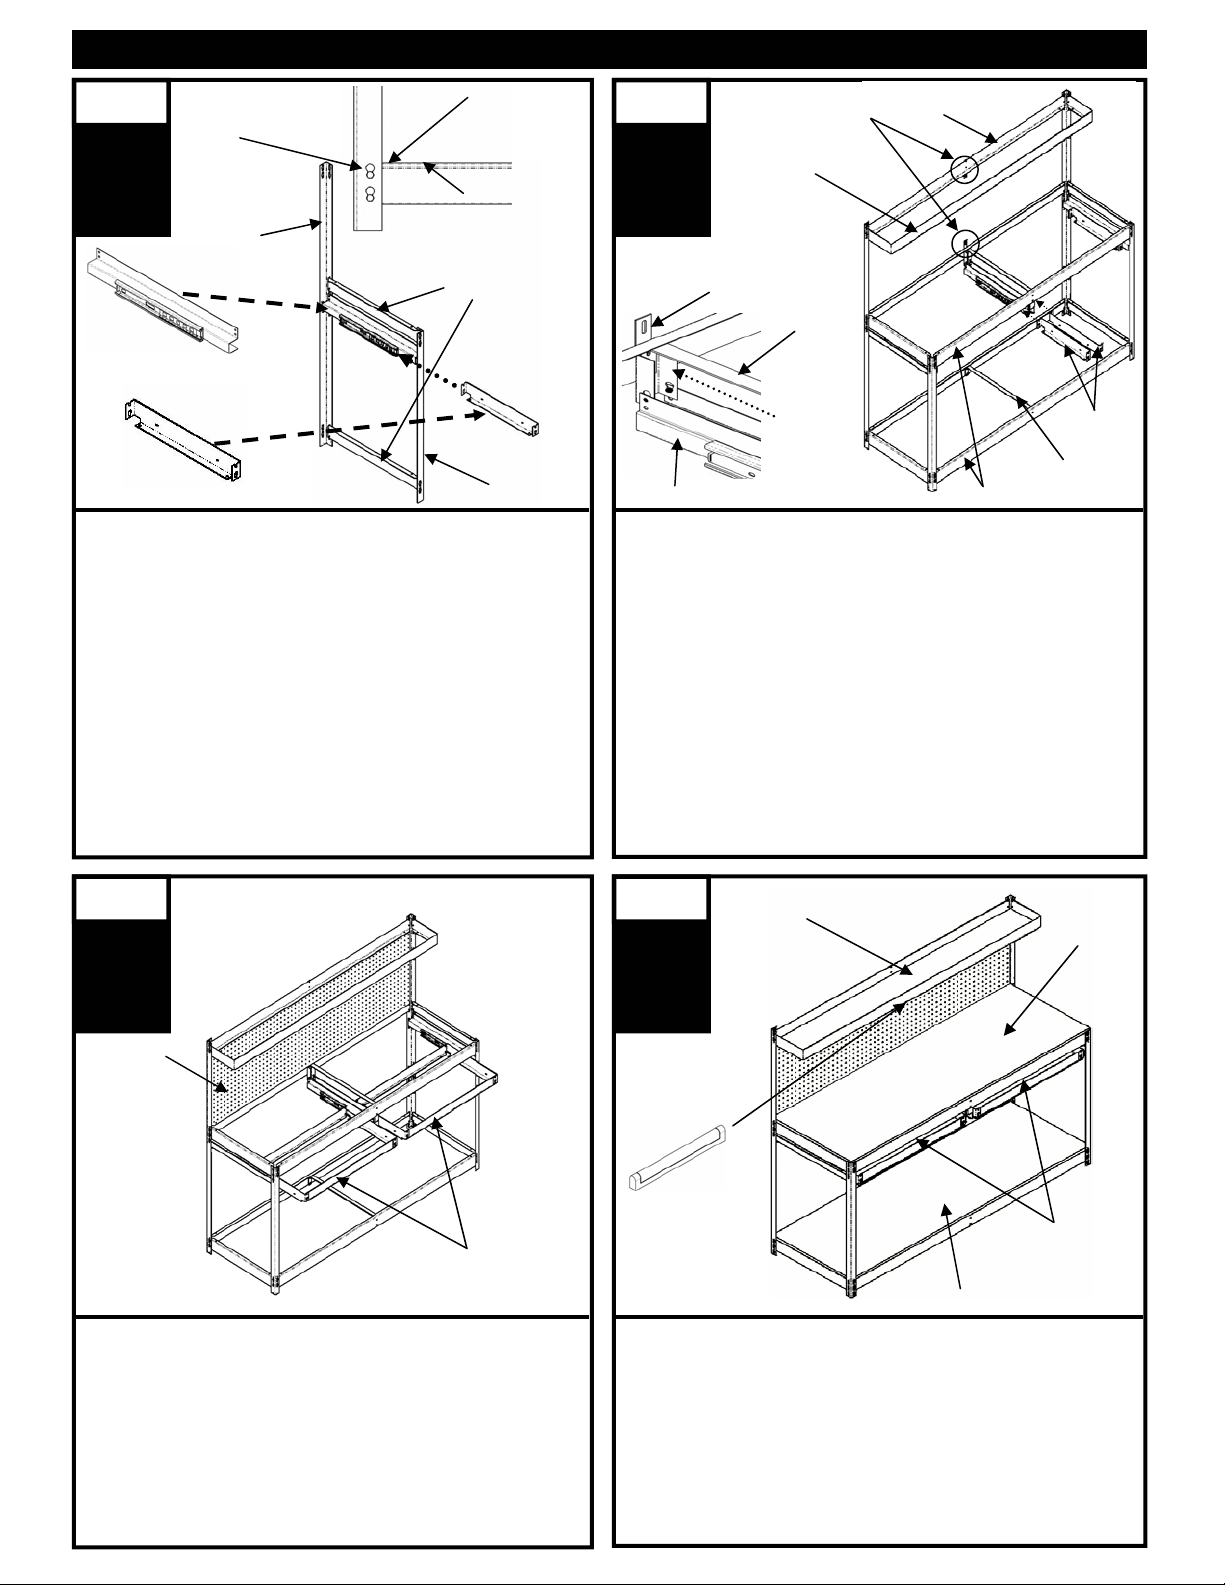
Assembly Instructions for MRWB52COS
Assembly Instructions for MRWB52COS
Assembly Instructions for MRWB52COS
Step
Post are directional.
The slot must point
down.
1
Long Post
Drawer Mount
Drawer Slide
Take two (2) 24” braces with the shelf ledge facing up,
and one (1) short 36” post and attach rivets from the
brace to the top two (2) holes of the short post. Take
one (1) long 60” post and attach the opposite end of the
brace to the holes of the long post so the brace is
level, tap the brace down to seat. Attach the bottom
brace to the short 36” post using the bottom holes, and
the opposite end to the long 60” post, tap the brace
down to seat. Take one (1) drawer mount and attach
the rivets to the short and long post holes located just
below the 24” braces, and tap down drawer mount to
seat. take one (1) drawer slide and insert it into the
slide of the drawer mount. Repeat this step for the opposite end assembly.
Tap Lightly
Shelf Ledge Up
24” Brace
Short Post
60” Beam
Step
Peg Board Brackets
Top Shelf Beam
(Bend facing down)
2
Figure A
Peg Board Bracket
Shelf Support
Center
Mounting
Bracket
Center Drawer Mount
Take four (4) 60” beams with the bend facing up, and attach
the rivets even with the braces from the two end assembly's,
and tap down to seat. Install the top shelf beam and one (1)
60” beam with the bend facing down, to the top holes of the
back posts. Next install a peg board bracket to the beam of
the top assembly using the nuts and bolts provided. Assemble the center drawer assembly by taking a peg board bracket,
one (1) shelf support, and one (1) center mounting bracket
and bolt them to the work surface back beam (see figure A).
Next bolt the shelf support bracket, and the last center mounting bracket to the opposite beam. Attach the two (2) center
drawer mounts by placing the rivets into the holes of the center mounting brackets. Insert the drawer slides into the center
drawer mount slides. Add the final shelf support to the bottom two (2) beams using the nuts and bolts provided.
60” Beams
Drawer Slides
Shelf Support
Step
3
Peg Board
26” Drawer Shelf Braces
(Bend facing down & the same
for back of drawer slides also)
Place the peg board to the inside of the back post of the work
bench. Using the first hole from the top of the back post,
align the holes of the peg board to the holes on the back
post, and fasten using the nuts and bolts provided. Align the
holes on the peg board brackets to the holes of the peg
board, and fasten the peg board to the peg board brackets
using the nuts and bolts provided. Take the four (4) 26”
drawer shelf braces and with the shelf ledge facing down,
insert the two (2) rivets into the two (2) holes located on the
front of the drawer slides.
Step
Top Wood Shelf
Work
Surface
Top
4
Light fixture installs
to the underside of
the top wood shelf.
Bottom Wood Shelf
Add the top wood shelf to the top shelf beam, the drawer
wood shelves to the drawer assemblies, the bottom wood
shelf to the bottom assembly, and the work surface top to
the work surface assembly. Finish the assembly of the
workbench by installing the light fixture to the underside of
the top wood shelf. Install using the hardware and instructions that are provided with the light fixture.
Drawer
Wood
Shelves
 Loading...