

Page 1
®
EDNord - Istedgade 37A - 9000 Aalborg - telefon 96333500
QMS
®
magicolor WX
User's Guide
1800444-001B
Page 2

Trademarks
EDNord - Istedgade 37A - 9000 Aalborg - telefon 96333500
The following are trademarks or regi ster ed trademarks of their res pec tive owners. Other
product names me ntioned in this m anual may also be tradem arks or registered
trademarks of their respective owners. Registered trademarks are registered in the
United States Patent and Trademark Office; some trademarks may also be registered in
other countries. QM S,
Inc. TrueType/Apple Computer, Inc. Windows/Microsoft Corporation. Xerox/Xerox
Corporation. H ammer mill/Hamm er mill. Avery/Avery.
magicolor
, and the QMS logo are registered trademarks of QMS,
Proprietary Statement
The digitally encoded s oftware included with your QMS pr inter is Copyrighted © 199 7
by QMS, Inc. All Rights Reserved. This software may not be reproduced, modified,
displayed, transferred, or copied in any form or in any m an ner or on any media, in whol e
or in part, witho ut the express written per mission of QM S, Inc.
Copyright Notice
This manual is Copyrighted © 1997 by QMS, Inc., One Magnum Pass, Mobile, AL
36618. All Rights Re served. This m anual may not be copied in wh ole or in par t, nor
transferred to any other media or langu age, without the express written p ermiss ion of
QMS, Inc.
Manual Notice
QMS, Inc. reserves the right to ma ke changes to this manual and to the equipment
described herein without notice. Considerable effort has been made to ensure that this
manual is free of inacc uracies and omiss i on s. How ever, QMS, Inc. makes no warr an t y
of any kind including, but not limited to, any implied warranties of merchantability
and fitness for a particular purpose with regard to this manual. QMS, Inc. assumes
no responsibility for, or liability for, errors contain ed in this manual o r for incidental,
special, or conseq uential damag es arising ou t of the furnish ing of this manual, or the
use of this manual in operatin g the equip ment, or in con nection with the perform anc e of
the equipment when so operated.
Page 3
Typographic Conventions
EDNord - Istedgade 37A - 9000 Aalborg - telefon 96333500
The following typographic conventions are used in this manual:
Mixed-Case
Courier
Mixed-Case
Italic
Courier
UPPERCASE
COURIER
lowercase ital ic
UPPERCASE File and utility names
↵ Press the Enter key (PC)
» Note:
Notes contain tips, extra information, or important information
Text you type, and messages and information
displayed on the screen
Variable text you type; replace the italicized
word(s) with information specific to your printer or
computer
Information displayed in the printer message
window
Variable information in text
that deserves emphasis or reiteration.
▲ Caution:
Cautions present information that you need to know to avoid
equipment damage, process failure, or extreme annoyance.
M WARNING!
Warnings indicate the possibility of personal injury if a
specific procedure is not performed exactly as described in the
manual.
ACHTUNG!
Bitte halten Sie sich exakt an die im Handbuch
beschriebene Vorgehensweise, da sonst Verletzungsgefahr
bestehen könnte.
v
Page 4

EDNord - Istedgade 37A - 9000 Aalborg - telefon 96333500
Page 5

Contents
EDNord - Istedgade 37A - 9000 Aalborg - telefon 96333500
1 Setup
Introduction ..................................................................................1-2
Find a Good Location ......................................................... .........1- 2
Unpack the Printer .......................................................................1-4
Check Shipment Contents ..........................................................1-6
Set up the Printer .........................................................................1 -7
Install the Developer and Toner Cartridges 1-7
Remove the Pressu re-Rel eas e Piec es 1-12
Install the Cleaning Pad and Oil Bottle 1-14
Install the Waste Toner Pack 1-18
Install the OPC Belt Cartridge 1-20
Fill the Paper Cassette 1-24
Connect the Printer to Your PC and Plug It In 1-26
Install the Printer Driver 1-26
Register the Printer ....................................................................1-29
Page 6

2 Printing
EDNord - Istedgade 37A - 9000 Aalborg - telefon 96333500
Configuring the Windows 95 Printer Driver .............................. 2-2
Setting the Printer Driver Defaults 2-2
Configuring the Print er Driver for the Current Print Job 2-3
Configuring Pape r Options 2-4
Configuring Gra phi cs Options 2-8
Configuring Co lo r Optio ns 2-11
Configuring the Windows NT 4.0 Printer Driver ..................... 2-14
Setting Document Defaults 2-14
Configuring t he Printer Driv er through the Windows NT 4.0 Start
Menu 2-15
Configuring the Printer Driver through the Application 2-15
Configuring Page Setup Opt ion s 2-16
Configuring Advanced Options 2-20
Configuring Halftone Color Adjustments 2-26
Configuring Devi ce Setting s 2-32
Halftone Setup 2-35
Printing on a Network ............................................ ....... ...... ...... 2-40
Sharing Your Printer with Others for Windows 95 Users 2-40
Sharing Your Printer with Others fo r Windows NT 4.0 Us ers 2-41
Sharing Someone Else's Printer 2-43
Refilling the Media Cassette ..................................................... 2-44
Using the Manual Feed Tray ..................................................... 2-47
Printing on Different Types of Print Media .............................. 2-49
Printing Transparencies 2-49
Printing Labels 2-49
Printing on Letterhe ad or Other Prep rin ted Me dia 2-50
Printing on 3-Hole or Other Pre-punc hed Media 2-50
Printing Envelopes 2-50
Printing on Thick Paper Stock s 2-50
More About Print Media ............................................................ 2-51
Print Media Sizes, Imageable Regions, and Margins 2-51
Print Media Types, Weights, and Recommended Brands 2-54
Print Media Storage 2-54
Preventing Media Jams ................ ............................................. 2-55
Preventing Envelope Jams 2-56
QMS magicolor WX User's Guideii
Page 7

Cancelling a Print Job ...............................................................2-56
EDNord - Istedgade 37A - 9000 Aalborg - telefon 96333500
3 Control Panel
Introduction ..................................................................................3-2
About the Control Panel ..............................................................3-3
The Message Window 3-3
The Control Panel Indicators 3-3
The Function Keys 3-5
Printer Configuration ...................................................................3-6
The Configuration Menu 3-7
Accessing the Configuration Menu 3-8
Selecting Configuration Menu Options 3-8
Setting the Message Window Language 3-9
Setting Energy Conservation 3-10
Setting the Media Source 3-10
4 Printer Options
Available Options and Accessories ............... ....... ...... ...... ....... ..4-2
Sheet Feeder .................................................................................4-2
The Envelope Cassette ................................................................4-6
Installing the Envelope Cassette 4-6
Removing and Replacing the Controller Board ......................4-10
Removing the Controller Board 4-10
Replacing the Controller Board 4-11
Single In-Line Memory Modules (SIMMs) ................................4-13
Updating System Software ........................................................4-16
Troubleshooting 4-17
Updating the Windows 95 Printer Driver .................................4-17
Updating the Windows NT 4.0 Printer Driver ...........................4-19
Contents iii
Page 8

5 Maintenance
EDNord - Istedgade 37A - 9000 Aalborg - telefon 96333500
Preventive Maintenance .............................................................. 5-2
General Tips for Extendi ng Print er Life 5-2
Preventive Ma int enance Procedures 5-2
About Consumables .................................................................... 5-3
Consumable Life 5-3
Ordering Consumables 5-4
Storing Consumables 5-4
Replacing Consumables ............................................................. 5-5
Replacing a Toner Cartridge 5-5
Replacing a Developer Cartridge 5-9
Replacing the OPC Belt Cartrid ge 5-14
Replacing the Cleaning Pad and Oil Bottle 5-18
Replacing the Waste Toner Pack 5-23
Cleaning the Printer .................................. ....... ...... ....... ............ 5-25
Guidelines for Cleaning the Printer 5-25
Cleaning the Charger Unit, the Precharger Unit, and the AC-
Charger Unit 5-26
Cleaning the Rollers 5-34
Cleaning the Exterior of Your Printer 5-41
6 Repacking the Printer
Introduction ............................. ...... ............. ............. ............. ........ 6-2
Remove Cables and Cassette(s) ................................................ 6-2
Remove the Toner and Developer Cartridges .......................... 6-3
Remove the Fuser Unit and Oil Bottle ....................................... 6-4
Replace the Fuser-Roller Pressure-Release Pieces ................. 6-7
Remove the OPC Belt Cartridge ............................................... 6-10
Remove the Waste Toner Pack ................................................ 6-12
Repack the Printer ..................................................................... 6-12
QMS magicolor WX User's Guideiv
Page 9

7 Troubleshooting
EDNord - Istedgade 37A - 9000 Aalborg - telefon 96333500
Miscellaneous Problems .............................................................7-2
Blank Pages ..................................................................................7-3
Only a Partial Page Prints ...........................................................7-3
Not All Pages Print .... ................................. ...... ............................7-4
Print Quality Problems ........................................... ...... ...... .........7- 4
Generally Poor Print Quality 7-4
Specific Print Quality Problems 7-4
Changing Print Density 7-10
Printer Status Messages ...........................................................7-11
Clearing Status Mess age s 7-16
Service Call Messages 7-17
Clearing Media Jams .................................................................7-18
Clearing Misfe ed Jams 7-18
Clearing Inner Jams 7-21
Clearing Outer Jams 7-27
If the Media Jam Message Stays On 7-32
Reseating the Drum ...................................................................7-32
Installing the Printer Driver Manually ............. ....... ...... ...... .......7-34
Placing a Service Call ................................................................7-36
A QMS Customer Support
Sources of Support ... ....... ...... ....... ...... ................................ ....... . A-2
Your QMS Vendor A-2
Your Application Vendor A-2
Q-FAX A-2
The QMS Corporate Bulletin Board System A-3
CompuServe A-3
Internet A-3
QMS Customer Response Center (CRC) A-4
QMS World-wide Offices . ...... ....... ...... ....... ................................ . A-5
Contents v
Page 10

B Technical Specifications
EDNord - Istedgade 37A - 9000 Aalborg - telefon 96333500
Print Engine Specifications ................ ...... ....... ...........................B-2
Controller Specifications ............................................................B-3
Environmental Requirements .....................................................B-3
Print Media and Consumables ...................................................B-4
Printer Options ............................................................................B-4
Centronics Parallel Cable Specifications ..................................B-4
Centronics/1284 Parallel Pinouts B-4
Notices ................. ............. ............. ............. ....... ............. ............ ..B-6
Energy Star Compliance B-6
FCC Statement B-6
Laser Safety B-7
Canadian Users Notice B-7
International Notice B-8
Warranty Considerations B-8
Index
QMS magicolor WX User's Guidevi
Page 11

1
EDNord - Istedgade 37A - 9000 Aalborg - telefon 96333500
Setup
In This Chapter . . .
n Finding a good location for the printer
n Unpacking the printer
n Checking shipment contents
n Setting up the printer
n Installing the printer dri ver
n Registering the printer
Page 12

Introduction
EDNord - Istedgade 37A - 9000 Aalborg - telefon 96333500
Introduction
The QMS
technology to produce 300 and 600 dpi color and monochrome documents from PCs using Windows 95 or Windows NT. This chapter
explains how to set up your QMS
first time and install the printer driver for either Windows 95 or Windows NT.
magicolor
WX Print System uses advanced color laser
magicolor
WX Print System for the
Find a Good Location
Use the follo wing guidelin es when selec ting a location for your printer:
n On a hard, level, sturdy surface capable of supporting 106 lbs
(48 kg). (By “level” we mean the surface should be so flat–1° of
slant or less–that you can lay a round pencil down on it, and it
doesn’t roll in any direction.)
n In an area with a moderate temperature and humidity (64°-81° F /
18°-27° C, 60%-70% relative humidity).
n Away from cooling sources, heating sources, extreme tempera-
ture changes, direct sunlight, excessive dust, corrosive chemicals, strong electromagnetic fields (such as that created by an air
conditioner) and excessive vibration. Don’t connect it to the same
electrical outlet as noise-generating equipment.
n Near an electrical outlet (grounded and surge-protected,
120 volts/
n Near the PC—6' (1.8 m) or less for parallel connection.
± 12 volts, 60 Hz/± 2 Hz).
QMS magicolor WX User’s Guide1-2
Page 13
Find a Good
EDNord - Istedgade 37A - 9000 Aalborg - telefon 96333500
Location
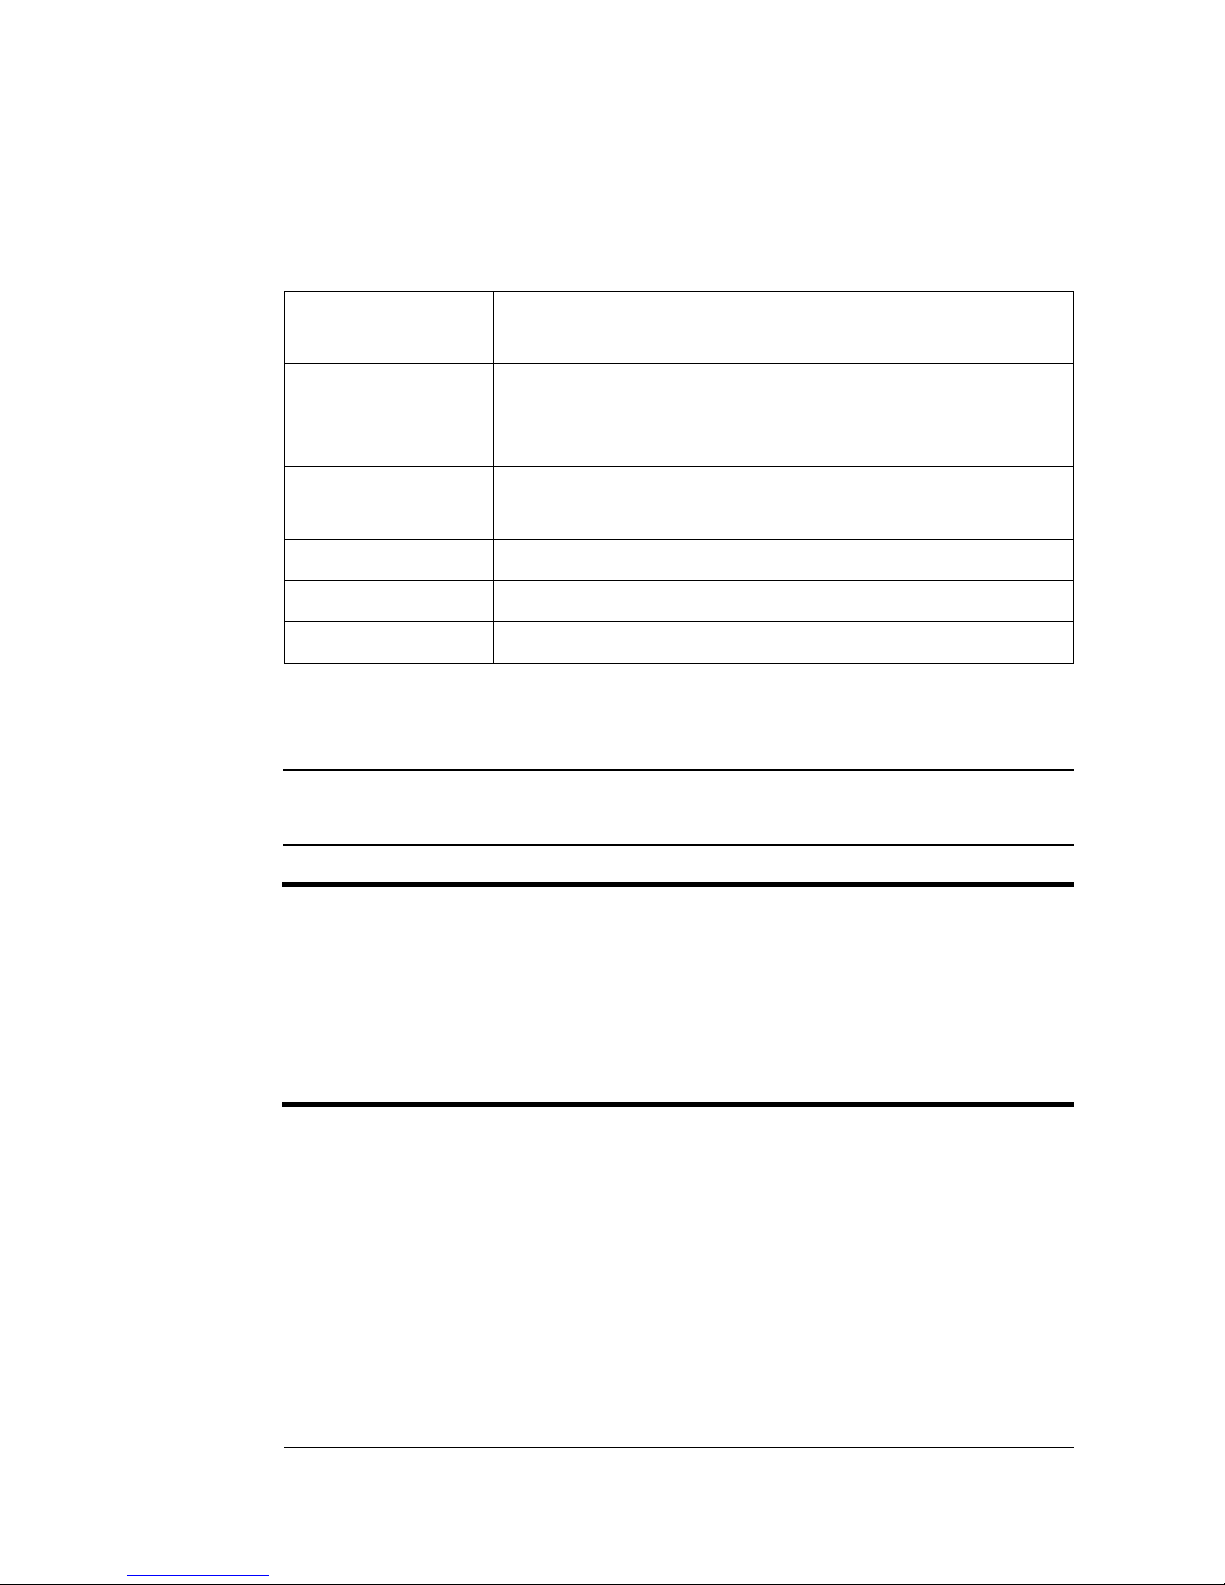
n In an area that allows plenty of space for ventilation and mainte-
nance access:
4"/10 cm
16"/40 cm
28"/70 cm
36"/90 cm
Setup
1-3
Page 14
Unpack the
EDNord - Istedgade 37A - 9000 Aalborg - telefon 96333500
Unpack the Printer
M WARNING!
consumables. Do not attempt to lift the printer by yourself.
ACHTUNG!
versuchen Sie niemals, den Drucker alleine anzuheben oder zu
transportieren.
▲ Caution:
packing materials (explained below) before turning it on.
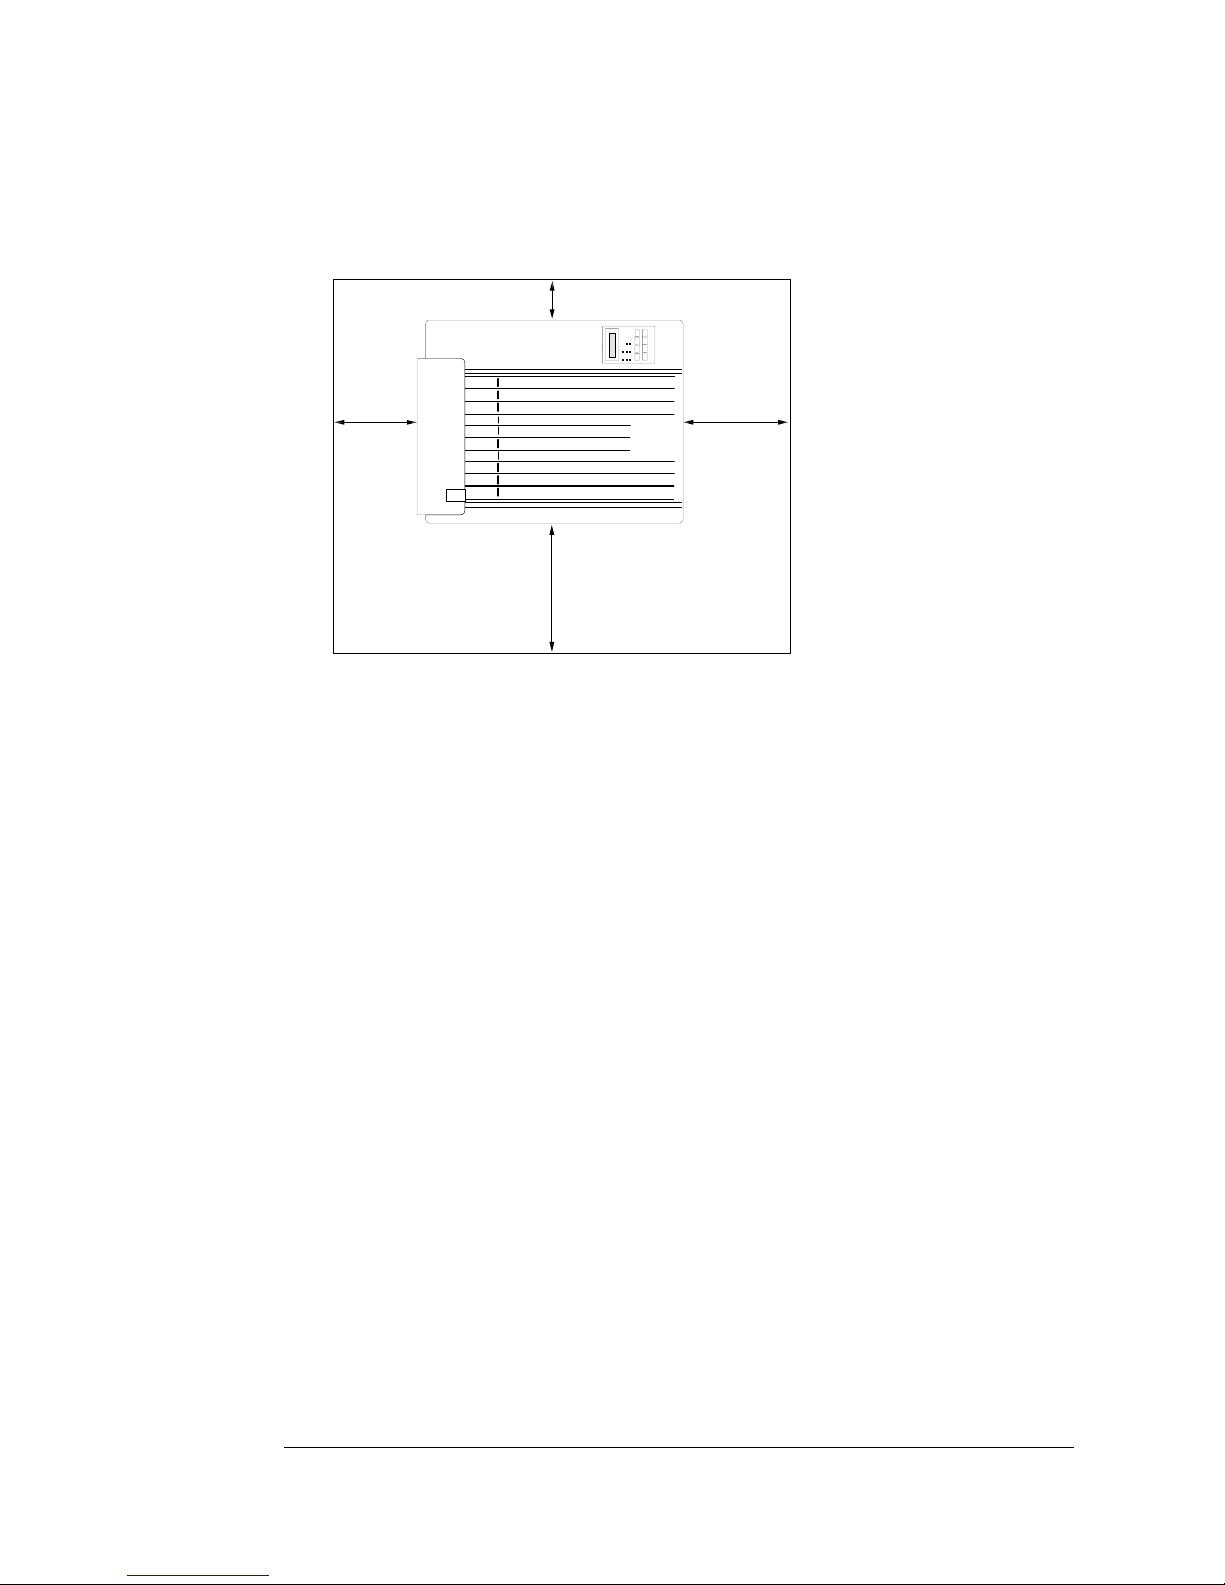
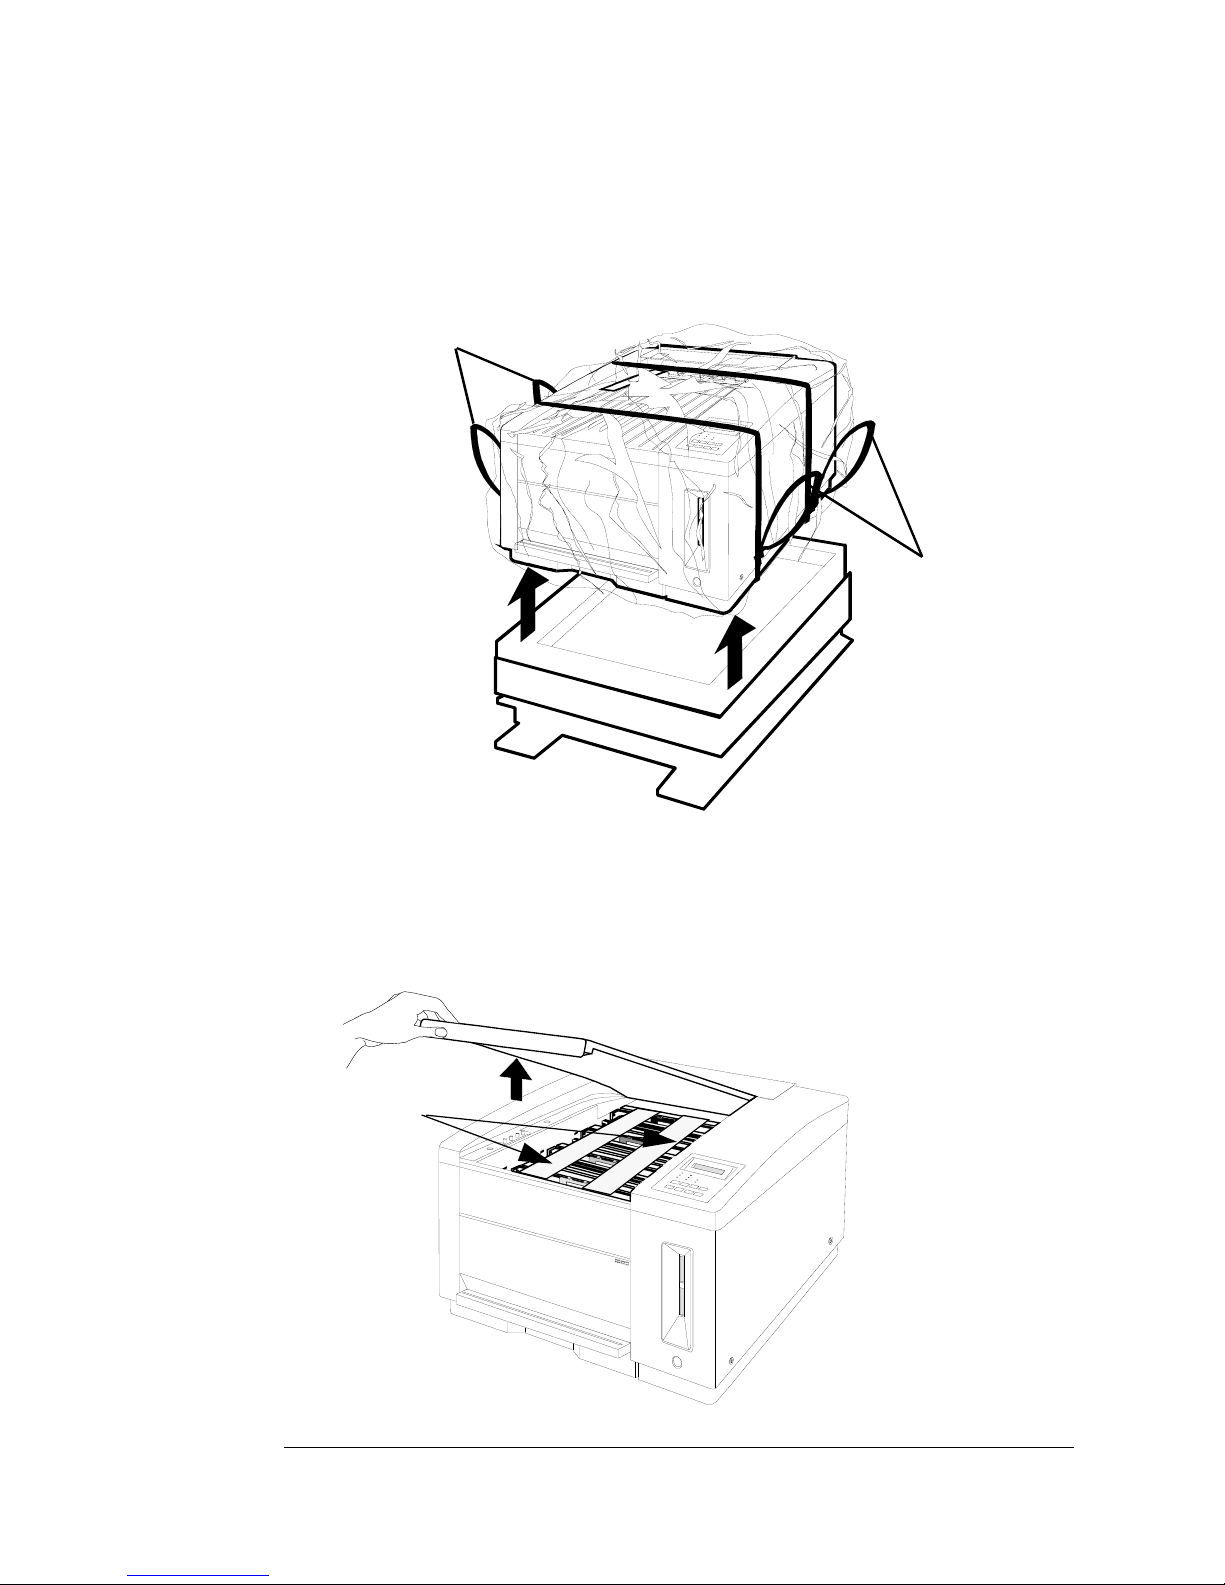
1 Remove everything except the printer from the shipping car-
ton (leave the plastic and the straps on the printer), then lift
off the box.
The printer weighs approximately 106 lbs (48 kg) without
Der Drucker hat ein Gewicht von ungefähr 48 kg. Bitte
To prevent damaging your printer, you must remove all
» Note:
them if you ever need to relocate the printer or return it for service.
Store all of the packing materials where you can easily access
QMS magicolor WX User’s Guide1-4
Page 15
Unpack the
EDNord - Istedgade 37A - 9000 Aalborg - telefon 96333500
Printer
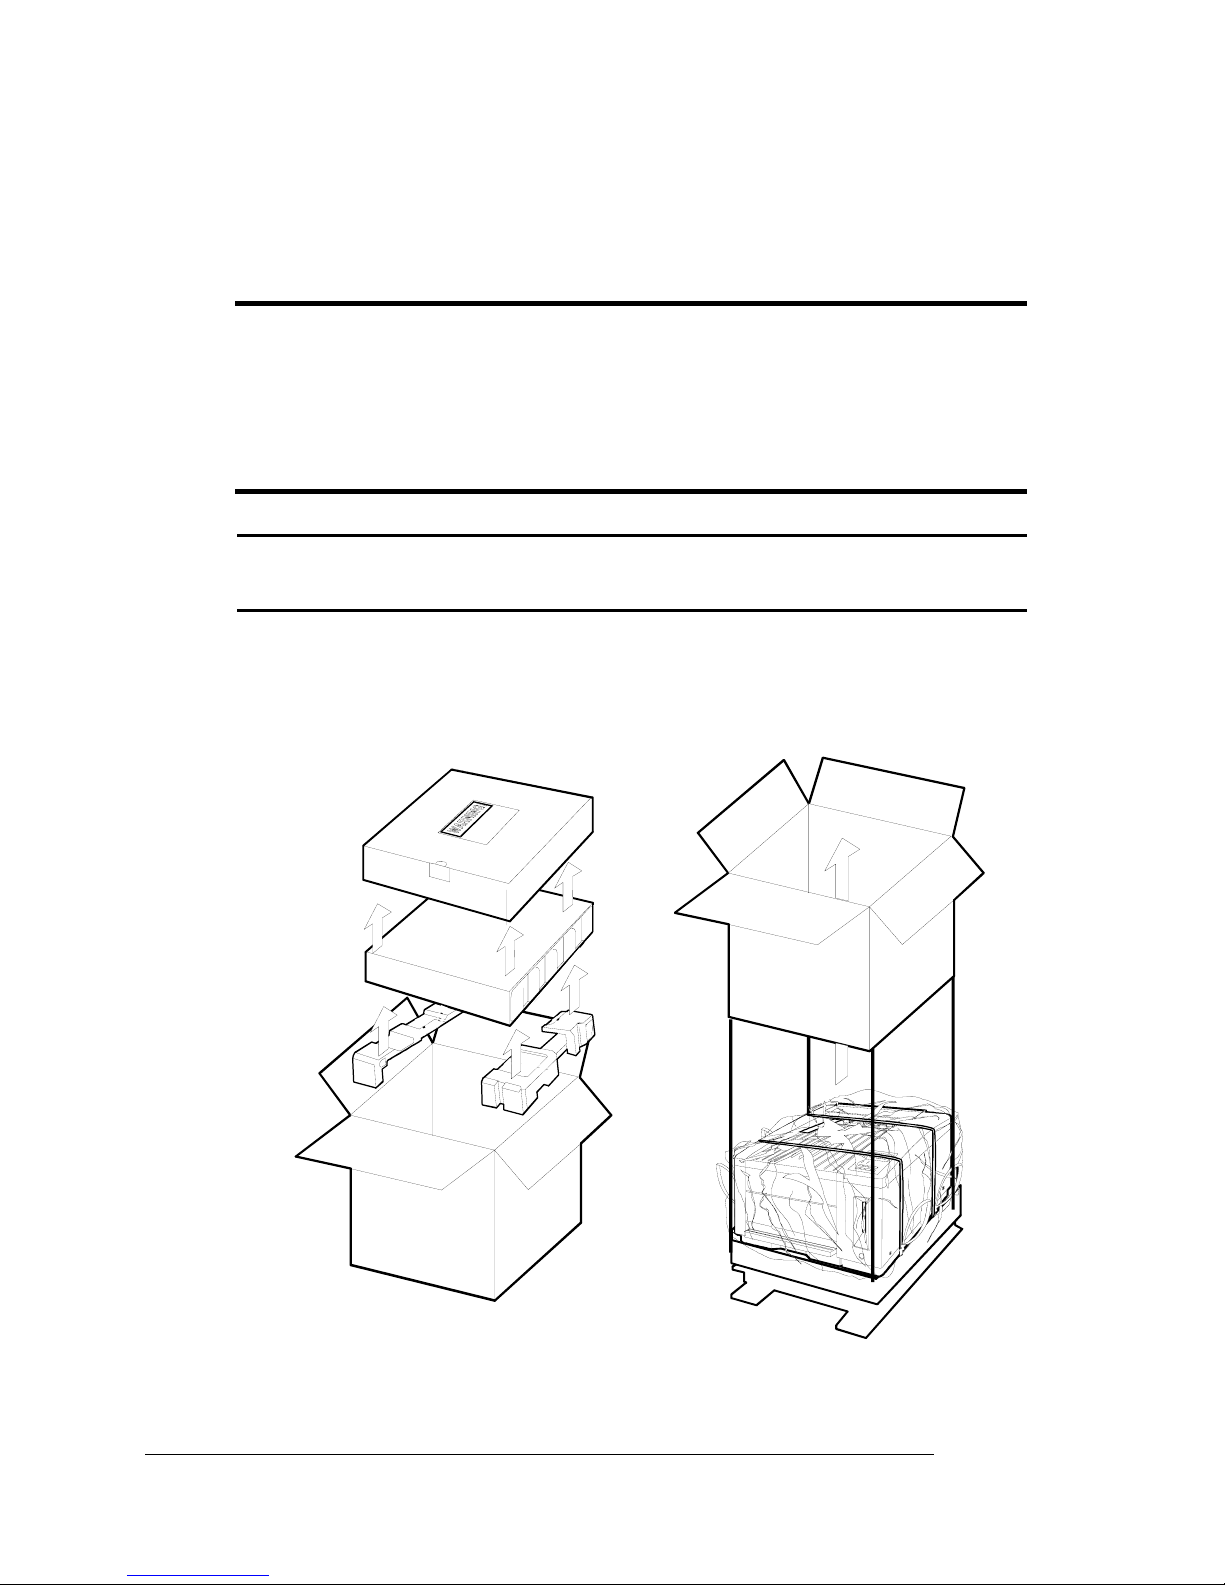
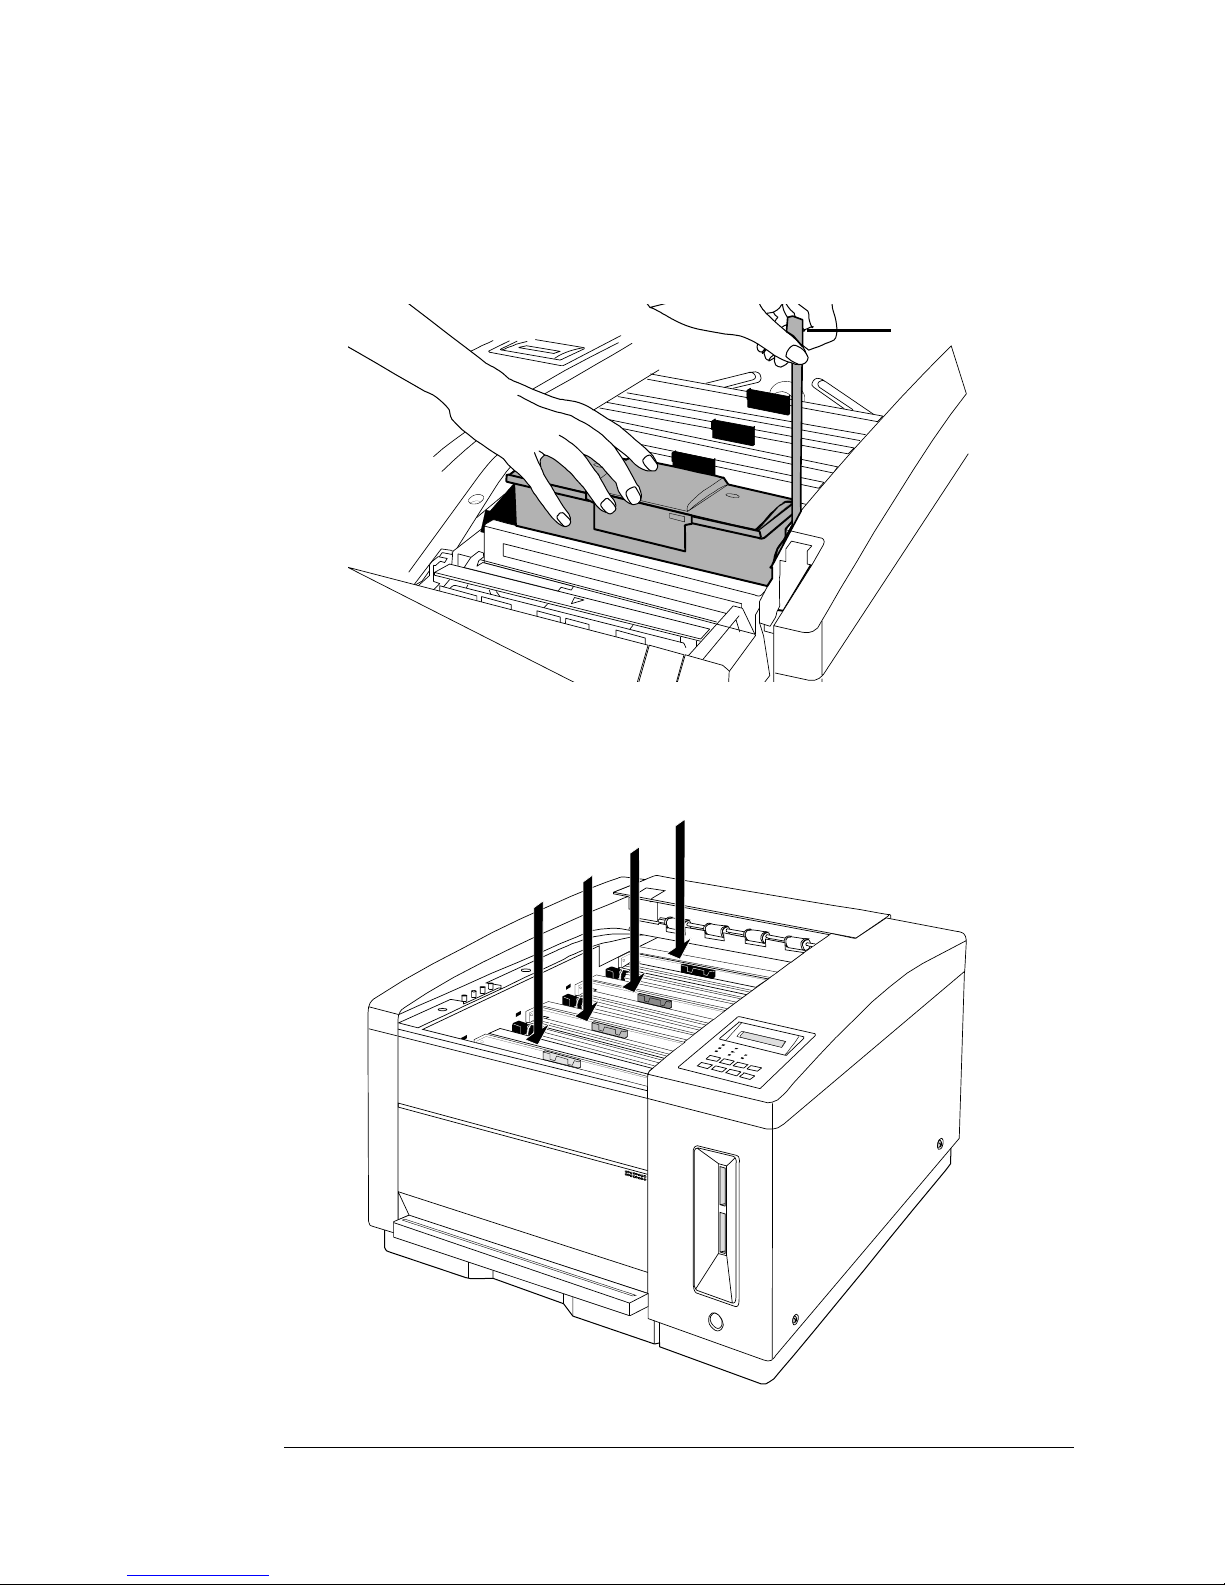
2 Get someone to help you with this step: Use the strap han-
dles provided (two on each side of the printer) to lift the
printer from its carton and place it in a sturdy, level surface.
Strap Handles
Strap Handles
3 Remove the plastic wrap and all packing tape from the
printer.
4 Remove the top cover and remove the packing material fr om
inside the printer.
Packing
Front View
Setup
1-5
Page 16

Check Shipment
EDNord - Istedgade 37A - 9000 Aalborg - telefon 96333500
Check Shipment Contents
In addition to the printer and this manual, the following items are
included in your shipment. If any items are missing or damaged, contact your QMS vendor immediately. Don’t return any merchandise
before contacting the vendor.
n 4 toner cartridges (one each cyan, magenta, yellow, and black)
n 4 developer cartridges (one each cyan, magenta, yellow, and
black)
n Bags for used toner and developer
n Waste toner pack
n 1 oil bottle
n 1 cleaning pad
n Power cord
n Printer driver disk for Windows 95
n Printer driver disk for Windows NT 4.0
n Warranty and registration card
n Universal media cassette
n OPC belt cartridge
▲ Caution:
Don’t remove the cartridge from its protective bag until you’re
ready to install it.
The OPC belt cartridge is sensitive to direct sunlight.
QMS magicolor WX User’s Guide1-6
Page 17

Set up the Printer
EDNord - Istedgade 37A - 9000 Aalborg - telefon 96333500
Set up the Printer
» Note:
the printer sometimes from the front and sometimes from the rear,
depending on which view is best to show you the part we’re installing
at the time. You don’t need to turn the printer while performing these
procedures.
The illustrations accompanying the following procedures show
Install the Developer and Toner Cartridges
M WARNING!
combustible powders; they should not be disposed of by burning.
Also, avoid inhaling loose developer or toner or getting them around
your eyes; they can cause respiratory problems and eye irritation.
ACHTUNG!
Pulver, die leicht enzündlich sind; sie dürfen deshalb niemals mit
offenem Feuer in Beruhrüng kommen. Einatmen oder Berührung mit
Haut und Augen ist ebenfalls zu vermeiden, da dieses zu
Beeintràchtigungen der Atemwege, Haut oder Augenreizungen
führen könnte.
The developer and toner cartridge contain highly
Bei Entwickler und Toner handelt es sich um gefährliche
▲ Caution:
the correct place, exactly as described.
1 Find the black-developer cartridge and remove it from its
protective bag.
Developer cartridges have green handles and a small strip of
plastic on top that indicates their color.
» Note:
access them if you ever need to relocate the printer or return it for
service.
Setup
It’s important to load the developer and toner cartridges in
Store all of the packing materials where you can easily
1-7
Page 18
Set up the Printer
EDNord - Istedgade 37A - 9000 Aalborg - telefon 96333500
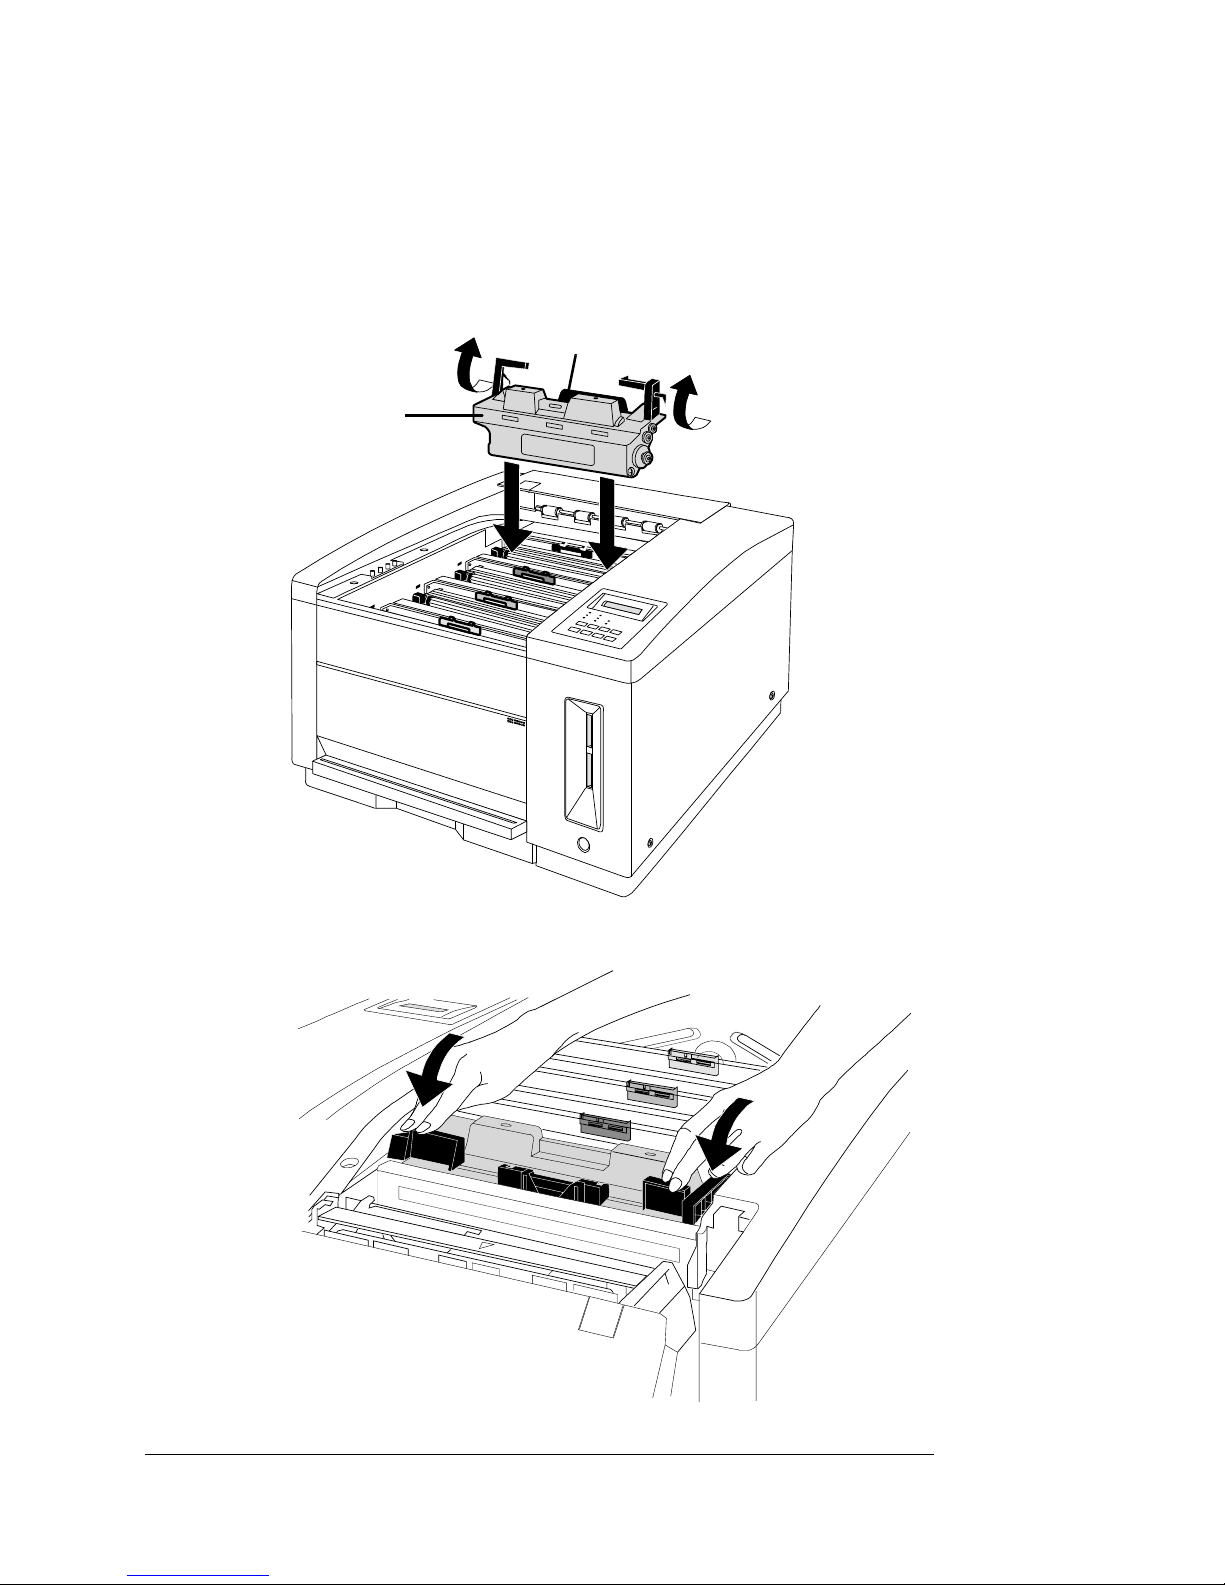
2 Raise the two green latches and lower the cartridge into the
slot closest to the back of the printer.
It should snap into place.
Developer
Cartridge
Color-Coded Tab
Front View
3 Close the developer cartridge latches.
Rear View
QMS magicolor WX User’s Guide1-8
Page 19
Set up the Printer
EDNord - Istedgade 37A - 9000 Aalborg - telefon 96333500
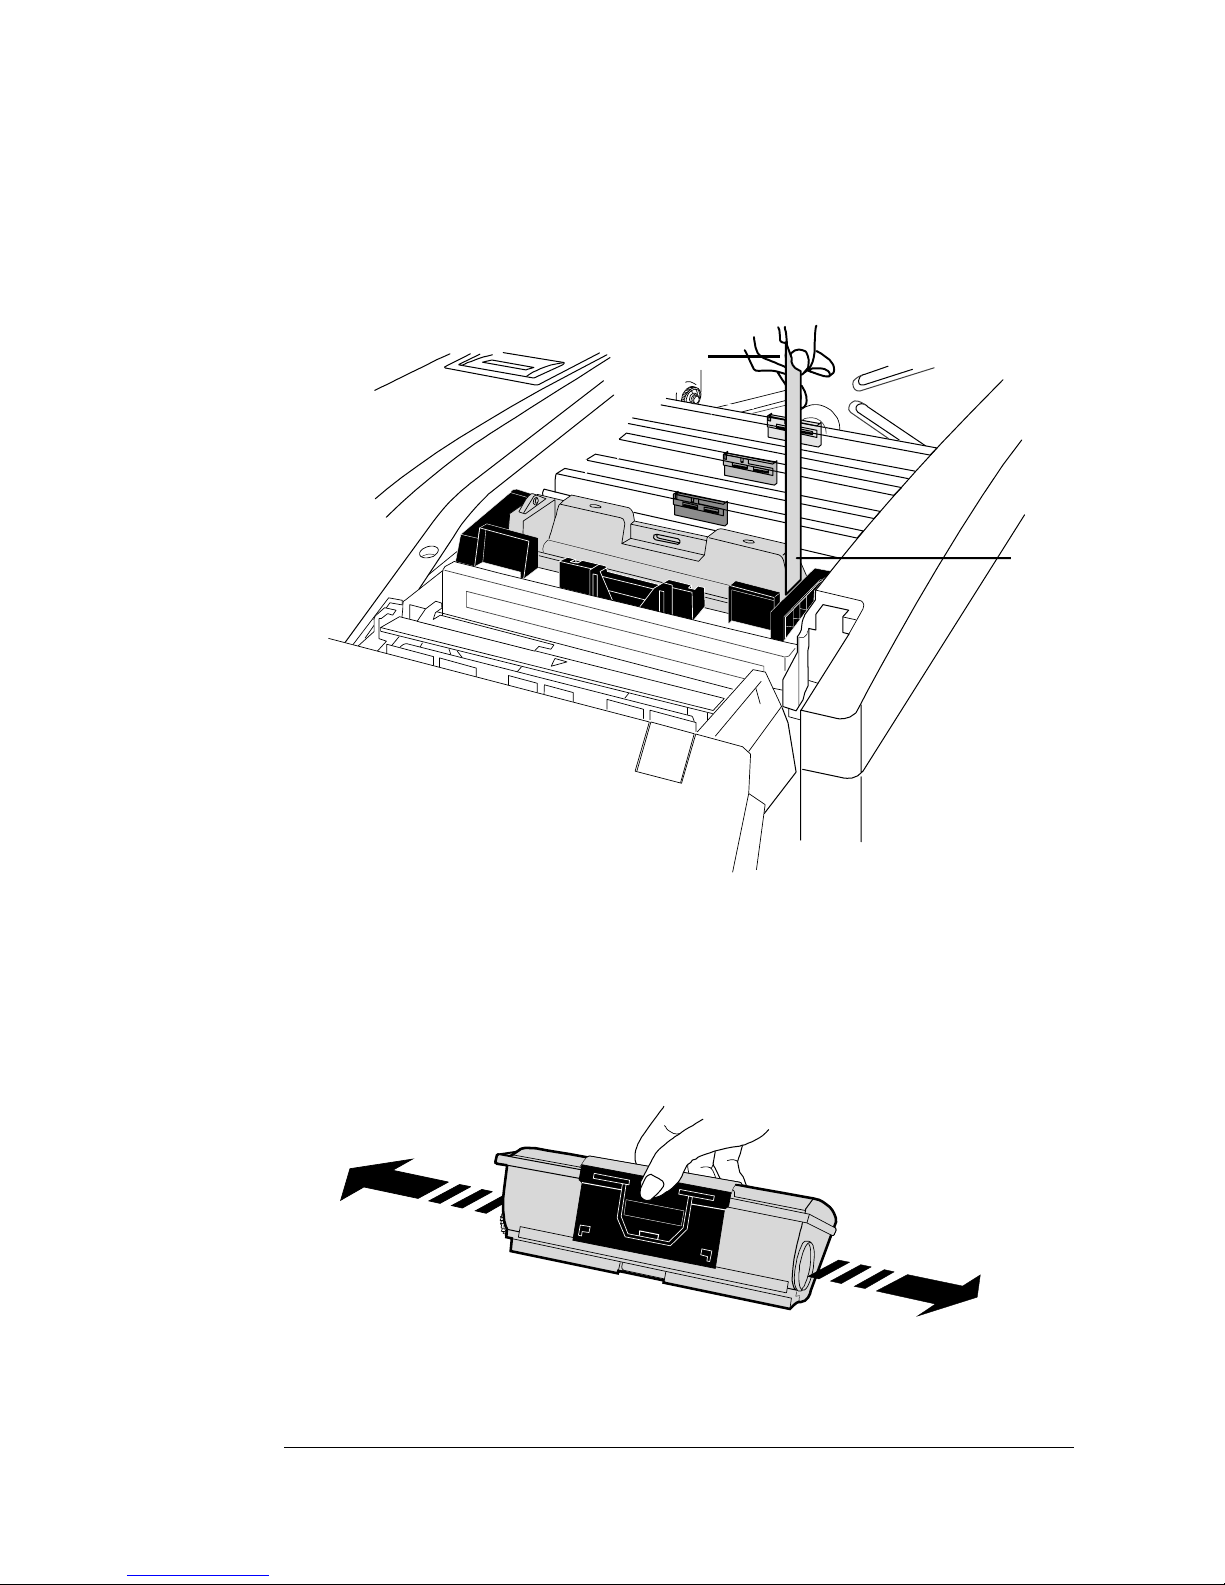
4 Grasp the tab on the top of the developer cartridge and pull
the tab and attached clear tape straight up and out of the car-
tridge.
Tab
Tape
Rear View
5 Remove the black toner cartridge from its protective bag.
(Toner cartridges are color-coded on top.)
6 Hold the toner cartridge as shown and shake it horizontally.
This distributes toner evenly inside the cartridge and helps
ensure quality printing.
Setup
1-9
Page 20
Set up the Printer
EDNord - Istedgade 37A - 9000 Aalborg - telefon 96333500
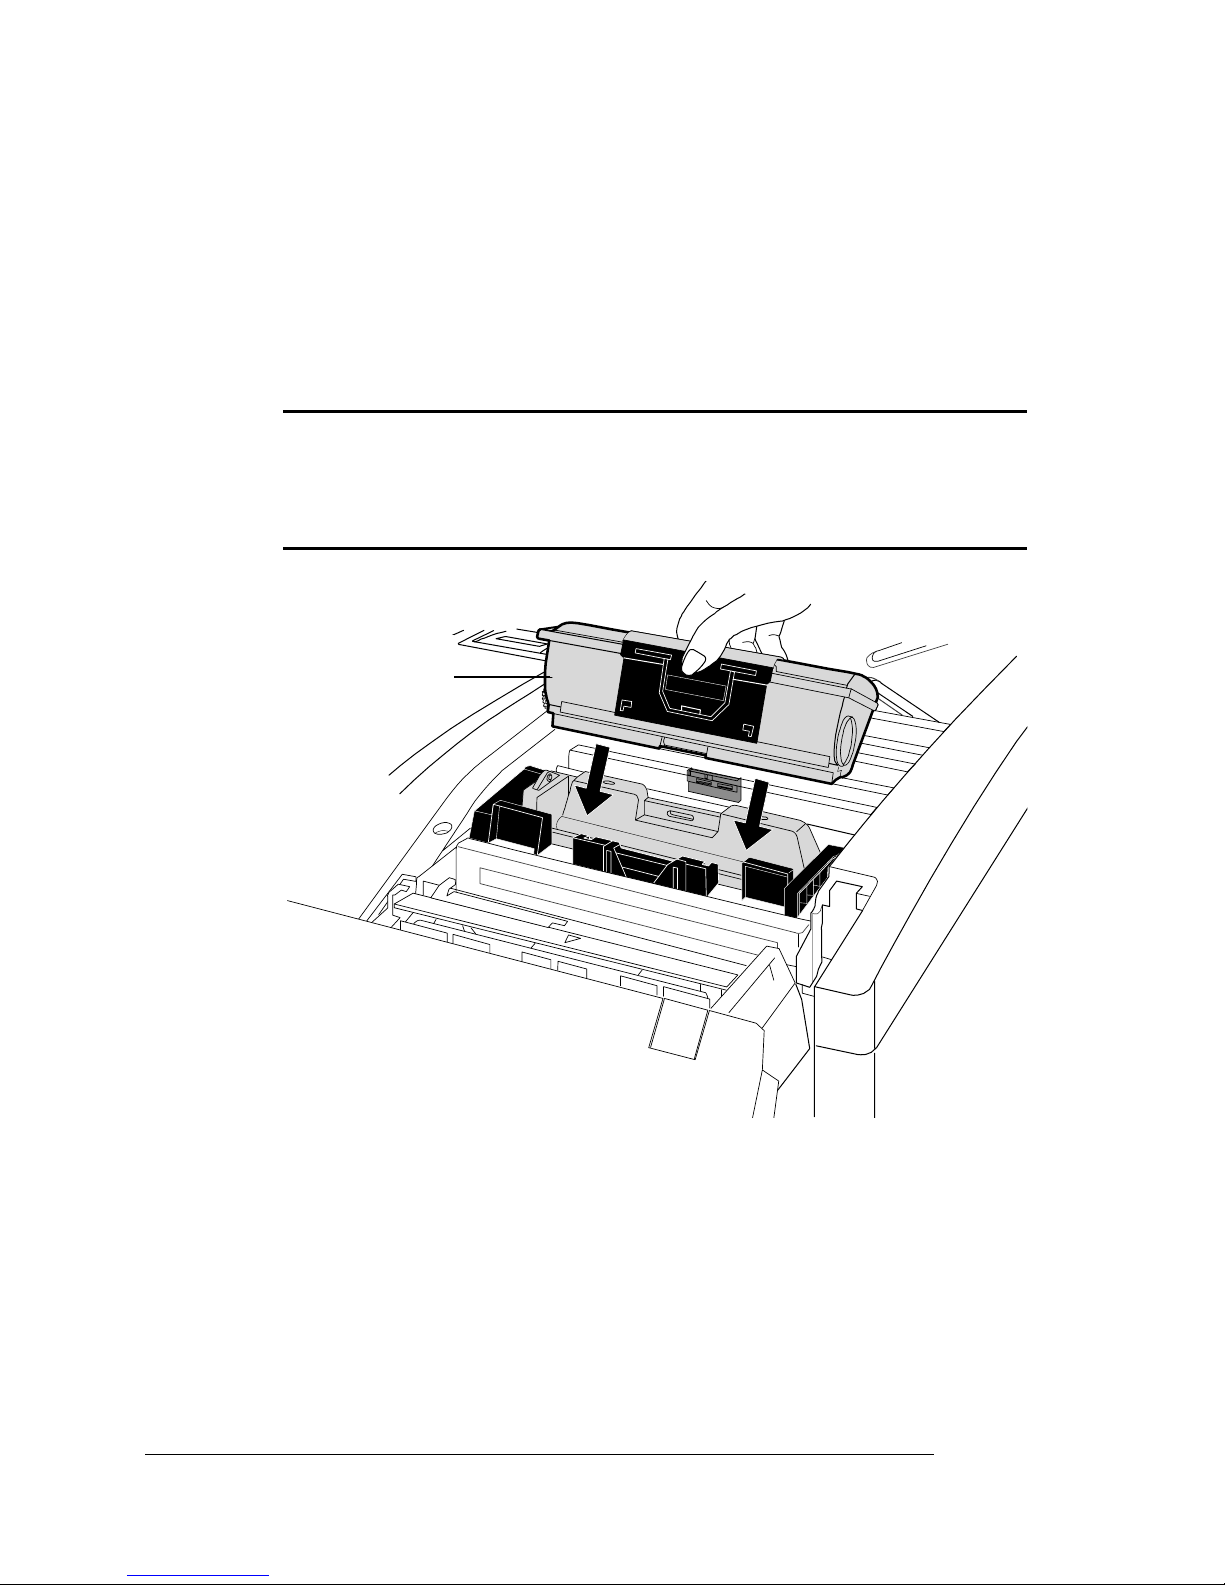
7 Install the toner cartridge on top of the developer cartridge.
Hold and squeeze the toner cartridge across the center, and align
the pins on the back side of the toner cartridge with the notches
on the developer cartridge. Orient the cartridge so that the words
on top are readable from the front of the printer.
▲ Caution:
cartridge, or you’ll damage the cartridges and the printer. If it
doesn’t fit easily, make sure you’re installing the correct color
car tr id ge: they’re keyed to fit each other.
Toner Cartridge
Rear View
Never force a toner cartridge onto a developer
QMS magicolor WX User’s Guide1-10
Page 21
Set up the Printer
EDNord - Istedgade 37A - 9000 Aalborg - telefon 96333500
8 Hold the toner cartridge in place with one hand while you
pull the tab straight up to remove the attached tape from the
cartridge.
Tab
Rear View
9 Repeat steps 1-8 to load the remaining developer and toner
cartridges in this order (from back to front): cyan, magenta
and yellow.
Black
Cyan
Magenta
Yellow
Setup
1-11
Page 22
Set up the Printer
EDNord - Istedgade 37A - 9000 Aalborg - telefon 96333500
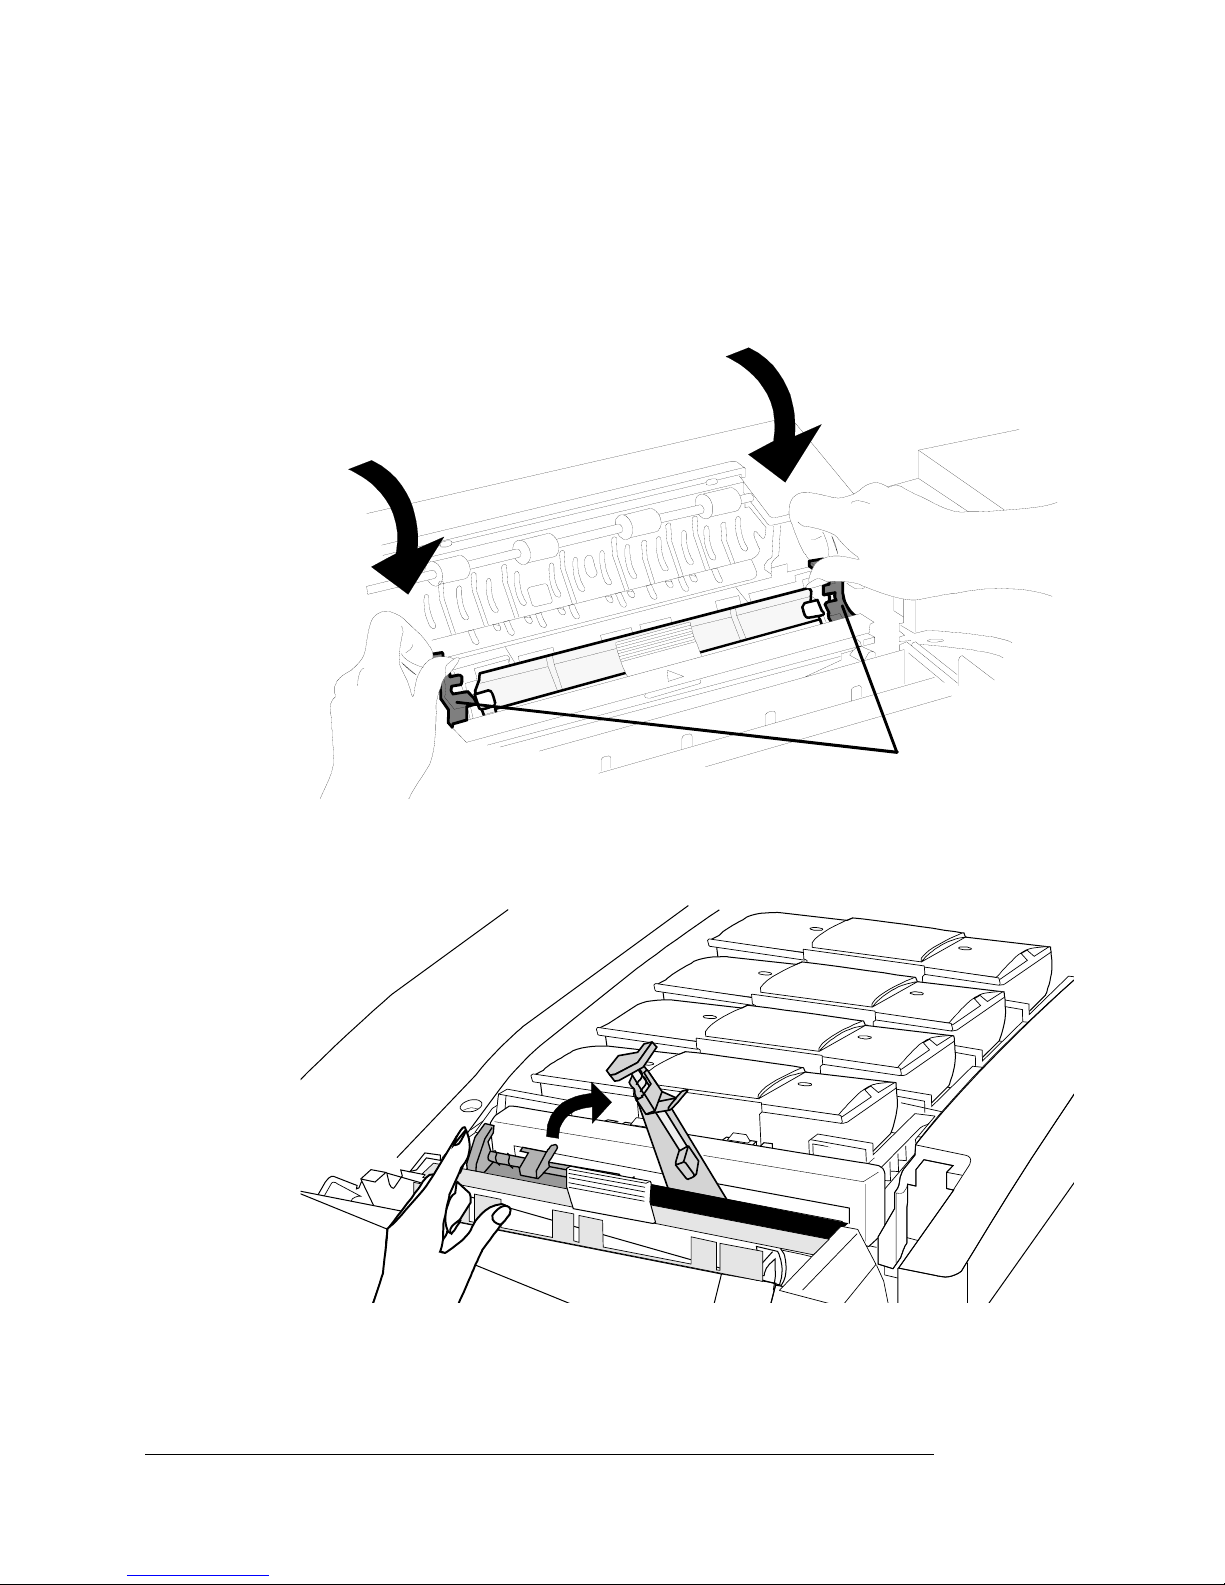
Remove the Pressure-Release Pieces
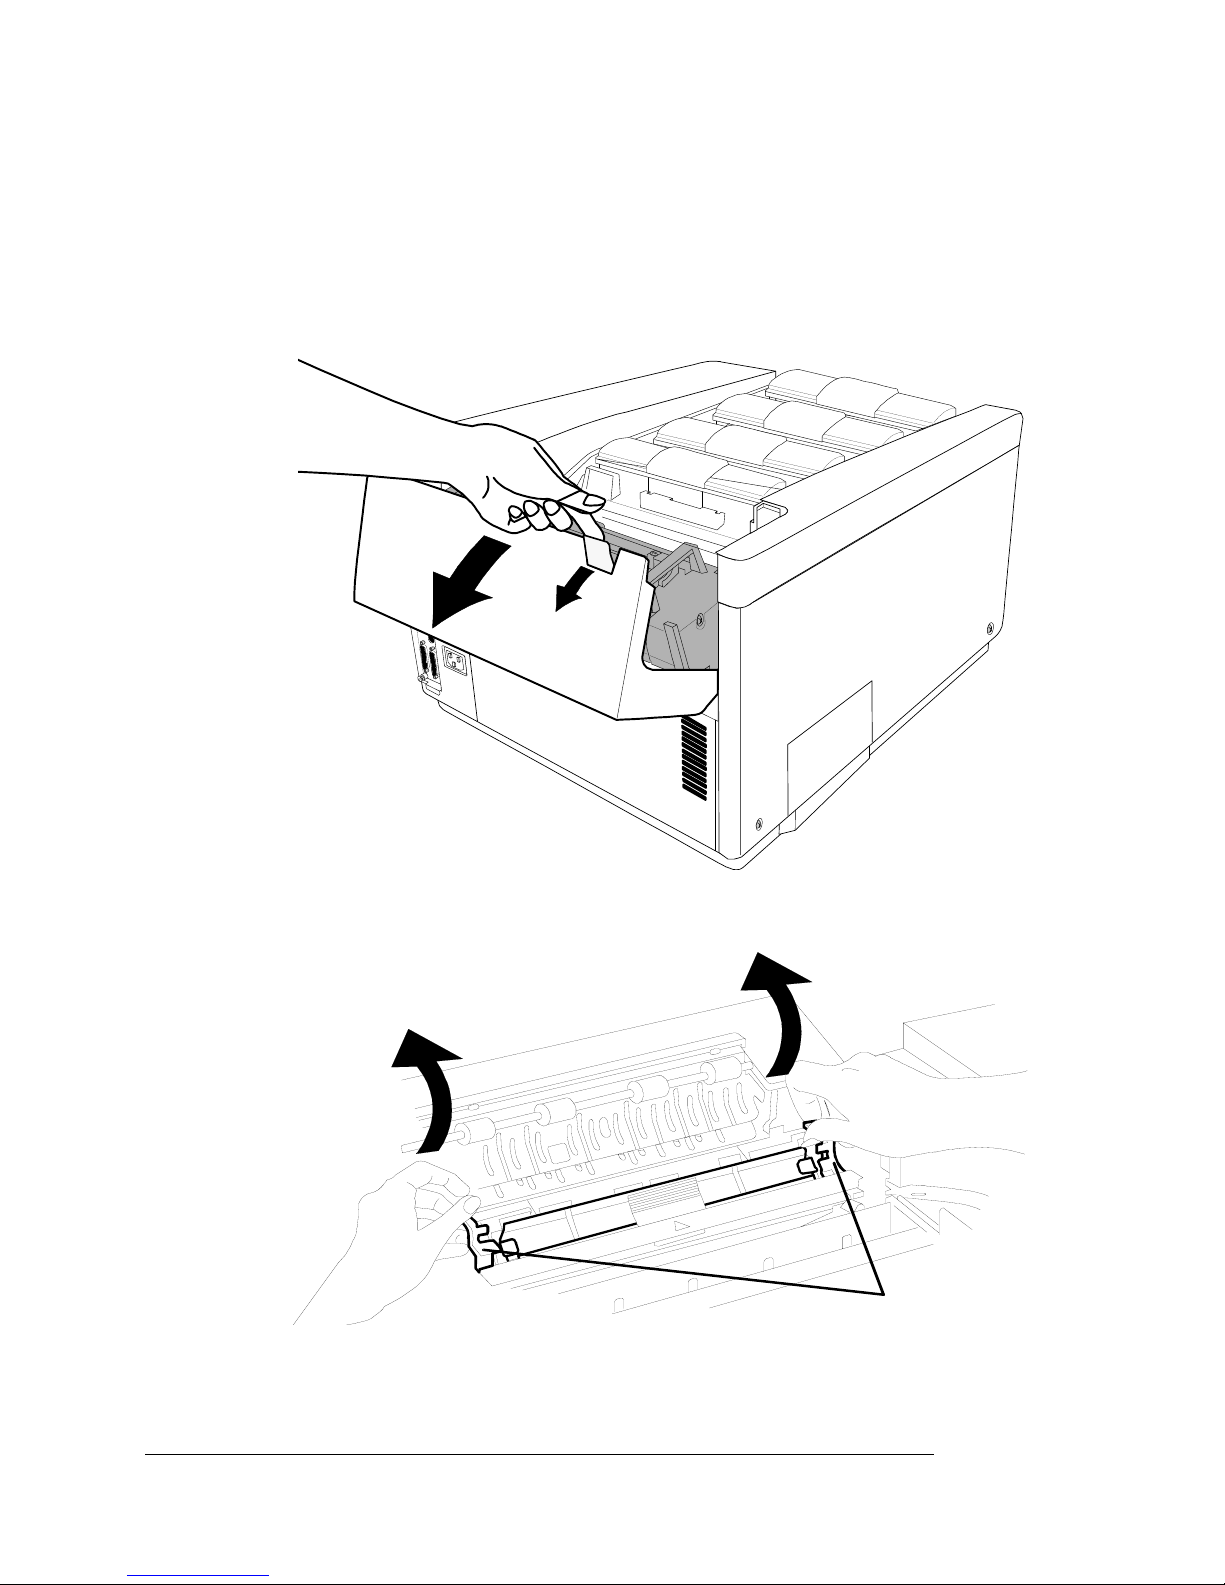
1 Pull up on the paper exit unit latch and then tilt the paper exit
unit back and down to open it.
Rear View
2 Use the two green separator latches to tilt the pawl unit back.
Front View
Latches
QMS magicolor WX User’s Guide1-12
Page 23
Set up the Printer
EDNord - Istedgade 37A - 9000 Aalborg - telefon 96333500
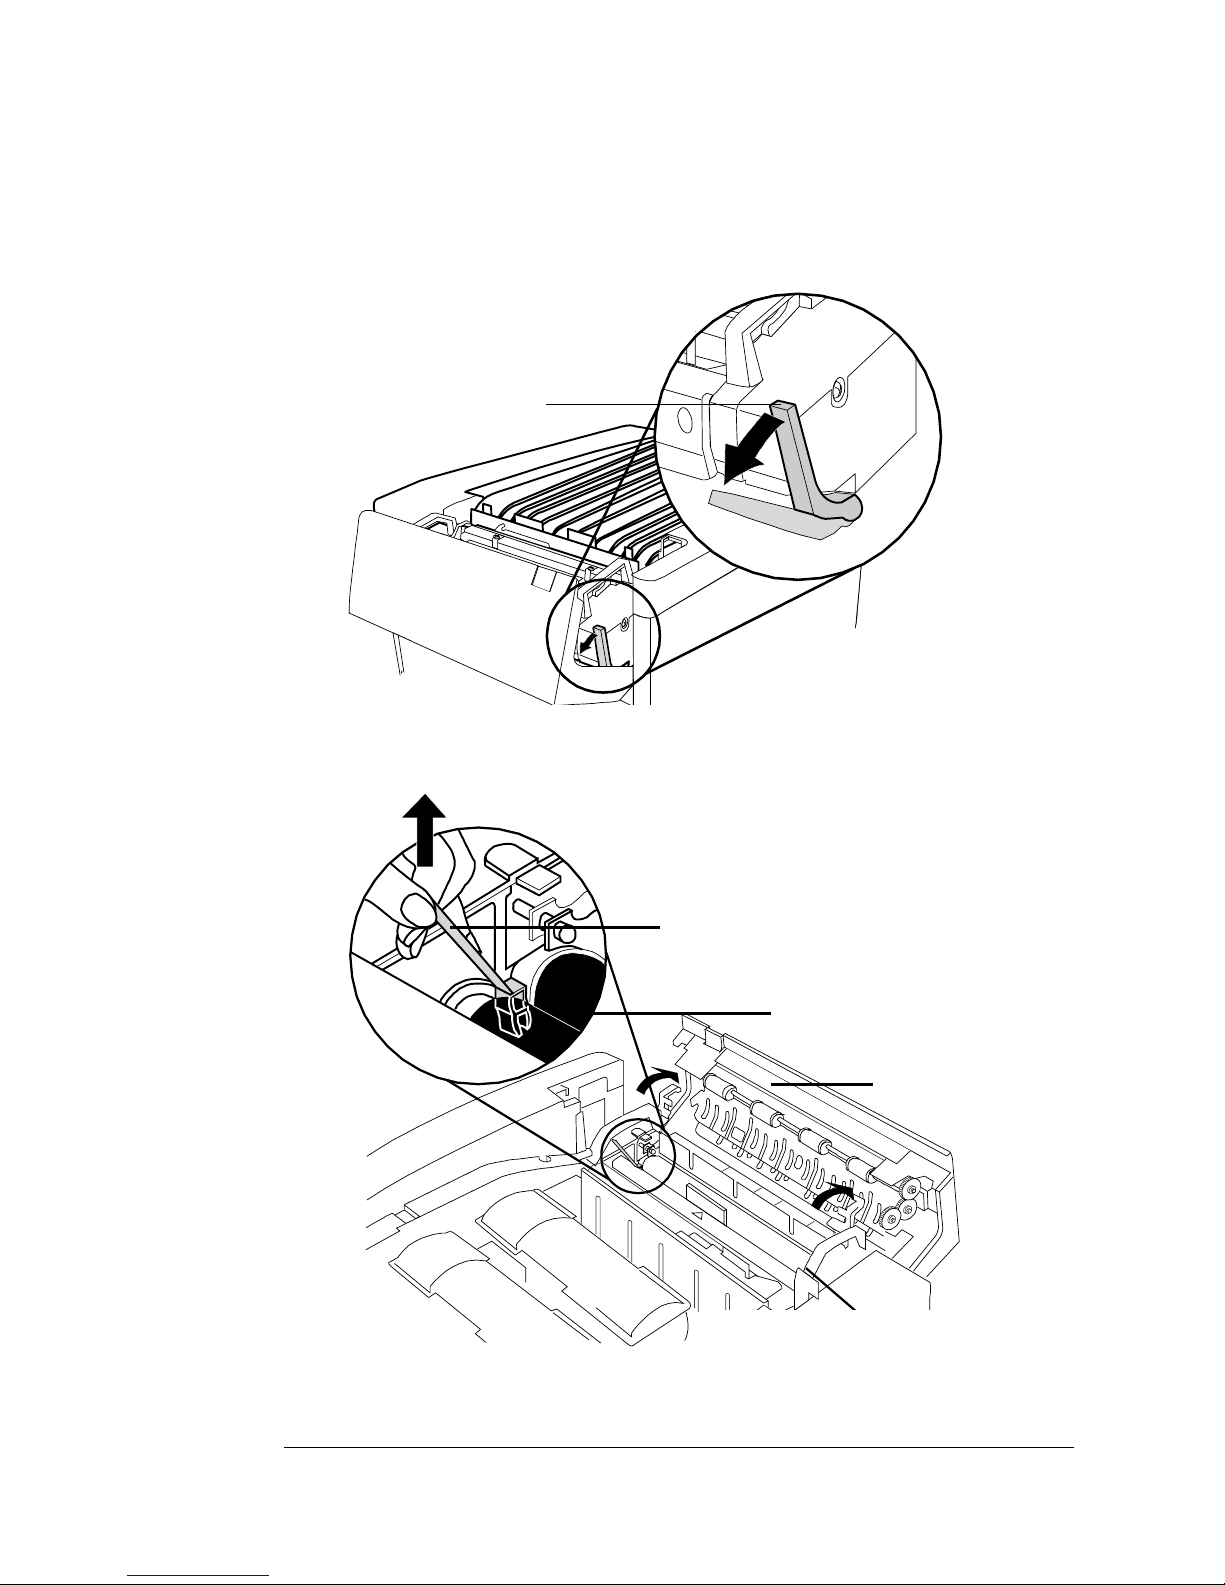
3 Open the green pressure-release lever on the end of the
fuser unit.
Pressure-Release
Lever
Rear View
4 Remove the two pressure-release pieces (one on each end of
the fuser roller).
Front View
Pressure-Release
Piece (left)
Fuser Rollers
Paper-Exit Unit
» Note:
Store all of these pieces where you can easily access them
if you ever need to relocate the printer or return it for service.
Setup
Pressure-Release Piece (right)
1-13
Page 24
Set up the Printer
EDNord - Istedgade 37A - 9000 Aalborg - telefon 96333500
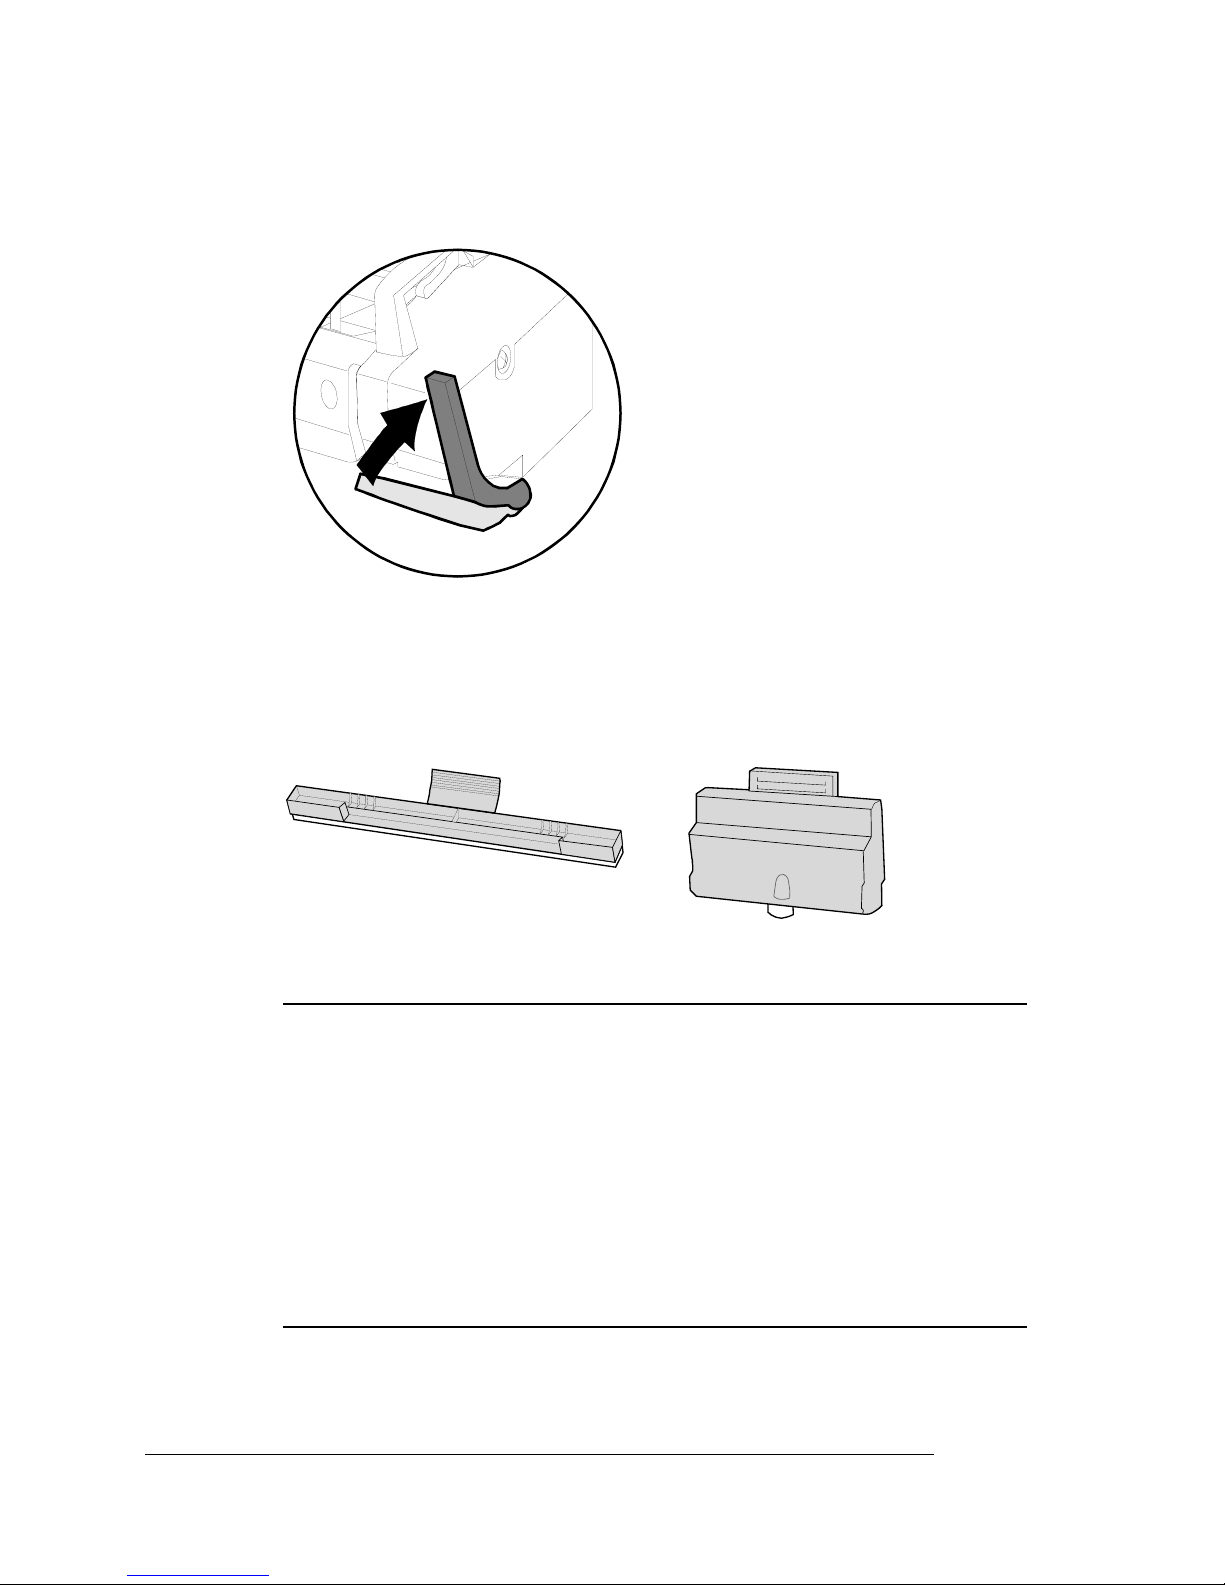
5 Close the pressure-r elease lever.
Install the Cleaning Pad and Oil Bottle
1 Remove the cleaning pad and oil bottle from their protective
bags.
Cleaning
Oil Bottle
▲ Caution:
The fuser unit is an integral part of the color imaging
process and is also very expensive to replace. The fuser life will
be shortened or the fuser permanently damaged if the cleaning
pad is not installed properly or if proper care is not taken to
change the cleaning pad and oil bottle when needed. This type of
damage is not covered under warranty or service contract.
The first oil bottle and cleaning pad will last approximately 1,500
pages. After that, they will last approximately 3,000 pages. (Refer
to chapter 5, “Maintenance,” for replacement instructions.
QMS magicolor WX User’s Guide1-14
Page 25

Set up the Printer
EDNord - Istedgade 37A - 9000 Aalborg - telefon 96333500
2 Hold the cleaning pad by its tab and place the white side
against the orange roller closest to the green felt strip. Align
the center rib of the cleaning pad with the triangle mark on
the green felt strip.
3 Keep the white side of the pad touching the orange roller
closest to the green felt strip as you press the pad forward
and down into the slot under the green felt strip.
It’s in place when it clips securely into the slot with the white pad
touching the orange roller.
Line up Rib with Triangle
Cleaning Pad
White Pad
Orange Rollers
Green Felt Strip
Setup
Black Toner Cartridge
Front View
1-15
Page 26
Set up the Printer
EDNord - Istedgade 37A - 9000 Aalborg - telefon 96333500
4 Close the separator pawl unit: lower it onto the orange roller;
then grasp the green separator latches with your thumbs
and forefingers and push down with your fingers while pushing back with your thumbs to snap the unit into place.
Front View
Latches
5 Place a finger on the outer edge of the oil bottle retainer and
push it in and up to open the spring latch.
Rear View
QMS magicolor WX User’s Guide1-16
Page 27
Set up the Printer
EDNord - Istedgade 37A - 9000 Aalborg - telefon 96333500
6 Hold the oil bottle over its slot (spout-end down and label
facing the printer’s front). Lower the bottle in place, making
sure the spout is aligned with the pin in the fuser slot. The
top of the bottle should be flush with the top of the fuser
unit.
Rear View
7 Close the oil bottle retainer, making sure the spring latch is
securely in place.
8 Close the paper exit unit.
If you have trouble closing it, make sure the separator pawl unit is
completely closed (see step 4).
Rear View
9 Close the top cover.
Setup
1-17
Page 28
Set up the Printer
EDNord - Istedgade 37A - 9000 Aalborg - telefon 96333500
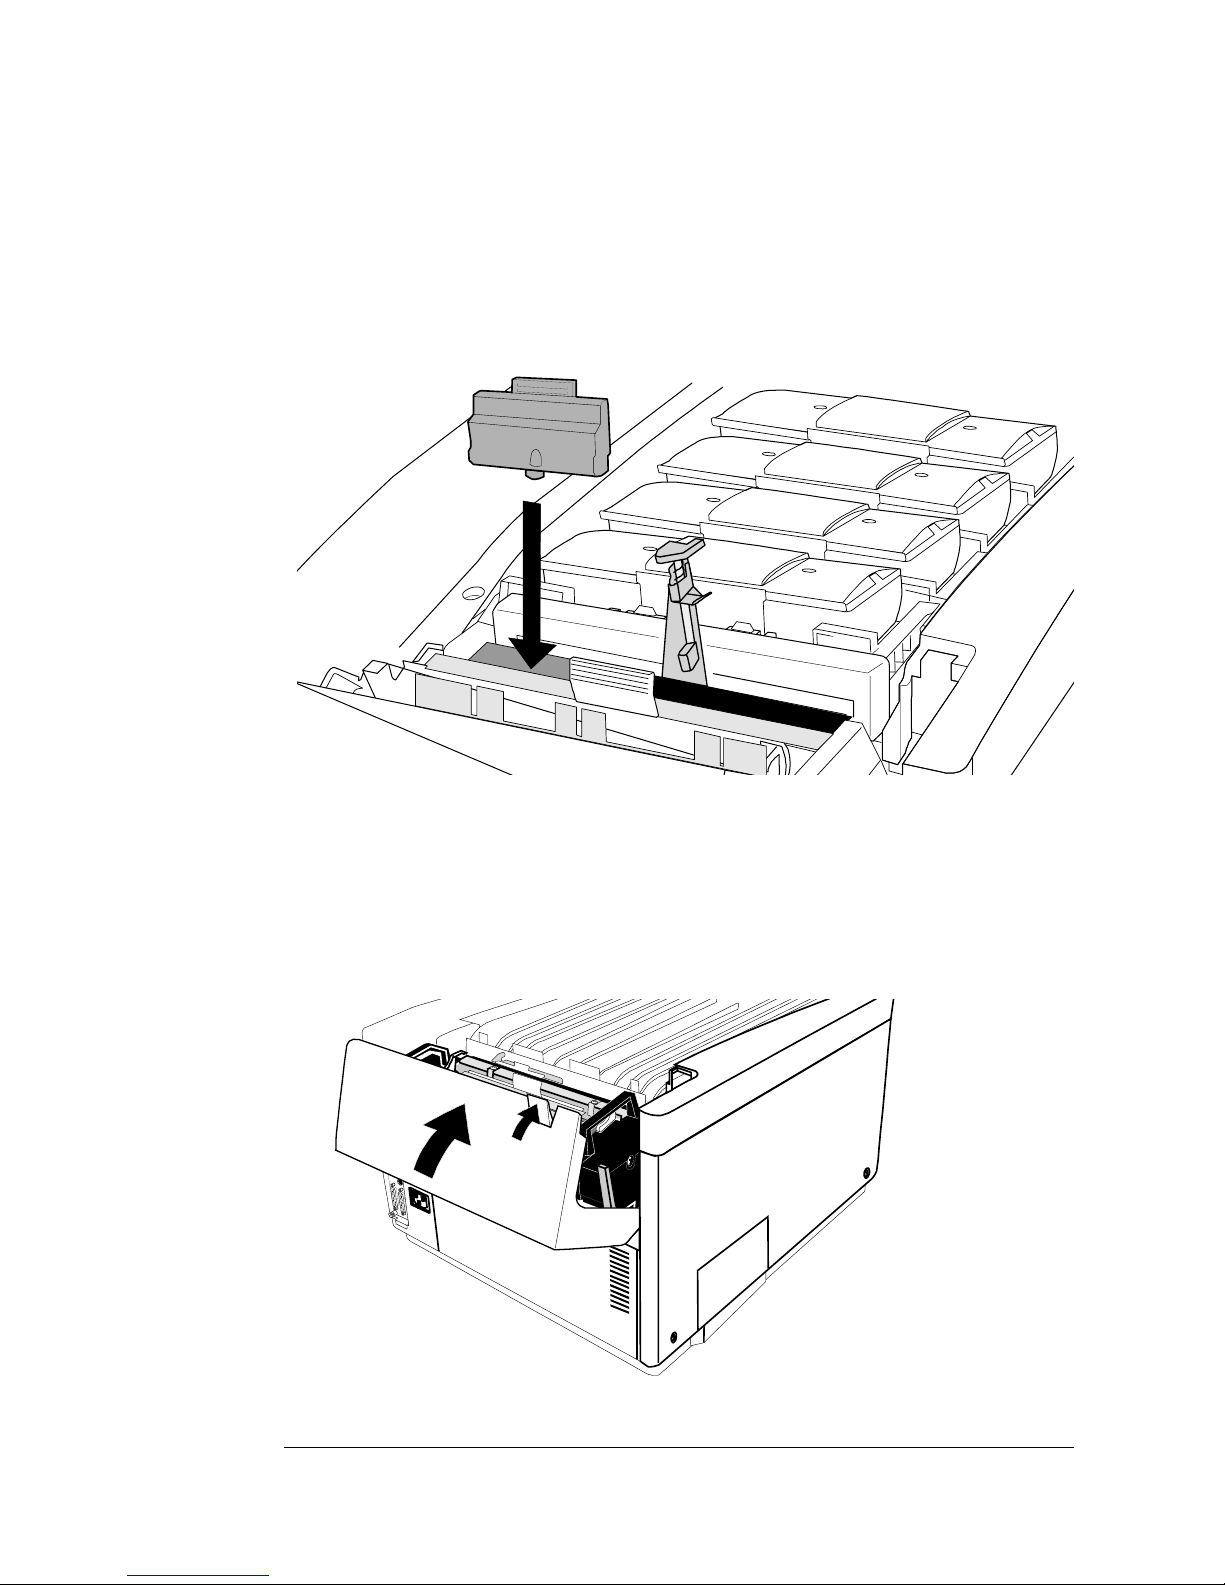
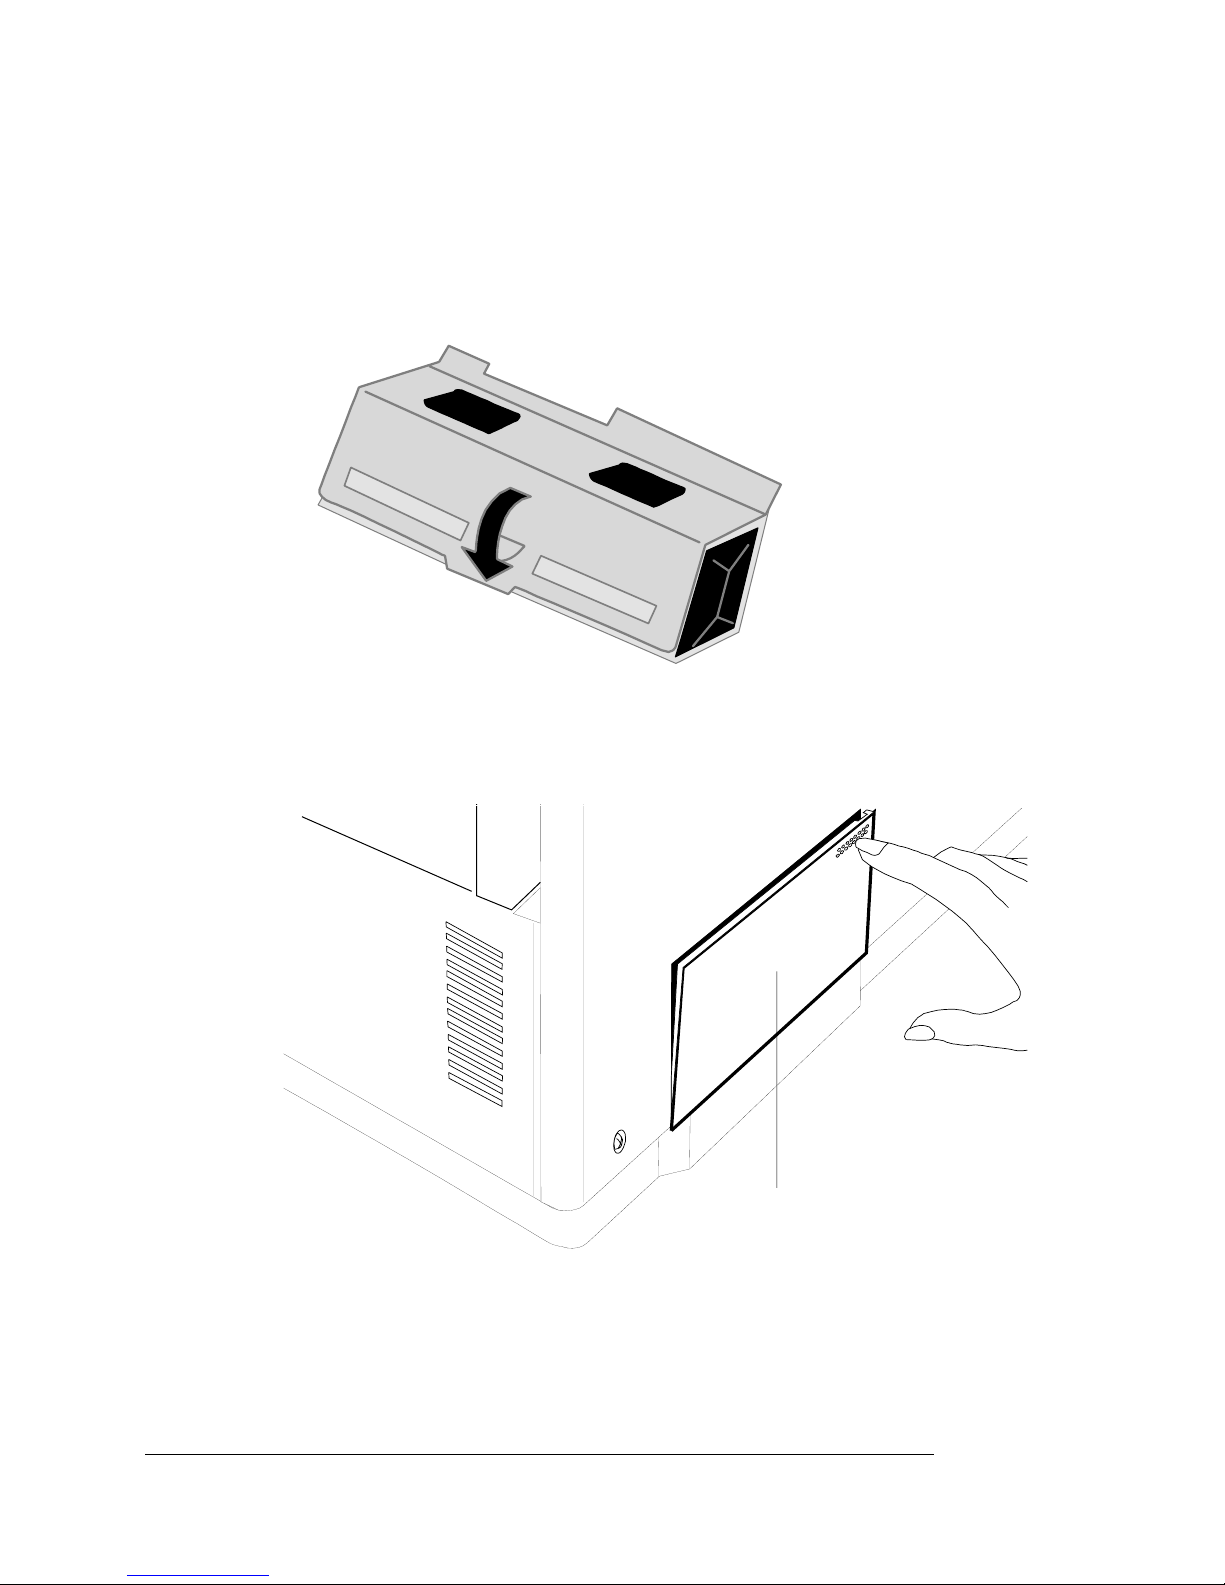
Install the Waste Toner Pack
1 Remove the waste toner pack from its protective bag and
assemble it.
2 Open the waste toner door (on the left side of the printer) by
pushing the cover on the top-right corner.
Waste Toner DoorRear View
3 Remove any tape inside the compartment.
QMS magicolor WX User’s Guide1-18
Page 29
Set up the Printer
EDNord - Istedgade 37A - 9000 Aalborg - telefon 96333500
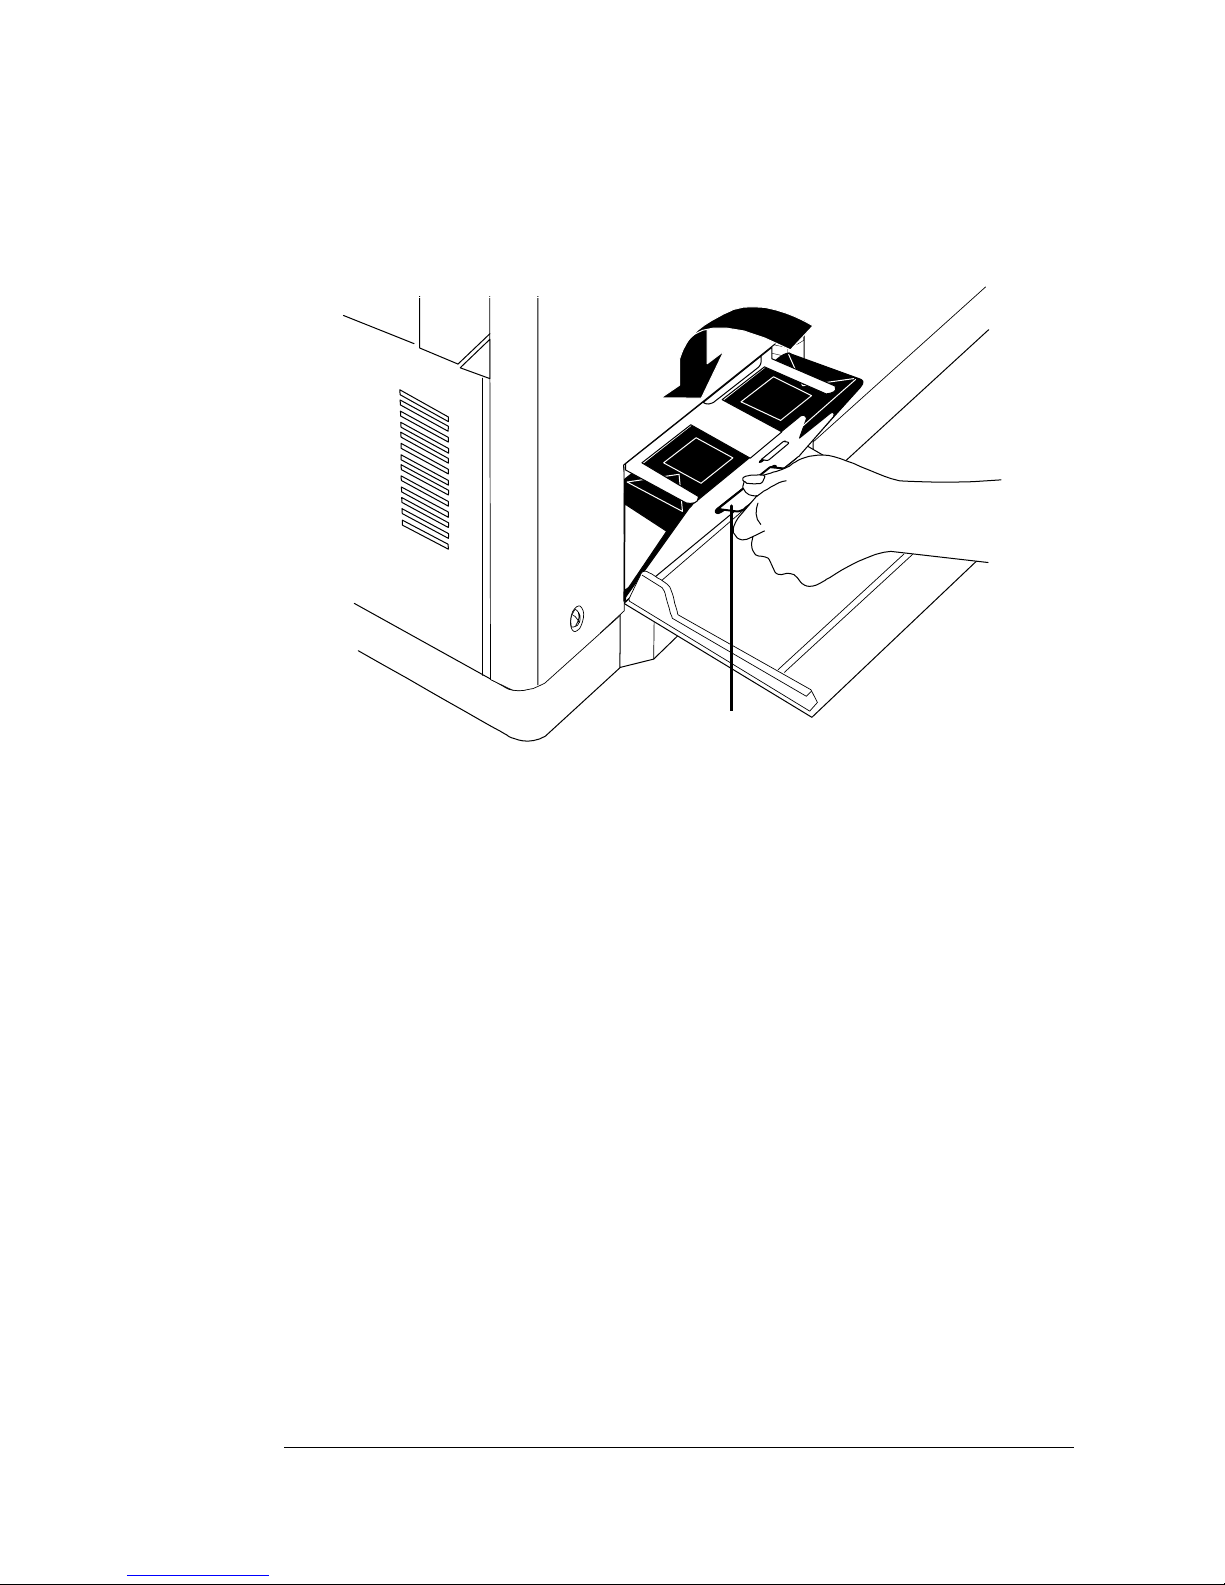
4 Insert the pack into the printer until it fits securely. Make
sure the pack is level and centered.
5 Close the waste toner door.
TabRear View
Setup
1-19
Page 30

Set up the Printer
EDNord - Istedgade 37A - 9000 Aalborg - telefon 96333500
Install the OPC Belt Cartridge
1 Open the manual feed tra y b y pushing t he top- right corner to
release the spring latch.
Front View
Manual
Feed
Tray
▲ Caution:
The OPC belt is extremely sensitive to bright light and
direct sunlight. Do not remove the cartridge from its protective
bag until you are ready to install it. Also, handle the belt cartridge
carefully. The belt is extremely sensitive to hand oils and
scratches, both of which will reduce print quality.
2 Remove the OPC belt cartridge from its protective bag.
Save the protective bag to use during printer cleaning and maintenance when the OPC belt cartridge is out of the printer.
QMS magicolor WX User’s Guide1-20
Page 31

Set up the Printer
EDNord - Istedgade 37A - 9000 Aalborg - telefon 96333500
3 Remove the pressure release and tension release pin sets
(one set on the left and one set on the right) from the OPC
belt cartridge.
The pressure release and tension relea se pins protect the belt
and its cleaning blade by relieving tension during shipment. Save
these pins to reinstall them if you need to ship the printer later.
Pressure-
Tension-Release
Pin
Release
Pin
Setup
1-21
Page 32

Set up the Printer
EDNord - Istedgade 37A - 9000 Aalborg - telefon 96333500
4 Make sure the green handle on the end of the OPC belt car-
tridge is turned up (unlocked).
5 Slide the cartridge three-quarters of the way into the printer
until the notches on each side of the bottom rest on the lip of
the manual feed tray.
Unlock the
Front View
Handle
QMS magicolor WX User’s Guide1-22
Page 33

Set up the Printer
EDNord - Istedgade 37A - 9000 Aalborg - telefon 96333500
6 Remove the black light-shield paper from the OPC belt by
pulling the tab on the front.
Light-Shield
Paper
Front View
7 Firmly slide the cartridge the rest of the way into the printer
until it snaps into place. It is in place when you can see the
green arrows inside the metal frame of the printer.
8 Turn the green end-handle on the cartridge down to close it
and lock the cartridge in place.
9 Close the manual feed tray.
Setup
1-23
Page 34

Set up the Printer
EDNord - Istedgade 37A - 9000 Aalborg - telefon 96333500
Fill the Paper Cassette
1 Pull the paper cassette out of the printer.
Front View
» Note:
Instructions are given here for loading and printing on
letter- or A4-size paper. Chapter 2, “Printing,” contains
instructions for printing on other media types and sizes.
2 Make sure the size key slide on the back end of the cassette
is set for letter- or A4-size media.
EX LT A4 LG
QMS magicolor WX User’s Guide1-24
Page 35

Set up the Printer
EDNord - Istedgade 37A - 9000 Aalborg - telefon 96333500
3 Load the paper (printing-side up) in the cassette.
» Note:
cassette, look at the paper packaging to determine which is the
printing side of the paper (an arrow points in the direction of the
printing side on most packaging). Also, you should fan the paper
(to prevent the sheets from sticking together).
For letterhead or preprinted media load the top-end first. Make
sure the paper lies flat and does not exceed the upper-limit mark
on the cassette for paper. Overloading the cassette can cause a
jam.
For the best quality printouts, before yo u load paper in the
Paper
Foil
4 Adjust the paper guides on each side and on the trailing
edge of the paper so that they rest lightly against the paper
without causing it to buckle.
5 Slide the filled cassette into the printer until it snaps firmly
into place and is flush with the front of the printer.
Setup
1-25
Page 36

Set up the Printer
EDNord - Istedgade 37A - 9000 Aalborg - telefon 96333500
Connect the Printer to Your PC and Plug It In
1 Connect the parallel port on the printer
to the parallel port on the PC.
If you’re replacing a printer already connected to a PC, you probably already have a
parallel cable. If not, contact your QMS vendor or a local computer store.
Also, see appendix B, “Technical Specifications,” for more inf ormation on PC-to-printer
cabling.
2 Plug the printer into a grounded, surge-
protected, electrical outlet.
Parallel
Port
▲ Caution:
the printer is off (the
Make sure that the main power switch on the back of
O
is pressed down) and that the remote
power switch on the front is also off (the button is out).
Install the Printer Driver
Two printer driver installation procedures follow: One for Windows 95
and one for Windows NT 4.0. If your PC is running Windows 95, use
the first procedure to install the printer driver. If your PC is running
Windows NT 4.0, use the second procedure to install the printer
driver.
Install the Windows 95 Printer Driver
The QMS
technology, which lets your PC and its attached devices work together
automatically. After you’ve connected the printer to the PC and
magicolor
WX and Windows 95 support Plug and Play
QMS magicolor WX User’s Guide1-26
Page 37

Set up the Printer
EDNord - Istedgade 37A - 9000 Aalborg - telefon 96333500
plugged it in, the correct printer driver is automatically selected for
you when you perform the following procedure.
1 If it’s on, shut down your PC in the usual way.
2 T urn on the main power switch on the back of the printer, and
then turn on the power switch at the front of the printer
(press in the button).
» Note:
There are two power switches on your printer, a main
switch on the back and a remote switch (for convenience) on the
front. Only one switch has to be off to turn off the printer, but both
switches must be on to turn on the printer.
The printer goes through an initialization warm-up and self-testing
that lasts about 4.5 minutes. When warm-up is complete, IDLE
displays in the message window.
3 Turn on the PC.
4 A message window informs you New Hardware Found, and
then you’re prompted to insert the QMS
magicolor
WX
printer driver disk.
5 Insert the printer driver disk (shipped with your printer) in
the PC’s 3.5" disk drive, and choose OK to continue.
6 Follow the instructions on the screen to install the printer
driver.
After installation, the Windows 95 desktop appears.
Install the Windows NT 4.0 Printer Driver
» Note:
technology; therefore, you must install the printer driver manually
as follows.
1 Insert the Windows NT printer driver disk into the PC’s 3.5”
disk drive.
2 In the Windows NT Start>Settings menu, choose Printers,
and then choose Add Printer. The Add Printer Wizard opens.
Setup
Windows NT 4.0 doesn’t support Plug and Play
1-27
Page 38

Set up the Printer
EDNord - Istedgade 37A - 9000 Aalborg - telefon 96333500
3 When prompted, choose either My Computer or Network
Printer to identify how the printer is attached to your workstation. (My Computer means Local Printer.) Then choose
Next.
4 When prompted, select the appropriate port to use with the
printer. Then choose Next.
5 When prompted to select a manufacturer and model of
printer, choose Have Disk.
6 In the Install from Disk dialog box, type the full pathname of
the directory in which the QMS Windows NT 4.0 printer
driver files are located, or choose Browse and locate the
directory .
7 After you’ve entered the full pathname of the directory,
choose OK.
QMS
magicolor
8 Select the QMS
WX printer displays in the list box.
magicolor
WX printer. (Be sure to click the
check box.) Then choose Next.
9 If you’re replacing an existing Windows NT 4.0 printer driver,
perform this step; otherwise, skip to step 10.
a When prompted, choose Replace Existing Driver, and then
choose Next.
b When prompted, for a printer name, either accept the
displayed name or type in a new one. Then choose Next.
» Note:
If you’re updating a currently installed QMS magicolor WX
on a Windows NT 4.0 station, always choose to replace the
existing driver. Otherwise, when finished, it will show another
QMS magicolor WX printer icon and state “copy 2.”
10 When prompted for sharing information, choose either
Shared or Not Shared as appropriate.
» Note:
If you chose Shared, you must continue with step 6 in
“Sharing Your Printer with Others for Windows NT 4.0 Users” on
page 2-41. If you chose Not Shared, continue with step 11 below.
QMS magicolor WX User’s Guide1-28
Page 39

11 Choose Next.
EDNord - Istedgade 37A - 9000 Aalborg - telefon 96333500
12 When asked if you would like to print a test page, choose
either Yes or No, and then choose Finish.
The Windows NT 4.0 printer driver installs, and then the Windows
desktop appears.
Register the Printer
QMS is committed to developing printers that offer you flexible, efficient solutions, so we’re interested in knowing how you plan to use
your printer. Please register now.
Register the
Printer
To register by mail, fill out and send in your warranty card. To register
by telephone, in the US call QMS toll-free at (800) 637-8049. In other
countries, refer to appendix A, “QMS Customer Support,” for the
appropriate telephone number.
v
Setup
1-29
Page 40

EDNord - Istedgade 37A - 9000 Aalborg - telefon 96333500
Page 41

2
EDNord - Istedgade 37A - 9000 Aalborg - telefon 96333500
Printing
In This Chapter . . .
n Configuring the QMS
n Refilling the media cassette
n Using the manual feed tray
n Printing on transparencies, labels, envelopes, and other special
media
n Working with media sizes, imageable regions, and margins
n Preventing media jams
n Printer resolution and RAM
n Cancelling print jobs
magicolor
WX printer drivers
Page 42

Configuring the
EDNord - Istedgade 37A - 9000 Aalborg - telefon 96333500
Windows 95
Printer Driver
Configuring the Windows 95
Printer Driver
» Note:
printer driver in Windows 95. The following section explains how to
configure the QMS magicolor WX printer driver in Windows NT 4.0.
This section explains how to configure the QMS magicolor WX
Setting the Printer Driver Defaults
1 From the Windows 95 Start menu choose Settings. Then
choose Printers.
2 In the Printers window, select either the QMS
Color or the QMS
n QMS
dpi resolution for color printing and 600x300 dpi resolution for
monochrome printi ng. It also allows you to set color printing
options. (See “Resolution” on page 2-9 and “Configuring
Color Options” on page 2-11.)
n QMS
600x600 dpi resolution for monochrome printing. It doesn’t
allow you to set color printing options. (See “Resolution” on
page 2-9.)
magicolor
magicolor
magicolor
WX Color provides 300x300 and 600x600
WX Monochrome provides 300x300 and
WX Monochrome printer driver.
magicolor
WX
3 From the File menu choose Properties.
The following tabs appear:
n General—Allows you to name the printer, use a separator
page, and print a test page. See your Windows documentation.
n Details—Allows you to set interface connection details. See
your Windows documentation.
n Sharing (optional)—Allows you to set up the printer so others
on the network can use it. See your Windows documentation.
QMS magicolor WX User's Guide2-2
Page 43

Configuring the
EDNord - Istedgade 37A - 9000 Aalborg - telefon 96333500
Windows 95
Printer Driver
n Paper—Allows you to provide information about the type and
location of the media you want to print on. See “Configuring
Paper Options” on page 2-4.
n Graphics—Allows you to provide information how the text
and images in your job will be printed. See “Configuring
Graphics Options” on page 2-8.
4 Make your selections, and then choose OK to save your
changes and return to the Printers window.
Configuring the Printer Driver for the Current
Print Job
1 From the application’s File menu choose Print (or, in some
cases, Print Setup).
2 In the Print or Print Setup dialog box, select either the QMS
magicolor
printer driver.
n QMS
dpi resolution for color printing and 600x300 dpi resolution for
monochrome printing. It also allows you to set color printing
options. (See “Resolution” on page 2-9 and “Configuring
Color Options” on page 2-11.)
n QMS
600x600 dpi resolution for monochrome printing. It doesn’t
allow you to set color printing options. (See “Resolution” on
page 2-9.)
3 Choose the Properties button.
Two tabs appear:
n Paper—Allows you to provide information about the type and
location of the media you want to print on. See “Configuring
Paper Options” on page 2-4.
WX Color or the QMS
magicolor
magicolor
WX Color provides 300x300 and 600x600
WX Monochrome provides 300x300 and
magicolor
WX Monochrome
n Graphics—Allows you to provide information how the text
and images in your job will be printed. See “Configuring
Graphics Options” on page 2-8.
Printing
2-3
Page 44

Configuring the
EDNord - Istedgade 37A - 9000 Aalborg - telefon 96333500
Windows 95
Printer Driver
4 Make your selections, and then choose the OK button to
return to the Print or Print Setup dialog box.
Configuring Paper Options
The Paper tab allows you to provide information about the type and
location of the media you want to print on. Each option and button is
explained in detail in this section.
QMS magicolor WX User's Guide2-4
Page 45

Configuring the
EDNord - Istedgade 37A - 9000 Aalborg - telefon 96333500
Windows 95
Printer Driver
Paper Size
Purpose Sets the media size.
Choices Size Inches Millimeters
A4 8.27 x 11.69 210.00 x 297.00
Executive 7.25 x 10.50 185.00 x 267.00
Legal 8.50 x 14.00 215.90 x 355.60
Letter 8.50 x 11.00 215.90 x 279.40
Envelope* 8.66 x 4.33 220.00 x 110.00
#10 En ve lope ** 9.50 x 4.125 241.30 x 104.78
Default Letter
Notes If a media size other than that chosen in the driver is installed
in the cassette, an error message displays, but the job still
prints on the currently installed media size.
* Envelo pe is als o known as DL.
** #10 Envelope is also kno wn as Com 10.
Orientation
Purpose Sets the orientation (printi ng dire ction) of the print media.
Choices Portrait—Printing across the narrow width of the page.
Landscape—Printing across the length of the page.
Default Portrait
Printing
2-5
Page 46

Configuring the
EDNord - Istedgade 37A - 9000 Aalborg - telefon 96333500
Windows 95
Printer Driver
Paper Source
Purpose Sets the input source (cass ett e/tr ay/bin) from which print
Choices Lower Tray—The optional lower media cassette
Default Upper Tray
Media Choice
media is pulled into the printer
Manual Feed—The manual feed tray
Printer Default—The tr a y or cass ette c hose n throu gh th e Tra y
Select Key on the printer control panel
Upper Tray—The standard media cass ette
Purpose Sets the type of media to be printed
Choices Standard—For printing on normal weight paper, envelopes,
and labels
Thick Stock—For printing on 24–43 lb (90–163 g/m2) stock
Transparency—For printing on overhead transparency film
Default Standard
Notes Your media choice must be set through the printer driver. (The
Media key on the printer control panel is not used. It is
available to allow you to upgrade your printer to a fully
networkable, departmental color printer, the QMS
CX Print System. Contact your QMS vendor for specifications
and purchase information.)
Do not select Transparency when printing on regular paper.
This may waste ink and cause smearing.
magicolor
QMS magicolor WX User's Guide2-6
Page 47

Configuring the
EDNord - Istedgade 37A - 9000 Aalborg - telefon 96333500
Windows 95
Printer Driver
Copy Count
Purpose Sets the number of copies to be printed.
Choices 1-99
Default 1
only
Notes This sc roll bo x is av ailabl e
driver defaults. If you’re configuring the printer for the current
print job, set the number of copies in the Print dialog box.
when you’re setting the printer
About... Button
The About... button displays the version number of the printer driver.
Restore Defaults Button
The Restore Defaults button allows you to reset all of the selections
on the Paper tab to their default settings.
Apply and OK Buttons
The Apply button allows you to save your changes and continue working in the Properties window, while the OK button allows you to save
your changes and exit from the Properties window.
Cancel Button
The Cancel button allows you to cancel your changes and exit from
the Proper ti es window.
Printing
2-7
Page 48

Configuring the
EDNord - Istedgade 37A - 9000 Aalborg - telefon 96333500
Windows 95
Printer Driver
Configuring Graphics Options
The Graphics tab allows you to provide information how the text and
images in your job will be printed. Each option and button is explained
in detail in this section.
QMS magicolor WX User's Guide2-8
Page 49

Configuring the
EDNord - Istedgade 37A - 9000 Aalborg - telefon 96333500
Windows 95
Printer Driver
Resolution
Resolution is the measurement of the dots per inch (dpi) at which
your documents are printed. Your printer is capable of printing at 300
and 600 dpi.
For jobs in which print speed is more important than print quality , y ou
might want to select 300 dpi. But for pages requiring the best quality
your printer can provide, set the printer resolution to 600 dpi. Printing
at 600 dpi is a good choice for pages with photographs or other
images that contain great detail, such as graphics with multiple levels
of shading, or for documents requiring the sharpest possible text and
line art.
Purpose Sets the printing resolution.
Choices If QMS
300 dots per inc h Color—For printing color documen ts at
600 dots per inc h Color—For printing color documen ts at
600 dots per inch Monochrome—For printing
If QMS
driver:
300 dots per inch Monochrome—For printing
600 dots per inch Monochrome—For printing
Default If QMS
600 dots per inch Color
If QMS
driver: 600 dots per inch Monochrome
magicolor
300x300 dpi
600x600 dpi
monochrome documents at 600x300 dpi
magicolor
monochrome documents at 300x300 dpi
monochrome documents at 600x600 dpi
magicolor
magicolor
WX Color is the selected printer driver:
WX Monochrome is the selected printer
WX Color is the selected printer driver:
WX Monochrome is the selected printer
Printing
2-9
Page 50

Configuring the
EDNord - Istedgade 37A - 9000 Aalborg - telefon 96333500
Windows 95
Printer Driver
Dithering
Dithering, a technique for placing dots, allows the printer to create
halftones, in which areas of print
ues and densities and thus simulate a full range of colors.
Purpose Sets the dither pattern.
Choices None—No dithering
appear
Fine—For printing at resolutions less than 300 dpi (not
recommended for this printer)
Coarse—For printing text and most graphics at 300 or 600 dpi
Error Diffusion—For printing photographs or pictures that
don’t have sharp, well-defined edges at 300 or 600 dpi
Line Art—For printing monochrome graphics with clearly
defined lines
to contain many different val-
Default Coarse
Notes Line Art is a vailable only if QM S
the selected printer type. Otherwise, it is grayed out.
magicolor
WX Monochrome is
Intensity
Intensity specifies how light or dark to print the graphics in your document.
Purpose Sets the degree of ligh tnes s /dark ne ss at whic h g ra phics are
printed.
Range 0 (darkest)–200 (lightest)
Default 100
Color... Button
The Color... button displays the Graphics—Color window. See the following section, “Configu r ing Color Options,” for more informatio n.
» Note:
The Color... button is av ailable only if QMS magicolor WX Color
is the selected printer driver.
QMS magicolor WX User's Guide2-10
Page 51

Configuring the
EDNord - Istedgade 37A - 9000 Aalborg - telefon 96333500
Windows 95
Printer Driver
Restore Defaults Button
The Restore Defaults button allows you to reset all of the selections
on the Paper tab to their default settings.
Apply and OK Buttons
The Apply button allows you to save your changes and continue working in the Properties window, while the OK button allows you to save
your changes and exit from the Properties window.
Cancel Button
The Cancel button allows you to cancel your changes and exit from
the Proper ti es window.
Configuring Color Options
Use the Color... button on the Graphics tab to display the Graphics—
Color window.
Printing
2-11
Page 52

Configuring the
EDNord - Istedgade 37A - 9000 Aalborg - telefon 96333500
Windows 95
Printer Driver
Color Control
Purpose Select between monochrome and color printing
Choices Print in black and white only
Default Print in color without image color matching (see “Notes”
Notes The “Print in color with image color matching on the host”
Print in color without image color matching
Print in color with image color matching on the host (see
“Notes”)
option is not currently in effect. It is provid ed in the driver to
allow you to use specially calibrated image color matching
(ICM) software when more Windows 95 app lications suppo rt it.
Contact your QMS vendor for availability and purchase
information.
Due to driver limitations, “Print in color with image color
matching on the host” is iden tif ied as the default. How ever,
since this option is not cu rrent ly in effect, the printer driv er
actually defaults to “Print in color without image color
matching.”
Color Rendering Intent
Purpose Sets the color profile to be used.
Notes This option is not currently in effect. It is provided in the driver
to allow you to use specially calibrated profiles when they
become av a ila ble. Contact y ou r QMS v en dor for av ai lab ility
and purchase information.
QMS magicolor WX User's Guide2-12
Page 53

Configuring the
EDNord - Istedgade 37A - 9000 Aalborg - telefon 96333500
Windows 95
Printer Driver
Restore Defaults Button
The Restore Defaults button allows you to reset all of the selections
on the Graphics—Color window to their default settings.
OK Button
The OK button allows you to save your changes and exit from the
Graphics—C olor window.
Cancel Button
The Cancel button allows you to cancel your changes and exit from
the Graphics—Color window.
Printing
2-13
Page 54

Configuring the
EDNord - Istedgade 37A - 9000 Aalborg - telefon 96333500
Windows NT 4.0
Printer Driver
Configuring the Windows NT
4.0 Printer Driver
» Note:
printer driver in Windows NT 4.0. The previous section explains how
to configure the QMS magicolor WX printer driver in Windows 95.
This section explains how to configure the QMS magicolor WX
Setting Document Defaults
» Note:
however, any changes made through your application will
override these settings.
1 From the Windo ws NT Start menu choose Settings, and then
Printers.
2 In the Printers window, select the QMS
3 From the File menu, choose Document Defaults.
The QMS
displays. This window contains the following tabs:
n Page Setup—Allows you to provide information about paper
Any changes made here apply to all new documents;
magicolor
magicolor
size, paper source, cop y count, orientation, and color appearance. For inf ormation on setting these options, see “Configuring Page Setup Options” on page 2-16.
WX Default Document Properties window
WX.
n Advanced—In addition to the Page Setup options, this tab
allows you to provide information about resolution, halftone
color adjustment, media, and metafile spooling. For information on setting these options, see “Configuring Advanced
Options” on page 2-20.
4 Make your option selections, and then choose OK to save
your changes and return to the Printers window.
QMS magicolor WX User's Guide2-14
Page 55

Configuring the
EDNord - Istedgade 37A - 9000 Aalborg - telefon 96333500
Windows NT 4.0
Printer Driver
Configuring the Printer Driver through the
Windows NT 4.0 Start Menu
1 From the Windows NT Start menu choose Settings. Then
choose Printers.
2 In the Printers window, select the QMS
3 From the File menu, choose Properties.
The QMS
dow contains the following six tabs: General, Ports, Scheduling,
Sharing, Securit y, and Device Settings. For information on all the
tabs, except Device Settings, refer to your Windows NT 4.0 docu-
mentation. For information on setting Device Settings, see “Con-
figuring Device Settings” on page 2-32.
4 Make your option selections, and then choose OK to save
your changes and return to the Printers window.
magicolor
WX 1Properties window displays. This win-
magicolor
WX.
Configuring the Printer Driver through the
Application
1 From the application’s File menu choose Print (or, in some
cases, Print Setup).
2 In the Print or Print Setup dialog box, select the QMS
color
WX, and choose the Properties button.
magi-
The QMS
This window contains the following tabs:
n Page Setup—Allows you to provide information about paper
size, paper source, cop y count, orientation, and color appearance. For inf ormation on setting these options, see “Configuring Page Setup Options” on page 2-16.
Printing
magicolor
WX Document Properties window displays.
2-15
Page 56

Configuring the
EDNord - Istedgade 37A - 9000 Aalborg - telefon 96333500
Windows NT 4.0
Printer Driver
n Advanced—In addition to the Page Setup options, this tab
allows you to provide information about resolution, halftone
color adjustment, media, and metafile spooling. For informa-
tion on setting these options, see “Configuring Advanced
Options” on page 2-20.
3 Make your options selections, and then choose the OK but-
ton to return to the Print or Print Setup dialog box.
Configuring Page Setup Options
The Page Setup tab allows you to provide information about the paper
size, paper source, copy count, orientation, and color appearance of
the media you want to print on. Each option and button is explained in
this section.
» Note:
The Page Setup and Advanced tabs display on both the QMS
magicolor WX Default Document Properties and the QMS magicolor
WX Document Properties dialog boxes. Since the tabs display the
same in either box, only one box is shown in full in the following
illustration.
QMS magicolor WX User's Guide2-16
Page 57

Configuring the
EDNord - Istedgade 37A - 9000 Aalborg - telefon 96333500
Windows NT 4.0
Printer Driver
Printing
2-17
Page 58

Configuring the
EDNord - Istedgade 37A - 9000 Aalborg - telefon 96333500
Windows NT 4.0
Printer Driver
Paper Size
Purpose Sets the media size.
Choices Size Inches Millimeters
A4 8.27 x 11.69 210.00 x 297.00
A4 Small 8.27 x 11.69 210.00 x 297.00
Com 10 9.50 x 4.125 241.30 x 104.78
DL 8.66 x 4.33 220.00 x 110.00
Envelope #10 9.50 x 4.125 241.30 x 104.78
Envelope DL 8.66 x 4.33 220.00 x 110.00
Executive 7.25 x 10.50 185.00 x 267.00
Legal 8.50 x 14.00 215.90 x 355.60
Letter 8.50 x 11.00 215.90 x 279.40
Letter Small 8.50 x 11.00 215.90 x 279.40
Note 8.50 x 11.00 215.90 x 279.40
Default Letter
Notes If a media size other than that chosen in the driver is installed
in the cassette, an error message displays, but the job still
prints on the currently installed media.
More information about the media supported by this printer is
located in “Print Media Sizes, Imageable Regions, and Mar-
gins” on page 2-51.
QMS magicolor WX User's Guide2-18
Page 59

Configuring the
EDNord - Istedgade 37A - 9000 Aalborg - telefon 96333500
Windows NT 4.0
Printer Driver
Paper Source
Purpose Sets the input source (cass ett e/tr ay/bin) from which print
media is pulled into the printer.
Choices Lower Tray—The optional lower media cassette
Manual Feed—The manual feed tray
Printer Default—The tr a y or cass ette c hose n throu gh th e Tra y
Select key on the printer control panel
Upper Tray—The standard media cass ette
Default Upper Tray
Copy Count
Purpose Sets the number of copies to be printed.
Choices 1-999
Default 1
Orientation
Purpose Sets the orientation (printi ng dire ction) of the print media.
Choices Portrait—Printing across the narrow width of the page.
Landscape—Printing across the length of the page.
Default Portrait
Color Appearance
Purpose Selects between gray scale and color printing.
Choices Gray Scale—Print in black and white only
Color—Print in color
Default Color
Printing
2-19
Page 60

Configuring the
EDNord - Istedgade 37A - 9000 Aalborg - telefon 96333500
Windows NT 4.0
Printer Driver
OK Button
The OK button allows you to save your changes and exit from the
Document Properties window.
Cancel Button
The Cancel button allows you to cancel your changes and exit from
the Document Properties window.
Configuring Advanced Options
The Advanced tab allows you to provide information about resolution,
halftone color adjustment, media, and metafile spooling in addition to
the page setup options discussed in “Configuring Page Setup
Options” on page 2-16.
On the Advanced tab, the options are listed in tree form on three
branches: Paper/Output, Graphic, and Document Options.
n Under the Paper/Output branch, Paper Size, Orientation, Paper
Source, and Copy Count are listed.
n Under the Graphic branch, Resolution and Color Appearance are
listed.
n Under the Document Options branch, Halftone Color Adjustment,
Media, and Metafile Spooling are listed.
Beside each option is a word or phrase in angle brackets. This is the
option setting. For example, <Letter> is beside Paper Size—Paper
size is the option and <Letter> is the option setting.
To change an option setting, select an option. Under the options, a
group of selections for that option will display. Just click a selection to
display it inside the angle brackets beside the option.
Each option is explained in detail in this section.
» Note:
The Page Setup and Advanced tabs display on both the QMS
magicolor WX Default Document Properties and the QMS magicolor
WX Document Properties dialog boxes. Since the tabs display the
same in either box, only one box is shown in full in the following
illustration.
QMS magicolor WX User's Guide2-20
Page 61

Configuring the
EDNord - Istedgade 37A - 9000 Aalborg - telefon 96333500
Windows NT 4.0
Printer Driver
Printing
2-21
Page 62

Configuring the
EDNord - Istedgade 37A - 9000 Aalborg - telefon 96333500
Windows NT 4.0
Printer Driver
Paper Size
Branch Paper/Output
Purpose Sets the media size.
Choices Size Inches Millimeters
A4 8.27 x 11.69 210.00 x 297.00
A4 Small 8.27 x 11.69 210.00 x 297.00
Com 10 9.50 x 4.125 241.30 x 104.78
DL 8.66 x 4.33 220.00 x 110.00
Envelope #10 9.50 x 4.125 241.30 x 104.78
Envelope DL 8.66 x 4.33 220.00 x 110.00
Executive 7.25 x 10.50 185.00 x 267.00
Legal 8.50 x 14.00 215.90 x 355.60
Letter 8.50 x 11.00 215.90 x 279.40
Letter Small 8.50 x 11.00 215.90 x 279.40
Note 8.50 x 11.00 215.90 x 279.40
Default Letter
Notes If a media size other than that chosen in the driver is installed
in the cassette, an error message displays, but the job still
prints on the currently installed media.
More information about the media supported by this printer is
located in “Print Media Sizes, Imageable Regions, and Mar-
gins” on page 2-51.
QMS magicolor WX User's Guide2-22
Page 63

Configuring the
EDNord - Istedgade 37A - 9000 Aalborg - telefon 96333500
Windows NT 4.0
Printer Driver
Orientation
Branch Paper/Output
Purpose Sets the orientation (printi ng dire ction) of the print media.
Choices Portrait—Printing across the narrow width of the page.
Landscape—Printing across the length of the page.
Default Portrait
Paper Source
Branch Paper/Output
Purpose Sets the input source (cass ett e/tr ay/bin) from which print
media is pulled into the printer.
Choices Lower Tray—The optional lower media cassette
Manual Feed—The manual feed tray
Printer Default—The tr a y or cass ette c hose n throu gh th e Tra y
Select Key on the printer control panel
Upper Tray—The standard media cass ette
Default Upper Tra y
Copy Count
Branch Paper/Output
Purpose Sets the number of copies to be printed.
Choices 1-999
Default 1
Resolution
Branch Graphic
Purpose Sets the printing resolution.
Printing
2-23
Page 64

Configuring the
EDNord - Istedgade 37A - 9000 Aalborg - telefon 96333500
Windows NT 4.0
Printer Driver
Choices 600 dots per inch Color—For printing color documents at
Default 600 dots per inch Color
Color Appearance
Branch Graphic
Purpose Selects between gray scale and color printing.
Choices Gray Scale—Print in black and white only
Default Color
600x600 dpi
Color—Print in color
Halftone Color Adjustment
See “Configuring Halftone Color Adjustments” on page 2-26.
Media
Branch Document Options
Purpose Sets the type of media to be printed.
Choices Standard—For printing on normal weight paper, envelopes,
and labels
2
Thick Stock—For printing on 24–43 lb (90–163 g/m
Transparency—For printing on overhead transparency film
Default Standard
Notes Your media choice must be set through the printer driver. (The
Media key on the printer control panel is not used. It is
available to allow you to upgrade your printer to a fully
networkable, departmental color printer, the QMS
CX Print System. Contact your QMS vendor for specifications
and purchase information.)
) stock
magicolor
Do not select Transparency when printing on regular paper.
This may waste ink and cause smearing.
QMS magicolor WX User's Guide2-24
Page 65

Configuring the
EDNord - Istedgade 37A - 9000 Aalborg - telefon 96333500
Windows NT 4.0
Printer Driver
Metafile Spooling
Branch Document Options
Purpose Sets the format in which printing information is stored while a
print job is waitin g.
Choices Off—Turns off metafile spooling.
On—Turns on metafile spooling.
Default On
Notes Generally, EMF (Metafile Spooling on) format frees up your
program because it is smaller and doesn’t depend on what
kind of printing device you have. RAW (Metafile Spooling off)
format is specific to the printin g device, so e x tr a time may be
required to convert the printing information, and your program
would not be a v aila b le for working on other tas ks . If y o u ha v e a
printing problem using EMF, try RAW.
OK Button
The OK button allows you to save your changes and exit from the
Default Document Properties window.
Cancel Button
The Cancel button allows you to cancel your changes and exit from
the Default Document Properties window.
Printing
2-25
Page 66

Configuring the
EDNord - Istedgade 37A - 9000 Aalborg - telefon 96333500
Windows NT 4.0
Printer Driver
Configuring Halftone Color Adjustments
Halftone Color Adjustment is the first subbranch under the Document
Options branch. When Halftone Color Adjustment is selected, the
Halftone Color Adjustment window displays. Each option and button
on this window is explained in detail in this section.
QMS magicolor WX User's Guide2-26
Page 67

Configuring the
EDNord - Istedgade 37A - 9000 Aalborg - telefon 96333500
Windows NT 4.0
Printer Driver
Contrast
Purpose Sets the difference between dark and bright areas in your
picture.
Range -100 (darkest) to +100 (brighte st )
Default 0
Brightness
Purpose Sets the intensity of the light in y our pic ture.
Range -100 (darkest) to +100 (light est)
Default 0
Color
Purpose Sets the saturation of color in your picture.
Range -100 (gra y scal ed) to +100 (full col or)
Default 0
Tint
Purpose Sets the hue in your pictu re.
Range -100 to +100
Default 0
Notes Tint is used to correct flesh tones. A negative adjustment
corrects the hue counterclockwise on the color wheel
(example: corrects red in the direction of blue). A positive
adjustment corrects the hue clockwise on the color wheel
(example: corrects red in the direct ion of green).
Printing
2-27
Page 68

Configuring the
EDNord - Istedgade 37A - 9000 Aalborg - telefon 96333500
Windows NT 4.0
Printer Driver
Dark Picture
Purpose Adjusts images that are too dark.
Choices Unchecked—Does not adjust image.
Default Unchecked
Notes Adjusting for overexposure can restore details lost due to a
Negative
Purpose Sets image to positiv e or n ega tive.
Choices Unchec ke d—Does not adjust Image.
Checked—Lightens the colors in the image.
lack of contrast .
Checked—Inverts the colors in the image.
Default Unchecked
Notes Setting the image to negative inverts the colors in the image.
Black Ref. and White Ref.
Black Ref. and White Ref. work together.
Purpose Sets the range between the darkest and lightest reference
points in the image .
Range Black Ref.—0.000 (less black) to 0.400 (more black)
White Ref.—0.600 (more white) to 1.000 (less white)
Default Black Ref.—0.000
White Ref.—1.000
Notes Increasing the value of the black reference point and
decreasing the value of the white reference point increases
contrast but narrows the range of midtones.
QMS magicolor WX User's Guide2-28
Page 69

Configuring the
EDNord - Istedgade 37A - 9000 Aalborg - telefon 96333500
Windows NT 4.0
Printer Driver
Illuminant
Purpose Adjusts for conditions under which an image is viewed.
Choices 1: Device’s Default
2: Tungsten Lamp
3: Noon Sunlight
4: NTSC Daylight
5: Normal Print
6: Bond Paper Print
7: Standard Daylight
8: Northern Daylight
9: Cool White Lamp
Default Device’s Default
Input RGB Gamma
The Red, Green, and Blue input gamma corrections work either independently or together.
Purpose Corrects for unbalanced brightness of the input image by
adjusting input gamma.
Choices Unchecked or checked (See Notes)
Defaults Unchecked
Range 0.250 to 6.5
Default 1.000
Printing
2-29
Page 70

Configuring the
EDNord - Istedgade 37A - 9000 Aalborg - telefon 96333500
Windows NT 4.0
Printer Driver
Notes Adjust the scroll bars to the left to increase brightness and to
the right to decrease brightness.
If the Red, Green, a nd Blue chec k bo x es a re all le ft unc hec ked ,
the Red, Green, and Blue scroll b ars will adjus t in dep endently.
If any two check boxes are checked, the corresponding scroll
bars adjust together. If all three check boxes are checked, all
three scroll bars adjust together.
Checking the Linear=1.0 box disables the Red, Green, and
Blue scroll boxes and sets each input RGB gamma correction
to 1.000 (brightness equal to input value).
Picture
Purpose Selects a predefined test picture.
Choices 1: Reference Colors
2: RGB Test Colors
3: NTSC Color Bar
Default RGB Test Colors
QMS magicolor WX User's Guide2-30
Page 71

Configuring the
EDNord - Istedgade 37A - 9000 Aalborg - telefon 96333500
Windows NT 4.0
Printer Driver
Picture Check Boxes
Purpose Set various attributes of the test picture.
Choices View—When che cked, displ ays a test pictur e .
Maximize—When checked, maximizes the test picture to full
screen. Click the right mouse button to hide/unhide the
Halftone Colo r Adjust me nt d ial og box.
Palet te—Wh en che c k ed, displ a y s a co lor pal ette based on th e
colors in the test pict ure.
Scale—Whe n check ed, adjus ts the gr aphic height a nd width to
match the proportions of the original graphic. When
unchec ked, the gra phi c fills its window.
Flip X—Reverses the graphic along its horizontal axis.
Flip Y—Reverses the graphic along its vertical axis.
Default No defaults
OK Button
The OK button allows you to save your changes and exit from the
Halftone Color Adjustment tab.
Cancel Button
The Cancel button allows you to cancel your changes and exit from
the Halftone Color Adjustment tab.
Default Button
The Default button allows you to reset all of the selections on the Halftone Color Adjustment tab to their default settings.
Revert Button
The Rev ert button allows you to reset all of the selections on the Halftone Color Adjustment tab to the values in use when the tab was
opened.
Printing
2-31
Page 72

Configuring the
EDNord - Istedgade 37A - 9000 Aalborg - telefon 96333500
Windows NT 4.0
Printer Driver
Open... Button
The Open... button allows you to open a graphic file so that you can
see how your changes affect color. A standard Windows NT File
Open dialog with a Select a Test Picture prompt will display.
Save As... Button
The Save As... button sav es the graphic file you have opened. Saving
the file saves the changes you have made to size, orientation, and
color for the graphic.
Configuring Device Settings
Device Settings is the sixth tab in the QMS
dialog box. The QMS
magicolor
WX Device Settings tree in the dia-
magicolor
WX Properties
log’s window has two branches: Form To Tray Assignment and Halftone Setup.
n Form To Tray Assignment has four sub-branches: Upper Paper
tray, Manual Paper feed, Lower Paper tray, and Printer Default.
n Halftone Setup... has no subbranches. Selecting Halftone
Setup... displays a push button that will in turn display the Device
Color / Halftone Properties dialog box.
Each option and button on this window is explained in detail in this
section.
Form To Tray Assignment
Purpose Set form (media size) to tray assignment.
Choices Upper P ape r Tray, Manual P aper Feed, Low er Paper Tray, and
Printer Default
Default No defaults
Notes See the f o llowing table fo r an expla nat ion of Upper Paper Tray,
Manual Paper Feed, Lower Paper Tray, and Printer Default.
QMS magicolor WX User's Guide2-32
Page 73

Configuring the
EDNord - Istedgade 37A - 9000 Aalborg - telefon 96333500
Windows NT 4.0
Printer Driver
Printing
2-33
Page 74

Configuring the
EDNord - Istedgade 37A - 9000 Aalborg - telefon 96333500
Windows NT 4.0
Printer Driver
Upper Paper Tray, Manual Paper Feed, Lower
Paper Tray, and Printer Default
These items are subbranches to Form To Tray Assignment. If they are
not displayed, click the “+” sign before Form To Tray Assignment.
Purpose Set form (media size) to tray assignment.
Choices Size Inches Millimeters
Not Ava ila ble
A4 8.27 x 11.69 210.00 x 297.00
A4 Small 8.27 x 11.69 210.00 x 297.00
Com 10 9.50 x 4.125 241.30 x 104.78
DL 8.66 x 4.33 220.00 x 110.00
Envelope #10 9.50 x 4.125 241.30 x 104.78
Envelope DL 8.66 x 4.33 220.00 x 110.00
Executive 7.25 x 10.50 185.00 x 267.00
Legal 8.50 x 14.00 215.90 x 355.60
Letter 8.50 x 11.00 215.90 x 279.40
Letter Small 8.50 x 11.00 215.90 x 279.40
Note 8.50 x 11.00 215.90 x 279.40
Default No defaults
Notes Select an option (subbranch) to display the choices for that
option. The choices appear in a lower window. Then select a
form (media size) for the selected option . The sel ec ted form
(media size) will appear in the upper window beside the name
of the option.
QMS magicolor WX User's Guide2-34
Page 75

Configuring the
EDNord - Istedgade 37A - 9000 Aalborg - telefon 96333500
Windows NT 4.0
Printer Driver
Halftone Setup
Selecting the Halftone Setup branch of the Device Settings tab
causes the Device Color / Halftone Properties dialog box to display.
Each option and button is explained in detail in this section.
Using the Device Color / Halftone Properties
Dialog Box
QMS has carefully set the default values of the parameters in the
Device Color / Halftone Properties dialog box to provide optimum
color performance with the
handling these parameters, QMS recommends that you use the Halftone Color Adjustment dialog box on page 2-26 to make color adjust-
Printing
magicolor
WX. Unless you’re an expert at
2-35
Page 76

Configuring the
EDNord - Istedgade 37A - 9000 Aalborg - telefon 96333500
Windows NT 4.0
Printer Driver
ments. If, through the use of the Device Color / Halftone Properties
dialog box, you reach an impasse in your color adjustments, use the
Default button to return the parameters to their default values.
Halftone Pattern
Purpose Specifies the cell size for the pattern.
Choices 2x2, 2x2 Enhanced, 4x4, 4x4 Enhanced, 6x6, 6x6 Enhanced,
Default 10x10 Enhanced
Notes Halftone pattern is defined by the size of the cells used in the
8x8, 8x8 Enhanced, 10x10, 10x10 Enhanced, 12x12, 12x12
Enhanced, 14x14, 14x14 Enhanced, 16x16, 16x16 Enhanced
pattern. Cells are measured in pix el s .
A 4x4 cell con tains 16 pix els . Larger c ells print a more coars ely
grained picture; however, larger cells allow a greater range of
grays or colors to be printed.
Enhanced cell patterns are optimized to produce greater
resolution. If your graphic prints with an unwanted pattern of
lines or an unwanted moiré pattern, try printing it again, using
the same cell size but without enhancement.
Device Gamma
Purpose Adjusts the color-intensity balance of the printing device.
Range 0.2500-6.5000
Default 1.0000
Pixel Diameter
Purpose Adjusts the print density.
Range 576.9%-33.3%-DEVICE-1/52"-1/900”
Default DEVICE
QMS magicolor WX User's Guide2-36
Page 77

Configuring the
EDNord - Istedgade 37A - 9000 Aalborg - telefon 96333500
Windows NT 4.0
Printer Driver
Notes Setting the pix el dia meter adj us ts the prints density. Pixel
diameters can be measured either in inches or as relative
percentage s . You can also spe cify that the halftone driv e r
should use a pixel size based on the print resolution. The
mode value or name appears to the left of the scroll bar and
changes as you scroll.
In the inch mode, you adjust the pixel diameter based on the
real pixel size. The displayed size is shown in fractions of an
inch. For example, 1/100 equals 0.01".
In relative-percentage mode, you adjust the pixel diameter
based on final printing resolution. The relative pixel size is
shown as a percen tag e . For ex ample, 200.00% spec ifi es that
the pixel diameter is 200% larger than the printing resolution.
“DEVICE” specifies that the halftone driver should use a pixel
size based on the print resolution.
Printing
2-37
Page 78

Configuring the
EDNord - Istedgade 37A - 9000 Aalborg - telefon 96333500
Windows NT 4.0
Printer Driver
Primary Colors CIE (x,y) Chromaticity Coordinate
Purpose Adjusts colors bas ed on CIE color sy ste m
Range x : 0.0010-0.8000
Default Red: x=0.6810, y=0.3050
Notes The CIE (International Commission on Illumination) color
y: 0.0010-0.8500
Green: x=0.2260, y=0.6550
Blue: x=0.1810, y=0.0500
White: x=0.3324, y=0.3474
system defines color in terms of luminance, hue, and
saturation.
Use the associat ed con trol s to adjust the coordinates of
primary colors based on their CIE x- and y-values.
Alignment White Luminance (CIE Y)
Purpose Adjusts device white points using the CIE color system
Range 25.00-400.00
Default 100.00
Notes The CIE (International Commission on Illumination) color
system defines color in terms of luminance, hue, and
saturation.
The range (25.00 to 400. 00) sc ale s the enti re device-output
color darker or brighter by stretching device colors over a
smaller or larger range.
QMS magicolor WX User's Guide2-38
Page 79

Configuring the
EDNord - Istedgade 37A - 9000 Aalborg - telefon 96333500
Windows NT 4.0
Printer Driver
Primary Dye Concentrations (C=Cyan, M=Magenta,
Y=Yellow)
Purpose Corrects printing-dye color.
Range 0.00%-90.00%
Defaults 0
Notes Use this to correct printing-dye color (cyan, magenta, yellow)
by correcting the percentage of other colors present in the
process colors.
For e x amp le : if the sky bl ue in your graphics is too purple, y ou
may want to correct the color by increasing the amount of
magenta in the cyan.
Default Button
The Default button allows you to reset all of the selections in the
Device Color / Halftone Properties window to their default settings.
Revert Button
The Revert button allows you to reset all of the selections in the
Device Color / Halftone Properties window to the values in use when
the window was opened.
OK Button
The OK button allows you to save your changes and exit from the
Device Color / Halftone Properties window.
Cancel Button
The Cancel button allows you to cancel your changes and exit from
the Device Color / Halftone Properties window.
Printing
2-39
Page 80

Printing on a
EDNord - Istedgade 37A - 9000 Aalborg - telefon 96333500
Network
Printing on a Network
Sharing Your Printer with Others for Windows
95 Users
» Note:
printer driver in Windows 95 for sharing. The following section
explains how to configure the QMS magicolor WX printer driver in
Windows NT 4.0 for sharing.
Before you can let other people print to your printer, y ou ha v e to set it
up as a shared printer. Use the following instructions:
1 From the Windows 95 Start menu choose Settings.
2 From the Settings menu choose Printers.
3 In the Printers window, select either the QMS
4 From the File menu choose Sharing.
» Note:
This section explains how to configure the QMS magicolor WX
magicolor
Color or the QMS
If Sharing isn’t available, do the following to add File and
Printer Sharing services:
a From the Windows 95 Start menu choose Settings.
b From the Settings menu choose Control Panel.
magicolor
WX Monochrome printer driver.
WX
c Open the Network folder.
d On the Configuration tab, choose the Add button.
e In the Select Network Component Type window, select
Service, and then choose the Add button.
f In the Select Network Service window, select Microsoft, and
then select the File and Print sharing entry that matches your
network.
g Choose the OK button, and follow the instructions.
h Restart your computer for the changes to take effect.
5 On the Sharing tab, choose the Shared As: radio button.
QMS magicolor WX User's Guide2-40
Page 81

Printing on a
EDNord - Istedgade 37A - 9000 Aalborg - telefon 96333500
Network
6 In the Share Name box type a name for the printer.
You’ll use this name and the PC’s name to identify the printer.
7 If you want to, in the Comment box type a location or other
description.
This will help others locate and identify your printer.
8 If you want to limit the use of your printer to only a certain
group of people, in the Password box type a password.
9 Choose the OK button.
An outstretched hand is added to the bottom of the printer’s icon
to indicate that the printer can be shared.
Sharing Your Printer with Others for Windows
NT 4.0 Users
» Note:
printer driver in Windows NT 4.0 for sharing. The previous section
explains how to configure the QMS magicolor WX printer driver in
Windows 95 for sharing.
» Note:
running either Windows 95 or Windows NT 4.0.
If your Windows NT 4.0 printer driver was not configured for sharing
when originally installed, then to add sharing, use the following
instructions:
1 From the Windows NT Start menu choose Settings. Then
2 In the Printers window, select QMS
3 From the File menu, choose Properties.
This section explains how to configure the QMS magicolor WX
Printer sharing can only be used with attached PCs that are
choose Printers.
magicolor
WX.
4 From the Properties dialog box, choose the Sharing tab.
5 After the Sharing tab displays, select Shared.
Printing
2-41
Page 82

Printing on a
EDNord - Istedgade 37A - 9000 Aalborg - telefon 96333500
Network
6 In the Share Name edit box, type the name of the printer.
This is the name displayed when your PC is connected to the
printer.
7 If you’re sharing your printer with a Windows NT 4.0 worksta-
tion, choose OK and skip to step 8. If you’re sharing your
printer with a Windows 95 workstation, perform this step.
a In the Alternate Drivers list box, select the Windows 95
b If the operating system on your PC does not have the
operating system and choose OK.
magicolor WX printer driver for Windows 95, you will be
prompted to install it. Insert the
magicolor
WX printer driver
disk for Windows 95 and choose OK.
The required files are copied to the appropriate directory.
» Note:
magicolor WX printer driver must be installed on the server and
on every client PC as illustrated below.
.
When connected to a Windows 95 server, the QMS
*Server PC
Windows 95
**Client PC
WX printer driver must
be installed on all
requesting clients.
**Client PC
QMS magicolor WX
Printer
**Client PC
*WX printer driver must be installed on server.
**Client PCs supported are Windows 95 and Windows NT 4.0 configured.
QMS magicolor WX User's Guide2-42
Page 83

Printing on a
EDNord - Istedgade 37A - 9000 Aalborg - telefon 96333500
Network
» Note:
magicolor WX printer driver is automatically downloaded to any
requesting client PC that is running Windows 95 or Windows NT
4.0 as illustrated below.
*Server PC
Windows NT 4.0
*WX printer driver must be installed on server.
**Client PCs supported are Windows 95 and Windows NT 4.0 configured.
When connected to a Windows NT 4.0 server, the QMS
QMS magicolor WX
Printer
**Client PC
**Client PC
WX printer driver is
automatically downloaded
to all requesting clients.
**Client PC
8 When asked if you would like to print a test page, choose
either Yes or No, and then choose Finish.
Sharing Someone Else's Printer
Use the following instructions to print to a printer that someone else
has already set up as a shared printer:
1 Browse thr ough the Netw ork Neighborhood until you find the
printer icon.
2 Use the right mouse button to select the printer icon.
3 From the shortcut menu that displays choose Install to add
the printer driver to your PC.
4 Follow the instructions on the screen.
Printing
2-43
Page 84

Refilling the
EDNord - Istedgade 37A - 9000 Aalborg - telefon 96333500
Media Cassette
5 Print to this printer just as if it were connected directly to
your PC.
Refilling the Media Cassette
Use the following procedure to refill the standard or optional media
trays.
1 Pull the paper cassette out of the printer.
Front View
QMS magicolor WX User's Guide2-44
Page 85

Refilling the
EDNord - Istedgade 37A - 9000 Aalborg - telefon 96333500
Media Cassette
2 Make sure the size key slide on the back end of the cassette
is set for letter- or A4-size media.
EX LT A4 LG
3 Load the media (printing-side up) in the cassette.
» Note:
For the best quality printouts, before you load media in the
cassette, look at the packaging to determine which is the printing
side of the (an arrow points in the direction of the printing side on
most packaging). Also, if y ou're printing on paper, f an it to pre v ent
the sheets from sticking together. (Don't fan transparencies or
labels because this can cause jams.)
Printing
2-45
Page 86

Refilling the
EDNord - Istedgade 37A - 9000 Aalborg - telefon 96333500
Media Cassette
For letterhead or preprinted media load the top-end first. Make
sure the paper lies flat and does not exceed the upper-limit mark
on the cassette for paper or foil (transparencies).
Paper
Foil
4 Adjust the paper guides on each side and on the trailing
edge of the media so that they rest lightly against the media
without causing it to buckle.
QMS magicolor WX User's Guide2-46
Page 87

Using the
EDNord - Istedgade 37A - 9000 Aalborg - telefon 96333500
Manual Feed
Tray
5 Slide the filled cassette into the printer until it snaps firmly
into place and is flush with the front of the printer.
Front View
» Note:
type (paper or transparency) you have in the cassette, or print
quality could degrade.
Make sure that in the printer driver you select the media
Using the Manual Feed Tray
You can feed a single sheet at a time to the printer using the manual-feed tray. This allows you to print on a different media type without
changing the media in the cassette, or to print on media not supported by the standard cassette (envelopes or thick stock).
1 Use your application's print setup feature to select the man-
ual-feed tray and the media type you plan to use (paper or
transparency).
2 Use your application's print setup feature to select any other
printing options you want.
Printing
2-47
Page 88

Using the
EDNord - Istedgade 37A - 9000 Aalborg - telefon 96333500
Manual Feed
Tray
3 Open the manual-feed tray by lightly pressing on the
top-right corner to release the spring latch.
4 Move the paper guides on the manual feed tray to fit the size
of the chosen media.
5 Insert a single sheet of media, printing side up, with the top
edge leading into the printer, in the manual feed tray until it
reaches the rear of the tray inside the printer and lies flat.
The media wrapping should indicate which is the printing side.
If you're printing envelopes, load the envelope printing-side up, so
that the flap side will be on the left when the envelope is pulled
into the printer.
QMS magicolor WX User's Guide2-48
Page 89

Printing on
EDNord - Istedgade 37A - 9000 Aalborg - telefon 96333500
Different Types
of Print Media
6 Through your application, print your document.
Printing on Different Types of
Print Media
Printing Transparencies
1 See “Refilling the Media Cassette” on page 2-44 or “Using
the Manual Feed Tray” on page 2-47 for information on loading transparencies.
2 Use the Windows 95 printer driver to select transparency
printing (see “Media Choice” on page 2-6) and any other
printing options you want.
3 Send your job.
Printing Labels
For best results when printing labels, format the labels through your
application and then run a test print on plain paper to check formatting and avoid wasting label sheets.
1 See “Refilling the Media Cassette” on page 2-44 or “Using
the Manual Feed Tray” on page 2-47 for information on loading labels.
Make sure you place the labels printing-side up with the top edge
feeding into the printer first.
2 Use the Windows 95 printer driver to select standard printing
(see “Media Choice” on page 2-6) and any other printing
options you want.
3 Send your job.
Printing
2-49
Page 90

Printing on
EDNord - Istedgade 37A - 9000 Aalborg - telefon 96333500
Different Types
of Print Media
Printing on Letterhead or Other Preprinted
Media
Print letterhead or other preprinted media the same way labels are
printed. Make sure you place the media printing-side up with the
letterhead edge feeding into the printer first.
Printing on 3-Hole or Other Pre-punched
Media
Print 3-hole or other pre-punched media the same way labels are
printed. Make sure you place the media printing-side up with the top
edge feeding into the printer first.
Printing Envelopes
Envelopes can be printed from the manual-feed tray or from the
optional envelope cassette. If you purchased the optional envelope
cassette for your printer, see chapter 4, “Printer Options,” for information on installing and using it.
To print envelopes from the manual-feed tray, see “Using the Manual
Feed Tray” on page 2-47. Envelopes are loaded with the printing side
up, so that the top of the envelope (the flap side) is on the left as the
envelope is pulled into the printer.
Printing on Thick Paper Stocks
You can print on heavy paper stocks (24–43 lb [90–163 g/m2] through
the manual feed tray.
1 Use the Windows 95 printer driver to select thick stock print-
ing (see “Media Choice” on page 2-6) and any other printing
options you want.
2 See “Using the Manual Feed Tray” on page 2-47 for instruc-
tions on feeding media manually to the printer.
QMS magicolor WX User's Guide2-50
Page 91

More About Print Media
EDNord - Istedgade 37A - 9000 Aalborg - telefon 96333500
Your print quality depends in large part on the quality of the media.
You can get sharper contrast on printed pages by using special laser
printer media, which is available from a variety of manufacturers. This
paper is thicker, smoother, and whiter than copier paper and gives
your page a more professional appearance.
The printer accommodates plain or laser paper, transparencies, and
labels. You can also print on envelopes and thicker stocks (24–43 lbs
2
[90–163 g/m
cations. Copier paper has a smooth, clean surface, controlled electrical properties, and heat stability. This assures good image transfer
without excessive curling of the paper.
]). Conventional copier paper is adequate for most appli-
More About
Print Media
You can use special paper, such as bond paper, often used for stationery, for special applications. However, textured paper may result in
uneven toner placement and print quality may vary. You may want to
do a test run before printing a large quantity. Colored paper may also
be used, but not paper with a colored coating applied. “Print Media
Types, Weights, and Recommended Brands” on page 2-54 contains
additional paper specifications.
Print Media Sizes, Imageable Regions, and
Margins
Media Sizes* Size Inches Millimeters
A4 8.27 x 11.69 210.00 x 297.00
A4 small 8.27 x 11.69 210.00 x 297.00
Executive 7.25 x 10.50 185.00 x 267.00
Legal 8.50 x 14.00 215.90 x 355.60
Letter 8.50 x 11.00 215.90 x 279.40
Letter small 8.50 x 11.00 215.90 x 279.40
Note 8.50 x 11.00 215.90 x 279.40
Envelope** 8.66 x 4.33 220.00 x 110.00
#10 Envelope** 9.50 x 4.125 241.30 x 104.78
Printing
2-51
Page 92

More About
EDNord - Istedgade 37A - 9000 Aalborg - telefon 96333500
Print Media
Imageable
Regions*
Size Inches Millimeters
A4 7.87 x 11.30 200.00 x 287.00
A4 small 7.87 x 11.30 200.00 x 287.00
Executive 6.89 x 10.12 175.00 x 257.00
Legal 1-Color*** 8.11 x 13.61 205.90 x 345.60
Legal 4-Color*** 8.11 x 11.7 205.90 x 297.18
Letter 7.87 x 11.30 200.00 x 287.00
Letter small 7.87 x 11.30 200.00 x 287.00
Note 7.87 x 11.30 200.00 x 287.00
Envelope** 8.35 x 4.09 212.00 x 104.00
#10 Envelope** 9.19 x 3.89 233.30 x 98.78
Margins* Size Top Bottom Left & Right
A4 5 mm 5 mm 5 mm
A4 small 5 mm 5 mm 5 mm
Executive 5 mm 5 mm 5 mm
Legal 1-Color*** 0.2" 0.2" 0.2"
Legal 4-Color*** 0.2" 2.1" 0.2"
Letter 0.2" 0.2" 0.2"
Letter small 0.2" 0.2" 0.2"
Note 0.2" 0.2" 0.2"
Envelope** 3 mm 3 mm 4 mm
#10 Envelope** 0.12" 0.12" 0.16"
*All measurements are accurate within 0.02"/0.5 mm
** Envel ope is also kno wn as DL. #10 Envelope is also known as Com 10.
***Although the monochrome imageable region for legal-sized pages is
8.11" x 13.61"/205.90 x 345.60 mm, the full-color imageable region for this
size is limited to 8.11" x 11.25"/205.90 x 285.75 mm.
QMS magicolor WX User's Guide2-52
Page 93

More About
EDNord - Istedgade 37A - 9000 Aalborg - telefon 96333500
Print Media
About Imageable Regions and Margins
The imageable region of each media size is smaller than the size of
the media. The imageable region is subject to hardware limits (physical page size and margins required by the print engine). As you set
page margins in your application, remember they must be equal to or
less than the imageable regions specified for the page size you’re
using. “Print Media Sizes, Imageable Regions, and Margins” on page
2-51 lists measurements of imageable regions and margins for each
media size.
About Legal-Size Imageable Regions
There are two imageable regions for legal-sized pages: one for black
and one for color. The imageable region for black on legal-sized
pages is 8.11" x 13.61" (205.90 mm x 345.60 mm). The imageable
region for color on legal-sized pages is an 8.11" x 11.7" (205.90 mm x
297.18 mm) region at the top of the page. We recommend that you
compose color legal-sized pages so that color images stay in this
8.11" x 11.7" area near the top of the page, and use the imageable
region below this for black only .
Working Within Imageable Regions and Margins
If you experience problems with your file being cut off (not printing to
the expected margins), it might be due to an imageable region constraint. To compensate for imageable region constraints, use a larger
page size or adjust margins, page size, or scale through your application.
Printing
2-53
Page 94

More About
EDNord - Istedgade 37A - 9000 Aalborg - telefon 96333500
Print Media
Print Media Types, Weights, and
Recommended Brands
Media T y pe Weight in g/m
Plain Paper 60 to 90 g/m
Laser Paper 60 to 90 g/m
Thick Stock
(manual feed only)
Transparencie s 138 to 146 g/m
Labels 156 to 170 g/m
Envelopes 90 g/m
up to 163 g/m
2
2
Weight in lb Brand
2
2
16 to 24 lb Xerox 4024
16 to 24 lb Hammermill Laser Print
(White)
2
up to 43 lb N/A
2
36.7 to 38.8 lb 3M PP2500, Xerox 3R
2780, Xerox 3R 3117
2
41.5 to 45.2 lb Avery 5260
24 lb White Wove Sub 24 Auto
Fil #1914
Print Media Storage
Media should be stored in its original wrapper, on a flat surface, a w ay
from dust and sunlight.
n Temperature—63.5° to 80.6° F (17.5° to 27° C)
n Humidity—60% to 70% relative humidity
QMS magicolor WX User's Guide2-54
Page 95

Preventing Media Jams
EDNord - Istedgade 37A - 9000 Aalborg - telefon 96333500
Some printer problems are caused by improper handling of media or
use of the wrong media and consumables. The following section provides information about correctly handling media and preventing
jams. Severa l things you can do to reduce print media jamming in
your printer are
n Set the printer driver for the print media type and size currently in
the cassette. (See “Configuring the Windows 95 Printer Driver” on
page 2-2 or “Configuring the Windows NT 4.0 Printer Driver” on
page 2-14.)
n Use QMS-supplied toner and developer, and use QMS-recom-
mended print media.
Preventing
Media Jams
n Make sure print media is not torn, folded, or wrinkled.
n Do not overfill the media cassette: it holds 250 sheets of paper,
50 transparencies, or label stock up to the upper-limit mark on the
cassette.
» Note: If the printer is operating in a low-humidity environment, we
recommend printing fewer than 20 consecutive transparencies to
prevent jamming.
n If you have problems with double feeding, remove the paper from
the cassette and fan the edges. The sheets may be sticking
together. (However, do not fan transparencies; this can create
electrostatic buildup that can cause jamming.)
n Store print media away from moisture and humidity . Moisture and
humidity may cause media to turn up at the edges or wrinkles to
occur. The recommended relative humidity during operation is
60%-70%.
n Load media printing side up, top edge first. The printing side of
media is indicated on the wrapping, so leave it in its wrapping
until you’re ready to load it.
n Keep the paper-feed rollers and the manual-feed belts clean.
Dirty rollers and belts can draw media unevenly into the printer.
See “Cleaning the Rollers” in chapter 5, “Maintenance.”
Printing
2-55
Page 96

Cancelling a
EDNord - Istedgade 37A - 9000 Aalborg - telefon 96333500
Print Job
Preventing Envelope Jams
To prevent envelope jams
n Keep envelopes in their original box to protect them until they’re
used. Don’t use damaged envelopes.
n Store envelopes in a low-humidity environment.
n Use only the envelope types specified in “Print Media Types,
Weights, and Recommended Brands” on page 2-54. Don’t use
envelopes with windows.
n If you're using the optional envelope cassette, use it in the stan-
dard cassette slot (not the optional feeder), and don’t place more
than 30 envelopes in the cassette at once.
Cancelling a Print Job
To cancel all pages currently received by the printer, press the Cancel
key on the printer control panel.
To cancel all pages of the print job not yet received by the printer, cancel the job at your PC.
» Note:
received by the printer at the time you’re trying to cancel the job, you
may have to cancel the job both at the printer and at your PC.
v
Since all pages of a multi-page print job may not have been
QMS magicolor WX User's Guide2-56
Page 97

3
EDNord - Istedgade 37A - 9000 Aalborg - telefon 96333500
Control Panel
In This Chapter . . .
n About the message window
n About the indicators
n About the keys
n About printer configuration
Page 98

Introduction
EDNord - Istedgade 37A - 9000 Aalborg - telefon 96333500
Introduction
The control panel, located on the front of the printer, has two
functions:
n It alerts you to the printer’s current status, including any error
needing your attention
n It allows you to configure several printer features
The control panel consists of a message window, eight LED
indicators, and eight keys . Each of these is discussed in the following
sections.
PRINTING
QMS magicolor WX User’s Guide3-2
Page 99

About the
EDNord - Istedgade 37A - 9000 Aalborg - telefon 96333500
Control Panel
About the Control Panel
The Message Window
The 2-line, 32-character message window provides 2 functions:
n It displays status and error information. See chapter 7, “Trouble-
shooting,” for an annotated list of status and error messages.
n It displays configuration options. Configuration is discussed later
in this chapter.
Messages and configuration options can be displayed in 4 languages.
The Control Panel Indicators
Several LED indicators provide printer status information. The other
indicators are available to allow you to upgrade your printer to a net-
workable departmental color laser print system, the QMS
magicolor
CX.. (See chapter 4, “Printer Options,” for more information.)
On—The printer is on line and ready to accept
new print jobs. Press the Online/Offline key
once to take the printer off line (the indicator
goes out).
Off—The communication port is closed, so no
new data is acc epte d. The prin ter con tin ues
printing until it has finished all jobs in process.
Although jobs continue to compile and print
using the data already received, a job may be
interrupted, causi ng it to wait f or mo re incoming
data before printing resumes. Press the Online/
Offline key once to put the printer back on line
and ready to accept ne w print jobs (the
indicator goes back on).
Control Panel
Blinking—The printer is sleeping (in energy
sav er mo de) or wa rming up, or an engine error
has occurred (check the Message indicator).
3-3
Page 100

About the
EDNord - Istedgade 37A - 9000 Aalborg - telefon 96333500
Control Panel
Blinking—The printer is receiving data from
the PC.
On—An error message is displayed in the
messa ge wi ndow.
On—The standard paper cassette is selected
through the printer drive r or the Tray Selec t
key .
On—The optional, lo wer paper cassette is
selected through the printer driver or the Tray
Select key.
On—Manual fee d is sel ected through the
printer driver or the Tray Select key.
On—The media in the active cassette has
been defined in the printer driver to be paper .
When this LED an d the Transparency LE D are
both off, it means that the Thick Stock has
been selected in the printer driver.
On—The media in the active cassette has
been defined in the printer driver to be
transparency. When this LED and the Paper
LED are both off , it means that Th ick Stoc k has
been selected in the printer driver.
QMS magicolor WX User’s Guide3-4
 Loading...