

Page 1

®
EDNord - Istedgade 37A - 9000 Aalborg - telefon 96333500
®
QMS magicolor 2
Print System
Getting Started
1800481-001B
Page 2

Trademarks
EDNord - Istedgade 37A - 9000 Aalborg - telefon 96333500
The following are trademarks or registered trademarks of their respective owners. Other
product names mentioned in this manual may also be trademarks or registered
trademarks of their respective owners. Registered trademarks are registered in the
United States Patent and Trademark Office; some trademarks may also be registered in
other countries. QMS, Crown, CrownAdmin, CrownCopy, CrownNet, magicolor, the
QMS logo, and the Crown seal are registered trademarks of QMS, Inc., and CrownView,
ImageServer, Multi-Res, PS Executive Series, Q
QMS, Inc. PostScript is a trademark of Adobe Systems Incorporated for a page
description language and may be registered in certain jurisdictions. Throughout this
manual, “PostScript Level 2” is used to refer to a set of capabilities defined by Adobe
Systems for its PostScript Level 2 page description language. These capabilities,
among others, are implemented in this product through a QMS-developed emulation
that is compatible with Adobe's PostScript Level 2 language. Adobe, Acrobat, the
Acrobat logo/Adobe Systems Incorporated. 3Com, 3+Open/3Com Corporation. Aldus,
Aldus PageMaker, Aldus FreeHand/Aldus Corporation. Apple, AppleTalk, EtherTalk,
LaserWriter, LocalTalk, Macintosh, TrueType/Apple Computer, Inc. VINES/Banyan.
Centronics/Centronics. Color Solutions, ColorBlind/Color Solutions. DEC, DECnet,
LN03, LN03 Plus, VMS/Digital Equipment Corporation. PhoneNET/Farallon Computing,
Inc. CompuServe /H & R Block. Hewlett-Packard, HP, PCL, HP-GL, LaserJet/HewlettPackard Co. IBM, OS/2, Token-Ring/International Business Machines Corporation.
Intel/Intel Corporation. Iomega, Jaz, Zip/Iomega. Kodak, ColorSense/Kodak. Microsoft,
MS-DOS/Microsoft Corporation. Netscape/Netscape. NEC, V
NetWare/Novell, Inc. Pantone, PANTONE/Pantone. PANTONE is Pantone, Inc.’s checkstandard trademark for color reproduction and color reproduction materials. QuarkXPress/
Quark, Inc. TOPS/Sun Microsystems, Inc. UNIX/UNIX Systems Laboratories. SIMM/
Wang Laboratories. Ethernet/Xerox. All other trademarks are the property of their
respective owners.
COLOR, and QFORM are trademarks of
R4300/NEC. Novell and
Proprietary Statement
The digitally encoded software included with your QMS magicolor 2 Print System is
Copyrighted © 1998 by QMS, Inc. All Rights Reserved. This software may not be
reproduced, modified, displayed, transferred, or copied in any form or in any manner or
on any media, in whole or in part, without the express written permission of QMS, Inc.
Copyright Notice
This manual is Copyrighted © 1998 by QMS, Inc., One Magnum Pass, Mobile, AL
36618. All Rights Reserved. This manual may not be copied in whole or in part, nor
transferred to any other media or language, without the express written permission of
QMS, Inc.
Page 3

Contents
EDNord - Istedgade 37A - 9000 Aalborg - telefon 96333500
1 Introduction
About the Printer ..........................................................................1-2
About the Documentation ...........................................................1-3
Standard Product Documentation 1-3
Related Documentation 1-5
Manuals on the CD-ROMs 1-5
About This Manual 1-8
Typographic Conventions 1-9
What's Next? .......................... ...... ....... ...... ....... ...... ....... ...... ...... .1-10
2 Setting Up Your Printer
Introduction ..................................................................................2-2
Finding a Good Location ............................................................2-2
Location Requirements 2-2
Power Requirements 2-3
Page 4

Checking Shipment Contents ................................................... 2-4
EDNord - Istedgade 37A - 9000 Aalborg - telefon 96333500
Shipment Contents 2-4
Media 2-5
Registering the Printer ............................................................... 2-5
Unpacking the Printer ................................................................ 2-6
Getting Acquainted with Your Printer ....................................... 2-9
Installing Consumables ..................... ....... ...... ....... ...... ....... ...... 2-10
OPC Belt Cartridge 2-10
Toner Cartridges 2-12
Fuser Oil Bottle and Cleanin g Rolle r 2- 13
Loading the Media Cassette ..................................................... 2-15
Prepare the Paper 2-15
Load the Cassette 2-15
Printing a Start-up Page .............................................. ............. 2-17
Installing Options ............................... ....... ................................ 2-18
Installation Troubleshooting ....................................... ....... ...... 2-18
What's Next? .......................... ....... ...... ....... ...... ....... ...... ............. 2-19
3 Connecting to a PC
Introduction ...................... ............. ............. ............. ............. ........ 3-2
Overview 3-2
Making a Parallel Connection ..................................................... 3-3
What You Need for a Parallel Connection 3-3
Making the Connection 3-4
Making a Serial Connection ........................................................ 3-5
What You Need for a Serial Connection 3-5
Making the Connection 3-6
PC Printing Software ....... ...... ....... ...... ....... ...... ....... ..................... 3-7
Installing a PostScript Printer Driver 3-7
Installing a QMS Level 2 Windows Driver 3-8
Notes on Installing Printer Description Files 3-12
Printing from the PC ..................... ...... ....... ...... ....... ...... ....... ...... 3-16
QMS magicolor 2 Getting Startedvi
Page 5

If You Have Trouble ...................................................................3-17
EDNord - Istedgade 37A - 9000 Aalborg - telefon 96333500
What's Next? .......................... ...... ....... ...... ....... ...... ....... ...... ...... .3-17
4 Connecting to an Ethernet
Network
Introduction ..................................................................................4-2
Overview 4-2
Connect to the Network ...............................................................4-3
Install the CrownNet Software ....................................................4-3
Configure the Interface ................................................................4-4
EtherTalk Interface Configuration 4-4
OS/2 LAN Manager/LAN Server and Microsoft Windows
Network Interface Configuration 4-5
NetWare Interface Configuration (Netware 3.x) 4-5
NetWare Interface Configuration (Netware 4.x) 4-8
TCP/IP Interface Configuration 4-10
Configure the Network ...............................................................4-11
TCP/IP NetWork Configuration 4-11
Install the QMS CrownNet Print Utility or the QMS
Network Print Monitor .................. ...... ....... ..........................4-12
Where To Go From Here ............................................................4-12
If You Have Trouble ...................................................................4-13
What's Next? .......................... ...... ....... ...... ....... ...... ....... ...... ...... .4-13
5 Connecting to a Macintosh
Introduction ..................................................................................5-2
Overview 5-2
Making the Connection ................................................................5-3
What You Need for the Connection 5-3
Making the Connection 5-4
Contents vii
Page 6

Macintosh Printing Software ...................................................... 5-5
EDNord - Istedgade 37A - 9000 Aalborg - telefon 96333500
Installing Macintosh Util ities 5-5
Installing Macintosh Printer Drivers 5-6
Installing the QMS magicolor 2 PPD 5-7
Printing from the Macintosh ..................... ...... ....... ...... ............... 5-9
If You Have Trouble ..................................................................... 5-9
What's Next? .......................... ....... ...... ....... ...... ....... ...... ............... 5-9
6 Using the Control Panel
Introduction ...................... ............. ............. ............. ............. ........ 6-2
Message Window ......................................................................... 6-2
Setting the Message Window Language 6-3
Control Panel Indicators ............................................................. 6-3
Control Panel Keys ...................................................................... 6-4
Online, Copy, and Cancel Keys 6-4
Menu, Select, Previous, and Next Keys 6-5
What's Next? .......................... ....... ...... ....... ...... ....... ...... ............... 6-6
A QMS Customer Support
Sources of Support ............................ ....... ...... ....... ...... ....... ...... ..A-2
Your QMS Vendor A-2
Your Application Vendor A-2
Q-FAX A-2
CompuServe A-3
Internet A-3
QMS Customer Response Center (CRC) A-4
QMS World-wide Offices .............................................................A-5
Index
v
QMS magicolor 2 Getting Startedviii
Page 7

1
EDNord - Istedgade 37A - 9000 Aalborg - telefon 96333500
Introduction
In This Chapter . . .
n “About the Printer” on page 1-2
n “About the Documentation” on page 1-3
n “What's Next?” on page 1-10
Page 8
About the
EDNord - Istedgade 37A - 9000 Aalborg - telefon 96333500
Printer
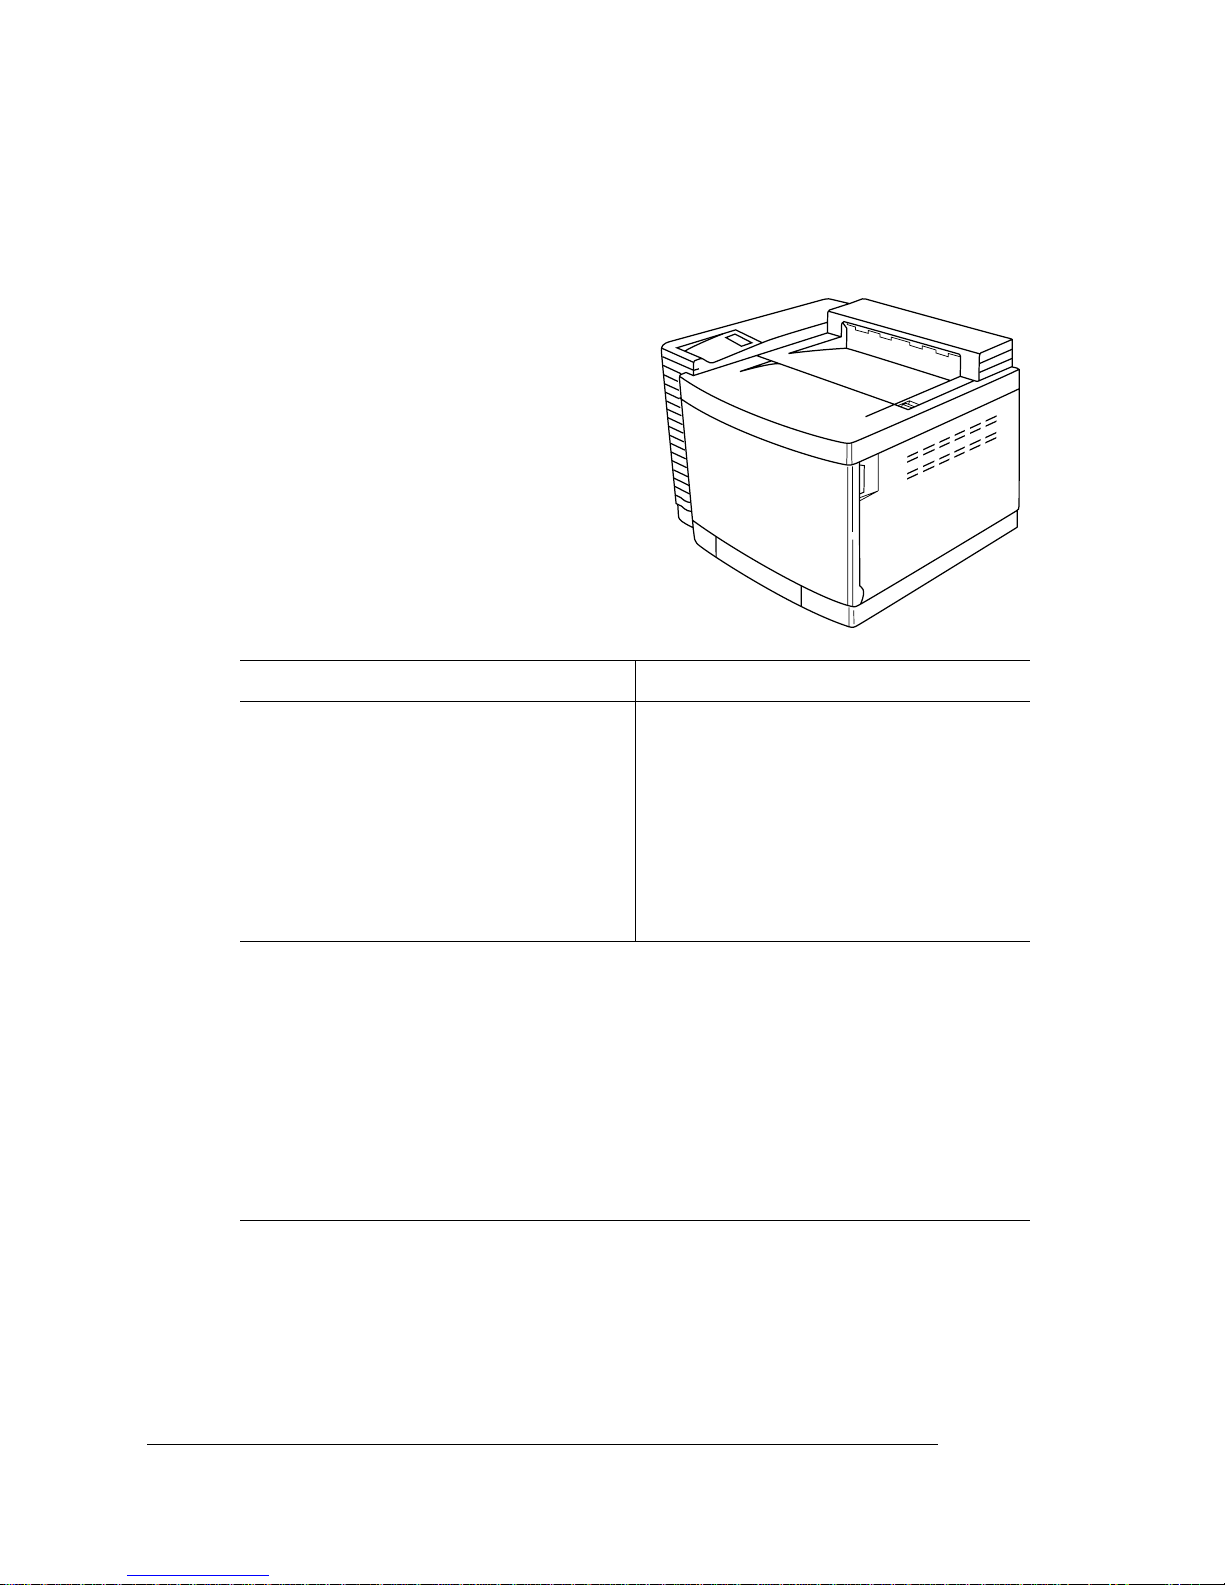
About the Printer
The QMS
magicolor
2 Print System
comes in two models: CX and EX.
An optional 250-sheet lower input
feeder is available for either model.
QMS
magicolor
n 24 MB RAM (upgradable to 384
MB)
n 300x300 and 600x600 dpi resolu-
tions; upgradable to 1200x600 dpi
or 2400x600 dpi
n Flash ROM to hold system software
2 CX Print System
QMS
magicolor
n 80 MB RAM (upgradable to 384
MB)
n 300x300, 60 0x600, 12 00x600, and
2400x600 dpi resolutions
n Hard disk to hold system software
2 EX Print System
n Time-of-day clock
n 16 ppm (pages-per mi n ute) monochrome/4 ppm color print speed
(letter/A4 paper; 600x600 dpi)
n 250-sheet letter/A4 media cassette
n PostScript Level 2, HP PCL 5c, HP-GL, and Line printer emulations
n Centronics/IEEE 1284 parallel, RS-232C serial, and QMS CrownNet
Ethernet (EtherTalk, LAN Manager/LAN Server, NetWare, TCP/IP)
interfaces
n Energy Star compliant
QMS magicolor 2
Getting Started1-2
Page 9
About the
EDNord - Istedgade 37A - 9000 Aalborg - telefon 96333500
Documentation
About the Documentation
The documentation provides a window into the many capabilities of
your printer. The more familiar you are with the documentation, the
easier it’ll be for you to achie v e the results you want from your printer.
This section gives you an idea of how we’ve organized information
and which documents you’ll probably refer to the most.
Standard Product Documentation
&
magicolor
CD-ROM
magicolor
CD-ROM
QMS magicolor 2
Print System
Getting Started
QMS magicolor 2
Print System
Operation
(Adobe Acrob at PDF
2
format)
QMS magicolor 2
Print System
Options
(Adobe Acrob at PDF
2
format)
You’re looking at this document right
now. It introduces the printer and
documenta tion; prov ides instruc tions on
getting the printer set up and runnin g;
and explains the control panel.
» Note:
Acrobat PDF format on the
magicolor 2 CD-ROM.
This manual guides you through the
day-to-day operation of your printer. It
includes information on printing files;
adding print media, a nd repl acing toner.
It also inclu des in f ormation on h andlin g,
cleaning, and maintaining your printer;
improving print quality; and
troubleshooting printer problems.
Refer to this manu al for infor mation on
installing and using printer options:
emulations, security key, memory
upgrades , f onts, interf aces, Cro wnCop y,
hard disks, and system software
updates.
This manual is also in Adobe
QMS
magicolor
Print System
Reference
magicolor
CD-ROM
(Adobe Acrob at PDF
2
format)
2
Refer to this manual when you need to
change your printer’s configuration. It
also provides information on typefaces
and fonts, job accounting, printer memory, and other advanced printer features. The system administrator should
get the most use from this manual.
1-3Introduction
Page 10

About the
EDNord - Istedgade 37A - 9000 Aalborg - telefon 96333500
Documentation
Software
Utilities
CD-ROM
Software
Utilities
CD-ROM
Software
Utilities
CD-ROM
QMS Crown
Remote Console
User’s Guide
(Adobe Acrob at PDF
format)
QMS Crown
Network Notes
(PostScript format)
QMS CrownNet
Setup Guide
(Adobe Acrob at PDF
format)
This manual describes how to use the
Remote Console software to access
printer information and change printer
configur ation settings from an ywhere on
the network.
Refer to this document for network tips.
It discusses 3Com 3+Open, Banyan
VINES, LAN Manager-based LANs,
Novell NetWare, TCP/IP, UNIX,
DECnet, and VMS. In most cases, only
advanced network users and system
administrators need this information.
Refer to thi s man ua l for complete setup
information on the QMS CrownNet
Ethernet and QMS CrownNet TokenRing interfaces.
Software
Utilities
CD-ROM
Software
Utilities
CD-ROM
QMS CrownNet
System Administrator’s Guide
(Adobe Acrob at PDF
format)
QMS Crown
Document Option
Commands
(Adobe Acrob at PDF
format)
QMS magicolor 2
Refer to this manual when configuring
the printer’ s QMS CrownNet Ethernet or
optional QMS CrownNet Token-Ring
interface and when using the QMS
CrownAdmin 3 software.
This manual lists and explains all QMS
Document Option Commands (DOCs),
software code s yo u insert in documents
to enable printer features that can’t be
accessed b y your application or page
description l anguage. Printer-supported
DOCs are listed in appendix C,
“Document Option Commands,” of the
Reference
advanced users or system
administrators need this information.
manual. In most cases only
Getting Started1-4
Page 11
About the
EDNord - Istedgade 37A - 9000 Aalborg - telefon 96333500
Documentation
Related Documentation
Several other documents are also helpful when using your printer:
PostScript
Reference
Manuals
Other Reference
Sources
Other manuals that contain PostScript
information are the
Referen ce Ma n ual
Reading, MA: Addison-Wesley, 1990 ISBN0201-18127-4), and other PostScript
Language Reference Manual
Don’t forget that your application
documentation, host operating system
documentation, and network documentation
all contain useful printing information.
Further information on QMS printers is
available through the Internet and Q-FAX.
See appendix A, “QMS Customer Support,”
for details.
PostScript Language
(Adobe Systems, Inc.,
supplements.
Manuals on the CD-ROMs
The manuals included on the
and
mentation
QMS Software Utilities
bat PDF format. We’ve also provided the Acrobat Reader and
QuickTime programs on both CD-ROMs. The CD-ROM insert provides instructions on installing them.
QMS magicolor 2 Print System Docu-
CD-ROMs are in Adobe Acro-
About Adobe Acrobat Reader
Adobe Acrobat PDF-formatted manuals give you more flexibility and
convenience than do hardcopy manuals when you have to access
information. Here are some of the advantages PDF-formatted
manuals provide:
n You can store the PDF manuals in a central location for access by
anyone on the network.
n You can view and print the manuals on Windows, Macintosh, and
UNIX platforms.
n You can view the manuals on web browsers using the Acrobat
plug-in.
1-5Introduction
Page 12

About the
EDNord - Istedgade 37A - 9000 Aalborg - telefon 96333500
Documentation
n You can view the manuals on-screen in diff erent forma t s (side-
by-side or two-up, one page at a time, scrolling two-up, article
flow, and zooming capability up to 800%).
n You can conduct full-text searches through all of the manuals.
n You can watch QuickTime video clips on Windows and Macintosh
platforms that enhance the text and il lustrati ons for a numbe r of
commonly performed procedures. (When installing the Reader,
be sure to select the option to install QuickTime.)
n You can print only the manual pages that you need.
n The PDF-formatted manuals have been enhanced for on-screen
viewing and navigation. Throughout each manual are numerous
hotlinks to cross-reference points. The table of contents and the
index are fully hotlinked to their respective page references, and
all World Wide Web addresses are linked to their respective
home pages.
We hope you enjoy using the Acrobat software to access the information in your manuals. They’ll never become dog-eared and yellowed
or collect dust on some forgotten shelf with quick on-line access. Your
PDF-formatted manuals will empower you to take full advantage of all
the capabilities of your printer.
Using Adobe Acrobat Reader
When you use Acrobat to view your manuals, keep the following tips
in mind for using some of the navigation features built into Acrobat
and your manuals.
n You may view the document in three different styles: page only,
with bookmarks, or with thumbnails. Try each to see which you
like best. Viewing with bookmarks will enable you to use a quick
table of contents to move around the document.
n The toolbar also gives you quick access to page navigation fea-
tures. For example, you may click a button to advance (>) or
reverse (<) one page, go to the start (|<) or end (>|) of the document, or use the history button (<<) to go to the previous pages
you viewed. There are other buttons in the toolbar to change view
or magnification of the document.
QMS magicolor 2
Getting Started1-6
Page 13

About the
EDNord - Istedgade 37A - 9000 Aalborg - telefon 96333500
Documentation
n As you browse through the document the open hand tool will
sometimes turn into a pointing hand. You have discovered an
embedded link in the manual. You will find these links in the table
of contents, index, www addresses, and cross references. Click
on the link to jump to a new location.
n You may discover a movie camera icon on Windows and
Macintosh platforms. Click the icon to play a QuickTime
video clip of the procedure described in the text.
n Use the Acrobat Reader Online Help for a more complete expla-
nation of these features.
A Note on Media
All QMS manuals are also available in hard copy. In the US, call
1(800) 523-2696 for purchase information. Elsewhere, refer to
appendix A, “QMS Customer Support.”
In addition, many
QMS Software Utilities
applications, utilities, and printer drivers on the
CD-ROM are available on alternate media.
Contact your QMS vendor for media availability and purchase information. You can also download many of these files via ftp from our
World Wide Web Server at http:/www.qms.com, our ftp resource at
ftp.qms.com, or CompuServe at go qmsprint. Refer to appendix A,
“QMS Customer Support,” for sales and support locations and
telephone numbers.
1-7Introduction
Page 14

About the
EDNord - Istedgade 37A - 9000 Aalborg - telefon 96333500
Documentation
About This Manual
This manual contains detailed, illustrated instructions to guide you as
you unpack and set up your printer and connect it to a host computer
or network. In addition, it introduces you to the printer’s control panel.
1
2
3
4
5
Introduction
Setting Up Your
Printer
Connecting to a PC
Connecting to an
Ethernet Network
Connecting to a
Macintosh
Presents an overview of the
documentation and of the printer’s
features.
Guides you in selecting a location
for your printer and explains how to
unpack and set up your printer.
Explains how to connect the printer
to a PC using either the parallel or
serial port.
Explains how to connect the printer
to an Ethernet network using the
Ethernet port and how to do the
necessary printer and network
configuration.
Explains how to connect the printer
to a Macintosh using the optional
LocalTalk port.
6
Using the Control
Panel
A
QMS Customer
Support
QMS magicolor 2
Introduces the parts of the printer
control panel.
Provides product sales and support
telephone numbers and describes
how to communicate with QMS
through CompuServe, the Internet,
and Q-FAX
.
Getting Started1-8
Page 15

About the
EDNord - Istedgade 37A - 9000 Aalborg - telefon 96333500
Documentation
Typographic Conventions
The following typographic conventions are used in this manual:
Mixed-Case
Courier
Mixed-Case
Italic Courier
UPPERCASE
COURIER
lowercase bold PostScript operators and DOS commands
lowercase ital ic
UPPERCASE File and utility names
↵ Press the Enter key (PC) or Return key
^ Press and hold down the Ctrl key (PC)
Text you type, and messages and information
displayed on the screen
Variable text you type; replace the italicized
word(s) with information specific to your printer
or computer
Information displayed in the printer message
window
Variable information in text
(Macintosh)
In Adobe Acrobat PDF versions of the manual,
click to play a QuickTime video clip of the
procedure described in the text.
» Note:
Notes contain tips, extra information, or important information
that deserves emphasis or reiteration.
▲ Caution:
Cautions present information that you need to know to avoid
equipment damage, process failure, or extreme annoyance.
M WARNING!
Warnings indicate the possibility of personal injury if a
specific procedure is not performed exactly as described in the
manual.
ACHTUNG!
Bitte halten Sie sich exakt an die im Handbuch
beschriebene Vorgehensweise, da sonst Verletzungsgefahr
bestehen könnte.
1-9Introduction
Page 16

What's Next?
EDNord - Istedgade 37A - 9000 Aalborg - telefon 96333500
What's Next?
Chapter 2, “Setting Up Your Printer,” explains how to find a good location for the printer, unpack the printer, install consumables (toner cartridges, belt cartridge, fuser oil, and fuser cleaning pad), load and
install the standard media cassette, turn the printer on, and print a
start-up pag e.
v
QMS magicolor 2
Getting Started1-10
Page 17

2
EDNord - Istedgade 37A - 9000 Aalborg - telefon 96333500
Setting Up Your
Printer
In This Chapter . . .
n “Introduction” on page 2-2
n “Finding a Good Location” on page 2-2
n “Checking Shipment Contents” on page 2-4
n “Registering the Printer” on page 2-5
n “Unpacking the Printer” on page 2-6
n “Getting Acquainted with Your Printer” on page 2-9
n “Installing Consumables” on page 2-10
n “Loading the Media Cassette” on page 2-15
n “Printing a Start-up Page” on page 2-17
n “Installing Options” on page 2-18
Page 18

Introduction
EDNord - Istedgade 37A - 9000 Aalborg - telefon 96333500
Introduction
This chapter explains how to set up your printer for the first time. It
includes information on finding a good location for the printer, unpacking and checking the shipment contents, installing consumables
(toner cartridges, OPC belt cartridge, fuser oil bottle, and cleaning
pad), loading the media cassette, turning the printer on, and printing a
start-up pag e.
Finding a Good Location
Location Requirements
n With enough space to allow adequate
venti lat ion a nd eas y servicing.
n Away from cooling and heating
sources, extreme temperature
changes, direct su nligh t, excessiv e
dust, corrosive chemicals or vapors,
water pi pe s , ref rigerators, and any
strong electr omagnetic field (such as
that created by an air conditioner),
n Awa y from items that can easily burn
(such as curtains) and items that produce exce ssive vibratio n.
n In an area with a temperature range
of 50°–90.5° F (10°–32.5° C) and relative humidity range of 20%–80%.
n At an altitude of 0–8202' (0–2500 m).
1
6
1 18"/45 cm
2 19.5"/50 cm
3 16"/40 cm
3
2
4
Front
5
n On a hard, level surface capable of
supporting the 79 lb (36 kg) printer.
The printer must be placed within
1.5° of level.
2-2
QMS magicolor 2 Getting Started
4 4"/10 cm
5 28"/70 cm
6 4"/10 cm
Page 19

Finding a Good
EDNord - Istedgade 37A - 9000 Aalborg - telefon 96333500
Location
n In a well-ventilated room.
n Close to an easily accessible power supply. Don’t connect it to the
same electri cal outl et as noi se -g enerating equipment.
n Near your computer—6.5' (2 m) or less for an IEEE 1284 direc-
tional parallel connection; cables for other connections may be
longer.
Power Requirements
n Your printer requires a properly grounded AC outlet with a rated
line voltage of 100 V, 120 V, or 220-240 V.
n The line voltage must remain within ±10 percent of the rated volt-
age for proper operation of the printer.
n The amperage capacity of the electrical outlet must be at least
1.2 times that used by the printer.
n The maximum electrical current required during operation is 10
amps for a 100 V system, 8.3 amps for a 120 V system, and 4
amps for a 220-240 V system.
n Noise-generating equipment should not be connected to the same
electrical outlet as the printer.
n The recommended frequency is 50–60 Hz ±2 Hz for a 100 V sys-
tem, 60 Hz ±2 Hz for a 120 V system, and 50 Hz ±2 Hz for a
220-240 V system.
2-3Setting Up Your Printer
Page 20

Checking
EDNord - Istedgade 37A - 9000 Aalborg - telefon 96333500
Shipment
Contents
Energy Star Compliance
The QMS
compliant with US Environmental Protection Agency (EPA) Energy Star regulations. After a specified period of
inactivity, the printer changes to a lowpower state (the engine remains on,
but the fuser turns off). When a print
job is received, the printer returns to
normal power within 90 seconds.
magicolor
2 Print System is
Checking Shipment Contents
Shipment Contents
Make sure that all items are included in your shipment before setting
up your printer. If any items are missing or damaged, contact your
shipping company or your QMS vendor. See appendix A, “QMS Customer Support,” for product sales and support information.
2-4
n 250-sheet letter/A4 media cassette
n Consumables starter kit
— 4 starter toner cartridges (1 each black, cyan, magenta, and
yellow); at normal 5% coverage, the black cartridge will print
5,000 simplex letter/A4-size pages while the cyan, magenta,
and yellow cartridges will each print 3,000 pages
— OPC belt cartridge
— Fuser oil
— Fuser cleaning roller
— Fuser oil removal syringe
n Power cord
n
QMS magicolor 2 Print System Getting Started
QMS magicolor 2 Getting Started
(this manual)
Page 21

n
EDNord - Istedgade 37A - 9000 Aalborg - telefon 96333500
QMS magicolor 2 Documentation
Registering the
Printer
CD-ROM
— QMS magicolor 2 Print System Getting Started
— QMS magicolor 2 Print System Operation
— QMS magicolor 2 Print System Options
— QMS magicolor 2 Print System Reference
—Adobe Acrobat Reader 3.0 software
n
QMS Software Utilities
n Warranty and registration card
» Note:
cables, contact your QMS vendor or a local computer store. See
chapters 3, 4, and 5 of this manual for information on the type cable
needed.
Interface cables aren’t included in the shipment. If you need
CD-ROM
(this manual)
Media
If you need alternate media, contact your QMS vendor for media
availability and purchase information. (See appendix A, “QMS Customer Support,” for sales and support locations and telephone numbers.) You can also download some of these files via ftp from our
World Wide Web Server at http:/www.qms.com, our ftp resource at
ftp.qms.com, or CompuServe at go qmsprint.
Registering the Printer
You can register your printer through our World-Wide Web site,
http://www.qms.com/support/prodreg. To register by mail, fill out and
send in your warranty card. To register by telephone, in the US call
QMS at (334) 633-4300. In other countries, refer to appendix A,
“QMS Customer Support,” for the appropriate telephone number.
2-5Setting Up Your Printer
Page 22
Unpacking the
EDNord - Istedgade 37A - 9000 Aalborg - telefon 96333500
Printer
Unpacking the Printer
Save the packing materials in case you ever have to move or ship the
printer to a new location.
s Caution:
Remove all packing materials before turning on the printer,
or you may damage it.
1 Remove everything except
the printer from the shipping carton.
2 Open the protective plastic
covering the printer.
3 With another person’s help,
lift the printer from the base
tray, and place it in its permanent location.
When lifting or carrying the
printer, use the carrying grips
on the bottom sides of the
printer.
Carrying
Grips
M WARNING!
The printer weighs approximately 64 lbs (29 kg)
without consumables. Do not attempt to lift the printer by yourself.
ACHTUNG!
Der Drucker hat ein Gewicht von ungefähr 29 kg.
Bitte versuchen Sie niemals, den Drucker alleine anzuheben oder
zu transportieren.
4 Remove any tape securing the front, top, and rear covers.
2-6
QMS magicolor 2 Getting Started
Page 23
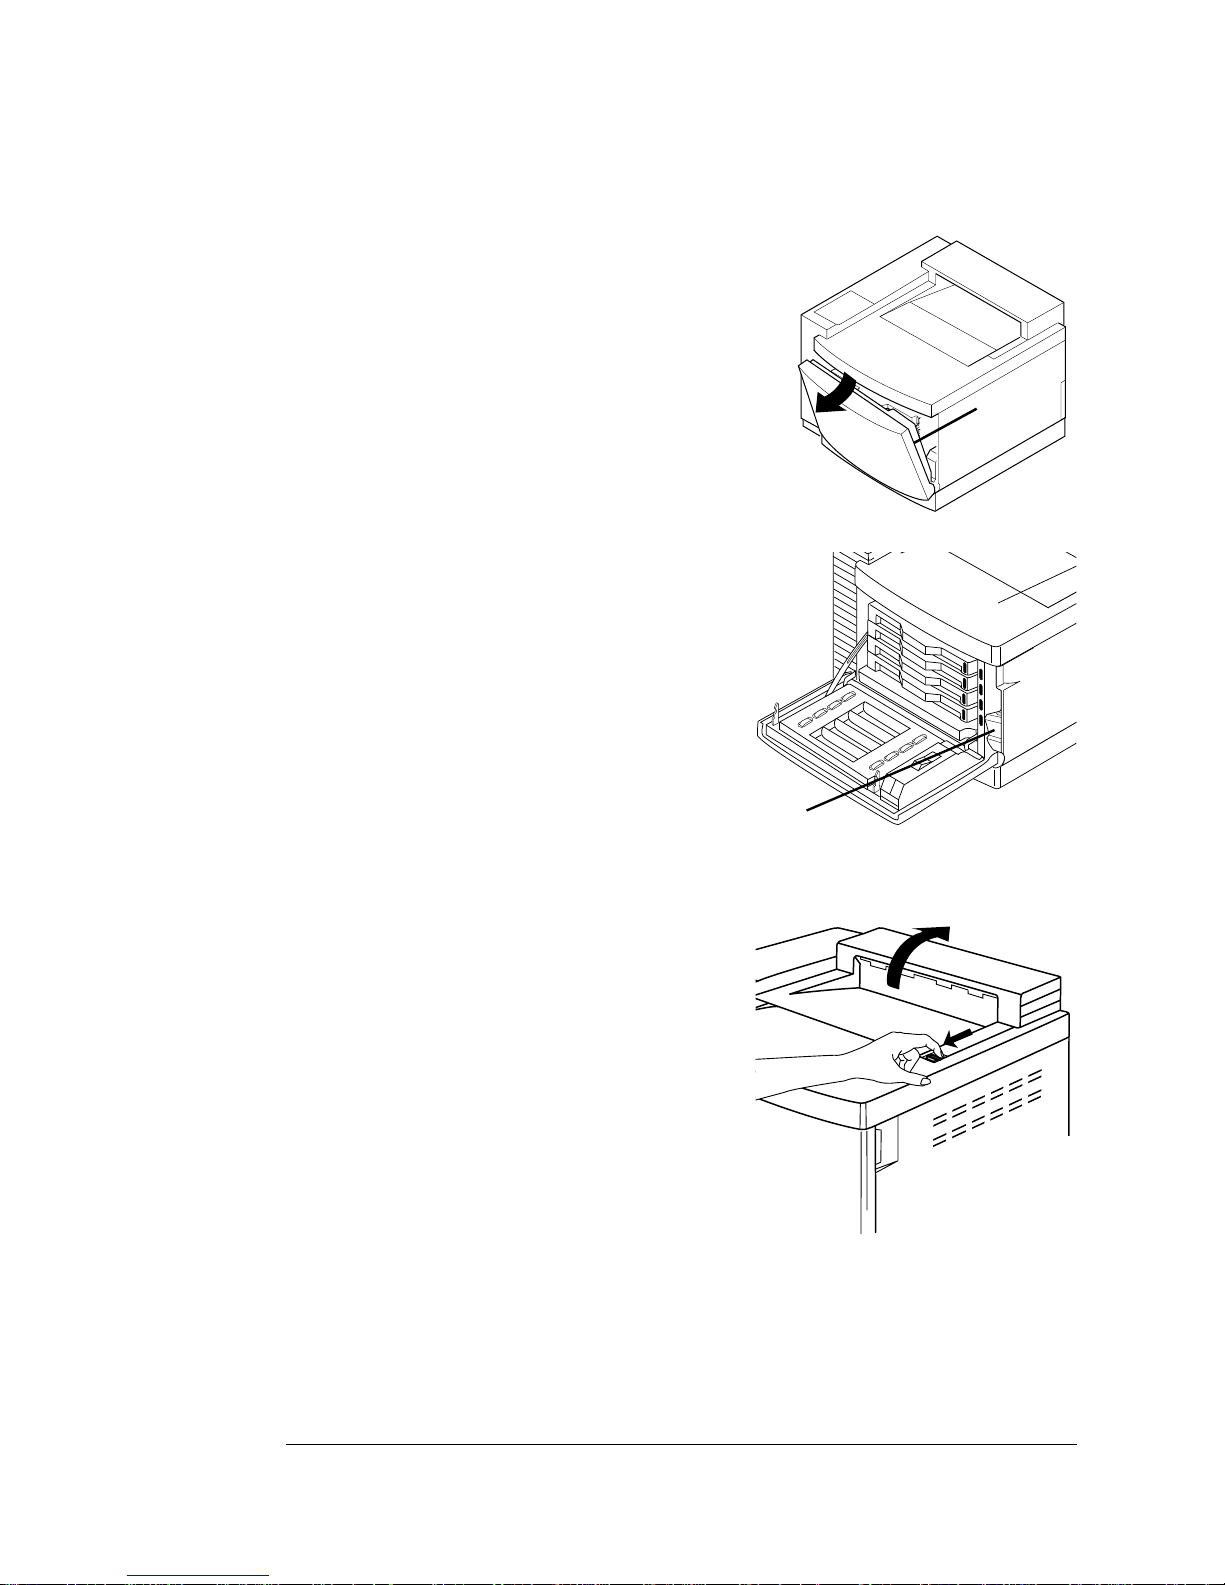
5 Open the printer’s front cover.
EDNord - Istedgade 37A - 9000 Aalborg - telefon 96333500
Squeeze the latch near the upperright corner of the cover.
6 Remove any pac king material from
the printer’s waste toner pack.
Ensure that the waste toner pack is
reinserted into its cavity when finished.
Unpacking the
Printer
Latch
Waste
Toner Pack
7 Remove any other packing material from inside the printer’s
front cover and toner cartridge cavity.
8 Pull the latch to release the top
cover, and then open the cover.
2-7Setting Up Your Printer
Page 24
Unpacking the
EDNord - Istedgade 37A - 9000 Aalborg - telefon 96333500
Printer
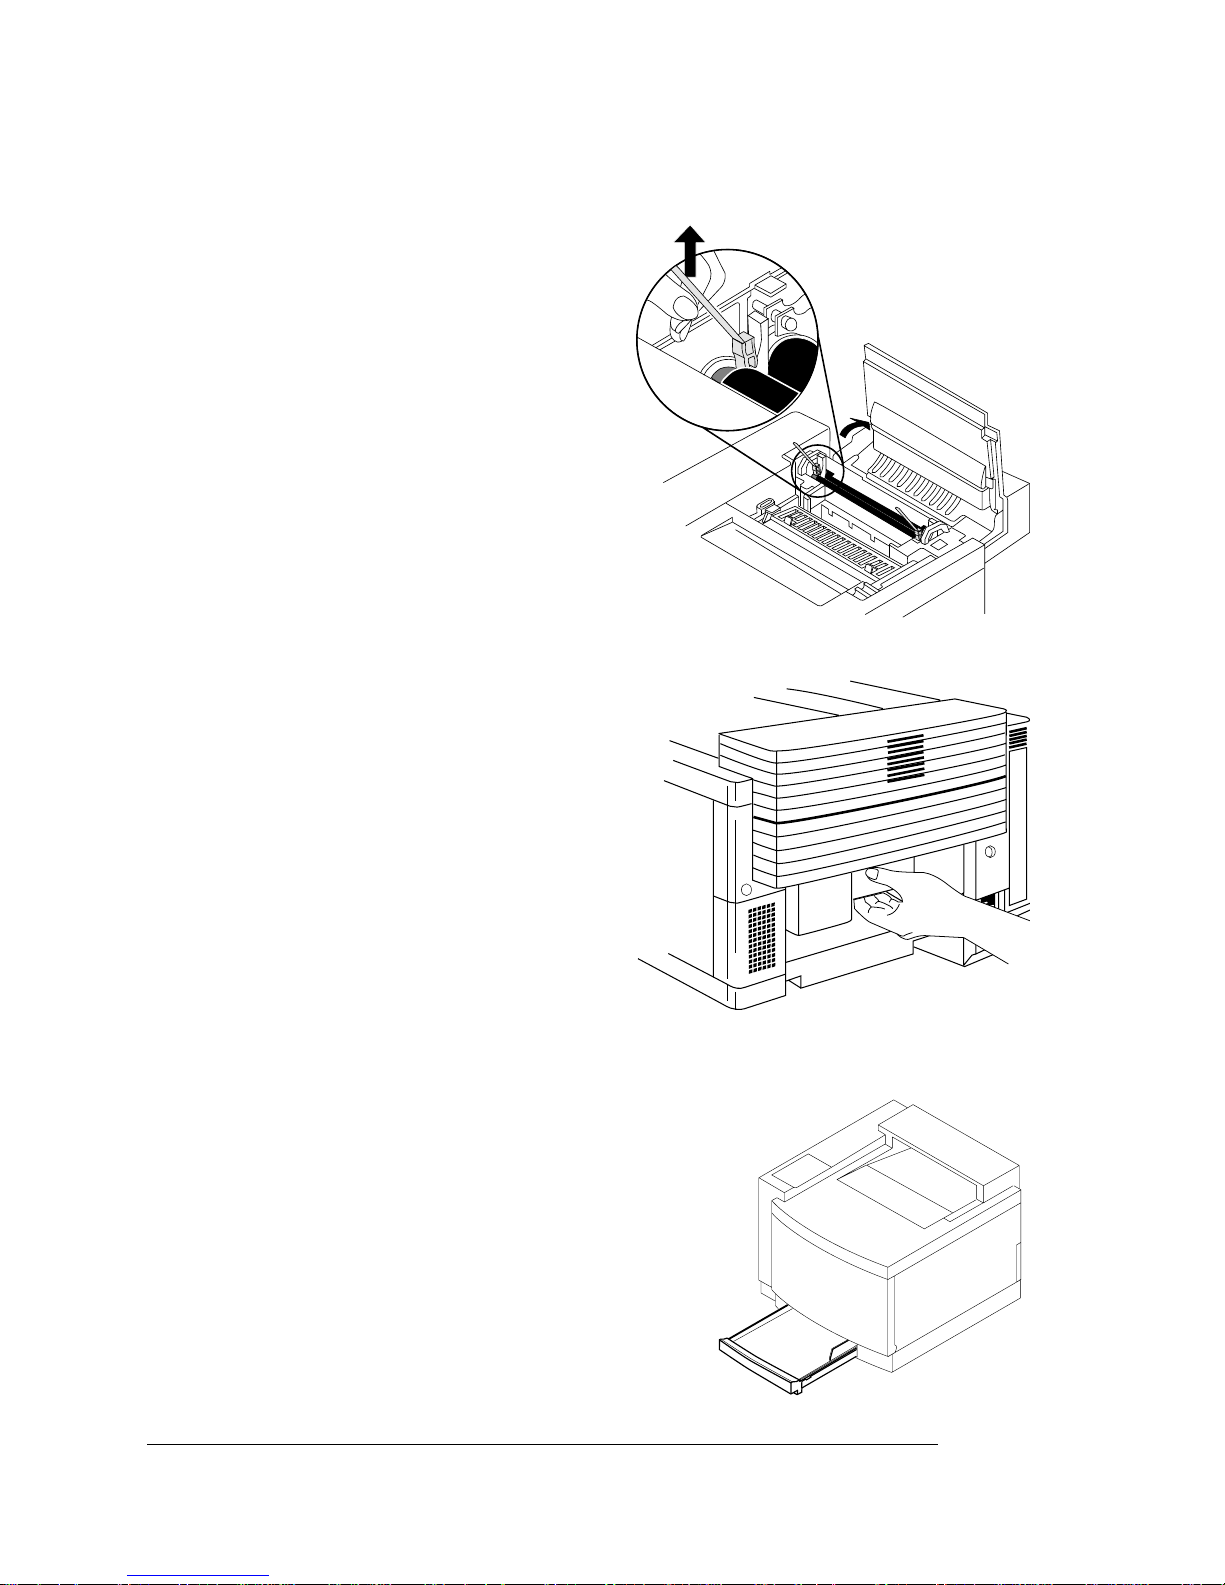
9 Remove any packing mate-
rial from inside the printer.
10 Remove the orange
shipping spacers from
between the fuser rollers.
» Note:
Save the spacers in
case you need to repack the
printer for relocation or
shipping later.
11 Open the rear cover, and
remove any packing
material.
Pull the handle on the rear
cover to open it.
12 Close all the printer’s covers.
13 Remove the media cassette, and
then remove any packing material
from the cassette.
14 Slide the media cassette back into
the printer.
2-8
QMS magicolor 2 Getting Started
Page 25

Getting
EDNord - Istedgade 37A - 9000 Aalborg - telefon 96333500
Acquainted with
Your Printer
Getting Acquainted with Your
Printer
Before installing the consumables and operating the printer, you
should become familiar with certain physical items:
Control panel
Output tray
Power switch
Media cassette
Top cover
Front cover
Ozone filter
Interface panel
AC power
connector
Rear cover
2-9Setting Up Your Printer
Page 26
Installing
EDNord - Istedgade 37A - 9000 Aalborg - telefon 96333500
Consumables
Installing Consumables
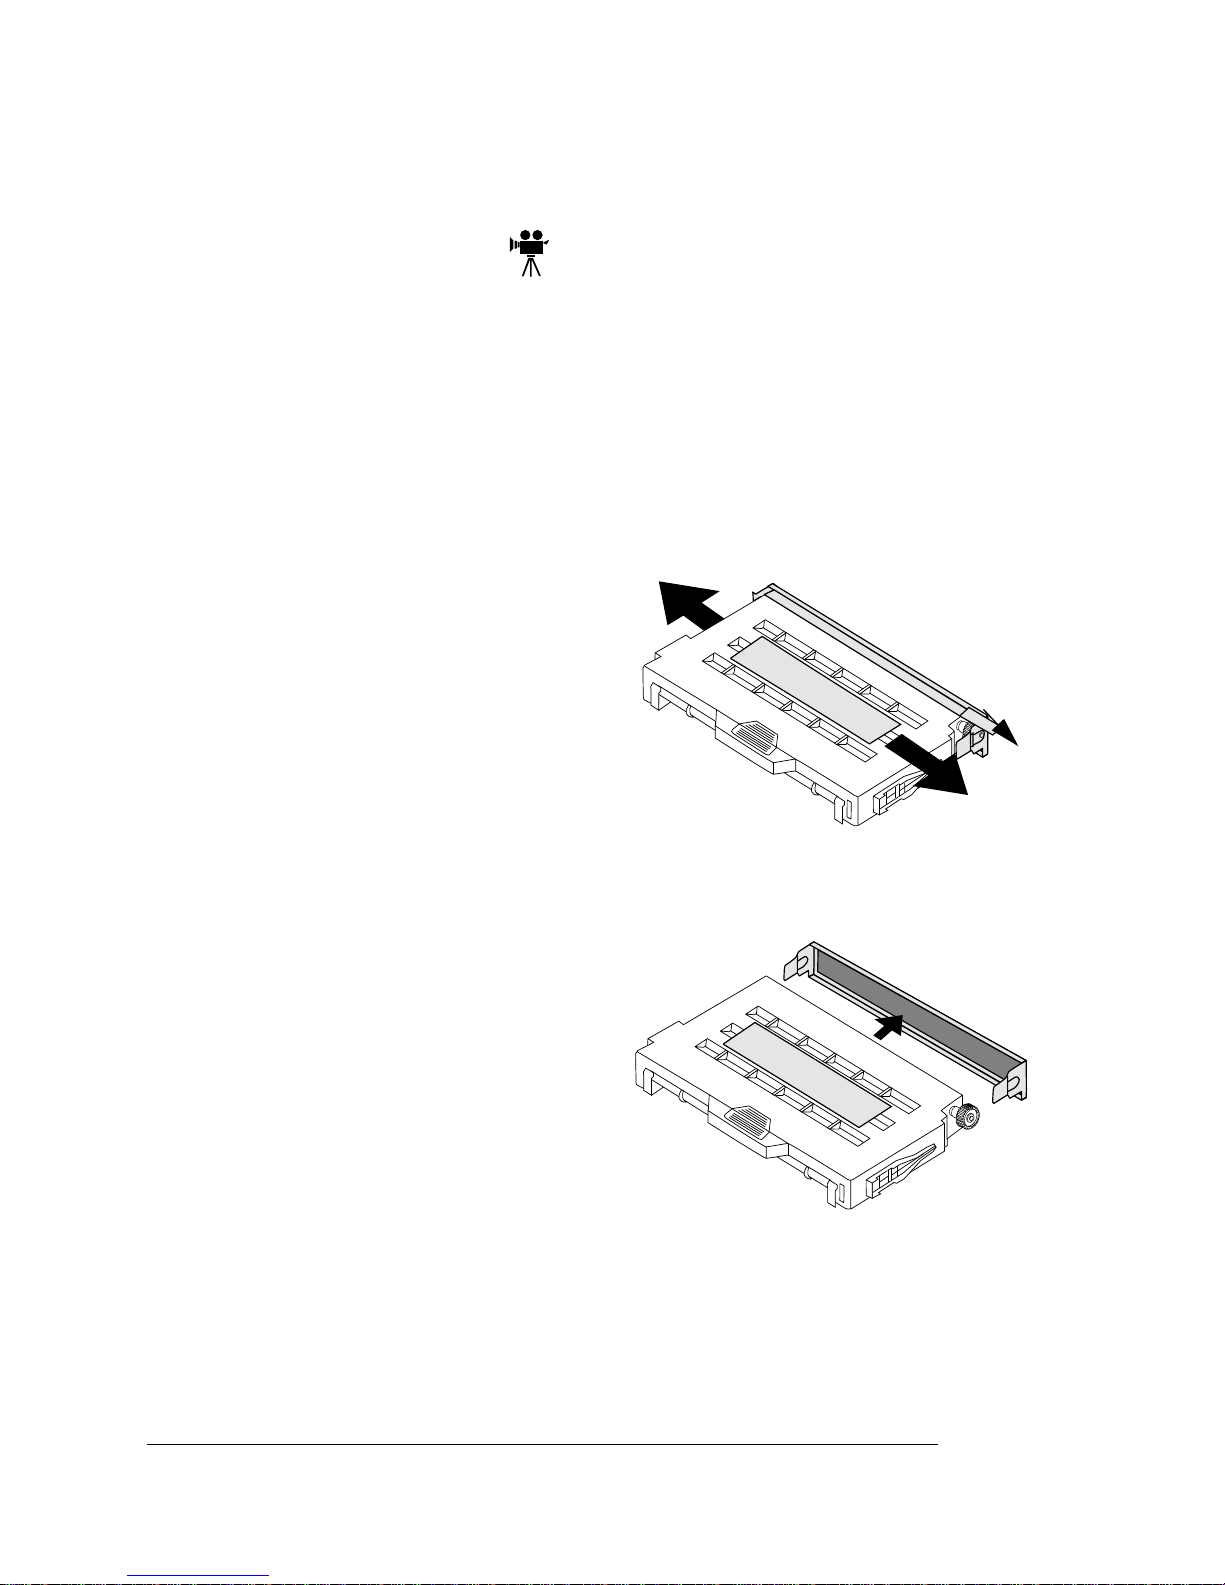
OPC Belt Cartridge
s Caution:
sunlight. Always leave it in its protective bag until you’re ready to
install it. Also, handle the cartridge carefully. The belt is also
extremely sensitive to hand oils and scratches, both of which reduce
print quality.
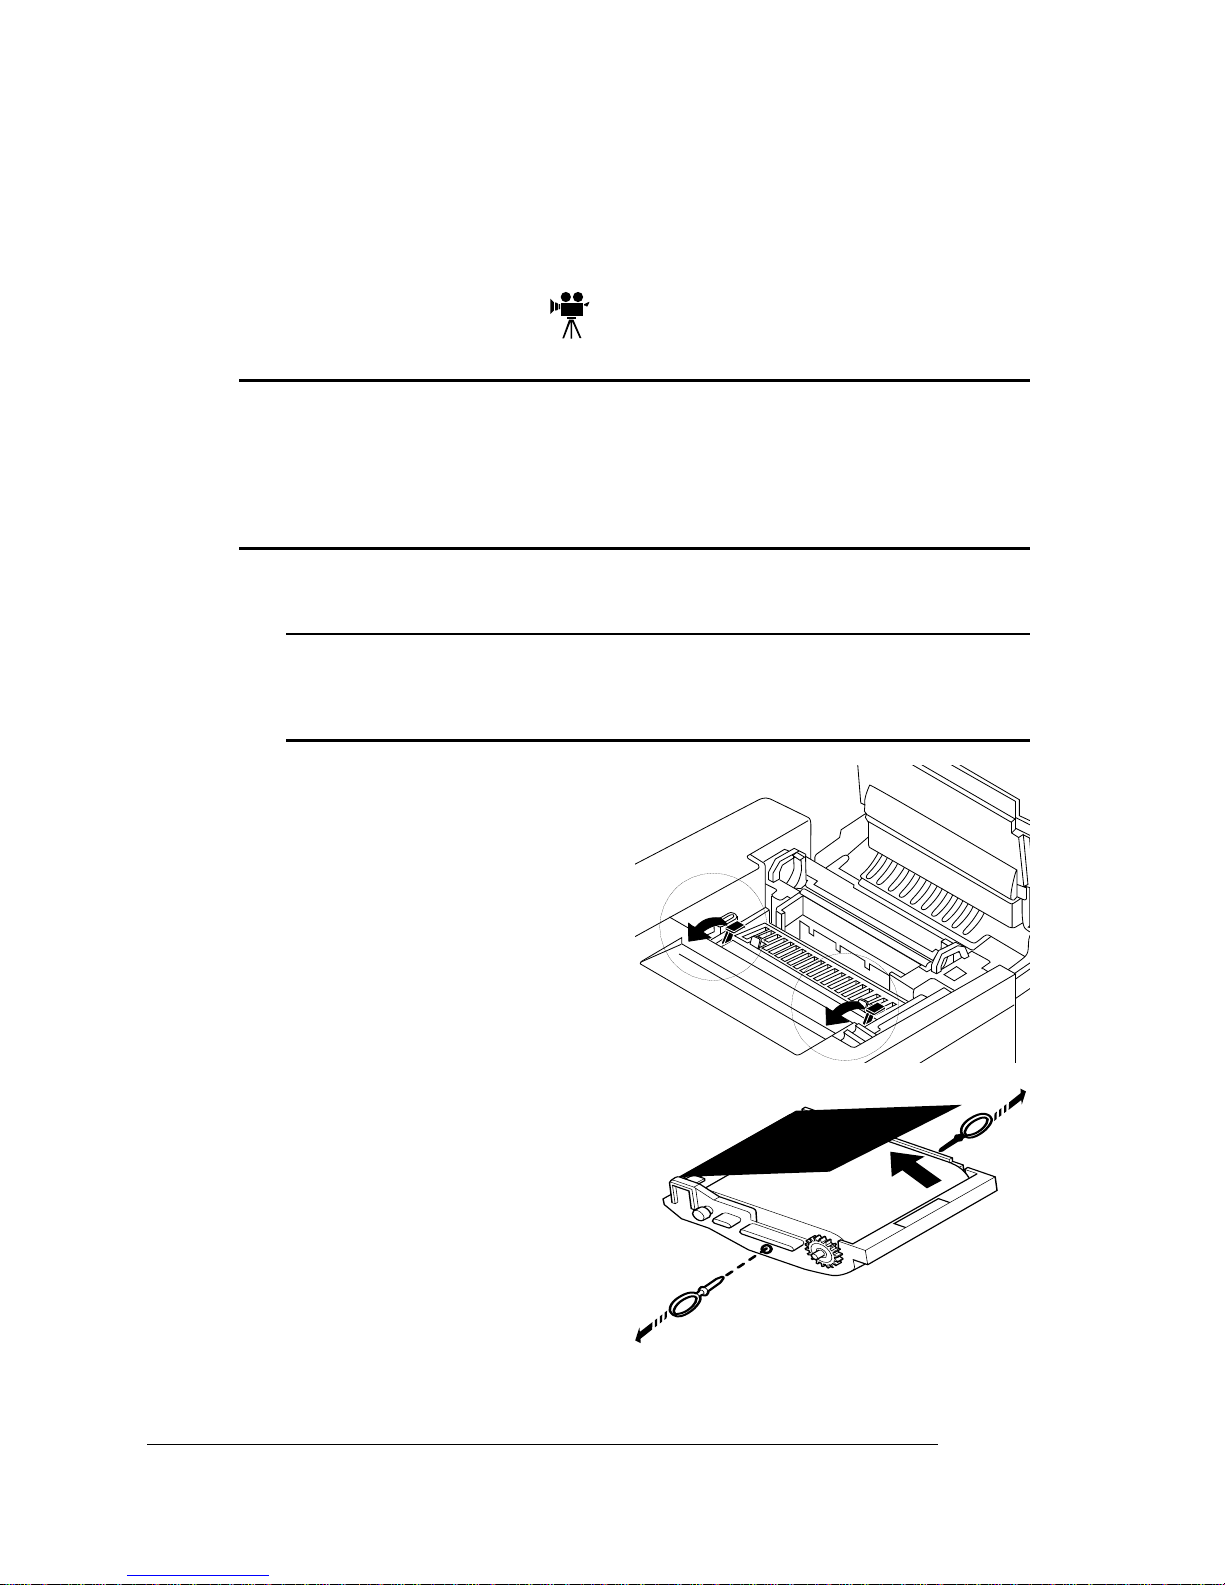
1 If it’s not already open, open the printer’s front cover.
s Caution:
2 Open the printer’s top cover .
3 Rotate up the two lock
The OPC belt is extremely sensitive to bright light and direct
This is necessary as it pulls the toner cartridges forward
slightly to make room for the OPC belt cartridge. You could
damage the OPC belt if you don’t do this.
levers (one on each side of
the OPC belt cartridge opening) to prepare the opening
for the cartridge.
4 Remove the protective sheet
from the cartridge, and then
pull out the two orange tension-release pins (one on
each side of the cartridge).
» Note:
case you need to repack the
printer for relocation or
shipping later.
2-10
Save the spacers in
QMS magicolor 2 Getting Started
Page 27
5 Holding the cartridge above
EDNord - Istedgade 37A - 9000 Aalborg - telefon 96333500
the printer, align the guide
pins on the cartridge with
the guide slots in the lock
levers.
The white gear on the cartridge goes to the right, and
the green surface of the cartridge faces you.
6 Gently guide the cartridge into the printer.
Installing
Consumables
s
Caution: The cartridge should slide easily into the printer. Don’t
force it.
7 Rotate the two lock le vers to
secure the OPC belt cartridge in the printer.
8 Close the printer’s front
cover.
2-11Setting Up Your Printer
Page 28
Installing
EDNord - Istedgade 37A - 9000 Aalborg - telefon 96333500
Consumables
Toner Cartridges
Your printer uses four toner cartridges: black, yellow, magenta, and
cyan.
» Note:
The starter toner cartridges shipped with your printer contain
half the capacity of replacement toner cartridges. In other words, the
black starter toner cart r idg e will pr int 5,000 images (at normal 5%
coverage) while the yellow, magenta, and cyan starter toner
car tr id ges will each pr in t 3,000 ima ges (at nor ma l 5% coverage).
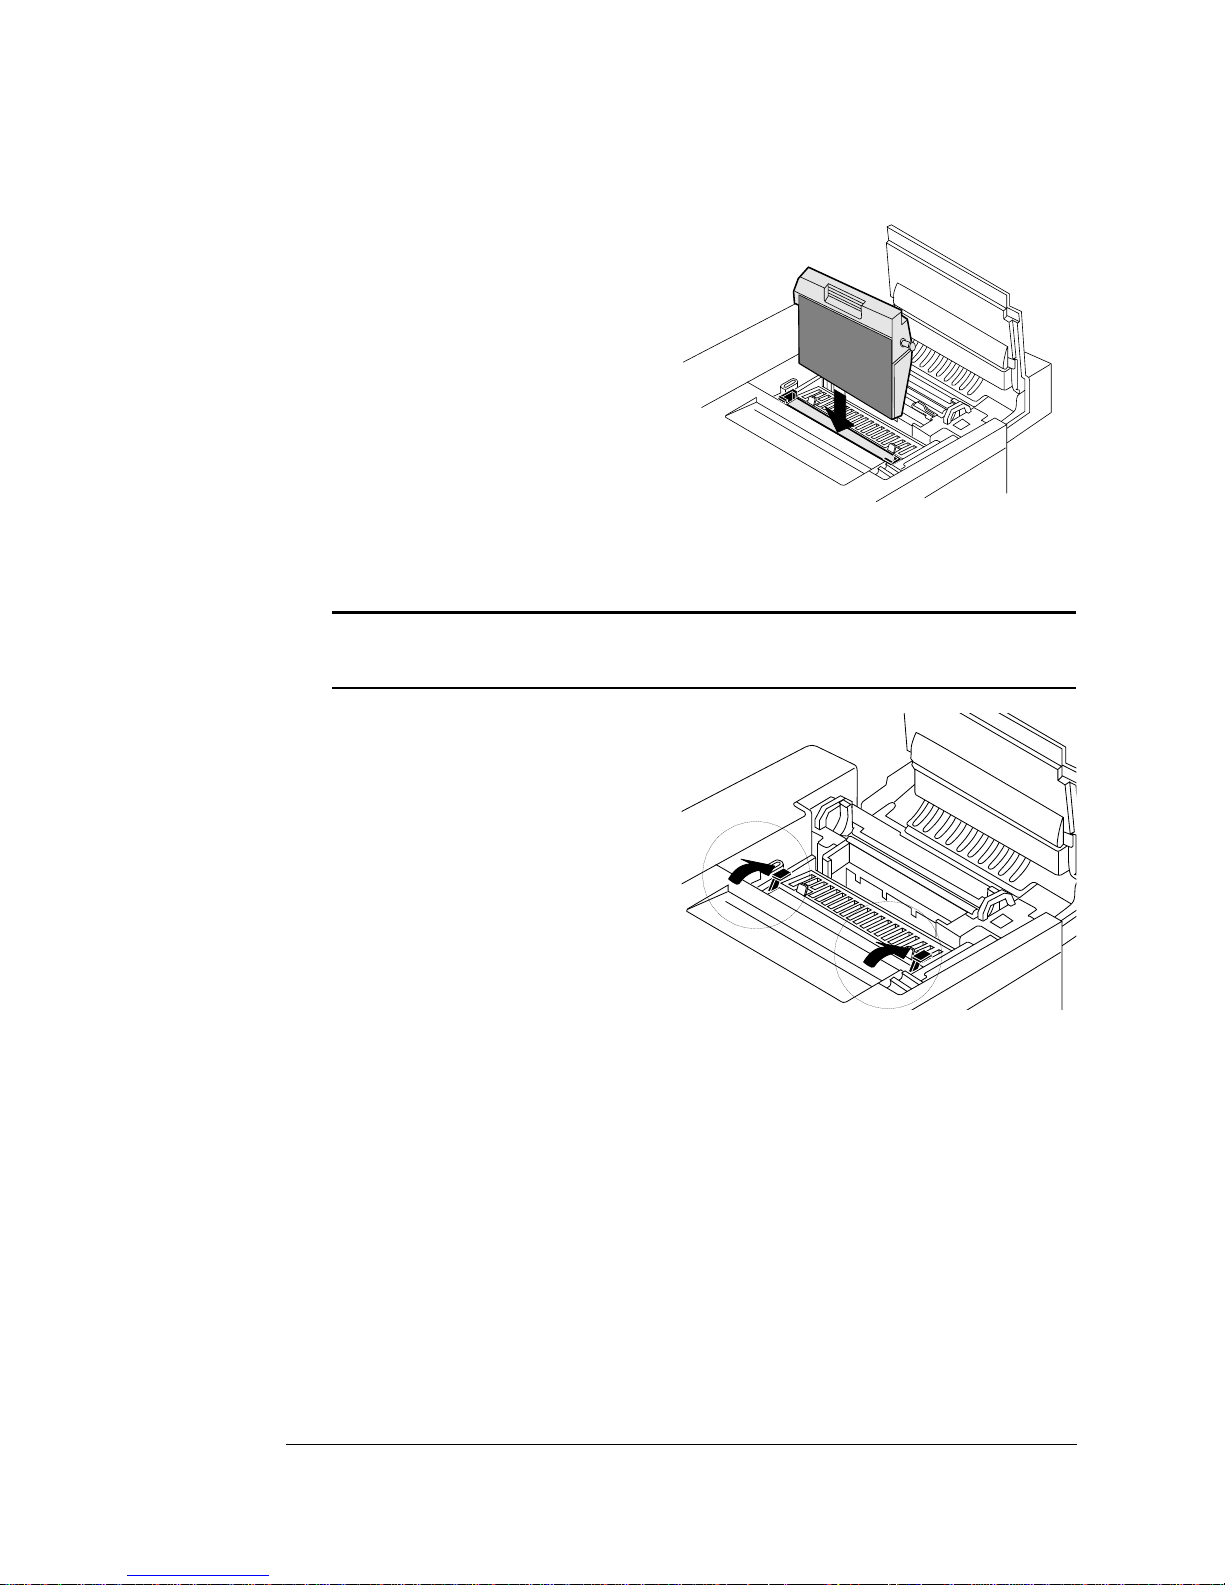
1 Open the printer’s front
cover.
2 Remove the toner cartridges
from their shipping cartons.
3 Distribute the toner in the
cartridges.
Holding a cartridge with both
hands, gently rock it from sideto-side five or six times.
4 Pull the tab.
5 Remove the orange protec-
tive cover from each cartridge.
Pull
Tab
2-12
QMS magicolor 2 Getting Started
Page 29
6 Install the four toner
EDNord - Istedgade 37A - 9000 Aalborg - telefon 96333500
cartridges.
Align each toner cartridge with
its cartridge guides, and gently
push the cartr idg e into the
printer.
Installing
Consumables
Colored
Labels
s Caution:
Each toner cartridge has a colored label that
corresponds to a colored label to the right of the car tr i dge slots.
Always install the toner cartridge in the slot with a label of the
same color.
If a toner cartridge doesn’t slide in easily , don’t force it. Check that
you’re installing the correct color toner cartridge into the correct
slot. (Each cartridge is physically as well as visually keyed to
ensure correct installation.) In addition, toner cartridges don’t
snap into place and may appear not to be fully inserted; however,
closing the font door will guide the cartridges into their final
position.
7 Leave the printer’s front cover open for now.
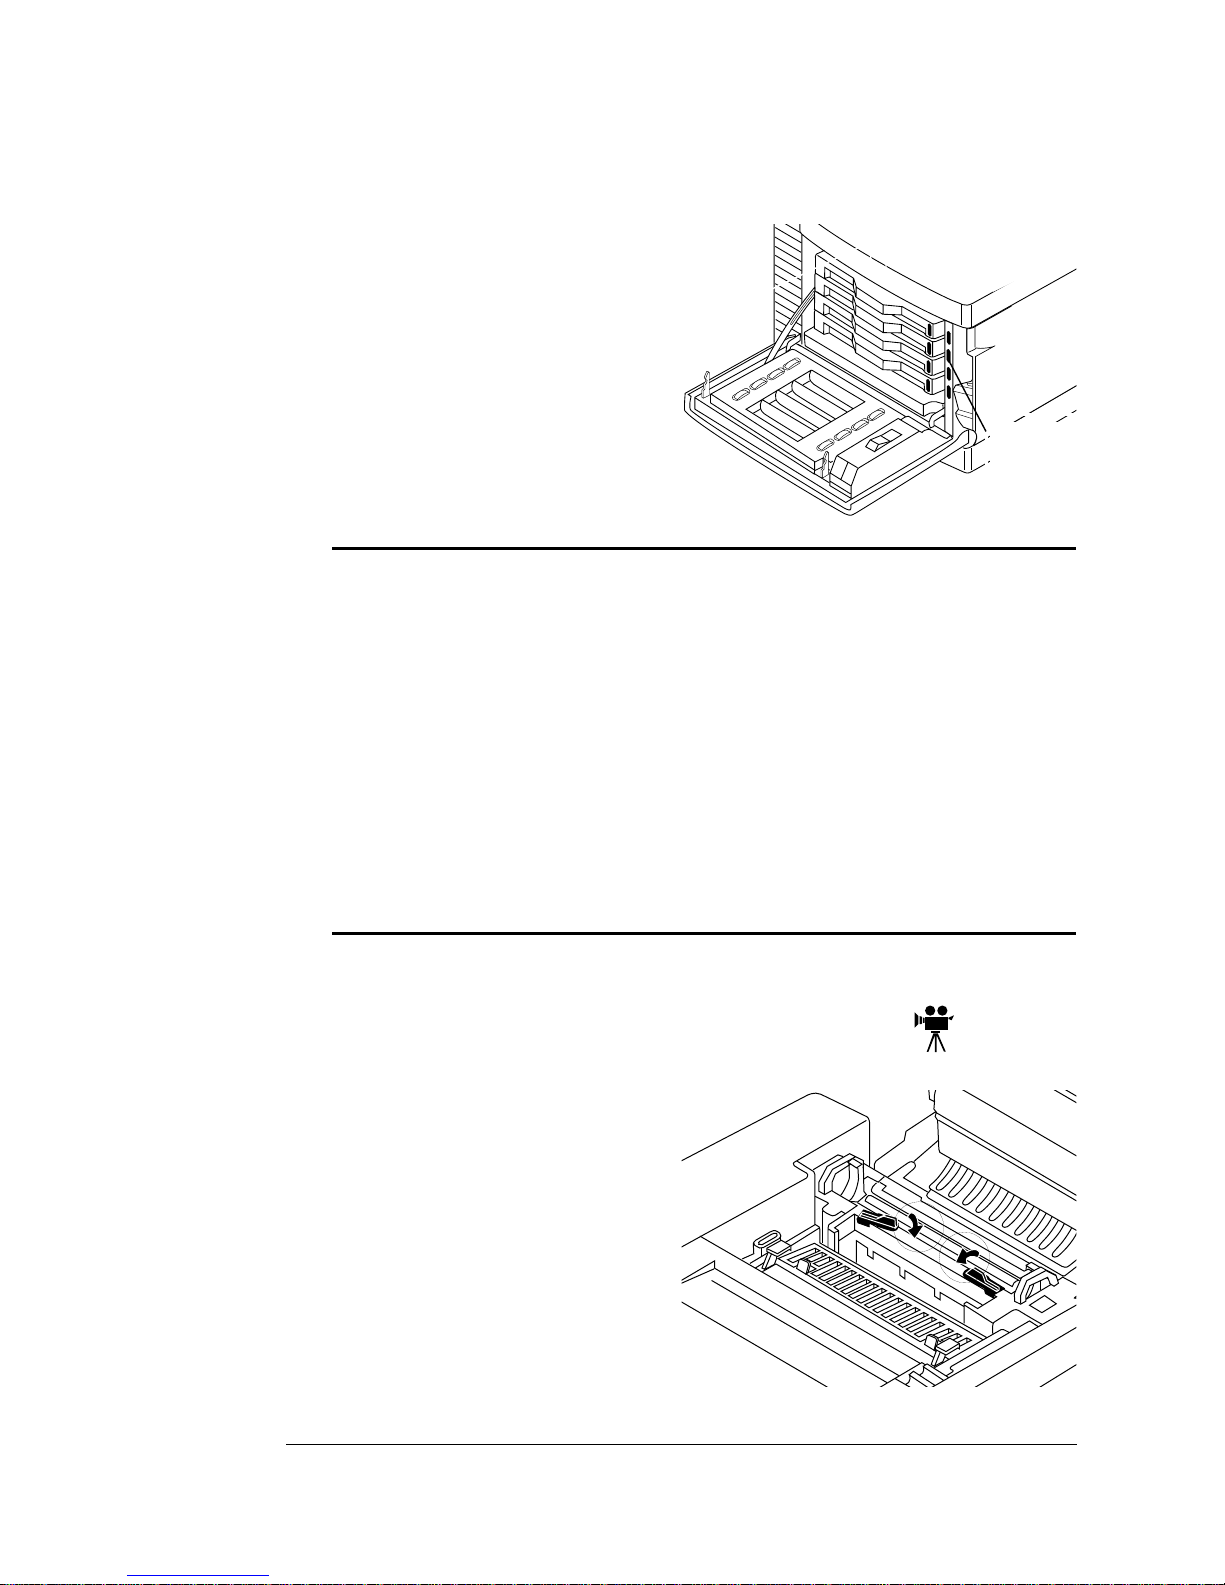
Fuser Oil Bottle and Cleaning Roller
1 Open the two cleaning roller
lock levers by rotating them
toward you.
2-13Setting Up Your Printer
Page 30

Installing
T
EDNord - Istedgade 37A - 9000 Aalborg - telefon 96333500
Consumables
2 Lower the oil bottle into its
slot.
The tab on the side of the bottle must be on the right.
» Note:
Because the first oil
bottle must prime the printer, it
has less than the normal
12,000-page life expectancy.
3 Install the cleaning roller in
its slot.
The tab on the top of the
cleaning roller must be on the
left.
4 Close the two lock levers by
rotating them away from
you.
ab
5 Close all the printer’s
covers.
2-14
QMS magicolor 2 Getting Started
Page 31

Loading the
EDNord - Istedgade 37A - 9000 Aalborg - telefon 96333500
Media Cassette
Loading the Media Cassette
Prepare the Paper
1 Take a stack of about 250 sheets (
» Note:
cause media particles to fall into the printer.
2 Holding the stack with one hand, fan the sheets with the
other hand.
This gets air through the sheets and prevents static buildup.
3 Take off the top and bottom sheets.
These sheets sometimes have residual glue buildup that could
cause a media jam.
Don’t unpack the media above the printer as this might
½ ream).
Load the Cassette
1 Remove the media cassette from the printer.
2 Adjust the media guides to fit the size paper you’re loading.
Squeeze the retainers at the ends of the left width guide and/or
the length guide, move the guide to the appropriate location
(media sizes are liste d on the cassette) , and r eleas e the reta iners .
2-15Setting Up Your Printer
Page 32

Loading the
EDNord - Istedgade 37A - 9000 Aalborg - telefon 96333500
Media Cassette
3 Push the media pressure
plate down to lock it in position.
4 Load the paper.
n A fill limit mark is provided
on the inside left side of
the cassette.The media
cassette holds 250 sheets
2
of 20 lb (75g/m
) paper.
(Paper is packed in reams
of 500 sheets.) Do not
overfill the cassette.
n The paper should face up
with its top towards the
rear of the cassette. An
arrow on the paper package label indicates the
face-up side of the paper.
5 Slide the media cassette back into the printer.
2-16
QMS magicolor 2 Getting Started
Page 33

Printing a Start-
EDNord - Istedgade 37A - 9000 Aalborg - telefon 96333500
up Page
Printing a Start-up Page
1 Make sure the printer is
turned off.
2 Plug the printer into a
grounded, surge-protected,
electrical outlet.
3 Turn on the printer.
Press in the power button near
the bottom left of the printer.
After a brief warm-up (typically
3 minutes) the printer produces a start-up page. More information
about start-up pages is included in the
Reference
manual.
4 If the start-up page prints and the print quality is good, go on
to the next section, “Installing Options.”
» Note:
up page differ from the number of sheets/faces printed statistics
in CrownView and on the consumables statistics page (Operator
Control/Consumables/Print Statistics). The numbers on the startup page refer to the number of sheets/faces printed during the life
of the printer. The numbers in CrownView and on the
consumables statistics page refer to the number of sheets/faces
printed to date during the current consumables tracking period
(Administration/Consumables/Start Period menu).
If the start-up page doesn’t print or the print quality is not good,
skip ahead to “Installation Troubleshooting” on page 2-18.
The number of sheets/faces printed statistics on the start-
2-17Setting Up Your Printer
Page 34

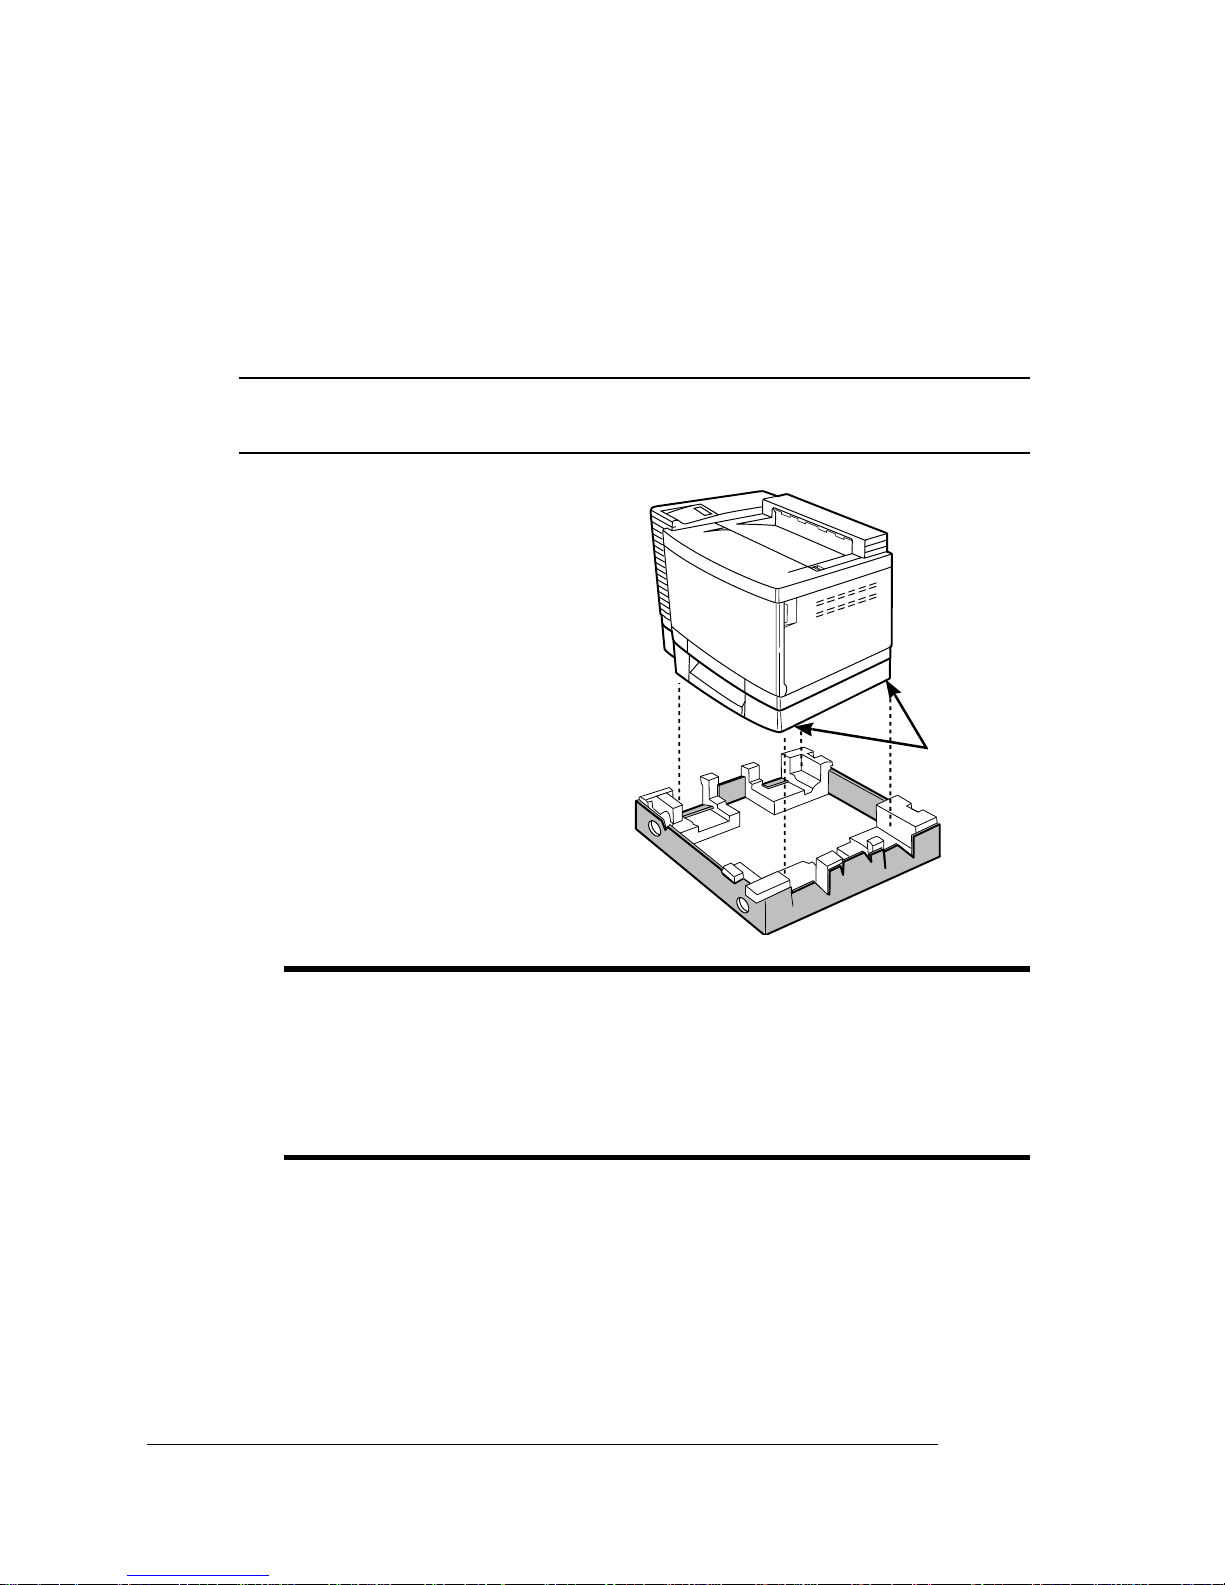
Installing Options
EDNord - Istedgade 37A - 9000 Aalborg - telefon 96333500
Installing Options
If yo u purchased any printer options, such as extr a memory (SIMMs),
emulations, an interface card, or an internal hard disk, install them now.
If installation instructions are included with the option, follow them. If
not, use the installation instructions in the
Options
manual.
Installation Troubleshooting
If you see this... It’ s probably
because...
Colors aren’t
registering prop erly.
CHECK WASTE
TONER message
appears in the
messa ge wi ndow.
Printouts seem
fade d on one s ide o f
the page.
The colors look
drastically wrong.
The OPC belt
cartridge is not
pushed all t he way in.
The waste tone r pack
isn’t properly
installed.
The printer is not on
a level enough
surface.
The toner cartridges
are not correctly
installed.
Do this...
Repeat the steps in “OPC Belt
Cartridge” on page 2-10.
Make sure it sits loosely in its
compartment and that the top of
the pac k is no t wedged under the
top of the compartment.
Level the printer surface. The
slant of the surface holding the
printer should not exceed 1.5°
after the printer is placed on it
(for example, a round pencil laid
on the surfac e sho uld n’t rol l in
any direction).
Check the toner cartridge
installation. Refer to “Toner
Cartridges” on page 2-12.
The start-up page
comes out skewed.
The transfer unit was
jarred open during
the installation and
needs to be closed.
If you’ve followed all of the instructions in this chapter and still have
problems you can’t solve, see appendix A, “QMS Customer Support,”
for information on getting help.
2-18
QMS magicolor 2 Getting Started
Refer to the “Troubleshooting”
chapter in the
for information on opening and
closing the unit.
Operation
guide
Page 35

What's Next?
EDNord - Istedgade 37A - 9000 Aalborg - telefon 96333500
Now that you’ve set up your printer and installed any options you
might have purchased, refer to one of the following chapters to connect it either directly to a computer or to a network:
n Chapter 3, “Connecting to a PC”
n Chapter 4, “Connecting to an Ethernet Network”
n Chapter 5, “Connecting to a Macintosh”
v
What's Next?
2-19Setting Up Your Printer
Page 36

EDNord - Istedgade 37A - 9000 Aalborg - telefon 96333500
Page 37

3
EDNord - Istedgade 37A - 9000 Aalborg - telefon 96333500
Connecting to a
PC
In This Chapter . . .
n “Introduction” on page 3-2
n “Making a Parallel Connection” on page 3-3
n “Making a Serial Connection” on page 3-5
n “PC Printing Software” on page 3-7
n “Printing from the PC” on page 3-16
n “If You Have Trouble” on page 3-17
n “What's Next?” on page 3-17
Page 38

Introduction
EDNord - Istedgade 37A - 9000 Aalborg - telefon 96333500
Introduction
This chapter explains how to connect your printer to a PC through
either the parallel port or serial port.
» Note:
to chapter 4, “Connecting to an Ethernet Network.”
If you’ re c onnecting to a PC through an Ethernet network, refer
Overview
1 Turn off both the printer and the PC.
2 Connect the printer to the PC.
n If you’re connecting to a PC through a parallel interface, con-
nect the printer to the PC as described in “Making a Parallel
Connection” on page 3-3.
n If you’re connecting to the PC through a serial interface, con-
nect the printer to the PC as described in “Making a Serial
Connection” on page 3-5.
» Note:
we recommend using a serial connection for better
communication.
3 Turn on both the printer and the PC.
If the printer is more than 6.5 feet (2 meters) from the PC,
4 Install a printer driver.
See “PC Printing Software” on page 3-7.
5 You’re ready to print.
QMS magicolor 2
Getting Started3-2
Page 39

Making a
EDNord - Istedgade 37A - 9000 Aalborg - telefon 96333500
Parallel
Connection
Making a Parallel Connection
What You Need for a Parallel Connection
Interface cables are not included with your printer. If you’re replacing
a printer, you may already have the necessary cables. If not, you’ll
need to purchase the cables from your QMS vendor or a local computer store.
To connect your printer to a single PC, you need a parallel cable with
a 36-pin male and a 25-pin male connector.
How to Choose a Parallel Cable
Your printer supports both Centronics parallel and IEEE 1284 bidirectional parallel communications. The type of parallel cable you use
depends on the type of parallel communication your computer supports (check your computer user’s manual if you’re unsure).
n If your computer supports IEEE 1284 bidirectional parallel com-
munication, you need an IEEE 1284 bidirectional parallel cable
(IEEE 1284 is indicated on the cable). This cable must be 6.5
feet/2 meters or less in length.
n If your computer supports only Centronics parallel unidirectional
communication, you may use either a Centronics parallel cable
(unmarked on cable) or an IEEE 1284 bidirectional paralle l cable
(IEEE 1284 is indicated on the cable). QMS recommends the
IEEE 1284 cable. The IEEE 1284 cable must be 6.5 feet/2 meters
or less in length while the Centronics cable may be longer.
3-3Connecting to a PC
Page 40

Making a
EDNord - Istedgade 37A - 9000 Aalborg - telefon 96333500
Parallel
Connection
Making the Connection
1 Turn off both the printer and the PC.
2 Connect the PC and the printer using a paral-
lel cable.
a Connect the 25-pin end of the cable to the
PC’s parallel port, and then tighten the
screws.
b Attach the 36-pin end of the cable to the
printer’s parallel port, and close the clips.
To Computer To Printer
25-pin
Male
36-pin
Male
3 Turn on both the printer and the PC.
A start-up page should print. If it doesn’t, refer to chapter 8, “Troubleshooting,” of the
Operation
manual.
4 Test the communication between the printer and the PC.
You can do this by sending a file from one of your applications, or
refer to chapter 8, “Troubleshooting,” of the
Operation
manual.
QMS magicolor 2
Getting Started3-4
Page 41

Making a Serial
EDNord - Istedgade 37A - 9000 Aalborg - telefon 96333500
Connection
Making a Serial Connection
What You Need for a Serial Connection
Interface cables are not included with your printer. If you’re replacing
a printer, you may already have the necessary cables. If not, you’ll
need to purchase the cables from your QMS vendor or a local computer store.
To connect your printer to a single PC, you need a serial cable with
either a 9- or 25-pin connector (depending on your PC’s serial port)
and a 9- or 25-pin null modem assembly to connect to the serial
cable. Depending on the type of null modem assembly you have, you
may also need a 9-to-25-pin adapter. See your cable vendor for more
specific cable assembly informatio n.
How to Choose a Serial Cable
For best results, the serial cable should be less than 25 feet (7.6
meters long).
3-5Connecting to a PC
Page 42

Making a Serial
EDNord - Istedgade 37A - 9000 Aalborg - telefon 96333500
Connection
Making the Connection
1 Turn off both the printer and the PC.
2 Connect the PC and the printer using a serial
cable.
a Connect the serial cable (with the null
modem adapter attached) to the PC’s 9- or
25-pin male serial port, and tighten the
screws.
b Connect the other end of the cable to the
printer’s serial port, and tighten the screws.
To Computer
9-pin or
25-pin
Female
To Printer
9-pin
Female
3 Turn on both the printer and the PC.
A start-up page should print, and Serial RS-232C should be listed
as an interface. If it doesn’t, refer to chapter 8, “Troubleshooting,”
of the
Operation
manual.
4 Test the communication between the printer and the PC.
You can do this by sending a file from one of your applications, or
refer to chapter 8, “Troubleshooting,” of the
QMS magicolor 2
Operation
Getting Started3-6
manual.
Page 43

PC Printing Software
EDNord - Istedgade 37A - 9000 Aalborg - telefon 96333500
If you're replacing a PostScript printer, you can probably start printing
now with the printing software already in place. Refer to your application documentation for instructions on sending documents to the
printer.
However, if you want to be able to use all your printer's special features, or if you've never printed to a PostScript printer before, we recommend you take a few minutes to make sure you have the following
printing software installed:
n A PostScript Level 2 printer driver
n Printer description files (if you use QuarkXPress 3.3, PageMaker,
or Photoshop)
PC Printing
Software
Installing a PostScript Printer Driver
Windows Applications
If you're using Windows, we recommend that you install one of the
QMS-developed Level 2 Windows drivers on the
CD-ROM we shipped with your printer. Drivers are available for
ties
n Windows 3.1
n Windows for Workgroups 3.11
n Windows 95
n Windows NT 3.51
n Windows NT 4.0
Refer to the README file on the CD-ROM for information on the
directory location of each driver. Then refer to the README file in that
directory for installation information.
Non-Windows Applications
QMS Software Utili-
If you're using a non-Windows application, read the printing section of the application documentation for information on choosing a
3-7Connecting to a PC
Page 44

PC Printing
EDNord - Istedgade 37A - 9000 Aalborg - telefon 96333500
Software
PostScript driver. If the application does not provide a PostScript
driver, contact the application manufacturer to see if one has become
available since you bought the program. Also, PostScript drivers for
some applications are available through CompuServe. See appendix
A, “QMS Customer Support,” for information.
Also, check to see if application notes (tips for printing from specific
applications) are available for your application from Q-FAX or
CompuServe. Appendix A, “QMS Customer Support," explains how
use these QMS information services.
Installing a QMS Level 2 Windows Driver
Windows 95
System Requirements
n An IBM or compatible PC with 386 or higher processor
n A hard disk with at least 1 MB of free space
n At least 4 MB of RAM
n Windows 95
Installation
1 With Windows 95 running, insert the CD-ROM in your PC’s
CD-ROM drive.
2 From the Start menu choose Settings.
3 From the Settings menu choose Printers.
4 In the Printers window double-click on Add Printer.
5 Follow the instructions in the Add Printer Wizard.
6 When you’re prompted to select a manufacturer and printer,
choose Have Disk...
7 In the Install From Disk window, choose Browse...
QMS magicolor 2
Getting Started3-8
Page 45

PC Printing
EDNord - Istedgade 37A - 9000 Aalborg - telefon 96333500
Software
8 Change to the x/PLATFORM/WINDO WS/DRIVERS/MC2_95PS
x
directory, where
is the PC’s CD-ROM drive.
QMS.INF displays in the File Name list.
9 Choose OK to return to the Install from Disk window.
10 Choose OK again.
QMS magicolor 2 CX displays in the Printers list.
11 Continue following the instructions in the Add Printer Wizar d
to complete the installation.
12 When the installation is complete, exit from the Printers win-
dow.
13 Remove the CD-ROM, and store it in a safe place.
Windows 3.1, Windows for Workgroups 3.11,
Windows 95, Windows NT 3.51
System Requirements
n An IBM or compatible computer with 386 or higher processor
n A hard disk with at least 1 MB of free space
n At least 4 MB of RAM
n MS-DOS 5.0 or higher
n Either Windows 3.1, Windows for Workgroups 3.11, Windows 95,
or Windows NT 3.51
Installation
1 Insert the CD-ROM in your CD-ROM drive.
2 With Windows running, from Program manager’s File menu,
choose Run.
» Note:
automatically start Windows and run the program.
Running the installation program outside of windows will
3-9Connecting to a PC
Page 46

PC Printing
EDNord - Istedgade 37A - 9000 Aalborg - telefon 96333500
Software
3 In the Run dialog box, type
x:\platform\windows\drivers\pslv12\setup.exe↵
where x is the letter of your CD-ROM drive, and then choose OK.
4 Read the license agreement, and choose Yes upon accep-
tance.
5 Select the destination hard disk.
6 Specify the installation directory.
7 Select the QMS printer(s) to be installed.
s Caution:
Windows limits the total number of installed printers to 16.
8 Choose OK.
Windows NT 4.0
System Requirements
n An IBM or compatible PC with 386 or higher processor
n A hard disk with at least 128 MB of free space
n At least 16 MB of RAM (32 MB recommended)
n Windows NT 4.0
Installation
» Note:
QMS CrownNet Print Utility for Windows must be installed on your
Windows NT workstation or server, and a port must be created before
continuing with this installation procedure. See the PRTMONNT.PDF
file (Adobe Acrobat format) in the \PLATFORM\WIN_NT\MONITOR
directory of the
installing and setting up this utility . In addition, if a Windows NT 4.0 or
a QMS Level 2 Windows NT 4.0 printer driver has been previously
installed, you must use the reinstallation procedure on page 3-12.
If you want to be able to print to a QMS CrownNet port, the
QMS Software Utilities
CD-ROM for details on
1 With Windows NT 4.0 running, insert the
CD-ROM disk in the CD-ROM drive on your workstation.
ties
QMS magicolor 2
QMS Software Utili-
Getting Started3-10
Page 47

PC Printing
EDNord - Istedgade 37A - 9000 Aalborg - telefon 96333500
Software
2 In the Windows NT Start menu choose Settings.
3 In the Settings menu choose Printers.
4 Choose Add Printer.
5 Choose Next.
6 When prompted, choose the appropriate radio button to
identify how the printer is attached to your workstation
(Local Printer or Network Printer), and then choose Next.
7 When prompted to select a port to use with the printer, select
the appropriate port, and then choose Next.
8 When prompted to select a manufacturer and model of
printer, choose Have Disk.
9 In the Install from Disk dialog box, choose Browse.
10 Change to the
tory, where
y
/PLATFORM/WIN_NT/DRIVER/4X/
y
is the workstation’s CD-ROM drive, and
type
direc-
type
is
the type of processor on your workstation.
OEMSETUP.INF displays in the File Name list.
11 Choose OK.
A list of QMS printers displays.
12 Select QMS magicolor 2 CX, and choose Next.
13 When prompted, choose Replace Existing Driver, and then
choose Next.
14 When prompted for a printer name, either accept the dis-
played name or type a new one, and then choose Next.
15 When prompted for sharing information, choose either
Shared (and type a Share Name) or Not Shared, and choose
Next.
16 When prompted, select the operating systems of ALL com-
puters that will be printing to the printer, and then choose
Next.
17 When asked if you'd like to print a test page, choose either
Yes or No, and then choose Finish.
3-11Connecting to a PC
Page 48

PC Printing
EDNord - Istedgade 37A - 9000 Aalborg - telefon 96333500
Software
Reinstallation
» Note:
If a Microsoft Windows NT 4.0 or a QMS Level 2 Windows NT 4.0
printer driver has been previously installed, you must use the f ollo wing
procedure to delete the files before installing a new printer driver.
1 Open Windows NT Explorer (from the Start>Programs menu
choose Windows NT Explorer).
2 Delete the printer(s) you want to replace or upgrade.
3 Install the new printers using the installation procedure on
page 3-10.
4 Reboot your workstation.
Notes on Installing Printer Description Files
The QMS Lev el 2 Windows Driver install progr am SETUP.EXE copies
PPD and PDF files into separate subdirectories under the specified
installation directory. See the QMS Level 2 Windows Driver for more
detailed driver information. Online help is provided through the QMS
Level 2 Windows driver. You may delete the PPD and/or PDF files if
you don’t use app lications that require them.
Applications may require special files, drivers, and/or configurations
to produce correct output on your QMS
Check your application’s documentation to determine if you need to
use one or more of these files.
magicolor
2 Print System.
Adobe Illustrator 5.5
For best output quality and accurate screening, install the QMS-developed Windows driver as described in “Installing a QMS Level 2 Windows Driver” on page 3-8. Then do the following to change the default
resolution:
1 In Adobe Illustrator, enable 600 dpi by choosing Document
Setup from the File menu.
» Note:
2 Click on Use Printer’s Default Screens to enable it.
3 Go to Output Resolution and enter the resolution.
Adobe Illustrator 5.5 has a default setting of 300 dpi.
QMS magicolor 2
Getting Started3-12
Page 49

PC Printing
EDNord - Istedgade 37A - 9000 Aalborg - telefon 96333500
Software
Adobe Photoshop
For best output quality and accurate screening, install the QMS-devel-
oped Windows driver as described in “Installing a QMS Level 2 Win-
dows Driver” on page 3-8. Then do the following:
1 From Page Setup dialog box of the Photoshop application,
select Screens.
2 Then click the Use Printer’s Default Screen box to enable it.
In addition, RGB graphics created in Photoshop 2.5 and later include
data called RGB tags, which causes Photoshop to use its own algo-
rithms when converting RGB data to CMYK for separations. Unless
these tags are disabled (possible in all versions except 3.01), Photo-
shop converts all RGB data to CMYK rather than letting the printer
perform the conversion. Use the following procedure to disable RGB
tags in Photoshop for Windows. (RGB tags are disabled by default in
Photoshop for Macintosh.)
1 Make a backup copy of the Photoshp.ini (Photoshop 2.5x) or
Photos30.ini (Photoshop 3.0 and later) initialization file.
2 Using a text editor, open the original initialization file.
3 In the [Photoshop} section of the initialization file, add the
following line:
Disablergbtags=1
4 Save the initialization file (in text-only format).
5 Restart Photoshop.
3-13Connecting to a PC
Page 50

PC Printing
EDNord - Istedgade 37A - 9000 Aalborg - telefon 96333500
Software
Aldus PageMaker 5.x/Adobe PageMaker 6.x
We recommend that you install a Windows Printer Description (WPD)
file instead of the QMS Level 2 Windows driver with PageMaker 5.0
because PageMaker requires a Microsoft 3.56 or higher Windows
driver. Use the following procedure to install a WPD file.
» Note:
Keep in mind that many of the QMS Level 2 Windows driver
features are not available from within PageMaker using the Microsoft
Window s Driver.
1 In the Windows Main group, double-click the Control Panel
icon.
2 Double-click the Printers icon.
The Printers dialog box displays the list of installed printers. If no
printer is installed, the install button and the list of available Windows 95 printers displays. If no printer is installed, skip to step 4,
otherwise continue at step 3.
3 Click the Add button to install a new printer.
4 In the List of Printers dialog box, select Install Unlisted or
Updated Printer.
5 Click the Install button and the Install Driver window dis-
plays.
6 Insert the
QMS Software Utilities
CD-ROM.
7 Type
y
:\platform\windows\ppd\PPD95↵ (where y is the
drive in which you inserted the CD-ROM), or use Browse to
select the path, and then choose OK.
The list of available QMS printers displays.
8 Select the QMS
magicolor
If Windows does not ask for an updated driver, the printer
appears in the list of installed printers.
If Windows asks for an updated driver, p ut PageMaker dis k#6
in the disk drive, then type the letter of that drive.
QMS magicolor 2
2 printer, then choose OK.
Getting Started3-14
Page 51

PC Printing
EDNord - Istedgade 37A - 9000 Aalborg - telefon 96333500
Software
9 Choose OK.
The printer appears in the list of installed printers.
PPD files are also to be used with PageMaker 5.0. They were copied
into the PPD subdirectory of the QMS Level 2 Windows driver directory during the installation process. They should be stored in the
\ALDUS\USENGLISH\PPD4 directory . This directory is typically found
in the \WINDOWS directory, but PageMaker allows you to install it
anywhere on your system.
If you’re not sure where the \ALDUS directory is, open Windows File
Manager, and search (the File menu) for “aldus” starting from the C:\
directory. Make sure you select “Search All Subdirectories.”
Aldus Persuasion 2.1
This application won’t pr int EPS (Encapsulated PostScript) images if
the PostScript driver isn’t PSCRIPT.DRV.
CorelDRAW 4.0
This application provides a feature to control whether a PostScript
driver is actually treated as a PostScript driver or not. In the CORELPRN.INI file under the [PSDRIVERS] section, specify which driver by
either of the following statements:
QMSPS=1↵ (PostScript driver)
QMSPS=0↵ (Non-PostScript driver)
Microsoft Excel 5.0
If your using this application with color cell backgrounds in a sparse
dot pattern, the background may not always print in all resolutions
and/or orientations. Interference between the bit pattern and the PostScript halftoning for co lor causes this inconsistency. Change the resolution to one that does work for the background and use a darker
shade of black for the pattern color, or enable the All Colors to Black
option from within the Excel Images dia lo g box.
3-15Connecting to a PC
Page 52

Printing from
EDNord - Istedgade 37A - 9000 Aalborg - telefon 96333500
the PC
Other Applications
The scaling factor set in the driver is independent of any scaling factor
set in an application. While the application’s scaling factor is likely to
affect the size and placement of image elements, the driver scaling
factor simply scales the resultant image from the center of the page.
QuarkXPress 3.3
Follow this procedure to install the PDF. See your QuarkXPress documentation for detailed information on installing PDFs.
» Note:
Level 2 Windows Driver installation process.
1 After you install the QMS driver for Windows, close the
2 Copy the QuarkXPress PDF from its installation directory to
3 Resta rt QuarkX Pr ess.
4 Check the Page Setup menu to verify that your printer is in
All PDFs are copied into a PDF subdirectory during the QMS
QuarkXPress application on your PC.
the QuarkXPress directory on your PC.
the list of available printers.
Printing from the PC
You're now ready to print from your PC. From this point, you'll
probably perform most printing tasks from your application. For
specific informati on, check the prin ting section in your applicati on
documentation.
For information on print media types and sizes, see chapter 2, “Print
Media,” in the
Reference
manual.
QMS magicolor 2
Getting Started3-16
Page 53

If You Have Trouble
EDNord - Istedgade 37A - 9000 Aalborg - telefon 96333500
If you have trouble connecting and configuring your PC interface,
refer to chapter 8, “Troubleshooting,” of the Operation manual
for troubleshooting tips.
What's Next?
Now that you’ve connected your printer to a PC, continue with chapter
6, “Using the Control Panel,” in this manual to learn about the
printer’s control panel keys, indicators, and message window.
If You Have
Trouble
v
3-17Connecting to a PC
Page 54

EDNord - Istedgade 37A - 9000 Aalborg - telefon 96333500
Page 55

4
EDNord - Istedgade 37A - 9000 Aalborg - telefon 96333500
Connecting to an
Ethernet Network
In This Chapter . . .
In This Chapter.
n “Introduction” on page 4-2
n “Connect to the Network” on page 4-3
n “Install the CrownNet Software” on page 4-3
n “Configure the Interface” on page 4-4
n “Configure the Network” on page 4-11
n “Install the QMS CrownNet Print Utility or the QMS Network Print
Monitor” on page 4-12
n “Where To Go From Here” on page 4-12
n “If You Have Trouble” on page 4-13
n “What's Next?” on page 4-13
Page 56

Introduction
EDNord - Istedgade 37A - 9000 Aalborg - telefon 96333500
Introduction
The QMS CrownNet Ethernet interface is a combination of hardware
and host software that allows your printer to be connected to an
Ethernet network that supports the following:
Operating System Protocol
AppleTalk EtherTalk
LAN Manager/LAN Server NetBIOS/NetBEUI
NetWare IPX/SPX
TCP/IP TCP/IP
Windows 3.1/Windows 95/Windows NT TCP/IP/NetBIOS/NetBEUI/EtherTalk
The instructions given in this chapter are the minimum steps needed
to get your printer up and printing. For complete installation information refer to the
figuring the CrownNet interface and using the CrownNet software
(CrownAdmin, CrownAdmin 3, CrownNet Manager, and the CrownNet Print Utility for Windows), refer to the
Administrator’s Guide
QMS CrownNet Setup Guide
.
. For information on con-
QMS CrownNet System
Overview
1 Connect the printer to the network.
2 Install the CrownNet software.
3 Configure the CrownNet interface.
4 Configure the network.
5 Install the QMS CrownNet Print Utility or a QMS Network
Print Monitor.
QMS magicolor 2 Getting Started4-2
Page 57

Connect to the Network
EDNord - Istedgade 37A - 9000 Aalborg - telefon 96333500
The printer provides a twisted-pair (10BaseT) Ethernet interface.
Twisted-pair Ethernet connections use RJ45 connectors.
1 Turn off the printer, and unplug the power
cord.
2 Connect one end of the twisted-pair Ethernet
cable to the printer’s Ethernet port.
3 Connect the other end of the cable to the
10BaseT concentrator.
10BaseT Concentrator
Connect to the
Network
To RJ45 Port
RJ45
Connector
4 Plug in the printer, and turn it on.
Install the CrownNet Software
It’s not necessary to do this right now. You can install the CrownNet
software after the printer is up and printing.
For complete instructions, refer to the
on the
Connecting to an Ethernet Network
QMS Software Utilities CD-ROM.
QMS CrownNet Setup Guide
4-3
Page 58

Configure the
EDNord - Istedgade 37A - 9000 Aalborg - telefon 96333500
Interface
Configure the Interface
This section briefly describes the configuration procedure for the
CrownNet Ethernet printer interface. For a complete discussion of all
of the configuration options available through the Administration/Communications/Network2/CrownNet menu, see chapter 2, “Interface
Configuration,” of the
You can make these configuration changes through any of the following means:
n Printer control panel—For information on using the printer con-
trol panel to change configuration menu settings, refer to chapter
4, “Printer Configuration,” of the
n CrownAdmin (for DOS and Macintosh), CrownAdmin 3 (for
AIX, HP-UX, Solaris/SunOS, and Windows/Windows NT/Windows for Workgroups), or CrownNet Manager (for OS/2)—For
more information on using this software, re fer to the appropriat e
chapter in the
the software’s on-line help.
QMS CrownNet System Administrator ’s Guide
Reference
QMS CrownNet System Administrator’s Guide
manual.
.
or to
n Remote Console—For information on accessing Remote Con-
sole, refer to the appropriate chapter in the
tem Administrator’s Guide
Console, refer to the
. For information on using Remote
QMS Crown Remote Console User’s Guide
QMS CrownNet Sys-
EtherTalk Interface Configuration
1 If your network has more than one zone, use the Administra-
tion/Communications/Network2/CrownNet/EtherTalk/Zone
Name/Zone Part 1 and Zone Part 2 menus to enter the name
of the zone to which the printer is attached.
» Note:
with a name up to 32 characters long. (Up to 16 characters can
be entered in each of the two menus). You cannot use these two
menus to identify two zones. Trailing spaces are not considered
part of the zone name. All standard printable ASCII characters
are valid except the @ and ' symbols. The names are case
sensitive.
The two Zone Part x menus allow you to identify 1 zone
.
QMS magicolor 2 Getting Started4-4
Page 59

Configure the
EDNord - Istedgade 37A - 9000 Aalborg - telefon 96333500
Interface
2 You’re now ready to print.
From this point, you’ll probably perform most printing tasks from
your application. For specific information, check the printing section in your application documentation.
For information on print media types and sizes, see chapter 2,
“Print Media,” in the
Reference manual
.
OS/2 LAN Manager/LAN Server and Microsoft
Windows Network Interface Configuration
1 One unique printer name is broadcast to the network. Use
the Administration/Communications/Network2/CrownNet/
LAN Manager/Printer Name menu to enter the name of the
printer.
» Note:
The name can be up to 16 characters long. Spaces and
lowercase characters are not allowed. Underscore characters
( _ ) are allowed to simulate multiword names (for example,
PRODUCT_MKTG).
2 You’re now ready to print.
From this point, you’ll probably perform most printing tasks from
your application. For specific information, check the printing section in your application documentation.
For information on print media types and sizes, see chapter 2,
“Print Media,” in the
Reference manual
.
NetWare Interface Configuration (Netware 3.x)
Unless you want to use the default settings, use the following procedure to name the file and print servers. These names must be unique.
» Note:
System_hardwareaddress, where xxxx is the printer model
number and hardwareaddress is the printer’s hardware address as
found on the printer start-up page. This address will be blank until the
interface has been reset following installation.
In CrownAdmin, the printer shows up as QMS_xxxx_Print_
Connecting to an Ethernet Network
4-5
Page 60

Configure the
EDNord - Istedgade 37A - 9000 Aalborg - telefon 96333500
Interface
1 In the Administration/Communications/Network2/CrownNet/
NetWare/Config PServer/File Srv Name[1], File Srv Name[2],
and File Srv Name[3] menus, enter the name of the target file
server (primary 3.
x
configuration server).
» Note:
file server with a name up to 47 characters long. (Up to 16
characters can be entered in each of the 3 menus). You cannot
use these 3 menus to identify 3 file servers. Up to 16 file servers
are supported. To enter the 15 other file server names, use
CrownAdmin 3.
Spaces and lowercase characters are not allowed within file
server names. However, underscore characters ( _ ) are allowed
to simulate multiword names (for example, PUBS_SERVER). At
the printer control panel only, a space must be used following the
last character of the file server name to end the name. For
example, the file server name
FIRSTGROUP_GROUPS_BLUE_TEAM_TEAMS_CRC_QMS
is 42 characters long, and must be entered as follows:
FILE SRV NAME[1]
FIRST_GROUP_GROU
FILE SRV NAME[2]
PS_BLUE_TEAM_TEA
The three File Srv Name[x] menus allow you to identify 1
FILE SRV NAME[3]
MS_CRC_QMS<space>
where <space> is the space character.
2 In the Administration/Communications/Network2/CrownNet/
NetWare/Config PServer/PServer Name[1], PServer Name[2],
and PServer Name[3] menus, enter the name of the bindery
print server.
» Note:
The three PServer Name[x] menus allow you to identify
one print server with a name up to 47 characters long. (Up to 16
characters can be entered in each of the 3 menus). You cannot
use these 3 menus to identify 3 print servers.
QMS magicolor 2 Getting Started4-6
Page 61

Configure the
EDNord - Istedgade 37A - 9000 Aalborg - telefon 96333500
Interface
Spaces and lowercase characters are not allowed in print server
names. However, underscore characters ( _ ) are allowed to
simulate multiword names (for example, PUBS_PSERVER). At
the printer control panel only, a space must be used following the
last character of the print server name to end the name. For
example, the print server name
FIRSTGROUP_GROUPS_BLUE_TEAM_TEAMS_CRC_QMS
is 42 characters long, and must be entered as follows:
PSERVER NAME[1]
FIRST_GROUP_GROU
PSERVER NAME[2]
PS_BLUE_TEAM_TEA
PSERVER NAME[3]
MS_CRC_QMS<space>
where <space> is the space character.
3 In the Administration/Communications/Network2/CrownNet/
NetWare/RN Printer#1/Printer Slot # menu, enter the printer
slot number.
» Note:
This number must match the slot number chosen in the
Printer Configuration submenu of the Print Server Configuration
menu in the NetWare PCONSOLE utility.
4 In the Administration/Communications/Network2/CrownNet/
NetWare/RN Printer#1/PServer Name[1], PServer Name[2],
and PServer Name[3] menus, enter the name of the print
server.
» Note:
The three PServer Name[x] menus allow you to identify 1
print server with a name up to 47 characters long. (Up to 16
characters can be entered in each of the 3 menus). You cannot
use these 3 menus to identify 3 print servers.
Spaces and lowercase characters are not allowed. However,
underscore characters ( _ ) are allowed to simulate multiword
names (for example, PUBS_PSERVER). At the printer control
panel only, a space must be used following the last character of
Connecting to an Ethernet Network
4-7
Page 62

Configure the
EDNord - Istedgade 37A - 9000 Aalborg - telefon 96333500
Interface
the print server name to end the name. For example, the print
server name
FIRSTGROUP_GROUPS_BLUE_TEAM_TEAMS_CRC_QMS
is 42 characters long, and must be entered as follows:
PSERVER NAME[1]
FIRST_GROUP_GROU
PSERVER NAME[2]
PS_BLUE_TEAM_TEA
PSERVER NAME[3]
MS_CRC_QMS<space>
where <space> is the space character.
5 Reset the CrownNet interface by using the Administration/
Communications/Network2/CrownNet/Common/Soft Reset
menu.
6 You’re now ready to print.
From this point, you’ll probably perform most printing tasks from
your application. For specific information, check the printing section in your application documentation.
For information on print media types and sizes, see chapter 2,
“Print Media,” in the
Reference manual
.
NetWare Interface Configuration (Netware 4.x)
Unless you want to use the default settings, use the following procedure to name the file and print servers. These names must be unique.
» Note:
System-hardwareaddress, where xxxx is the printer model
number and hardwareaddress is the printer’s hardware address as
found on the printer start-up page.
In CrownAdmin, the printer shows up as QMS-xxxx-Print-
QMS magicolor 2 Getting Started4-8
Page 63

Configure the
EDNord - Istedgade 37A - 9000 Aalborg - telefon 96333500
Interface
1 In the Administration/Communications/Network2/CrownNet/
NetWare/Config PServer/PServ er Context[1], PServer Context[2], and PServer Context[3] menus, enter the name of the
configuration file server and print server context.
» Note:
the name of the NDS configuration file server and the print server
context.
The format for the option is
n File server name
n Space
n Print server context
For example, if the configuration file server name is QMS-4 and
the print server context is PRINTSERV2.SALES.QMS, you would
enter:
QMS-4 PRINTSERV2.SALES.QMS
» Note:
(QMS-4)
PRINTSERV2.SALES.QMS).
(
Up to 16 characters can be entered in the Pserver Context[1]
field, and additional 16 characters in Pserver Context[2] field, and
16 characters in the Pserver Context[3] field.
The three PServer Context[x] menus allow you to identify
Make sure to put a space between the file server name
and the print server context
» Note:
If you want to assign more than 14 characters to the file
server name you must use CrownAdmin 3 to enter the name.
2 Reset the CrownNet interface by using the Administration/
Communications/Network2/CrownNet/Common/Soft Reset
menu.
3 You’re now ready to print.
From this point, you’ll probably perform most printing tasks from
your application. For specific information, check the printing section in your application documentation.
For information on print media types and sizes, see chapter 2,
“Print Media,” in the
Connecting to an Ethernet Network
Reference manual
.
4-9
Page 64

Configure the
EDNord - Istedgade 37A - 9000 Aalborg - telefon 96333500
Interface
TCP/IP Interface Configuration
1 If necessary, in the Administration/Communications/
Network2/CrownNet/TCPIP/Internet Address menu, enter the
printer’s Internet address.
The factory default Internet address is 161.033.128.024.
» Note:
Only the IP address needs to be entered. It is not
necessary to enter the subnet mask.
2 If necessary, in the Administration/Communications/
Network2/CrownNet/TCPIP/Default Router menu enter the
Internet address of the default router.
The factory default router address is 000.000.000.000.
3 If necessary, in the Administration/Communications/
Network2/CrownNet/TCPIP/Subnet Mask menu enter the
printer’s subnet mask.
The default subnet mask is 000.000.000.000. This setting
provides automatic sensing of gateways. If you identify a subnet
mask, automatic sensing is disabled.
4 You’re now ready to print.
From this point, you’ll probably perform most printing tasks from
your application. For specific information, check the printing section in your application documentation.
For information on print media types and sizes, see chapter 2,
“Print Media,” in the
Reference manual
QMS magicolor 2 Getting Started4-10
.
Page 65

Configure the Network
EDNord - Istedgade 37A - 9000 Aalborg - telefon 96333500
Unless you are using TCP/IP, it is not necessary to do this right now.
You can configure the network after the printer is up and running.
Configure the
Network
For complete instructions, refer to the
QMS CrownNet Setup Guide
TCP/IP NetWork Configuration
1 Log on the UNIX system as root.
2 Edit the system host table by ad ding the following line to the
/etc/hosts file:
internetaddress hostname
where
(Administration/Communications/Network2/CrownNet/TCPIP/
Internet Address menu) and
3 If necessary, set the hardware address.
s Caution:
hardware address.
n If you’re working on a system other than a UNIX system, set
internetaddress
We strongly recommend that you do not change the
the hardware address through the printer control panel.
is the Internet address of the printer
hostname
is the name of the host.
.
n If you’re working on a UNIX system, send the hardware
address to the print server by typing
arp -s
ping
where
dress
##.##.##.##
» Note:
system through the BOOTP and RARP utilities.
Connecting to an Ethernet Network
hostname hardwareaddress
hostname
hostname
is the hardware address of the printer (in the form
as found on the printer start-up page).
You can also send the hardware address of a UNIX
temp↵
↵
is the name of the host and
hardwaread-
4-11
Page 66

Install the QMS
EDNord - Istedgade 37A - 9000 Aalborg - telefon 96333500
CrownNet Print
Utility or the
QMS Network
Install the QMS CrownNet
Print Utility or the QMS
Network Print Monitor
It is not necessary to install these right now. You can do this after the
printer is up and printing.
For complete instructions, refer to the
QMS Network Print Monitor for Windows NT Administrator’s Guide, or
QMS Network Print Monitor for Windows 95 Administrator’s Guide
QMS CrownNet Setup Guide,
Where To Go From Here
In addition to this chapter, the following documentation contains information you may need:
n
QMS CrownNet Setup Guide
information.
n
QMS CrownNet System Administrator’s Guide
detailed confi gurat ion and utili ty inform ati on.
n CrownAdmin 3 on-line help—Contains detailed information on
using CrownAdmin 3. Choose Contents from the Help menu in
the main CrownAdmin 3 window (or choose any Help button) to
access the on-line user’s guide.
—Contains detailed setup
—Provides
.
n CrownNet Print Utility on-line help—Contains detailed information
on using CrownNet Print Utility.
QMS Crown Remote Console User’s Guide
n
use Remote Console to control printing from a workstation anywhere on the network.
n Your network documentation—Contains information on printing.
QMS magicolor 2 Getting Started4-12
—Explains how to
Page 67

If You Have
EDNord - Istedgade 37A - 9000 Aalborg - telefon 96333500
Trouble
n
QMS Network Print Monitor Administrator’s Guide
detailed information on using the QMS Network Print Monitor for
Window s NT.
n QMS Network Print Monitor on-line help—Contains detailed infor-
mation on using the QMS Network Print Monitor for Windows NT.
—Contains
Network Print Monitor for Windows 95 Administrator’s Guide
n
Contains detailed information on using the QMS Network Print
Monitor for Windows 9 5 .
n QMS Network Print Monitor for Windows 95 on-line help—Con-
tains detailed information on using the QMS Network Print Monitor for Windows 95.
If You Have Trouble
If you have trouble connecting and configuring your Ethernet interface, refer to the “CrownNet Problems” section of chapter 8, “Troubleshooting,” of the
Operation
manual.
What's Next?
—
Now that you’ve connected your printer to an Ethernet network,
continue with chapter 6, ”Using the Control Panel,” in this manual to
learn about the printer’s control panel keys, indicators, and message
window.
v
Connecting to an Ethernet Network
4-13
Page 68

EDNord - Istedgade 37A - 9000 Aalborg - telefon 96333500
Page 69

5
EDNord - Istedgade 37A - 9000 Aalborg - telefon 96333500
Connecting to a
Macintosh
In This Chapter . . .
n “Introduction” on page 5-2
n “Making the Connection” on page 5-3
n “Macintosh Printing Software” on page 5-5
n “Printing from the Macintosh” on page 5-9
n “If You Have Trouble” on page 5-9
n “What's Next?” on page 5-9
Page 70

Introduction
EDNord - Istedgade 37A - 9000 Aalborg - telefon 96333500
Introduction
This chapter describes how to connect your printer to a Macintosh via
LocalTalk port.
» Note:
network, refer to chapter 4, “Connecting to an Ethernet Network.”
If you’re connecting to a Macintosh through an Ethernet
Overview
1 Turn off both the printer and the Macintosh.
2 Install an optional LocalTalk interface card in the printer.
A LocalTalk interface is not standard on your printer. You need to
install an optional LocalTalk interface card. See chapter 3, “Interfaces and Daughterboards,” of the
information.
3 Connect the printer to the Macintosh.
4 Turn on both the printer and the Macintosh.
5 Install a printer driver.
See “Macintosh Printing Software” on page 5-5.
6 Now you’re ready to print.
Options
manual for installation
5-2
QMS magicolor 2 Getting Started
Page 71

Making the Connection
EDNord - Istedgade 37A - 9000 Aalborg - telefon 96333500
What You Need for the Connection
Interface cables are not included with your printer. If you’re replacing
a printer, you may already have the necessary cables. If not, you’ll
need to purchase the cables from your QMS vendor or a local computer store.
To connect your printer to a single Macintosh, you must have
n An optional LocalTalk interface. See chapter 3, “Interfaces and
Daughterboards,” of the
information.
Options
manual for installation
Making the
Connection
n Two PhoneNET-type transformer boxes: one with a DIN-8 con-
nector for the printer port and one with a DIN-8 connector for the
Macintosh port
n An RJ11 (telephone) cable
n Two terminating resistors to close the open sockets left in the
transformer box es after the connection is made
If you’re connecting the printer to an AppleTalk network with more
than one Macintosh, see your PhoneNET and Macintosh documentation for more information.
5-3Connecting to a Macintosh
Page 72

Making the
EDNord - Istedgade 37A - 9000 Aalborg - telefon 96333500
Connection
Making the Connection
1 Turn off both the printer and the Macintosh.
2 Plug the connector from one transformer box
into the printer’s optional LocalTalk port
(installed in the slot marked “Option”).
3 Plug the connector from the other trans-
former box into the Macintosh printer port.
4 Connect the two transformer boxes with the
telephone cable.
5 Put terminating resistors in all open sockets
in the connector boxes.
This ensures proper communication and helps
speed up transmission.
Host
DIN-8 Female Port
Transformer Boxes
RJ-11 Cable
Terminating Resistors
Printer
DIN-8 Female Port
6 Turn on the printer.
A start-up page should print. If it doesn’t, refer to chapter 8, “Troubleshooting,” of the
Operation
manual.
5-4
QMS magicolor 2 Getting Started
Page 73

Macintosh
EDNord - Istedgade 37A - 9000 Aalborg - telefon 96333500
Printing
Software
Macintosh Printing Software
If you’ re replacing a PostScript printer, you can probably start printing
now with the printing software already in place. Refer to your application documentation for instructions on sending documents to the
printer.
However, if you want to be able to use all your printer’s special features or if you’ve never printed to a PostScript printer before, we recommend you take a few minutes to make sure you have the following
printing software installed:
n QMS Macintosh Utilities
n A PostScript printer driver
n Application-specific printer files
Installing Macintosh Utilities
QMS Macintosh Utilities are utilities for controlling the printer from the
Macintosh. It is included on the
shipped with your printer.
1 With the Macintosh on, insert the
ROM in your Macintosh’s CD-ROM drive.
2 If necessary, double-click the CD-ROM icon to display the
CD-ROM contents.
3 Double-click the PLATFORM folder icon to display the folder
contents.
4 Double-click the MAC folder icon to display the folder con-
tents.
5 Double-click the UTILS folder icon to display the folder con-
tents.
QMS Software Utilities
QMS Software Utilities
CD-ROM
CD-
6 Double-click the UTILS installer icon.
5-5Connecting to a Macintosh
Page 74

Macintosh
EDNord - Istedgade 37A - 9000 Aalborg - telefon 96333500
Printing
Software
7 In the dialog box that appears, verify the Install location.
8 Also in the dialog box, choose Easy Install or Custom Install.
To change the Install Location you can either use the drop-down
list box to display and select the appropriate disk, or you can
choose the Switch Disk b utto n to scroll t hrough the a vailable disks .
n Easy Install automatically installs all of the utilities, including
the PDF, PDX, and PPD files and the screen fonts.
n Custom Install allows you to choose the options you want to
install. The amount of available space on your Macintosh
hard disk and the amount of space necessary for all of the
selected options are indicated near the bottom of the window.
» Note:
If you're using Custom Install, you can click the small
icon (it looks like a capital I inside a square) to the right of
each install option for more information about that option .
9 Choose the Install button to begin.
Installation takes approximately one minute. The Installer places
all of the options inside a newly created PSExec ƒ folder in the
location you chose in step 7.
10 When the installation is finished, you're prompted to choose
either Continue to install additional options from the Custom
installation option or Quit to exit the Utils installer program.
Installing Macintosh Printer Drivers
To be able to use all your printer’s special features, you need to take a
few minutes to load the following software:
n QMS
See the following section, “Installing the QMS magicolor 2 PPD,”
for information.
magicolor 2
PPD file
n Printer files for Aldus/Adobe PageMaker, Aldus/MacroMedia
FreeHand, Adobe PrePrint, Adobe Separator, or QuarkXPress
See “Application Notes” on page 5-8 for information.
5-6
QMS magicolor 2 Getting Started
Page 75

Macintosh
EDNord - Istedgade 37A - 9000 Aalborg - telefon 96333500
Printing
Software
Installing the QMS magicolor 2 PPD
Although the QMS
recommend using LaserWrite r 8.
» Note:
The LaserWriter driver is provided with your Macintosh system
magicolor 2
supports LaserWriter 6, 7, and 8, we
software. All Macintosh users on a network must use the same
version of the LaserWriter and Laser Prep files to run correctly. For
example, if the network has a mixture of LaserWriter 6.x, 7.x, and/or
8.x, the printer will experience frequent reinitialization problems. To
check the version number, select the LaserWriter icon and then hold
down the Command key and press the I (letter I) key. The driver
version number appears in the Info window on the second-to-last line.
LaserWriter 7.x and 8.x do not require a Laser Prep file to work
correctly with your printer. The Laser Prep information is located
within the LaserWriter driver itself.
The QMS
your printer so you can take advantage of special printer features
while using the LaserWriter driver.
1 If you haven’t already, install a LaserWriter driver.
magicolor 2
PPD (a printer description file) is provided with
Refer to your Macintosh documentation.
2 If you haven't already, follow the instructions given above in
“Installing Macintosh Utilities” on page 5-5.
3 If you don’t already have one, create a Printer Descriptions
folder on your Macintosh hard disk:
System 8 and 7 users—Create a folder called Printer Descrip-
tions inside the Extensions folder inside the System Folder.
System 6 users—Create a folder called Printer Descriptions
inside the System Folder.
4 Open the PSExec
tosh Utilities” on page 5-5.
5 Open the 4.x PPD’s folder.
6 Select the QMS
it to the Printer Descriptions folder on your Macintosh hard
disk.
f
folder you created in “Installing Macin-
magicolor 2
printer description file and drag
5-7Connecting to a Macintosh
Page 76

Macintosh
EDNord - Istedgade 37A - 9000 Aalborg - telefon 96333500
Printing
Software
7 From the Apple menu, choose Chooser.
8 In the Chooser window, select the LaserWriter 8.
then select the QMS
magicolor
2.
x
icon, and
9 Choose the Setup button.
This causes the LaserWriter to query the printer and automatically choose the appropriate PPD.
10 Ex it from the Chooser.
Now, when you go into your application, you can access QMS
printing options by choosing Options in your application's Print
dialog box.
Application Notes
If you use any of these applications, install the appropriate printer
description file (PPD, PDX, and/or PDF) as described below:
1 If you haven't already, follow the instructions given above in
“Installing Macintosh Utilities” on page 5-5 and in “Installing
the QMS magicolor 2 PPD” on page 5-7.
2 Install the appropriate printer description file(s) for your
f
application from the PSExec
folder:
n If you use Adobe Separator, install the PPD file. Your Sepa-
rator documentation explains where to put it.
n If you use Adobe PageMaker 5.
x
, install the version 4.x
PPD in the Printer Descriptions folder.
n If you use Macromedia FreeHand 4.
x
, install the version 4.x
PPD in the Printer Descriptions folder.
n If you use QuarkXPress 3.3 or later, you can use the QMS
magicolor
inst all th e QMS
2 PPD. However, if you use an earlier version,
magicolor
2 PDF in the QuarkXPress folder in
the PDF folder. To select the PDF, go to Quark's Page Setup
dialog box. Under Printer Type, select the QMS
magicolor
PDF and select the Use Printer Default Screen Angles checkbox. Also in Quark’ s Page Setup dialog box, make sure None
is selected for the EFI Color profile option.
2
5-8
QMS magicolor 2 Getting Started
Page 77

Printing from
EDNord - Istedgade 37A - 9000 Aalborg - telefon 96333500
the Macintosh
Printing from the Macintosh
You’re now ready to print from your Macintosh. From this point, you’ll
probably perform most printing tasks from your application. For specific information, check the printing section in your application documentation. For information on print media types and sizes, see
chapter 2, “Print Media,” in the
Reference
A Note for Users of Aldus Applications
If you use an Aldus application (or one that used to be owned by
Aldus, such as PageMaker or FreeHand), when you want to print,
hold down the Option key while selecting Print from the File menu.
This brings up the LaserWriter windows, which contains the QMS
printing options. Normally, Aldus applications bypass LaserWriter and
use an Aldus printer driver, which prevents you from accessing QMS
printing options.
guide.
A Note for Users of Adobe PhotoShop
If you use Adobe PhotoShop, go to PhotoShop’s Page Setup dialog
box, and select Use Printer’s Default Screen under the Screens
option. This allows your choices in the QMS driver to take effect.
If You Have Trouble
If you have trouble connecting and configuring your Macintosh interface, ref er to chapter 8, “T r oubleshooting,” in the
troubleshooting tips.
What's Next?
Now that you’ve connected your printer to a Macintosh interface, continue with chapter 6, “Using the Control Panel,” to learn about the
printer’s control pa ne l keys, in di cat or s , and me ssag e win dow.
v
Operation
manual for
5-9Connecting to a Macintosh
Page 78

EDNord - Istedgade 37A - 9000 Aalborg - telefon 96333500
Page 79

6
EDNord - Istedgade 37A - 9000 Aalborg - telefon 96333500
Using the Control
Panel
In This Chapter . . .
n “Introduction” on page 6-2
n “Message Window” on page 6-2
n “Control Panel Indicators” on page 6-3
n “Control Panel Keys” on page 6-4
n “What's Next?” on page 6-6
Page 80

Introduction
EDNord - Istedgade 37A - 9000 Aalborg - telefon 96333500
Introduction
The control panel, located on the front of the printer, allows you to
direct the printer’s operation. In addition, it displays the current status
of the printer, including any condition that needs your attention.
4 indicators
provide printer
status
information.
A 2-line, 16
characters/line,
message window
displays status
and configuration information.
4 keys are used in
printer
configuration
Message Window
The control panel message window provides status and configuration
information. Status messages are listed in chapte r 8, “Troubleshooting,” of the
chapter 4, “Printer Configuration,” of the
Operation
manual. Printer configuration is explained in
Reference
3 keys access
frequently used
printer functions
manual
.
QMS magicolor 2 Getting Started6-2
Page 81

Control Panel
EDNord - Istedgade 37A - 9000 Aalborg - telefon 96333500
Indicators
Setting the Message Window Language
Menu Administration/Miscellaneous/Keypad Language
Purpose Change the message window language.
Choices English, French, German, Spanish
Default English
Notes The printer must be restarted for changes to this menu to
take effect. You can either let the printer restart automa ticall y
after you save the chang e and exit from the configuration
menu, or you can wait for the change to take effect the next
time you manually turn on the printer.
Control Panel Indicators
Four indicators display printer status information.
Indicator Off On Blinking
The printer is not
ready to print.
The printer is off
line and not ready
to accept data.
No problem. The printer requi res
The printer has
finished warming
up and is ready to
print.
The printer is on
line and ready to
accept data.
operator attention
(usually
accompanied by a
status mess age in
the message
window).
The printer is
warming up, or the
printer is in Energy
Saver mode.
6-3Using the Control Panel
Page 82

Control Panel
EDNord - Istedgade 37A - 9000 Aalborg - telefon 96333500
Keys
Indicator Off On Blinking
The printer is not
receiving data.
The printer is
receiving data
through one or
more of its
simultaneous
interfaces (usually
accompanied by a
status mess age in
the message
window).
Control Panel Keys
Online, Copy, and Cancel Keys
These keys access frequently used printer functions.
Key Function
The Online k ey s witc hes the printe r between on-line to off-line
status.
When off line, the printer c on tin u es printin g unti l it has
finished all jobs received, but it doesn’t accept any new data.
Although jobs continue to compile and print using the data
already received, a job may be interrupted.
If a remote cons ol e ha s t aken the printer off l ine, pressing th e
Online key on the control panel will not take effect until the
console puts the printer back on line.
» Note:
other ke ys e x cept the Cancel and Copy k eys.
When CrownCopy and the copy key are installed, this key
allows you to access the Copy menu to print a copy or
configure Cro wnCop y. You can use t his k ey while the printer is
on line.
You must take the printer off line before using all
QMS magicolor 2 Getting Started6-4
Page 83

Key Function
EDNord - Istedgade 37A - 9000 Aalborg - telefon 96333500
The Cancel key allows you to cancel one or more print jobs.
(See chapter 3, “Advanced Printing Features,” in the
Operation
key while the printer is on line.
Control Panel
Keys
manual f o r compl ete information.) You can use this
» Note:
decide not to cancel a print job after pressing this key,
press the Menu key to “cancel” the Cancel key’s function.
If you press the Cancel k ey by mistake, or if you
Menu, Select, Previous, and Next Keys
The Menu, Select, Previous, and Next keys are used in printer configuration (explained in detail in chapter 4, “Printer Configuration,” of the
Reference
key to take the printer off line.
Key Function
manual). Before using any of these keys, press the Online
The Menu key provides access to the configuration menu.
First press the Online key to take the printer off line, and then
press the Menu key to access the configuration menu. When
you’re changing the printer configuration, press this key to
cancel a change (before pressing the Select keys), to return
to a previous menu, or to return to a pre vi ous cha racter when
entering character information.
Press the Select key to access a menu or to choose a
displayed menu option.
Press the Previous key to return to the previous selection or
option for the current menu. When changing character
information, use this key to return to the previous choice for
the current input character.
Press the Next key to advance to the next selection or option
in the current menu. When changing character information,
use this ke y to advance to the next choi ce f or the current in put
characte r .
6-5Using the Control Panel
Page 84

What's Next?
EDNord - Istedgade 37A - 9000 Aalborg - telefon 96333500
What's Next?
Now you’re ready to print. For more information on the day-to-day
operation of your printer, refer to the
technical information, refer to the
v
Operation
Reference
manual. For more
manual.
QMS magicolor 2 Getting Started6-6
Page 85

A
EDNord - Istedgade 37A - 9000 Aalborg - telefon 96333500
QMS Customer
Support
In This Appendix . . .
n “Sources of Support” on page A-2
n “QMS World-wide Offices” on page A-5
Page 86

Sources of
EDNord - Istedgade 37A - 9000 Aalborg - telefon 96333500
Support
Sources of Support
Severa l sources of help and information are available, depending on
the type of help you need:
Your QMS Vendor
Your local vendor (the one from whom you bought the printer) may be
best equipped to help you. Your vendor has specially trained service
technicians available to answer questions, and the equipment to analyze your printer problems.
Your Application Vendor
Often, “printing” problems have more to do with the application being
used than with the printer. In this case, the application manufacturer
is the best source of help.
Q-FAX
Q-FAX, a QMS information retrieval service, provides application
notes, technical support notes on common pri nti ng pro blems, and
information about printer specifications, options, accessories, consumables, and prices.
In the United States and Canada, call (800) 633-7213 to reach
Q-F A X. In all other countries, call (334) 633-3850. Have your f ax n umber handy when you call (or place the call from your fax machine's
handset).
You can choose to have either a directory (a list of currently available
documents) or a specific document sent to you. The first time you call,
request the director y (press 2 on your phone or fax keypad when
prompted). Then call back to request specific docume nts. You can
order up to three documents per call.
QMS magicolor 2
Getting StartedA-2
Page 87

Sources of
EDNord - Istedgade 37A - 9000 Aalborg - telefon 96333500
Support
CompuServe
Through CompuServe, you ask general (non-technical) questions,
share information with other users, and access printing information
and programs. When you use CompuServe, type go qmsprint↵ to
go directly to the forum where QMS is located. The QMS library section contains application notes, printer drivers, utilities, technical information, and announcement files.
Internet
The QMS server provides access to technical reports, new product
announcements, a trade show schedule, and other general information about QMS.
If you have access to the World Wide Web, you can view the QMS
home page at http://www.qms.com/. The QMS ftp resource is
ftp.qms.com.
QMS Customer Support
A-3
Page 88

Sources of
EDNord - Istedgade 37A - 9000 Aalborg - telefon 96333500
Support
QMS Customer Response Center (CRC)
You can contact the QMS Customer Response Center (CRC) in three
different ways:
n Telephone—You can call the CRC at (334) 633-4500 (US)
Monday–Friday, 7:00 am–6:00 pm, Central Time.
» Note:
If you call for assistance, have the following information
ready so our technicians can help you more quickly:
þ Your phone number, fax number, and shipping address
þ A description of the problem
þ The printer model
þ The type of host computer you’re using
þ The type and version of operating system you’re using
þ The interface you’re using, and, if serial, the protocol (for
example, XON/XOFF)
þ The application and version you’re using
þ The emulation you’re using
þ Your printer firmware version (listed on the status/start-up
pages)
n Fax—You can fax questions to the CRC at (334) 633-3716 (US).
Provide the same information as listed above, and indicate
whether you would like a faxed or a phoned reply.
n Internet—If you have access to the World Wide Web, you can
access the CRC through the QMS home page at
http://www.qms.com/
QMS magicolor 2
Getting StartedA-4
Page 89

QMS World-wide Offices
EDNord - Istedgade 37A - 9000 Aalborg - telefon 96333500
QMS United States and Latin America
General Contact
1 (334) 633-4300
Fax 1 (334) 633-4866
Email info@qms.com
Internet http://www.qms.com
Information on QMS products, supplies, and accessories, and on the
authorized QMS remarketer or service provider nearest y ou
1 (800) 523-2696
Customer Response Center (CRC)
Technical Assistance
1 (334) 633-4500 7:00 am–6:00 pm Central Time
Fax 1 (334) 633-3716
Internet http://www.qms.com
QMS Worldwide Offices
Latin America Fax
1 (334) 639-3347
National Service
Service Information, Installation, and Maintenance Pricing
1 (800) 762-8894
On-Site Service and Depot Repair Information
1 (800) 858-1597 7:00 am–7:00 pm Central Time
Spare P arts Ordering and Information
1 (334) 633-4300 x2530 8:00 am–5:00 pm Central Time
QMS Canada
General Contact
1 (514) 333-5940
Fax 1 (514) 333-5949
Supplies and Accessories 1 (800) 268-0343 x223
National Service
On-Site Service and Depot Repair Information
1 (800) 268-4969 8:30 am–7:00 pm Eastern Time
Spare P arts Ordering and Information
1 (905) 206-9234 x238 8:30 am–5:00 pm Ea ste rn Time
QMS Customer Support
A-5
Page 90

QMS World-
EDNord - Istedgade 37A - 9000 Aalborg - telefon 96333500
wide Offices
QMS in Japan
QMS in Latin America
QMS EMEA
General Contact
(+81)-3 3779-9600
Fax (+81)-3 3779-9650
Internet http://www.qmsj.co.jp
General Contact
Cra 43 DD#8-42
Officina 201
Medellin, Colombia
(+57) (4) 312 13 70
Fax (+57) (4) 268 92 97
QMS Australia
QMS Benelux
Belgium, Netherlands, and all
unlisted countries
QMS France
QMS GmbH
Germany and
Austria
Anitech
Sydney Business & Tech. Centre
52/2 Railway Parade
2141 Lidcombe NSW
Australia
(+61) 2–9901 3235
Fax (+61) 2–9901 3273
Planetenbaan 60 ‘Corner Plaza’
3606 AK Maarssen
The Netherlands
(+31) 346–551333
Fax (+31) 346–550170
Internet http://www.qms.nl
Vélizy Plus
1 Bis, Rue du Petit Clamart
78142 Vélizy Cedex
France
(+33) 1–410 79 393
Fa x (+33) 1–408 30 110
Gustav Heinemann Ring 212
D-81739 Munich
Germany
(+49) 89 63 02 67 0
Fax (+49) 89 63 02 67 67
QMS magicolor 2
Getting StartedA-6
Page 91

QMS World-
EDNord - Istedgade 37A - 9000 Aalborg - telefon 96333500
wide Offices
QMS Italy
QMS Nordic
Sweden, Finland,
Norway, and
Denmark
QMS South
Africa
QMS UK
United Kingdom
and Ireland
Via della Repubblica 56
43100 Parma
Italy
(+39) 52–1231 998
Fax (+39) 52–1232 902
Arenavägen 41, 6th floor
121 77 Johanneshov
Sweden
(+46) 8–600 01 30
Fa x (+46) 8–600 01 33
Saskay House
Unit 24 Sunninghill Business Park
Peltier Road, Sunninghill, Johannesburg
Republic of South Africa
(+27) 11–807 6957
Fax (+27) 11–807 6960
Old Bridge House, The Hythe
Staines, Middlesex TW18 3JF
United Kingdom
(+44) 1784–4422 55
Fax (+44) 1784–461641
v
QMS Customer Support
A-7
Page 92

EDNord - Istedgade 37A - 9000 Aalborg - telefon 96333500
Page 93

Index
EDNord - Istedgade 37A - 9000 Aalborg - telefon 96333500
A
Acrobat 1-9
Adobe
Acrobat 1-9
Illustrator 5-8
PhotoShop 5-9
Aldus 5-9
PageMaker 5-8
AppleTalk
Connection 5-3
See also LocalTalk
Application
Notes, QMS 3-8
PC 3-8
B
Bottle, fuser oil 2-13
C
Cabling
PC interface 3-3, 3-5, 5-3
Cassette
Loading 2-15
Config PServer 4-6
Configuration
Remote Console 4-4
Control panel 6-2
Data indicator 6-4
Indicators 6-3
Menu key 6-5
Message indicator 6-3
Message window 6-2
Message window language 6-3
Next key 6-5
Online indicator 6-3
Previous key 6-5
Ready indicator 6-3
Page 94

Select key 6-5
EDNord - Istedgade 37A - 9000 Aalborg - telefon 96333500
CrownAdmin on-line help 4-12
Customer Response Center (CRC),
QMS A-4
Customer support, QMS A-2
D
Data indicator 6-4
Documentation
Overview of this manual 1-8
Standard 1-3
Driver
LaserWriter 5-7
PC 3-7, 5-5
PostScript emulation 3-8
E
Energy Star 2-4
EtherTalk
Interface configuration 4-4
F
File servers
Naming 4-5
File Srv Name 4-6
I
Indicators
Control panel 6-3
Message 6-3
Online 6-3
Ready 6-3
Installation
Cassette 2-15
Laser Prep, Macintosh 5-7
LaserWriter printer driver, Macintosh
5-7
Printer description files, Macintosh 5-8
Printer options 2-18
Toner cartridge 2-12
Interface configuration
Control panel 4-4
EtherTalk 4-4
NetWare 3.xx 4-5
NetWare 4.x 4-8
Remote Console 4-4
TCP/IP 4-10
Internet A-3
K
Keypad Language menu 6-3
Keys
Menu 6-5
Next 6-5
Previous 6-5
Select 6-5
L
Laser Prep 5-7
LaserWriter 5-7
LocalTalk 5-3
See also AppleTalk
Location requirements 2-2
M
Macintosh
Laser Prep 5-7
LaserWriter 5-7
Print Monitor 5-7
System 6 5-7
System 7 5-7
System 8 5-7
Macintosh Utilities, QMS
Installing 5-5
Manual
Contents 1-8
Overview 1-8
Typographic conventions 1-9
Media cassette
Loading 2-15
Menu key 6-5
I-2 QMS magicolor 2 Getting Started
Page 95

Message 6-2
EDNord - Istedgade 37A - 9000 Aalborg - telefon 96333500
Message indicator 6-3
Message window 6-2
Language, changing 6-3
Setting message window language 6-2
N
Naming
File servers 4-5
Print servers 4-5
NetWare 3.xx
Interface configuration 4-5
NetWare 4.x
Interface configuration 4-8
Network connection 4-3
Network interface
TCP/IP, configuration 4-11
Next key 6-5
O
Online indicator 6-3
Options
See specific printer options
OS/2 LAN Manager/LAN Server
Configuration 4-5
P
PC
Application 3-8
Driver 3-7, 5-5
Software 3-8
Software, printing 3-7
PDF file
Adobe Acrobat 1-9
QuarkXPress 5-8
PDX file 5-8
PhotoShop 5-9
Power requirements 2-3
Energy Star, compliance 2-4
PPD file 5-8
Installing 5-7
Previous key 6-5
Print Monitor 5-7
Print servers
Naming 4-5
Printer
Control panel 4-4
Location requirements 2-2
Name, Windows 4-5
Power requirements 2-3
PServer Name 4-6
Q
Q-FAX 3-8, A-2
QMS
Corporate contact numbers A-5
Customer Response Center (CRC)
A-4
Q-FAX 3-8
Registration, printer 2-5
World-wide offices A-5
QuarkXPress 5-8
QuickTime 1-9
R
Ready indicator 6-3
Registration, printer 2-5
Remote Console 4-4
Remote printers 4-7
RN Printer 4-7
S
Select key 6-5
Service
United States A-4
Setup
Printer 2-2
Shipment 2-6
Contents 2-4
Soft Reset
NetWare 3.x 4-8
NetWare 4.x 4-9
I-3Index
Page 96

Soft reset
EDNord - Istedgade 37A - 9000 Aalborg - telefon 96333500
NetWare 3.x 4-8
Software
PC 3-8
Start-up page
Information 2-17
Printing 2-17
Support, QMS
Customer A-2
Internet A-3
Technical A-4
World-wide A-5
T
TCP/IP
Configuration 4-10
Network configuration 4-11
Technical support, QMS A-4
Toner cartridge
Installing 2-12
U
Unpacking 2-6
V
Video clips 1-9
W
Windows driver
Installing 3-7
v
I-4 QMS magicolor 2 Getting Started
 Loading...