

Page 1
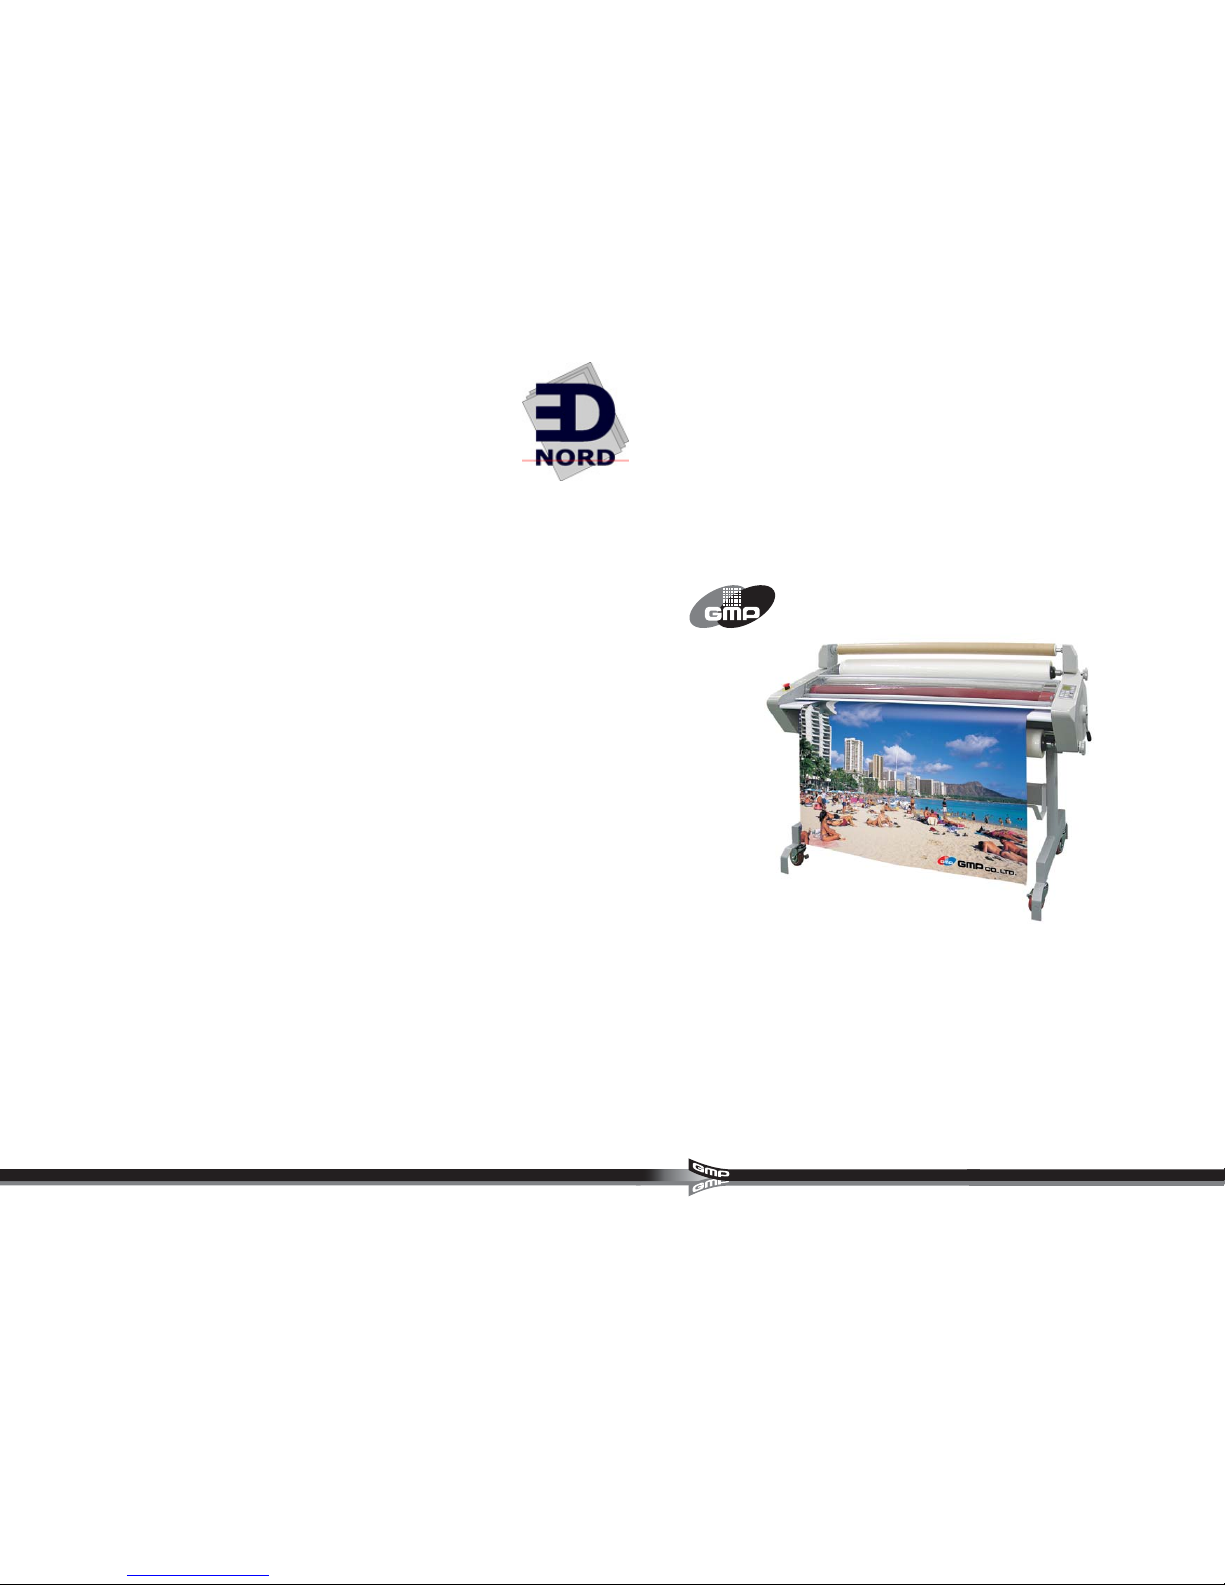
LEADERS IN LAMINATION TECHNOLOGY
Before operating the unit, please read this manual thoroughly and retain it for future reference.
www.gmp.com
USER’S GUIDE
EXCELAM-Q
1100RS/1670RS
EDNord - Istedgade 37A - 9000 Aalborg - telefon 96333500
Page 2
3
2
WARNING
If you ignore this symbol, you could suffer serious injury or death.
This symbol means a prohibited action.
If you ignore a prohibited action, you could
suffer a personal injury and damage
the machine
This symbol means a required action.
If you don't follow this action, your safety is
not guaranteed.
Required action will be included in this symbol.
“Important Safety Instruction” is for the purpose of user’s safety and prevention of Property loss.
Read thoroughly and use rightly according to the manual.
Important Safety Instruction is classified as “Warning” and “Caution”, the meaning is as follows.
This symbol means that you could suffer personal injury and damage the machine.
CAUTION
If you ignore this symbol, you could receive a serious injury or loss of property.
WARNING
Do not overload a power supply.
Do not connect or disconnect with wet hands, as this will cause an electric shock.
Make sure plug is in the socket, as it could cause fire or an electric shock.
Do not use a damaged plug or lead, as this could cause a fire or an electric shock.
Do not use other voltage and power supply other than specified,
as this will cause a fire and an electric shock.
Do not dissemble, make repairs or convert the machine. Contact your dealer for repairs.
Do not use materials near a naked flame.
Do not use the flammable spray or flammable materials inside or outside the machine.
As this could cause a fire.
Do not allow children use of this equipment.
Do not spill any liquids on the laminator as this will cause damage and a possible electric shock.
Danger, Malfunction, loss of electricity could cause an electric shock.
EDNord - Istedgade 37A - 9000 Aalborg - telefon 96333500
Page 3
When lamintor is not in use, you must turn off the power switch, disconnect the power plug from the
socket.
When moving the product, turn off the power switch, disconnect the power plug from the socket.
CAUTION
Please avoid installing near the following places :
*Gas stove, Ventilator or Air conditioner due the higher temperature or higher humidity.
*Dusty environment.
Do not place any materials on the top of the laminator as they could catch a fire.
Avoid touching the laminator and the film just after laminating as you could get burned.
Ensure all hair, neckties, necklaces, are kept free of the feeding table to avoid injury.
2 people are needed to carry this equipment to avoid personal injury or damage to the machine.
Danger - laminating blades are sharp and can cause injury
Keep gears and chains free of all materials.
Do not touch the roller and heating plate with your hand as you could be burnt.
Warnung
Wenn Sie dieses Symbol ignorieren, Sie können verletzen und sterben.
Dieser Sicherheitshinweise meint das
Verboten.
Wenn Sie nicht vorsichtig umgehen, das
Gerät kann die Zerstörungen sein, und Sie
können sich verletzen.
Dieser Sicherheitshinweise meint die Achtung.
Wenn Sie nicht vorsichtig umgehen, nicht
genug Sicherheit garantieren.
In dem Zirkus, Sie konnen die Achtung fur
Zeihen sehen.
Dieses Sicherheits-Zeichen markiert einen wichtigen Sicherheitshinweis in diesem
Bedienungshandbuch und auch an dem Gerät.
Lesen und beachten Sie diese Hinweise und die entsprechenden Anweisungen sorgfällig.
Es gibt zwei wichitige Sicherheitshinweise und sie meinen unter Folgende.
Vorsicht
Wenn Sie dieses Symbol ignorieren, Sie können verletzen und das Gerät kann
Zerstörungen sein.
5
4
EDNord - Istedgade 37A - 9000 Aalborg - telefon 96333500
Page 4

7
6
Warnung
Vermeiden Sie viele Steckeren im eine Steckdose zu einstecken.
Es gibt das Risco eines elecktrischen Shlages und bricht ein Brand aus.
Vermeiden Sie die Stecker mit flußiges Hand im Kontakt.
Es gibt das Risiko eines elecktrischen Shlages.
Stecken Sie den Stecker im der Steckdose richtig ein.
Es gibt das Risiko eines elecktrischen Shlages und bricht ein Brand aus.
Verbinden Sie den Erdeschuß des Gerät fur die Sicherheits.
Nicht transformieren Sie den Stecker and die Steckdose.
Es gibt das Risiko eines elecktrischen Shlages und bricht ein Brand aus.
Nur benutzen Sie die richtige Stromsorgung.
Es gibt das Risco eines elecktrischen Shlages und bricht ein Brand aus.
Versuchen Sie niemals im Falle einer Betriebsstörung das Gerät selber zu reparieren oder den
Fehler innerhalb des Gerät zu suchen. Frangen Sie unbedingt qualifiziertes Service-Person.
Nicht benutzen Sie neben Brandstuffe.
Es gibt das Risiko eines elecktrischen Shlages und bricht ein Brand aus.
Wenn Sie das Gerät reinigungsarbeiten, Sie können nicht die brandstuffe benutzen.
Es bricht ein Brand aus.
Halten und installieren Sie das Gerät fern vom Kinder.
Es gibt das Risiko eines elecktrischen Shlages und Verbruhende.
Nicht liegt das Wasser oder Flußigkeit ober dem Gerat.
Das Gerat kann die Zerstorungen sein und es gibt das Risiko eines elecktrischen Shlages.
Nicht linken, schlagen und ziehen das Stromkabel.
Es gibt das Risiko eines elecktrischen Shlages und bricht ein Brand aus.
Under die Zerstörung des Gerät und das Krieshstrom, Es gibt das Risiko eines elecktrischen Schlages.
Wenn Sie nicht das Gerat langezeit benutzen, ausschalten Sie das Gerät and ziehen Sie den Stecker
aus der Steckdose.
Wenn Sie das Gerät in eine neue Position bewegen, ziehen Sie den Stecker aus der Steckdose und
halten Sie das Stromkabel bei sich.Wenn Stecker und Stromkabel beshadigt werden, gibt es das Risiko
eines elecktrischen Shlages und bricht ein Brand aus.
VORSICHT
Vermeiden Sie die Installation vom Gerate in der folgende platze.
-Neben dem heiße Gerät oder Klimaanlage. Hoch variation temperatur platz oder hoch Feuchtigplatz.
-Neben dem arbeitsplatz oder dampf Gerät ( die Brantquelle )
-Die sonnen Shein kommt direkt.
-Schmutzig und Schwingung Platz.
-Instabilität Platz.
Nicht einladen Sie Material ober das Gerat.
Das Material kann transformieren und das Gerät kann die Zerstörungen sein.
Halten Sie Ihre Hände fern von Foilen nach dem Laminierung und ober das Gerät.
Halten Sie Ihre Klabatt, lange Haare, und Halsketten vom foilen eingang im Gerät um verletzungen
zu vermeiden.
Das Gerät wird nur fur Laminieren benutzt.
Das Gerät kann die Zerstörungen sein.
Wenn Sie laminieren, das Arbeitsplazt wird unter Reinigungssituation sein.
Wenn Sie das Gerät entpacken oder in eine neue Position bewegen, bedarfen Sie die Hilfe
vom anderem Leute. Das Gerät kann die Zerstorungen sein, und Sie können sich verletzen.
Scharfe Messerklinge
Sie konnen sich verletzen, wenn Sie nicht vorsichtig mit der Schneidevorrichtung umgehen.
Halten Sie die Ihre Hande und Körfer, lockere Kleidungs stucke, langes Haar, Schmuck, z.B. lange Halsketten
fern von dem Kette oder Getriebe.Das Gerät kann die Zerstörungen sein, und Sie können sich verletzen.
Halten Sie Ihre Hände und Körfer fern von den vorderen heißen Walzen um verletzungen zu vermeiden.
EDNord - Istedgade 37A - 9000 Aalborg - telefon 96333500
Page 5

9
8
Contents
Part name
Carriage & Installation
Control panel
Usage of the main device
Laminating procedure
Laminating guide
Product Maintenance
Trouble shooting
Specification
GMP Subsidiaries
SURELAMPLUS-PCR800DBS
2.5mm T Wrench 1EA
3mm, 4mm L Wrench 1EA
User GuideFuse 5A 2EA
EDNord - Istedgade 37A - 9000 Aalborg - telefon 96333500
Page 6

11
10
Q
Y
QQ
QS
S
X
QP
W
U
R
QT
V
QR
T
Front Panel
Pressure Plate
Safety Cover
Upper Sub-roller
Rewinder
Heat Roller
Upper Film
Bottom Film
Stretch Bar
Film Cutter
Pull Roller
Bottom Sub-Roller
Stand
Moving Wheels
Upper Film
Rewinder Paper Pipe
Bottom Film
Foot Switch
Stand
Control Panel
Safety Cover
Roller Pressure
Bottom film tension handle
Front Panel
Power Cable
Power Switch
Foot Switch Cable
Bottom Film
Emergency Switch
Bottom Film Tension Handle
Back Trimmer
Pull Roller
Clutch Pressure Handle
Rewinder Pressurel handle
Rewinder
Emergency Switch
Separator
(Ultra-thin Film Sepa.)
Film Core
Pressure Plate
Safety Cover
Front Panel
Rewinder Shaft Rewinder Paper Pipe
Rewinder Cap
Film Shaft
Film Core
EDNord - Istedgade 37A - 9000 Aalborg - telefon 96333500
Page 7

13
12
Power supply should be used AC 220V/20A above.
Necessarily Grounding is needed for your safety.
Grounding
This product is easy to carry mainly due to the caster attached
At carrying product, push the “locker of a caster” toward “OFF” direction and the caster moves.
The product is too heavy, necessarily more than 2 persons should carry the product. On the condition of loading and
carrying the product, necessarily use the lift-truck.
After installing a product, push “locker of a caster” toward “ON” direction. The caster are fixed, it prevents from the
product’s movement.
The product is too heavy, therefore at the condition of carrying product,
necessarily more than 2persons carry. If you don't, it makes a product breakage
and personal injury
On carrying product, segregate the powerplug from the outlet, otherwise it makes an
electric shock
At the same place, carry and install the product in a short distance, use a caster.
At the caster, a locker is installed, on carrying product, you should unlock the locker
of a caster.
The caster's locking or unlocking is fixed when you push the “lock(ON)” just like the
right picture, the caster is locked and otherwise push “OFF” lever, the caster is
unlocked. After carrying the product, lock the caster.
Lock(ON)
Unlock(OFF)
Unlock(OFF)Lock(ON)
Product installation should be installed on the hard and balanced floor. At the condition of unbalanced status, a laminating
quality can be down.
Grounding is necessary for your safety. If the grounding isn't good,
a static electricity happens excessively, it can be a main reason of a
malfunction on operating of a laminator. A malfunction and electric
leakage can make an electric shock.
Insert the powerplug inside firmly.
If you don't, it makes a fireflame by the overheating.
Upper Heating roller temperature
indication panel
Shows the setting temperature of Heating
roller and current temperature.
In the normal condition, setting temperature
diplays but if you press “Measure indication
button” of Function button, It shows the
current temperature. A setting temperature
change can be modified by pressing the top
button upwards or downwards.
This product has a self-detection system for
overheating. If a heater's temperature rises
too high, it displays “OH”, in this case you turn
off the power supply of machine, contact your
dealer.
Speed Display Window
It displays roller's rotation speed, Variation
speed is “1~9”. Roller's rotation speed is
modified by the “Speed setting button” being
adjusted up or down.
Job Mode Display Window
Can memorize the different working condition
from “1” to “9”, the displayed number means
that the working condition of included current
temp and speed memorized.
Working condition change can be adjusted by
“Job button”.
Working Mode Display Window
“READY” indicates that a heated roller's temperature has reached the laminating temperature.
When “READY” displays on the control panel, you can start laminating.
Heating Display Window
“WAIT” means that the roller's temperature is not right(temperaute is low) against setting
temperature. On the condition of “WAIT” displays, if you start laminating, a laminating can’t be
made. If “WAIT” on display window flickers, a roller's temperature is very high against a setting
temperature. When “WAIT” display flickers, at that time you start laminating, the laminating
result can have a crease, curving.
EDNord - Istedgade 37A - 9000 Aalborg - telefon 96333500
Page 8

15
14
Temperature Setting Button
Is for the purpose of setting heated roller's temperature. The setting temperature range is
“0
~130 ”. When you press the temperature setting button, the value on the display
increase “1
” for the first time. If you press the button contineously, the temperature
increases 1
during 0.5 second, after two second, 10 increases quickly by one second.
MEAS Button
When you press the MEAS button. The machine beeps, the current temperature is flashed
in the “Temperature Window”. If you keep your fingers on the button, it displays a previous
set temperature.
Job mode button
Is for the purpose of setting JOB1~JOB9 level.
Memory Button
Is for memorizing of working condition.
JOB Mode Function
You can save 9 different working conditions from Job1 to Job 9.
Saving of Working condition
1) Select Number by using Job mode button.
(Selected Number displays on the Job mode display window)
2) You can set the temperature of the heated roller, speed with the temperature and speed
setting button.
3) If you press the “MEMORY”, setting value automatically is memorized.
Reference!!!
When you chang the temperature or speed, the changed number and current job number
flickers for 2senconds.
The flickering alarms that the setting value is correct and asks that saving the changed
contents to memorize at the job condition.
Speed Control Button
Is for the purpose of settting a roller rotation speed. Roller rotation speed can be increased /
decreased from 1 step to 9 step.
Change of roller’s rotating speed
1) When rollers rotate : by the change of speed, the roller rotates by the changed speed.
2) When rollers stop : At time of roller's stop, if you change the speed, only the number is
changed. Press the Run button if you want to rotate the roller.
RUN Button
Is for the purpose of roller rotation.
Stop Button
Is for the purpose of stopping a roller's rotation.
Reverse Button
This is for reverse rotation of the rollers. When pressed the “REVERSE” button will show a
speed flicker indication and the rollers will start to reverse. Remove fingers from the button to
stop reverse procedure.
Cooling button
Is for the purpose of starting a cooling motor.
Press once to start, once to stop.
STAND-BY
1) Setting by Users : For short time, if you does not operate the machine, it can be used.
At the normal condition. f you press the “STAND-BY” button, the setting temp. can be
changed to 80
automatically. (The operating condition stops)
2) Automatic setting by microprocessor : If you leave the machine for 3hours, microprocessor installed in machine controls the roller temp. below 80
(If the setting temp is
below 80
it is controlled at the 0 ). At this time, stand-by display lamp is on, Job
display or Heater display window is cleared. And then one and half hour passed, Standby Mode flickers and Power of heater is cut off."
At the above two condition, release of stanby mode is available by pressing “STANDBY” button again. If the saving mode is released, all conditions come back to the previous
status of stand-by mode.
Standby(Safety) Mode
In case of leaving the machine on for 3hours or longer, the temperature of roller will drop
below 80
and go to standby mode This is an automatic power-shut off function to prevent
an accident and save power.
Before Saving mode
Saving mode
Stand-by(safety) mode
Releasing power
save/stand-by mode
EDNord - Istedgade 37A - 9000 Aalborg - telefon 96333500
Page 9

17
16
Power Switch
Is for supplying or interrupting the power of machine, circuit breaker installed,
when the overloading or overflow of electricity happens, automatically shuts off
the power when pressing the switch “I”, the power is on, otherwise pressing “O”,
the power is “off”.
Emergency Switch
Is for stoping rollers' rotation and system operation on emergency.
When this switch pressed, the system does not operate for the cancellation of
emergency switch, turn the red handle right for one-third.
Feed table safety lever
Is a safety device for preventing the product's malfunction and user's safety.
Safety lever moves left/right, when installing front panel, pull the lever at the right
direction, install the front panel.
After installing front panel, leave the lever, it comes back to the original status by
the spring’s power.
If the safety lever is not fixed at the front fixing hole, the rollers does not operate.
Pressure plate
Is for speading over at feeding papers.
When you install the pressure plate, first pull the lever(positioned at left/right) to
arrow, install the feed table.
After installing, if you lay down the lever, it can be back to the original position by
spring.
Film tension handle
This controls the tension of the film.
Clockwise to increase film tension, ante clockwise to take off.
SEPARATOR - Option
Is a device for separating film from paper at working
with MICRONEX. When installation of separator
(positioned at the end of right/left) can be made by
pulling forwards to arrow direction and then, by the
back trimmer guide it can be installed.
After installation, if you lay down the lever, it can be
back to he original position by spring.
Rewinder tension handle
Is for the tension control of rewinder.
On the way of using it, if the tension is loose or too strong, adjust it.
Tension increases when turning the handle right, otherwise turn left, it decreases.
Clutch Handle
Clutch handle's pressure increases when turning the handle clockwise, otherwise
it decreases.
Generally, the clutch pressure is first fixed when delivery and recommend to
use it.
Back trimmer
Is for separating the laminating results from the laminator.
After laminating, at the condition of trimmer lever is pressed, push the trimmer
right(left), the film can be cut.
Foot switch
Is for mounting.
When you press the foot switch, the roller rotates. If you take off the foot switch,
the roller stops.
When the roller rotates by foot switch, be cautious
because the safety function does not work.
If you does not watch out, you can suffer a
personal injury.
Be cautious to the blade of trimmer.
laminating
heavy@gauge
QU@mount
HQU@ψڒࣹI
mount
HψڒࣹI
Main roller pressure lever
Is for the control of heating roller's pressure. The rightful pressure
can be selected by the laminating results. When the lever is
directed upwards, upper / lower roller are seperated, it is easy to
insert / remove a film or a paper.
At the time of roller not pressed, laminating does not happen.
EDNord - Istedgade 37A - 9000 Aalborg - telefon 96333500
Page 10

19
18
Stage 1 : Film Installation
1. Insert the film into film
core.
2. After film sheaft insertion,
lock it with fixing bolt.
3. After another film core
insertion, lock it with fixing bolt.
4. Reitherate sequence 1~3,
ready for another set.
When you exchange the film, first pull out the fixing
ring and take off it. After fixing ring thaking off, push
film shaft at the other direction, you can change it.
Fixing ring
Film fixing ring
Fixing core bolt
In the case of film width is above 1M or 25KG, More than 2persons is needed.
If you does not, you can suffer a personal injury.
Upper Film
Bottom Film
Pull Roller
Heat Roller
Upper Sub-Roller
Stretch Bar
Bottom Sub-Roller
Film Loading
At the condition of laminating status, temperature and speed adjusting is needed.
Stage 2 : Laminating Readiness
1. The edge of upper film should be
positioned at the upper roller.
2. The inserted paper between rollers,
should be sticked to upper film.
3. Bottom film should be sticked to
paper and bottom film.
4. Install the feed table.
5. Install the safety cover.
6. Install the pressure plate.
It is easy to work if you preheat the roller before readiness stage.
Necessarily film should be passed by sub-roller. (Refer to film loading)
If the film does not pass by sub-roller, it will cause a film crease.
Film tension is available to adjust according to the laminating results,
basically film tension is enough to spread over the film crease.
When paper width is smaller than the laminating film, the glue of film can contaminate the bottom roller.
It is possible to use the paper width larger than film width.
At the condition of roller stop, lay down the roller pressure handle to the preheating or stand-by. It is for preventing roller
damage.
Be cautious to the body touch to the heat plate at laminating.
It will cause a personal damage.
When you laminate and machine running, you shoud be careful not to touch
the hair,necktie, necklace with the machine. It will cause a personal injury.
1. Set the pressure control handle to
the right position.
2. Set the right speed and temp.
3. Load the paper on the feeding table
and insert the paper slightly.
Stage 3 : Laminating
Film Core
EDNord - Istedgade 37A - 9000 Aalborg - telefon 96333500
Page 11

21
20
Do not laminate with following things
Stage 1 : Film Installation
Film installation is the same as the stage 1 of hot laminating.
Only the film should be placed at the upper end of the film core. MICRONEX is only for the single side laminator.
Film should be passed by the sub-roller. (Refer to the film loading)
If you does not like that, it will cause a film crease.
Stage 2 : Rewinder Paper Pipe Installation
1. Insert the paper core into
the rewinder paper pipe
2. Insert the paper pipe shaft
into the rewinder paper
pipge.
3. And then insert another
paper pipe core.
4. It is a figure of rewinder
installation finished.
Heat Roller
Pull-Roller
Upper Film
Rewinder
Upper Sub-Roller
Film Loading
According to the laminating status, Temperature and Speed control is needed.
1. After Installing separator,
insert the paper to push
out.
2. It is the same as hot
laminating stage 2 of
sequence 2~6.
7. Rewind the film into the
rewinder paper pipe.
8. It is a readiness for ultrathin film laminating.
Stage 3. Readiness for laminating
Ultra-thin film necessarily should be used at the condition of bottom heat roller cooled down.
Stage 4 : Laminating
It is a same procedure just like the hot laminating stage 3.
When you handle the ultra-thin film, the caution to treat.
1. At the condition of no paper and roller stopping, roller pressure handle should be at the stand-by status.
2. On operating, necessarily use the cooling fan.
3. Below 80g paper is not separated.
Metal plate, Timber board,
Clothes
Credit card Things to be tarnished
easily by heat
Combustible things
After laminating paper printed by heat transfer printer, as time goes by, the paper may
be tarnished.
In the case of film width is above 1M or 25KG, More than 2persons is needed.
If you does not, you can suffer a personal injury.
Using a separator, separate the laminated Film
and paper.
EDNord - Istedgade 37A - 9000 Aalborg - telefon 96333500
Page 12

23
22
Stage 1 : Film Installation
the same case as like the hot laminating stage 1.(Film installation)
Stage 2 : Rewinder Paper Pipe Installation
Rewinder paper pipe installation is the same as the ultra-thin film laminating stage 2.
Stage 3. Readiness for laminating
1. Install the paper liner on the
rewinder paper pipe.
2. Stick the paper to the bottom film.
3. It is a cold laminating readiness.
Paper size should be larger than the film size to prevent the film winding.
Film tenison is enough to spread over the film crease between the rollers.
Upper Sub-Roller
Upper Film
Rewinder
Pull Roller
Heat Roller
The rotating direction
of rewinder
Film Loading
According to the laminating status, Temperature and Speed control is needed.
Stage 4 Laminating
Is the same as the hot laminating stage 3
Caution at the cold laminating
Laminating should be made below 30
It is easy to work when you use the foot switch on cold laminating.
When the rollers rotate by foot switch, you have to take care because the safety
function does not activated. You can suffer a personal injury.
Mounting
1. Load the paper on the mounting board.
2. Feed the mounting board between rollers.
Direction
Liner
Heat Roller
Mounting Board
When you are ready to laminate, take care of non-touching your
body to the machine. You can suffer a personal injury
When laminating or machine operating, Do not wind the long-hair,
necktie, necklace into machine. It will cause a personal injury
In the case of film width is above 1M or 25KG, More than 2persons is needed.
If you does not, you can suffer a personal injury.
EDNord - Istedgade 37A - 9000 Aalborg - telefon 96333500
Page 13

25
24
1. Always test your material before commencing ‘live’ jobs.
2. Thicker film require slower speeds and sometimes temperature adjustment.
3. Thinner film can be run at a faster speed.
4. Do not stop the machine with a ‘live’ job between the rollers as the hot roller will mark the paper.
5. If laminating result isn’t good, decrease the speed or increase the temperature.
6. For optimum results GMP laminating film is always recommended.
To increase product life.
- After laminating arrange “the roller pressure control handle” to the open position.
- If you leave the laminator not used for one hour, set the temperature on 0
.
* These requests are for the purpose of maintaining the safety of the roller and laminator, on saving power.
Below 38mic(1.5mil)
50~80mic(2~3.5mil)
100~150mic(4~6mil)
175~250mic7~10mil)
Below 38mic(1.5mil)
50~80mic(2~3.5mil)
100~150mic(4~6mil)
175~250mic7~10mil)
Below 38mic(1.5mil)
50~80mic(2~3.5mil)
100~150mic(4~6mil)
175~250mic7~10mil)
Below 38mic(1.5mil)
50~80mic(2~3.5mil)
100~150mic(4~6mil)
175~250mic7~10mil)
Below 100g
Above 100g ~ Below 150g
Above 150g ~ Below 300g
Above 300g ~ 1mm
Temp.
110
110
110
110
110
110
110
110
110
110
110
110
110
110
110
110
Speed
9
5
3
1
7
3
1
x
5
1
x
x
3
x
x
x
Max. Setting
Film Thickness
Paper Type
When the laminating results are not good, adjust the speed.
If you does not cleanse the roller...
- Film can be wound with rollers.
- Laminating results have a stain.
* To prevent this status, roller cleansing is needed.
Roller’s cleansing
- After laminating when the heating roller’s temperature is belowe 80
, wipe the roller with a “linen” and “iso-prophilene
alcohol”.
- Remove front panel and open upper / bottom heat shoe and then cleanse a roller.
A main body's washing
A main body and cover should be brushed with a soft and dried linen.
* Follow the caution, when washing with a neutral detergent or chemical.
When cleansing roller, only should use Iso-prophillene alcohol.
Segregate the powerplug from the outlet. It is a main reason of a fireflame.
Do not use acetone, bezene, or that kinds of flamables at the washing. It is a main reason of a fireflame.
EDNord - Istedgade 37A - 9000 Aalborg - telefon 96333500
Page 14

27
26
ABC
DEF
Picture A,B,C,D,E,F
Symptom Trouble shooting
Power supply problem
Rollers not turning
Symptom of picture "A"
Symptom of picture "B"
Symptom of picture "C"
Symptom of picture "D"
Symptom of picture "E"
Symptom of picture "F"
Check circuit breaker and disconnection of fuse. Contact dealer / engineer.
Check whether the front safety lever is fixed into fixing hole inside
Check safety cover is normally placed
Check roller pressure control lever position. Only when the roller pressured,
normally it works.
Increase roller pressure
Decrease roller pressure. Operate cooling fan.
Decrease roller pressure
Increase roller pressure
Operate cooling fan.
If not solved by cooling fan, cooling the laminator for about 30 minutes
This symptom caused by high temperature of pulling roller.
Operate cooling fan
Decrease roller temperature
Model Name EXCELAM-Q 1100RS EXCELAM-Q 1670RS
Power Requirements
Power Consumption
Dimensions(WxLxH)
Warm Up Time
Max Laminating Speed
Max Laminating Width
Laminating thickness
Max Mounting Height
Thickness of substrate(Paper)
Roller temperature
Weight
Heating System
Temperature Control
Temperature Adjustment
Speed Control
Type of Main Motor
Roller pressure control
Film Core
Cooling System
Rewinding Mothod
220~240V, 50/60Hz
3000W / 15A
3000mm/min
25~500mic
13mm
80~350g/m
2
160
Infrared Heater
Key Pad
Time control
Key Pad
DC Motor
Manual
77mm(3
) Bilateral core
AC Motor (Blower fan)
Link to Main Motor
Outerior design and Product specification can be changed without previous notice.
1500 x 710 x 1250mm
22 minute
1100mm
205kg
2000 x 710 x 1250mm
25 minute
1670mm
276kg
EDNord - Istedgade 37A - 9000 Aalborg - telefon 96333500
Page 15

29
28
http://www.gmp.com
President & CEO Y P Kim
#472, Munbal-Ri Kyoha-Eup, Paju-Si, Kyoungki-Do, Korea
Trade Dept Tel No : +82-31-943-3600
Fax No : +82-31-943-4433
e-mail : export@gmp.com
Total Laminating &
Graphic Systems Manufacturer
GMP Co (UK) LTD
Managing Director S G Ra
Sales & Marketing Director Annmarie McCaffrey
Address Unit 3, Network II Thorpe Way, Banbury Oxon,
OX16 4XS, United Kingdom
e-mail : Management uk-m@gmp.com
Sales uk-s@gmp.com
Tel No. +44(0)1295-268833 Fax No. +44(0)1295-268835
GMP PROGRAPHICS Germany GmbH
EU Prographics Center for Distribution, Marketing,
Service and Training
Managing Director S G Ra
Sales Director Dieter Georgi
http://www.gmp-germany.de
e-mail : Management germany-m@gmp.com
Sales germany-s@gmp.com
Address August-Horch Str. 19, 56751 Polch, Germany
Tel No. +49-2654-9490-0 Fax No. +49-2654-9490-90
European Lamination Service Center Tel No. +49-2654-950-540
GMP EUDC GmbH
Europe Distribution and Marketing Center
Managing Director S G Ra
Sales & Marketing Director Monika Georgi
http://www.gmp-germany.de
e-mail : Management eudc-m@gmp.com
Sales eudc-s@gmp.com
Address Robert-Bosch-Str. 4, 56751 Polch, Germany
Tel No. +49-2654-9490-0 Fax No. +49-2654-8806-24
GERMANY
EUROPE
UNITED KINGDOM
EUROPE
EDNord - Istedgade 37A - 9000 Aalborg - telefon 96333500
 Loading...