

Generators
(Industrial)
WARNING! Read and follow all safety
warnings and instructions carefully before
using this machine. Failure to follow the
warnings and instructions may result in
electric shock, fire and/or serious injury.
Save this manual for future reference.
ATTENTION! Products covered by this
manual will vary in appearance, assembly,
inclusions, description and packaging.
NOTE! This manual covers multiple styles
of generators as well as options /
accessories that may not be suitable for
the machine you have purchased.
IMPORTANT! A UPS or power filter is
recommended for powering expensive
equipment (all models).
User manual

Index
Index ................................................................................................................................................... 1
Safety Warnings .................................................................................................................................. 2
Parts Diagram ..................................................................................................................................... 4
Before use ........................................................................................................................................... 6
Starting the engine .............................................................................................................................. 7
Stopping the Engine ............................................................................................................................ 8
Re-Priming the fuel system .................................................................................................................. 8
Using your Generator .......................................................................................................................... 9
Maintenance ...................................................................................................................................... 12
Service Schedule .............................................................................................................................. 14
Transporting/Storage ................................................................................................ ......................... 15
Troubleshooting ................................................................................................................................. 16
Specifications .................................................................................................................................... 17
Appendix ................................ ................................................................ ........................................... 18
Safety Warnings
General Safety Warnings
It is important you read
and understand the
instruction manual
before use and keep the
manual in a safe place
for future reference.
Safety precautions must
be observed to reduce
the risk of personal
injury when operating
this generator.
The Generator is a
potential source of
electric shock if
misused. DO NOT
expose the generator to
moisture, rain or snow. Do not let the
generator get wet. Do not operate the
generator with wet hands.
It is strongly
recommended that a
comprehensive training
course on machine use,
fuel handling safety and engine
operation be completed before
attempting to use this machine.
Like all power equipment this unit must
be handled carefully:
Do not expose yourself or others to
danger. Do not permit others to use this
generator unless they have read this
manual and are trained in its operation.
Do not operate if the generator is
damaged or is in an excessively worn
state. To reduce fire hazards keep the
engine and silencer free of debris,
leaves, or excessive lubricant. Do not
use any attachments or accessories with
the generator other than the ones
recommended by the supplier. Serious
injury to the operator or bystanders can
result as well as cause damage to the
generator. Always use proper handles
when moving the generator. Keep the
generator in a horizontal position on a
firm flat surface. Do not tilt. Do not use
the unit if it is damaged or poorly
adjusted. Never remove the generator’s
coverings. Serious injury to the operator
or bystanders could result as well as
damage to the generator.
Do not use this unit for any job other
than those for which it is intended as
described in this manual. In start-up or
during or after operation of the engine,
never touch hot parts such as the
muffler, the high voltage wire or the
spark plug. Do not operate the generator
in the rain or under wet conditions.
Always ensure all handles, guards and
covers are fitted when using the
generator. Always keep the generator
away from naked flame or sparks.
Always stop the engine or disconnect
from mains before cleaning / clearing a
blockage or checking, maintaining or
working on the generator. Connections
to a building’s electrical system must be
made by a qualified electrician and must
comply with all applicable laws and
electrical codes. Improper connections
can allow an electrical current from the
generator to back feed into power lines.
Such back feed may electrocute utility
company workers or others who contact
the lines during a power outage.
Improper connections may cause the
generator to explode, burn or cause fires
in the building’s electrical system.
Transporting the Generator
The engine should be turned off when
the generator is moved between areas
and when transporting or storing the
generator. Always turn off the engine.
When transporting in a vehicle: properly
secure your generator to prevent
turnover, fuel spillage and damage.
Fuelling
Petrol is an extremely
flammable fuel. Keep
clear of naked flames.
Do not spill any fuel –
do not smoke near fuel
or the generator.
Always shut off the engine before
refuelling. Do not fuel a hot engine – fuel
may spill and cause a fire. Open the fuel
cap carefully to allow any pressure buildup in the tank to release slowly and
avoid fuel spillage. Fuel your generator
only in well ventilated areas. If you spill
fuel, wipe the generator immediately – if
fuel gets on your clothing, change
immediately. To reduce the risk of
serious or fatal burn injuries, check for
fuel leakage. If fuel leakage is found, do
not start or run the engine until leak is
fixed.
During Operation
Make sure you always have good
balance and secure footing. Always be
aware of your surroundings and stay
alert for possible hazards that you may
not hear due to the noise of the
generator.
Never allow children to access
the generator.
Avoid operating while people, especially
children or pets are nearby. To reduce
the risk of injury or damage, do not allow
any other persons within a radius of 1
metre of the product. To reduce the risk
of damage to property, also maintain this
distance from other objects (vehicles,
windows).
After Use
Always clean dust and dirt off the
generator – do not use any grease
solvents. Always keep the generator
clean, especially, the fuel tank, its
surroundings, and the air cleaner. After
the engine has stopped, the engine and
exhaust components will still be hot.
Never place the generator in any places
where there are flammable materials
such as dry grass, combustible gases or
combustible liquids etc. Let the engine
cool before storing the generator
indoors.
Maintenance and Repairs
Service the generator regularly. Do not
attempt any maintenance or repair work
not described in this instruction manual.
Have all other work performed by a
servicing dealer. We recommend that
you have servicing and repair work
carried out exclusively by an authorised
service person. Before proceeding to
adjust or repair the generator, be sure to
stop the engine and detach the spark
plug. Never attempt to make engine
adjustments while the unit is running.
Always make engine adjustments with
the unit resting on a flat, clear surface.
Replace any worn, damaged or removed
warning labels immediately.
3
3
IMPORTANT! - Machine, Fuel handling or Electrical Safety
If you are not familiar with safe operation / handling of this machine, or are in any way unsure of any
object of this products suitability or correct use for your application you should complete training
conducted by a person or organisation qualified in safe use and training related to this product.
250714103200
4
4
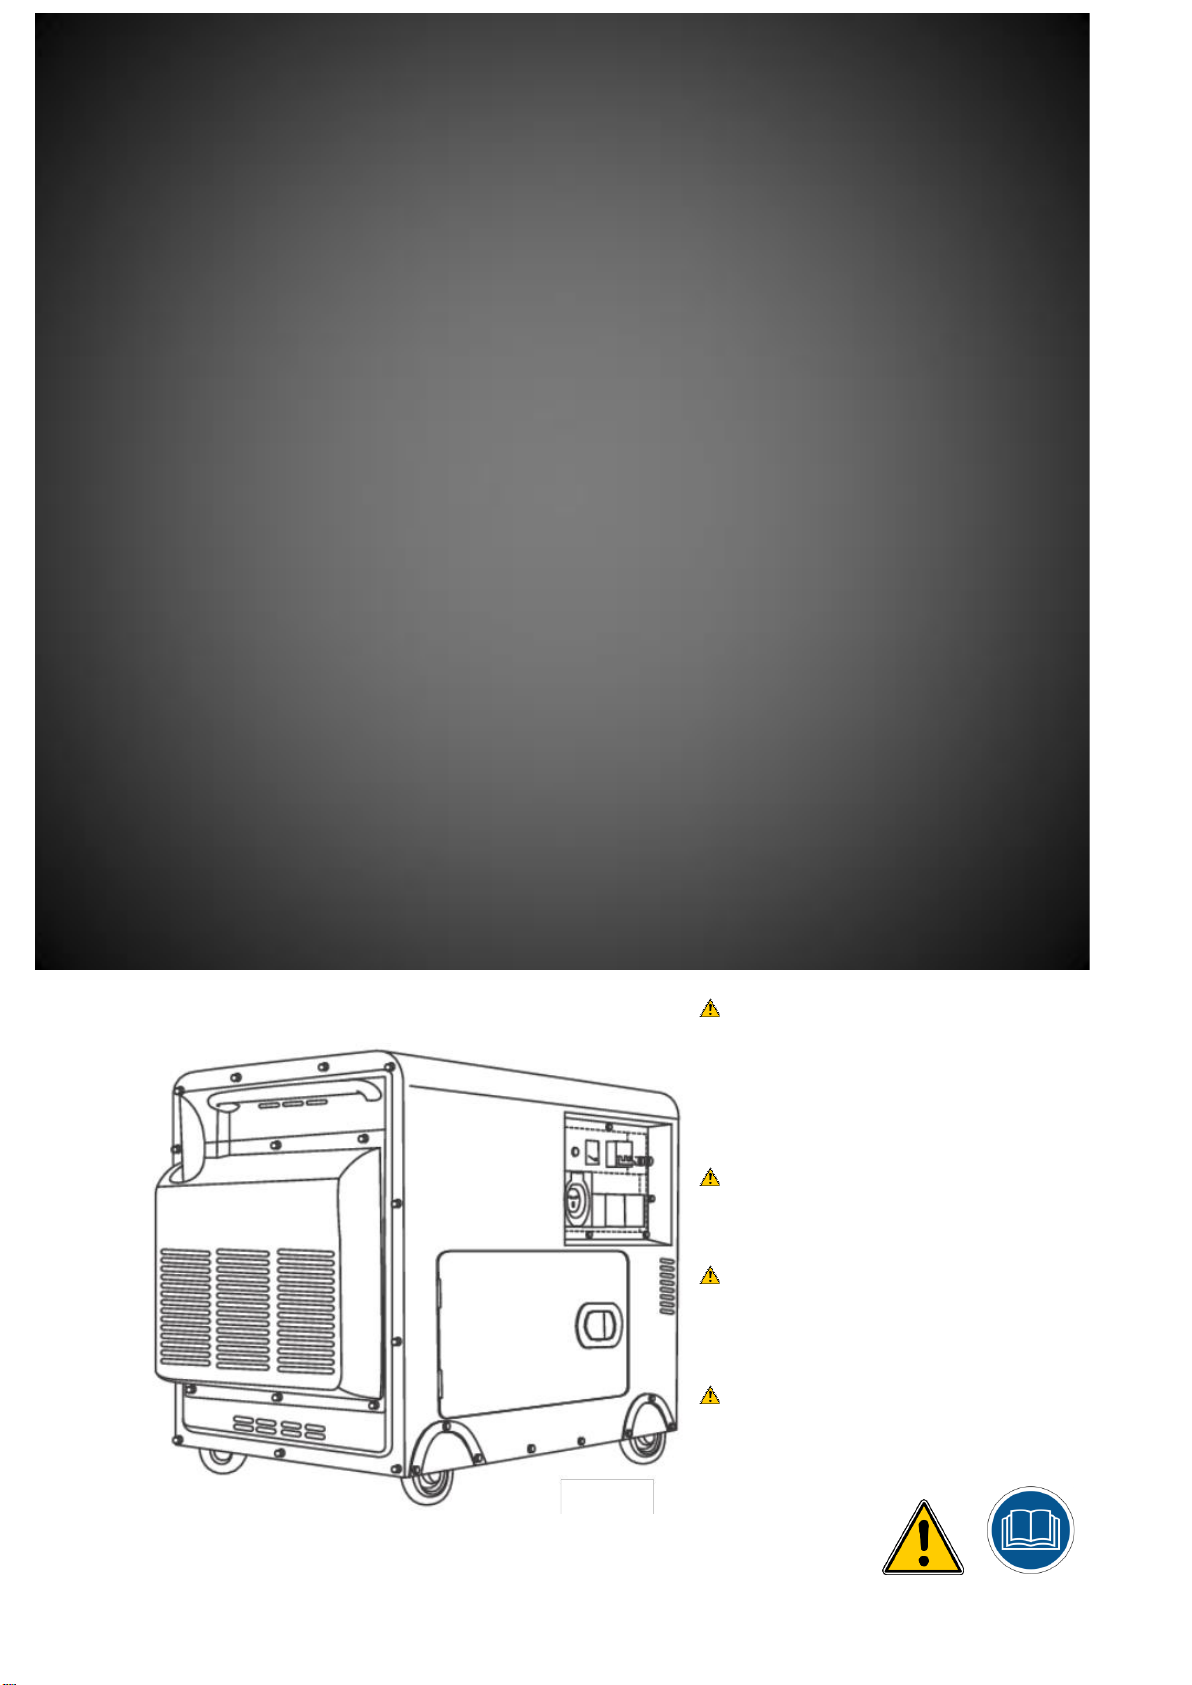
Parts Diagram
ATTENTION! Products covered by this manual will vary in appearance, assembly, inclusions,
description and packaging.
1. Exhaust Cover
2. Exhaust Outlet
3. Handle (a)
4. Fuel Guage
Control Panel(s)
5. Fuel filler cap
6. Black control panel
7. Front access panel
8. Wheels
9. Wheel covers
10. Handle (b)
11. Rear Access Panel
12. Air filter service panel
1. Key Ignition
2. Low Oil indicator
3. Digital Voltmeter
4. 3-Phase Circuit breaker
5. DC Circuit Fuse
6. DC output
7. AC Fuses
8. Ground
9. AC Socket
10. 3-Phase AC socket
250714103200
5
5
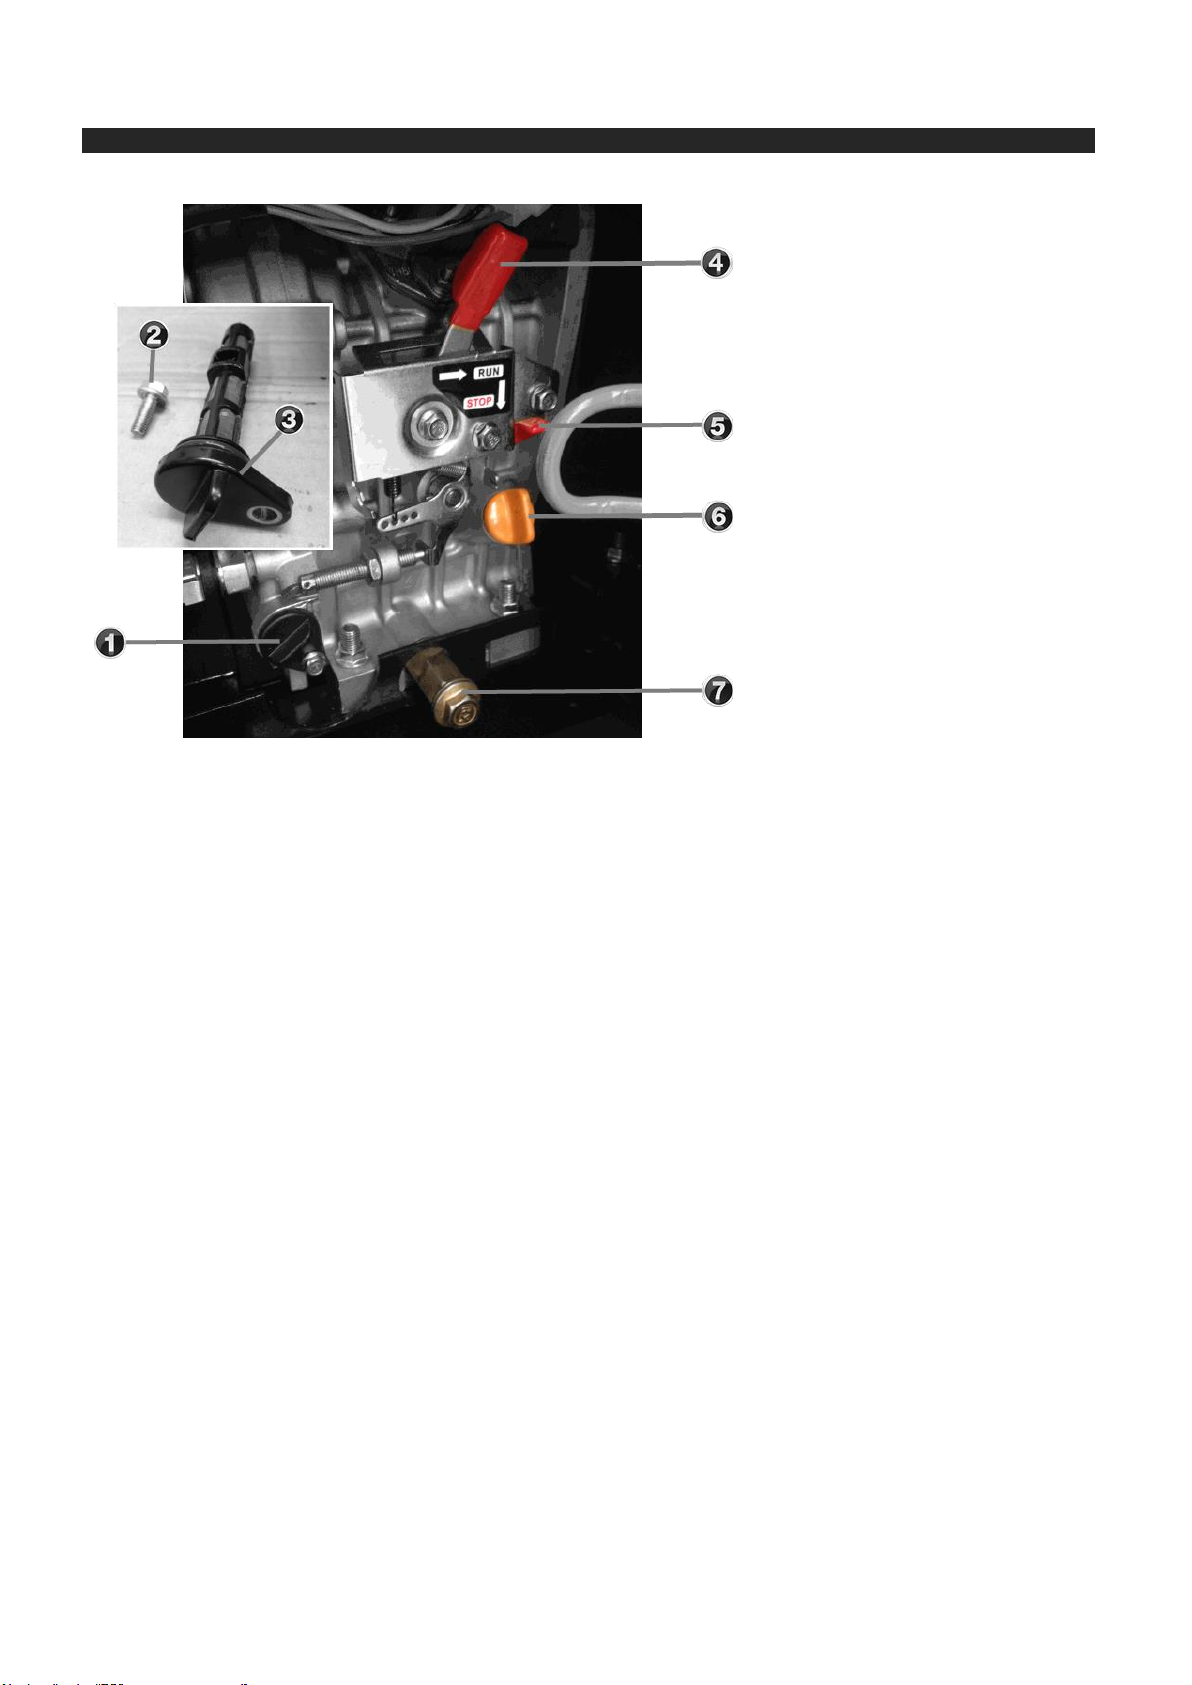
Engine
1. Oil Filter location
2. Oil Filter locking bolt
3. Oil Filter strainer
4. Run Lever
5. Emergency OFF lever
6. Oil filler cap
7. Oil drain bolt
250714103200

6
6
Before use
Connecting the Battery (if equipped)
For safety the connection plugs may have been disconnected from the battery before shipping. Please follow
the below steps to connect your battery.
1. Open the “front access panel”.
2. Bolt the RED wire to the POSITIVE terminal and the BLACK wire
to the NEGATIVE terminal on the battery.
NOTE! The battery is self-charging through general use however
there may be need on occasion to remove the battery and
charge it with an appropriate charger or jump start.
Fitting the Wheels (applicable models)
1. Installing one wheel at a time; slide one wheel onto the axle.
2. Pass the “split pin” through the “axle” and bend the legs out and around the “axle”.
3. Using the 3 short bolts provided; bolt the “wheel cover guards” over each wheel as shown.
1. Wheel guard bolt whole
2. Axel
3. Split Pin
4. Wheel
5. Wheel guard and bolts
6. Fully Assembled wheel and wheel
guard.
250714103200

7
7
Adding Oil (4-Stroke and Diesel engines only)
WARNING! Using the wrong oil
can damage your engine and
void warranty.
With the engine perfectly level:
1. Open the “front access panel”.
2. Remove the “oil filler cap” on the side of the engine.
3. Fill with engine oil until oil starts to run back out of the filler hole.
4. Replace the filler cap.
5. Clean up and excess oil.
Acceptable Oil Grades: 10W30
/ 10W40 / 15W30 / 15W40.
WARNING! Do not overfill or tilt
while filling.
Adding Fuel
WARNING! Only use fresh clean commercially available pump Diesel.
WARNING! Do not use fuel substitutes such as ethanol, methanol or biofuel in your engine, using such fuel
will cause damage and void any applicable warranty.
ATTENION! Before refuelling ensure the engine is switched off and has cooled
NOTE! It is normal for smoke to be emitted from a new engine for the first 5
hours of use while running in.
1. Clean surface around fuel cap to prevent contamination.
2. Loosen fuel cap slowly. Rest the cap on a clean surface.
3. Carefully pour fuel into the tank. Avoid spillage.
4. Prior to replacing the fuel cap, clean and inspect the gasket.
5. Immediately replace fuel cap and hand tighten. Wipe up any fuel spillage.
Starting the engine
ATTENTION! Disconnect all appliances before starting engine.
1. Make sure any protective switches / circuit breakers are switched off.
2. Turn the “Ignition Key” “ON”.
3. Start the engine:
If the battery has enough charge, use the ignition key to start the engine by holding the key in the “Start”
position for a few seconds (New batteries can have no/little charge; jump start or change battery if
needed).
4. Turn on any protective switches / circuit breakers.
5. Connect your appliance(s).
6. Turn on your appliance(s).
IF ENGINE WILL NOT START:
1. Check Oil Level.
2. Charge battery or jump-start if needed.
3. See section “Troubleshooting”.
250714103200

8
8
Remote control start (if equipped)
IMPORTANT! Applicable generators may be fitted with a remote start isolator switch; you must have this
switch turned on to be able to use your remote control to start / stop your engine. Some models generators
must have the ignition key in the “ON” position to allow the remote to work.
IMPORTANT! If you leave the ignition on without the engine running
for extended periods it will drain the battery.
1. To turn engine “ON” - click down once to activate then push and
hold down until unit starts.
2. Once the engine starts, allow it to run continuously and warm
up for a short time.
3. Once warm, slide the choke lever (if equipped) to the “RUN”
position.
4. To turn engine “OFF” - the engine press the off button.
Stopping the Engine
IMPORTANT! To stop the engine in an emergency, turn the engine switch to the OFF position or
open the front access panel door and move the red shut down lever to the “stop” position.
In normal use:
1. Switch OFF all connected equipment and pull the inserted plug(s) out.
2. Switch OFF any protective switches / circuit breakers.
3. Turn the engine “ignition switch” to the OFF position.
In emergency use:
1. Turn the engine “ignition switch” to the “OFF” position.
2. If Key will not work;
a. Open the “front access panel”.
b. Press the “Emergency STOP” lever down (see parts diagram).
Re-Priming the fuel system
Occasionally, when an engine is new or has been run completely out of fuel it may be necessary to “reprime” the
fuel system. This is simply removing any air bubbles from the fuel line.
1. Remove the “front access panel”.
2. With the fuel tank full of fuel; remove the fuel line from the engine by
using a pair of pliers to unclip the hose-clamp.
3. Allow fuel to flow out until there are no more air bubbles. This can be
a messy process so use an absorbent rag to catch all the fuel running
out of the line.
4. Push the fuel line back onto its connection point and re-fasten the
hose clamp.
5. Clean up any spilled fuel.
6. Attempt to start the engine.
250714103200

9
9
Using your Generator
Checking the fuel level
WARNING! Fuel is extremely flammable and is explosive under certain conditions.
WARNING! Refuel in a well-ventilated area with the engine stopped. Do not smoke or allow flames or sparks
in the area where the engine is refuelled or where fuel is stored.
WARNING! Do not overfill the fuel tank. After refuelling, make sure the fuel filter cap is closed properly and
securely.
WARNING! Keep out of reach of children
WARNING! Be careful not to spill fuel when refuelling. Spilled fuel or fuel vapour may ignite. If any fuel is
spilled, make sure the area is dry before starting the engine.
WARNING! Avoid repeated or prolonged contact with skin or breathing in of vapour.
1. Fill the fuel tank until you can see the fuel rise up into the strainer tube or reach the upper limit mark
2. After refuelling, tighten the fuel filler cap securely.
Checking the Air Filter
NOTICE! It is normal for a small amount of oil may leak under the air filter box if the generator is running for a
long period of time. Wipe excess oil after each 10 hours of use.
NOTE! Never run the engine without the air cleaner. Rapid engine wear will result from contaminants, such
as dust and dirt, being drawn through the carburettor into the engine.
See section “Cleaning the Air filter” for more information.
Checking the engine oil level
Visually inspect the oil level by opening the “Oil filler cap”. Oil should be just touching the outer most brim of the
oil filler hole, See section “adding oil” for more information.
Oil alert system (if equipped)
ATTENTION! Generators must operate on a level surface or engine damage may occur.
WARNING! This is a backup feature only; warranty is void if run with low oil.
ATTENTION! Check Oil level before each use or every 3 hours of continuous running.
The oil alert system (if equipped) is designed to reduce the chance of engine damage caused by an insufficient
amount of oil in the crankcase. Before the oil level in the crankcase falls below a safe limit, the oil alert system
will automatically shut down the engine (the engine switch will remain in the ON position).
If the oil alert system shuts down the engine, the oil alert indicator light (red) will come on when you operate the
starter, and the engine will not run. If this occurs, add engine oil. Always check the oil before starting the engine.
250714103200

10
10
Voltmeter (if equipped)
The Voltmeter displayed current total power generation by the generator. Some models
are fitted with an LCD digital display instead (see section “Digital Display”).
Digital Display (if equipped)
The LCD Digital display provides the following information:
V: Voltage output (power is being generated)
H: Total Hours used (some models are factory tested before being packaged)
Hz: Hertz (power is being generated)
AC applications
1. Ensure all appliances have been disconnected from the generator.
2. Start the engine. Turn on all circuit breakers.
3. Make sure the output indicator light stays on or the Voltmeter indicates steady power output. (indicators vary
between models)
4. Connect appliances one-by-one (spread the load over all 240V outlets if you purchased a 3-Phase).
5. Switch all circuit breakers to “ON”.
6. Switch on your appliances one-by-one taking care not to overload the generator.
DC applications
Charging 12V automotive batteries:
The DC receptacle may be used while the AC power is in use.
An overloaded DC circuit will trip the DC circuit protector. If this happens, unload the DC load before
pushing in the circuit protector to resume operation.
3-Phase applications (selected models only)
IMPORTANT! Its critical you balance the load on a 3-Phase generator to avoid all the power being
created from one of the three parts (phases) or damage to the engine may occur.
IMPORTANT! On 3-Phase generators, only one third of the total generator capacity is available
from any single phase 240v outlet.
IMPORTANT! 3-Phase generators are not suitable for running power-hungry appliances from 240v
Single Phase outlets.
IMPORTANT! Appliances that draw surges of power should not be run from the 240v single phase
outlets on 3-phase generators.
If you have purchased a 3-Phase generator identified by a large 5 PIN
round electrical socket.
On a 3-Phase generator power is generated on three individual parts
of the motor and combined to create one single and very powerful
socket.
All three 240v outlets must be used with even amounts of power or damage
may occur to the engine and void warranty (See section on balancing a 3-Phase outlet).
250714103200

11
11
Balancing power on a 3-Phase generator
IMPORTANT! This section only applied to 3-Phase capable generators.
WARNING! Failure to balance output on a 3-Phase generator can cause damage and void warranty.
IMPORTANT! Only one third of the total generator capacity is available from any single phase 240v outlet.
WARNING! 3-Phase generators are not suitable for running power-hungry appliances from 240v Single
Phase outlets.
WARNING! Appliances that draw surges of power should not be run from the 240v single phase outlets on
3-phase generators.
250714103200

12
12
Maintenance
Cleaning the air filter
NOTICE! It is normal for a small amount of oil may leak under the air filter box if the generator is running for a
long period of time. Wipe excess oil after each 10 hours of use.
1. Unscrew the Air filter service panel.
2. Unscrew the wing nut on the air cleaner cover.
3. Remove the air filter cover.
4. Remove the air filter element.
5. Blow out with compressed air and inspect for damage.
6. Wipe dirt from the air cleaner body and cover, using a moist rag. Be careful to prevent dirt from entering the
engine.
7. Replace in the reverse order.
NOTE! Never run the engine without the air cleaner. Rapid engine wear will result from
contaminants, such as dust and dirt, being drawn through the carburettor into the engine.
Changing the oil
NOTE! Drain the oil while the engine is still warm but not hot to assure rapid and complete draining.
IMPORTANT! Make sure to turn the engine switch OFF before draining.
NOTE! When the oil is drained it is an optimal time to clean the oil filter strainer.
1. Open the “oil filler cap”.
2. Unscrew the “oil drain bolt” to drain off the engine oil (if equipped). Otherwise tilt the engine to drain the oil.
3. Replace the “oil drain bolt”.
4. Clean the oil filter strainer if applicable (see section below*)
5. Refill with new oil and check the oil level (see section “checking the oil”).
6. Replace the oil filler cap.
7. Make sure all nuts, bolts and screws are tightened.
8. After refilling with new oil, rock the generator left to right to make sure the internal oil alarm sensor detects the
new oil.
9. Wash your hands with soap and water after handling oil.
Please dispose of used motor oil in a manner that is compatible with the environment. We suggest you take it
in a sealed container to your local waste disposal station for free reclamation. Do not throw it in the trash or
pour it on the ground
250714103200

13
13
*Cleaning the oil filter strainer
1. Remove the Oil filter locking bolt.
2. Gently remove the Oil filter strainer.
3. Clean with degreaser and wipe down to remove debris and any degreaser left behind.
4. Replace the Oil filter strainer followed by the oil filter locking bolt.
IMPORTANT! Please dispose of used motor oil in a manner that is compatible with the environment. We
suggest you take it in a sealed container to your local waste disposal station for free reclamation. Do not
throw it in the trash or pour it on the ground.
250714103200

14
14
Service Schedule
250714103200

15
15
Transporting/Storage
To prevent fuel spillage when transporting or during temporary storage, the generator should be secured upright
in its normal operating position, with the engine switch (if equipped). It is also reocmmmended the remote control
switch (if equipped) be turned off to avoid accidental starting.
WARNING! Before storing the unit for an extended period be sure the storage area is free from excessive
humidity and dust.
WARNING! Do not operate the generator while it is on a vehicle. Take the generator off the vehicle and use it
in a well-ventilated place.
WARNING! Do not drive on a rough road for an extended period with the generator on board. If you must
transport the generator on a rough road, drain the fuel from the generator beforehand.
WARNING! Do not overfill the tank (there should be no fuel in the filler neck).
WARNING! Avoid a place exposed to direct sunlight when putting the generator on a vehicle. If the generator
is left in an enclosed vehicle for many hours, high temperature inside the vehicle could cause fuel to vaporise
resulting in a possible explosion.
NOTE! In the case of storing the product for a long period of time, clean the fuel tank after running it empty.
Next, activate the engine and empty the carburettor of any remaining fuel.
Draining the fuel
WARNING! Fuel is extremely flammable and is explosive under certain conditions. Perform this task in a well-
ventilated area with the engine stopped. Do not smoke or allow flames or sparks in the area during this
procedure.
1. Remove the fuel cap.
2. Drain all fuel from the fuel tank into an approved fuel container. We recommend using a commercially
available fuel hand pump.
3. Reinstall the fuel filter and the fuel filler cap.
Draining the oil
See section “Changing the oil”.
250714103200

16
16
Is there fuel in the
tank?
Refill the fuel tank
Is the engine switch
ON?
Turn the engine
switch on
Add the
recommended oil
Is there enough oil
in the engine?
If the engine still
does not start, take
the generator to an
authorised service
center.
Clean, re-adjust the
gap and dry the
spark plug. Replace
it if necessary
The Engine Will Not Start
Is the output
indicator ON?
Disconnect the
electrical
appliances. Stop
and re-start the
engine.
Are all circuit
breakers ON?
Check the electrical
appliance or
equipment for any
defects.
Plug in your
appliances
(spread the load
over all 240V outlets
if your purchased a
3-Phase)
Switch all circuit
breakers to “ON”
Take the generator
to an authorised
service center.
Turn all circuit
breakers ON.
- Replace the electrical appliance or equipment.
- Take the electrical appliance or equipment to an
electrical repair shop for repair.
Take the generator
to an authorised
service center.
No power from outlet socket
If ‘yes’
If ‘yes’
If ‘yes’
If ‘yes’
If ‘yes’
If ‘no’
If ‘no’
If ‘no’
If ‘no’
If ‘no’
If ‘no’
If ‘no’
If ‘no’ fault
Is the output
indicator ON?
If ‘yes’
Is the engine
running?
Start Engine
If ‘yes’
If ‘no’
fault
Switch on your
appliances one-byone taking care not
to overload the
generator
Is it a Diesel
Engine?
If ‘yes’
Is the spark plug in
good condition?
If ‘no’
If ‘yes’
Could there be an
air lock or bubbles
in the fuel line?
If ‘no’
Re-Prime the Fuel
line system.
See section in
manual.
If ‘yes’
Determine if
“overloaded”
If ‘yes’
If ‘no’
Reduce the load on
your generator by
removing some of
your appliances
Troubleshooting
250714103200

17
17
Diesel
Specifications
OSE or Other Seller Equivalent! We provide this specification to enable buyers to compare
generators where @cos0.8 is used as the output measurement. We strongly recommend you only
refer to the Continuous Rated Output when considering whether a product is right for your needs.
NOTE! Power produced by generators can fluctuate.
IMPORTANT! UPS or power filter recommended for powering expensive equipment (all models).
GENP-GEN-DSL-1P895
Manufacturer: GenPower
Engine Type: Diesel
Engine Displacement: 208CC
Engine Output: 8hp/3600rpm
Fuel Type: Commercially Available Pump Non-Bio Diesel
AC Voltage: 240/415V
Continuous Rated Output from each 240V outlet:
15amp.
(Note: Each 240v outlet supplies approx 1/3 of the total
generator output - e.g. 7amps)
OSE Max output: 10kVA @ cos.08
(Other Seller Equivalent)
DC Output: 12V - 8.3A
Starting Method: Electric Key Start
Engine Oil Type: Acceptable Oil Grades: 10W30 / 10W40
/ 15W30 / 15W40.
Noise Level at 7m: 74db
Other Specifications: Refer to brochure or advertisement
GENDSLTXSGPRACAB / DSLGEN-6500S
Manufacturer: GenPower
Engine Type: Diesel
Engine Displacement: 208CC
Engine Output: 20hp/3600rpm
Fuel Type: Commercially Available Pump Non-Bio Diesel
AC Voltage: 240/415V
Continuous Rated Output from 415V 20Amp outlet: 5000W OR
Continuous Rated Output from each 240V outlet: 1500W*
(*When using 240V outlets, load must be balanced across all 3 outlets)
OSE Max output: 11kVA @ cos 0.8
(Other Seller Equivalent)
DC Output: 12V - 8.3A
Starting Method: Electric Key Start
Engine Oil Type: Acceptable Oil Grades: 10W30 / 10W40 / 15W30 /
15W40.
Noise Level at 7m: 93dB
Other Specifications: Refer to brochure or advertisement
250714103200

18
18
Appendix
© Copyright 2012 - Mills International Trading Pty Ltd.
250714103200

Some experts believe the incorrect or prolonged use of almost any
product could cause
serious inju
ry or de
a
th. F
or inf
orm
ation th
at
may reduce your risk of serious injury or deathconsult thepoints
below and additionally, the information available at
www.datastreamserver.com/safety
- Consult all docume ntation, packaging and
product labelling before use. Note that some
products feature online documentation which
should be printed and kept with the p roduct.
- Check product for loose / broken / damaged /
missing parts, wear or leaks (if applicable) be fore
each use. Never use a product with loose / b roken
/ damaged / missing pa rts, wear or leaks (if
applicable).
- Products must be inspected and serviced (if
applicable) by a qualified specialist every 6
months assuming average residential use by a
person of average weight and strength, ab ove
average technical aptitude, on a property
matching average metropolitan specification.
Intended use outside these guidelines could
indicate the product is not suitable for intended
use or may require more regular inspection or
servicing.
- Ensure all possible users of the p roduct have
completed an industry recognised training course
before being given access to the product.
- The product has been supplied by a general merchandise
retailer that may not be familiar with your specific applic ation or
your description of the applic ation. Be sure to attain third party
approval for your application from a qualified specialist before use
regardless of prior assurances by the retailer or its representatives.
- This product is not intended for use where fail-safe operation is
required. As with any product (take an au tomobile, aircraft,
computer or ball poi nt pen for example) there is always a small
chance of a technical issue that needs to be repaired or may
require replacement of the product or a part. If the possibility of
such failure and the associated time it takes to rectify could in any
situation inconvenience the user, business or employee or could
financially affect the user, business or employee then the product
is not suitable for your requirements. This p roduct is not for use
where incorrect operation or a failure of any kind, including but
not limited to a condition requiring product return, replacement,
service by a technician or replacement of parts could cause a
financial loss, loss of employee time or an in c
onvenience
requiring compensation.
- If this item has been purchased in error considering the points
above simply contact the retailer directly for details of their
returns policies if required.
 Loading...