

Getting Started
Erste Schritte
Démarrage
Operazioni preliminari
Guía de iniciación
Thank you, and congratulations on your choice of the STUDIO Canvas SD-80.
Before using this unit, carefully read the sections entitled:
“IMPORTANT SAFETY INSTRUCTIONS” (Owner’s manual p. 2),
“USING THE UNIT SAFELY” (Owner’s manual pp. 3--4), and
“IMPORTANT NOTES” (Owner’s manual p. 5). These sections provide
important information concerning the proper operation of the unit.
Additionally, in order to feel assured that you have gained a good grasp
of every feature provided by your new unit, Getting started and Owner’s
manual should be read in its entirety. The manual should be saved and
kept on hand as a convenient reference.
Copyright © 2002 ROLAND CORPORATION
All rights reserved. No part of this publication may be reproduced in any form
without the written permission of ROLAND CORPORATION.
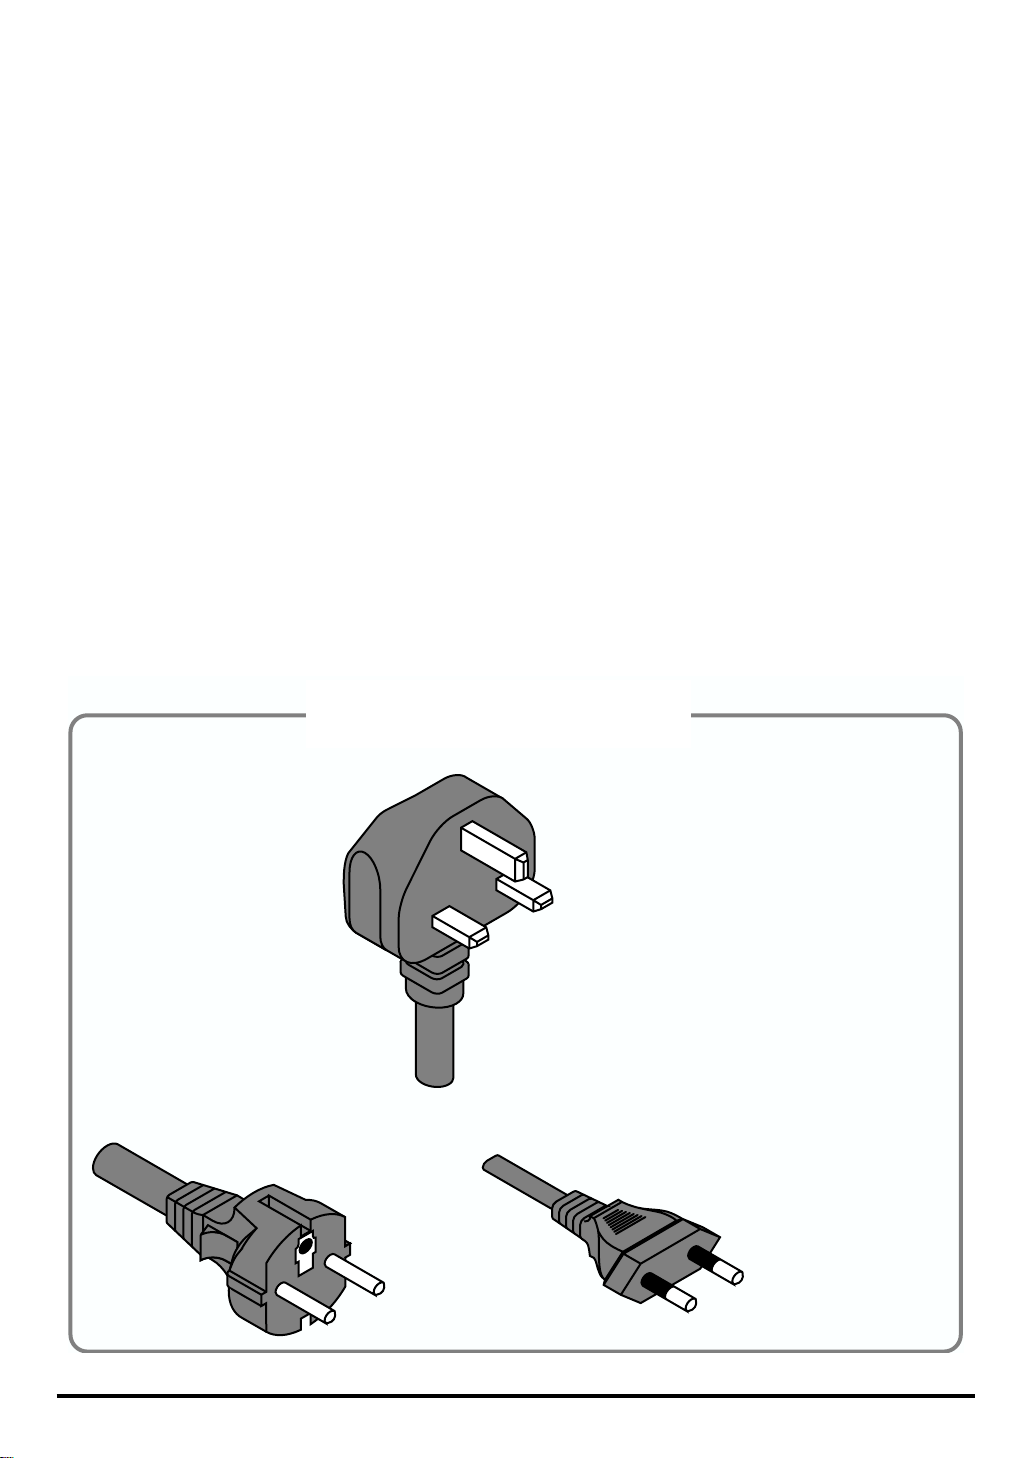
For 230 V (English)
This box contains continental and British power cables. Please select the
correct type for your country.
Für 230 V (Deutsch)
Diese Packung beinhaltet europäische und britische Netzkabel. Bitte
suchen Sie sich die richtige Variante für Ihr Land aus.
Pour 230 V (Français)
Cette boite contient des alimentations anglaises ou continentales. Merci
de choisir l'alimentation appropriée de votre pays.
Per 230 V (Italiano)
La confezione contiene alimentatori con spina europea e Inglese.
Scegliete quella adatta alla Vostra nazione.
Para 230 V (Español)
Esta caja contiene cables de corriente continentales y británicos. Por
favor seleccione el tipo correcto para su país.
Application of AC230 V
Power Cord
for UK
except for UKor
2

Contents
Contents ...................................................................................3
Contents of the Package.........................................................6
Connections with audio equipment.......................................8
Installing & Setting Up the Driver (Windows)........................9
Driver Installation................................................................................................................9
Settings ................................................................................................................................21
Check whether there is sound..........................................................................................24
Installing & Setting Up the Driver (Macintosh)....................25
Connecting your Macintosh.............................................................................................25
Installing the SD-80 driver (OMS)...................................................................................26
Installing the SD-80 driver (FreeMIDI)...........................................................................30
Troubleshooting.....................................................................32
Problems related to the USB driver.................................................................................32
Problems when using the SD-80......................................................................................36
Deleting the driver.............................................................................................................39
Deutsch
Inhalt der Verpackung...........................................................41
Anschluss von Audiogeräten...............................................43
Installieren und Einrichten des Treibers (Windows)..........44
Treiberinstallation..............................................................................................................44
Einstellungen......................................................................................................................56
Prüfung, ob Sound zu hören ist.......................................................................................59
Installieren und Einrichten des Treibers (Macintosh)........60
Anschluss an Ihren Macintosh.........................................................................................60
Installation des SD-80-Treibers (OMS) ...........................................................................61
Installation des SD-80-Treibers (FreeMIDI)...................................................................64
Fehlerbehebung..................................................................... 67
Probleme in Verbindung mit dem USB-Treiber............................................................67
Problems when using the SD-80......................................................................................71
Deleting the driver.............................................................................................................74
3

Contents
Français
Contenu du carton.................................................................76
Connexions à des équipements audio ................................78
Installation et configuration du pilote (Windows)...............79
Installation du pilote..........................................................................................................79
Paramètres...........................................................................................................................91
Vérifiez la présence de son ...............................................................................................94
Installation et configuration du pilote (Macintosh).............95
Connexion du Macintosh..................................................................................................95
Installation du pilote SD-80 (OMS) .................................................................................96
Installation du pilote SD-80 (FreeMIDI).......................................................................100
En cas de problème............................................................. 102
Problèmes liés au pilote USB..........................................................................................102
Problems when using the SD-80....................................................................................106
Deleting the driver...........................................................................................................109
Italiano
Contenuto della scatola ......................................................111
Collegamento degli apparecchi audio...............................113
Installazione e configurazione del driver (Windows) .......114
Installazione del driver ...................................................................................................114
Impostazioni.....................................................................................................................126
Verificare se l’audio viene riprodotto..........................................................................129
Installazione e configurazione del driver (Macintosh) .....130
Collegamento del Macintosh..........................................................................................130
Installazione del driver SD-80 (OMS)...........................................................................131
Installazione del driver SD-80 (FreeMIDI)...................................................................135
Ricerca e soluzione dei problemi....................................... 137
Problemi relativi al driver USB......................................................................................137
Problems when using the SD-80....................................................................................141
Deleting the driver...........................................................................................................144
4

Español
Contenido del paquete........................................................146
Conexiones con el equipo de audio...................................148
Instalación y configuración del controlador (Windows)..149
Instalación del controlador.............................................................................................149
Configuración...................................................................................................................161
Comprobar si hay sonido................................................................................................164
Instalación y configuración del controlador (Macintosh) 165
Conexión del Macintosh .................................................................................................165
Instalación del controlador del SD-80 (OMS)..............................................................166
Instalación del controlador del SD-80 (FreeMIDI)......................................................170
Resolución de problemas...................................................172
Problemas relacionados con el controlador USB.........................................................172
Problems when using the SD-80....................................................................................176
Deleting the driver...........................................................................................................179
Contents
204
* Microsoft and Windows are registered trademarks of Microsoft Corporation.
206e
* Screen shots in this documents are reprinted with permission from Microsoft Corporation.
ADD
* Windows® XP is known officially as: “Microsoft® Windows® XP operating system.”
206f
* Windows® 2000 is known officially as: “Microsoft® Windows® 2000 operating system.”
206g
* Windows® Me is known officially as: “Microsoft® Windows® Millennium Edition operating system.”
206c
* Windows® 98 is known officially as: “Microsoft® Windows® 98 operating system.”
207
* Apple and Macintosh are registered trademark of Apple Computer, Inc.
209
* MacOS is a trademark of Apple Computer, Inc.
203
* GS ( ) is a registered trademark of Roland Corporation.
ADD
* XG ( ) and XGlite ( ) are trademarks of YAMAHA Corporation.
231
* OMS is a registered trademark of Opcode Systems, Inc.
232
* FreeMIDI is a trademark of Mark of the Unicorn, Inc.
220
* All product names mentioned in this document are trademarks or registered trademarks of their respective
owners.
5
Contents of the Package
The box in which the SD-80 was shipped should contain the following items. After opening the box,
first check to make sure that all the items are included. If any items are missing, please contact the
store where you purchased the SD-80.
●
SD-80
●
AC cable
This is the only AC cable you should use with the SD-80.
Do not use any AC cable other than the supplied one, since doing so may cause malfunction.
●
USB Cable
●
CD-ROM
This contains drivers used by the SD-80, and demo songs.
* Avoid touching or scratching the shiny underside (encoded surface) of the disc. Damaged or dirty CD-ROM
discs may not be read properly. Keep your discs clean using a commercially available CD cleaner.
DO NOT play a CD-ROM disc on a conventional audio CD player.
The resulting sound may be of a level that could cause permanent
hearing loss. Damage to speakers or other system components may
result.
●
Getting Started
This is the manual you are holding. Please read this first.
This manual explains how to install the drivers and make the settings required in order to use the
SD-80. Starting at the beginning, please read the sections that are relevant to your system.
●
Owner’s Manual
This is the owner’s manual for the SD-80.
Read this to gain in-depth information concerning the use of the SD-80, and the numerous
functions it offers.
6
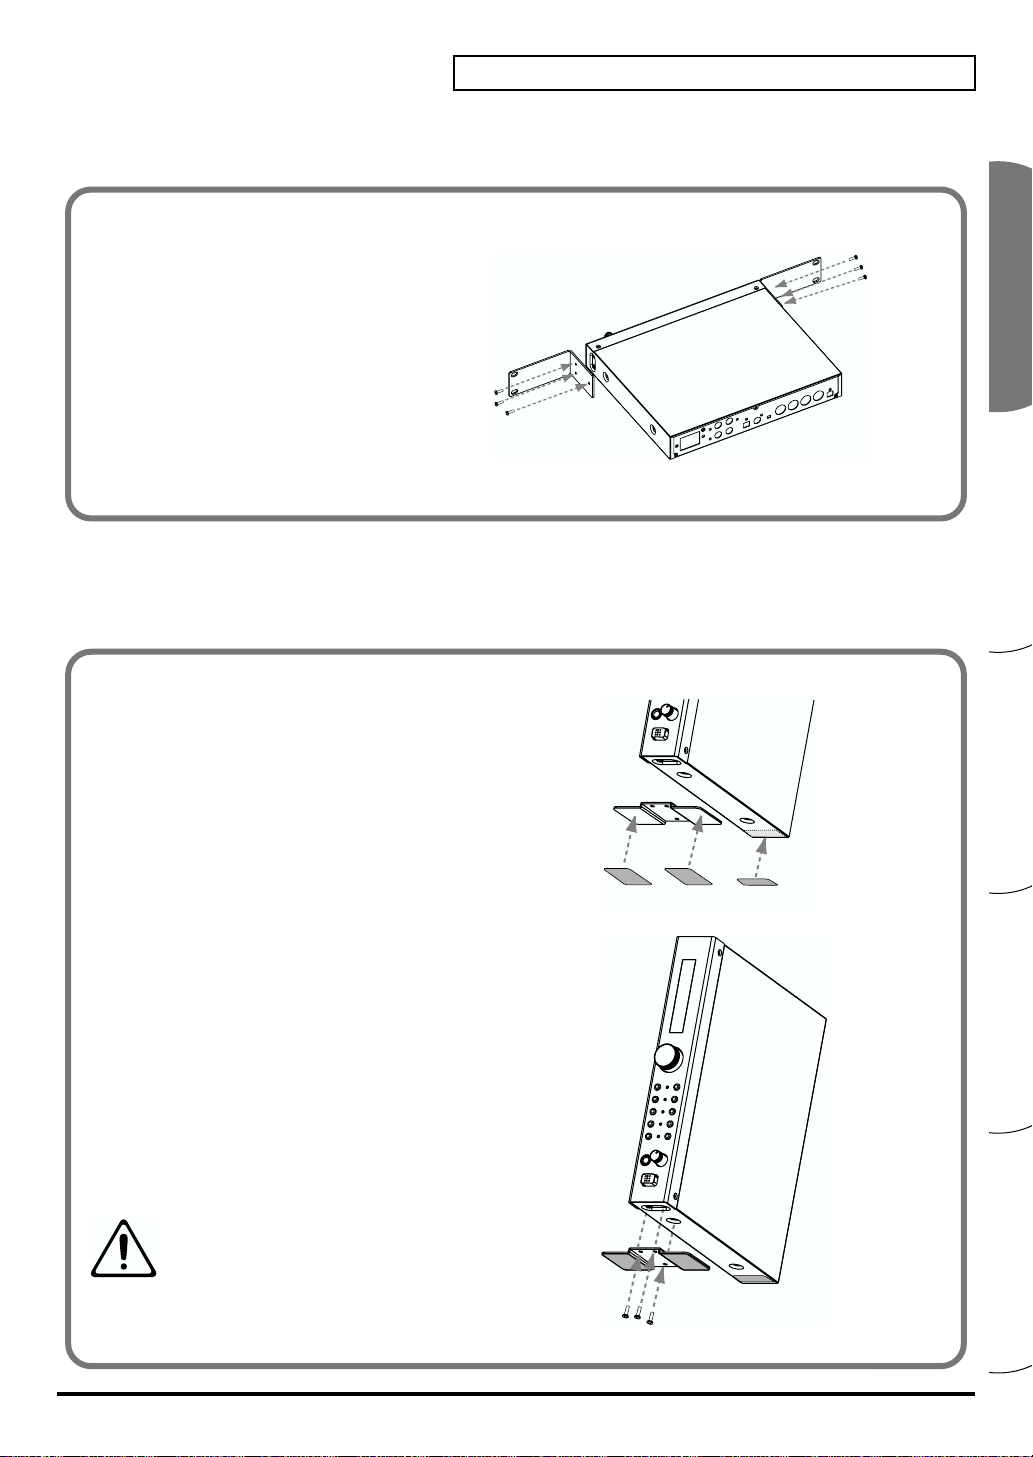
●
Cushion set (stickers)
Rack-mount adaptor
Use this when you want to install the SD-80 in an audio rack. Two rack ears are included.
Attaching the rack-mount adaptor
fig.um550
1. Remove three screws (on each side)
from the right and left panels of the
SD-80.
2. Using the screws you removed in step
1, attach the rack-mount brackets to the
SD-80.
* You must use the screws that you removed.
Do not use any other screws.
●
Desk-stand mount
Use this when you want to place the SD-80 vertically. (with Cushion sets)
Contents of the Package
Attaching the desk-stand mount
fig.cushion
1. Remove three screws from the right panel of the
SD-80.
2. Affix the cushion set (stickers) to the locations shown
in the diagram at right.
3. Using the screws you removed in step 1, attach the
desk-stand mount to the SD-80.
* You must use the screws that you removed. Do not use any
other screws.
When standing the SD-80 on its side, make sure to
position it so the power switch is at the bottom.
Do not place the SD-80 on its side at the edge of
a table or high location (e.g. top of book shelves
and furniture) to avoid physical injury or
property damage.
Español Italiano Français Deutsch English
7
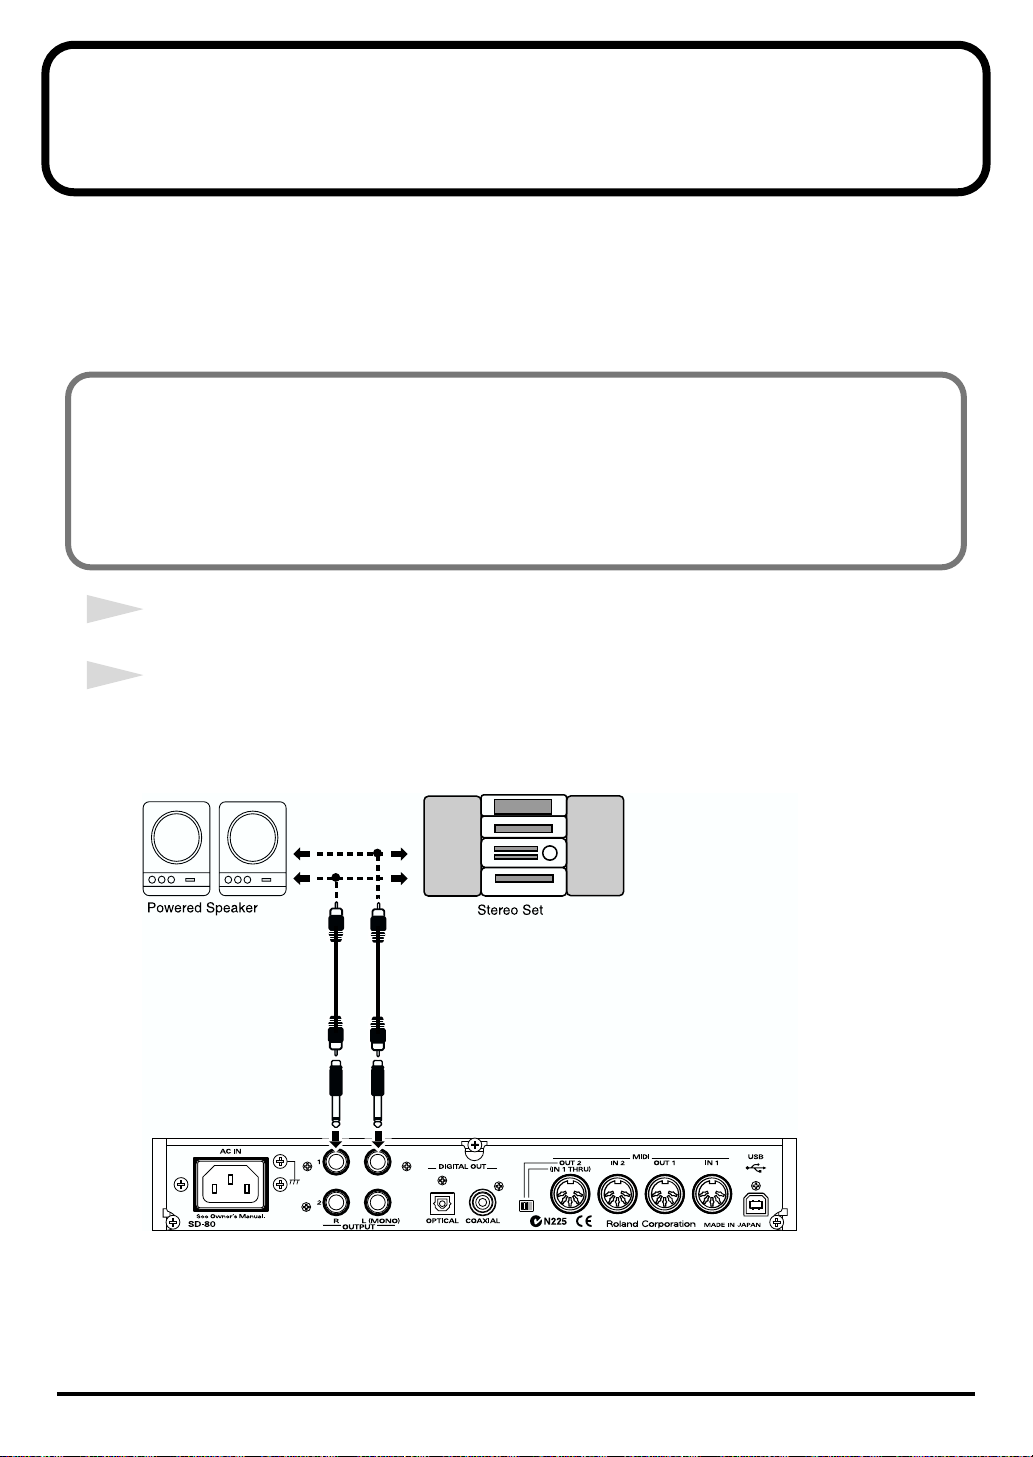
Connections with audio equipment
You will not hear any sound from the SD-80 unless you connect headphones to the Headphones
jack, or connect the audio outputs (analog) of the SD-80 to your audio playback equipment as
shown below. You will need the following items.
• SD-80
• Audio cables
• Audio playback equipment such as an amp and speakers, or a stereo system
* Before making connections to other equipment, you must turn down the volume of all equipment to avoid
malfunctions or speaker damage.
* To avoid short circuits or broken connections, grasp the plug when disconnecting a cable.
* Some connection cables contain a resistor. Do not use a cable with a built-in resistor to connect with the
SD-80. Doing so may make the sound extremely weak, or inaudible. For details on your cable, please contact
its manufacturer.
1
Lower the volume of your audio playback equipment.
2
Connect the SD-80’s
are using headphones, connect them to the
SD-80.
fig.8-1e
OUTPUT1 jacks
INPUT
LINE IN
to the input jacks of your audio playback equipment. If you
Headphone jack
OUTPUT
located on the front panel of the
SD-80
8

Installing & Setting Up the Driver (Windows)
The following items are required for connections and installation. Remove
them from the SD-80 package, and have them ready.
• SD-80 • AC cable
• USB cable • CD-ROM
In order to use the SD-80, you must first install the USB MIDI driver.
The installation procedure will differ depending on your system. Please
proceed to one of the following sections, depending on the system you
use.
• Windows XP users .....................................................(p. 9)
• Windows 2000 users................................................... (p. 15)
• Windows Me/98 users ..............................................(p. 19)
• Macintosh users.......................................................... (p. 25)
Driver Installation
What is a driver?
A “driver” is software
that transfers data
between the SD-80 and
application software
running on your
computer, when your
computer and the SD-80
are connected by a USB
cable.
The driver sends data
from your application to
the SD-80, and from the
SD-80 to your
application.
■
Windows XP users
1
With the SD-80 disconnected, start up Windows.
Disconnect all USB cables except for a USB keyboard and USB mouse (if
used).
2
Open the
1.
2.
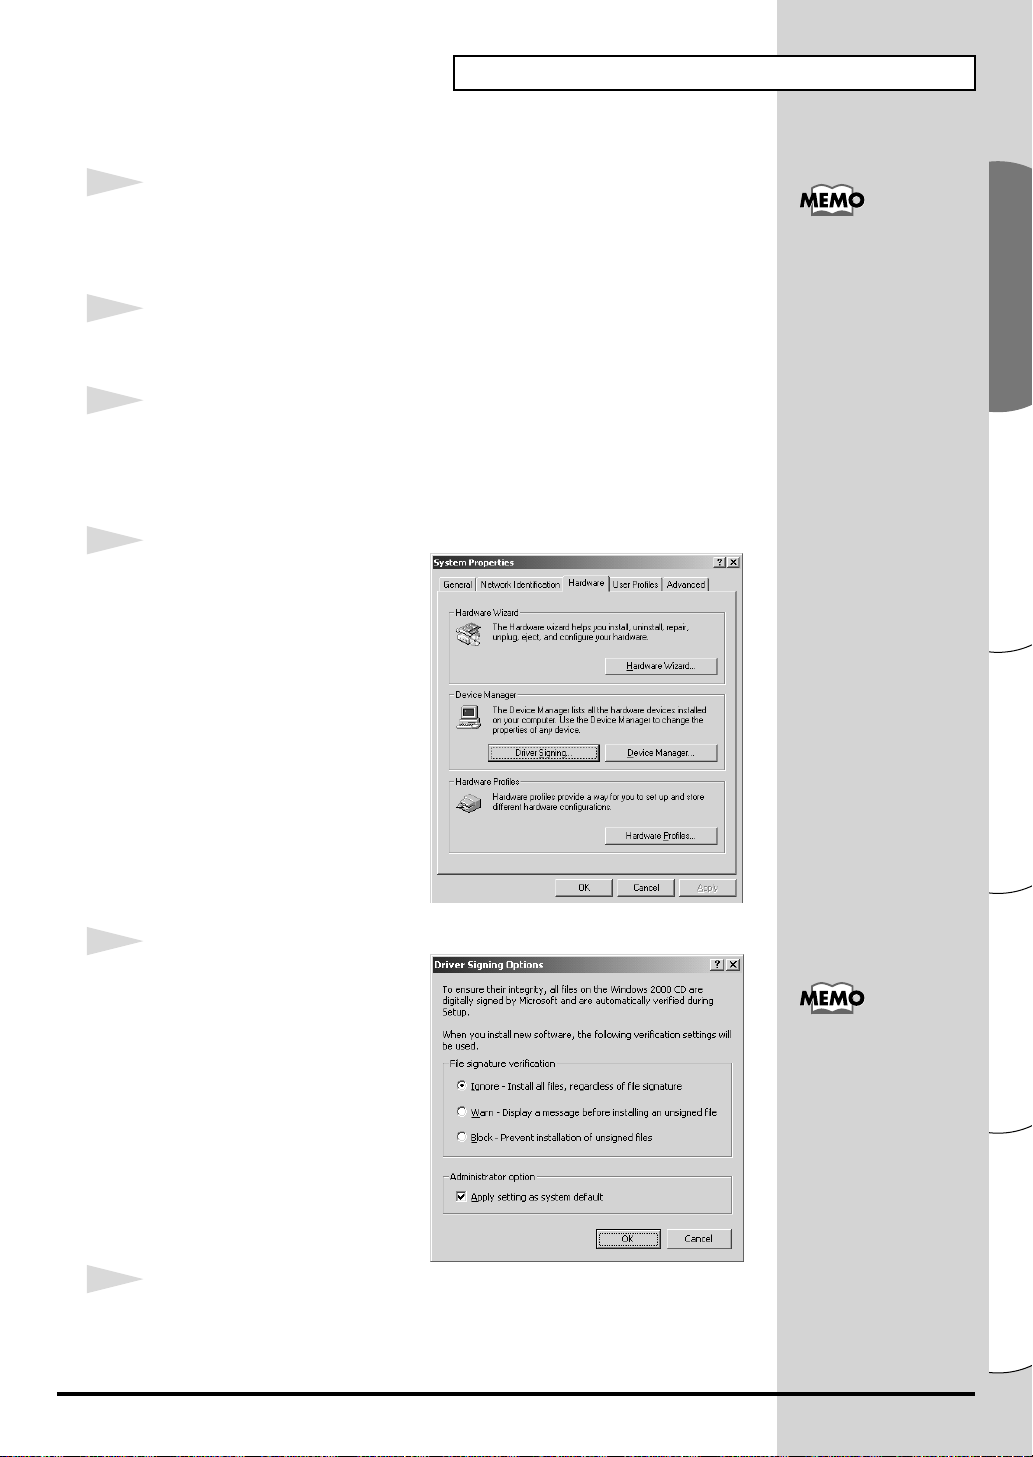
3.
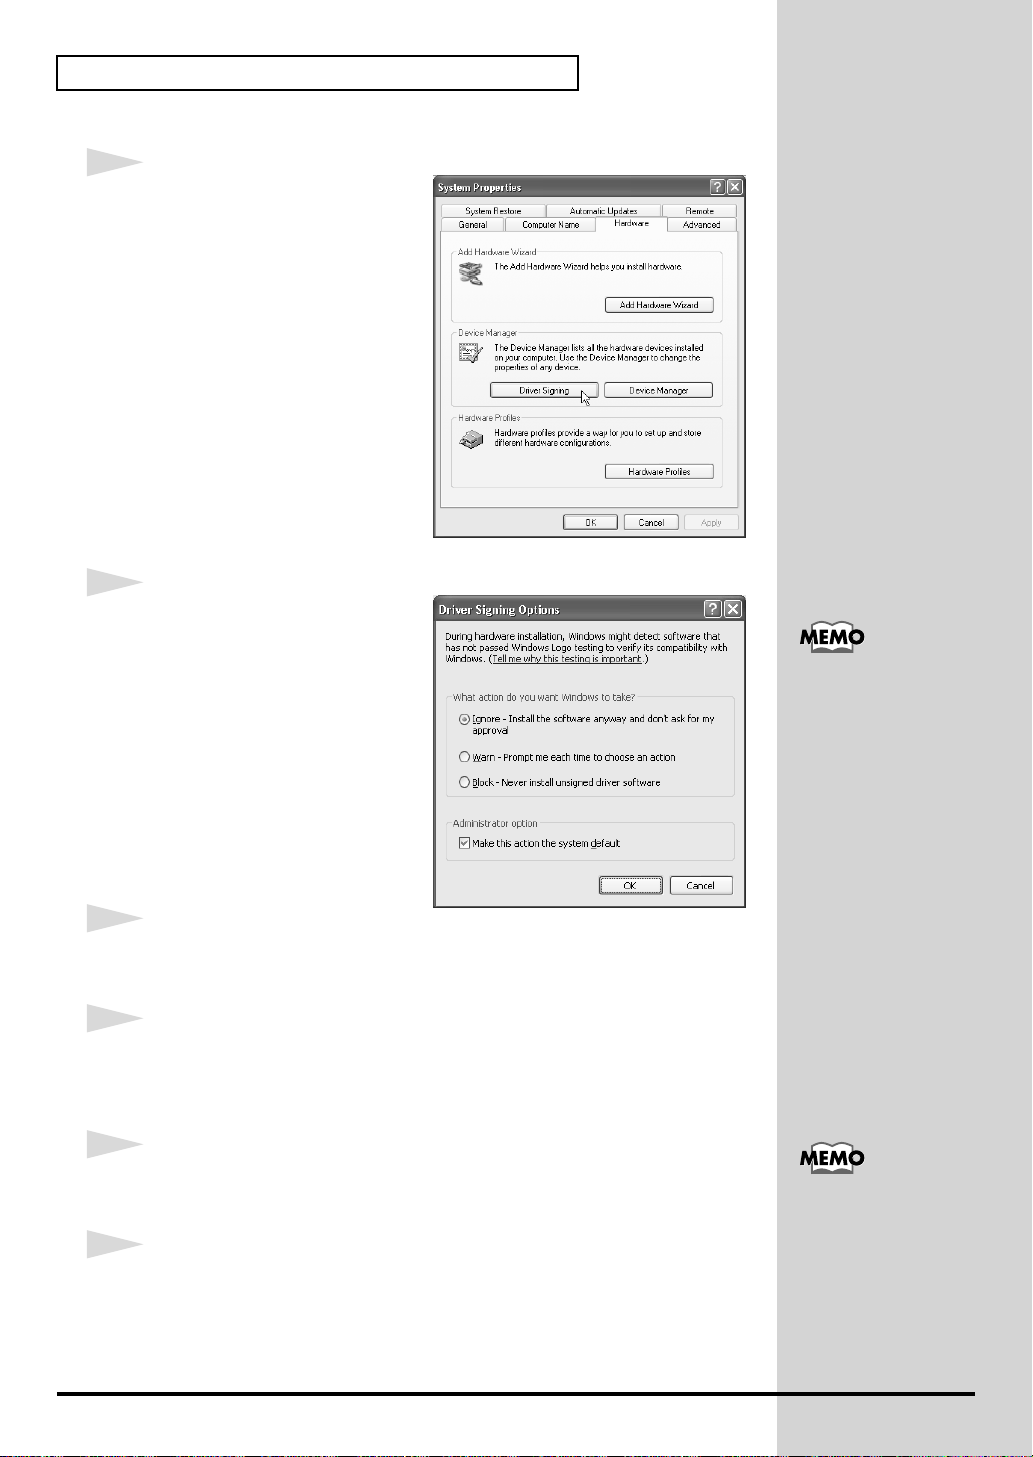
System Properties
Click the Windows
Panel
.
In
“Pick a category”
In
“or pick a Control Panel icon”
dialog box.
Start
menu, and from the menu, select
, click
“Performance and Maintenance”
, click the
System
icon.
Control
.
If you are using Windows
XP Professional, you must
log on using a user name
with an administrative
account type (e.g.,
Administrator). For details
on user accounts, please
consult the system
administrator of your
computer.
Depending on how your
system is set up, the
System icon may be
displayed directly in the
Control Panel (the Classic
display). In this case,
double-click the System
icon.
9
Español Italiano Français Deutsch English
Installing & Setting Up the Driver (Windows)
fig.2-1
3
Open the
Options
Driver Signing
dialog box.
Click the
click
fig.2-2
4
Make sure that
you want Windows to take?”
set to
If it is set to
[OK]
If it is not set to “
note of the current setting
(“Warn” or “Block”). Then change
the setting to
[OK]
Hardware
[Driver Signing]
“What action do
“Ignore”
.
.
.
“Ignore”
Ignore
“Ignore”
tab, and then
.
is
, simply click
”, make a
and click
If you changed “What
action do you want
Windows to take?” in
step 4, you must restore
the previous setting after
you have installed the
driver. (->If you changed
“What action do you
want Windows to take?”
(p. 14))
10
5
Close the
Click
6
Exit all currently running software (applications).
Also close any open windows. If you are using virus checking or similar
software, be sure to exit it as well.
7
Prepare the CD-ROM.
Insert the CD-ROM into the CD-ROM drive of your computer.
8
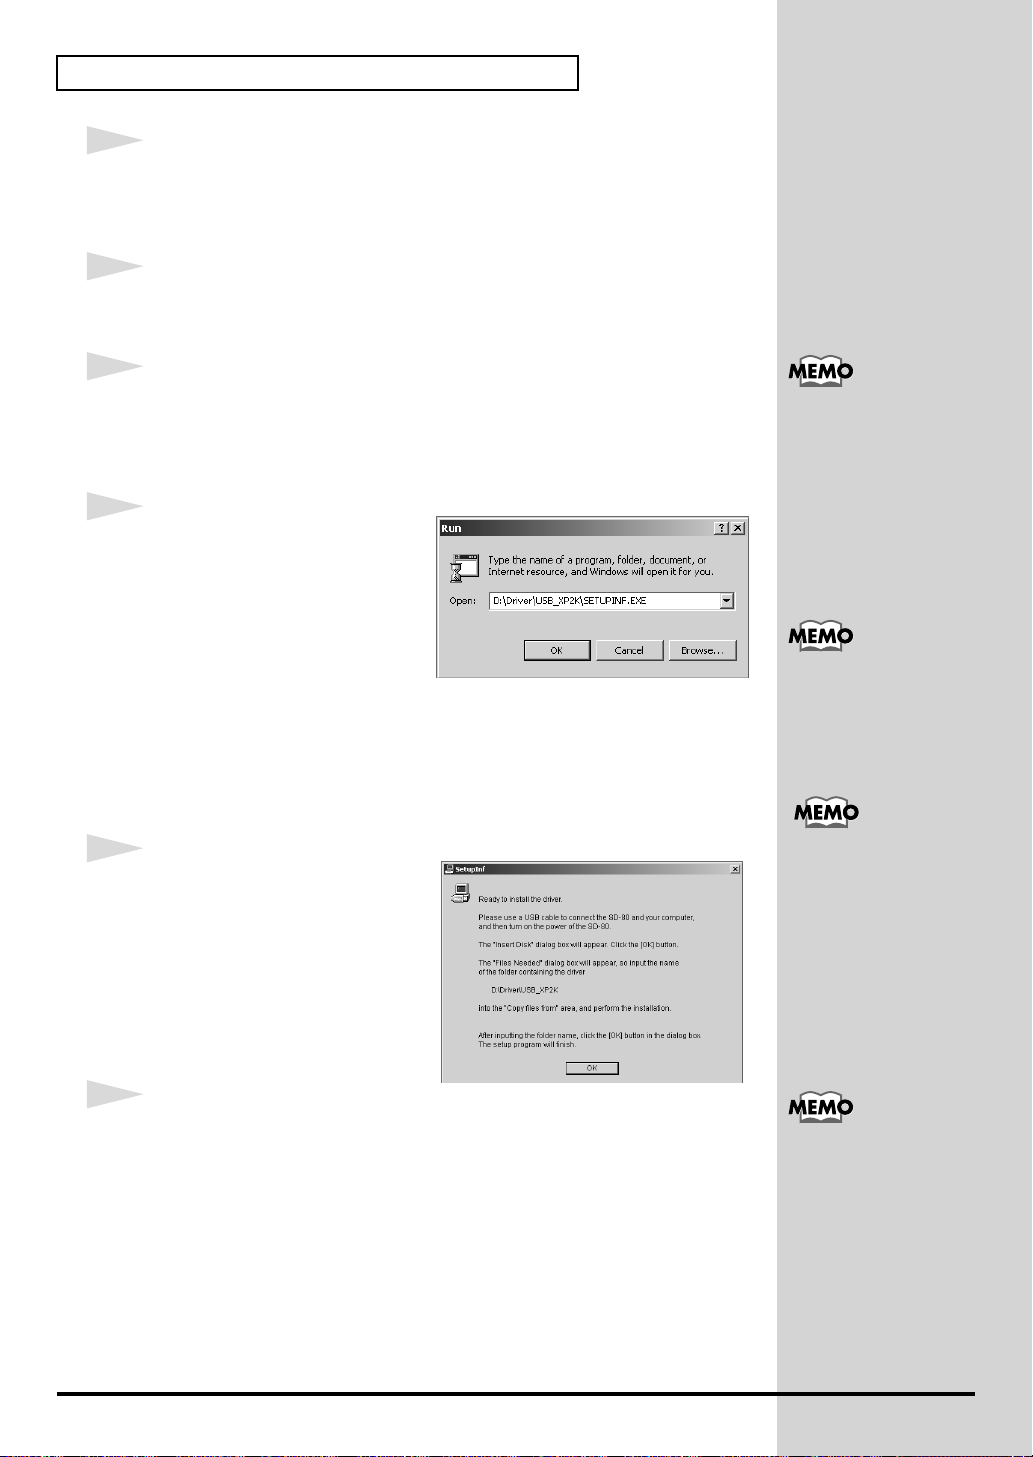
Open the
Click the Windows
System Properties
[OK]
.
“Run...”
dialog box.
start
dialog box.
button. From the menu that appears, select
“Run...”
If “Windows can perform
the same action each
time you insert a disk or
connect a device with
this kind of file” appears,
.
click [Cancel].
fig.2-3_30
b
Installing & Setting Up the Driver (Windows)
9
In the dialog box that appears, input the
following into the
click
[OK]
.
D:\Driver\USB_XP2K\SETUPINF.EXE
* The drive name “D:” may be different for
your system. Specify the drive name of your CD-ROM drive.
fig.2-4_30
10
The
SetupInf
You are now ready to install the driver.
11
Use the
USB cable
“Open”
dialog box will appear.
field, and
to connect the
SD-80
to your
computer
In this manual, the location
of folders and files is given
in terms of the file path,
using \ as the delimiter.
For example,
USB_XP2K\SETUPINF.
EXE indicates the
SETUPINF.EXE file found
in the USB_XP2K folder.
If “Do you want to re-
install the driver after
uninstalling the driver
that is already
installed?” appears, click
[Yes].
.
1.
With the power switch turned
2.
Connect the
3.
Use the
12
Set the SD-80’s power switch to the ON position.
Near the task bar, your computer will indicate “Found New Hardware”.
Please wait.
fig.2-6
13
The Found New Hardware
Wizard will appear.
Make sure that the screen
indicates “EDIROL SD-80”, select
“Install from a list or specific
location (Advanced)”, and click
[Next].
AC cable
USB cable
to an electrical outlet.
to connect the
OFF
, connect the
SD-80
to your
AC cable
computer
to the
.
SD-80
.
Once the connections have
een completed, turn on
power to your various
devices in the order
specified. By turning on
devices in the wrong
order, you risk causing
malfunction and/or
damage to speakers and
other devices.
Always make sure to have
the volume level turned
down before switching on
power. Even with the
volume all the way down,
you may still hear some
sound when the power is
switched on, but this is
normal, and does not
indicate a malfunction.
Español Italiano Français Deutsch English
11
Installing & Setting Up the Driver (Windows)
fig.2-7
14
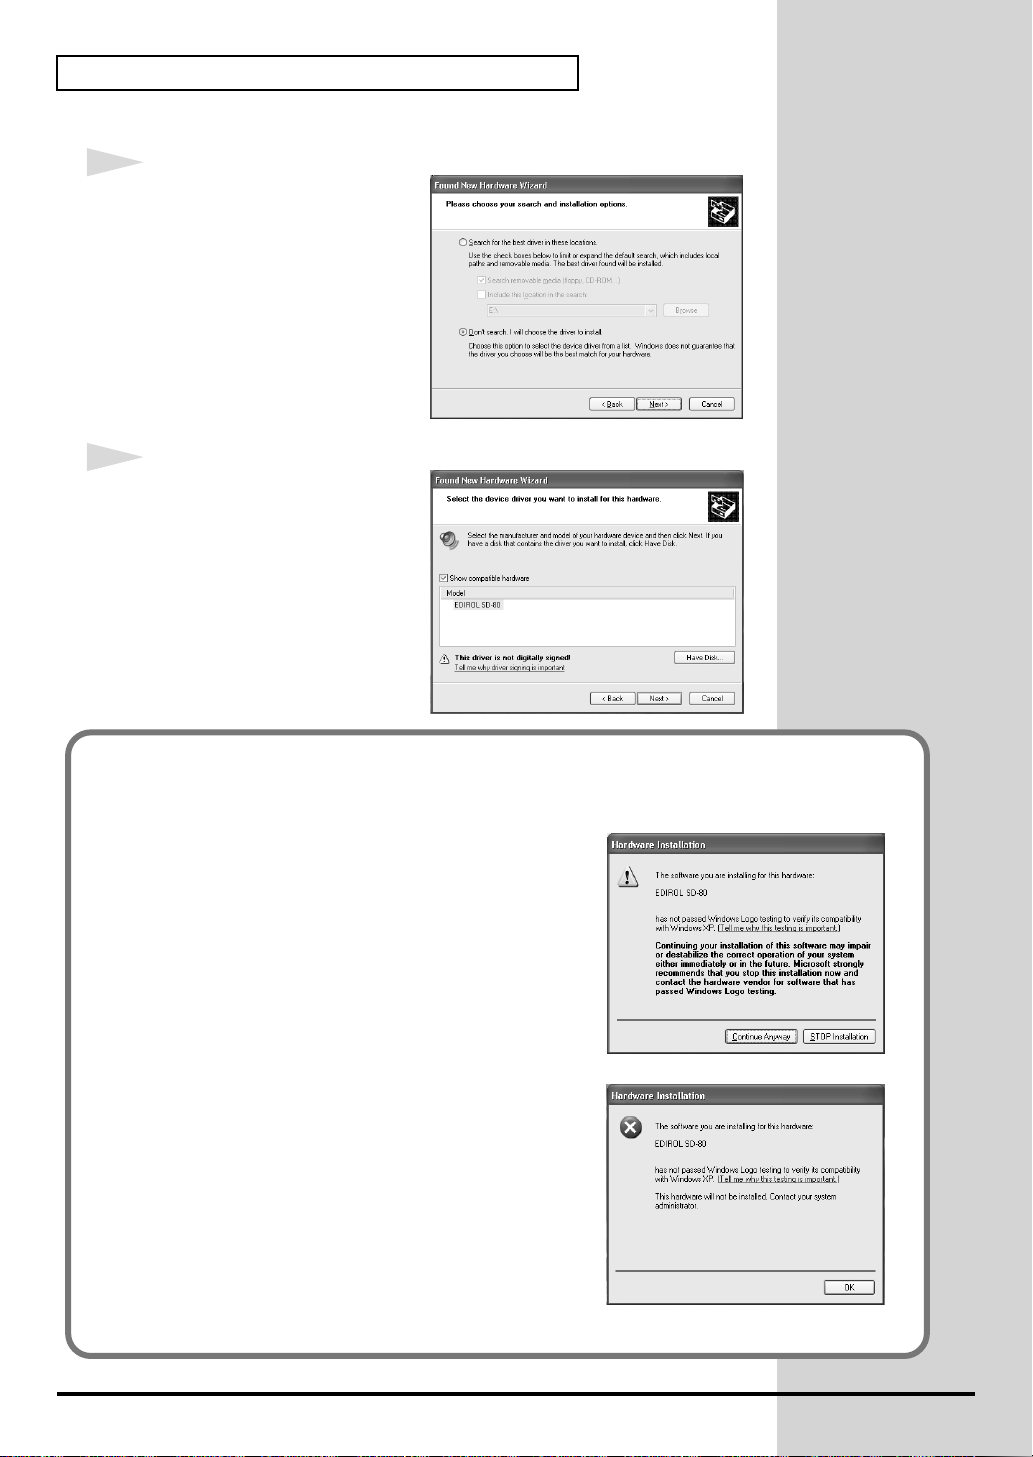
The screen will indicate “Please
choose your search and
installation options”.
Select “Don’t search. I will
choose the driver to install”, and
click [Next].
fig.2-8_20
15
Make sure that the “Model” field
indicates “EDIROL SD-80”, and
click [Next]. Driver installation
will begin.
If the “What action do you want Windows to take?” setting was not set to “Ignore”, a
“Hardware Installation” dialog box will appear.
If “What action do you want Windows to take?”
is set to “Warn,”
1. Click [Continue Anyway].
2. Continue the installation.
If “What action do you want Windows to take?”
is set to “Block”
1. Click [OK].
2. When the “Found New Hardware Wizard”
appears, click [Finish].
3. Perform the installation as described in the
“Troubleshooting” section on Device Manager
shows “?”, “!”, or “USB Composite Device”
(p. 35).
12
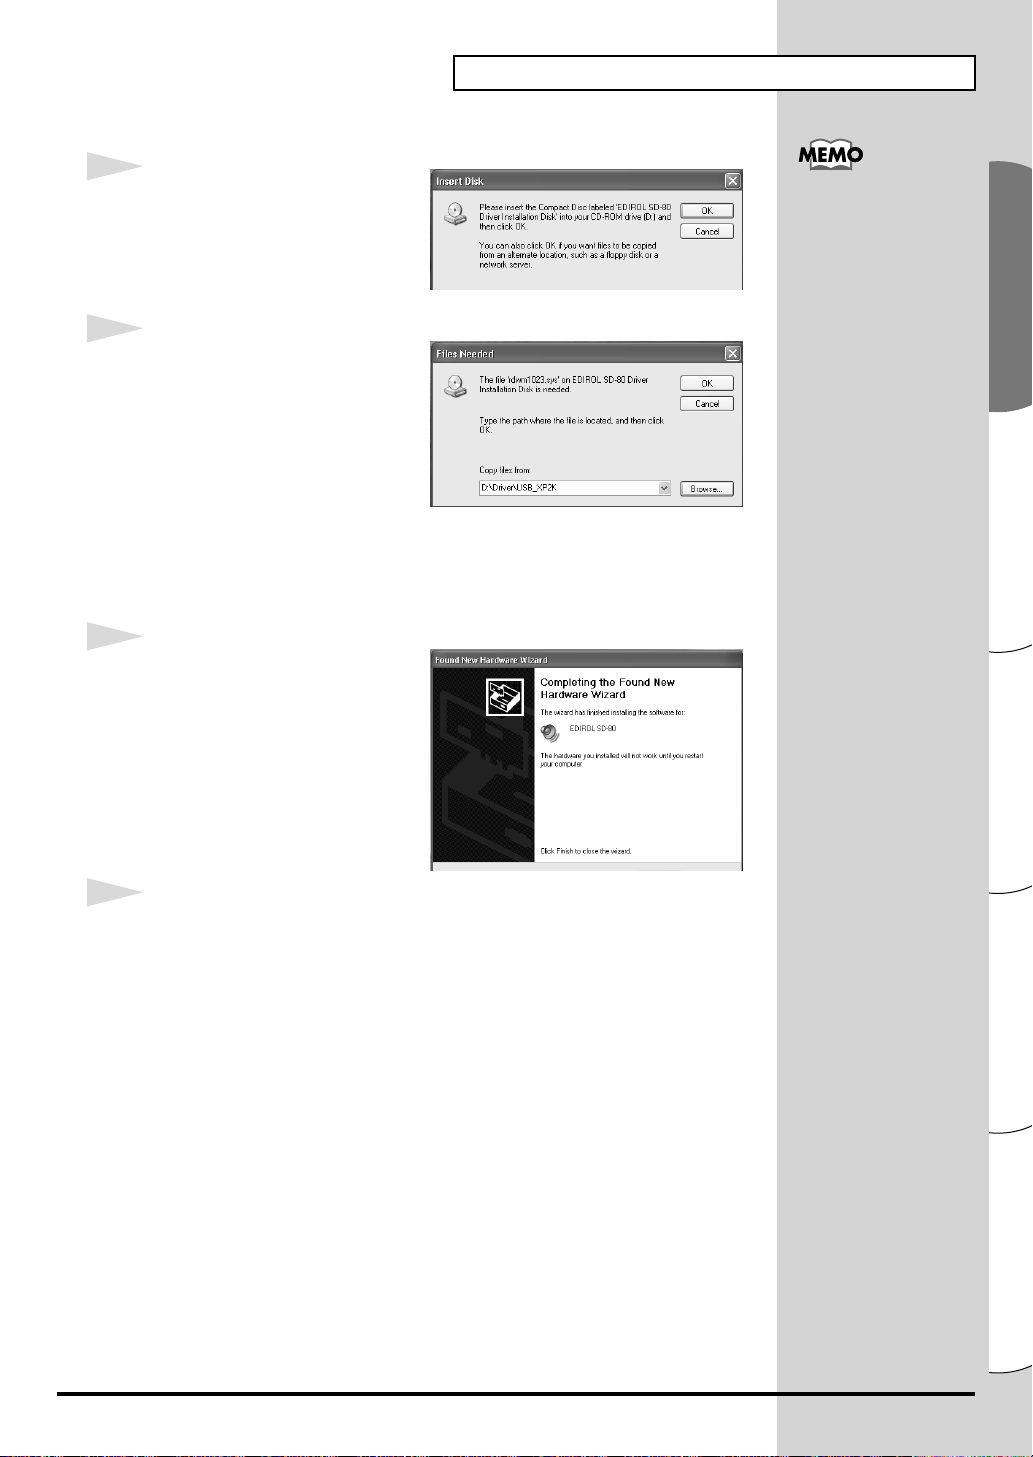
fig.2-9_30
Installing & Setting Up the Driver (Windows)
16
The Insert Disk dialog box will
appear.
Click [OK].
fig.2-10_30
17
The Files Needed dialog box will
appear. Input the following into
the “Copy files from” field, and
click [OK].
D:\Driver\USB_XP2K
* The drive name “D:” may be different for your system. Specify the drive name of your
CD-ROM drive.
fig.2-11_20
18
The Found New Hardware
Wizard will appear.
Make sure that the display
indicates “EDIROL SD-80”, and
click [Finish].
Wait until “Found New
Hardware” appears near the
taskbar.
The Insert Disk dialog
may not appear. In that
case, proceed to step 17.
19
When driver installation has been completed, the System Setting Change
dialog box will appear.
Click [Yes]. Windows will restart automatically.
Español Italiano Français Deutsch English
13
Installing & Setting Up the Driver (Windows)
If you changed “What action do you want Windows to take?”
If you changed the What action do you want Windows to take? setting,
restore the original setting after Windows restarts.
1. If you are using Windows XP Professional, log on to Windows using
the user name of an administrative account (e.g., Administrator).
2. Click the Windows start menu, and from the menu, select Control
Panel.
3. In “Pick a category”, click “Performance and Maintenance”.
4. In “or pick a Control Panel icon”, click the System icon. The System
Properties dialog box will appear.
5. Click the Hardware tab, and then click [Driver Signing]. The Driver
Signing Options dialog box will appear.
6. Return the What action do you want Windows to take? setting to the
original setting (either “Warn” or “Block”), and click [OK].
7. Click [OK]. The System properties dialog box will close.
Depending on how your
system is set up, the
System icon may be
displayed directly in the
Control Panel (the Classic
display). In this case,
double-click the System
icon.
Next, you need to make the driver settings.
(-> MIDI input and output destinations (p. 21))
14
■ Windows 2000 users
1
With the SD-80 disconnected, start up Windows.
Disconnect all USB cables except for a USB keyboard and USB mouse (if
used).
2
Log on to Windows as a user with administrative privileges (such as
Administrator).
3
Open the System Properties dialog box.
Click the Windows Start button, and from the menu that appears, select
Settings | Control Panel. In Control Panel, double-click the System icon.
fig.2-12
4
Open the Driver Signing
Options dialog box.
Click the Hardware tab, and then
click [Driver Signing].
Installing & Setting Up the Driver (Windows)
If you have already
connected the SD-80 to
your computer but the
“Add New Hardware
Wizard” appears, refer to
“You attempted to install
using the above
procedure, but were not
able to” in the
Troubleshooting section
of the Readme_e file
included in the
Driver\USB_XP2K folder
on the CD-ROM.
fig.2-13_50
5
Make sure that “File signature
verification” is set to “Ignore”.
If it is set to “Ignore”, simply click
[OK].
If it is not set to “Ignore”, make a
note of the current setting
(“Warn” or “Block”). Then change
the setting to “Ignore” and click
[OK].
6
Close the System Properties dialog box.
Click [OK].
If you changed the “File
signature verification”
setting in step 5, restore
the original setting after
Windows restarts. (->If
you changed “File
signature verification”
(p. 18))
Español Italiano Français Deutsch English
15
Installing & Setting Up the Driver (Windows)
7
Exit all currently running software (applications).
Also close any open windows. If you are using virus checking or similar
software, be sure to exit it as well.
8
Prepare the CD-ROM.
Insert the CD-ROM into the CD-ROM drive of your computer.
9
Open the “Run...” dialog box.
Click the Windows Start button. From the menu that appears, select
“Run...”.
fig.2-14_40
10
In the dialog box that appears,
input the following into the
“Open” field, and click [OK].
In this manual, the location
of folders and files is given
in terms of the file path,
using \ as the delimiter.
For example,
USB_XP2K\SETUPINF.
EXE indicates the
SETUPINF.EXE file found
in the USB_XP2K folder.
D:\Driver\USB_XP2K\SETUPINF.EXE
* The drive name “D:” may be different for your system. Specify the drive name of your
CD-ROM drive.
fig.2-15_40
11
The SetupInf dialog box will
appear.
You are now ready to install the
driver.
12
Use the USB cable to connect the SD-80 to your computer.
1. With the power switch turned OFF, connect the AC cable to the SD-80.
2. Connect the AC cable to an electrical outlet.
3. Use the USB cable to connect the SD-80 to your computer.
If a message of “The
driver is already
installed” appears, you
can connect the SD-80 to
your computer and use it.
Once the connections have
been completed, turn on
power to your various
devices in the order
specified. By turning on
devices in the wrong
order, you risk causing
malfunction and/or
damage to speakers and
other devices.
Always make sure to have
the volume level turned
down before switching on
power. Even with the
volume all the way down,
you may still hear some
sound when the power is
switched on, but this is
normal, and does not
indicate a malfunction.
16
13
Set the SD-80’s power switch to the ON position.
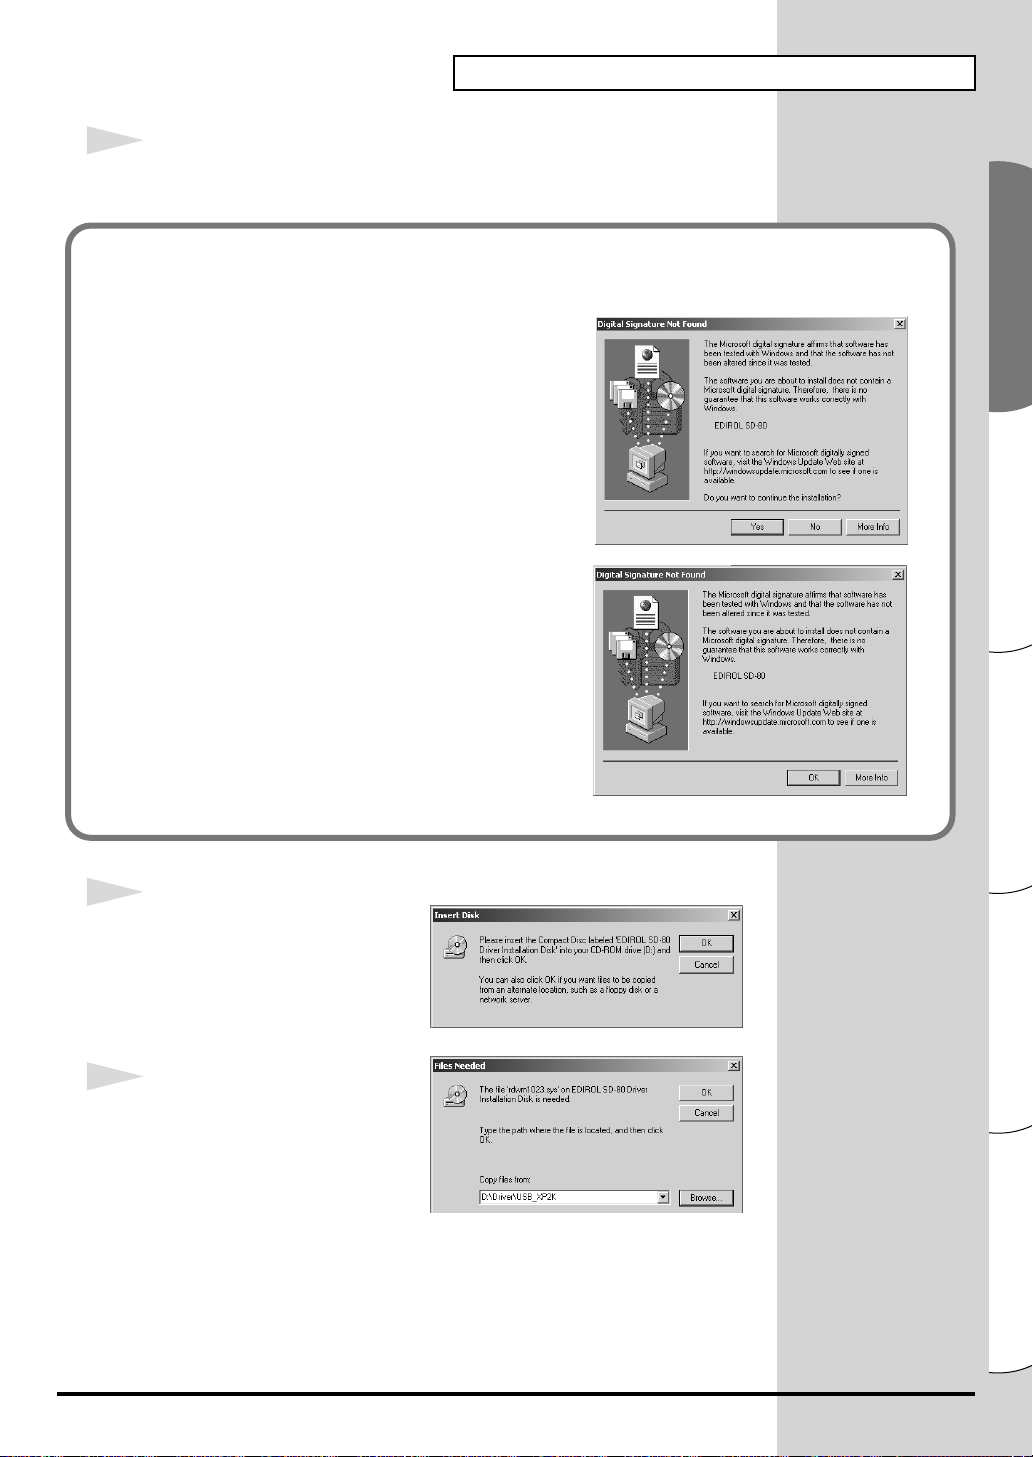
If the “File signature verification” setting was not set to “Ignore”, a “Digital
Signature Not Found” dialog box will appear.
fig.2-16_30
If “File signature verification” is set to “Warn,”
1. Click [Yes].
2. Continue the installation.
If “File signature verification” is set to “Block”
1. Click [OK].
Installing & Setting Up the Driver (Windows)
2. When the “Found New Hardware Wizard”
appears, click [Finish].
3. Perform the installation as described in the
“Troubleshooting” section on Device Manager
shows “?”, “!”, or “USB Composite Device”
(p. 35).
fig.2-17_30
14
The Insert Disk dialog box will
appear.
Click [OK].
fig.2-18_30
15
The Files Needed dialog box will
appear.
Input the following into the
“Copy files from” field, and click
[OK].
D:\Drivers\USB_XP2K
* The drive name “D:” may be different for your system. Specify the drive name of your
CD-ROM drive.
Español Italiano Français Deutsch English
17
Installing & Setting Up the Driver (Windows)
fig.2-17b_30
16
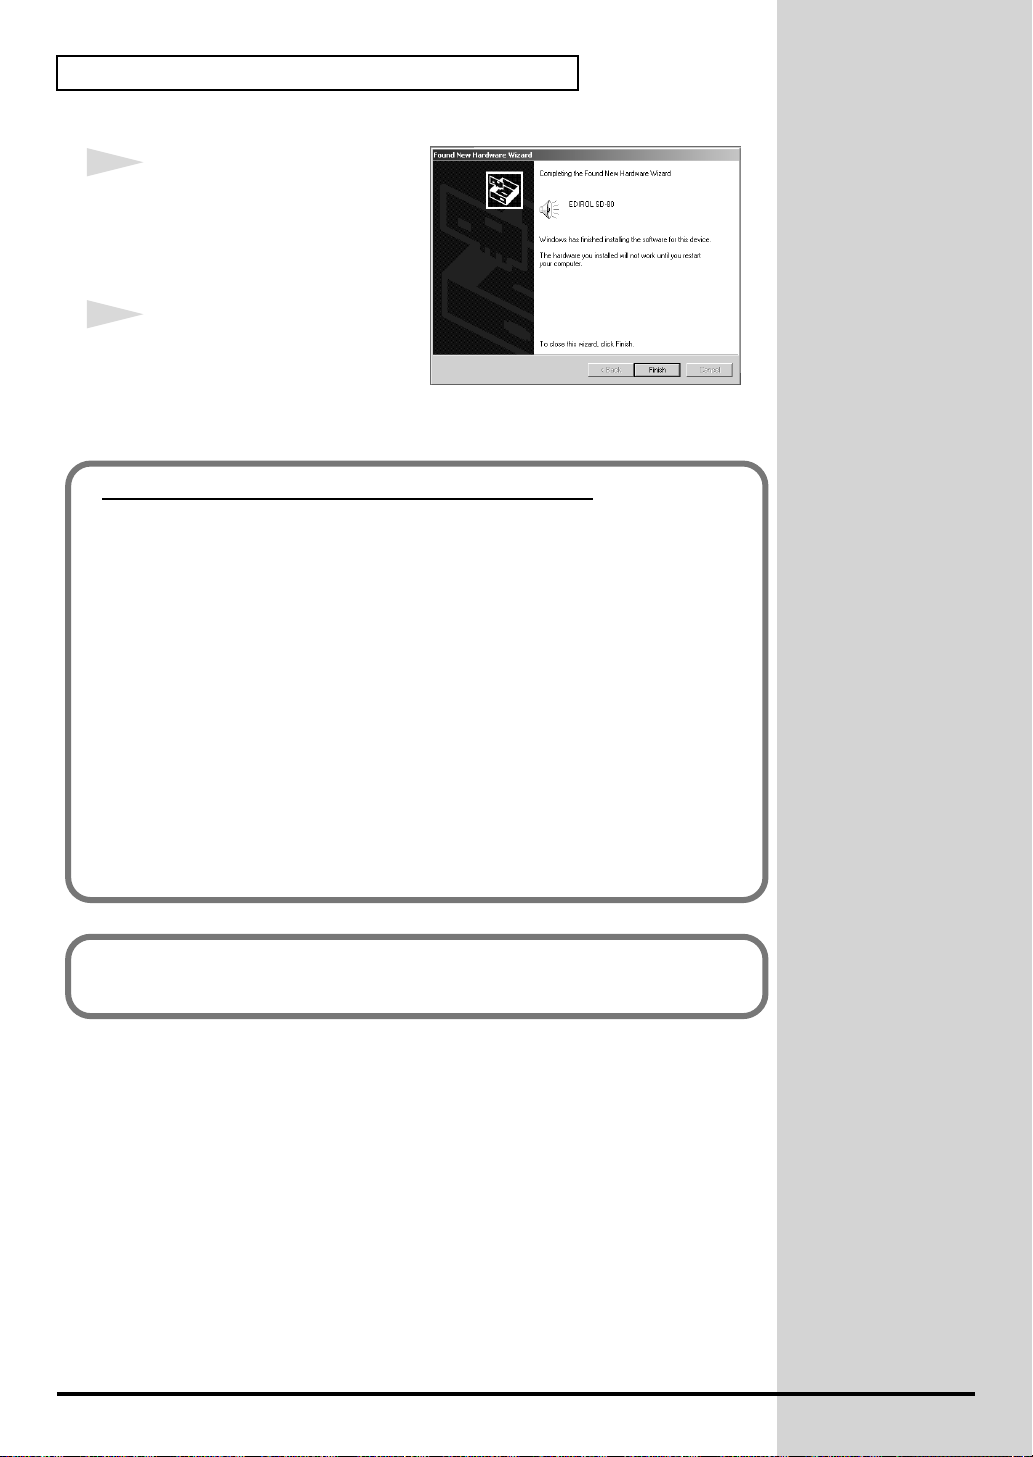
The “Found New Hardware
Wizard” may be displayed.
Verify that “EDIROL SD-80” is
displayed, and click [Finish].
17
Restart Windows.
The System Settings Change
dialog box may appear. Click
[Yes]. Windows will restart automatically.
If you changed “File signature verification”
If you changed the “File signature verification” setting, restore the original
setting after Windows restarts.
1. After Windows restarts, log in to Windows as a user with
administrative privileges, (such as Administrator).
2. In the Windows desktop, right-click the My Computer icon, and from
the menu that appears, select Properties. The System Properties
dialog box will appear.
3. Click the Hardware tab, and then click [Driver signature]. The Driver
Signing Options dialog box will appear.
4. Return the “File signature verification” setting to the original setting
(either “Warn” or “Block”), and click [OK].
5. Click [OK]. The System properties dialog box will close.
Next, you need to make the driver settings.
(-> MIDI input and output destinations (p. 21)
18
■ Windows Me/98 users
1
With the SD-80 disconnected, start up Windows.
Disconnect all USB cables except for a USB keyboard and USB mouse (if
used).
2
Exit all currently running software (applications).
Also close any open windows. If you are using virus checking or similar
software, be sure to exit it as well.
3
Prepare the CD-ROM.
Insert the CD-ROM into the CD-ROM drive of your computer.
4
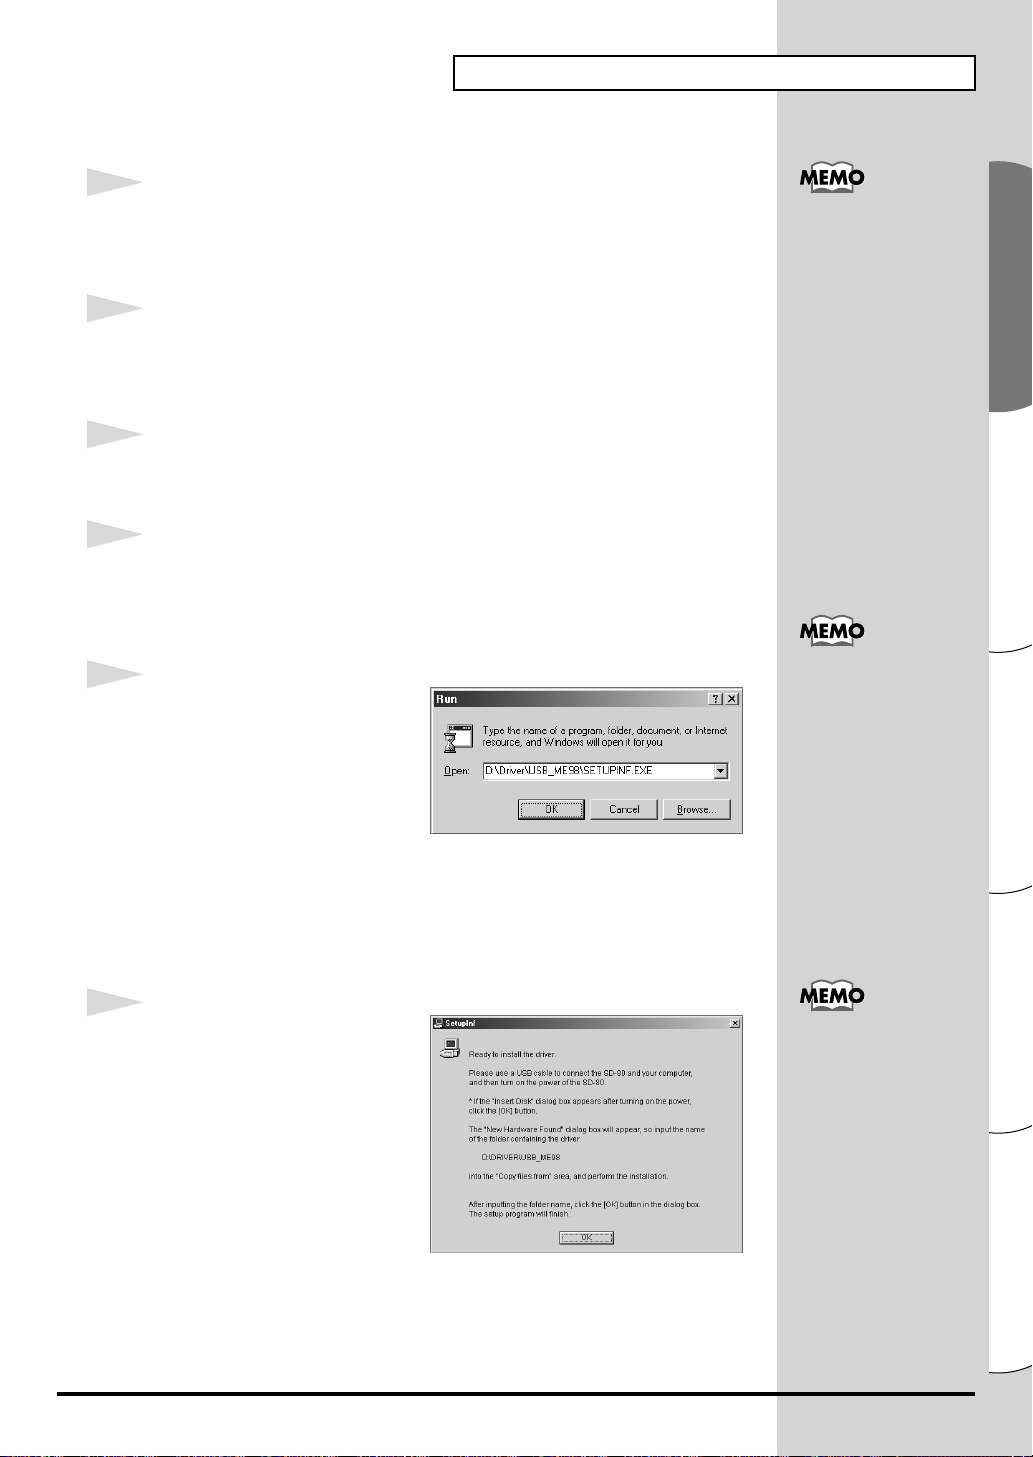
Open the “Run...” dialog box.
Click the Windows Start button.
From the menu that appears, select “Run...”.
fig.2-19a_30
5
In the dialog box that appears,
input the following into the
“Open” field, and click [OK].
D:\Driver\USB_ME98\SETUPINF.EXE
Installing & Setting Up the Driver (Windows)
If you have already
connected the SD-80 to
your computer but the
“Add New Hardware
Wizard” appears, refer to
“You attempted to install
using the above
procedure, but were not
able to” in the
Troubleshooting section
of the Readme_e file
included in the
Driver\USB_ME98 folder
on the CD-ROM.
In this manual, the location
of folders and files is given
in terms of the file path,
using \ as the delimiter. For
example,
USB_ME98\SETUPINF.
EXE indicates the
SETUPINF.EXE file found
in the USB_ME98 folder.
* The drive name “D:” may be different for your system. Specify the drive name of your
CD-ROM drive.
fig.2-19_30
6
The SetupInf dialog box will
appear.
You are now ready to install the
driver.
* Do not click [OK] at this time.
If a message of “The
driver is already
installed” appears, you
can connect the SD-80 to
your computer and use it.
Español Italiano Français Deutsch English
19
Installing & Setting Up the Driver (Windows)
b
7
Use the USB cable to connect the SD-80 to your computer.
1. With the power switch turned OFF, connect the AC cable to the SD-80.
2. Connect the AC cable to an electrical outlet.
3. Use the USB cable to connect the SD-80 to your computer.
8
Set the SD-80’s power switch to the ON position.
fig.2-20_30
9
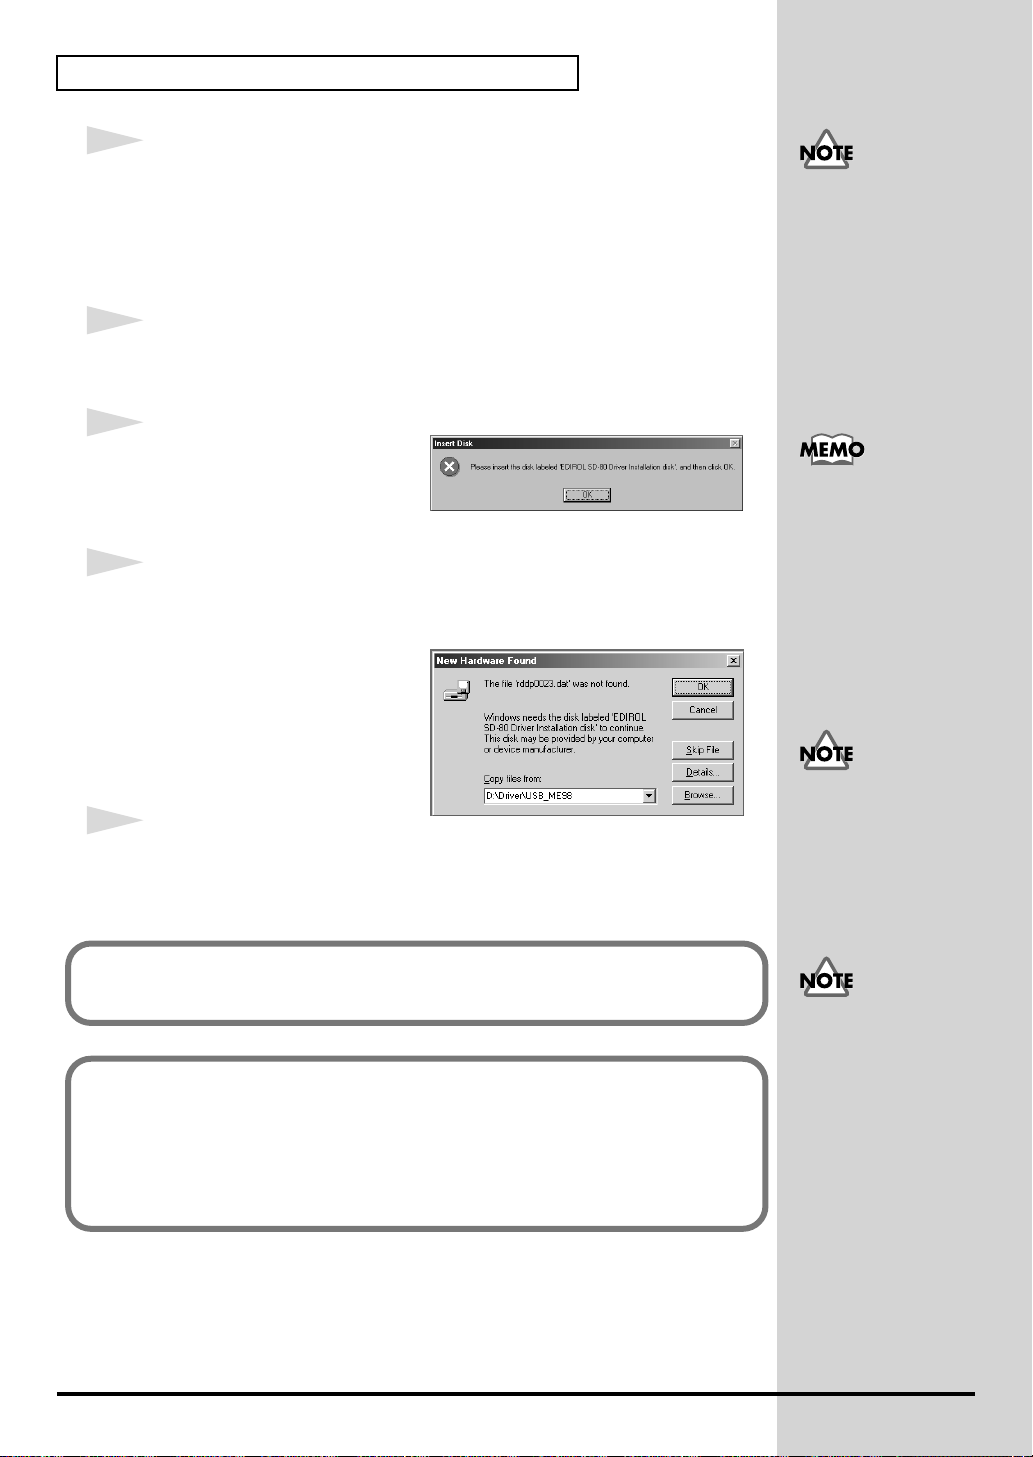
If you are using Windows 98, an
Insert Disk dialog box will
appear. Click [OK].
10
The New Hardware Found dialog box will appear.
Input the following into the “Copy files from” field, and click [OK].
fig.2-21a_40
D:\Driver\USB_ME98
* The drive name “D:” may be different
for your system. Specify the drive
name of your CD-ROM drive.
11
Once the driver has been
installed, New Hardware Found dialog box will close.
In the SetupInf dialog box, click [OK]. The SETUPINF dialog box will close.
Once the connections have
een completed, turn on
power to your various
devices in the order
specified. By turning on
devices in the wrong
order, you risk causing
malfunction and/or
damage to speakers and
other devices.
Always make sure to have
the volume level turned
down before switching on
power. Even with the
volume all the way down,
you may still hear some
sound when the power is
switched on, but this is
normal, and does not
indicate a malfunction.
If you are using
Windows 98 and the
Insert Disk dialog box
dose not appear, please
read The “Insert Disk”
dialog box does not
appear (p. 35).
Next, you need to make the driver settings.
(-> MIDI input and output destinations (p. 21)
If the New Hardware
Found dialog box does not
If you were not able to install the SD-80 driver according to the procedure, or
if you are unable to use the SD-80 even after installing the driver, you must
delete the driver. For details on how to delete the driver, refer to Deleting the
driver (p. 39).
After deleting the driver, use the procedure described in “Installing &
Setting Up the Driver (Windows)” (p. 9) to re-install the driver.
appear, re-install the
driver using the same
procedure as described in
The “Insert Disk” dialog
box does not appear
(p. 35).
20

Settings
■ MIDI input and output destinations
Windows XP/2000/Me users
1
Open Control Panel.
Click the Windows Start button, and from the menu that appears, select
Settings | Control Panel.
Windows XP
Click the Windows start button, and from the menu that appears, select
Control Panel.
2
Open the Sounds and Audio Devices Properties dialog box (or in
Windows 2000/Me, Sounds and Multimedia Properties).
Windows XP
In “Pick a category”, click “Sound, Speech, and Audio Devices”. Next, in
“or pick a Control Panel icon”, click the sounds and Audio Devices icon.
Windows 2000/Me
In Control Panel, double-click the Sounds and Multimedia icon to open
the “Sounds and Multimedia Properties” dialog box.
3
Click the Audio tab.
fig.2-28_30
Installing & Setting Up the Driver (Windows)
Depending on how your
system is set up, the
Sounds and Audio
Devices icon may be
displayed directly in the
Control Panel (the Classic
display). In this case,
double-click the Sounds
and Audio Devices icon.
4
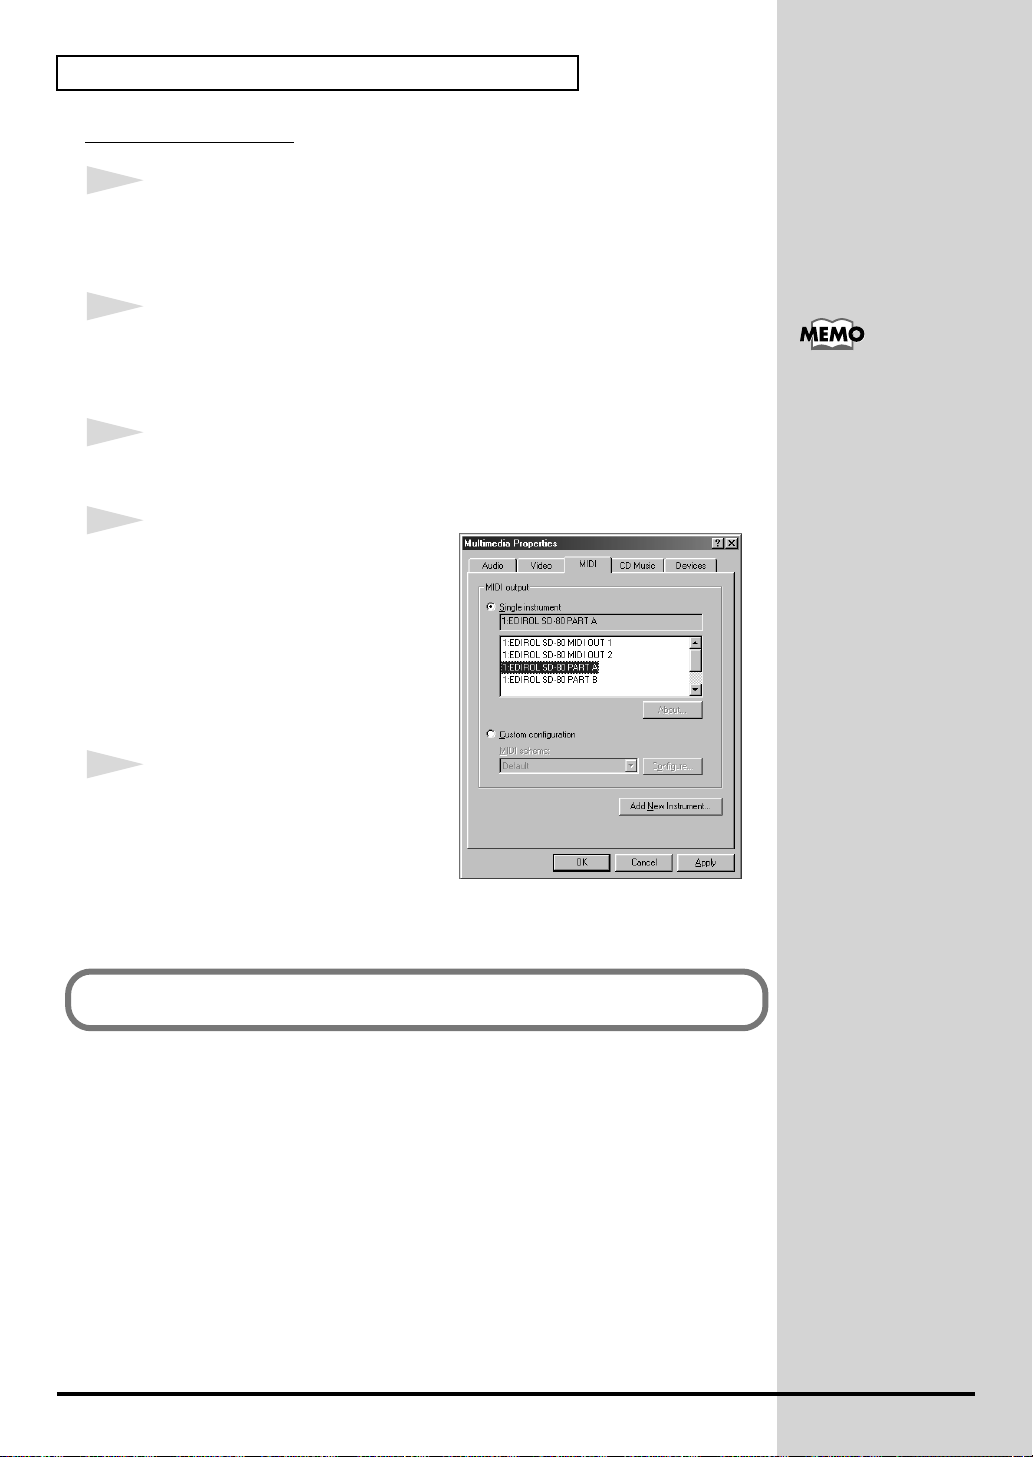
For MIDI music playback, click the ▼
located at the right of [Default device] (or
in Windows 2000/Me, [Preferred
device]), and select the following from
the list that appears.
1:EDIROL SD-80 PARTA
5
Close the Sounds and Audio Devices
Properties dialog box.
Click OK to complete the settings.
Proceed to the next section.
•Windows XP users ....................................................... p. 23
•Windows 2000/Me users............................................. p. 24
Additional information
about the ports
SD-80 MIDI OUT1:
Sends/receives data from
the SD-80’s MIDI OUT
1 connectors
SD-80 MIDI OUT2:
Sends/receives data from
the SD-80’s MIDI OUT
2 connectors
SD-80 PART A:
Sends/receives data for
SD-80 part group A
SD-80 PART B:
Sends/receives data for
SD-80 part group B
21
Español Italiano Français Deutsch English
Installing & Setting Up the Driver (Windows)
Windows 98 users
1
Open Control Panel.
Click the Windows Start button, and from the menu that appears, select
Settings | Control Panel.
2
Open the Multimedia Properties dialog box.
In Control Panel, double-click the Multimedia icon to open the “Multimedia
Properties” dialog box.
3
Click the MIDI tab.
fig.2-29_30
4
Set “MIDI output”.
Select [Single instrument], and
choose one of the following from the
list that appears.
1:EDIROL SD-80 PARTA
5
Close the Multimedia Properties
dialog box.
Click OK to complete the settings.
Additional information
about the ports
SD-80 MIDI OUT1:
Sends/receives data from
the SD-80’s MIDI OUT
1 connectors
SD-80 MIDI OUT2:
Sends/receives data from
the SD-80’s MIDI OUT
2 connectors
SD-80 PART A:
Sends/receives data for
SD-80 part group A
SD-80 PART B:
Sends/receives data for
SD-80 part group B
22
Proceed to the next section. -> Check whether there is sound (p. 24)
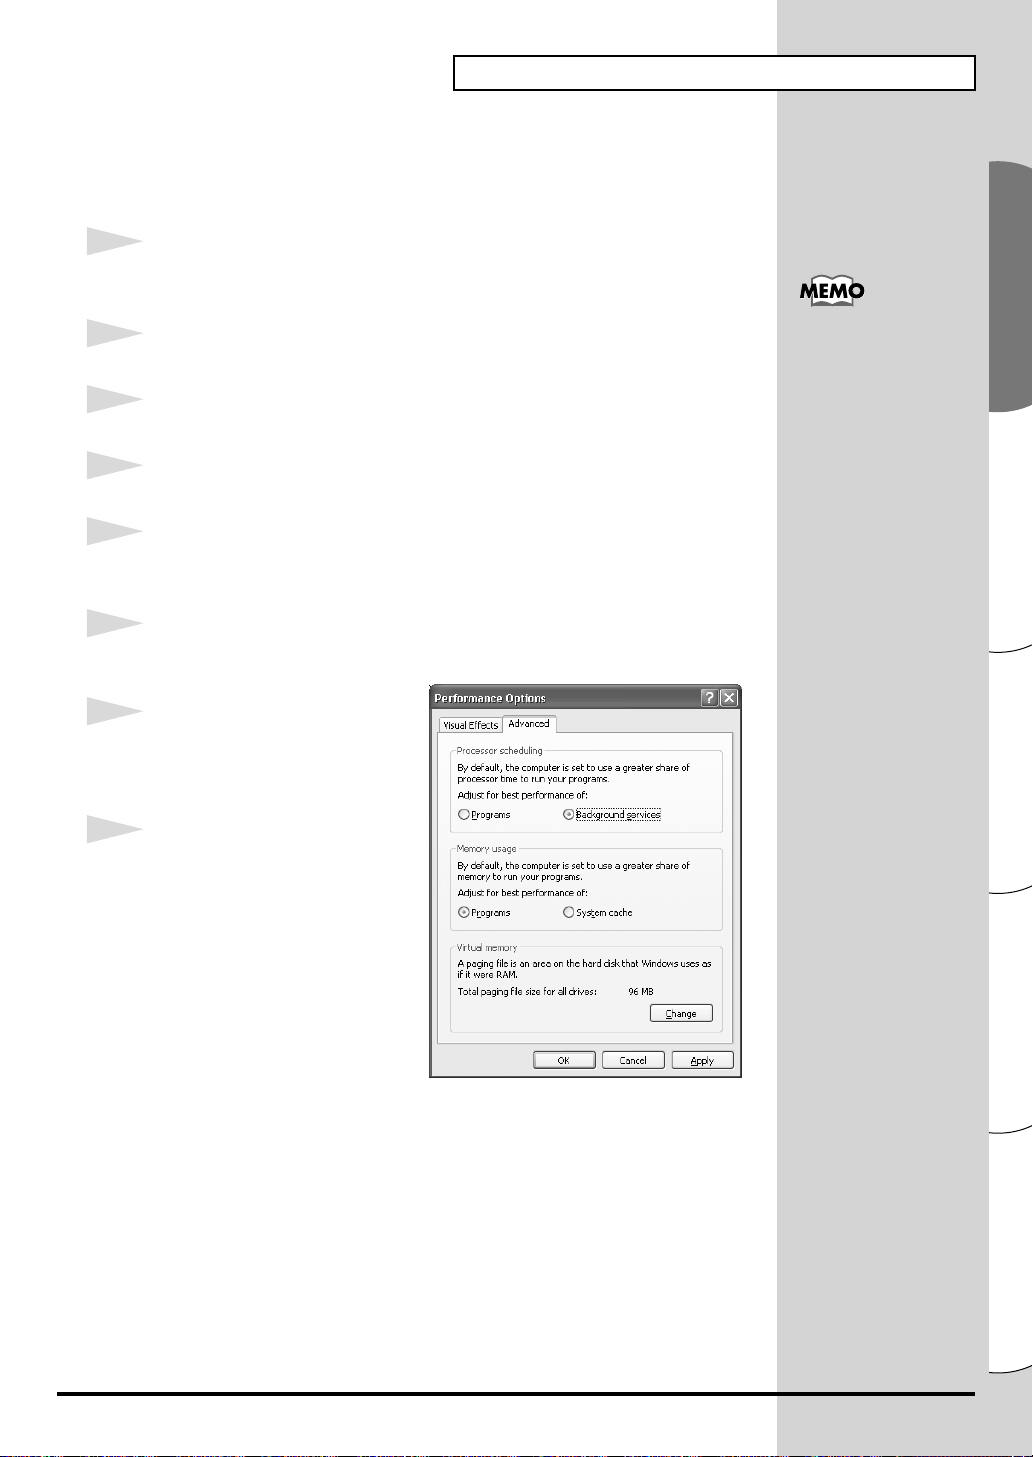
■ Enabling background services
In Windows XP, perform these settings to make MIDI processing occur more
smoothly. These settings are unavailable in Windows 2000/Me/98.
1
Click the Windows start button, and from the menu that appears, select
Control Panel.
2
In “Pick a category”, click “Performance and Maintenance”.
3
In “or pick a Control Panel icon”, click the System icon.
4
Click the Advanced tab.
5
At the right of the Performance field, click [Settings]. The Performance
Options dialog box will appear.
6
Click the Advanced tab.
fig.2-30
Installing & Setting Up the Driver (Windows)
Depending on how your
system is set up, the
System icon may be
displayed directly in the
Control Panel (the Classic
display). In this case,
double-click the System
icon.
7
In the Processor Scheduling
field, select “Background
services”, and click [OK].
8
In the System Properties dialog
box, click [OK].
The System Properties dialog
box will close.
23
Español Italiano Français Deutsch English

Installing & Setting Up the Driver (Windows)
b
b
Check whether there is sound
Next, play back the sample data to verify that the driver installation and
settings were performed correctly.
■ Playing back the sample data (MIDI)
Here we will use standard Windows functionality to play back the sample
data (MIDI). The sample data is found on the CD-ROM.
1
Prepare the CD-ROM.
Insert the CD-ROM into the CD-ROM drive of your computer.
2
From the DemoSong\Additional folder of the CD-ROM, drag
01ORCH(.MID) to your desktop to copy it.
fig.listen98-1m_50
3
Right-click the copied file 01ORCH(.MID), and select
Properties (Play for Windows XP/2000/Me).
Use of the demo song
supplied with this product
for any purpose other than
private, personal
enjoyment without the
permission of the
copyright holder is
prohibited by law.
Additionally, this data
must not be copied, nor
used in a secondary
copyrighted work without
the permission of the
copyright holder.
What you actually see on
your computer screen may
e different, depending on
your computing
environment and the
operating system you're
using.
fig.listen98-2m_30
4
Play back the sample data.
Click the Preview tab, and then
click the button.
If it did not play back
correctly, refer to
Troubleshooting (p. 32) to
determine the reason. This
section contains
information on how to
solve problems such as no
Was the sample data played back?
If it was played back correctly, this means that the computer and the SD-80
are connected correctly, and that the drivers have been installed correctly.
sound, or failure to play
ack correctly.
24
Installing & Setting Up the Driver (Macintosh)
The following items are required for connections and installation. Remove them from the SD-80
package, and have them ready.
• SD-80 • AC cable
• USB cable • CD-ROM
Connecting your Macintosh
1
Turn off the power of the Macintosh and all peripheral devices connected to the Macintosh.
2
With the power switch turned OFF, connect the AC cable to the SD-80.
3
Connect the AC cable to an electrical outlet.
4
Turn on the peripheral devices connected to the Macintosh, except for the SD-80. Then turn on the
power of the Macintosh itself.
* Do not turn on the power of the SD-80 at this time.
If the power of the SD-80 is turned on, a message like the following will appear when the Macintosh
is started up. Perform the steps described below as appropriate for the message that is displayed.
If the screen indicates:
“Driver required for USB device ‘unknown device’ is not available.
Search for driver on the Internet?” -> click [Cancel].
If the screen indicates:
“Software required for using device ‘unknown device’ cannot be found.
Please refer to the manual included with the device, and install the
necessary software.” -> click [OK].
Use either OMS or FreeMIDI as the MIDI driver.
• If you are using OMS..................................................(p. 26)
• If you are using FreeMIDI .........................................(p. 30)
* Either OMS or FreeMIDI must be installed in your Macintosh, as appropriate for
the sequencer software you are using.
What is a driver?
A “driver” is software that transfers data between the SD-80 and application software running on
your computer, when your computer and the SD-80 are connected by a USB cable. The driver sends
data from your application to the SD-80, and from the SD-80 to your application.
Español Italiano Français Deutsch English
25
Installing & Setting Up the Driver (Macintosh)
b
b
Installing the SD-80 driver (OMS)
Use the following procedure to install the SD-80 driver.
The included SD-80 OMS driver is an add-on module for using the SD-80
with OMS. In order for you to use it, OMS must already be installed on the
hard disk from which you started up.
If you would like to learn more about OMS, refer to OMS_2.3_Mac.pdf
(online manual) in the OMS2.3.8E folder within the OMS folder of the
CD-ROM.
OMS can be found in the
OMS 2.3.8 E folder within
the OMS folder of the
CD-ROM.
* Disconnect the SD-80 from the Macintosh before you perform the installation.
1
Exit all currently running software (applications).
If you are using a virus checker or similar software, be sure to exit this as well.
2
Prepare the CD-ROM.
Insert the CD-ROM into the CD-ROM drive.
3
Double-click the SD-80 OMS Driver-E Installer icon (found in the Driver
E-OMS folder of the CD-ROM) to start up the installer.
4
Verify the Install Location, and click [Install].
fig.3-2_40
5
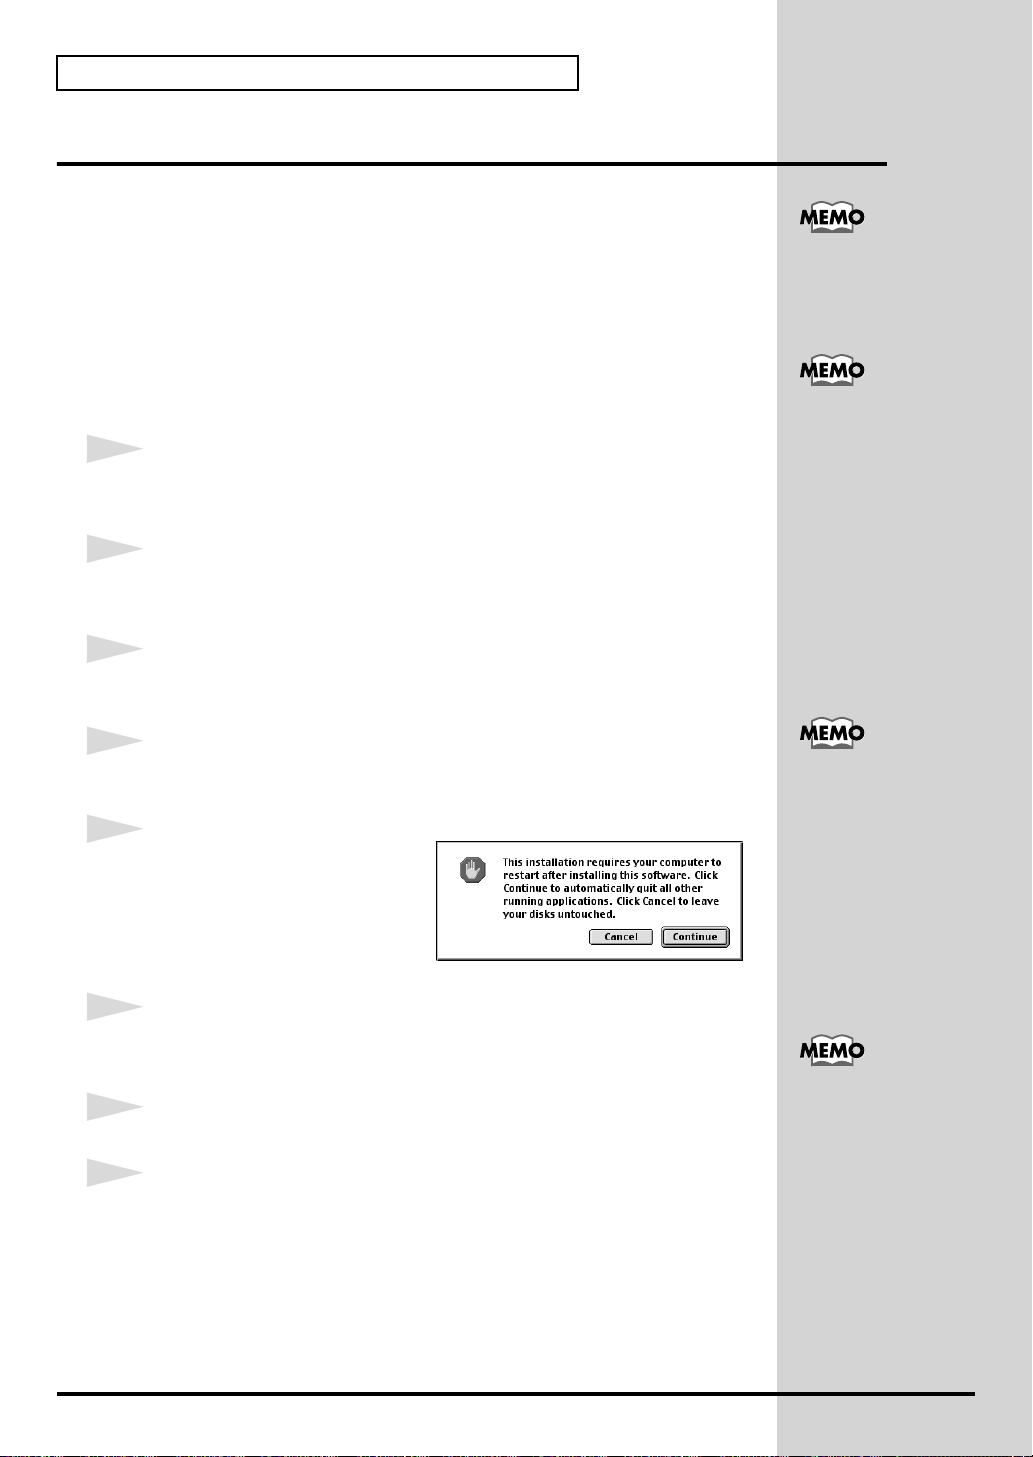
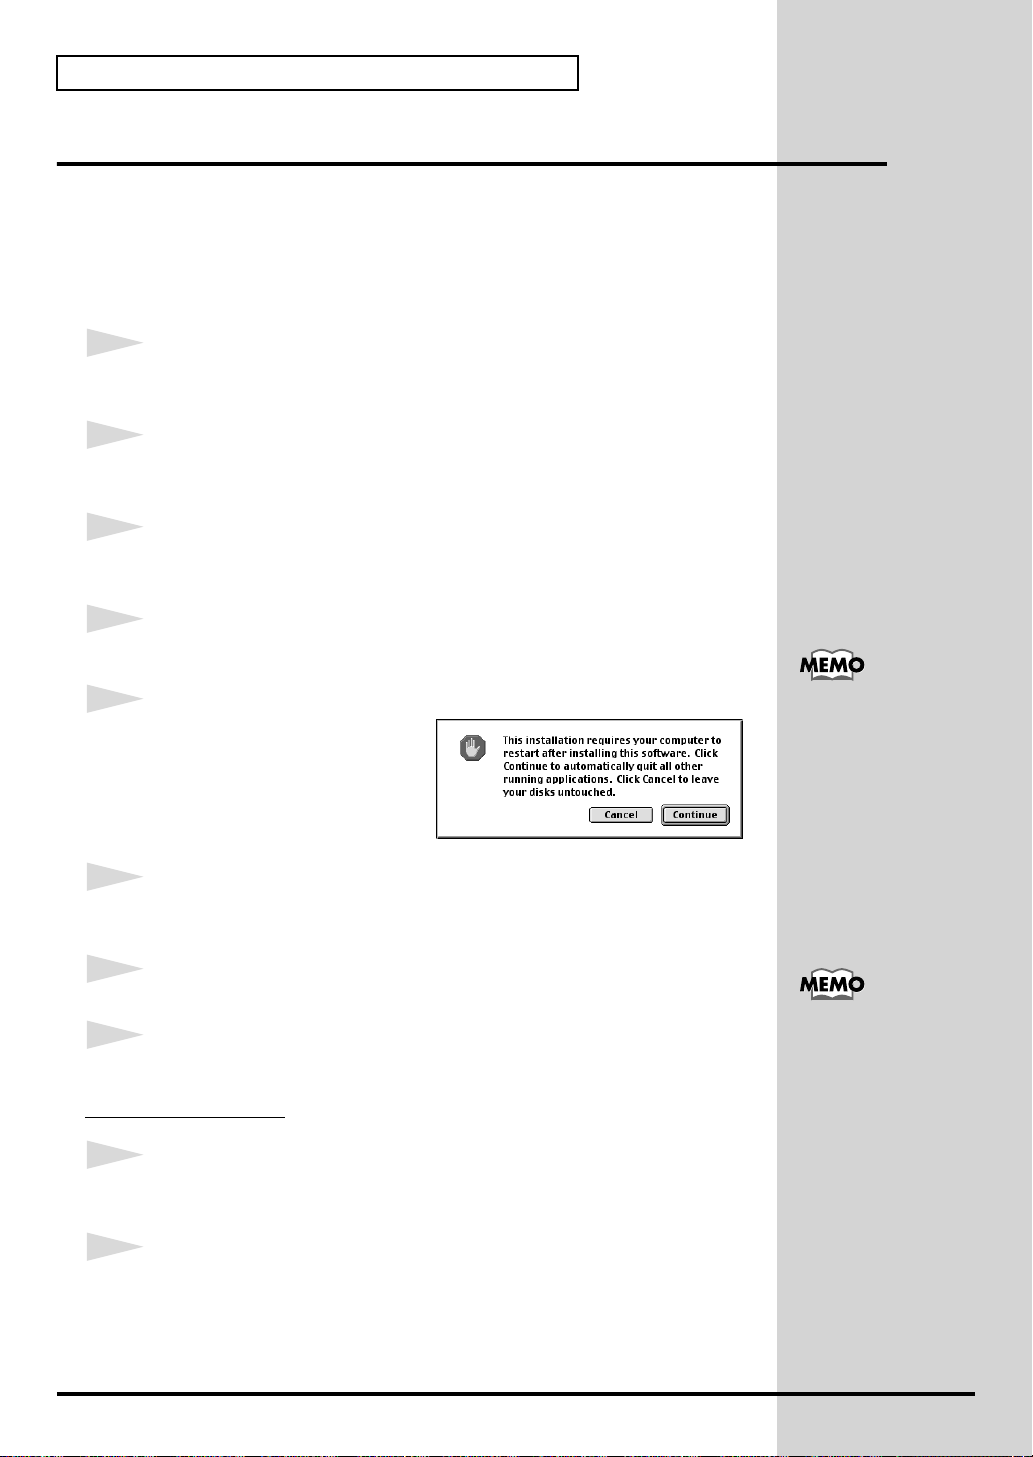
If a message like the following is
displayed, click [Continue].
The other currently running
applications will exit, and
installation will continue.
You will need the Adobe
Acrobat Reader in order to
view OMS_2.3_Mac.pdf.
The latest version of
Adobe Acrobat Reader can
e downloaded from the
Adobe website. http://
www.adobe.com (This
URL may change without
notice.)
Once the connections have
een completed, turn on
power to your various
devices in the order
specified. By turning on
devices in the wrong
order, you risk causing
malfunction and/or
damage to speakers and
other devices.
6
A dialog box will indicate Installation completed.
Click [Restart] to restart your Macintosh.
7
Use the USB cable to connect the SD-80 to your computer.
8
Set the SD-80’s power switch to the ON position.
Always make sure to have
the volume level turned
down before switching on
power. Even with the
volume all the way down,
you may still hear some
sound when the power is
switched on, but this is
normal, and does not
indicate a malfunction
.
26

OMS settings
fig.3-3
1
From the CD-ROM, drag the Driver E-OMS-Setting
folder to the hard disk of your Macintosh to copy it.
fig.3-4
2
In the Opcode-OMS Application folder where you
installed OMS, double-click OMS Setup to start it up.
fig.3-5_35
3
If a dialog box like the one shown
here appears, click [Turn It Off]. A
confirmation dialog box will then
appear, so click [OK].
fig.3-6_35
Installing & Setting Up the Driver (Macintosh)
We recommend that you
turn off AppleTalk, by
selecting Chooser from
the Apple menu.
4
The Create a New Studio Setup
dialog box will appear. Click
[Cancel].
If you accidentally clicked [OK], click
[Cancel] in the next screen.
fig.3-7
5
Choose “Open” from the File menu.
From the Setting folder that you copied in step 1, select the SD-80 USB file,
and click [Open].
fig.3-8_35
A screen like the one shown here will
appear.
27
Español Italiano Français Deutsch English
Installing & Setting Up the Driver (Macintosh)
fig.3-9_35
6
From the Edit menu, select OMS MIDI
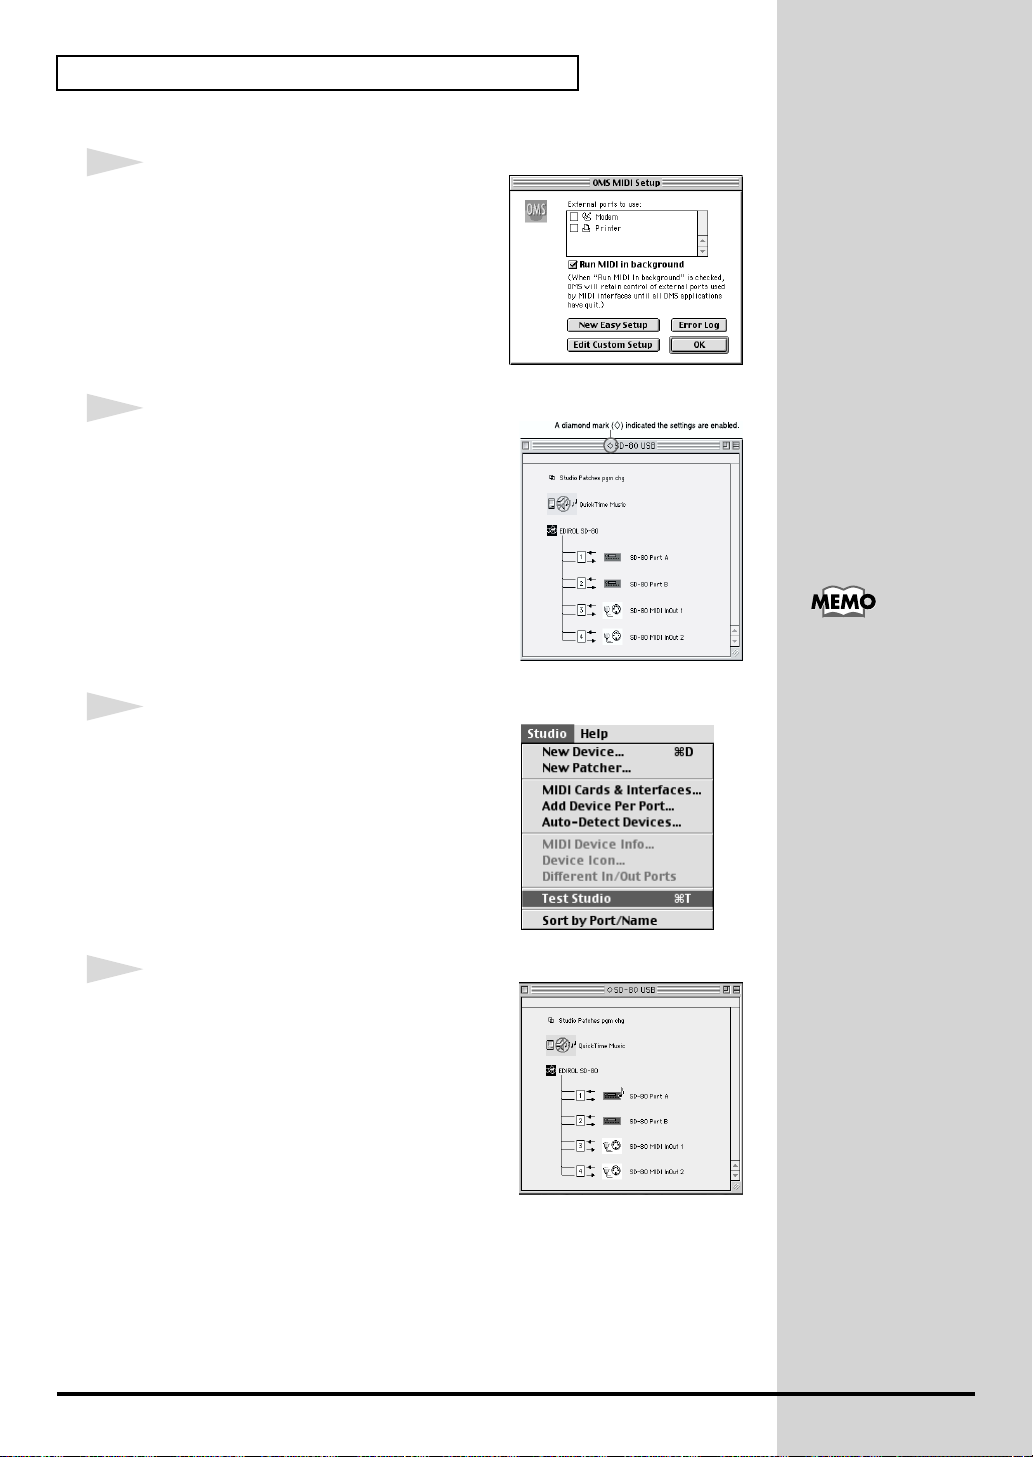
Setup.
In the OMS MIDI Setup dialog box that
appears, check Run MIDI in background,
and click [OK].
fig.3-10
7
From the File menu, choose Make Current.
If you are unable to select Make Current, it
has already been applied, and you may
continue to the next step.
fig.3-11_50
Additional information
about the ports
8
Verify that MIDI transmission and reception
can be performed correctly. From the Studio
menu, choose Test Studio.
fig.3-22_50
9
When you move the mouse cursor near the
sound generator icon, the cursor will change
to a shape.
Click on the sound generator icon of each port
in the diagram at right. If sound is heard from
the SD-80, the settings are correct.
SD-80 Port A:
Sends/receives data for
SD-80 part group A
SD-80 Port B:
Sends/receives data for
SD-80 part group B
SD-80 MIDI InOut1:
Sends/receives data from
the SD-80’s MIDI IN 1/
OUT 1 connectors
SD-80 MIDI InOut2:
Sends/receives data from
the SD-80’s MIDI IN 2/
OUT 2 connectors
28

Installing & Setting Up the Driver (Macintosh)
Does the SD-80’s PART level meter move?
If the PART level meter in the SD-80’s display is moving but you do not hear
sound, check whether the volume of the SD-80 or your speaker system has
been lowered. If the PART level meter does not move, check the connections
and OMS settings once again.
10
Exit OMS Setup.
From the File menu, choose [Exit]. If the AppleTalk confirmation dialog box
appears, click [OK] to close the dialog box.
This completes the series of steps needed to connect the SD-80 to the
Macintosh, install the MIDI driver, and make the driver settings.
If the SD-80 does not
produce sound, refer to No
sound (p. 36).
29
Español Italiano Français Deutsch English
Installing & Setting Up the Driver (Macintosh)
b
Installing the SD-80 driver (FreeMIDI)
Use the following procedure to install the SD-80 driver.
The included SD-80 FreeMIDI driver is an add-on module for using the
SD-80 with FreeMIDI. In order to use it, FreeMIDI must be installed on the
hard disk from which you started up.
* Disconnect the SD-80 from the Macintosh before beginning the installation.
1
Exit all currently running software (applications).
If you are using a virus checker or similar software, be sure to exit this as well.
2
Prepare the CD-ROM.
Insert the CD-ROM into the CD-ROM drive.
3
Double-click the SD-80 FM Driver-E Installer icon (found in the Driver
E-FreeMIDI folder of the CD-ROM) to start up the installer.
4
Verify the Install Location, and click [Install].
fig.3-2_40
5
If a message like the following is
displayed, click [Continue].
The other currently running
applications will exit, and
installation will continue.
6
A dialog box will indicate Installation completed. Click [Restart] to restart
your Macintosh.
Once the connections have
een completed, turn on
power to your various
devices in the order
specified. By turning on
devices in the wrong
order, you risk causing
malfunction and/or
damage to speakers and
other devices.
7
Use the USB cable to connect the SD-80 to your computer.
Always make sure to have
8
Switch ON the SD-80’s Power switch.
FreeMIDI settings
1
From the CD-ROM, copy the Driver E–FreeMIDI–Setting folder onto the
hard disk of your Macintosh.
2
Open the FreeMIDI Applications folder from the location into which you
installed FreeMIDI, and double-click the FreeMIDI Setup icon to start it up.
the volume level turned
down before switching on
power. Even with the
volume all the way down,
you may still hear some
sound when the power is
switched on, but this is
normal, and does not
indicate a malfunction
.
30
 Loading...