

Page 1

AC1200 11ac Wireless LAN
Dual band USB Adapter
User Manual
Version: 1.0
(January, 2013)
I
Page 2

COPYRIGHT
Copyright ©2013 by this company. All rights reserved. No part of this publication
may be reproduced, transmitted, transcribed, stored in a retrieval system, or translated
into any language or computer language, in any form or by any means, electronic,
mechanical, magnetic, optical, chemical, manual or otherwise, without the prior
written permission of this company
This company makes no representations or warranties, either expressed or implied,
with respect to the contents hereof and specifically disclaims any warranties,
merchantability or fitness for any particular purpose. Any software described in this
manual is sold or licensed "as is". Should the programs prove defective following
their purchase, the buyer (and not this company, its distributor, or its dealer) assumes
the entire cost of all necessary servicing, repair, and any incidental or consequential
damages resulting from any defect in the software. Further, this company reserves the
right to revise this publication and to make changes from time to time in the contents
thereof without obligation to notify any person of such revision or changes.
II
Page 3

Federal Communication Commission
Interference Statement
FCC Part 15
This equipment has been tested and found to comply with the limits for a Class B
digital device, pursuant to part 15 of the FCC Rules. These limits are designed to
provide reasonable protection against harmful interference in a residential installation.
This equipment generates, uses and can radiate radio frequency energy and, if not
installed and used in accordance with the instructions, may cause harmful interference
to radio communications. However, there is no guarantee that interference will not
occur in a particular installation. If this equipment does cause harmful interference to
radio or television reception, which can be determined by turning the equipment off
and on, the user is encouraged to try to correct the interference by one or more of the
following measures:
● Reorient or relocate the receiving antenna.
● Increase the separation between the equipment and receiver.
● Connect the equipment into an outlet on a circuit different from that to which
the receiver is connected.
● Consult the dealer or an experienced Radio/ TV technician for help.
This device complies with part 15 of the FCC Rules. Operation is subject to the
following two conditions:
1) This device may not cause harmful interference.
2) This device must accept any interference received, including interference that
may cause undesired operation.
Any changes or modifications not expressly approved by the party responsible for
compliance could void the user’s authority to operate the equipment.
Note: The manufacturer is not responsible for any Radio or TV interference caused by
unauthorized modifications to this equipment. Such modifications could void the
user’s authority to operate the equipment.
III
Page 4

Federal Communication Commission (FCC) Radiation Expos ure
Statement
This equipment complies with FCC radiation exposure limits set forth for an
uncontrolled environment. End users must follow the specific operating instructions
for satisfying RF exposure compliance. This transmitter must not be co-located or
operating in conjunction with any other antenna or transmitter. This equipment has
been SAR-evaluated for use in hand. SAR measurements are based on a 5mm spacing
from the body and that compliance is achieved at that distance.
IV
Page 5

R&TTE Compliance Statement
This equipment complies with all the requirements of DIRECTIVE 1999/5/EC OF
THE EUROPEAN PARLIAMENT AND THE COUNCIL of March 9, 1999 on radio
equipment and telecommunication terminal Equipment and the mutual recognition of
their conformity (R&TTE).
The R&TTE Directive repeals and replaces in the directive 98/13/EEC
(Telecommunications Terminal Equipment and Satellite Earth Station Equipment) As
of April 8, 2000.
Safety
This equipment is designed with the utmost care for the safety of those who install
and use it. However, special attention must be paid to the dangers of electric shock
and static electricity when working with electrical equipment. All guidelines of this
and of the computer manufacture must therefore be allowed at all times to ensure the
safe use of the equipment.
EU Countries Intended for Use
The ETSI version of this device is intended for home and office use in Austria,
Belgium, Denmark, Finland, France, Germany, Greece, Ireland, Italy, Luxembourg,
the Netherlands, Portugal, Spain, Sweden, and the United Kingdom.
The ETSI version of this device is also authorized for use in EFTA member states:
Iceland, Liechtenstein, Norway, and Switzerland.
EU Countries Not intended for use
None.
V
Page 6

RF Exposur e Informat ion (SAR)
This device meets the government’s requirements for exposure to radio waves. This
device is designed and manufactured not to exceed the emission limits for exposure to
radio frequency (RF) energy set by the Federal Communications Commission of the
U.S. Government.
The exposure standard for wireless device employs a unit of measurement known as
the Specific Absorption Rate, or SAR. The SAR limit set by the FCC is 1.6W/kg.
*Tests for SAR are conducted using standard operating positions accepted by the FCC
with the device transmitting at its highest certified power level in all tested frequency
bands. Although the SAR is determined at the highest certified power level, the actual
SAR level of the device while operating can be well below the maximum value. This
is because the device is designed to operate at multiple power levels so as to use only
the poser required to reach the network. In general, the closer you are to a wireless
base station antenna, the lower the power output.
SAR compliance has been established in the host product(s) (laptop computers),
tested at 5mm separation distance to the human body, and tested with USB slot
configurations including Horizontal-UP, Horizontal-Down, V er tical-Front,
Vertical-Back. This device can be used in host product(s) with substantially similar
physical dimensions, construction, and electrical and RF characteristics.
The highest SAR value, tested per FCC RF exposure guidelines for USB dongle, as
described in this user guide, is 1.19 W/kg. The FCC has granted an Equipment
Authorization for this device with all reported SAR levels evaluated as in compliance
with the FCC RF exposure guidelines. SAR information on this device is on file with
the FCC and can be found under the Display Grant section of
www.fcc.gov/oet/ea/fccid after searching on FCC ID: NDD9578221212.
This USB dongle transmitter is approved for use in typical laptop computers. To
comply with FCC RF exposure requirements, this USB dongle should not be used in
other devices or certain laptop and tablet computer configurations where the USB
connectors on the host computer are unable to provide or ensure the necessary
operating configurations intended for the device and its users or bystanders to satisfy
RF exposure compliance requirements. This USB dongle should be installed and
operated with minimum distance 5mm between the radiator & your body.
VI
Page 7

C A T A L O G
Chapter I: Product Information ...................................................................... 1
1-1 Introduction and safety information ................................................................ 1
1-2 Safety Information ........................................................................................... 2
1-3 System Requirements ...................................................................................... 3
1-4 Package Contents ............................................................................................. 4
1-5 Familiar with your new wireless network adapter ........................................... 5
CHAPTER II: Driver Installation and Configuration ............................... 6
2-1 Network adapter Installation ...................................................................................... 6
2-2 Connect to Wireless Access Point ........................................................................... 10
2-2-1 Using Realtek Utility .......................................................................... 10
2-2-2 Using Windows Zero Configuration .................................................. 16
2-3 Connection Profile Management ............................................................................. 21
2-3-1 Add a new profile ............................................................................... 22
2-3-2 Remove an existing profile ................................................................ 25
2-3-3 Edit an existing profile ....................................................................... 26
2-3-4 Make a copy of existing profile.......................................................... 27
2-3-5 Set as default profile ........................................................................... 28
2-4 View Network Statistics, General Information, and Status ............................. 29
2-4-1 General Information ........................................................................... 29
2-4-2 Status .................................................................................................. 30
2-4-3 V ie w Network Statistics ..................................................................... 31
2-5 Miscellaneous Settings ................................................................................................ 32
2-6 Establish secure connection with AP by WPS .................................................... 34
2-6-1 PIN Code ............................................................................................ 36
2-6-2 Push Button ........................................................................................ 38
CHAPTER III: Soft-AP Function ................................................................. 40
3-1 Switch to AP Mode and Station Mode ..................................................................... 40
3-1-1 Configure SSID and Channel ............................................................. 43
3-1-2 Setup Soft-AP Security ...................................................................... 45
3-2 Advanced Settings ......................................................................................................... 47
3-3 Wireless Statistics .......................................................................................................... 48
3-4 Internet Connection Sharing (ICS) ......................................................................... 49
CHAPTER IV: Appendix ............................................................................ 50
4-1 Hardware Specification .............................................................................................. 50
4-2 Troubleshooting............................................................................................................. 51
4-3 Glossary ............................................................................................................................ 53
VII
Page 8

Chapter I: Product Inf ormation
1-1 Introduction and safety information
Thank you fo r purchasing this extreme high-speed 802.11a/b/g/n/ac dual
band wirele ss network adapter! Excepting comm on wireless standar d s
802.11a/b/g/n, this wirele ss network adapter is also 802.11ac compatible data transfe r rate is 867Mbps, and that’s sixteen times faste r than 802.11g
wireless ne twork! 802.11ac also provides wider wireless coverage, so you
don’t have to worry if your computer is far from your wireless access
point.
With easy-to-install Super Speed USB 3.0 interfa ce - a very com mon
expansion p ort of computers - plug this wireless ne twork adapter into any
empty USB 3.0 port of your computer, just that simple!
Other features of this route r inc lu di ng:
IEEE 802.11a/b/g/n/ac compatible.
Extreme High transfer data rate – 11ac up to 867Mbps, 11n up to
300Mbps
Support WMM wireless QoS featu re.
Support 64/128-bit WEP, WPA, WPA2 with IEEE 802.1x
functions for high level of security.
Support the most popular operating syste m : Windows
XP/Vista/7/8, Linux, MAC OS
Support WPS (Wi-Fi Protected Setup) hardware button for easy
connection.
Support USB 3.0/2.0 interface. (11ac mode use USB 3.0 is
required )
Portable don gle type design.
1
Page 9

1-2 Safety Information
In order to keep the safe ty of users and your properties, please follow the
following safety instructions:
1. This USB wireless network adapter is desi gne d for in d oor us e only.
DO NOT expose this network adapter to direct sun light, rain, or snow.
2. DO NOT put this netw ork adapter at or near hot or humid places, like
kitchen or bathroom. Also, do not left this wireless network adapter in the
car in summer.
3. This network adapter is small e nough to put in a child’s mouth, and it
could cause serious injury or could b e fatal. If t hey throw the network
adapter, the adapter will be damaged. PLEASE KEEP THIS NETWORK
ADAPTER OUT THE REACH OF CHILDREN!
4. This network adapter will become hot when being used for long time
(This is normal and is no t a malfunction). DO NOT put the network
adapter on a paper, cloth, or other flammable objects after the network
adapter has bee n used for a long time.
5. There’s n o user-se rviceable part inside the network adapter. If you
found that the network adapter is not working prope rly, please contact
your dealer of purchase and ask for help. DO NO T disassemble the
network adapter by yourself, warranty will be void.
6. If the network adapter falls into water, DO NOT USE IT AGAIN
BEFORE YOU SEND THE ADAPTER TO THE DEALER OF
PURCHASE FOR INSPECTION.
7. If you sm ell somethin g strange or even see some smoke coming out
from the network adapter, switch the computer off immediately, and call
dealer of pur chase for help.
2
Page 10

1-3 System Requirements
An empty USB 3.0/2.0 port (11ac mode use Super Speed USB 3.0 is
required ) (May not be able work with USB 1.1 port, and
performa nce will be greatly reduce d)
Windows XP, Vista, Windows 7, Windows 8 operating system
CD-ROM drive
At least 100MB of available disk space
3
Page 11

1-4 Package Contents
Before you starting to use this wirele ss network a dapter, please check if
there is any of the items missing in the package, and contact your dealer
of purchase to claim for missing items:
□ USB Wireless Network Adapter (1 pcs) ……...………………… 1
□ Quick Installation Guide (1 pcs)….………….…………………. 2
□ Driver/Utility/Quick Guide/User Manual CD-ROM (1 pcs) …… 3
3 2 1
4
Page 12
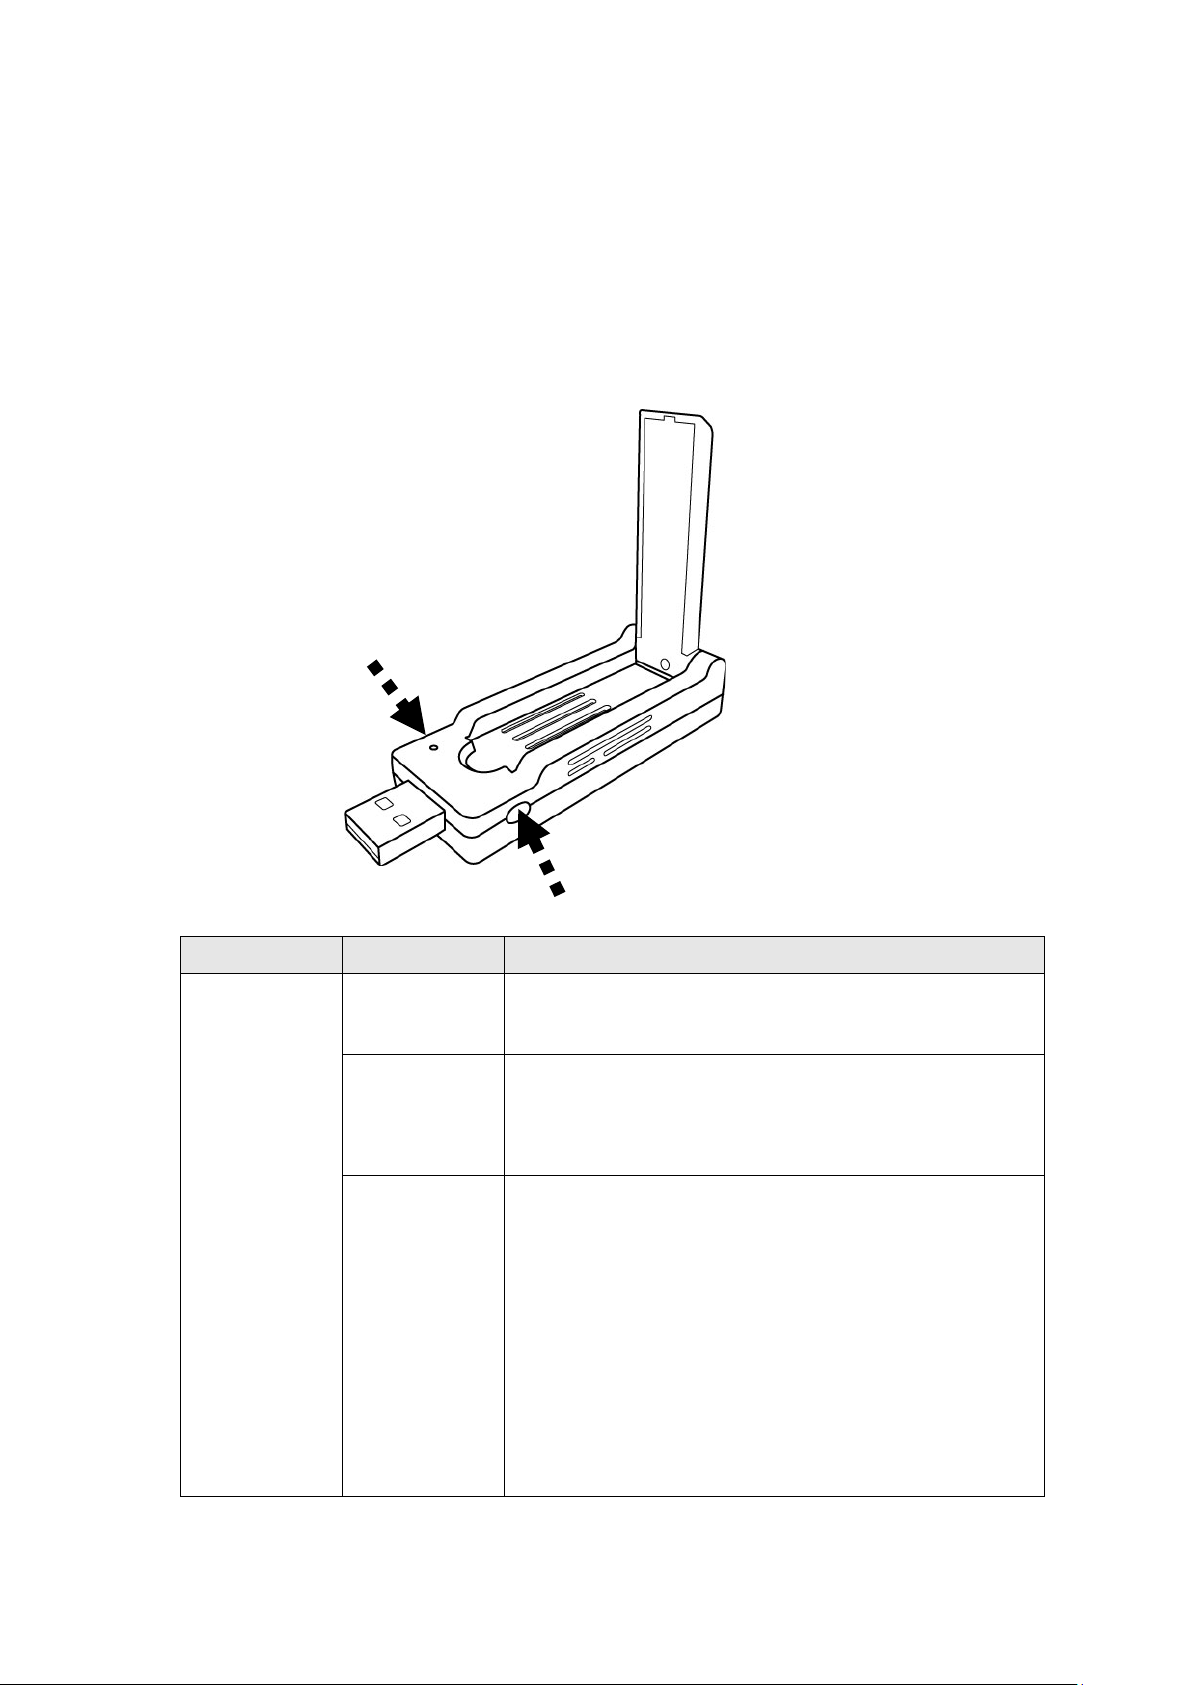
1-5 Familiar with your new wireless network adapter
1
2
3
4
1. USB Connector
2. External W ireless An tenna
3. Power/Activity/WPS LED
4. WPS Button (Press 2 second s to activate WPS pairin g mode)
LED Name Light Status Description
Power/
Activity/
WPS
Off 1.No wireless ne tw or k adapter is installed
On 1.Wireless network adapter is n ormally
2.Radio off mode.
installed
2.Radio on mode.
Blinking 1.Transferring or receiving data.
2.Slow Blinking one time per seconds means
WPS is activated. The network adapter will
wait for 2 m inutes to establish WPS
connection.
3. Fast Blinking 30 seconds, then Solid light
15 seconds, m eans W PS connec ti on is
established successfully.
5
Page 13

CHAPTER II: Driver Installation and C on fi gur at ion
2-1 Network Ada pter Installation
Please follow the following instruc tions to install your new wireless
network adapter:
1. Insert the USB wire le ss network adapter into an empty Super Speed
USB 3.0 port of your computer when computer is switched on. Never
use force to insert the adapter, if you fe el it’s stuck, flip the adapter
over and try again.
Super Speed USB 3.0
6
Page 14
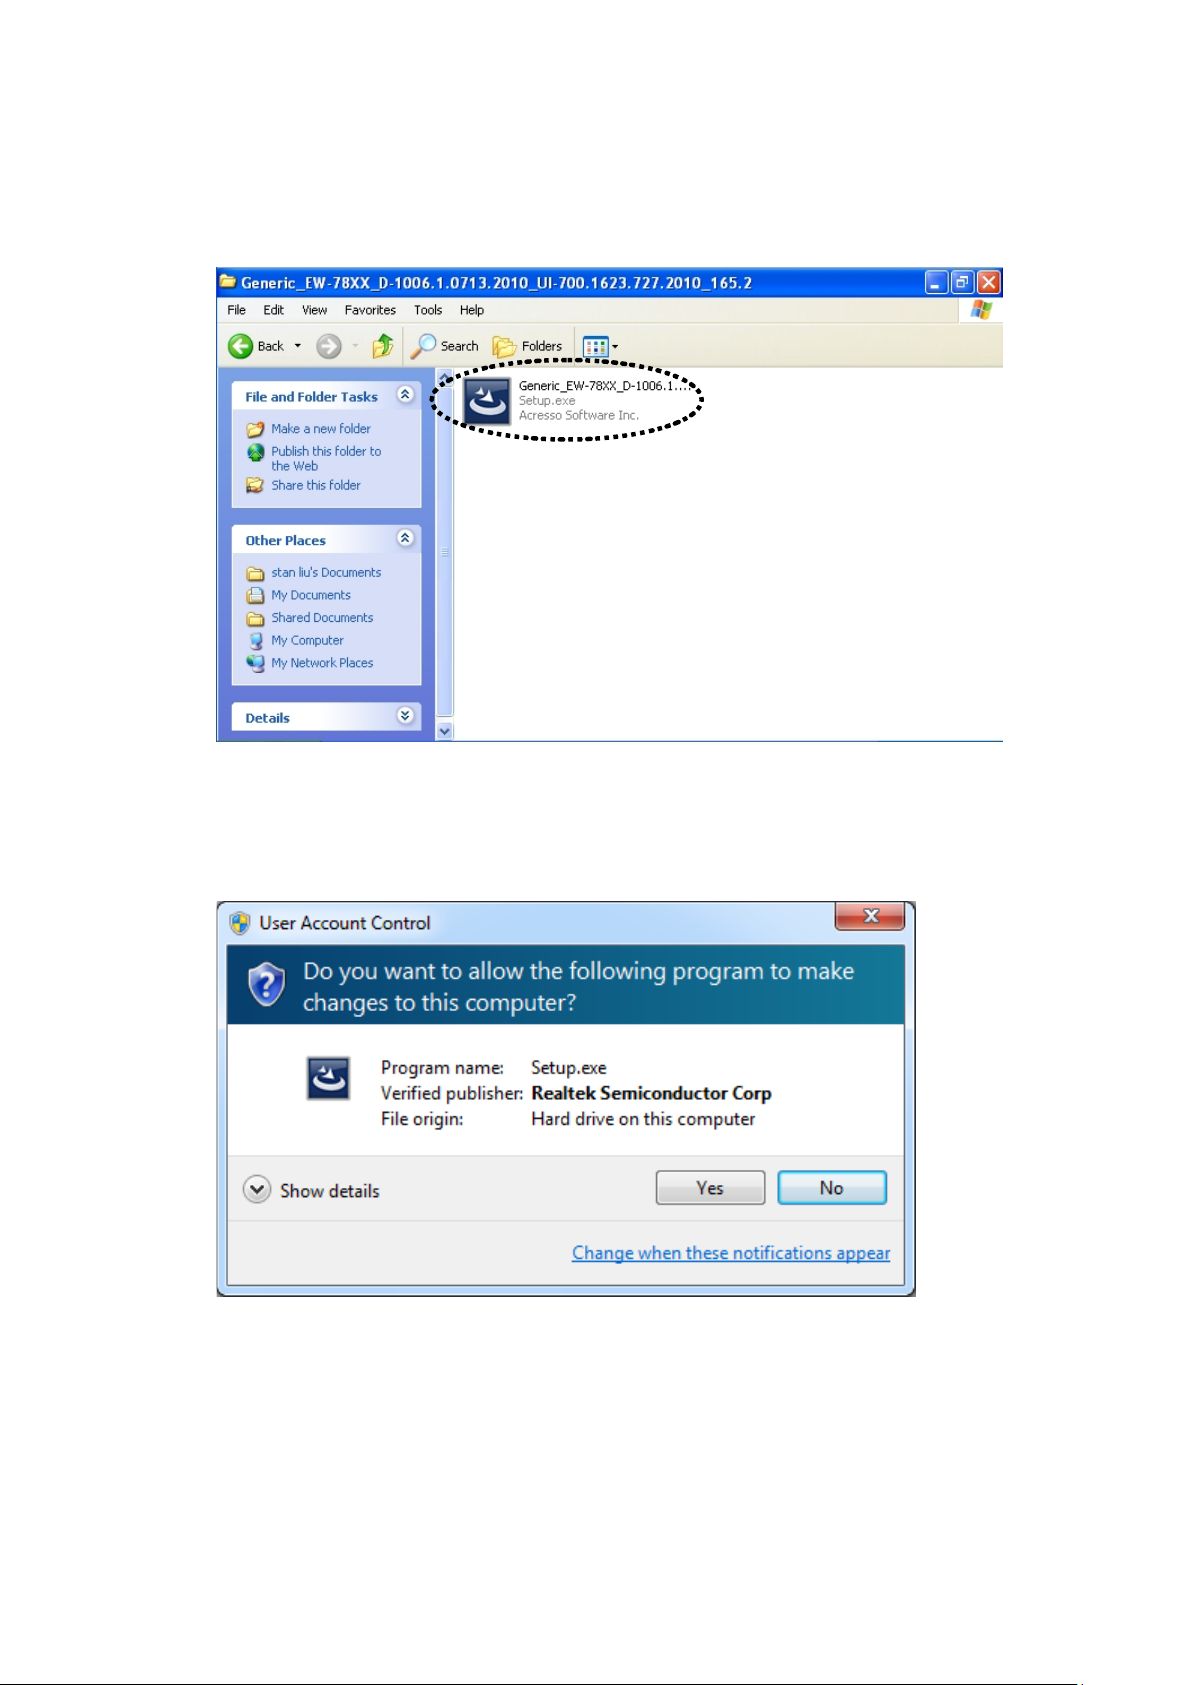
2. Insert devi ce driver CDROM into the C D/DVD RO M drive of your
computer, and execute ‘Setup.exe’ program in ‘Driver’ folder.
For Windows Vista / Windows 7 OS, you’ll be prompted to c onfirm
installation. Click ‘Yes’ to continue.
7
Page 15
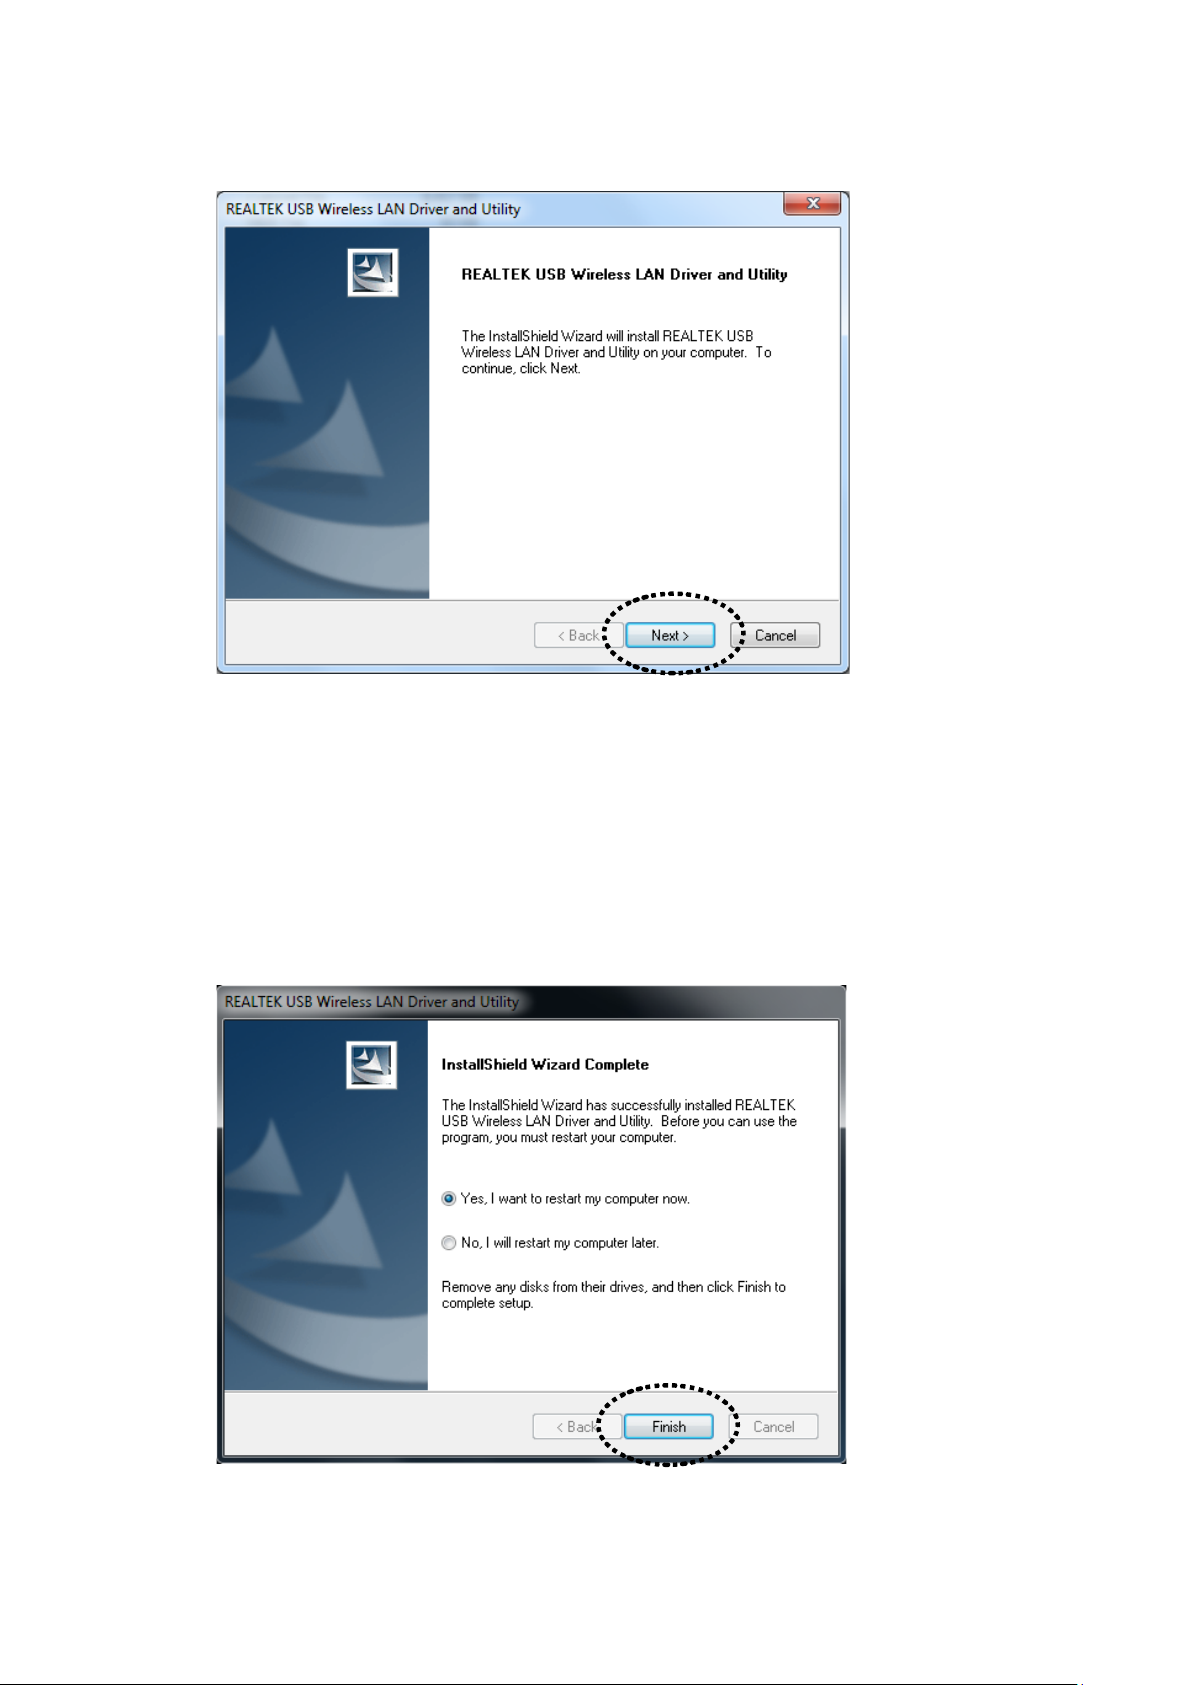
3. Click ‘Next’ to continue.
Click ‘Next’ to start installation. Ins tal la ti on pr oce d ure nee ds fe w
minutes to complete, ple ase be patient.
4. Click ‘Finish’ to re start your computer to complete insta llation
procedure. If you don’t want to restart compu ter now, select ‘No, I
will restart my computer later’ option an d cli ck ‘Finish’. Please no te
you have to restart your computer bef ore you can use your new USB
wireless ne twork adapter.
8
Page 16
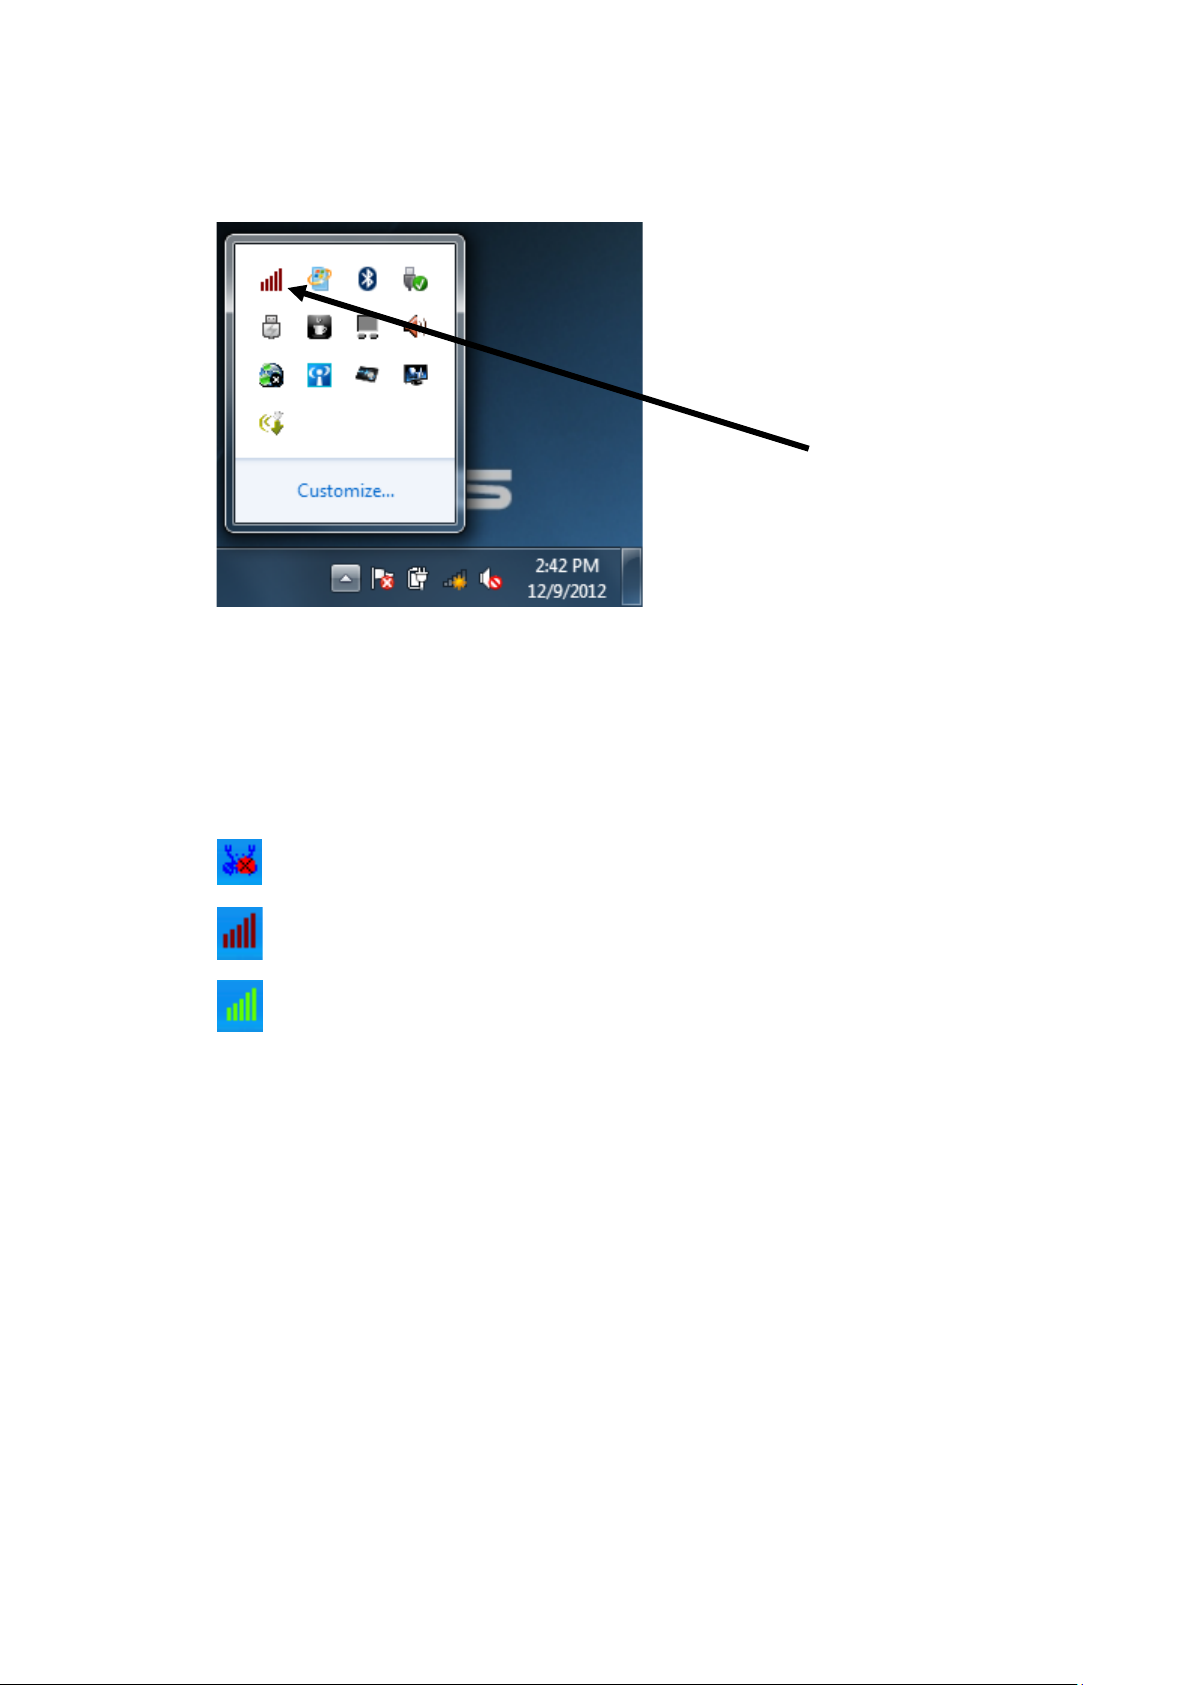
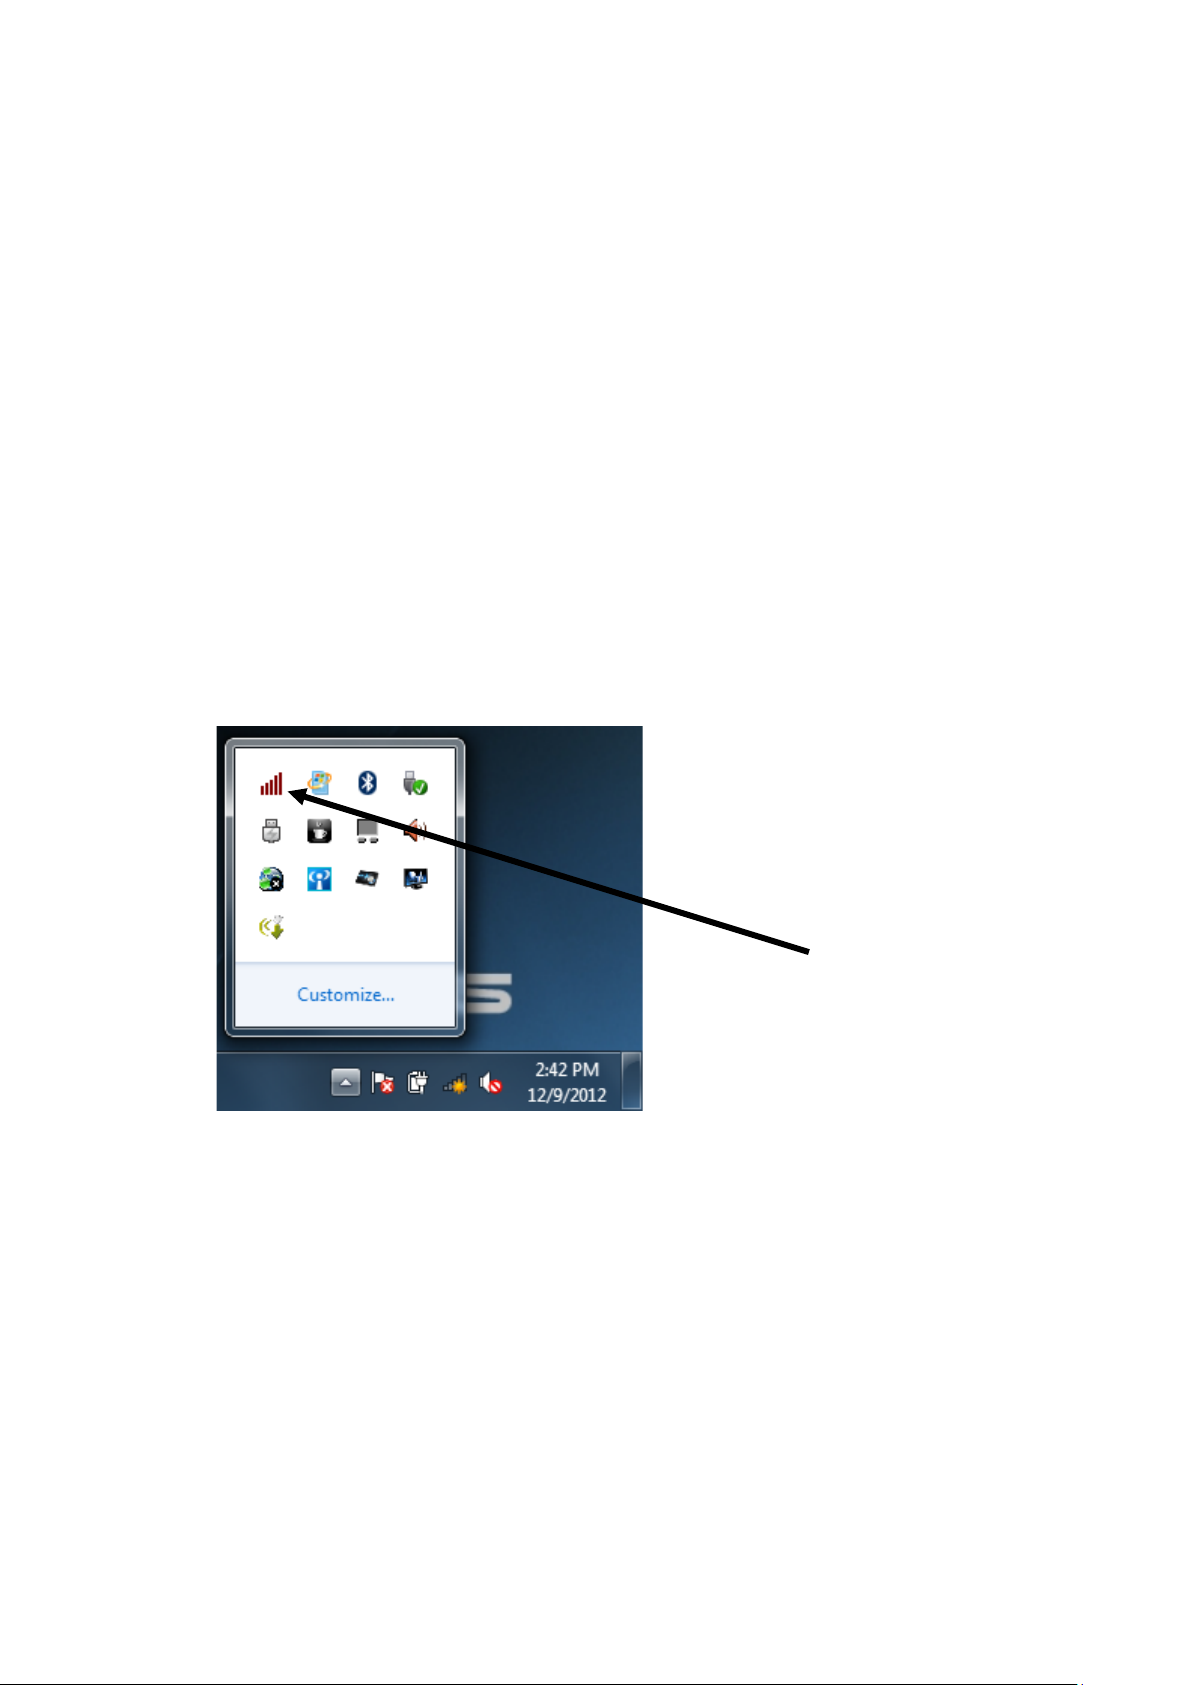
5. A new icon will appear near t he clock of system tray:
HERE!
Left-click the icon w ill launch wireless network configuration utility,
and you can r ight-click the icon to show the quick menu of
configura tion u ti li ty. This icon also use s different co lor to sh ow the
status of wireless connection:
Wir ele ss network adapter not detected
No connection with acces s point is established (black).
Connection with access point has bee n established (green)
For detailed instructions of wirele ss network configurat ion utility,
please see next chapter.
9
Page 17
2-2 Connect to Wireless Access Point
HERE!
To use wir eless netw ork, you have to connect t o a wireless access point
first. You can either use Realtek utility (com es with networ k adapter
driver), or Windows Z ero Config utility (comes with Windows operat ing
system).
2-2-1 Using Realtek Utility
Please follow the fo llow i ng in str uc t ion s to use Realtek configuration
utility to connect to wir eless access point.
1. Left-click the Realtek c onf i gur at i on ut ili ty icon located at lower-right
corner of computer desktop, and configuration menu will appear:
10
Page 18
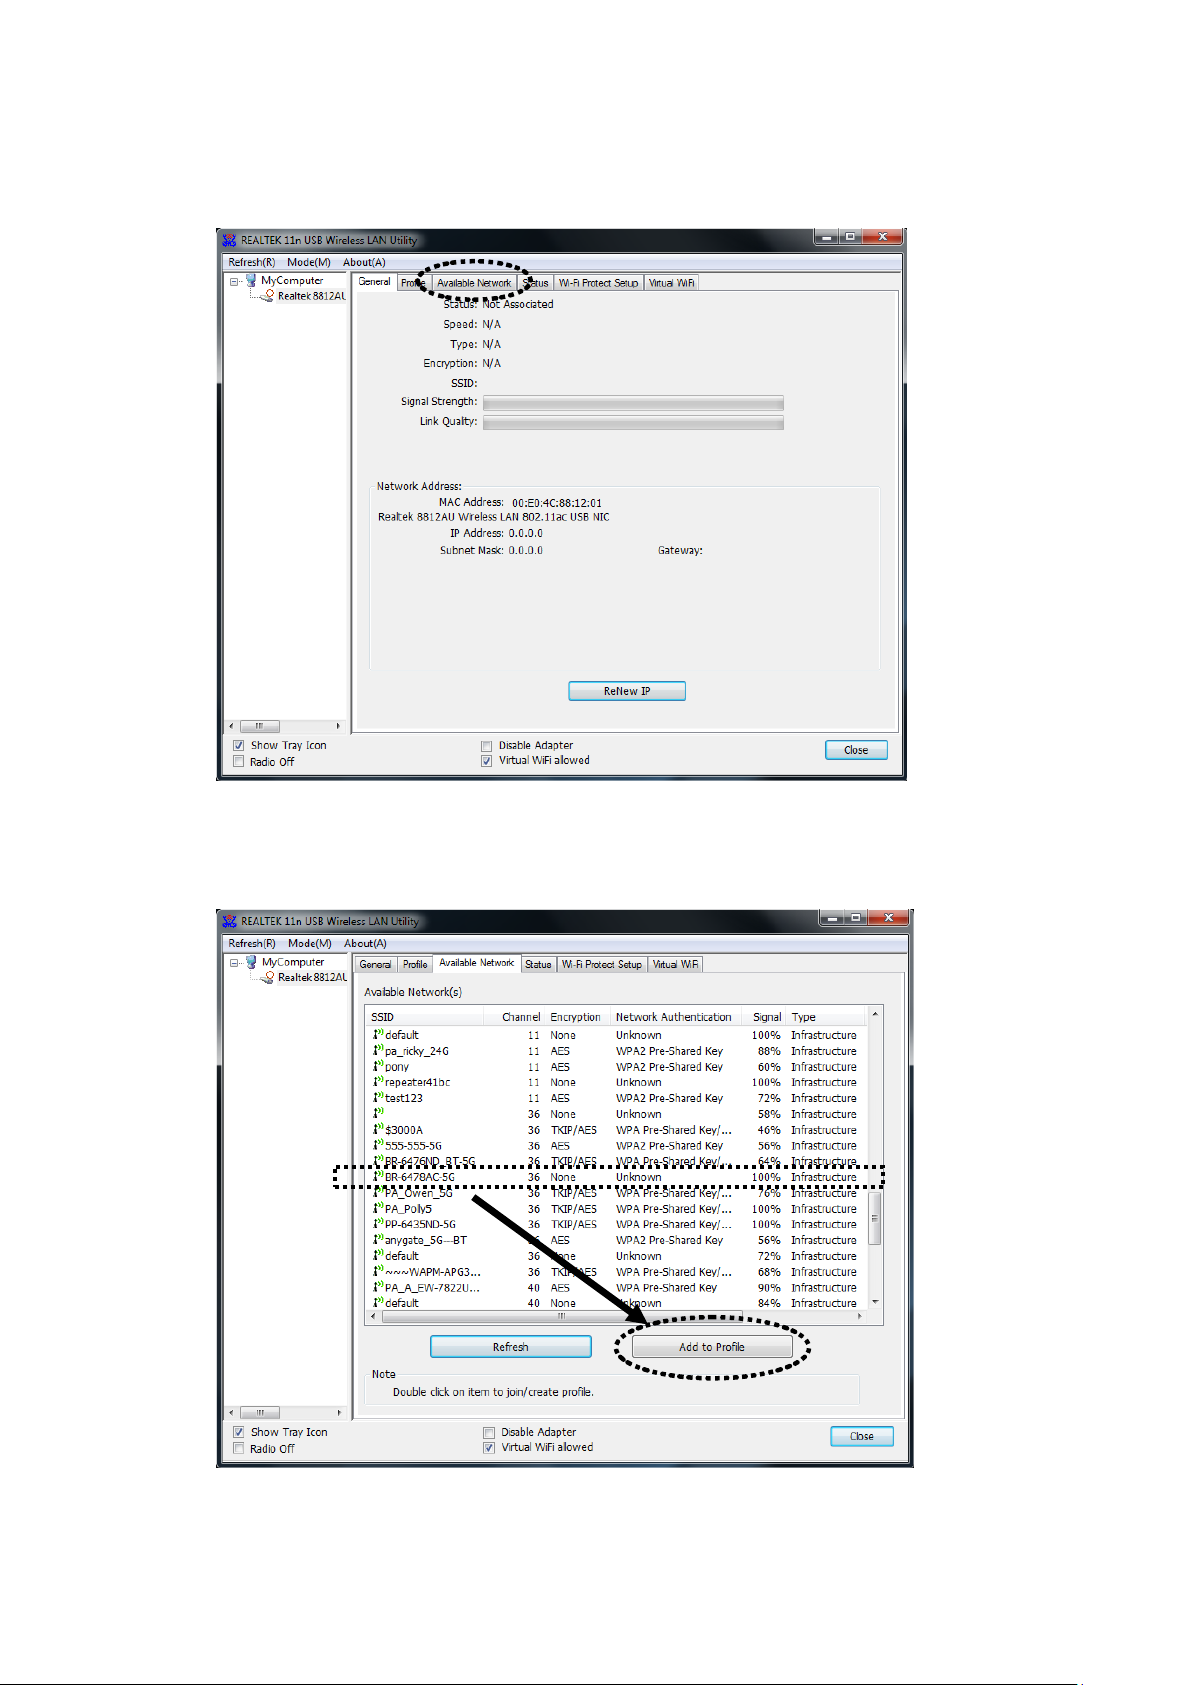
2. Wireless utility will appe ar. Click ‘Available Network’ menu to search
for wireless access points nearby.
3. Please wait for a while, and all wireless access points which can be
reached by this wir e le ss network adapter will be dis pla y ed he r e.
11
Page 19
If the wirele ss access point you wish to connect does not appea r here,
you can clic k ‘Refresh’ button to scan for wireless access point s again;
if the wireless access point you’re looking for still not appear, try to
move the computer closer.
When the access point you’re looking for is on the list, left-click it and
then double clic k it or click ‘A dd to Prof il e’.
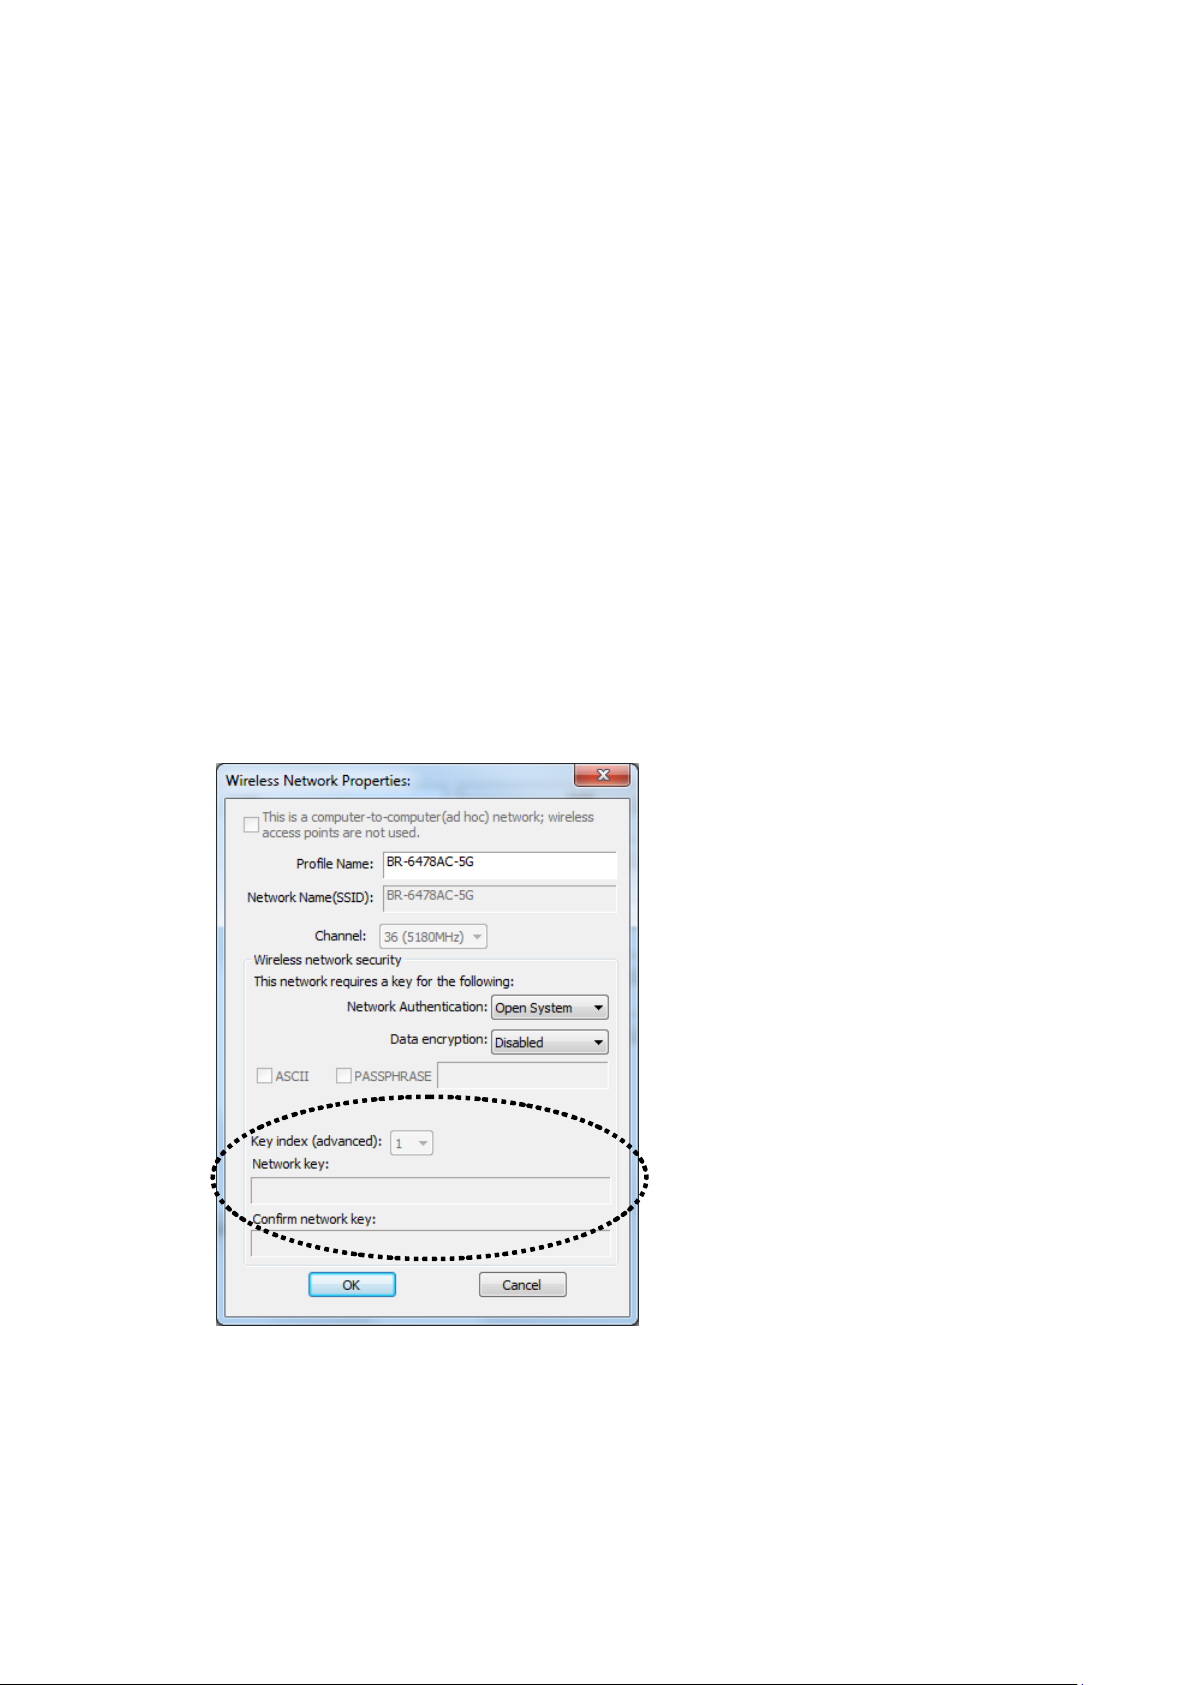
4. If a password (Network Key) is required to access the wireles s access
point, please in put it i n ‘Network key’ (and input it agai n in ‘Confirm
network key’ for confirmation) . Click ‘OK’ when password is properly
inputted.
NOTE: Netw ork security type (‘Network A uthe ntic ati on’ and ‘Data
encryption’) will be selected automatically ba sed on wireless access
point’s security setting. It’s not r eq ui red to chan ge the se set t in gs by
yourself.
All options in this page w ill be fille d automatica lly according to the
access poin t you wish to a dd to profile. However, you c an still modify
any of them to meet your requirement.
12
Page 20

Network Name
The SSID (Service Set ID entities, i.e. access
Channel
Select wire less channel for ad hoc connection.
Data encryption
Select the data encryption type from
Key index (advanced)
Select WEP key index. For most of access
Profile nam e You can give a name to this profile, so you
can remember its purpose easily. It can be any
phrase to help you remember.
(SSID)
This is a
computer-to-computer
(ad hoc) network
Network
Authentication
point’s na me). This field will be filled as the
access poin t you selected when SSID is not
hidden and grayed out. If SSID is hidden, you
have to input correct SSID you yourself.
Check this box if you wish to connect t o
another computer / network device by ad h oc
method. When not accessing to wir eless
access poin t, you have to check this box.
This option only appear s when you’re using
ad hoc conne ction.
Select the netw or k authentication type from
drop-down menu. This setting must be
identical with the setting of wireless access
point you with to connect.
drop-down menu. This setting must be
identical with the setting of wireless access
point you with to connect.
ASCII /
PASSPHRASE
When the enc ryption ty pe is ‘WEP’, it’s
required to inp ut a set of ‘passphrase’ to
connect to wireless access point. Check
‘ASCII’ or ‘PASSPHRASE’ depends on the
security sett i ng of acc ess p oi nt, and input it in
the box; if you select ‘PASSPHRASE’ you
also need to select the length of the key.
The passphrase must be identical with the
setting of wireless access point you with to
connect.
points you can select ‘1’, but please refer to
the setting of the ac ce ss po i nt.
13
Page 21

Network key /
EAP TYPE / Tunnel /
When authentication type is any of 802.1X,
Certificate
If certification is required to aut henticate with
When the enc ryption ty pe is ‘WPA’ or
Confirm networ k ke y
‘WPA2-PSK’, it’s required to input a se t of
‘passphrase’ to connect to wireless acc ess
point. Please input the same passphrase in two
boxes for co nfirmation.
Provision Mode
you have to select EAP type, tunnel, and
provision mode from dropdown me nu. This
setting must be identical with your 802.1x
authentication server.
Username / Identity /
Domain / Password
Please inpu t 802.1x related authentication
informatio n here .
802.1x authentication server, please select a
local certificate from dropdown list.
PAC Check this box and PAC (Privilege Access
Certificate) will be a utomatically selected.
Please clic k ‘OK’ when re ady.
14
Page 22

5. Network adapter will attempt to connect to acces s po in t now, this
may require few seconds to minutes, ple as e be pat ie nt. When the ‘Status’
become ‘Associated’, your computer is connected to a ccess point you
selected. Click ‘Close’ to close configura tion menu.
NOTE: If you connected to an access point but the c onnection has been
dropped soon, please check security settings and re-check password
spelling.
NOTE: If you insert t he USB wireless network adapter into an USB 3.0
port and connect to an 11ac AP, device driver will doing auto USB mode
switch and s hown the me ssage as below photo, or you will heard sounds
of USB insert or unpl ug, th is is th e normal states.
15
Page 23

2-2-2 Using Windows Zero Configuration
Windows XP and Vista has a built-in wireless network configuration
utility, called as ‘Windows Zero Configuration’ (WZC). You can also use
WZC to configure your wireless network par ameter:
1. Right-click Realtek configuration utility icon, a nd click ‘Open C onf i g
Utility’.
2. Check ‘Windows Zero Config’ box.
3. A message indicating that you’ve been swi tc he d to Windows Zero
Configurat i on m ode will a ppe a r. Click ‘OK’ to continue.
16
Page 24

NOTE: To return to use Realtek utility, uncheck ‘Windows Zero
Config’ box.
4. Click ‘Start’ but ton (should be located at the bottom-left corner of
windows desktop), click ‘Control Panel’, then click ‘Network and
Internet Connections’ in Control Pa nel.
17
Page 25

5. Double click ‘Network Connections’.
6. Right-click ‘Wireless Network Connection’ (it may have a num ber as
suffix if you have more than one wireless network adapter, please
make sure you right-click the ‘Realtek 8812AU Wireless LAN
802.11ac USB NIC), then select ‘V iew A vaila ble Wirele ss Networks’.
18
Page 26

7. All wireless access points in proximity will be displayed he re. If the
access poin t you want to u se is not disp layed here, please try to move
your computer or notebook closer to the access poin t, or you can click
‘Refresh network list’ to rescan access points. Click the access point
you want to use if it’s sh own, then click ‘Connect’.
8. If the access point is protected by encryption, you have to input its
security key or passphrase here. It must match the encryptio n setting
on the access point.
If the access point you selected does not use encr yption, you’ll not be
prompted fo r security ke y or passphrase.
19
Page 27

9. If you can see ‘Connected’ message, the c onne c t ion between your
computer and wireless a ccess point is successfully established.
20
Page 28

2-3 Connection Profile Management
If you need to connect to different wireless a ccess point s at different time,
like of access point of your home, office, cybercafe, or public wireles s
service, you can store the connecti on parameter s (encryption, passphrase,
security etc, etc.) as a profile for every access point, so y ou don’t have to
input these parameters every time when you want to connect to a specific
wireless access point.
To manage profiles, right-click the Realtek configuration utility icon
located at l ower-right corner of computer desktop, then click ‘Open
Config Utility’.
Click the ‘Profile’ menu.
21
Page 29

2-3-1 Add a new profile
By this function you can setup the connection parameters f or a specific
wireless acc ess point in advance, without contacting it firs t.
If you want to create a new profile, click ‘Profile’ menu, then click ‘Add’
button.
22
Page 30

You’ll be prompted to input connection parameters for the wir eless access
Network Name
The SSID (Service Set Identifier, i.e. access
Channel
Select wire less channel for ad hoc connection.
point you wish to con nec t:
Required parameters are:
Profile nam e You can give a name to this profile, so you
can remember its purpose easily. It can be any
phrase to help you remember.
(SSID)
point’s na me). This must be ide ntical with the
SSID of the access point you wish to connect.
This is a
computer-to-computer
(ad hoc) network
Check this box if you wish to connect t o
another computer / network device by ad hoc
method. When not a ccessing t o wireless
access poin t, you have to check this box.
This option only appear s when you’re using
ad hoc conne ction.
Network
Authentication
Select the netw or k authentication type from
drop-down menu. This setting must be
identical with the setting of wireless access
point you with to connect.
23
Page 31

Data encryption Select the data encryption type from
ASCII /
When the enc ryption ty pe is ‘WEP’, it’s
Network key /
When the enc ryption ty pe is ‘WPA’ or
Usernam e / Identity /
Please inpu t 802.1x related authentication
PAC
Check this box and PAC (Privilege Access
drop-down menu. This setting must be
identical with the setting of wireless access
point you with to connect.
PASSPHRASE
required to inp ut a set of ‘passphrase’ to
connect to wireless access point. Check
‘ASCII’ or ‘PASSPHRASE’ depends on the
security setting of acc ess point, and input it in
the box; if you select ‘PASSPHRASE’ you
also need to select the length of the key.
The passphrase must be identical with the
setting of wireless access point you with to
connect.
Key index Select WEP key index. For most of access
points you can select ‘1’, but please ref er to
the setting of the ac ce ss po i nt.
Confirm networ k ke y
‘WPA2-PSK’, it’s required to input a se t of
‘passphrase’ to connect to wireless acc ess
point. Please input the same passphrase in two
EAP TYPE /
Tunnel /
Provision Mode
Domain / Password
Certificate If certification is required to aut henticate with
When all req uired parameters are set, click ‘OK’ to create and save a new
profile.
boxes for co nfirmation.
When authentication type is any of 802.1X,
you have to select EAP type, tunnel, and
provision mode from dropdown me nu. This
setting must be identical with your 802.1x
authentication server.
informatio n here .
802.1x authentication server, please select a
local certificate from dropdown list.
Certificate) will be automatically selected.
24
Page 32

2-3-2 Remove an existing profile
When you no longer need an existing profile, you can remove it.
If you want to remove a profile, click ‘Profile’ menu, then select an
existing profile which you wish to remove, and then click ‘Remove’
button.
25
Page 33

2-3-3 Edit an existing profile
If you have added a profile before, and you wish to change the content of
the profile, you can use t his function. Please selec t a profile from the list
first, then click ‘Edit’ button. You’ll be provided wi th the co nt en ts of
selected profile, and you can edit them. Click ‘OK’ to save changes, or
click ‘Cancel’ to disadapter changes.
26
Page 34

2-3-4 Make a copy of existing profile
If you need to make a copy of a specific profile, you can use this function.
This functi on is very co nvenient when you need to build a new pr ofile
which parameters are similar to any existing profile.
To do this, select an existing profile, then click ‘Duplicate’ button.
You’ll be prompted to input a profile name, please use an identical name
that does not exist in pro fi le list.
27
Page 35

2-3-5 Set as default profile
If you wish to use a specific profile as default con nection, you can select
a profile in the list, and click ‘Set Default’. Selected profile will become
default selection and R ealtek configuration utility will attempt to con nect
to selected acce ss po i nt.
28
Page 36

2-4 View Network Statistics, General Information, and Status
The configuration utility provides inf ormation about networ k statistics
and link sta tus. If you want to know how your wirele ss network ada pt er
works, you can use these functions to get detailed information about the
wireless connection you’re using.
2-4-1 General I nformation
If you want to know the gene ra l in formation of the acce ss p oi nt y ou’re
connecting to, clic k ‘General’ menu:
All general infor m a ti on like si gna l str en g th an d li nk qua lity will be
displayed here. These information are very useful whe n you encounter
some problem on connecting to access point.
If you wish to get a new IP address from DHCP server, you can click
‘ReNew IP’ button.
29
Page 37

2-4-2 Status
If you want to know the status of your wireless netw ork a da pte r, click
‘Status’ menu:
30
Page 38

2-4-3 View Network Statistic s
To view the statistical data of wireless netw or k ada p ter, click ‘Statistics’
menu, and the statistics of wireless connection will be displa yed:
All connection-related statistics i s displayed here. You can click ‘Reset’
button, to reset the sta tistics of al l items back to 0.
31
Page 39

2-5 Miscellaneous Settings
Radio Off
Switch wire less radio off. Wireless network
There are fe w functions provided by Realtek configuration utility, you
can access t hese functions from the bottom of configuratio n menu:
The descri ptions of these function are listed as fo llow:
Show T ray Icon Check this box to show a n icon on system
tray.
HERE!
Uncheck this box t o hide it.
functionalities are disabled.
Disable Ada pter Disable wireless network adapter. All
functionalities of configration menu will
32
Page 40

disappear. To resume, unckeck ‘Disable
Windows Zero Config
Use Windows Zero Configuration to manage
Adapter’.
wireless co nnections. See section 2-2-2.
33
Page 41

2-6 Establish secure connection with AP by WPS
Wi-Fi Protected Setup (WPS) is the latest wireless network technology
which make s wireless network setu p become very simple. If you have
WPS-enabled wireless access point, and you want to establish a secure
connection to it, y ou don’t have to configure the wireless access point and
setup data e ncryption by yourself. All you have to do is to go to the WPS
setup page of this wireless adapter, click a button, and then p ress a
specific bu tton or enter a set of 8-digit code on the wireless acc ess point
you wish to establ ish a secur e con ne c tio n - just three simple steps!
For older wireless acce ss points, it’s possible to perform a firmware
upgrade to become a WPS-enabled access point. Since they may not have
a hardware button to press for WPS setup, you can use an alternative
WPS setup method - input the pin c ode . Eve ry WPS-compatible wireless
network ada pter support pin code co nfiguration method; you can just
input the co de to wireless access po int, and the wi reless acce ss point and
wireless network adapter will do the rest for you.
This wireless network adapter is compatible with WPS. To use this
function, t he wireless access poin t you wish to co nnect to m ust support
WPS function too. Now, please follow the following instructions to
establish secure connection between WPS-enabled wireless access point
and your wireless network adapter.
This wireless network adapter supports 2 kinds of WPS: P IN code and
Push-Button.
Please follow the foll ow i ng in str uc t ion s to set u p W PS :
1. Right-click Realtek configurat ion utility icon, and click ‘Open Config
Utility’.
34
Page 42

2. Click ‘Wi-Fi Protect Setup’ menu.
3. You can use PIN code or Push-Button configuration, and
WPS-compatible wireless access po int must use the same type of WPS.
For instructi ons on setup each type of WPS, see next 2 chapters for
detailed instructions.
35
Page 43

2-6-1 PIN Code
To use PIN Code, plea se click ‘Pin Input Config (PIN)’ button:
You’ll be prompted to se lect an access point you wish to connect. If you
know its SSID, click ‘Yes’, otherwise click ‘No’.
If you select ‘Yes’, a list of all WPS-c ompatible AP nearby will be
displayed; you can clic k ‘Refresh’ to re scan, then se lect an AP and cl ick
‘Select’ button.
36
Page 44

If you select ‘No’, wirele ss network adapter will prompt you to enter
8-digit PIN code into your AP, without selecting an AP in advance.
After you se lect ‘Yes’ or ‘No’ in previous step, networ k adapter will
attempt to connect to WPS-compatible AP , and an 8-digit number will
appear. Please input this number to AP’s configuration menu within 2
minutes, and network adapter will establish secure connection with AP
automatically.
To stop this procedure before connection is established, click ‘Cancel’.
37
Page 45

2-6-2 Push Button
To use Push-Button WPS configuration, please click ‘Push Button Config
(PBC)’ button. This is the easie st way to establish secure connection by
WPS, but if there’re more than one WPS-compati ble AP using
Push-Button config, please use PIN Code instead.
38
Page 46

After you click Push Button Config, a message bo x will appear:
Please acti vate Push-Button functi on on wireles s access point now, and
wireless network adapter will esta blish secure connection with access
point within one minute.
39
Page 47

CHAPTER III: Soft-AP Function
Excepting b ecome a wire less client of other wireless acces s points, this
wireless adapter can act as a wireless service provider also! You can
switch this wire le ss adapter’s operating mode to ‘AP’ mode to simulate
the function of a real wireless access point by software, and all other
computers and wireless devices ca n connect to your comput er wireless ly,
even share the internet connection you have!
Please follow the ins t ruc ti o ns in fol l ow ing c ha pt ers to us e the AP func tion
of your wire less adapter.
3-1 Switch to AP Mode and Station Mode
The operat ing mode of the wireless adapter is ‘Station Mode’ (becoming
a client of o ther wirele ss access points) by default.
Please follow the fo llow i ng in str uc t ion s to sw itc h to AP mode:
1. Right-click Realtek configuration utility icon, and click ‘Open Confi g
Utility’.
40
Page 48

2. Select ‘Mode’, and then se lect ‘Access Point’.
It requires f ew seconds to switch to AP mode, ple ase be patie nt.
41
Page 49

After mode switch is complete, you’ll see ge ne ra l inf or mation of software
AP, which shows AP’s SS ID and connected wireless clients.
42
Page 50

3-1-1 Configure SSID and Channel
To conf igure software AP, click ‘Config’ button:
43
Page 51

The ‘W ireless Network Properties’ is displayed.
Channel
Please sele ct the wirele ss channel you wish to
Please note that Ad-Hoc mode is not available when network adapter is in
AP mode. The de sc ri pt ion of major setup items are listed below:
Network Name
(SSID)
Please inpu t the SSID (the name used to identify
this wireless access point) here. Up to 32
numerical characters can be accepted here,
excepting space.
use, from 1 to 13.
To save changes, click ‘OK’; otherwise click ‘Cancel’ to leave this m enu
and keep settin gs unt ou che d.
44
Page 52

3-1-2 Setup Soft-AP Security
Data Encryption
Select data encryption m ethod from dropdown
Key Index
Select WEP key index (1-4). If you don’t know
To setup security options for Soft-AP, configure ‘Wireless Network
Security’ section as follow:
The descri ption of setup items abou t wireless security are listed below:
Network
Authentication
Select network authentication mode from
dropdown menu.
menu.
ASCII /
PASSPHRASE
If the encryption method is WEP, check either
‘ASCII’ or ‘PASSPHRASE’ box and input it in
the box as WEP passphrase .
which one y ou should use, se lec t 1.
45
Page 53

Network key /
IF network authentication mode is WPA, please
Confirm networ k ke y
input W PA passphrase in both box.
To save changes, click ‘OK’; otherwise click ‘Cancel’ to leave this m enu
and keep settin gs unt ou che d.
46
Page 54

3-2 Advanced Settings
DTIM Period
Please inpu t DTIM (Delivery Traffic Indic ation
Set Defaults
Reset all settings back to factory default value.
If you want to setup advanced settings of softw are access point, select
‘Advanced’ menu. If you don’t know the meaning and affe cts of these
settings, ke ep them untouched.
The descri ption of all setup item s are listed bel ow:
Beacon Interval Please input wireless beacon time interval here.
Message) here.
Preamble Mode Select wireless frame preamble mode (long or
short) from dropdown menu.
Apply Save change s.
If you chang ed any setting here and cause problem on communicating
with wireless clients, click ‘Set Defaults’ to reset a ll settings back to
default setting.
47
Page 55

3-3 Wireless Statistics
Select ‘Statistics’ menu and the data statistics ab out software access point
will be display ed.
Click ‘Reset’ to reset the value of every item back to ‘0’.
48
Page 56

3-4 Internet Connection Sharing (ICS)
In this page, you can assign a network adapter on your computer as the
path for all w ireless clients to get connected to Internet.
If you have o nly one network adapter (e xc ept t hi s sof tw are acc e ss poi nt) ,
you don’t have to select network adapter here; if you have more than o ne
network ada pter, select the one you wish to be used as Internet gateway.
Click ‘Apply’ to save changes (‘Apply’ is grayed out when no changes
are made in this page).
49
Page 57

CHAPTER IV: Appendix
4-1 Hardware Specification
Standards: IEEE 802.11a/b/g/n/ac
Interface: USB 3.0 (USB 2.0 Compatible)
Frequency Band: 2.4000~2.4835GHz (subject to local regulations)
5.150~5.825GHz (subject to local regulations)
Data Rate:
11a: 6/9/12/24/36/48/54Mbps;
11b: 1/2/5.5/11Mbps; 11g: 6/9/12/24/36/48/54Mbps
11n (20MHz): MCS0-15, up to 144Mbps
11n (40MHz): MCS0-15, up to 300Mbps
11ac (80MHz): VHTMCS0-9, up to 867Mbps
Securities: WEP 64/128, WPA, WPA2 and IEEE 802.1x
Antenna: 2 internal PIFA antennas (2.4G/5G 2dBi)
Drivers: Windows XP / Vista / 7 / 8, Linux, MAC OS
LED: Link/Act/WPS
TX Power: 2.4GHz: 11b(11M): 16±1.5 dBm , 11g(54M): 14±1.5 dB m
11n(20MHz, MCS7): 14±1.5 dBm,
11n(40MHz, MCS7): 12±1.5 dBm
5GHz: 11a(54M): 12±1.5 dBm,
11n(20MHz, MCS7): 10±1.5 dBm,
11n(40MHz, MCS7): 10±1.5 dBm
11ac(80MHz, VHTMCS 9): 10±1.0 dBm
RX Sensitivity: 2.4GHz: 11b(11M): -79±2 d B m, 11g ( 54M ) : -65±2dBm
11n(20MHz, MCS7): -64±2dBm,
11n(40MHz, MCS7): -61±2dBm
5GHz: 11a(54M): -70±2dBm,
11n(20MHz, MCS7): -67±2dBm,
11n(40MHz, MCS7): -64±2dBm,
11ac(80MHz, VHTMCS9): -51±2dBm
Dimension: 87.1 (L) x 27.2 (W) x 17.2 (H) mm
Temperature: 32~104°F (0 ~ 40°C), Humidity: 10 -95% (Non-Condensing)
Certification: FCC, CE
50
Page 58

4-2 Troubleshooting
I can’t find any wireless
1. Click ‘Rescan’ for few more times and
I cannot establish
1. Click ‘Add to Prof il e’ for few more
If you encou nter any problem when you’re using this wireless network
adapter, don’t panic! B efore you call your dealer of purchase for help,
please chec k this troubleshooting table, the so lution of your problem
could be very simple, and you can so lve the prob lem by yourself!
Scenario Solution
access poin t / wireless
device in ‘S ite Survey’
function.
see if you can find any wireless access
point or wirele ss de vic e.
2. Please move closer to any known
wireless acc ess point.
3. ‘Ad hoc’ function must be enabled for
the wireles s device you w ish to establish
a direct wireless link.
4. Please adjust the p os i tion of network
adapter (you may have to move your
computer if you’re using a notebook
computer) a nd click ‘Rescan’ button for
few more times. If you ca n find the
wireless acc ess point or wireless de vice
you want to connect by doing this, try to
move closer to the place where the
wireless acc ess point or wireless de vice
is located.
Nothing happens when I
click ‘Open Config
Utility’
connection with a certain
wireless access point
1. Please ma ke sure the wir eless network
adapter is inserted into y our computer’s
USB port.
2. Reboot the computer and tr y again.
3. Remove the adapter and insert it into
another USB port.
4. Remove the driver and re-install.
5. Contact the dea ler of pur ch ase for he lp.
times.
2. If the SSID of access poi nt you wish to
51
Page 59

connect is hidde n (n oth in g di spla y e d in
The network is slow /
1. Move closer to the place where a c cess
‘SSID’ field in ‘Site Survey’ function),
you have to input correct SSID of the
access poin t you wish to connect. Please
contact the own er of ac ces s po int to a sk
for correct SSID.
3. You have to input correct passphr as e /
security key to connect an access point
with encryption. Please contact the
owner of acc ess point to ask for corre ct
passphrase / security key.
4. The access point you wish to connect
only allows ne tw o rk a da pt ers with
specific MAC address to establish
connection. Please go to ‘Status’ menu
and write the value of ‘MAC Address’
down, then prese nt th is val ue to th e
having problem when
transferri ng large files
owner of acc ess point so he / she can add
the MAC address of your network
adapter to his / her access point’s list.
point is located.
2. There could be too much people using
the same radio channel. Ask the owner
of the acces s point to change the channel
number.
Please try one or more solutions listed
above.
52
Page 60

4-3 Glossary
1. What is the IEEE 802.11g standard?
802.11g is the ne w IEEE standard for hi gh-speed wireless LAN
communications that provides for up to 54 Mbps data rate in the 2.4
GHz band. 802.11g is quickly becoming the next m ainstream
wireless LAN technolo gy for the home, office and public networks.
802.11g defines the use of the same OFDM modulatio n technique
specified in IEEE 802.11a for the 5 GHz fr equency band and applies
it in the same 2.4 GHz frequency band as IEEE 802. 11b. The
802.1 1 g sta n dar d re q uir es ba c kwa r d com pa tib il ity with 802.11b.
The standar d specifically calls for:
A. A new physical la yer for the 802.11 Medium Access Control
(MAC) in the 2.4 GHz freq uency band, known as the extended
rate PHY (ERP). The ERP adds OFDM as a mandatory new
coding scheme for 6, 12 and 24 Mbps (mandatory speeds), and 18,
36, 48 and 54 Mbps (optio nal speeds). The ERP includes the
modulation schemes found in 802.11b including CCK for 11 and
5.5 Mbps and Barker code modulation for 2 and 1 Mbps.
B. A protection mechanism called RTS/CTS that g overns how
802.1 1 g de vic e s and 80 2. 11b devic e s inte r op era te .
2. What is the IEEE 802.11b standard?
The IEEE 802.11 b Wireless LAN standard subcomm ittee, which
formulates the standard for the industry. The objective is to enable
wireless LAN hardware f rom diffe rent manufactures to
communicate.
3. What does IEEE 802.11 feature support?
The product supports the following IEEE 802.11 functions:
CSMA/CA plus Acknowledge Protocol
Multi-Channel Roam ing
Automatic Rate Selection
RTS/CTS Feature
Fragmentation
Power Mana gement
4. What is Ad-hoc?
An Ad-hoc integrated wireless LAN is a group of computers, each
has a Wireless LAN adapter, Connecte d as an independent wireless
LAN. Ad hoc w ireless LAN is applicable at a departmental scale for
a branch or SOHO operation.
53
Page 61

5. What is Infrastru ct u re?
An integrated wireles s and wireless and wired LAN is called a n
Infrastructure configurat ion. Infrastructure is ap plicable to enterprise
scale for wir eless access to centra l database, or wireless application
for mobile workers.
6. What is BSS ID?
A specific Ad hoc LAN is called a Basic Service Set (BSS).
Computers in a BSS must be configured with the same BSS ID.
7. What is WEP?
WEP is Wired Equivalent Pr ivacy, a data privacy mecha nism based
on a 40 bit shared key algorithm, as described in the IEEE 802 .11
standard.
8. What is TKIP?
TKIP is a quick-fix method to quickly overcome the inh erent
weaknesses in WEP security, especially the reuse of encryption keys.
TKIP is involved in the IEEE 802.11i WLAN secur ity standard, and
the specification mig ht be officially re leased by early 2003.
9. What is AES?
AES (Advanced Encryption Standard), a chip-based security, has
been devel oped to ensur e the highest degree of security and
authenticity for digital inform ation, wherev er and however
communicated or stored, while making more efficient use of
hardware a nd/or software than pre vious encry ption standards. It is
also included in IEEE 802.11i standard. Compare with AES, TKIP is
a temporary protocol for re plac ing W E P security until manufacturers
implement AES at the hardware level.
10. Can W ireless products support printer sh aring?
Wireless produc ts per f orm the same function as LAN prod ucts.
Therefore, Wireless products can work with Netware, Windows
2000, or othe r LAN operating systems to support printer or file
sharing.
11. Would the inf ormation be intercepted while transmitt ing on air?
WLAN featur es two-fold pro tection in security. On the hardware
side, as wit h Direct Sequence Spread Spectrum technology, it has
the inherent security feature of scr ambling. On the software side,
WLAN series offer the encrypt ion function (WEP) to enhance
security and Access Control. Users can set it up depending upon
their needs.
54
Page 62

12. What is DSSS? What is FHSS? And what a re their d ifferences?
Frequency-hoppi ng spr ea d-spectrum (FHSS) uses a narrowband
carrier that changes frequency in a pattern tha t is known to both
transmitte r and receiv er. Properly synchronized, the net effect is to
maintain a single logic al channel. To an unintende d receiver, FHSS
appears to be short-duration impulse noise. Dire ct-sequence
spread-spectrum (DSSS) generates a redundant bit pattern for each
bit to be transmitted. This bit pattern is cal led a chip (or chipping
code). The longer the chip is, the greater the probability that the
original data can be recovered. Eve n if one or more bits in the chip
are damaged during tra nsmission, statistical techniques embedded in
the radio can recover the original data without-the need for
retransmission. To an unintended receiver, DSSS appears as low
power wideband noise and is rejecte d (ignored) by most narr owband
receivers.
13. What is Spread Spectrum?
Spread Spectrum technology is a wideband radio frequency
technique developed by the military for use in re liable, secure,
mission-critical communication systems. It is designed to trade off
bandwidth e fficienc y for relia bility, integrity, and security. In other
words, more bandwidth is consume d than in the case of narrowband
transmission, but the tr ade off produces a s ignal that is, in effec t,
louder and thus easier to detect, provided that the receiver knows the
parameters of the spread-spectrum signal being broadcast. If a
receiver is not tuned to the right frequency, a spread –spectrum
signal looks like background noise. There are two main alternatives,
Direct Sequence Spread Spectrum (DSSS) and Frequency Hopping
Spread Spectrum (FHSS).
14. What is WPS?
WPS stands f or Wi-Fi Prote cted Setup. It provides a simple way to
establish unencrypted or encrypte d connectio ns between wireless
clients and a ccess point automatica lly. User can press a software or
hardware button to activate WPS function, and WP S -compatible
wireless cl ients and acc ess point will establish c onnection by
themselves. There are two types of WPS: PBC (Push-Button
Configuration) and PIN code.
55
 Loading...