

Page 1

150N Wireless LAN
ADSL2/2+ Router
User’s Manual
Version: 1.0
(July, 2010)
Page 2

COPYRIGHT
Copyright 2010/2011 by this company. All rights reserved. No part of this
publication may be reproduced, transmitted, transcribed, stored in a retrieval
system, or translated into any language or computer language, in any form or by
any means, electronic, mechanical, magnetic, optical, chemical, manual or
otherwise, without the prior written permission of this company.
Page 3

Federal Communication Commission
Interference Statement
FCC Part 68
This equipment complies with Part 68 of the FCC Rules. On the bottom of this
equipment is a label that contains the FCC Registration Number and Ringer
Equivalence Number (REN) for this equipment. You must provide this information
to the telephone company upon request.
The REN is useful to determine the quantity of devices you may connect to the
telephone line and still have all of those devices ring when your number is
called.
In most, but not all areas, the sum of the REN of all devices connected to one
line should not exceed five (5.0). To be certain of the number of devices you may
connect to your line, as determined by the REN, you should contact your local
telephone company to determine the maximum REN for your calling area.
If the modem causes harm to the telephone network, the telephone company
may discontinue your service temporarily. If possible, they will notify you in
advance.
But if advance notice isn't practical, you will be notified as soon as possible. You
will be advised of your right to file a complaint with the FCC.
The telephone company may make changes in its facilities, equipment,
operations, or procedures that could affect the proper operation of your
equipment.
If they do, you will be notified in advance to give you an opportunity to maintain
uninterrupted telephone service.
If you experience trouble with this modem, please contact your dealer for
repair/warranty information. The telephone company may ask you to disconnect
Page 4

this equipment from the network until the problem has been corrected or you are
sure that the equipment is not malfunctioning.
This equipment may not be used on coin service provided by the telephone
company. Connection to party lines is subject to state tariffs.
Installation
This device is equipped with a USOC RJ11C connector.
FCC Part 15
This equipment has been tested and found to comply with the limits for a Class B
digital device, pursuant to Part 15 of FCC Rules. These limits are designed to
provide reasonable protection against harmful interference in a residential
installation. This equipment generates, uses, and can radiate radio frequency
energy and, if not installed and used in accordance with the instructions, may
cause harmful interference to radio communications. However, there is no
guarantee that interference will not occur in a particular installation. If this
equipment does cause harmful interference to radio or television reception, which
can be determined by turning the equipment off and on, the user is encouraged
to try to correct the interference by one or more of the following measures:
1. Reorient or relocate the receiving antenna.
2. Increase the separation between the equipment and receiver.
3. Connect the equipment into an outlet on a circuit different from that to
which the receiver is connected.
4. Consult the dealer or an experienced radio technician for help.
Page 5

FCC Caution
This equipment must be installed and operated in accordance with provided
instructions and a minimum 20 cm spacing must be provided between computer
mounted antenna and person‟s body (excluding extremities of hands, wrist and
feet) during wireless modes of operation.
This device complies with Part 15 of the FCC Rules. Operation is subject to the
following two conditions: (1) this device may not cause harmful interference, and
(2) this device must accept any interference received, including interference that
may cause undesired operation.
Any changes or modifications not expressly approved by the party responsible for
compliance could void the authority to operate equipment.
Federal Communication Commission (FCC) Radiation Exposure Statement
This equipment complies with FCC radiation exposure set forth for an
uncontrolled environment. In order to avoid the possibility of exceeding the FCC
radio frequency exposure limits, human proximity to the antenna shall not be less
than 20cm (8 inches) during normal operation.
The antenna(s) used for this transmitter must not be co-located or operating in
conjunction with any other antenna or transmitter.
Page 6

R&TTE Compliance Statement
This equipment complies with all the requirements of DIRECTIVE 1999/5/EC OF
THE EUROPEAN PARLIAMENT AND THE COUNCIL of March 9, 1999 on radio
equipment and telecommunication terminal Equipment and the mutual
recognition of their conformity (R&TTE).
The R&TTE Directive repeals and replaces in the directive 98/13/EEC
(Telecommunications Terminal Equipment and Satellite Earth Station Equipment)
As of April 8, 2000.
Safety
This equipment is designed with the utmost care for the safety of those who
install and use it. However, special attention must be paid to the dangers of
electric shock and static electricity when working with electrical equipment. All
guidelines of this and of the computer manufacture must therefore be allowed at
all times to ensure the safe use of the equipment.
EU Countries Intended for Use
The ETSI version of this device is intended for home and office use in Austria,
Belgium, Denmark, Finland, France, Germany, Greece, Ireland, Italy,
Luxembourg, the Netherlands, Portugal, Spain, Sweden, and the United Kingdom.
The ETSI version of this device is also authorized for use in EFTA member states:
Iceland, Liechtenstein, Norway, and Switzerland.
EU Countries Not intended for use
None.
Page 7

Contents
1. INTRODUCTION ....................................................... 1
1.1. FEATURES ............................................................................. 2
1.2. MINIMUM REQUIREMENTS ................................................... 3
1.3. PACKAGE CONTENT ............................................................. 3
1.4. HARDWARE PLACEMENT ..................................................... 4
1.4.1. Rear Panel .................................................................................. 4
1.4.2. Front LEDs ................................................................................. 5
2. HARDWARE INSTALLATION ............................... 6
3. SETUP WIZARD ........................................................ 7
3.1. GETTING STARTED ............................................................... 7
3.2. AUTOMATICALLY SET ISP ................................................. 10
3.3. MANUALLY SET ISP........................................................... 14
4. IP ADDRESS SETTING ........................................... 19
5. WEB MANAGEMENT CONFIGURATION ......... 24
5.1. QUICK SETUP ..................................................................... 26
5.2. GENERAL SETUP ................................................................. 29
5.2.1. System ....................................................................................... 29
5.2.1.1. Time Zone ......................................................................................... 29
5.2.1.2. Password Settings ............................................................................. 30
5.2.1.3. Remote Management ........................................................................ 32
5.2.1.4. SNMP ................................................................................................ 34
5.2.2. WAN.......................................................................................... 36
5.2.2.1. Channel Config ................................................................................. 36
5.2.2.2. ATM Setting ..................................................................................... 41
5.2.2.3. ADSL Setting .................................................................................... 44
5.2.2.4. DNS ................................................................................................... 45
5.2.2.5. DDNS ................................................................................................ 47
5.2.2.6. RIP .................................................................................................... 48
5.2.3. LAN ........................................................................................... 51
5.2.3.1. DHCP Mode ...................................................................................... 52
Page 8

5.2.3.2. DHCP Relay ...................................................................................... 53
5.2.3.3. DHCP Server .................................................................................... 54
5.2.3.4. ARP Table ......................................................................................... 56
5.2.3.5. Bridging ............................................................................................ 57
5.2.4. Wireless .................................................................................... 59
5.2.4.1. Basic Settings .................................................................................... 59
5.2.4.2. Advanced Settings ............................................................................ 62
5.2.4.3. Security ............................................................................................. 66
5.2.4.4. Access Control .................................................................................. 69
5.2.4.5. WPS .................................................................................................. 71
5.2.5. QoS ........................................................................................... 74
5.2.5.1. Classification ..................................................................................... 74
5.2.5.2. QoS Queue ........................................................................................ 77
5.2.6. NAT (Network address translations) ........................................ 80
5.2.6.1. Port Forwarding ................................................................................ 80
5.2.6.2. Port Mapping .................................................................................... 82
5.2.6.3. UPNP ................................................................................................ 84
5.2.6.4. IGMP Proxy ...................................................................................... 85
5.2.7. Firewall .................................................................................... 87
5.2.7.1. IP/Port Filtering ................................................................................ 87
5.2.7.2. MAC Filtering ................................................................................... 89
5.2.7.3. URL Blocking ................................................................................... 91
5.2.7.4. Domain Blocking .............................................................................. 93
5.2.7.5. Routing Configuration ...................................................................... 94
5.2.7.6. ACL Configuration ........................................................................... 96
5.2.7.7. DMZ .................................................................................................. 97
5.3. STATUS ............................................................................... 99
5.3.1. Interface ................................................................................. 100
5.3.2. ADSL ...................................................................................... 101
5.4. TOOLS ............................................................................... 102
5.4.1. Configuration Tools ............................................................... 102
5.4.2. Firmware Upgrade ................................................................. 103
5.4.3. Ping ........................................................................................ 103
5.4.4. ATM Loopback ....................................................................... 104
5.4.5. Diagnostic Test ....................................................................... 106
Page 9

5.4.6. Reboot ..................................................................................... 106
6. TROUBLESHOOTING .......................................... 107
7. GLOSSARY ............................................................. 111
Page 10

1
1. Introduction
Congratulations on purchasing this 150N Wireless LAN ADSL2/2+ Router. This
router is a cost-effective ADSL2/2+ router, with the combination of an ADSL2/2+
modem, router, Ethernet network switch and wireless access point, you can surf
the Internet through your ADSL2/2+ ADSL connection without investing other
devices.
This router can support downstream transmission rates of up to 24Mbps and
upstream transmission rates of up to 1Mbps. It supports PPPoA (RFC 2364 PPP over ATM Adaptation Layer 5), RFC 1483/2684 encapsulation over ATM
(bridged or routed) and PPP over Ethernet (RFC 2516) to establish a connection
with ISP. The product also supports VC-based and LLC-based multiplexing.
With the web management interface, users can easily configure the various
functions of the router including DHCP server, NAT, port forwarding, DMZ,
access control, IP/MAC/Port filtering, QoS, Firewall, PPTP/IPSec/L2TP passthrough, DDNS, UPnP, Wireless and etc.
This router is a high performance and high-speed device that provides a full rate
of ADSL2+ standard with the superb reliability and a complete solution for home
and office application.
Page 11

2
1.1. Features
ADSL2/2+ Compliance
Support downstream rates of up to 24Mbps and upstream rates of up to
1Mbps.
Compliant to ITU-T G.992.1 (G.dmt), G.992.2 (G.lite), G.992.3 (ADSL2),
G.992.4 (splitterless ADSL2), G.992.5 (ADSL2+) for Annex A, B. (Annex A
and B are supported in different H/W platform)
Multiple Protocols over AAL5 (RFC 1483/2684).
PPP over AAL5 (RFC 2364).
PPP over Ethernet (RFC 2516).
Support 802.11g Wireless Access Point
Complies with IEEE 802.11b/g/n standards.
High data rate – up to 150Mbps network speed.
Supports 64-bit/128-bit WEP, WPA-PSK and WPA2-PSK wireless security
functions.
Supports MAC address filtering.
Router
NAT (Network Address Translation) IP Sharing
Port Forwarding/Port Mapping
DMZ
VPN Pass Through (IPSec/PPTP/L2TP)
IP QoS
SPI Anti-DOS Firewall
DHCP Server and Client
USB Port 2.0 x 1 (This USB port is for storage sharing, only an option for
this product.)
Access Management
ACL (Access Control)
IP/MAC/Port Filter
UPnP (Universal Plug and Play)
SNMP
Dynamic DNS
Page 12

3
1.2. Minimum Requirements
The following devices are necessary to configure and use the ADSL2+ Router:
A PC with Pre-installed Ethernet Adapter (Required) and a Web-Browser
(Internet Explorer 4.0 or higher)
RJ-45 Ethernet crossover cable (Included in the package)
RJ-11 (ADSL Ready) phone Line
1.3. Package Content
One ADSL2+ Router (Annex A or B)
One Power Adapter (12VDC, 1A)
One RJ-45 Ethernet Cable (100 cm)
One RJ-11 Telephone Line (180 cm)
One CD with full User Manual and Quick Installation Guide
Page 13
4
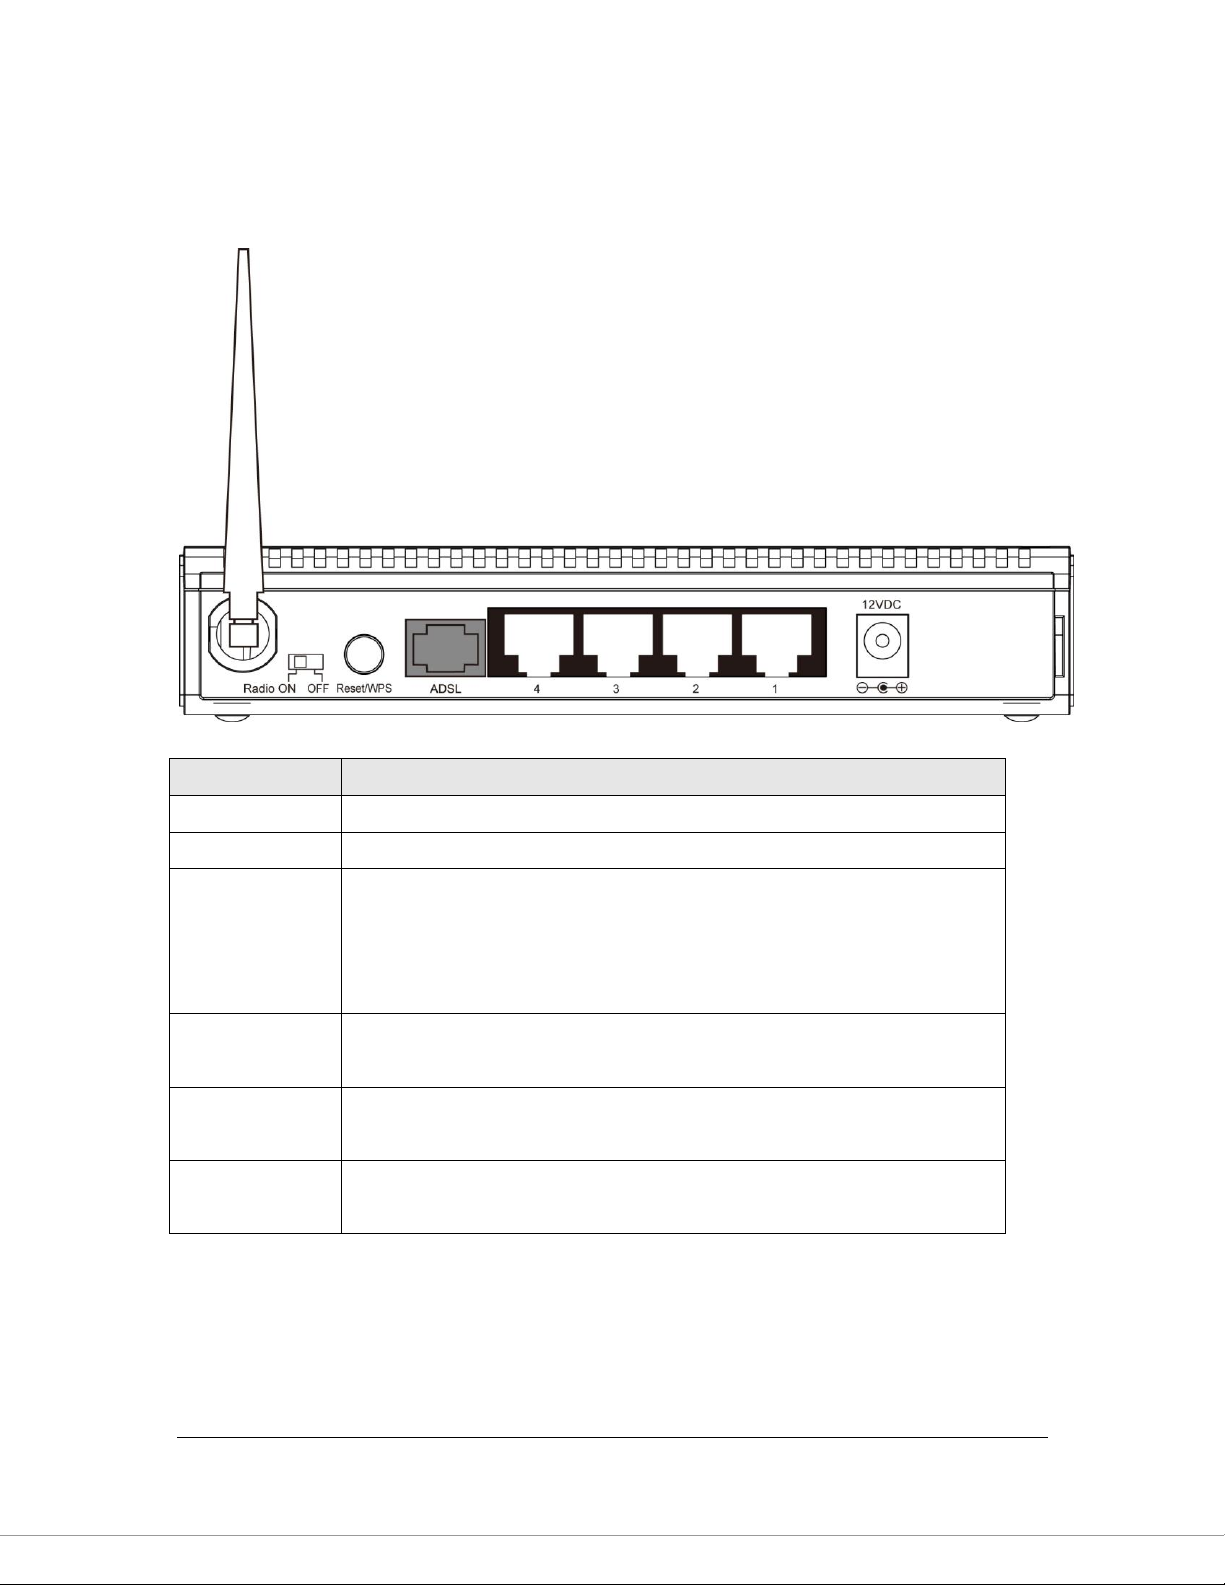
Item Name
Description
Antenna
These antennas are 3dBi dipole antennas.
Radio ON/OFF
Switch the button to activate or deactivate the wireless functions.
Reset / WPS
Reset the router to factory default settings (clear all settings) or start
WPS function. Press this button and hold for 10 seconds to restore all
settings to factory defaults, and press this button for less than 5 seconds
to start WPS function.
1 - 4
The router‟s 4 LAN ports are where you connect your LAN‟s PCs, printer
servers, hubs and switches etc.
ADSL
Connect the supplied RJ-11 telephone line to this port and your
ADSL/telephone network.
Power
Please plug the power adapter attached with the ADSL Router to the
power jack. The power adapter is 12VDC, 1A.
Antenna
1.4. Hardware Placement
1.4.1. Rear Panel
Page 14

5
LED
Light Status
Description
POWER (Green)
On
Router is switched on and correctly
powered.
WLAN (Yellow)
On
Off
Wireless LAN WPS is on.
Wireless LAN is disabled
Blinking
Wireless traffic is transmitting or receiving
ADSL (Green)
On
Connected to an ADSL DSLAN
successfully
Blinking
ADSL line is not connect to internet.
LAN LNK/ACT (Port 1-4)
On
The LAN cable is connected to the router
Off
No network connection.
Blinking
Network traffic transferring or receiving
through the LAN port
1.4.2. Front LEDs
On the router‟s front panel there are LED lights that inform you of the router‟s
current status. Below is an explanation of each LED and its description.
Page 15

6
2. Hardware Installation
Step 1. Connect the ADSL Line
Connect the router to your ADSL cable through the supplied RJ-11 telephone line.
Step 2. Connect the router to your LAN network
Connect the router to your PC, hub or switch by attached the Ethernet cable to
the LAN port of the router.
Step 3. Connect the Power Adapter to the Router
Connect the power adapter to the power jack on the rear panel of router.
Step4: Check the ADSL LED on the Router
The ADSL LED will be ON if the router is connected to the ADSL cable and
receives the ADSL signals successfully. If the LED is blinking, please contact
with your ISP (Internet Service Provider) to check the problem.
Note: You must use the power adapter shipped along with the router, do
NOT use any other power adapter from other sources.
Page 16

7
3. Setup Wizard
This router provides a Setup Wizard tool for user to configure the ADSL settings.
This wizard collects some ISP‟s ADSL settings so that user can easy to configure
the router‟s ADSL settings by only selecting the ISP vendor from the wizard.
If you cannot find your ISP from the list in the wizard, please manually set the ISP
information through the wizard.
3.1. Getting Started
Before you start, please check the following items:
1. Please make sure that you have connected the ADSL cable to the router
correctly. When the ADSL cable is worked normally, the ADSL LED will be on.
2. Uninstall all of dial up programs if you have installed previously for the USB
modem or other dial up devices.
3. It is recommended to configure the router through the Ethernet cable before
you have set the wireless functions correctly.
This wizard can be run in Windows 98SE/Me/2000/XP/Vista/7. The following
procedures are operated in Windows XP. (Procedures are similar for Windows
98SE/Me/2000/Vista/7.)
1. Insert the CD shipped along with the ADSL router into your CD-ROM drive.
The Autorun.exe program should be executed automatically. If not, run
Autorun.exe manually from “Autorun” folder in the CD.
Page 17

8
2. The following screen will be displayed. Click “Setup Wizard”.
3. This wizard will be executed and try to search for the ADSL Router. If the
ADSL Router can be searched successfully, the wizard will guide you to step
5.
Page 18
9
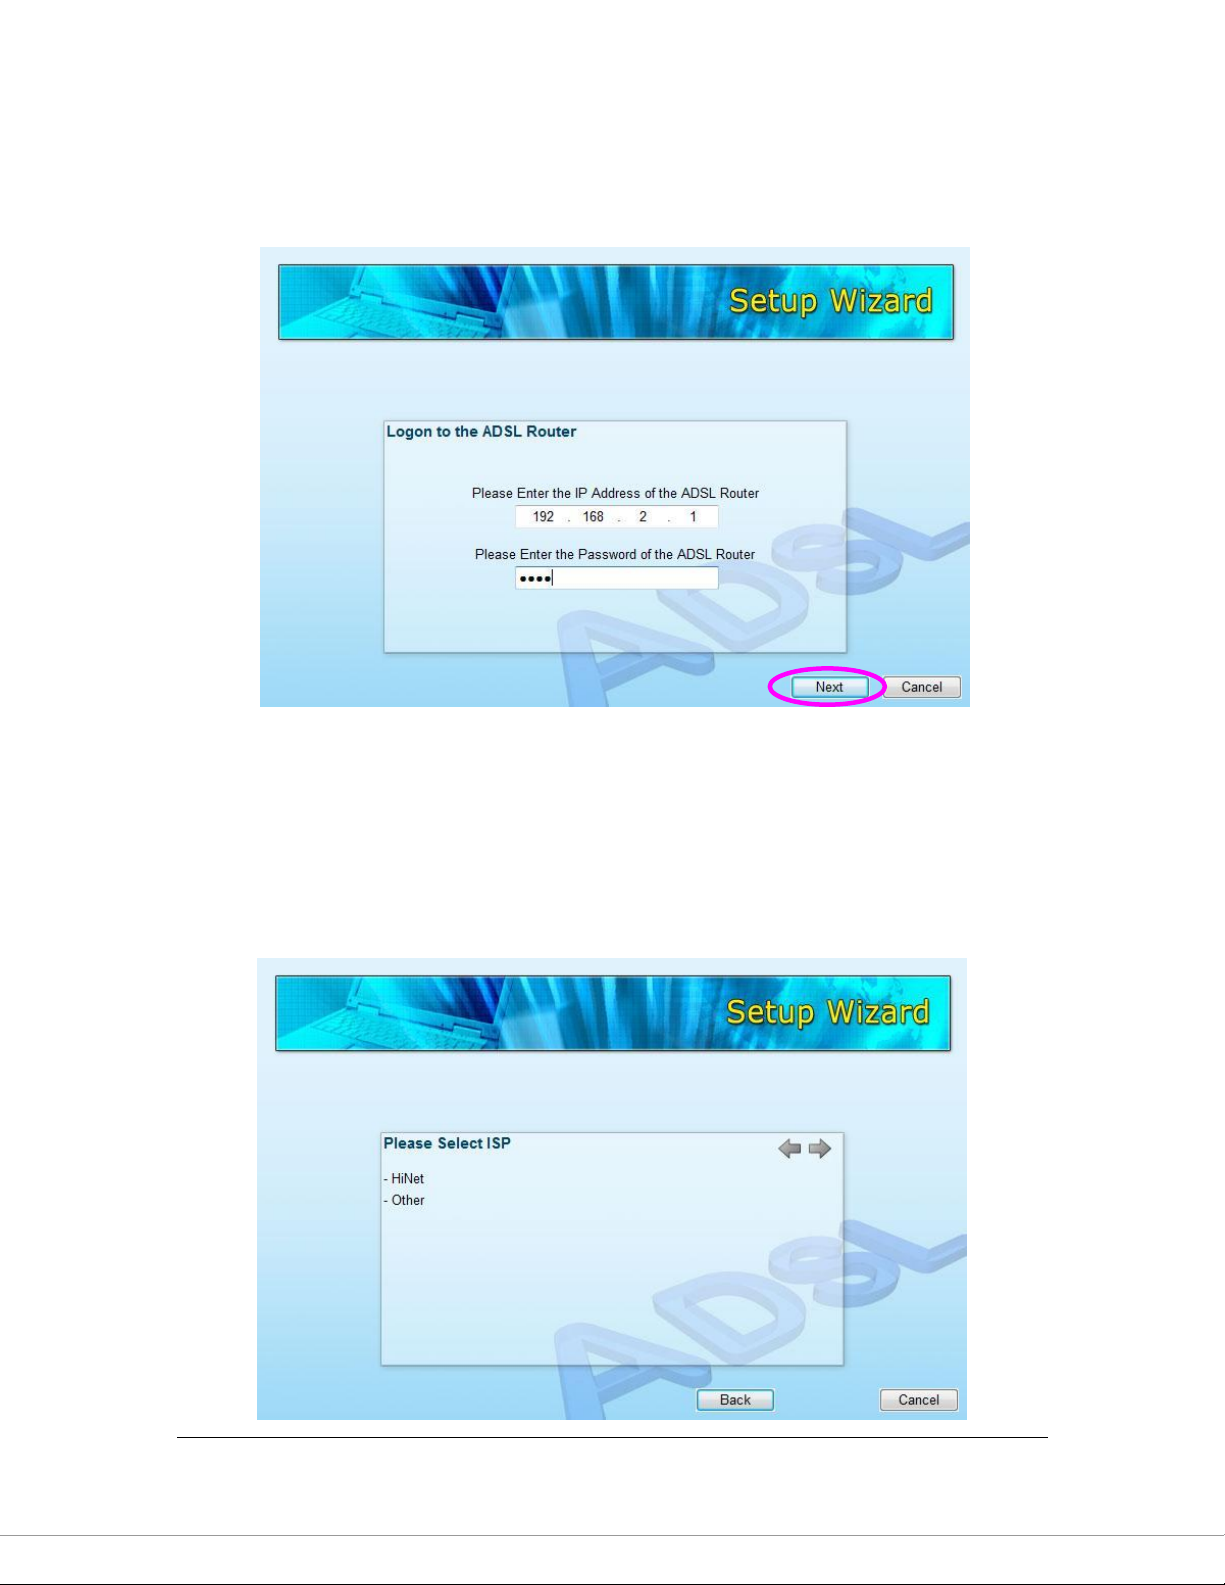
4. If the router cannot be found, please enter the IP Address and the Password
of the router to search again. Click “Next” to continue.
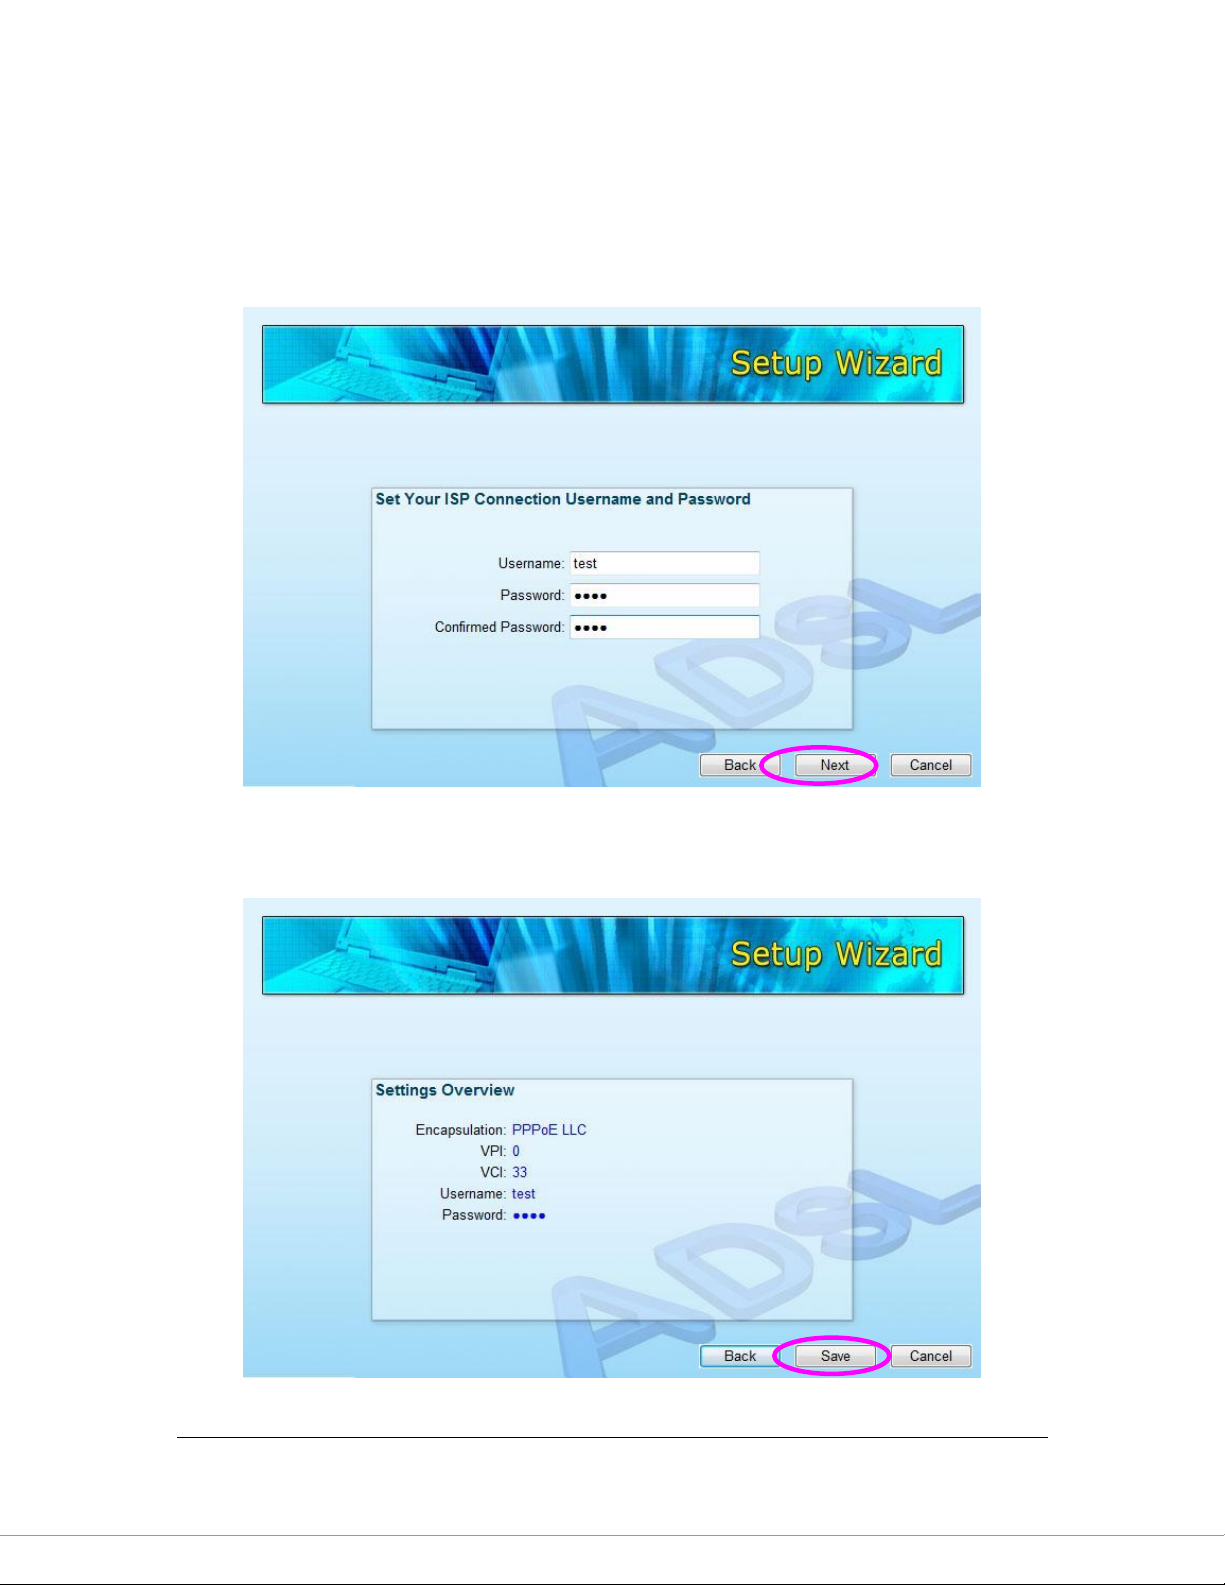
5. The wizard will automatically select the country where you are in by checking
the language of the operating system in your computer and skip to the “Select
ISP” page. Please select the ISP.
If you cannot find the ISP, please click “Other” to reselect the country or
manual configure the ISP information.
Page 19
10
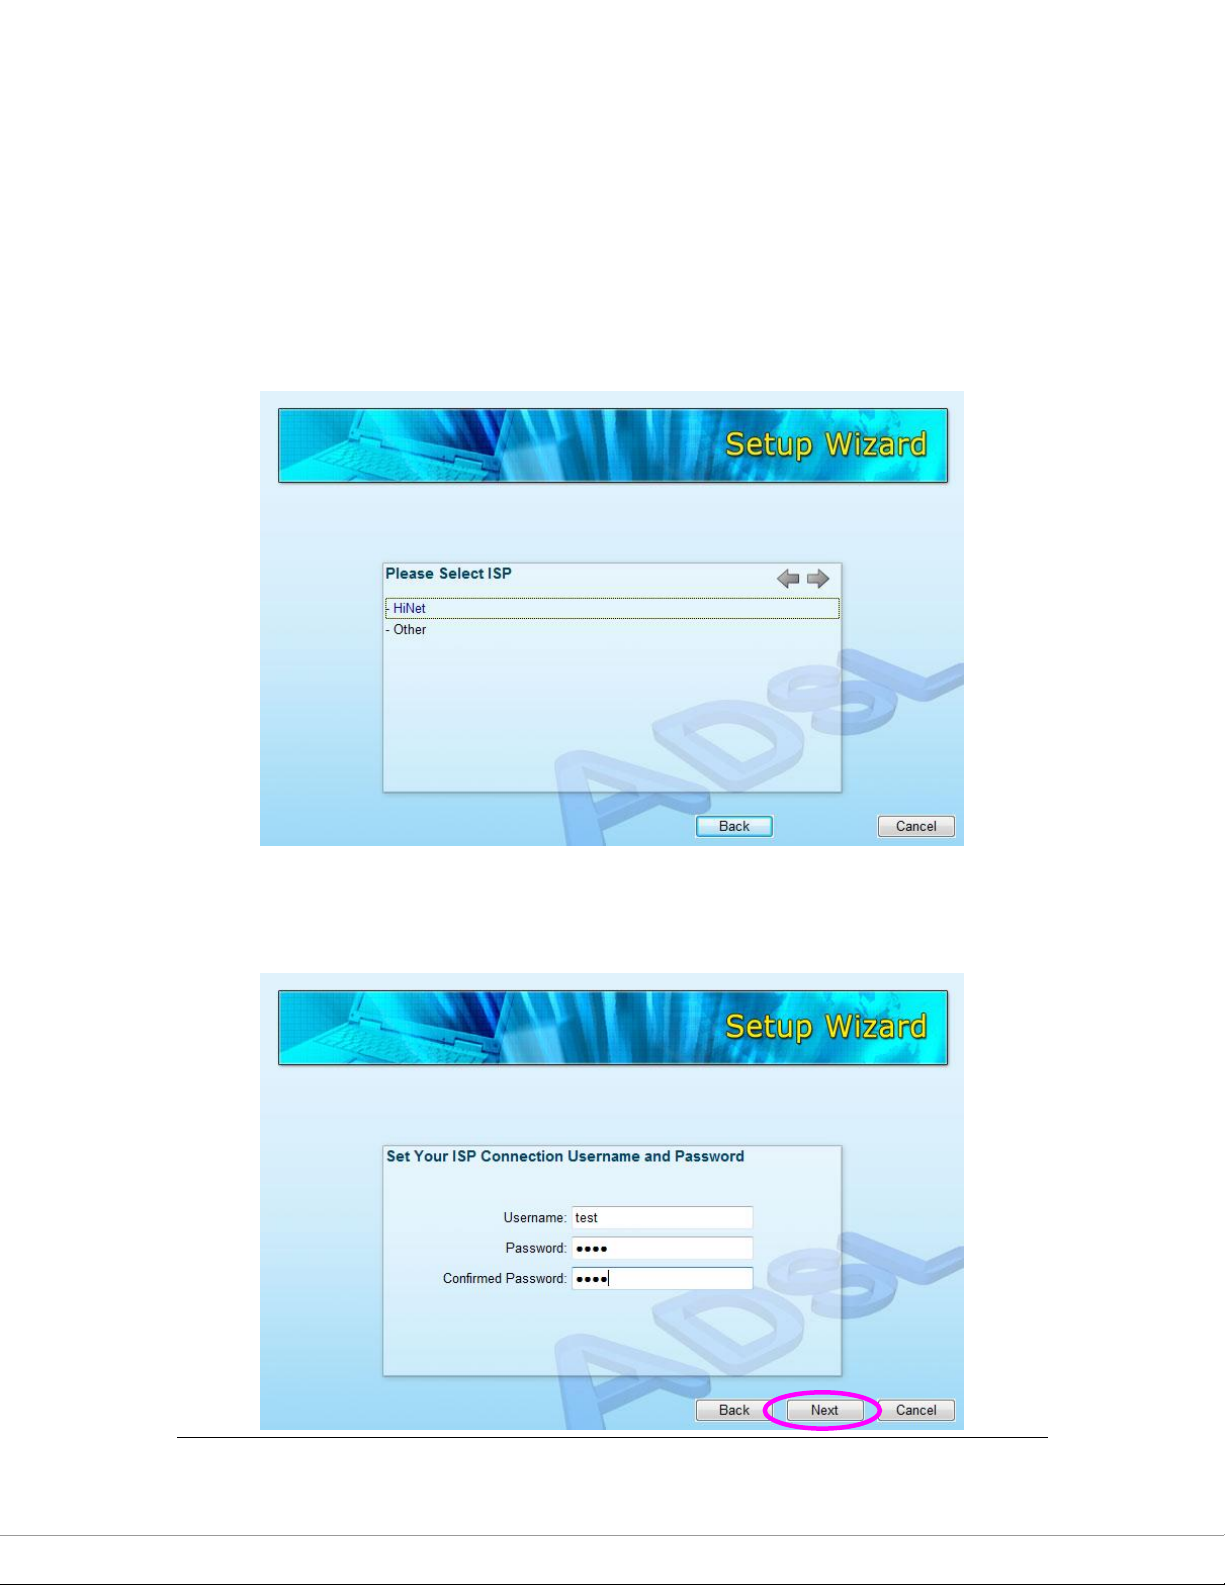
3.2. Automatically Set ISP
If you can find the ISP from the wizard, please follow the procedures below to let
the wizard set the ISP settings automatically.
1. Please select the ISP (Internet Service Provider) of your ADSL service.
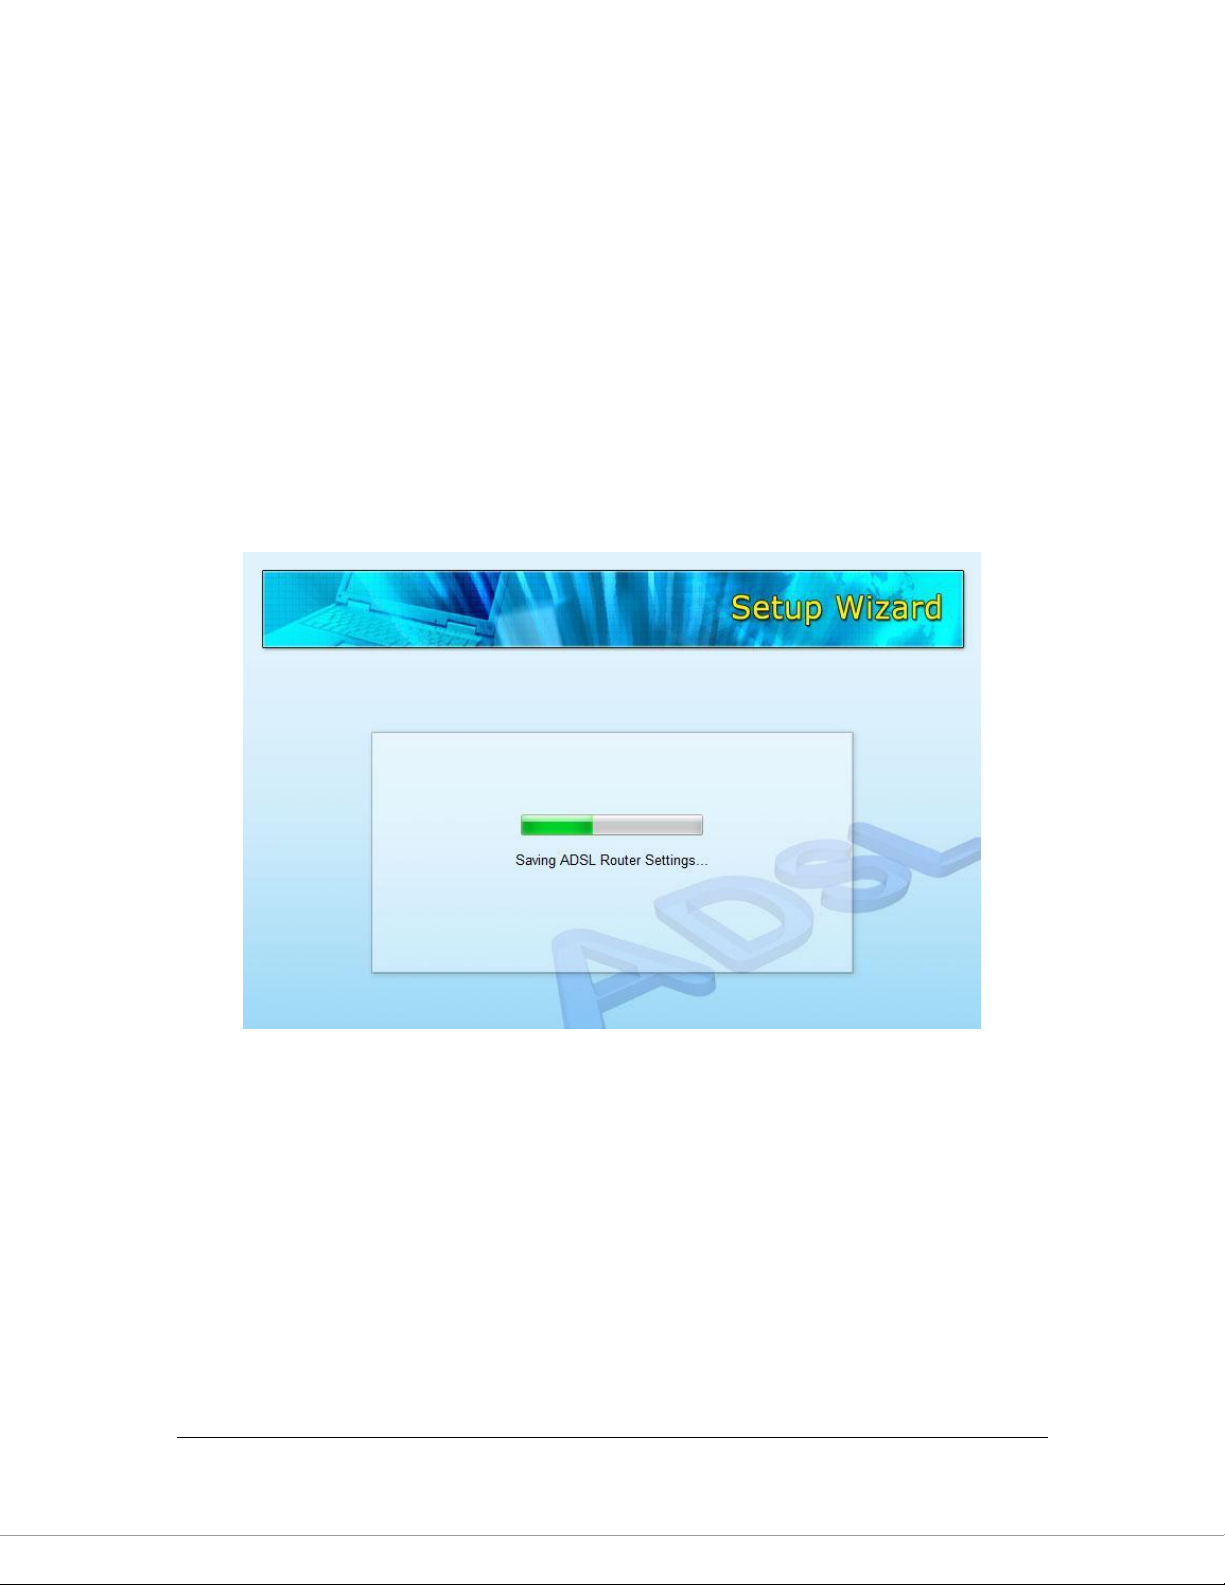
2. Enter the Username and Password which your ISP has provided to you if it is
needed. Click “Next”.
Page 20
11
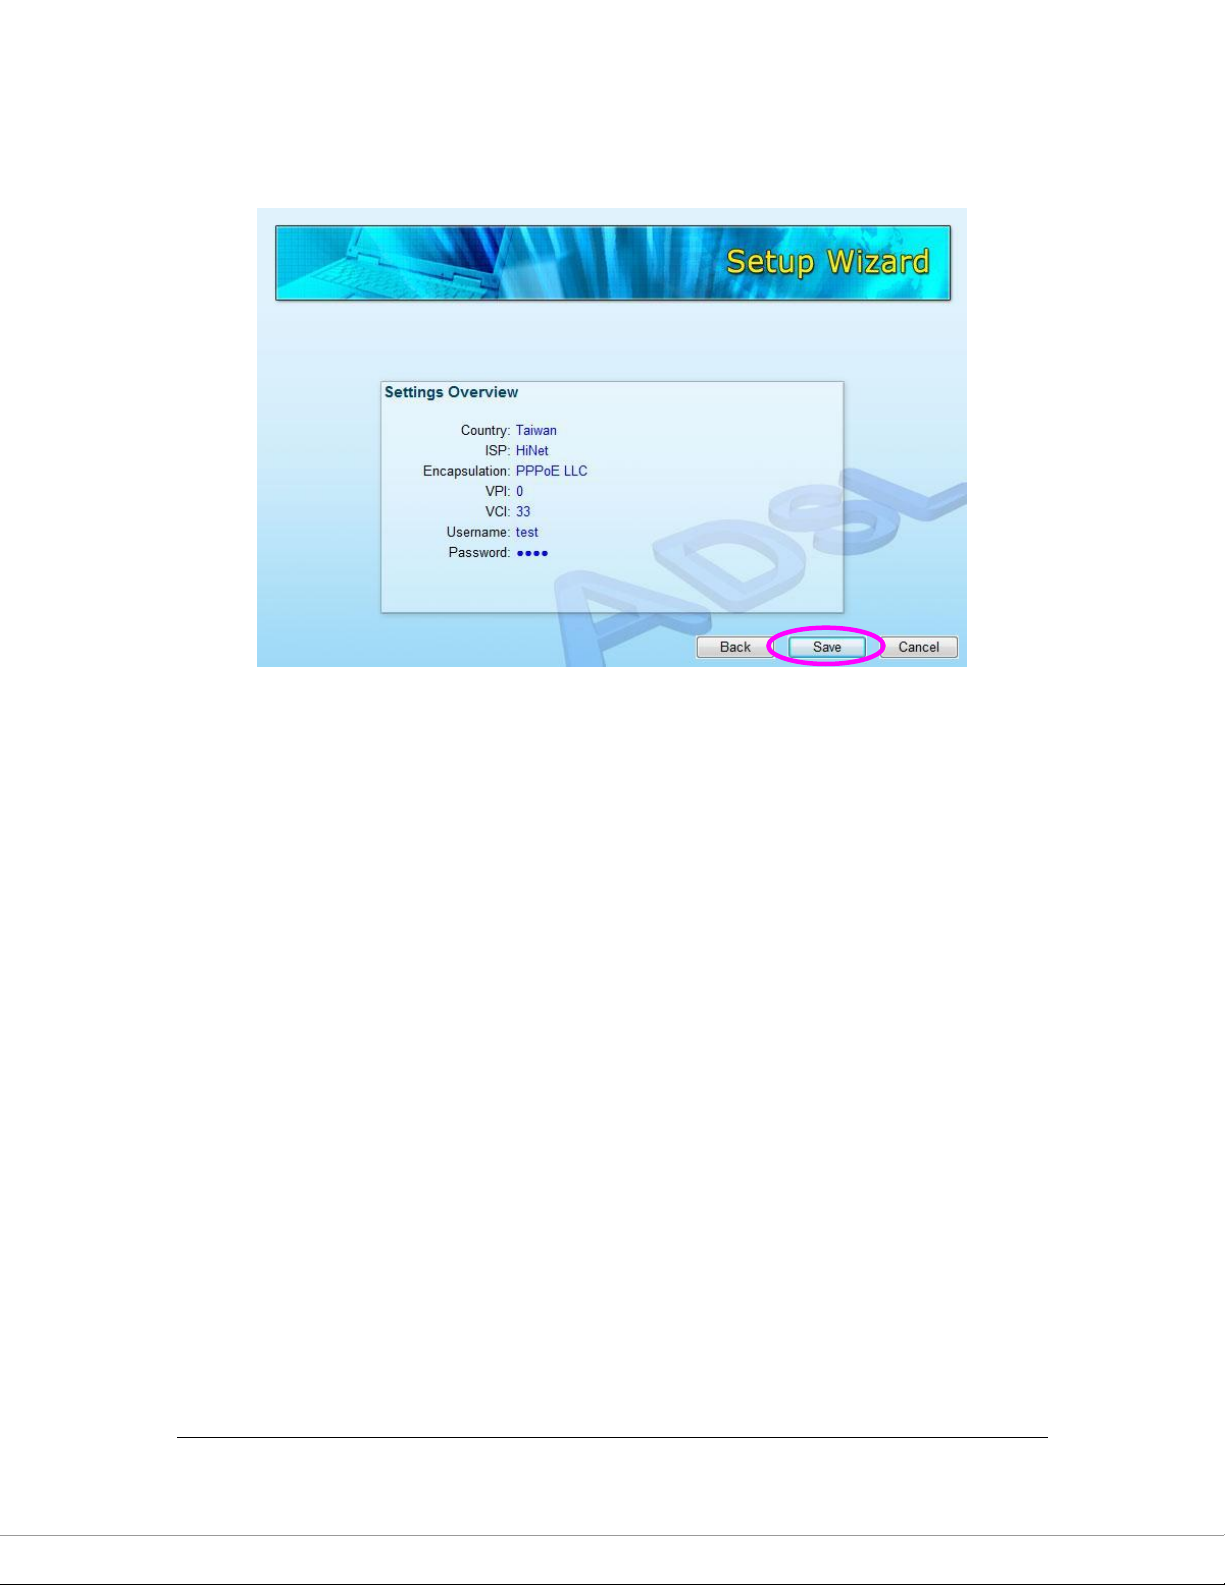
3. Click “Save” to save the settings and reboot the router.
4. After saving and rebooting the router, the ISP settings are all finished. This
wizard will then help to set your computer to obtain IP Address from the router
automatically.
Note1: To use the router to get into the Internet, the IP Address of each
PC has to be set in the same network segment as the router. This wizard
will help to set the proper IP Address to your computer.
Note2: By default, the router’s DHCP Server is enabled. If it is disabled
before running the wizard, the wizard will enable the DHCP Server of the
router automatically.
Page 21
12
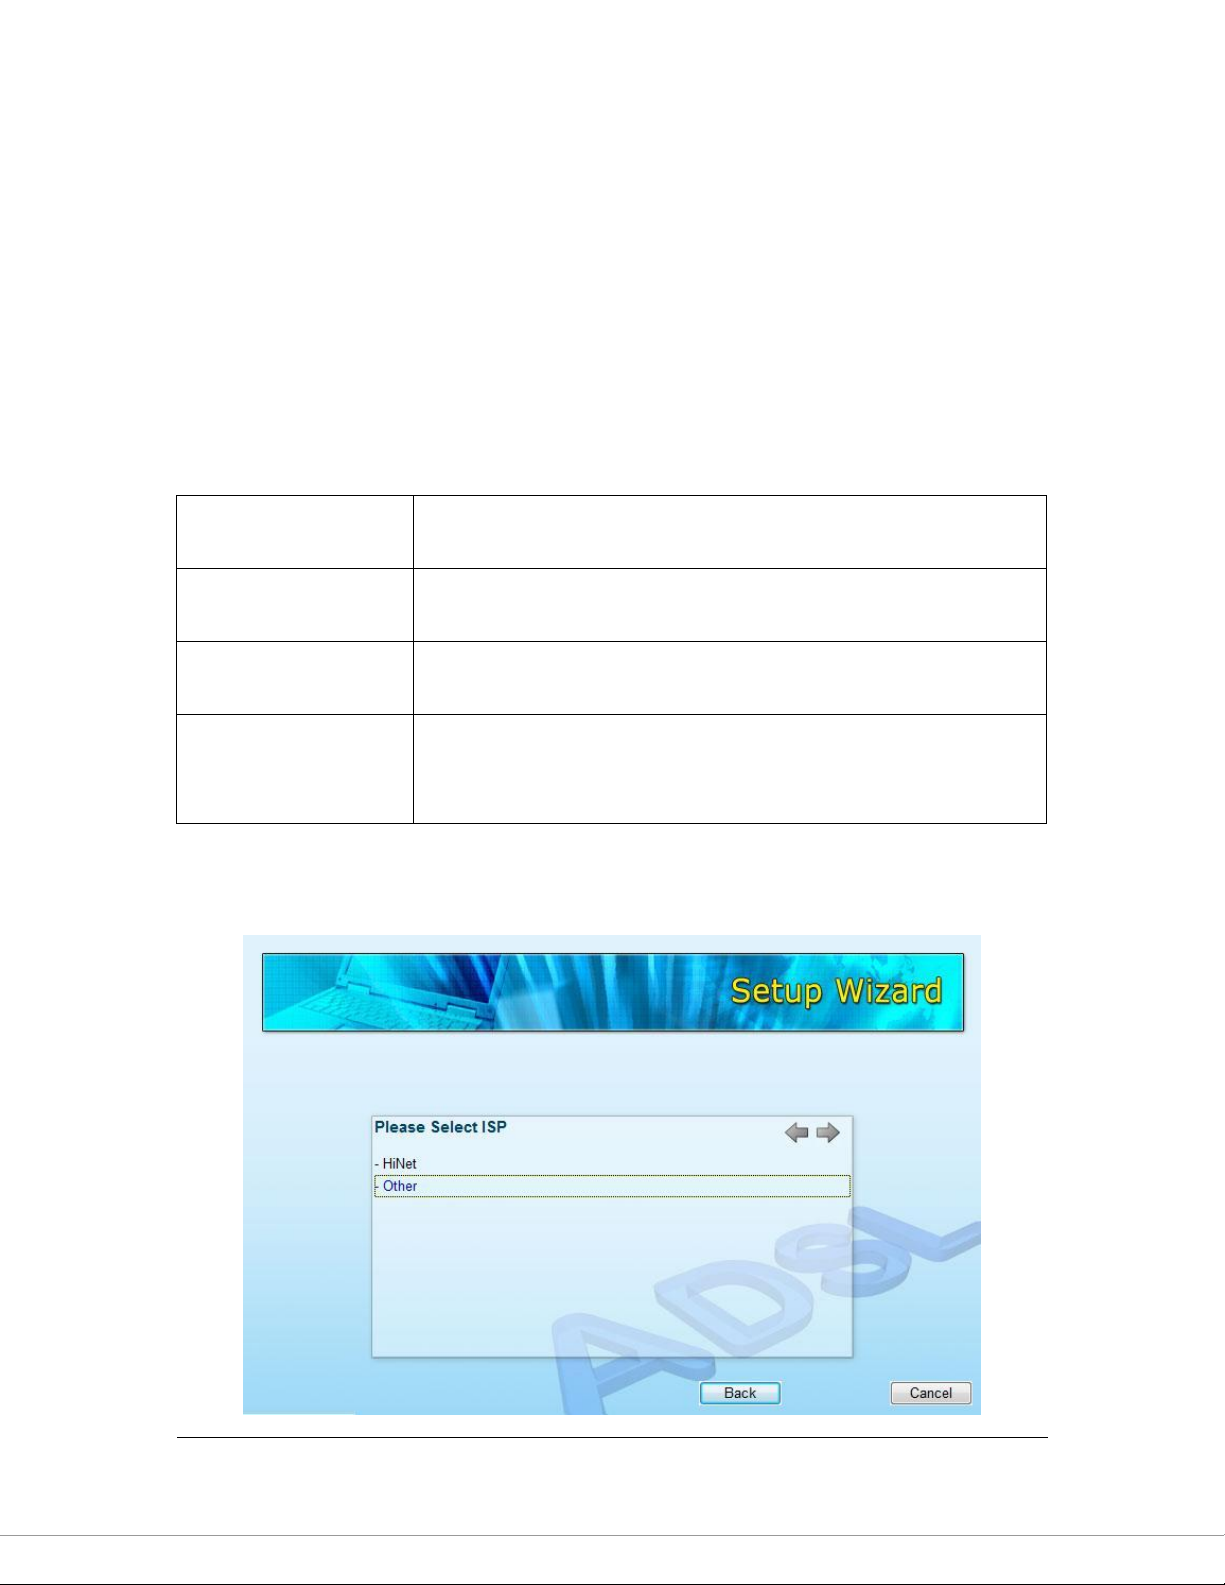
5. The wizard will try to connect to the ISP you have selected. If the connection
is failed, please run the wizard to select the ISP again.
Page 22

13
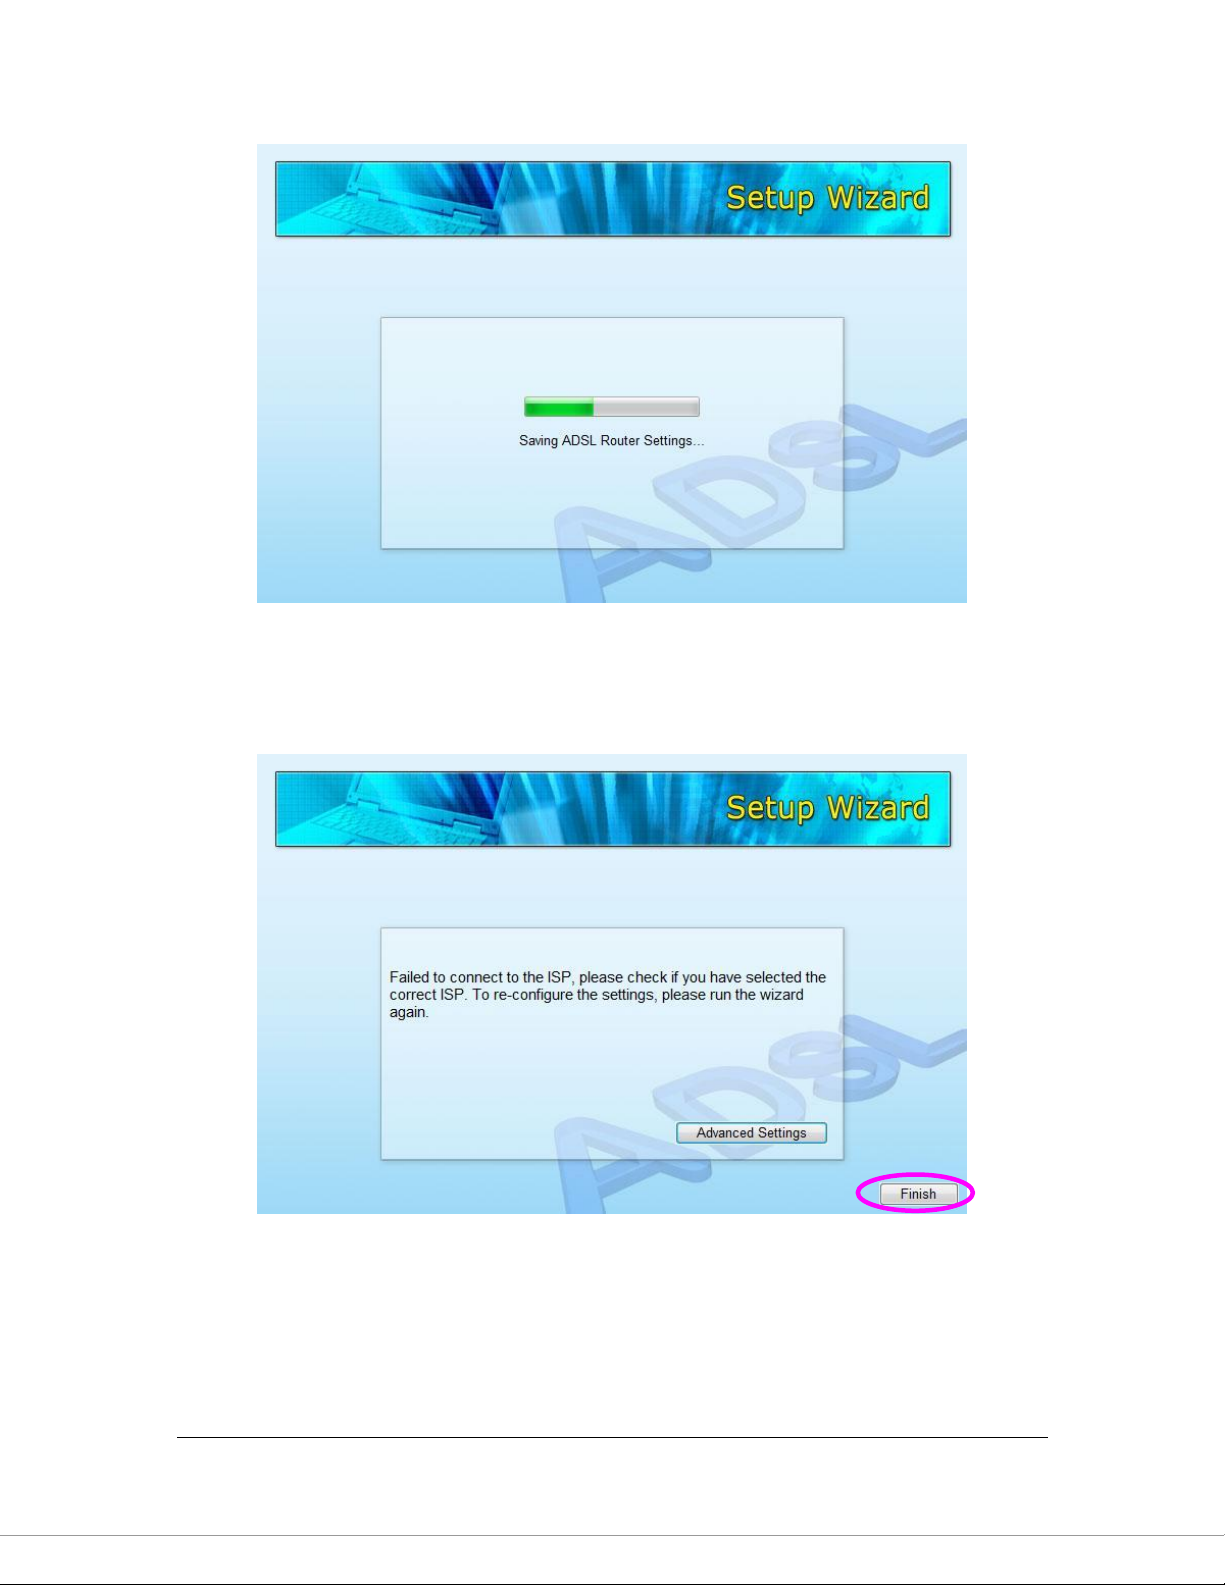
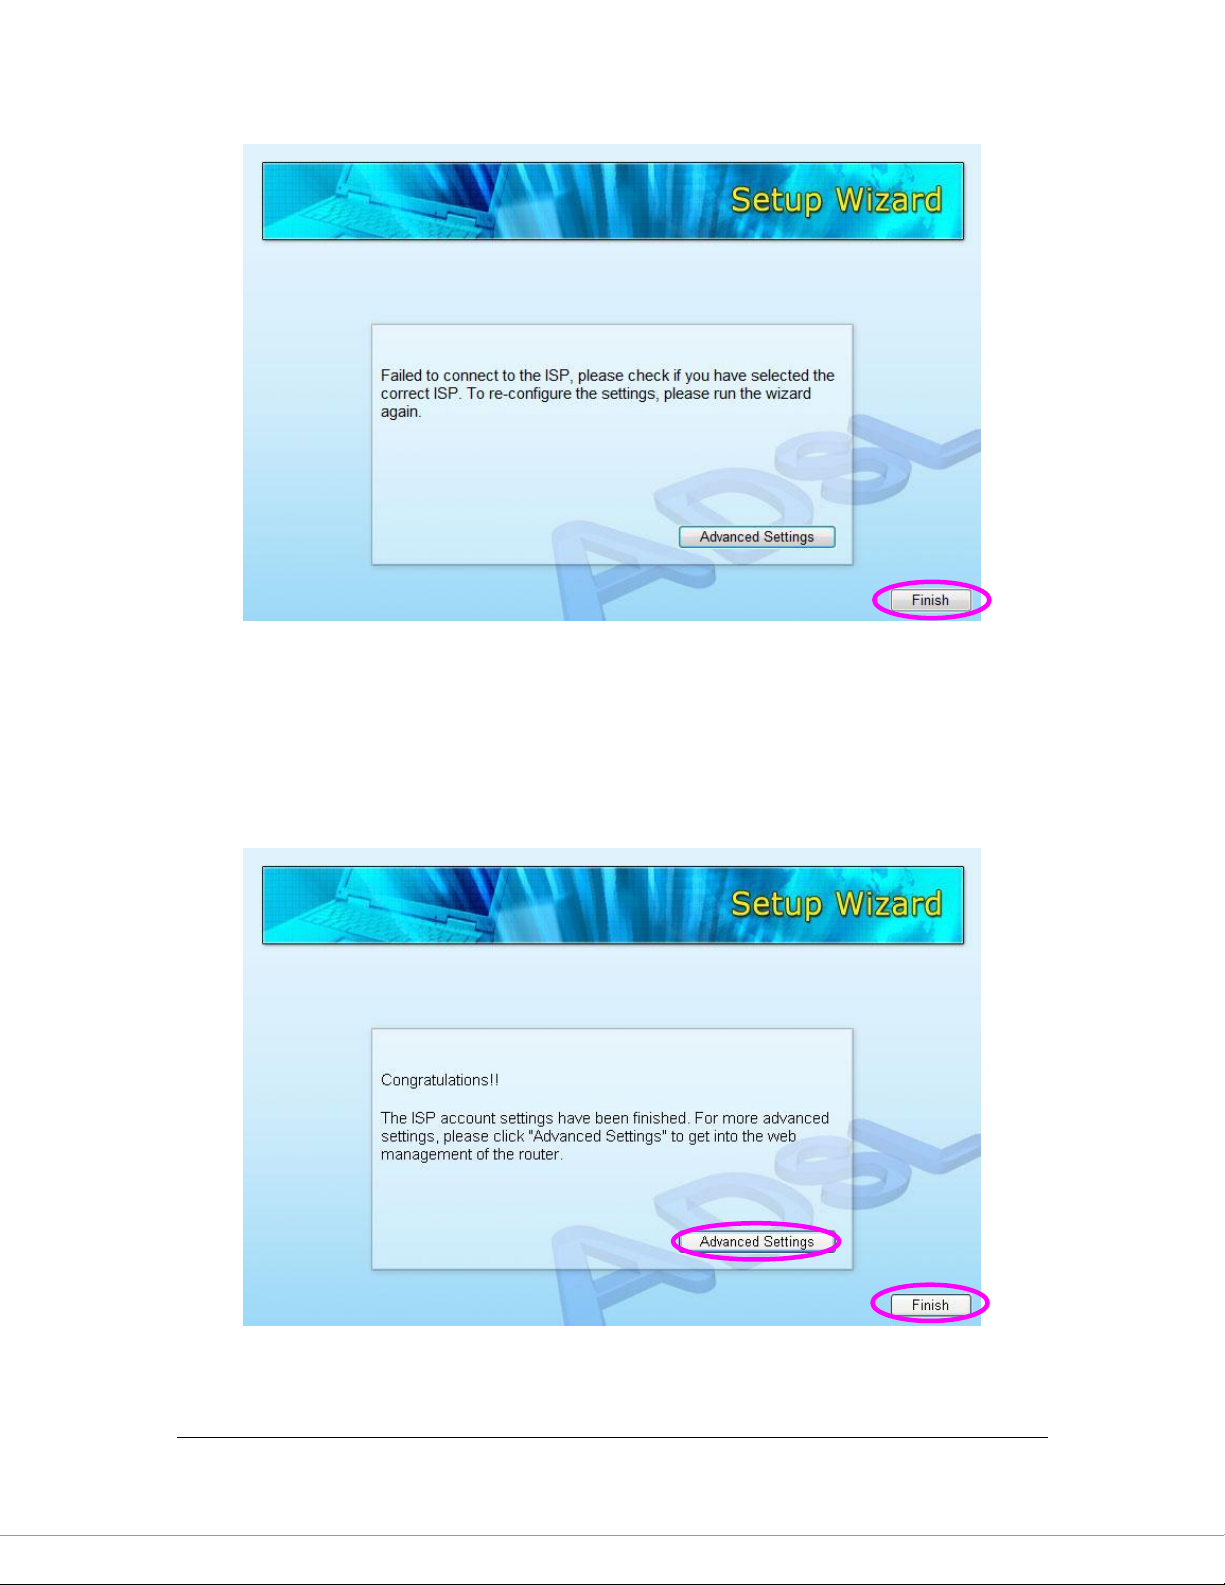
6. If you can successfully to connect to the ISP, you will see below page. If you
want to configure more settings, please click “Advanced Settings” to get into
the web management of the router or click “Finish” to close the wizard.
Page 23
14
PPPoE
VPI/VCI, VC-based/LLC-based multiplexing, Username,
Password (and Service Name).
PPPoA
VPI/VCI, VC-based/LLC-based multiplexing, Username,
Password.
RFC1483 Bridged
VPI/VCI, VC-based/LLC-based multiplexing to use Bridged
Mode.
RFC1483 Routed
VPI/VCI, VC-based/LLC-based multiplexing, IP Address,
Subnet Mask, Gateway Address, and Domain Name
System (DNS) IP Address (It is a fixed IP Address).
3.3. Manually Set ISP
If you cannot find the ISP from the wizard, please follow the procedures below to
set the ISP settings manually.
Before configuring the ISP manually, please check with your ISP (Internet
Service Provider) what kind of the service is provided such as PPPoE, PPPoA or
RFC1483/2684. Gather the information as illustrated in the following table and
keep it for reference.
1. Please select “Other”.
Page 24

15
2. Please check with your ISP the connection type of the ADSL line. Select the
Connection Type and click “Next”.
3. Input the VPI, VCI and Encapsulation data supplied by your ISP. If the
Connection Type is “Static IP Address”, you have to input the IP Address
information supplied by your ISP. To know more about the explanation of
each setting, please refer to Section 5.2 in the manual.
Page 25
16
4. Enter the Username and Password which your ISP has provided to you if it is
needed. Click “Next”.
5. Click “Save” to save the settings and reboot the router.
Page 26
17
6. After saving and rebooting the router, the ISP settings are all finished. This
wizard will then help to set your computer to obtain IP Address from the router
automatically.
Note1: To use the router to get into the Internet, the IP Address of each
PC has to be set in the same network segment as the router. This wizard
will help to set the proper IP Address to your computer.
Note2: By default, the router’s DHCP Server is enabled. If it is disabled
before running the wizard, the wizard will enable the DHCP Server of the
router automatically.
7. The wizard will try to connect to the ISP you have selected. If the connection
is failed, please run the wizard to select the ISP again.
Page 27
18
8. If you can successfully to connect to the ISP, you will see below page. If you
want to configure more settings, please click “Advanced Settings” to get into
the web management of the router or click “Finish” to close the wizard.
Page 28

19
4. IP Address Setting
Using the router to get into the Internet, the PCs in the network must have
Ethernet adapter installed and be connected to the router either directly or
through a hub or switch. The TCP/IP protocol of each PC has to been installed
and the IP Address of each PC has to be set in the same subnet as the router.
The router‟s default IP Address is 192.168.2.1 and the subnet mask is
255.255.255.0. PCs can be configured to obtain IP Address automatically
through the DHCP Server of the router or a fixed IP Address in order to be in the
same subnet as the router. By default, the DHCP Server of the router is enabled
and will dispatch IP Address to PC from 192.168.2.100 to 192.168.2.200. It is
strongly recommended to set obtaining IP address automatically.
This section shows you how to configure your PC‟s so that it can obtain an IP
address automatically for either Windows 95/98/Me, 2000 or NT operating
systems. For other operating systems (Macintosh, Sun, etc.), please follow the
manual of the operating systems. The following is a step-by-step illustration on
how to configure your PC to obtain an IP address automatically for Windows
Vista, Windows XP and Windows 2000.
Windows Vista
1. Click the Start button and select Settings and then select Control Panel.
Double click Network and Sharing Center, the Network and Sharing Center
window will appear.
2. Click Manage network connections and right click on the Local Area
Connection icon and select Properties. The Local Area Connection window
will appear.
3. Check your list of Network Components. You should see Internet Protocol
Version 4 (TCP/IPv4) on your list. Select it and click the Properties button.
Page 29
20
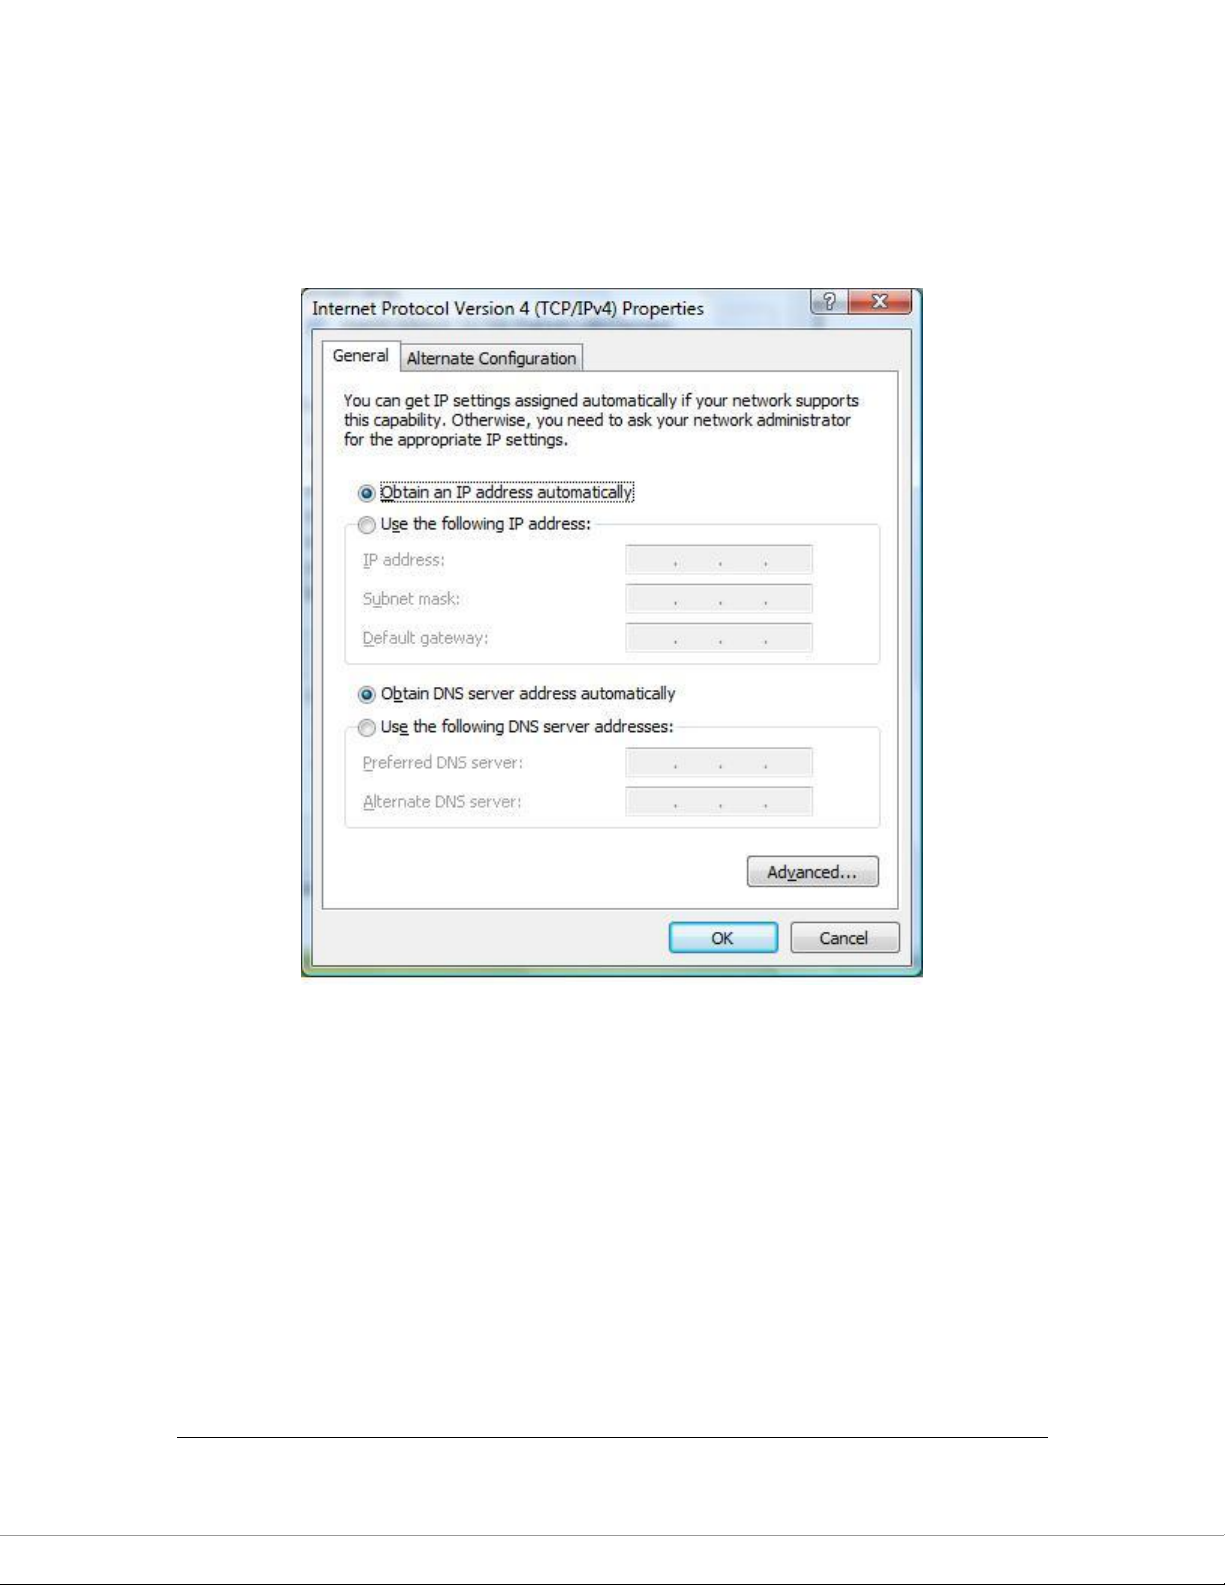
4. In the Internet Protocol Version 4 (TCP/IPv4) Properties window, select
Obtain an IP address automatically and Obtain DNS server address
automatically as shown on the following screen.
5. Click OK to confirm the setting. Your PC will now obtain an IP address
automatically from your router‟s DHCP server.
Note: Please make sure that the router’s DHCP server is the only DHCP
server available on your LAN.
Windows XP
1. Click the Start button and select Control Panel and then double click Network
Connections. The Network Connections window will appear.
Page 30
21
2. Right click on the Local Area Connection icon and select Properties. The
Local Area Connection window will appear.
3. Check your list of Network Components. You should see Internet Protocol
[TCP/IP] on your list. Select it and click the Properties button.
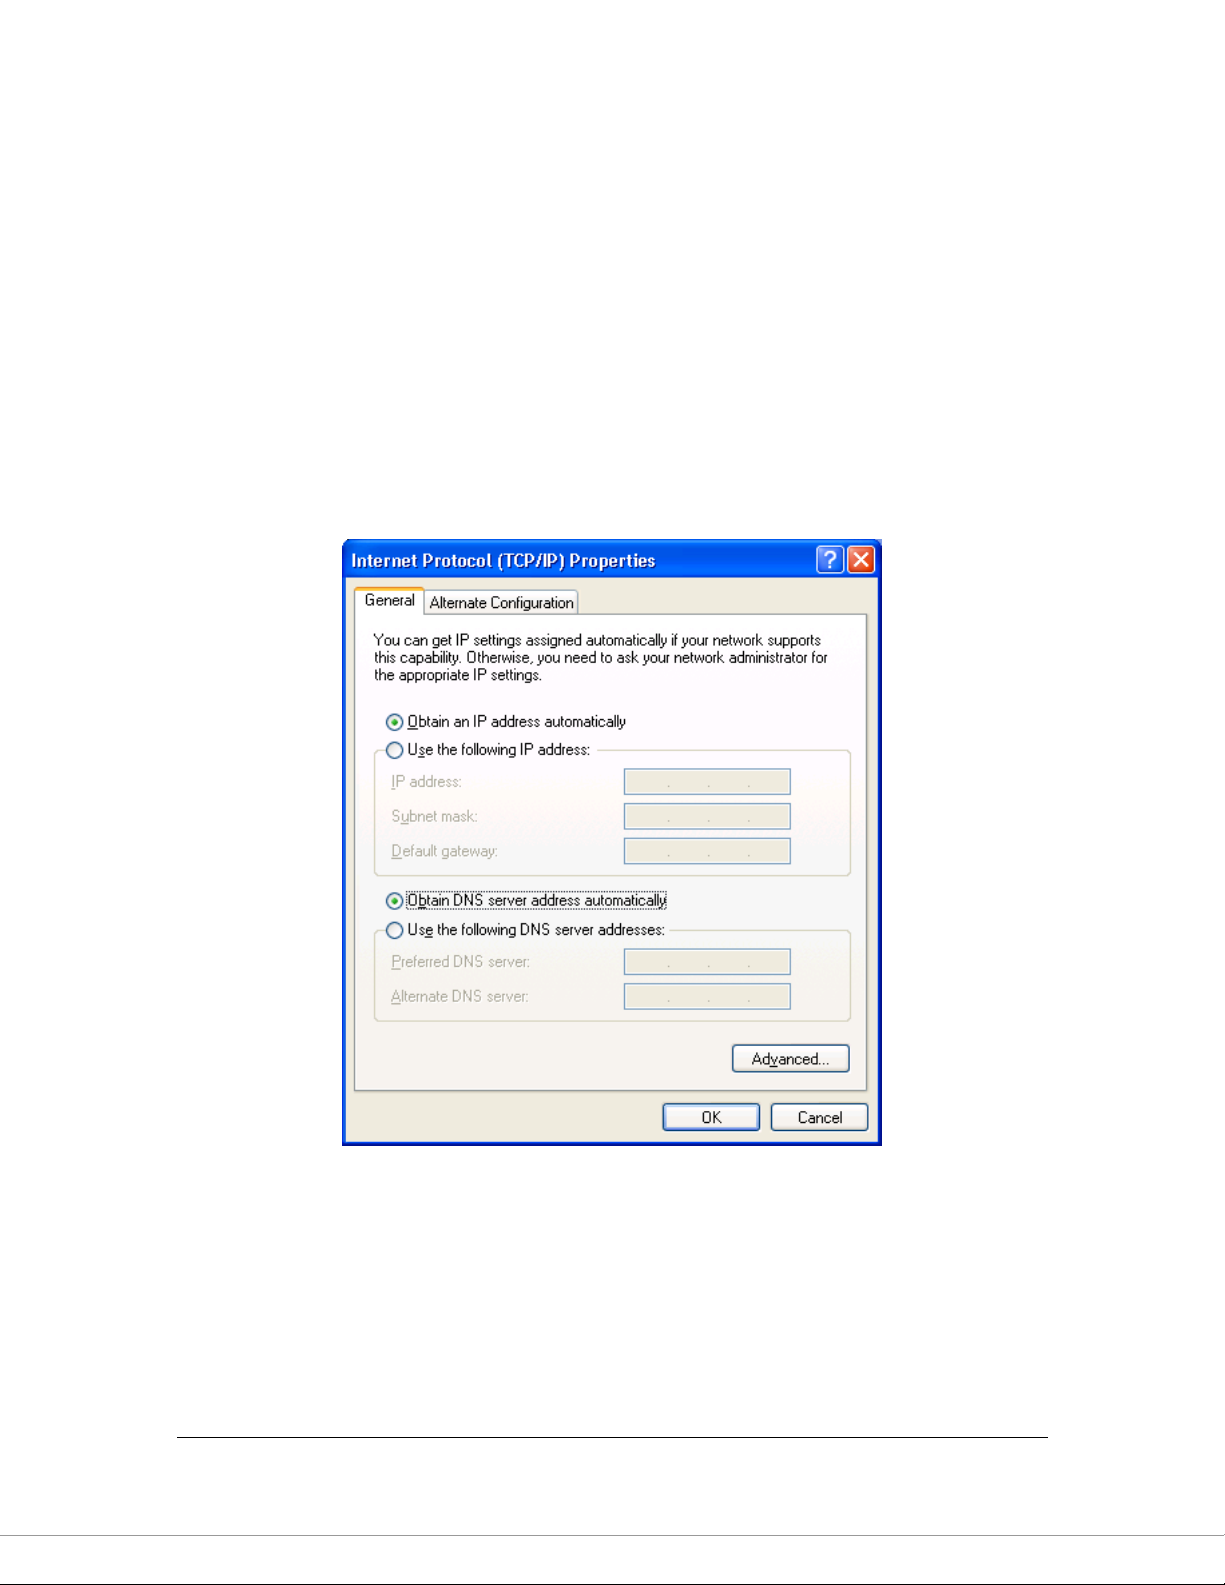
4. In the Internet Protocol (TCP/IP) Properties window, select Obtain an IP
address automatically and Obtain DNS server address automatically as
shown on the following screen.
5. Click OK to confirm the setting. Your PC will now obtain an IP address
automatically from your router‟s DHCP server.
Note: Please make sure that the router’s DHCP server is the only DHCP
server available on your LAN.
Page 31

22
Windows 2000
1. Click the Start button and select Settings, then click Control Panel. The
Control Panel window will appear.
2. Double-click Network and Dial-up Connections icon. In the Network and Dial-
up Connection window, double-click Local Area Connection icon. The Local
Area Connection window will appear.
3. In the Local Area Connection window, click the Properties button.
4. Check your list of Network Components. You should see Internet Protocol
[TCP/IP] on your list. Select it and click the Properties button.
5. In the Internet Protocol (TCP/IP) Properties window, select Obtain an IP
address automatically and Obtain DNS server address automatically as
shown on the following screen.
Page 32

23
6. Click OK to confirm the setting. Your PC will now obtain an IP address
automatically from your ADSL Router‟s DHCP server.
Note: Please make sure that the router’s DHCP server is the only DHCP
server available on your LAN.
Page 33

24
5. Web Management Configuration
Once you have configured your PCs to obtain an IP address automatically, the
router‟s DHCP server will automatically give your LAN clients an IP address. By
default the router‟s DHCP server is enabled so that you can obtain an IP address
automatically. To see if you have obtained an IP address, see Appendix A.
Once your PC has obtained an IP address from your router, enter the default IP
address 192.168.2.1 (router‟s IP address) into your PC‟s web browser and press
<enter>
The login screen below will appear. Enter the “User Name” and “Password” and
then click <OK> to login. By default the user name is “admin” and the password
is “1234”. For security reasons it is recommended that you change the password
as soon as possible.
The HOME page screen below will appear. The Home Page is divided into four
sections: Quick Setup, General Setup, Status, Tools.
Page 34

25
Quick Setup (Section 5.1)
The Quick Setup Wizard provides only the necessary configurations to connect
your ADSL router to your Internet Service Provider (ISP).
General Setup (Section 5.2)
The ADSL router supports advanced functions like Virtual Server, Access Control,
Hacker Attack Detection and DMZ. We highly recommend you keep the default
settings.
Status (Section 5.3)
The ADSL router's status information provides the following information about
your ADSL router: Hardware/Firmware version, Serial Number, and its current
operating status.
Tools (Section 5.4)
ADSL router Tools - Tools include Configuration tools, Firmware upgrade and
Reset.Configuration tools allow you to Backup, Restore, or Restore to Factory
Default setting for your ADSL router. The Firmware upgrade tool allows you to
upgrade your ADSL router's firmware. The RESET tool allows you to reset your
ADSL router.
Page 35

26
PPPoE
VPI/VCI, VC-based/LLC-based multiplexing, Username,
Password (and Service Name).
PPPoA
VPI/VCI, VC-based/LLC-based multiplexing, Username,
Password.
RFC1483 Bridged
VPI/VCI, VC-based/LLC-based multiplexing to use Bridged
Mode.
RFC1483 Routed
VPI/VCI, VC-based/LLC-based multiplexing, IP Address,
Subnet Mask, Gateway Address, and Domain Name
System (DNS) IP Address (It is a fixed IP Address).
5.1. Quick Setup
The Quick Start section is designed to get you using the router as quickly as
possible. Before configuring the router, please check with your ISP (Internet
Service Provider) what kind of the service is provided such as PPPoE, PPPoA or
RFC1483/2684. Gather the information as illustrated in the following table and
keep it for reference.
1. Please go to Quick Setup menu by clicking „Quick Setup‟ button and the
following page will be displayed :
Page 36

27
2. Please select the country where you are in and then the ISP (Internet Service
Provider) of your ADSL service.
3. Enter the Username and Password which your ISP has provided to you if it is
needed. Click “Finish” to save the settings.
Page 37

28
4. Click “Commit and Reboot” to reboot the router.
Page 38

29
Parameter
Description
Current Time
The current time of the specified time zone. You can set
the current time by yourself or configured by SNTP
server.
5.2. General Setup
Please start your web browser and log onto the web management interface of the
router, then click „General Setup‟ button on the left menu, or click „General Setup‟
link at the upper-right corner of web management interface.
5.2.1. System
This page includes the basic configuration tools for the ADSL router's remote
management access function.
5.2.1.1. Time Zone
The Time Zone allows your router to set its time; especially for recording System
Log.
Page 39

30
Time Zone Select
Select the time zone of the country you are currently in.
The router will set its time based on your selection.
Enable SNTP client
update
Check the box to enable router to update time from
SNTP server.
SNTP server
The IP address or the host name of the SNTP server.
You can select from the list or set it manually.
When you finish, click „Apply Changes‟. You‟ll see the following message
displayed on web browser:
Press „Continue‟ to save the settings made and back to web management
interface; press „Apply‟ to save the settings and restart the router so the settings
will take effect after it reboots.
5.2.1.2. Password Settings
This page allows you to set the password to access the web server of the router.
Please select the “admin (as administrator)” or “user (as user)” account and
configure the password.
Page 40

31
When you finish, click „Apply Changes‟.
If the password you typed in „New Password‟ and „Confirmed Password‟ field are
not the same, you‟ll see the following message:
Please retype the new password again when you see above message.
If you see the following message:
Page 41

32
It means the content in „Current Password‟ field is wrong, please click „OK‟ to go
back to previous menu, and try to input current password again.
If the current and new passwords are correctly entered, after you click „Apply‟,
you‟ll be prompted to input your new password:
Please use new password to enter web management interface again, and you
should be able to login with new password.
5.2.1.3. Remote Management
The Remote Access function can secure remote host access to your router from
LAN and WAN interfaces for some services provided by the router. These
services include Telnet, FTP, TFTP, HTTP, SNMP and PING.
Please click „System‟ menu on the left of web management interface, then click
„Remote Management‟, and the following page will be displayed on your web
browser:
Page 42

33
Parameter
Description
LAN
Check/un-check the services on the LAN column to allow/unallow the services access from LAN side.
WAN
Check/un-check the services on the WAN column to allow/unallow the services access from WAN side.
WAN Port
This field allows the user to specify the port of the
corresponding to the service. Take the HTTP service for
example; when it is changed to 8080, the HTTP server
address for the WAN side is http://dsl_addr:8080, where the
“dsl addr” is the WAN side IP address of the router.
When you finish, click „Apply Changes‟. You‟ll see the following message
displayed on web browser:
Page 43

34
Parameter
Description
SNMP
Select “Disable” or “Enable” to disable or enable the
SNMP feature.
Press „Continue‟ to save the settings made and back to web management
interface; press „Apply‟ to save the settings made and restart the router so the
settings will take effect after it reboots.
5.2.1.4. SNMP
Simple Network Management Protocol (SNMP) is a troubleshooting and
management protocol that uses the UDP protocol on port 161 to communicate
between clients and servers. The router can be managed locally or remotely by
SNMP protocol.
Page 44

35
System Description
Enter the system description of the router.
System Contact
Enter the contact person and/or contact information for
the router.
System Name
Assign an administratively name for the router.
System Location
The physical location of the router.
System Object ID
It is the vendor object identifier. The vendor‟s
authoritative identification of the network management
subsystem contained in the entity.
Trap IP Address
Destination IP address of the SNMP trap.
Community name
(read-only)
Name of the read-only community. This read-only
community allows read operation to all objects in the
MIB.
Community name
(write-only)
Name of the write-only community. This write-only
community allows write operation to the objects defines
as read-writable in the MIB.
When you finish, click „Apply Changes‟. You‟ll see the following message
displayed on web browser:
Press „Continue‟ to save the settings made and back to web management
interface; press „Apply‟ to save the settings made and restart the router so the
settings will take effect after it reboots.
Page 45

36
5.2.2. WAN
Use the WAN Settings screen if you have already configured the Quick Setup Wizard section and
you would like to change your Internet connection type. The WAN Settings screen allows to
specify the type of WAN port connect you want to establish with your ISP. The WAN settings offer
the following selections for the router‟s WAN port, Channel, ATM Setting, ADSL Setting, DNS,
DDNS and RIP.
5.2.2.1. Channel Config
ADSL modem/router supports 8 ATM Permanent Virtual Channels (PVCs) at the
most. This page is used to configure the parameters for the channel operation
modes of your ADSL Router.
Before configuring the router, please check with your ISP (Internet Service
Provider) what kind of the service is provided such as PPPoE, PPPoA or
RFC1483/2684. Gather the information as illustrated in the following table and
keep it for reference.
Page 46

37
PPPoE
VPI/VCI, VC-based/LLC-based multiplexing, Username,
Password (and Service Name).
PPPoA
VPI/VCI, VC-based/LLC-based multiplexing, Username,
Password.
RFC1483 Bridged
VPI/VCI, VC-based/LLC-based multiplexing to use Bridged
Mode.
RFC1483 Routed
VPI/VCI, VC-based/LLC-based multiplexing, IP Address,
Subnet Mask, Gateway Address, and Domain Name
System (DNS) IP Address (It is a fixed IP Address).
RFC1483 MER
VPI/VCI, VC-based/LLC-based multiplexing, IP Address,
Subnet Mask, Gateway Address, and Domain Name
System (DNS) IP Address.
Page 47

38
Parameter
Description
VPI
VPI is a virtual path determines the way an ATM cell
should be routed. The VPI is an 8-bit (in UNI) or 12-bit (in
NNI) number that is included in the header of an ATM
cell. The valid range for the VPI is 0 to 255. Enter the VPI
assigned by the ISP.
VCI
VCI is the label given to an ATM VC to identify it and
determine its destination. The VCI is a 16-bit number that
is included in the header of an ATM cell. The valid range
for the VCI is 32 to 65535. Enter the VCI assigned by the
ISP.
Encapsulation
Please check with your ISP the method of multiplexing.
Channel Mode
There are five kinds of channel modes you can select for
ADSL connection. Please check with your ISP the
method of the ADSL connection.
Enable NAPT
Enable or disable NAPT. NAPT, an Internet standard that
enables a local-area network (LAN) to use one set of IP
addresses for internal traffic and a second set of
addresses for external traffic. When NAPT is enabled,
the router will help to make all necessary IP address
translations for the PC connected to the router to access
the Internet.
Admin Status
Enable or disable the PVC channel setting.
Enable IGMP
Check the box to enable IGMP function.
Enable QoS
Check the box to enable QoS function.
NOTE : Enabling packet level QoS for PVC improves
performance for selected classes of applications. While
QoS consumes system resources; therefore the number
Page 48

39
of PVC(s) will be reduced. Besides this, it cannot be set
for the connection type of CBR and Real-time VBR. If
you enable the QoS service, please check the detailed
configuration in 5.2.5 QoS
PPP Setting
User Name
Enter the username exactly as your ISP assigned.
Password
Enter the password that your ISP has assigned to you.
Type
Continuous – The connection will be kept always on. If
the connection is interrupted, the router will re-connect
automatically.
Connect on Demand – Only connect when you want to
surf the Internet. “Idle Time” is set to stop the connection
when the network traffic is not sending or receiving after
an idle time.
Manual – After you have selected this option, please go
to Status page. You will see the “Connect” button, click it
and the router will connect to the ISP. If you want to stop
the connection, please click “Disconnect” button.
Idle Time (ms)
“Idle Time” is set to stop the connection when the
network traffic is not sending or receiving after an idle
time.
WAN IP Setting
Type
Fixed IP – Set the static IP Address to the router. Please
enter the IP Address your ISP has assigned.
DHCP – To get the IP Address from the ISP directly.
Page 49

40
Local IP Address
Set the IP Address obtained from your ISP.
Remote IP Address
Enter the remote IP Address assigned by your ISP.
Subnet Mask
Enter the Subnet Mask assigned by your ISP.
Unnumbered
The IP Unnumbered configuration allows you to enable
IP processing on a serial interface without assigning it an
explicit IP address. When it is enabled, the router‟s WAN
IP Address can "borrow" the IP address of another
interface already configured on the router, which
conserves network and address space. Check it if you
want to assign the WAN IP Address from other interface,
such as client‟s IP Address.
Default Route
When “Default Router” is enabled, all the packets for
destinations not known by the router's routing table are
sent to the default route. By default, it is enabled.
Add/Modify
These buttons are for you to maintain the channel
configuration settings.
Current ATM VC Table
The channel you have configured will be listed here. You
can select the VC channel to Edit or Delete.
Delete Selected
If you want to delete a specific VC channel entry, check
the „select‟ box of the VC channel you want to delete,
then click „Delete Selected‟ button.
Enable Auto-PVC
Search
Check the box and „Apply‟ button to enable auto PVC
search function.
VPI
VPI is a virtual path determines the way an ATM cell
should be routed.
Page 50

41
VCI
VCI is the label given to an ATM VC to identify it and
determine its destination.
Add/Delete
These buttons are for you to maintain the Current AutoPVC Table.
Current Auto-PVC
Table
You can add/delete VPI/VCI into the backup list. The
backup list of PVCs is of the following VPI/VCI: 0/35,
8/35, 0/43, 0/51, 0/59, 8/43, 8/51, and 8/59.
When you finish, click „Apply Changes‟. You‟ll see the following message
displayed on web browser:
Press „Continue‟ to save the settings made and back to web management
interface; press „Apply‟ to save the settings made and restart the router so the
settings will take effect after it reboots.
5.2.2.2. ATM Setting
The page is for ATM PVC QoS parameters setting.
Page 51

42
Parameter
Description
VPI
VPI is a virtual path determines the way an ATM cell
should be routed. The VPI is an 8-bit (in UNI) or 12-bit (in
NNI) number that is included in the header of an ATM
cell. The valid range for the VPI is 0 to 255. Enter the VPI
assigned by the ISP.
VCI
VCI is the label given to an ATM VC to identify it and
determine its destination. The VCI is a 16-bit number that
is included in the header of an ATM cell. The valid range
for the VCI is 32 to 65535. Enter the VCI assigned by the
ISP.
QoS
UBR (Unspecified Bit Rate) – Select UBR for
applications that are non-time sensitive, such as e-mail.
CBR (Constant Bit Rate) – This class is used for
emulating circuit switching. The cell rate is constant with
time. Select CBR to specify fixed (always on) bandwidth
for voice or data traffic.
Page 52

43
nrtVBR (non-real time Variable Bit Rate) – This class
allows users to send traffic at a rate that varies with time
depending on the availability of user information.
Statistical multiplexing is provided to make optimum use
of network resources. Multimedia e-mail is an example of
nrtVBR.
rtVBR (real time Variable Bit Rate) – This class is
similar to nrtVBR but is designed for applications that are
sensitive to cell-delay variation. Examples for real-time
VBR are voice with speech activity detection (SAD) and
interactive compressed video.
PCR
Divide the DSL line rate (bps) by 424 (the size of an ATM
cell) to find the PCR (Peak Cell Rate). This is the
maximum rate at which the sender can send cells.
CDVT
PCR generally is coupled with the CDVT (Cell Delay
Variation Tolerance), which indicates how much jitter is
allowable.
SCR
SCR (Sustain Cell Rate) is the average rate, as
measured over a long interval, in the order of the
connection lifetime.
MBS
MBS (Maximum Burst Size) refers to the maximum
number of cells that can be sent at the peak rate. Type
the MBS, which is less than 65535.
Current ATM VC Table
The channel you have configured with regard to the ATM
settings will be listed here.
When you finish, click „Apply Changes‟. You‟ll see the following message
displayed on web browser:
Page 53

44
Parameter
Description
Press „Continue‟ to save the settings made and back to web management
interface; press „Apply‟ to save the settings made and restart the router so the
settings will take effect after it reboots.
5.2.2.3. ADSL Setting
The page allows you to select any combination of DSL modes.
Page 54

45
ADSL modulation
Choose preferred ADSL standard protocols.
AnnexL Option
Enable/Disable ADSL2/ADSL2+ Annex L capability.
AnnexM Option
Enable/Disable ADSL2/ADSL2+ Annex M capability.
ADSL Capability
Bitswap Enable – Enable/Disable bitswap capability.
SRA Enable – Enable/Disable SRA (seamless rate
adaptation) capability.
ADSL Tone
Choose tones to be masked. The masked tones will not
carry any data. Click “Tone Mask” to mask the tone
number you have selected or all the tone numbers.
When you finish, click „Apply Changes‟. You‟ll see the following message
displayed on web browser:
Press „Continue‟ to save the settings made and back to web management
interface; press „Apply‟ to save the settings made and restart the router so the
settings will take effect after it reboots.
5.2.2.4. DNS
A Domain Name System (DNS) server is like an index of IP addresses and Web
addresses. If you type a Web address into your browser, such as
“www.router.com”, a DNS server will find that name in its index and the matching
IP address. This page is used to select the way to obtain the IP addresses of the
DNS servers.
Page 55

46
Parameter
Description
Attain DNS
Automatically
Select this item if you want to use the DNS servers
obtained from ISP.
Set DNS Manually
Select this item to specify up to three DNS IP addresses.
When you finish, click „Apply Changes‟. You‟ll see the following message
displayed on web browser:
Press „Continue‟ to save the settings made and back to web management
interface; press „Apply‟ to save the settings made and restart the router so the
settings will take effect after it reboots.
Page 56

47
Parameter
Description
Enable
Check the box to enable DDNS function.
DDNS Provider
Select your DDNS service provider here. This router
supports DynDNS and TZO service providers
Host Name
Enter the domain name you‟ve obtained from DDNS
service provider.
5.2.2.5. DDNS
Dynamic DNS (DDNS) allows you to map the static domain name to a dynamic
IP address. You must get an account, password and your static domain name
from the DDNS service providers.
Page 57

48
DynDns Settings
Username
Enter the username assigned by the DDNS service
provider.
Password
Enter the password assigned by the DDNS service
provider.
TZO Settings
Email
Enter the Email account that your DDNS service provider
assigned to you.
Key
Enter the password that your DDNS service provider
assigned to you.
Add/Modify/Remove
These buttons are for you to maintain the DDNS table.-
Dynamic DDNS Table
The DDNS you have configured will be added to the list.
When you finish, click „Apply Changes‟. You‟ll see the following message
displayed on web browser:
Press „Continue‟ to save the settings made and back to web management
interface; press „Apply‟ to save the settings made and restart the router so the
settings will take effect after it reboots.
5.2.2.6. RIP
RIP is an Internet protocol you can set up to share routing table information with
other routing devices on your LAN, at your ISP‟s location, or on remote networks
connected to your network via the ADSL line.
Page 58

49
Most small home or office networks do not need to use RIP; they have only one
router, such as the ADSL Router, and one path to an ISP. In these cases, there
is no need to share routes, because all Internet data from the network is sent to
the same ISP gateway.
You may want to configure RIP if any of the following circumstances apply to
your network:
Your home network setup includes an additional router or RIP-enabled PC
(other than the ADSL Router). The ADSL Router and the router will need to
communicate via RIP to share their routing tables.
Your network connects via the ADSL line to a remote network, such as a
corporate network. In order for your LAN to learn the routes used within your
corporate network, they should both be configured with RIP.
Your ISP requests that you run RIP for communication with devices on their
network.
Page 59

50
Parameter
Description
RIP
Enable/disable the RIP feature.
Interface
Select the interface that you want to enable the RIP
feature.
Receive Mode
Indicate the RIP version in which information must be
passed to the DSL device in order for it to be accepted
into its routing table.
Send Mode
Indicate the RIP version this interface will use when it
sends its route information to other devices.
RIP Config Table
The RIP you have configured will be listed in the table. If
you want to delete some settings, please select the
settings and click “Delete Selected”.
When you finish, click „Apply Changes‟. You‟ll see the following message
displayed on web browser:
Press „Continue‟ to save the settings made and back to web management
interface; press „Apply‟ to save the settings made and restart the router so the
settings will take effect after it reboots.
Page 60

51
Parameter
Description
Interface Name
The interface name is “br0”.
IP Address
Enter the IP Address of the ADSL router for the local user to
access the router‟s web page. By default, the IP Address is
192.168.2.1.
Subnet Mask
Enter the Subnet Mask of the ADSL router. By default, the
Subnet Mask is 255.255.255.0.
Secondary IP
Assign second IP address to LAN.
IGMP Snooping
Enable/disable the IGMP snooping function for the multiple
5.2.3. LAN
This page is used to configure the LAN interface of your ADSL Router. You can
set IP address, subnet mask, and IGMP Snooping.
Page 61

52
bridged LAN ports. When “IGMP Snoop” (Internet Group
Management Protocol Snoop) is enabled, the router can make
intelligent multicast forwarding decisions by examining the
contents of each frame‟s IP header. Without the function, the
router will broadcast the multicast packets to each port and
may create excessive traffic on the network and degrade the
performance of the network.
Ethernet to
Wireless
Blocking
Enable/disable the „Ethernet to Wireless Blocking‟, when this
function is enabled, the traffic between Ethernet and wireless
interfaces is not allowed.
When you finish, click „Apply Changes‟. You‟ll see the following message
displayed on web browser:
Press „Continue‟ to save the settings made and back to web management
interface; press „Apply‟ to save the settings made and restart the router so the
settings will take effect after it reboots.
5.2.3.1. DHCP Mode
You can configure your network and the router to use the Dynamic Host
Configuration Protocol (DHCP). This page allows you to select the DHCP mode
that this router will support.
There are two different DHCP Modes: DHCP Serve and DHCP Relay. When the
router is acting as DHCP server, please configure the router in the “DHCP
Server” page; while acting as DHCP Relay, you can setup the relay in the “DHCP
Relay” page.
Page 62

53
Parameter
Description
DHCP Server Address
Specify the IP address of your ISP‟s DHCP server.
Requests for IP information from your LAN interface will
be passed to the default gateway, which should route the
5.2.3.2. DHCP Relay
Some ISPs perform the DHCP server function for their customers‟ home/small
office network. In this case, you can configure this device to act as a DHCP relay
agent. When a user‟s computer on your network requests Internet access, the
router contacts your ISP to obtain the IP configuration, and then forward that
information to the computer.
Page 63

54
request appropriately.
When you finish, click „Apply Changes‟. You‟ll see the following message
displayed on web browser:
Press „Continue‟ to save the settings made and back to web management
interface; press „Apply‟ to save the settings made and restart the router so the
settings will take effect after it reboots.
5.2.3.3. DHCP Server
When the DHCP server is enabled, the router will automatically give your LAN
clients an IP address. If the DHCP is not enabled then you‟ll have to manually set
your LAN client‟s IP addresses.
Page 64

55
Parameter
Description
LAN IP Address
The current IP Address of the router.
Subnet Mask
The current Subnet Mask of the router.
IP Pool Range
You can select a particular IP address range for your
DHCP server to issue IP addresses to your LAN Clients.
By default, the IP range is starting from IP 192.168.2.100
to 192.168.2.200.
Show Client
Click this button and a table is displayed. You can know
the assigned IP address, MAC address and time expired
for each DHCP leased client.
Max Lease Time
In the Lease Time setting you can specify the time period
that the DHCP Server lends an IP address to your LAN
clients. The DHCP will change your LAN client‟s IP
Page 65

56
address when this time threshold period is terminated.
Domain Name
A user-friendly name that refers to the group of hosts
(subnet) that will be assigned addresses from this pool.
Gateway Address
The IP address of the ADSL router.
MAC Base Assignment
Click this button and you can assign a static IP Address
to the computer with the designated MAC Address. The
MAC Address is the 12-digit hexadecimal number, for
example "00-d0-59-c6-12-43". The Assigned IP Address
should be a unique IP Address.
When you finish, click „Apply Changes‟. You‟ll see the following message
displayed on web browser:
Press „Continue‟ to save the settings made and back to web management
interface; press „Apply‟ to save the settings made and restart the router so the
settings will take effect after it reboots.
5.2.3.4. ARP Table
ARP is the Address Resolution Protocol and its job is to match MAC address to
IP address and obviously vice versa - to match IP addresses to MAC addresses.
This page lists the IP Addresses and the match MAC Addresses in the network.
Page 66

57
Parameter
Description
Ageing Time
Set the Ethernet address ageing time. After the ageing
time of not having seen a frame coming from a certain
address, the bridge will time out (delete) and do not
forward the frame.
802.1d Spanning Tree
Enable/disable the spanning tree protocol. When this
feature is enabled, this router will use the spanning tree
protocol to prevent from network loop happened in the
5.2.3.5. Bridging
You can enable/disable Spanning Tree Protocol and set MAC address aging time
in this page.
Page 67

58
network (LAN Side).
When you finish, click „Apply Changes‟. You‟ll see the following message
displayed on web browser:
Press „Continue‟ to save the settings made and back to web management
interface; press „Apply‟ to save the settings made and restart the router so the
settings will take effect after it reboots.
Page 68

59
5.2.4. Wireless
ADSL router builds a wireless LAN and can let all IEEE 802.11b, IEEE 801.11g
or IEEE 802.1n wireless stations connect to your Intranet. It supports WEP, WPA
and WPA2 encryption to enhance the security of your wireless network. It also
support WPS function for you to easy setup the wireless connection between the
ADSL router with other stations.
5.2.4.1. Basic Settings
This section provides the wireless network settings for your router. You can
enable the wireless AP function here.
Page 69

60
Parameter
Description
Band
Please select the radio band from one of the following
options.
2.4GHz(B): 2.4GHz band, only allows 802.11b wireless
network client to connect this router (maximum transfer
rate 11Mbps).
2.4 GHz (G): 2.4GHz band, only allows 802.11g wireless
network client to connect this router (maximum transfer
rate 54Mbps).
2.4 GHz (B+G):2.4GHz band, only allows 802.11b and
802.11g wireless network client to connect this router
(maximum transfer rate 11Mbps for 802.11b clients, and
maximum 54Mbps for 802.11g clients).
Page 70

61
2.4 GHz (N): 2.4GHz band, only allows 802.11n wireless
network client to connect this router (maximum transfer
rate 150Mbps).
2.4 GHz (G+N):2.4GHz band, only allows 802.11g and
802.11n wireless network client to connect this router
(maximum transfer rate 54Mbps for 802.11g clients, and
maximum 150Mbps for 802.11n clients).
2.4 GHz (B+G+N): 2.4GHz band, allows 802.11b,
802.11g, and 802.11n wireless network client to connect
this router (maximum transfer rate 11Mbps for 802.11b
clients, maximum 54Mbps for 802.11g clients, and
maximum 150Mbps for 802.11n clients).
Mode
It allows you to set the router to act in “AP”, “Client” or
“WDS” mode.
SSID
The SSID (up to 32 printable ASCII characters) is the
unique name identified in a WLAN. The ID prevents the
unintentional merging of two co-located WLANs. The
default SSID of the router is “default”.
Channel Width
Set channel width of wireless radio. Do not modify default
value if you don‟t know what it is, default setting is „Auto
20/40 MHz‟.
Conntrol Sideband
Select the upper band or lower band for your radio
frequency. While upper band is selected, the channel
number you can select is from channel 5 to channel 11.
While lower band is selected, the channel number you
can select is from channel 1 to channel 7.
Channel Number
It is the radio channel used by the wireless LAN. All
Page 71

62
devices in the same wireless LAN should use the same
channel. Please select the country you are located and
designate a channel that the router will use. If you want
to let the router automatically to find an available channel
with the highest signal strength, please select “Auto”.
Radio Power (mW)
Set the maximum output power of the router. The higher
output power, the wider coverage range.
Associated Clients
Click “Show Active Clients” button and you can see the
wireless clients connected to the router.
When you finish, click „Apply Changes‟. You‟ll see the following message
displayed on web browser:
Press „Continue‟ to save the settings made and back to web management
interface; press „Apply‟ to save the settings made and restart the router so the
settings will take effect after it reboots.
5.2.4.2. Advanced Settings
This page allows advanced users who have sufficient knowledge of wireless LAN.
These setting shall not be changed unless you know exactly what will happen for
the changes you made on your router.
Page 72

63
Parameter
Description
Authentication Type
There are three authentication types: "Open System",
"Shared Key" and "Auto".
Open System: Open System authentication is not
required to be successful while a client may decline to
authenticate with any particular other client.
Shared Key: Shared Key is only available if the WEP
option is implemented. Shared Key authentication
supports authentication of clients as either a member of
those who know a shared secret key or a member of
those who do not. IEEE 802.11 Shared Key
authentication accomplishes this without the need to
transmit the secret key in clear. Requiring the use of the
Page 73

64
WEP privacy mechanism.
Auto: Auto is the default authentication algorithm. It will
change its authentication type automatically to fulfill
client‟s requirement.
Fragmentation
Threshold
Fragment Threshold specifies the maximum size of
packet during the fragmentation of data to be transmitted.
If you set this value too low, it will result in bad
performance. Enter a value from 256 to 2346.
RTS Threshold
This value should remain at its default setting of 2347.
Should you encounter inconsistent data flow, only minor
modifications are recommended. If a network packet is
smaller than the preset “RTS threshold” size, the
RTS/CTS mechanism will not be enabled. The wireless
router sends Request to Send (RTS) frames to a
particular receiving station and negotiates the sending of
a data frame. After receiving an RTS, the wireless station
responds with a Clear to Send (CTS) frame to
acknowledge the right to begin transmission.
Beacon Interval
The interval of time that this wireless router broadcast a
beacon. Beacon is used to synchronize the wireless
network. The range for the beacon period is between 20
and 1024 with a default value of 100 (milliseconds).
Data Rate
The rate of data transmission should be set depending
on the speed of your wireless network. You should select
from a range of transmission speeds, or you can select
Auto to have the wireless router automatically use the
fastest possible data rate and enable the Auto-Fallback
feature. Auto-Fallback will negotiate the best possible
connection speed between the router and a wireless
client. The default setting is “Auto”.
Page 74

65
Preamble Type
The Preamble Type defines the length of the CRC
(Cyclic Redundancy Check) block for communication
between the router and wireless stations. Make sure to
select the appropriate preamble type. Note that high
network traffic areas should use the “Short Preamble”.
CRC is a common technique for detecting data
transmission errors.
Broadcast SSID
If this option is enabled, the router will automatically
transmit the network name (SSID) into open air at regular
interval. This feature is intended to allow clients to
dynamically discover the router. If this option is disabled,
the router will hide its SSID. When this is done, the
clients cannot directly discover the router and MUST be
configure with the SSID for accessing to the router. It is
used to protect your network from being accessed easily.
Relay Blocking
When you enable this function, wireless clients will not be
able to directly access other wireless clients.
Protection
This is also called CTS Protection. It is recommended to
enable the protection mechanism. This mechanism can
decrease the rate of data collision between 802.11b and
802.11g/802.11n wireless stations. When the protection
mode is enabled, the throughput of the AP will be a little
lower due to many of frame traffic should be transmitted.
Aggregation
This function is used to join multiple data packets for
transmission as a single unit to increase network
efficiency.
Short GI
The 802.11n draft specifies two guard intervals: 400ns
(short) and 800ns (long). Support of the 400ns GI is
optional for transmit and receive. Enable this function
Page 75

66
will increase network efficiency.
When you finish, click „Apply Changes‟. You‟ll see the following message
displayed on web browser:
Press „Continue‟ to save the settings made and back to web management
interface; press „Apply‟ to save the settings made and restart the router so the
settings will take effect after it reboots.
5.2.4.3. Security
This router provides complete wireless LAN security functions, include WEP,
IEEE 802.1x, IEEE 802.1x with WEP, WPA with pre-shared key and WPA with
RADIUS. With these security functions, you can prevent your wireless LAN from
illegal access. Please make sure your wireless stations use the same security
function.
Page 76

67
Parameter
Description
Encryption
You can choose “None” to disable the encryption or
select “WEP”, “WPA(TKIP)”, “WPA2(AES)” or “WPA2
Mixed” mode for security. When “WEP” is enabled,
please click “Set WEP Key” button to choose the default
key and set the four sets of WEP keys.
WEP –WEP is less level of security than WPA. WEP
supports 64-bit and 128-bit key lengths to encrypt the
wireless data.
WPA(TKIP) – WPA uses Temporal Key Integrity Protocol
(TKIP) for data encryption. TKIP utilized a stronger
encryption method and incorporates Message Integrity
Code (MIC) to provide protection against hackers.
WPA2(AES) – WPA2, also known as 802.11i, uses
Advanced Encryption Standard (AES) for data
encryption. AES utilized a symmetric 128-bit block data
Page 77

68
encryption.
WPA Mixed – The router supports WPA (TKIP) and
WPA2 (AES) for data encryption. The actual selection of
the encryption methods will depend on the clients.
Use 802.1x
Authentication
IEEE 802.1x is an authentication protocol. Every user
must use a valid account to login to this wireless router
before accessing the wireless LAN. The authentication is
processed by a RADIUS server. Check this box to
authenticates user by IEEE 802.1x.
WEP-64Bits
WEP is less level of security than WPA. WEP supports
64-bit and 128-bit key lengths to encrypt the wireless
data. The longer key length will provide higher security.
When “WEP-64Bits” is selected, you have to enter
exactly 5 ASCII characters (“a-z” and “0-9”) or 10
hexadecimal digits ("0-9", "a-f") for each Key (1-4).
WEP-128Bits
When “WEP-128Bits” is selected, you have to enter
exactly 13 ASCII characters (“a-z” and “0-9”) or 26
hexadecimal digits ("0-9", "a-f") for each Key (1-4).
WPA Authentication
Mode
There are two types of authentication mode for WPA.
Enterprise (RADIUS) – It uses an external RADIUS
server to perform user authentication. To use RADIUS,
enter the IP address of the RADIUS server, the RADIUS
port (default is 1812) and the shared secret from the
RADIUS server. Please refer to “Authentication RADIUS
Server” setting below for RADIUS setting.
Personal (Pre-Shared Key) – Pre-Shared Key
authentication is based on a shared secret that is known
only by the parties involved. To use WPA Pre-Shared
Key, select key format and enter a password in the “Pre-
Page 78

69
Shared Key Format” and “Pre-Shared Key” setting
respectively.
Pre-Shared Key
Format
You may select to select Passphrase (alphanumeric
format) or Hexadecimal Digits (in the “A-F”, “a-f” and “09” range) to be the Pre-shared Key. For example:
Passphrase: ”iamguest”
Hexadecimal Digits: “12345abcde”
Pre-Shared Key
Please enter 8-63 characters as the “Pre-Shared Key”.
Authentication
RADIUS Server
Enter the port (default is 1812), the IP address and the
password of external RADIUS server are specified here.
When you finish, click „Apply Changes‟. You‟ll see the following message
displayed on web browser:
Press „Continue‟ to save the settings made and back to web management
interface; press „Apply‟ to save the settings made and restart the router so the
settings will take effect after it reboots.
5.2.4.4. Access Control
This wireless router provides MAC Address Control, which prevents the
unauthorized MAC Addresses from accessing your wireless network.
Page 79

70
Parameter
Description
Wireless Access
Control Mode
This router can prevent the wireless clients from
accessing the wireless network by checking the MAC
Address of the clients. If you enable this function, please
set the MAC Address of the wireless clients that you
want to filter.
Disable – Disable this function.
Allow Listed – Only allow the wireless clients with the
MAC Address you have specified can access to the
router.
Deny Listed – The wireless clients with the MAC
Address you have specified will be denied accessing to
the router.
MAC Address
Enter the MAC Address of the wireless clients for the
filtering control.
Page 80

71
Current Access Control
List
If you want to remove some MAC address from the
"Current Access Control List ", select the MAC addresses
you want to remove in the list and then click "Delete
Selected". If you want remove all MAC addresses from
the table, just click "Delete All" button. Click "Reset" will
clear your current selections.
When you finish, click „Apply Changes‟. You‟ll see the following message
displayed on web browser:
Press „Continue‟ to save the settings made and back to web management
interface; press „Apply‟ to save the settings made and restart the router so the
settings will take effect after it reboots.
5.2.4.5. WPS
Although home Wi-Fi networks have become more and more popular, users still
have trouble with the initial set up of network. This obstacle forces users to use
the open security and increases the risk of eavesdropping. Therefore, The Wi-Fi
Protected Setup (WPS) is designed to ease set up of security-enabled Wi-Fi
networks and subsequently network management.
The largest difference between WPS-enabled devices and legacy devices is that
users do not need the knowledge about SSID, channel and security settings, but
they could still surf in a security-enabled Wi-Fi network.
This device supports Push Button method and PIN method for WPS. The
following sub-paragraphs will describe the function of each item. The webpage is
as below.
Page 81

72
Parameter
Description
Disable WPS
Check to disable the Wi-Fi protected Setup.
WPS Status
When AP‟s settings are factory default (out of box), it is
set to open security and un-configured state. “WPS
Status” will display it as “UnConfigured”. If it already
shows “Configured”, some registrars such as Vista WCN
will not configure AP. Users will need to go to the
“Backup/Restore” page and click “Reset” to reload
factory default settings.
Self-PIN Number
“Self-PIN Number” is AP‟s PIN. Whenever users want to
change AP‟s PIN, they could click “Regenerate PIN” and
then click “ Apply Changes”. Moreover, if users want to
make their own PIN, they could enter four-digit PIN
without checksum and then click “ Apply Changes”.
However, this would not be recommended since the
registrar side needs to be supported with four-digit PIN.
Regenerate PIN
Click to regenerate the Self-PIN Number.
Page 82

73
Push Button
Configuration
Clicking this button will invoke the PBC method of WPS.
It is only used when AP acts as a registrar.
Start PBC
Click to start the Push Button method of WPS.
Reset
It restores the original values.
Client PIN Number
It is only used when users want their station to join AP‟s
network. The length of PIN is limited to four or eight
numeric digits. If users enter eight-digit PIN with
checksum error, there will be a warning message
popping up. If users insist on this PIN, AP will take it.
When you finish, click „Apply Changes‟. You‟ll see the following message
displayed on web browser:
Press „Continue‟ to save the settings made and back to web management
interface; press „Apply‟ to save the settings made and restart the router so the
settings will take effect after it reboots.
Page 83

74
Parameter
Description
IP QoS
Click the radio button to enable or disable the IP QoS
function.
Default QoS
Select the default mode of QoS from the list.
5.2.5. QoS
The router supports IP QoS feature that can provide different priority to different
users or data flows.
5.2.5.1. Classification
Page 84

75
IP Pred:
In QoS, a three-bit field in the ToS byte of the IP header
(see RFC 791). Using IP Precedence, a network
administrator can assign values from 0(the default) to 7
to classify and prioritize types of traffic.
802.1P:
IEEE 802.1p is a 3 bit field within an Ethernet frame
header when using tagged frames on an 802.1 network.
It specifies a priority value of between 0 and 7 inclusive
that can be used by Quality of Service (QoS) disciplines
to differentiate traffic.
Source IP
The IP address of the traffic source.
Netmask (Source)
The source IP netmask. This field is required if the
source IP has been entered.
Port (Source)
The source port of the selected protocol. You cannot
configure this field without entering the protocol first.
Destination IP
The IP address of the traffic destination.
Netmask (Destination)
The destination IP netmask. This field is required if the
destination IP has been entered.
Port (Destination)
The destination port of the selected protocol. You cannot
configure this field without entering the protocol first.
Protocol
The selections are TCP, UDP, ICMP and the blank for
none. This field is required if the source port or
destination port has been entered.
Physical Port
The incoming ports. The selections include LAN ports,
Page 85

76
wireless port, and the blank for not applicable.
ClassQueue
The priority level for the traffic that matches this
classification rule. Please refer to 5.2.5.2 QOS Queue to
create a ClassQueue.
802.1p_Mark
Select this field to mark the 3-bit user-priority field in the
802.1p header of the packet that matches this
classification rule. Note that this 802.1p marking is
workable on a given PVC channel only if the VLAN tag is
enabled in this PVC channel.
IP.Pred_Mark
Select this field to mark the IP precedence bits in the
packet that match this classification rule.
TOS_Mark
The IP (Internet Protocol) uses the ToS (Type of Service)
field to provide an indication of the quality of service
desired. These parameters are to be used to guide the
selection of the actual service parameters when
transmitting an IP datagram through a particular
network.0
IP QoS Rules
This table lists the rules you have configured. Click
“Delete Selected” to delete the selected rules or click
“Delete All” to delete all the rules.
When you finish, click „Apply Changes‟. You‟ll see the following message
displayed on web browser:
Page 86

77
Press „Continue‟ to save the settings made and back to web management
interface; press „Apply‟ to save the settings made and restart the router so the
settings will take effect after it reboots.
5.2.5.2. QoS Queue
The screen allows you to configure a QoS queue and assign it to a specific
network.
If the channel operation modes of your ADSL router are not configured and
enable the QoS function, you‟ll see the following message:
Please return to the General Setup to finish the setting of WAN configuration
before setting up QoS.
Page 87

78
Parameter
Description
Queue Description
The description of the queue will be appeared according
to your selection automatically.
Queue Status
The status of the queue is selected here.
Queue Interface
The WAN interface of the queue is selected here.
Queue Priority
The priority of the queue is selected here.
Click the „Add‟ button, and you can configure the QoS queue entry on the
following screen.
When you finish, click „Apply‟. You‟ll see the following message displayed on web
browser:
Page 88

79
Parameter
Description
Queue Config List
The queue you have configured will be listed here.
Remove
If you want to remove some queue from the "Queue
Config List ", select the “Remove” check box of the
queue you want to remove in the list and then click
"Remove" button.
Save
If you want to enable/disable some queue from the
"Queue Config List ", select the “Enable” check box of
the queue you want to disable in the list and then click
"Save" button.
Click “Save” to save the setting to the configuration.
Page 89

80
5.2.6. NAT (Network address translations)
NAT (Network address translations) solve the problem if sharing a single IP
address to multiple computers. Without NAT, all computers must be assigned
with a valid Internet IP address to get connected to Internet, but Internet service
providers only provide very few IP addresses to every user. Therefore it‟s
necessary to use NAT technology to share a single Internet IP address to
multiple computers on local network, so everyone can get connected to Internet.
Please follow the following instructions to set NAT parameters:
5.2.6.1. Port Forwarding
The Port Forwarding allows you to re-direct a particular range of service port
numbers (from the Internet) to a particular LAN IP address. It helps you to host
some servers behind the router NAT firewall.
Page 90

81
Parameter
Description
Port Forwarding
Check this item to enable or disable the port-forwarding
feature.
Protocol
This is the protocol type to be forwarded. You can
choose to forward “TCP” or “UDP” packets only or select
“Both” to forward both “TCP” and “UDP” packets.
Comment
Enter the comment for the setting.
Enable
Check this item to enable this entry.
Local IP Address
IP address of your local server that will be accessed by
Internet.
Local IP Port
The destination port number that is made open for this
application on the LAN side.
Page 91

82
Remote IP Address
The source IP address from which the incoming traffic is
allowed. Leave blank for all.
Public Port
The destination port number that is made open for this
application on the WAN side
Interface
Select the WAN interface on which the port-forwarding
rule is to be applied.
Current Port
Forwarding Table
If you want to remove the port forwarding settings from
the table, select the items and then click "Delete
Selected". If you want remove all settings, just click
"Delete All" button.
When you finish, click „Apply Changes‟. You‟ll see the following message
displayed on web browser:
Press „Continue‟ to save the settings made and back to web management
interface; press „Apply‟ to save the settings made and restart the router so the
settings will take effect after it reboots.
5.2.6.2. Port Mapping
The router provides multiple interface groups. Up to five interface groups are
supported including one default group. The LAN and WAN interfaces could be
included. Traffic coming from one interface of a group can only be flowed to the
interfaces in the same interface group. Thus, the router can isolate traffic from
group to group for some application. By default, all the interfaces (LAN and WAN)
Page 92

83
Parameter
Description
Disabled/ Enabled
Click the radio button to enable or disable the feature. If
disabled, all interfaces belong to the default group.
Interface groups
To manipulate a mapping group:
1. Select a group from the table.
2. Select interfaces from the available/grouped interface
list and add it to the grouped/available interface list using
the arrow buttons to manipulate the required mapping of
the ports.
3. Click “Apply Changes” button to save the changes.
belong to the default group, and the other four groups are all empty. It is possible
to assign any interface to any group but only one group.
Page 93

84
Parameter
Description
UPnP
Enable or disable UPnP feature.
WAN Interface
The upstream WAN interface is selected here. Select
When you finish, click „Apply Changes‟. You‟ll see the following message
displayed on web browser:
Press „Continue‟ to save the settings made and back to web management
interface; press „Apply‟ to save the settings made and restart the router so the
settings will take effect after it reboots.
5.2.6.3. UPNP
When the UPnP function is enabled, the router can be detected by UPnP
compliant system such as Windows XP. The router will be displayed in the
Neighborhood of Windows XP, so you can directly double click the router or right
click the router and select “Invoke” to configure the router through web browser.
Page 94

85
WAN interface that will use UPnP from the drop-down
lists.
When you finish, click „Apply Changes‟. You‟ll see the following message
displayed on web browser:
Press „Continue‟ to save the settings made and back to web management
interface; press „Apply‟ to save the settings made and restart the router so the
settings will take effect after it reboots.
5.2.6.4. IGMP Proxy
When “IGMP Proxy” (Internet Group Management Protocol Proxy) is enabled, the
router can make intelligent multicast forwarding decisions by examining the
contents of each frame‟s IP header. Without the function, the router will
broadcast the multicast packets to each port and may create excessive traffic on
the network and degrade the performance of the network.
The IGMP Proxy page allows you to enable multicast on WAN and LAN
interfaces. The LAN interface is always served as downstream IGMP proxy, and
you can configure one of the available WAN interfaces as the upstream IGMP
proxy. Upstream is the interface that IGMP requests from hosts are sent to the
multicast router. Downstream is the interface data from the multicast router are
sent to hosts in the multicast group database.
Page 95

86
Parameter
Description
IGMP Proxy
Enable or disable IGMP proxy feature.
Proxy Interface
The upstream WAN interface is selected here.
When you finish, click „Apply Changes‟. You‟ll see the following message
displayed on web browser:
Press „Continue‟ to save the settings made and back to web management
interface; press „Apply‟ to save the settings made and restart the router so the
settings will take effect after it reboots.
Page 96

87
Parameter
Description
Outgoing Default
Action
Specify the default action on the LAN to WAN (Traffic to
Internet) forwarding path. You can choose „Allow‟ if you
allow the IP Addresses listed in the following table to
connect to the Internet; choose „Deny‟ if you deny the IP
Addressed listed in the following table to connect to the
Internet.
Incoming Default
Action
Specify the default action on the WAN to LAN (Traffic
from Internet) forwarding path. You can choose „Allow‟ if
you allow the IP Addresses listed in the following table
from connecting to the Internet; choose „Deny‟ if you
deny the IP Addressed listed in the following table from
5.2.7. Firewall
Firewall contains several features that are used to deny or allow traffic from
passing through the router.
5.2.7.1. IP/Port Filtering
The IP/Port filtering feature allows you to deny/allow specific services or
applications in the forwarding path.
Page 97

88
connecting to the Internet.
Direction
Select the traffic forwarding direction: outgoing or
incoming.
Protocol
There are 3 options available: TCP, UDP and ICMP.
Rule Action
Deny or allow traffic when matching this rule.
Source IP Address
Enter the start IP Address which will be monitored.
Subnet Mask
Enter the Subnet Mask based on the Source IP Address.
Port
LAN users use port number to distinguish one network
application over another such as 21 is for FTP service.
The port number range is from 0 to 65535. It is
recommended that this option be configured by an
advanced user.
Destination IP Address
Enter the destination IP Address which will be monitored.
Subnet Mask
Enter the Subnet Mask based on the Destination IP
Address.
Port
This is the port or port ranges that define the application.
Current Filter Table
If you want to remove some IP/Port filter settings from
the "Current Filter Table", select the items you want to
remove in the list and then click "Delete Selected". If you
want remove all the items from the table, just click
"Delete All" button.
When you finish, click „Apply Changes‟. You‟ll see the following message
displayed on web browser:
Page 98

89
Press „Continue‟ to save the settings made and back to web management
interface; press „Apply‟ to save the settings made and restart the router so the
settings will take effect after it reboots.
5.2.7.2. MAC Filtering
The MAC filtering feature allows you to define rules to allow or deny frames
through the router based on source MAC address, destination MAC address, and
traffic direction.
Page 99

90
Parameter
Description
Outgoing Default
Action
Specify the default action on the LAN to WAN (Traffic to
Internet) forwarding path. You can choose „Allow‟ if you
allow the IP Addresses listed in the following table from
connecting to the Internet; choose „Deny‟ if you deny the
IP Addressed listed in the following table from connecting
to the Internet.
Incoming Default
Action
Specify the default action on the WAN to LAN (Traffic
from Internet) forwarding path.沒有 deny and allow 說明
You can choose „Allow‟ if you allow the IP Addresses
listed in the following table from connecting to the
Internet; choose „Deny‟ if you deny the IP Addressed
listed in the following table from connecting to the
Internet.
Direction
Traffic bridging/forwarding direction: outgoing or
incoming.
Rule Action
Deny or allow traffic when matching this rule.
Source MAC Address
The source MAC address. It must be 12-digit
hexadecimal format, for example: “00-d0-59-c6-12-43”.
Destination MAC
Address
The destination MAC address. It must be 12-digit
hexadecimal format, for example: “00-d0-59-c6-12-50”.
Current Filter Table
If you want to remove some filter rules from the "Current
Filter Table", select the MAC Address you want to
remove in the table and then click "Delete Selected". If
you want remove all settings from the table, just click
"Delete All" button.
When you finish, click „Apply Changes‟. You‟ll see the following message
displayed on web browser:
Page 100

91
Press „Continue‟ to save the settings made and back to web management
interface; press „Apply‟ to save the settings made and restart the router so the
settings will take effect after it reboots.
5.2.7.3. URL Blocking
This page is used to block some URL addresses or keywords.
 Loading...