

Page 1

Fast Ethernet Print Server
User’s Manual
Version: 1.0(July, 2005)
Page 2

COPYRIGHT
Copyright ©2005/2006 by E dimax Technology. All rights reserved. No par t of t his
publ ic ation m ay be reproduced, tran s mitted, t r anscr ibed, stor ed in a ret r ieval system, or
tr ans lated into any language or comput er langua ge, in any form or by any mean s,
elect r onic, mechanic al, mag netic, optica l, che mical, manual or ot her wise, without t he pr ior
writ ten per mi s s ion of this comp any.
Federal Co m municat i on Com mission
Interf er ence Stat ement
This e quipment has b een tested and found to c omp ly with t he lim its for a Cla s s B digit al
device, pur s uant to Par t 15 of F CC Rules. These li m its ar e designed to provide
reason able prot ec tion again st harmful inter ference in a re sid ential installation. This
equi pment generat es, use s, and can radiate r adio fr equency energy and, if not installed
and used in ac c ordanc e with the instr uc tions, m ay cause harmful inter fere nc e to radi o
comm unications. However, there is no guara ntee that interfer ence will not occur in a
part ic ular installation. If t his equi pment doe s cause harmful interfer ence t o r adio or
televisi on r ec eption, whic h c an be determined by turning the equipment off and on, the
user is encouraged to t r y to corr ec t the int er ference by one or mor e of the f ollowing
measures:
1. Reorient or r elocate t he r ec eiving antenna.
2. Inc r ease t he separation between the equip m ent and receiv er .
3. Connect the equipment into an outlet on a circuit different from that to which the
receiver is connect ed.
4. Consult the dealer or an experienced radio technician for help.
FC C Caut ion
This e quipment mu st be installe d and operat ed in accor dance with provided inst r uc tions
and a min imum 20 cm spacing mu st be prov ided between c omputer m ounted antenna and
person ’s body (excluding extr em ities of hand s, wr ist and feet) dur ing wireles s mod es of
operation.
This d evice complie s with P ar t 15 of t he FCC Rules. Operation is su bjec t to t he following
two c onditions: ( 1) this device may not c ause h armful int er fer enc e, and (2) t his dev ic e
must ac c ept any interference rec eived, including i nt er ference t hat may cause undesired
operation.
Any c hanges or m odific ations n ot ex pr es sly approved by the party respo nsible for
compliance could void the aut horit y to operate equipm ent.
Page 3

Federal Communication Commission ( FCC) Radiation Exp osure Statement
This e quipment complies w ith FCC radiation exposure set forth for an uncontr olled
environ ment. In order to av oid the pos si bility of exceeding t he FCC radi o freque nc y
exposure limits, huma n pr oximity to t he antenna sh all not be less than 20cm (8 inche s)
during nor ma l operation.
The antenna(s) used for this transmitt er must not be co-l oc ated or op er ating in c onjunct ion
with any other antenna or tran s mitter.
R&TTE Compliance Statement
This e quipment complies w ith all the requirements of DIRECTIV E 1999/5/EC OF T HE
EURO P EA N PA RLIAMENT A ND THE COUNCIL of March 9, 1999 on radio e quip ment
and telecom mun ic ation terminal Equi pment and the m utual recognition of t heir c onfor m ity
(R&TTE)
The R& TTE Dir ec tiv e r epeals and repl ac es in t he directiv e 98/13/EE C
(T elec ommunic ations T ermin al E quip me nt and Satellite E ar th Station Equ ipme nt) As of
April 8, 2000.
Safety
This e quipment is de s igned with the utmost c ar e for the saf ety of t hose w ho install and use
it. Howev er , special att ention m ust be paid to the danger s of electr ic s hoc k and st atic
elect r ic ity when wor king with electr ical equipment . A ll guideline s of this and of the
computer man ufactur e must therefore be all owed at all t imes to ensure t he saf e use of the
equipment.
EU Countries Intended for U se
The E TSI v er sion of this device i s intende d for ho me an d office us e in Austr ia, Bel gium,
Denmark, Finland, Franc e, Germany, G r eec e, Ireland, It aly, Luxembourg, the Netherlands,
Portugal, Spain, S weden, and the United Ki ngdom.
The E TSI v er sion of this device i s al s o author ized for use i n E FTA me mber states: Iceland,
Liecht enstein, Norway , and Switzerland.
EU Coun t ries Not in t end ed for use
None.
DISCLAIMER
This company makes no repre sentations or war ranties, eit her expresse d or implied, wit h
respec t to t he c ontents hereof and specifically discl aims any war r anties, merc hantability or
fitness f or any partic ular purpo se. Any software de scribed i n this ma nual i s sold or
licensed "as is". S hould the pr ogr ams pr ove defectiv e following their purcha se, the buy er
(and not this comp any, it s di str ibutor, or its dea ler ) assum es t he entire cost of all
necessary servicing, repair , and any incide ntal or con s equential damages resulting fr om
any defect in the soft war e. Further, this compa ny reserves t he r ight to revise this
publ ic ation and to make chang es f r om time t o time in the c ont ent s h ereof without
obli gation to notif y any person of such revisi on or c hange s.
Page 4

Contents
1. PRODUCT INTRO DUCTI ON 1.1 P RODUCT
INTRODUCTION................................................................................1
1.3 Network Printing Architecture.............................................2
Print Server Network Functions...................................................................2
Network Printing Functions for Clients.......................................................3
Network Printing Functions for Network Server.........................................5
1.4 Network Printing Environment............................................ 6
1.6 Firmware & Printing Function............................................. 8
3. WI NDO W S PEER- TO-PEER N ET W O RK 3.1 SY STEM
ARCHITECTURE...............................................................................9
3.2 Administrator Installation and Setup.................................10
3.4 Client Installation and Setup............................................16
3.5 Client Utilities...................................................................20
3.5.1 Network Ports Quick Setup...........................................................20
3.5.2 Remote Ports (Utility)......................................................................21
3.6 Windows Add Printer Procedure...................................24
4. W I NDOWS NT/2000/ 2003 NETWORK 4.1 SY STEM
ARCHITECTURE.............................................................................28
4.2 Windows NT /2000/2003 Server Installation and Setup.....29
4.3 User Installation and Setup..............................................30
5. NETWARE NETWORK 5.1 SYSTEM
ARCHITECTURE.............................................................................31
5.2.1 Installation Using PCONSOLE .......................................................32
6. UNIX S YSTEM NET W ORK 6.1 INTRODUCTI ON....35
6.3.1 DHCP...............................................................................................36
6.3.2 BOOTP.............................................................................................36
7. CONFIGURATION UTILITY 7.1 INTRODUCTION..39
7.3 Status of Print Ser ver.......................................................41
7.4 Setup the Print Server...................................................... 4 2
7.5 AppleTalk Configuration...................................................4 3
7.6 General Configuration......................................................4 4
7.7 Netware Print Server Configuration..................................45
7.8 System Configuration.......................................................46
Page 5

7.9 TCP/IP Configuration.......................................................48
7.10 Wireless Configuration...................................................50
7.11 SNMP Configuration......................................................57
8. WEB M ANA GEMENT 8. 1 INT RODUCTI ON.......62
8.3 Device Status..................................................................63
8.3.1 System..............................................................................................63
8.3.2 Printer..............................................................................................63
8.3.3 TCP/IP.............................................................................................64
8.3.4 SMB................................................................................................64
8.3.5 SNMP..............................................................................................65
8.3.6 NetWare..........................................................................................65
8.3.7 AppleTalk........................................................................................66
8.4.1 System...........................................................................................66
8.4.2 Advanced Settings............................................................................67
8.4.3 TCP/IP............................................................................................68
8.4.4 SMB..............................................................................................69
8.4.5 SNMP............................................................................................69
8.4.6 NetWare........................................................................................70
8.4.7 AppleTalk......................................................................................71
8.4.8 Save Settings .................................................................................72
8.5 System T ools................................................................73
8.5.1 Load Default .................................................................................73
8.5.2 Upgrade Firmware from Browser.................................................73
9.2 System Setup.................................................................75
9.2.1 Print Server Side ...........................................................................75
9.2.2 Client Side.....................................................................................75
10. WINDOWS XP SP2 SETUP..................................................78
Page 6

1. Product Introduction
1.1 Product Introduction
Thank you for purchasing and using our print server. This
print ser ver allows your pri nter to become a s hared device
on the ne t wo rk . It offe r s prin ting f le xib ility and
manageabilit y o n your Local Area Netwo rk at an extremel y
low cos t a nd with an absol ute minimum setup a nd
mainte nance req uired.
This print serve r provides IEEE 802.11g/b wireless LAN ( up
to 54Mbps data t ransfer rate), a n E the r net network port
(10/100Mbps Et her net) a nd one print port fo r pri nter .
This print server supports IPX/SPX, NetBEUI, TCP/IP and
AppleTalk protocols. It i s the best network printing
solutions for various commo n netwo rk operating sys tems
such as Windows 95/98/Me/NT/2000/X P/2003, NetWare,
Unix/Lin u x and MAC OS, etc .
With t he help of Insta lla tion Wizard , you can easil y a nd
i nstant l y co mple te t he settings fo r the pr i n ting en vi ronmen t,
and start e njoyi ng t he fa ntasti c features pro vided by the
print ser ver.
In the following chapters, we will introd uce in detai l the
printing features, i ns tallati on methods, and system
config uration for dif fere nt ne twork e nvironme nts.
If you wo uld like to set up a nd install prin t server quickly,
please refer to t he Q uick Ins tallati on G uide t ha t comes
along with t his print server.
1.2 Prod uct Package
This package contains t he following components :
z One Print Server
z One Antenna
z One P ower Adapt er
z O n e Quick In st alla tio n Guide
z One CD-ROM (Inc luding all the software utilities, dr ivers and User’ s Manual)
1
Page 7
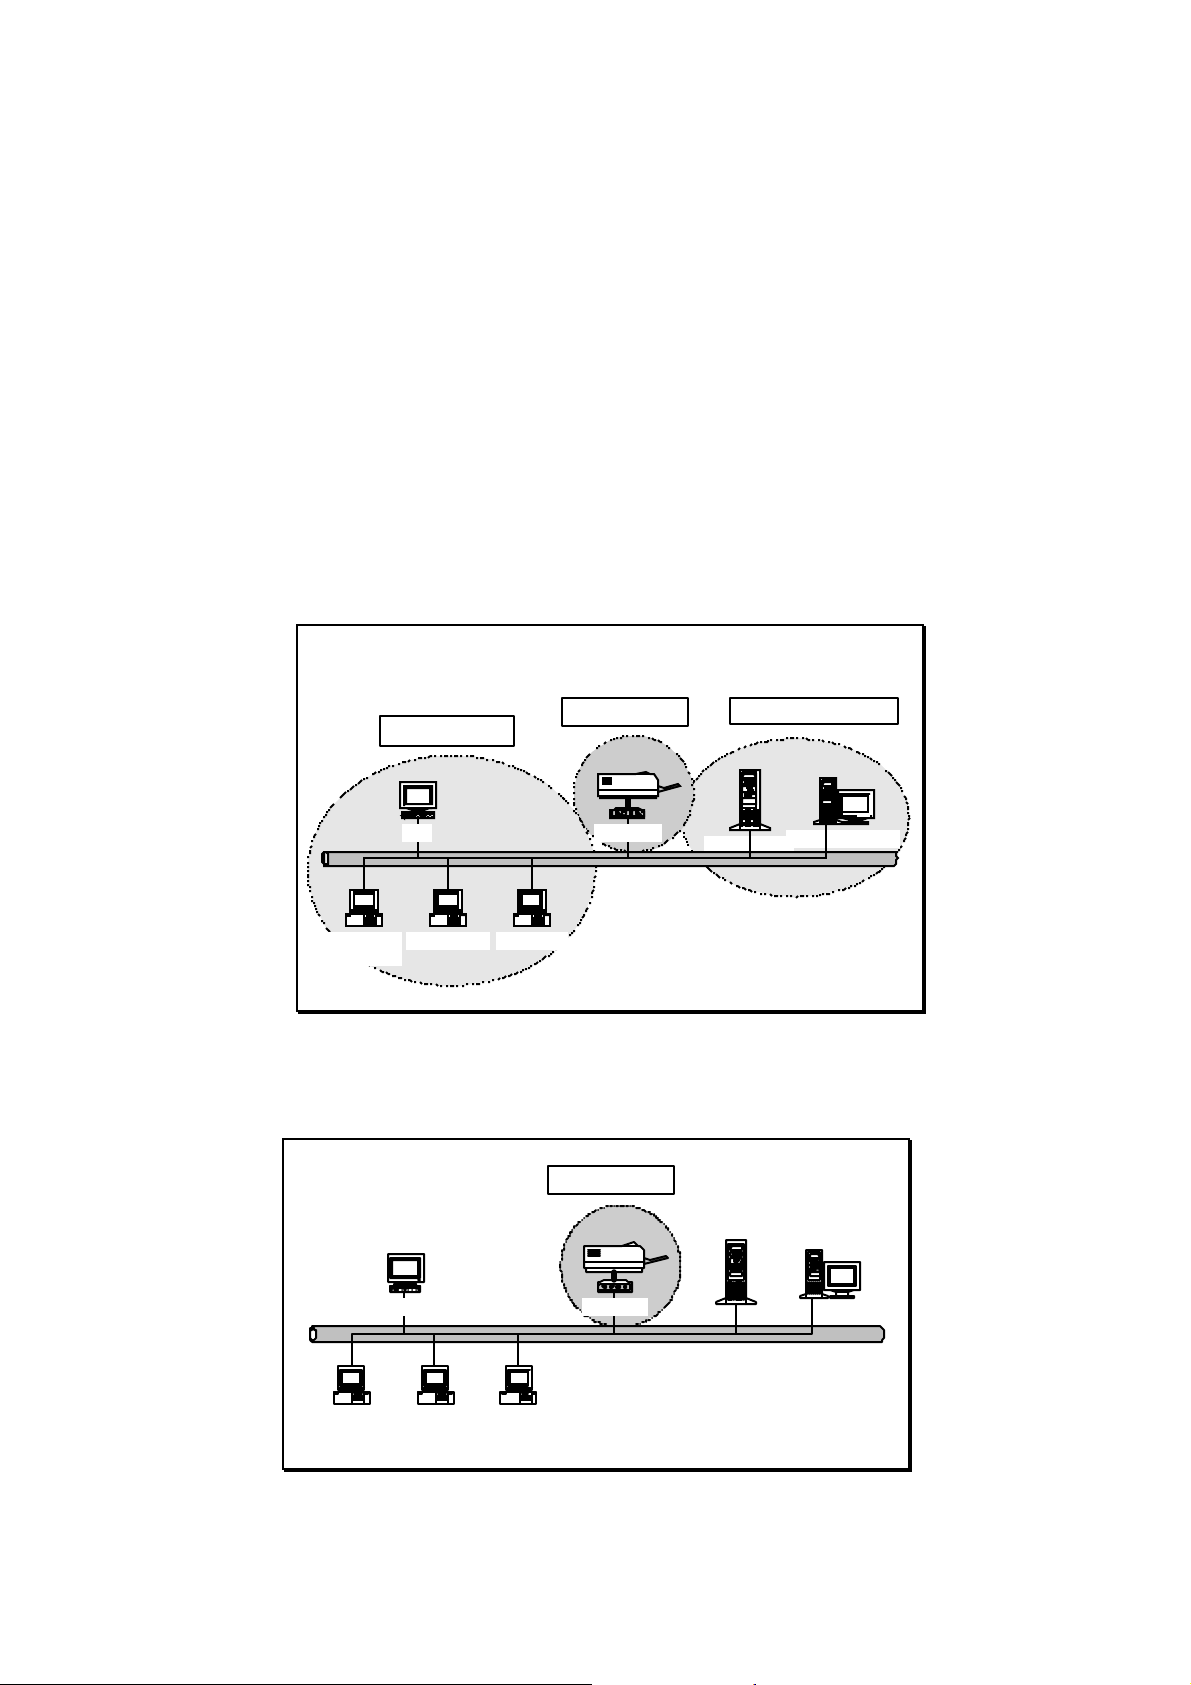
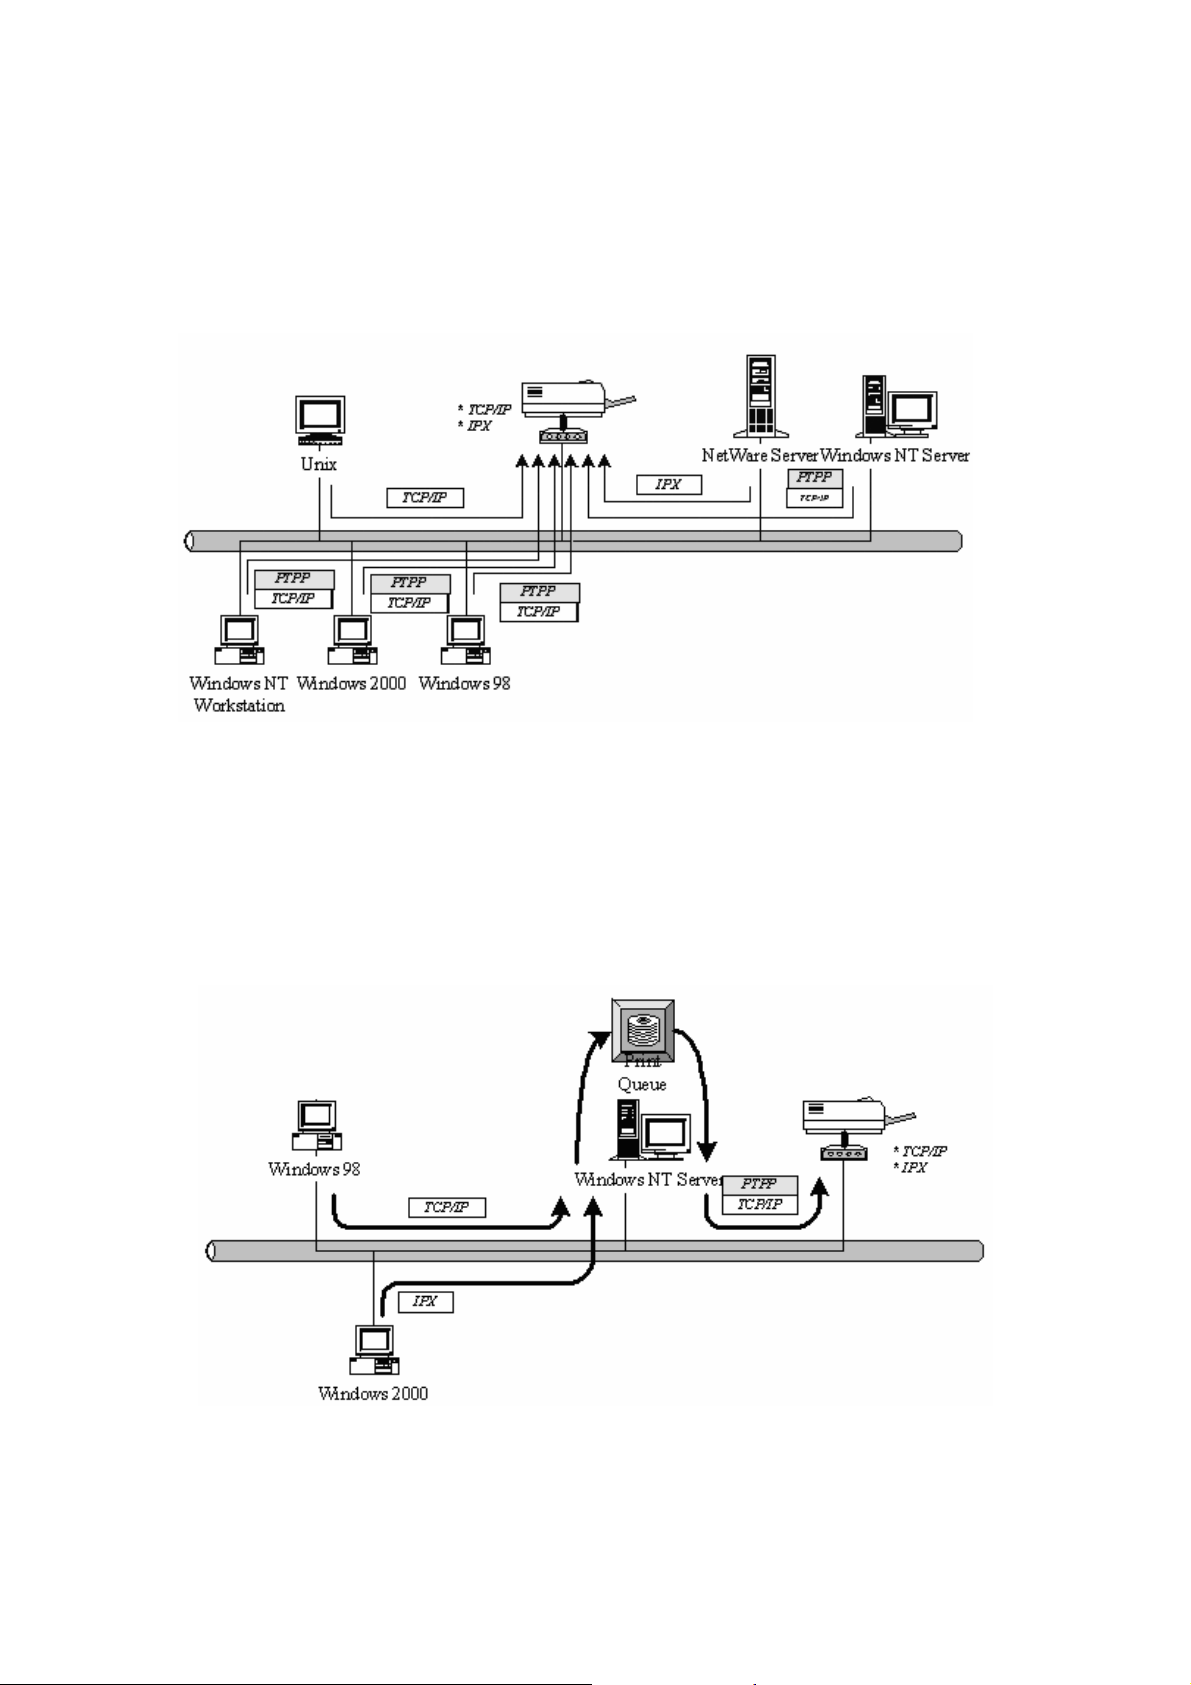
1.3 Network Prin t ing Architecture
This section illus trates how print serve r func tions and
operates o n the netwo rk. Before you i nstall a nd use pri nt
server, it is st rongl y recommended t hat yo u read this
section comp letely, and select o nly the c hap ters you need
according to your network operating system b y “Contents of
the User ’s M anual ” in next sectio n.
This section will first introduce the role every compone nt
plays i n t he network-printing environment.
Print Server
Client User
Netwo rk Server (optio nal)
Network Printing Environment
Print Serv er
Client User
Unix Pr in t Serv er
Workstation
Windows 2000
Wind ows 98Wind ows NT
Print Server Ne twork Fun ctions
Print Server
Network Server
NetWare Server
Wind ows NT Server
Workstation
Unix Print Server
Wind ows 2 00 0
Windows 98Windows NT
N etWare Server
Windows NT Server
Because print se r ver supports IP X/SPX, NetBEUI, TCP/IP
and A ppleTalk network pro tocols , any networked comp uter
2
Page 8
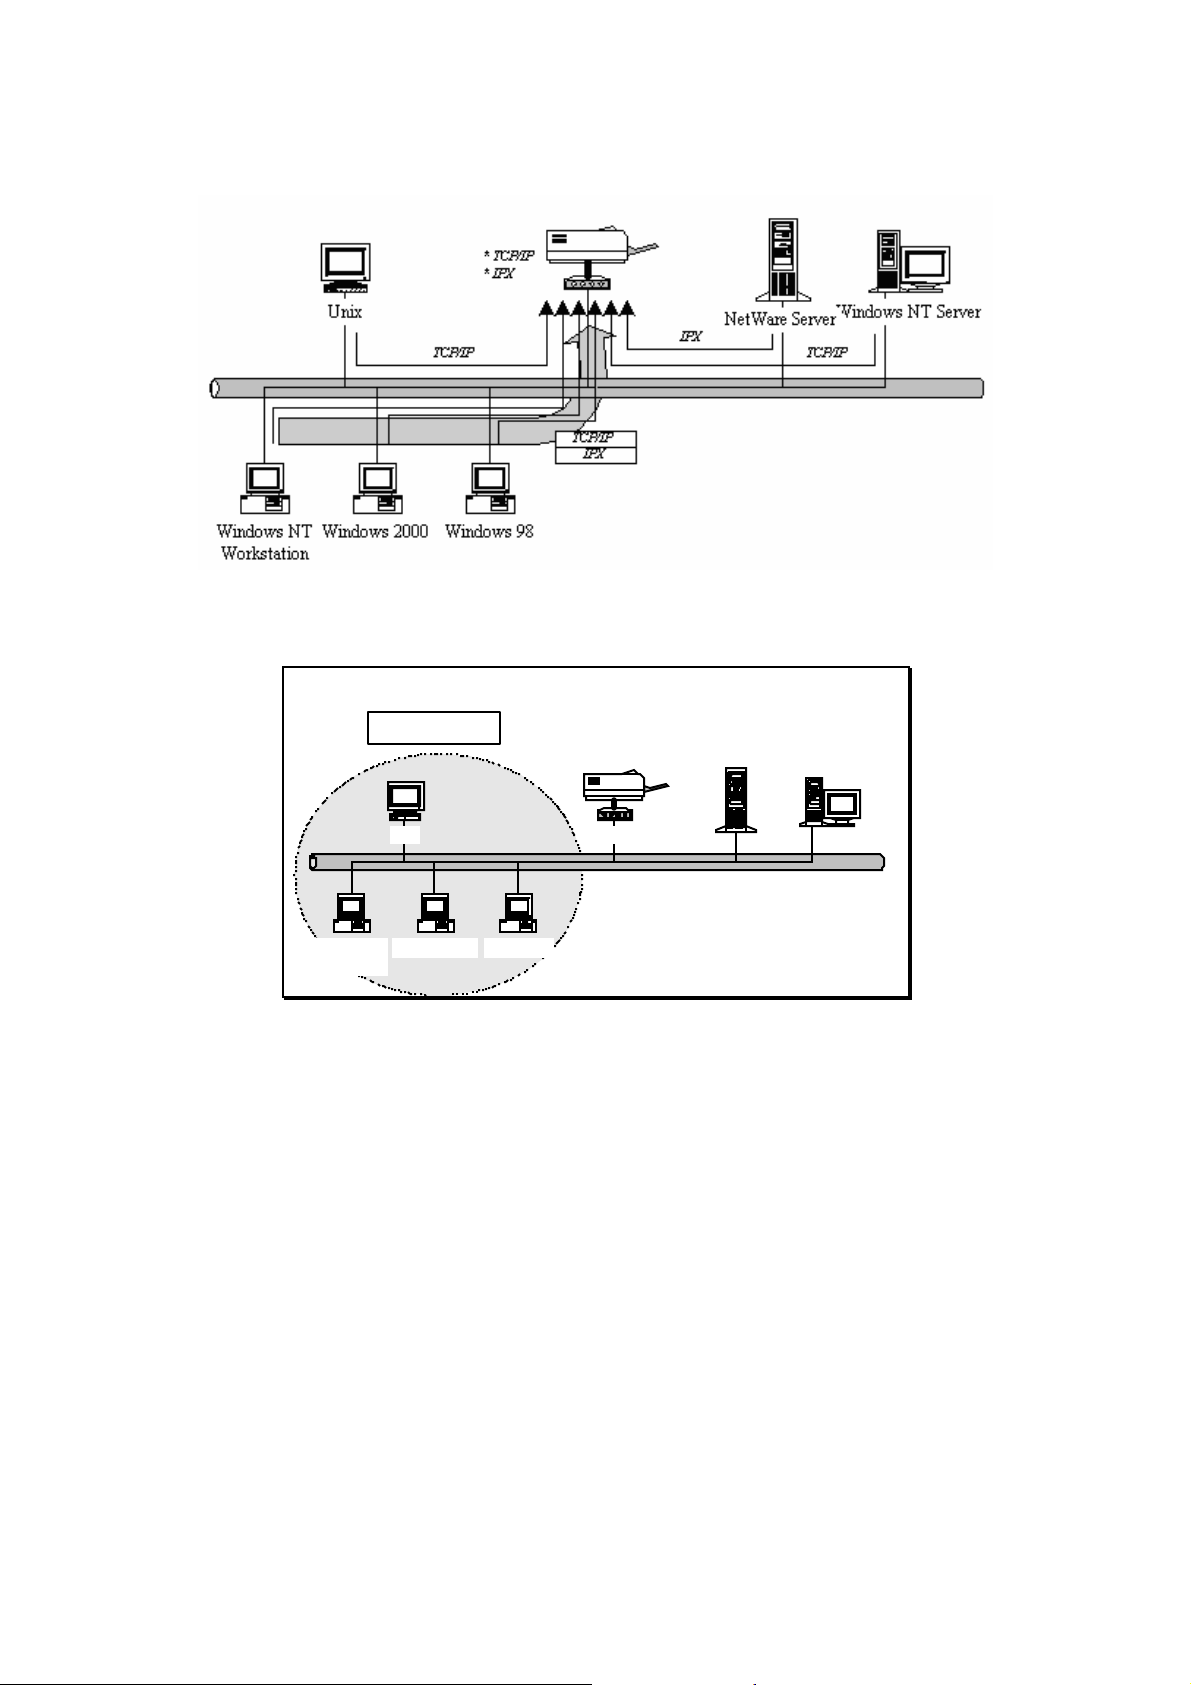
can di rectly print to t he print server f rom any of its i nstalled
protocol.
Network Printing Functions for Clients
Client Use r
Workstation
Unix Print Server
Wind ows 2 00 0
Windows 98Windows NT
N etWare Server
Windows NT Server
Common opera ting s ystems for clients are c lassified as
fo llowing:
Windows 95 /98/Me/NT/2000/XP/2003
Our pri nt ser ver s ystem pro vides PTPP (Peer- to-Peer
Printing ) driver and utilities for Wi ndows
95/98/Me/NT/2000/X P/2003 users. PTPP (Peer-to-Peer
Printing) s upports TCP/ IP protocol.
3
Page 9
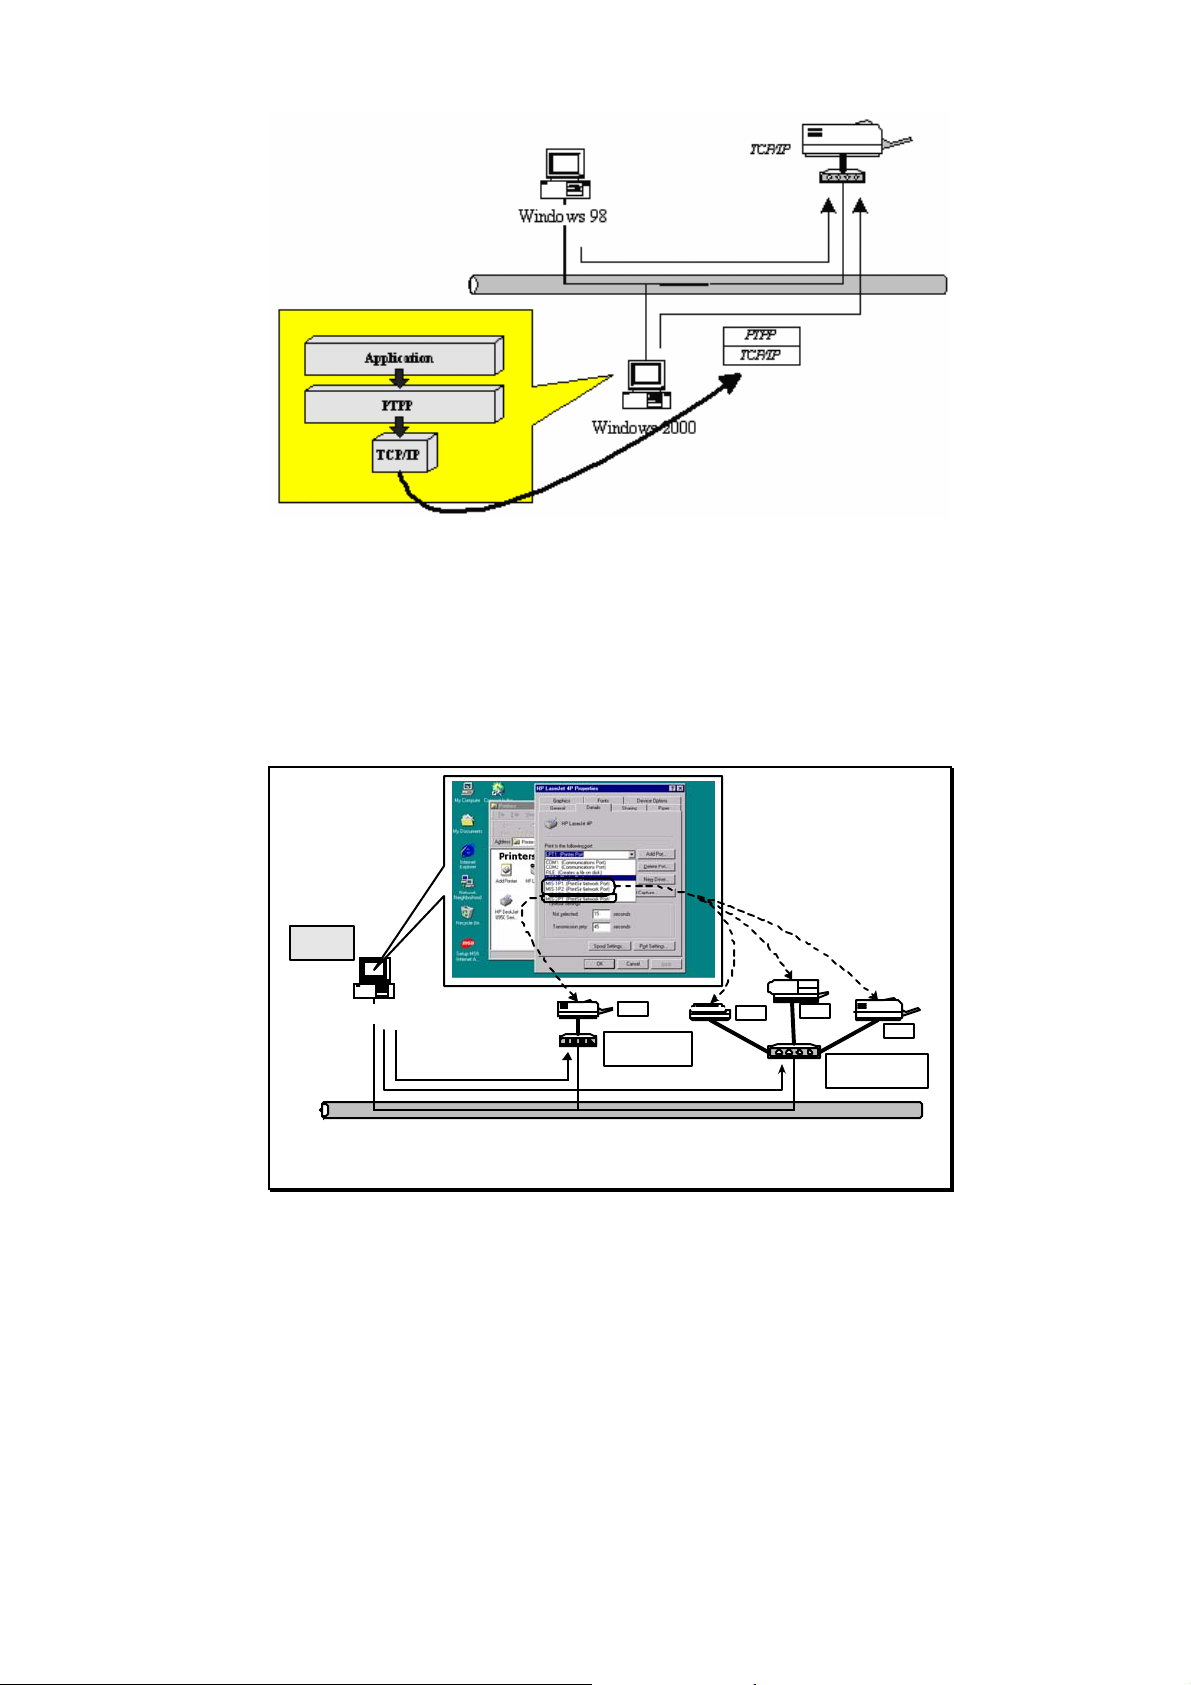
In the client i nstalla tion procedure , a fter PTPP (Peer- toPeer Printing Driver) is i nsta lled into Windows, the s ys tem
will automatically (ma nual co nfiguration i s also al lowed)
search a ll the print serve rs o n t he network, a nd the n add
their printing po rts i nto Windows’ printing port (see be low).
PTPP
Window s 98
P1
Print Server
MIS-2
P1
P2
P3
Print Server
MIS-1
UNIX / Li nux
UNIX (include HP/UX, SCO Unix, SunOS, So laris, Unixware
DEC Uni x, IB M AIX a nd others ) a nd Li nux use t he s ystemstandard LP R to pri nt through print server.
MAC OS
MAC OS can use the system -standard AppleTalk network to
print throug h print server.
4
Page 10
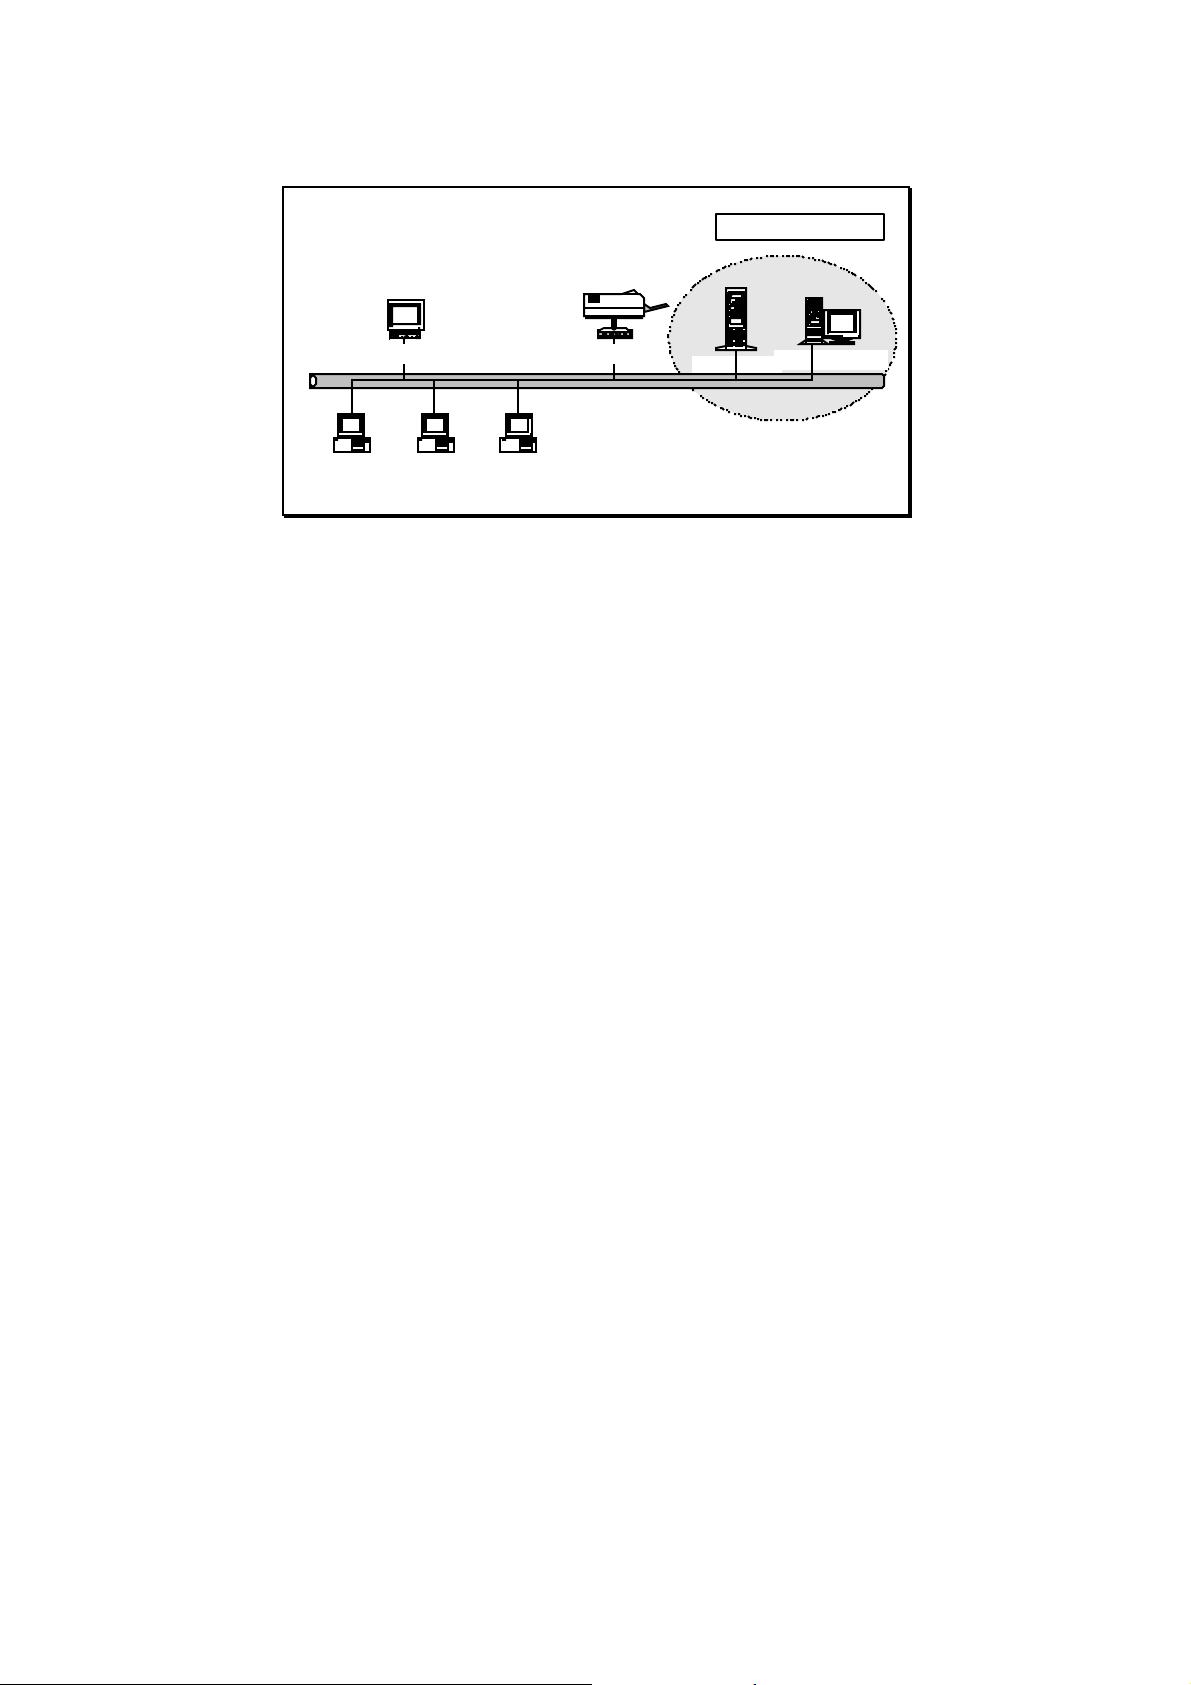
Network Printing Functions for Ne twork Se rver
Netw ork Server
Workstation
Unix Prin t Server
Wind ows 2 00 0
Windows 98Windows NT
N etWare Server
Windows NT Server
Common network ser vers are c lassified as fo llo wing :
Windows NT/2000/2003
Our pri nt ser ver s ystem pro vides PTPP (Peer- to-Peer
Printing) dri ver a nd uti lities fo r Windows N T/2000/2003.
After P TPP i s installed, the ser ver can directly print t hrough
print ser ver. Addi ng t his printing f unction into Windows
NT/2000/2003 Ser ver allo ws p rint queue , user a uthorit y
manageme nt, a nd ma ny other ad vanced feat ures to be
used.
NetWare 3. x/4. x/5.x
In NetWa r e envi ronment, print s e rver offe r s vari ous p rinting
modes li ke pri nt queue, remote pri nter , e tc.
5
Page 11
1.4 Network Prin t ing Environment
Common network envi ronment are classified as followi ng:
Windows Peer-to-Peer Network
The c lient’s PTP P driver will use TCP/IP pro tocol to print
through print se r ver.
Windows NT/2000/2003 Network
Netwo rk printi ng func tion will become available a fter P TPP
driver is insta lled i nto Windows NT/2000/2003. A dding t his
printing function i nto Windows NT/2000/2003 Server allo ws
print queue, user aut horit y manageme nt, and ma ny o t her
advanced fea tures to be used.
NetWare Network (see be low)
6
Page 12
1.5 Con tent s of the User’s M anual
Chapter 2 explai ns print ser ver’s hardwa re installati on and
config uration. It is strong ly recomme nded for yo u to read.
The follo wing c hapters i ntroduce:
Chapter 3 . Windows Peer-to-Peer Netwo rk
Chapter 4 . Windows NT/2000/2003 Server-Based Network
Chapter 5 . Ne tWare Network
Chapter 6 . U NIX System Network
You may select the appropriate chapters and sectio ns to
read depending on your network printing’s requi re ment.
Chapter 7 and chapter 8 i ntroduce p rint server’s
manageme nt and confi guratio n uti lities on Wi ndo ws a nd
Web Browser’s enviro nme nt respecti vely. You ma y select
the appropriate ma nageme nt uti lity according to t he
admini strator’s co mp uter platform.
Chapter 9 i ntrod uces Print Server’s IPP Printing f uncti on
and set up proced ure. The IPP P rinting pro vides a
convenient wa y to print doc ume nts across t he Internet by
the IPP protocol.
Chapter 10 i ntrod uces how to deal with the problem t ha t if
you can’t find any print ser ver listed o n t he “Available
Ports” i n “Network Ports Quick Setup” in Wi ndows XP SP2.
7
Page 13

1.6 Firmware & Print ing Function
The pri nt ser ver provides a comple te network printing
solution. The feature se t is listed below:
PTP P (P e e r-to-Pe e r-P rinting)
TC P/IP (LPR)
IPP Pri nting
NetWare Bi ndery Pri nti ng
AppleTalk
SMB Printing
2. Hardware Installation
Unpack t he p rint server package and veri f y that all the
items listed in t he sectio n 1 .2 are pro vided.
Connec t the print se r ver to the printer you wa nt to share o n
the netwo rk .
C o nnect the pr i n t s erver to your network by atta ched the
net work cab le to the U TP port of the print serve r.
Connec t the power adapter to t he pri nt server. The print
se rver will p e rfo rm the P o we r-On-S e lf-Test ( P OST) afte r it
is powered o n. Duri ng the P OST, t he Status and Ready
LEDs will be on. W he n t he LEDs are unlighted, the print
server i s read y.
NOTE1: MUST use the power adapter sh ipped with the print server, do
NOT u se any other power adapter from any sour ces.
NOTE2: To prevent t he compatibility problem between pr int server an d
a few printer, it is recommended that you power on the print server
befo re the p ri nt er.
8
Page 14
3. Windows Peer-to-Peer Ne twork
3.1 System Architecture
Print se r ver s upports Wi ndows P eer -to-Peer network
printing mode, whic h is suitable for mos t medium a nd small
ne twork en vironmen t s. Through quick and simple
installatio n procedure , users can i mmediately enjoy t he
convenience of network printing.
Ins tallation proced ure is separa ted into followi ng two parts:
1. Administrator Ins tallati on and Setup (refer to section 2
for more d e tailed i nforma ti on).
System administrators m ust:
Install adminis trator’s utilities into his/her computer.
Configure print se r ver from administrator’s configuration
utility.
2. C lient Installation and Configuration (refer to sec tion 3
for more d e tailed i nforma ti on).
Client users m us t ins tall Windows P TPP dri ver (Peer-to-
Pee r P rinti ng) fo r ne twork pri nting .
In addition, after PTPP is insta lled, the system will
automa tically search for all pri nt se r vers on t he network,
and add the printi ng port of t he p rint servers i nto Wi ndows’
printing port ( refer to Network Printing Arc hitecture in
section 1.4 fo r mo re detailed i nfor mation).
9
Page 15

3.2 Administrator Installation and Setup
The Administrator Ins tallati on can be per formed on
Windows 95 /98/Me/NT/2000/XP/2003 wit h the same user
interface. Before the i nstalla tion, please verif y t hat your
net work protocol i s installed on your PC ( TCP/IP, IPX
and/or NetBEU I) .
Inse rt t he CD s hipped along wit h the print server into yo ur
CD -ROM drive. The A utorun.exe program sho uld be
executed a utomatically. If not, run Autorun.exe ma nua lly
from CD-ROM drive’ s root directory.
The “Installation Manager” will be displayed on t he screen
as following. Click “Admin Utili ty” t he n click “English
V e rs i o n” .
10
Page 16
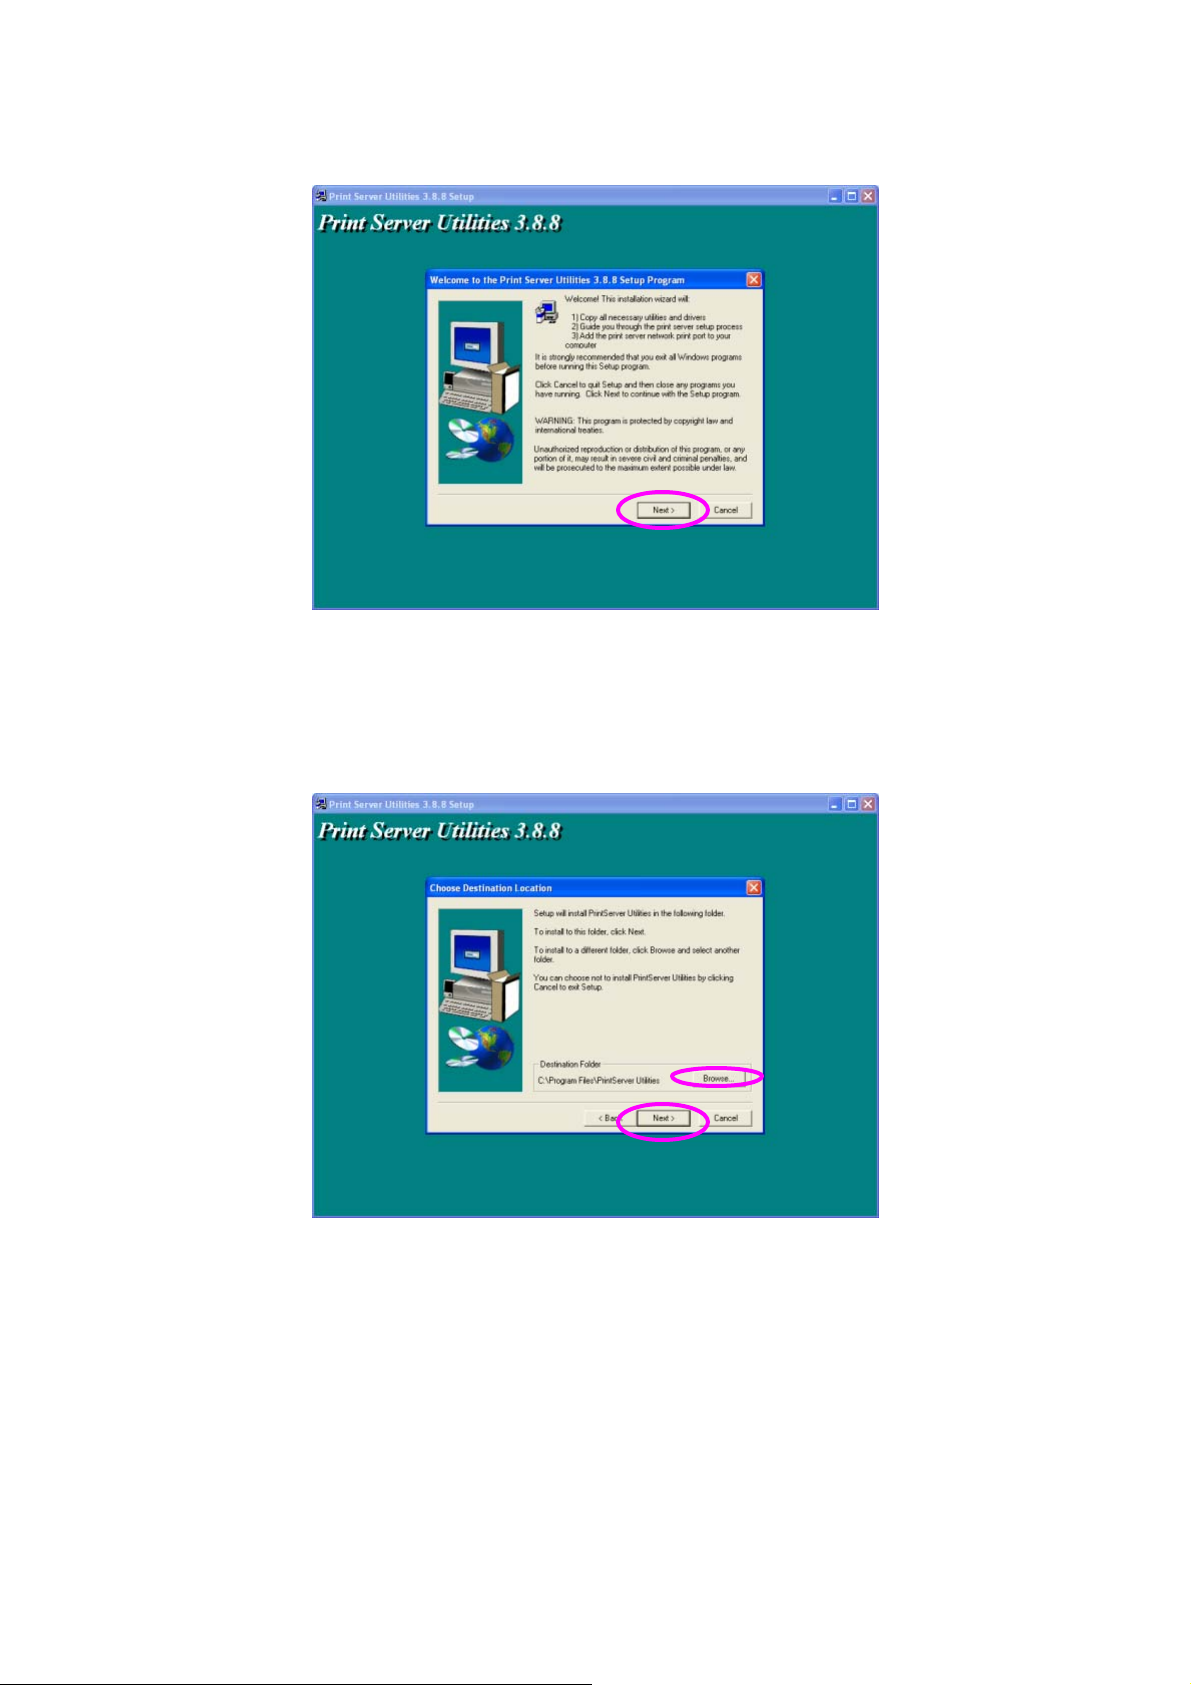
The “Utilities Setup” wi ndow will be displayed. Click “Ne xt”.
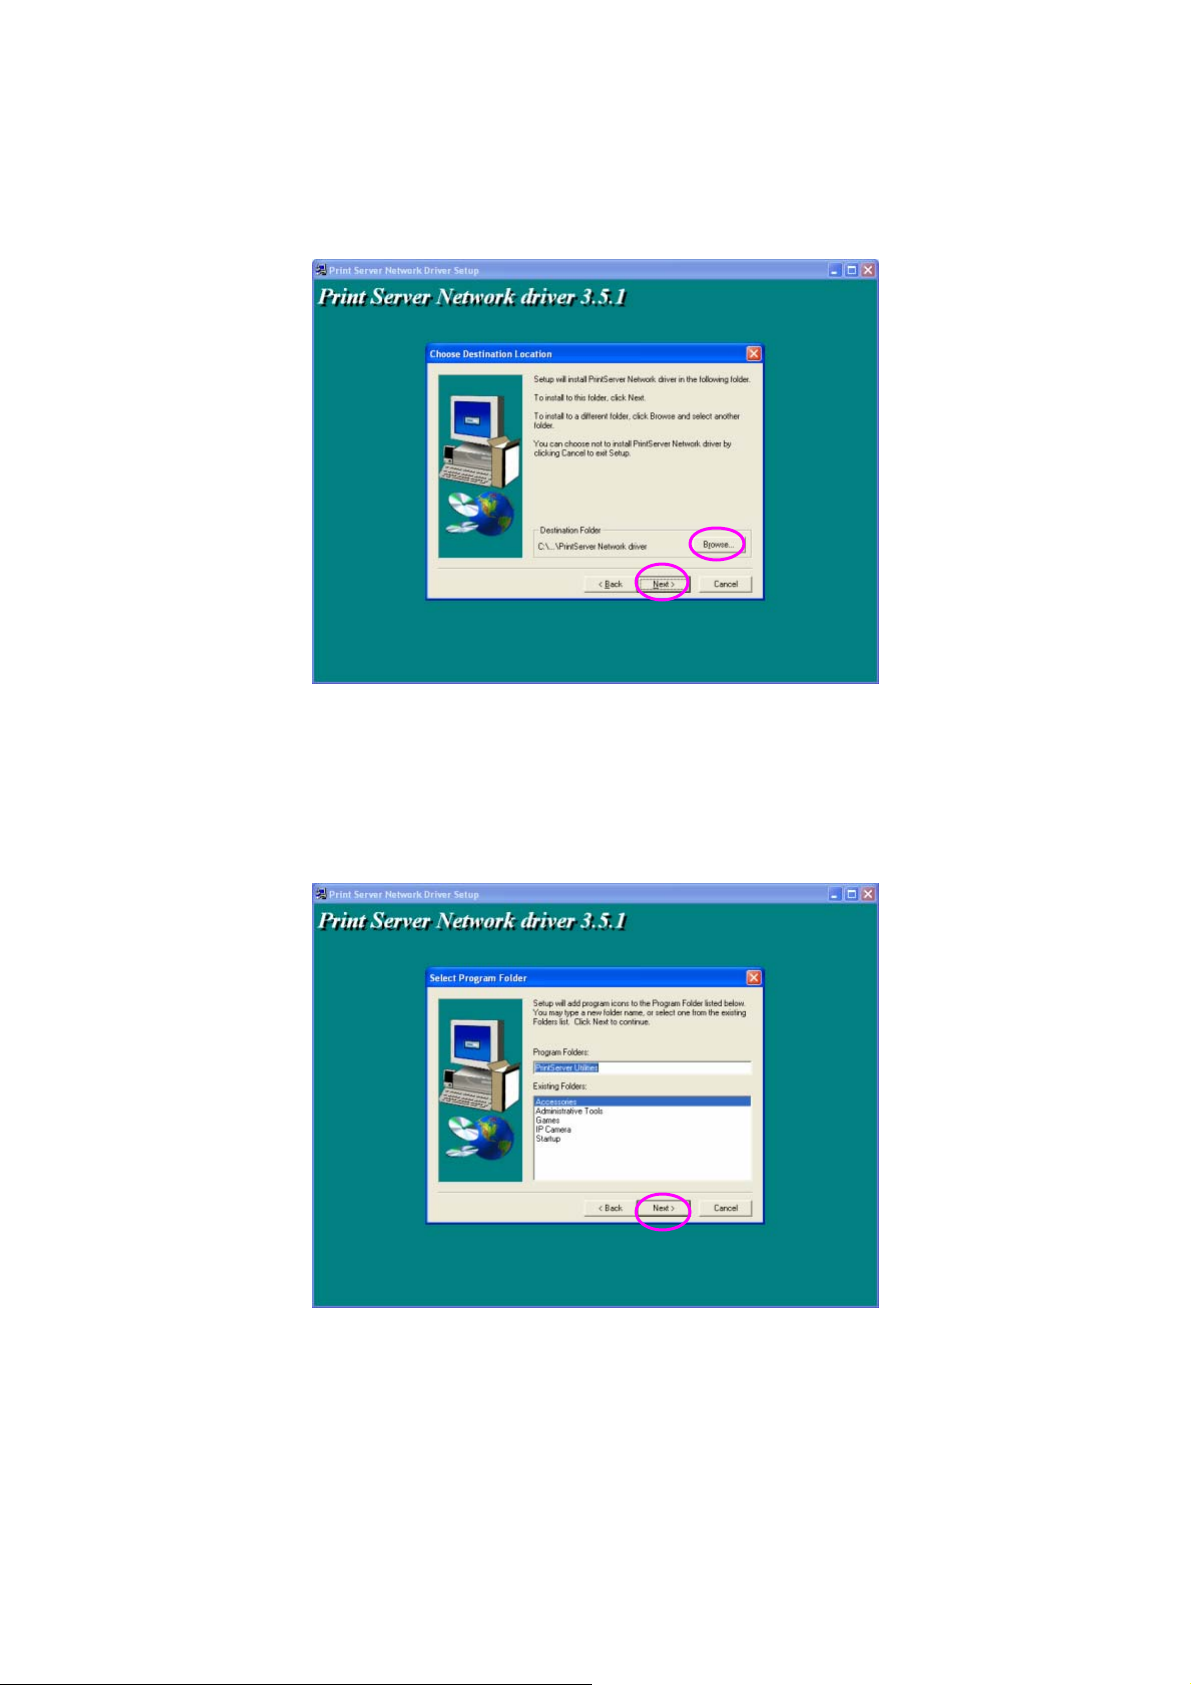
Click “Next” to install the utilities i n the default folder or
click “Browse” to speci fy the destination folde r where you
would like to i nsta ll the utilities.
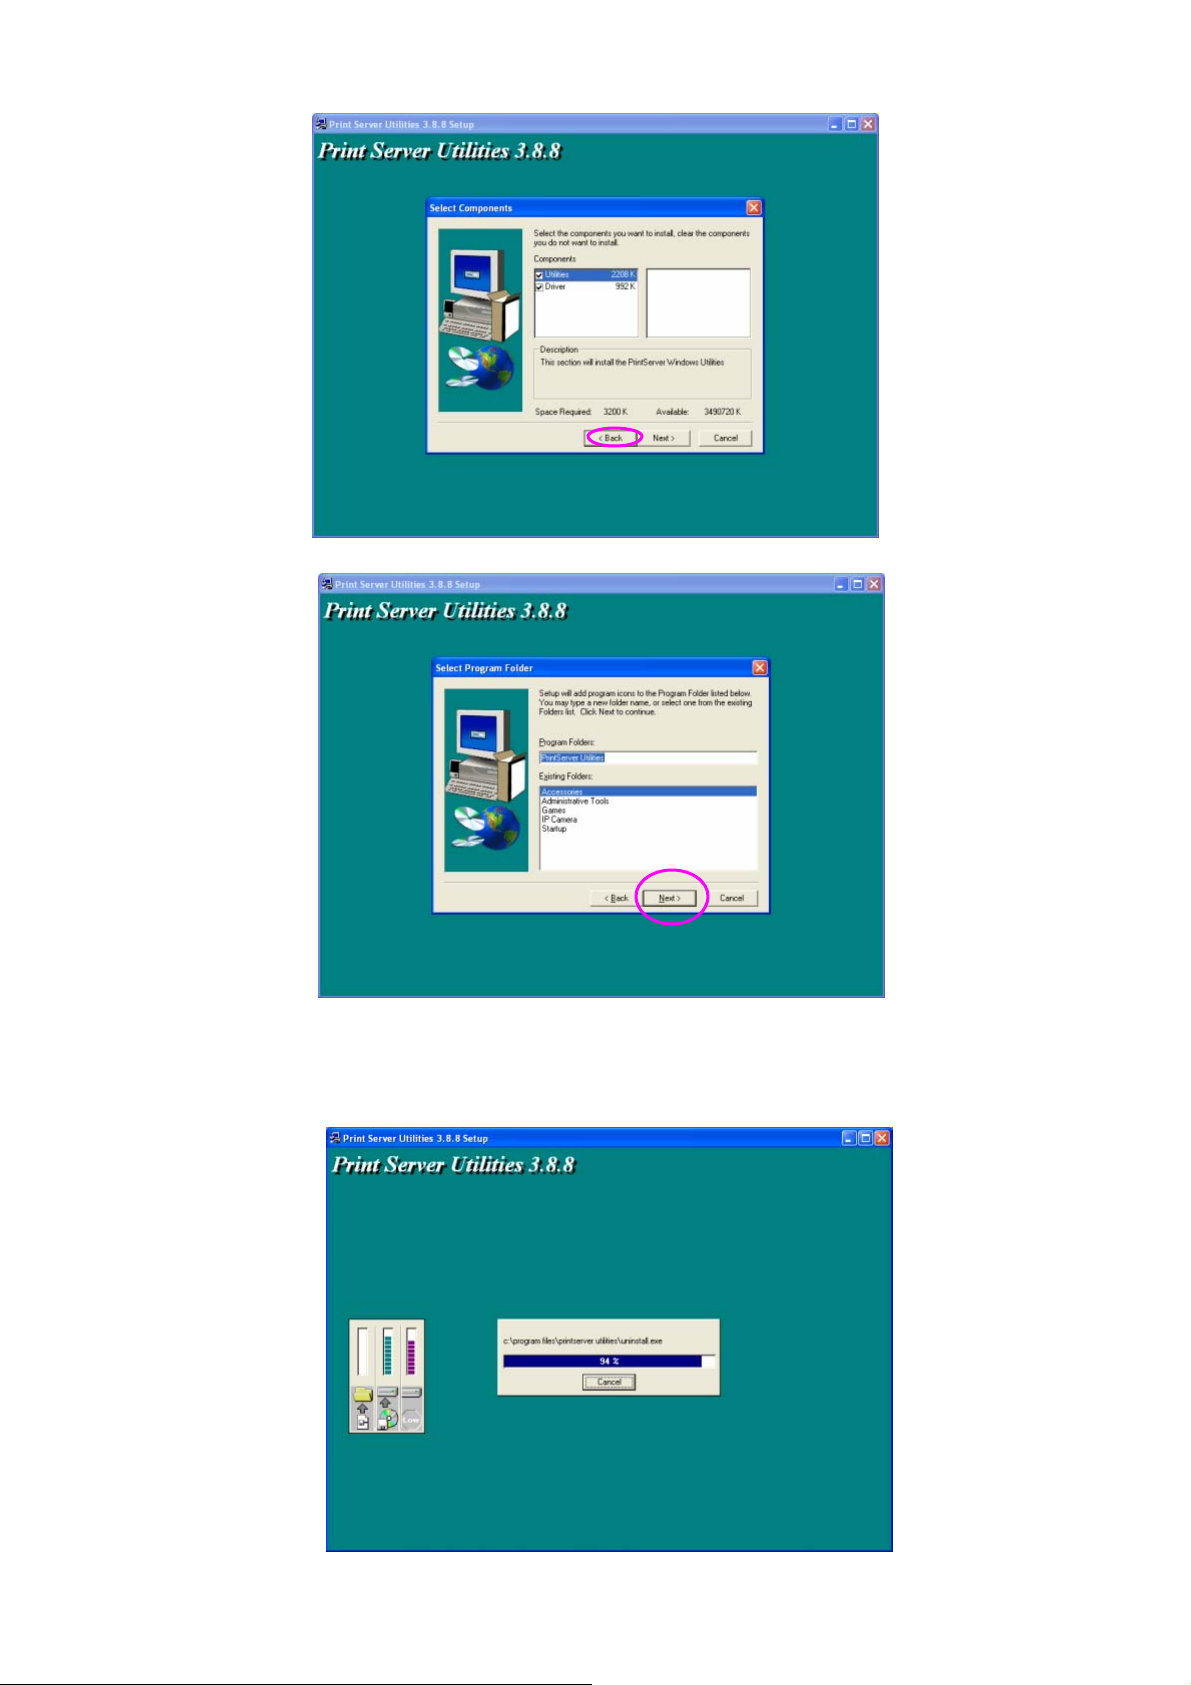
Select the components you wa nt to insta ll. It i s highly
recommended to i nstall all p rovi ded compo ne nts. Click
“Next ” to conti n ue.
Specify t he program folder w here the program icons will be
added to, click “Ne xt”
11
Page 17
.
The s ystem will start to i nstall t he utilities automati call y.
12
Page 18
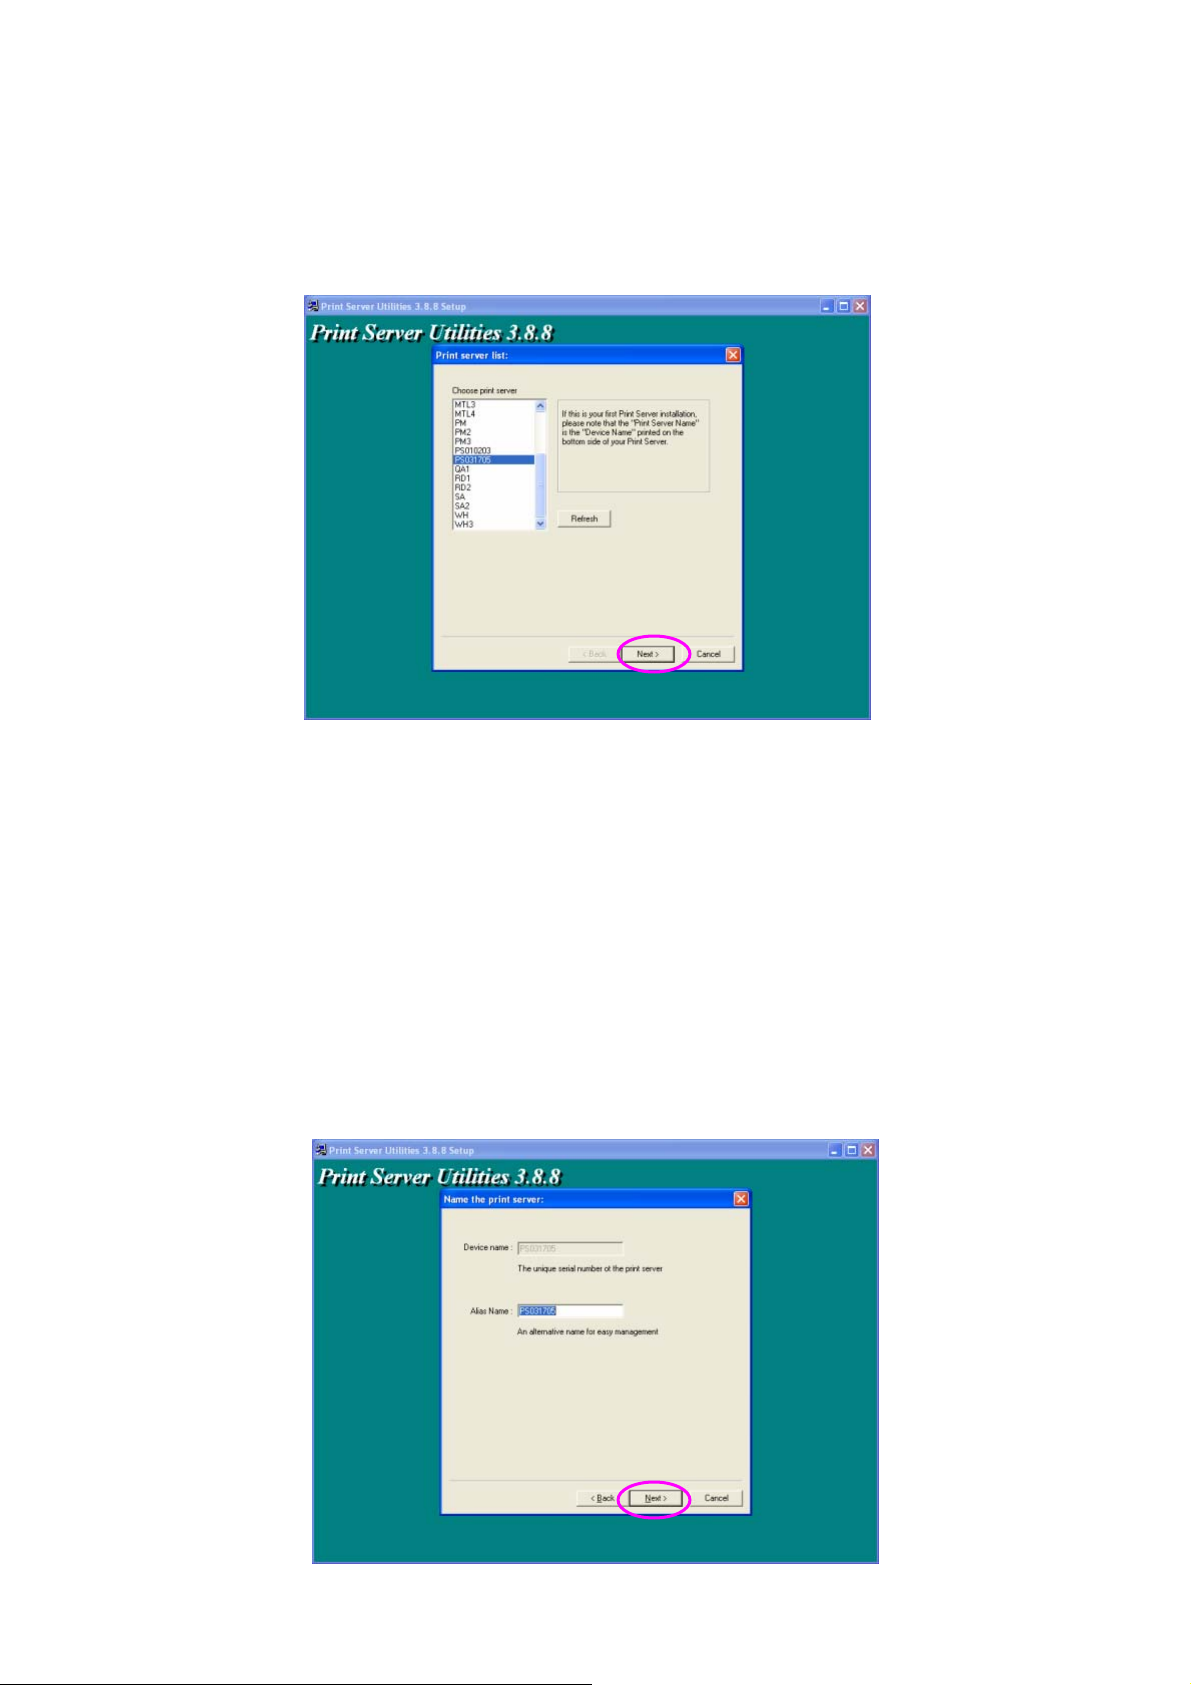
You have comp leted the installati on phase and prepare to
configure t he Print Server . T he “Choose Pri nt Server” will
list all Pri nt Ser vers within the network. Select t he Print
Server you would like to co nfigure and click “Ne xt”.
NOTE 1: If this is the first time you configure the Print Server, the “Print Server
Name” is the last 6-digit of MAC ID with prefix “PS”. Please check
th e MAC ID on th e p rin t server.
NOTE 2: The l ist can on l y display t he d evices f rom th e same m a nufa ctu rer.
Specify a recognizable name for the Print Ser ver and click
“Ne xt ”.
13
Page 19

Specify t he IP Address for t he Print S er ve r manually or
click “Ne xt” to keep de fault IP Address, i.e. 192.168.2 .2.
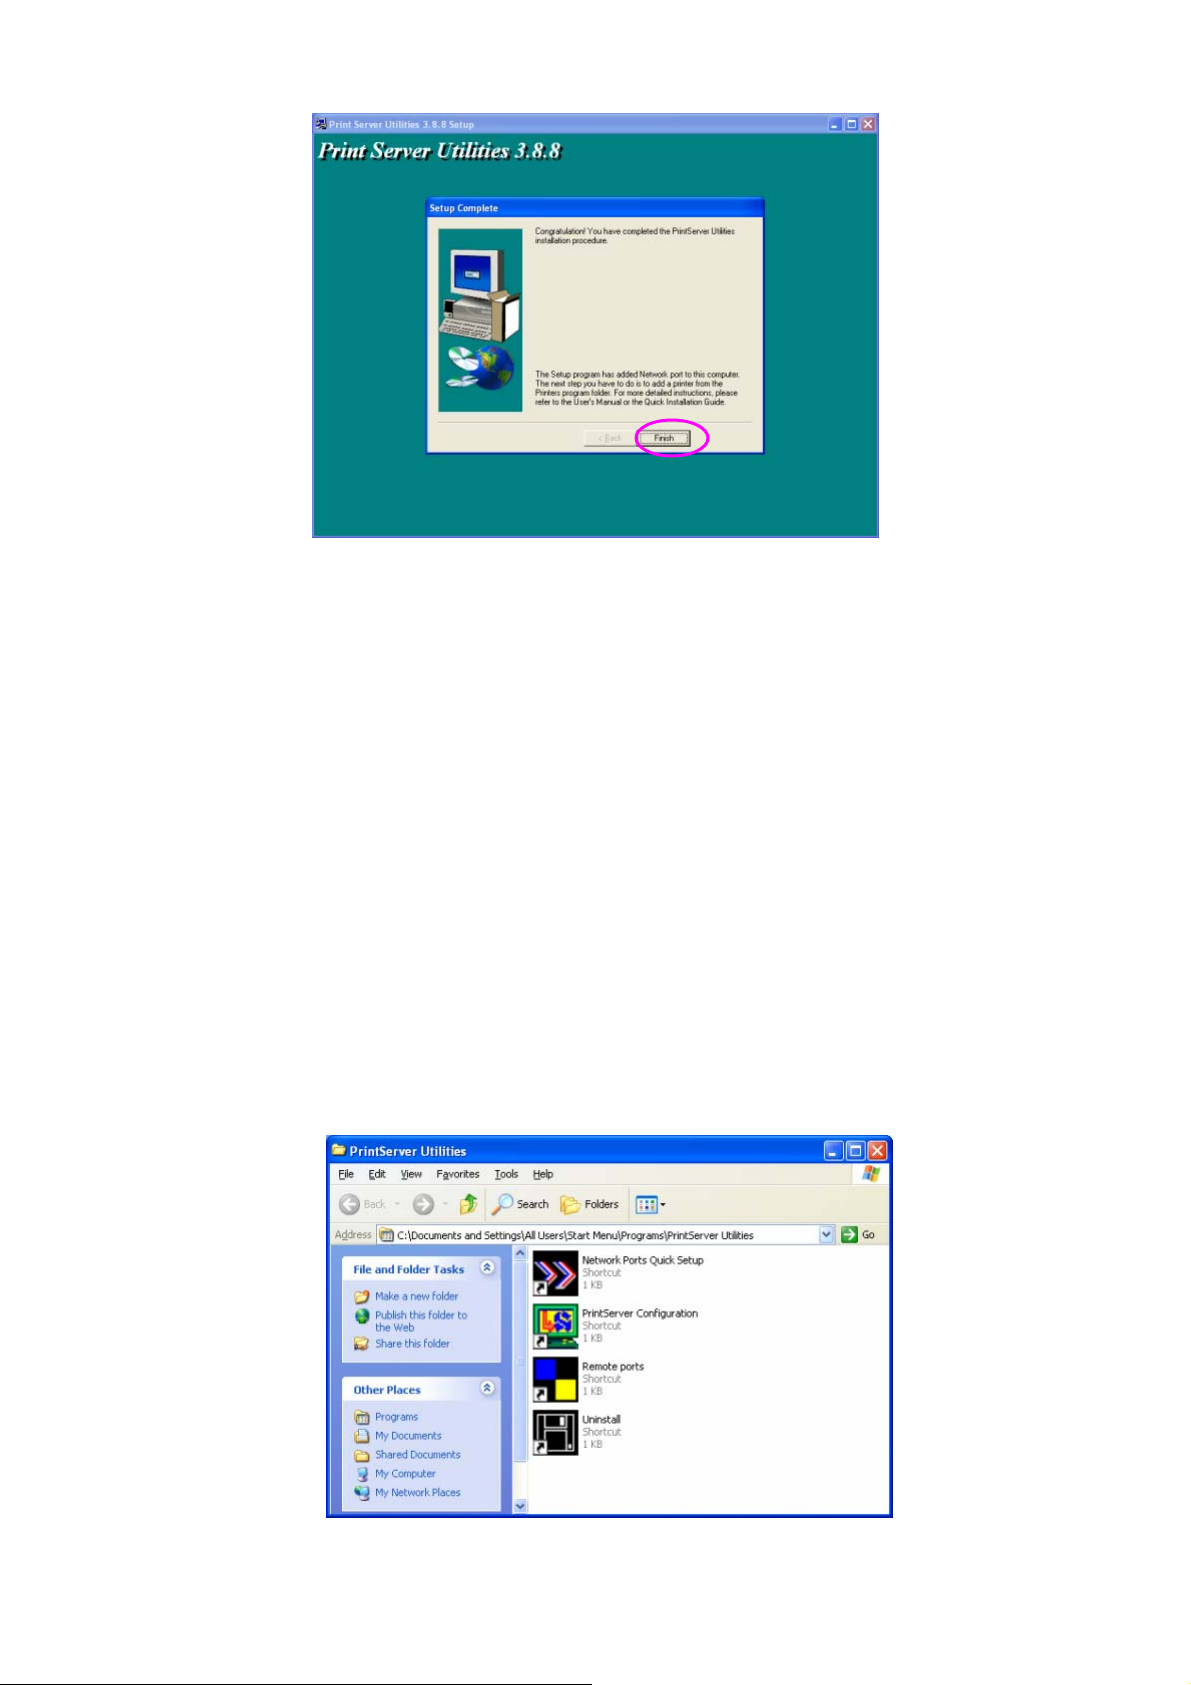
The co nfig uration summary is displayed i n t he wi ndow. No w,
you have comp lete d t he “Pri n t S e rver Se tup ”. Cli c k “F i ni sh”
and your s ystem will add netwo rk port of t he Print Ser ver to
yo ur PC a utomatic a lly.
The Administrator Ins tallati on procedure is totally
completed. Click “Finis h” .
14
Page 20
The Administrator Ins tallati on Program have exec uted the
installatio n proced ure t hat performs t he fo llowing tasks:
Ins tall all uti lities and drivers to t he administrator’s PC .
Configure the print serve r (including the print serve r name
and network protocol)
A d d the network p o rt o f t he p r i n t s e rver to the
admini strator’s PC .
If you want to p ri n t from t hi s a d mini s tra to r’s P C to the pr i n t
server, all yo u need to do is to perform Windows’ s tandard
“Add Printer” procedure (please refer to S ection 3.6).
3.3 Admi ni strat or Utilities
After Administrator Ins tallati on i s completed, t here will be
four utilities in print server’s p rogram folder.
.
15
Page 21
3.4 Client Installat ion and Setup
The Client Insta lla tion ca n be performed on Wi ndows
95/98/Me/NT/2000/X P/2003 wit h t he sa me user interface.
Before the i nstalla tion p rocedure , p lease confirm t hat your
PC has connected to the netwo rk a nd installed at least o ne
net work protocol.
Inse rt t he CD s hipped along wit h the print server into yo ur
CD -ROM drive. The A utorun.exe program sho uld be
executed a utomatically. If not, run Autorun.exe ma nua lly
from CD-ROM drive’ s root directory.
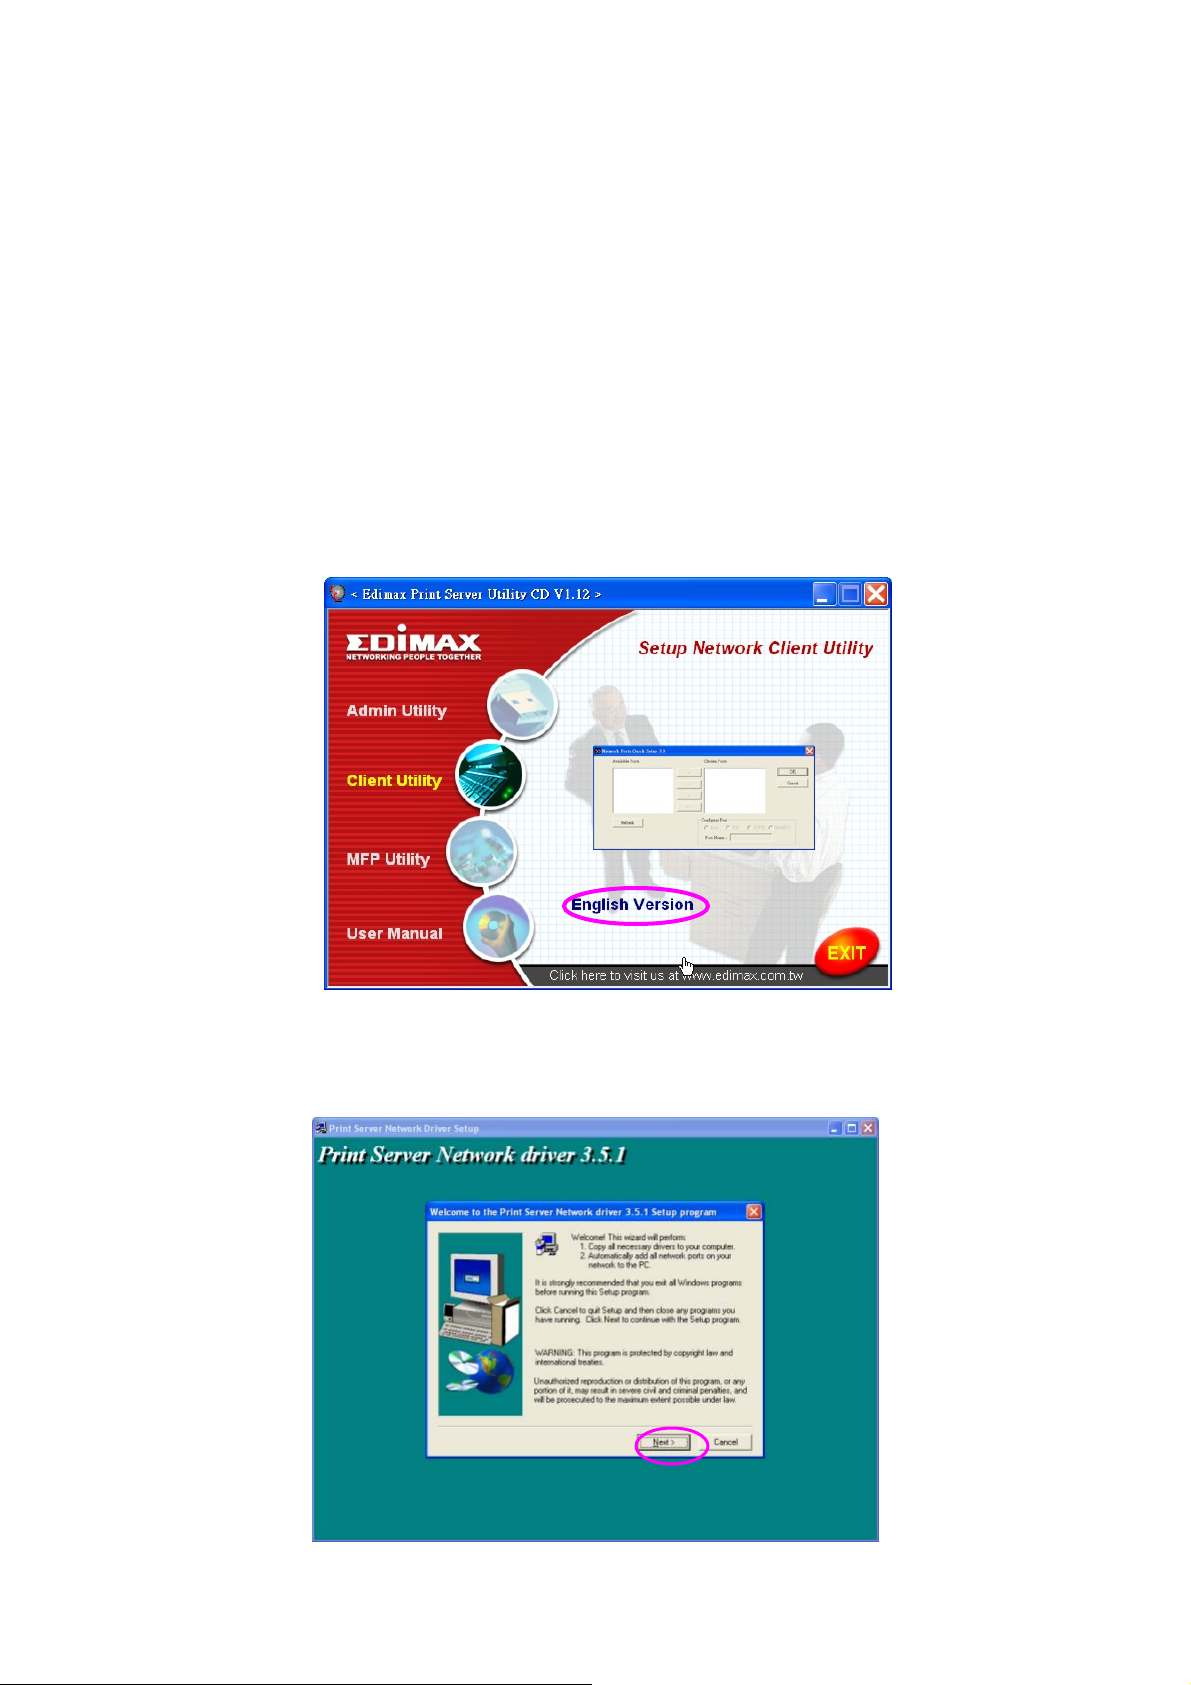
The " Insta lla tion Ma nager" will be displa yed o n the scree n
as follows . Click “Client Utility” then click “English Version”.
The “Utilities Setup” wi ndow will be displayed. Click “Ne xt”.
16
Page 22
Click “Next” to install the utilities i n the default folder or
click “Browse” to speci fy the destination folde r where you
would like to i nsta ll the utilities.
Specify t he program folder w here the program icons will be
added to, click “Ne xt”.
The s ystem will start to i nstall t he utilities automati call y.
17
Page 23
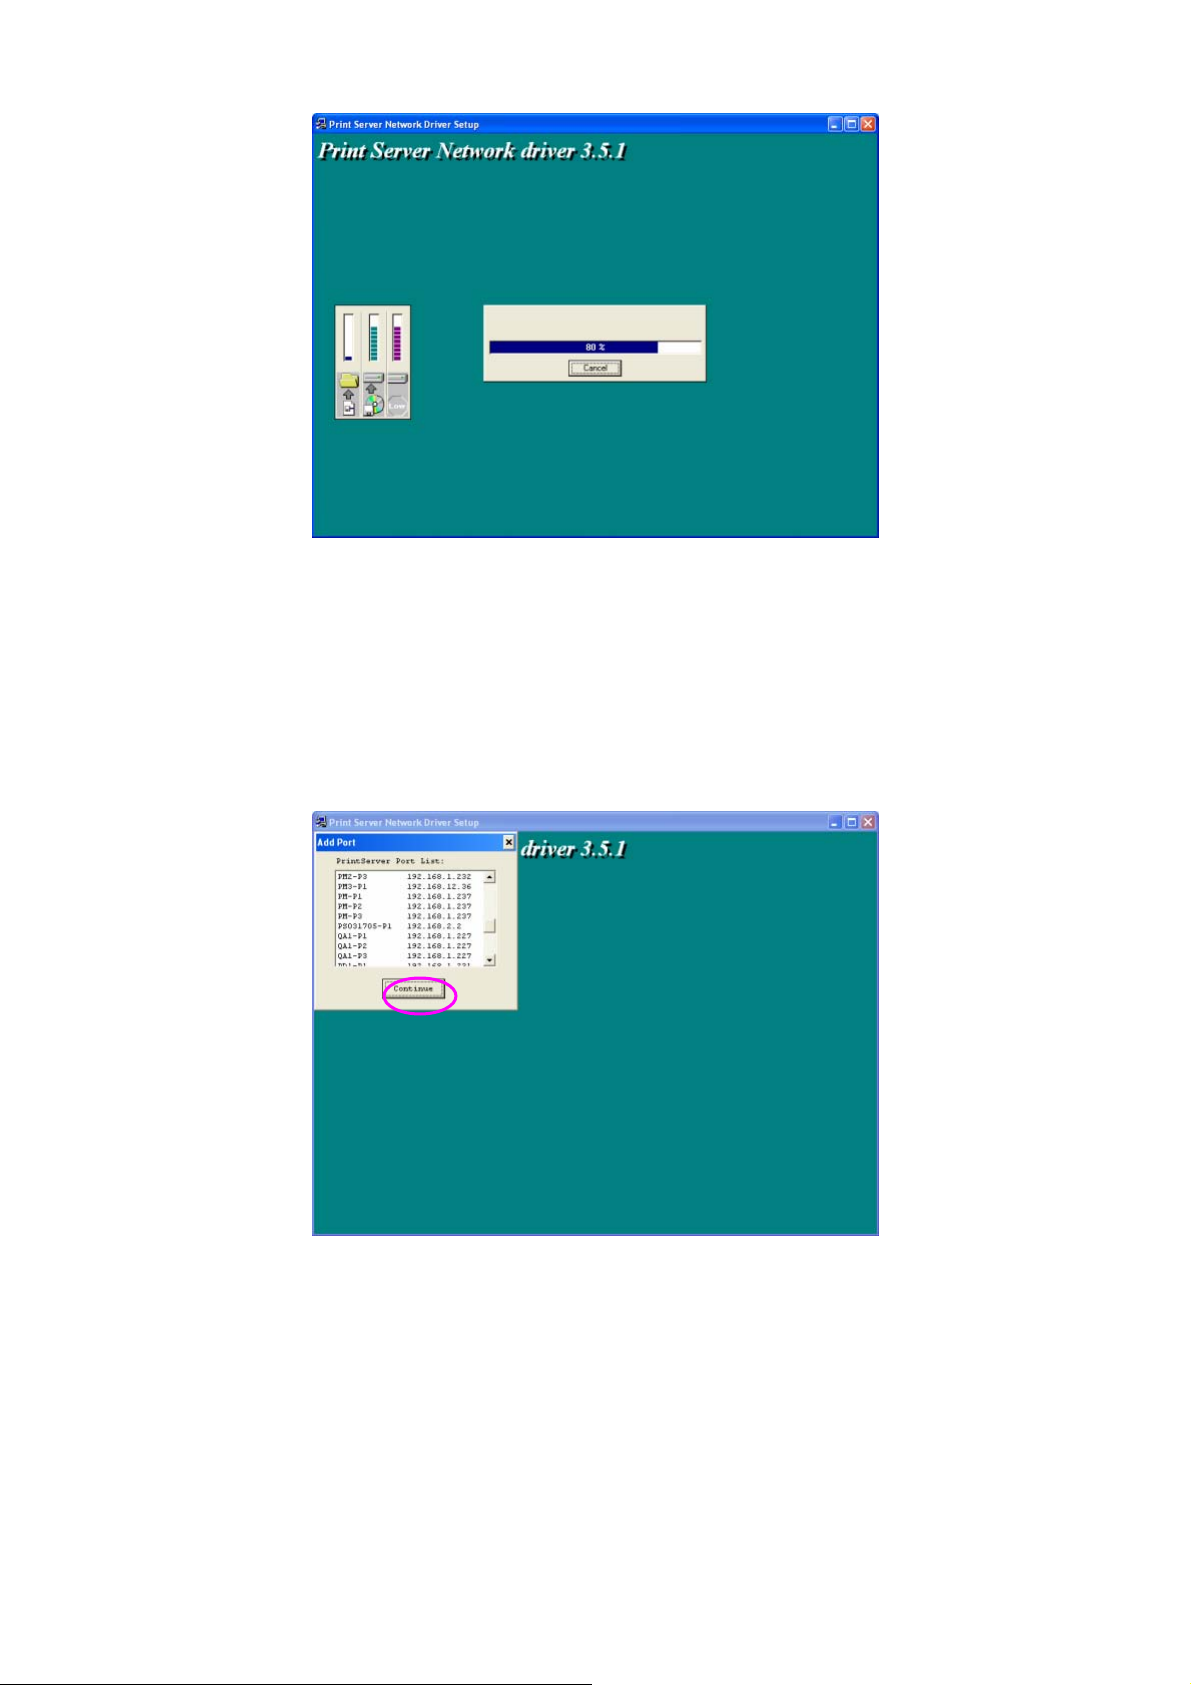
Now, t he i nstalla tion procedure is comp leted, you are read y
to set up t he client’s comp uter. All network ports of the
Print Servers detec ted on the netwo rk will be added to your
PC auto maticall y, click “Continue”.
The Client Insta lla tion p rocedure i s comple ted. Click
“Finish”.
18
Page 24
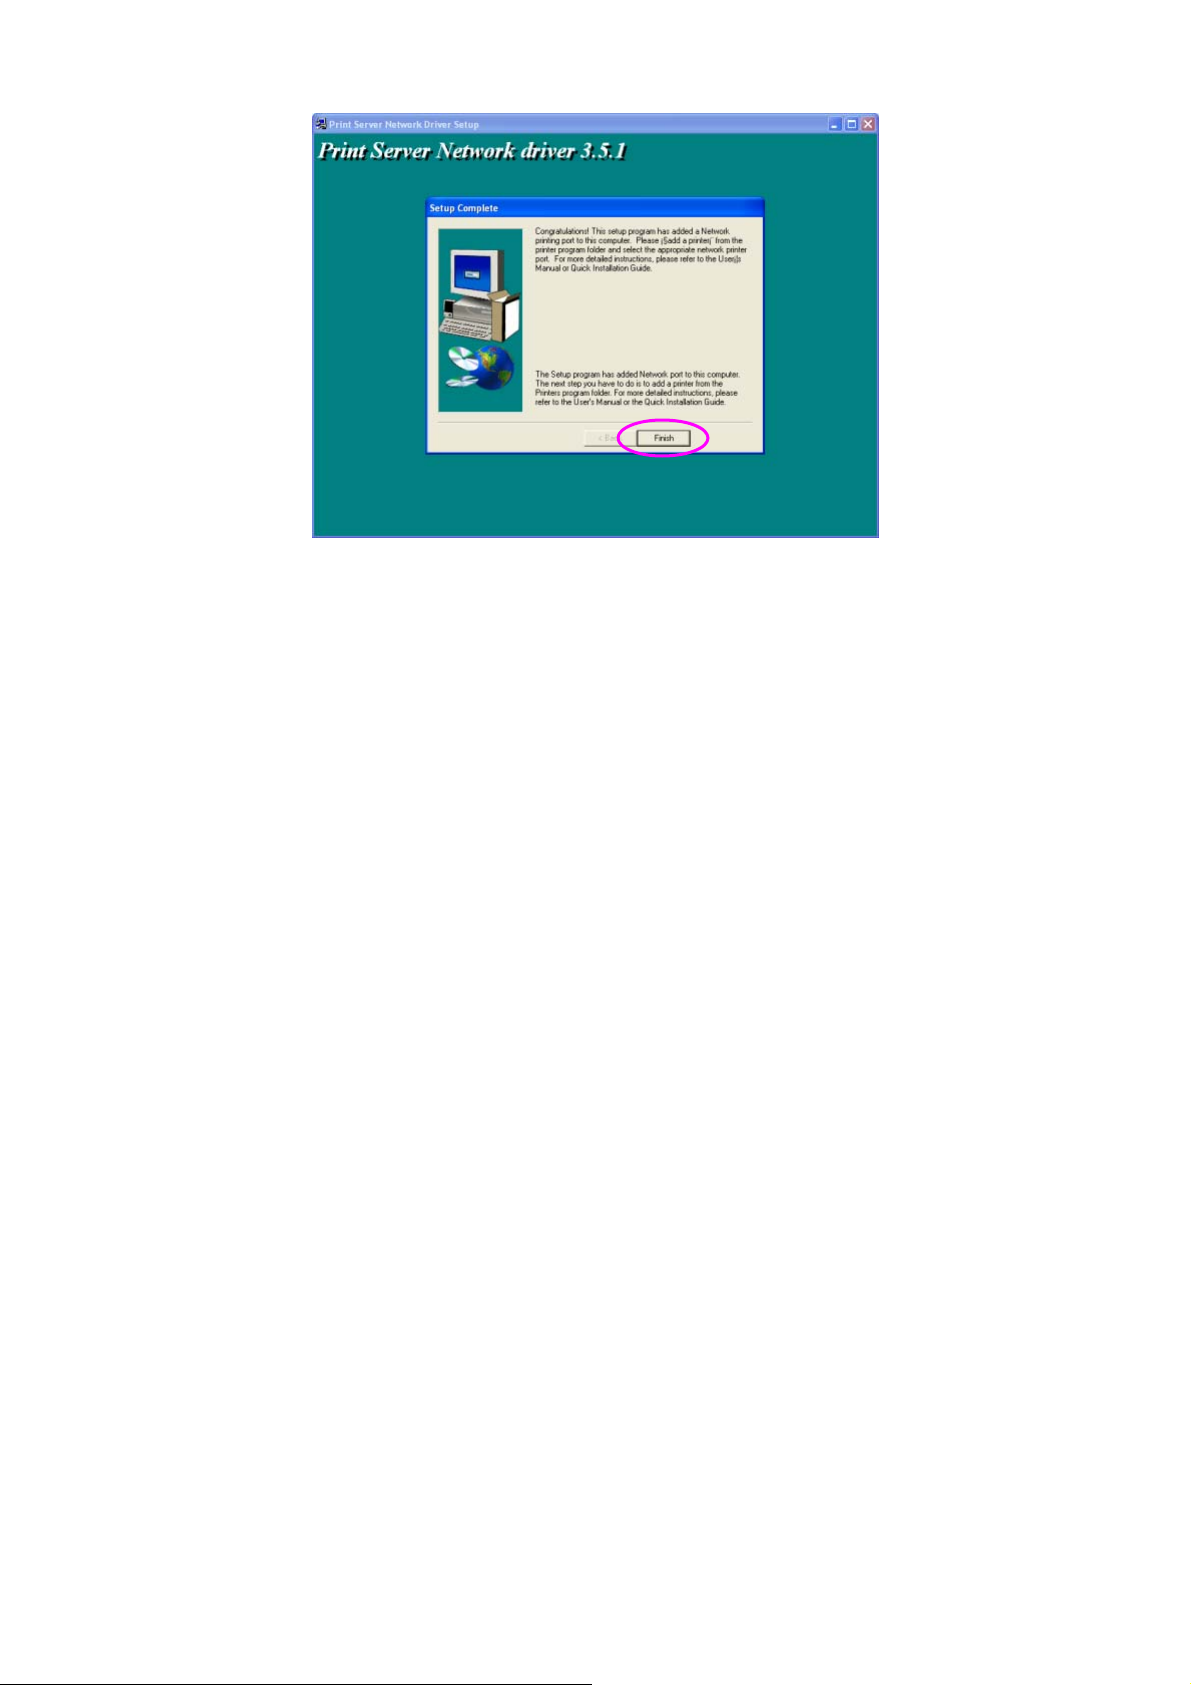
After t he ins tallati o n, yo u have comp le ted the fo llo wi ng
tasks:
Ins tall a ll utilities and dri vers to the client’s PC.
Add all the pri nt server’s network ports of t he network to
the c lient’s PC.
You ca n t hen perfo rm t he Windows’ standard “Add Printer”
procedure to add network printers to yo ur PC. Please refer
to Section 3.6.
19
Page 25
3.5 Client Utilities
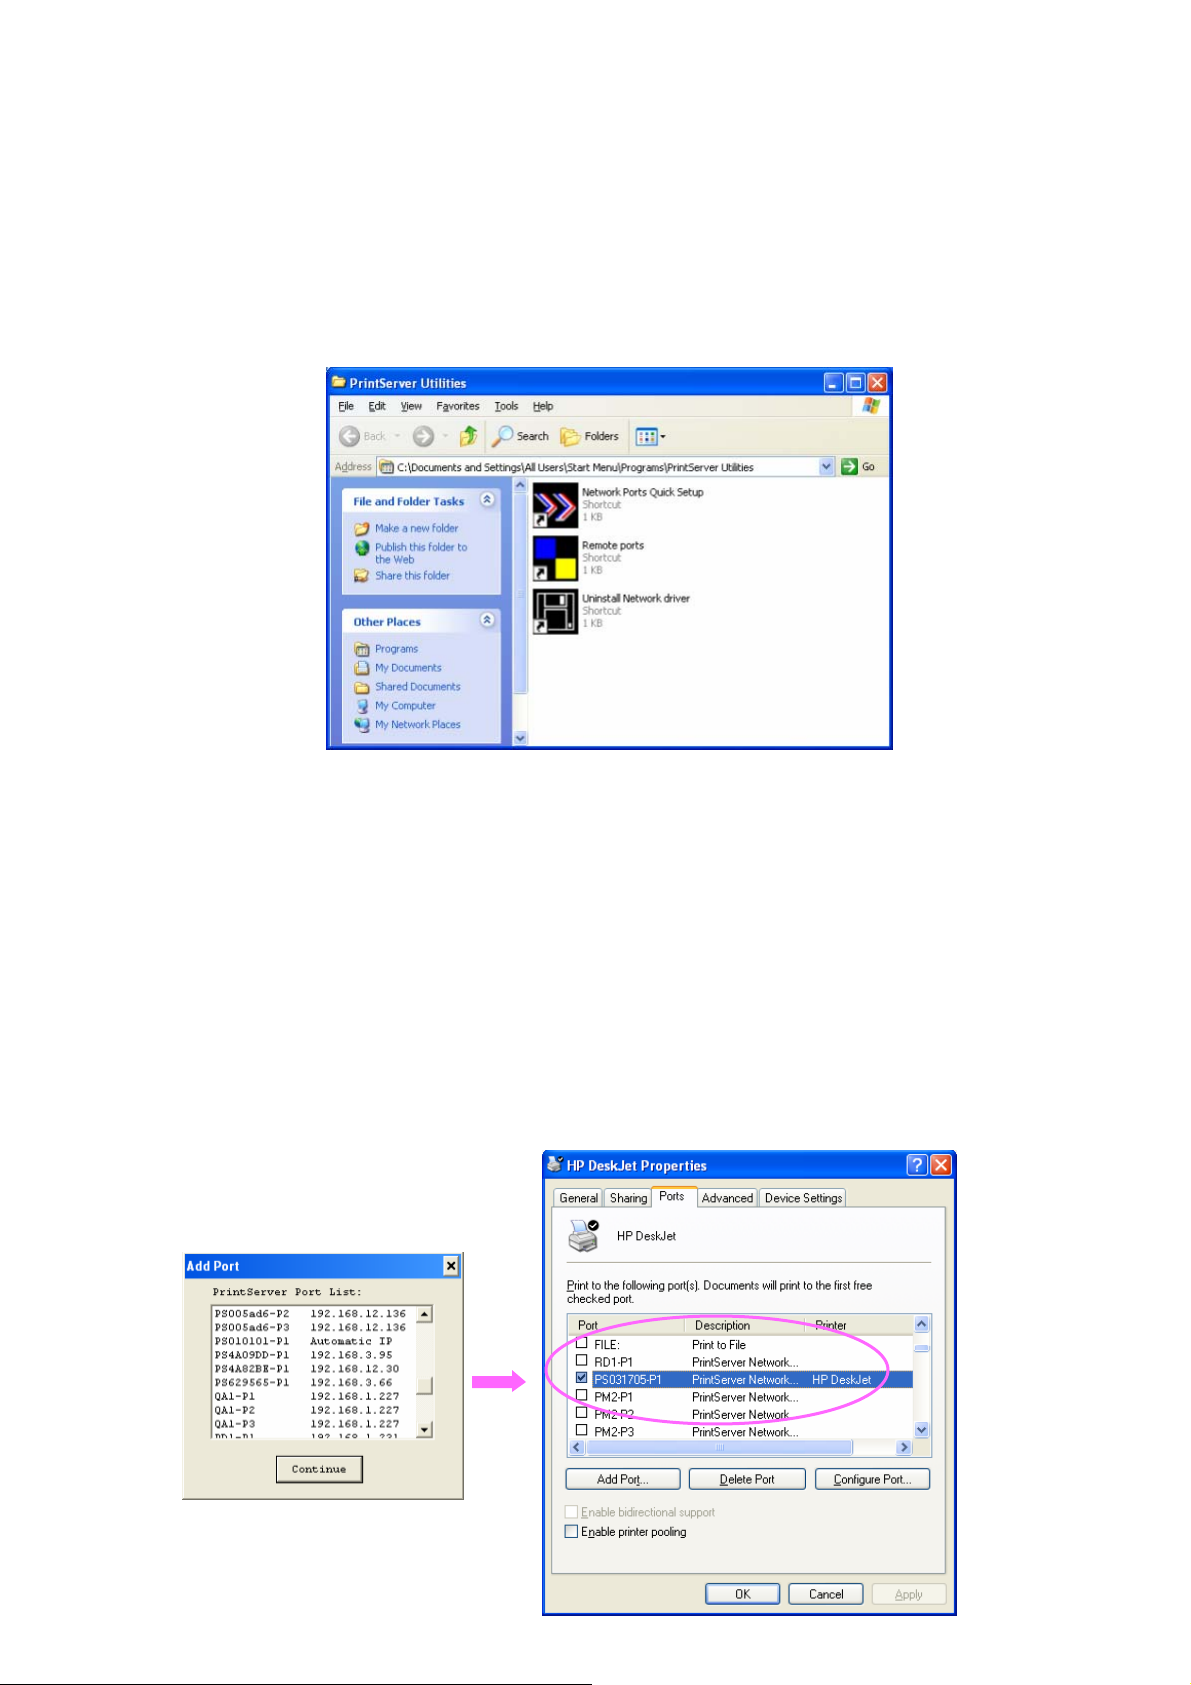
After Client Insta llation is completed, t here will be three
tools in pri nt ser ver’s Progra m folder.
z Net w ork Ports Quick Setu p
z Remote Ports
z U nin s tal l Net wor k Driver
3.5.1 Network Ports Quick Se tup
Network P orts Q uick Set up Utilit y offe rs a ver y simple
method to add or remo ve pri nt ser ver’s pri nter por t from t he
client’ s co mputer.
During t he c lient’s ins tallati on procedure, the s ys tem will
automa tically search for all pri nt se r vers on t he network,
and add them into t he pri nte r ports of t he client’s comp uter
20
Page 26

If you have j us t i nstal led a nother new print se r ver i n the
net work, yo u must r un thi s prog ram first. T his program wil l
search for new p rint servers and al low you to add the new
net work printer por t i nto client’s computer co nvenient ly.
Perform t he standard Add P rinter procedure , t hen yo u can
print di rectly to the printer t hrough t he ne wly installed print
server .
Please be aware t hat Ne twork P orts Q uick Set up Utility can
onl y detect a nd confi gure a ll print servers o n t he same
net work, it cannot search a nd configure print se r vers on
other s ubnets across network seg ments. You m ust use
Remote Por ts Utilit y described in the next section to
manage remote (across network segme nts) pri nt servers.
3.5.2 Re mote Port s ( Utility)
Remo te Po rts Utility o ffe rs a c o n veni ent way fo r you to
manage a nd add printer port of the remo te pri nt ser ver.
From the assista nt of this utility, you can pri nt to ot her p rint
servers outside the subne t across netwo rk segment.
However, please note that t his functio n o nl y s upports
TCP/ IP network p rotocol.
Please fol low the procedures described belo w:
Step1. Run Remote Ports Utilit y. Clicks “Add” to add a
remote print port.
21
Page 27

Step2. Enter print se r ver’s name, IP address, selec t used
ports, a nd enter LP R queue name o f each port. Click “Ok”.
Step3. The new remo te pri nt port i s displayed as follows.
In order to use the re mote printi ng functi o n, yo u wi ll ha ve to
proceed wi t h normal Add Printer procedure a nd select yo ur
printer port as t he newly added remote printer port.
22
Page 28

23
Page 29

3.6 Windows Add Printer Procedure
After adding a “ Network Port” of t he print ser ver to yo ur PC
by A dmi nistrato r or C lient Installation Program, you can
follo w t he proced ure described below to add printer to the
Windows. No te tha t following “Add Pri nter” steps are
running i n Windows XP, t he steps i n ot her Operati ng
Systems are similar.
Step1. C lick “Start”, c hoose “Settings” a nd select “Printers
and F a xes”.
Step2. C lick “Add a Printer”.
Step3. The “Add Printer Wizard ” is displa yed. Click “Ne xt”.
Step4. Select “Local printer a ttac hed to this computer”
and make sure t hat “Automati call y de tect a nd i nstall m y
P lug and Play printer” i s not se le cted . Cli c k “ Next”.
24
Page 30

Step5. Choose the suitab le “Print Ser ver Network Por t”
which was created by t he Administ rator Ins tallati on or
Client Installation process a nd click “Ne xt”.
Step6. Select a s uitable printer manufacture r a nd the
printer model and click “Next”. If yo ur pri nter i s not in t he
list, click “Ha ve Disk…” to i ns tall the driver o f the printer.
After i nstallatio n, t he printer model will be added to the list.
25
Page 31

Step7. Name your p rinter a nd setup the defa ult pri nter ,
click “Next”.
Step8. C hoose to pri nt t he test page or not. It i s
recommended to print a test page. Click “Next”.
26
Page 32

Step9. You have added t he p rinter to the P C successfully.
The informa tion of t he pri nter i s displa yed in t he wi ndows.
Click “Finish” .
27
Page 33

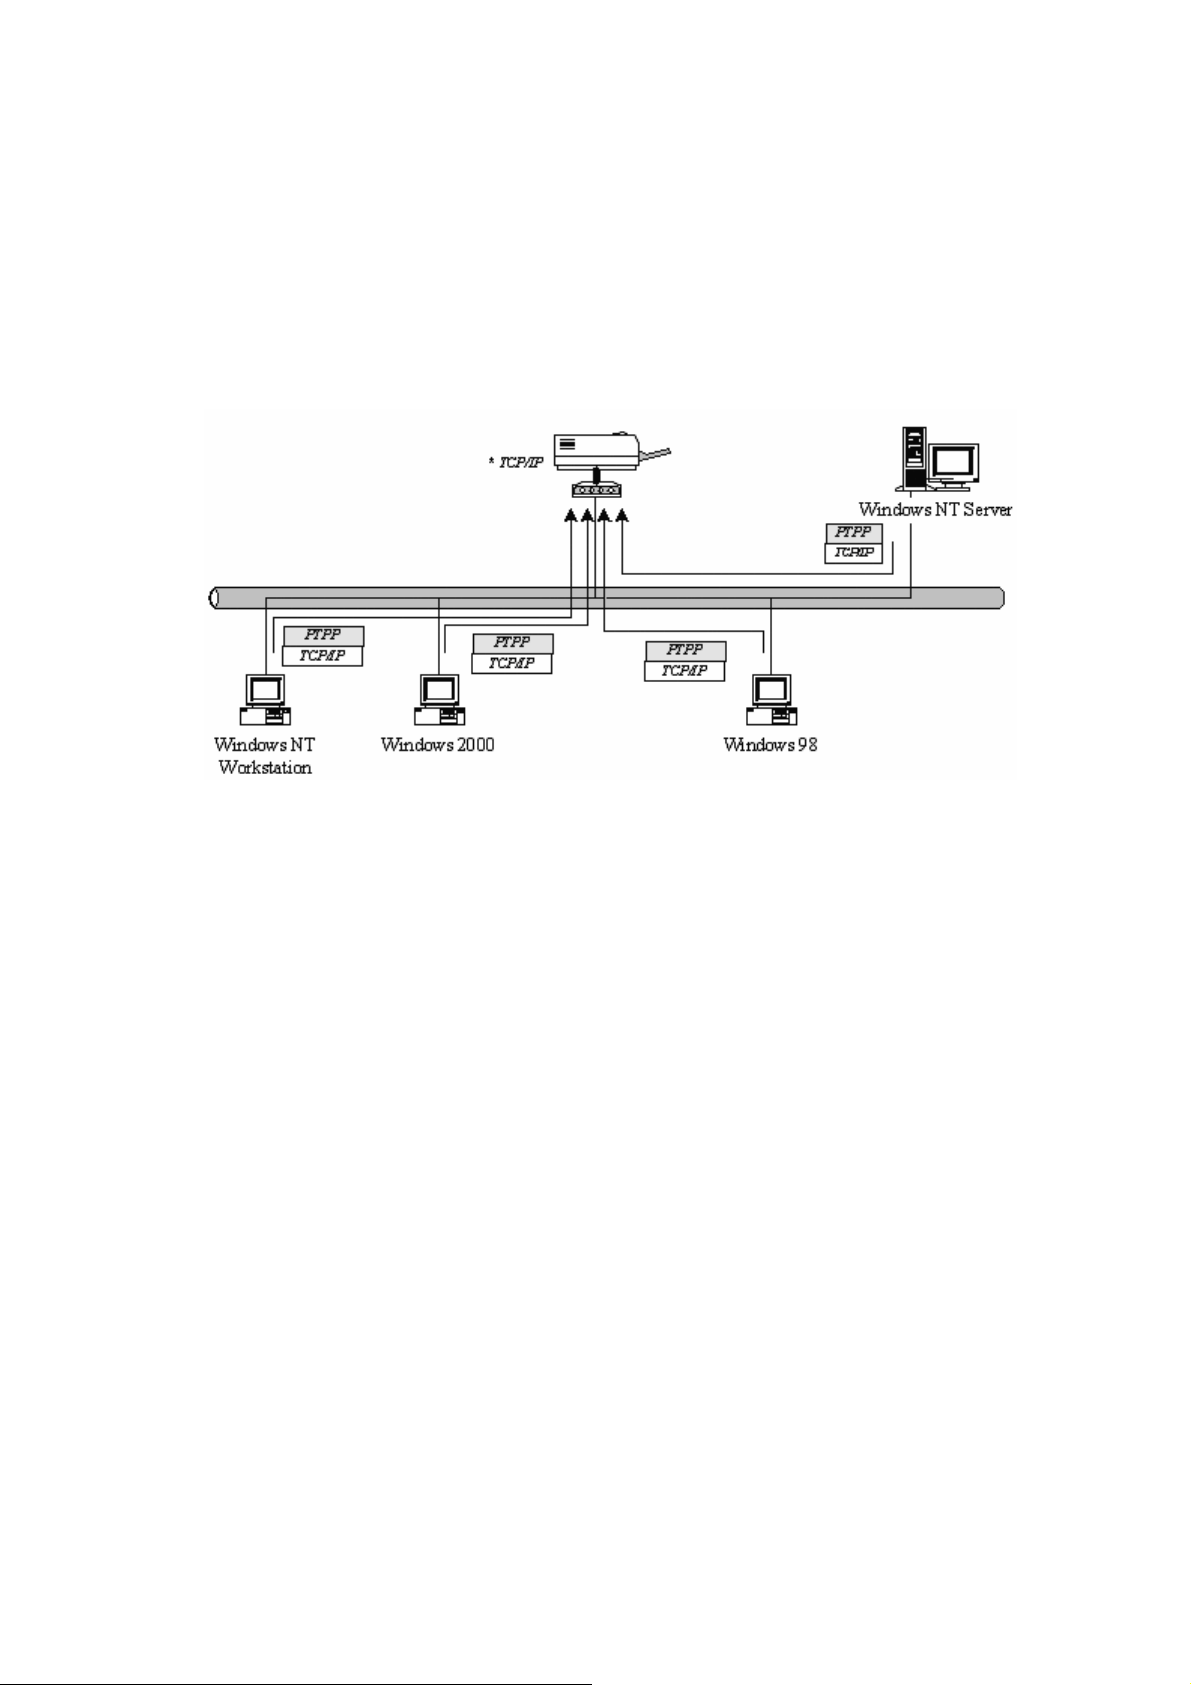
4. Windows NT/2000/2003 Network
4.1 System Architecture
In Windows network envi ro nment, ot her than the P eer-toPeer net work printing arc hitecture described i n t he pre vio us
chapter, we a lso offer the Server-Based Printi ng
architecture fo r Windows N T/2000/2003 se r ver. Onl y o ne
Windows NT/2000/2003 is required to have Wi ndows PTPP
(Peer-to-Peer Printing) driver installed and share t he
printi ng service o n t he network. Other network users can
simply co nnec t to the ser ver and a ccess t he shared pri nte r
(see below ).
28
Page 34

4.2 Windows NT/2000/2003 Server Installation and
Setup
Please fol low the procedures described belo w for
installatio n a nd constr uct a peer-to-peer connectio n (PTPP)
between Windows NT/2000/2003 Server and P rint Server.
Step1.
If this i s your first time i nstalli ng pri nt ser ver, please i nstall
the administrator software on Wi ndo ws NT/2000/2003
se rver fi rst. Re fer to s e c tion 3.2 fo r insta lla tio n instructi ons.
If your network has already installed a working print serve r
and your Windows NT/2000/2003 server has not yet
installed the PTPP driver, please i nstall the clie nt so ftware.
Refer to sec tion 3.4 and 3.5 fo r instal lation i nstruc tions.
Step2.
Please add/configure the Peer-to-P eer Printing o f the
Windows NT/2000/2003 network printer a nd verif y t hat yo u
can print from Wi ndows NT/2000/2003 to t he pri nt server by
the i ns talled PTP P driver.
Step3.
S hare the ab ove s e rver’s printer to the ne twork by
performing the sta ndard Windows printer s haring process.
29
Page 35

4.3 User Installation and Setup
After server side’s installa tion is comple ted, client side will
be able to find the server’s s hared printer i n Network
Neighbor hood. Yo u only need to perform Window’s
standard Add New Printer procedure, select “N etwork
Printer” s hown in the screen belo w, and comple te the
configurations afterwards to access the shared p rinter.
30
Page 36

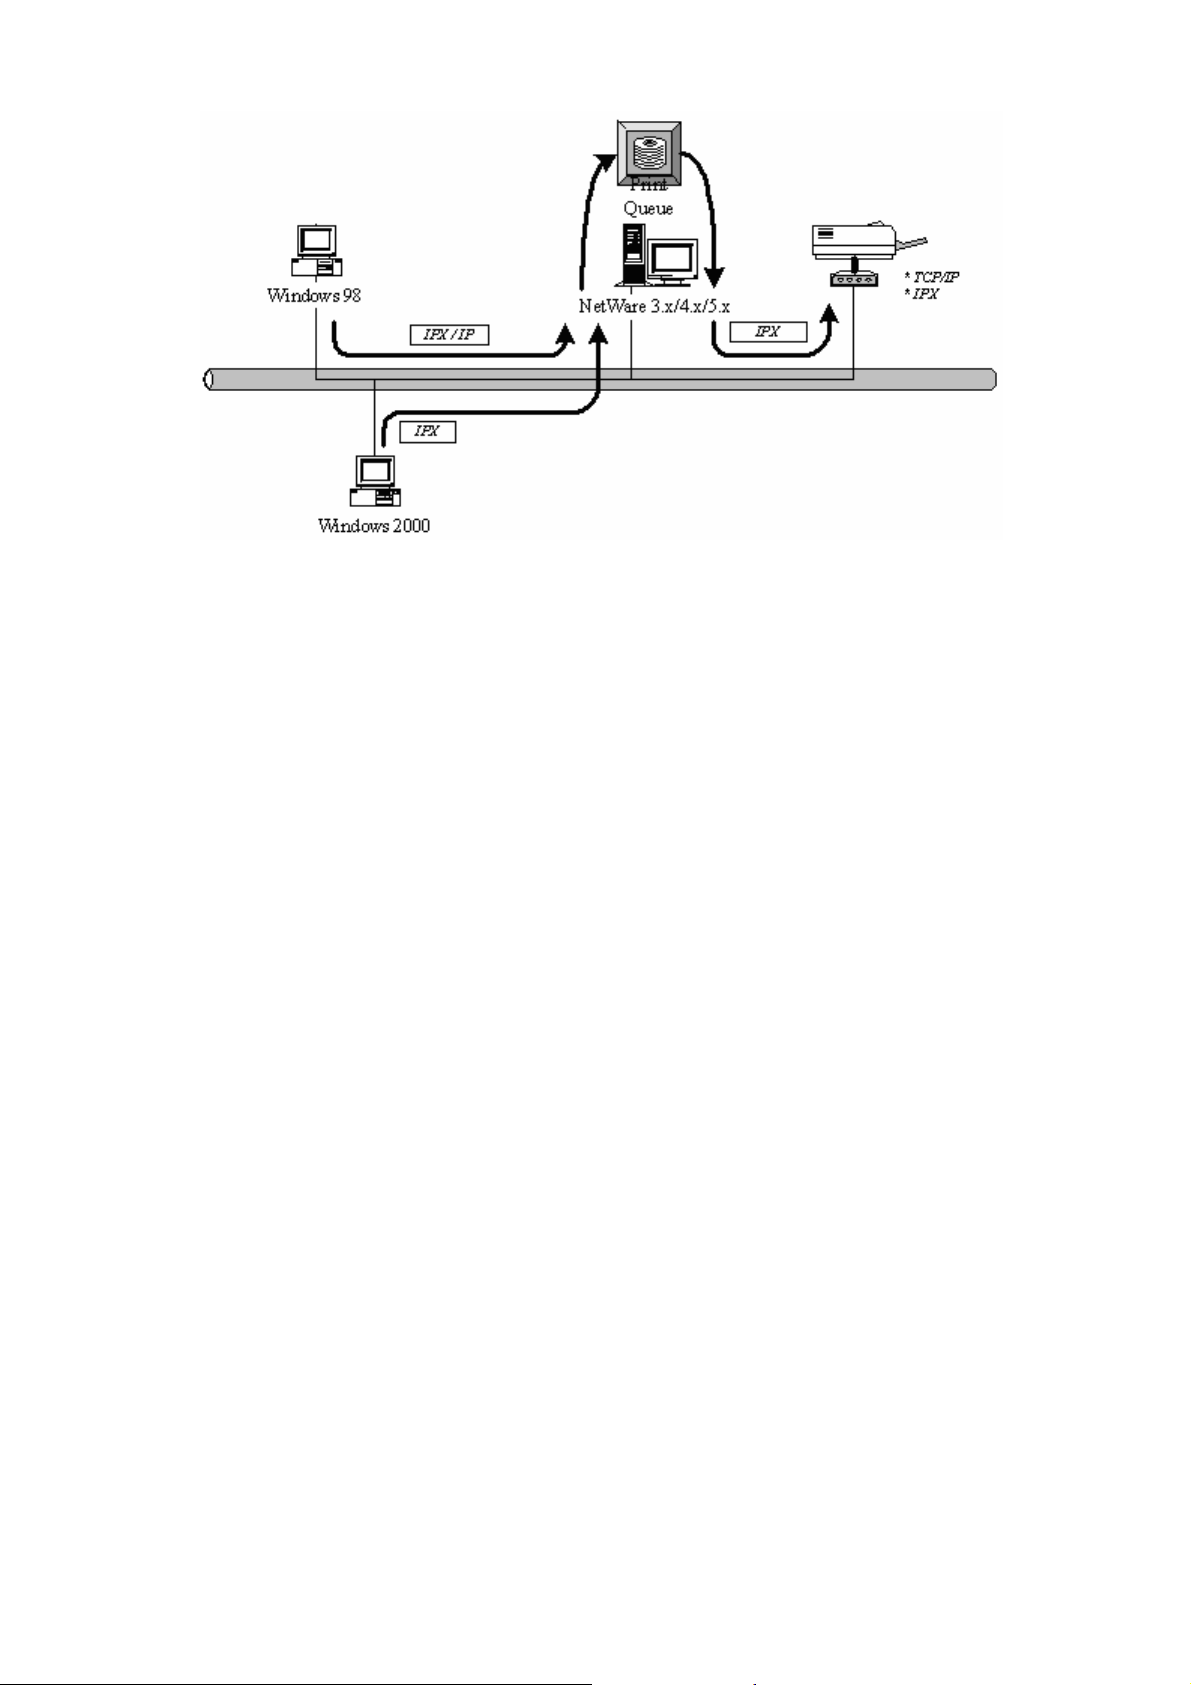
5. NetWare Network
5.1 System Architecture
We implement Ne tWare pri nter sharing functionality into t he
print ser ver itself, t hus allowing one or more pri nters
attached by a print serve r to be connected to the network.
We have developed the print serve r to support Ne tWare
print ser ver.
Embedded print se r ver, which emulates t he “queue
manageme nt f unctionalit y” of NetWare print server,
PSERVER program running o n the NetWare serve r. A user
first prints a job at a workstation, the job is routed to a
NetWare ser ver, the Ne tWare ser ver s tores the job i n a
print queue and t he n t he print ser ver gets the print job from
the q ueue to prin te rs .
Print Queue
Windows 98
Windows 2000
Netware Server
Print Server
Compare wi t h NetWare printing f unctio nality, the
advantages o f embedding t he NetWa re network p rinting
func tionality in t he print serve r incl ude:
Ins tallation is easi er a nd q uicker.
Netwo rk ma nageme nt is easier.
P ri nti ng pe rfo rmance is en hance d.
Relieve NetW a re f i le s erver’s burd en.
Reli eve t he need of a works tation running the remote
printer utility.
31
Page 37

Improve prod uc tivi t y by locating t he pri nter near the
workgro up.
Each pri nt ser ver should log into a NetWa re server before
servicing t he pri nt jobs. Eac h print ser ver wil l occup y a user
account with w hich it ca n log i nto t he NetWare ser ver.
5.2 NetW ar e 3. x/ 4.x/5. x Installat i on & Setup
Once your pri nt ser ver is connec ted to your Ether net
ne t wor k, you c a n set i t up f o r us e wi t h yo ur ne t wo rk ing
so ftware .
5.2.1 Inst allation Using PCONSOLE
5.2.1.1 Co nfigu ring as P rint S erver Mode
1. Run the NetWa re PCONSOLE program.
2. Change the current file ser ve r, i f necessary, usi ng the
Change Current File Server me nu selectio n.
3. Choose the Pri nt Queue Informa tion me nu selection.
4. Pre s s the Insert key to a d d a ne w p rin t queue.
5. Type in a pri nt queue name, suc h as “PQ ” or “Q1”.
6. You have now s uccessfull y created the print q ueue that
your print serve r will serve. P ress t he Escape key until the
Available Opti ons mai n me nu i s displayed .
7. Select Pri nt Ser ver Information.
8. Press the Inser t ke y to add a new NetWa re pri nt ser ver
object. The print serve r name can be identical to the
PSxxxxxx name pri nted on t he label of t he p rint server .
32
Page 38

9. P ress Enter to select t he newly created prin t server.
10. Select Print Server Configuratio n.
11. Select Printer Co nfiguration.
12. Select Printer 0 (or P rinter 1, Printer 2), and press
Enter, then selec t LPT1 (or LP T2, LPT3) i n t he Type field.
If your pri nt ser ver is wit h o nl y o ne port, you do not need to
configure t his Type field.
13. Press Escape, and answer Yes to t he Save Changes
question.
14 . Se le c t Que ues Se rvi c e d by Printe r, then s e le ct P rin te r
0 (or Pri nter 1, Printer 2) a nd press E nter.
15. Press Ins ert and add your newly created print q ue ue to
the list of q ueues se r viced by the p rinter. Enter a priority
33
Page 39

number for t he queue se r vice, or press E nter to accept t he
default.
16. Repeated l y press Escape to e xit the PCONSOLE
program.
17 . Re s e t the prin t s e rve r to ha ve the chang e s tak e effe ct.
NOTE: If the print server you ha ve is with multiple printer
connectors, yo u ma y create multiple print q ue ues and
printer objects .
Your print server s hould now be ready to use. You should
be able to redirect printing to yo ur print se r ver using a
CAP TURE command such as t he one shown i n the previous
section.
34
Page 40

6. UNIX System Network
6.1 Introduction
The pri nt ser ver i s availab le for TCP/ IP printi ng by U nix
LPD (Line Printer Daemo n) p rotocol. The LPD protoco l
originated wi t h Uni x release is based o n t he BSD ve rsion o f
Unix and suppo rted under most versi ons of Uni x.
This c hapter e xplains how to co nfi gure the print ser ver for
TCP/ IP operation, and how to modify confi guratio n fi les on
yo ur Unix s ystem to a llo w p rinting to the print s e rver . The
configuration examp les in this manua l follow t he s yntax fo r
BSD based Unix systems. Please refer to the related
system d o cumentatio n fo r t he c orre c t sy ntax of your
syste ms.
To co nfig ure the pri nt server for LPD printi ng, perform t he
procedures below:
1. E nable P rint Ser ver’s TCP/ IP Support.
2. Set up Print Ser ver’s IP address.
3. Verif y Print S er ver’s IP Address.
4. Confi g u re remo te L PD p rinting on t he host.
5. Print a test page.
In the next sec tions, we will describe t hese five procedures
step by step.
6. 2 Enable Pri nt Server ’s TCP/ I P Suppor t
The default configura tion of t he pri nt ser ver is with TCP/IP
support enabled. Anywa y, you ca n confi gure t he pri nt
server to enable TCP/IP s upport using t he co nfiguration
program.
6.3 Setup Print Server’s IP Address
The pri nt ser ver must have a unique IP address i n o rder to
be recognized by t he network.
You ca n se t up t he IP address on the various Uni x s ys tems
usi ng any one of the following methods:
1. DHCP (Dynamic Host Co nfiguratio n Protocol)
2. BOOTP (Bootstrap Protoco l)
35
Page 41

The pri nt server will use the last t hree methods to obtai n its
IP address a utoma tically if its IP address is configured as
Auto (0.0 .0 .0).
6.3 .1 DHCP
There are m any Unix s ys tems that s upport DHCP protocol, and the
procedures to configure the DHCP server databas e are different. This
m anual does not des cribe the DHCP s erver configuration on the Unix
s ys tems . It is highly recommended that the DHCP s erver should be located
on the sam e network as the print server.
6.3.2 BOOTP
If you have the BOOTP daemon, bootpd, running on your UNIX s ystem that
is accessible by the print s erver, you can us e the BOOTP protocol to s et up
the IP address of the print server. We recommend that the BOOTP server
s hould be located on the same subnet as the print server. If you us e
Network Inform ation Services (NIS) in your s ys tem , you m ay need to rebuild
the NIS m ap with the BOOTP s ervices before doing the following BOOTP
configuration. To rebuild the NIS m ap, please refer to your s ys tem
docum entation.
To configure the IP address data for the BOOTP server, you will need to log
in the hos t of BOOTP server as the superuser (root). Perform the following
s teps to add address entries ,
1. Optionally, assign a name corresponding to t he pri nt
server
’s IP address. You can add t his address to the
/etc/ hosts file, b y addi ng a line such as:
203.66.191.12 pserver
2. Ad d an en try to the hos t’s /e tc/bootptab file , similar to
the followi ng:
hostname:\
:ht=1:\
:h a= prin t _server_eth ernet _address: \
:i p=prin t _server_ip_add ress:
Lines should be indented with tabs.
Where hos tname is the device name of a print server, the ht=1 tag specifies
the hardware type is Ethernet, the ha= tag specifies the Ethernet address of
a print server, which is the Node ID located on the print s erver. The ha tag
36
Page 42

m ust be preceded by the ht tag. The ip= tag should corres pond to the IP
address you want to ass ign to the print server.
For exam ple, a print s erver with the following configuration:
Node ID: 0000B4010101 (this implies Ethernet
address is 0000B4010101),
IP address: 203.66.191.12
The entry for this print s erver in the /etc/bootptab file should be:
PS010101:\
:ht=1 :\
:ha=0000B4010101:\
:ip=203.66.191.12:
6.4 Verify Pr i nt Server’ s I P Address
To ver i fy tha t yo ur pri n t s e rver i s re s p ondi ng to t he ne w ly
assigned IP address usi ng a PING command:
ping ip-address
6. 5 Conf i gur e Remote LPD Printi ng on t he Host
The proced ure you use to co nfigure yo ur U ni x host(s) to
allow pri nti ng to your network remo te pri nt ser ver va ries
between di ffe rent vari eties o f Unix. T he p rocedure below
ca n be use d fo r U nix variants tha t a r e r e late d to B SD Unix,
such as S unOS or Li nux. For o t her versions o f U nix,
consult yo ur s ystem doc umentatio n, keepi ng in mind t hat:
1. The print server should be trea ted as a BS D networked
print ser ver host.
2. The host name s ho uld be t he name (or IP address) that
you have assigned to t he p rint server.
3. The pri nte r name (o r que ue na me) o n the remo te hos t
should be lpt1 , lp t2 o r lp t3, the name of the pr i n te r po rt o n
the p rin t s e rve r.
You wi ll need to perform the tasks be low, logged in as the
super user (root). To configure your U nix host for p rinting,
37
Page 43

1. Optionally, assign a name corresponding to t he pri nt
server
’s IP address. You can add t his address to the
/etc/ hosts file, b y addi ng a line such as:
203.66.191.186 pserver
2. Create a spool directory for the printer in the same
directory where spool directories are normall y kept on t he
machine, s uc h as / va r/spool or / var/spool/lpd:
mkdir /var/spool/lpd/pserverd
chown daemon /var/spool/lpd/pserverd
chgrp daemon /var/spool/lpd/pserverd
chmod 775 / var/spool/lp d/p serverd
3. Ad d an en try to the hos t’s /etc /p rintcap fi le , s im i la r to
the followi ng:
printer-name:\
:lp =:\
:rm=203.66.191. 186:\
:rp =lpt1:\
:lf=/var/spool/lpd/pserverd.log:\
:sd=/var/spool/lpd/pserverd:\
:mx#0:
Lines s hould be i nde nted with tabs. More t han one pri nter
name ca n be used, with variants separated by vertical bars
(name1 |na me2).
The rm= entr y s ho uld correspond to t he IP address yo u
have assi gned to t he pri nt server. You can also use a host
name i f yo u have a s s igned one i n the /e tc/hos ts file .
The sd= entr y should correspond to t he spoo l director y you
created i n t he p re vious s tep.
The rp= entry should correspond to the port name of the
rem o te p rinter. T he values should b e one of lp t1 , lpt2 o r
lpt3 depends on t he pri nter port .
The pri nt ser ver should now be a vailable for pri nting from
your Unix host.
38
Page 44

7. Configuration Utility
7.1 Introduction
This c hapter int roduces print se r ver’s s ystem configuratio n
utility in Windows environment . This utility is automatically
installed d uri ng Wi ndows Administrator Utility i ns tallati on
procedure - refer to sec tion 3.2 and 3.3.
This utility pro vides t he most co mplete ma nageme nt and
configuration func tions on t he print serve r side. This utility
onl y pro vides co nfiguration f unctio ns for print server i tself;
it does not include configuration f uncti ons for c lient side or
other file ser ver or NetWa re server in t he network
envi ronme nt.
The Configuration Utility provi des the fo llowing
configuration and management functions :
Search Print Server: Searc h All Availab le Printer Servers
on t he Netwo rk.
Print Server Status: Display Print Ser ver Ne twork Status.
AppleTalk Configuration: AppleTa lk Protocol Setting.
General Configuration: General Informa ti on o f p rin t s erver.
NetWare Configuration: NetWare Printing Configuratio n.
System Configuration : P rint Se rver Ne twork A b ility
Setting a nd Firmware Upgrade.
TCP/IP Configuration: IP Address and DHCP Server
Configuration.
Wireless Configuration: Wireless LAN Co nfiguratio n.
SNMP Configuration: S NMP In fo rm ati o n Co nfi guration.
Setup Wiz ard: Guide Yo u Thro ugh A ll the Set tings.
Report: List the Status of All A vailable Print Ser vers on t he
Net work .
We will e xplai n eac h f unction separatel y in the follo wing
section.
39
Page 45

7.2 Search for All Available Pr int Server
Every time whe n you run print server’s configuration uti lity,
click the “Se arch” icon
on the to ol b a r. The
c onf igur at ion ut ility w il l d el ay f o r sever al s ec onds b ec a use
the utility is usi ng s ys tem’s a vailable network protocols to
search for al l print servers on t he network. All avai lab le
print ser vers will be listed under “Print Ser ver G roup” on
the left s i d e of the window.
You must selec t t he pri nt server you wo uld li ke to co nfig ure
from t he list. The system will, at t he sa me time, display t he
selected pri nt server’s s tatus o n t he ri ght side of t he
window .
40
Page 46

7.3 Status o f Print Server
Click “Status” i con on the tool bar, t he s tatus o f t he
cur rent selected p rint server will be showed on t he right
side of the windo w.
The informa tion of t he pri nt server displayed are MAC ID,
Model Type, Firmware V ersion, status of each printer port,
NetW a re fi le s erver na me, Ne tW are fi le s e rver p o lling
interva l, NetWa re pri nter q ueue names, IP address, s ub net
mask, defa ult gateway, Apple Talk printer t ype, A ppleTalk
zone and print server printing abi lity…etc.
You ca n refresh t he print server’s s tatus b y pressing t he
“Ref re s h” button
.
You ca n restar t the print serve r b y p ressing t he “ Reboot”
but ton .
41
Page 47

7.4 Setup the Pr int Server
Click “Setup ” icon on the tool ba r, t he setup i tems o f t he
cur rent selected p rint server will be showed on t he right
side of the windo w.
Double c lick one of t he icons to set up the se lected prin t
server. A sc reen wi ll pop up to verif y “Use r Name” and
“Password” o f the print ser ver. The defa ult val ues are as
fo llows .
y User Name: admin
y Password: 1234
42
Page 48

7.5 AppleTalk Configuration
Double Click “AppleTalk” i con a nd t he AppleTalk
configuration window wi ll pop-up.
AppleTalk i s a data communication protocol ofte n used by
Macintos hes. The print se r ver can use t hese parameters to
join t he Apple Talk netwo rk a nd s hare the printer to other
AppleTalk workstations. Yo u have to se tup t he “ Zone
Name” a nd “Printer T ype” fo r eac h pri nter port of t his print
server .
Zone N ame: P ri nt se r ver has to join zones of A ppleTalk
before it can be shared to other workstatio ns. O nl y
worksta tions i n t he same zone can s hare t he pri nter . If you
want to s hare the printer to al l workstations in al l Zo nes,
you should enter only “*” in the “Zone Name” field.
Printer Type, t he type of p rinter attac hed to each printer
port. Yo u ca n get t he pri nter t ype from the ma nufacturer of
the p rin te r .
43
Page 49

7.6 General Configuration
Double Click “Ge neral” icon a nd the Ge neral configura tion
window will pop-up .
You ca n see basic pri nt server information i n t his page.
You a lso can configure the “P rint S e rve r Na me”, “S MB
Group Name ”, “Us er Name” and “P a ss word ” here.
Prin ter S e rve r N a me, t he name of t he p rint server. Yo u
can use thi s name to identify the pri nt se rver when yo u a re
searching for t he print serve r b y t he admi nistratio n and
client utilities.
SMB Group Name, the name of S MB group t hat t his print
server belo ngs to. A ll PC sho uld join the same gro up before
the y can use t his print serve r b y SMB p rotocol.
User Name / Password i s use d to aut henti c a te t he
admini strator b y t he Web admi nistration tool.
44
Page 50

7.7 Netware Print S erver Configuration
Double Click “NetWare” ico n and t he NetWare configuration
window will pop-up .
This print ser ver supports NetWa re Bindery Printing method.
The pri nt ser ver periodically polls t he NetWare ser ver
printer queues for printi ng jobs. You ha ve to assign the
NetWare ser ver name, print server pol ling i nter val and t he
name o f q ueue on t he NetWare ser ver for each printer port.
Polling Time i s the p olling i n te rval of the pr i n t s e rver for
waiting pri nting jobs o n t he NetWare se r ver.
NetWare Server is the name of the NetWare file ser ver t hat
provides printer queues .
45
Page 51

7.8 S ystem Config uration
Double Click “Sys tem” icon and the S yste m config uratio n
window will pop-up .
In the Sys tem co nfiguration page, yo u ca n select to
enable/disable each printing or ma nagement pro tocol,
upgrade t he new firmware for t his print se r ver, a nd
enable/disable wireless func tion.
Upgrade Firmware: Yo u can use t his “Upgrade Firmware”
tool to update the newest firmwa re of t he print server. C lick
“
” button and sele c t the c o rrec t fir mwa re in your P C. After
selecting t he firmware file, c lick the “ Upgrade” but to n to
finish t he firmware update process. If yo u want to reset the
Print Server to defa ult factory settings, please c lick “Load
D e fa ul t”.
Wireless Function: You ca n selec t “E nable” or “Disable” to
manuall y e nable or di sable the wireless f unctio n. If you
manuall y enable wireless func tion, the pri nt se rver’s
wireless LAN will be al ways enabled and E thernet will be
always disabled. If you ma nua lly disable the wireless
fu nction, the print s e rver’s wir ele s s L AN wil l b e always
disabled and Et hernet will be always e nabled. Yo u a lso can
select “Auto” to let t he print ser ver automaticall y decide to
46
Page 52

enable o r disable the wireless func tion. The pri nt ser ver
onl y can work in ether Et hernet or wire less LAN mode. It
cannot work in bot h Ethernet a nd wireless LA N mode at t he
sa me time . When the pr i n t s e rver sta r ts up, it will au to detect i f the LAN port is connec ted to an active network by
an E t hernet cab le. If t he p rint server i s connected to a n
active network by Ethernet cable w he n starting up, the print
server will r un in Ethernet mode. If t he print ser ver i s not
connected to a n ac tive netwo rk b y Et he r net cable when
starting up, the print ser ver wil l r un in wire less LAN mode.
The pri nt ser ver default is in “Auto” mode.
Domain C ountry: The wireless c ha nnels are di fferent from
co u ntr y to c ountry . Ge ner a l ly, the chan ne ls a r e from 1 to 1 1
in USA a nd from 1 to 13 i n E urope. The D omain Countr y
se tting i s fo r you to se t the avai lab le channe ls a c co r d ing to
yo ur lo c a ti on.
47
Page 53

7.9 TCP/IP C onfiguration
Double Click “TCP/IP” icon and the TCP/IP configura tion
window will pop-up .
You ca n co nfig ure t he print ser ver to automaticall y get IP
from D HCP serve r or ma nuall y specify static IP. The print
server also has a b uilt-in D HCP server. You can enable this
DHCP server and le t it ma nages IP for you.
Click the “ IP” button to e nter t he IP setting page . If you
need t he print se r ver to a utoma tically get a n IP from DHCP
server , select “Auto IP”. You also ca n select “Static IP” to
manuall y assig n “ IP Address”, “Subnet Mask” a nd
“Gate way” for the pri nt server .
Click the “DHCP Ser ver” butto n to enter t he DHCP ser ver’ s
setti ng page. You can “Enable/Disable” the D HCP ser ver or
48
Page 54

set “Auto” a nd assign a ra nge of IP addresses here. The
DHCP server is di sabled by default. If “Auto” is selected,
the D HCP Server of pri nt ser ver wil l be enabled onl y w hen
the re is no othe r DHCP Server within the network . W hen
“Enable” or “Auto” is selected , yo u have to co nfigure
“Sta rting A d d res s”, “Ra nge ”, “Subnet Ma sk”, “Gateway
Address” and “DNS”. The print server will assign a unique
IP for each clie nt.
49
Page 55

7.10 Wireless C onfiguration
If you want to use the print server through wireless LAN, pleas e set up the
print server through Ethernet firs t and m ake sure your wireless LAN setting
is correct. After s etting the wireless LAN, unplug the Ethernet cable and
restart the print server, then you can s tart to use the print server through
wireless LAN. If the wireless configuration does not work, pleas e plug the
Ethernet cable again, res tart the print server and configure the print server
through Ethernet until the wireless LAN s ettings are correct.
The default setti ngs of the print serve r wireless f uncti on are
as follows .
y Mode: Ad-Hoc
y SSI D: Default
y Channel: 11
Double Click “Wireless” i con a nd t he wireless configura tion
window will pop-up .
If you use access point to b uild up wireless network, you
ha ve to selec t “ Infrastr uc ture Mode”. If you do not ha ve a ny
access point a nd wa nt to use peer- to-peer connecti on to
bui ld up wireless network, you have to selec t “Ad-Hoc
Mode”.
After selecting t he operation modes of t he wireless f unc tion,
click “Ne xt” to go to further detailed configuration.
Infrastr ucture Mode:
50
Page 56

In the Infrastruct ure mode, yo u ha ve to let t he p ri nt server
associate wi th a n access poi nt. You le t t he pri nt server
scan for an avai lable access point automati call y o r
manuall y assig n t he SS ID of the access point you want to
use.
If you s e le c t to let the p r i n t s e rver sc an fo r an avai la b le
access point, t he following windo w will pop up.
The list is the sca nned available access poi nts. Select a n
access point in t he list and click “Next”. If you cannot find
the access poi nt tha t yo u wa nt to use , c li ck “Sca n” to let
the print serve r sca n agai n.
Ad Hoc Mode:
51
Page 57

In the A d- Hoc mode, you ca n le t the print se r ver
automatically associ ate wit h ot her wire less station o r
manuall y assign t he SS ID of your wireless network. Yo u
can let t he p rint ser ver automa tically select t he c hannel
tha t is t he sa me with t he peer or ma nually assig n a channe l.
If you s e le c t to let the p r i n t s e rver sc an fo r an a ctive
wireless s tation, t he follo wing wi ndow wil l pop up.
The list is t he scanned active wire less s tations. Selec t a
wireless s tation i n t he list a nd click “ Ne xt”. If you ca nnot
find t he wi re less station t hat you want t he pri nt server to
communi cate wit h, click “Scan” to le t t he print se rver sca n
again.
Both “ Inf rastruct ure” and “Ad- Hoc” mode have to go
through t he following procedure :
52
Page 58

This print server supports WEP and WPA-PSK security
mode. If you wa nt to use WEP enc r yption to protect yo ur
wi re le ss ne t wo rk, you have to s elec t “ WEP ( A S CII) ” o r
“WEP(HEX)”. If you want to use WPA-PSK, yo u have to
select “WPA-shared key”. T he wi re less securit y setti ng
sho uld be t he same wit h other wire less de vices in t he same
network.
WEP Security Mode :
53
Page 59

You ca n se lect “64 bit” or “128 bit” le ngth and
“Hexadeci mal” or “ASC II” format fo r the encryption key.
Longer ke y le ngth can pro vide st ronger sec uri t y but worth
co mmuni ca ti on performance.
Enter four ke y values by followi ng t he r ules below and
select o ne ke y as the de fa ult key.
y PassPhrase – A passphrase simplifies the WEP encryption process by
automatically generat ing the WEP encryption keys for the print server.
This setting is only valid when the sec ur ity mode is in “WEP(HEX)”.
y Key 1 to Key 4 – If the key length is 64- bit, enter 10-digit Hex values
or 5- digit ASCII values as the encryption keys. For example:
“0123456aef“ or “Gues t“.
If the key length is 128-bit, enter 26-digit Hex values or 13- digit ASCII
values as the encr yption keys. For example:
“01234567890123456789abcdef“ or “administ rator “.
WPA-shared ke y Sec urit y Mode:
54
Page 60

Whe n “WPA-shared ke y”, also named “WPA-PSK” requires
users to se lect the adva nced encryption methods, i .e. TK IP
and ente r a se t o f s hared key.
y TKIP – TKIP (Temporal Key Integrity Protoc ol) changes the temporal
key every 10,000 packets . This insures much greater sec urity than the
standard WEP security.
y Shared Key – Enter 8 to 63 digits of ASCII for mat to be the key for the
authentication within the netw ork.
Whe n you finish co nfiguring the wireless sec urit y, click
“Next ” to go to next s te p .
55
Page 61

You ca n se lect to let t he pri nt ser ver automatically obtain
IP settings with DHCP client or manually assign t he IP
se ttings.
If yo u ma nual ly as sign t he IP set tings , yo u ha ve to e nte r IP
address, subnet mask a nd defa ult gateway address.
When you fini sh con fi g uring the IP settings, cli c k “Next” to
confirm t he IP A ddress configuration.
Click “Save” to save t he wireless configurati on.
56
Page 62

7.11 SNMP Configuration
Double Click “SNMP” icon and the SNMP configuratio n
window will pop up.
Contact: You can enter t he print ser ver administra tor’s
contac t information here. This i nfor mation wil l be di splayed
in the S NMP management tool.
Location: You can enter t he i nstalled location of t he print
server here. Thi s info rmati on will be displayed in the SNMP
manageme nt too l.
7.12 Wizard
57
Page 63

Click “Wizard ” icon on the tool ba r, t he setup wizard
item of t he current selected p rint server will be s howed on
the right side of t he wi ndow.
Double click the “Print Server Set up Wi zard” t he setup
wizard will guide yo u t hrough al l the setup process.
Step 1: Set up t he name of t his print server and t he SMB
Group Nam e for the pr int server. Als o s et up “E nable” ,
“Disable” or “Auto ” for the wireless func ti on here. Please
refe r to s e c tion 7.6 and 7 .8 fo r d e ta il in fo rm a ti on.
Step 2: Select to e nable requi red p rinting p rotocol. Please
refe r to s e c tion 7.8 for d e ta il in fo rm ati o n.
58
Page 64

Step 3: Setup t he IP of t his print se r ver and t he DHCP
se rver. Plea s e re fer to s e c tion 7.9 fo r d e ta il informa ti on.
Step 4: Setup t he Apple Talk printing . Please refer to
se c tio n 7.5 for d e ta i l in fo r ma ti on.
Step 5: Setup t he NetWare printing . Please refer to section
7.7 for detail informatio n.
59
Page 65

Step 6: Select the Wi reless A dapter mode and complete
wireless LAN set tings. The other proced ures are t he same
with “Wire less” Set ting in “Set up” screen. Please refer to
se c tio n 7.1 0 fo r d e ta il informa ti on.
S te p 7 : C lic k “ S a ve” to finis h setting.
60
Page 66

7.13 Report
Click “Report” ico n on the tool bar, t he Report window
will pop up.
The report lists basic i nfor mation of all a vailable p rint
servers on the network. The i nformation includes Device
Name, MAC ID, Model Type, Firmware Version a nd Status
of print ser ver.
61
Page 67

8. Web Management
8.1 Introduction
Print se r ver ca n be confi gured a nd managed on the Web.
Through Local Area Network, or e ve n Interne t,
admini strator ca n easily configure and manage print
se rver’ s vario us ma i n fu nctions in brows ers . S imp l y e nter
print ser ver’s IP address into your browse r’s address fi eld
to ma nage a p rint server b y pri nt server’s b uilt-in Web
Server.
The default IP Address, User Name a nd Password set tings
of the P ri nt server are as fo llo ws.
IP A ddress: 192.168.2.2
Use r Name: Admi n
Password: 1234
8. 2 Login
You m ay use any Web Brows er to review the status or configure the settings
of the print server. After entering the IP address of the print server, a login
page dis play. You have to enter correct “Us er Nam e” and “Password” before
going to the Web Managem ent pages.
Notes : Default Us er Nam e is “admin”, default password is “1234”.
62
Page 68

8.3 Device Status
8.3.1 Syste m
Sys tem Information includes “Device Name”, “Print Server Name”, “Model
Type”, “Sys tem Up Tim e”, “Firmware Version”, “MAC Address ”, “Wireless
LAN Status ” and the protocols enabled status, etc.
8.3.2 Printer
This page lists inform ation of printers connected to all printer ports.
63
Page 69

8.3.3 TCP/IP
This page lists all TCP/IP settings of the print server including “IP Address”,
“Subnet Mask” and “Gateway”. It als o lis ts DHCP s erver setting.
8.3.4 SM B
This page lists the SMB group s etting of the print server.
64
Page 70

8.3.5 SNM P
This page lists the SNMP s ettings of the print server. It includes the s ettings
of “SNMP S ys tem Contact” and “SNMP S ys tem Location”.
8.3.6 NetWare
This page lists NetWare settings, including “Polling Time”, “Use Bindery
Mode”, “Name of the File Server” and “Port Attached Queue”.
65
Page 71

8.3.7 AppleTalk
This page lists AppleTalk settings , including “AppleTalk Zone Nam e” and
“Printer Type” of printers connected to all print ports.
8.4 S etup W izard
8.4.1 Syste m
You ca n cha nge the print se r ver name and password of t he
print server from here.
66
Page 72

Print Server Name, the name of t he pri nt server. Yo u ca n
use this name to identify the print serve r w hen yo u are
searching for t he print serve r b y t he admi nistratio n and
client utilities.
Passw ord, enter the password yo u wa nt to change to the
print ser ver. T he passwo rd ca n be up to 7 -digit
alpha numeric format. The defa ult pass word is “1234”.
Re-type Password, enter t he pass word you wa nt to c ha nge
to the print server again.
8.4.2 Advance d Se ttings
You ca n enable/disable the printing protocols f rom t he
screen. To e nable t he f unc tion, please selec t “Enable” ; to
disable the f unction, please select “Disable”.
67
Page 73

8.4.3 TCP/IP
You ca n co nfig ure t he print ser ver to automaticall y get IP
from D HCP serve r or ma nuall y specify static IP. The print
server also has a b uilt-in D HCP server. You can enable this
DHCP server and le t it ma nages IP for you.
If you need t he print ser ver to automati call y ge t a n IP from
D HC P s e rver, selec t “ E nable Obtain TC P /IP S e tti ngs
Auto ma tically (Use D HCP / BOOTP)”. You also ca n select
“Disable Use t he fo llo wing TCP/IP Set tings ” to ma nually
assign “IP Address”, “Subnet Mask ” a nd “Gatewa y” for t he
print ser ver.
You ca n enable/disable or se t a uto fo r the print serve r’s
DHCP server . The DHCP ser ver i s disabled b y default. If
the DHCP S e r ve r is enab le d or se t Au to , you have to
assign a range of IP addresses here. Fill in t he “Start IP” ,
“Range”, “DNS”, “S ub net Mask” and “Gateway”, and t he
print ser ver wil l assign a unique IP for each c lient. Note
tha t w hen “A uto” is selected, t he DHCP Ser ver o f t he pri nt
server will be e nabled onl y when there is no other D HCP
Server within the network.
68
Page 74

8.4.4 SM B
You ca n enable/disable the S MB protocol from here. If SMB
is enabled, e nter the “SMB Group Na me” to specify t he
SMB group t hat t his print server be longs to. All PC should
join t he same gro up before t hey ca n use thi s p rint server b y
SMB protocol.
8.4.5 SNM P
69
Page 75

The pri nt ser ver supports S NMP co nfig uratio n. If i t is
enabled, please se t up the followi ng parameters.
SNMP System Contact: Yo u can enter t he pri nt server
ad mini s tra to r’s c on ta c t informa ti on her e. T hi s in fo rma tion
will be displa yed in t he SNMP manageme nt tool.
SNMP System Location: You can enter the installed location of the print
s erver here. This information will be dis played in the SNMP m anagem ent
tool.
8.4.6 NetWare
This print ser ver supports NetWa re Bindery Printing method.
The pri nt ser ver periodically polls t he NetWare ser ver
printer queues for printi ng jobs. You ha ve to assign the
NetWare ser ver name, print server pol ling i nter val and t he
name o f q ueue on t he NetWare ser ver for each printer port.
Polling Time i s the p olling i n te rval of the pr i n t s e rver for
waiting pri nting jobs o n t he NetWare se r ver.
N a me o f th e F ile Se r v e r is the name o f t he NetWare file
server t hat provides printer queues.
70
Page 76

8.4.7 AppleTalk
AppleTalk i s a data communication protocol ofte n used by
Macintos hes. The print se r ver can use t hese parameters to
join t he Apple Talk netwo rk a nd s hare the printer to other
AppleTalk works tatio ns. Yo u ha ve to select to enable or
disable AppleTalk , a nd se t up the “ Zo ne Name” and “Printer
Type” for each printer po rt of t his print serve r.
AppleTalk Enable: Enable or disable “AppleTalk”.
AppleTalk Zone Name: Prin t s erver ha s to jo in zones o f
AppleTalk before it can be shared to ot her works tations.
Only wo rk statio ns i n the s ame zone c an shar e t he prin te r . If
yo u want to share t he prin te r to a ll wo rk sta ti o ns in a ll
Zo nes, you should ente r o nly “*” in the “ Zone Name” field.
Printer Type, t he type of p rinter attac hed to each printer
port. Yo u ca n get t he pri nter t ype from the ma nufacturer of
the p rin te r .
71
Page 77

8.4.8 Save Se ttings
You ca n click the “Save S etti ngs” to sa ve t he settings and
restart t he sys tem.
72
Page 78

8.5 System Tools
8.5.1 Load Defau lt
You ca n use t his page to restore the factor y default
setti ngs . All o f yo ur pre vious set up will be c leared.
8.5.2 Upgrade Firmware f ro m Browser
73
Page 79

You can upgrade new firm ware for this print server in this page. Click
“Brows e” to select the new firmware in your storage and then click “OK”, the
firmware will be updated in several m inutes.
Be aware that if you have s tarted upgrading firm ware, you have to follow all
the upgrading steps or the print server can’t turn back to norm al
configuration.
9. IPP Printing
9.1 Introduction
IPP (Inte rne t Pri nti ng Protocol) Printing provides a
convenient wa y of remote printing ser vice by TCP/ IP. The
print ser ver can support IP P printing by default. It is
needless to do any setting. A ny PC t hat can s upport IP P
printing, for example Windows 2000/XP, ca n directl y uses
the print serve r b y IP. B y using t he IP P printing, you can
share t he pri nte r to al l t he PC’s that ca n access t he print
se rver by IP. You can e ven s har e yo ur p rin te r to Inte rnet
user s.
74
Page 80

9.2 S ystem Setup
9.2.1 Pr int Se rver Side
It i s needless to do any setting on t he print serve r side.
Make sure the pri nt se rver has co rrect IP setti ngs. If you
wan t to share the p r inters to In te rnet users , you ha ve to s e t
a re a l IP to the prin t s e rve r. You als o have to ma k e sure
tha t a ny gatewa y, ro ute r or fire wall does not block IP P
protocol if you have t hese gateway devices insta lled i n your
network.
9.2.2 Clie nt Side
You o nly need to perform Wi ndow’s standard Add New
Printer proced ure.
Step1. C lick “Start”, c hoose “Settings” a nd select “Printers
and F a xes”.
Step2. C lick “Add a Printer”.
Step3. The “Add Printer Wizard ” is displa yed. Click “Ne xt”.
Step4. Select “A network printer, or a printer attached to
anot her computer”. C lick “Next”.
75
Page 81

Step5. Select “Co nnect to a printer o n t he Inter ne t or on a
home o r of fice network” and e nter the URL of print serve r.
The URL format is “http://IP:631/Port Name”. The IP sho uld
be the pri nt server’s IP. T he number 631 i s IPP standard
port number. Port Name is the port name of print ser ver
tha t your printer is connec ted to . The defa ult port na me is
“lpt1”. O ne example of t he U RL is
ht tp://192.168.3 .66:631/lpt1. After entering t he URL o f pri nt
server , c lick “ Ne xt”.
Step6. Select a s uitable printer manufacture r a nd the
printer model and click “Next”. If yo ur pri nter i s not in t he
list, click “Ha ve Disk…” to i ns tall the driver o f the printer.
After i nstallatio n, t he printer model will be added to the list.
76
Page 82

Step7. C hoose to set the print whet her as a defa ult printer
or not. Clic k “Next” .
Step8. You have added t he network printer to t he PC
successfully. T he infor mation of t he printer is displa yed in
the windows. Click “Finish”.
77
Page 83

10. Windows XP SP2 Setup
In Windo ws XP SP2, XP SP2’s firewall would block the
unknow n co mmunications. This print serve r has allo wed the
communi catio ns data passed t hrough t he XP SP2’ s firewal l.
In case that yo u do not find any print ser ver listed on t he
“Avai lable P orts” i n “ Network Ports Quick Setup”, p lease
follo w t he steps belo w.
Step1. C lick “Start”, c hoose “Settings” a nd select
“Net work Connecti ons”.
Step2. Rig ht click “Local Area Co nnec tion” a nd select
“Properties”.
Step3. Select “Adva nced” tab a nd click “Settings…”.
78
Page 84

Step4. Select “E xceptions” tab and click “Add Program… ”.
79
Page 85

Step5. C lick “Browse ” to add a ne w program.
Step6. Ope n the “NPUti l” file from “C:\Program
Files\PrintServer Utilities” (where C:\ is t he s ystem drive).
Step7. A new program “Network Ports Q uick Set up” is
displayed in the list , c lick “Ok”.
80
Page 86

Step8. C lick “Ok”. You have completed the setting. The
Windows XP SP2 will a llow t he incomi ng ne two rk
connections acti vated by the p rogram.
81
 Loading...