

Page 1

1
Page 2

English
Copyright© by Edimax Technology Co, LTD. all rights reserved. No part of
this publication may be reproduced, transmitted, transcribed, stored in a
retrieval system, or translated into any language or computer language, in any
form or by any means, electronic, mechanical, magnetic, optical, chemical,
manual or otherwise, without the prior written permission of this Company .
This company makes no representations or warranties, either expressed or
implied, with respect to the contents hereof and specifically disclaims any
warranties, merchantability or fitness for any particular purpose. Any
software described in this manual is sold or licensed "as is". Should the
programs prove defective following their purchase, the buyer (and not this
company, its distributor, or its dealer) assumes the entire cost of all necessary
servicing, repair, and any incidental or consequential damages resulting from
any defect in the software. Further, this company reserves the right to revise
this publication and to make changes from time to time in the contents hereof
without obligation to notify any person of such revision or changes.
The product you have purchased and the setup screen may appear slightly
different from those shown in this QIG. For more detailed information about this
product, please refer to the User Manual on the CD-ROM. The software and
specifications are subject to change without notice. Please visit our web site
www.edimax.com for the update. All rights reserved including all brand and
product names mentioned in this manual are trademarks and/or registered
trademarks of their respective holders .
Notice according to GNU/GPL-Version 2
This product includes software that is subject to the GNU/GPL-Version 2.
You find the text of the license on the product cd/dvd. The program is free
software and distributed without any warranty of the author. We offer, valid
for at least three years, to give you, for a charge no more than the costs of
physically performing source distribution, a complete machine-readable
copy of the corresponding source code.
Please contact Edimax at: Edimax Technology co., Ltd, NO. 3, Wu-Chuan
3rd RD Wu-Ku-Industrial Park, Taipei Hsien, Taiwan. R.O.C., TEL :
+886-2-77396888, FAX : +886-2-77396887, sales@edimax.com.tw
2
Page 3

C A T A L O G
Chapter I: Product Information ....................................................................................... 6
1-1 Introduction and safety information .......................................................................... 6
1-2 Safety Information ..................................................................................................... 8
1-3 System Requirements ................................................................................................. 9
1-4 Package Contents .................................................................................................... 10
1-5 Familiar with your new wireless broadband router ................................................ 11
Chapter II: System and Network Setup ........................................................................... 13
2-1 Establish network connection .................................................................................. 13
2-2 Setup client computers to obtain IP address automatically .................................... 15
2-2-1 Windows 95/98/Me IP address setup: ................................................ 16
2-2-2 Windows 2000 IP address setup: ........................................................ 18
2-2-3 Windows XP IP address setup: ........................................................... 20
2-2-4 Windows Vista IP address setup: ........................................................ 22
2-3 Connect to broadband router by web browser ........................................................ 24
2-4 Using ‘Quick Setup’................................................................................................. 28
2-4-1 Using ‘Dynamic IP’ as broadband connection type ........................... 32
2-4-2 Using ‘Fixed-IP xDSL’ as broadband connection type ...................... 34
2-4-3 Using ‘PPPoE xDSL’ as broadband connection type ......................... 36
2-4-4 Using ‘PPTP xDSL’ as broadband connection type ........................... 38
2-4-5 Using 'L2TP xDSL' as broadband connection type ............................ 41
2-4-6 Using 'Telstra Big Pond' as broadband connection type .................... 44
2-4-7 WISP (Wireless ISP Connection mode) ............................................. 46
Chapter III: General Setup ........................................................................................... 48
3-1 System ...................................................................................................................... 50
3-1-1 Time Zone .......................................................................................... 50
3-1-2 Password Settings ............................................................................... 52
3-1-3 Remote Management .......................................................................... 53
3-2 W AN ......................................................................................................................... 55
3-2-1 Dynamic IP ......................................................................................... 58
3-2-2 Static IP .............................................................................................. 60
3-2-3 PPPoE ................................................................................................. 62
3-2-4 PPTP ................................................................................................... 65
3-2-5 L2TP ................................................................................................... 65
3-2-6 Telstra Big Pond ................................................................................. 68
3-2-7 WISP ( Wireless ISP Connection Mode ) ........................................... 70
3-3 LAN (Wired) ............................................................................................................. 72
3-3-1 Start .................................................................................................... 72
3-3-2 LAN IP ............................................................................................... 73
3
Page 4

3-3-2 LAN IP ............................................................................................... 74
3-3-3 DHCP Server ...................................................................................... 75
3-3-4 Static DHCP Leases ........................................................................... 76
3-4 Wireless .................................................................................................................... 78
3-4-1 Basic Settings ..................................................................................... 79
3-4-1-1 AP mode .................................................................................. 80
3-4-1-2 Station-Infrastructure .............................................................. 84
3-4-1-3 AP Bridge-Point to Point ......................................................... 87
3-4-1-4 AP Bridge-Point to Multi-Point .............................................. 90
3-4-1-5 AP Bridge-WDS ...................................................................... 92
3-4-1-6 Universal Repeater .................................................................. 95
3-4-2 Security Settings ............................................................................... 102
3-4-4 WPS .................................................................................................. 109
3-4-5 Wireless Schedule ............................................................................ 11 1
3-5 Advance Settings* .................................................................................................. 112
3-5-1 QoS ................................................................................................... 113
3-5-1-1 Basic QoS Settings ................................................................ 113
3-5-1-2 Add a new QoS entry ............................................................ 115
3-5-2 NAT .................................................................................................. 117
3-5-2-1 V irtual Server ........................................................................ 118
3-5-2-2 Special Applications .............................................................. 120
3-5-2-3 UPnP Settings ....................................................................... 123
3-5-2-4 ALG Settings ......................................................................... 124
3-5-2-5 Static Routing ........................................................................ 125
3-5-3 Firewall............................................................................................. 127
3-5-3-1 Access Control ...................................................................... 127
3-5-3-2 URL Blocking ....................................................................... 132
3-5-3-3 DoS ....................................................................................... 134
3-5-4 DDNS ............................................................................................... 137
3-5-5 Port Forwarding................................................................................ 140
3-5-6 DMZ ................................................................................................. 143
Chapter IV EZ View ................................................................................................. 146
Chapter V: Status ...................................................................................................... 154
5-1 Internet Connection ............................................................................. 156
5-2 Device Status ....................................................................................... 157
5-3 System Log .......................................................................................... 158
5-4 Security Log ........................................................................................ 159
5-5 Active DHCP Client ............................................................................ 160
5-6 Statistics ............................................................................................................. 161
Chapter VI : T ools ........................................................................................................ 162
4
Page 5

6-1 Configuration Tools ........................................................................................... 164
6-2 Firmware Upgrade ............................................................................................. 165
6-3 Restart ................................................................................................................ 166
Chapter VII : Language ............................................................................................... 167
5
Page 6

Chapter I: Product Information
1-1 Introduction and safety information
Thank you for purchasing Edimax BR-6225n / BR-6226n nLite wireless
broadband router! This high cost-efficiency router is the best choice for
Small office / Home office users, all computers and network devices can
share a single xDSL / cable modem internet connection at high speed.
Easy install procedures allows any computer users to setup a network
environment in very short time - within minutes, even inexperienced.
When the number of your computers and network-enabled devices grow,
you can also expand the number of network slot by simple attach a hub or
switch, to extend the scope of your network!
With built-in IEEE 802.11b/g wireless network capability, all computers
and wireless-enabled network devices (including PDA, cellular phone,
game console, and more!) can connect to this broadband router without
additional cabling. New Draft-N wireless capability also gives you the
highest speed of wireless experience ever! With a compatible wireless
card installed in your PC, you can transfer file for up to 150 Mbps! The
radio coverage is also doubled, so don’t worry if your office or house is
really big!
Other features of this router including:
• Provide 12-languages user interface
• Support WISP (Wireless ISP) connection mode
• Support EZview to manage LAN devices
• Support wireless schedule setting
• Built-in 16-languages EZmax Setup Wizard to setup router
• High Internet Access throughput
• Allow multiple users to share a single Internet connection
• Supports up to 253 LAN users sharing a single Cable or xDSL internet
connection
• Four wired LAN ports (10/100Mbps) and one WAN port (10/100Mbps)
• Comply with wireless IEEE 802.11b/g standards
6
Page 7

• Compatible with wireless IEEE802.11n standard
• Support DHCP (Server/Client) for easy client IP-address setup
• Advanced network and security features like: Special Applications, DMZ,
Virtual Servers, URL blocking, QoS, Access Control, Firewall.
• Allow you to monitor the router’s status like: DHCP Client Log, System
Log, Security Log and Device/Connection Status
• Easy to use Web-based GUI for network configuration and
management purposes
• Remote management function allows configuration and upgrades from
a remote computer (over the Internet)
Auto MDI / MDI-X function for all wired Ethernet ports.
•
7
Page 8

1-2 Safety Information
In order to keep the safety of users and your properties, please follow the
following safety instructions:
1. This router is designed for indoor use only; DO NOT place this router
outdoor.
2. DO NOT put this router at or near hot or humid places, like kitchen or
bathroom. Also, do not left this router in the car in summer.
3. DO NOT pull any connected cable with force; disconnect it from the
router first.
4. If you want to place this router at high places or hang on the wall,
please make sure the router is firmly secured. Falling from high places
would damage the router and its accessories, and warranty will be void.
5. Accessories of this router, like antenna and power supply, are danger to
small children under 3 years old. They may put the small parts in their
nose or month and it could cause serious damage to them. KEEP THIS
ROUTER OUT THE REACH OF CHILDREN!
6. The router will become hot when being used for long time (This is
normal and is not a malfunction), DO NOT put this router on paper,
cloth, or other flammable materials.
7. There’s no user-serviceable part inside the router. If you found that the
router is not working properly, please contact your dealer of purchase and
ask for help. DO NOT disassemble the router, warranty will be void.
8. If the router falls into water when it’s powered, DO NOT use your
hand to pick it up. Switch the electrical power off before you do anything,
or contact an experienced technician for help.
9. If you smell something strange, or even see some smoke coming out
from the router or power supply, remove the power supply or switch the
electrical power off immediately, and call dealer of purchase for help.
8
Page 9

1-3 System Requirements
z Internet connection, provided by xDSL or cable modem with a RJ-45
Ethernet port.
z Computer or network devices with wired or wireless network interface
card.
z Web browser (Microsoft Internet Explorer 4.0 or above, Netscape
Navigator 4.7 or above, Opera web browser, or Safari web browser).
z An available power socket
9
Page 10

1-4 Package Contents
Before you starting to use this router, please check if there’s anything
missing in the package, and contact your dealer of purchase to claim for
missing items:
□ Router ………………………………………………………… 1
□ Quick installation guide (1 pcs) ………………………………… 2
□ CDROM (with multi-languages setup wizard, multi-languages Quick
installation guide and User manual )(1 pcs) …………………….. 3
□ 12V 1A power adapter (1 pcs)…………………………………..... 4
□ Ethernet Cable (1 pcs)………………………………………..... 5
□ Holding base (1 pcs)…………………………………………..... 6
□ Antenna (1 pcs for BR-6225n only)…………………………….....7
□ Accessories (1 pcs) ……………………………………………..... 8
You can configure the router by running the Setup Wizard in the
CD-ROM provided in the package. The wizard provides quick setup
for the Internet connection, SSID, wireless security, firmware
upgrade and changing router’s password. When you start the
Setup Wizard, you will get the following Welcome screen. Please
choose the language to start with and follow the easy steps in the
Wizard. No instruction for the Setup Wizard is given here.
If you lost the CD-ROM or you prefer the traditional web setup,
please follow the procedures in this Manual ( or Quick Installation
Guide ) to configure the router
10
Page 11
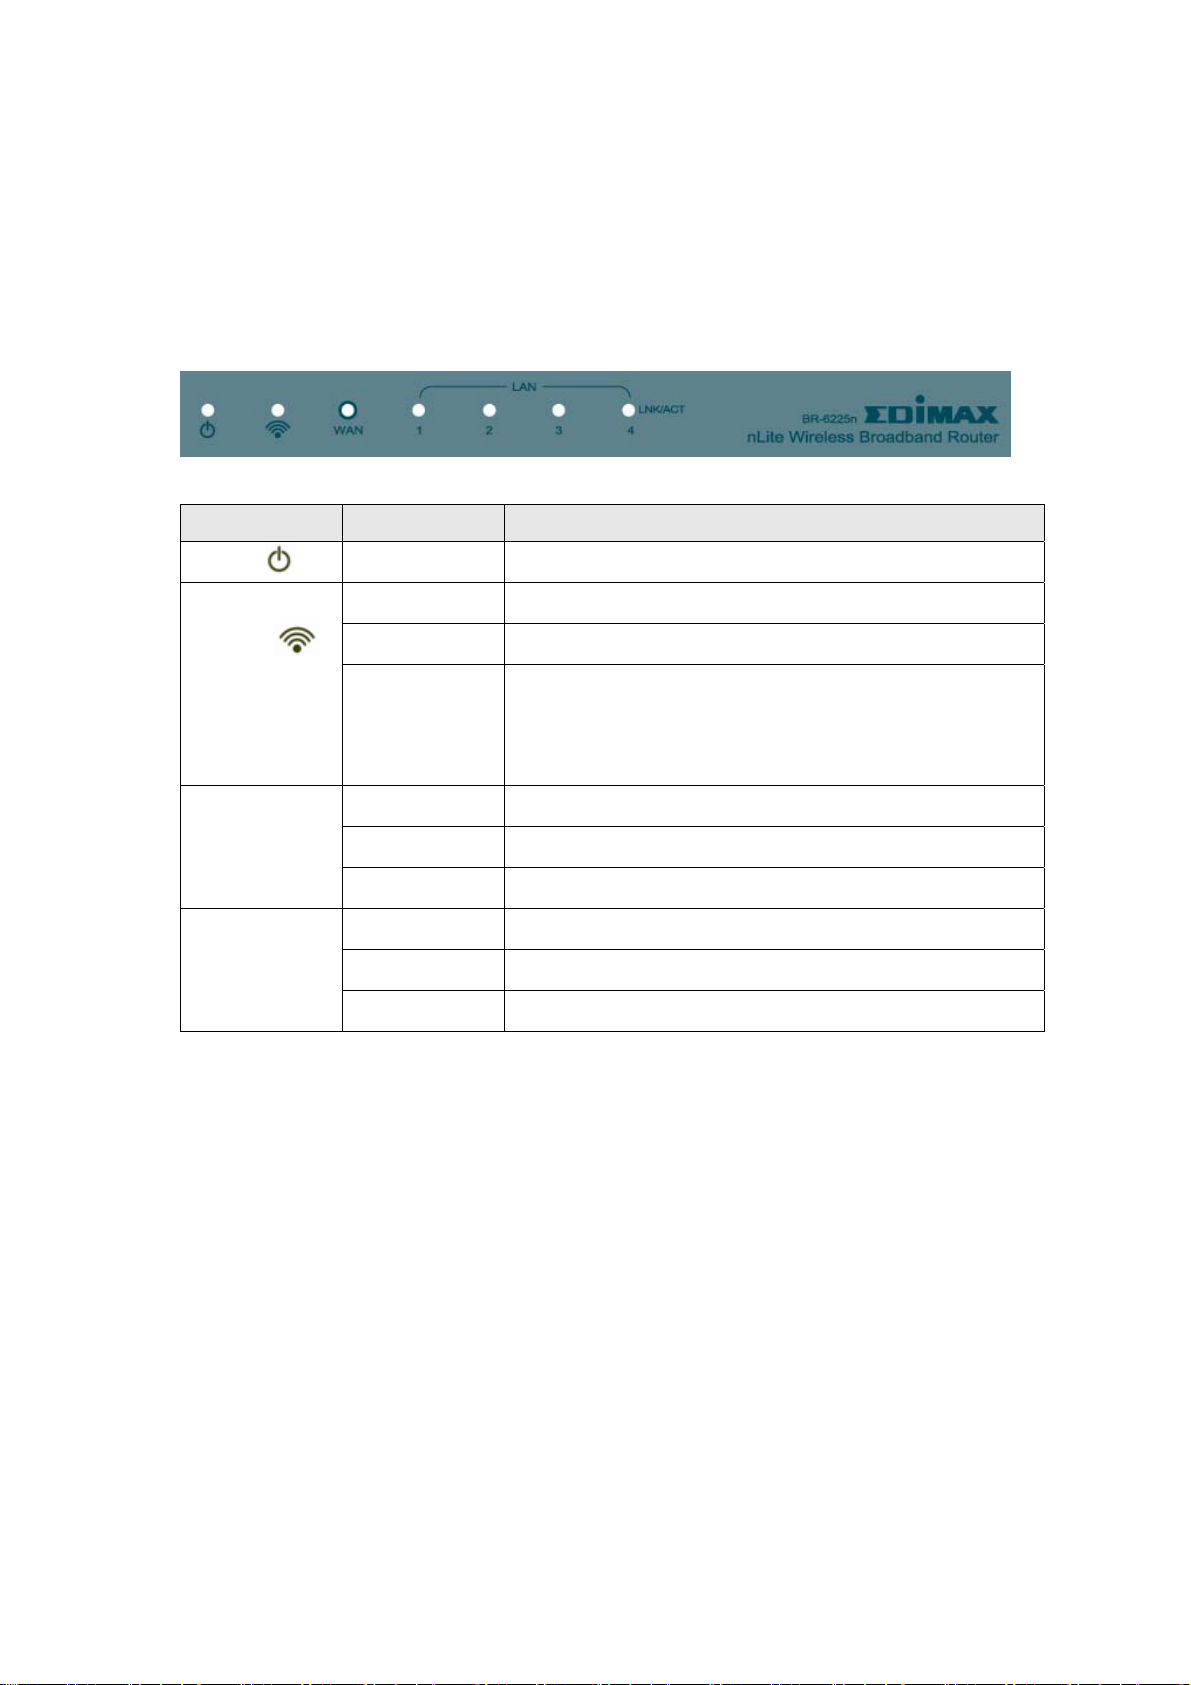
1-5 Familiar with your new wireless broadband router
Front Panel
LED Name Light Status Description
PWR ON Router is switched on and correctly powered
WLAN
WAN
LNK/ACT
LAN
LNK/ACT
On Wireless network is switched on
Off Wireless network is switched off
Flashing Wireless LAN activity (transferring data) or
WPS mode is on. (LED will on and off every
1 second)
On WAN port is connected
Off WAN port is not connected
Flashing WAN activity (transferring data)
On LAN port is connected
Off LAN port is not connected
Flashing LAN activity (transferring data)
11
Page 12

Back Panel
BR-6226n
BR-6225n
Item Name Description
Antenna High gain 3dBi Antenna
Enable / Disable wireless signal
ON/OFF
You can not connect the router via wireless adapter,
when you disable (OFF) the wireless signal.
12V (Power) Power connector, connects to power adapter
Reset / WPS Reset the router to factory default settings (clear all
settings) or start WPS function. Press this button and
hold for 20 seconds to clear all settings, and press this
button 3~5 seconds to start WPS function.
1 - 4 Local Area Network (LAN) ports 1 to 4
WAN Wide Area Network (WAN / Internet) port
12
Page 13
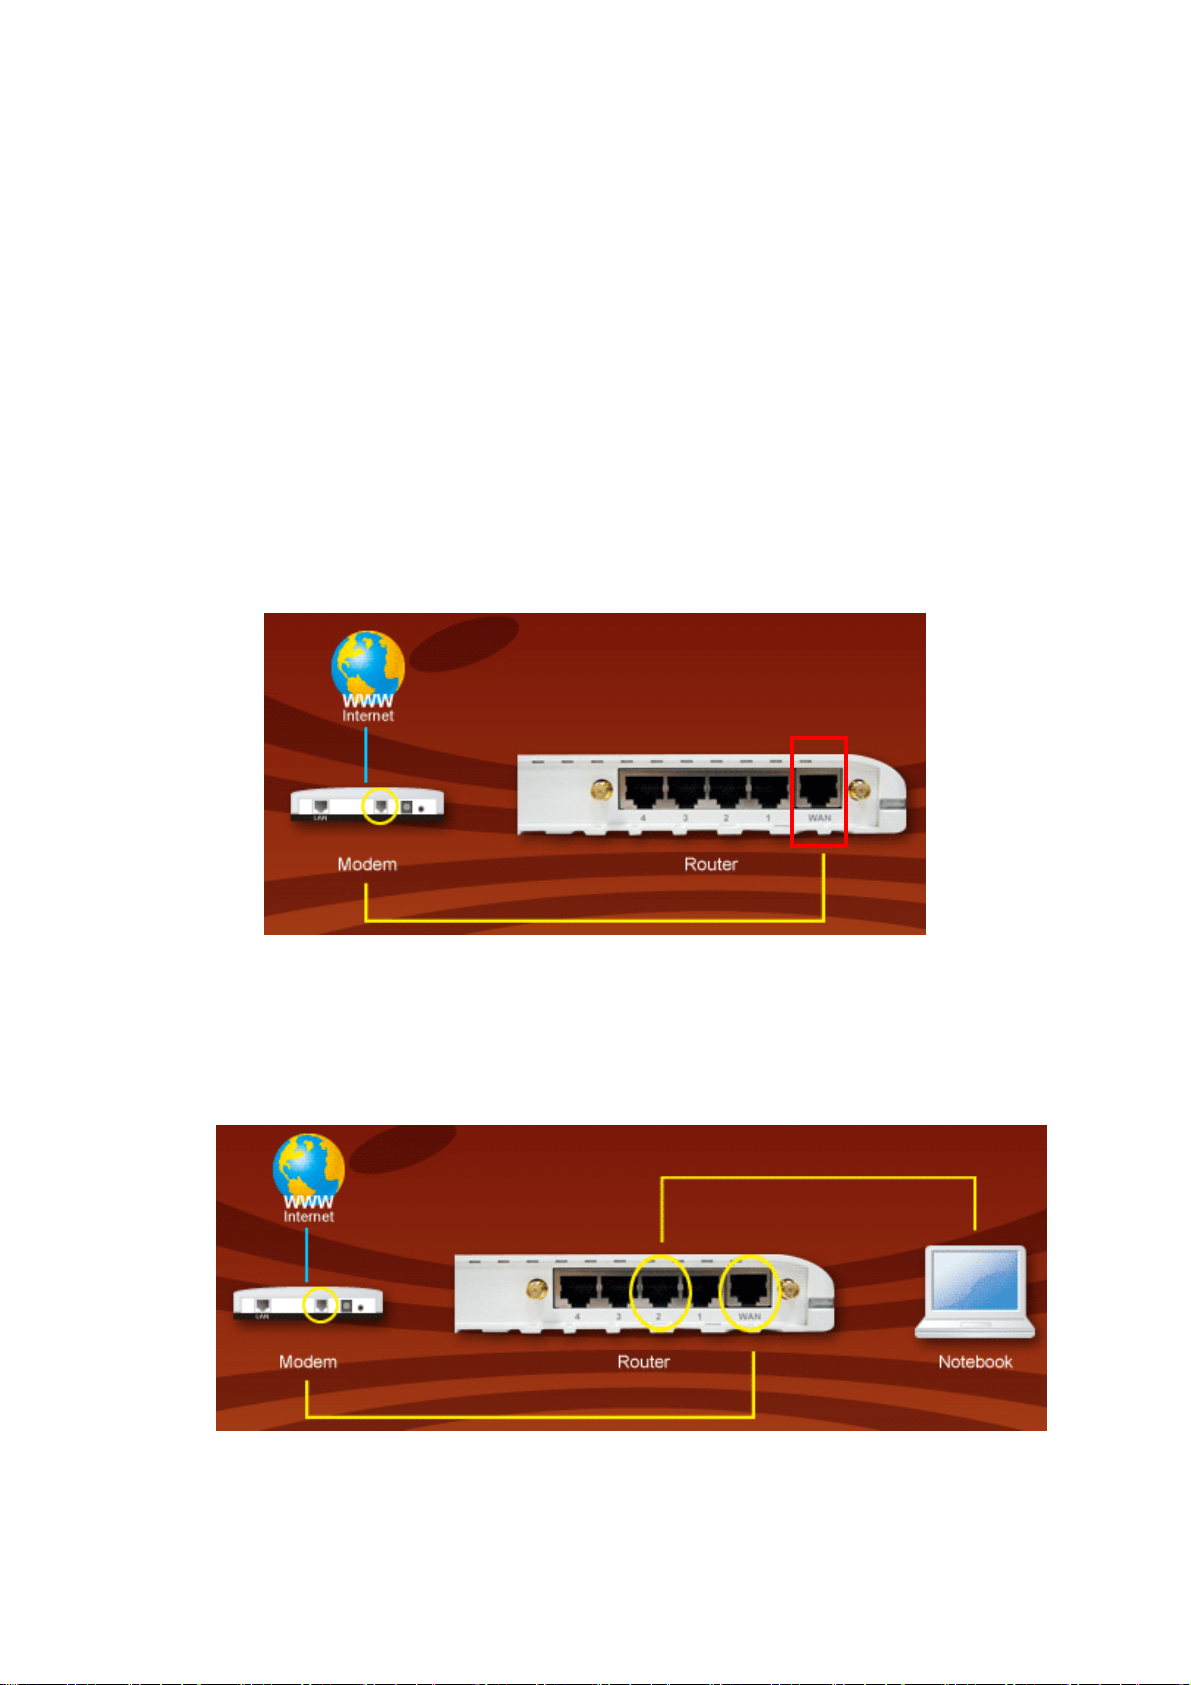
Chapter II: System and Network Setup
2-1 Establish network connection
Please follow the following instruction to build the network connection
between your new Broadband router and your computers, network
devices:
1. Connect your xDSL / cable modem to the WAN port of router by
Ethernet cable.
2. Connect all your computers, network devices (network-enabled
consumer devices other than computers, like game console, or switch /
hub) to the LAN port of the router.
13
Page 14

3. Connect the power adapter to the wall socket, and then connect it to
the ‘Power’ socket of the router.
4. Please check all LEDs on the front panel. ‘PWR’ LED should be
steadily on, WAN and LAN LEDs should be on if the computer /
network device connected to the respective port of the router is
powered on and correctly connected. If PWD LED is not on, or any
LED you expected is not on, please recheck the cabling.
14
Page 15

2-2 Setup client computers to obtain IP address automatically
After the network connection is established, the next step you should
do is setup the router with proper network parameters, so it can work
properly in your network environment.
Before you can connect to the router and start configuration
procedures, your computer must be able to get an IP address
automatically (use dynamic IP address). If it’s set to use static IP address,
or you’re unsure, please follow the following instructions to configure
your computer to use dynamic IP address:
If the operating system of your computer is….
Windows 95/98/Me - please go to section 2-2-1
Windows 2000 - please go to section 2-2-2
Windows XP - please go to section 2-2-3
Windows NT - please go to section 2-2-4
15
Page 16
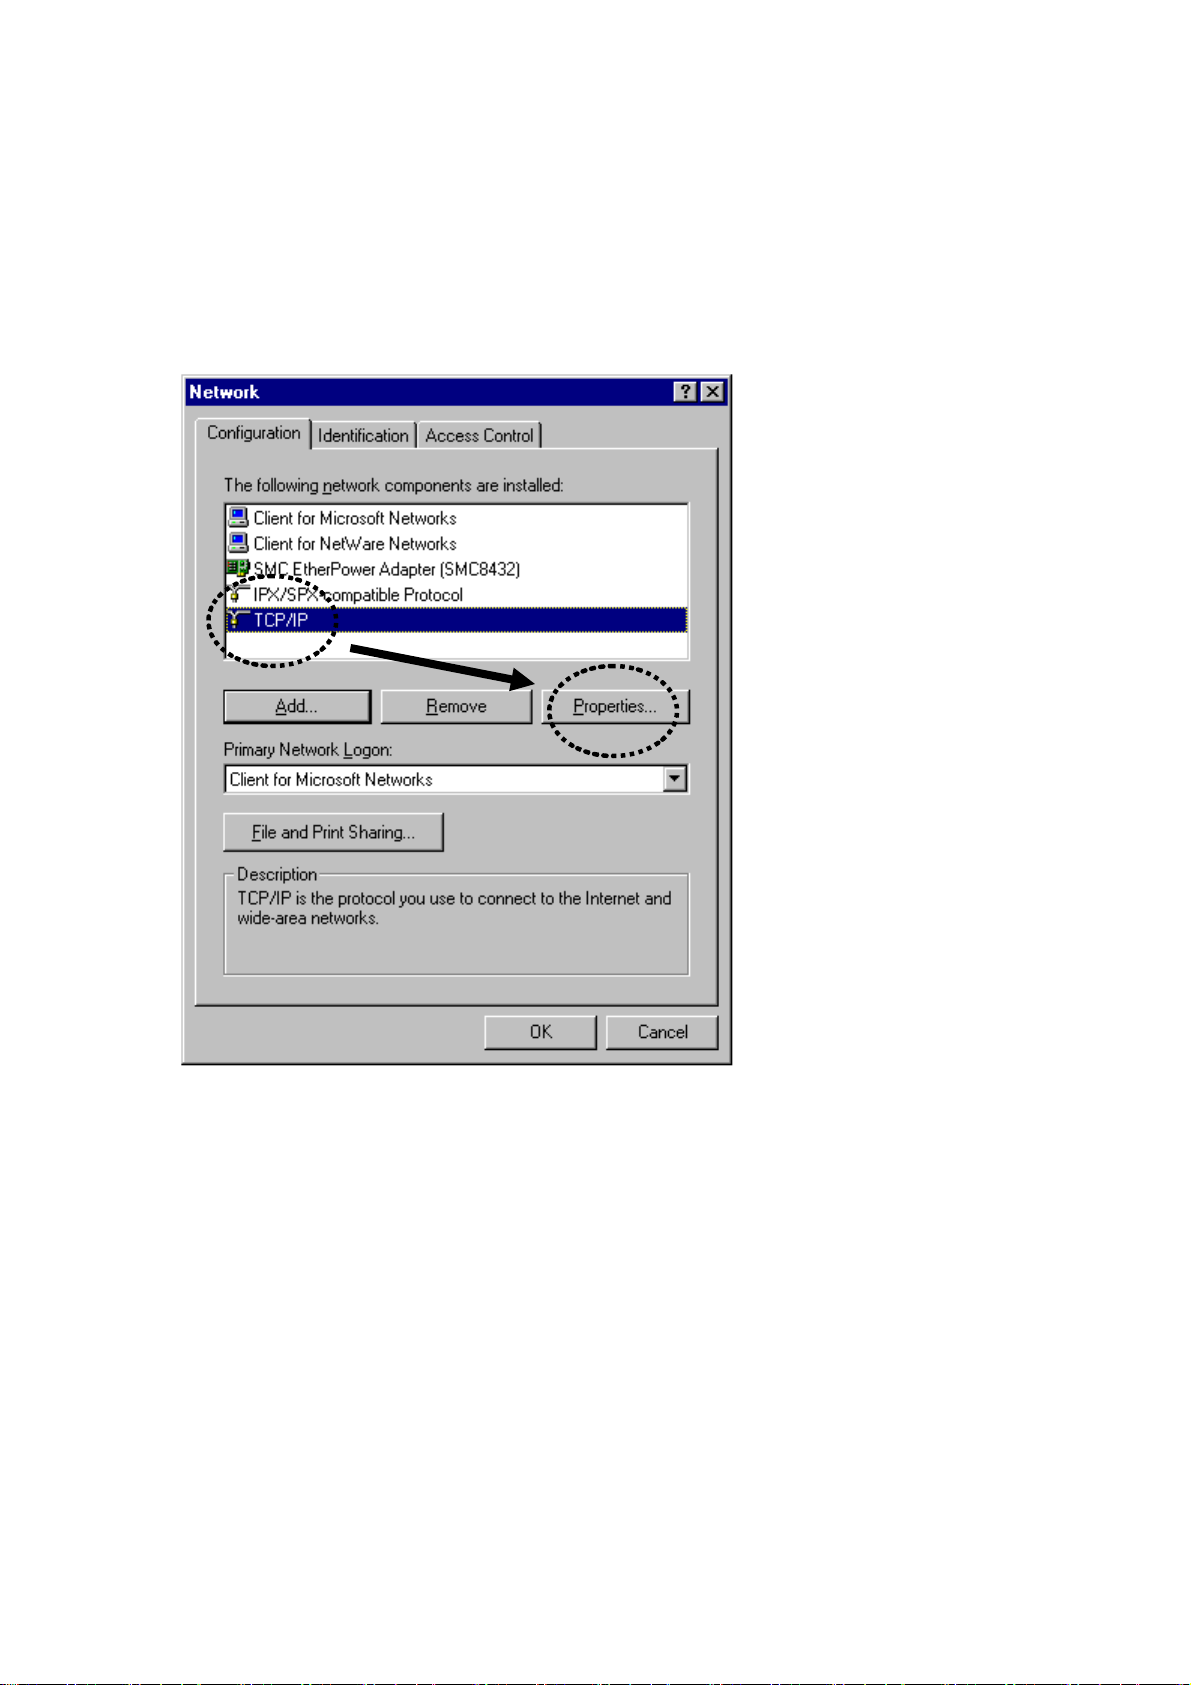
2-2-1 Windows 95/98/Me IP address setup:
1. Click ‘Start’ button (it should be located at lower-left corner of your
computer), then click control panel. Double-click Network icon, and
Network window will appear. Select ‘TCP/IP’, then click ‘Properties’.
16
Page 17
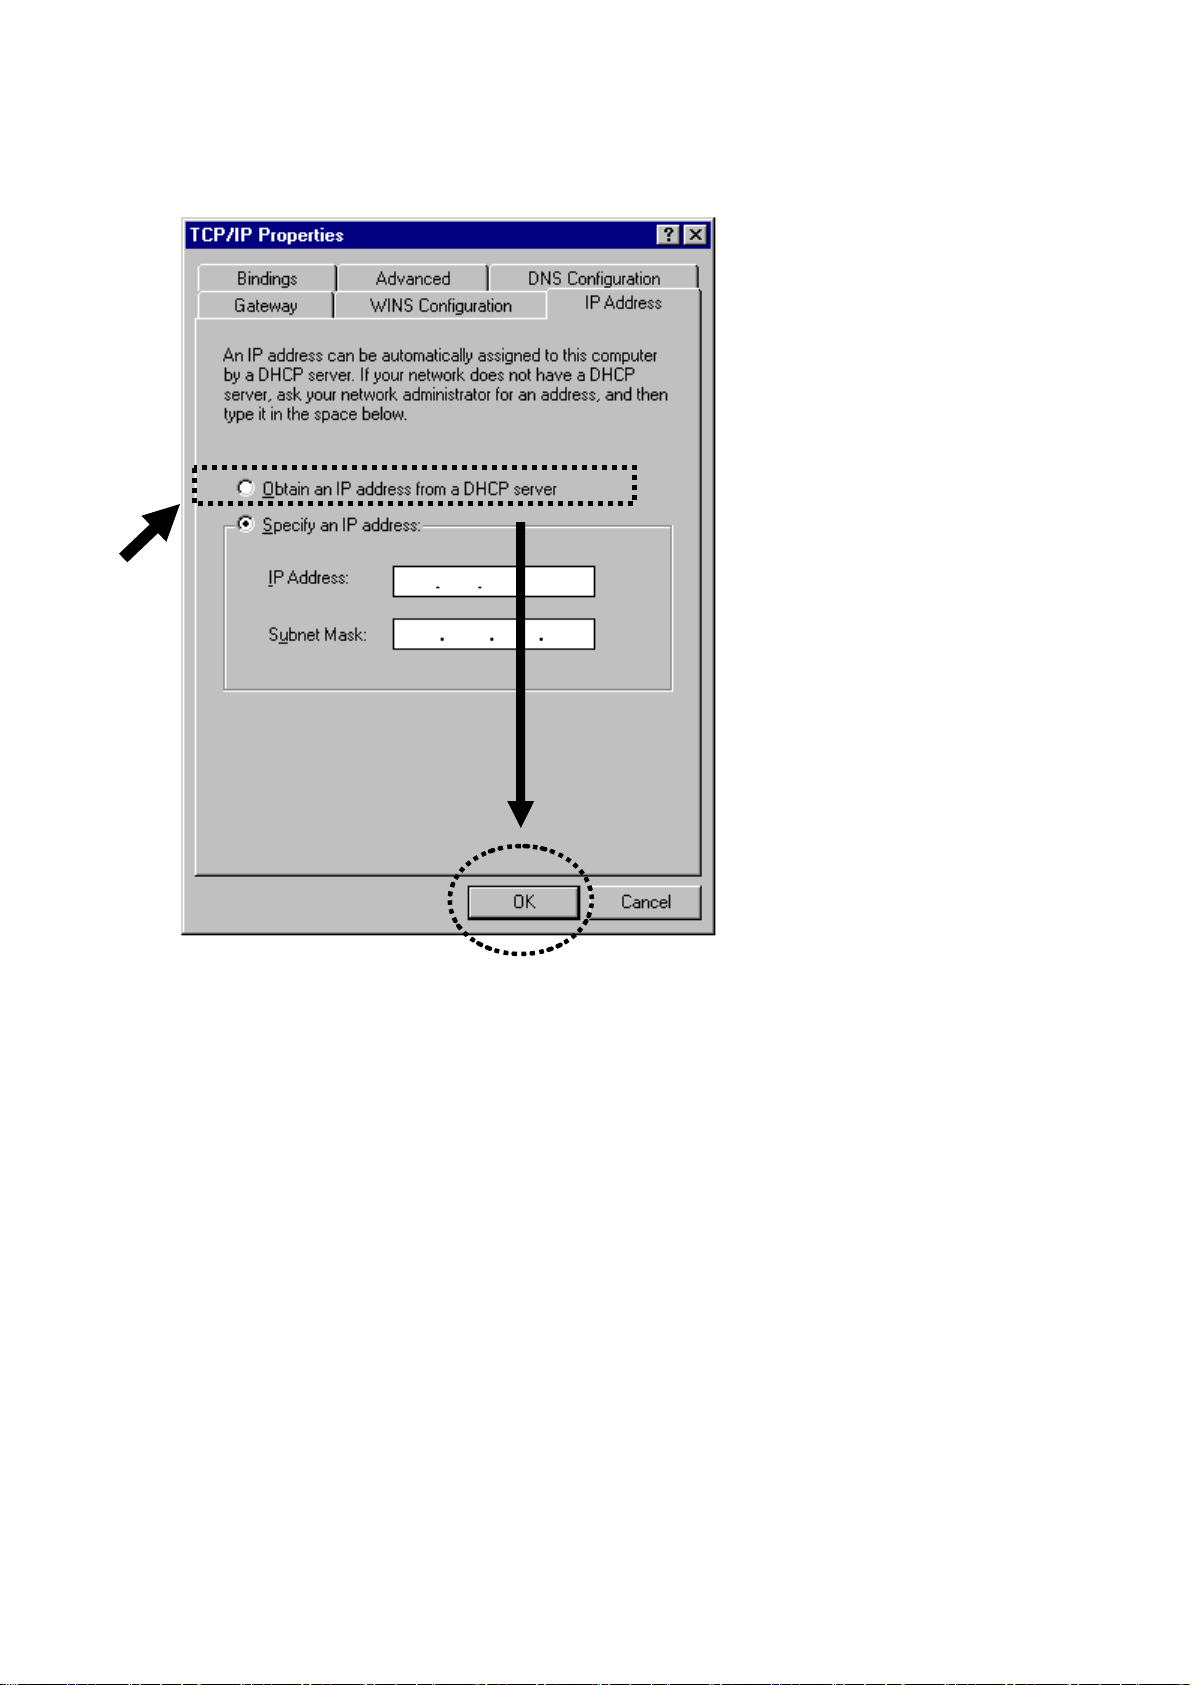
2. Select ‘Obtain an IP address from a DHCP server’, then click ‘OK’.
17
Page 18
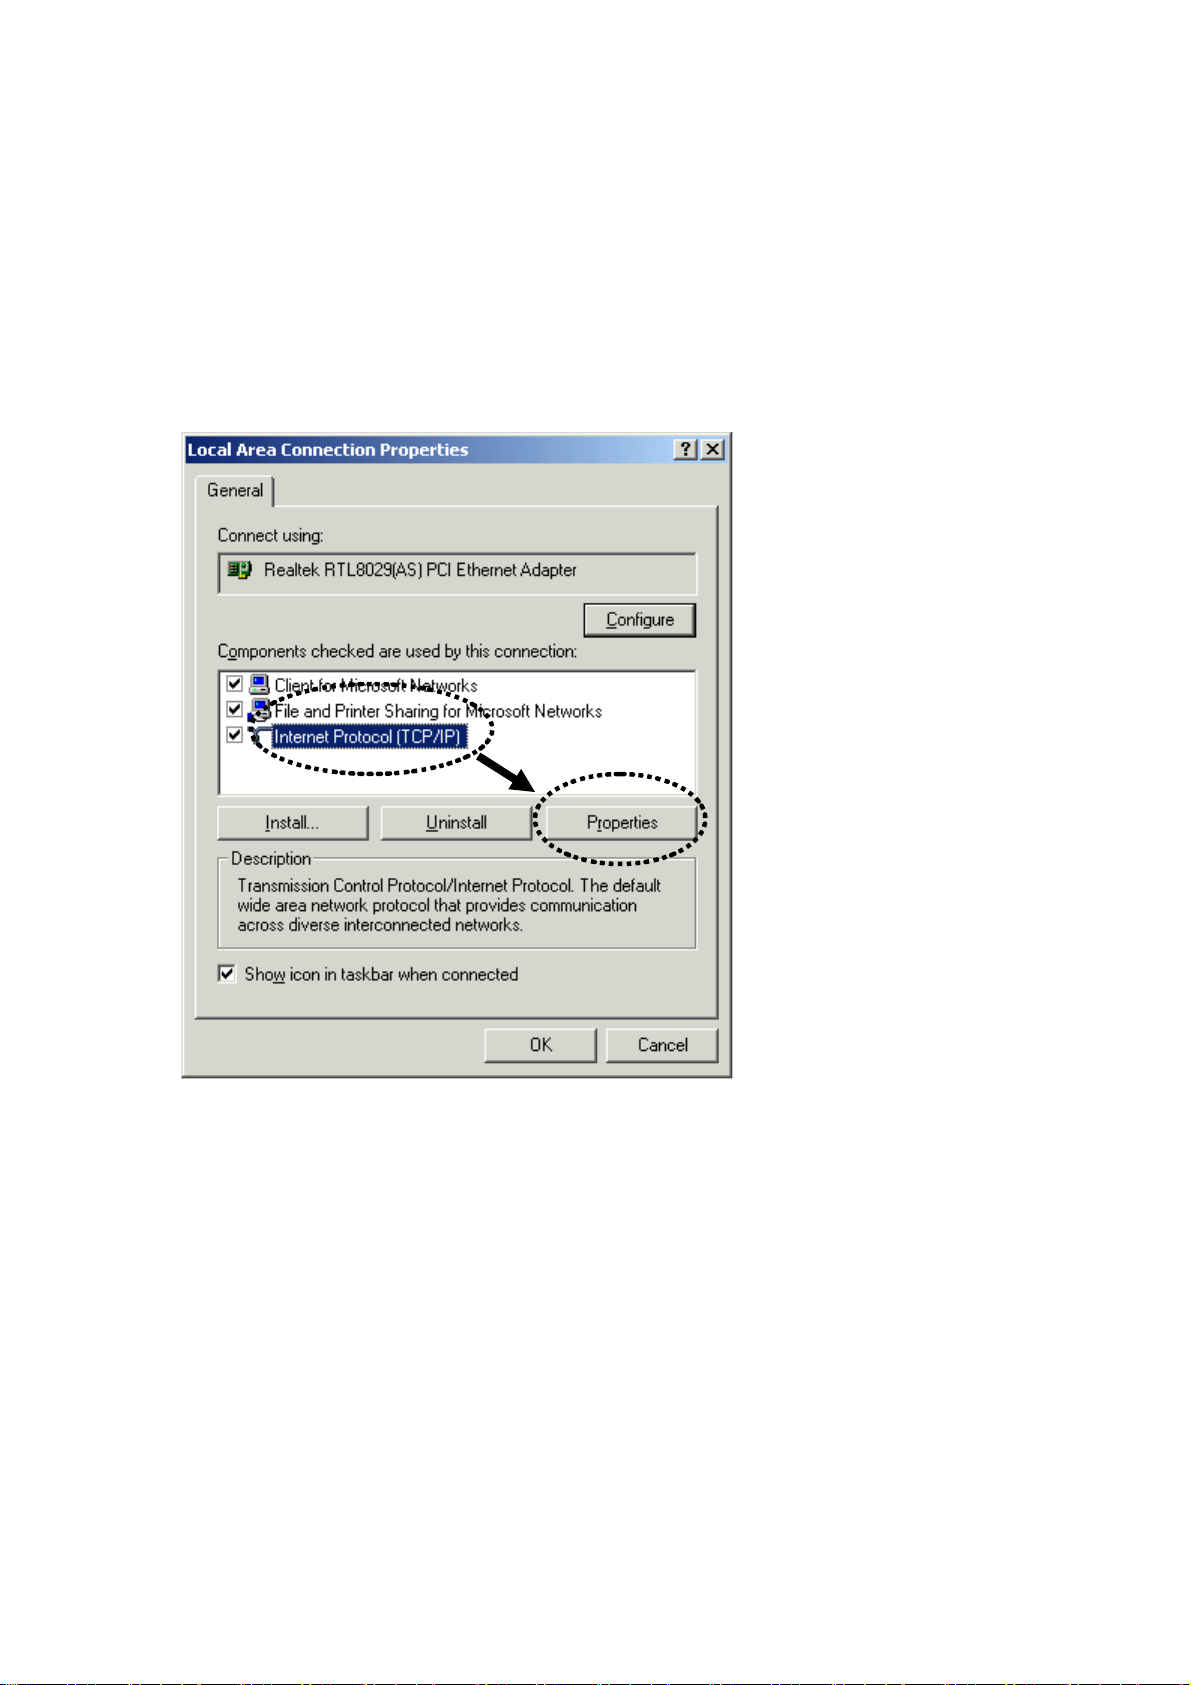
2-2-2 W indows 2000 IP address setup:
1. Click ‘Start’ button (it should be located at lower-left corner of your
computer), then click control panel. Double-click Network and Dial-up
Connections icon, double click Local Area Connection, and Local Area
Connection Properties window will appear. Select ‘Internet Protocol
(TCP/IP)’, then click ‘Properties’
18
Page 19
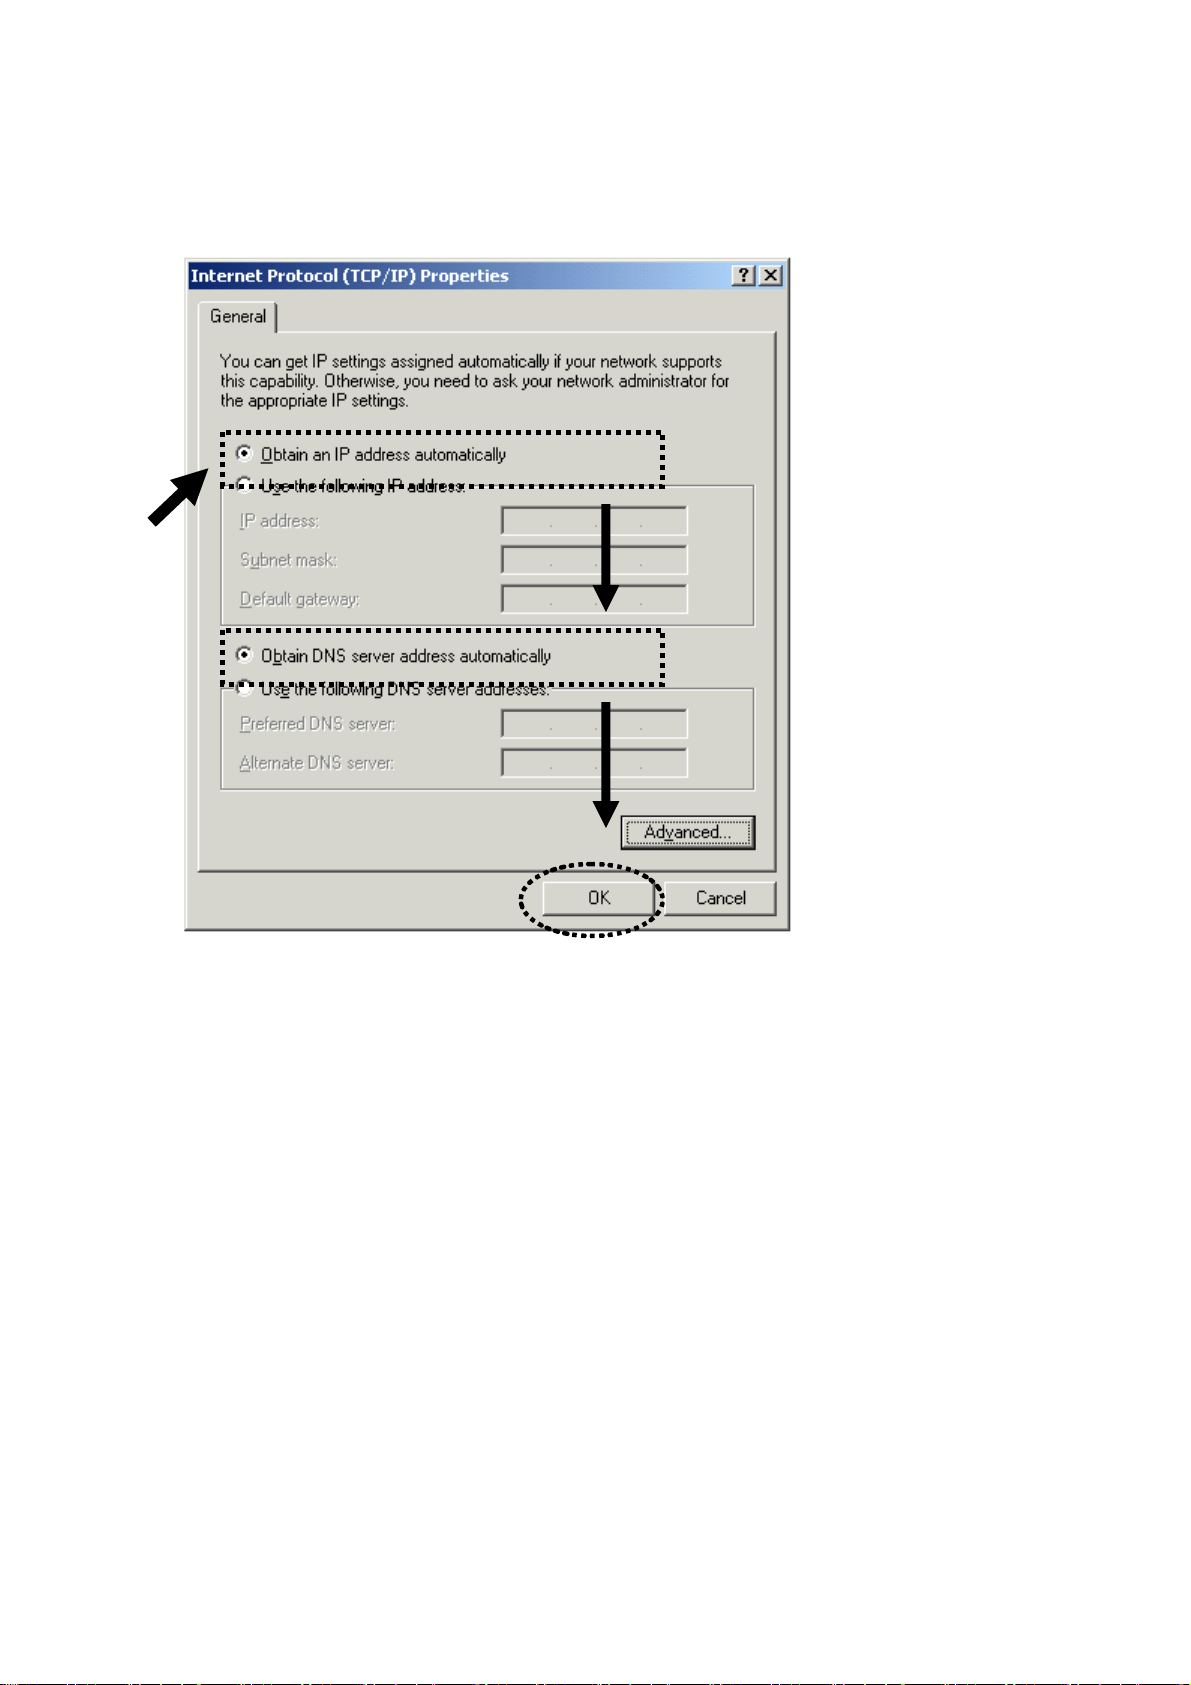
2. Select ‘Obtain an IP address automatically’ and ‘Obtain DNS server
address automatically’, then click ‘OK’.
19
Page 20
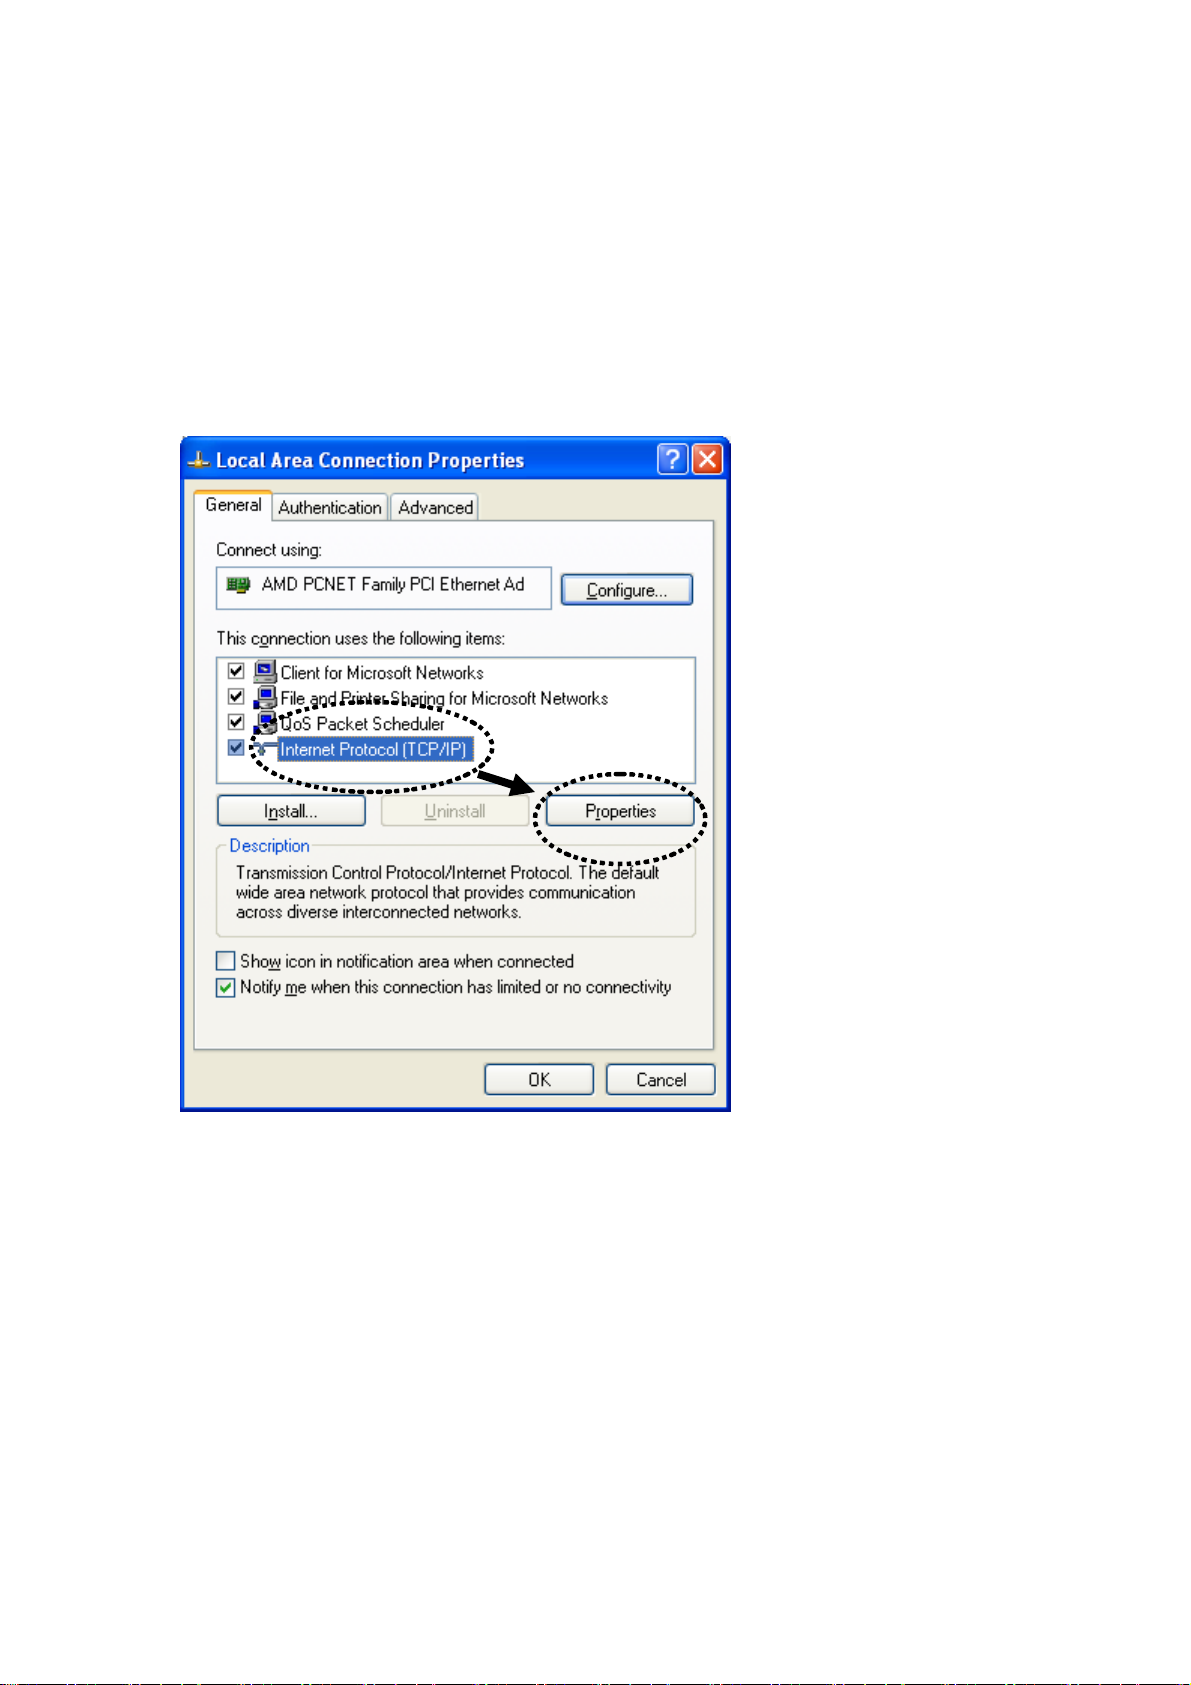
2-2-3 Windows XP IP address setup:
1. Click ‘Start’ button (it should be located at lower-left corner of your
computer), then click control panel. Double-click Network and Internet
Connections icon, click Network Connections, then double-click Local
Area Connection, Local Area Connection Status window will appear,
and then click ‘Properties’
20
Page 21
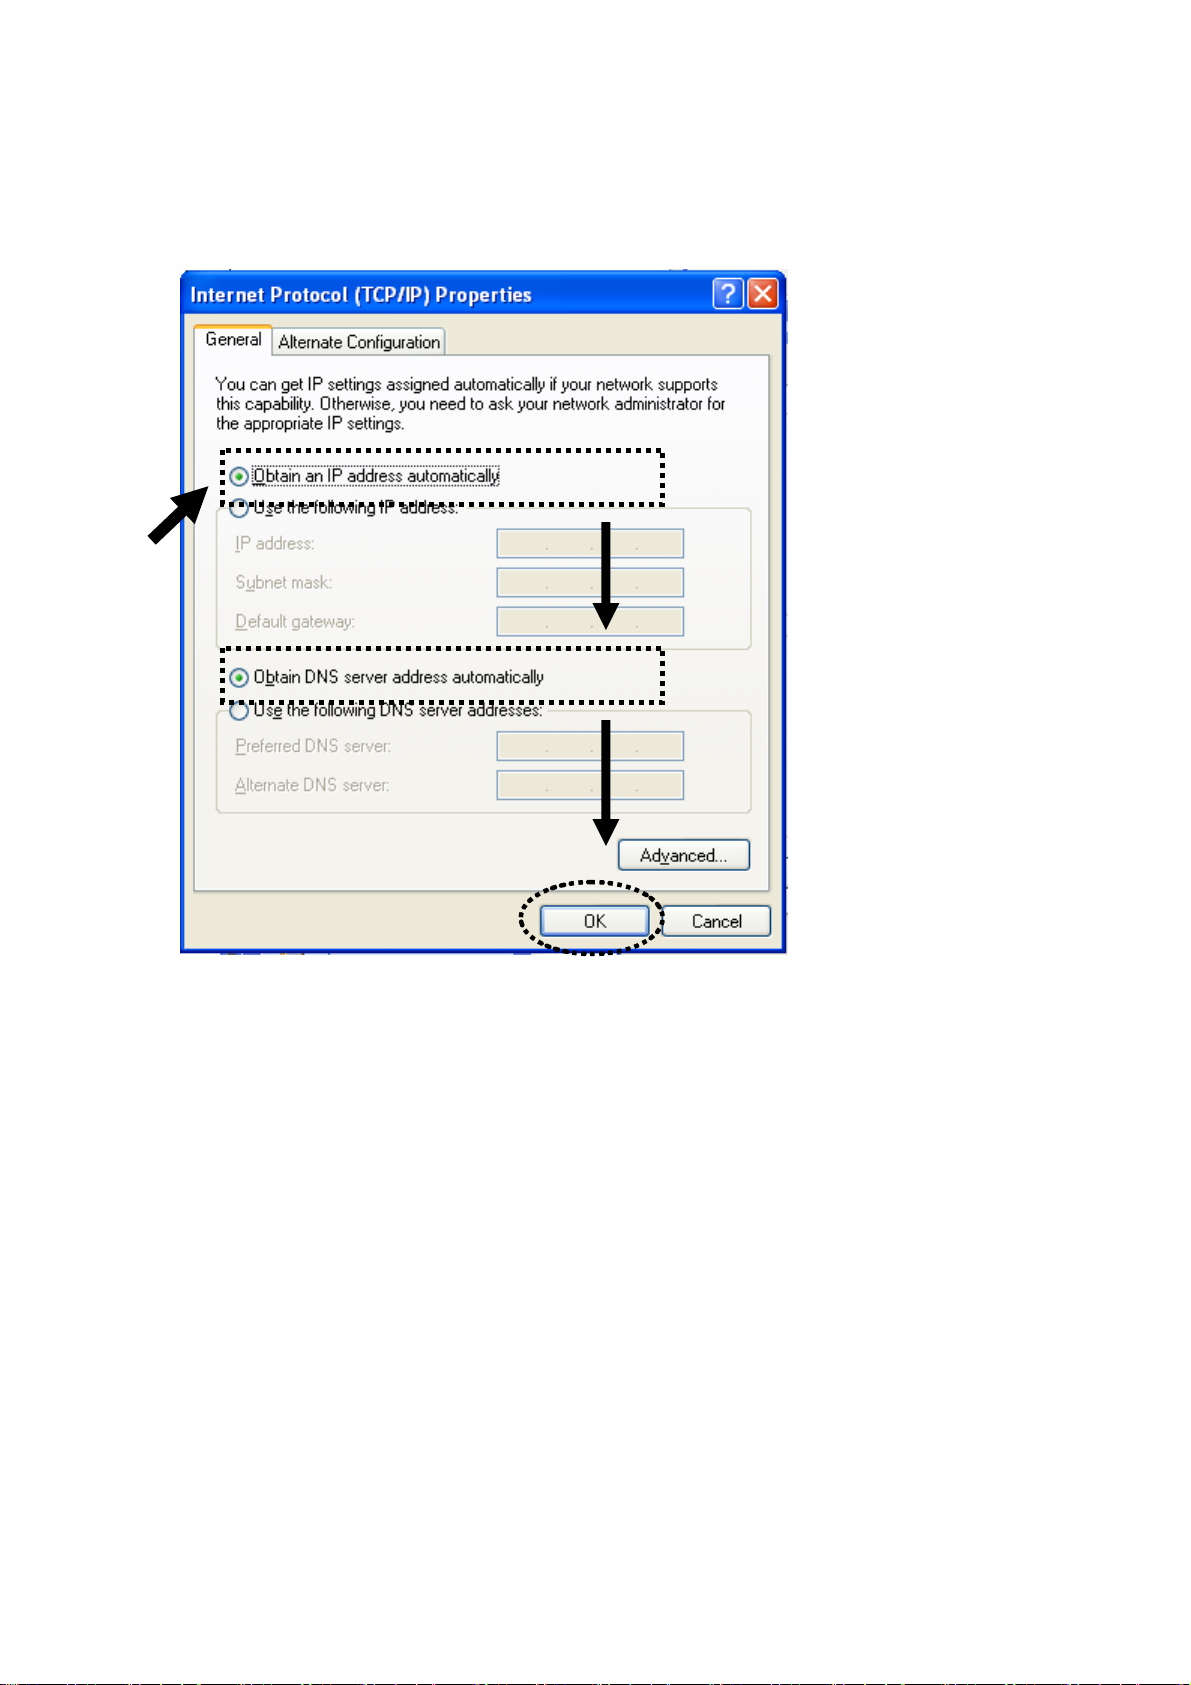
2. Select ‘Obtain an IP address automatically’ and ‘Obtain DNS server
address automatically’, then click ‘OK’.
21
Page 22
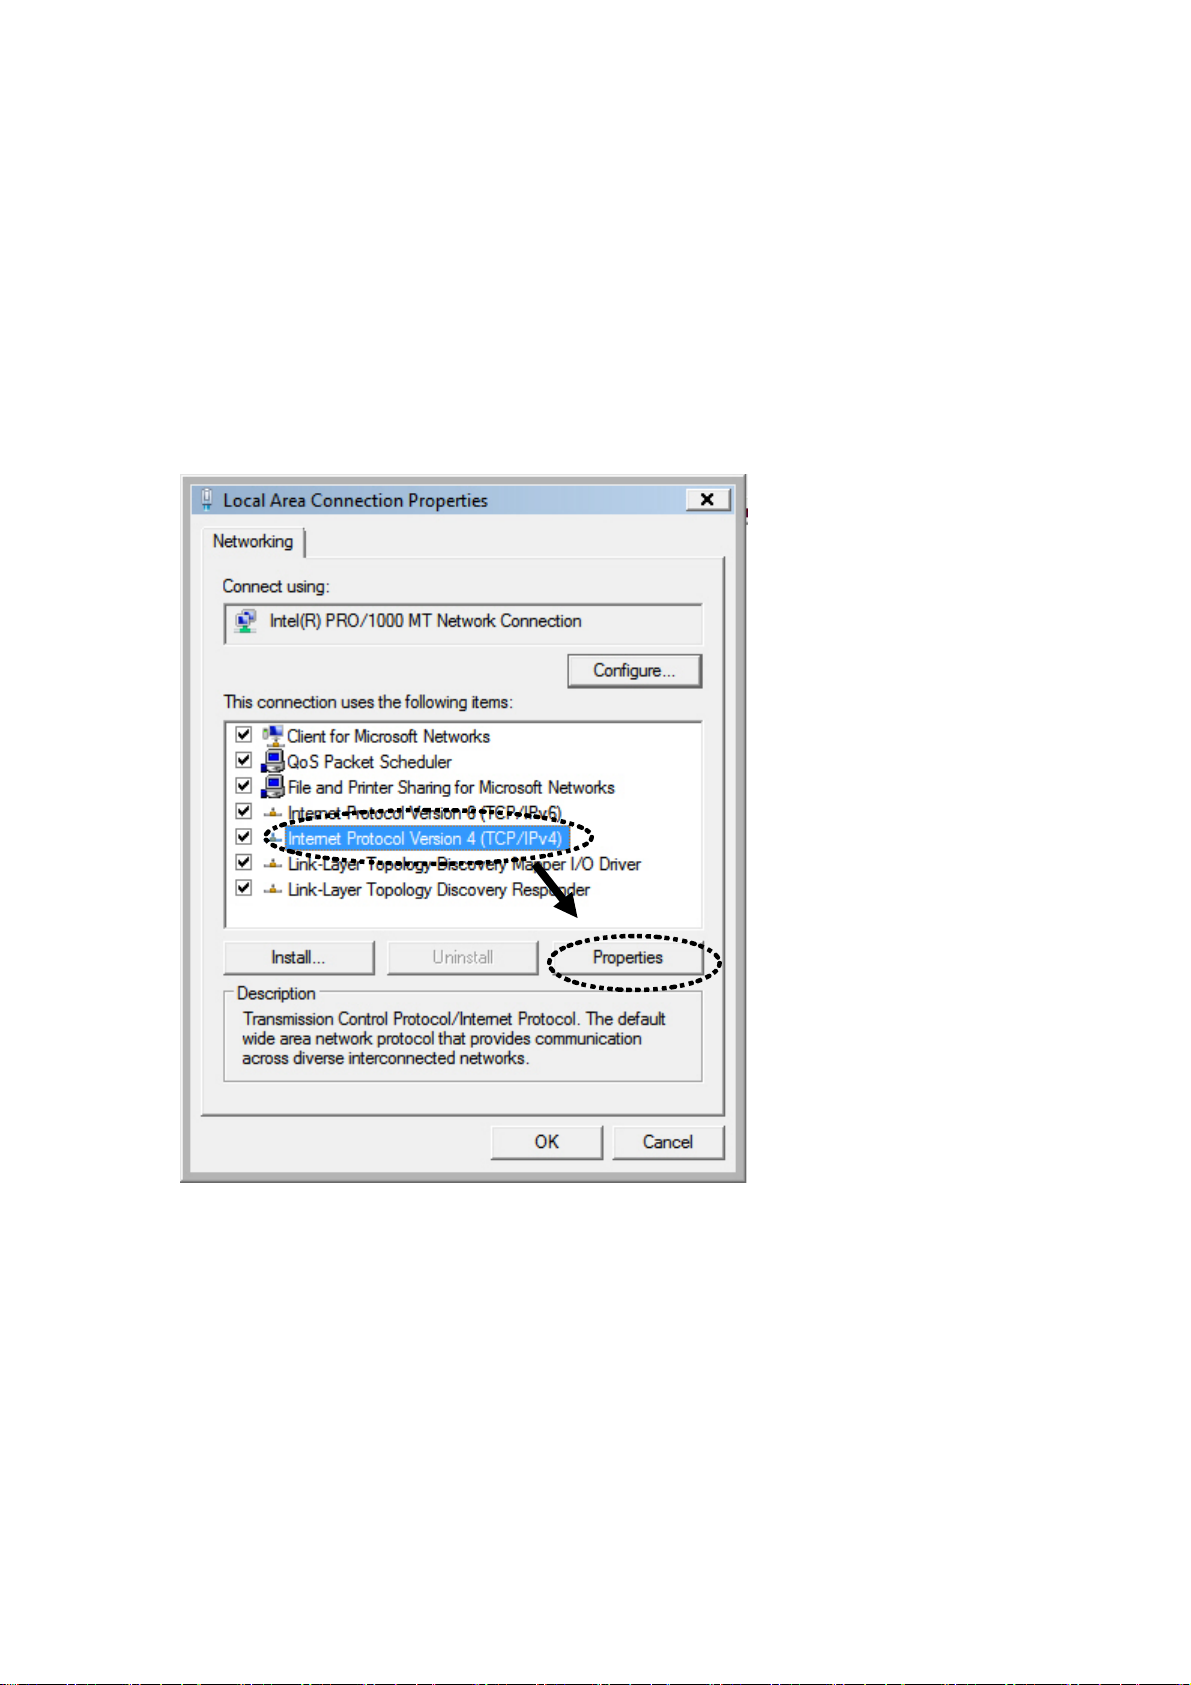
2-2-4 Windows Vista IP address setup:
1. Click ‘Start’ button (it should be located at lower-left corner of your
computer), then click control panel. Click View Network Status and
Tasks, then click Manage Network Connections..Right-click Local Area
Netwrok, then select ‘Properties’. Local Area Connection Properties
window will appear, select ‘Internet Protocol Version 4 (TCP / IPv4), and
then click ‘Properties’
22
Page 23

2. Select ‘Obtain an IP address automatically’ and ‘Obtain DNS server
address automatically’, then click ‘OK’.
23
Page 24
2-3 Connect to broadband router by web browser
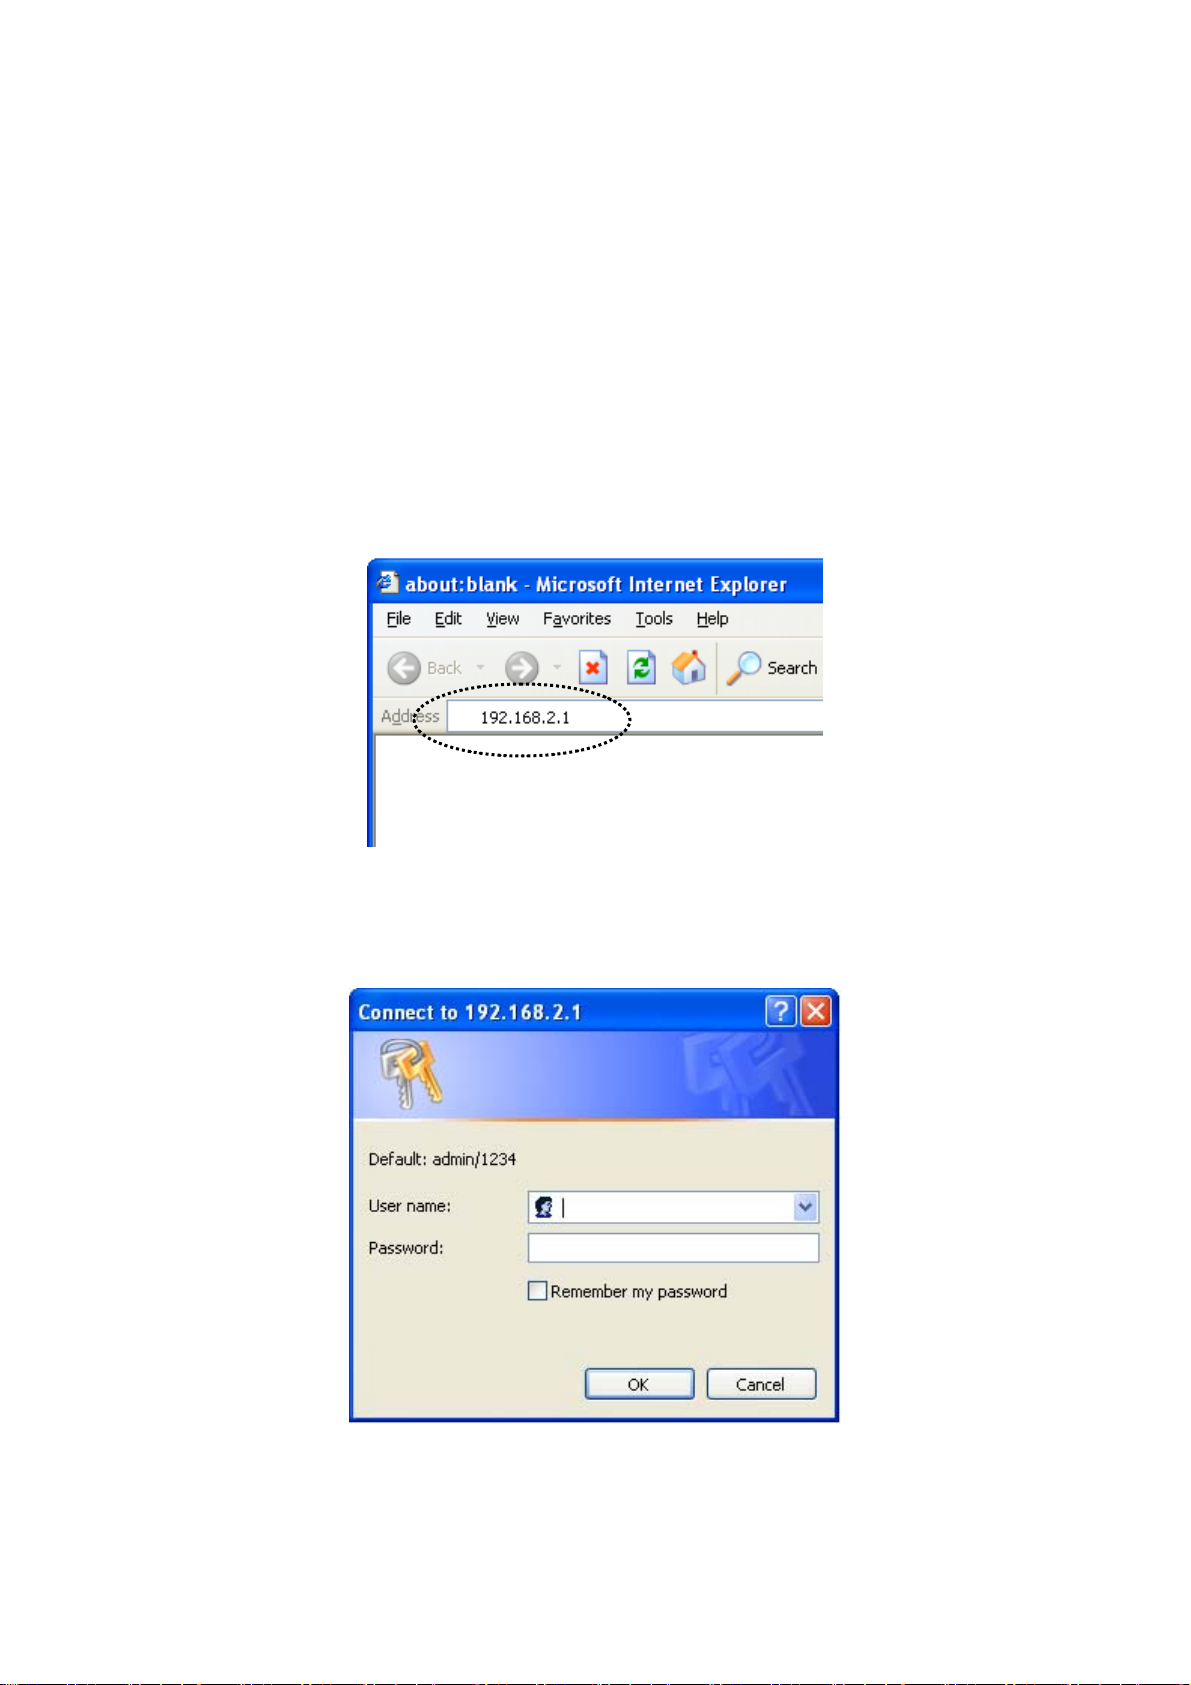
Default IP address of this broadband router is ‘192.168.2.1’, and you can
connect to broadband router’s web-based configuration interface by any
connected computer with web browser (Internet Explorer 5.x or above,
Firefox, or Netscape).
Please input ‘192.168.2.1’ in web browser’s address bar and press ‘Enter’
key to establish connection:
You should see the following authentication window:
24
Page 25
Please input ‘admin’ in ‘User name’ field, and ‘1234’ in ‘Password’ field,
and click ‘OK’ button to enter web configuration interface.
TIPS: If you can’t establish connection with broadband router with web
browser (got ‘The page cannot be displayed’ or similar error message),
the IP address you inputted may be wrong. If you’ve changed the IP
address of this broadband router previously, please input correct IP
address instead of the default IP address ’192.168.2.1’.
If the DHCP server function of this broadband router is enabled, please
follow the following instructions to find out the IP address of this
broadband router:
25
Page 26

Please click ‘start’ -> ‘run’ at the bottom-lower corner of your desktop:
Input ‘cmd’, then click ‘OK’
26
Page 27
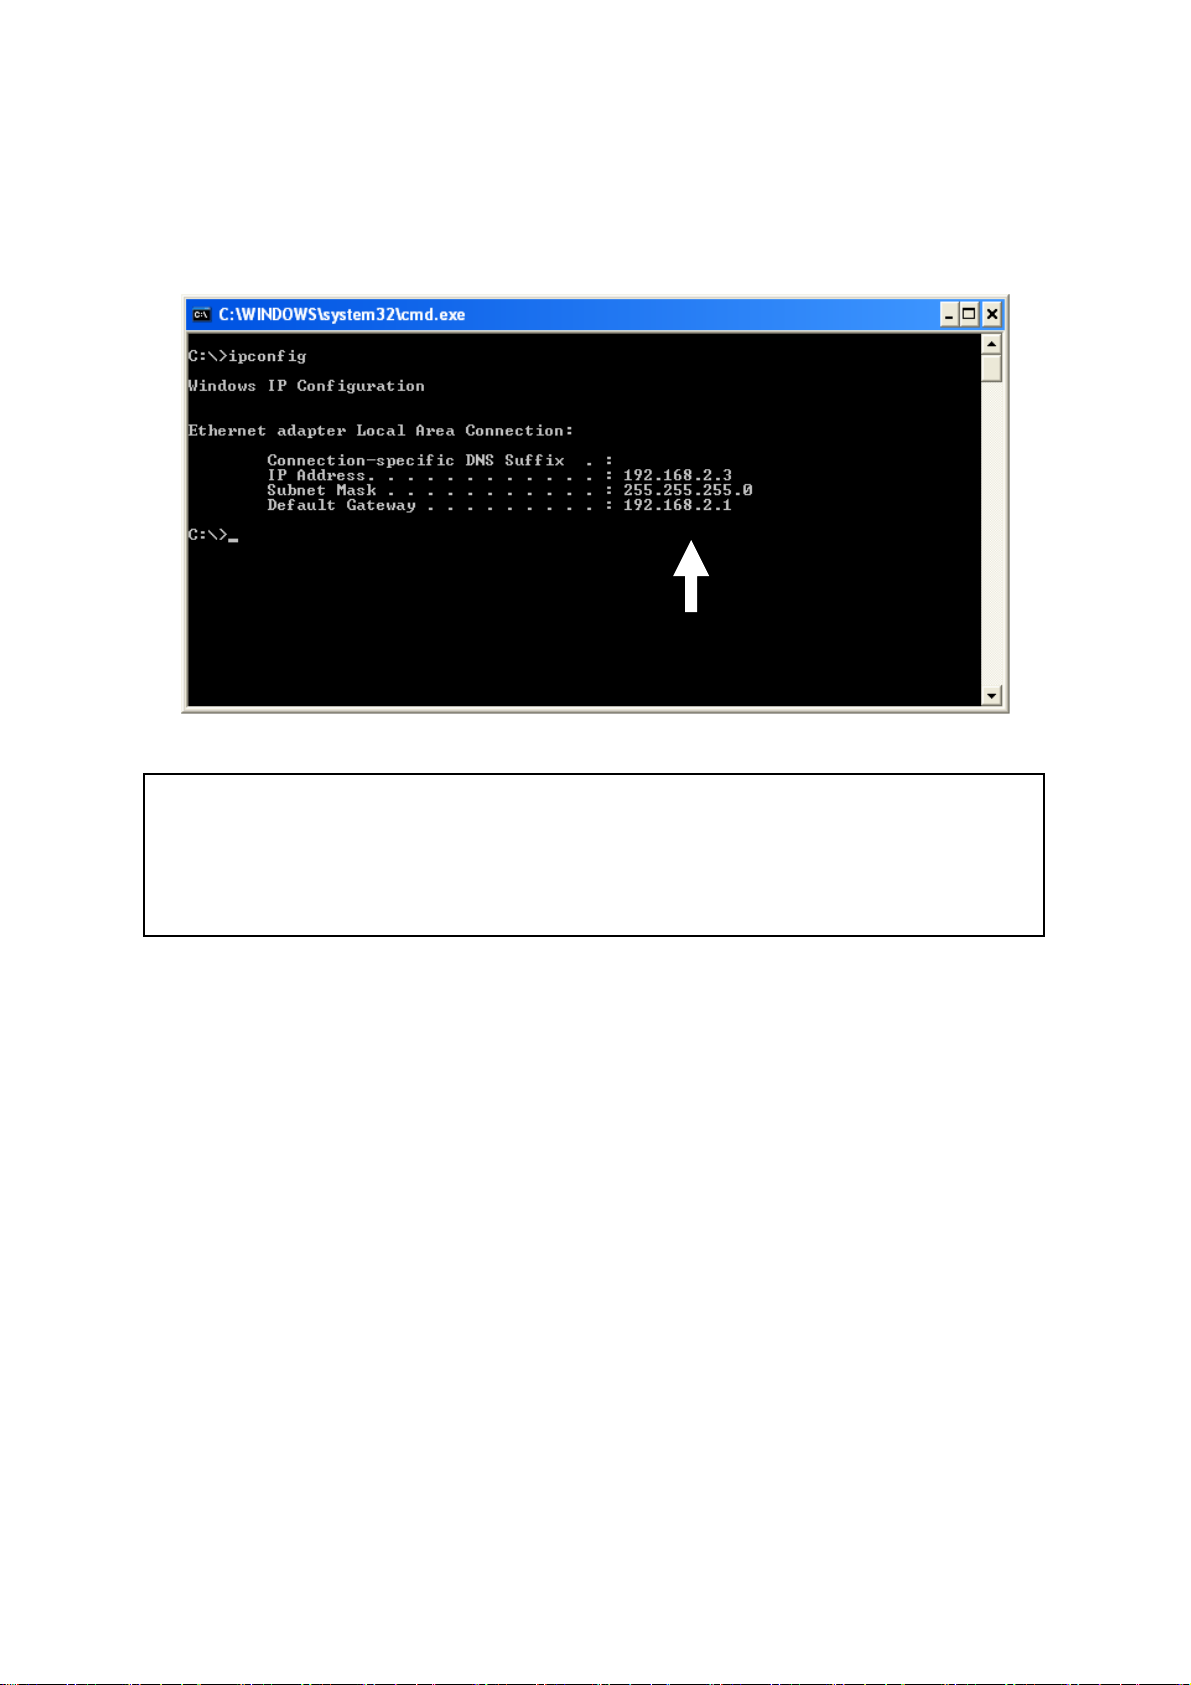
Input ‘ipconfig’, then press ‘Enter’ key. Please check the IP address
followed by ‘Default Gateway’ (In this example, the IP address of router
is 192.168.2.1, please note that this value may be different.)
NOTE: If the IP address of Gateway is not displayed, or the address followed
by ‘IP Address’ begins with ‘169’, please recheck network connection
between your computer and router, and / or go to the beginning of this
chapter, to recheck every step of network setup procedure.
If you tried the instructions listed above and still can not find the IP
address of this broadband router / you forget the password, please jump to
chapter 6-1 to reset the broadband router.
27
Page 28
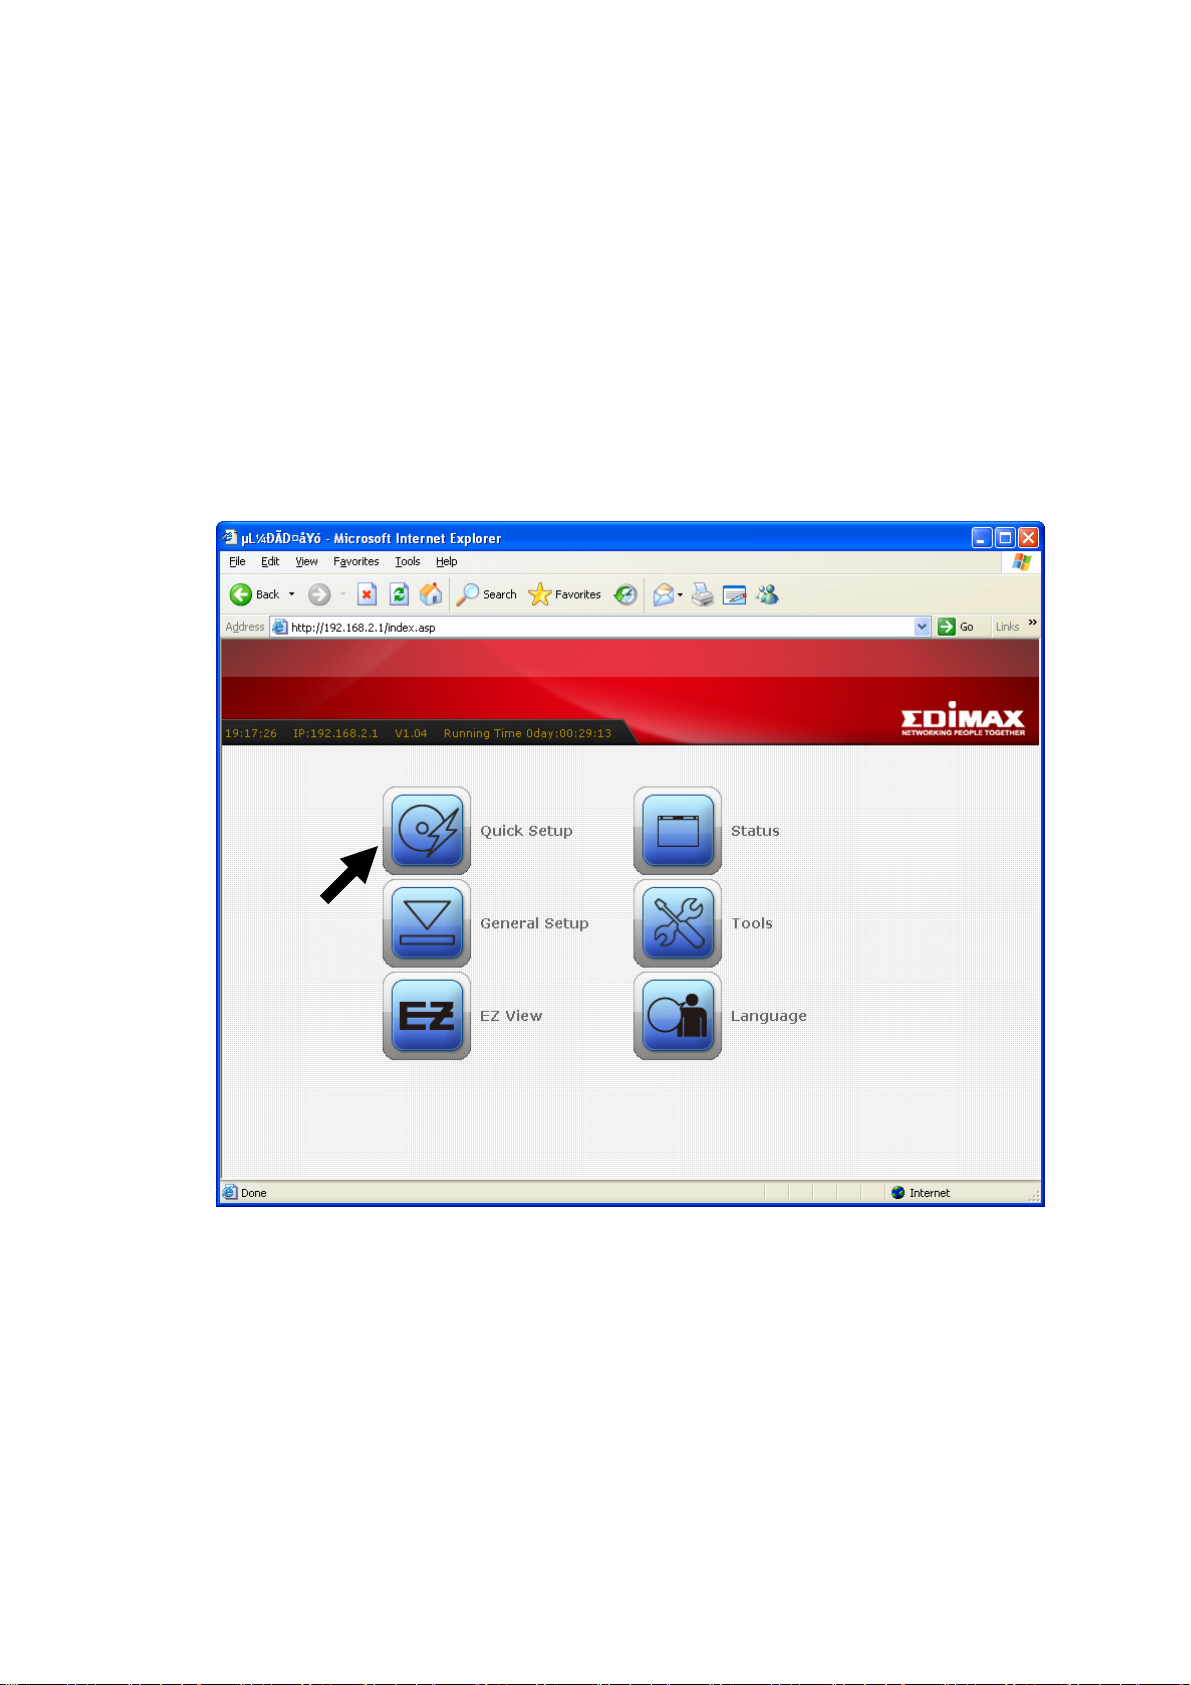
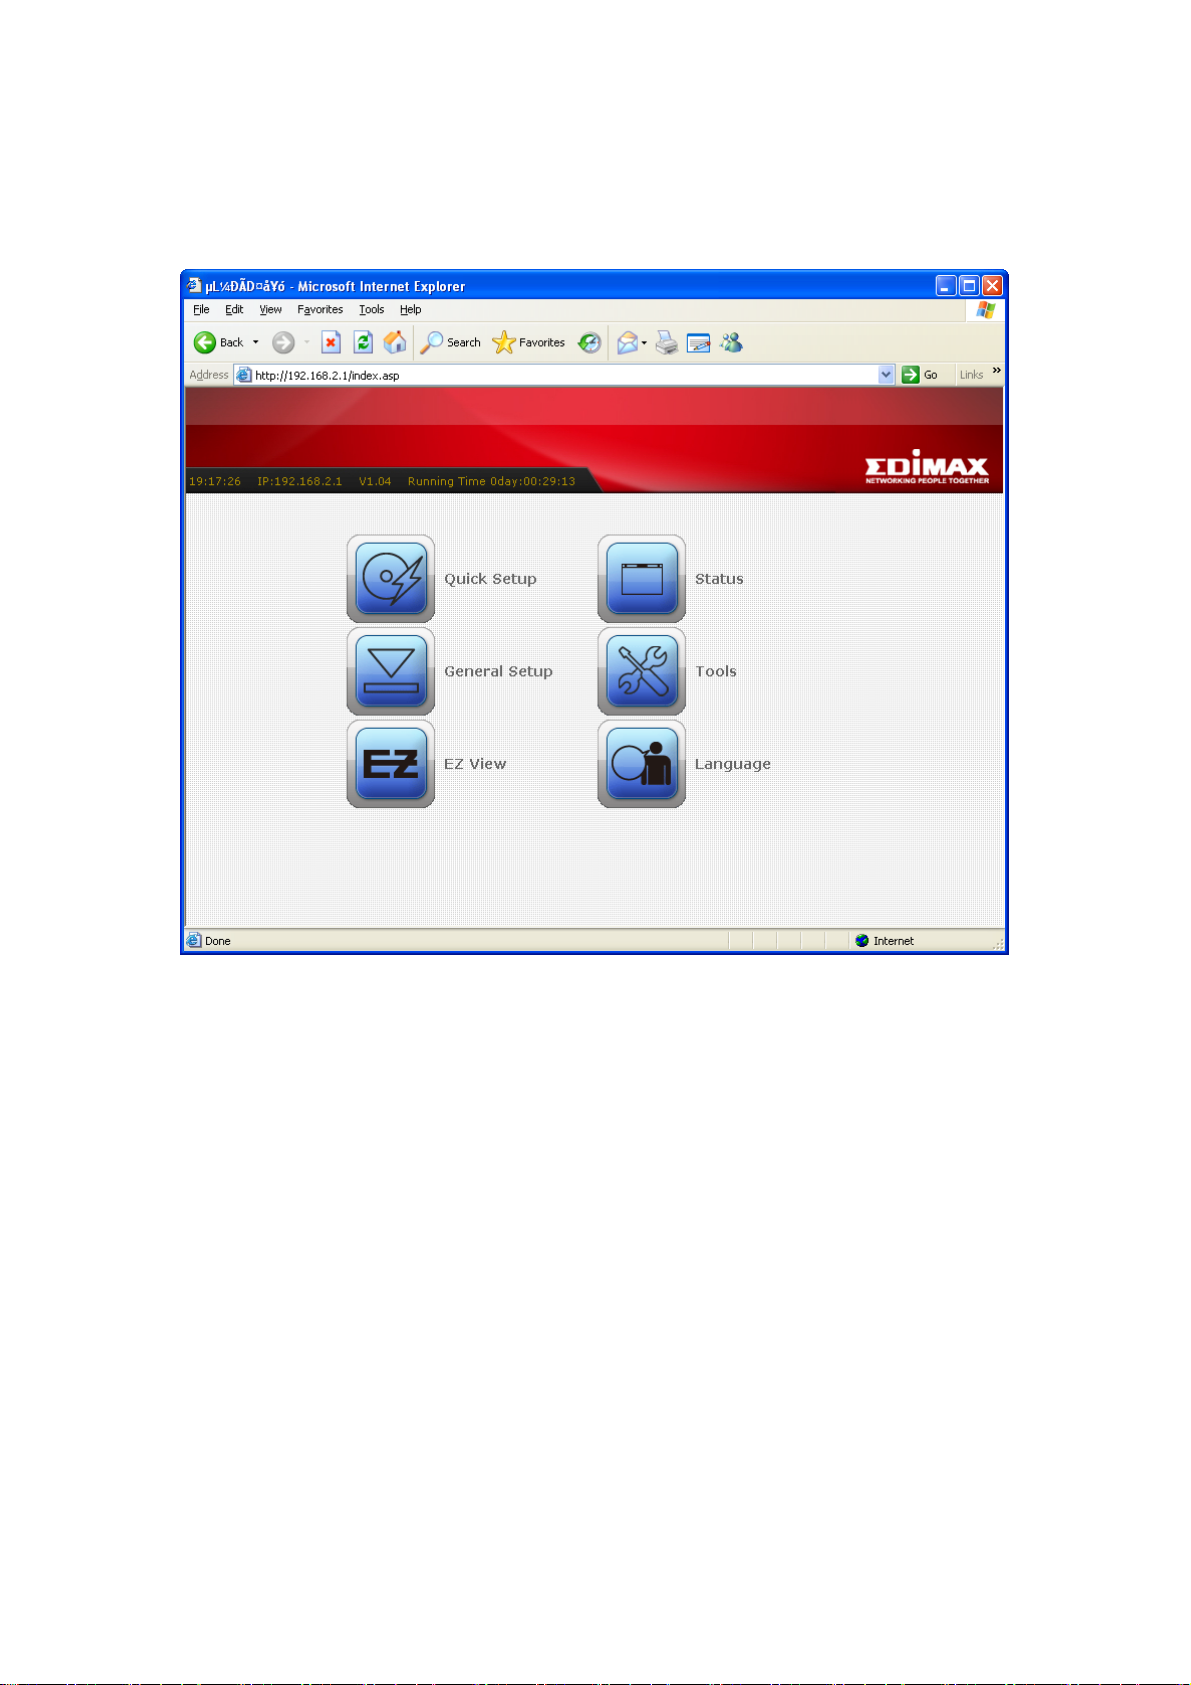
2-4 Using ‘Quick Setup’
This broadband router provides a ‘Quick Setup’ menu, and you can setup
basic parameters of this broadband router.
Please follow the following instructions to use ‘Quick Setup’ menu:
1. Click ‘Quick Setup’ after logged in.
28
Page 29

2. In the first step of quick setup, you can setup automatic time
synchronization settings.
The descriptions of every setting items are listed as follow:
Item Name Description
Time Zone Please select a time zone of the country or
region of your residence here. If you can’t find
the country / region of your residence here,
please select a city / region which time zone is
the same with the country / region of your
residence.
Time Server Address This load-balance router supports NTP
(Network Time Protocol). NTP server will
provide correct time for this router to setup the
date and time of the router automatically.
Please input the host name or IP address of
NTP server here. If you don’t know the host
name or IP address of time server, please ask
network administrator or use ‘pool.ntp.org’ as
time server.
Daylight Savings If the country / region of your residence use
daylight saving time, please check ‘Enable
Function’ box, and select the beginning and
ending date of daylight time saving.
29
Page 30
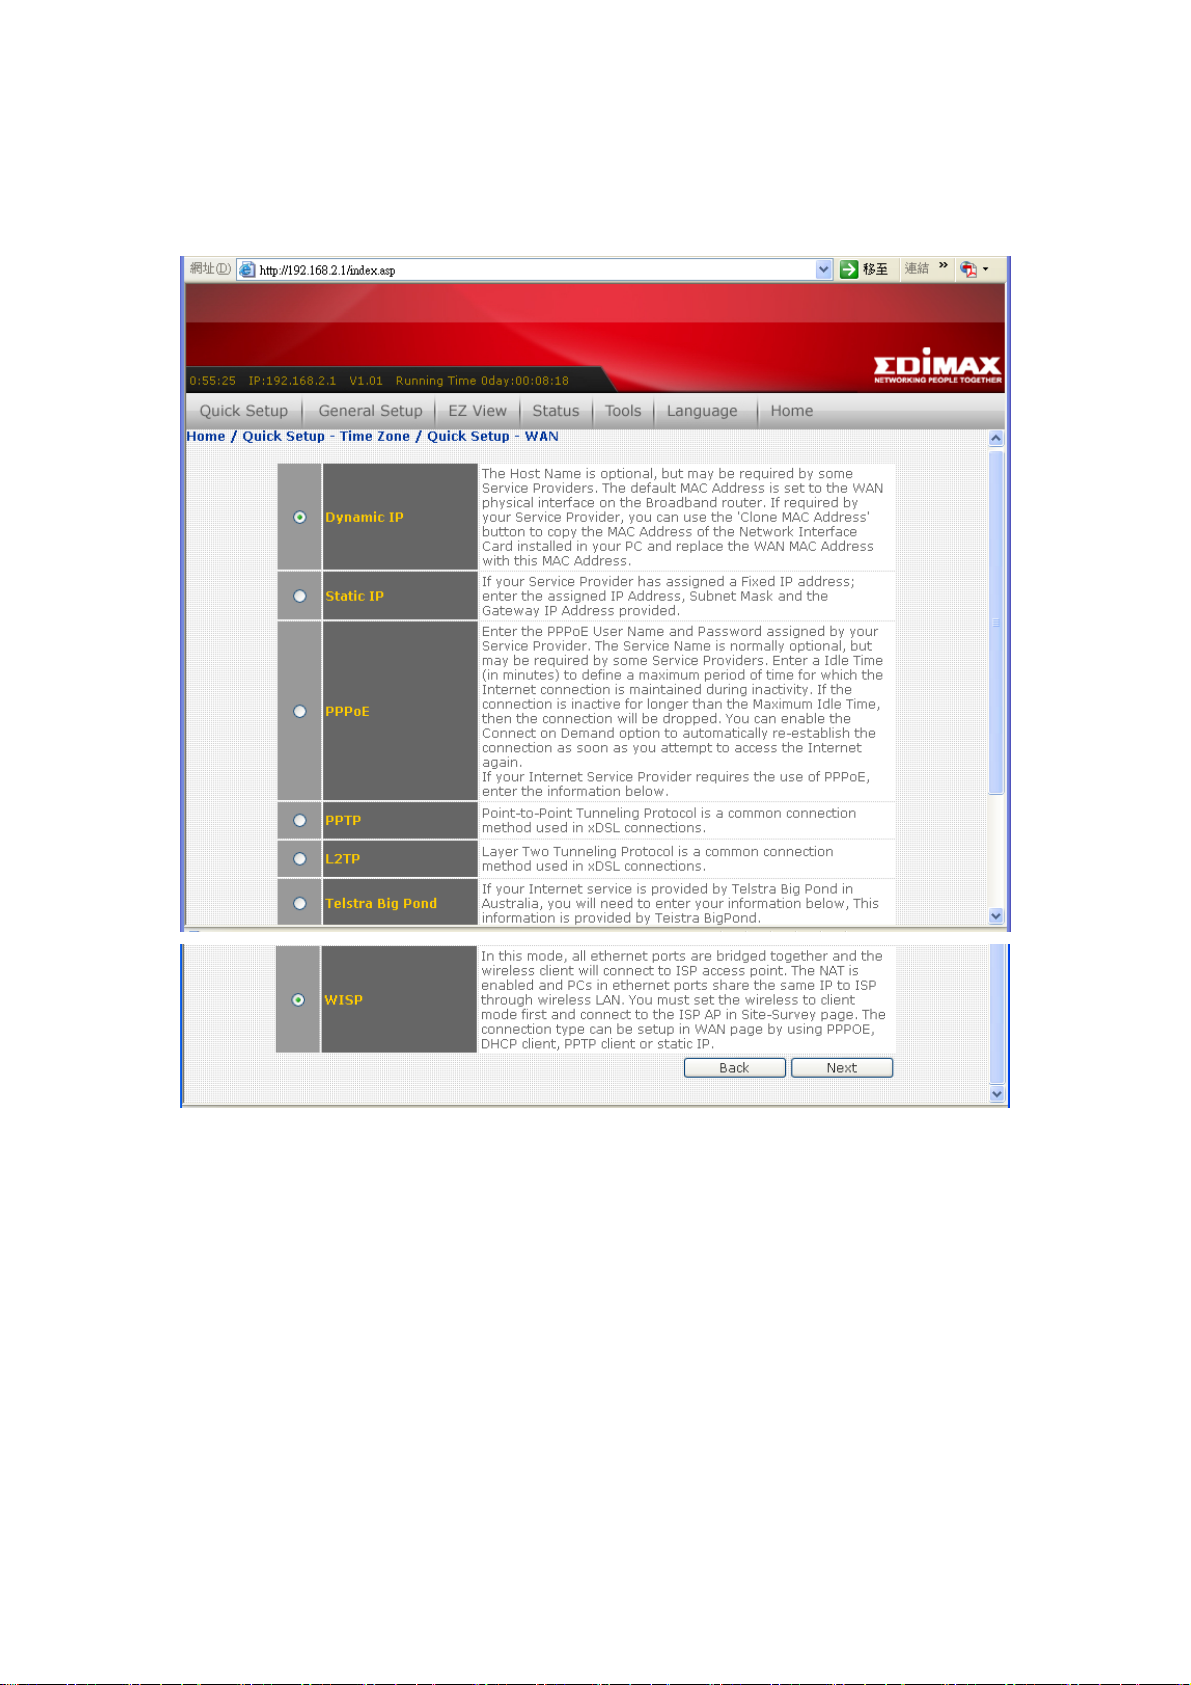
After you finish with time zone settings, please click ‘Next’ to proceed to
next step of quick setup - broadband type:
Please choose the broadband (Internet connection) type you’re using in
this page. There are six types of Internet connection, they are:
Dynamic IP - Please go to section 2-4-1
Fixed-IP xDSL - Please go to section 2-4-2
PPPoE xDSL - Please go to section 2-4-3
PPTP xDSL - Please go to section 2-4-4
L2TP xDSL - Please go to section 2-4-5
Telstra Big Pond - Please go to section 2-4-6
WISP - P lease go to section 2-4-7
30
Page 31

If you’re not sure, please contact your Internet service provider. A wrong
Internet connection type will cause connection problem, and you will not
be able to connect to internet.
If you want to go back to previous step, please press ‘Back’ button on the
bottom of this page.
NOTE: Some service providers use ‘DHCP’ (Dynamic Host
Configuration Protocol) to assign IP address to you. In this case, you
can choose ‘Cable Modem’ as Internet connection type, even you’re
using another connection type, like xDSL. Also, some cable modem
3.
uses PPPoE, so you can choose ‘PPPoE xDSL’ for such cable modem
connection, even you’re using a cable modem.
31
Page 32

2-4-1 Using ‘Dynamic IP’ as broadband connection type
If your Internet service provider uses cable modem to provide Internet
service to you, you can select this connection type. You can also select
this connection type if your ISP tells you that they will assign you the IP
address by ’DHCP’ (Dynamic Host Configuration Protocol).
Here are descriptions of every setup items:
Item Name Description
Host Name Please input the host name of your computer,
this is optional, and only required if your
service provider asks you to do so.
MAC address Please input MAC address of your computer
here, if your service provider only permits
computer with certain MAC address to access
internet. If you’re using the computer which
used to connect to Internet via cable modem,
you can simply press ‘Clone Mac address’
button to fill the MAC address field with the
MAC address of your computer.
TTL Time-to-live (TTL) is a value in an Internet
Protocol packet that tells a network router
whether or not the packet has been in the
network too long and should be discarded.
32
Page 33

If you wish to select another connection type as broadband connection
type, click ‘Back’; or you can click ‘OK’ to finish with quick setup.
You’ll see the following messages:
Please click ‘Apply’ to save changes you made and restart the broadband
router, this requires about 30 seconds and the broadband router will stop
responding (this is normal and is not malfunction). You can reconnect to
this broadband router and continue on other settings later.
33
Page 34

2-4-2 Using ‘Fixed-IP xDSL’ as broadband connection type
If your ISP requires you to set a fixed IP address to establish connection,
you can use this connection type to input the IP address information
assigned by your ISP.
Please note that not only xDSL connections (like ADSL, HDSL, VDSL)
can use this connection type, you can select this connection type for all
connections that requires you to input a fixed IP address. Also, if your ISP
is assigning a fixed IP address to you by DHCP or PPPoE, do not select
this connection type. Please contact your ISP’s service hotline to make
sure you really need to use static IP as connection type.
Here are descriptions of every setup items:
Item Name Description
IP address assigned by
your by your service
Please input IP address assigned by your
service provider.
provider
Subnet Mask Please input subnet mask assigned by your
service provider.
DNS address Please input the IP address of DNS server
provided by your service provider.
Service Provider
Gateway Address
Please input the IP address of DNS server
provided by your service provider.
TTL Time-to-live (TTL) is a value in an Internet
Protocol packet that tells a network router
whether or not the packet has been in the
network too long and should be discarded.
34
Page 35

You must use the addresses provided b y your Internet service
provider, wrong setting value will cause connection problem.
If you wish to select another connection type as broadband connection
type, click ‘Back’; or you can click ‘OK’ to finish with quick setup.
You’ll see the following messages:
Please click ‘Apply’ to save changes you made and restart the broadband
router, this requires about 30 seconds and the broadband router will stop
responding (this is normal and is not malfunction). You can reconnect to
this broadband router and continue on other settings later.
35
Page 36

2-4-3 Using ‘PPPoE xDSL’ as broadband connection type
If your ISP requires you to establish Internet connection by PPPoE
(Point-to-Point Protocol over Ethernet), you can use this connection type
to establish Internet connection.
Here are descriptions of every setup items:
Item Name Description
User Name Please input user name assigned by your
Internet service provider here.
Password Please input the password assigned by your
Internet service provider here.
Service Name Please give a name to this Internet service, this
is optional.
MTU Please input the MTU value of your network
connection here. If you don’t know, you can use
default value.
Connection Type Please select the connection type of Internet
connection you wish to use. There are 3
options:
‘Continuous’ - keep internet connection alive,
do not disconnect.
’Connect on Demand’ - only connects to
36
Page 37

Internet when there’s a connect attempt,
Manual - only connects to Internet when
‘Connect’ button on this page is pressed, and
disconnects when ‘Disconnect button is
pressed.
Idle T ime Out Please specify the time to shutdown internet
connect after no internet activity is detected in
minute(s). This option is only available when
connection type is ‘Connect on Demand’.
TTL Time-to-live (TTL) is a value in an Internet
Protocol packet that tells a network router
whether or not the packet has been in the
network too long and should be discarded.
If you wish to select another connection type as broadband connection
type, click ‘Back’; or you can click ‘OK’ to finish with quick setup.
You’ll see the following messages:
Please click ‘Apply’ to save changes you made and restart the broadband
router, this requires about 30 seconds and the broadband router will stop
responding (this is normal and is not malfunction). You can reconnect to
this broadband router and continue on other settings later.
37
Page 38

2-4-4 Using ‘PPTP xDSL’ as broadband connection type
If your ISP requires you to use PPTP (Point-to-Point Tunneling Protocol)
to establish connection, you can select this connection type to establish
Internet connection.
PPTP xDSL requires two kinds of setting: WAN interface setting (setup
IP address) and PPTP setting (PPTP user name and password). Here we
start from WAN interface setting first:
Select the type of how you obtain IP address from your service provider
here. You can choose ‘Obtain an IP address automatically’ (equal to
DHCP, please refer to ‘Cable Modem’ section above), or ‘Use the
following IP address’ (i.e. static IP address).
WAN interface settings must be correctly set, or the Internet connection
will fail even those settings of PPTP settings are correct. Please contact
your Internet service provider if you don’t know what you should fill in
these fields.
38
Page 39

Now please go to PPTP settings section:
Here are descriptions of every setup items:
Item Name Description
User ID Please input user ID (user name) assigned by
your Internet service provider here.
Password Please input the passwor d assigned by your
Internet service provider here.
PPTP Gateway Please input the IP address of PPTP gateway
assigned by your Internet service provider
here.
Connection ID Please input the connection ID here, this is
optional and you can leave it blank.
MTU Please input the MTU value of your network
connection here. If you don’t know, you can use
default value.
BEZEQ-ISRAEL Check ‘Enable’ box if you’re using BEZEQ
network service in Israel. Do not check this
box if you’re using other Internet service
provider.
Connection Type Please select the connection type of Internet
connection you wish to use. There are 3
options:
39
Page 40

‘Continuous’ - keep internet connection alive,
do not disconnect.
’Connect on Demand’ - only connects to
Internet when there’s a connect attempt,
Manual - only connects to Internet when
‘Connect’ button on this page is pressed, and
disconnects when ‘Disconnect button is
pressed.
Idle T ime Out Please specify the time to shutdown internet
connect after no internet activity is detected in
minute(s). This option is only available when
connection type is ‘Connect on Demand’.
If you wish to select another connection type as broadband connection
type, click ‘Back’; or you can click ‘OK’ to finish with quick setup.
You’ll see the following messages:
Please click ‘Apply’ to save changes you made and restart the broadband
router, this requires about 30 seconds and the broadband router will stop
responding (this is normal and is not malfunction). You can reconnect to
this broadband router and continue on other settings later.
40
Page 41

2-4-5 Using 'L2TP xDSL' as broadband connection type
If your ISP requires you to use L2TP (Layer-2 Tunneling Protocol) to
establish connection, you can select this connection type to establish
Internet connection. L2TP is another popular connection method for
xDSL and other Internet connection types, and all required setting items
are the same with PPTP connection.
Like PPTP, there are two kinds of required setting, we’ll start from ‘WAN
Interface Settings’:
Please select the type of how you obtain IP address from your service
provider here. You can choose ‘Obtain an IP address automatically’ (equal
to DHCP, please refer to ‘Cable Modem’ section above), or ‘Use the
following IP address’ (equal to static IP address, please refer to ‘PPPoE
xDSL’ section above).
WAN interface settings must be correctly set, or the Internet connection
will fail even those settings of L2TP settings are correct. Please contact
your Internet service provider if you don’t know what you should fill in
these fields.
Now please go to L2TP settings section:
41
Page 42

Here are descriptions of every setup items:
Item Name Description
User ID Please input user ID (user name) assigned by
your Internet service provider here.
Password Please input the password assigned by your
Internet service provider here.
L2TP Gateway Please input the IP address of L2TP gateway
assigned by your Internet service provider
here.
MTU Please input the MTU value of your network
connection here. If you don’t know, you can use
default value.
Connection Type Please select the connection type of Internet
connection you wish to use. There are 3
options:
‘Continuous’ - keep internet connection alive,
do not disconnect.
’Connect on Demand’ - only connects to
Internet when there’s a connect attempt,
Manual - only connects to Internet when
‘Connect’ button on this page is pressed, and
disconnects when ‘Disconnect button is
pressed.
42
Page 43

Idle T ime Out Please specify the time to shutdown internet
connect after no internet activity is detected in
minute(s). This option is only available when
connection type is ‘Connect on Demand’.
If you wish to select another connection type as broadband connection
type, click ‘Back’; or you can click ‘OK’ to finish with quick setup.
You’ll see the following messages:
Please click ‘Apply’ to save changes you made and restart the broadband
router, this requires about 30 seconds and the broadband router will stop
responding (this is normal and is not malfunction). You can reconnect to
this broadband router and continue on other settings later.
43
Page 44

2-4-6 Using 'Telstra Big Pond' as broadband connection type
This connection type only works for Telstra big pond network service in
Australia. DO NOT select this connection type if you’re not using Telstra
big pond network service.
Here are descriptions of every setup items:
Item Name Description
User Name Please input the user name assigned by Telstra.
Password Please input the password assigned by Telstra.
User device login
server manually
Check this box to choose login server by
yourself.
Login Server Please input the IP address of login server here.
If you wish to select another connection type as broadband connection
type, click ‘Back’; or you can click ‘OK’ to finish with quick setup.
You’ll see the following messages:
Please click ‘Apply’ to save changes you made and restart the broadband
44
Page 45

router, this requires about 30 seconds and the broadband router will stop
responding (this is normal and is not malfunction). You can reconnect to
this broadband router and continue on other settings later.
45
Page 46

2-4-7 WISP (Wireless ISP Connection mode)
You can connect with ISP via the router wirelessly, because the router
provides WISP connection mode. Click “ Enable “ and “ Select Site
Survey “ button
Here you will find many Wireless Access Points as follows. To Choose an
Access Point which you would like connect , then click “Select” button
and “Done” .
Here you will see the Access Point which you select.
Here we provide WEP and PWA-PSK security settings for you to connect
with ISP (Access Point). If your ISP does not ask you to input the security
key, please choose “ Disable” and click “ Apply “ to save changes you
46
Page 47

made and restart the broadband router, this requires about 30 seconds and
the broadband router will stop responding (this is normal and is not
malfunction). You can reconnect to this broadband router and continue on
other settings later.
47
Page 48

Chapter III: General Setup
The ‘General Setup’ is for you to setup “System, WAN, LAN, Wireless,
and others ( Advance settings ) “.
Please follow the following instructions to use ‘General Setup’ menu:
1. Click ‘General Setup’ after logged in.
48
Page 49

2. Five submenus will appear:
System - Basic system settings (please go to chapter 3-1)
WAN - Setup WAN port manually (please go to chapter 3-2)
LAN - Setup LAN port manually (please go to chapter 3-3)
Wireless - Setup wireless interface manually (please go to chapter 3-4)
Advance Settings - Setup advanced settings of this broadband router
(Please go to chapter 3-5)
49
Page 50

3-1 System
You can setup basic system settings of this broadband router in ‘System’
menu:
Please select the setting item you wish to set, then click ‘Apply’ button to
proceed. You can also click ‘Previous’ button to back to ‘System’ menu.
3-1-1 Time Zone
You can change the time zone settings of this broadband router. It’s
important to have correct date and time setting if you need to read system
log and use build-in firewall functions.
50
Page 51

The descriptions of every setting item are listed as follow:
Item Name Description
Time Zone Please select a time zone of the country or
region of your residence here. If you can’t find
the country / region of your residence here,
please select a city / region which time zone is
the same with the country / region of your
residence.
Time Server Address This load-balance router supports NTP
(Network Time Protocol). NTP server will
provide correct time for this router to setup the
date and time of the router automatically.
Please input the host name or IP address of
NTP server here. If you don’t know the host
name or IP address of time server, please ask
network administrator or use ‘pool.ntp.org’ as
time server.
Daylight Savings If the country / region of your residence use
daylight saving time, please check ‘Enable
Function’ box, and select the beginning and
ending date of daylight time saving.
51
Page 52

3-1-2 Password Settings
You can change the web login password of this broadband router. If you
keep using the default password ‘1234’, other people may access the
configuration interface without your permission. Please change the
password as soon as possible.
The descriptions of every setting item are listed as follow:
Item Name Description
Current Password Please input current password here.
New Password Please input new password here.
Confirmed Password Please input new password here again for
confirmation.
After you inputted current and new password, click ‘Apply’ to save
changes, or you can click ‘Cancel’ to keep current password untouched.
52
Page 53

3-1-3 Remote Management
If you need to manage this broadband router outside of your LAN (i.e.
from Internet), you can use this function to assign a remote IP address
which is permitted to connect to this broadband router’s web management
interface from Internet.
If it’s not required for you to manage this broadband router from Internet,
you can disable this function to improve security.
The descriptions of every setting item are listed as follow:
Item Name Description
Host address
Input the IP address of the remote host you
wish to initiate a management access.
Port
You can define the port number this router
should expect an incoming connection request.
If you’re providing a web service (default port
number is 80), you should try to use other port
number. You can use the default port setting
‘8080’, or something like ‘32245’ or ‘1429’.
(Any integer between 1 and 65534)
Enabled
Check this box to enable remote management
function. When this box is unchecked, no one
can access this broadband router’s
management interface from Internet.
53
Page 54

Please click ‘Apply’ to save changes in this page, or you can click
‘Cancel’ to discard all settings in this page. After you click ‘Apply’ button,
you’ll see the following message:
Please click ‘Apply’ to save changes you made and restart the broadband
router, this requires about 30 seconds and the broadband router will stop
responding (this is normal and is not malfunction). You can reconnect to
this broadband router and continue on other settings later.
54
Page 55

3-2 WAN
You can setup WAN (Wide Area Network, i.e. Internet) connections of
this broadband router in ‘WAN’ menu:
Please select the WAN connection type you wish to use, then click
‘Apply’ to continue. You can also click ‘Previous’ to back to previous
page.
If you’re not sure which connection type you should use, please call your
ISP’s service hotline and ask for help. You’ll not be able to connect to
Internet with wrong connection type.
55
Page 56

3-2-1 Dynamic IP
Dynamic IP means your ISP will assign an IP address to you
automatically by ‘DHCP’ (Dynamic Host Configuration Protocol).
Dynamic IP is often used by cable modem Internet connection.
Here are descriptions of every setup items:
Item Name Description
Host Name Please input the host name of your computer,
this is optional, and only required if your
service provider asks you to do so.
MAC address Please input MAC address of your computer
here, if your service provider only permits
computer with certain MAC address to access
internet. If you’re using the computer which
used to connect to Internet via cable modem,
you can simply press ‘Clone Mac address’
button to fill the MAC address field with the
MAC address of your computer.
TTL Time-to-live (TTL) is a value in an Internet
Protocol packet that tells a network router
whether or not the packet has been in the
network too long and should be discarded.
56
Page 57

If you wish to select another connection type as broadband connection
type, click ‘Back’; or you can click ‘OK’ to finish with quick setup.
You’ll see the following messages:
Please click ‘Apply’ to save changes you made and restart the broadband
router, this requires about 30 seconds and the broadband router will stop
responding (this is normal and is not malfunction). You can reconnect to
this broadband router and continue on other settings later.
57
Page 58

3-2-2 Static IP
Some ISP will give you a fixed IP address, and ask you to use this IP
address to establish Internet connection. In this case, you have to select
this connection type to establish connection with your ISP.
Please note that if your ISP is assigning a fixed IP address to you by
DHCP or PPPoE, do not select this connection type. Please contact your
ISP’s service hotline to make sure you really need to use static IP as
connection type.
Here are descriptions of every setup items:
Item Name Description
IP address assigned by
your by your service
Please input IP address assigned by your
service provider.
provider
Subnet Mask Please input subnet mask assigned by your
service provider.
DNS address Please input the IP address of DNS server
provided by your service provider.
Service Provider
Gateway Address
Please input the IP address of DNS server
provided by your service provider.
TTL Time-to-live (TTL) is a value in an Internet
Protocol packet that tells a network router
whether or not the packet has been in the
network too long and should be discarded.
58
Page 59

You must use the addresses provided b y your Internet service
provider, wrong setting value will cause connection problem.
If you wish to select another connection type as broadband connection
type, click ‘Back’; or you can click ‘OK’ to finish with quick setup.
You’ll see the following messages:
Please click ‘Apply’ to save changes you made and restart the broadband
router, this requires about 30 seconds and the broadband router will stop
responding (this is normal and is not malfunction). You can reconnect to
this broadband router and continue on other settings later.
59
Page 60

3-2-3 PPPoE
If your ISP requires you to establish Internet connection by PPPoE
(Point-to-Point Protocol over Ethernet), you can use this connection type
to establish Internet connection.
Here are descriptions of every setup items:
Item Name Description
User Name Please input user name assigned by your
Internet service provider here.
Password Please input the password assigned by your
Internet service provider here.
Service Name Please give a name to this Internet service, this
is optional.
MTU Please input the MTU value of your network
connection here. If you don’t know, you can use
default value.
Connection Type Please select the connection type of Internet
connection you wish to use. There are 3
options:
‘Continuous’ - keep internet connection alive,
do not disconnect.
’Connect on Demand’ - only connects to
60
Page 61

Internet when there’s a connect attempt,
Manual - only connects to Internet when
‘Connect’ button on this page is pressed, and
disconnects when ‘Disconnect button is
pressed.
Idle T ime Out Please specify the time to shutdown internet
connect after no internet activity is detected in
minute(s). This option is only available when
connection type is ‘Connect on Demand’.
TTL Time-to-live (TTL) is a value in an Internet
Protocol packet that tells a network router
whether or not the packet has been in the
network too long and should be discarded.
If you wish to select another connection type as broadband connection
type, click ‘Back’; or you can click ‘OK’ to finish with quick setup.
You’ll see the following messages:
Please click ‘Apply’ to save changes you made and restart the broadband
router, this requires about 30 seconds and the broadband router will stop
responding (this is normal and is not malfunction). You can reconnect to
this broadband router and continue on other settings later.
61
Page 62

3-2-4 PPTP
If your ISP requires you to use PPTP (Point-to-Point Tunneling Protocol)
to establish connection, you can select this connection type to establish
Internet connection.
PPTP requires two kinds of setting: WAN interface setting (setup IP
address) and PPTP setting (PPTP user name and password). Here we start
from WAN interface setting first:
Select the type of how you obtain IP address from your service provider
here. You can choose ‘Obtain an IP address automatically’ (equal to
DHCP, please refer to ‘Cable Modem’ section above), or ‘Use the
following IP address’ (i.e. static IP address).
WAN interface settings must be correctly set, or the Internet connection
will fail even those settings of PPTP settings are correct. Please contact
your Internet service provider if you don’t know what you should fill in
these fields.
62
Page 63

Now please go to PPTP settings section:
Here are descriptions of every setup items:
Item Name Description
User ID Please input user ID (user name) assigned by
your Internet service provider here.
Password Please input the passwor d assigned by your
Internet service provider here.
PPTP Gateway Please input the IP address of PPTP gateway
assigned by your Internet service provider
here.
Connection ID Please input the connection ID here, this is
optional and you can leave it blank.
MTU Please input the MTU value of your network
connection here. If you don’t know, you can use
default value.
BEZEQ-ISRAEL Check ‘Enable’ box if you’re using BEZEQ
network service in Israel. Do not check this
box if you’re using other Internet service
provider.
Connection Type Please select the connection type of Internet
connection you wish to use. There are 3
options:
63
Page 64

‘Continuous’ - keep internet connection alive,
do not disconnect.
’Connect on Demand’ - only connects to
Internet when there’s a connect attempt,
Manual - only connects to Internet when
‘Connect’ button on this page is pressed, and
disconnects when ‘Disconnect button is
pressed.
Idle T ime Out Please specify the time to shutdown internet
connect after no internet activity is detected in
minute(s). This option is only available when
connection type is ‘Connect on Demand’.
If you wish to select another connection type as broadband connection
type, click ‘Back’; or you can click ‘OK’ to finish with quick setup.
You’ll see the following messages:
Please click ‘Apply’ to save changes you made and restart the broadband
router, this requires about 30 seconds and the broadband router will stop
responding (this is normal and is not malfunction). You can reconnect to
this broadband router and continue on other settings later.
64
Page 65

3-2-5 L2TP
If your ISP requires you to use L2TP (Layer-2 Tunneling Protocol) to
establish connection, you can select this connection type to establish
Internet connection. L2TP is another popular connection method for
xDSL and other Internet connection types, and all required setting items
are the same with PPTP connection.
Like PPTP, there are two kinds of required setting, we’ll start from ‘WAN
Interface Settings’:
Please select the type of how you obtain IP address from your service
provider here. You can choose ‘Obtain an IP address automatically’ (equal
to DHCP, please refer to ‘Cable Modem’ section above), or ‘Use the
following IP address’ (equal to static IP address, please refer to ‘PPPoE
xDSL’ section above).
WAN interface settings must be correctly set, or the Internet connection
will fail even those settings of L2TP settings are correct. Please contact
your Internet service provider if you don’t know what you should fill in
these fields.
Now please go to L2TP settings section:
65
Page 66

Here are descriptions of every setup items:
Item Name Description
User ID Please input user ID (user name) assigned by
your Internet service provider here.
Password Please input the password assigned by your
Internet service provider here.
L2TP Gateway Please input the IP address of L2TP gateway
assigned by your Internet service provider
here.
MTU Please input the MTU value of your network
connection here. If you don’t know, you can use
default value.
Connection Type Please select the connection type of Internet
connection you wish to use. There are 3
options:
‘Continuous’ - keep internet connection alive,
do not disconnect.
’Connect on Demand’ - only connects to
Internet when there’s a connect attempt,
Manual - only connects to Internet when
‘Connect’ button on this page is pressed, and
disconnects when ‘Disconnect button is
pressed.
Idle T ime Out Please specify the time to shutdown internet
66
Page 67

connect after no internet activity is detected in
minute(s). This option is only available when
connection type is ‘Connect on Demand’.
If you wish to select another connection type as broadband connection
type, click ‘Back’; or you can click ‘OK’ to finish with quick setup.
You’ll see the following messages:
Please click ‘Apply’ to save changes you made and restart the broadband
router, this requires about 30 seconds and the broadband router will stop
responding (this is normal and is not malfunction). You can reconnect to
this broadband router and continue on other settings later.
67
Page 68

3-2-6 Telstra Big Pond
This connection type only works for Telstra big pond network service in
Australia. DO NOT select this connection type if you’re not using Telstra
big pond network service.
Here are descriptions of every setup items:
Item Name Description
User Name Please input the user name assigned by Telstra.
Password Please input the password assigned by Telstra.
User device login
server manually
Check this box to choose login server by
yourself.
Login Server Please input the IP address of login server
here.
If you wish to select another connection type as broadband connection
type, click ‘Back’; or you can click ‘OK’ to finish with quick setup.
You’ll see the following messages:
68
Page 69

Please click ‘Apply’ to save changes you made and restart the broadband
router, this requires about 30 seconds and the broadband router will stop
responding (this is normal and is not malfunction). You can reconnect to
this broadband router and continue on other settings later.
69
Page 70

3-2-7 WISP ( Wireless ISP Connection Mode )
You can connect with ISP via the router wirelessly, because the router
provides WISP connection mode. Click “ Enable “ and “ Select Site
Survey “ button
Here you will find many Wireless Access Points as follows. To Choose an
Access Point which you would like connect , then click “Select” button
and “Done” .
Here you will see the Access Point which you select.
Here we provide WEP and PWA-PSK security settings for you to connect
with ISP (Access Point). If your ISP does not ask you to input the security
key, please choose “ Disable” and click “ Apply “ to save changes you
70
Page 71

made and restart the broadband router, this requires about 30 seconds and
the broadband router will stop responding (this is normal and is not
malfunction). You can reconnect to this broadband router and continue on
other settings later.
71
Page 72

3-3 LAN (Wired)
You can setup Wired LAN (Local Area Network) connections of this
broadband router in ‘LAN’ menu. This broadband router has 4 LAN ports
and they’ll all use the same LAN IP address settings. Please also note that
both wired and wireless LAN uses the same LAN IP address settings, too.
LAN settings split into 3 sections: LAN IP, DHCP Server, and Static
DHCP leases. Please refer to corresponding sections below for detailed
setup instructions.
3-3-1 Start
Before you start - Suggestions for deciding an IP address to be used with
this broadband router
Before all computers using wired Ethernet connection (i.e. those
computers connect to this router’s LAN port 1 to 4 by Ethernet cable) or
wireless connection can communicate with each other and access internet,
they must have a valid IP address.
There are two ways to assign IP addresses to computers: static IP address
(set the IP address for every computer manually), and dynamic IP address
(IP address of computers will be assigned by router automatically. It’s
recommended for most of computers to use dynamic IP address, it will
save a lot of time on setting IP addresses for every computer, especially
when there are a lot of computers in your network; for servers and
network devices which will provide services to other computer and users
that come from Internet, static IP address should be used, so other
computes can locate the server.
This broadband router has a built-in DHCP (Dynamic Host Configuration
Protocol) server, and can help you to assign IP addresses to your client
computers. Almost all network computers / devices manufactured after
year 1995 are compatible with DHCP, and you can let this broadband
router to assign the IP address to client computers / devices for you.
72
Page 73

Suggestions on IP address numbering plan:
If you have no idea on how to define an IP address plan for your
network, here are some suggestions.
1. A valid IP address has 4 fields: a.b.c.d, for most of home and
company users, it’s suggested to use 192.168.c.d, where c is
an integer between 0 and 254, and d is an integer between 1
and 254. This router is capable to work with up to 253 clients,
so you can set ‘d’ field of IP address of router as 1 or 254 (or
any number between 1 and 254), and pick a number between 0
and 254 for field ‘c’.
2. In most cases, you should use ‘255.255.255.0’ as subnet mask,
which allows up to 253 clients (this also meets router’s
capability of working with up to 253 clients).
3. For all servers and network devices which will provide
services to other people (like Internet service, print service,
and file service), they should use static IP address. Give each
of them a unique number between 1 and 253, and maintain a
list, so everyone can locate those servers easily.
4. For computers which are not dedicated to provide specific
service to others, they should use dynamic IP address.
If you don’t really understand the descriptions listed above, don’t
worry! We will provide recommended setup values below.
73
Page 74

3-3-2 LAN IP
If you enable “DHCP Server” , the router can assign IP address to PC
which connect with the router. You can use this setting to assign an IP
address to the LAN interface of this broadband router.
Here are descriptions of every setup items:
Item Name Description
IP address Please input the IP address of this broadband
router’s LAN interface.
Subnet Mask Please input subnet mask for this network.
802.1d Spanning Tree If you wish to activate 802.1d spanning tree
function, select ‘Enabled’ for setup item
‘802.1d Spanning Tree’, or set it to ‘Disabled’.
DHCP Server If you want to activate DHCP server function
of this router, select ‘Enabled’, or set it to
‘Disabled’.
Lease Time Please select the lease time for every DHCP
leases here. You can select the time period from
the dropdown list, and the DHCP client will be
forced to obtain a new IP address from this
broadband router after this period of time.
You can select ‘Forever’ if you’re using this
broadband router with only few computers
(less than 30 computers)
Recommended Value if you don’t know what to fill:
IP Address: 192.168.1.254
Subnet Mask: 255.255.255.0
802.1d Spanning Tree: Disabled
DHCP Server: Enabled
74
Page 75

3-3-3 DHCP Server
You can use this setting to decide the range of IP address leases.
Here are descriptions of every setup items:
Item Name Description
Start IP Please input the start IP address of the IP
leases range.
End IP Please input the end IP address of the IP leases
range.
Domain Name If you wish, you can also input the domain
name for your network. This is optional.
Recommended Value if you don’t know what to fill:
Lease Time: Two Weeks (or ‘Forever’, if you have less than 20 computers)
Start IP: 192.168.2.2
End IP: 192.168.2.200
Domain Name: (leave it blank)
NOTE:
1. The number of the last field (mentioned ‘d’ field) of ‘End IP’ must be
greater than ‘Start IP’, and can not the same with router’s IP address.
2. The former three fields of IP address of ‘Start IP’, ‘End IP’, and ‘IP
Address of ‘LAN IP’ section (mentioned ‘a’, ‘b’, and ‘c’ field) should be
the same.
3. These settings will affect wireless clients, too.
75
Page 76

3-3-4 Static DHCP Leases
If you wish to assign a fixed IP address to certain computers / devices by
DHCP, you can use this function to establish a MAC-to-IP address table
here, so you can assign a specific IP address to a specific computer /
network device by its MAC address.
Here are descriptions of every setup items:
Item Name Description
Enable Static
DHCP Leases
Check this box to enable this function,
otherwise uncheck it to disable this function.
MAC Address Input the MAC address of the computer or
network device (total 12 characters, with
character from 0 to 9, and from a to f, like
‘001122aabbcc’).
IP address Input the IP address you want to assign to
this computer or network device.
Add After you inputted MAC address and IP
address pair, click this button to add the pair
to static DHCP leases table.
Clear Click this button to remove texts in MAC
address and IP address field.
76
Page 77

All MAC-to-IP address entries will be listed in this page, and this
broadband router supports up 16 static DHCP leases:
To delete one or more entries listed here, please check the box of the
mapping entry (under ‘Select’), and click ‘Delete Selected’ button.
If you wish to delete all mapping entries, click ‘Delete All’ button. To
deselect all checked boxes, click ‘Reset’ button.
When you finished with the settings in this page, you can click ‘Apply’
button to save changes you made in this page, or you can click ‘Cancel’
to discard changes. After you click ‘Apply’ button, you’ll see the
following messages:
Please click ‘Apply’ to save changes you made and restart the broadband
router, this requires about 30 seconds and the broadband router will stop
responding (this is normal and is not malfunction). You can reconnect to
this broadband router and continue on other settings later.
77
Page 78

3-4 W ireless
You can setup Wireless LAN connection parameters of this broadband
router in ‘Wireless’ menu:
Please select one setting in this menu, then click ‘Apply’ to proceed. If
you wish to go back to previous page, click ‘Previous’.
78
Page 79

3-4-1 Basic Settings
You can set basic settings of wireless LAN here.
Please select the working mode of this broadband router from ‘Mode’
dropdown list first:
a. AP: Standard wireless AP (access point).
b. Station-Infrastructure: This broadband router acts as both wireless
communication client and server - connects to another wireless access
point as client, and serves other wireless clients as server.
c. AP Bridge-Point to Point: Connect this router with another broadband
router, to expand the scope of network.
d. AP Bridge-Point to Multi-Point: Connect this router with up to four
other broadband routers, to expand the scope of network.
e. AP Bridge-WDS: Connect this router with up to four WDS-capable
broadband routers, to expand the scope of network.
f. Universal Repeater: This broadband router will repeat other wireless
access point’s signal to extend its wireless signal coverage, and also acts
as a wireless access point to serve other wireless clients.
Note : When you enable WISP connection mode, you will not get “b.
Station-Infrastructure” and “f. Universal Repeater “ mode here .
79
Page 80

3-4-1-1 AP mode
In AP mode, the following settings will appear:
Here are descriptions of every setup items:
Item Name Description
Band Please select the radio band from one of
following options:
2.4 GHz (B): 2.4GHz band, only allows
802.11b wireless network client to connect this
router (maximum transfer rate 11Mbps).
2.4 GHz (N): 2.4GHz band, only allows
802.11n wireless network client to connect this
router (maximum transfer rate 150Mbps).
2.4 GHz (B+G): 2.4GHz band, only allows
802.11b and 802.11g wireless network client to
connect this router (maximum transfer rate
11Mbps for 802.11b clients, and maximum
54Mbps for 802.11g clients).
2.4 GHz (G): 2.4GHz band, only allows
802.11g wireless network client to connect this
router (maximum transfer rate 54Mbps).
2.4 GHz (B+G+N): 2.4GHz Band, Allows
802.11b, 802.11g, and 802.11N wireless clients.
80
Page 81

It’s recommends to select this band to maximize
compatibility.
ESSID This is the name of broadband router. You can
type any alphanumerical characters here,
maximum 32 characters. ESSID is used to
identify your own broadband router from
others when there are other broadband routers
in the same area. Default SSID is ‘default’, it’s
recommended to change default ESSID value
to the one which is meaningful to you, like
myhome, office_room1, etc.
Channel Number Please select a channel from the dropdown list
of ‘Channel Number’, available channel
numbers are 1 to 13. You can choose any
channel number you want to use, and almost
all wireless clients can locate the channel
you’re using automatically without any
problem. However, it’s still useful to remember
the channel number you use, some wireless
client supports manual channel number select,
and this would help in certain scenario when
there is some radio communication problem.
Associated Clients Click ‘Show Active Clients’ button to show
the list of all connected wireless clients. You
can click ‘Refresh’ in new window to get
latest list again, or click ‘Close’ to close the
window.
Please note that if you have pop-up blocker
installed, you may have to disable it or tell
your pop-up blocker to allow the popup
window, or you will not be able to see the
wireless client list window.
Advanced Settings When you click ”Advanced Settings”, you
will get a windows as follows. Please do not
change the default settings, if you do not
understand the meaning of the setting.
81
Page 82

Where you can setup Channel Width in ”
Auto 20/40MHz ” to get good wireless
signal.
TIPS: You can try to change channel number to another one if you
think the data transfer rate is too slow, or keep having problem while
transferring the file over wireless network. There could be some other
broadband routers using the same channel, which will disturb the
radio communication between wireless client and the broadband
When you finished with the settings in this page, you can click ‘Apply’
button to save changes you made in this page, or you can click ‘Cancel’
to discard changes. After you click ‘Apply’ button, you’ll see the
following messages:
82
Page 83

Please click ‘Apply’ to save changes you made and restart the broadband
router, this requires about 30 seconds and the broadband router will stop
responding (this is normal and is not malfunction). You can reconnect to
this broadband router and continue on other settings later.
You can click ‘Continue’ to continue on other settings without restart the
broadband router, however, the changes you made will not take effect
before you restart the broadband router.
83
Page 84

3-4-1-2 Station-Infrastructure
In Station-Infrastructure mode, you can select a wireless access point to
become its wireless client, and also acts as wireless access point to serve
other wireless clients. If you have the access privilege of other wireless
access point nearby, and you wish to use that access point to access
Internet, you can use this connection type:
Note : You will not get this mode, when you enable WISP.
Here are descriptions of every setup items:
Item Name Description
Band Please select the radio band from one of
following options (must be the same with the
wireless access point you wish to connect):
2.4 GHz (B): 2.4GHz band, only allows
802.11b wireless network client to connect this
router (maximum transfer rate 11Mbps).
2.4 GHz (N): 2.4GHz band, only allows
802.11n wireless network client to connect this
router (maximum transfer rate 150Mbps).
2.4 GHz (B+G): 2.4GHz band, only allows
802.11b and 802.11g wireless network client to
connect this router (maximum transfer rate
84
Page 85

11Mbps for 802.11b clients, and maximum
54Mbps for 802.11g clients).
2.4 GHz (G): 2.4GHz band, only allows
802.11g wireless network client to connect this
router (maximum transfer rate 54Mbps).
2.4 GHz (B+G+N): 2.4GHz Band, Allows
802.11b, 802.11g, and 802.11N wireless clients.
It’s recommends to select this band to maximize
compatibility.
ESSID This is the name of broadband router. You can
type any alphanumerical characters here,
maximum 32 characters. ESSID is used to
identify your own broadband router from
others when there are other broadband routers
in the same area. Default SSID is ‘default’, it’s
recommended to change default ESSID value
to the one which is meaningful to you, like
myhome, office_room1, etc.
Site Survey Click ‘Select Site Survey’ and a popup window
will appear. All reachable wireless access
points will be shown in the window. Select the
wireless access point you wish to connect from
the list, and click ‘Done’. If the wireless access
point you wish to connect is not listed, you can
click ‘Refresh’ to rescan.
If you still can’t find the wireless access point
you wish to connect, please move the
broadband router to the place nearer to the
access point you wish to connect.
WLAN MAC Some wireless access points will only allow
clients with certain MAC address to
establish connection. In this case, you can
input the MAC address that will be accepted
by the wireless access point you wish to
connect here. You can also click ‘Clone
85
Page 86

MAC’ button to use the MAC address of your
computer (the one you used to connect to the
web management interface currently).
Auto MAC Clone If you wish to use the MAC address of wired
LAN interface of this broadband router,
select ‘Enable’, or select ‘Disable’ to not to
use the MAC address of the wired LAN
interface of this broadband router.
When you finished with the settings in this page, you can click ‘Apply’
button to save changes you made in this page, or you can click ‘Cancel’
to discard changes. After you click ‘Apply’ button, you’ll see the
following messages:
Please click ‘Apply’ to save changes you made and restart the broadband
router, this requires about 30 seconds and the broadband router will stop
responding (this is normal and is not malfunction). You can reconnect to
this broadband router and continue on other settings later.
You can click ‘Continue’ to continue on other settings without restart the
broadband router, however, the changes you made will not take effect
before you restart the broadband router.
86
Page 87

3-4-1-3 AP Bridge-Point to Point
In this mode, you can use this broadband router as a wireless network
bridge and let all computers connected to the LAN ports of both wireless
access points to communicate with each other. This mode supports only
one wireless access point peer.
Please note that when you select this mode, this broadband router will act
as wireless bridge only, and will not accept other wireless clients.
Also, you can connect to the wireless access point with the same
functionality only. If you wish to connect to the wireless access points
made by other manufacturer, please select ‘AP Bridge-WDS’ mode if the
wireless access point you wish to connect supports WDS.
Here are descriptions of every setup items:
Item Name Description
Band Please select the radio band from one of
following options (must be the same with the
wireless access point you wish to connect):
2.4 GHz (B): 2.4GHz band, only allows
802.11b wireless network client to connect this
router (maximum transfer rate 11Mbps).
2.4 GHz (N): 2.4GHz band, only allows
802.11n wireless network client to connect this
87
Page 88

router (maximum transfer rate 150Mbps).
2.4 GHz (B+G): 2.4GHz band, only allows
802.11b and 802.11g wireless network client to
connect this router (maximum transfer rate
11Mbps for 802.11b clients, and maximum
54Mbps for 802.11g clients).
2.4 GHz (G): 2.4GHz band, only allows
802.11g wireless network client to connect this
router (maximum transfer rate 54Mbps).
2.4 GHz (B+G+N): 2.4GHz Band, Allows
802.11b, 802.11g, and 802.11N wireless clients.
It’s recommends to select this band to maximize
compatibility.
Channel Number Select the channel number you wish to use;
both access points must use the same channel.
MAC address 1 Input the MAC address of another wireless
access point (the one you wish to connect).
Set Security Click ‘Set Security’ button to set security
functions of this wireless connection to
improve security. Please refer to chapter
3-2-1-7 for detailed instructions.
When you finished with the settings in this page, you can click ‘Apply’
button to save changes you made in this page, or you can click ‘Cancel’
to discard changes. After you click ‘Apply’ button, you’ll see the
following messages:
88
Page 89

Please click ‘Apply’ to save changes you made and restart the broadband
router, this requires about 30 seconds and the broadband router will stop
responding (this is normal and is not malfunction). You can reconnect to
this broadband router and continue on other settings later.
You can click ‘Continue’ to continue on other settings without restart the
broadband router, however, the changes you made will not take effect
before you restart the broadband router.
89
Page 90

3-4-1-4 AP Bridge-Point to Multi-Point
In this mode, you can use this broadband router as a wireless network
bridge and let all computers connected to the LAN ports of all wireless
access points to communicate with each other. This mode supports up to
four wireless access point peers.
Please note that when you select this mode, this broadband router will act
as wireless bridge only, and will not accept other wireless clients.
Also, you can connect to the wireless access point with the same
functionality only. If you wish to connect to the wireless access points
made by other manufacturer, please select ‘AP Bridge-WDS’ mode if the
wireless access point you wish to connect supports WDS.
Here are descriptions of every setup items:
Item Name Description
Band Please select the radio band from one of
following options (must be the same with the
wireless access point you wish to connect):
2.4 GHz (B): 2.4GHz band, only allows
802.11b wireless network client to connect this
router (maximum transfer rate 11Mbps).
2.4 GHz (N): 2.4GHz band, only allows
802.11n wireless network client to connect this
router (maximum transfer rate 150Mbps).
2.4 GHz (B+G): 2.4GHz band, only allows
802.11b and 802.11g wireless network client to
connect this router (maximum transfer rate
11Mbps for 802.11b clients, and maximum
54Mbps for 802.11g clients).
2.4 GHz (G): 2.4GHz band, only allows
802.11g wireless network client to connect this
90
Page 91

router (maximum transfer rate 54Mbps).
2.4 GHz (B+G+N): 2.4GHz Band, Allows
802.11b, 802.11g, and 802.11N wireless clients.
It’s recommends to select this band to maximize
compatibility.
Channel Number Select the channel number you wish to use; all
access points must use the same channel.
MAC address 1 to 4 Input the MAC address of other wireless access
points (the access points you wish to connect).
Set Security Click ‘Set Security’ button to set security
functions of this wireless connection to
improve security. Please refer to chapter
3-2-1-7 for detailed instructions.
When you finished with the settings in this page, you can click ‘Apply’
button to save changes you made in this page, or you can click ‘Cancel’
to discard changes. After you click ‘Apply’ button, you’ll see the
following messages:
Please click ‘Apply’ to save changes you made and restart the broadband
router, this requires about 30 seconds and the broadband router will stop
responding (this is normal and is not malfunction). You can reconnect to
this broadband router and continue on other settings later.
You can click ‘Continue’ to continue on other settings without restart the
broadband router, however, the changes you made will not take effect
before you restart the broadband router.
91
Page 92

3-4-1-5 AP Bridge-WDS
In this mode, this broadband router acts as both wireless communication
bridge and wireless access point. This broadband router can establish
communication with up to four WDS-compatible wireless access points,
and let all computers connected to the LAN ports of every wireless access
points communicate with each other. The broadband router is able to
serve other wireless clients and acts as a wireless access point at the same
time.
Here are descriptions of every setup items:
Item Name Description
Band Please select the radio band from one of
following options (must be the same with the
wireless access point you wish to connect):
2.4 GHz (B): 2.4GHz band, only allows
802.11b wireless network client to connect this
router (maximum transfer rate 11Mbps).
2.4 GHz (N): 2.4GHz band, only allows
92
Page 93

802.11n wireless network client to connect this
router (maximum transfer rate 150Mbps).
2.4 GHz (B+G): 2.4GHz band, only allows
802.11b and 802.11g wireless network client to
connect this router (maximum transfer rate
11Mbps for 802.11b clients, and maximum
54Mbps for 802.11g clients).
2.4 GHz (G): 2.4GHz band, only allows
802.11g wireless network client to connect this
router (maximum transfer rate 54Mbps).
2.4 GHz (B+G+N): 2.4GHz Band, Allows
802.11b, 802.11g, and 802.11N wireless clients.
It’s recommends to select this band to maximize
compatibility.
ESSID This is the name of broadband router. You can
type any alphanumerical characters here,
maximum 32 characters. ESSID is used to
identify your own broadband router from
others when there are other broadband routers
in the same area. Default SSID is ‘default’, it’s
recommended to change default ESSID value
to the one which is meaningful to you, like
myhome, office_room1, etc.
Channel Number Select the channel number you wish to use; all
access points must use the same channel.
Associated Clients Click ‘Show Active Clients’ button to show
the list of all connected wireless clients. You
can click ‘Refresh’ in new window to get
latest list again, or click ‘Close’ to close the
window.
Please note that if you have pop-up blocker
installed, you may have to disable it or tell
your pop-up blocker to allow the popup
window, or you will not be able to see the
93
Page 94

wireless client list window.
MAC address 1 to 4 Input the MAC address of other wireless access
points (the access points you wish to connect).
Set Security Click ‘Set Security’ button to set security
functions of this wireless connection to
improve security. Please refer to chapter
3-2-1-7 for detailed instructions.
When you finished with the settings in this page, you can click ‘Apply’
button to save changes you made in this page, or you can click ‘Cancel’
to discard changes. After you click ‘Apply’ button, you’ll see the
following messages:
Please click ‘Apply’ to save changes you made and restart the broadband
router, this requires about 30 seconds and the broadband router will stop
responding (this is normal and is not malfunction). You can reconnect to
this broadband router and continue on other settings later.
You can click ‘Continue’ to continue on other settings without restart the
broadband router, however, the changes you made will not take effect
before you restart the broadband router.
94
Page 95

3-4-1-6 Universal Repeater
In this mode, this broadband router acts as a wireless repeater. It will
repeat the signal of the wireless access point you specified, to extend its
wireless coverage. The broadband router will still accept wireless clients
when in this mode.
Note : You will not get this mode, when you enable WISP.
Here are descriptions of every setup items:
Item Name Description
Band Please select the radio band from one of
following options (must be the same with the
wireless access point you wish to connect):
2.4 GHz (B): 2.4GHz band, only allows
802.11b wireless network client to connect this
router (maximum transfer rate 11Mbps).
2.4 GHz (N): 2.4GHz band, only allows
802.11n wireless network client to connect this
router (maximum transfer rate 150Mbps).
2.4 GHz (B+G): 2.4GHz band, only allows
802.11b and 802.11g wireless network client to
connect this router (maximum transfer rate
95
Page 96

11Mbps for 802.11b clients, and maximum
54Mbps for 802.11g clients).
2.4 GHz (G): 2.4GHz band, only allows
802.11g wireless network client to connect this
router (maximum transfer rate 54Mbps).
2.4 GHz (B+G+N): 2.4GHz Band, Allows
802.11b, 802.11g, and 802.11N wireless clients.
It’s recommends to select this band to maximize
compatibility.
ESSID This is the name of broadband router. You can
type any alphanumerical characters here,
maximum 32 characters. ESSID is used to
identify your own broadband router from
others when there are other broadband routers
in the same area. Default SSID is ‘default’, it’s
recommended to change default ESSID value
to the one which is meaningful to you, like
myhome, office_room1, etc.
Channel Number Select the channel number you wish to use; all
access points must use the same channel.
Associated Clients Click ‘Show Active Clients’ button to show
the list of all connected wireless clients. You
can click ‘Refresh’ in new window to get
latest list again, or click ‘Close’ to close the
window.
Please note that if you have pop-up blocker
installed, you may have to disable it or tell
your pop-up blocker to allow the popup
window, or you will not be able to see the
wireless client list window.
Root AP SSID Please input the SSID of the wireless access
point you wish to extend signal coverage.
Site Survey Click ‘Select Site Survey’ and a popup window
will appear. All reachable wireless access
points will be shown in the window. Select the
96
Page 97

wireless access point you wish to connect from
the list, and click ‘Done’. If the wireless access
point you wish to connect is not listed, you can
click ‘Refresh’ to rescan.
If you still can’t find the wireless access point
you wish to connect, please move the
broadband router to the place nearer to the
access point you wish to connect.
When you finished with the settings in this page, you can click ‘Apply’
button to save changes you made in this page, or you can click ‘Cancel’
to discard changes. After you click ‘Apply’ button, you’ll see the
following messages:
Please click ‘Apply’ to save changes you made and restart the broadband
router, this requires about 30 seconds and the broadband router will stop
responding (this is normal and is not malfunction). You can reconnect to
this broadband router and continue on other settings later.
You can click ‘Continue’ to continue on other settings without restart the
broadband router, however, the changes you made will not take effect
before you restart the broadband router.
97
Page 98

3-4-1-7 Set Security
In certain AP working modes, you can enable encryption to improve
security level.
When you click ‘Set Security’ button, the following window will appear:
Please select an encryption method from ‘Encryption’ dropdown menu,
and corresponding setting will appear:
Disabled
Encryption is disabled. It’s not recommended to disable encryption
because other people may use certain wireless scanner to copy the data
transferred over air.
98
Page 99

WEP
Select WEP to enable WEP (Wired Equivalent Privacy) encryption:
Here are descriptions of every setup items:
Item Name Description
Key Length There are two types of WEP key length: 64-bit
and 128-bit. Using ‘128-bit’ is safer
than ’64-bit’, but will reduce some data
transfer performance.
Key Format There are two types of key format: ASCII and
Hex. When you select a key format, the number
of characters of key will be displayed. For
example, if you select ’64-bit’ as key length,
and ‘Hex’ as key format, you’ll see the message
at the right of ‘Key Format’ is ‘Hex (10
characters), which means the length of WEP
key is 10 characters.
Default Tx Key You can set up to four sets of WEP key, and you
can decide which key is being used by default
here. If you don’t know which one you should
use, select ‘Key 1’.
Encryption Key 1 to 4 Input WEP key characters here, the number of
characters must be the same as the number
99
Page 100

displayed at ‘Key Format’ field. You can use
any alphanumerical characters (0-9, a-z, and
A-Z) if you select ‘ASCII’ key format, and if
you select ‘Hex’ as key format, you can use
characters 0-9, a-f, and A-F. You must enter at
least one encryption key here, and if you
entered multiple WEP keys, they should not be
same with each other.
Please click ‘Apply’ to save changes, or click ‘Reset’ to clear the texts in
all fields. If you click ‘Apply’, the following messages will appear:
You can click ‘Continue’ to back to previous page and continue setting, or
click ‘Apply’ to restart the broadband router so the changes will take
effect.
WPA pre-shared key
WPA (Wi-Fi Protected Access) is also an encryption method and is safer
than WEP. It’s recommended to use WPA instead of WEP when you need
to use encryption to protect your data security.
100
 Loading...