

Page 1

880022..1111gg W
Wiirreelleessss LLAANN
PPCCII AAddaapptteerr
User Manu al
Page 2

Ver sion: 1.1
(June, 2005)
COPYRIGHT
Copyright © 2005/2006 by this company. All rights reserved. No part of this
publication may be reproduced, transmitted, transcribed, stor ed in a retrieval
system, or translated into any language or computer language, in any form or
by any means, electronic, mechanical, magnetic, optical, chemical, manual or
otherw ise, w itho ut th e prior written permission of th is c ompany
This company makes no representations or warranties, either expressed or
implied, with respect to the cont ents hereof and specific ally disclaims any
warranties, merchantability or fitness for any particular purpose. Any software
described in this manual is sold or licensed "as is". Should the programs
p ro ve de fecti ve following thei r pur chase, the bu yer (a nd not this com pan y, its
distr ibutor, or its dealer) assumes the entire cost of all necessary servicing,
r epai r , and any inci den tal or consequent ial damages res ul ting from any de fe ct
in the s of tware. Fu r ther, this com pany reserves the righ t to re vis e this
pu blic at ion and to m ake changes from t im e to time in t he contents hereo f
without obligation to notify any person of such revision or changes.
All brand and product names mentioned in this manual are trademar ks and/or registe red
t rademarks of their respecti ve holders.
Page 3

Fe deral Communication Commission
Interference Statement
This equipment has been tested and found to comply with the limits for a
Class B digital dev ice, pursuant t o Part 15 of FCC Rules. These limits are
designed to provide reasonable protection against harmful interference in a
residential installation. This equipment generates, uses, and can radiate radio
frequency energy and, if not installed and used in accordance with t he
instruc tions , m a y cause harmful inte r ference to radio com m unica tions.
Howev er, there is no guarantee that interference will not occur in a particular
installati on . If this equipm ent does caus e harmful int er ferenc e to radio or
television reception, which can be determined by turning the equipment off
an d on , the us er is encou raged to try to correc t t he interfe ren ce by one or
m ore of the foll owing meas ures:
1. Reorient or r elocate t he r ec eiving antenn a.
2. Inc r ease the sep ar atio n betwe en the eq uipment and receiver.
3. Connect the equipm ent into an outlet on a circuit different from that to which the
receiver is connecte d.
4. Consu lt the dealer or an experie nc ed r adio t ec hnician f or help.
FC C Caut i on
This equipment must be installed and operated in accordance with provided
instr uctions and a minimum 5 cm spacing must be provided between
computer mounted antenna and person’s body (excluding ext remities of
hands, wrist and feet) during wireless modes of operat ion.
This device complies wit h Pa rt 15 of the FCC Rules . Opera tion is s ubjec t to
the following two conditions: (1) this device may not cause harmful
interference, and (2) this device must accept any interference received,
including interference that may cause undesired operation.
Any changes or modifications not expressly approv ed by the party responsible
for compliance c ould void the autho ri ty to opera te equipm ent.
Federal Communication Commission (FCC) Radiation Exposure Statement
This equipment complies with FCC radiation ex posure set forth for an
un con t rolled envi ronm en t . In orde r to a voi d th e pos s ibility o f exceeding the
FCC radio frequency exposure limits, human proximity to the antenna shall
not be less than 20cm (8 inches) during normal operation.
Page 4

R&TTE Compliance Statement
This equipment complies with all the requirements of DI RECTIVE 1999/5/CE
OF THE EUROPEAN PARLIAMEN T AND THE C OUNCIL o f March 9, 1999 on
radio equipment and telecommunication t erminal Equipment and the mutual
recognition of their conformity (R&TTE)
The R&TTE Directive repeals and replaces in the directive 98/13/EEC
(T elecommunications Terminal Equipment and Satellite Earth Station
Equipment) A s of April 8, 2000.
Safety
This equipment is designed with the utmost care for the safety of those who
install and use it. However, special attention must be paid to the dangers of
electric shock and static electricity when working with electrical equipment. All
guidelines of t his and of the computer manufacture must therefore be allowed
at all times t o ensure the saf e use of the equipment.
EU Countries Intended for Use
The ETSI version of this device is intended for home and off ice use in A ustria,
B elgium, Denmar k , Fi nland, France , Germ any, Gree ce , Irelan d, I taly,
Lu xem bou rg , the Netherlands , Por tugal, Spain , Sweden, and the Unite d
K ingdom.
The ETSI version of this device is also authorized for use in EFTA member
s tat es : Iceland, Liech tenstein, Norwa y, and Swi t ze rlan d.
EU C ountries N ot intended fo r use
No ne.
Page 5

CONTENTS
1 INTRODUCTION............................................................. 1
1.1 FEATURES........................................................................................ 1
1.2 SPEC IFICAT I ONS................................................................................ 1
1.3 PACKAGE CONTENTS.......................................................................... 2
2 INSTALLATION PROCEDURE.......................................... 3
3 C ONFIGUR ATIO N UTI LI TY ........................................... 10
3.1 WIRELESS CONNECTION STATUS......................................................... 10
3.2 PROFILE MANAGEMENT ....................................................................11
3.3 DIAGNOSTICS ................................................................................. 12
3.4 SECURITY......................................................................................13
3.4.1 WPA Setting................................................................................15
3.4.2 Usin g WPA Passphrase Security.........................................................22
3 . 4. 3 Pre -S h ar ed Encryp tion Key s..............................................................23
OVERW RIT ING AN EXISTING STATIC WEP KEY .............................................. 24
DISABLING STATIC WEP .......................................................................... 24
4 TROUBLESHOOTI NG .................................................... 25
Page 6

1 Introduction
Thank you fo r pu rchasing the 802.11g Wi reless LAN Ca rbu s Adapter. This Adapter is
de si gn ed to com ply with IEEE 802.11g Wi rele ss LA N standa rd and easy to carr y with the
Mini si ze. I t is suitable for any Laptop or De sktop computers.
Thi s adapte r sup port s 64/128/152-bit WEP da ta en cryption that p rotect s you r wirel ess
net work f rom eave sdropping. It also supports WPA (Wi-Fi Protected Access) feature that
c ombi nes IEEE 80 2.1x and TKIP (Tem p oral Key Integrity Protocol) te chnologi es. Cli ent
users are required to authorize before accessing to APs or AP Router s, and the data
t ran smi tted in the netwo r k is enc rypted/decrypted by a dyn am i cally changed secret key.
I t supports the Super G mode feature to enhance the data rate to reach to 108Mbps, it can
enhance the data rate when it connect with Super G produ ct .
This adapter is with the versatile features; it is the best solution for you to build your
wireless ne twork.
1.1 Features
• Complies wi th the IEEE 802.11b and IEEE 802.11g 2.4GHz standards.
• Up to 54Mbps high data transfer rate. ( 108M : Super G mode enabled)
• Sup por t 64/ 128/152- b it W E P, WP A , IE EE 80 2. 1x h ig h level of s ec urity.
• Complie s with IEEE 802.11d country roaming standard.
• Support the most popular operating system: Windows 98SE/Me/2000/XP.
• Suppor ts Standard 32bit Ca r dbus interface.
• Portable and Compact- size design.
• Suitable for Any Notebook.
1.2 Specifications
• Standard: IEEE 802.11g/b
• Bus Type: 32-bit Car dbus
• Frequency Band: 2.4000~2.4835GHz (Industrial Sci entific Medical Band)
• M odulatio n : OFDM with B PSK, QPSK, 16QA M, 64QAM (11 g )
BPSK, QPSK, CCK (11b)
• Data Rate: 54/48/36/24/18/12/11/9/6/5.5/2/1Mbps auto fall back (108Mbps: Super G enabled)
• Securi ty: 64/128/152-bit WEP Data Encryption, WPA , IEEE 802.1x
• Antenna: Internal Antenna
• Drivers: Wi ndows 98SE/Me/2000/XP/2003 Server
• LE D: Link, Activi ty
• T ransmit Power: 16 ~18 dBm (T ypi cal )
1
Page 7

• Dimensi on: 8(H) x 118(W) x 54(D) mm
• T emperature: 32~131°F (0 ~55°C)
• Humidity: 0-95% (NonCondensing)
• Certific at ion: FCC, CE
1.3 Package Contents
Before you begin the installati on, please check the items of your pac kage. The package
should include the following items:
• One PC Car d
• One CD (Driver/Utility/User’s M anual.)
• One Qu ick Gui de
I f a ny o f t he above i tems is missi ng, contac t y our su pplier as soo n as p ossi ble.
2
Page 8
2 Installation Procedure
Before you proceed with the installation, please notic e fol l owing descriptions.
Note1 : The fol l owing insta llation was operated i n Windows XP. (Procedur es are si m i lar for
Windows 98SE/Me /2000)
Note2: If you have installed the Wireless PC Card driver & utility before, please uninstall the
old v ersion fi r st.
Note3 : For Window s 98SE pl ea se m ake sure your copy of wi ndows i s fully updated with the
la tes t hotfix es by going to http://windowsupdate.microsoft.com
Th is chap te r describ es u s in g the Ath e ro s insta lle r to in s ta ll th e Athero s wireles s
net wo rk ad ap ter driver.
Installation
Note: P lease ensure th e Su per-G cardbus adapter is firmly
inserted to the cardbus slot before startin g the setu p
program.
To install th e ACU and devi c e driver:
1. I n s ert the d evi ce into the co mp u ter, an d ins ert the i n s tallatio n CD.
2. Open the InstallShield Wizard (setup.exe).
3. Th e Ath e ro s C lien t In s ta llation in s ta ller ope n s . Select the lan g uage yo u wis h
the in s ta llatio n p ro g ram to p ro ceed in . C lick Nex t.
4. The Atheros license agreement window appears. Read and accept the
agreement to continue. C lick Nex t.
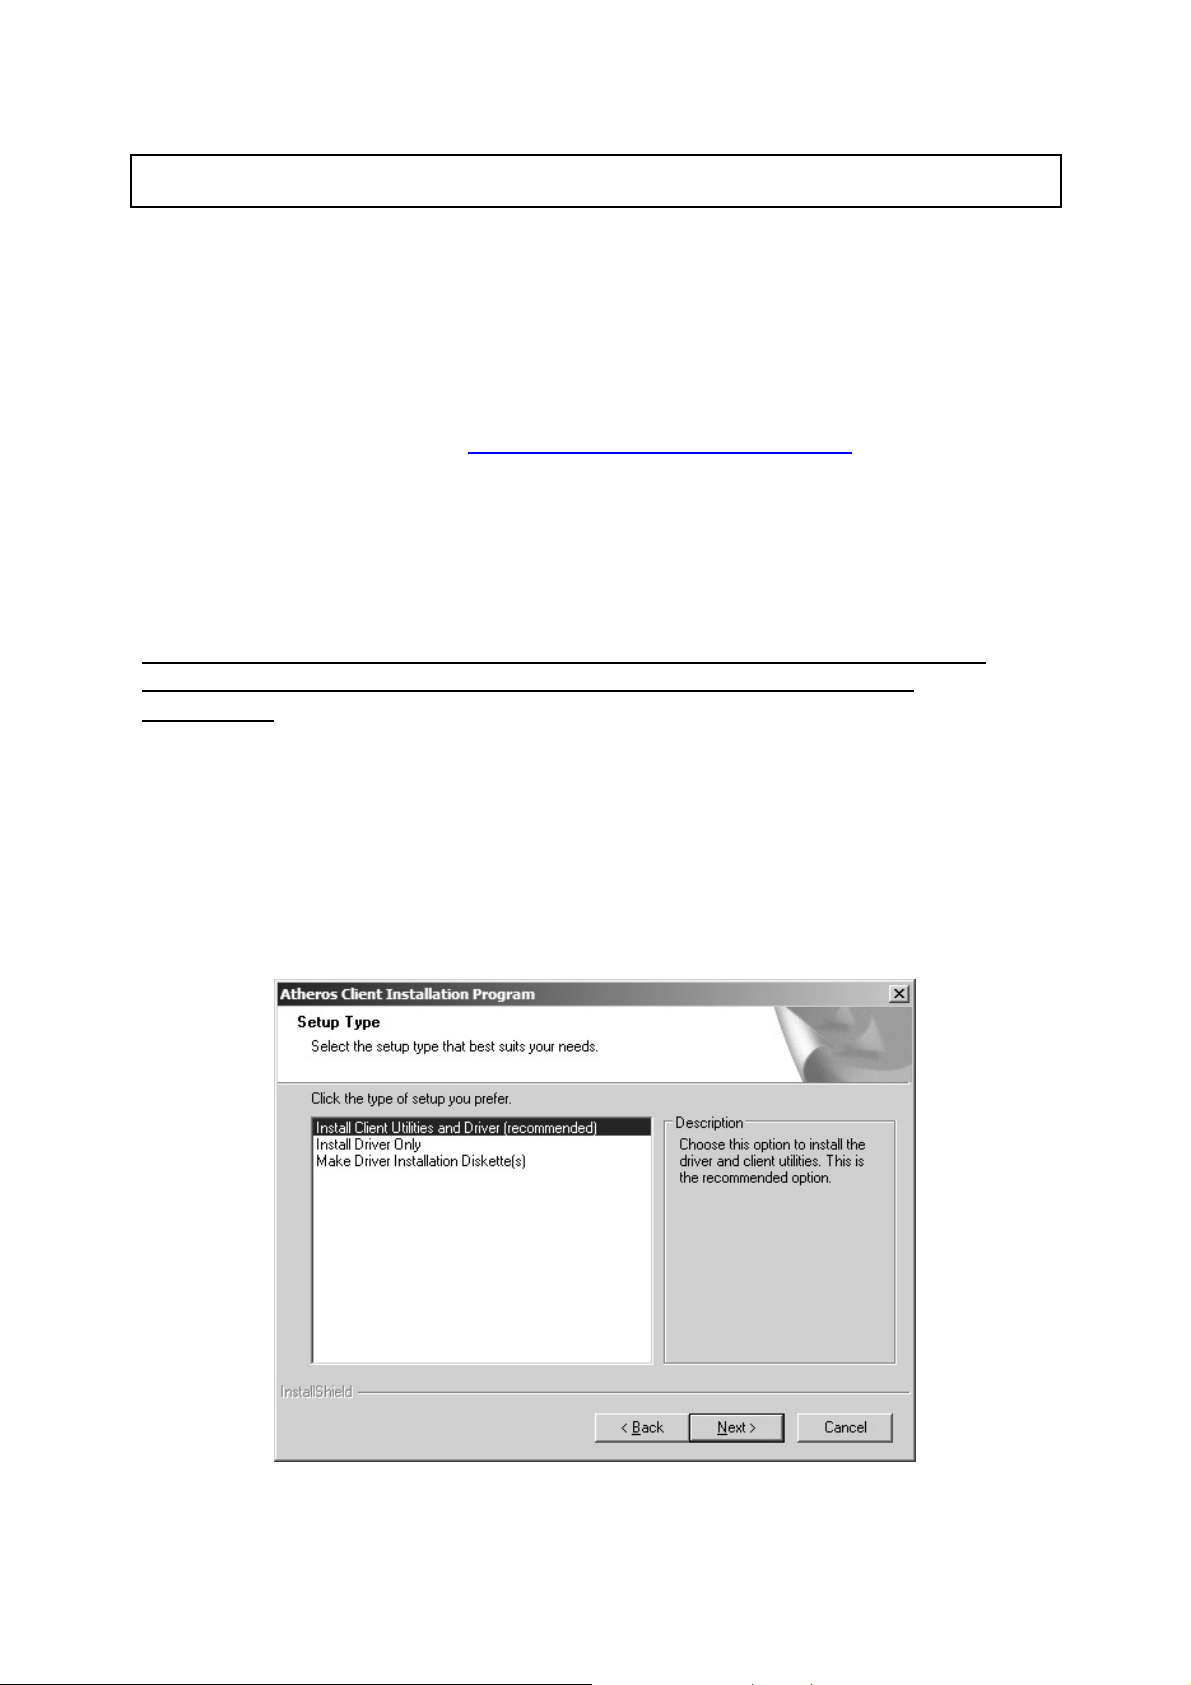
5. T h e I nstallatio n Program win do w appears with three s etu p op ti on s.
To in s ta ll th e clie n t utili tie s an d d river, se lect the a ppro p r ia te in s ta llatio n type
(se e Tab le (2-1 ) a nd click Next.
3
Page 9
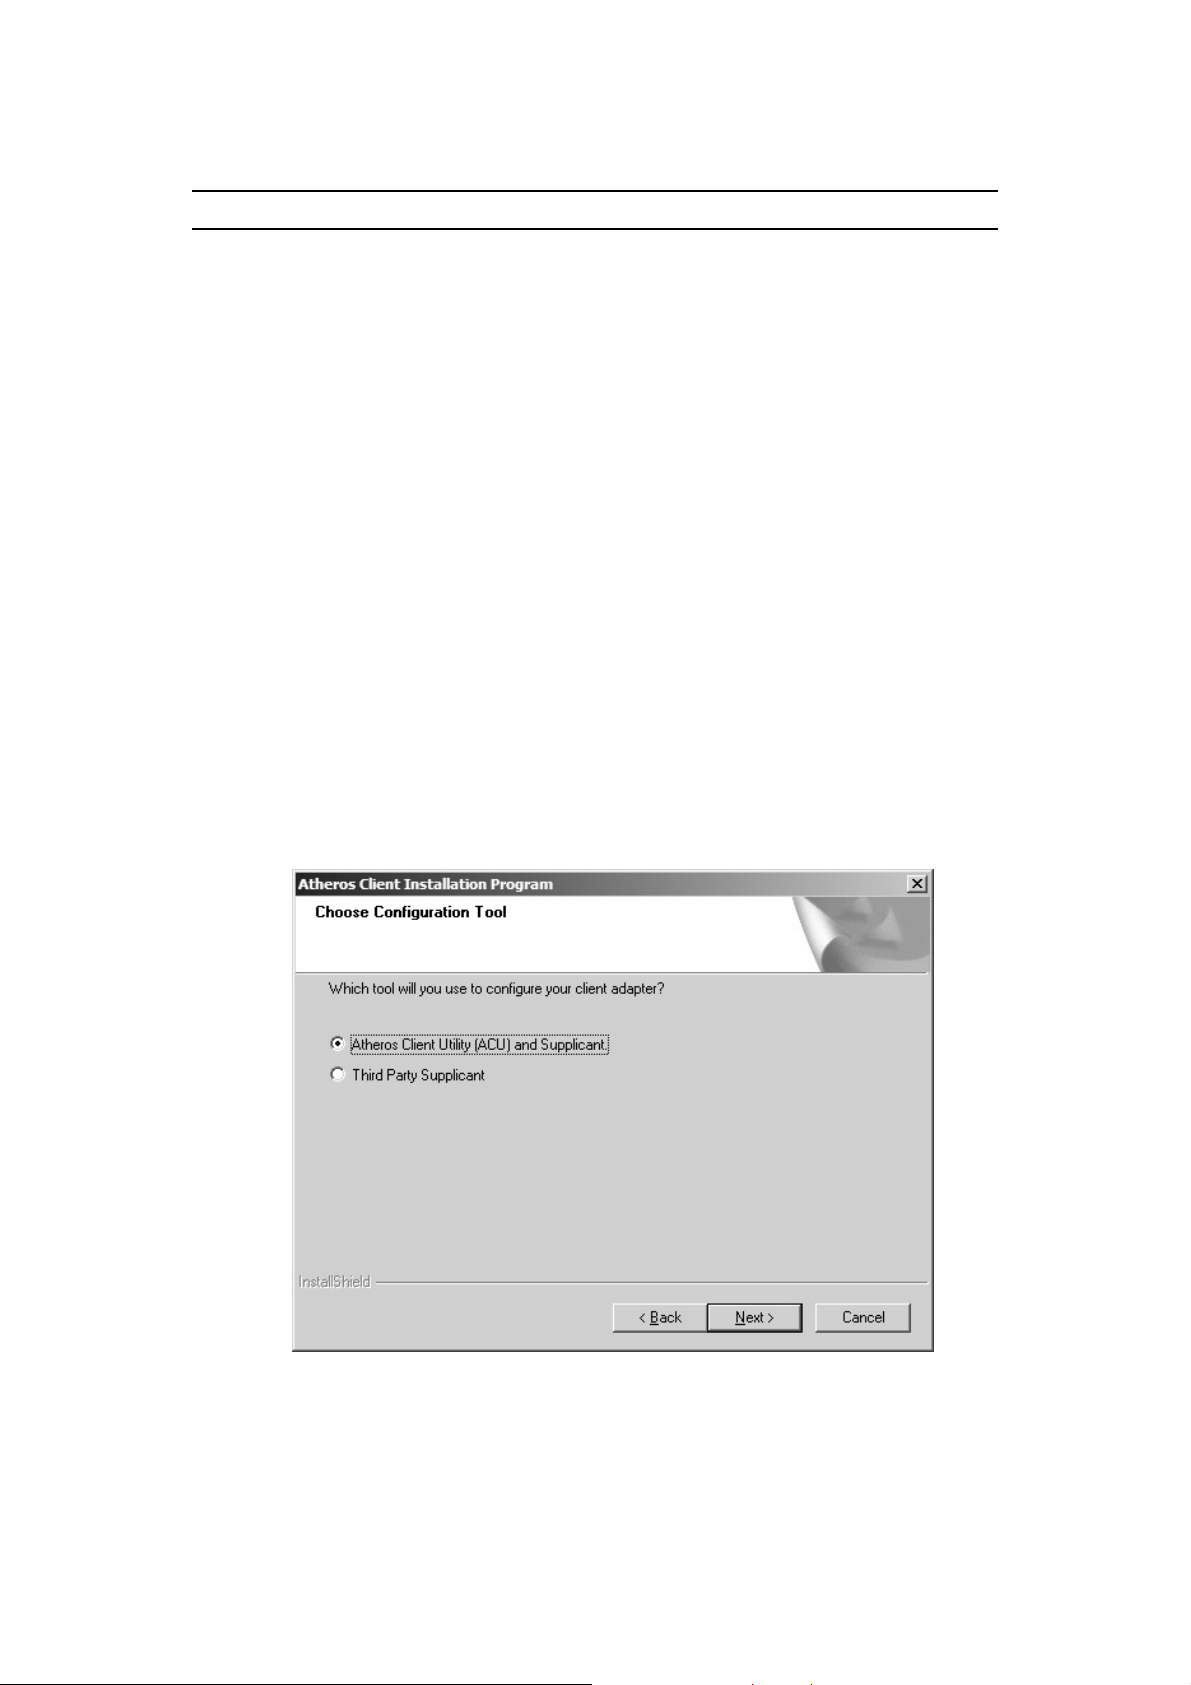
Table 2-1. Insta ller I nsta llat ion Se lect ions
Rad io But ton Description
Install Client
Utilitie s and
Dri ver
(recommended)
In stall Driver Only Installs only the driver without installing the client utilities.
Make Driver
Installation
Diske tte(s)
6. A promp t a p pears wa rning that the in s ta ll re q u ires the sys tem to be reb oo te d
a t the en d of th e in s ta llatio n p ro ces s . Click Y es to co ntin u e .
7. Choo se the setup directo ry. The default is C:\Program Files \ Atheros.
Click Next.
8. Choose the program folder for the start menu. The default is Athero s . C lick
Next.
9. For a windo ws XP installation, the next screen defines the Windo ws Ze ro
Configura tio n. Windows XP Ze ro Configura tion provides functio nality to
a u toma ti ca l ly t ry to con nect th e statio n to availabl e wire l ess ne two rk s . For
comp lete in forma tio n o n Windows Ze ro C on fig u ra tio n , see the M ic roso f t web
site.
10 .I n this in s tallatio n , s elect th e Athero s C lient Utility an d Supp lica n t.
Install s the driver and client utilities. This is the recommends
option.
Creates driver installation diskettes.
C lick Next. T h e insta ller a u to ma tically ins ta lls th e d ri ve r.
11 .M a ke su re th a t the USB d e vice is in s e rted . I f it is n o t, in s ert it, th e n ca n cel
the fo un d Ne w Ha rd ware W izard if it appea rs. Proceed wi th the ins tallation.
Cl ick OK .
12.W indows m ay display a Windows Logo error for the USB bootloader. Click
Continue Anyway.
4
Page 10

13 .Win d ows ma y dis p lay a Win dows L o g o er ror fo r the WLAN drive r. C lick Click
Continue Anyway.
Th e in s ta ller co n tinu es in s ta llatio n .
14. Cl ick OK at th e p ro mp t to reboot and compl ete the in stallatio n.
5
Page 11

Insta lling the At heros U SB Wireless Network
Adapter
To in s ta ll th e U SB d r ive r a nd th e Atheros Client Utility, s ee “ T o in s ta ll th e ACU
and USB device driver:” on page 2-1.
To in s ta ll th e U SB De vice Dr ive r sep ara te ly:
1. Insert the USB device into the computer: The Found New Hard ware Wizard
opens. C hoose advanced insta llation and cli ck Next.
2. Ch oos e Se arch for dri ve r in the se lo ca tio n s . T he d river is lo ca te d in th e
Nd is 5 x \ 2 KXP d ire c to ry. ( For W in d ows 9 8 SE/ME comp u ters, th e d river is lo ca te d
in the Ndis5 x\9 8ME).
3. Windows ma y displa y a W indows Logo error fo r the bootloader. C lick Co ntinue
An yway. The ins talle r will continue with the ins ta llatio n.
6
Page 12

4. Cl ick Fi n ish to clos e th e Fou n d New H ardware Wiza rd and co m p l ete in s tallatio n
of the USB device bootloader.
5 . The F oun d Ne w Ha rdwa re Wizard opens to i nst al l sof tware f or t h e USB dev i ce.
Click Nex t to continue.
6. Ch oos e Se arch for dri ve r in the se lo ca tio n s . T he d river is lo ca te d in th e
Nd is 5 x \ 2 KXP d ire c to ry. ( For W in d ows 9 8 SE/ME comp u ters, th e d river is lo ca te d
in the Ndis5 x\9 8ME).
7
Page 13

7. Windows ma y display a Windo ws Logo error for the WLAN driver. Cli ck
C o n tinu e An yway. T h e in s ta ller will co n tinu e th e insta llatio n .
8. Cl ick Fi n ish to clos e th e Fou n d New H ardware Wiza rd and co m p l ete in s tallatio n
o f th e Athero s U SB Netwo rk Ad ap ter.
Use the ACU to configure the device driver. The ACU provides extensive online
help to a id i n co nf igurin g th e de vice . A c cess th e ACU b y ri g h t- cl ick in g the tray
i co n and choos in g Athero s Clie n t Utility.
III. Using the Configuration Utility
To setup the USB adapter, double-cli ck the icon i n the sy stem tray.
8
Page 14

A
For Wi ndows XP, there is a “Windo w s Zero Configurati on Tool” b y def ault fo r you to setup
wireless client s. If you want to u se the Utility of the USB adapter, pl ease foll ow one of the
ways as below.
. Double-clic k the icon.
B. Click “Ad van ce ”.
C. U nchec k “U se Win do w s to
confi gure m y wireless
net wo rk se tti ngs”.
9
Page 15

3 Configuration Utility
The Client Utility is a user-mode utility designed to edi t and add profi les for, as well as
displ ay and diagnostics pe rtaining to a selected wirel e ss USB adapte r.
3.1 Wirel ess Connect ion St at us
When you open the Confi gura tion Utility, the system will scan all the channels to fi nd al l the
access poi nts/stations within the accessibl e ra nge of your card and automaticall y connect to
the wireless device with the highest si gnal strength. From the sc reen , y ou m ay know all the
infomration about the wireless connecti on.
10
Page 16

3.2 Profile Management
Parameter Description
New To add a new configuration profi le, click Ne w on the Profi l e
Management tab. T o m odify a configura tion profile, sel ect the
confi gurati on from the Profile l ist and clic k the Modify bu tto n.
Modify
Remove Select the profi le to remo ve from the l ist of configuration p rofiles.
Imp ort
In the Atheros Client Utility, access the General tab by clicking New or
Modify on the Profile Management tab.
Edit the fields i n the General tab to configure the configuration
profile. M ake sure to also edi t the Securi ty and Advanced tabs.
1. From the Profile Managem ent ta b , clic k the Import b u tto n.
The Import Profi le windo w appears.
2. Browse to the directory whe re the profi le is located.
3. Highli ght the profi l e nam e.
4. Cli ck Open. The im ported profile appears in the profiles
li st.
Export
1. From the Profile Managem ent tab, high ligh t th e profil e to
export.
2. Cli c k the Export button. The Expo r t Profile window
appea r s.
11
Page 17

3. Browse to the directory to expo rt the pro fi l e to.
4. Cli ck Save. The profi l e is exported to the spe cifi ed
loca tion.
Orde r Profiles
In cludi ng a profi le in the auto selection feature al lows the wi reless
adapter to automaticall y selec t that profile from the l ist of profiles
and use i t to connect to the network.
3.3 Diagnostics
The client utility includes a number of tools to di splay current diagnostics and status
information.
Parameter Description
Adapter Information The Adapter Information button contains general information
about the networ k interface card (the wireless networ k adapter)
and the networ k driver inte rface specification (NDIS ) d rive r.
Advanced Sta tistics The Diagnostics tab of the Athero s Client Utility p rovides buttons
used to re tri eve re ceive and transmit statistic s. The Diagnostic s
tab does not require any configuration
12
Page 18

3.4 Security
Thi s Chapter de scribe s setting up se cu rity u sing th e Athe ros Client Utility(A CU).
Whil e using the Atheros USB wireless networ k adapte r , encryption data can protect it s as it
i s t ran smitted th rough the wi rele ss networ k.
While usi ng the Atheros USB wi reless network adapter, encrypting data can
protect its privacy as it is transmitted through the wireless network.
The ACU allows connection profiles of:
z No security (not recomm ended)
Link encryption/decryption is disabl ed, no keys are installed.
z WPA security
Enables the use of Wi-Fi Protected Access (WPA). This option requires IT
administration. This option incl udes the EAP (wi th dynamic WEP keys)
security protocols: EAP, PEAP, and LEAP.
WPA is a standard-based, interoperable security enhancement that
provides data protection and access control for wireless LAN sy stems. It
is de rived from and is forward-compatible wi th the upcoming IEEE
802.11i standard. WPA leverages Temporal Key Integrity Protocol (TKIP)
and Michael message integri ty check (MIC) for data protecti on, and
802.1X for authenticated key m anagement.
WPA supports two mutually exclusive key management types: WPA and
WPA passphrase (also known as WPA-Pre Shared Key (PSK)). Using
WPA, clients and the authentication server authenti cate to each other
using an EAP authentication method, and the client and server generate a
pai rwi se master key (PMK). The server generates the PMK dynamically
and passes it to the access point.
z WPA-PSK security
Enables WPA passphrase security (al so known as WPA-Pre Shared Key
(PSK)).
z 802.1x security
Enable s 802.1x se curi ty. This o ption requires IT adm inistrati on. Thi s
option includes the EAP (with dynamic WEP keys) security protocol s:
EAP, PEA P, an d LEAP.
802.1x is the standard for wireless LAN securi ty defi ned by IEEE as 802.1x
for 802.11, or simply 802.1x. An access point that supports 802.1x and i ts
protocol, Extensible Authentication Protocol (EAP), acts as the i nterface
between a wi reless client and an authenti cation server such as a RADIUS
server, to which the access point communi cates over the wired network.
z Pre-Shared Key security (Static WEP)
Static WEP enables the use of up to four pre-shared (static wired equivalent pri vacy
(WEP)) keys that are defined on both the access poi nt and the client station.
These keys are stored in an encrypted format in the registry of the
Wi ndows device. When the driver loads and reads the USB devi ce's
registry parameters, it also finds the static WEP keys, decrypts them, and
stores them in volatile memory on the USB devi ce.
If a device recei ves a packet that is not encrypted with the appropriate key,
the device discards the packet and never delivers it to the intended recipi ent.
13
Page 19

This is because the WEP keys of all devi ces that are to communicate with each
o ther must match.
Authenti cation Process
Enabling EAP on the access point and configuring the USB devi ce to LEAP,
EAP-TLS, PEAP (EAP-GTC), or PEAP (EAP-M SCHAP V2) authentication to
the network occurs in the following sequence:
1. The cl ient associates to an access point and begins authentication.
2. Communicating through the access point, the client and RADIUS server
complete authentication wi th the password (LEAP a nd PEAP) or
certifi cate (EAP-TLS). The password is never transm itted during the
process.
3. After successful authentication, the client and RADIUS server deri ve a
dynami c WEP key uni que to the cli ent.
4. The RADIUS server transm its the key to the access point using a secure
chan nel on the wir e d LAN .
5. For the length of a sessi on the access point and the client use thi s key to
encrypt or decrypt all unicast packets (and broadcast packets).
O verview O f t he S ecurity Configurat io n Op tions In ACU
Rad io But ton Descr ip tion
WPA
Enables the use of Wi -Fi Pro tecte d Acce ss ( WPA).
Choosi ng WPA opens the WPA EAP drop -down menu. T he
options include:
EA P-TLS
EA P-TTLS
PE AP (EAP -GT C)
PE AP (EAP -MS CHAP V2 )
LEAP
WPA
Pass phras e
Enable s WPA Pa ssph ra se se curi ty.
Click on the Configure button and fill in the WPA Pa ssphra se.
802.1x
Enables 802.1 x security. This option require s IT admi nistration.
Choosi ng 802.1x open s the 802.1x EAP typ e drop-down
menu. T he options include:
EA P-TLS
EA P-TTLS
PE AP (EAP -GT C)
PE AP (EAP -MS CHAP V2 )
LEAP
I f the ac cess point that the wi rele ss adapte r i s a sso ciating to ha s
WEP set to Optional and the cl ient ha s WEP en abled, ma ke sure
14
Page 20

that All ow A sso ciation to M ixed Cell s i s chec ked on the Security
Tab to al low asso ciation.
Pre-Shared
Enable s the u se of pre -shared key s tha t a re de fined on bo th th e
a cce ss poi nt and the station.
Key(Stat ic
WEP)
To define pre-shared encryption keys, choose the Pre-Sh are d Ke y
radio button and click the Confi gure button to fill in the Defi ne
P re -Sha red Keys window .
I f the ac cess point that the wi rele ss adapte r i s a sso ciating to ha s
WEP set to Optional and the cl ient ha s WEP en abled, ma ke sure
that All ow A sso ciation to M ixed Cell s i s chec ked on the Security
Tab to al low asso ciation.
None
No securit y (not re commended ).
3.4.1 WPA Security Settings
EAP Security
To use EAP security, access the Security tab in Profile Management.
1. In t h e A C U, e di t t he sec urity s ett in gs by clickin g New or Mo dify o n th e
Profile Ma nagement tab .
2. Choose a profile to edit, or name the new profile in the Profile
Ma n agement win d o w. En ter th e SSI D of th e a c ces s po int the s ta ti on
co nnects to.
3. On the Secu rity tab , choose the WP A radio bu tton.
O R: On th e S e c urity tab, choos e th e 8 0 2.1 x rad i o b u t to n .
4 . Choose EAP- TL S o r EAP-TTL S from the drop-do wn menu
15
Page 21

Using EAP-TLS Security
Imp ortan t Note : To use EAP -TT LS security, the machine m ust already have the EA P-
TTLS certificate s downloaded onto it f rom a Cer ti ficate Authority (CA). Pl ease chec k with
your IT adm inist rator.
To use EAP-TLS secu rity In the Athe ros Client Utility, access the Se cu rity tab in the Profile
Management window.
1. On the S ecurity tab, choo se the WPA radio button .
O R: On the Security tab, choose the 802.1x radio button.
2. Choo se EAP -TLS f rom the drop -do wn menu.
Enabling EA P-TLS security:
Imp ortan t Note : To use EAP -TT LS security, the machine m ust already have the EA P-
TTLS certificate s downloaded onto it f rom a Cer ti ficate Authority (CA). Pl ease chec k with
your IT adm inist rator.
1. If EAP -TLS is supported, choose EAP-TLS from the drop -do wn menu on the right,
then click the Configure button.
2. Sele ct the appropriate certificate authority from the l ist. T he server /domain name
and the logi n nam e are fil l ed in automatically from the certificate information. Clic k
OK.
3. Cli ck OK.
4. Activate th e profil e .
16
Page 22

Using EAP-TTLS Sec urit y
Imp ortan t Note : To use EAP -TT LS security, the machine m ust already have the EA P-
TTLS certificate s downloaded onto it f rom a Cer ti ficate Authority (CA). Pl ease chec k with
your IT adm inist rator.
To use EAP se curity In the Atheros Client Utility, acce ss the Se curity tab in the Profile
Management window.
1. On the S ecurity tab, choo se the WPA radio button .
O R: On the Security tab, choose the 802.1x radio button.
2. Choo se EAP -TTLS from the drop-down menu.
Enabling EA P-TTLS security:
1. If EAP -TTLS is supported, ch oose EAP-TTLS from the drop -do wn menu on the right,
then click the Confi gure button.
2. Sele ct the appropriate certificate from the drop- down list and cli ck OK.
3. Spe cify a user name for EAP authenticati on:
o Check Use Wi ndows Use r Name to use the Windows user na m e as the EAP
user name.
o OR: Enter a EAP user name i n the User Name fi e ld to use a separate user
name and passw or d and start the EAP authentication pro cess.
4. Click Advanced and:
o Leave the server name fi el d blank fo r the cli ent to accep t a certificate from
any serve r with a certifica te signed by the authority listed in the Network
Certificate Authority drop -down list. (recommende d)
o Enter the domain name of the server from which the client will accept a
certificate.
o Change the l ogi n nam e if needed.
5. Click OK.
6. Enabl e the profile.
17
Page 23

Using PEAP-G TC Secu rity
I m p or ta n t No te ! To use PEAP (EAP -GTC) securi t y, the server must have WPA-PEAP
certificates, and the Certificate A uthority ( CA) server properties must alread y be set
up. Please che ck with your I T administrator.
To use PEAP security, access the Securi ty tab in the Profile Management
window.
1. In the ACU, edi t the securi ty settings by clicking New or Modify on the
Profile Management tab.
2. Choose a profile to ed it, or nam e the new pr ofile in the Profi l e
Management window. Enter the SSID of the access poi nt the client computer
connects to .
3. On the Security tab, choose the WPA radio button.
OR: On the Security tab, choo se the 802.1x radio button.
4. Choose PEAP (EAP-GTC) or PEAP (EAP-MSCHAP V2) from the
dr op- d ow n me nu.
z PEAP (EAP-GTC) authentication is designed to support one-time Password (OTP), Windows
2000 domain, and L DAP user databases over a wireless LAN. It is based on EAP-TLS
authentication but uses a password instead of a client certificate for authentication. PEAP
(EAPGT C) uses a d ynami c se ssi on-based WEP ke y de rived from the USB devi ce and RADIUS
server to e n crypt data.
Networks that use an OTP user database requi re enteri ng a hardware or software token
password to start the PEAP (EAP-GTC) authentication process and to gain access to the
network. Networks that use a Windows 2000 domain user database or an L DAP user database
(such as NDS) require entering a username, password, and domain name i n order to start the
PEAP (EAP-GTC) authentication process.
z The PEAP (EAP-MSCHAP V2) authentication type is based on EAPTLS authenti cation, b ut uses
password instead of a client certifi cate for authenticati on. PEAP (EAP-MSCHAP V2) uses a
dynami c sessi on-based WEP key, whi ch is derived from the USB device and RADIUS server, to
encr y pt da t a.
To use PEAP-GTC secu rity In the Atheros Client Utility, access the Se cu rity tab in th e
Profi le Managem ent window.
1. On the Security tab, choose t he WPA radio button.
2. OR: On the Security tab, choose the 802.1x radio button.
3. Choose PEAP (EAP -GTC ) from the dro p -down menu.
4. Cli c k the Configu re button.
5. Sel ect the appropriate network ce r tifi cate authori ty from the dro p-d own list.
6. Specify a user nam e for inner PEAP tunnel authentication:
– Check U se Windows Use r Name to use the Windows user na m e as the PEAP
user name.
– OR: Enter a PEAP user name i n the User Name fie ld to use a separate user
name an d start the PEAP authentication p ro cess.
18
Page 24

7. C hoose T oken or Static Password, depending on the user database.
Note that Token uses a hardware token device o r t he Secure Computing SofToken
program (ver sion 1.3 or l ater) to obtai n and ente r a one - ti m e password during
auth entication.
8. Click Advanced and:
– Lea ve the server name fi el d blank fo r the client to accept a certificate from
any serve r with a certifica te signed by the authority listed in the Network
Certificate Authority drop -down list. (recommende d)
– Enter the domain name of the server from which the client will accep t a
certificate.
9. The login name used fo r PEAP tunnel authenti cation, fil ls in automatically as PE AP-
xxxxxxxxxxxx, where xxxxxxxxxxxx is the computer's MA C address. Change the
logi n nam e i f needed.
10. Cli ck OK.
11. Enable the p rofi le.
Using PEAP-MSCHAP V2 Security
Imp ortan t Note ! To use PEAP (EAP-MSCHAP V2) security , the server must h ave WPA-
PE AP certificates, and the server properties m ust al ready be set. Che ck with the IT
manager.
To use PEAP-MSCHAP V2 security In the Athero s Client Utility, access the S e curity tab in
the Profi l e M anagem ent window.
1. On the Security tab, choose t he WPA radio button.
O R: On the Security tab, choose the 802.1x radio button.
2. Choose PEAP (EAP -MSCHAP V2) from the drop -down menu.
3. Cli c k the Configu re button.
4. Sel ect the appropriate certificate from the drop-down list.
19
Page 25

5. Specify a user nam e for inner PEAP tunnel authentication:
– Check U se Windows Use r Name to use the Windows user na m e as the PEAP
user name.
– OR: Enter a PEAP user name i n the User Name fie ld to use a separate user
name an d start the PEAP authentication p ro cess.
6. Click Advanced and:
– Lea ve the server name fi el d blank fo r the client to accept a certificate from
any serve r with a certifica te signed by the authority listed in the Network
Certificate Authority drop -down list. (recommende d)
– Enter the domain name of the server from which the client will accep t a
certificate.
– The login nam e used for PEAP tunnel authentication, fills i n automatically as
PEAP-xxxxxxxxxxxx, whe re xxxxxxxxxxxx is the compu ter 's MAC
address. Change the logi n nam e i f needed.
7. Click OK.
8. Enabl e the profile.
20
Page 26

Using LEAP Secur it y
Imp ortan t Note ! LEAP securi ty requires that al l infrast ructure de vices (e.g. acce ss
points and se rvers) are configu red for LEAP a uthentica ti on. Chec k with the IT m anager.
To use security In the Atheros Client Utility, access the Se curity tab in the Profile
Management window.
Configuring LEAP :
The LEAP authenti cati on type uses Cisco Key Integrity Protocol (CKIP) and MMH message i ntegrity
check (MIC) for data protection. The USB device uses the username and password to perform m utual
authentication wi th the RADIUS server through the access point. To use LEAP securi ty, access the
Securi ty ta b in Profile Manageme n t.
1. In the ACU, edi t the securi ty settings by clicking New or Modify on the
Profile Management tab.
2. Choose a profile to ed it, or nam e the new pr ofile in the Profi l e
Management window. Enter the SSID of the access poi nt the station
connects to .
3. On the Security tab, choose the WPA radio button.
OR: On the Security tab, choo se the 802.1x radio button.
4. Choose LEAP from the drop-down menu.
1. Cli c k the Configu re button.
2. Specify a user name and password:
Select to Use Tem porary User Nam e and Passw ord b y choo si ng the radio button:
21
Page 27

o Check Use Wi ndows Use r Name to use the Windows user na m e as the LEAP
user name.
o OR: Check Manually Prompt for LEAP U ser Name and Password to manuall y
logi n and start the LEAP authentica ti on process.
Select to Use Saved User Name and Passw ord b y choo sing the radi o bu tton:
o Specify the LEAP user name, passwo rd, and dom ain to save and use.
3. Enter the u ser name an d password.
4. C onfirm the password.
5. Specify a domai n nam e:
o Check the Include Wi ndows Logon D om ain with U ser Name setti n g to pass
the Windows logi n dom ain and user name to the R AD IU S se r ver. ( default)
o O R: Enter a specific domain nam e.
6. If desired, chec k No Ne two r k Conne ction Unless U ser Is Logg ed In to for ce the
wi reless adapter to disasso ciate after logging off .
7. Enter the LEAP authenticati on ti m eout tim e (be twe en 30 and 500 seconds) to specify
how long LEAP should wait befo re declaring authentication fail ed, and sending an
erro r message. The defaul t is 90 seconds.
8. Click OK.
9. Enabl e the profile.
3 .4.2 Us i ng W P A Pass phrase Sec urity
To use WPA Passph rase security In the Athe ros Client Utility, access the Se curity tab i n the
Profi le Managem ent window.
1. In the ACU, edi t the securi ty settings by clicking New or Modify on the Profile Management
tab.
2. Choose a profile to ed it, or nam e the new pr ofile in the Profi l e Man ag em en t wi nd ow . Ent er
the SSID of the access point the client computer connects to.
3. On the Security tab, choose WPA Passphrase.
4. Cli ck on the Security tab, a nd choose the WPA-PSK radio button. Click the
Confi gure button.
.
22
Page 28

5. Enter the WPA passph ra se (for ASC II te xt, enter 8 -63 characters, for he xadecimal,
ente r 64 characters). Click OK.
6. Click O K and enabl e the profi le.
3.4.3 Pre-Shared Encryption Keys
T o use Pre-Shared Key (sta tic WEP) se curity In the Atheros Client Utility, a ccess the S e curity tab in
the Pr ofi le Manage me nt w in dow .
1. In the ACU, edi t the securi ty settings by clicking New or Modify on the Profile Management tab.
2. Choose a profile to edi t, or name the new profile in the Profile Management window. Enter the SSID
of the access point the client computer connects to.
3. On the Security tab, choose Pre-Shared Key (Static WEP).
Defining pre-shared encryption keys:
1. Cli c k the Define Pre -Sha red Keys radio bu tton on the Se curity tab.
2. Click on Confi gure.
3. Fill in the fields in the WEP Encryption keys dialog box:
Ke y Butt on Descr ipti on
Key Entry Determines the entr y method for an encr yption key:
he xadecim al (0 -9, A- F), o r ASCII text (all keyb oard cha ra cter s
except spaces).
Enc rypti on Keys Sele cts the defaul t encryption ke ys used. Only allows the
selection for a shared Fi r st, Second, Thi rd, or Fourth key
whose cor re sponding fi el d has been completed.
WE P K eys (1-4 )
Defines a set of shared encryption keys for networ k
23
Page 29

confi gurati on security. At least one Shared Key fiel d m ust be
populated to enabl e secu rity using a shared key .
Clic k on the radio button to set the key a s t he defaul t
en cr ypt io n key .
WEP Key Size
Defines the size for each encryption key. T he opti ons include:
o 64- bit (e nter 10 di gits fo r h exadecimal , 5 ASCII
char acte rs)
o 128- bit ( enter 26 di gits fo r hexadecimal , 13
digits for ASCII)
o 152-bit (en ter 32 digits hexadecimal, 16 digits
fo r AS CII )
4. Click OK for the changes to take effect.
Overwriting an Existing Static WEP Key
1. Cli c k the Define Pre -Sha red Keys radio bu tton on the Se curity tab.
2. Click on Confi gure.
3. I n t he wind ow, all exi sting sta t ic WEP keys are di sp laye d as asterisks for securi t y
reasons. Clic k in the fi el d of the existing static WEP key to overw rite.
4. Dele t e the asterisks in that field.
5. Enter a new key.
6. M a ke su r e t o s e l ec t t h e Transmit Key button to the l e ft of this key is selected for th e
key to transm it pa ckets.
7. Click OK.
D isabling S t at ic WEP
To disable static WEP for a par ti cular profi le, choose None on the Profile
Management tab and cli ck OK.
OR: Select any other secu rit y option on the Pro fi l e M anagem ent tab to automaticall y
di sable sta ti c WEP.
24
Page 30

4 Troubleshooting
This chapte r p ro vides solutions to problems u sual ly encountered during the installation and
operation of the adapter.
1. Fo r Window s 98SE c om pute rs, if the Atheros Cli ent Util ity fails to loa d
after properly installation, click on the windows “S tart” button on your
t oolbar, se le c t the “run” button, a nd e nter
“C :\ Window s\s ys tem \aegis2.exe” i nto the dia log box, then press e nte r, a
dialog box w ill p op up, please select “ins tall” t hen press “enter”.
2. Fo r Window s XP or Wind ow s XP SP1, please update your win dows w i th
the follow ing hotfix http ://suppor t. micr osoft.com/?sci d=k b %3 Ben-
us%3 B822603 &x=10&y =13 i f y o ur c o p y of Win d ow s XP ha s be en u pda te d
w ith Serv ice Pack 2 ( SP2), you do not need t o apply this hot fix.
3. To Unins tall the Ath eros Clie nt Utili ty, please double c lick on “setup” on
you r driver i nstallatio n C D, then selec t t he uni nstall option, the n press
enter.
4. In Win dows ME, if you receiv e an err or abo ut IPHLPAPI.DLL, pl ease
logoff your account, and re-login your account.
5. In Win dows 98SE/ME, Errors may be enc oun tered w hen the drivers are
ins talled thr ough the “Found New Hardw are Wiza rd” by c hoosing “Don’t
search. I w ill cho ose the driver to install”. To prevent t his err or , please
fo ll ow pag e 7 of th is user’s ma nua l.
Frequently Asked Questions (FAQ)
1. What is t he IEEE 802.11g stan dard?
802. 11g is the new IEEE standard for high- speed wireless LAN communi cations that
provi des for up to 54 Mbps data ra te i n the 2.4 GH z band. 802.11g is quickl y becoming
the next mai nst ream wirele ss LAN te chnology for the home, office and public ne twor ks.
802. 11g defi nes the use of the same OF DM modul ati on technique specified in IEEE
802. 11a for the 5 GHz frequency band and appl i es it i n the same 2.4 GHz frequency
band as IEEE 802.11b. T he 802.11g standard requi re s backward compatibility with
802. 11b.
The standa rd speci fi cal ly call s for:
A. A new physical layer for the 802.11 Medium Acce ss Control (MAC) in the 2.4 GHz
f requen cy band, known a s the extended rate PHY (ERP). The E RP adds OFDM as
a mandatory new coding scheme for 6, 12 and 24 M bps (mandatory speeds), and
18, 36, 48 and 54 Mbps (op ti onal speeds). The ERP in cludes the modulation
25
Page 31

schemes found in 802.11b including CCK for 11 and 5.5 M bps and Bar ker code
modulati on for 2 and 1 Mbps.
B. A protection mechanism call ed RTS/CTS that govern s how 802.11g devices and
802. 11b devices interope rate.
2. What is t he IEEE 802.11b stan dard?
The IEEE 802.11b Wireless LAN standa rd subcommittee, which formulates the
standard for the i ndustry. The obj ective is to enable wireless LAN hard ware from
different manufactu re s to communicate.
3. What d oes IEEE 802.11 feature s uppor t?
The product supports the following I EEE 80 2.11 functio ns:
z CSMA/CA plus A cknowledge Pro tocol
z Mul ti -Channel Roami ng
z Au tom atic Rate Se lectio n
z RTS/CTS Feat ure
z Fra gmentation
z Power Management
4. What is Ad-hoc?
An Ad-hoc i ntegrated wireless LAN is a group of computers, e ach has a Wirel ess LAN
adapter, Connected as an independent wirele ss LAN. Ad hoc wireless LAN is
appli cable at a departmental scale fo r a branch or SOHO operation.
5. What is Infrastructure?
An integrated wireless and wirele ss and wired LAN i s called an Infra stru ctu re
confi gurati on. Infrastructure is applicable to enterp rise scale for wirel ess access to
central database, or wireless applica tion for m obile workers.
6. What is BSS ID?
A spe cific Ad hoc LAN is called a Basic Ser vice Set (BSS). Compute r s i n a BSS must
be configu red with the same BSS I D.
7. What is WEP?
WEP is Wi red Equival ent Priva cy, a data priva cy me chanism based on a 40 bi t shared
key algorithm, as described in the IEEE 802 .11 standa rd .
8. What is TKIP?
TKIP is a quick-fix method to quickly overcom e the inherent weakne sses in WEP
security, especially t he reuse of encryption keys. TKIP is involved in the IEEE 802.11i
WLAN secu rit y standa rd, and the specification mi ght be offi cial l y released by early
2003 .
9. What is AES?
AE S (Advanced Encryption Stan dard ) , a chip-based sec urit y, has been developed to
ensu re the highest degree of security and authen ti city for digital information, wherever
26
Page 32

and however communi cated or sto red , while maki ng m ore effi cient use of hardware
and/ or sof tw are than pre vious encryption standa rd s. It is also included in IEEE 802.11i
standa rd. Compa re with AES, TKIP is a temp orary protocol for replacing WEP security
until m anufactu re r s im plement AES at the hardware l evel .
10. Can Wireless produc ts s uppor t pri nter sha ring?
Wir el ess pr oducts pe rform the same function as LAN product s. Therefore, Wireless
product s can wo r k with Netwa re, Windows 2000, or other LAN operating system s to
support printer or file sharing.
1 1. Woul d the informati on be i nter cepted whi le tr an s m i tti ng on ai r?
WLAN feature s t wo-fold protection in security. On the hardware side, as with Direct
Sequence Sprea d Spectrum technology, it has the inhere nt secu rit y feat ure of
scrambling. On the software side, WLAN series offer the enc r yption function (WEP) to
enhance secu rit y and Access Control. U sers can set it up depending upon their need s.
12. What is DSS S? What is FHSS? A nd what are their di f ferences?
Fre quency-hopping sp read -spect rum (FHSS ) u se s a na rro wband ca rrie r that change s
f requen cy i n a pattern that is known to both tran sm i tter and receive r. Prope rly
synchronized, the net effect is to mai ntai n a singl e l ogical channel. T o an unintended
receiver, FHSS appea r s to be short -du ration impulse noise. Direct - sequence spreadspectrum ( DSSS) generates a redundan t bit pattern for each bi t to be transmi tted. This
bit pattern i s called a chip (o r chippi ng code). The longer the chip is, the gre ater the
p robability that the original data can be recovered . Even if one or more bits in the chip
are damaged during transm ission, statistical technique s embedded in the radio can
reco ver the ori ginal data without -the need for retran smission. To an uni ntended
receiver, DSSS appears as low power wideband noise and is rejected (i gnored) by
most na r ro wband receive r s.
13. What is Spread Spec t rum?
Spread Spec trum technology is a wideband radio frequency technique developed by
the military for use in reliable, secure, mission -critical communication systems. I t is
designed to trade off bandwidth efficienc y for rel iability, i ntegrity, and security. In other
word s, m or e bandwidth is consumed than in the case of narrowband tran sm ission, but
the trade o ff produ ces a si gnal that is, in effec t, louder and thus ea si er to detect,
p rovided that the re ceiver knows the parameter s of the spread-spe ctrum si gnal being
broadcast. I f a receiver is not tuned to the right frequency, a spread –spectrum signal
looks like b ackground noise. Ther e are two m ain alternative s, Direct Sequence Spread
Spectrum (DSSS) and Frequency Hopping Spread Spectrum ( FHSS).
27
 Loading...