

Page 1
WP-S1000
Wireless Projector Server
User Manual
Version: 1.0 (November, 2007)
Page 2

Index
1. PRODUCT INTRODUCTION.............................................................................................2
1.1. Product Introduction and Features........................................................................2
1.2. Safety Information ................................................................................................. 4
1.3. Package Contents.................................................................................................5
1.4. Familiar With WP-S1000.......................................................................................6
2. INSTALL YOUR WIRELESS PROJECTOR SERVER (WPS)........................................ 8
2.1 Hardware Installation.............................................................................................8
2.2 Make software USB Flash (PnS Token) by yourself........................................... 11
2.3 Software Installation (Using the USB Flash).......................................................13
2.3 Software Installation (From the WPS).................................................................19
3. FAMILIAR WITH PRESENTATION CLIENT SOFTWARE...........................................24
3.1 Presentation Mode .............................................................................................. 24
3.2 Video Playing Mode.............................................................................................25
3.3 Menu....................................................................................................................26
4. MAKE A NEW USB FLASH DISK WITH CLIENT SOFTWARE (PnS TOKEN)..........27
5. USING WEB ADMINISTRATION INTERFACE ............................................................29
5.1 Open the Web Administration Interface:..............................................................29
5.2 Download.............................................................................................................31
5.3 Conference Control ............................................................................................. 32
5.4 Admin ..................................................................................................................34
5.5 System Status......................................................................................................36
5.6 Network Setup..................................................................................................... 37
5.7 Projection Setup.................................................................................................. 39
5.8 Change Passwords ............................................................................................. 40
5.9 Reset to Default...................................................................................................41
5.10 Firmware Upgrade...............................................................................................42
5.11 Reboot System....................................................................................................43
6. APPENDIX....................................................................................................................44
6.1 Troubleshooting.......................................................................................................44
6.2 Reset The Projector Server To Factory Default Setting ..........................................46
6.3 Set Up The Wireless Projector Server (WPS) To The Internet................................47
1
Page 3

1. PRODUCT INTRODUCTION
1.1. Product Introduction and Features
Thank you for purchasing this wireless projector server - WP-S1000! This projector server is
an user-friendly presentation video server, you can connect this server to video projector or
any CRT / LCD monitor with 15-pin D-sub video connector and support XGA resolution (1024
x 768 pixels), and share the projector or CRT / LCD monitor with every computer equipped
with wired or wireless network connection.
¾ Wired and Wireless Network Connection
WP-S1000 projector server supports both wired and wireless network connection.
High-performance 100Mbps wired Ethernet connection and 54Mbps wireless Ethernet
connection provides smooth video and audio performance.
¾ Audio Support
Video alone is good enough, but with audio, your presentation will become more outstanding.
WP-S1000 projector server also provides audio function. If your computer equips with audio
interface, WP-S1000 is also capable to transmit the audio from your computer to external
speaker or amplifier via built-in audio interface.
¾ No more hassle cables
WP-S1000 projector server only requires few connection cables - power, video, audio
(optional), and network (optional). In most cases with computers equipped with wireless
network interface, you only need power and video connection for this projector server, and
you can get it installed within 1 minute!
¾ Easy to Setup
WP-S1000 projector server supports DHCP (Dynamic Host Configuration Protocol), which is
very common nowadays. You only have to connect the network cable to the projector server,
and WP-S1000 will setup required network parameters automatically!
2
Page 4

It’s also simple to install client software. The WP-S1000 projector server provides
user-friendly web interface, and you can access the interface with Microsoft Internet Explorer ,
FireFox, or any other web browser. You can start software download from the web and get
the software installed on your computer within 1 or 2 minutes! The web interface also
supports 4 languages (English, Japanese, Traditional Chinese, and Simplified Chinese), to
satisfy the needs of different people from different country.
The projector server package also comes with 2 sets of USB flash disk with PnS (Plug &
Show) pre-installed client software. You can give the flash disk to anyone who needs to use
client software to control the presentation, and he / she can start the software after the flash
disk has inserted into his / her computer immediately, without downloading and installation!
¾ Security
All users who wish to access the controlling interface of WP-S1000 projector server must be
verified - A random 4-digit login code will be displayed on the projector or CRT / LCD monitor
which WP-S1000 is connected to, and the code is required to control the presentation. Web
interface of WP-S1000 projector server is also protected by password, and you can change
the password often to improve security.
If you care about wireless network connection, forget it now! WP-S1000 projector server
supports high-level wireless encryption method, which will protect the connection and
unauthorized computer, will never know the contents transferred via wireless connection.
Main Features
‧ Provides wireless presentation without cable swapping.
‧ Provides one click conference control to allow host moderated meetings.
‧ Compatible with any type of projectors with standard VGA connectors
‧ Provides robust security with session login code and wireless WEP key
‧ Provides real time display of high quality images and applications
‧ Provides friendly web-based user interface for easy configuration
‧ Supports high display resolution SVGA, XGA and WXGA with 32bit colour.
‧ Supports Plug-n-Show (PnS) USB dongle software installation without CD Rom
required.
3
Page 5

1.2. Safety Information
Please follow the following safety instructions while you’re using this wireless projector
server, or you could damage this projector server and yourself.
1. THIS PROJECTOR SERVER IS NOT A TOY! Keep out of reach of children!
2. Do not place this wireless projector server in high-humid and / or hot environment, like bathroom or kitchen.
Please refer to the specification of this wireless projector server to understand the environmental
requirements of this wireless projector server.
3. This wireless projector server is designed to be used indoor. Do not use this wireless projector server at
places like garden or any other outdoor environment.
4. Do not put any part or any component of this projector server into your body.
5. If any part or any component is dropped into water, return it to your dealer of purchase and ask for an
examination; never use it again before it has been properly processed by certified Edimax technician or
dealer.
6. If the projector server is dropped into water when it’s powered on, DO NOT ATTEMPT TO TAKE IT BACK
BY YOURSELF! Call a qualified electrical technician or us immediately for help.
7. If you want to hang this wireless projector server at high places, please make sure that the wireless
projector server is properly secured. Falling down from high places will damage this wireless projector
server, and may cause serious injury to people!
8. Do not drag any connected cord with force; the terminal and cord will be damaged.
9. Only use dry cloth with water to clean this wireless projector server; do not use alcohol or other chemical
solution to clean this wireless projector server.
10. There’s no user-serviceable part inside this wireless projector server; if the wireless projector server is not
working properly, please contact the dealer of purchase to ask for help.
11. Do not put the wireless projector server and / or A/C adapter on paper, cloth, or other flammable materials.
After hours of use, this projector server will become hot, and may cause flammable materials placed under
it to burn.
12. If you smell something strange or even see smoke coming out from the wireless projector server or A/C
adapter, disconnect the power cord immediately, and call your dealer of purchase for help.
Linux Open-Source Code
Certain Edimax products include software code developed by third parties, which software code subject to
the GNU General Public License ("GPL") or GNU Lesser General Public License ("LGPL"). Please see the
GNU and LPGL Web sites to view the terms of each license.
The GPL Code and LGPL Code used in Edimax products is distributed without any warranty and is subject
to the copyrights of their authors.
For detail of the GPL Code and LGPL Code used in Edimax products, please refer to Edimax website
http://www.edimax.com by product model number.
4
Page 6
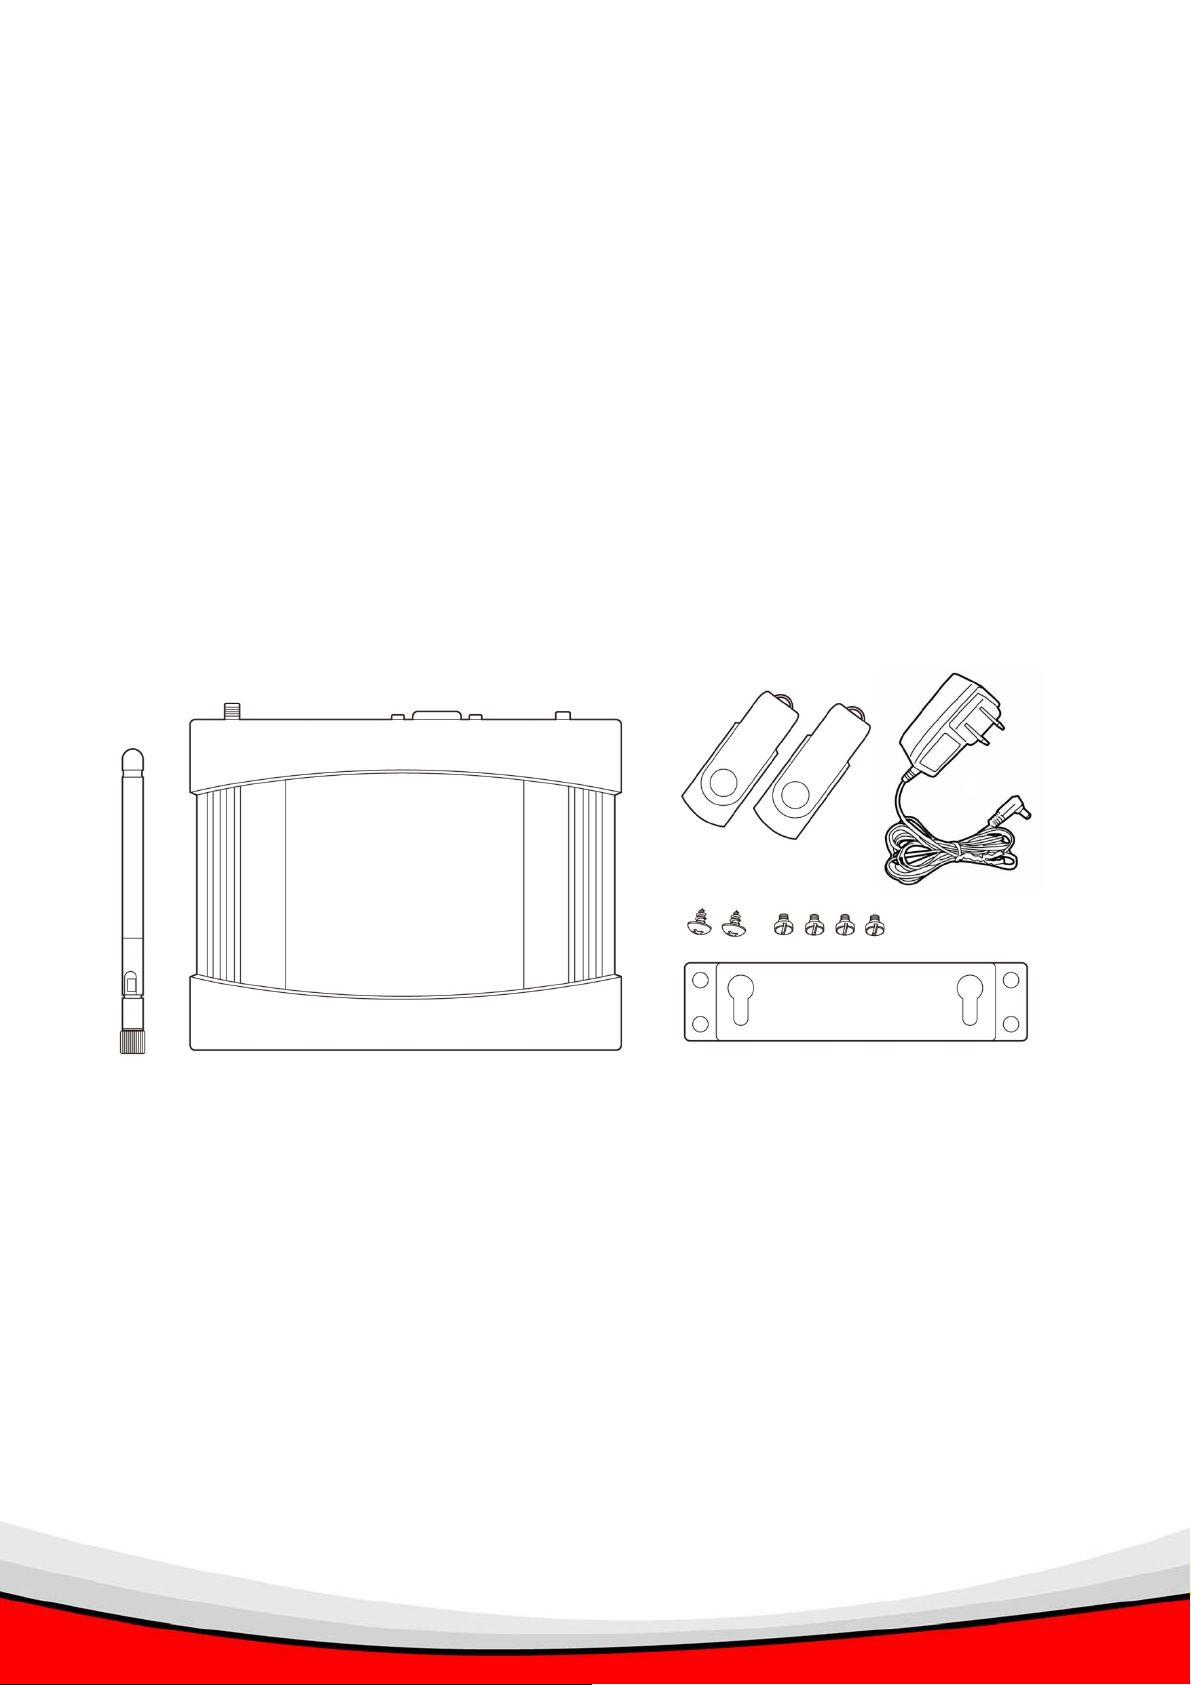
1.3. Package Contents
Before you unpack the package and continue with installation, please check the contents
inside the package. If any item is missing, please return the package to the dealer of
purchase.
Wireless Projector Server (1 pc)
Power Adapter (1 pc)
Software USB Flash Disk (2 pcs)
Antenna (1 pc)
Mounting Bracket (1 pc, with 4 screws)
Quick Installation Guide (1 pc)
User Manual CD-ROM (1 pc)
5
Page 7
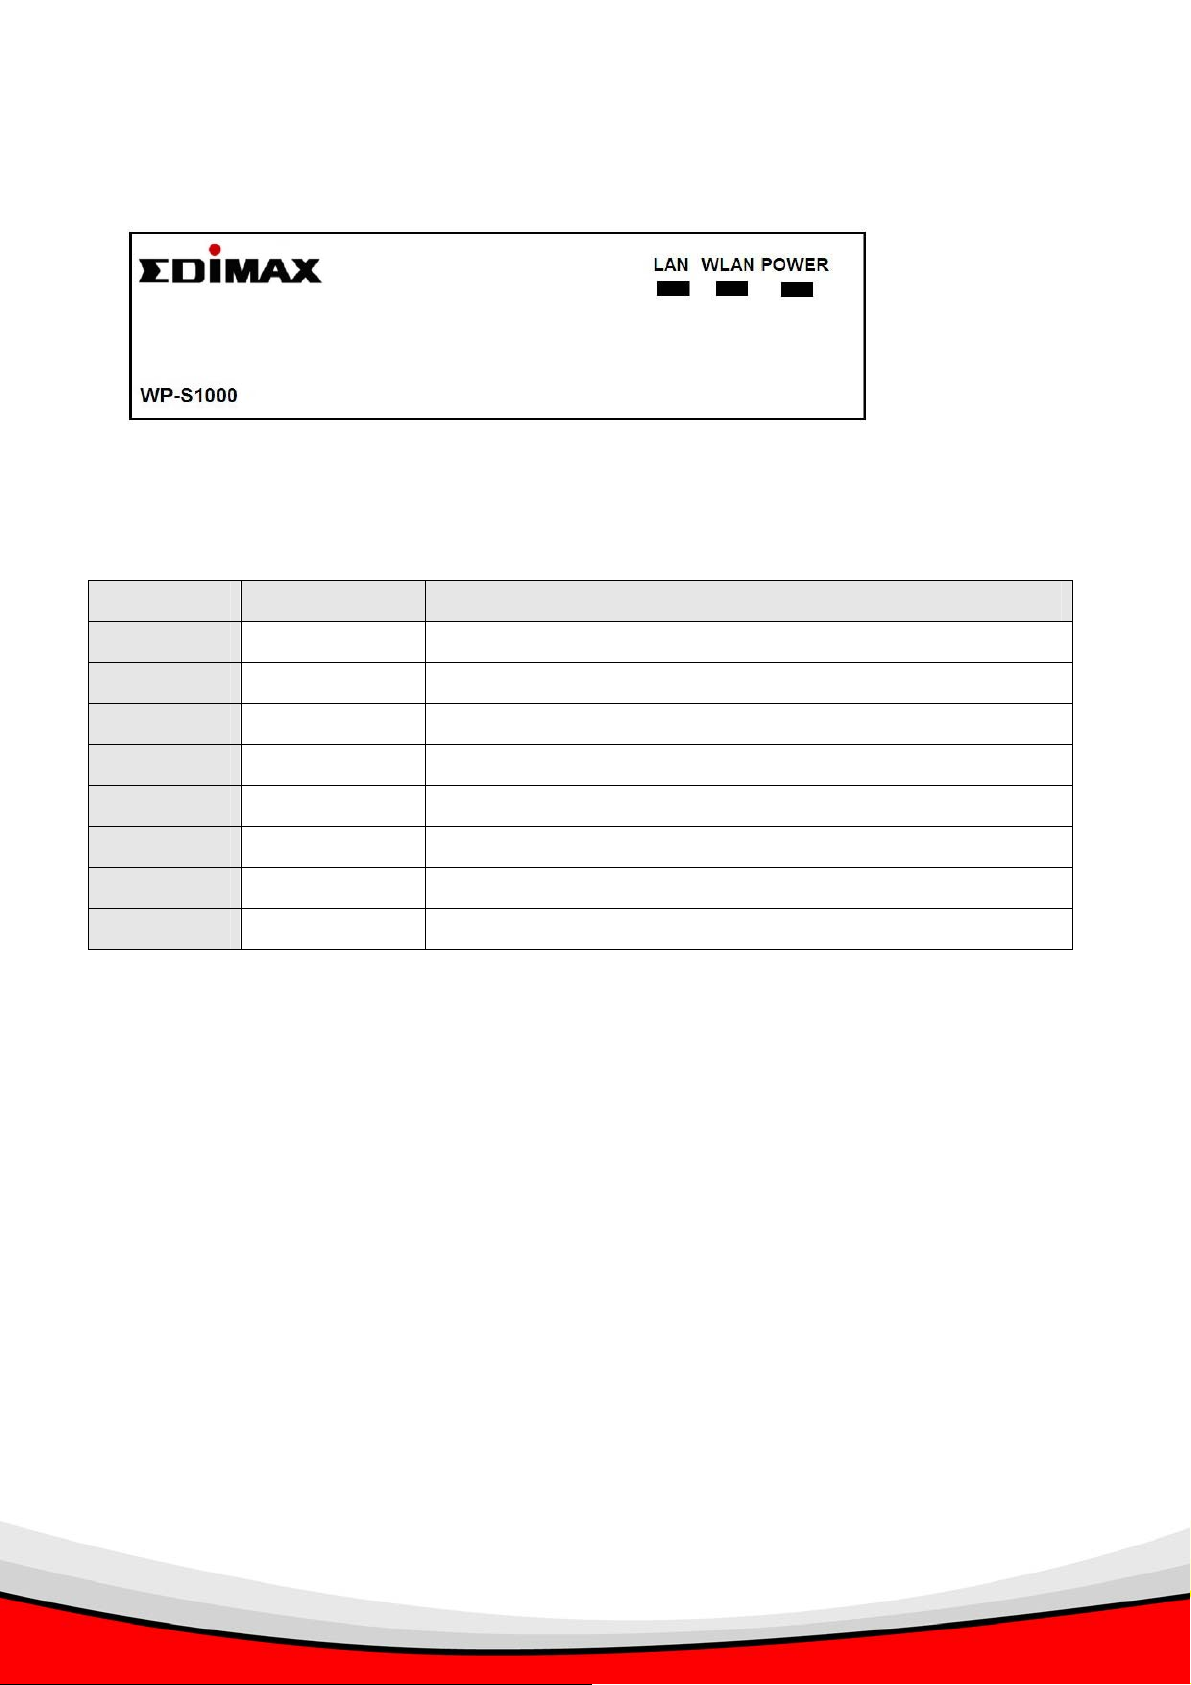
1.4. Familiar With WP-S1000
Front View
These 3 LEDs indicate the system status of WP-S1000 projector server:
STATUS DESCRIPTION
POWER ON WP-S1000 projector server is powered on
OFF WP-S1000 projector server is powered off
WLAN ON Wireless LAN function is activated
OFF Wireless LAN function is deactivated
FLASHING Transferring data via wireless LAN interface
LAN ON Wired network is connected
OFF Wired network is disconnected
FLASHING Transferring data via wired LAN interface
6
Page 8

Back View
PWR: Push this button to switch on the WP-S1000 projector server (the ‘POWER’ led
at the front panel will lit), push this button again to switch off the projector server.
5V DC: Connects to the power connector of power adapter. WARNING: Only use the
power adapter comes with product package, DO NOT replace with other power
adapter!
VGA: Connects to the video cable of your projector or CRT / LCD monitor
(15-pin D-sub connector).
AUDIO: Connects to the audio cable of external speaker or audio amplifier.
(3.5mm audio connector)
LAN: Connects to your local area network (LAN) by network cable.
(RJ-45 network connector)
RESET: When the projector server is not working properly, you can use this button to
clear all settings and restore the WP-S100 to factory default settings: Switch the
projector server off, press and hold the RESET button using a pen or pin, then switch
the projector server on. You should still press and hold ‘RESET’ button, after 10
seconds you can release the RESET button, and all settings in the projector server
will be restored to factory default.
ANT.: Connects to the antenna, please only use the antenna in the product package.
If you need to use other antenna to improve radio reception, please make sure the
antenna you’re using is designed for 2.4GHz radio band. (R-SMA connector)
7
Page 9
2. INSTALL YOUR WIRELESS PROJECTOR SERVER (WPS)
Step 1) Hardware Installation.
Step 2) Make software USB Flash (PnS Token) by yourself.
Step 3) Software Installation. Choose one of the following:
i. Install the software using the USB Flash (Recommended)
ii. Install the software from the WPS (2
nd
Option)
Note: It’s recommended to install the soft ware using the USB flash (Fast and Easier).
However we only provide 2 USB flash disks, therefore we provide second option to install the
software from the WPS. If you need more USB flash disks, you can build your own USB
Flash disks, refer Chapter 4: Make a New USB Flash Disk with Client Software (PnS Token).
2.1 Hardware Installation
Use the mounting bracket and screws to mount the Wireless Project Server (WPS) on the
1.
wall. (Skip this step if this is not required.).
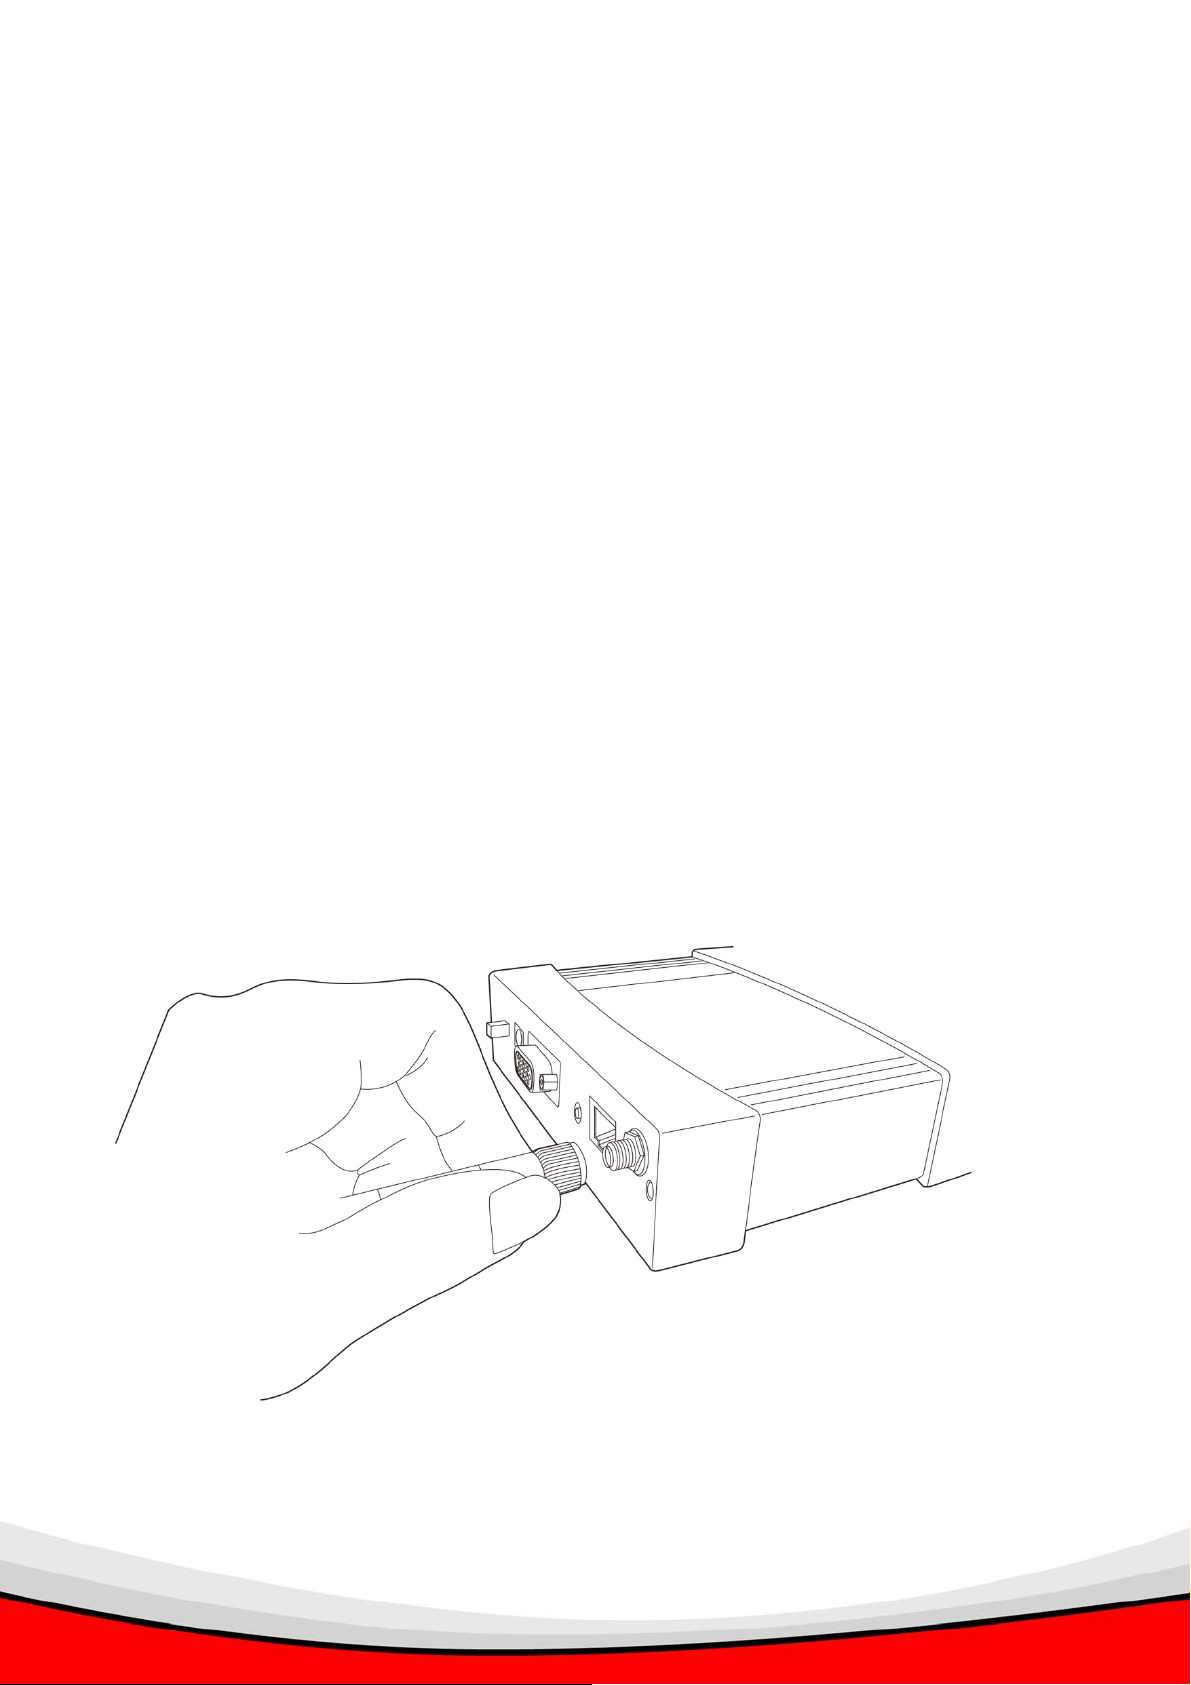
2. Connect the supplied antenna to the antenna connector located at the back of the WPS
(labeled as ‘ANT’). Fasten and adjust the antenna to make it perpendicular to the ground.
8
Page 10
3.
Connect the video (VGA) cable of the projector to the video (VGA) port (labeled as ‘VGA’)
located at the back of the WPS.
4. Connect the audio cable of external speaker (powered) or audio amplifier to the audio
port (labeled as ‘AUDIO’) located at the back of the WPS. (Skip this step if this is not
required.)
5. Connect the network cable to the network port (labeled as ‘LAN’) located at the back of
the WPS. (Skip this step if you use wireless network connection).
6. Connect the power adapter to the power port of the WPS and then plug in the power
adapter to the electrical power socket on the wall.
7. Power on the WPS by pressing ‘PWR’ button located at the back of the WPS. ‘Power’
LED will be lit when it is switched on.
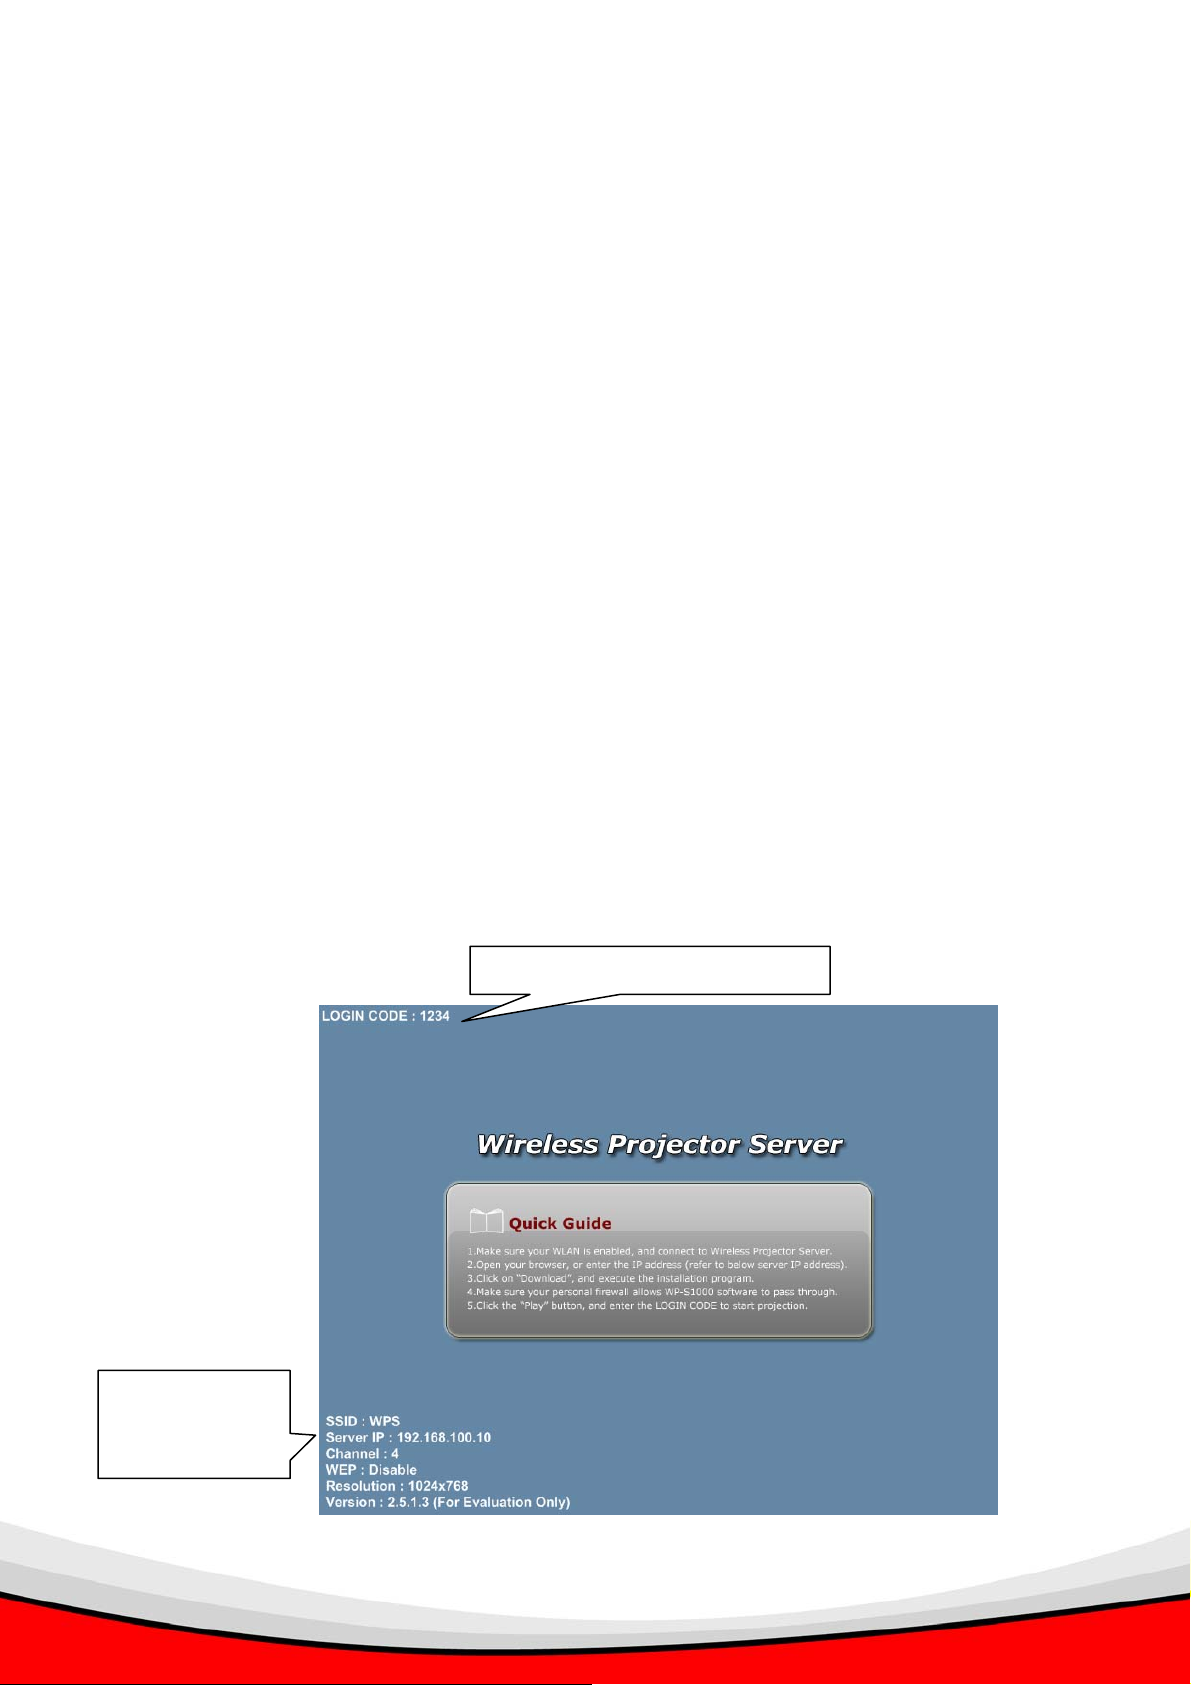
8. Please switch on the projector, and you should be able to see the welcome screen of this
projector server on projector or CRT / LCD monitor. A 4-digit login code and the IP
address of projector server will be displayed, please remember them or write them down,
you’ll need these information when you need to connect the computer to this projector
server by software.
4-Digit Random Login Code
Current
Configuration
9
Page 11

The current configuration of this projector server will be displayed at the lower-left corner,
they are:
SSID: The Service Set Identifier of the wireless interface of this projector server.
Server IP: The IP address of this projector server.
Channel: The radio channel this projector server is using.
WEP: The encryption method of the wireless network of this projector server.
Resolution: Current video resolution.
Version: The version number of the firmware of this projector server.
10
Page 12
2.2 ) Make software USB Flash (PnS Token) by yourself
**Note: The Software USB flash disk is an option item. We recommend
you to build the USB PnS Token from WP-S1000 with your USB flash disk/
pen drive by yourself.
Before start making an USB Flash Disk, please follow the instruction on Quick Installation
Guide page 7 to 13 “Step 2ii) Software Installation (From the WPS)”. And then, follow the
instruction below to build your USB flash disk/pen drive.
You’ll need:
An USB flash disk/pen drive with capacity larger than 5MB (formatted)
Installed the presentation client software into the USB flash disk/pen drive
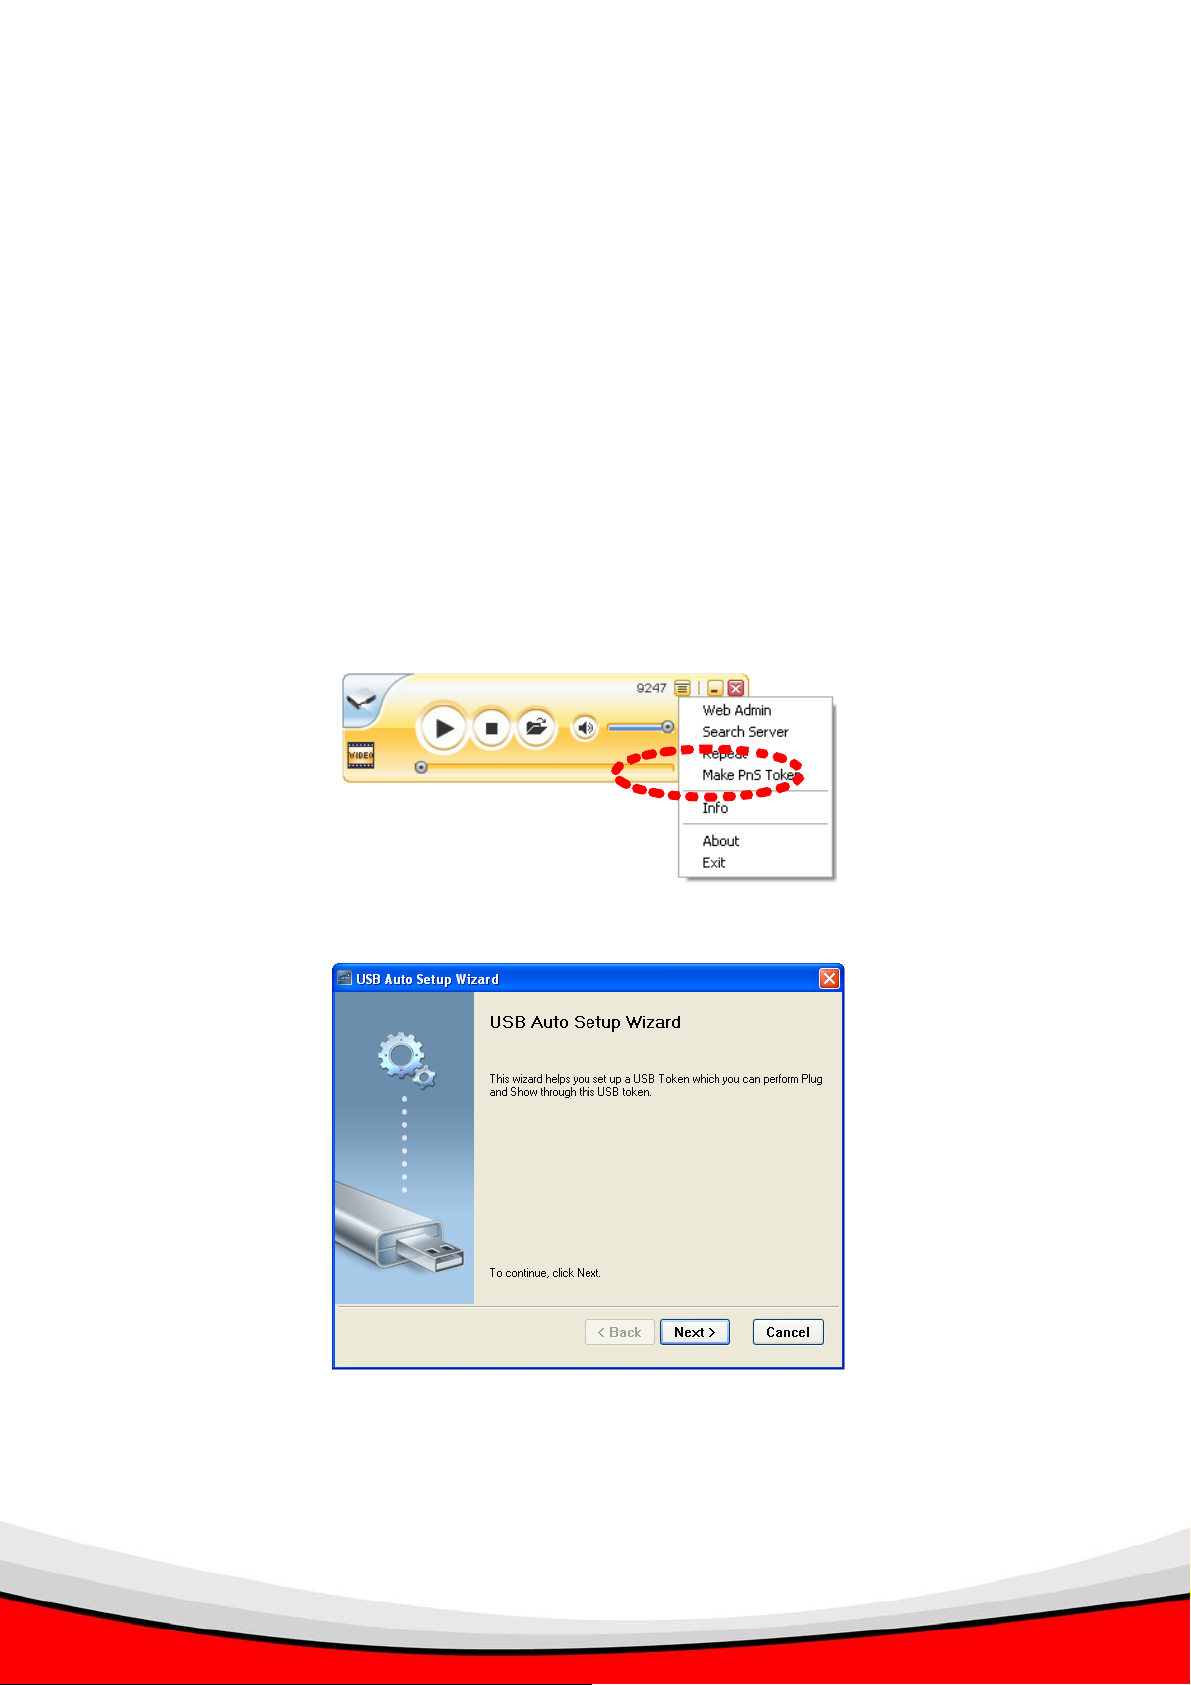
Insert the USB flash disk into your computer’s USB port and start the presentation client
software. Select ‘Make PnS Token’ from the menu of client software, then follows the
instructions to build a new USB flash disk:
1. Click ‘Next’ when setup wizard appears.
2. Click ‘Flash Drive’ dropdown menu to select the drive letter that represents your USB flash
disk. If you only have one flash disk inserted, setup wizard should be able to identify the USB
flash disk automatically. If the USB flash disk is not correctly identified, please insert the USB
flash disk once again, and click ‘Next’.
11
Page 13
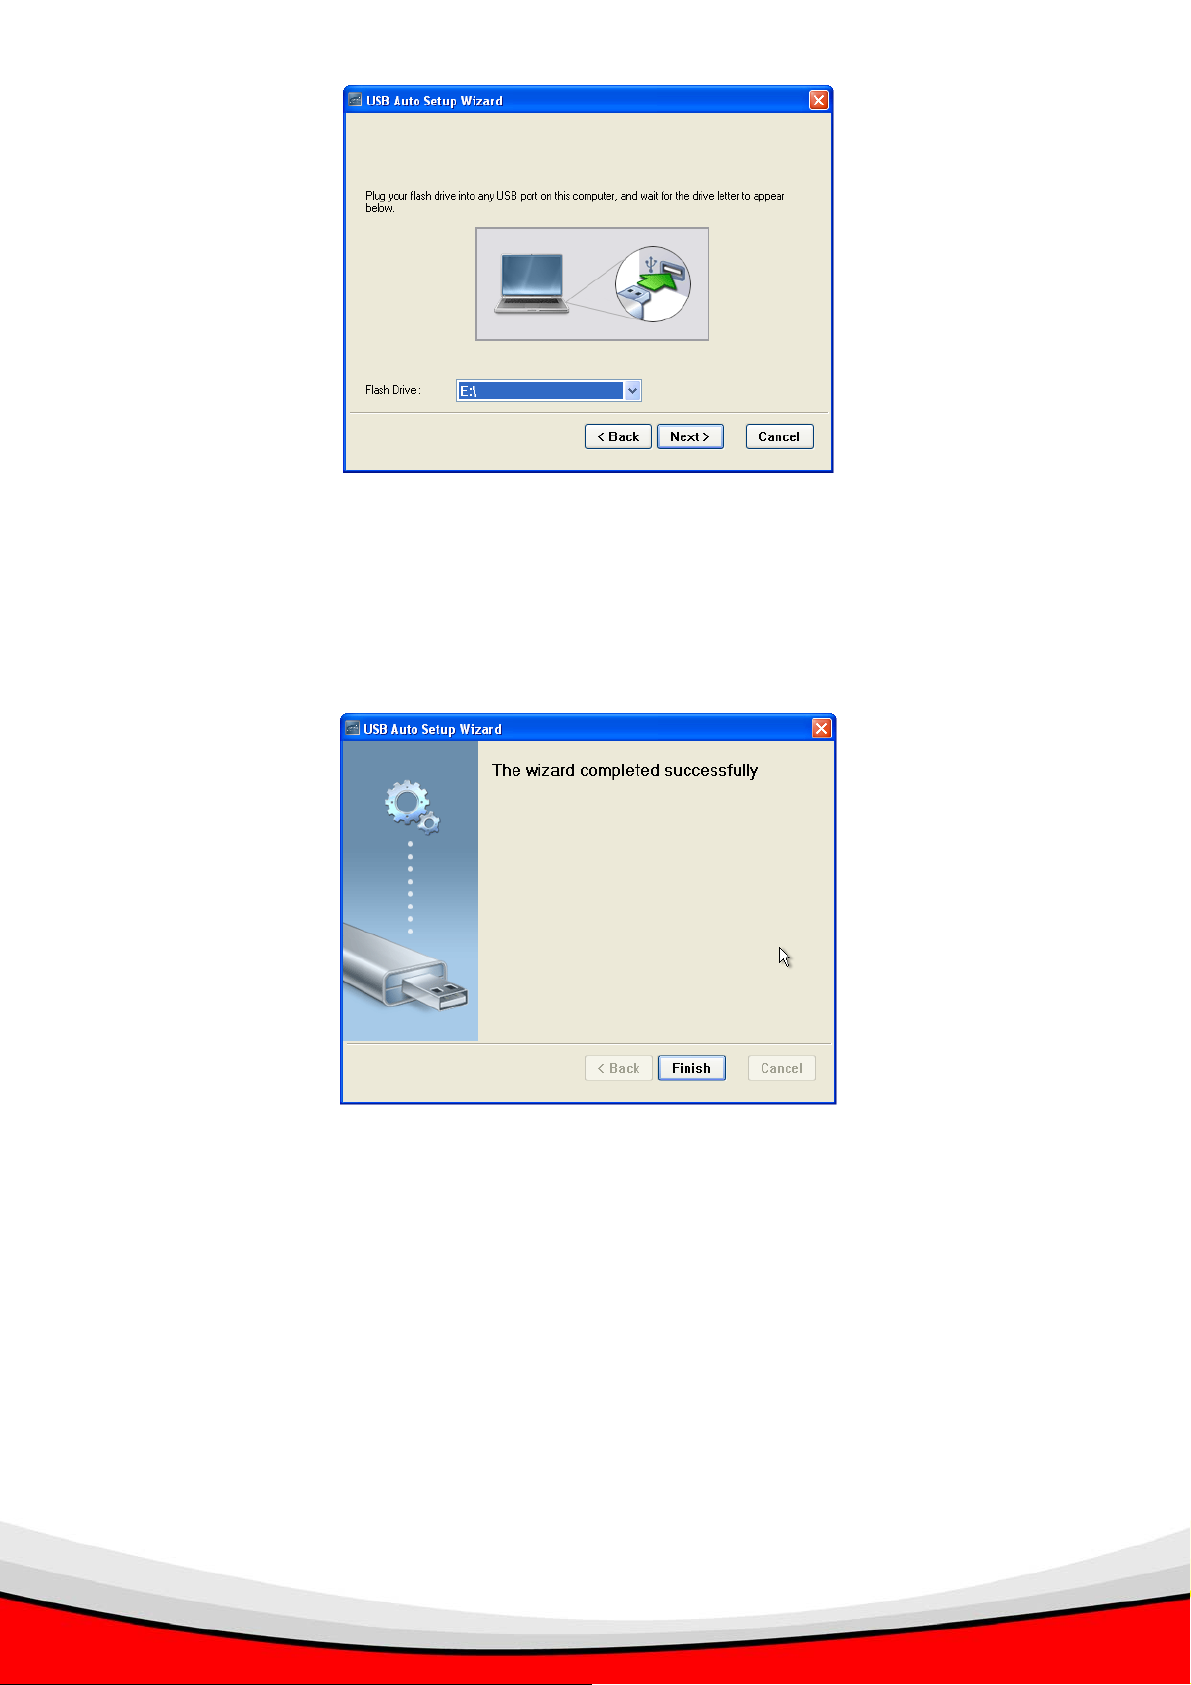
3. Setup wizard will copy all necessary files to the USB flash disk, please be patient, and do
not remove the USB flash disk in this process. When you see this message, the wizard is
completed successfully and the USB flash disk is ready to use. Click ‘Finish’ to exit and
remove the USB flash disk.
12
Page 14
2.3 Software Installation (Using the USB Flash)
Install the software using the USB Flash Disk. (Please Skip S tep 1 to 3 if you’re using wired
LAN connection).
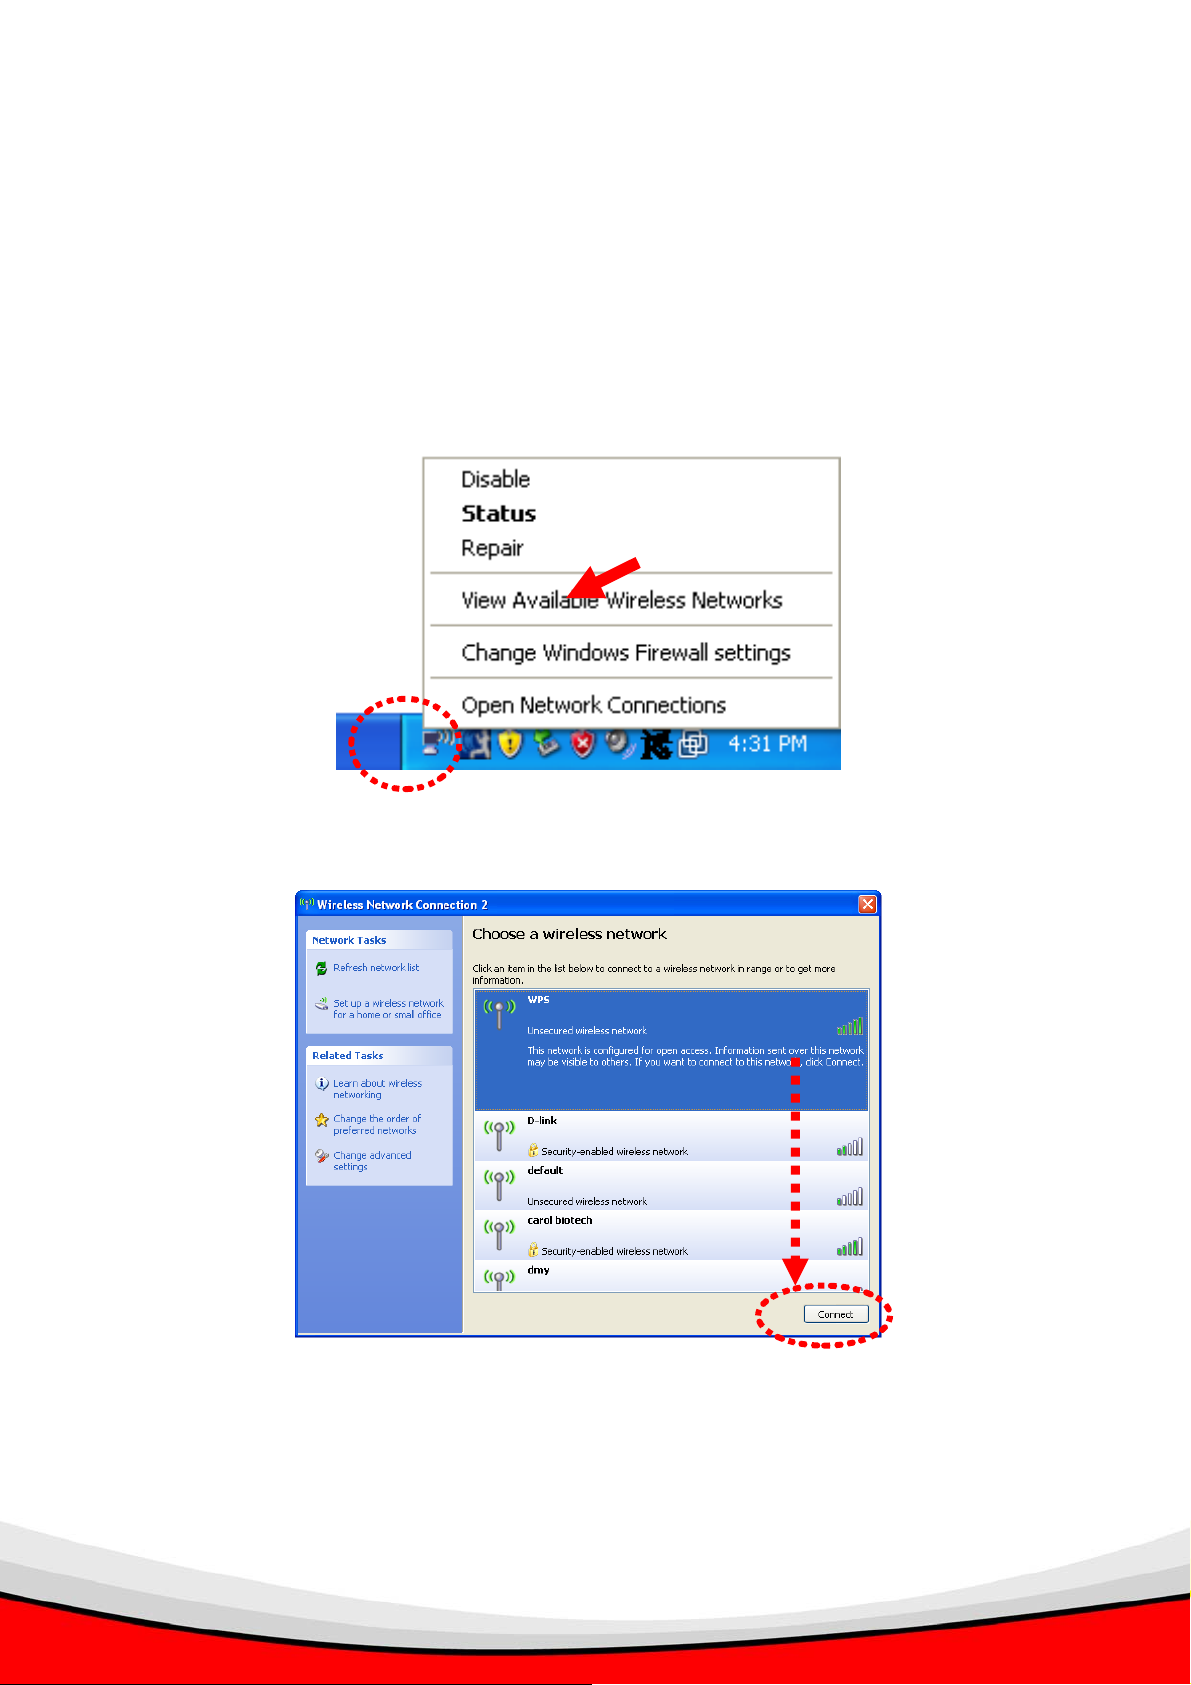
1. Right-click on wireless network icon located near the clock (usually located at the
bottom-right corner of desktop), and select ‘View Available Wireless Networks’ to
launch windows zero configuration utility.
2. Locate a wireless network named ‘WPS’, select it and click ‘Connect’.
13
Page 15
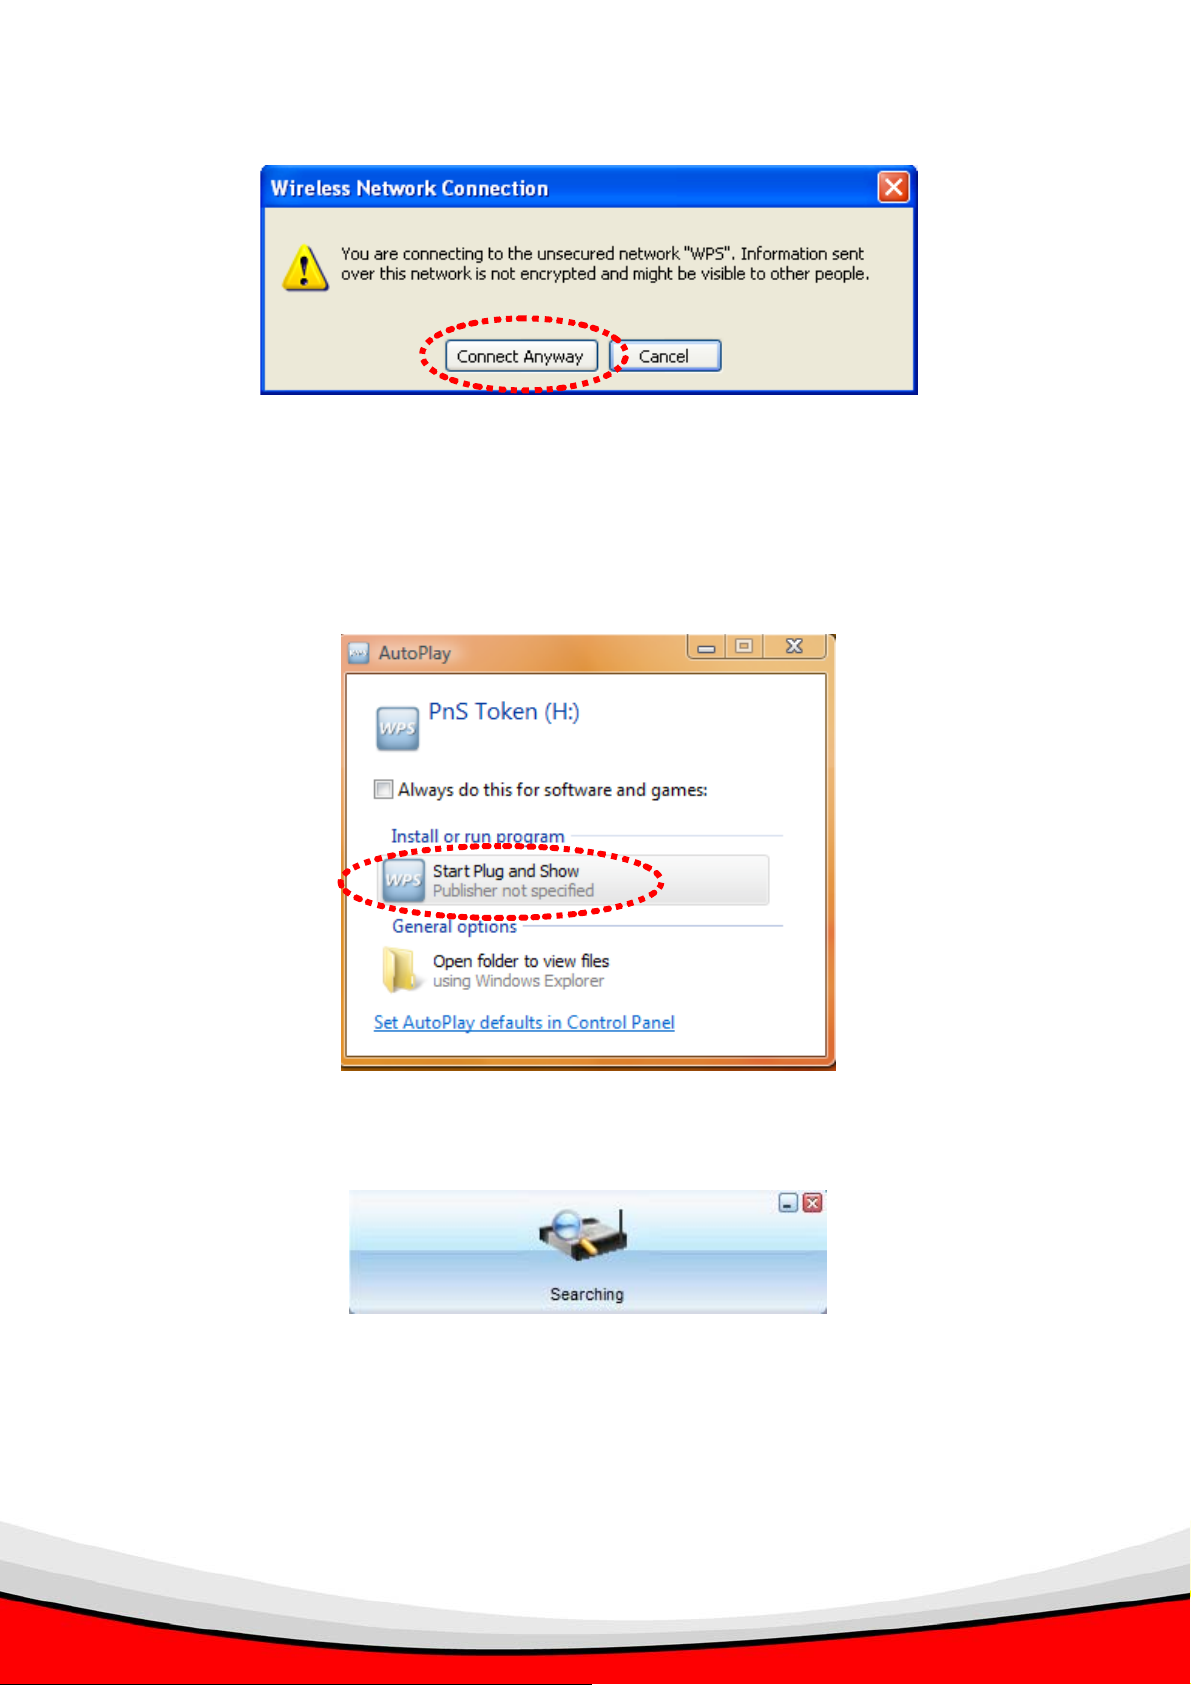
3. Click ‘Connect Anyway’ when you see this message to continue.
4. Insert the USB flash into the USB port of your computer. The computer will automatically
search and locate the USB flash. You can run the Plug and Show software immediately
by clicking on Start Plug and Show.
5. It will start searching for the WPS.
14
Page 16

6. You’ll be prompted to enter Login Code, which is a 4-digit number displayed at the
upper-left corner of the WPS. Enter Login Code and click ‘OK’ to connect to the WPS.
IP Address of
the WPS
7. Once you login successfully to the projector server, you will be connected and the WPS
will project your PC screen to the projector automatically. You will find the Presentation
Client Software appears in your computer.
Presentation Client
Software.
8. If you close the Presentation Client Software, the WPS will disconnect your computer and
will not project your PC screen to the projector.
15
Page 17

9. To re-connect to the WPS and re-project your PC screen, follow Step 10-13 below.
10. Click on ‘Start’ > ’My Computer’.
11. A removable storage named ‘PnS Token’ will be appeared in your computer’s drive,
double-click on it.
16
Page 18

12. Then, double-click on ‘WP-S1000’ icon, and it will start searching for the WPS.
17
Page 19

13. You’ll be prompted to enter Login Code, which is a 4-digit number displayed at the
upper-left corner of the WPS. Enter Login Code and click ‘OK’ to connect to the WPS.
You will be connected and the WPS will project your PC screen to the projector
automatically.
NOTE: Login code
WILL CHANGE when:
a. Projector server rebooted.
b. User logged out and when
login again.
IP Address of
the WPS
14. You need to plug-in the USB flash disk into your computer during your presentation. If you
unplug the USB flash disk from your computer, you are unable to re-connect to the WPS
once you close the Presentation Client Software.
18
Page 20

2.3 Software Installation (From the WPS)
You can install the software from the WPS via wired / wireless LAN connection into your
computer. (Please skip Step 1 to 3 if you’re using wired LAN connection):
1. Right-click on wireless network icon located near the clock (usually located at the
bottom-right corner of desktop), and select ‘View Available Wireless Networks’ to
launch windows zero configuration utility.
2. Locate a wireless network named ‘WPS’, select it and click ‘Connect’.
19
Page 21

3. Click ‘Connect Anyway’ when you see this message to continue.
4. Launch Internet Explorer (or other web browser like FireFox), input ‘192.168.100.10’ in
address bar, and then press ‘Enter’ key.
5. Click ‘Download’ to download projector server software.
20
Page 22

6. Click ‘Download’ to begin software download (leave password field blank).
7. Click ‘Run’ to start software installation after the download is completed.
8. When you see this security warning, click ‘Run’ to continue.
21
Page 23

9. Click ‘Next’ to start software installation procedure.
10. You’ll be prompted to enter Login Code, which is a 4-digit number displayed at the
upper-left corner of the WPS. Enter Login Code and click ‘OK’ to connect to the WPS.
You will be connected and the WPS will project your PC screen to the projector
automatically.
NOTE: Login code
WILL CHANGE when:
a. Projector server rebooted.
b. User logged out and when
login again.
22
Page 24

11. You will find the Presentation Client Software appears in your computer.
Presentation Client
Software.
12. If you close the Presentation Client Software, the WPS will disconnect your computer and
will not project your PC screen to the projector.
13. T o re-connect to the WPS and re-project your PC screen. Run the Presentation Client
Software manually from your computer.
14. To run the Presentation Client Software, click on Start>All Programs>WP-S1000>, then
click on WP-S1000.
23
Page 25

3. FAMILIAR WITH PRESENTATION CLIENT SOFTWARE
3.1 Presentation Mode
Once you login successfully to the projector server, you will be connected and the WPS will
project your PC screen to the projector automatically. You will find the Presentation Client
Software appears in your computer.
Switch to
Video Mode
Here are descriptions of all buttons:
Play / Pause Stop Refresh
Menu
Minimize
Close
Play / Pause: Click this button to toggle play / pause mode; when in play mode, the display
of WP-S1000 projector server is synchronized with the display content of your computer;
when in pause mode, the display of WP-S1000 projector server freezes and is not
synchronized with the display content of your computer.
Stop: Click this button to disconnect your computer from WP-S1000 projector server. You
can click Play / Pause button to reconnect again, if the project server is not controlled by
other computer.
Refresh: If the display content of WP-S1000 and your computer is not synchronized, you
can click this button to refresh display.
Close: Click this button to close client software, your computer will be disconnected from
WP-S1000 projector server. If you want to reconnect again, you have to launch client
software again and input correct login code.
Minimize: Minimize (hide) client software window, so it will not be shown during
presentation.
Menu: Click this button for menu (for more functions of client software).
Switch to video mode: Click to switch to video playing mode (see next page).
24
Page 26

3.2 Video Playing Mode
Minimize Menu
Close
Switch to
Presentation
Mode
Play / Pause Stop Open
Progress Indicator
Mute /
Volume
Here are descriptions of all buttons:
Play / Pause: Click this button to toggle video play / pause mode. After a video file has been
loaded, click this button to play the video; you can click this button during video play, to
pause playing video.
Stop: Stop playing video.
Open: Click this button to open a video file. You’ll be prompted to provide the location of
video file. Supported video file formats are: MPG / MPEG, DAT, VOB, WMV9, ASF, DivX, and
Xvid.
Progress Indicator: When video is playing, the progress indicator will move from left to right,
to show the progress of video play. You can also drag the progress indicator to move to
specific position within video file.
Mute / Volume: You can click mute button
as
. To resume, click mute button again. If you want to adjust volume, drag volume control
to mute audio, and the icon will be displayed
to left will decrease volume, and drag volume control to right will increase volume.
Close: Click this button to close client software, your computer will be disconnected from
WP-S1000 projector server. If you want to reconnect again, you have to launch client
software again and input correct login code.
Minimize: Minimize (hide) client software window, so it will not be shown during
presentation.
Menu: Click this button for menu (for more functions of client software).
Switch to Presentation Mode: Return to presentation mode (see previous page).
25
Page 27

3.3 Menu
By clicking the ‘Menu’ of the presentation client software, a menu will appear:
These functions in the menu will help you to use more functions of this projector server, and
the descriptions of these functions are listed below:
Web Admin: Launch your computer’s default web browser to enter the web administration
menu of this projector server. For detailed instructions for web administration menu, please
go to Chapter 5.
Search Server: Search for WP-S1000 projector server on the local network. Please note
that if you’re currently connected to any projector server, you’ll be disconnected first.
Repeat: Select this item and a ‘v’ sign will appear at the front of ‘Repeat’ item, which will
activate video repeat mode (the video will be played again from the beginning when it ends).
To cancel repeat, select this item again, and make sure the ‘v’ sign disappeared (This
function is only applied for Video Playing Mode).
Make PnS Token: If you lost the client software USB flash disk, you can use this function to
build a new one with your own USB flash disk/pen drive. For detailed instructions, please
refer to Chapter 4.
Info: Shows the model name, IP address, and current login code of the projector server.
About: Shows the information about the presentation client software.
Exit: Disconnect from projector server and close the client software.
26
Page 28

4. MAKE A NEW USB FLASH DISK WITH CLIENT SOFTWARE
(PnS TOKEN)
We only provide 2 USB flash disks. If you need more USB flash disks, you can build it using
your USB flash disk/pen drive.
If you lost the USB flash disk that comes with your projector server, you can rebuild one with
your own USB flash disk/pen drive too.
You’ll need:
An USB flash disk/pen drive with capacity larger than 5MB (formatted)
Installed the presentation client software into the USB flash disk/pen drive
Insert the USB flash disk into your computer’s USB port and start the presentation client
software. Select ‘Make PnS Token’ from the menu of client software, then follows the
instructions to build a new USB flash disk:
1. Click ‘Next’ when setup wizard appears.
27
Page 29

2. Click ‘Flash Drive’ dropdown menu to select the drive letter that represents your USB flash
disk. If you only have one flash disk inserted, setup wizard should be able to identify the USB
flash disk automatically. If the USB flash disk is not correctly identified, please insert the USB
flash disk once again, and click ‘Next’.
3. Setup wizard will copy all necessary files to the USB flash disk, please be patient, and do
not remove the USB flash disk in this process. When you see this message, the wizard is
completed successfully and the USB flash disk is ready to use. Click ‘Finish’ to exit and
remove the USB flash disk.
28
Page 30

5. USING WEB ADMINISTRATION INTERFACE
There are 2 Administrator Accounts in the W eb Administration Interface> Conference Control
and Admin.
Conference Control – To control the process of presentation when more than one presenter
are connected.
Admin – To configure WPS settings, network setup and perform firmware upgrade.
5.1 Open the Web Administration Interface:
1. Click ‘Web Admin’ from the menu of presentation client software:
2. The following administration interface will be shown:
Language
29
Page 31

Here are descriptions of every setup item:
Download: Download presentation client software. No password is required to download the
software by default; however, you can setup a password for file download in ‘admin’ menu.
(Refer Page 17 for downloading software from the WPS).
Conference Control: If there are more than one users logged onto projector server, you can
arrange the presentation by selecting the active presenter.
Default password of conference control menu is ‘admin’.
Admin: You can configure network and other parameters of this projector server, and
perform firmware upgrade.
Default password of admin menu is ‘admin’.
Language: Change web administration interface’s language. Available languages are:
English, Japanese, Traditional Chinese, and Simplified Chinese.
30
Page 32

5.2 Download
Click ‘Download’ to enter client software download page, and click ‘Download’ to start
download. Password is not required by default; however, you can setup a password for file
download in ‘admin’ menu. (Please refer to Page 17)
31
Page 33
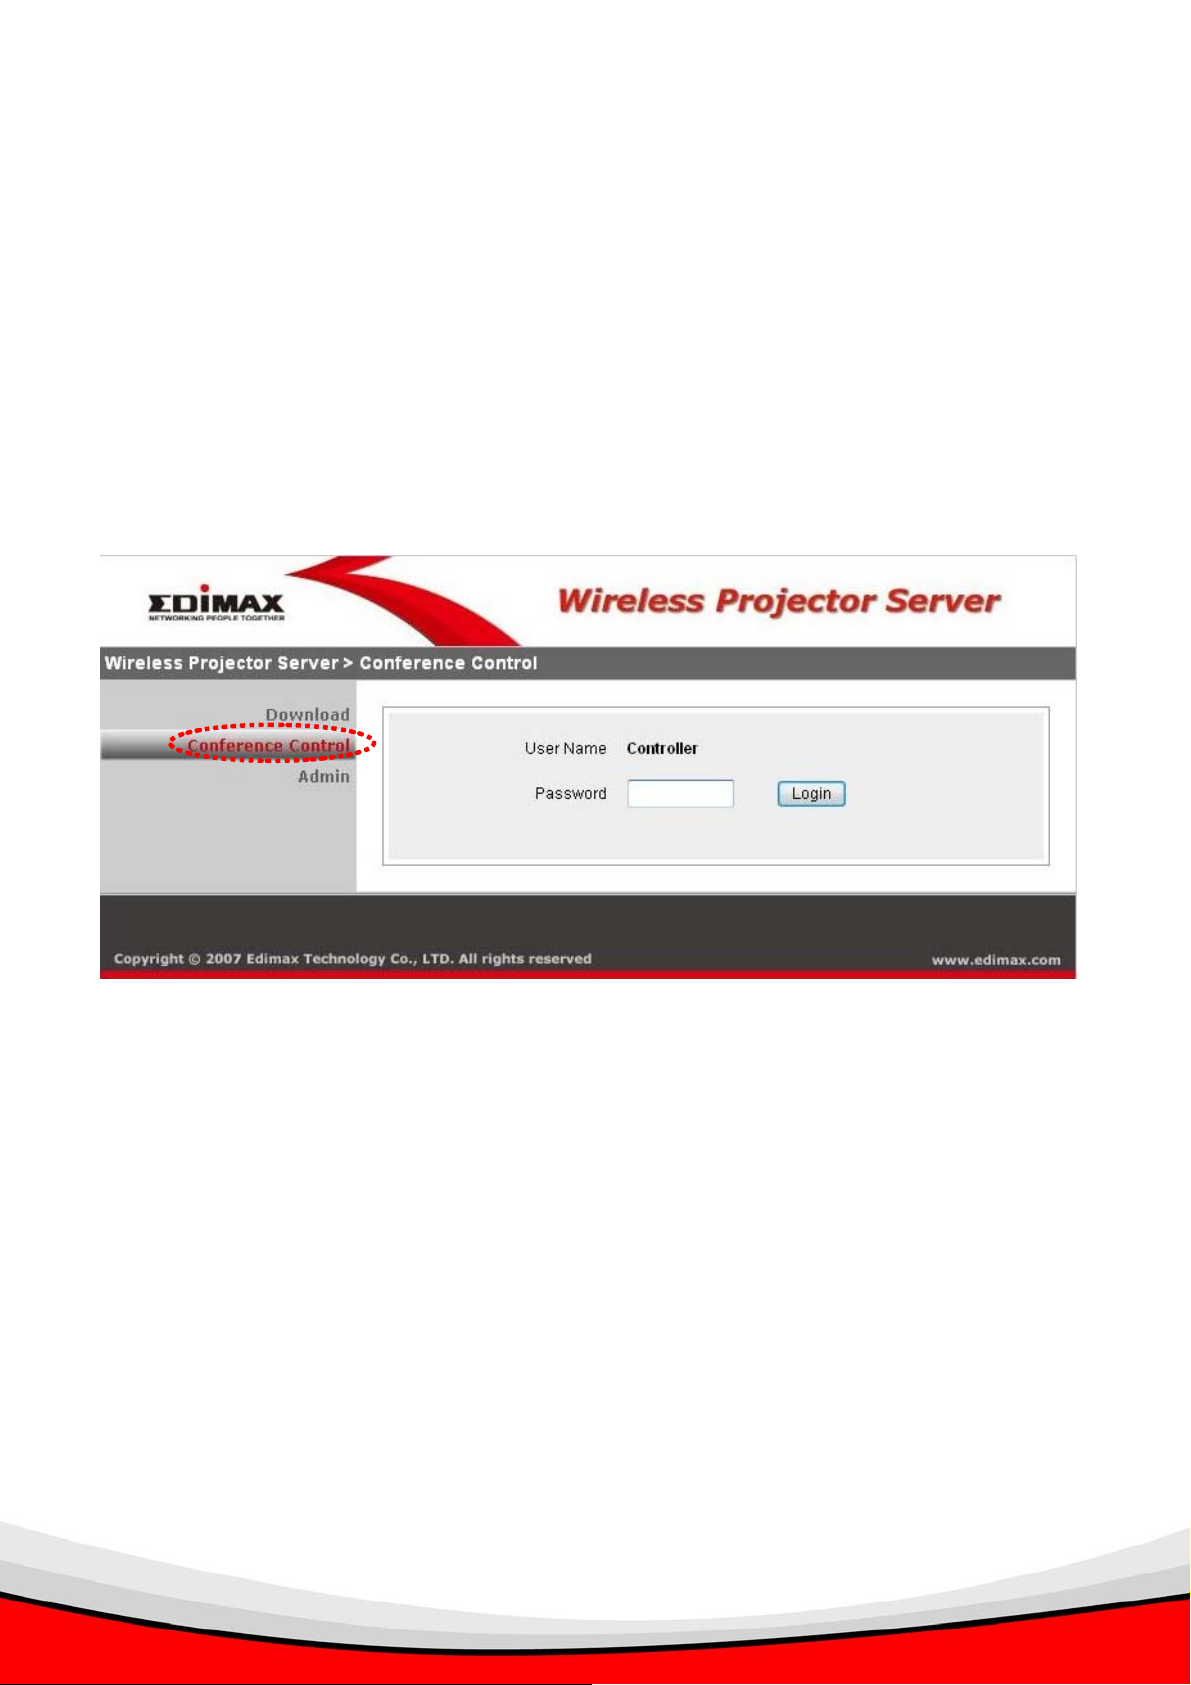
5.3 Conference Control
When you have more than one presenter , you can enter this menu and control the process of
the presentation by deciding who is controlling the presentation.
You can also see the computer’s name of every presenter. Please note that every presenter
can change the name by using a different user name when they login. You can use the login
name to identify the presenters.
1. Click on Conference Control. Login default password is ‘admin’.
Default password is ‘admin’.
32
Page 34

2. All connected presenter(s) will be shown.
The active presenter has a icon shown at his / her ‘Play Control’ field. If you want to stop
this presenter from presenting, click the icon.
All inactive presenters will have a icon shown at their ‘Play Control’ field. If you want to
make another presenter as active presenter, click the icon. The former active presenter
will be stopped and replaced by the new presenter.
If you want to leave conference control menu, click ‘Logout’.
NOTE: Active presenter will have a flashing icon on his / her client software:
When this icon
flashes, the user
of this client
software is
controlling the
33
presentation
Page 35

5.4 Admin
1. You can configure network and other parameters of this projector server, or upgrade
system firmware. To enter admin menu, click ‘admin’. Enter password as ‘admin’, and click
‘Login’ button.
Default password is ‘admin’.
34
Page 36

2. After logged in, you’ll see the following administration menu:
All setup items are listed on the left, and their detailed descriptions will start from next page.
If you want to leave administration menu, click ‘Logout’.
35
Page 37

5.5 System Status
This page provides various information and the status of WP-S1000 projector server, like
firmware version, network settings, and connection status. If you need help from online
technician or dealer of purchase for help, the information will help.
36
Page 38

5.6 Network Setup
You can setup network parameters in this page.
Description of every setup items are listed below:
Obtain an IP
address
Choose this item to obtain the IP address for this projector server
automatically from the DHCP server on local network. If you don’t
have a DHCP server on local network, you have to select ‘Use the
automatically
Use the following IP
address
following IP address’ and setup the IP address manually.
Choose this item to setup a fix IP address for this project server
manually. You have to input IP address, subnet mask, and the IP
address of gateway manually. If you don’t know how to input these
values, please ask network administrator.
DHCP Server Setup
You can choose to enable or disable the built-in DHCP server for
client computers. You can choose ‘Auto’ to let WP-S1000 projector
server decide by itself, or choose ‘Disable’ if you want to use other
DHCP server on the network. Please note that if you have clients
using wireless network to connect to this projector server, please
choose ’Auto’.
If DHCP server is enabled, please check your IP range (‘Start IP’ and
‘End IP’).
37
Page 39

Wireless Setup
You can configure the wireless network. Available settings are:
Region: Select the country of your residence, this will affect available
wireless radio channel. Selecting a different country may offend local
radio regulation and cause legal problem.
SSID: You can change the Service Set Identifier (SSID, the name
used to identify this projector server from other wireless devices) by
input another SSID here. Default SSID is WPS. (No space is
allowed)
Channel: You can change the channel number of wireless network
from dropdown menu here. Available channels will vary depending
on the region you selected. You can select ‘Auto’ to let projector
server decides which channel to use.
GateKeeper
WEP: Select the wireless encryption level and key type. Available
options are 128bit (13 ASCII characters or 26 Hexadecimal
characters) and 64bit (5 ASCII characters or 10 Hexadecimal
characters). You can also select ‘Disable’ to let everyone connect to
the projector server wirelessly without the encryption.
Key: Input the WEP key here. Required number or characters will
vary depending on the encryption level and key type.
This projector server has a built-in firewall to isolate wireless users
and LAN. If you select ‘All Pass’, wireless users connected to this
projector server will be able to access the wired Ethernet network
connected to this projector server; if you select ‘All Block’, wireless
users will not be able to access the wired Ethernet network, to keep
privacy (this is also the default setting). If you want to let guests to
access to the Internet, you can select ‘Internet Only’, to let guests
visit web pages on internet through the wired Ethernet network
connected to this projector server. (Refer Appendix on set up the
projector server to the Internet).
After setting up the above configurations, please click ‘Apply’ and then ‘Reboot System’ to
allow all changes take effect.
38
Page 40

5.7 Projection Setup
You can use this page to setup video resolution, color depth, and refresh rate.
Description of every setup items are listed below:
Resolution
Color Depth Select the color depth (the number of displaying colors) from
Screen Refresh
Rate
After setting up the above configurations, please click ‘Apply’ and then ‘Reboot System’ to
Select video output resolution from dropdown menu, available
options are XGA (1024x768), SVGA (800x600), and WXGA
(1280x768). Please make sure the projector or CRT / LCD monitor
connected to the projector server supports the video resolution you
selected.
dropdown menu, available options are normal (16-bit color) and high
(32-bit color).
Select the video refresh rate from dropdown menu, available options
are 60Hz and 75Hz. For projectors and LCD monitors, please select
‘60Hz’; for CRT monitors, please select ‘75Hz’ for better video
performance.
allow all changes take effect.
39
Page 41

5.8 Change Passwords
You can use this page to change the passwords for Download, Conference Control, and
Administration.
Description of every setup items are listed below:
Download
Change the password required for client software download. Please
enter the same password for both ‘Enter New Password’ and
‘Confirm New Password’ fields.
Conference Control Change the password required for conference control page. Please
enter the same password for both ‘Enter New Password’ and
‘Confirm New Password’ fields.
Admin
Change the password required for administration page. Please enter
the same password for both ‘Enter New Password’ and ‘Confirm
New Password’ fields.
After setting up the above configurations, please click ‘Apply’ and then ‘Reboot System’ to
allow all changes take effect.
40
Page 42

5.9 Reset to Default
You can use this Reset to clear all current settings and restore the project server to factory
default settings.
Click ‘Apply’ to clear all settings and you will not be able to recover any settings, so please
think twice before you click ‘Apply’ button. Then, click on ‘Reboot System’ to reboot the
projector server so that the default settings can take effect.
41
Page 43

5.10 Firmware Upgrade
If there is new version of firmware (the system software of this projector server) available,
you can download it from Edimax’s website, and store the firmware file to your hard disk.
Then you can use this page to upload new firmware file to the projector server and replace
previous version.
1) Click ‘Browse’ button and you’ll be prompted to provide the location of the firmware
file.
2) Then click ‘Upgrade’ button to start firmware upgrade. Please note that all settings will
be restored to factory default setting after the firmware upgrade.
After click on ‘Upgrade’ button,
the firmware upgrade process
takes 5-7 minutes.
Please note: It’s recommended to use wired LAN/Ethernet connection to perform the
firmware upgrade, and never disconnect the network cable, or switch computer / projector
server off during the upgrade process.
42
Page 44

5.11 Reboot System
You can use this page to reboot the projector server by clicking the ‘Reboot’ button. If the
projector server is not working properly, rebooting the projector server may help, and this
function is very helpful when the projector server is located at the place where it is unable to
reach easily.
43
Page 45

6. APPENDIX
6.1 Troubleshooting
If you encounter any difficult when using this projector server, eg: the server is not
responding or response with strange behaviors, please refer to this troubleshooting table
before you contact us or the dealer of purchase, you may be able to solve the problem by
yourself and save a lot of time.
Scenario Possible Solution
‘POWER’ LED
does not lit, and
the projector
server doesn’t
seem to be
working
Cannot connect to
projector server by
client software or
web browser
1. Check ‘PWR’ button located at the back of projector server, it
should be pressed down; you may also check if the power cable of
is securely inserted into ‘5V DC’ jack.
2. If you tried above procedure and the ‘POWER’ LED is still not lit,
make sure the wall socket which power adapter connected to is
working, you may ask for a qualified electrical technician for help.
3. If the ‘POWER’ LED is not lit, but other LEDs (WLAN / LAN) are lit,
please contact your dealer of purchase for assistance.
4. Contact your dealer of purchase for assistance if all solutions listed
above do not work.
1. Make sure the IP address you used to connect the projector server
is correct (refer to Chapter 2.1 for instructions on how to know
projector server’s IP address).
2. Please check network cable is correctly and securely connected to
the LAN jack of projector server, and the ‘LAN’ LED at the front
panel of projector server is lit.
3. If you set the projector server to obtain an IP address
automatically , make sure the DHCP server on your local network is
working.
4. If you tried to connect to the projector server via wireless
connection, make sure you’re connected to the correct access
point SSID (default SSID of the projector server is ‘WPS’ and it will
be changed if you modified the wireless setting of the projector
server).
5. Switch the projector server off, and switch it on again after 5
seconds, then try to connect to the projector server again. You can
44
Page 46

also use a pen or pin to press the ‘RESET’ button located at the
back of projector server.
6. Ask your network administrator or a qualified technician for help.
The image
displayed on
projector or CRT /
LCD monitor is
distorted
The wireless
signal reception is
bad
1. Make sure the video cable is securely connected to ‘VGA’ jack at
the back of the projector server. You may also check the video
connection to the projector or CRT/LCD monitor.
2. Make sure the projector or CRT/LCD monitor works with the video
output setting of projector server. You can change to a lower
resolution and see if the display on projector or CRT/LCD monitor
becomes normal (see Chapter 5.7 for detailed instructions for
changing the output resolution).
3. Replace the video cable used to connect the projector server and
your projector or CRT/LCD monitor with a new one.
4. Contact your projector or CRT/LCD monitor manufacturer for help.
1. If you’re using this projector server in an extremely big room, you
may wish to try another antenna with high signal gain for better
signal reception. Contact your dealer of purchase for detailed
information. DO NOT ATTEMPT TO REAPLCE THE ANTENNA
BY YOURSELF IF YOU’RE NOT SURE WHAT ANTENNA YOU
SHOULD USE!
2. Move your computer closer to the projector server if possible, or
use wired connection.
3. The wireless antenna on the projector server should be
perpendicular to the ground for better reception.
Cannot connect
wirelessly to the
projector server
1. If you set the projector server to use wireless encryption, all
wireless clients should input the correct WEP key before they can
get connected.
2. Make sure the SSID of the projector server is found by your
computer, and you connect to the correct SSID for the projector
server.
3. Reboot your computer and try again.
No audio 1. Check the volume setting of your computer and your audio
speaker / amplifier.
2. Check the audio cable that connects the projector server and your
audio speaker / amplifier.
3. Replace the audio cable with a new one.
45
Page 47

6.2 Reset The Projector Server To Factory Default Setting
In some cases, you may lose the control of your projector server, eg: you forget the
administration password, or you can’t get access to the administration interface for some
reasons. You can use reset button located at the back of the projector server, to clear all
settings (include admin password).
Please follow the following instructions to perform the reset:
1. Press ‘PWR’ button to make sure the projector server is switched off.
2. Use a pen or pin to press ‘RESET’ button located at the back of projector server and hold
still.
3. Press ‘PWR’ button to switch projector server on (you should still press and hold ‘RESET’
button now).
4. Release ‘RESET’ button after 10 seconds, and the projector server will be restored to
factory default settings, you may use default password to access administration menu
now.
HERE
46
Page 48

6.3 Set Up The Wireless Projector Server (WPS) To The Internet
You can setup the WPS to connect to your router/existing network that has internet
connection. By doing this, all computers connected to the WPS wirelessly will be able to
access to the Internet via your router. This allows the presenters to enhance their
presentations using the information on the Internet.
1) Configure the WPS from the Web Admin by clicking on Admin>Network Setup.
2) Select Use the following IP Address. Configure:
IP Address – Use an IP address that correspond to your router IP range.
Subnet Mask – Use the same Subnet Mask of your router.
Default Gateway – The IP Address of your router.
3) Select Disable on DHCP Server Setup.
4) Select All Pass on GateKeeper.
5) Click ‘Apply ‘and then click ‘Reboot System’ to save your settings.
47
Page 49

6) Connect a LAN cable to the WPS’s LAN port and connect it to the LAN port of your
router.
Application (Example):
- IP Address, Subnet Mask and Default Gateway of the WPS.
- IP Address and Subnet Mask of the router.
7) All computers that connected to the WPS wirelessly can access to the Internet freely.
Presenters can now incorporate their presentations with live web data.
48
 Loading...