

WWiirreelleessss // FFaasstt EEtthheerrnneett
PPrriinntt SSeerrvveerr SSeerriieess
Quick Installation Guide
Version 1.1

1
Multi-Languages Content Table
English ..………………………..........……………….02
Nederlands ............................................................16
Deutsch ……………….…....................................... 30
Français ................................................................ 44
Polski ..................................................................... 59
Italiano ……………..................................................73
Español .................................................................. 87
Português .............................................................101
Český ....................................................................115
Magyar ..................................................................130
Türkçe ...................................................................144
ירבעת .....................................................................159

2
ENGLISH VERSION.
1.1 Product Introduction
Thank you for purchasing and using our print server. This print server
allows your printer to become a shared device on the network. It offers
printing flexibility and manageability on your Wired or Wireless Local Area
Network with an absolute minimum setup and maintenance required.
This print server supports TCP/IP, NetBEUI, IPX/SPX, and AppleTalk
protocols. It is the best network printing solutions for various common
network operating systems such as
Windows Peer-to-Peer Printing (95/98/Me/NT/2000/XP)
Microsoft Windows NT/2000 Server-Based Printing
Novell NetWare 3.x/4.x/5.x
Unix/Linux
MAC OS
With the help of Installation Wizard, you can easily and instantly complete
the settings for the printing environment, and start enjoying the fantastic
features provided by this print server.
This guide is used for quick installation on Windows peer-to-peer printing
environments and Novell NetWare network environments. If you have a
simple network you can simply follow the procedures described in this
guide step-by-step to complete the installation. If you find any problem,
please refer to the User’s Manual on the CD-ROM for more detail
information.
1.2 Product Package
This package contains the following components:
One Print Server
One Antenna (Wireless version only)
One Power Adapter
One Quick Installation Guide
One CD-ROM (Including all the utilities, drivers and User’s Manual)

3
1.3 Hardware Installation Procedure
Unpack the print server package and verify that all the items listed in
the previous section are provided.
Connect the print server to the printer you want to share on the
network by standard USB or Parallel cable.
Connect the print server to your network by attached the network
cable to the UTP port of the print server.
Connect the power adapter to the print server. The print server will
perform the Power-On-Self-Test (POST) after it is powered on.
During the POST, the status LED will flash. When the status LED is
unlighted, the print server is ready.
Note: You must use the power adapter shipped along with the print server,
do NOT use any other power adapter from other sources.
1.4 Administrator Installation and Setup
The Administrator Installation Program executes a wizard-driven procedure
that performs the following tasks:
Install all necessary utilities and drivers in your PC (including the
client utilities).
Prompt to setup the print server (including the print server name and
network protocols).
Add the network port of the print server to your PC.
After the installation, perform the standard “Add Printer” procedure and
choose the print server’s “Network Port” in the “Available Ports” list. Then,
you can test printing function from the Administrator PC.
The Administrator Installation can be performed on Windows
95/98/Me/NT/2000/XP with the same user interface. Before the installation,
please verify that your network protocol is installed on your PC (TCP/IP,
IPX and/or NetBEUI). Please follow the steps below to start installation.
Insert the CD shipped along with the print server into your CD-ROM drive.
The Autorun.exe program should be executed automatically. If not, run
Autorun.exe manually from CD-ROM drive’s root directory.

4
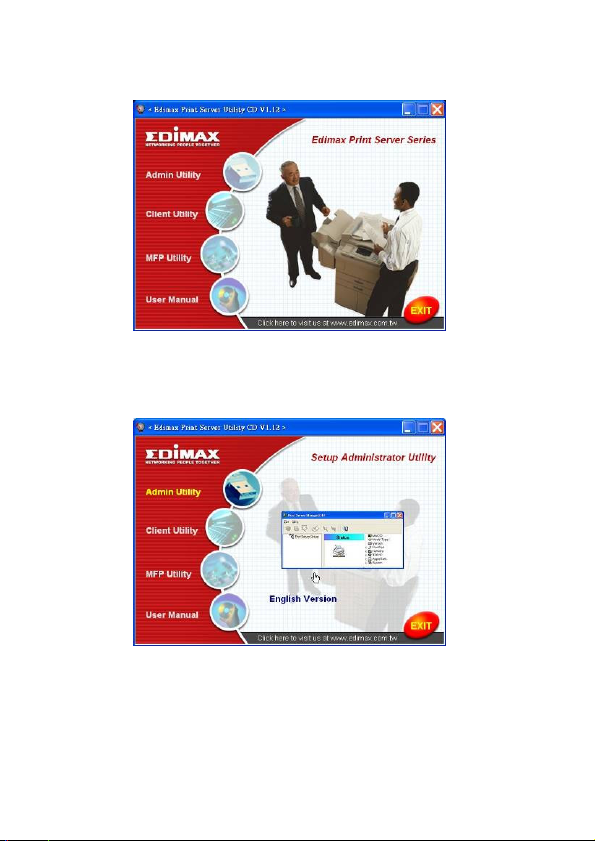
The “Installation Manager” will be displayed on the screen as following.
Click “Admin Utility”.
The “Admin Utility” window will be displayed. Click “English Version”.
5
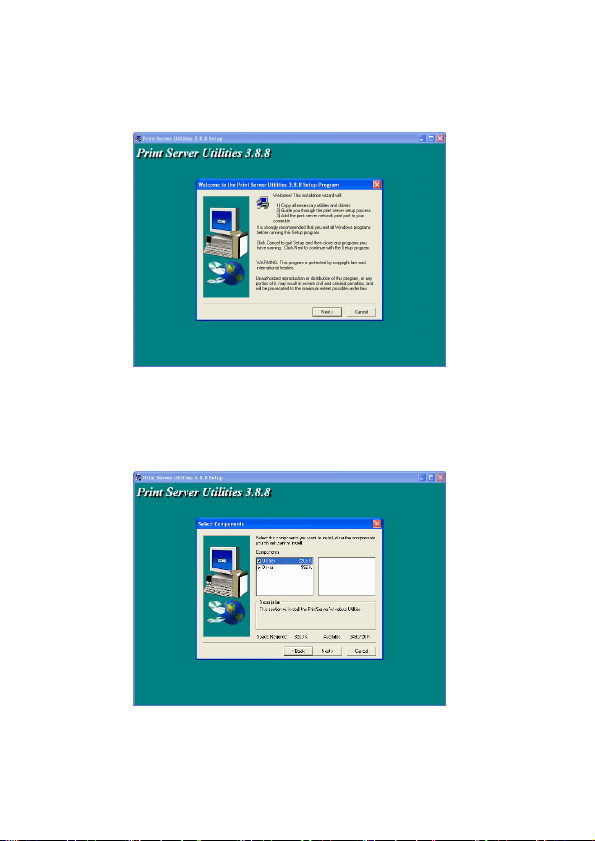
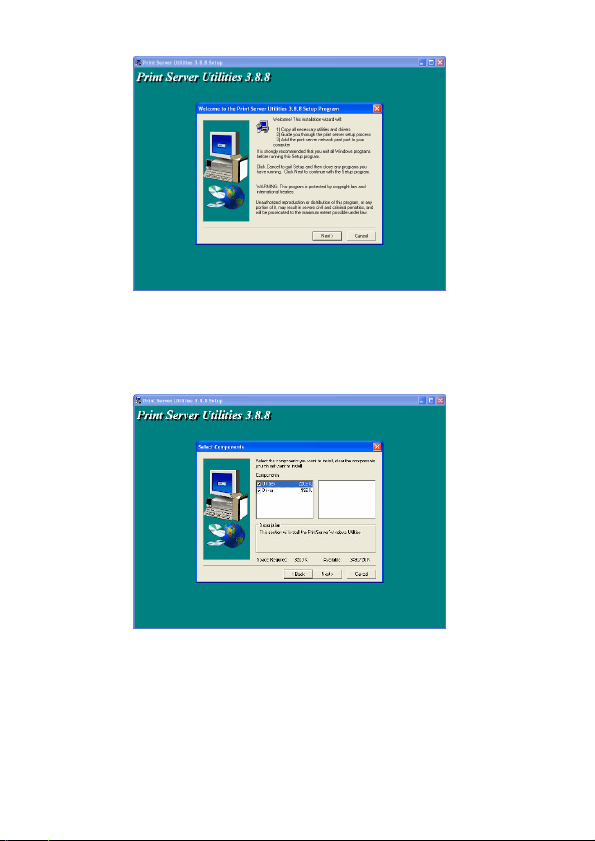
Click “Next” to install the utilities in the default folder or click “Browse” to
specify the destination folder where you would like to install the utilities.
Select the components you want to install. It is highly recommended to
install all provided components. Click “Next” to continue.
6
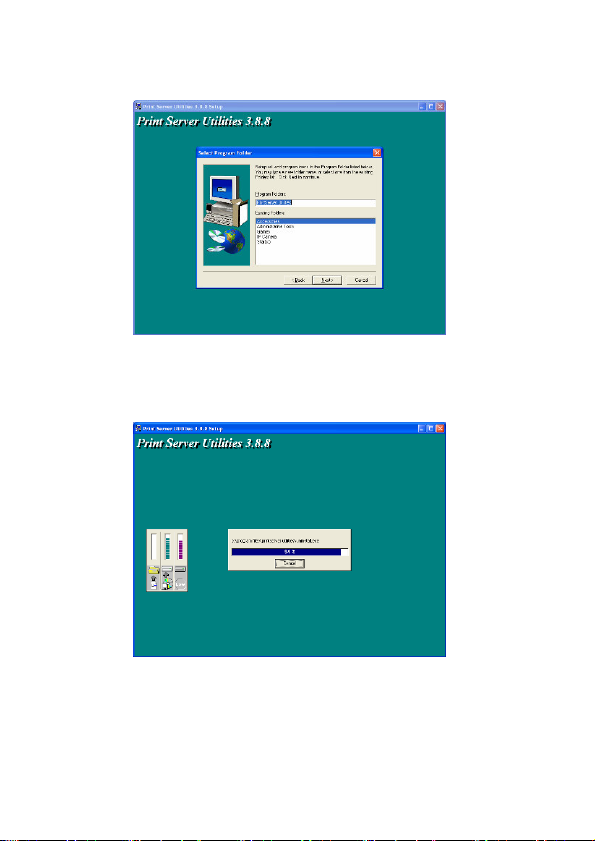
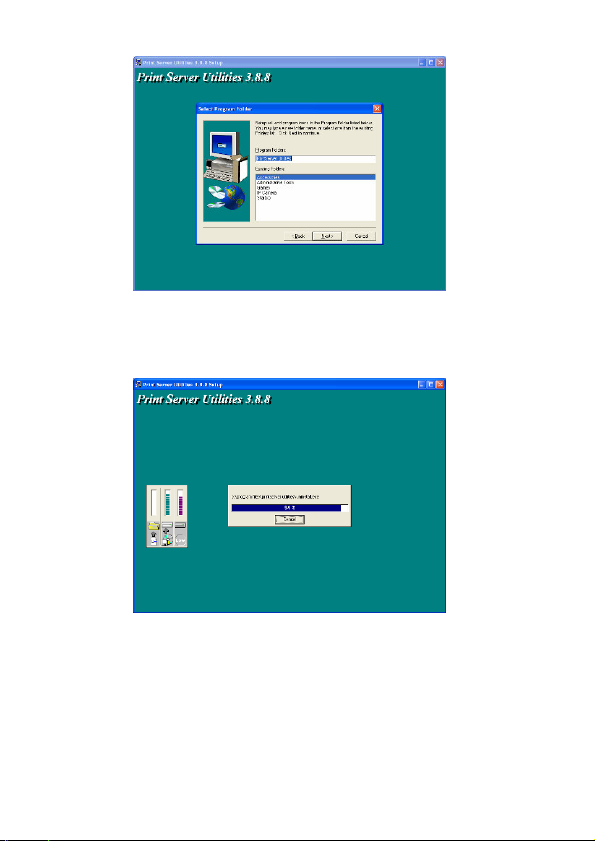
Specify the program folder where the program icons will be added to, click
“Next”.
The system will start to install the utilities automatically.
7
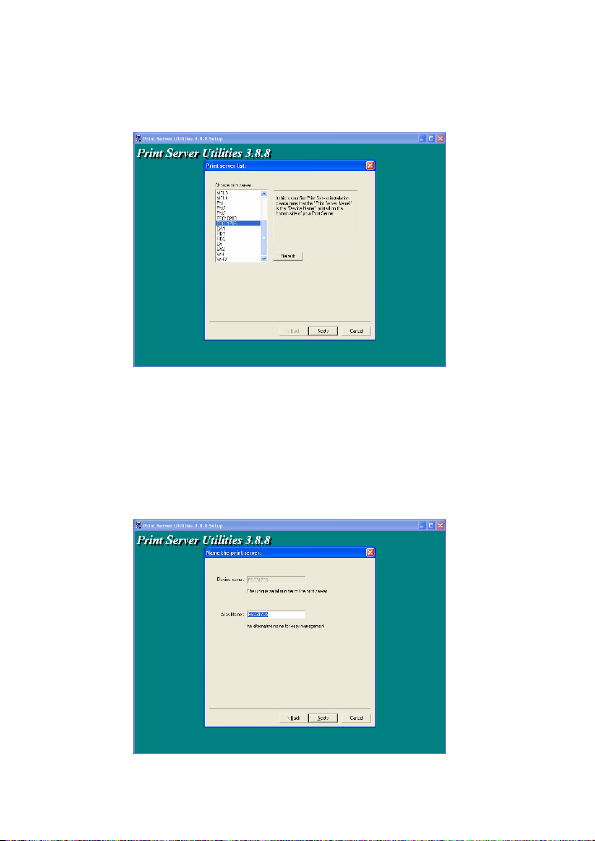
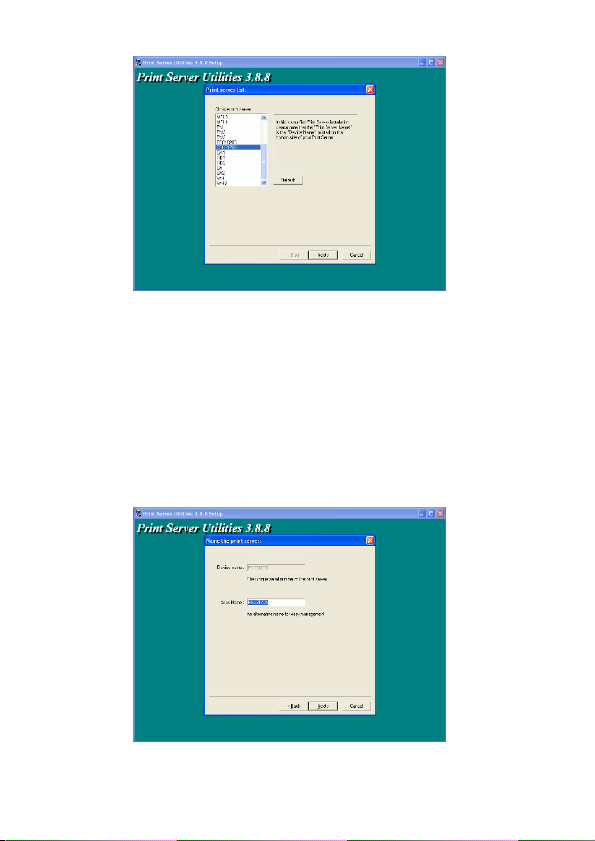
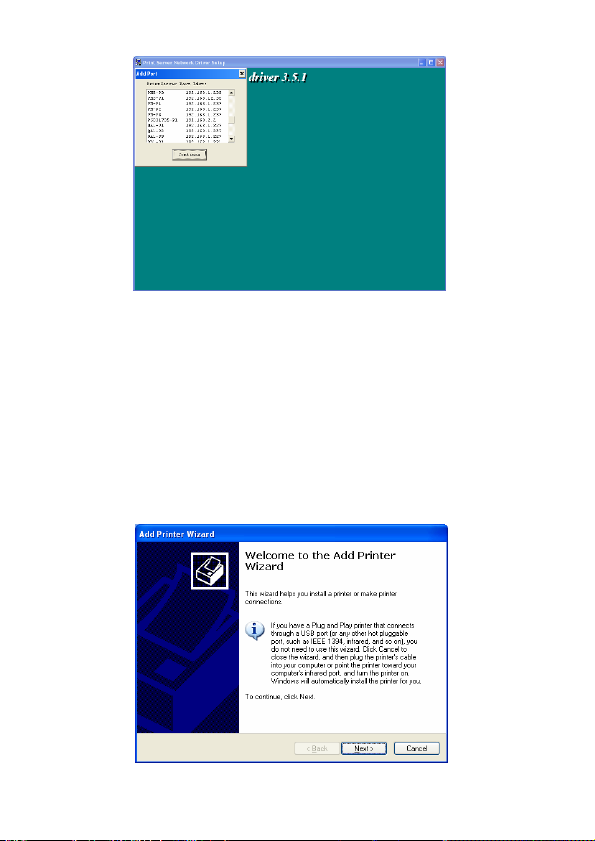
You have completed the installation phase and prepare to configure the
Print Server. The “Choose Print Server” will list all Print Servers within
the network. Select the Print Server you would like to configure and click
“Next”.
NOTE 1: If this is the first time you configure the Print Server, the “Print
Server Name” is the same as the “Device Name” printed at the rear side of
the print server.
NOTE 2: The list can only display the devices from the same manufacturer.
Specify a recognizable name for the Print Server and click “Next”.
8
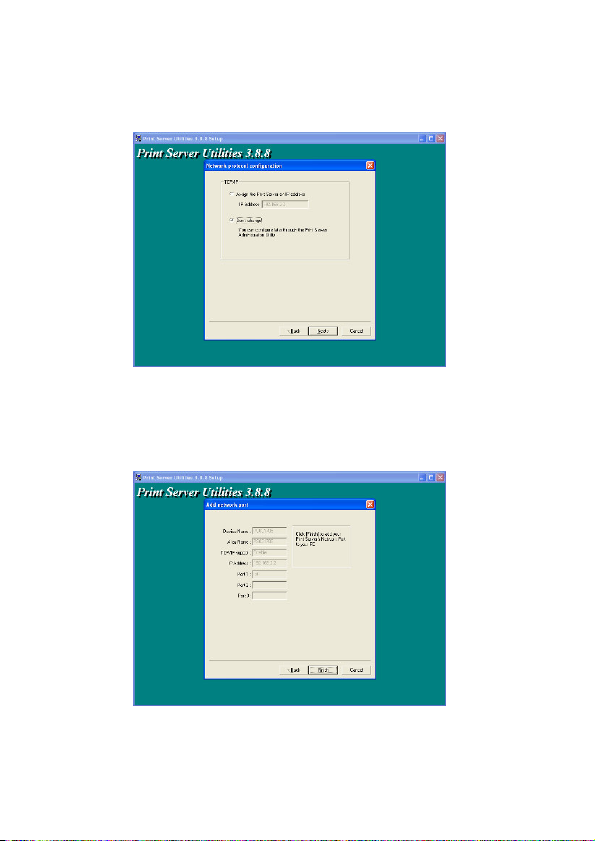
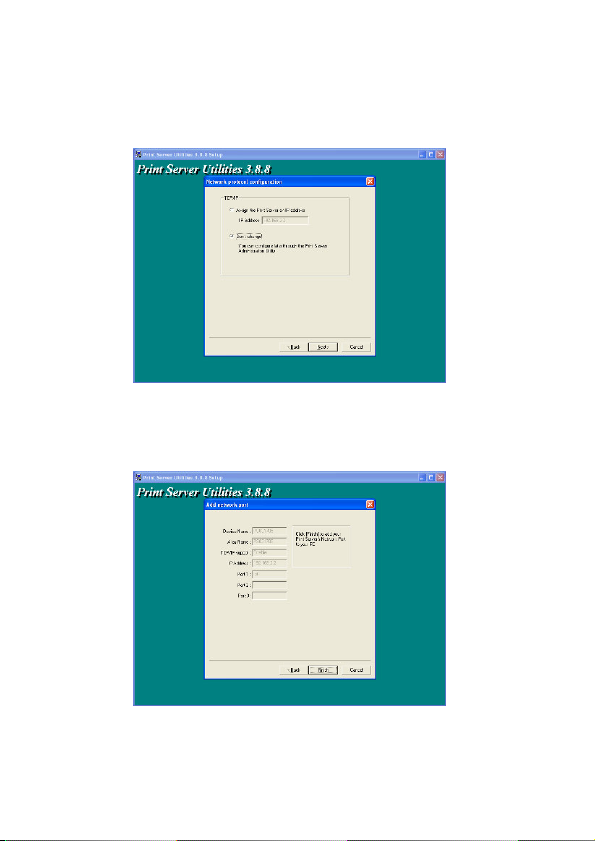
The “Network Protocol Configuration” will display the network protocols the
Print Server is currently enabled. By default, TCP/IP is enabled, while IPX
and NetBEUI are disabled. Specify the IP Address for the Print Server
manually or click “Next” to keep default IP Address, i.e. 192.168.2.1.
The configuration summary is displayed in the window. Now, you have
completed the “Print Server Setup”. Click “Finish” and your system will
add network port of the Print Server to your PC automatically.
The Administrator Installation procedure is totally completed. Click
“Finish”.

9
1.5 Client Installation and Setup
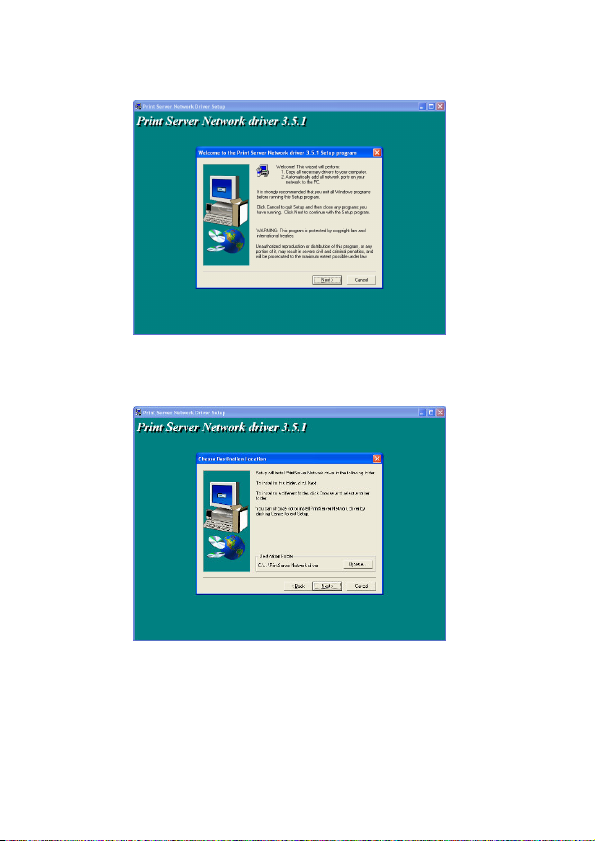
The Client Installation Program is a wizard driven procedure which will
perform the following tasks,
Install client utilities and drivers into your PC.
Automatically add all Network Ports to your PC.
The network port driver supports network protocol auto-detection. It
will automatically select an available network protocol (TCP/IP, IPX
or NetBEUI) of the client computer to connect to the print server.
Since both the print server side and client side support multi-protocols, the
configuration process of the client side is fully automatic.
After the installation, perform the standard “Add Printer” procedure and
choose the print server’s “Network Port” in the “Available Ports” list. You
can test printing from the PC to the print server as your local printer.
The Client Installation can be performed on Windows
95/98/Me/NT/2000/XP with the same user interface. Before installation,
please confirm that your PC has already connected to the network and
installed at least one network protocol. Please follow the steps below to
start installation.
Insert the CD shipped along with the print server into your CD-ROM drive.
The Autorun.exe program should be executed automatically. If not, run
Autorun.exe manually from CD-ROM drive’s root directory.
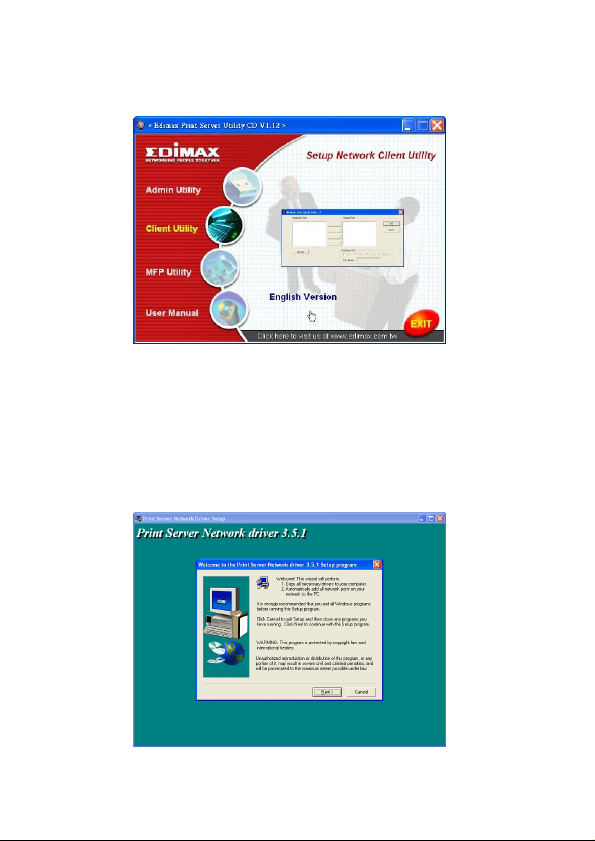
The "Installation Manager" will be displayed on the screen as follows. Click
“Client Utility”. The “Client Utilities” window will be displayed. Click
“English Version”.
10
Click “Next” to install the utilities in the default folder or click “Browse” to
specify the destination folder where you would like to install the utilities.
Specify the program folder where the program icons will be added to, click
“Next”.
The system will start to install the utilities automatically.
11
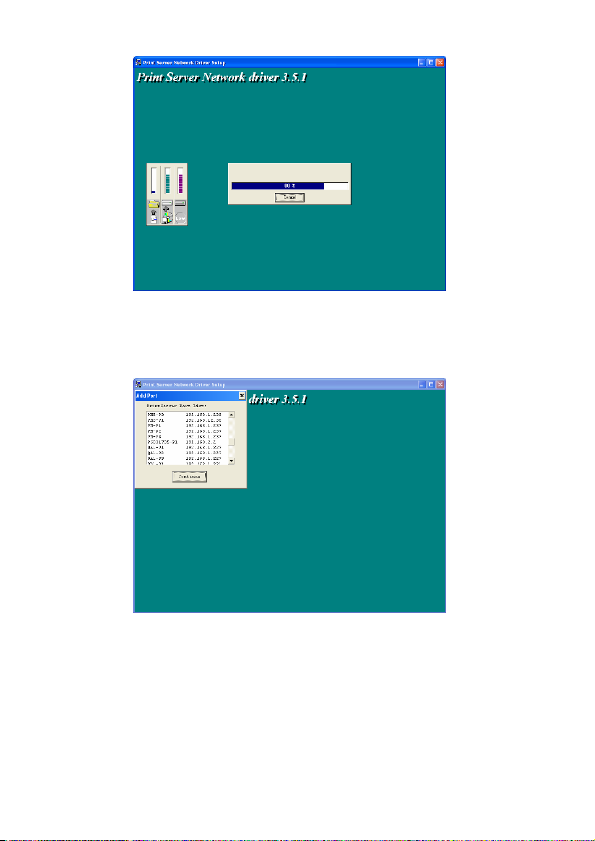
Now, the installation procedure is completed, you are ready to set up the
client’s computer. All network ports of the Print Servers detected on the
network will be added to your PC automatically, click “Continue”.
Then the Installation procedure is completed. Click “Finish”.
After adding a “Network Port” of the print server to your PC by
Administrator or Client Installation Program, you can follow the procedure
described in next pages add printer to the Windows.

12
1.6 Windows Add Printer Procedure
Step1. Click “Start”, choose “Settings” and select “Printers
Faxes”.
Step2. Click “Add a Printer”.
Step3. The “Add Printer Wizard” is displayed. Click “Next”.
Step4. Select “Local printer attached to this computer” and
make sure that “Automatically detect and install my Plug and Play
printer” is not selected. Click “Next”.
and
13
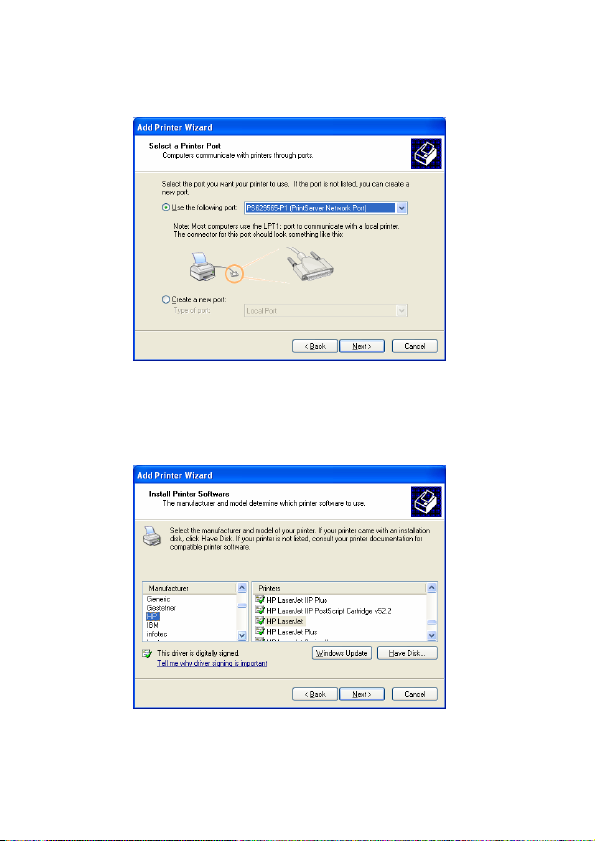
Step5. Choose the suitable “Print Server Network Port” which was
created by the Administrator Installation or Client Installation process
and click “Next”.
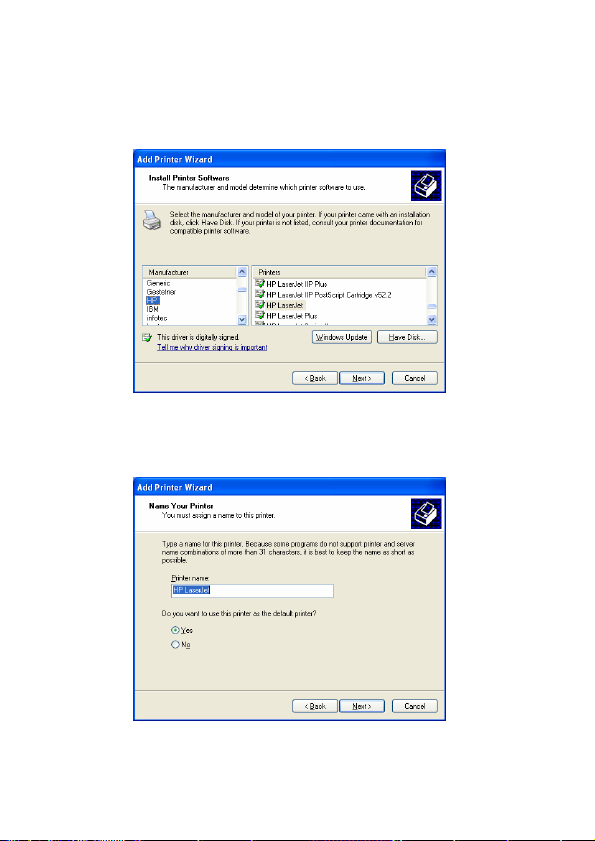
Step6. Select a suitable printer manufacturer and the printer model
and click “Next”. If your printer is not in the list, click “Have Disk…”
to install the driver of the printer. After installation, the printer model
will be added to the list.
14
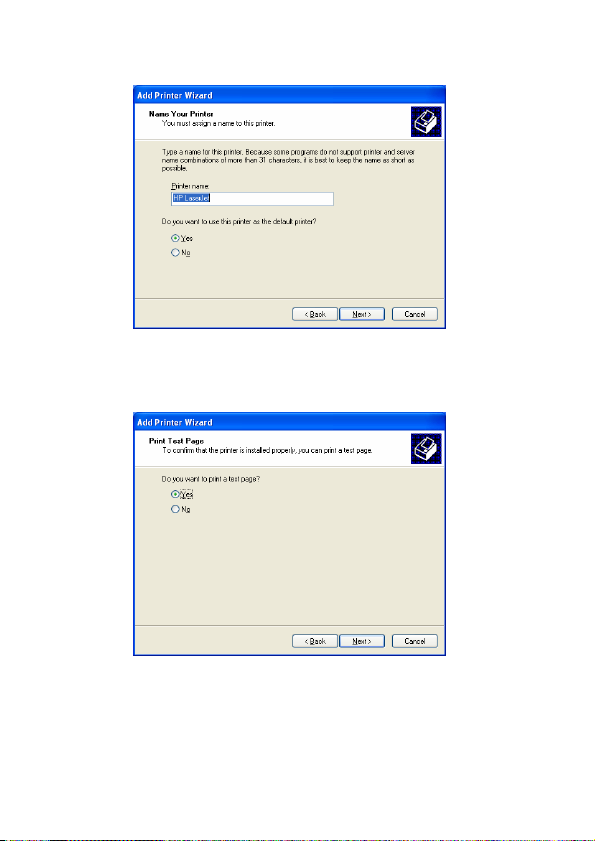
Step7. Name your printer and setup the default printer, click “Next”.
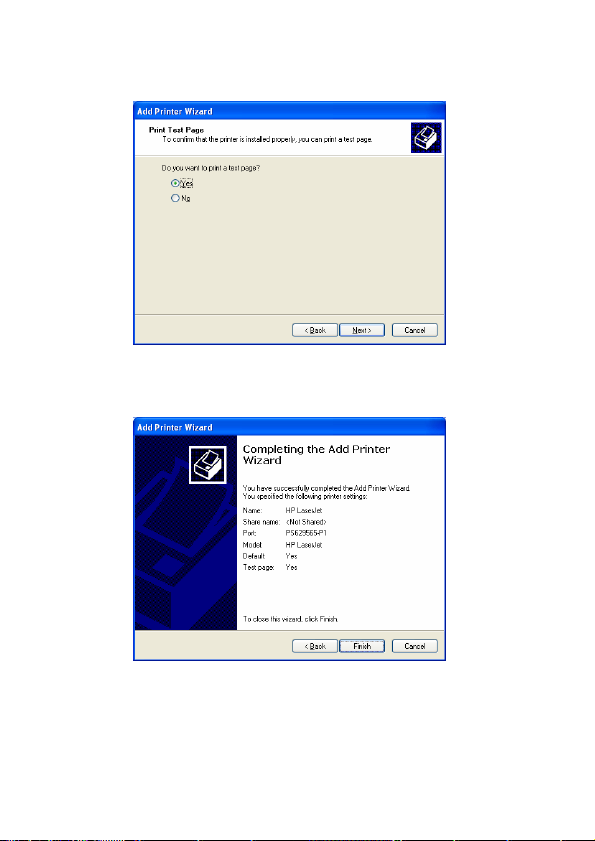
Step8. Choose to print the test page or not. It is recommended to
print a test page. Click “Next”.
15
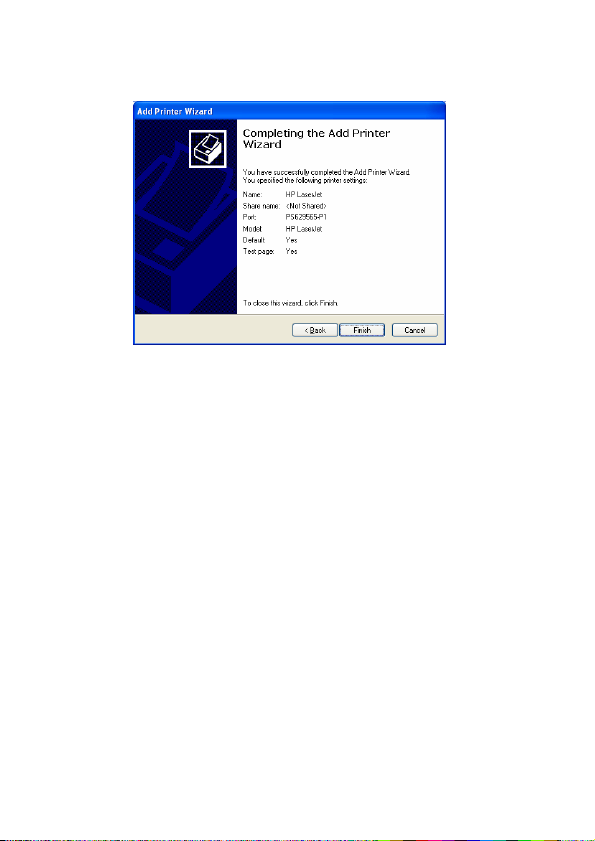
Step9. You have added the printer to the PC successfully. The
information of the printer is displayed in the windows. Click “Finish”.
Now you can start to print from your PC to the print server.
NOTE: The Above “Add Printer” steps are running under Windows
XP, the steps in other Operating Systems are similar.

16
NEDERLANDSTALIGE VERSIE
1.1 Introductie van het product
Dank u voor de aankoop en het gebruik van onze printserver. Met de
printserver kan uw printer binnen het netwerk worden gedeeld. Hierdoor
beschikt u bij het printen over flexibiliteit en beheersbaarheid op uw Wired of Wireless Local Area Network, terwijl er minimale
instel- en onderhoudswerkzaamheden vereist zijn.
Deze printserver ondersteunt TCP/IP-, NetBEUI-, IPX/SPX- en AppleTalkprotocollen. Dit zijn de beste printoplossingen voor het netwerk binnen
diverse veel voorkomende netwerkbesturingssystemen zoals
Windows Peer-to-Peer Printing (95/98/Me/NT/2000/XP)
Microsoft Windows NT/2000 Server-Based Printing
Novell NetWare 3.x/4.x/5.x
Unix/Linux
MAC OS
Met behulp van de Installatie-Wizard kunt u eenvoudig en snel de
instellingen voor de printomgeving invoeren en profiteren van de
fantastische eigenschappen die deze printserver te bieden heeft.
Deze gids is bedoeld voor snelle installatie binnen Windows peer-to-peer
printomgevingen en Novell NetWare netwerkomgevingen.
Als u een eenvoudig netwerk hebt kunt u de procedures in deze gids stap
voor stap volgen om de installatie af te ronden. Als er problemen zijn kunt
u de gebruikershandleiding op de CD-ROM raadplegen voor meer
gedetailleerde informatie.
1.2 Productpakket
Het pakket bestaat uit de volgende onderdelen:
Eén printserver
Eén antenne
Eén stroomadapter
Eén beknopte installatiegids
Eén CD-ROM (met alle softwareprogramma’s, stuurprogramma’s en
de gebruikershandleiding)

17
1.3 Installatieprocedure voor de Hardware
Maak het pakket met de printserver los en controleer of alle
onderdelen die hierboven zijn genoemd aanwezig zijn.
Sluit de printserver aan op de printer die u op het netwerk wilt delen
met behulp van een standaard USB-kabel of parallelkabel.
Sluit de printserver aan op uw netwerk door de netwerkkabel aan te
sluiten op de UTP-poort van de printserver.
Sluit de stroomadapter aan op de printserver. De printserver zal
nadat hij is aangezet een zelftest (Power-On-Self-Test, POST)
uitvoeren. Tijdens deze test zal het status-LED knipperen. Wanneer het status-LED niet meer oplicht is de printserver gereed.
Let op: U moet de stroomadapter gebruiken die bij deze printserver is
geleverd. Maak GEEN gebruik van andere stroomadapters die van elders
afkomstig zijn.
1.4 Administrator Installeren en Instellen
Het Programma Administrator Installeren voert een wizard-procedure uit
waarbij de volgende taken worden verricht:
Alle benodigde hulpprogramma’s en stuurprogramma’s worden op
uw PC geïnstalleerd (met inbegrip van de client-hulpprogramma’s).
U wordt gevraagd de printserver in te stellen (met inbegrip van de
naam van de printserver en de netwerkprotocollen).
De netwerkpoort van de printserver wordt aan de PC toegevoegd.
Na de installatie moet u standaard de procedure “Printer Toevoegen”
uitvoeren en de “Netwerkpoort” van de printer selecteren uit de lijst met
“Beschikbare Poorten”. Vervolgens kunt u de printfunctie testen vanaf de
administratie-PC.
Administrator Installeren kan onder Windows 95/98/Me/NT/2000/XP
worden verricht met dezelfde gebruikersinterface. Vóór de installatie moet
u controleren of uw netwerkprotocol is geïnstalleerd op uw PC (TCP/IP,
IPX en/of NetBEUI). Volg de onderstaande stappen om de installatie te
starten.
Plaats de CD die bij printserver is geleverd in het CD-ROM-station. Het
programma Autorun.exe moet automatisch worden gestart. Zo niet, moet u
Autorun.exe handmatig starten vanaf de hoofdmap van het CD-ROMstation.
18
De “Installatie Manager” wordt als volgt op het scherm weergegeven. Klik
op “Beheerhulpprogramma”.
Het venster “Beheerhulpprogramma” wordt getoond. Klik op
“Nederlandse Versie”.
Klik op “Volgende” om de hulpprogramma’s in de standaard map te
installeren of klik op “Bladeren…” om de map te specificeren waar u de
hulpprogramma’s wilt installeren.
19
Selecteer de onderdelen die u wilt installeren. Wij adviseren u ten zeerste
om alle geleverde onderdelen te installeren. Klik op “Volgende” om
verder te gaan.
Specificeer de programmamap waar de programmapictogrammen aan
zullen worden toegevoegd en klik op “Volgende”.
20
Het systeem begint automatisch met het installeren van de
hulpprogramma’s.
De installatiefase is nu voltooid en u bent nu klaar om de printserver te
configureren. Met “Printserver Kiezen” zullen alle printservers binnen het
netwerk in een lijst worden weergegeven. Selecteer de printserver die u
wilt configureren en klik op “Volgende”.
21
OPMERKING 1: Als dit de eerste keer is dat u de printserver configureert,
is de “naam van de printserver” gelijk aan de “naam van het apparaat” die
aan de achterkant van de printserver gedrukt staat.
OPMERKING 2: In de lijst kunnen alleen apparaten van dezelfde fabrikant
worden weergegeven.
Specificeer een herkenbare naam voor de printserver en klik op
“Volgende”.
22
Met “Configuratie Netwerkprotocol” worden de netwerkprotocollen
weergegeven voor de printserver die op dat moment beschikbaar zijn.
Standaard is TCP/IP beschikbaar, terwijl IPX en NetBEUI niet beschikbaar
zijn. Specificeer het IP-adres voor de printserver met de hand of klik op
“Volgende” om het standaard IP-adres aan te houden, d.w.z. 192.168.2.1.
In het venster wordt een samenvatting van de configuratie getoond. Nu
bent u klaar met het instellen van de printserver. Klik op “Voltooien” en
het systeem zal automatisch de netwerkpoort van de printserver aan uw
PC toevoegen.
De procedure voor het installeren van de Administrator is nu
volledig afgerond. Klik op “Voltooien”.

23
1.5 Client Installeren en Instellen
Het Programma Cliënt Installeren voert een wizard-procedure uit waarbij
de volgende taken worden verricht:
De client-hulpprogramma’s en stuurprogramma’s worden op uw PC
geïnstalleerd.
Alle netwerkpoorten worden automatisch aan uw PC toegevoegd.
Het stuurprogramma van de netwerkpoort ondersteunt automatische
herkenning van het netwerkprotocol. Er wordt automatisch een
beschikbaar netwerkprotocol (TCP/IP, IPX of NetBEUI) geselecteerd
van de clientcomputer om verbinding te maken met de printserver.
Aangezien zowel aan de kant van de printserver als aan de kant van de
client meerdere protocollen worden ondersteund, is het configuratieproces
aan de kant van de client volledig automatisch.
Na de installatie moet u standaard de procedure “Printer Toevoegen”
uitvoeren en de “Netwerkpoort” van de printer selecteren uit de lijst met
“Beschikbare Poorten”. U kunt een testafdruk maken van de PC naar de
printserver als uw lokale printer.
De installatie van de Client kan worden verricht onder Windows
95/98/Me/NT/2000/XP met dezelfde gebruikersinterface. Controleer, vóór
installatie, of de PC al is aangesloten op het netwerk en er ten minste één
netwerkprotocol is geïnstalleerd. Volg de onderstaande stappen om de
installatie te starten.
Plaats de CD die bij printserver is geleverd in het CD-ROM-station. Het
programma Autorun.exe moet automatisch worden gestart. Zo niet, moet u
Autorun.exe handmatig starten vanaf de hoofdmap van het CD-ROMstation.
24
De “Installatie Manager” wordt als volgt op het scherm weergegeven. Klik
op “Client-hulpprogramma”.
Het venster “Client-hulpprogramma” wordt getoond. Klik op “Nederlandse
Versie”.
Klik op “Volgende” om de hulpprogramma’s in de standaard map te
installeren of klik op “Bladeren…” om de map te specificeren waar u de
hulpprogramma’s wilt installeren.

25
Specificeer de programmamap waar de programmapictogrammen aan
zullen worden toegevoegd en klik op “Volgende”.
Het systeem begint automatisch met het installeren van de
hulpprogramma’s.
Nu de installatieprocedure is afgerond kunt u de computer van de client
instellen. Alle netwerkpoorten van de printservers die worden gevonden op
het netwerk zullen automatisch aan uw PC worden toegevoegd, klik op
“Verder gaan”.
26
De installatieprocedure is dan afgerond. Klik op “Voltooien”.
Nadat er een “Netwerkpoort” van de printserver is toegevoegd aan uw
PC met behulp van het programma Administrator of Client Installeren, kunt
u de procedure die in de volgende pagina’s wordt beschreven volgen om
de printer aan Windows toe te voegen.
1.6 Procedure voor het toevoegen van een printer onder Windows
Stap1. Klik op “Start”, kies “Configuratiescherm” en selecteer
“Printers en faxapparaten”.
Stap2. Klik op “Een printer toevoegen”.
Stap3. De “Wizard Printer toevoegen” wordt weergegeven. Klik op
“Volgende”.

27
Stap4. Selecteer “Lokale printer die met deze computer is
verbonden” en zorg ervoor dat “Mijn plug en play-printer
automatisch detecteren en installeren” niet is aangevinkt. Klik op
“Volgende”.
Stap5. Kies de geschikte “Printserver Netwerkpoort” die is
aangemaakt tijdens het installatieproces voor de Administrator of
Client en klik op “Volgende”.
28
Stap6. Selecteer een geschikte printerfabrikant en het model van de
printer en klik op “Volgende”. Als de printer niet in de lijst staat moet
u klikken op “Heb Disk…” om het stuurprogramma van de printer te
installeren. Na de installatie is het printermodel in de lijst opgenomen.
Stap7. Geef de naam van uw printer en stel de standaard printer in,
klik op “Volgende”.
29
Stap8. Kies ervoor om een testpagina af te drukken of niet. Wij
adviseren u een testpagina af te drukken. Klik op “Volgende”.
Stap9. U hebt de printer met succes aan uw PC toegevoegd. De
informatie van de printer wordt weergegeven in de vensters. Klik op
“Voltooien”.
Nu kunt u vanaf uw PC afdrukken met de printserver.
LET OP: De bovenstaande stappen voor he t toevoegen van een
printer gelden voor Windows XP, de stappen onder andere
besturingssystemen zijn vergelijkbaar.

30
DEUTSCHE VERSION
1.1 Produktvorstellung
Vielen Dank, dass Sie sich für unseren Printserver entschieden haben. Mit
diesem Printserver können Sie Ihren Drucker gemeinsam im Netzwerk
nutzen. Der Printserver zeichnet sich durch flexiblen Druck und
problemlose Verwaltung in Ihrem kabelgebundenen oder drahtlosen
lokalen Netzwerk bei einem absoluten Minimum an Konfigurations- und
Wartungsaufwand aus.
Dieser Printserver unterstützt die Protokolle TCP/IP, NetBEUI, IPX/SPX
und AppleTalk. Er ist die optimale Netzwerk-Drucklösung für verschiedene
gängige Netzwerkbetriebssysteme wie z. B.
Windows Peer-to-Peer Printing (95/98/Me/NT/2000/XP)
Microsoft Windows NT/2000 Server-Based Printing
Novell NetWare 3.x/4.x/5.x
Unix/Linux
Mac OS
Mithilfe des Installationsassistenten können Sie leicht sämtliche
Einstellungen für die Druckumgebung vornehmen und die fantastischen
Möglichkeiten dieses Printservers in kürzester Zeit nutzen.
Diese Anleitung ist für eine schnelle Installation in Umgebungen mit
Windows Peer-to-Peer Printing und Novell NetWare-Netzwerken
vorgesehen. Wenn Ihr Netzwerk einfach aufgebaut ist, können Sie zur
Installation einfach die in dieser Anleitung beschriebenen Verfahren
schrittweise ausführen. Falls Sie auf ein Problem stoßen, entnehmen Sie
bitte dem Benutzerhandbuch auf der CD-ROM nähere Einzelheiten.
1.2 Produktverpackung
Das Paket enthält folgende Komponenten:
Ein Printserver
Eine Antenne
Ein Netzadapter
Eine Kurzanleitung zur Installation
Eine CD-ROM (mit allen Hilfsprogrammen, Treibern und dem
Benutzerhandbuch)

31
1.3 Hardware-Installation
Packen Sie den Printserver aus und kontrollieren Sie, ob alle im
letzten Abschnitt genannten Teile vorhanden sind.
Verbinden Sie den Printserver mit einem handelsüblichen USB- oder
Parallelkabel mit dem Drucker, den Sie im Netzwerk nutzen möchten.
Verbinden Sie den Printserver mit dem Netzwerk, indem Sie das
Netzwerkkabel an den UTP-Anschluss des Printservers anschließen.
Schließen Sie den Netzadapter an den Printserver an. Nach dem
Einschalten führt der Printserver den Power-On-Self-Test (POST)
aus. Während des POST blinkt die Status-LED. Wenn die StatusLED erlischt, ist der Printserver betriebsbereit.
Hinweis: Sie müssen den mitgelieferten Netzadapter des Printservers
verwenden. Verwenden Sie keinen Netzadapter eines anderen Herstellers.
1.4 Administrator-Installation und -Konfiguration
Das Administrator-Installationsprogramm führt mit Hilfe eines Assistenten
folgende Aufgaben aus:
Alle notwendigen Treiber und Hilfsprogramme (einschließlich der
Client-Hilfsprogramme) auf dem Client installieren.
Zur Konfiguration des Printservers (einschließlich des Printserver-
Namens und der Netzwerkprotokolle) auffordern.
Den Netzwerkanschluss des Printservers auf Ihrem PC hinzufügen.
Im Anschluss an die Installation führen Sie das normale Verfahren
„Drucker hinzufügen“ aus und wählen den „Netzwerkanschluss“ des
Printservers in der Liste „Anschlüsse“. Anschließend können Sie die
Druckfunktion vom Administrator-PC aus testen.
Unter Windows 95/98/Me/NT/2000/XP kann die Administrator-Installation
mit derselben Benutzeroberfläche ausgeführt werden. Vergewissern Sie
sich bitte vor der Installation, dass Ihr Netzwerkprotokoll (TCP/IP, IPX
und/oder NetBEUI) auf Ihrem PC installiert ist. Zum Start der Installation
führen Sie bitte die folgenden Schritte aus.
Legen Sie die mitgelieferte CD des Printservers in das CD-ROM-Laufwerk
ein. Das Programm „Autorun.exe“ sollte automatisch ausgeführt werden.
Falls nicht, führen Sie Autorun.exe von Hand im Stammverzeichnis des
CD-ROM-Laufwerks aus.

32
Der „Installation Manager“ wird wie folgt auf dem Bildschirm angezeigt.
Klicken Sie auf „AdminUtility”.
Das Fenster „AdminUtility“ erscheint. Klicken Sie auf „English Version“.

33
Klicken Sie auf „Next“, um die Hilfsprogramme im Standardverzeichnis zu
installieren. Falls Sie das Zielverzeichnis für die Installation der
Hilfsprogramme angeben wollen, klicken Sie auf „Browse“ (Suchen).
Wählen Sie die Komponenten, die Sie installieren möchten. Es wird
dringend empfohlen, alle vorgesehenen Komponenten zu installieren.
Klicken Sie zum Fortfahren auf „Next“ (Weiter).

34
Geben Sie an, in welchem Programmverzeichnis die Programmsymbole
hinzugefügt werden sollen. Klicken Sie dann auf „Next“ (Weiter).
Das System beginnt automatisch mit der Installation der Hilfsprogramme.
Damit ist die Installationsphase abgeschlossen. Jetzt können Sie den
Printserver konfigurieren. „Choose Print Server“ (Printserver auswählen)
zeigt alle Printserver im Netzwerk an. Wählen Sie den Printserver, den Sie
konfigurieren möchten und klicken Sie auf „Next“.

35
HINWEIS 1: Wenn Sie den Printserver zum ersten Mal konfigurieren,
stimmt der „Print Server Name“ mit dem „Device Name“ überein, der auf
der Rückseite des Printservers vermerkt ist.
HINWEIS 2: In der Liste können nur Geräte desselben Herstellers
angezeigt werden.
Geben Sie dem Printserver einen einprägsamen Namen und klicken Sie
auf „Next“.
„Network Protocol Configuration“ zeigt an, welche Netzwerkprotokolle
momentan auf dem Printserver aktiviert sind. In der Standardeinstellung ist

36
TCP/IP aktiviert, hingegen sind IPX und NetBEUI deaktiviert. Geben Sie
die IP-Adresse des Printservers von Hand ein oder klicken Sie auf „Next“,
um die Standard-IP-Adresse (d.h. 192.168.2.1) beizubehalten.
Im Fenster wird die Konfigurationsübersicht angezeigt. Damit ist die
Konfiguration des Printservers abgeschlossen. Wenn Sie auf
„Finish“ (Fertig stellen) klicken, fügt Ihr System die Netzwerkverbindung
des Printservers automatisch auf Ihrem PC hinzu.
Damit ist die Administrator-Installation vollständig abgeschlossen.
Klicken Sie auf „Finish“.

37
1.5 Installation und Konfiguration der Clients
Das Client-Installationsprogramm führt mithilfe eines Assistenten folgende
Aufgaben aus:
Client-Treiber und -Hilfsprogramme auf Ihrem PC installieren.
Alle Netzwerkverbindungen automatisch auf Ihrem PC hinzufügen.
Der Netzwerkport-Treiber unterstützt die automatische Erkennung
von Netzwerkprotokollen. Das Programm wählt automatisch ein auf
dem Client-Computer verfügbares Netzwerkprotokoll (TCP/IP, IPX
oder NetBEUI) zur Verbindung mit dem Printserver.
Da sowohl der Printserver als auch die Clients mehrere Protokolle
unterstützen, verläuft die Konfiguration der Client-Seite vollautomatisch.
Im Anschluss an die Installation führen Sie das normale Verfahren
„Drucker hinzufügen“ aus und wählen den „Netzwerkanschluss“ des
Printservers in der Liste „Anschlüsse“. Sie können den Ausdruck vom PC
auf den Printserver wie bei einem lokalen Drucker testen.
Unter Windows 95/98/Me/NT/2000/XP kann die Client-Installation mit
derselben Benutzeroberfläche ausgeführt werden. Vergewissern Sie sich
bitte vor der Installation, dass Ihr PC bereits mit dem Netzwerk verbunden
und mindestens ein Netzwerkprotokoll installiert ist. Zum Start der
Installation führen Sie bitte die folgenden Schritte aus.
Legen Sie die mitgelieferte CD des Printservers in das CD-ROM-Laufwerk
ein. Das Programm „Autorun.exe“ sollte automatisch ausgeführt werden.
Falls nicht, führen Sie Autorun.exe von Hand im Stammverzeichnis des
CD-ROM-Laufwerks aus. Der „Installation Manager“ wird wie folgt auf
dem Bildschirm angezeigt. Klicken Sie auf „Client Utility“. Das Fenster
„ClientUtilities“ wird angezeigt. Klicken Sie auf „English Version“.

38
Klicken Sie auf „Next“ (Weiter), um die Hilfsprogramme im
Standardverzeichnis zu installieren. Falls Sie das Zielverzeichnis für die
Installation der Hilfsprogramme angeben wollen, klicken Sie auf
„Browse“ (Suchen).
Geben Sie an, in welchem Programmverzeichnis die Programmsymbole
hinzugefügt werden sollen. Klicken Sie dann auf „Next“.

39
Das System beginnt automatisch mit der Installation der Hilfsprogramme.
Damit ist die Installation abgeschlossen und Sie können den ClientComputer konfigurieren. Alle Netzwerkanschlüsse der im Netzwerk
erkannten Printserver werden automatisch auf Ihrem PC hinzugefügt.
Klicken Sie auf „Continue“ (Weiter).

40
Damit ist der Installationsvorgang abgeschlossen. Klicken Sie auf
„Finish“ (Fertig stellen).
Nach dem Hinzufügen eines „Netzwerkanschlusses“ für den Printserver
auf Ihrem PC durch das Administrator- oder Client-Installationsprogramm
können Sie mit dem auf den folgenden Seiten beschriebenen Verfahren
einen Drucker in Windows hinzufügen.
1.6 Drucker in Windows hinzufügen
Schritt 1. Klicken Sie auf „Start“, dann auf „Einstellungen“, und
wählen Sie „Drucker und Faxe“....
Schritt 2. Klicken Sie auf „Drucker hinzufügen“.
Schritt 3. Der Assistent „Drucker hinzufügen“ wird angezeigt. Klicken
Sie auf „Weiter“.

41
Schritt 4. Wählen Sie „Lokaler Drucker, der an den Computer
angeschlossen ist“. Achten Sie darauf, dass „Plug-and-PlayDrucker automatisch erkennen und installieren“ nicht ausgewählt
ist. Klicken Sie auf „Weiter“.
Schritt 5. Wählen Sie den entsprechenden „Printserver-
Netzwerkanschluss“, der bei der Administrator- oder Client-
Installation angelegt wurde, und klicken Sie auf „Weiter“.
Schritt 6. Wählen Sie den Druckerhersteller, das Druckermodell und
klicken Sie auf „Weiter“. Wenn Ihr Drucker in der Liste nicht

42
aufgeführt ist, klicken Sie auf „Datenträger …“, um die Druckertreiber
zu installieren. Nach der Installation wird das Druckermodell zur Liste
hinzufügt.
Schritt 7. Geben Sie dem Drucker einen Namen, legen Sie den
Standarddrucker fest und klicken Sie auf „Weiter“.
Schritt 8. Entscheiden Sie, ob die Testseite gedruckt werden soll. Es
empfiehlt sich, eine Testseite zu drucken. Klicken Sie auf „Weiter“.

43
Schritt 9. Sie haben den Drucker erfolgreich auf dem PC hinzugefügt.
Die Daten des Druckers werden in den Fenstern angezeigt. Klicken
Sie auf „Fertig stellen“.
Jetzt können Sie mit dem Drucken vom PC auf den Printserver beginnen.
HINWEIS: Die unter „Drucker hinzufügen“ genannten Schritte gelten
für Windows XP, die Vorgehensweise in anderen Betriebssystemen
ist ähnlich.

44
VERSION FRANÇAISE
1.1 Introduction au produit
Nous vous remercions pour l’achat et l’utilisation du serveur d’impression. Ce serveur d’impression permet de partager votre imprimante en
réseau. Il assure la flexibilité et la gérabilité d’impression sur votre réseau
local (LAN) avec ou sans fil, sans pour autant exiger une configuration
complexe et un degré élevé de maintenance.
Ce serveur d’impression supporte les protocoles TCP/IP, NetBEUI,
IPX/SPX et AppleTalk. Il s’agit de la meilleure solution d’impression réseau
pour de nombreux systèmes d’exploitation de réseaux en commun, tels
que
Impression poste à poste Windows (95/98/Me/NT/2000/XP)
Impression serveur Microsoft Windows NT/2000
Novell NetWare 3.x/4.x/5.x
Unix/Linux
MAC OS
Grâce à l’Assistant d’installation, vous pouvez facilement et immédiatement compléter les configurations requises pour l’environnement
d’impression, afin de pouvoir bénéficier des incroyables fonctions de ce
serveur d’impression.
Le présent guide est destiné à une installation rapide sur les
environnements d’impression poste à poste Windows et les
environnements de réseau Novell NetWare. Si vous disposez d’un réseau
ne présentant aucune complexité, vous pouvez simplement suivre pas à
pas les procédures de ce guide afin de terminer l’installation. Si vous
rencontrez le moindre problème, veuillez vous reporter au manuel de
l’utilisateur sur le CD-ROM pour des informations plus détaillées.
1.2 Emballage du produit
Cet emballage contient les composantes suivantes :
Un serveur d’impression
Une antenne
Un adaptateur pour l’alimentation
Un guide d’installation rapide
Un CD-ROM (contenant tous les utilitaires, les pilotes et le manuel
de l’utilisateur)

45
1.3 Procédure d’installation du matériel
Déballez le serveur d’impression et vérifiez que tous les éléments
repris au point précédent sont bien fournis.
Connectez le serveur d’impression à l’imprimante que vous
souhaitez partager sur le réseau via un câble USB standard ou un
câble parallèle.
Connectez le serveur d’impression à votre réseau en branchant le
câble réseau sur le port UTP du serveur d’impression.
Connectez l’adaptateur d’alimentation au serveur d’impression. Le
serveur d’impression exécutera le test POST (Power-On-Self-Test)
après avoir été allumé. Durant le test POST, le témoin DEL clignote.
Lorsque la DEL d’état est éteinte, le serveur d’impression est prêt.
Remarque : Nous vous recommandons vivement d'utiliser l'adaptateur
d'alimentation qui est fourni avec le serveur d’impression, et de ne PAS
utiliser d'adaptateur provenant d'une autre source.
1.4 Installation et configuration Administrateur
Le programme Installation Administrateur exécute une procédure assistée
qui accomplit les tâches suivantes :
Installation de l’ensemble des utilitaires et pilotes nécessaires dans
votre PC (dont les utilitaires client).
Invite à configurer le serveur d’impression (y compris le nom du
serveur d’impression et les protocoles de réseau).
Ajout du port réseau du serveur d’impression à votre PC.
Après l’installation, vous devez suivre la procédure classique d’ajout
d’imprimante et choisir le serveur d’impression « Network Port » dans la
liste des ports disponibles. Ensuite, vous pouvez tester la fonction
d’impression à partir du PC administrateur.
L’installation Administrateur peut être réalisée sur Windows
95/98/Me/NT/2000/XP avec la même interface utilisateur. Avant
l’installation, veuillez vérifier que votre protocole de réseau est installé sur
votre PC (TCP/IP, IPX et/ou NetBEUI). Veuillez suivre les étapes ci-après
avant de démarrer l’installation.
Insérez dans votre lecteur de CD-ROM le CD fourni avec le serveur
d’impression. Le programme « Autorun.exe » va être exécuté
automatiquement. Dans le cas contraire, exécutez « Autorun.exe »
manuellement à partir du répertoire racine du lecteur de CD-ROM.

46
Le gestionnaire d’installation s’affiche à l’écran de la façon suivante.
Cliquez sur « Admin Utility » (Utilitaire Admin).
La fenêtre « Admin Utility » s’affiche. Cliquez sur « French Version »
(Version française).

47
Cliquez sur « Next » (Suivant) pour installer les utilitaires dans le dossier
par défaut ou sur « Browse » (Parcourir) pour préciser le dossier de
destination dans lequel vous aimeriez installer les utilitaires.
Sélectionnez les éléments à installer. Nous vous invitons à installer
l’intégralité des éléments proposés. Cliquez sur « Next » (Suivant) pour
poursuivre l’installation.

48
Précisez le dossier de programme dans lequel ajouter les icônes de
programme, puis cliquez sur « Next » (Suivant).
Le système commence à installer automatiquement les utilitaires.
Vous avez terminé la phase d’installation. A présent il faut encore
configurer le serveur d’impression. La fenêtre « Choose Print Server »
(Choisir le serveur d’impression) énumère la liste de tous les serveurs
d’impression présents sur le réseau. Sélectionnez le serveur d’impression
que vous désirez configurer, puis cliquez sur « Next » (Suivant).

49
REMARQUE 1 : Si vous configurez le serveur d’impression pour la
première fois, le nom du serveur d’impression est identique au nom de
l’appareil qui est imprimé à l’arrière du serveur.
REMARQUE 2 : La liste peut uniquement afficher les appareils provenant
du même fabricant.
Indiquez un nom reconnaissable pour le serveur d’impression, puis cliquez
sur « Next » (Suivant).

50
La configuration du protocole de réseau affiche les protocoles réseau que
le serveur d’impression a activé. Par défaut, TCP/IP est activé, tandis que
IPX et NetBEUI sont désactivés. Précisez manuellement l’adresse IP pour
le serveur d’impression ou cliquez sur « Next » (Suivant) pour conserver
l’adresse IP par défaut, à savoir 192.168.2.1.
Le résumé de la configuration est affiché dans la fenêtre. Vous avez à
présent terminé la configuration du serveur d’impression. Cliquez sur
« Finish » et votre système va automatiquement ajouter le port réseau du
serveur d’impression à votre PC.

51
La procédure d’installation Administrateur est à présent
entièrement terminée. Cliquez sur « Finish ».
1.5 Installation et configuration Client
Le programme Installation Client exécute une procédure assistée qui
accomplit les tâches suivantes :
Installation des utilitaires et pilotes client sur votre PC.
Ajout automatique de tous les ports de réseau sur votre PC.
Le pilote du port réseau supporte la détection automatique des
protocoles de réseau. Il sélectionne automatiquement un protocole
de réseau disponible (TCP/IP, IPX ou NetBEUI) de l’ordinateur client
pour se connecter au serveur d’impression.
Comme le serveur d’impression et le client supportent tous deux plusieurs
protocoles, la procédure de configuration du client est entièrement
automatique.
Après l’installation, vous devez suivre la procédure classique d’ajout
d’imprimante et choisir le serveur d’impression « Network Port » dans la
liste des ports disponibles. Vous pouvez tester une impression à partir de
votre PC vers le serveur d’impression, en tant qu’imprimante locale.
L’installation Client peut être réalisée sur Windows 95/98/Me/NT/2000/XP
avec la même interface utilisateur. Avant l’installation, veuillez confirmer
que votre PC est déjà connecté au réseau et que vous avez installez au
moins un protocole de réseau. Veuillez suivre les étapes ci-après avant de
démarrer l’installation.
Insérez dans votre lecteur de CD-ROM le CD fourni avec le serveur
d’impression. Le programme « Autorun.exe » va être exécuté
automatiquement. Dans le cas contraire, exécutez « Autorun.exe »
manuellement à partir du répertoire racine du lecteur de CD-ROM.
Le gestionnaire d’installation s’affiche à l’écran de la façon suivante.
Cliquez sur « Client Utility » (Utilitaire Client).
La fenêtre « Client Utility » s’affiche. Cliquez sur « French Version »
(Version française).

52
Cliquez sur « Next » (Suivant) pour installer les utilitaires dans le dossier
par défaut ou sur « Browse » (Parcourir) pour préciser le dossier de
destination dans lequel vous aimeriez installer les utilitaires.

53
Précisez le dossier de programme dans lequel ajouter les icônes de
programme, puis cliquez sur « Next » (Suivant).
Le système commence à installer automatiquement les utilitaires.

54
La procédure d’installation est à présent terminée et vous pouvez
commencer la configuration de l’ordinateur client. Tous les ports de réseau
des serveurs d’impression détectés sur le réseau s’ajoutent
automatiquement à votre PC, cliquez ensuite « Continue ».
La procédure d’installation est ensuite terminée. Cliquez sur «Finish».
Après avoir ajouté un port de réseau du serveur d’impression sur votre PC,
via le programme d’installation Administrateur ou Client, vous pouvez
suivre la procédure décrite dans les pages suivantes pour ajouter une
imprimante dans la fenêtre.
1.6 Procédure d’ajout d’une imprimante dans Windows
Etape 1. Cliquez sur « Start » (Démarrer), puis sélectionnez
« Settings » (paramètres) et ensuite « Printers and Faxes »
(Imprimantes et fax).
Etape 2. Cliquez sur « Add a Printer » (Ajouter une imprimante).
Etape 3. L’assistant d’ajout d’imprimante s’affiche. Ensuite, cliquez
sur « Next ».

55
Etape 4. Sélectionnez « Local printer attached to this computer »
(imprimante locale connectée à cet ordinateur) et assurez-vous que
l’option « Automatically detect and install my Plug and Play printer »
(détecter et installer automatiquement mon imprimante Plug&Play)
n’est pas sélectionnée. Ensuite, cliquez sur « Next ».

56
Etape 5. Sélectionnez le port de réseau du serveur d’impression
approprié « Print Server Network Port » qui a été créé par la
procédure d’installation Administrateur ou Client, puis cliquez sur
« Next ».
Etape 6. Sélectionnez le fabricant d’imprimante approprié, le modèle
d’imprimante, puis cliquez sur « Next ». Si votre imprimante ne figure
pas sur la liste, cliquez sur « Have Disk… » pour installer le pilote de
l’imprimante. Après son installation, le modèle d’imprimante est
ajouté à la liste.

57
Etape 7. Donnez un nom à votre imprimante et configurez
l’imprimante par défaut, puis cliquez sur « Next ».
Etape 8. Vous pouvez décider d’imprimer la page de test mais nous
vous recommandons de le faire. Ensuite, cliquez sur « Next ».

58
Etape 9. Vous avez réussi l’ajout de l’imprimante au PC. Les
informations relatives à l’imprimante s’affichent dans la fenêtre.
Cliquez sur « Finish ».
A présent, vous pouvez démarrer l’impression depuis votre PC jusqu’au
serveur d’impression.
REMARQUE : Les étapes d’ajout d’imprimante, telles que décrites cidessus, fonctionnent sous Windows XP. Les étapes sont identiques
dans d’autres systèmes d’exploitation.

59
WERSJA POLSKA
1.1 Wstępna prezentacja produktu
Dziękujemy Państwu za zakup i używanie naszego serwera do drukarki
Ten serwer do drukarki pozwoli Państwa drukarce zostać urządzeniem do
użytku wspólnego w sieci. Oferuje on elastyczność drukowania i
możliwość zarządzania siecią LAN (opartą na przewodach, bądź
bezprzewodową) przy absolutnym minimum wymogów dla konfiguracji i
konserwacji.
Ten serwer dla drukarki obsługuje protokoły TCP/IP, NetBEUI, IPX/SPX
oraz AppleTalk. Stanowi najlepsze rozwiązanie dla drukowania w sieci dla
różnych powszechnie używanych systemów operacyjnych takich jak
Windows (95/98/Me/NT/2000/XP) – opcją drukowania peer-to-peer
Drukowanie oparte na serwerze w systemie Microsoft Windows
NT/2000
Novell NetWare 3.x/4.x/5.x
Unix/Linux
MAC OS
Za pomocą kreatora instalacji mogą Państwo łatwo i szybko ukończyć
konfigurację otoczenia drukarki i zacząć cieszyć się używaniem
fantastycznych opcji oferowanych przez ten serwer dla drukarki.
Ta instrukcja jest używana dla przeprowadzenia szybkiej instalacji w
środowisku drukowania peer-to-peer w systemie operacyjnym Windows
oraz w otoczeniu sieciowym Novell NetWare.
Jeżeli posiadają Państwo prostą sieć, mogą Państwo po prostu
zastosować procedury opisane krok po kroku w tej instrukcji i w ten sposób
ukończyć instalację. Jeżeli napotkają Państwo jakikolwiek problem, proszę
odnieść się do podręcznika użytkownika umieszczonego na płycie CD w
celu uzyskania szczegółowych informacji.
1.2 Zestaw
Ten zestaw zawiera następujące elementy:
Jeden serwer do drukowania
Jedną antenę
Jeden zasilacz
Jedna skrócona instrukcja obsługi
Jedną płytę CD (zawierającą całe oprogramowanie, sterowniki i
podręcznik użytkownika)

60
1.3 Procedura instalacji sprzętu
Proszę rozpakować zestaw, w którym znajduje się serwer do
drukarki, aby sprawdzić, czy dostarczone zostały wszystkie
uprzednio wymienione elementy.
Proszę podłączyć serwer do drukarki za pomocą USB lub kabla
podłączonego równolegle, jeżeli chcą Państwo używać jej jako
urządzenia sieciowego.
Proszę podłączyć serwer do sieci za pomocą dostarczonego kabla
sieciowego do portu UTP na serwerze.
Proszę podłączyć do serwera drukarki zasilacz. Serwer wykona
automatyczny test zasilania (POST) zaraz po podłączeniu do
zasilania. Podczas testu POST dioda LED pokazująca status będzie
migać. Gdy dioda LED pokazująca status nie świeci się, serwer
drukarki znajduje się w stanie gotowości.
NOTA: Należy używać zasilacza dostarczonego wraz z serwerem, proszę
NIE używać zasilacza pochodzącego z jakiegokolwiek innego źródła.
1.4 Instalacja i konfiguracja ustawień administratora
Program do instalacji ustawień administratora przeprowadza procedurę sterowaną przez kreator, która wykonuje następujące zadania:
Instaluje na komputerze wszystkie niezbędne programy i sterowniki
(włącznie z oprogramowaniem klienta).
Przygotowuje do konfiguracji serwer drukarki (włącznie z nazwą
serwera i protokołami sieciowymi).
Dodaje port sieci drukarki do Państwa komputera.
Po instalacji, proszę wykonać standardową procedurę „Dodaj drukarkę” i
wybrać z listy dostępnych portów port sieci dla serwera drukarki. Wtedy
można rozpocząć testowanie funkcji drukowania z komputera
administratora.
Instalacja ustawień administratora może być wykonana na systemach
operacyjnych 95/98/Me/NT/2000/XP przy użyciu tego samego interfejsu
użytkownika. Przed instalacją proszę sprawdzić, czy na Państwa
komputerze jest zainstalowany protokół sieciowy (TCP/IP, IPX i/lub
NetBEUI). Aby rozpocząć instalację, proszę wykonać następujące kroki.

61
Proszę umieścić płytę CD dostarczoną wraz z serwerem drukarki w
napędzie CD-ROM. Program “Autorun.exe” powinien zostać wykonany
automatycznie. Jeżeli tak się nie dzieje, proszę uruchomić plik Autorun.exe
z katalogu głównego płyty CD.
Manager instalacji zostanie wyświetlony na ekranie w następujący sposób.
Proszę kliknąć w „Ustawienia administratora”.
Zostanie wyświetlone okienko „Ustawienia administratora”. Proszę
kliknąć w „Wersja polska”.

62
Proszę kliknąć „Następny”, aby zainstalować ustawienia zawarte w
katalogu ustawień domyślnych lub kliknąć „Przeglądaj”, aby określić
katalog docelowy, w którym mają być zainstalowane te ustawienia.
Proszę wybrać elementy, które mają zostać zainstalowane. Zaleca się
zainstalowanie wszystkich dostarczonych elementów. Aby kontynuować,
proszę kliknąć „Next" (Następny).

63
Proszę określić katalog programu, do którego będą dodane ikony
programu i kliknąć w „Następny”.
System automatycznie rozpocznie instalację oprogramowania.
Zakończyli Państwo fazę instalacji i teraz nastąpi konfiguracja serwera
drukarki. Na liście „Wybierz serwer drukarki” zostaną wymienione
wszystkie serwery drukarki dostępne w sieci. Proszę wybrać serwer
drukarki, który ma zostać skonfigurowany i kliknąć w „Następny”.

64
NOTA 1: Jeżeli konfigurują Państwo po raz pierwszy serwer drukarki,
nazwa serwera drukarki jest taka sama jak nazwa urządzenia
umieszczona na tylnej stronie serwera drukarki.
NOTA 2: Na tej liście są wymienione tylko urządzenia tego samego
producenta.
Proszę określić rozpoznawalną nazwę serwera drukarki i kliknąć
„Następny”.

65
Protokół konfiguracji sieci wyświetli aktualnie dostępne protokoły dla
serwera drukarki. Domyślnie jest ustawiony protokół TCP/IP, podczas gdy
protokoły IPX i NetBEUI są wyłączone. Proszę ręcznie wpisać adres IP
serwera drukarki lub kliknąć w „Następny”, aby wprowadzić domyślny
adres IP, np.192.168.2.1.
W okienku wyświetla się podsumowanie konfiguracji. "Konfiguracja
serwera drukarki" została teraz ukończona. Proszę kliknąć w „Zakończ”, a
system automatycznie doda do Państwa komputera port sieci serwera
drukarki.

66
Procedura instalacji ustawień administratora została całkowicie
zakończona. Kliknąć „Zakończ”.
1.5 Instalacja i konfiguracja ustawień klienta
Program do instalacji ustawień klienta przeprowadza procedurę sterowaną
przez kreator, która wykonuje następujące zadania:
Instaluje ustawienia klienta i sterowniki na Państwa komputerze.
Automatycznie dodaje porty sieci do Państwa komputera.
Sterownik portu sieci obsługuje funkcję automatycznego wykrywania
protokołu sieciowego. Wybierze on automatycznie dostępny protokół
sieciowy (TCP/IP, IPX lub NetBEUI) na komputerze klienta, aby
podłączyć serwer drukarki.
Ponieważ zarówno po stronie serwera drukarki, jak i po stronie klienta
obsługiwane są multiprotokoły, proces konfiguracji po stronie klienta jest w
pełni automatyczny.
Po instalacji, proszę wykonać standardową procedurę „Dodaj drukarkę” i
wybrać z listy dostępnych portów port sieci dla serwera drukarki. Można
przetestować drukowanie z komputera do serwera drukarki w taki sposób,
jak gdyby była to drukarka lokalna.
Instalacja ustawień klienta może być wykonana na systemach
operacyjnych 95/98/Me/NT/2000/XP przy użyciu tego samego interfejsu
użytkownika. Przed instalacją proszę upewnić się, że Państwa komputer
został już podłąc zony do sieci i jest na nim zainstalowany przynajmniej
jeden protokół sieciowy. Aby rozpocząć instalację, proszę wykonać
następujące kroki.
Proszę umieścić płytę CD dostarczoną wraz z serwerem drukarki w
napędzie CD-ROM. Program “Autorun.exe” powinien zostać wykonany
automatycznie. Jeżeli tak się nie dzieje, proszę uruchomić plik Autorun.exe
z katalogu głównego płyty CD.
Manager instalacji zostanie wyświetlony na ekranie w następujący sposób.
Proszę kliknąć w „Ustawienia klienta”.

67
Zostanie wyświetlone okienko „Ustawienia klienta”. Proszę kliknąć w
„Wersja polska”.
Proszę kliknąć „Następny”, aby zainstalować ustawienia zawarte w
katalogu ustawień domyślnych lub kliknąć „Przeglądaj”, aby określić
katalog docelowy, w którym mają być zainstalowane te ustawienia.
Proszę określić katalog programu, do którego będą dodane ikony
programu i kliknąć w „Następny”.

68
System automatycznie rozpocznie instalację oprogramowania.
Teraz procedura instalacji została zakończona i mogą Państwo rozpocząć
konfigurację komputera klienta. Wszystkie porty sieciowe serwerów
drukarki wykryte w sieci zostaną automatycznie dodane do Państwa
komputera , proszę kliknąć „Dalej” („Continue”).

69
Procedura instalacji została zakończona. Kliknąć „Zakończ”.
Po dodaniu „Portu sieciowego" serwera drukarki do Państwa komputera
przez program instalujący ustawienia administratora lub klienta, mogą
Państwo wykonać procedurę opisaną na kolejnych stronach rozdziału
poświęconego dodawaniu drukarki w systemie Windows.
1.6 Procedura dodawania drukarki w systemie Windows
Krok 1. Kliknąć „Start”, wybrać „Ustawienia” i wybrać „Drukarki i
faksy”.
Krok 2. Kliknąć „Dodaj drukarkę”.
Krok 3. Wyświetla się „Kreator dodawania drukarki”. Kliknąć
„Następny”.

70
Krok 4. Wybrać „Drukarka lokalna podłączona do tego
komputera” i upewnić się, że nie została wybrana opcja "Wykryj
automatycznie i zainstaluj moją drukarkę w trybie "plug and play".
Kliknąć „Następny”.
Krok 5. Proszę wybrać odpowiedni "Port sieciowy serwera drukarki”
utworzony podczas konfiguracji ustawień administratora lub klienta i
kliknąć „Następny”.

71
Krok 6. Proszę wybrać odnośnego producenta drukarki i model
drukarki i kliknąć „Następny”. Jeżeli Państwa drukarka nie jest
wymieniona na liście, proszę kliknąć w „Dysk…”, aby zainstalować
sterownik drukarki. Po zainstalowaniu model drukarki zostanie
dodany do listy.
Krok 7. Proszę wprowadzić nazwę drukarki i ustawić ją jako
drukarkę domyślną oraz kliknąć „Następny”.

72
Krok 8. Proszę wybrać, czy ma być drukowana strona testowa, czy
nie. Zaleca się wydrukowania strony testowej. Kliknąć „Następny”.
Krok 9. Drukarka została pomyślnie dodana do Państwa komputera.
Informacja o drukarce jest wyświetlona w okienku. Kliknąć
„Zakończ”.
Teraz mogą Państwo rozpocząć drukowanie z komputera do serwera
drukarki.
NOTA: Procedury „Dodania drukarki” zostały podane na przykładzie
systemu Windows XP, ale przebiegają one podobnie w innych
systemach operacyjnych.

73
VERSIONE ITALIANA
1.1 Introduzione al prodotto
Grazie per aver acquistato e per il vostro impiego del nostro server di
stampa. Questo server di stampa consente ad una stampante di diventare
un dispositivo condiviso della vostra rete. Offre flessibilità e facilità di
gestione per la vostra rete locale LAN, cablata o wireless, con una
predisposizione ed una manutenzione veramente ridotte ai minimi termini.
Questo server di stampa è compatibile con i protocolli TCP/IP, NetBEUI,
IPX/SPX e AppleTalk. Si tratta della miglior soluzione di stampa per rete,
compatibile con svariati e diffusi sistemi operativi di rete, come ad esempio:
Windows Peer-to-Peer Printing (95/98/ME/NT/2000/XP)
Microsoft Windows NT/2000 Server-Based Printing
Novell NetWare 3.x/4.x/5.x
Unix/Linux
MAC OS
Grazie all’aiuto dell’Assistente d’installazione, si potrà facilmente e
rapidamente completare la predisposizione per l’ambiente di stampa, ed
iniziare quindi a fruire delle ottime caratteristiche offerte da questa server
di stampa.
Questa Guida è utile per l’installazione rapida in ambienti di stampa “peerto-peer” Windows ed in ambienti di rete Novell NetWare. Se si dispone di
una rete semplice, sarà sufficiente seguire le procedure descritte in questa
Guida, passo a passo, per completare l’installazione. Nel caso insorga un
qualsiasi problema, consultare il Manuale dell’utente che si trova nel CDROM per informazioni ulteriori e maggiormente dettagliate.
1.2 Confezione del prodotto
Questa confezione contiene gli elementi seguenti:
Un server di stampa
Un’antenna
Un adattatore d’alimentazione
Una Guida rapida d’installazione
Un CD-ROM (comprendente tutti gli utilitari e i driver software,
nonché il Manuale dell’utente)

74
1.3 Procedura d’installazione del materiale
Disimballare la confezione del server di stampa e verificare che tutti
gli elementi citati nel paragrafo precedente siano ben presenti.
Connettere il server di stampa alla stampa che si desidera
condividere sulla rete, mediante un normale cavetto USB o parallelo
(Centronics).
Connettere il server di stampa alla rete inserendo il cavetto di rete
alla porta UTP del server di stampa.
Connettere l’adattatore di alimentazione al server di stampa. Una
volta acceso, il server di stampa eseguirà un test di verifica del
materiale (Power-On-Self-Test, POST). Durante tale POST, il LED di
stato si metterà a lampeggiare. Allorché il LED di stato non è più
acceso, il server di stampa si può considerare pronto.
Nota: Si deve impiegare l’adattatore d’alimentazione fornito a corredo del
server di stampa. NON utilizzare nessun altro tipo di alimentatore.
1.4 Installazione e predisposizione dell’Amministratore
Il programma d’installazione dell’Amministratore esegue una procedura,
accompagnata da un assistente, che espleta i seguenti compiti:
Installazione di tutti gli utilitari e i driver necessari al PC (compresi gli
utilitari clienti).
Invito alla predisposizione del server di stampa (compresi il nome del
server di stampa e dei protocolli di rete).
Aggiunta della porta di rete del server di stampa al PC.
Dopo l’installazione, eseguire la procedura normale “Aggiunta di una
stampante” e selezionare la “Porta di rete” del server di stampa nell’elenco
delle “Porte disponibili”. Si può quindi collaudare la funzione di stampa a
partire dall’Amministratore PC.
L’installazione dell’Amministratore può essere eseguita in ambiente
Windows 95/98/ME/NT/2000/XP mediante la stessa interfaccia utente.
Prima dell’installazione, è necessario verificare che il protocollo di rete sia
già installato sul PC (TCP/IP, IPX e/o NetBEUI). Seguire i passi esposti qui
sotto per iniziare l’installazione.

75
Inserire il CD-ROM fornito a corredo del server di stampa nel lettore
corrispondente del PC. A questo punto dovrebbe avviarsi il programma di
esecuzione automatica . Altrimenti, eseguire manualmente il programma
“Autorun.exe” a partire dal repertorio di base del CD-ROM.
Sullo schermo apparirà il “Manager d’installazione” come si vede qui sotto.
Effettuare un clic su “Admin Utility”, utilitario di amministrazione.
Appare allora la finestra “Admin Utility”. Effettuare un clic su “Versione
italiana”.

76
Mediante un clic su “Next”, successivo, si installeranno gli utilitari nella
cartella per difetto, oppure si selezionerà “Browse”, navigatore, per
specificare la cartella di destinazione in cui installare gli utilitari in
questione.
Selezionare gli elementi da installare. Si consiglia caldamente di installare
tutti gli elementi a disposizione. Mediante un clic su "Next" si può far
proseguire l’installazione.

77
Specificare la cartella dei programmi a cui aggiungere le nuove icone, e
proseguire tramite un clic su “Next”.
Il sistema inizierà automaticamente l’installazione degli utilitari.
Si è così completata la fase d’installazione, e ci si può preparare alla
configurazione del server di stampa. L’opzione di scelta del server di
stampa, “Choose Print Server”, elenca tutti i server di stampa disponibili
nell’ambito della rete. Selezionare il server di stampa da configurare e
proseguire mediante un clic su “Next”.

78
NOTA 1: Nel caso che questa sia la prima volt ache si configure il server di
stampa, è bene sapere che il nome del server di stampa, “Print Server
Name”, è uguale al nome del dispositivo, “Device Name”, stampato sul
retro del server di stampa.
NOTA 2: L’elenco può visualizzare soltanto i dispositivi provenienti dallo
stesso fabbricante.
Specificare un nome riconoscibile per il server di stampa e proseguire
mediante un clic su “Next”.

79
La finestra di configurazione dei protocolli di rete, “Network Protocol
Configuration”, visualizzerà i protocolli di rete per cui il server di stampa è
attualmente abilitato. Per difetto, il TCP/IP è abilitato, mentre l’IPX e il
NetBEUI sono disabilitati. Specificare manualmente l’indirizzo IP per il
server di stampa, oppure effettuare un clic su “Next” per mantenere
l’indirizzo IP per difetto, vale a dire 192.168.2.1.
ppare una finestra che comporta un riepilogo della configurazione. Si è
così completata la predisposizione del server di stampa. Mediante un clic
su “Finish”, il sistema aggiungerà automaticamente la porta di rete del
server di stampa al PC.
La procedura d’installazione dell’Amministratore è del tutto completata.
Effettuare un clic su “Finish”.

80
1.5 Installazione e predisposizione del client
Il programma d’installazione dell’amministratore esegue una procedura, accompagnata da un assistente, che espleta i seguenti compiti:
Installazione degli utilitari e dei driver del client sul PC.
Aggiunta automatica di tutte le porte della rete al PC.
Il driver della porta di rete è compatibile con l’autorilevamento dei
protocolli della rete. Per questo motivo esso selezionerà
automaticamente un protocollo di rete disponibile (TCP/IP, IPX o
NetBEUI) per la connessione del computer client al server di stampa.
Dato che sia dal lato server di stampa che da quello del client sussiste una
compatibilità multi-protocollo, il processo di configurazione dal lato del
client è interamente automatico.
Dopo l’installazione, eseguire la procedura normale “Aggiunta di una
stampante” e selezionare la “Porta di rete” del server di stampa nell’elenco
delle “Porte disponibili”. Si può ora collaudare la stampa a partire dal
proprio PC, verso il server di stampa, come se si trattasse di una
stampante locale.
L’installazione del Client può essere eseguita in ambiente Windows
95/98/ME/NT/2000/XP mediante la stessa interfaccia utente. Prima
dell’installazione, confermare che il PC è stato già collegato alla rete, e che
è stato installato almeno un protocollo di rete. Seguire i passi esposti qui
sotto per iniziare l’installazione.
Inserire il CD-ROM fornito a corredo del server di stampa nel lettore
corrispondente del PC. A questo punto dovrebbe avviarsi il programma di
esecuzione automatica . Altrimenti, eseguire manualmente il programma
“Autorun.exe” a partire dal repertorio di base del CD-ROM.
Sullo schermo apparirà il “Manager d’installazione” come si vede qui sotto.
Effettuare un clic su “Client Utility”, utilitario del client.
Appare allora la finestra “Client Utility”. Effettuare un clic su “Versione
italiana”.

81
Mediante un clic su “Next”, successivo, si installeranno gli utilitari nella
cartella per difetto, oppure si selezionerà “Browse”, navigatore, per
specificare la cartella di destinazione in cui installare gli utilitari in
questione.
Specificare la cartella dei programmi a cui aggiungere le nuove icone, e
proseguire tramite un clic su “Next”.

82
Il sistema inizierà automaticamente l’installazione degli utilitari.
A questo punto, la procedura d'installazione è interamente completata, e si
è pronti alla predisposizione del computer Client. Tutte le porte di rete dei
server di stampa rilevati sulla rete saranno aggiunte automaticamente al
PC. Proseguire mediante un clic su “Continue”.

83
La procedura d’installazione è così terminate. Effettuare un clic su
“Finish”.
Dopo l’aggiunta di una “Porta di rete” del server di stampa al PC
mediante il programma d’installazione dell’Amministratore o del Client, si
può seguire la procedura descritta nelle pagine successive per l’aggiunta
di stampanti all’ambiente Windows.
1.6 Procedura di aggiunta di stampanti in ambiente Windows
Passo 1. Effettuare un clic su “Avvio”, selezionare “Parametri del
sistema” e quindi “Stampanti e fax”.
Passo 2. Continuare mediante un clic su “Aggiunta di una
stampante”.
Passo 3. Viene visualizzato l’Assistente dell’aggiunta di una
stampante. Effettuare un clic su “Next”.

84
Passo 4. Passo 4. Selezionare “Stampante locale collegata a
questo computer”, ed assicurarsi che non sia spuntata l’op-
zione “Rilevamento ed installazione automatici di una stampante
Plug-and-Play (connetti-e-vai)". Effettuare un clic su “Next”.
Passo 5. Selezionare la “Porta di rete del server di stampa”
adatta, creata dal processo d’installazione dell’Amministratore o del
Client, e proseguire mediante un clic su “Next”.
Passo 6. Selezionare il produttore di stampanti adatto, nonché il
modello della stampante, e proseguire mediante un clic su “Next”.

85
Nel caso che la stampante non fosse menzionata dall’elenco,
effettuare un clic su “Introdurre il dischetto...” per installare il driver
della stampante. Dopo l’installazione, il modello della stampante sarà
aggiunto all’elenco.
Passo 7. Denominare la stampante e predisporre la stampante per
difetto. Proseguire mediante un clic su “Next”.
Passo 8. Selezionare la stampa di test o no. Si consiglia di eseguire
questo utile test. Effettuare un clic su “Next”.

86
Passo 9. È stata così aggiunta la stampante al PC con esito positivo.
Le informazioni corrispondenti alla stampante sono visualizzate nella
finestra. Effettuare un clic su “Finish”.
Si può ora iniziare a stampare dal proprio PC verso il server di stampa.
NOTA: I passi dell’operazione “Aggiunta di una stampante” riportati
qui sopra valgono per l’ambiente operativo Windows XP; per gli altri
sistemi operativi, i passi sono simili.

87
VERSIÓN EN ESPAÑOL
1.1 Información sobre el producto
Le agradecemos que haya adquirido y vaya a utilizar nuestro servidor de
impresión. Con este servidor, podrá compartir sus impresoras en la red.
Ofrece flexibilidad y facilidad de manejo para la impresión en redes de
área local con o sin cables, con unos requisitos absolutamente mínimos
de configuración y mantenimiento.
Este servidor de impresión es compatible con los protocolos TCP/IP,
NetBEUI, IPX/SPX y AppleTalk. Es la mejor solución para imprimir en red
disponible para diversos sistemas operativos de red comunes, como
Windows Peer-to-Peer Printing (95/98/Me/NT/2000/XP)
Microsoft Windows NT/2000 Server-Based Printing
Novell NetWare 3.x/4.x/5.x
Unix/Linux
MAC OS
Con ayuda del asistente para instalación, podrá completar fácil y
rápidamente el proceso de configuración del entorno de impresión y
empezar a disfrutar de las estupendas funciones que ofrece el servidor de
impresión.
Esta guía sirve para instalación rápida en entornos de impresión P2P de
Windows y entornos de red Novell NetWare. Si dispone de una red
sencilla, puede seguir los procedimientos que se describen en esta guía
paso a paso para completar la instalación. Si tiene algún problema,
consulte el manual del usuario en el CD-ROM, donde encontrará
información más detallada.
1.2 Paquete del producto
Este paquete contiene los siguientes componentes
Un servidor de impresión
Una antena
Un adaptador de corriente
Una guía de instalación rápida
Un CD-ROM (que incluye todas las herramientas de software,
controladores y el manual del usuario)

88
1.3 Procedimiento de instalación del hardware
Desembale el servidor de impresión y verifique que el paquete
incluye todos los elementos mencionados en el apartado anterior.
Conecte el servidor de impresión a la impresora que desee compartir
en red mediante un cable estándar USB o paralelo.
Conecte el servidor de impresión a la red enchufando el cable de red
adjunto al puerto UTP del servidor de impresión.
Conecte el adaptador de corriente al servidor de impresión. Al
encenderse, el servidor de impresión ejecutará la prueba automática
de encendido (POST, por sus siglas en inglés). Durante esta prueba,
el indicador luminoso de estado parpadeará. Cuando se apaga este
indicador, el servidor de impresión está preparado.
Nota: Se debe utilizar el adaptador de corriente suministrado con el
servidor de impresión; NO use otros adaptadores de corriente.
1.4 Instalación y configuración del administrador
El programa de instalación del administrador ejecuta un proceso mediante
un asistente que realiza las siguientes tareas:
Instala todas las herramientas y controladores necesarios en el PC
(incluidas las herramientas de cliente).
Solicita que se configure el servidor de impresión (nombre del servidor y
protocolos de red).
Agrega el puerto de red del servidor de impresión al PC.
Después de la instalación, ejecute el procedimiento "Agregar impresora” y
elija el puerto de red correspondiente al servidor de impresión en la lista
de puertos disponibles. A continuación, puede probar la función de
impresión desde el PC administrador.
La instalación del administrador se puede realizar en Windows
95/98/Me/NT/2000/XP con la misma interfaz de usuario. Antes de la
instalación, verifique que su protocolo de red está instalado en su PC
(TCP/IP, IPX o NetBEUI). Siga los pasos que se indican a continuación
para iniciar la instalación.

89
Inserte en la unidad de CD-ROM el CD incluido en el paquete del servidor
de impresión. El programa “Autorun.exe”·debiera ejecutarse
automáticamente. Si no ocurre así, ejecútelo manualmente desde el
directorio raíz del CD.
En la pantalla aparecerá la ventana “Installation Manager” (Administrador
de la instalación). Haga clic en “Admin Utility”.
Se abrirá la ventana de la herramienta de administración. Haga clic en
“English Version” para ver la versión en inglés.

90
Haga clic en “Next” (Siguiente) para instalar las herramientas en la
carpeta predeterminada, o en “Browse” (Examinar) para especificar la
carpeta de destino en la que le gustaría instalar las herramientas.
Seleccione los componentes que desea instalar. Se recomienda
encarecidamente instalar todos los componentes proporcionados. Haga
clic en “Next” (Siguiente) para continuar.

91
Especifique la carpeta de programa donde se agregarán los iconos de
programa y haga clic en “Next” (Siguiente).
El sistema comenzará la instalación de las herramientas automáticamente.
Así, se completa la fase de instalación y preparación para configurar el
servidor de impresión. La lista “Choose Print Server” (Elegir servidor de
impresión) muestra todos los servidores de impresión incluidos en la red.
Seleccione el servidor de impresión que desea configurar y haga clic en
“Next” (Siguiente).

92
NOTA 1: Si es la primera vez que configura el servidor de impresión, el
nombre del servidor (“Print Server Name”) será el mismo que el nombre
del dispositivo (“Device Name”) que está impreso en la parte posterior del
servidor de impresión.
NOTA 2: La lista sólo puede mostrar los dispositivos del mismo fabricante.
Especifique un nombre fácil de reconocer para el servidor de impresión y
haga clic en “Next” (Siguiente).
La lista “Network Protocol Configuration” (Configuración de protocolos de
red) muestra los protocolos de red habilitados para el servidor de

93
impresión. Por defecto, TCP/IP está habilitado, mientras que IPX y
NetBEUI no lo están. Especifique la dirección IP para el servidor de
impresión manualmente o haga clic en “Next” (Siguiente) para mantener
el valor predeterminado: 192.168.2.1.
En la ventana se muestra el resumen de la configuración. Así, queda
completado el proceso de configuración del servidor de impresión. Haga
clic en “Finish” (Finalizar). El sistema agregará el puerto de red del
servidor de impresión en el PC automáticamente.
Así, habrá finalizado totalmente el procedimiento de instalación del
administrador. Haga clic en “Finish” (Finalizar).

94
1.5 Instalación y configuración del cliente
El programa de instalación del cliente ejecuta un proceso mediante un
asistente que realiza las siguientes tareas:
Instala herramientas y controladores de cliente en el PC.
Agrega automáticamente todos los puertos de red en el PC.
El controlador del puerto de red es compatible c on la detección automática
de protocolos de red. Seleccionará automáticamente un protocolo de
red disponible (TCP/IP, IPX o NetBEUI) del ordenador cliente para
conectarlo al servidor de impresión.
Dado que tanto el lado del servidor de impresión como el lado del cliente
admiten protocolos múltiples, el proceso de configuración del cliente es
totalmente automático.
Después de la instalación, ejecute el procedimiento "Agregar impresora” y
elija el puerto de red correspondiente al servidor de impresión en la lista
de puertos disponibles. Puede hacer una prueba de impresión desde el
PC utilizando el servidor de impresión como impresora local.
La instalación del cliente se puede realizar en Windows
95/98/Me/NT/2000/XP con la misma interfaz de usuario. Antes de la
instalación, confirme que el PC está conectado a la red y que tiene
instalado al menos un protocolo de red. Siga los pasos que se indican a
continuación para iniciar la instalación.
Inserte en la unidad de CD-ROM el CD incluido en el paquete del servidor
de impresión. El programa “Autorun.exe”·debiera ejecutarse
automáticamente. Si no ocurre así, ejecútelo manualmente desde el
directorio raíz del CD.
En la pantalla aparecerá la ventana “Installation Manager” (Administrador
de la instalación). Haga clic en “Client Utility”.
Se abrirá la ventana de herramientas de cliente. Haga clic en “English
Version” para ver la versión en inglés.

95
Haga clic en “Next” (Siguiente) para instalar las herramientas en la
carpeta predeterminada, o en “Browse” (Examinar) para especificar la
carpeta de destino en la que le gustaría instalar las herramientas.

96
Especifique la carpeta de programa donde se agregarán los iconos de
programa y haga clic en “Next” (Siguiente).
El sistema comenzará la instalación de las herramientas automáticamente.
Una vez completado el proceso de instalación, se puede iniciar la
configuración del ordenador cliente. Todos los puertos de red de los
servidores de impresión detectados en la red se agregarán
automáticamente al PC. Haga clic en “Continue” (Continuar).

97
Así, habrá finalizado el procedimiento de instalación. Haga clic en
“Finish” (Finalizar).
Después de agregar un puerto de red (“Network Port”) del servidor de
impresión al PC mediante el programa de instalación del administrador o de un cliente, puede seguir el procedimiento que se describe en
las páginas siguientes para agregar una impresora en Windows.
1.6 Procedimiento “Agregar impresora” de Windows
Paso 1. Haga clic en “Inicio”, vaya a “Configuración” y
seleccione “Impresoras y faxes”.
Paso 2. Haga clic en “Agregar impresora”.
Paso 3. Se abrirá el “Asistente para agregar impresoras”. Haga clic
en “Siguiente”.

98
Paso 4. Seleccione “Impresora local conectada a este equipo” y
compruebe que la casilla “Detectar e instalar mi impresora Plug and
Play automáticamente” no está activada. Haga clic en “Siguiente”.
Paso 5. Elija el “puerto de red del servidor de impresión”
adecuado, creado durante el proceso de instalación del
administrador o del cliente, y haga clic en “Siguiente”.

99
Paso 6. Seleccione el fabricante de la impresora que correspon-
da y el modelo de impresora y haga clic en “Siguiente”. Si la
impresora no aparece en la lista, haga clic en “Utilizar disco…” para
instalar el controlador de la impresora. Una vez concluida la
instalación, el modelo de impresora se agregará a la lista.
Paso 7. Especifique un nombre para la impresora y configúrela
como predeterminada. A continuación, haga clic en “Siguiente”.
 Loading...