

Page 1
Page 2
1
Notice according to GNU/GPL-Version 2
This product includes software that is subject to the GNU/GPL-Version 2.
You find the text of the license on the product cd/dvd. The program is free
software and distributed without any warranty of the author. We offer, valid
for at least three years, to give you, for a charge no more than the costs of
physically performing source distribution, a complete machine-readable
copy of the corresponding source code.
Please contact Edimax at: Edimax Technology co., Ltd, NO. 3, Wu-Chuan
3rd RD Wu-Ku-Industrial Park, Taipei Hsien, Taiwan. R.O.C., TEL : +886-277396888, FAX : +886-2-77396887, sales@edimax.com.tw
Copyright by Edimax Technology Co, LTD. all rights reserved. No part of
this publication may be reproduced, transmitted, transcribed, stored in a
retrieval system, or translated into any language or computer language, in
any form or by any means, electronic, mechanical, magnetic, optical,
chemical, manual or otherwise, without the prior written permission of this
Company.
This company makes no representations or warranties, either expressed or
implied, with respect to the contents hereof and specifically disclaims any
warranties, merchantability or fitness for any particular purpose. Any software
described in this manual is sold or licensed "as is". Should the programs
prove defective following their purchase, the buyer (and not this company, its
distributor, or its dealer) assumes the entire cost of all necessary servicing,
repair, and any incidental or consequential damages resulting from any defect
in the software. Further, this company reserves the right to revise this
publication and to make changes from time to time in the contents hereof
without obligation to notify any person of such revision or changes.
The product you have purchased and the setup screen may appear slightly
different from those shown in this QIG. For more detailed information about
this product, please refer to the User's Manual on the CD-ROM. The software
and specifications could be subjected to change without notice. Please visit
our web site www.edimax.com for the update. All right reserved including all
brand and product names mentioned in this manual are trademarks and/or
registered trademarks of their respective holders.
Page 3

2
Introduction .................................................................................................. 4
Features ....................................................................................................... 4
Minimum Requirements .............................................................................. 4
Package Contents ........................................................................................ 4
Back Panel ................................................................................................... 5
Front Panel ................................................................................................... 6
Getting started ........................................................................................... 10
Chapter 1 Status .................................................................................... 16
1.1 Status ................................................................................................ 16
1.2 Log ..................................................................................................... 17
1.3 Notification ........................................................................................ 18
Chapter 2 Quick Setup .......................................................................... 20
2.1 Password .......................................................................................... 20
2.2 Network ............................................................................................. 21
2.3 Storage Server Name ....................................................................... 21
2.4 Turn on Functions ............................................................................ 22
2.5 Time Zone.......................................................................................... 23
2.6 Confirm Settings ............................................................................... 24
2.7 Apply Settings .................................................................................. 25
2.8 Shared folders automatically created by Quick Setup .................. 27
Chapter 3 Basic ...................................................................................... 28
3.1 Time Zone.......................................................................................... 28
3.2 Password .......................................................................................... 29
Chapter 4 Network ................................................................................. 30
Chapter 5 File/FTP Server ..................................................................... 32
5.1 Users ................................................................................................. 32
5.1.1 Add a New User ............................................................................. 33
5.2 Groups ............................................................................................... 34
5.2.1 Add a New Group .......................................................................... 35
5.3 Server Settings ................................................................................. 36
5.4 Shared Folders ................................................................................. 38
5.4.1 Add/Edit Shared Folder ................................................................. 40
5.4.2 Browse Dialog ................................................................................ 42
5.5 Easy Send ......................................................................................... 43
Chapter 6 BT Download ........................................................................ 45
6.1 Add BT Torrent ................................................................................. 47
6.2 Advanced Setting ............................................................................. 48
Chapter 7 Web/FTP Download .............................................................. 50
Chapter 8 Download Manager ............................................................... 52
8.1 Start Download Manager .................................................................. 52
8.2 Search for storage server ................................................................ 52
8.3 Login storage server ........................................................................ 53
8.4 Manage download items .................................................................. 54
8.4.1 Add a download item..................................................................... 55
8.4.2 Main menu ...................................................................................... 57
Page 4

3
8.5 Tray Icon ............................................................................................ 59
Chapter 9 iTunes Server ........................................................................ 60
Chapter 10 Media Server ...................................................................... 63
Chapter 11 Backup .................................................................................. 65
11.1 Add/Edit a Local Backup ............................................................... 65
Chapter 12 Surveillance ....................................................................... 67
12.1 Add/Edit IP Camera ....................................................................... 68
12.2 Search Local IP Cameras .............................................................. 68
12.3 Basic Information of IP camera .................................................... 68
12.4 Video Information of IP camera .................................................... 69
12.5 Recording Settings ........................................................................ 70
12.6 Schedule Settings ......................................................................... 71
Chapter 13 Tools ................................................................................... 73
13.1 Storage Tools ................................ ................................................. 73
13.1.1 Check & Fix Disk ........................................................................ 76
13.1.2 S.M.A.R.T. .................................................................................... 77
13.1.2.1 S.M.A.R.T. Advanced Setting .................................................. 78
13.1.2.2 S.M.A.R.T. Self-Test ................................................................. 79
13.1.3 Auto Partition & Format ............................................................. 80
13.1.4 Add a Partition ............................................................................ 81
13.2 Storage Status ............................................................................... 82
13.3 USB Copy ....................................................................................... 82
13.4 Configuration Tools ....................................................................... 83
13.5 Firmware Upgrade ......................................................................... 84
13.6 Reset .............................................................................................. 86
Chapter 14 Storage Server Management Wizard ................................ 87
14.1 Login the storage server ............................................................... 87
14.2 Quick Setup ................................................................................... 89
14.3 Extension Functions ..................................................................... 89
14.3.1 Install Extension Function ......................................................... 89
14.3.2 Remove Extension Function...................................................... 92
14.4 Upgrade Firmware ......................................................................... 95
Chapter 15 NetDisk Explorer ............................................................... 98
15.1 Login the storage server ............................................................... 98
15.2 Map Network Drive ...................................................................... 100
15.3 Use the file server ........................................................................ 101
15.4 Setup NetDisk Explorer ............................................................... 103
15.5 Use tools of NetDisk Explorer .................................................... 104
15.6 Disconnect Network Drive .......................................................... 104
15.7 Logout the storage server .......................................................... 105
15.8 Exit the NetDisk Explorer ............................................................ 105
15.9 Easy Send .................................................................................... 105
15.9.1 Easy Send History .................................................................... 107
Page 5

4
Introduction
Congratulations on purchasing this network storage server (NAS, Network Attached
Storage). This storage server lets you easily share your files in your network.
Simply plug in the hard disk drive, connect the LAN port to your network, and do
some basic settings, and you're ready to share files. The storage server provides a
total solution for the Small and Medium-sized Business (SMB) and the Small
Office/Home Office (SOHO) markets, giving you an instant way to share and
manage your files through network.
Features
- Supports two internal SATA hard disk drives
- Provides two USB ports for connecting USB mass storage devices
- Allows you to share your files via FTP or Network Neighborhood
- Allows you to share your multimedia content to DLNA compliant media adapters,
like Xbox 360, Sony PS3…
- Allows you to share your music to iTunes
- Provides Internet download engine which supports download through FTP, Web
and BitTorrent.
- High file transfer throughput (> 100Mbps)
- Equipped with one gigabit LAN port (10/100/1000M)
- Supports static IP and dynamic IP
- Easy to use both Windows-based and Web-based GUI for configuration and
management
Minimum Requirements
- One SATA hard disk drive
- Network Interface Card (NIC) for each Personal Computer (PC)
- Computer with a Web-Browser (Internet Explorer 6.0 or higher, Netscape
Navigator 7.2 or higher, Firefox 2.0.0.3 or higher)
Package Contents
- One Network Storage Server
- One Quick Installation Guide
- One User Manual/Utilities CD
- One Power Adapter
- Accessories
Page 6
5
Understand your Storage Server
Back Panel
The diagram below shows the storage server‟s back panel.
1) Local Area Network (LAN)
You should connect the LAN port of this storage server to your hub/switch, or one
LAN port of your router etc.
2) USB2
The USB2 port allows you to share your files stored in the USB mass storage
device plugged in.
Note: Please plug the external power of your USB mass storage devices before
you connect them to the storage server.
Note: If you have USB mass storage device (like USB external HDD), please plug it
to this storage server‟s USB 2 port, and plug the USB flash disk you wish to share
to the USB 1 port.
3) Power Switch
When the storage server is not working, switch the Power switch to “1” will switch
on the power and make the storage server start. When the storage server has been
shut down, switch the Power switch to “0” will switch off the power.
Note: Please do not directly switch off the power when the storage server is
running. This will make some data not correctly saved in the storage server and
may make the storage server not work properly. Before switch off the power, please
press Release button for more than 5 seconds to shut down the storage server first.
Page 7
6
Note: If you did not switch off the power after your previous shut down (just press
Release button for more than 5 seconds) and you want to start the storage server
now, you should switch off the power first and then switch on the power, and the
storage server will start again.
Note: After you shut down the storage server and before switch off the power, the
storage server is still providing power to the hard disk drives and the hard disk
drives are still running. You have to switch off the power after you shut down the
storage server to make the whole system completely stopped.
Front Panel
1) Release button
The Release button has three functions: (1) unplug the external USB mass storage,
(2) shut down the storage server, and (3) reset the configuration of the storage
server to factory default settings.
Unplug the external USB mass storage: When you press and hold Release
button for 2 seconds, the storage server will beep for 0.5 second to hint that
your command is detected. At this time, you should release the Release button
immediately if you want to unplug the external USB mass storage device
plugged in USB1 port. The storage server will take several seconds to unplug
the USB mass storage. When the LED of the USB1 port goes off, you can
safely detach the USB mass storage device from this storage server.
Shut down the storage server: You should press and hold Release button for
more than 5 seconds to start shutting down the storage server. Please ignore
the beep sound. The Power LED will keep flashing during the shutting down
process. When the Power LED goes off, the storage server is completely shut
down. You can now switch off the power by switch the Power switch to “0”.
Page 8

7
Restore factory default settings: If you want to reset the configuration of the
storage server to factory default settings, you should press and hold BOTH the
Release button and the Copy button at the same time for more than 5 seconds,
the storage server will beep for 2 seconds to hint that your command is
accepted. The Power LED will keep flashing during the restore process. After
the restore is complete, the storage server will restart itself automatically.
2) Copy button
The Copy button has two functions: (1) copy the content of one external USB mass
storage device to another attached storage device, and (2) reset the configuration
of the storage server to factory default settings.
Copy USB mass storage device: When you press and hold the Copy button
for 2 seconds, the storage server will beep for 0.5 second to hint that your
command is detected. At this time, you should release the Copy button
immediately if you want to copy the content of one external USB mass storage
device to another attached storage device. During the process of copy, the LED
of corresponding USB port will flash slowly. When the LED of corresponding
USB port stops flashing and is lit steady, the copy job is finished. If any error
occurs during the process of copy, the LED of corresponding USB port will
flash very fast. The default source storage is USB1, you can change the source
storage by USB Copy settings in Web user interface of storage server.
Restore factory default settings: Please refer to the description of Release
button.
Note: Before you trigger the USB Copy function by pressing the Copy button, make
sure that the destination folder has enough free space to store all data of the
source USB mass storage device.
Note: USB Copy function does not support length of file name longer than 255
bytes. If the source USB mass storage device contains any file with file name
longer than 255 bytes, the copy job will fail.
3) USB1
The USB1 port allows you to share your files stored in the USB mass storage
device plugged in.
Note: Please plug the external power of your USB mass storage devices before
you connect them to the storage server.
Note: If you have USB mass storage device (like USB external HDD), please plug it
to this storage server‟s USB 2 port, and plug the USB flash disk you wish to share
to the USB 1 port.
Page 9
8
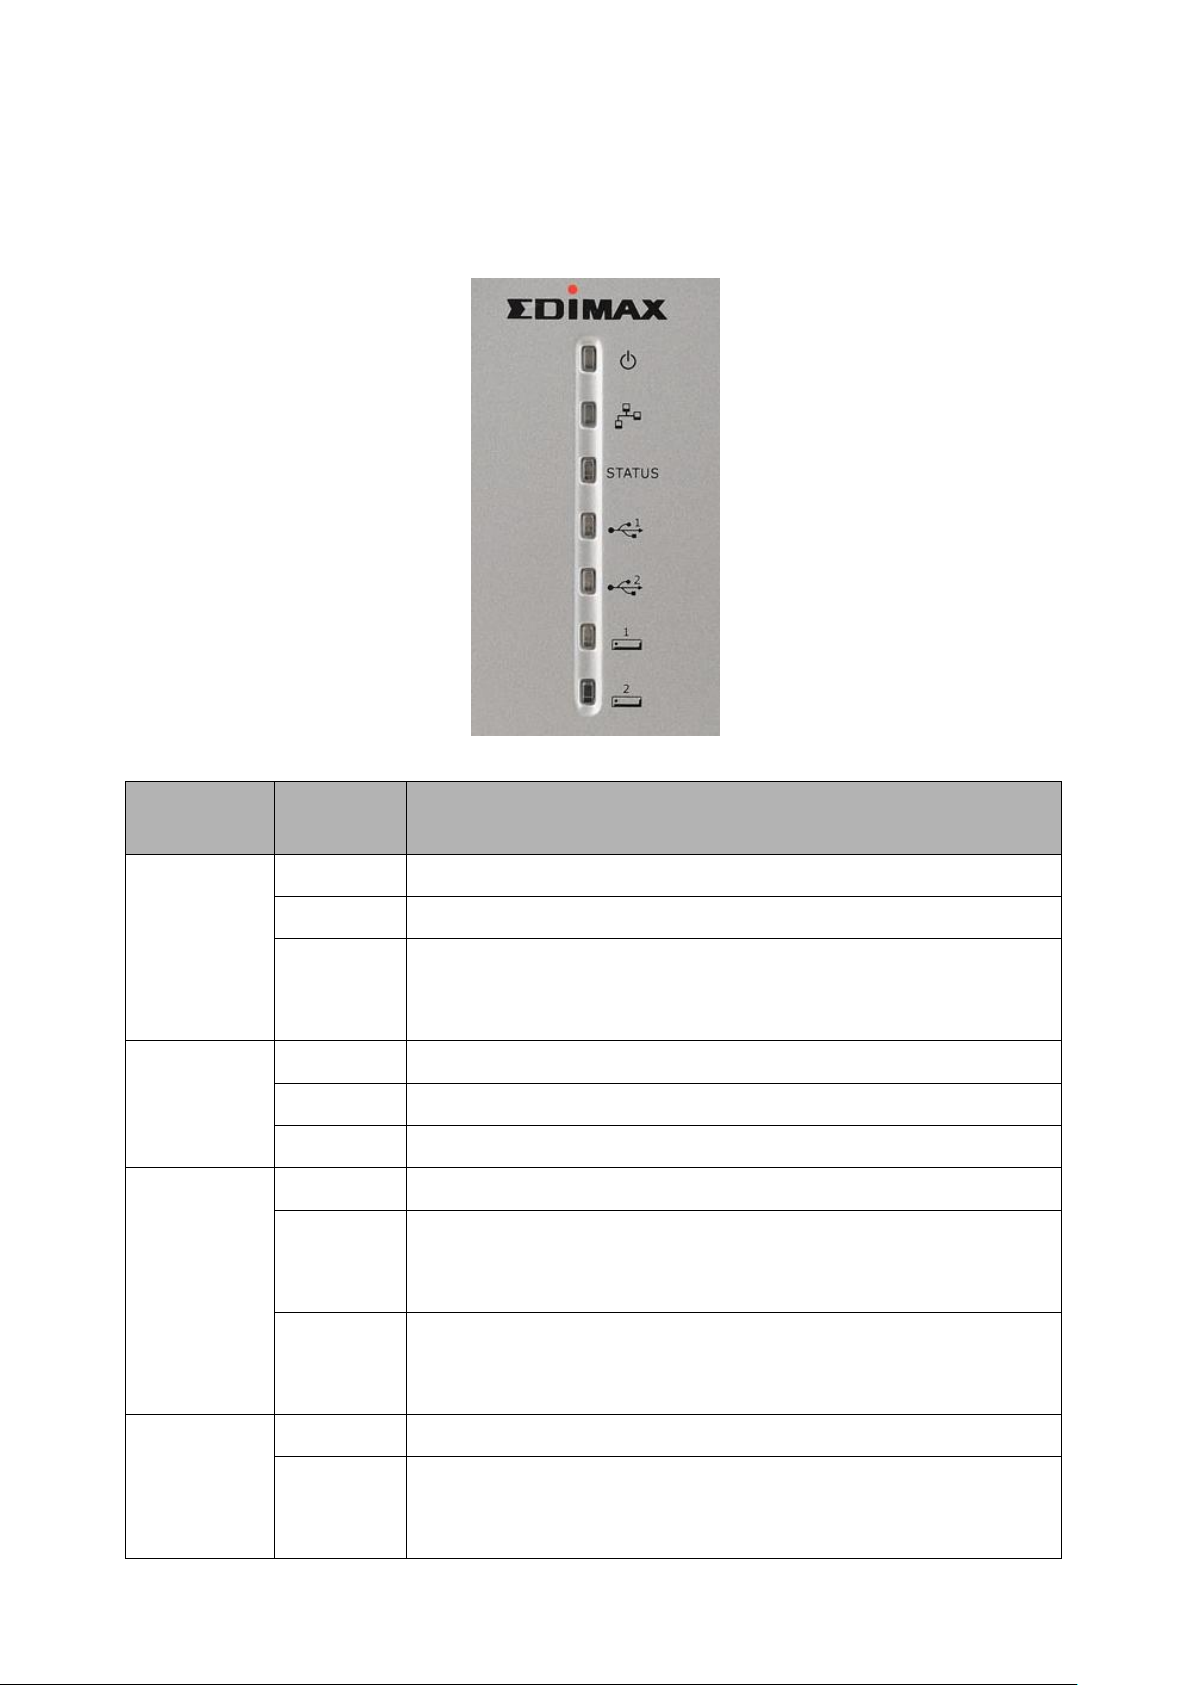
LED
Light
Status
Description
Power
ON
Storage server is powered on
Off
Storage server is shut down
Slow
Flashing
Storage server is starting; or the storage server is
shutting down; or the storage server is restoring its
settings to factory default values.
LAN
ON
LAN port is connected
Off
LAN port is unconnected
Flashing
Data is transferring through the network
Status
ON
The storage server is working well
Off
The storage server is not ready to provide service.
Please go to the Web GUI to configure the storage
server.
Slow
Flashing
The storage server has some problem. Please go to the
Web GUI to check the status of the system to find out
the problem.
USB1
ON
USB storage device is connected to USB1 port
Off
USB storage device is not connected to USB1 port or is
not detected due to hard disk failure or the system is
doing partition/format on this hard disk drive.
4) LED
On the storage server‟s front panel there are LEDs, which show the status of this
storage server. Below is the list of each LED and its description.
Page 10

9
Slow
Flashing
The used space of the USB mass storage is over 95%
or the USB Copy tool is copying from the USB mass
storage device plugged to USB1 port.
Fast
Flashing
The USB mass storage is full or the USB Copy tool is
copying from the USB mass storage device plugged to
USB1 port, but this job faces some error and is stopped
(In this situation, the LED will keep flashing about 30
seconds and go off).
USB2
ON
USB storage device is connected to USB2 port
Off
USB storage device is not connected to USB2 port or is
not detected due to hard disk failure or the system is
doing partition/format on this hard disk drive.
Slow
Flashing
The used space of the USB mass storage is over 95%
or the USB Copy tool is copying from the USB mass
storage device plugged to USB2 port.
Fast
Flashing
The USB mass storage is full or the USB Copy tool is
copying from the USB mass storage device plugged to
USB2 port, but this job faces some error and is stopped
(In this situation, the LED will keep flashing about 30
seconds and go off).
HDD1
ON
Internal SATA hard disk drive is installed
Off
Internal SATA hard disk drive is not installed or is not
detected due to hard disk failure or the system is doing
partition/format on this hard disk drive.
Slow
Flashing
The used space of the internal SATA hard disk drive is
over 95% or the two internal SATA hard disk drives are
synchronizing in RAID 1 mode.
Fast
Flashing
This internal SATA hard disk drive is full or this internal
SATA hard disk drive has some problem in RAID mode
(For example the hard disk fails or is not installed or the
RAID function fails to use this hard disk).
HDD2
ON
Internal SATA hard disk drive is installed
Off
Internal SATA hard disk drive is not installed or is not
detected due to hard disk failure or the system is doing
partition/format on this hard disk drive.
Slow
Flashing
The used space of the internal SATA hard disk drive is
over 95% or the two internal SATA hard disk drives are
synchronizing in RAID 1 mode.
Fast
Flashing
This internal SATA hard disk drive is full or this internal
SATA hard disk drive has some problem in RAID mode
(For example the hard disk fails or is not installed or the
RAID function fails to use this hard disk).
Page 11
10
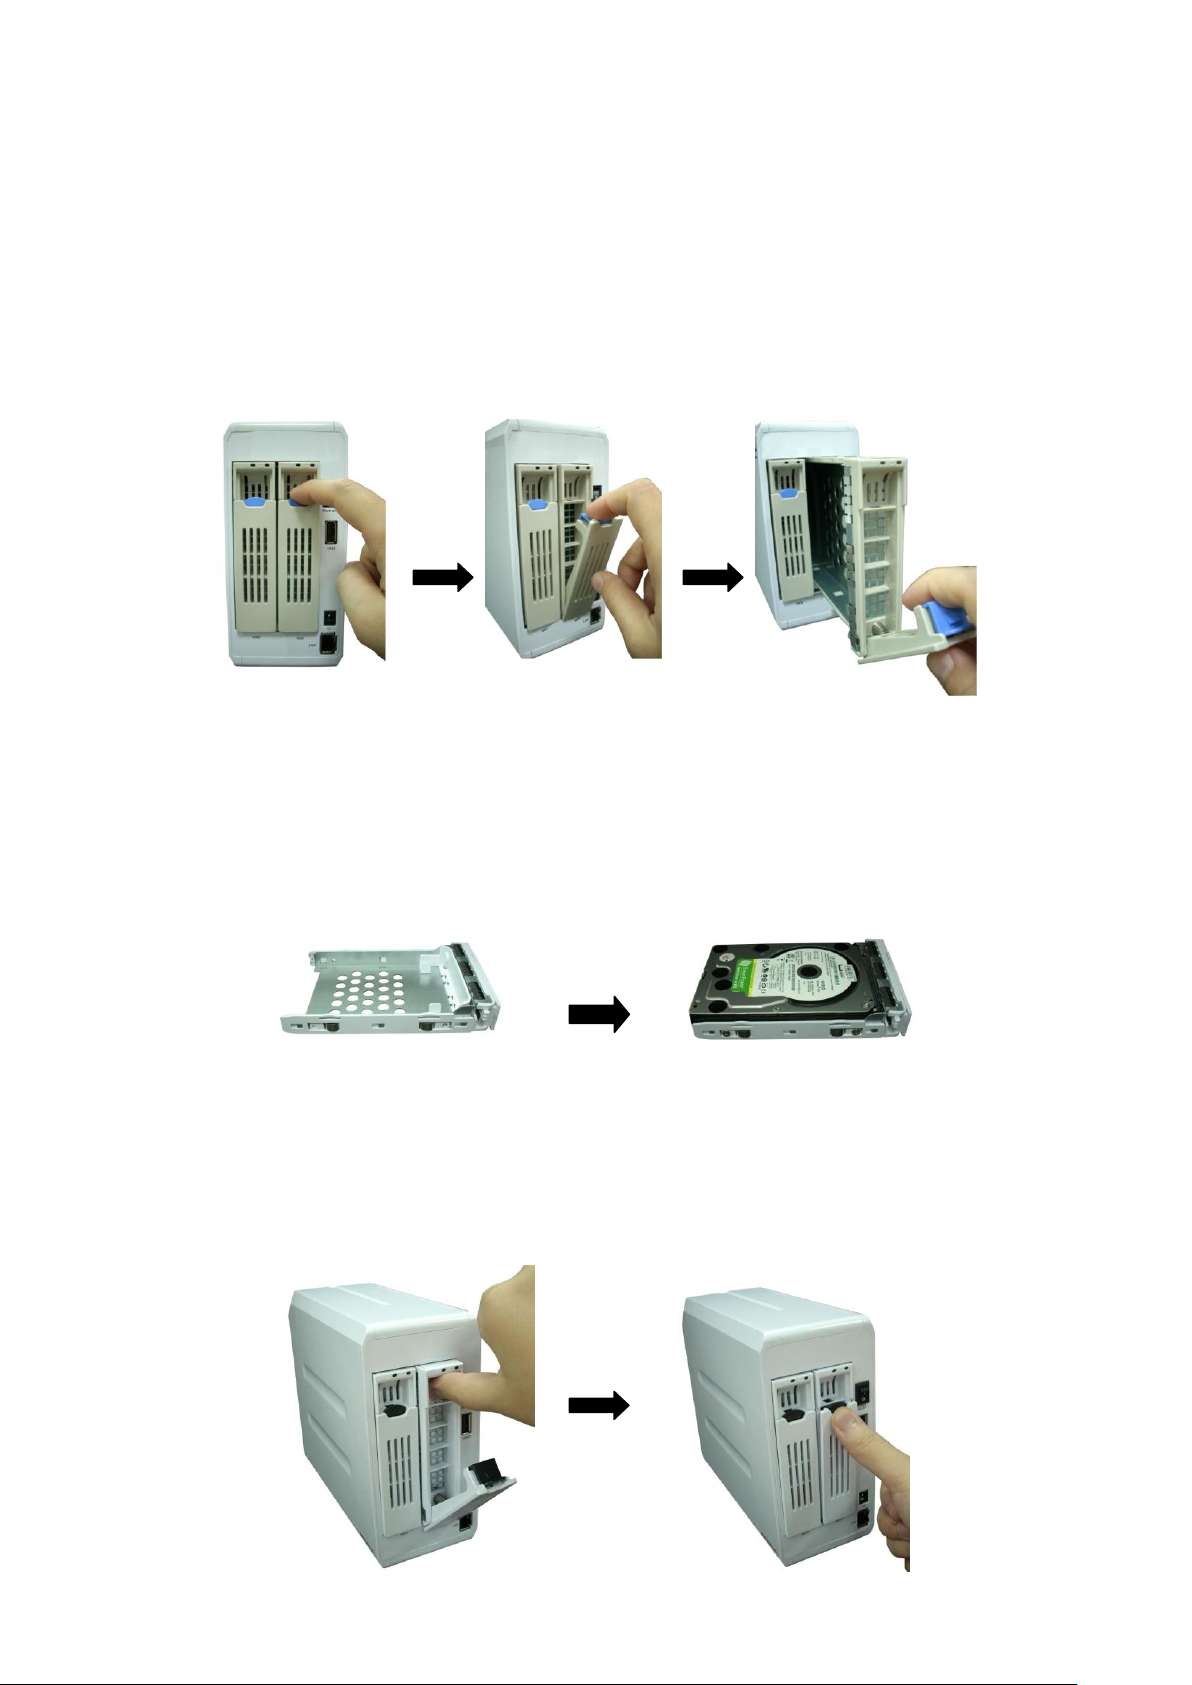
Getting started
This is a step-by-step instruction on how to start using the storage server.
1) Pull out the disk drawer from the case of storage server as shown in the setup
diagram below.
2) Fix your SATA hard disk drive in the drawer by screws as shown in the setup
diagram below.
3) Push the disk drawer with hard disk drive installed back into the case of storage
server as shown in the setup diagram below.
Page 12
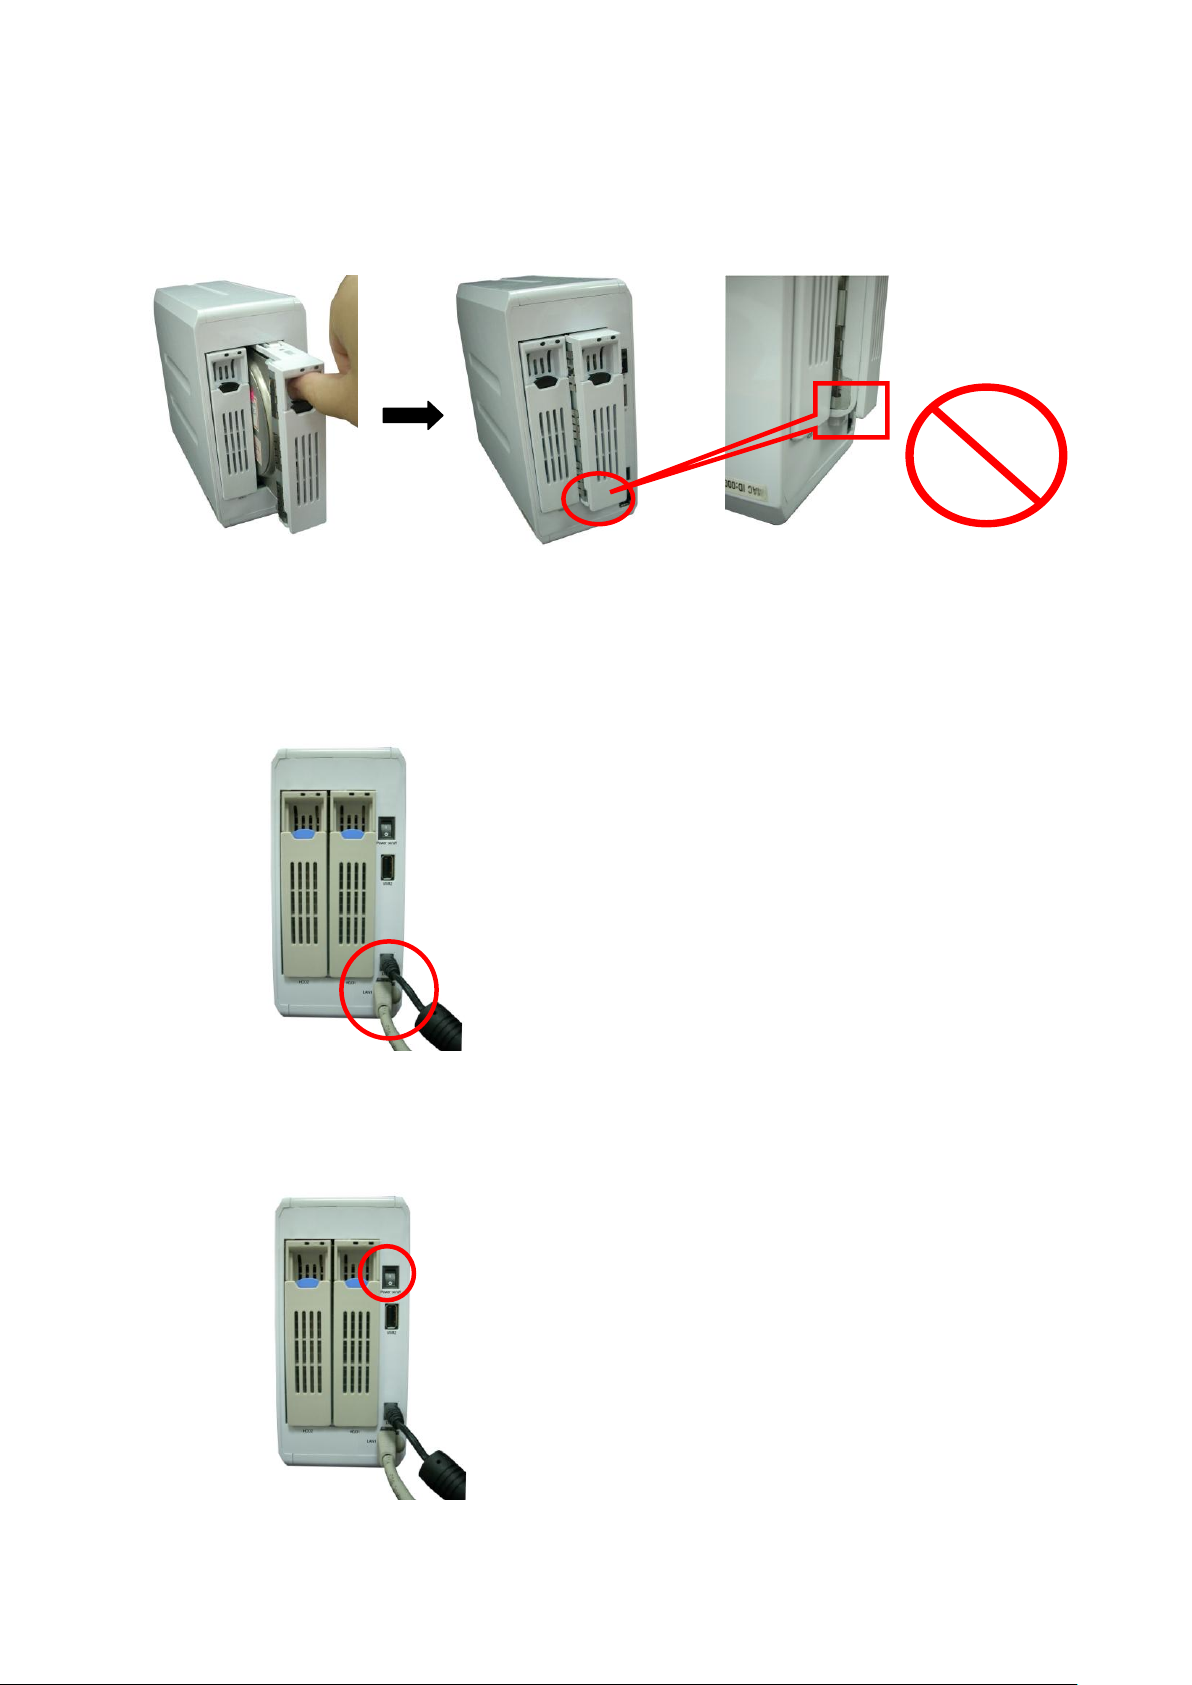
11
The disk drawer is
not safely installed
Note: Please make sure the disk drawer is safely installed.
For example, please DO NOT install hard disk by the way showed in the following
pictures.
4) Plug the power adaptor to the storage server and connect the storage server to
your network as shown in the setup diagram below.
5) Power on the storage server by pressing the power switch of the storage server
on as shown in the setup diagram below.
Page 13
12
6) When the Power LED is steady lit, the storage server is ready.
7) There are two methods to setup the storage server: (1) Use the Windows-based
Storage Server Management Wizard utility to do the basic setup; (2) Use the
Web-based GUI to do the advanced setup, just go to the next step.
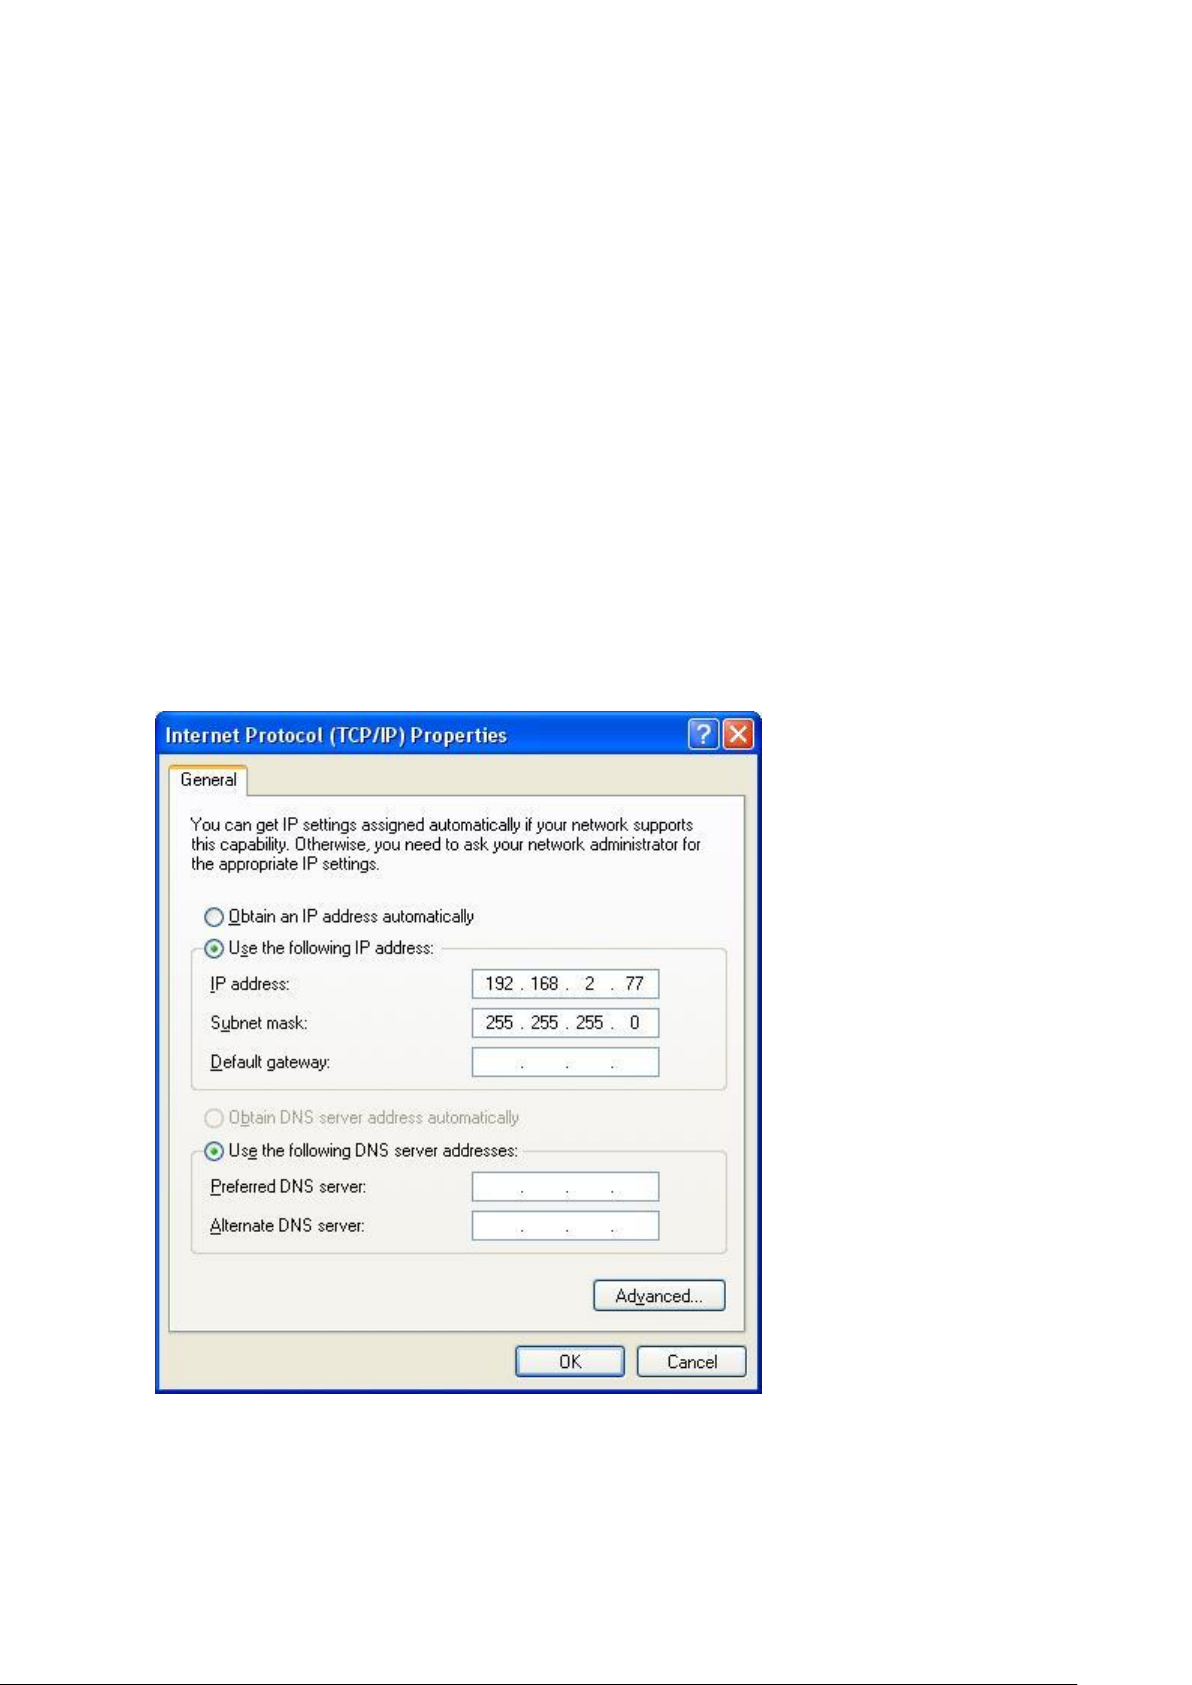
8) The default IP address of storage server is 192.168.2.5. The PC to setup the
storage server should be in the same subnet as the storage server. If the IP
address of your PC is not in the range of 192.168.2.1~254, please modify the
Windows IP address of your PC as following diagram. If you have used
Windows-based Storage Server Wizard utility to setup the IP of the Storage
Server, you can skip this step, because the IP of the Storage Server and your
PC should be in the same subnet now.
Note: If you have to modify the Windows IP address of your PC, please
remember the original Windows IP address settings of your PC. After you
finished the whole quick setup procedure, you have to modify the Windows IP
address settings of your PC back to the original values to make your PC work
well.
9) Once the IP address of your PC is in the same subnet of the storage server,
enter the URL of default IP address http://192.168.2.5 (default IP address of
this storage server) into your PC‟s web browser and press <enter>. If you have
Page 14

13
modified the IP of the Storage Server by some way, for example, by using the
Windows-based Storage Server Wizard utility, please use the new IP of Storage
Server.
Page 15
14
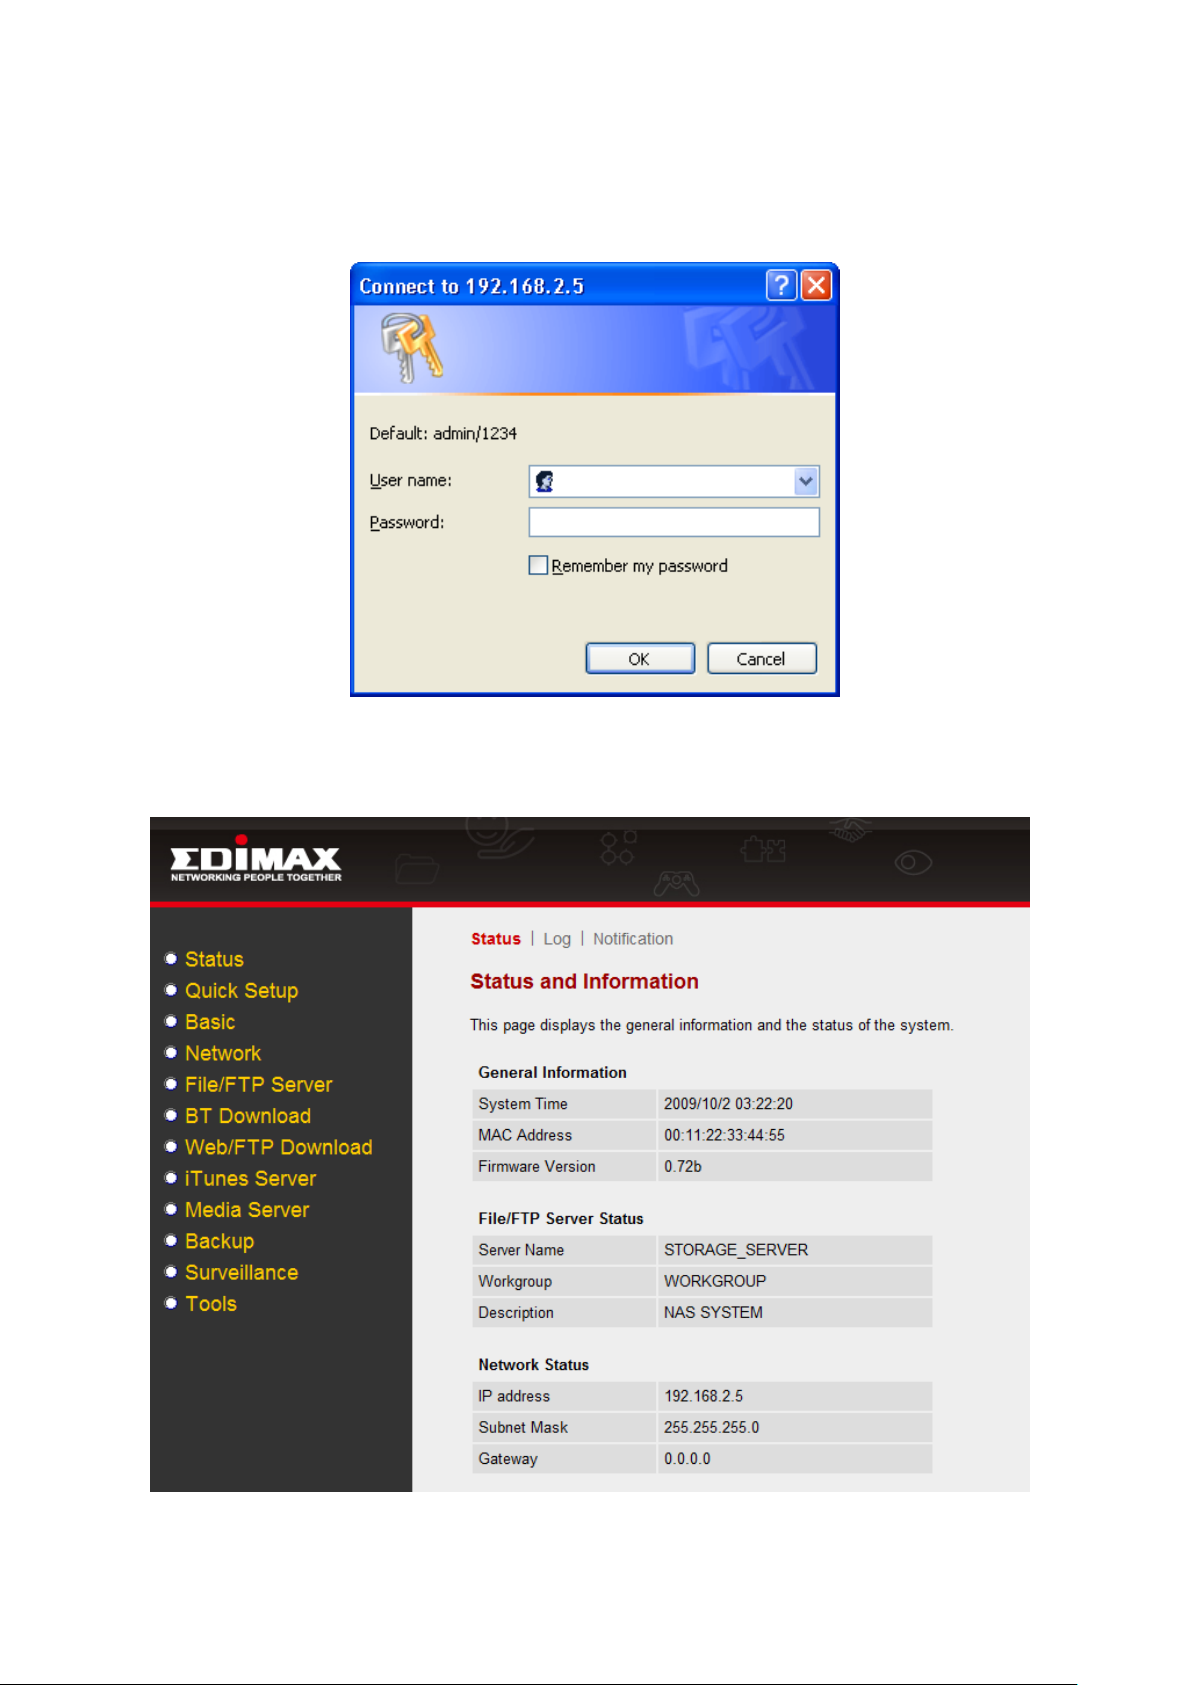
10) The login screen below will appear. Enter the “User Name” and “Password”
and then click <OK> to login.
Note: By default the user name is “admin” and the password is “1234”.
When you see the screen below, you are ready to setup the storage server.
Page 16

15
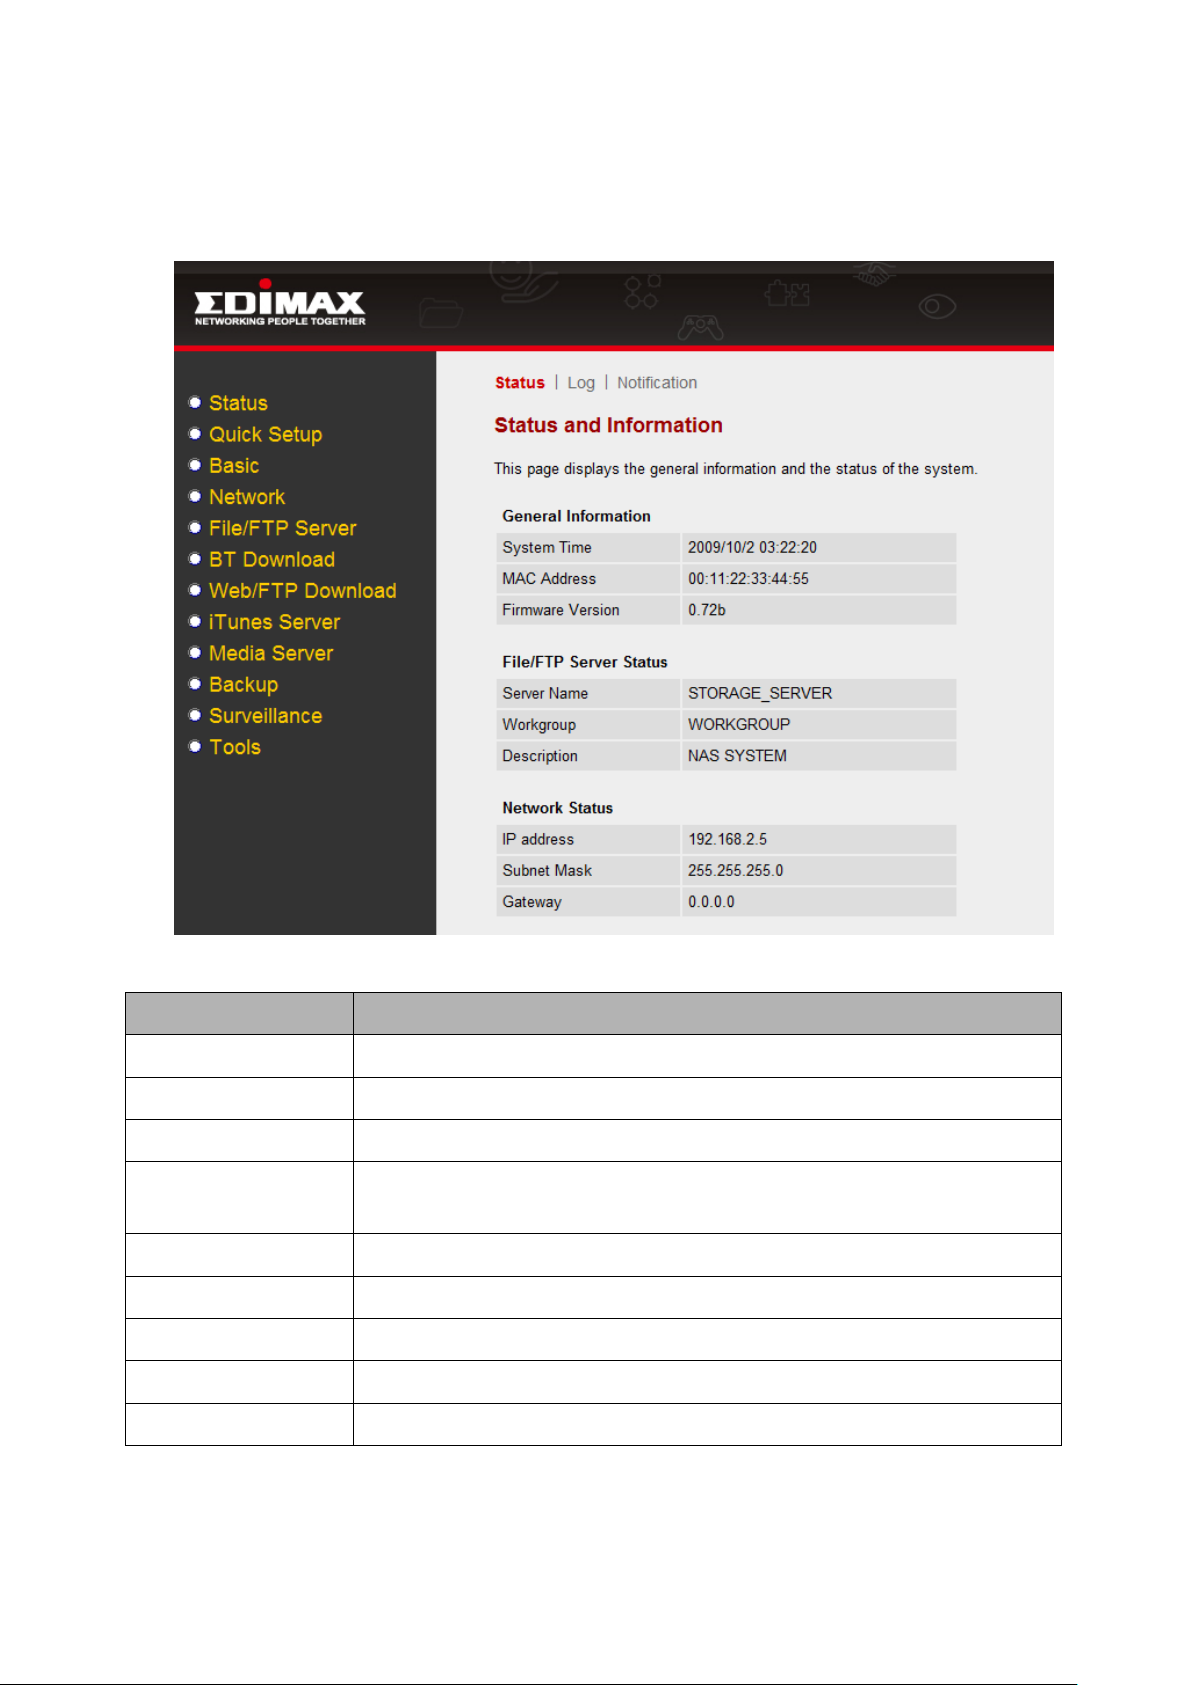
Status (Chapter 1)
This page displays the status and basic information of the storage server.
Quick Setup (Chapter 2)
Quick Setup will guide you through the basic settings of the storage server.
Basic (Chapter 3)
This section contains basic configurations such as: Time Zone and Password.
Network (Chapter 4)
This section contains network configurations such as: IP and DNS.
File/FTP Server (Chapter 5)
This section contains File Server and FTP Server configurations such as: User
Management, Group Management, File Server and FTP Server sharing policies.
BT Download (Chapter 6)
This section contains BT Download configurations such as: Torrent Management
and Download Status.
Web/FTP Download (Chapter 7)
This section contains Web Download and FTP Download configurations such as:
Download URL Management and Download Status.
Download Manager (Chapter 8)
This section contains usage of Windows Download Manager utility which let you
manage your BT/Web/FTP download items.
iTunes Server (Chapter 9)
This section contains iTunes Server configurations such as: Media Folder
Management, Server Status and User Status.
Media Server (Chapter 10)
This section contains Media Server configurations such as: Media Folder
Management and Rescan Interval.
Backup (Chapter 11)
This section contains Backup configurations.
Surveillance (Chapter 12)
This section contains Surveillance configurations.
Tools (Chapter 13)
This section contains Configuration Tools such as: Disk Drive Partition and Format
Tools, Storage Status, USB Copy Tool, Configuration Backup and Restore Tool,
Firmware Upgrade Tool, System Reset Tool.
Page 17
16
Parameter
Description
System Time
Current system time.
MAC Address
The MAC address of this storage server.
Firmware Version
The version of storage server firmware.
Server Name
The name of this storage server. This is the file server name
that shows in My Network Places on client computer.
Workgroup
The My Network Places group this file server will join.
Description
The description of this storage server.
IP Address
The IP address used by this storage server in your network.
Subnet Mask
The IP Subnet Mask of your LAN segment.
Gateway
The gateway IP address of your network.
Chapter 1 Status
1.1 Status
This page displays the status and basic information of the Storage Server.
Page 18
17
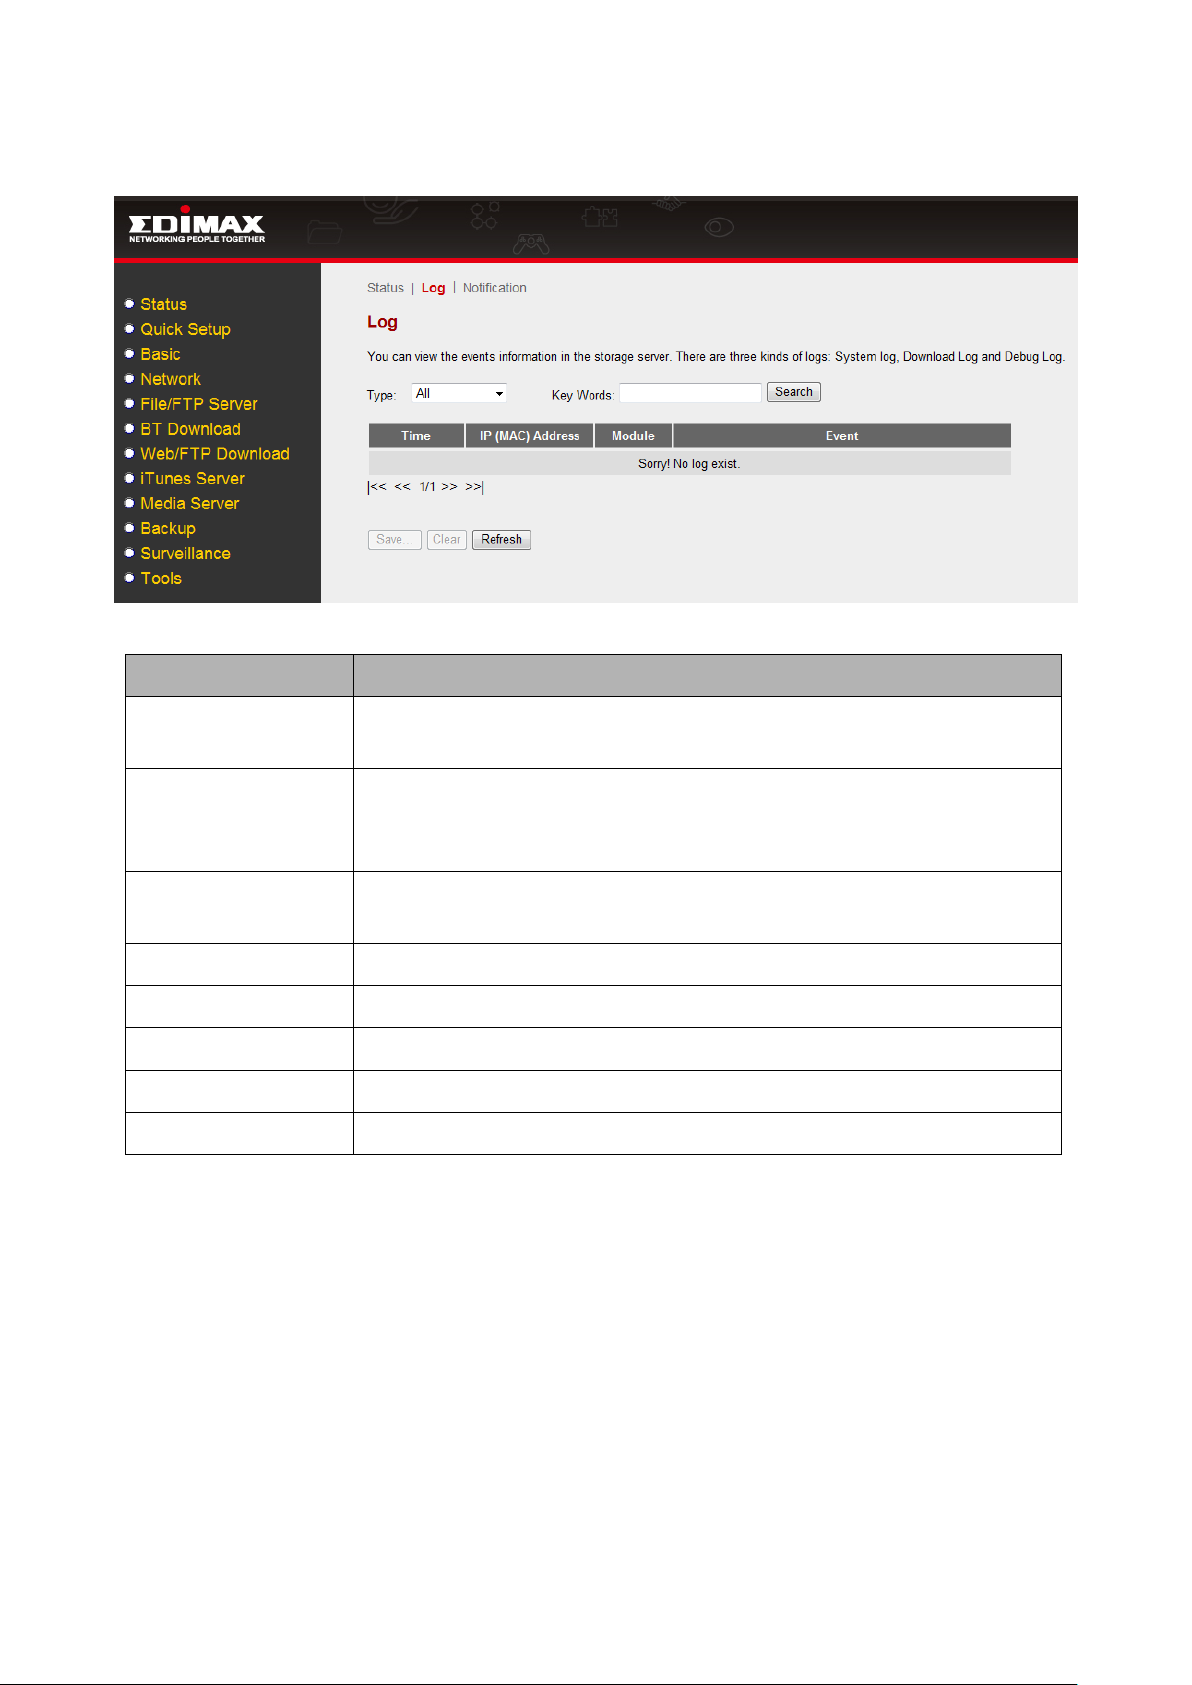
Parameter
Description
Type
Logs are categorized into several types. Please select a
suitable type of log that you want to check.
Key Words
You can enter key words here and click “Search” to let the
system searches all log information that contain the key
words.
Save
Click “Save” to download and save the log information into
your PC.
Clear
Click “Clear” to clear the log information of the selected type.
|<<
Move to the first page of log.
<<
Move to the previous page of log.
>>
Move to the next page of log.
>>|
Move to the last page of log.
1.2 Log
This page displays the log information of the Storage Server.
Page 19
18
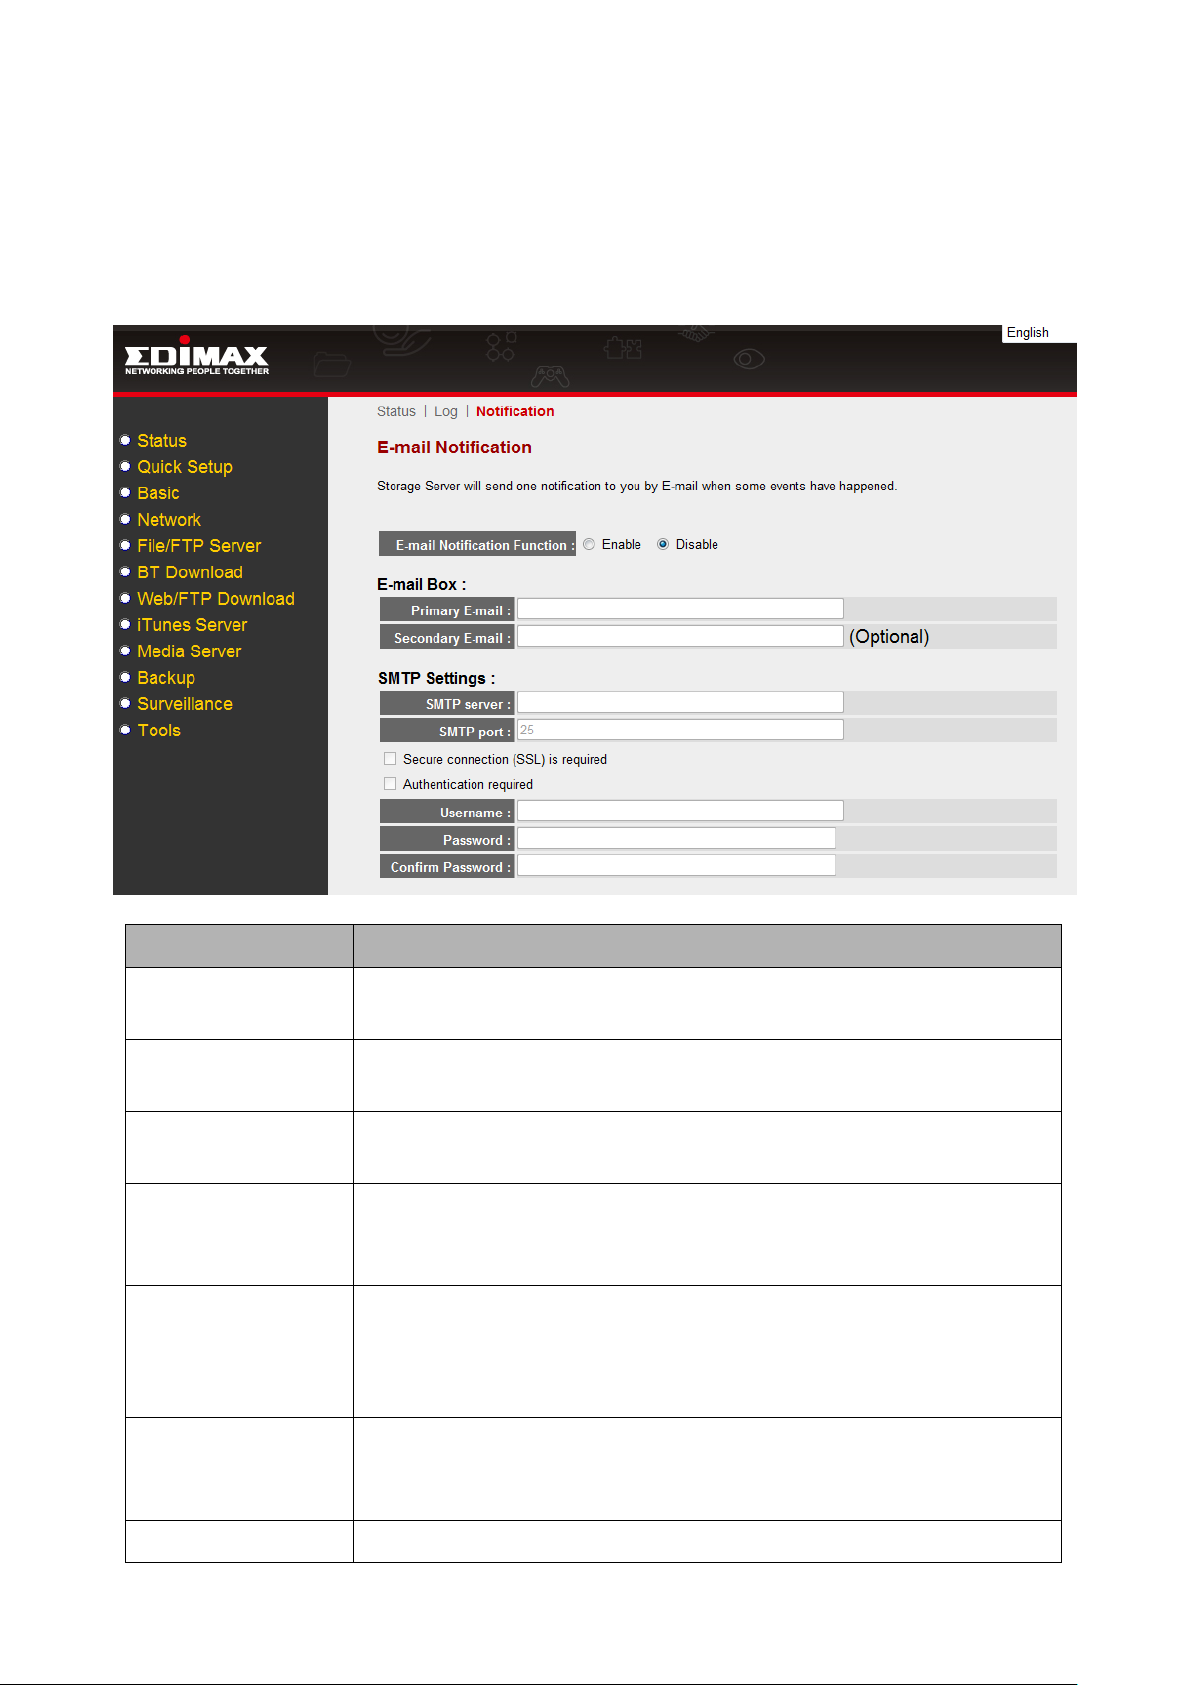
Parameter
Description
E-mail Notification
Function
Select to enable/disable E-mail Notification Function.
Primary E-mail
The e-mail address of the e-mail box that will receive
notification e-mail messages.
Secondary E-mail
The e-mail address of the e-mail box that will receive
notification e-mail messages.
SMTP Server
The address of the SMTP Server that the storage server will
use to send notification e-mail messages. You should refer
to your e-mail service provider for the correct address.
SMTP Port
The port number of the SMTP Server that the storage server
will use to send notification e-mail messages. You should
refer to your e-mail service provider for the correct port
number.
Secure
Connection (SSL)
is required
Select it if your e-mail service provider requires it.
Authentication
Select it and fill in the login information below if your e-mail
1.3 Notification
This page let you to setup e-mail account that the storage server will use to send
notification e-mail to you when the status of the storage server changes. You can
assign two e-mail addresses (primary and secondary) for notification. Both e-mail
boxes will receive the notification messages.
Page 20

19
Required
service provider requires you to provide user name and
password when using the e-mail service.
Username
The user name required by SMTP server.
Password
The password required by SMTP server.
Confirm Password
The password required by SMTP server. It should be the
same with the password above.
E-mail Subject
The subject of the e-mail notification messages sent by the
storage server.
E-mail Language
The language of the content of the e-mail notification
messages sent by the storage server.
Send a test
message
Click this button and the storage will send a test e-mail
notification message to the provided e-mail boxes. If you
receive the test e-mail notification message, it means your
e-mail notification settings are correct.
E-mail Notification
Events
Select types of notifications that you want the storage server
send to you by e-mail.
Page 21
20
Chapter 2 Quick Setup
Quick Setup will guide you through the basic settings of the storage server step by
step. When you click “Quick Setup” in the left menu, a Quick Setup window will pop
up.
Note: If this is the first time the internal SATA hard disk drive is used in the storage
server, the storage server will automatically erase old partitions and data in the
internal SATA hard disk drive and re-create partition and format the internal SATA
hard disk drive. Please make sure original valuable data in the internal SATA hard
disk drive is backed up before doing Quick Setup.
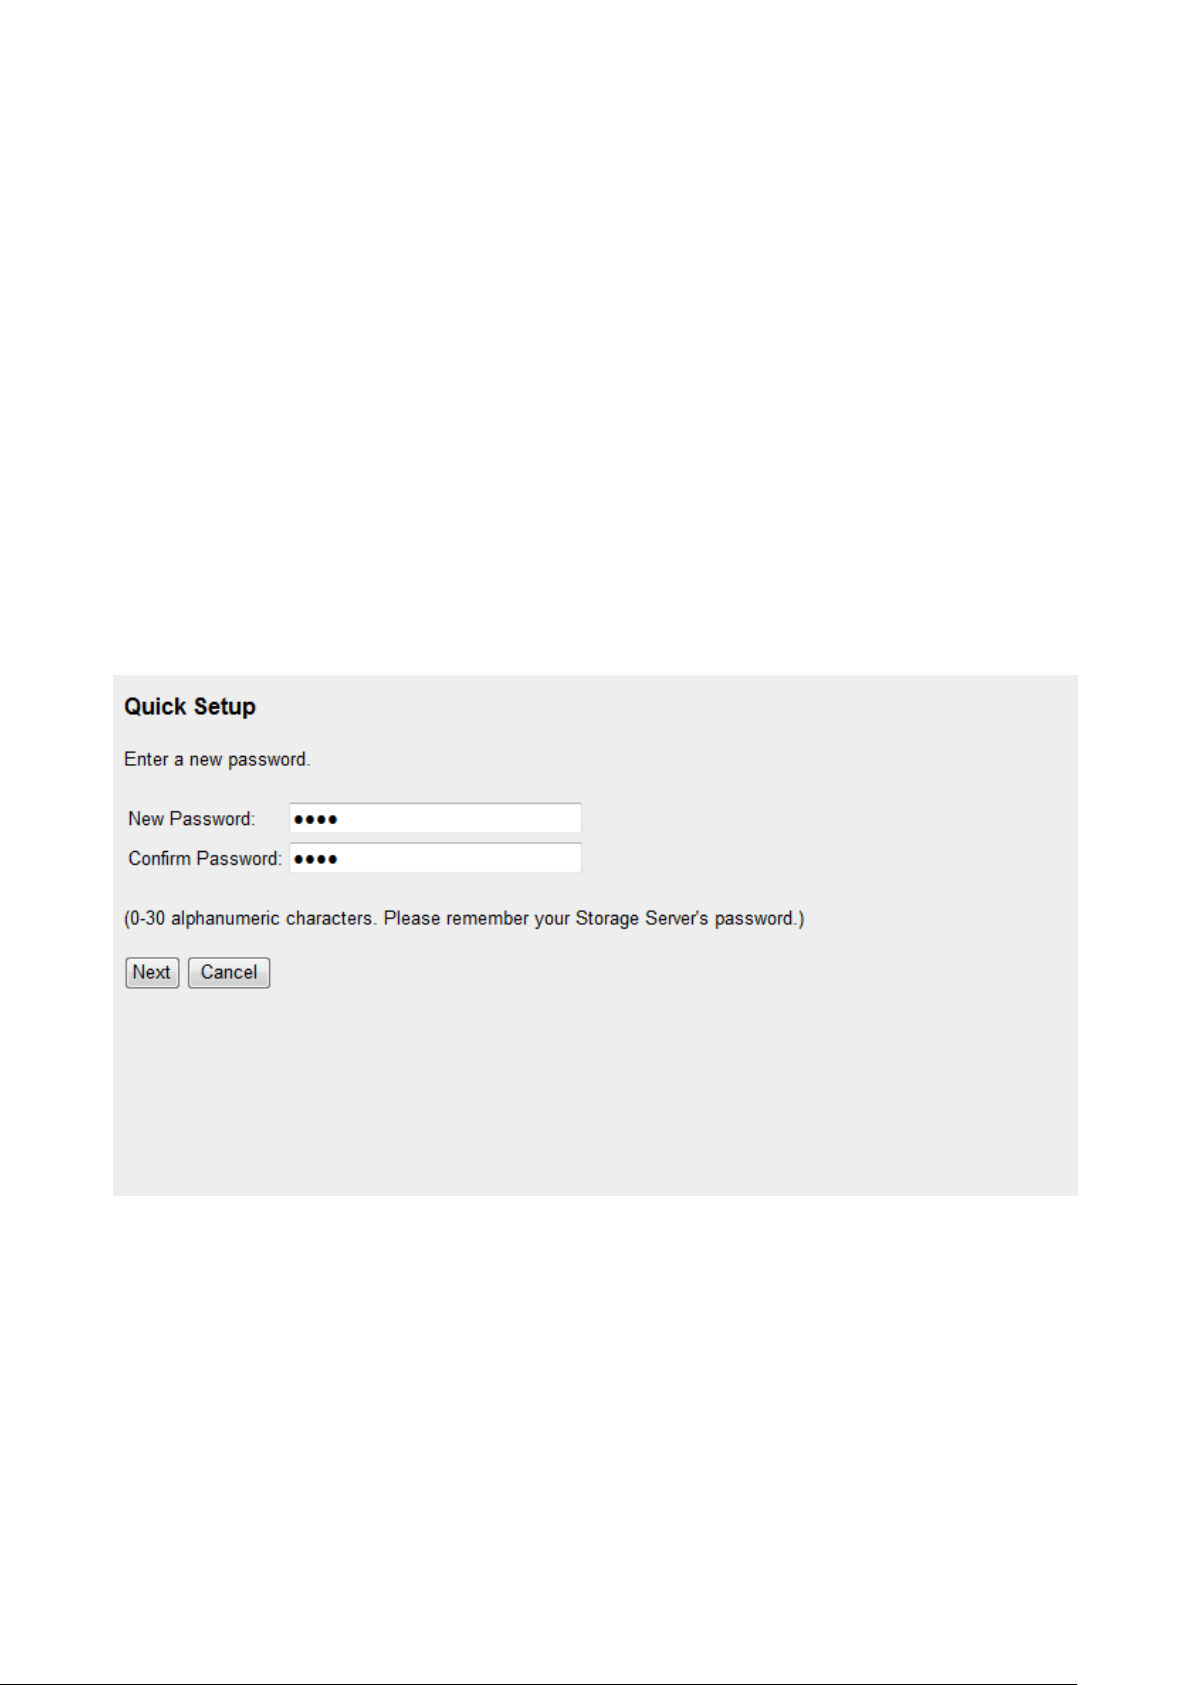
2.1 Password
Enter the new password of storage server. A valid password should consist of 0~30
alphanumeric characters. The New Password and the Confirm Password should be
the same.
Click “Next” to go to the next step of Quick Setup.
Click “Cancel” to abort the Quick Setup. Any modified settings during this Quick
Setup session will not take effect.
Page 22
21
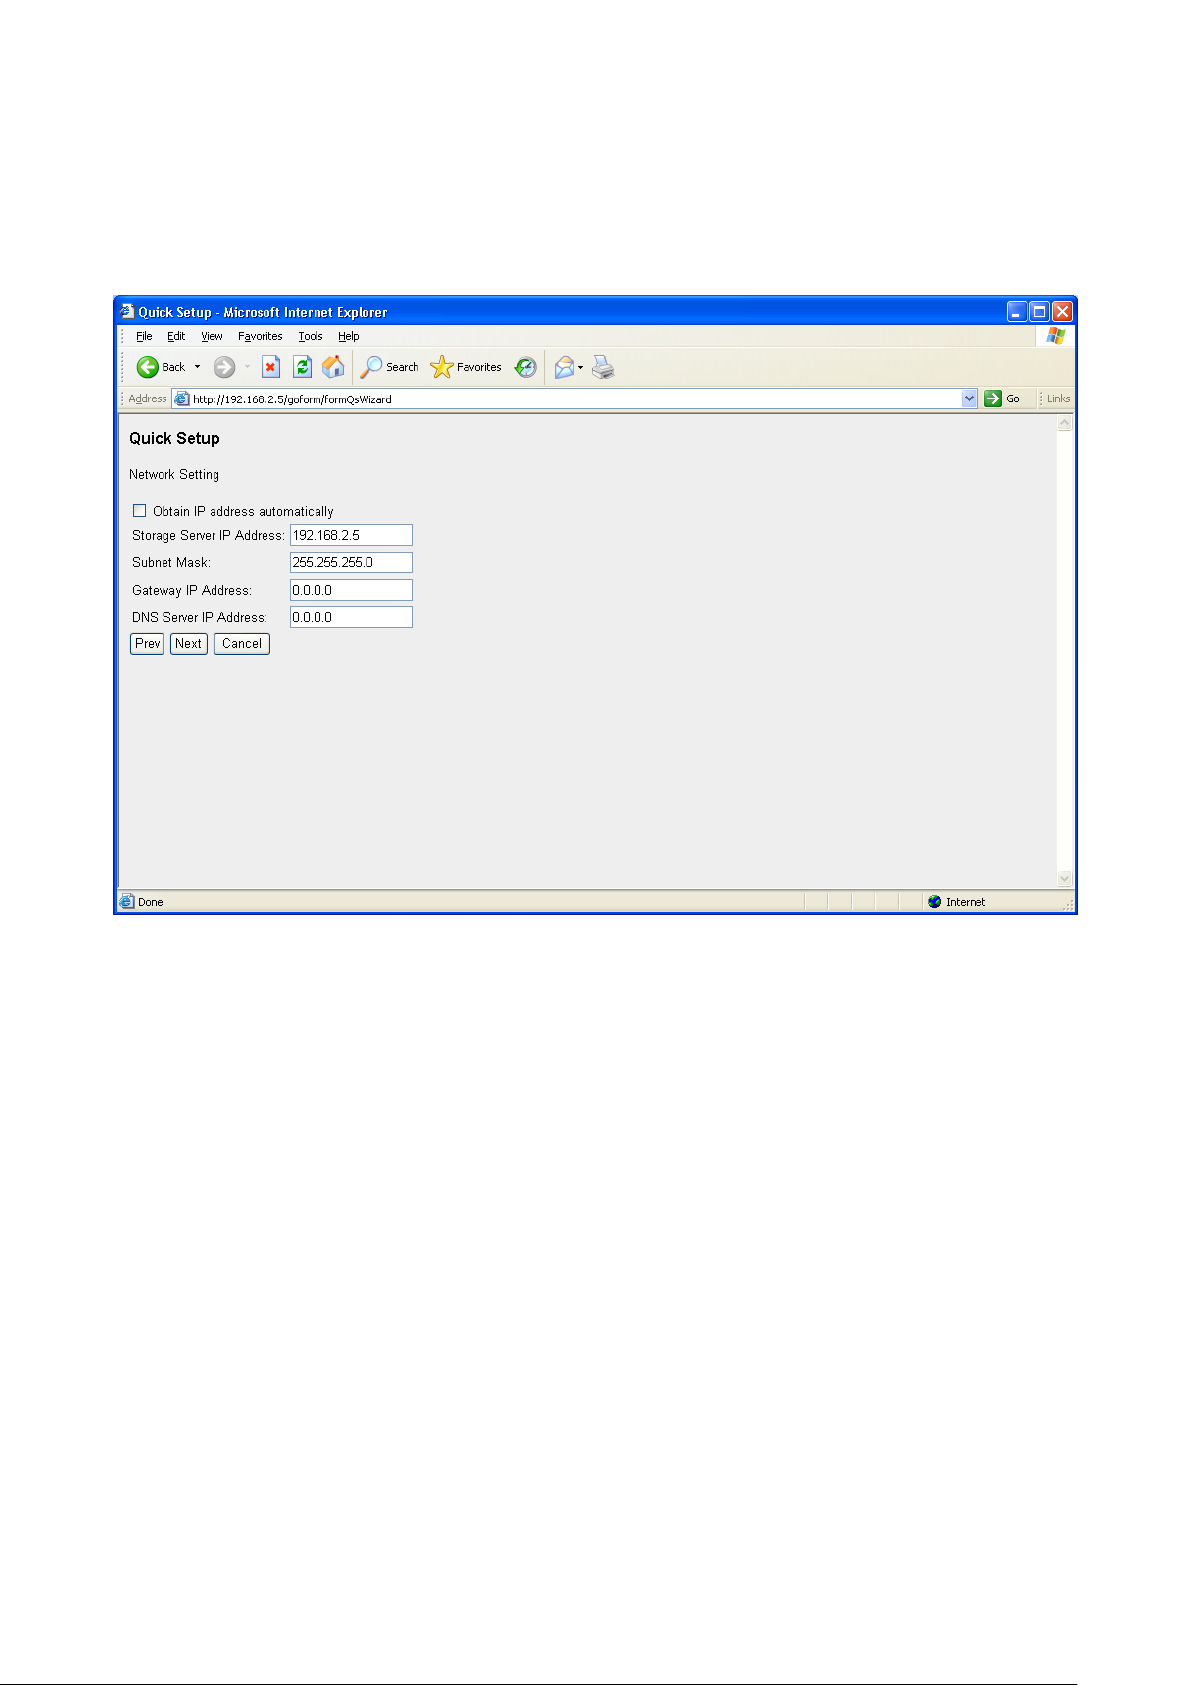
2.2 Network
Setup the IP address and DNS address of the storage server. You can manually
assign IP address or let the storage server to obtain IP address from DHCP server
automatically. For more detail information, you can refer to Chapter 4.
Click “Prev” to go to the previous step of Quick Setup.
Click “Next” to go to the next step of Quick Setup.
Click “Cancel” to abort the Quick Setup. Any modified settings during this Quick
Setup session will not take effect.
2.3 Storage Server Name
Assign a name to the storage server. A valid storage server name consists of 4~15
case sensitive alphanumeric and underline characters.
Page 23

22
Click “Prev” to go to the previous step of Quick Setup.
Click “Next” to go to the next step of Quick Setup.
Click “Cancel” to abort the Quick Setup. Any modified settings during this Quick
Setup session will not take effect.
2.4 Turn on Functions
Select functions that you want to turn on.
Page 24
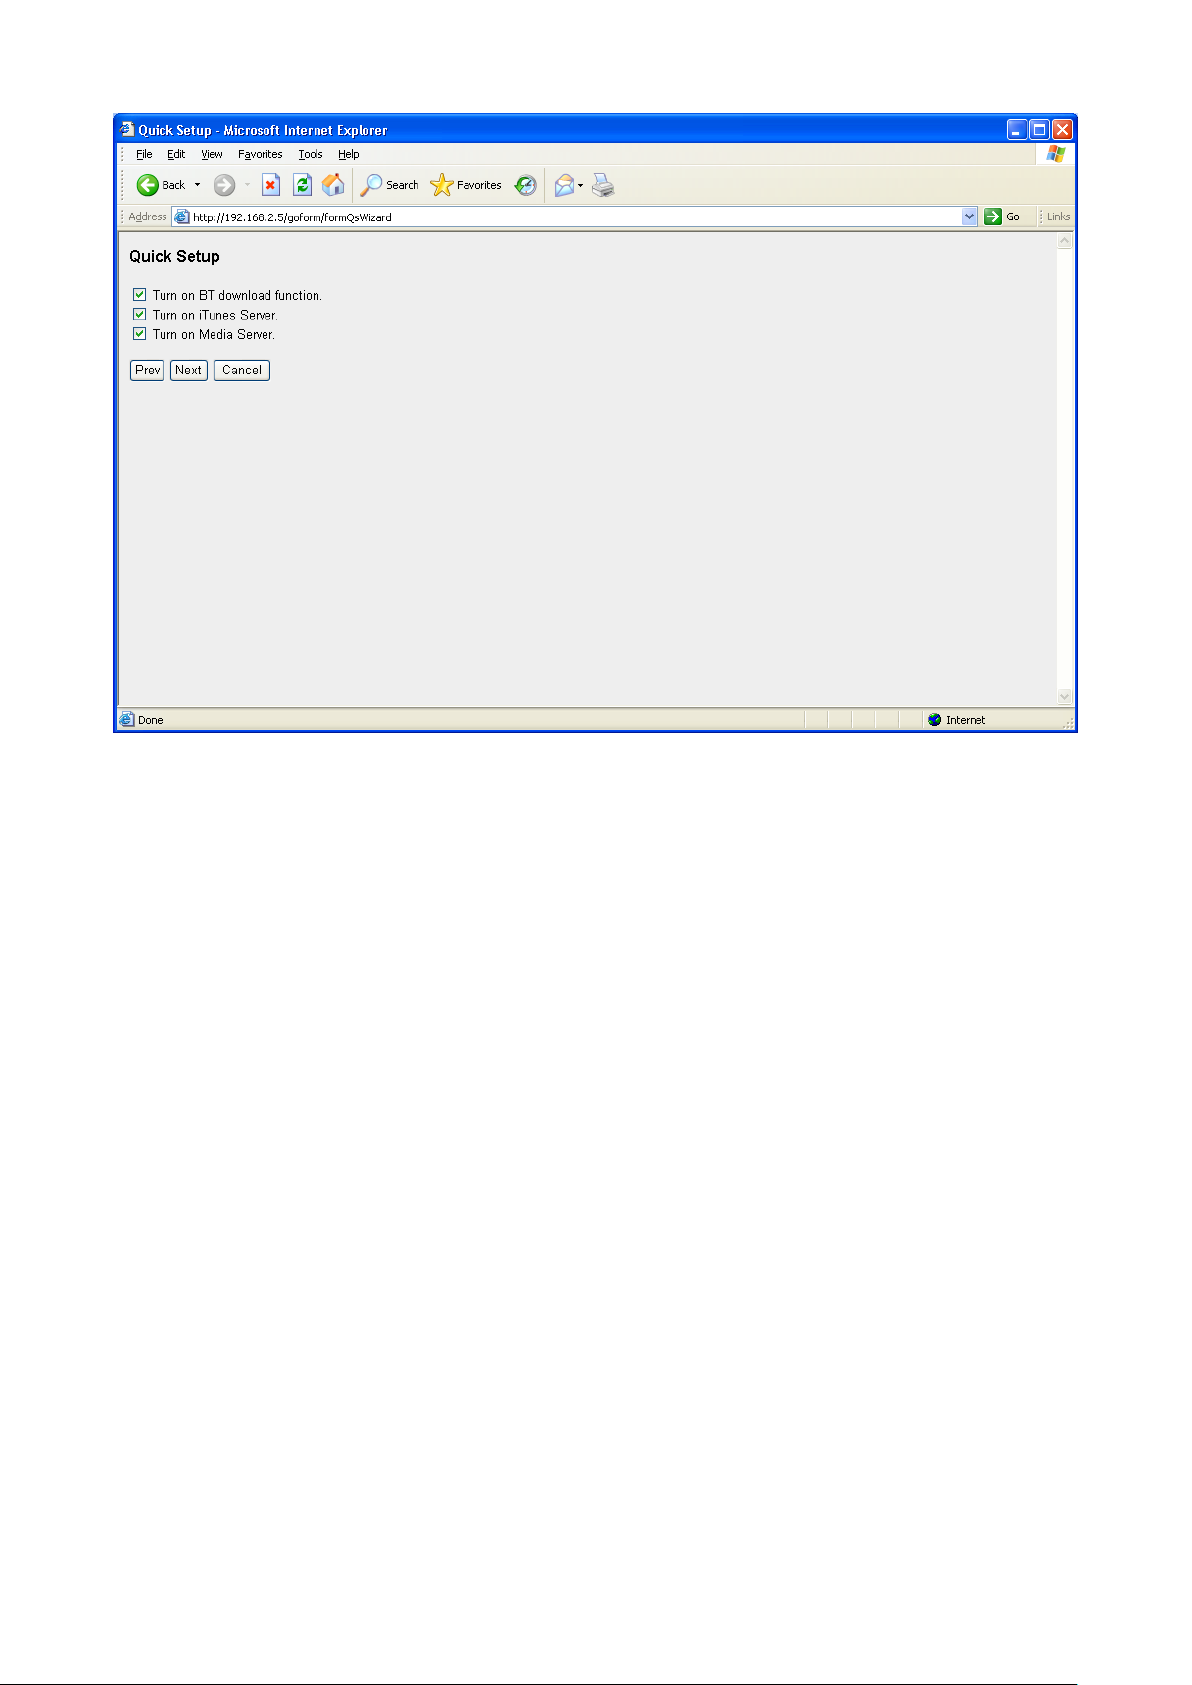
23
Click “Prev” to go to the previous step of Quick Setup.
Click “Next” to go to the next step of Quick Setup.
Click “Cancel” to abort the Quick Setup. Any modified settings during this Quick
Setup session will not take effect.
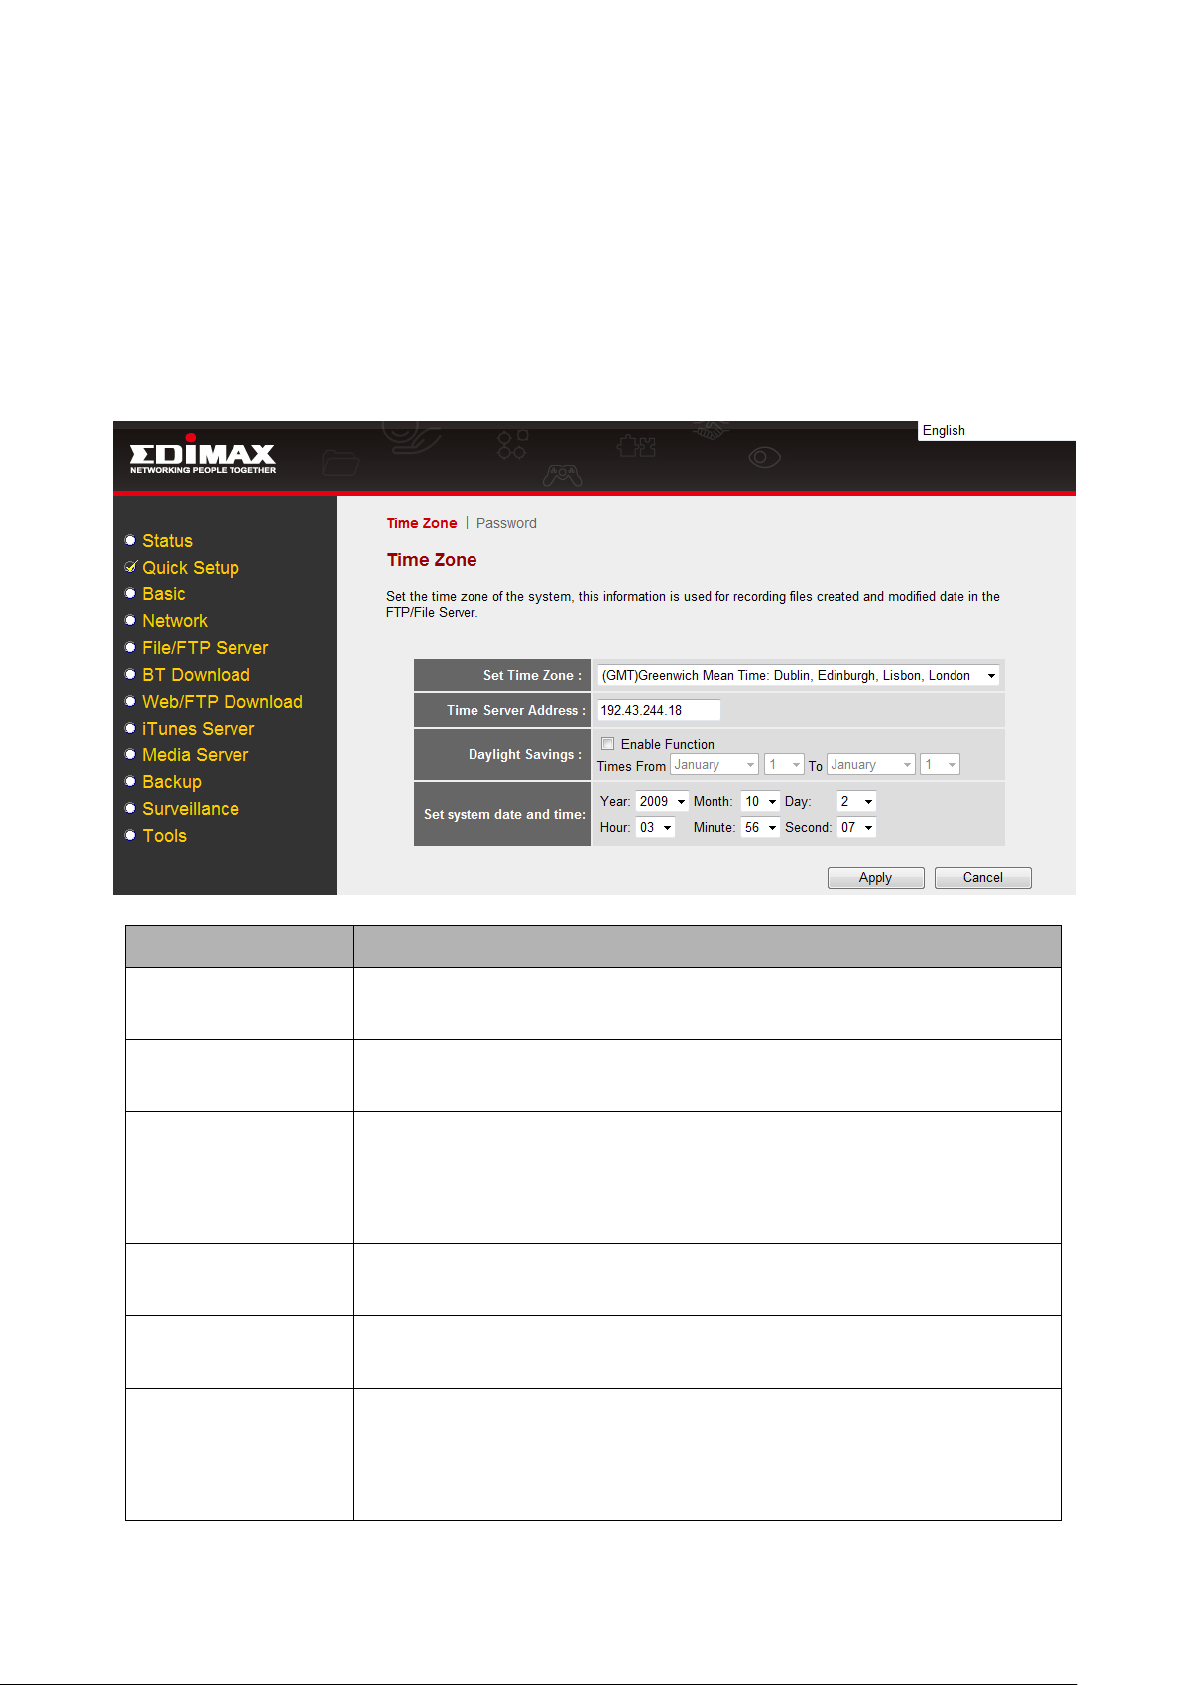
2.5 Time Zone
Select the time zone of your location. You can also assign daylight saving period if
you need. During this configuration, the storage server will synchronize its time with
your computer and remember it. After this configuration, the storage server will also
automatically try to synchronize its time with public time server in Internet every
time when it restarts.
Page 25

24
Click “Prev” to go to the previous step of Quick Setup.
Click “Next” to go to the next step of Quick Setup.
Click “Cancel” to abort the Quick Setup. Any modified settings during this Quick
Setup session will not take effect.
2.6 Confirm Settings
List the setting values of Quick Setup for your confirmation.
Page 26

25
Click “Prev” to go to the previous step of Quick Setup.
Click “Apply” to make all the settings of Quick Setup take effect.
Click “Cancel” to abort the Quick Setup. Any modified settings during this Quick
Setup session will not take effect.
2.7 Apply Settings
After you click “Apply” in the confirmation page, the following page will display and
the Quick Setup will start to apply the settings to the storage server. It will take
several minutes to apply the settings.
Page 27
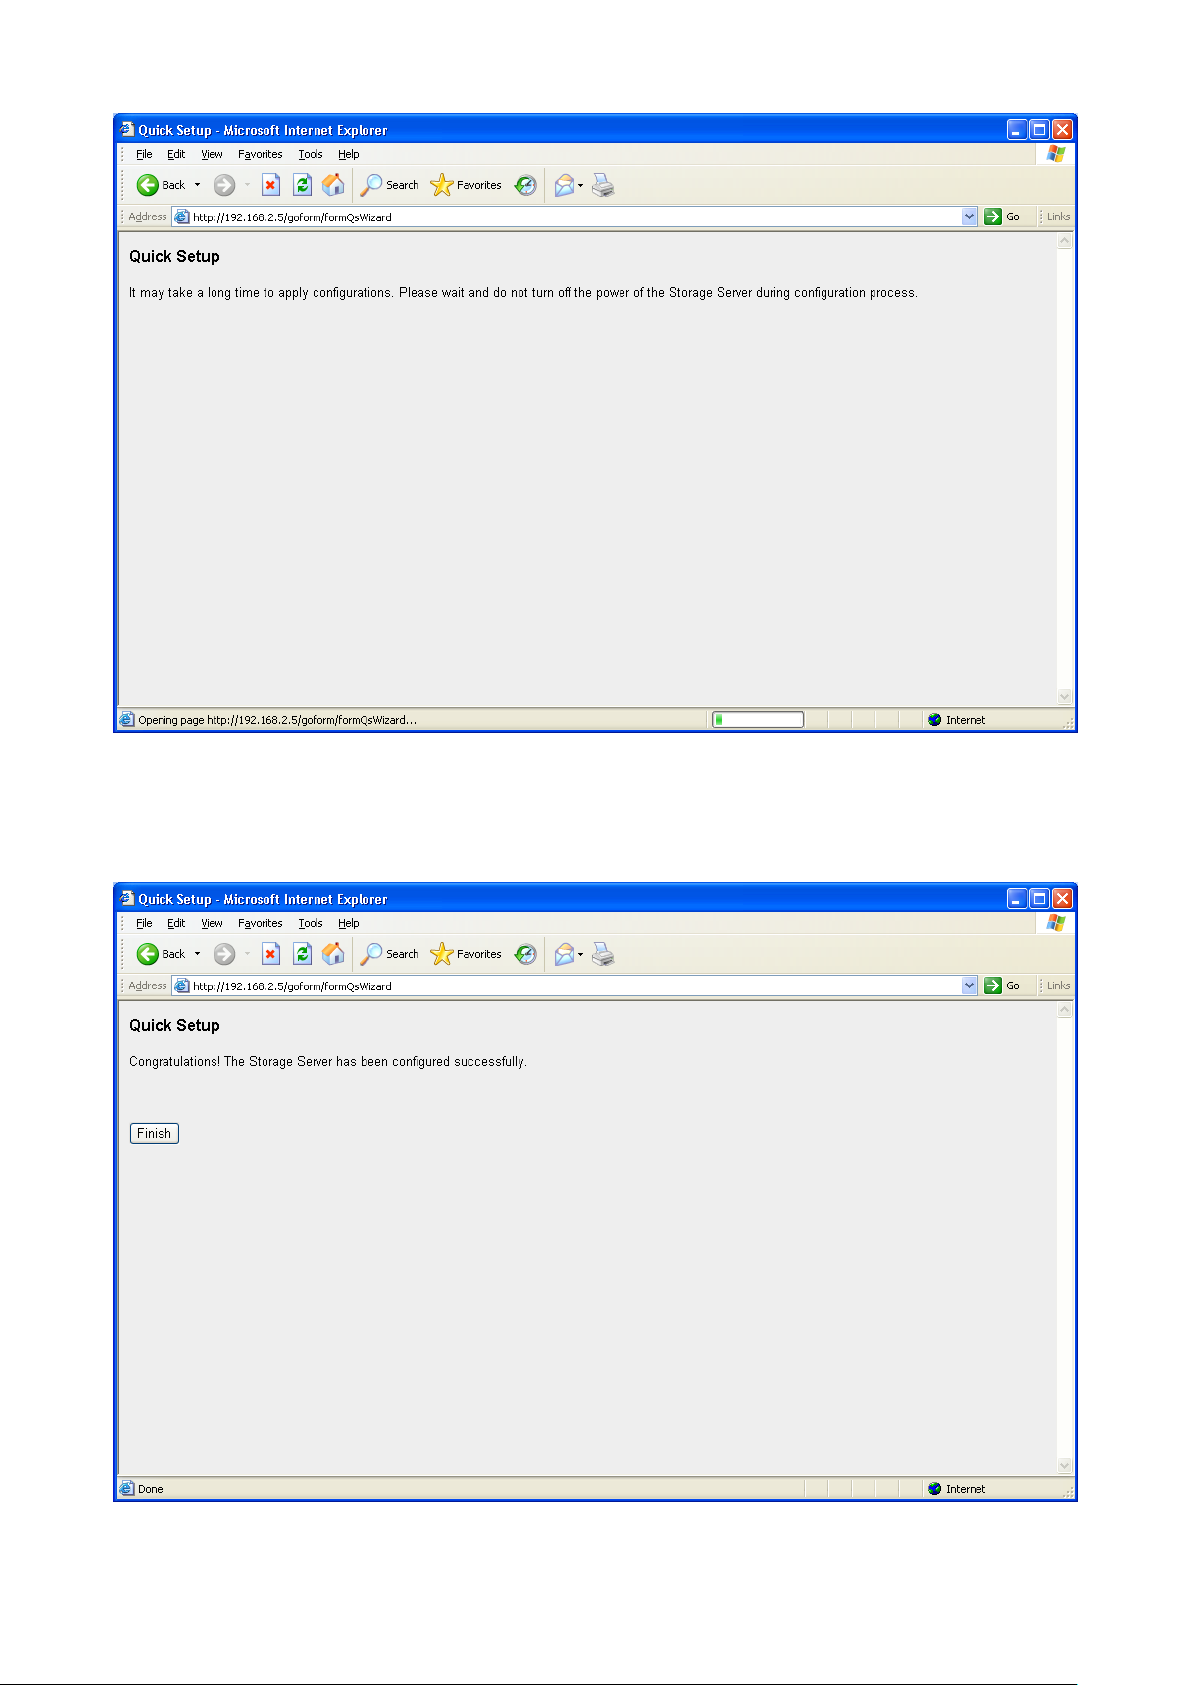
26
After the Quick Setup settings values are applied, the storage server will restart and
the following page will display. Please wait for a while.
Click “Finish” after the storage server restarts.
Page 28

27
2.8 Shared folders automatically created by Quick Setup
Quick Setup will automatically create some shared folders for you. The shared
folder names and their usage are listed as follows:
Public_hdd1: You can access “Public_hdd1” anonymously with reading and
writing privilege by FTP and Network Neighborhood (Samba). The absolute
path in the storage server of “Public_hdd1” is “[HDD1]C:\Public\”.
Media: The “Media” folder is located under the “Public_hdd1” folder, so the
“Media” folder is also accessible by FTP and Network Neighborhood (Samba)
with reading and writing privilege. The music files in “Media” folder can be
accessed by iTunes clients. The video, music and image files in “Media” folder
can be accessed by DLNA compliant media adapters like Sony PS3, Xbox
360…etc. The absolute path in the storage server of “Media” is
“[HDD1]C:\Public\Media\”.
Page 29
28
Parameter
Description
Set Time Zone
Select the time zone of the country you are living. The
storage server will set its time based on your selection.
Time Server
Address
You can manually assign time server address if the default
time server does not work.
Daylight Savings
The storage server can also take Daylight savings into
account. If you wish to use this function, you must check/tick
the enable box to enable your daylight saving configuration
(below)
Times From
Select the period in which you wish to start using daylight
saving
Times to
Select the period in which you wish to stop using daylight
saving
Set System Date
and Time
If your network is not connected to the Internet, the storage
server will have no chance to get correct time from the time
server. In this case, you can manually assign current time
here.
Chapter 3 Basic
The basic configurations include the Time Zone and Password setup pages.
3.1 Time Zone
The Time Zone allows this storage server to base its time on the settings
configured here. This will affect functions such as update time of files stored in this
storage server.
Click <Apply> at the bottom of the screen to save the configurations.
Page 30
29
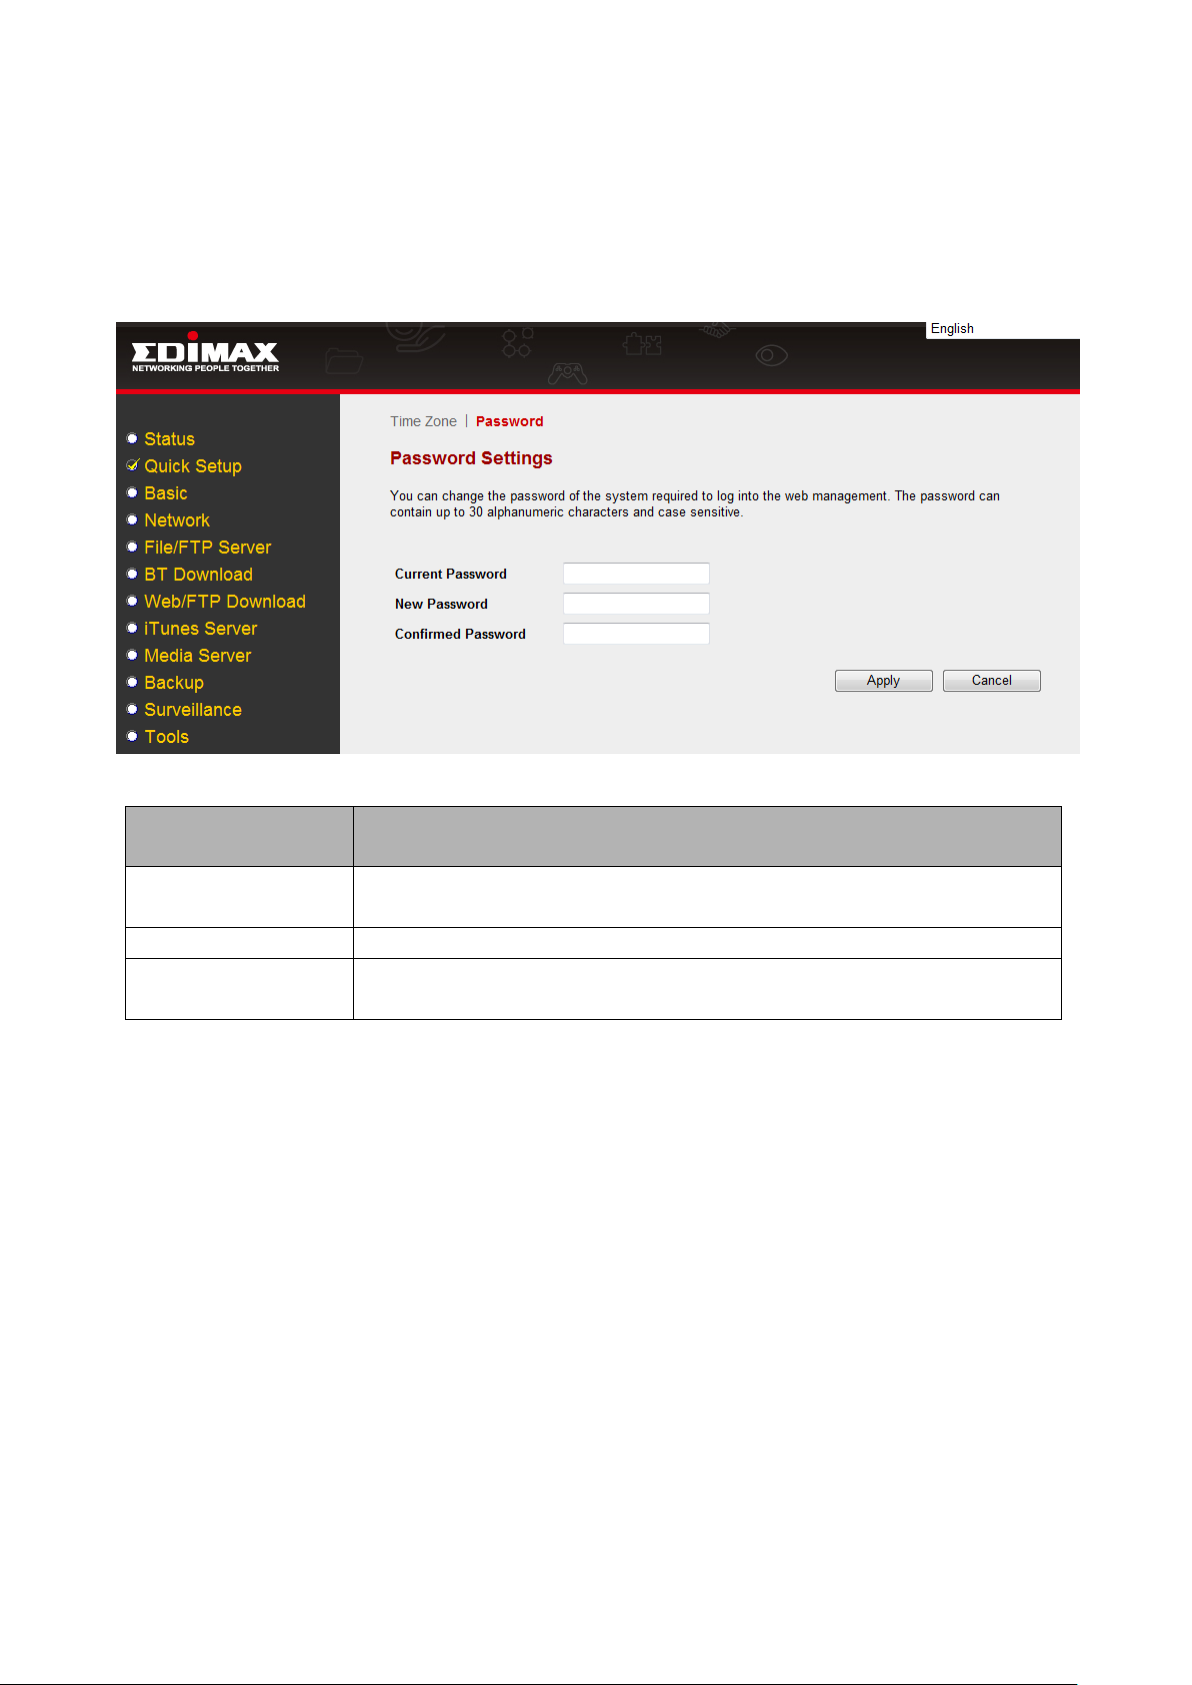
Description
Current
Password
Enter your current password.
New Password
Enter your new password.
Confirmed
Password
Enter your new password again for verification purposes.
3.2 Password
You can change the password required to log into the management GUI of the
storage server. By default, the password is “1234”. Please change the password as
soon as possible, and store it in a safe place. Password can contain 0 to 30
alphanumeric characters, and are case sensitive.
Note: If you forget your password, you have to reset the storage server to the
factory default (password is “1234”) with the “Release” and ”Copy” buttons (see
front panel of the storage server).
Click <Apply> at the bottom of the screen to save the configurations.
Page 31

30
Parameters
Description
Obtain an IP
address
automatically
DHCP server is used to manage the IP address of a
network. If you have a live DHCP server in your network and
wish this storage server get IP address from your DHCP
server, please select “Obtain an IP address automatically”.
Note: According to the settings of you DHCP server, the IP
address obtained from your DHCP server may change by
time.
Use the following
IP address
If you want to manually assign an IP address to this storage
server, please select “Use the following IP address” and
assign IP Address, Subnet Mask and Gateway Address to
the storage server here.
IP Address
The IP address used by this storage server in your network.
Subnet Mask
The IP Subnet Mask of your LAN segment.
Gateway Address
The gateway IP address of your network. Normally, it is the
LAN IP address of the router you are using to access the
Chapter 4 Network
The Network configurations include the IP address and DNS settings. A Domain
Name System (DNS) server is like an index of IP addresses and Web addresses. If
you type a Web address into your browser, such as www.router.com, a DNS server
will find that name in its index and reply the matching IP address.
Page 32

31
Internet.
DNS address
Fill in the IP address of a live DNS server.
Secondary/Third
DNS Address
(optional)
This is optional. You can enter another DNS server‟s IP
address as a backup. The secondary/third DNS will be used
when the above DNS server fails.
Click <Apply> at the bottom of the screen to save the configurations.
Page 33

32
Parameters
Description
Add
Click “Add” and fill the information of the Add a New User
page to add a new user for File/FTP server.
Edit
You can select any user in Users list and click “Edit” to modify
her/his profile.
Delete Selected
You can click “Delete Selected” to delete the selected users in
Users list.
Delete All
You can click “Delete All” to delete all the users in Users list.
Reset
You can click “Reset” to reset selection in Users list.
Chapter 5 File/FTP Server
The File/FTP server configurations include the Users, Groups, Server Settings,
Shared Folder and Easy Send setup pages.
5.1 Users
Users setup is used to add/edit users of File/FTP server.
Page 34

33
Parameters
Description
User Name
The name of this user. The allowed characters are „a-z‟, „A-Z‟,
„0-9‟ and „_‟.
Note: The user name should be unique and should not be the
same with any other user name and group name.
Description
The description of this user.
Password
The password of this user.
Confirm
password
Re-type the password of this user for confirmation.
E-mail Address
The e-mail address of this user. The storage server will send
some messages to this user by e-mail if necessary.
5.1.1 Add a New User
Click <Save> at the bottom of the screen to save the configurations.
NOTE: The max number of users supported in File/FTP server is 32.
Page 35

34
Parameters
Description
Add
Click “Add” and fill the information of the Add a New Group
page to add a new group for File/FTP server.
Edit
You can select any group in Groups list and click “Edit” to
modify its profile.
Delete Selected
You can click “Delete Selected” to delete the selected groups
in Groups list.
Delete All
You can click “Delete All” to delete all the groups in Groups
list.
Reset
You can click “Reset” to reset selection in Groups list.
5.2 Groups
Groups setup is used to add/edit groups of File/FTP server. You can add one or
more users to a group.
Page 36

35
Parameters
Description
Group Name
The name of this group. The allowed characters are „a-z‟, „AZ‟, „0-9‟ and „_‟.
Note: The first character of group name should be „a-z‟ or „A-
Z‟.
Note: The group name should be unique and should not be
the same with any other user name and group name.
Description
The description of this group.
Select
Authorized Users
Select the users that you want to add to this group by selecting
the check on the right.
5.2.1 Add a New Group
Click <Save> at the bottom of the screen to save the configurations.
Note: The max number of groups supported in File/FTP server is 12.
Page 37

36
My Network Places
Parameters
Description
Name
The file server name that shows in My Network Places on
client computers.
Workgroup
The My Network Places group this file server will join.
Description
A brief description of this file server. This string will be shown
at the detailed information field of My Network Places.
Recycle Bin
You select to enable/disable Recycle Bins function here. When
you delete a file in a shared folder which supports Recycle Bin
vi My Network Places, the deleted file will be kept in the
Recycle Bin and you still can read it. If you delete the file in the
Recycle Bin, the file will vaporize permanently.
FTP Settings
Parameters
Description
5.3 Server Settings
This storage server supports CIFS (Samba) and FTP protocols. Samba lets you
share files stored in the storage server via My Network Places. FTP lets you share
files stored in the storage server through Internet.
Note: The maximum file size of a single file is 2GB if the partition type is FAT16; the
maximum file size is 4GB if the partition type is FAT32 or NTFS; the file size can be
larger than 4GB if the partition type is EXT2 or EXT3.
Page 38

37
Max Users
Set the maximum concurrent users for the FTP server.
Idle Time
Set the time that FTP server will wait before disconnecting a
FTP client when it is inactive.
FTP Client
Language
(Encoding)
Select a language (or encoding) used by the FTP clients. If the
encodings of FTP client and server are different, the file
transfer will fail when there is any double byte word in the
folder name or file name.
Security
(SSL/TLS)
A secured FTP connection can be protected by SSL/TLS
encryption. If you select “No”, all FTP connections are not
protected. If you select “Only allow FTP clients with SSL/TLS”,
then only protected FTP connection is allowed. Any client
cannot create FTP connection without SSL/TLS protection. If
you select “Allow FTP clients with or without SSL/TLS”, then
the FTP server will receive connection from clients in both
ways.
Click <Save> to save the configurations.
Page 39

38
Parameters
Description
Add
Click “Add” and fill the information of the Add/Edit Shared
Folder page to add a new shared folder.
Edit
You can select any shared folder in Shared Folders list and
click “Edit” to modify its setting.
Delete All
You can click “Delete All” to delete all the shared folders in
Shared Folders list.
Delete Selected
You can click “Delete Selected” to delete the selected shared
folders in Shared Folders list.
Reset
You can click “Reset” to reset selection in Shared Folders
list.
Empty the
Recycle Bins of
Selected Shared
Folders
After clicking this button, the files in the Recycle Bins of the
selected shared folders will vaporize permanently. There will
be no way to reclaim the deleted files.
Empty the
Recycle Bins of
All Shared
Folders
After clicking this button, the files in the Recycle Bins of the all
shared folders will vaporize permanently. There will be no
way to reclaim the deleted files.
New Storage
You can set a default sharing policy (Read & Write, Read Only
5.4 Shared Folders
You can add/edit shared folders settings here. The shared folders can be shared by
FTP and My Network Places.
Page 40

39
Default Sharing
Policy
or Not to Share) to any USB storage which doesn‟t have any
shared folder yet. The whole disk of the new storage will be
shared. All users (including anonymous user) have the same
privilege to access the new storage.
Click <Save> at the bottom of the screen to save the configurations.
Note: The max number of shared folders supported in the storage server is 100.
Page 41

40
Parameters
Description
Folder Name
The name for shared folder that shows in My Network Places
on client computer.
Shared Folder‟s
Path
Click on “Browse” to select the folder to be shared.
If you select “Share all folders in storage”, the storage server
will create a share item for each partition of all currently
attached storages. The share name of each share item
consists of three parts, assigned folder name, disk name and
partition name, and the three parts are separated by “_”. There
are 3 possible disk names, HDD1, HDD2, RAID, USB1 and
USB2. For example, if you add a shared folder by assigning
“All” as the folder name and select “Share all folders in
storage”, and now you have an internal SATA hard disk drive
with one partition and one USB hard disk drive with 3 partitions
attached on USB2. Then after you create the shared folder,
there will be 4 share items created with the name of
“All_HDD1_C”, “All_USB2_C”, “All_USB2_D”, “All_USB2_E”.
Users/Groups
You can assign access privilege of the shared folder to all
users and groups here. There are three users/groups lists. The
left list contains all users and groups that have not been
assigned privilege on this shared folder. The upper right list
5.4.1 Add/Edit Shared Folder
Page 42

41
contains all users and groups that only have read privilege on
this shared folder. The lower right list contains all users and
groups that have read and write privileges on this shared
folder. If you assign “Read Only” or “Read & Write” privilege to
“anonymous”, then all users can access this folder without
password.
Description
The comments or descriptions for this share folder.
Shared to
You can select to share the folder vi My Network Places and/or
FTP.
Click <Save> at the bottom of the screen to save the configurations..
Page 43

42
5.4.2 Browse Dialog
When you click the “Browse” button, you can see the following popup screen that
shows all the attached storage devices (including the internal SATA hard disk drive
and external USB mass storage devices). Please select a storage device from left
panel, the right bottom panel will show the folders in this storage device. Choose
the folder you want to share, and click “Submit” to share the selected folder. You
can also click “New Folder” to create a new share folder.
Note: Only the folders in the storage devices will be shown as icons in Browse
Dialog, because the unit of sharing policy is restricted to folders, not files.
Page 44
43
Parameters
Description
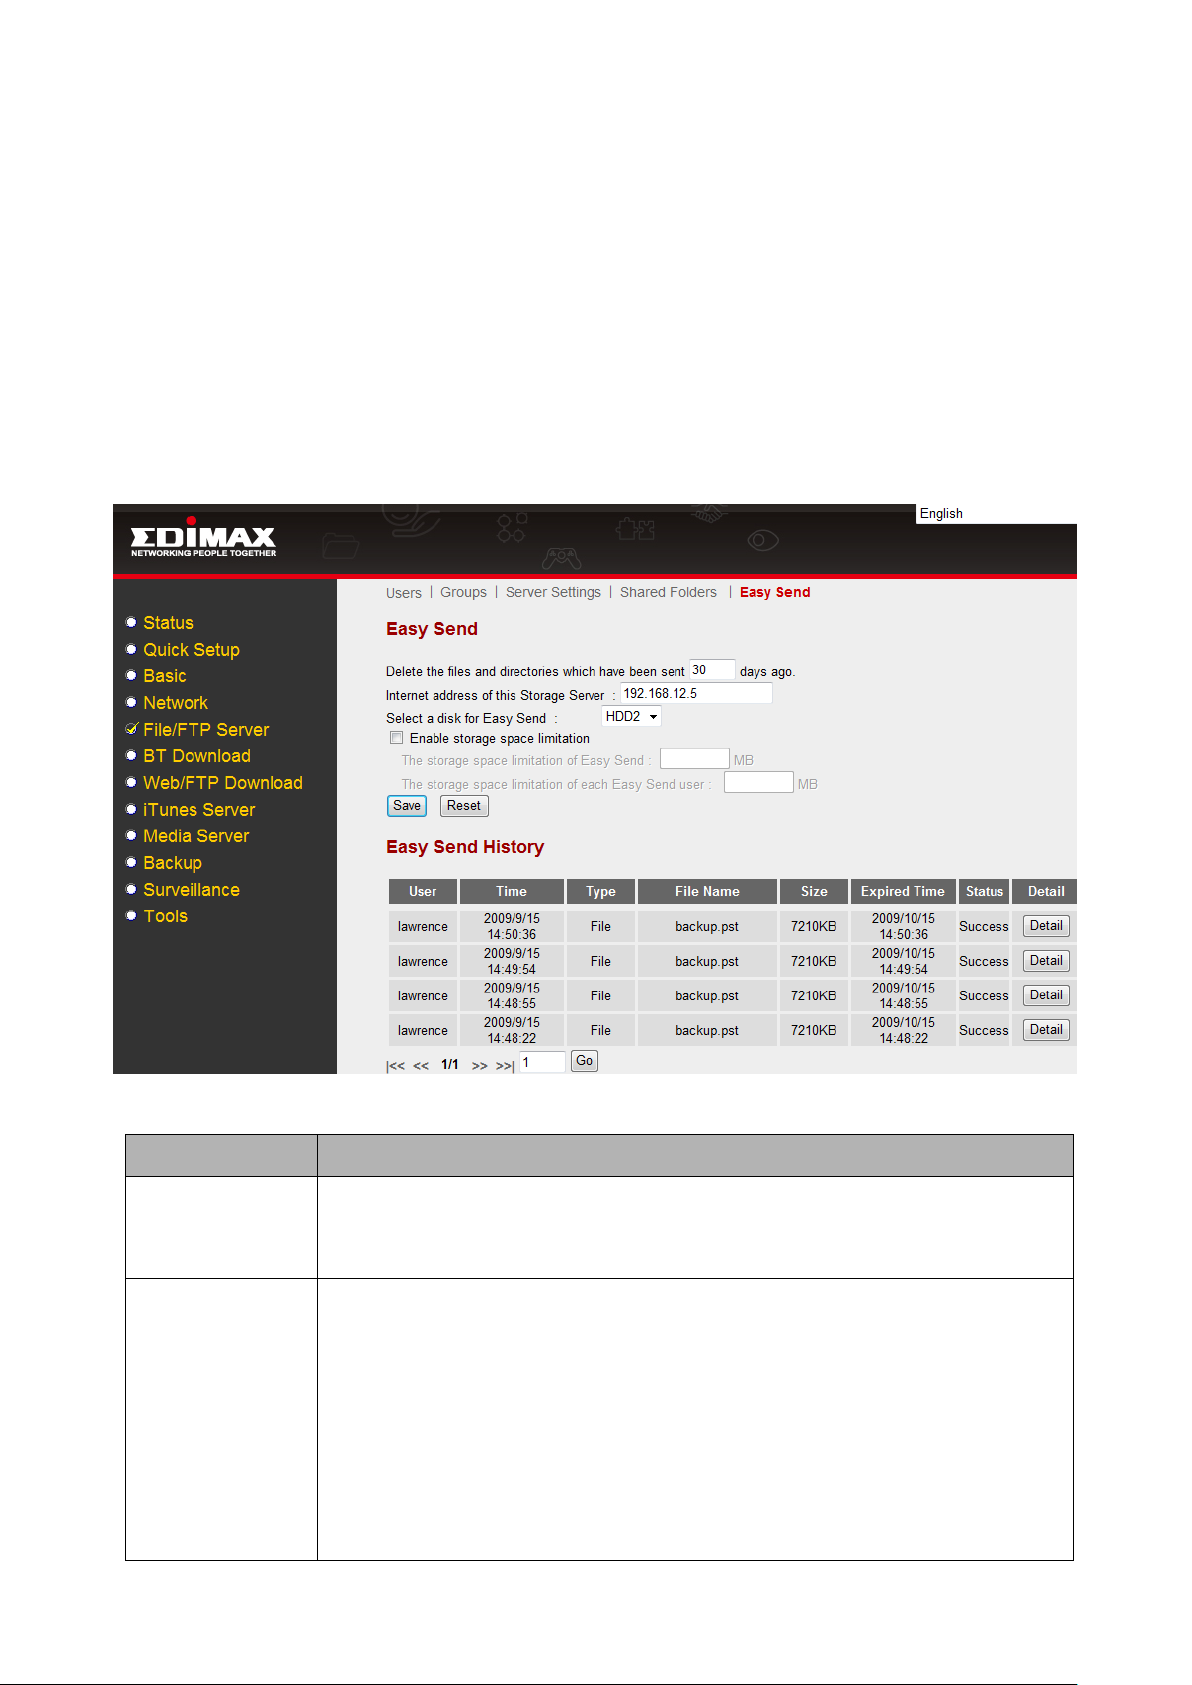
Life cycle of
sent file
You can assign the life cycle (in days) of the sent file. Every sent
file will be deleted after the end of its life cycle and the storage
space used by the deleted file is freed.
Internet
address of this
Storage Server
You have to provide a valid Internet address of this Storage
Server for recipients to download files from the Internet.
If the storage server is directly connected to Internet, then the
LAN IP address is the public IP address that your Internet
service provider assigns to you.
If the storage server is connected to Internet through an IP
sharing router, then the WAN address of the IP sharing router is
the Internet address of this storage server and you also have to
setup the IP sharing router to forward FTP traffic to this storage
5.5 Easy Send
Easy Send let you easily send files to everyone including person without a user
account of the storage server. Every time when you send a file, the storage server
will automatically generate a randomly encoded download address (in text, like a
URL) of the file for you. You can send the download address to the recipients by email, messengers and other ways. Every recipient who has this download address
can download the file without a user account of the storage server. Because every
download address is composed of a randomly encoded long text string, so hackers
are very difficult to guess it right.
Note: Please refer to the section 15.7 “Easy Send” for the details of how to use the
Easy Send.
Page 45

44
server.
If your Internet service provider assigns fixed public IP to you,
then you can use the fixed public IP address as the Internet
address of this storage server.
If your Internet service provider assigns dynamic public IP to
you, your public IP address will change frequently. You should
use DDNS service to map a fixed domain name address to the
dynamic public IP, and use this fixed domain name address as
the Internet address of this storage server.
If you leave this field blank, than the storage server will use your
current LAN IP address as Internet address of this storage
server.
Select a disk
for Easy Send
Select one available disk to let Easy Send to store files for
recipients to download.
Enable storage
space limitation
Check this if you want to limit the storage space used by Easy
Send. You also have to assign the storage space limitation for
the whole Easy Send system and the storage space limitation
for each Easy Send user. Easy Send will refuse to send new
files for you if the total size of your sent files reaches the
limitation.
Easy Send
History
Easy Send History list information of all sent files.
Detail
Click this button to read the details of sent file. It also contains
the links to download the sent files from both LAN and Internet.
|<<
Move to the first page of Easy Send History.
<<
Move to the previous page of Easy Send History.
>>
Move to the next page of Easy Send History.
>>|
Move to the last page of Easy Send History.
Go
Move to the page according to the assigned page number.
Delete
Selected
Delete selected sent files and free the storage space used by
them.
Delete
Selected
Delete all sent files and free the storage space used by them.
Page 46
45
Parameters
Description
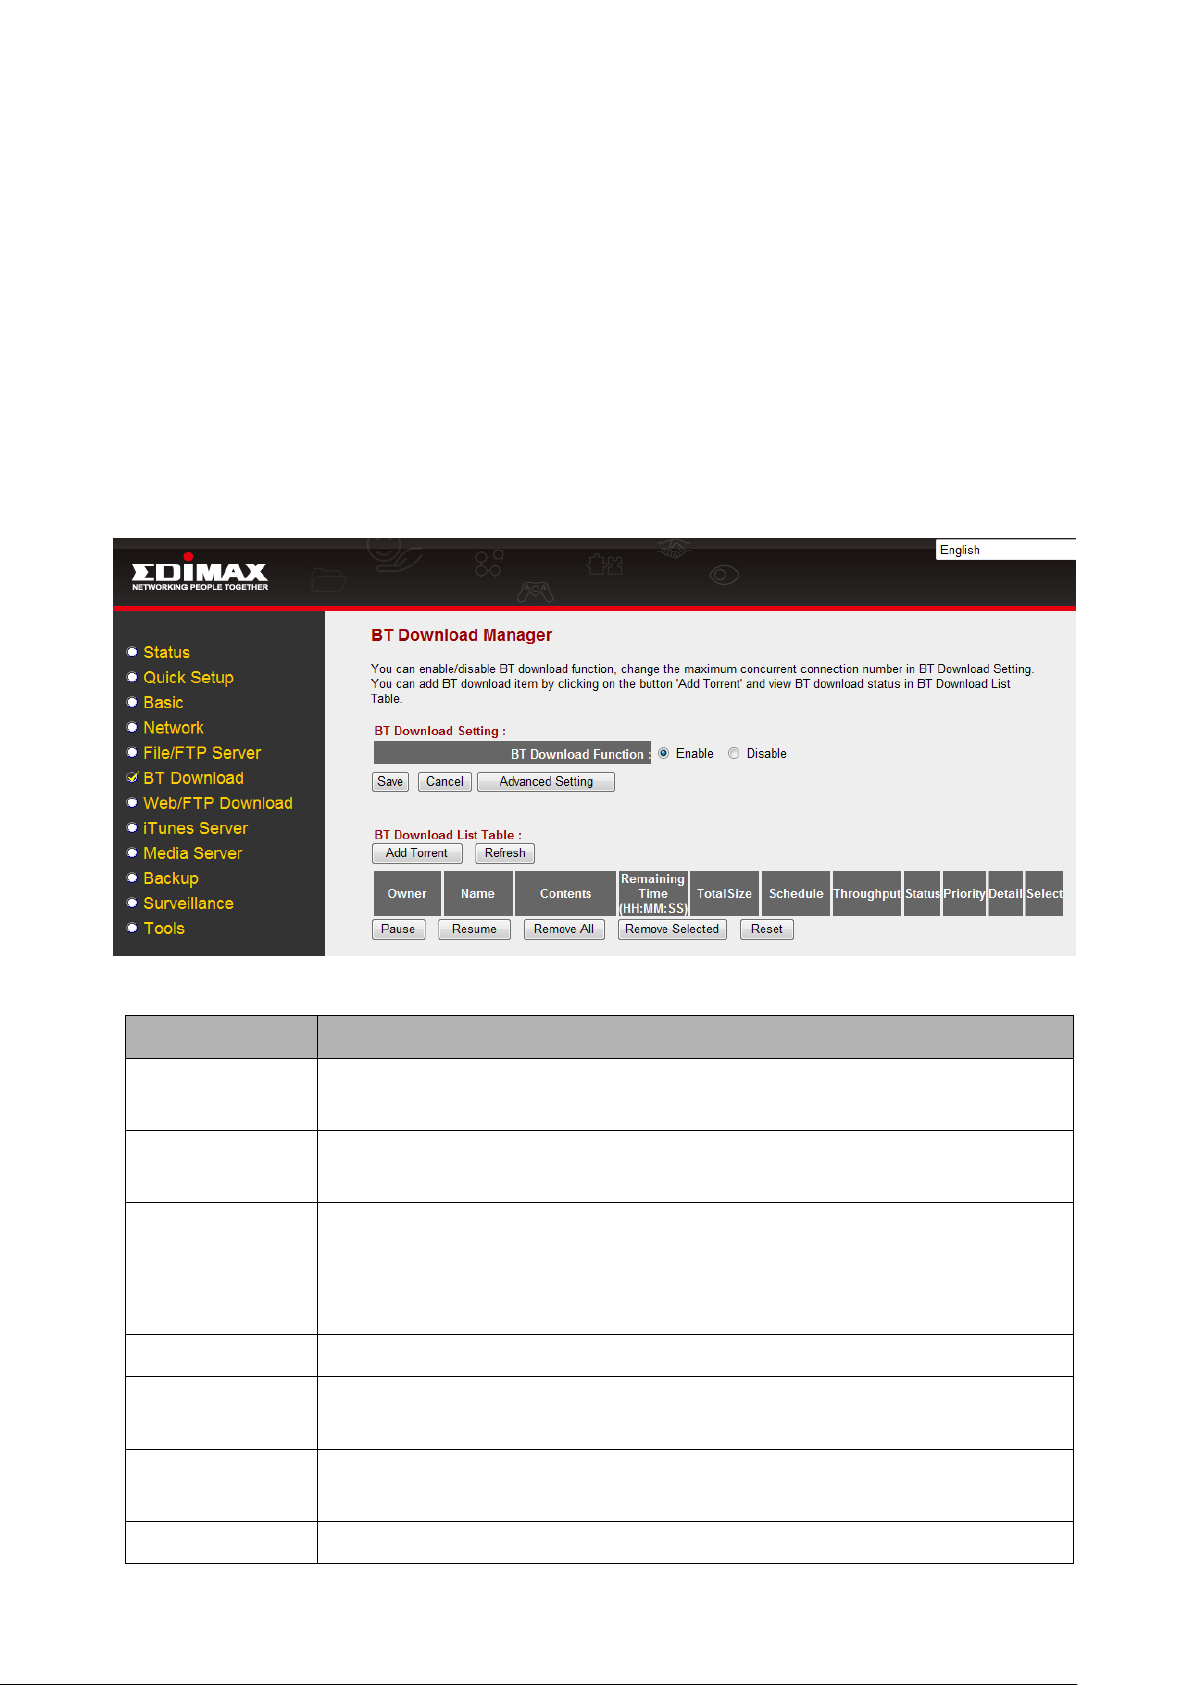
BT Download
Function
You can enable or disable BT Download Function here.
Advanced
Setting
Click this button and Advanced Setting page will show.
Add Torrent
Click this button to add a new torrent (files with .torrent
extension) file, and the storage server will start to download the
files. You‟ll be prompted to provide the location of .torrent file
(See the detailed descriptions below)
Refresh
Click this button to get latest status of BT Download.
Pause
Select one or more downloading BT items in the list, and click
this button to pause them.
Resume
Select one or more suspended BT items in the list, and click this
button to resume downloading.
Remove All
Remove all BT items from the list.
Chapter 6 BT Download
This storage server supports BT (stands for BitTorrent) peer-to-peer file download
function. You can let this storage server download files via BitTorrent protocol
without switching your computer on. You can also see all downloading BT items
here. Please make sure that this storage server has enough remaining storage
space to save the download files.
Except for this Web GUI, you also can use the Windows-based Download Manager
utility to manage the download items. Please refer to Chapter 8.
Note: Due to the download mechanism used by BitTorrent, it‟s not recommended to
use USB flash disks to save the files you wish to download.
Page 47

46
Remove
Selected
Remove selected BT items from the list.
Reset
Deselect all selected BT items in the list.
Click <Save> button to save the configurations.
Note: The max number of BT download items is 32.
Page 48

47
Parameters
Description
Torrent
Location
Please specify the location of .torrent file. You can provide the
Internet URL of a .torrent file (for example:
http://www.torrentfile.com/files/movie.torrent), upload a .torrent
file from your PC, or browse and select a .torrent file stored in
the storage server. If you select “Internet Address”, please fill the
URL address of torrent file, or you can just copy the URL
address of torrent file from web browser; If you select “PC” or
“This File Server”, click “Browse” and a file browsing window will
popup, and you can select the torrent file in your PC or the
storage server.
Assign a folder
on this file
server to save
the files
Please click „Browse‟ button and a file browsing window will
popup. Please specify the folder you wish to save downloaded
files. (You can create a new folder by clicking “New Folder”
button in file browsing window).
Priority
Please assign a priority level to this BT download item. Available
options are „VIP‟, „High‟, and „Low‟. The priority will affect the
order of BT download.
For example, if you set the maximum active BT download item
number to be 5 in the Advanced Setting page, only 5 active BT
Download items can be downloaded at the same time. If you
have more than 5 BT Download items, every BT Download item
with lower priority will be downloaded only when no more than 4
higher priority active BT download items are downloading.
Add
Click this button to add the BT Download job to the list.
Reset
Reset all fields in this page to default value.
6.1 Add BT Torrent
After you click „Add Torrent‟ button, you‟ll be prompted to provide the location of a
torrent file and the folder to save the downloaded files.
Page 49

48
Cancel
Cancel adding a new BT Download job and return to previous
page.
Parameters
Description
Listening ports
used for
incoming
TCP/UDP
connection
The port range BT listening to during downloading. If you are
using a NAT router to access the Internet, let the router
forwarding these ports to the IP of storage server. It will increase
the BT download speed.
Maximum
download rate
per torrent
The maximum download rate per torrent in Kbytes per second.
Enter “0” if you do not want to limit the download speed of BT.
Maximum
upload rate per
torrent
The maximum upload rate per torrent in Kbytes per second.
Enter “0” if you do not want to limit the upload speed of BT.
Maximum
number of
active
The maximum number of active torrents that can be downloaded
at the same time. If you add more download items, some items
have to wait in turn.
6.2 Advanced Setting
After you click “Advanced Setting” button, the BT Download Advanced Setting
page will show. You can set the port number used by BT, bandwidth control,
maximum active download number and enable/disable DHT here.
Page 50

49
downloads
Maximum
concurrent
connection
number per
torrent
The maximum number of connections can be used to download
a BT download item at the same time.
DHT network
Enable DHT network would let the BT have a chance to find
more peers to download even when no tracker servers are
available.
Page 51

50
Parameters
Description
Web/FTP
Download
Function
You can enable or disable Web/FTP Download Function here.
Click “Save” to apply changes or “Cancel” to discard the change
you made.
Internet
Address
Please specify the URL of file you wish to download from Web
or FTP server.
For example: ftp://ftp.fileserver.com/files/download.zip
or http://www.downloadfile.com/files/download.zip
URL Encoding
The URL encoding method of the download source Web/FTP
server. The Web/FTP server will encode double-byte characters
of URL. If the URL encoding method assigned is not the same
Chapter 7 Web/FTP Download
This storage server supports downloading file from Web and FTP server, so you
can download large file from Web or FTP server without keeping your computer
switched on.
Except for this Web GUI, you also can use the Windows-based Download Manager
utility to manage the download items. Please refer to Chapter 8.
Note: Before a file can be downloaded and saved, please make sure the free
space of the storage is enough.
Note: Only 5 active Web/FTP Download items can be downloaded at the same
time. If you have more than 5 Web/FTP Download items, some items have to wait
in turn.
Page 52

51
with the Web/FTP server, download will fail.
Save As
Please specify the location you wish to save downloaded file.
Click “Browse” button to select the folder you wish to save the
file.
User Name
This field is optional. Please input the server‟s username here if
the server requires it.
Password
This field is optional. Please input the server‟s password here if
the server requires it.
Add
Click this button to add the download job above to the download
list and start downloading.
Reset
Reset all fields in this page to default value.
Refresh
Click this button to get latest status of Web or FTP download.
Pause
Select one or more downloading items in the list, and click this
button to pause them.
Resume
Select one or more paused items in the list, and click this button
to resume downloading.
Remove All
Remove all items from the list.
Remove
Selected
Remove selected item from the list.
Reset
Deselect all selected items in the list.
Note: The max number of Web/FTP download items is 32.
Page 53

52
Chapter 8 Download Manager
If you have installed the Storage Server Wizard utility, the Download Manager will
also be installed. (For the details of Installation, please refer to Quick Installation
Guide) The Windows-based Download Manager utility can automatically search for
storage servers and let you manage the web/FTP/BT download items. For all
details information of settings of Download Manager, please refer to Chapter 6 BT
Download and Chapter 7 Web/FTP Download.
8.1 Start Download Manager
You can select “Start All Programs Storage Server Download Manager” to
start Download Manager.
8.2 Search for storage server
When starting, the Download Manager will scan your network for all available
storage servers and list them to you. If you do not see the storage server, please
check the network connectivity and click “Rescan”. Select the storage server in the
list and click “Connect” to login the storage server. You also can click “Enter the
address manually” if you know the address of the storage server.
Page 54

53
Parameters
Description
Address
If you select a storage server from the list in the previous step,
then this is the address of the selected storage server and you
cannot modify it.
If you click “Enter the address manually” in the previous step,
then you have to assign the address of the storage server here.
User Name
Enter your login account for the storage server.
Password
Enter your password for the storage server.
Remember the
address of this
Storage Server
If you check it, Download Manager will remember the address of
the storage server. Every time when you start Download
Manager, the address of this storage server will be listed in the
server list for selection, even when the storage server does not
exist in your network during the scanning.
Remember me
on this
computer
If you check it, Download Manager will remember your account
for the storage server. Every time when you enter this login
window, your account will be in the User Name list for selection.
Remember my
password
If you check it, Download Manager will remember your password
for the storage server. Every time when you enter this login
window and use the same user name for login, Download
Manager will automatically fill your password.
Automatically
login
If you check it, Download Manager will remember your account
and password for this storage server. Every time when you start
Download Manager, it will directly login. This login window will
not display.
8.3 Login storage server
The Download Manager will prompt you for the login information of the storage
server for connecting to the storage server.
Page 55

54
Select another
Storage Server
Go to the previous step to scan for available storage server and
select a storage server again.
8.4 Manage download items
After you login, the main window of Download Manager will pop up as following
picture. There are two major parts in the window. The BT Download part is to
manage the download items of BT, the Web/FTP Download part is to manage the
download items of Web/FTP.
All BT download items are listed in the BT Download list and all Web/FTP download
items are listed in the Web/FTP Download list. The Download Manager will
automatically refresh both lists every 60 seconds.
Through Download Manager, you can click “Add” to add a download item, or click
“Remove” to remove a download item.
Page 56

55
Every stopped download item has a “Resume” button and you can resume that
stopped download item by clicking the “Resume” button; Every non-stopped
download item has a “Pause” button and you can stop that download item by
clicking the “Pause” button.
For every BT download item, there is also a “Priority” combo box. You can adjust
the priority of BT download items by re-selecting the priority for each BT download
item.
The status of each download item is displayed by foreground and background color
as the following picture. All download items with error or pause state are in gray
background color; other download items are displayed with white background color.
All trying or downloading items are displayed with blue words; all waiting items are
displayed with red words; all finished items are displayed with green words.
8.4.1 Add a download item
When you click “Add” button of BT Download, the following window will pop up. You
can assign a torrent of BT download item here. You can upload a torrent file from
your PC or just enter the Internet address (URL) of the torrent file. If you provide an
Internet address of the torrent file, the storage server will download the torrent file
from the Internet address first and then download the files you want according the
content of the downloaded torrent file. You also have to assign the path of a folder
on the storage server to save the downloaded files and the priority of the download
item.
Page 57

56
When you click “Add” button of Web/FTP Download, the following window will pop
up. You have to assign an Internet address of the file. You also have to assign the
path of a folder on the storage server to save the downloaded file. If the server
requires you user name and password during download, you also have to assign
them.
If you are using Microsoft IE to surf the Internet and find a link of an interesting file
that you want to download, you can click the right button of your mouse on the link
and the following menu will pop up.
Page 58

57
Select “Download with Download Manager”, then the download job will be added to
Download Manager automatically and the downloaded files will be saved in default
path on the storage server.
If you double click a torrent file in Windows Explorer (try to open a torrent file), then
the download job with added to Download Manager automatically and the
downloaded files will be saved in default path on the storage server.
If the download job cannot be added to the Download Manager immediately when
you are adding a download job from IE or Windows Explorer, this may due to the
storage server or the Download Manager are busy, the following window will pop up.
This window will keep displaying before the download job is successfully added into
Download Manager. You can click “Cancel” in this window to abort adding it to the
Download Manager. After the download job is added to the Download Manager,
this window will disappear automatically.
8.4.2 Main menu
There are “Operation” and “Settings” menu in the main window of Download
Manager.
Page 59

58
You can select “Operation Refresh Download List” to let Download Manager
refresh both download lists.
If you select “Operation Log Out”, the Download Manager will disconnect current
storage server and the following Select Server window will pop up. You can scan
and connect to the other storage server here.
If you select “Operation Exit”, the Download Manager will completely exit and
both the main window and the tray icon of Download Manager will disappear.
You can enable/disable BT Download function or enable/disable Web/FTP
Download function by selecting the corresponding item in the “Settings” menu.
If you select “Settings Setting”, the following window will pop up to let you decide
if you want Download Manager automatically log in when it starts up.
Page 60

59
8.5 Tray Icon
After you login the storage server, the tray icon of Download Manager will display
as follows.
When you close the main window of Download Manager as the following picture,
the Download Manager is still executing in the background and the tray icon of
Download Manager is still displaying.
When you double click the tray icon of Download Manager or click the right button
of your mouse on the tray icon and select “Show Window” in the pop-up menu, the
main window of Download Manager will display again.
If you click the right button of your mouse on the tray icon and select “Exit” in the
pop-up menu, the Download Manager will completely exit and both the main
window and the tray icon of Download Manager will disappear.
You can enable/disable BT Download function or enable/disable Web/FTP
Download function by clicking the right button of your mouse on the tray icon and
select the corresponding item in the pop-up menu.
Page 61

60
Parameters
Description
iTunes Server
You can enable or disable iTunes Server here. Click “Save” to
keep changes or “Cancel” to discard the change you made.
Server name
Please assign a name to iTunes server. All iTunes clients will
need this name to locate this iTunes server. The length of a valid
server name is from 4 to 20 characters. It is case sensitive.
Media folder
Please specify the folder where the media files are stored, and
all media files inside the folder you specified here will be shared
to all iTunes clients. You can click „Open‟ button to select the
folder on the attached storage device.
Advanced
Setting
Click this button to modify advanced settings for this iTunes
server. Detailed instructions are listed below.
Refresh
Click this button to get latest status and user list of iTunes
Server.
Chapter 9 iTunes Server
iTunes is a popular and powerful multimedia player, and supports streaming media.
If you have media files supported by iTunes, you can share these file by iTunes
server and let other computers or iTunes-compatible media players play these
media files online.
After you click “Advanced Setting”, you‟ll be prompted to configure the advanced
settings of this iTunes server:
Page 62

61
Parameters
Description
Protect by
password
You can protect this iTunes server by password, so only iTunes
clients who know this password will be able to share media files.
By selecting “Disable”, everyone in your network will be able to
access your media files, and if too many users are accessing the
media files at the same time, iTunes server may respond slower
or even stop responding. It‟s recommended to select “Enable” to
protect your iTunes server by password if you want to prevent
non-privileged people from using your media files.
Password
If password protection is enabled, please specify the password
of iTunes server here.
Confirm
Password
Please confirm the password of iTunes server here.
Rescan interval
Please specify the time interval in second between two iTunes
server scans. The iTunes server periodically scan media folder
for newly added files. The valid rescan interval is from 30 to
65535 seconds. You can also click “Rescan” button to start a
scan immediately. The required scan time varies depend on the
number of media files. It may take several minutes to finish.
It‟s recommended to use default value (300) to prevent iTunes
server from rescanning too frequently. A short rescan interval
will make iTunes server respond slower.
Process m3u
If the folder where media files are located includes any m3u
(playlist) file, iTunes server will read it and generate proper
playlist for iTunes clients.
Playlist
If you have a playlist file, you can upload it from PC or select it
from an attached storage device (by selecting “File Server”). You
Page 63

62
can click “Open” to choose playlist file from your PC or attached
storage device.
Back
If you want to discard all settings listed in this page, click this
button to return to previous page.
Save
Click this button to save all settings in this page. You‟ll be
prompted to restart the iTunes server, so all changes you made
in this page will take effect after restarting.
Reset
Reset all fields in this page to default value.
Page 64

63
Parameters
Description
Media Server
You can enable or disable media server function here. Click
“Save” to keep changes or “Cancel” to discard the change you
made.
Server Name
Please specify the name of media server here. Media players
need this name to locate this media server.
Rescan Interval
Please specify the time interval in second between two media
server scans. The media server periodically scan media folder
for newly added files. The valid rescan interval is 0 or from 30 to
65535 seconds. 0 rescan interval means NO AUTO RESCAN.
You can also click “Rescan” button to start a scan immediately.
The required scan time varies depend on the number of media
files. It may take several minutes to finish.
It‟s recommended to use the value larger than 300 to prevent
media server from rescanning too frequently. A short rescan
interval will make media server respond slower.
Save
Click this button to save general settings of media server.
Add
Click this button to add a new folder to store shared media files.
You‟ll be prompted to select a folder on the attached storage
device.
Chapter 10 Media Server
The media server of this storage server allows you to share your media files to
DLNA compliant media adapters and players through network.
Page 65

64
Remove Select
Remove selected folder from the list.
Remove All
Remove all folders from the list.
Reset
Deselect all selected folders in the list.
Note: The max number of shared folders supported in Media Server is 12.
Page 66

65
Parameters
Description
Add
Click “Add” to add a backup task. Please refer to the section
“Add/Edit a Local Backup” for details.
Refresh
Click “Refresh” to refresh the status of Local Backup List Table.
Edit
Click “Edit” to add a backup task. Please refer to the section
“Add/Edit a Local Backup” for details.
Backup Now
Click “Backup Now” to do the select backup task immediately.
Cancel Backup
Click “Cancel Backup” to cancel the selected running backup
task.
Remove Select
Remove selected backup tasks from the list.
Remove All
Remove all backup tasks from the list.
Chapter 11 Backup
The storage server provides Backup function for you to backup files between hard
disk drives. You can schedule backup tasks easily.
11.1 Add/Edit a Local Backup
You can assign the source and destination of the backup task, backup types and
schedule here.
Page 67

66
Parameters
Description
Task Name
The name of the backup task.
Source
Click “Browse” to select the backup source folder.
Destination
Click “Browse” to select the backup destination folder.
Repository
Model
There are two types of backup. One is “Data synchronization”
and “Multi-complete backup”.
“Data synchronization” only keeps one copy of the backup and
keeps the backup content synchronized with the data source.
“Multi-complete backup” keeps multiple copies of the backup
and every copy is the snapshot of the data source on the time of
the backup. You can assign the number of copies you want to
keep. If you select “Delete oldest copy and backup new copy”,
then the storage server will delete the oldest backup to release
storage space for the new backup when disk space is full or the
backup number reaches the assigned limitation. If you select
“Stop backup – keep old copies”, then the storage server sill
stop backup when disk space is full or the backup number
reaches the assigned limitation.
Schedule
Select “Not scheduled” if you do not want to schedule any
backup task.
Select “Scheduled” if you want to assign backup schedule.
Check the days you want to do backup and assign the backup
time within each day.
Click “Save” to save the backup settings.
Page 68

67
Parameters
Description
Enable/Disable
Surveillance
Select Enable or Disable and click “Save”.
Add IP Camera
Click “Add IP Camera” and a wizard will guide through the
procedure of setting the IP camera. Please refer to the section
“Add/Edit IP Camera” for details.
Refresh
Click “Refresh” to refresh the status of surveillance.
Manual
Recording
Click to manually start recording. Click to manually
stop recording.
Detail
Click “Detail” to get the detail settings and status of the IP
camera.
Edit
Click “Edit” to modify the settings of IP camera. Please refer to
the section “Add/Edit IP Camera” for details.
Delete
Selected
Click “Delete Selected” to delete selected IP camera from the
Surveillance List.
Delete All
Click “Delete All” to delete all IP cameras from the Surveillance
List.
Reset
Click “Reset” to reset your selection in the Surveillance List.
Chapter 12 Surveillance
Surveillance let you record live video from IP camera. You can schedule the
recording or record live video manually.
Page 69

68
12.1 Add/Edit IP Camera
A wizard will step by stop guide you through all the settings of IP camera.
You can click “Search Local IP Cameras” to search your local network for all IP
cameras and select the IP camera to add in the list. You can click “Add Manually” if
you have already known the address of the IP camera.
12.2 Search Local IP Cameras
The Local IP Camera List has all available IP cameras in your network. Click “Add”
of the IP camera you want to add.
12.3 Basic Information of IP camera
You can edit basic information of IP camera in the first step and click “Next” to
move to the next step of setting.
Page 70

69
Parameters
Description
IP Camera
Name
Assign a name for the IP camera.
IP Camera
Model
Select the model of IP camera from the list.
Address
Address of IP camera.
Port
Port number of IP camera.
Login Name
The login user name of the IP camera.
Password
The login password of the IP camera.
Test Camera
Click “Test Camera”. Surveillance will try to capture a snapshot
from the IP camera. When the snapshot of the IP camera is
showed in the window above this button, it means your settings
are correct.
12.4 Video Information of IP camera
You can edit video information of IP camera and click “Next” to move to the next
step of setting.
Page 71

70
Parameters
Description
Video Format
Select the video format of IP camera.
Frame Rate
Assign the speed (frames per second) of the recording.
Video
Resolution
Provide the width and height (in pixels) of the IP camera
resolution.
Parameters
Description
Storage Path
Click “Browse” to select the folder to store the recorded video of
IP camera.
Max Storage
Assign the maximum size (in mega bytes) of storage space used
12.5 Recording Settings
You can edit the settings of recording parameters and click “Next” to move to the
next step of setting.
Page 72

71
Size
to record the video of the IP camera.
Max File Size
Assign the maximum size (in mega bytes) of recorded video file
of the IP camera. Every time when the video file size reaches
the limitation, Surveillance will create another video file to
continue recording.
File Name
Prefix
The prefix string of file name of each recorded video file.
Max Duration
of Each File
Assign the maximum duration (in minutes) of each recorded
video file of the IP camera. Every time when the video file
duration reaches the limitation, Surveillance will create another
video file to continue recording.
Cyclic
Recording
Check it to enable cyclic recording. In cyclic recording mode,
when the used storage space of the recording has reached the
limitation, Surveillance will delete the oldest video file and free
storage space for new video file. Otherwise, Surveillance will
stop recording of the IP camera.
Parameters
Description
Enable
schedule of this
Check this item to enable schedules below.
12.6 Schedule Settings
You can setup the recording schedules in the final step of setting and click “Save”
to save and apply the settings.
Page 73

72
IP camera
One-off task
You can select start time and end time of each one-off task.
Delete
Click “Delete” to delete the one-off task.
Add
Click “Add” to add more one-off tasks.
Weekly task
Click and then click the hour periods of a week to mark the
recording time. You also can click and then click the hour
periods with green blocks to mark the idle time.
You can click “All” button to mark the whole week. You can click
the button of a day to mark the whole day. You can click the
number of an hour to mark the hour time of every day.
Page 74

73
Chapter 13 Tools
The storage server provides several management tools, including Storage Tools,
Storage Status, USB Copy, Config Tools, Firmware Upgrade and Reset.
13.1 Storage Tools
You can use the Storage Tools to manage the partition and format of the attached
storage devices. It also allows you to build RAID 0, JBOD or RAID1 if you have two
internal SATA hard disk drives installed.
RAID 0 helps to you merge two hard disk drives together in striped way. It simulates
a big hard disk drive and the available space of the virtual big hard disk drive is the
sum of the two physical internal SATA hard disk drives. RAID 0 only works when
both internal SATA hard disk drives are healthy. If any one of the two internal SATA
hard disk drives fails in RAID 0 mode, you will lose whole data and it is
unrecoverable.
JBOD helps to you merge two hard disk drives together in linear way. It simulates a
big hard disk drive and the available space of the virtual big hard disk drive is the
sum of the two physical internal SATA hard disk drives. JBOD only works when
both internal SATA hard disk drives are healthy. If any one of the two internal SATA
hard disk drives fails in JBOD mode, you will lose whole data and it is
unrecoverable.
RAID 1 maintains two copies of your data in the two internal SATA hard disk drives.
Each disk drive keeps one copy. So RAID 1 still works correctly if just only one of
the two internal SATA hard disk drives fails. Because RAID 1 keeps two copies of
whole data, the disk space utilization is only 1/2. RAID 1 simulates a stable hard
disk drive and the available space of the virtual stable hard disk drive is the size of
the smaller physical internal SATA hard disk drive if the sizes of the two internal
SATA hard disk drives are different (The additional space of the larger hard disk
drive is useless).
Note: When you use the Storage Tools to partition or format the hard disk drive (no
matter internal SATA hard disk drive or external USB hard disk drive), the system
will stop all service first. So please make sure that you have finished all file transfer
before using Storage Tools.
Note: Storage Tools only can be used to manage internal SATA hard disk drives
and USB mass storage devices attached to USB2 port. You cannot use Storage
Tools to partition/format USB mass storage devices attached to USB1 port. If you
want to partition/format a USB mass storage device, please attached it to USB2
port or move the USB mass storage device to a PC and use the PC to do
partition/format.
Page 75

74
Parameters
Description
Check & Fix Disk
Click “Check & Fix Disk” to let the storage server check and fix
the format of the file system of the storage devices. Please
refer to the section “Check & Fix Disk” for details.
S.M.A.R.T.
Click “S.M.A.R.T.” to let the storage server check the
healthiness of hard disk drives supporting S.M.A.R.T. function.
Please refer to the section “S.M.A.R.T.” for details.
RAID
If you have two internal SATA hard disk drives installed in this
storage server, you can select “Enable” to enable the RAID
function. You also can select “Disable” to disable the RAID
function and let the two internal SATA hard disk drives work
independently. If you only have one internal SATA hard disk
drives installed in this storage server, you can not enable the
RAID function.
RAID Mode
You can select to let the storage server build RAID 0 or RAID
1 on the two internal SATA hard disk drives.
Auto Partition &
Format
By clicking this button, the system will partition and format the
attached storage device automatically. Please refer to the
detail descriptions below.
Fix RAID
The “Fix RAID” button only appears when the storage server
finds that RAID is not working well due to some problem. If any
Note: For the internal SATA hard disk drives, the storage server only allows you to
do “Auto Partition & Format”. Only the external USB hard disk drive attached to
USB2 port can be manually partitioned and formatted.
Note: If you want to build RAID for the storage server, it is strongly suggested that
the two internal SATA hard disk drives are the same brand and model.
Page 76

75
one of the internal SATA hard disk drive fails, the LED of the
failed hard disk driver will blink. After you clicking the “Fix
RAID” button, you should shut down and power off the storage
server, and then replace any failed hard disk drive with a good
one. When you power on the storage server again, the storage
server will try its best to fix the RAID.
Note: It is possible to fix the RAID and keep all data correctly if
you use RAID 1 and just only one of the two internal SATA
hard disk drives fails and you have replaced the failed hard
disk drive with a good one and the space of the new hard disk
is not smaller than the failed one.
Note: If you replace the failed hard disk drive with a smaller
hard disk drive when you try to fix a RAID in RAID 1 mode,
part of the data previously stored in the RAID may be lost.
Note: It is IMPOSSIBLE to fix the RAID and keep all data
correctly if you use RAID 0 and the RAID‟s failure is due to one
of the two internal SATA hard disk drives fails. The storage
server just clears all old data and rebuilds a new RAID when
you click “Fix RAID” button in RAID 0 mode.
Note: In RAID 1 mode, if you do not follow the normal shut
down procedure and just directly power off the storage server,
sometimes, it may make the RAID in an inconsistent state and
the storage server will ask you to fix RAID. In this situation,
you can click “Fix RAID” button, shut down storage server and
then start storage server again. The RAID will work well again.
If the storage server is still asking you to fix RAID, it may due
the some internal SATA hard disk drive failure. You have to
follow the fix RAID procedure described above to replace the
failed hard disk drive.
Tool
You can format the attached storage device by this tool. The
Storage Tools supports FAT16, FAT32, EXT2 and EXT3
format. The format may take several minutes to finish,
depends on the size of the partition.
Note: The data originally stored in the partition will be erased
after the format even you stop it before the job is finished.
Add a Partition
By clicking “Add” button, you can launch the “Add a Partition
page” to add a new partition in the attached storage device.
Remove
Selected
Partitions
You can click “Remove Selected Partitions” button to remove
the selected partitions in the attached storage device.
Note: The data originally stored in the partitions will be erased
after they are removed.
Remove All
Partitions
You can click “Remove All Partitions” to remove all the
partitions in the attached storage device.
Note: The data originally stored in the partitions will be erased
after they are removed.
Reset
You can click “Reset” to reset selection in partition list.
Page 77

76
Turn Off Hard
Disks
If you select “Never” then Hard Disk Power Management
function is disabled. If you select an idle time, then Hard Disk
Power Management function is enabled and the storage server
will turn off hard disk drive to save power after the hard disk
idle timeout. When your hard disk drive is sleeping, any
operation which requires reading or writing hard disk drive will
make the storage server wake up the hard disk drive in a few
seconds and the hard disk drive can work normally as usual.
Note: If you disabled the RAID previously and now want to enable it again. The old
data can be kept correctly after you re-enable the RAID only when all the following
conditions hold. Otherwise, you can only choose to create a new RAID and erase
old data stored in the two internal SATA hard disk drives:
The RAID mode before you disabled the RAID and the RAID mode that
you want to enable now should be the same.
The two current internal SATA hard disk drives are the same with the two
internal SATA hard disk drives before you disabled the RAID.
You never change the data of both internal SATA hard disk drives after you
disabled the RAID and before you enable the RAID.
13.1.1 Check & Fix Disk
Check & Fix Disk can check and fix the file system error of the hard disk drive.
Before start up, a warning window will pop-up to inform you that this action may
damage your data. Click “OK” to continue.
Note: When the storage server is doing Check & Fix Disk for your hard disk drive,
the hard disk drive is occupied. All the services of the storage server will be
stopped.
Note: Check & Fix Disk only supports internal SATA hard disk drives.
You can select the partition and schedule a check and fix job here.
Page 78
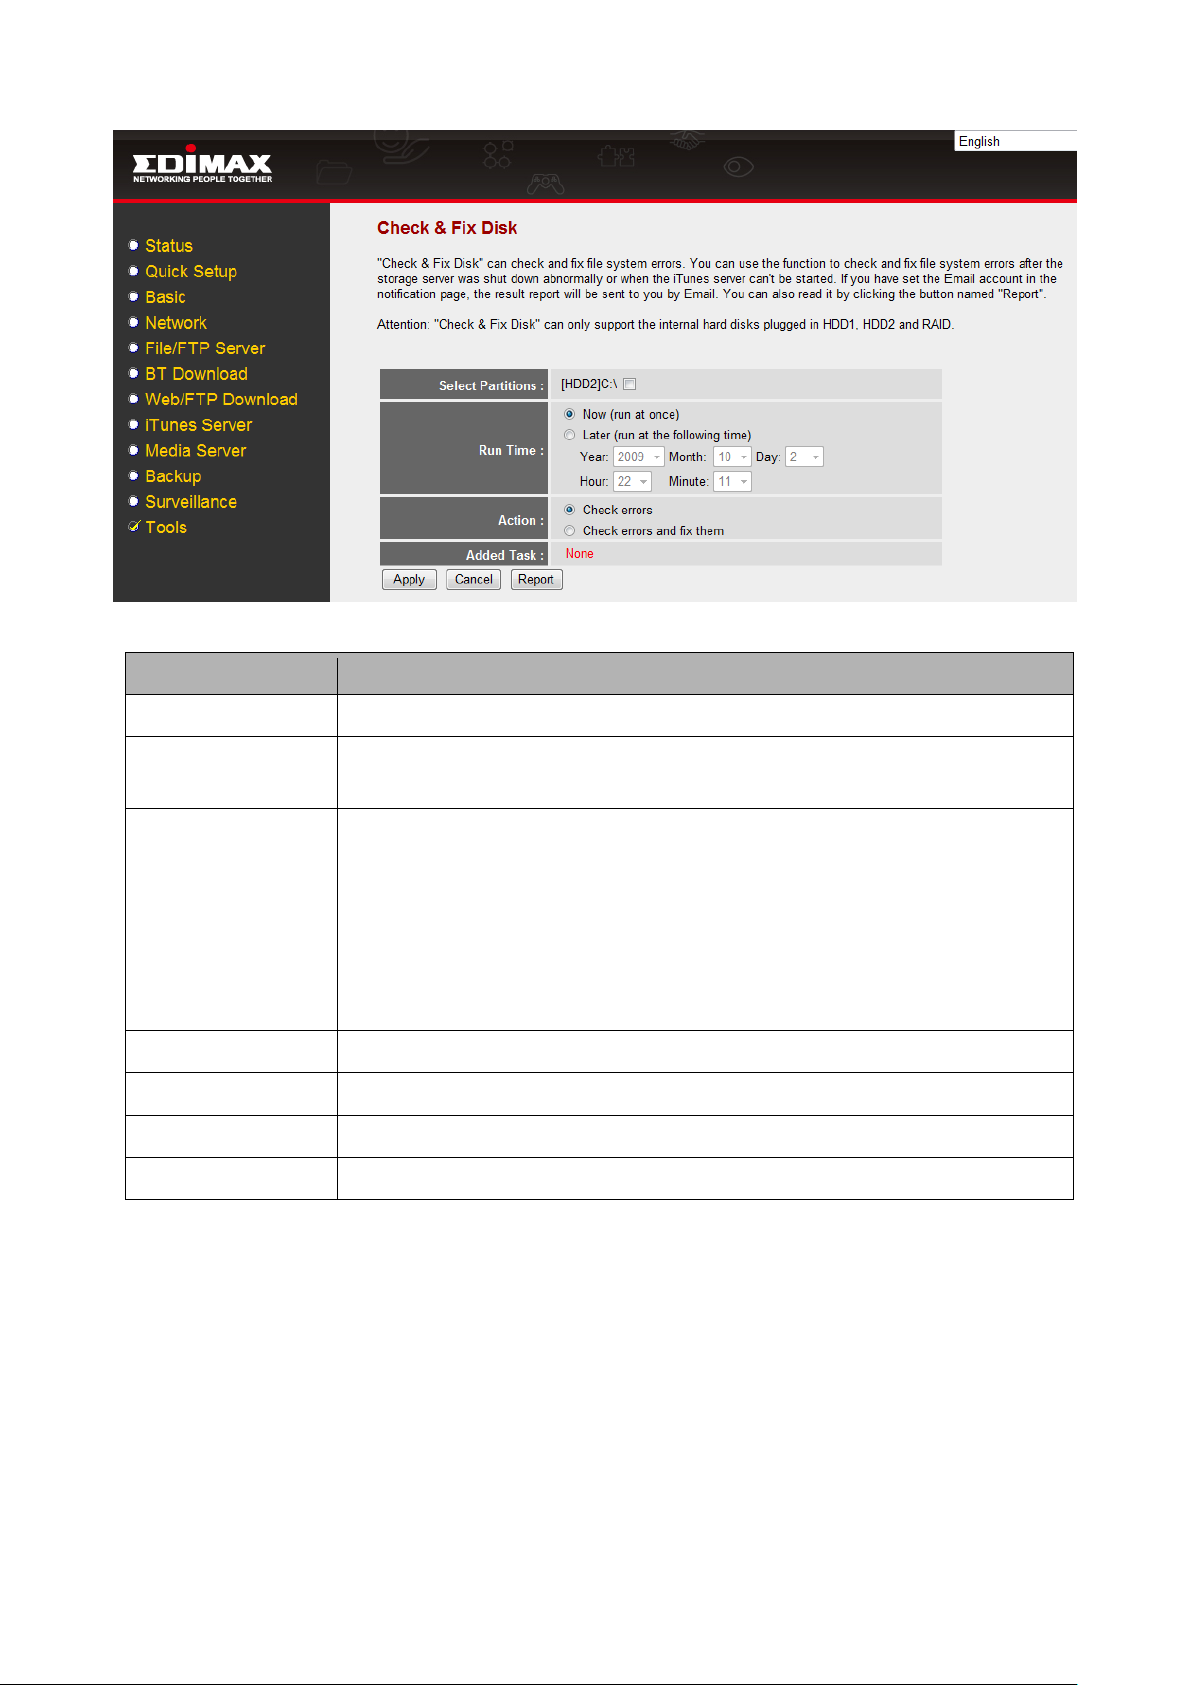
77
Parameters
Description
Select Partitions
Select all partitions you want to check.
Run Time
You can select “Now” to let the check start immediately. You
also can select “Later” and assign a schedule time below.
Action
If you select “Check errors”, the storage server only checks for
file system errors. The storage server will not fix the error and
the data will not be modified. So it is a safe operation.
If you select “Check errors and fix them”, the storage server
will try to fix errors found in the file system. If there are too
many errors in the file system and the storage server fails to fix
all of them, some of your data may be lost.
Added Task
It shows the added check and fix task.
Delete the task
Click “Delete the task” to delete the check and fix task.
Apply
Click “Apply” to submit the check and fix task.
Report
Click “Report” to read the reports of check and fix tasks.
13.1.2 S.M.A.R.T.
S.M.A.R.T. (self-monitoring, analysis, and reporting technology) can monitor the
healthiness of your hard disk drive. It will try to predict the failure of your hard disk
drive. If the healthiness of the hard disk drive is BAD, it does not mean your hard
disk is not working well. But there is high possibility that your hard disk drive will fail
soon, so you‟d better backup all data on the hard disk drive and change a healthy
hard disk drive as soon as possible.
Note: To use S.M.A.R.T., your hard disk drive has to support S.M.A.R.T.
Page 79

78
Parameters
Description
Advanced
Setting
Click “Advanced Setting” to do the S.M.A.R.T. advanced
setting. Please refer to the section “S.M.A.R.T. Advanced
Setting”.
S.M.A.R.T. Self-
Test
Click “S.M.A.R.T. Self-Test” to start a hard disk drive self test.
Please refer to the section “S.M.A.R.T. Self-Test”.
Note: Doing S.M.A.R.T. Self-Test will take several minutes
and will make all services of the storage server stop.
Current Disk
Select the hard disk drive to check the status.
13.1.2.1 S.M.A.R.T. Advanced Setting
S.M.A.R.T. advanced setting let you assign notification methods when the
healthiness of hard disk drive is BAD.
Page 80

79
Parameters
Description
E-mail
Notification
If you select “Send email once if disk problem is existed”, then
the storage server will send a notification e-mail to you in the
first time it detects the problem of the hard disk drive.
If you select “Send email once per day if disk problem is
existed”, then the storage server will send a notification e-mail
to you every day when it detects the problem of the hard disk
drive until the problem disappears.
Buzzer
Notification
If you enable “Buzzer Notification”, the storage server will beep
to notify you when it detects the problem of the hard disk drive.
Click “Apply” to apply the settings.
13.1.2.2 S.M.A.R.T. Self-Test
S.M.A.R.T. Self-Test will let the hard disk drive do self test for errors. It will take
several minutes depends on the status of the hard disk drive.
Note: Doing S.M.A.R.T. Self-Test will make all services of the storage server stop.
Page 81

80
Parameters
Description
Current Disk
Select the hard disk drive that you want to test.
Run Short Self-
Test
Start a basic self test on the hard disk drive.
Run Extended
Self-Test
Start an extended self test on the hard disk drive. It will take
long time.
13.1.3 Auto Partition & Format
This function will build partition and format the attached storage device according to
the following rules.
Note: The data originally stored in the attached storage device will completely
disappear after you doing “Auto Partition & Format” even you stop it before the job
is finished.
Note: The rules of internal SATA hard disk drive and external USB mass storage
device are different.
Internal SATA hard disk drive (includes RAID mode):
(i) It creates a single partition with the size of the whole SATA disk drive or the
whole RAID virtual hard disk drive.
(ii) It formats the created partition by EXT2 format.
External USB mass storage device:
(i) If the size of the USB mass storage device is larger than 160GB, it divides
the USB mass storage device into several 160GB partitions. The size of the
last partition may be less than 160GB. Otherwise, it creates a single partition
with the size of the whole USB mass storage device.
(ii) If formats all the created partitions by FAT32 format.
Note: During the process, user can click the “Stop” button to stop the job before it is
finished and back to Storage tools page to add or remove partition manually.
Page 82

81
Parameters
Description
Size of the
Space
The total free space that can be assigned to this new partition.
New Partition
Size
You can assign the size of the new partition.
File System
The Storage Tools will format the new partition. You can select
FAT16, FAT32, EXT2 or EXT3 format. The format may take
several minutes to finish, depends on the size of the partition.
13.1.4 Add a Partition
You can create a new partition in the attached storage device and format it.
Note: The partition size of FAT16 file system should be less than 2GB; for FAT32
the partition size should be less than 160GB; EXT2 and EXT3 have no such
limitation.
Page 83

82
Parameters
Description
Unplug
You can click this button to unplug the external USB mass
storage device. If the LED of the USB port is off, you can
safely detach the USB mass storage from this storage server.
Partition
The partition name of the attached storage device.
Size
Total space of this partition.
Used
Total used space of this partition. Here shows the size in byte
and the percentage of the total space.
Free
The remaining free space of the partition.
Status
The type of the partition. It can be FAT16, FAT32, NTFS or
Linux.
Refresh
You can click this button to refresh the Storage Status.
13.2 Storage Status
This Page shows the status of all attached storage devices.
13.3 USB Copy
USB Copy tool allows you to copy the content of one external USB mass storage
device to another attached storage device. When you press the Copy button on the
front panel of this storage server, the copy job will be triggered.
Note: Before you trigger the USB Copy function by pressing the Copy button on the
front panel of this storage server, make sure that the destination folder has enough
free space to store all data of the source USB mass storage device.
Page 84

83
Parameters
Description
Source Path
Select USB port that the source USB mass storage device of
the USB Copy job will be plugged in.
Saved Path
Select a shared folder as the destination of the USB Copy.
The USB Copy tool will create a folder named “USBCopy”
under the shared folder you selected. Each time when you
press the Copy button on the front panel of the storage server
to trigger the USB Copy job, a new folder named with the
trigger time will be created under the “USBCopy” folder and
the newly created folder will be the destination folder of the
USB Copy job.
Click <Save> button to save the configurations.
13.4 Configuration Tools
The Configuration Tools allow you to save (backup) the storage server‟s current
settings. Saving the configuration provides an added protection and convenience
when there‟re some problems with the storage server, and you have to reset to
factory default to solve the problem. You can upload the saved configuration to the
storage server through the Restore Settings tool. If extreme problems occur you
can use the Restore to Factory Default tool, this will set all configurations to its
original default settings (e.g. when you purchased the storage server)
Page 85

84
Parameters
Description
Configuration
Tools
Use the "Backup Settings" tool to save the storage server‟s
current configuration to a file named "config.bin" on your PC.
You can then use the "Restore Settings" tool to restore the
saved configuration to the storage server. Alternatively, you
can use the "Restore to Factory Defaults" tool to force the
storage server to perform a power reset and restore to
original factory settings.
13.5 Firmware Upgrade
This page allows you to upgrade the storage server‟s firmware
Click “Next” to go to the upload firmware file page.
Page 86
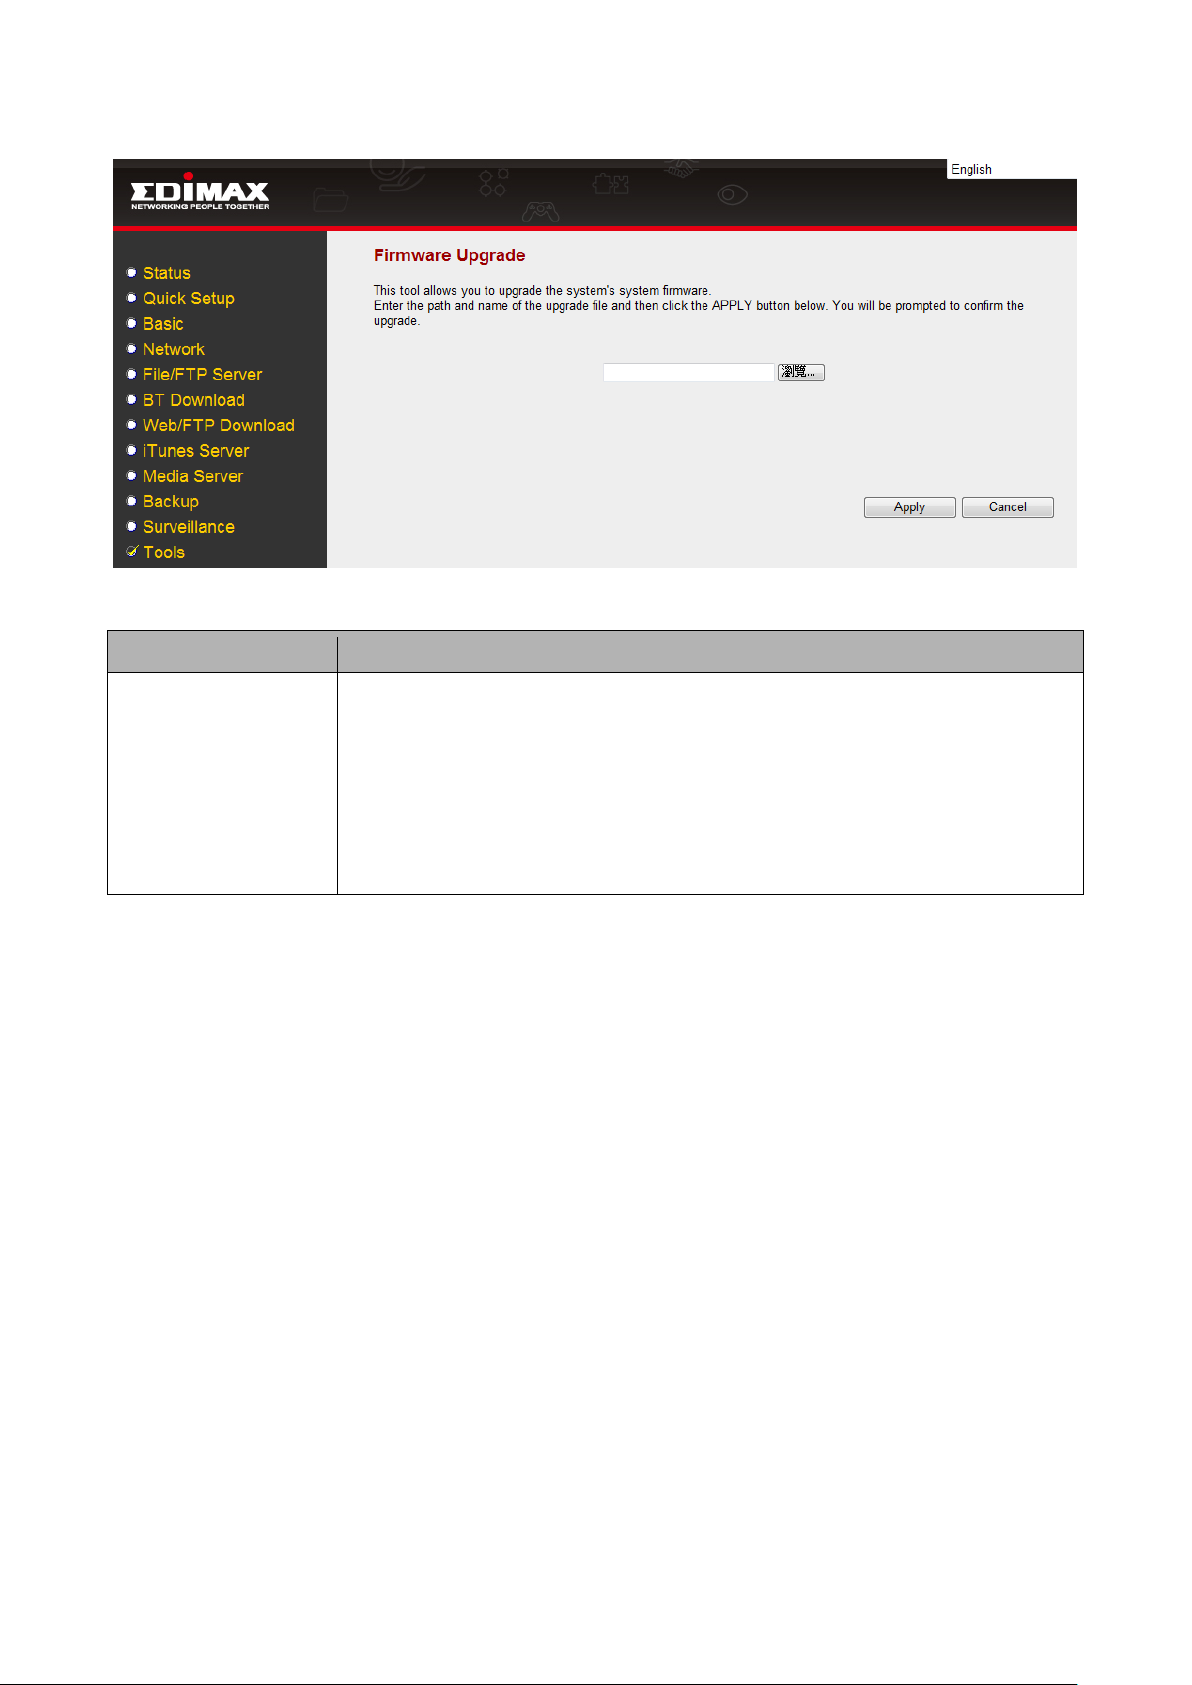
85
Parameters
Description
Firmware Upgrade
This tool allows you to upgrade the storage server‟s system
firmware. To upgrade the firmware of your storage server, you
need to download the firmware file to your local hard disk, and
enter that file name and path in the appropriate field on this
page. You can also click the browse button to locate the
firmware file on your PC.
After you selected the new firmware file, click “Apply” at the bottom of the screen to
start the upgrade process. (You may have to wait few minutes for the upgrade to
complete). Once the upgrade is complete you can start using the storage server.
Warning: When upgrading firmware, be sure not to switch the computer off, or
restart your computer, or break the network connection of your computer.
Page 87

86
Parameters
Description
Reset
In the event that the system stops responding or stops
functioning, you can perform a reset. Your settings will not
be changed. To perform the reset, click on the “APPLY”
button. You will be asked to confirm your decision. The reset
will be complete when the power LED stops blinking. Once
the reset process is complete you may start using the storage
server.
13.6 Reset
You can reset the storage server‟s system when there‟s something wrong with the
storage server. The reset function will reboot your storage server.
Page 88

87
Chapter 14 Storage Server Management Wizard
Storage Server Management Wizard is a Windows client utility for the storage
server. It step-by-step guides you through the setup of the storage server.
14.1 Login the storage server
Select “Start All Programs Storage Server Storage Server Management
Wizard” to execute Storage Server Management Wizard.
When the Storage Server Management Wizard starts, all Storage Servers in your
local area network will be listed. Select the Storage Server you want to configure,
and click “Next”. If you do not find the Storage Server you want to configure, please
check the network connection, and then click “Rescan” to restart searching.
Type the password and click “Next” to login the Storage Server that you want to
configure. (The default password is “1234” if you never change it.)
Page 89

88
The window of Storage Server Management Wizard will show after you successfully
login the storage server.
You can click “Quick Setup” to let the wizard step-by-step guide you through the
basic setting of the storage server.
You can click “Extension Functions” if you want to install or remove extension
function packages of the storage server.
You can click “Upgrade Firmware” if you want to upgrade the firmware of the
storage server.
Page 90

89
14.2 Quick Setup
Quick Setup is a wizard which can guide you through the procedure of formatting
hard disk drive, network setup, user setup and application setup. After doing Quick
Setup, you can start using the storage server. Please refer to “Quick Installation
Guide” of the storage server for details.
14.3 Extension Functions
The storage server is providing total solution for the SOHO requirements. The
provider of the storage server may provide new packages of extension functions for
the storage in the future. You can install the packages of extension functions by the
Storage Server Management Wizard.
14.3.1 Install Extension Function
After clicking “Extension Functions” in the Storage Server Management Wizard, the
following extension function management window will show. Click “Install Extension
Function” to start installing a package of extension function. You can consult your
provider of storage server for any available extension function and download the
package for installation. The package of extension function is a file with “.ssi”
extended file name.
Select the package file (.ssi file) of the extension function in your PC and then click
“Open”.
Page 91

90
In the pop-up window which shows the extension function name, click “Next” to
confirm installation.
You have to wait for several minutes until the installation is completed.
Page 92

91
When you see the following pop-up window showing the successful installation
message, the installation is completed. Click “Next” to finish it.
The installed extension function will be listed in the installed program list as follows.
Page 93

92
14.3.2 Remove Extension Function
You can remove installed extension function by Storage Server Management
Wizard. After clicking “Extension Functions” in the Storage Server Management
Wizard, the following extension function management window will show.
All installed extension functions will be listed in the installed program list.
To remove an extension function, select the extension function to remove in the list
and click “Uninstall”.
To remove all extension functions, click “Uninstall All”.
Page 94

93
A pop-up window will ask you if you want to uninstall the selected extension
function. Click “Yes” to confirm the uninstallation.
Please wait for several minutes until the uninstallation is completed.
Page 95

94
When you see the following pop-up window showing the successful uninstallation
message, the uninstallation is completed. Click “Next” to finish it.
Page 96

95
14.4 Upgrade Firmware
After clicking “Upgrade Firmware” in the Storage Server Management Wizard, the
following select firmware file window will show. You can consult your provider of
storage server for any available new firmware. The firmware is a file with “.bin”
extended file name. Select the firmware file (.bin file) and click “Open”.
Note: After upgrading firmware, the configuration of the storage server will be set to
factory default values.
In the following pop-up message window, click “Next” to confirm the upgrade.
Page 97

96
The upgrade will take several minutes. You SHOULD NOT turn off the power of the
storage server during the upgrade. If you turn off the power of the storage server
during upgrade firmware, the storage server may fail and you may not be able to
start it successfully any more.
Page 98

97
When the following window shows, the upgrade is completed successfully.
Page 99

98
Chapter 15 NetDisk Explorer
NetDisk Explorer is a Windows client utility for the storage server. It provides a
friendly user interface for you to upload or download files between your PC and the
storage server. You can manage your file and folders on the storage server.
15.1 Login the storage server
Select “Start All Programs Storage Server NetDisk Explorer” to execute
NetDisk Explorer.
All available storage servers in your local network will be listed in the pop-up
window. Select your storage server and click “Connect”. If your storage server is not
in the list, click “Rescan” to search again. If your storage server is not in your local
network (for example, in the Internet) and you know the address of your storage
server, you can click “Enter the address manually” to login the storage server.
Enter the User Name and Password of your account in the Login window. Click
“Connect” to login the storage server.
Page 100

99
Parameters
Description
Address
If you select a storage server from the list in previous step,
the address is automatically set.
If you select “Enter the address manually” in previous step,
then you have to enter the address of your storage server
here.
User Name
The user name of your account.
Password
The password of your account.
Remember the
address of this
Storage Server
If you check it, NetDisk Explorer will remember the address of
the storage server. Every time when you start NetDisk
Explorer, the address of this storage server will be listed in
the server list for selection, even when the storage server
does not exist in your network during the scanning.
Remember me
on this computer
If you check it, NetDisk Explorer will remember your account
for the storage server. Every time when you enter this login
window, your account will be in the User Name list for
selection.
Remember my
password
If you check it, NetDisk Explorer will remember your
password for the storage server. Every time when you enter
this login window and use the same user name for login,
NetDisk Explorer will automatically fill your password.
Automatically
login
If you check it, NetDisk Explorer will remember your account
and password for this storage server. Every time when you
start NetDisk Explorer, it will directly login. This login window
will not display.
Start when
Windows start up
If you check it, every time when Windows start up, it will
execute NetDisk Explorer automatically.
Select another
Storage Server
Go to the previous step to scan for available storage servers
and select a storage server again.
 Loading...