

Page 1

AR-7186WnA / AR-7186WnB
Quick Installation Guide
1-2013 / v1.0
Page 2

COPYRIGHT
Copyright Edimax Technology Co., Ltd. all rights reserved. No part of
this publication may be reproduced, transmitted, transcribed, stored in a
retrieval system, or translated into any language or computer language, in
any form or by any means, electronic, mechanical, magnetic, optical,
chemical, manual or otherwise, without the prior written permission from
Edimax Technology Co., Ltd.
Edimax Technology Co., Ltd. makes no representations or warranties,
either expressed or implied, with respect to the contents hereof and
specifically disclaims any warranties, merchantability, or fitness for any
particular purpose. Any software described in this manual is sold or licensed
as is. Should the programs prove defective following their purchase, the
buyer (and not this company, its distributor, or its dealer) assumes the entire
cost of all necessary servicing, repair, and any incidental or consequential
damages resulting from any defect in the software. Edimax Technology Co.,
Ltd. reserves the right to revise this publication and to make changes from
time to time in the contents hereof without the obligation to notify any
person of such revision or changes.
The product you have purchased and the setup screen may appear
slightly different from those shown in this QIG. For more information about
this product, please refer to the user manual on the CD-ROM. The software
and specifications are subject to change without notice. Please visit our
website www.edimax.com for updates. All brand and product names
mentioned in this manual are trademarks and/or registered trademarks of
their respective holders.
Edimax Technology Co., Ltd.
Add: No. 3, Wu-Chuan 3rd Rd., Wu-Ku Industrial Park, New Taipei City, Taiwan
Tel: +886-2-77396888
Email: sales@edimax.com.tw
1
Page 3

MMuullttii--LLaanngguuaaggee QQuuiicckk IInnssttaallllaattiioonn GGuuiiddee ((QQIIGG)) oonn tthhee CCDD
e
e
š
š
ttiinna
a
DDeeuuttsscchh:
:
EEssppaaññool
l
FFrraannççaaiiss:
:
IIttaalliiaannoo:
:
MMaaggyyaarr::
NNeeddeerrllaanndds
s
PPoollsskki
i
PPoorrttuugguuêês
s
РРууссссккиий
й
::
TTüürrkkççee:
:
УУккррааїїннссьькка
а
:
:
Č
: Českého průvodce rychlou instalací naleznete na přiloženém CD s
ovladači
Finden Sie bitte das deutsche S.A.L. beiliegend in der Treiber CD
: Incluido en el CD el G.R.I. en Español.
Veuillez trouver l’français G.I.R ci-joint dans le CD
Incluso nel CD il Q.I.G. in Italiano.
A magyar telepítési útmutató megtalálható a mellékelt CD-n
: De nederlandse Q.I.G. treft u aan op de bijgesloten CD
: Skrócona instrukcja instalacji w języku polskim znajduje się na
załączonej płycie CD
: Incluído no CD o G.I.R. em Portugues
Найдите Q.I.G. на pусскoм языке на приложеном CD
Ü rün ile beraber gelen CD içinde Türkçe Hızlı Kurulum Kılavuzu'nu
bulabilirsiniz
Для швидкого налаштування Вашого пристрою, будь ласка,
ознайомтесь з інструкцією на CD
2
Page 4
PRODUCT INTRODUCTION
Package Contents
Before you start using this product, please check if there is anything missing
in the package and contact your dealer to claim the missing item(s):
ADSL2+ router (AR-7186WnA or AR-7186WnB)
12V power adapter
1 meter RJ-45 Ethernet cable
1.8M RJ-11 telephone line x 2
Quick installation guide
CD containing setup wizard, user manual & multi-language QIG
Splitter
5dBi antenna
System Requirements
A 10/100 base-T Ethernet card installed in your PC.
A hub or switch (connected to several PCs through one of the Ethernet
interfaces on the device).
Windows 98 SE, Windows 2000, Windows ME, Windows XP, Windows
7, Windows 8.
Internet Explorer V5.0 or higher, Netscape V4.0 or higher or Firefox
1.5 or higher.
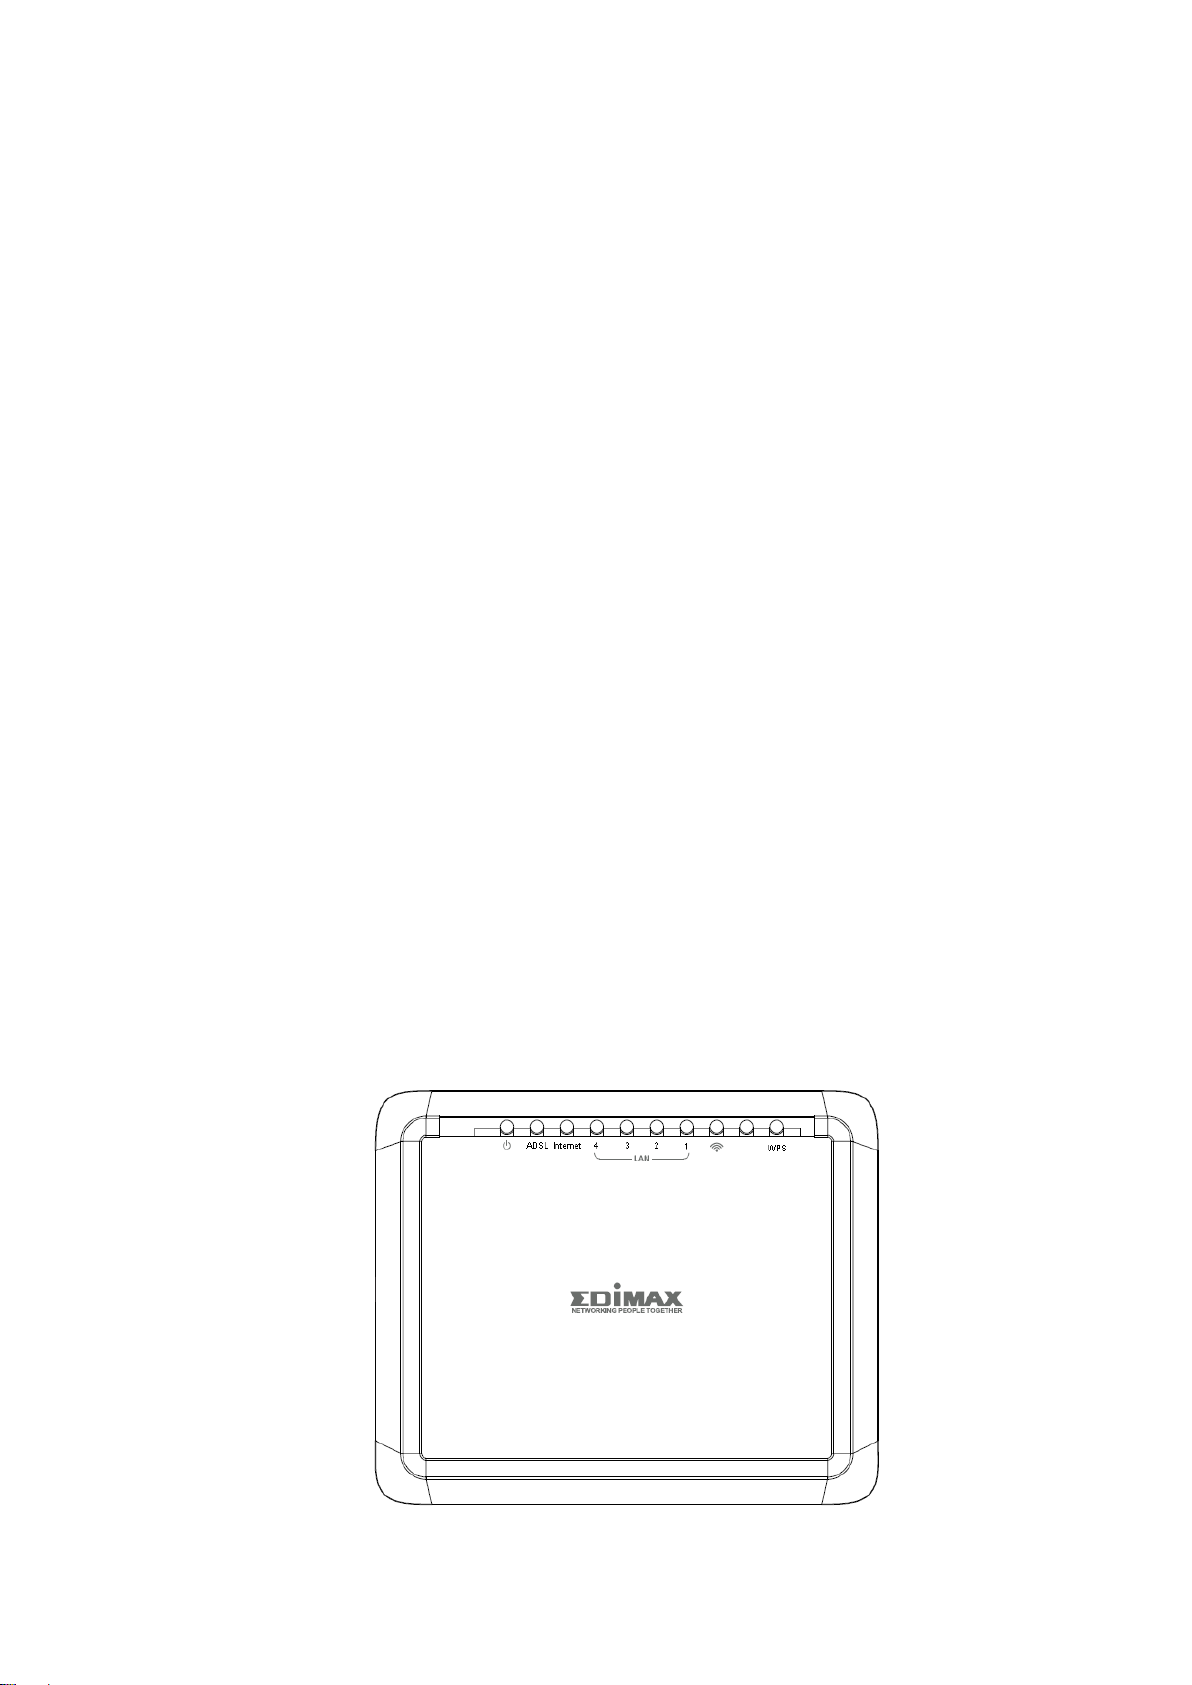
LED Status
Front Panel:
3
Page 5
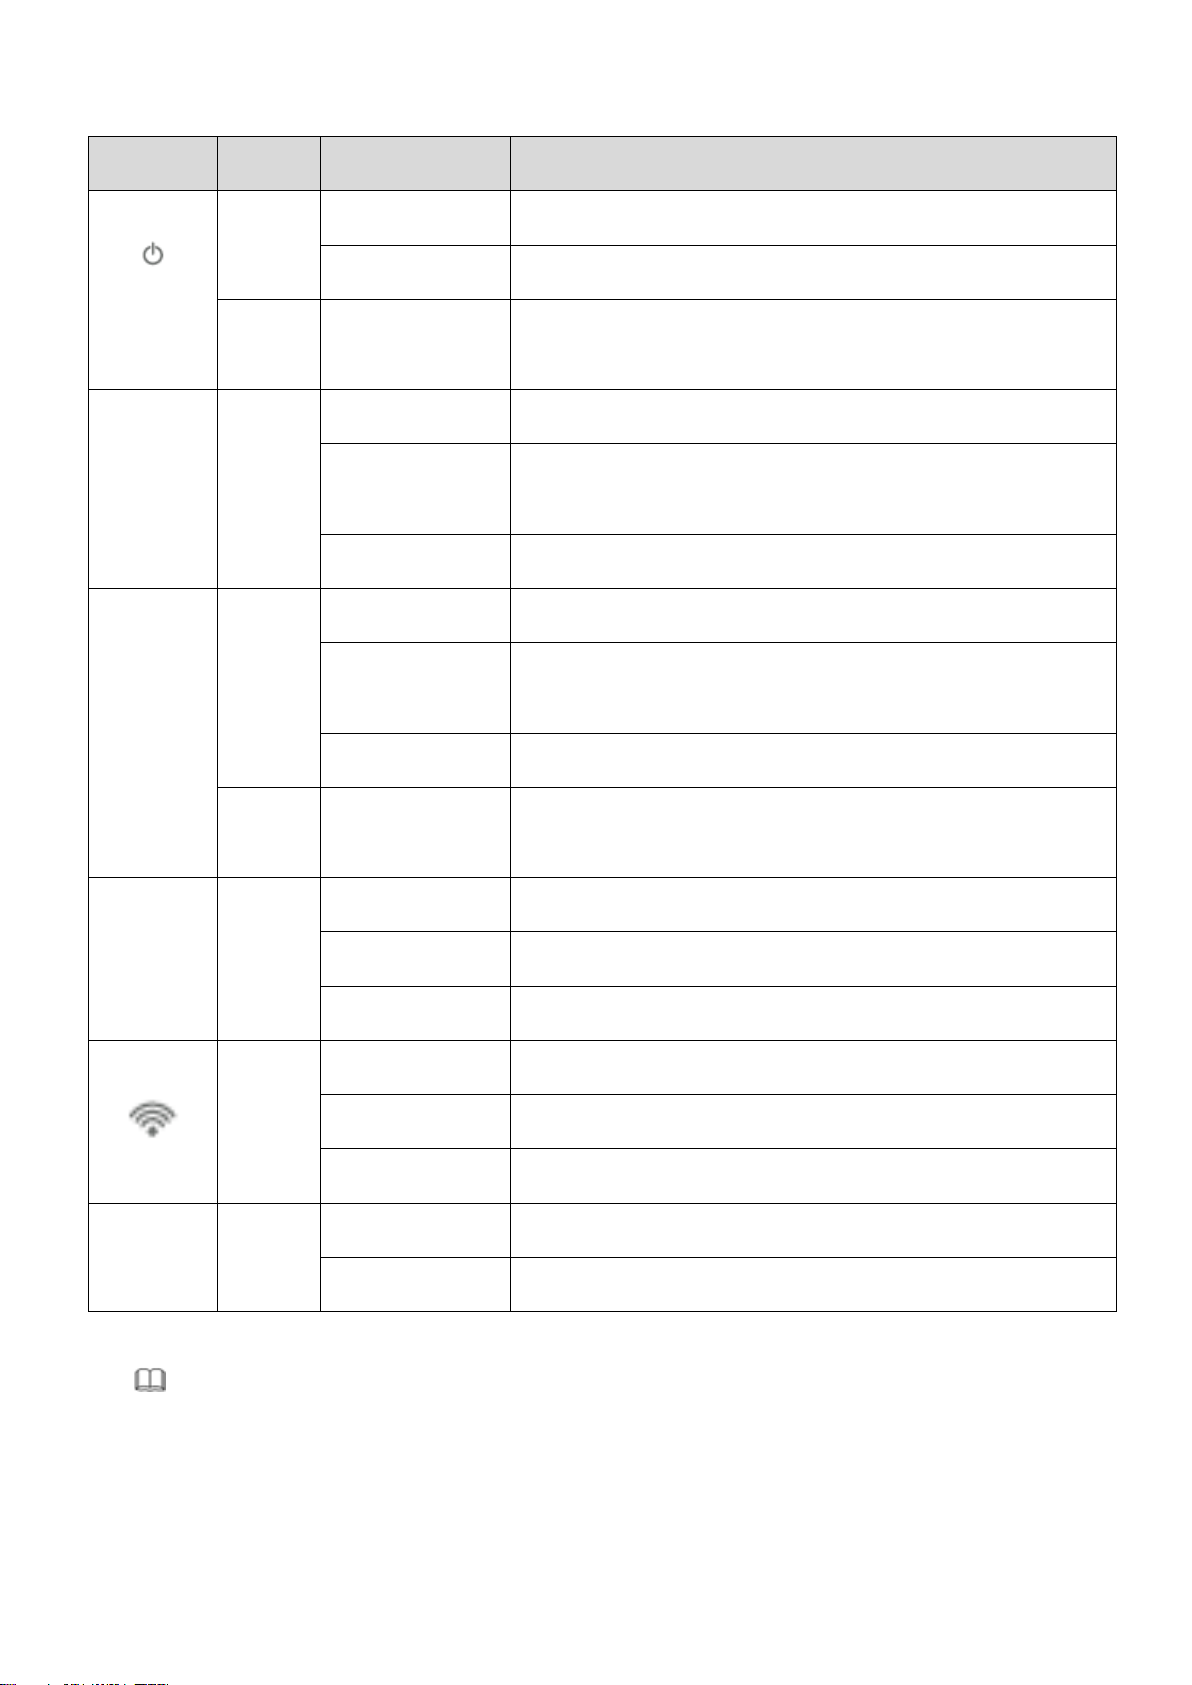
LED
Color
Status
Description
Power
Green
On
ADSL2+ router is on.
Off
ADSL2+ router Is off.
Red
On
ADSL broadband initial self-test failed or upgrading
firmware.
ADSL
Green
On
ADSL line is synchronized and ready to use.
Slow Flashing
ADSL synchronization failed ( please refer to
Note i. below)
Quick Flashing
ADSL negotiation is in progress.
Internet
Green
On
Internet connected in router mode
Flashing
Internet activity (transferring/receiving data) in
router mode.
Off
Device in bridged mode.
Red
On
Internet not connected in router mode
(Please refer to Note ii. below).
LAN1–4
Green
On
LAN port connected.
Flashing
LAN activity (transferring/receiving data).
Off
LAN port not connected.
WLAN
Green
On
Successful WLAN connection.
Flashing
WLAN activity (transferring/receiving data).
Off
WLAN connection failed.
WPS
Green
Off
WPS is disabled.
Flashing
WPS is enabled and waiting for client to negotiate.
Note i. If the ADSL LED is off, please check your Internet
connection. Refer to A. Hardware Installation for more
information about how to connect the router correctly. If
all connections are correct, please contact your ISP to
check if there is a problem with your Internet service.
4
Page 6

Item
Description
Power On/Off
Button
Switches the router on or off.
Power
Power port for included 12V power adapter.
Wireless
On/Off Button
Switch the wireless signal on or off.
Rear Panel:
ii. If the Internet LED is red, please check your ADSL LED first.
If the ADSL LED is off, refer to Note 1. If the green ADSL
LED is ON, please check your Internet configuration. You
may need to check with your ISP that your Internet is
configured correctly.
5
Page 7

Item
Description
WPS Button
Activate WPS (Wi-Fi Protected Setup)
LAN 1–4
RJ-45 Ethernet ports 1–4.
Reset Button
Hold for less than 5 seconds to restart the device, and hold for more
than 10 seconds to reset the device to factory default settings.
Line
RJ-11 port for standard telephone line.
GETTING STARTED
A. Hardware Installation
1. Connect the ADSL line.
Connect the line port of the router of the device to the modem interface of
a splitter using a telephone cable. Connect a telephone to the Phone
interface of the splitter using a telephone cable. Connect the Line interface
of the splitter to your existing, incoming line.
The splitter has three interfaces:
Line: Connect to a wall phone jack (RJ-11 jack).
Modem: Connect to the ADSL jack of the device.
Phone: Connect to a telephone set.
2. Connect the router to your LAN network.
Connect the LAN interface of the router to your PC, hub or switch using an
Ethernet cable.
3. Connect the power adapter to the router.
Plug one end of the power adapter into a wall outlet and connect the other
end to the 12V interface of the device. The following diagram shows how to
correctly connect the router, PC, splitter and telephone sets.
6
Page 8

4. Check the ADSL LED status.
Please check the ADSL LED on the front panel. This light indicates the status
of your ADSL broadband through your telephone line. If the light is on, you
can continue setup. However if the light is flashing, there is no broadband
line detected. Please call your Internet Service Provider (ISP) and inform
them about the flashing ADSL light to resolve the issue.
5. Firewall settings.
Please turn off all personal firewalls before you continue the setup – firewalls
can block communication between your PC and router.
Note: You must use the power adapter included in the package with the
router, do NOT attempt to use a third-party power adapter.
6. PC LAN IP configuration.
Configure your PC’s LAN settings to automatically obtain an IP address from
the router by following the steps below:
1. Click “Start” and then select “Control Panel”.
7
Page 9

2. Click “Switch to Classic View” in the top left to show additional setting
icons.
3. Locate the “Network Connections” icon and double-click to open
network connection settings.
4. Select the “Local Area Connection” icon and right-click it to open the
sub-menu, then select “Properties”.
8
Page 10

5. Select “Internet Protocol (TCP/IP)” and then click “Properties”
6. Ensure that “Obtain an IP address automatically” and “Obtain DNS
server address automatically” are selected and then press “OK”.
9
Page 11

B. Internet Connection
You can configure the router by running the setup wizard on the CD-ROM
included in the package contents. The wizard enables you to configure
your Internet connection, upgrade the firmware and change the router’s
password. When you start the setup wizard, you will see the following
screen. Please choose a language and follow the on screen instructions
until setup is complete.
Alternatively, if you lose the CD-ROM or prefer a web based setup, you can
login to the ADSL router using Internet Explorer, and configure the router
from there using the web-based interface. Please follow the instructions
below:
1. Enter the router’s default IP address: “192.168.2.1” into your PC’s web
browser and press “Enter”.
10
Page 12

2. The login screen below will appear. Enter the default username “admin”
and default password “1234” and click “OK”.
3. You will arrive at the system status page as shown below.
4. In the navigation bar across the top of the screen, click “Quick Start” and
then “RUN WIZARD”. The Wizard page of the web-based interface allows fast
configuration of the Internet connection and other parameters. Please refer
to the user manual for detailed information on these parameters.
11
Page 13

NNoottee:: PPlleeaassee rreeffeerr ttoo tthhee UUsseerr MMaannuuaall oonn tthhee iinncclluuddeedd CCDD--RROOMM ffoorr mmoorree
ddeettaaiilleedd iinnffoorrmmaattiioonn rreeggaarrddiinngg ccoonnffiigguurraattiioonn aanndd IInntteerrnneett ccoonnnneeccttiioonn
ttyyppee..
5. Follow the on screen instructions until the wizard is complete.
12
Page 14

EU Declaration of Conformity
English: This equipment is in compliance with the essential requirements and other relevant
provisions of Directive 1999/5/EC, 2009/125/EC.
French: Cet équipement est conforme aux exigences essentielles et autres dispositions de la
directive 1999/5/CE, 2009/125/CE
Czechian: Toto zařízení je v souladu se základními požadavky a ostatními příslušnými ustanoveními
směrnic 1999/5/ES, 2009/125/ES.
Polish: Urządzenie jest zgodne z ogólnymi wymaganiami oraz szczególnymi warunkami
określonymi Dyrektywą UE 1999/5/EC, 2009/125/EC
Romanian: Acest echipament este în conformitate cu cerinţele esenţiale şi alte prevederi relevante
ale Directivei 1999/5/CE, 2009/125/CE.
Russian: Это оборудование соответствует основным требованиям и положениям Директивы
1999/5/EC, 2009/125/EC.
Magyar: Ez a berendezés megfelel az alapvető követelményeknek és más vonatkozó irányelveknek
(1999/5/EK, 2009/125/EC)
Türkçe: Bu cihaz 1999/5/EC, 2009/125/EC direktifleri zorunlu istekler ve diğer hükümlerle ile
uyumludur.
Ukrainian: Обладнання відповідає вимогам і умовам директиви 1999/5/EC, 2009/125/EC.
Slovakian: Toto zariadenie spĺňa základné požiadavky a ďalšie príslušné ustanovenia smerníc
1999/5/ES, 2009/125/ES.
German: Dieses Gerät erfüllt die Voraussetzungen gemäß den Richtlinien 1999/5/EC, 2009/125/EC.
Spanish: El presente equipo cumple los requisitos esenciales de la Directiva 1999/5/EC,
2009/125/EC.
Italian: Questo apparecchio è conforme ai requisiti essenziali e alle altre disposizioni applicabili
della Direttiva 1999/5/CE, 2009/125/CE.
Dutch: Dit apparaat voldoet aan de essentiële eisen en andere van toepassing zijnde bepalingen
van richtlijn 1999/5/EC, 2009/125/EC.
Portugese: Este equipamento cumpre os requesitos essênciais da Directiva 1999/5/EC, 2009/125/EC
Norwegian: Dette utstyret er i samsvar med de viktigste kravene og andre relevante regler i Direktiv
1999/5/EC, 2009/125/EC.
Swedish: Denna utrustning är i överensstämmelse med de väsentliga kraven och övriga relevanta
bestämmelser i direktiv 1999/5/EG, 2009/125/EG.
Danish: Dette udstyr er i overensstemmelse med de væ sentligste krav og andre relevante
forordninger i direktiv 1999/5/EC, 2009/125/EC.
Finnish: Tämä laite täyttää direktiivien 1999/5/EY, 2009/125/EY oleelliset vaatimukset ja muut
asiaankuuluvat määräykset.
-----------------------------------------------------------------------------------------------------------
WEEE Directive & Product Disposal
At the end of its serviceable life, this product should not be treated as household or general
waste. It should be handed over to the applicable collection point for the recycling of electrical
and electronic equipment, or returned to the supplier for disposal.
13
Page 15

Declaration of Conformity
We, Edimax Technology Co., LTD., declare under our sole responsibility, that the equipment
described below complies with the requirements of the European Council directive
(1995/5/EC, 2006/95/EC).
Equipment
:
N150 Wireless ADSL Modem Router
Model No.
:
AR-7186WnA & AR-7186WnB
The following European standards for essential requirements have been followed:
Spectrum
:
ETSI EN 300 328 : V1.7.1(2006-10)
EMC
:
EN 301 489-1 V1.9.2(2011-09)
EN 301 489-17 V2.1.1(2009-05)
EMF
:
EN 50385:2002
Safety (LVD)
:
IEC 60950-1 : 2005 (2nd Edition)+A1:2009
EN 60950-1 : 2006+A11:2009+A1:2010+A12:2011
Edimax Technology Co., Ltd.
No. 3, Wu Chuan 3rd Road,
Wu-Ku Industrial Park.
New Taipei City, Taiwan
Date of Signature:
January, 2013
Signature:
Printed Name:
Albert Chang
Title:
Director
Edimax Technology Co., Ltd.
14
Page 16

15
 Loading...