

Page 1
EDIMAX AC-M3000 / M1000
Quick Installation Guide
AC-M3000/AC-M1000
Network Access Controller
Quick Installation Guide
快速安裝手冊
Page 2
EDIMAX AC-M3000 / M1000
Quick Installation Guide
Copyright© by Edimax Technology Co, LTD. all rights reserved. No part of this publication may
be reproduced, transmitted, transcribed, stored in a retrieval system, or translated into any
language or computer language, in any form or by any means, electronic, mechanical, magnetic,
optical, chemical, manual or otherwise, without the prior written permission of this company
This company makes no representations or warranties, either expressed or implied, with respect
to the contents hereof and specifically disclaims any warranties, merchantability or fitness for any
particular purpose. Any software described in this manual is sold or licensed "as is". Should the
programs prove defective following their purchase, the buyer (and not this company, its
distributor, or its dealer) assumes the entire cost of all necessary servicing, repair, and any
incidental or consequential damages resulting from any defect in the software. Further, this
company reserves the right to revise this publication and to make changes from time to time in
the contents hereof without obligation to notify any person of such revision or changes.
The product you have purchased and the setup screen may appear slightly different from those
shown in this QIG. For more detailed information about this product, please refer to the User's
Manual on the CD-ROM.The software and specifications subject to change without notice.
Please visit our web site www.edimax.com.tw for the update. All right reserved including all brand
and product names mentioned in this manual are trademarks and/or registered trademarks of
their respective holders.
Linux Open Source Code
Certain Edimax products include software code developed by third parties, including
software code subject to the GNU General Public License ("GPL") or GNU Lesser General
Public License ("LGPL"). Please see the GNU (www.gnu.org) and LPGL (www.gnu.org)
Web sites to view the terms of each license.
The GPL Code and LGPL Code used in Edimax products are distributed without any
warranty and are subject to the copyrights of their authors. For details, see the GPL Code
and LGPL Code licenses. You can download the firmware-files at edimax’s Website:
http://www.edimax.com.tw under "Download" page.
※ The product you have purchased and the setup screen may appear slightly different from
those shown in this QIG. For more detailed information about this product, please refer to
the User's Manual on the CD-ROM.
※ Software and specifications subject to change without notice. Please visit our web site for the
update.
※ All rights reserved. Trademarks or registered trademarks are the property of their respective
holders
2
Page 3

EDIMAX AC-M3000 / M1000
Quick Installation Guide
1. Introduction
1.1 Preface
Edimax AC-M3000 is a Network Access Controller, specially designed for the small scale
wireless and wired network management and access control. The major functional areas include
user management, access control, AP management, and security management. The Quick
Installation Guide provides instructions and reference materials for getting start with Edimax
AC-M3000. The installation steps to build an SMB network based on Edimax AC-M3000 are
included as the configuration example.
Note: This Quick Installation Guide is applicable to both Edimax AC-M3000 and Edimax
AC-M1000. The detailed information of the differences can be found in the Edimax
AC-M3000/AC-M1000 manual.
1.2 Package Contents
Open the package carefully, and make sure that none of the items listed below are missing.
z Edimax AC-M3000 x 1
z Quick Installation Guide x 1
z CD-ROM (with user manual and QIG) x 1
z DC 12V Power Adaptor x 1
z Cross-over Ethernet RJ-45 Cable x 1
z Console Cable x 1
If any item is missing or damaged, please contact your local resellers for service.
Attention: It is recommended to keep the original packing materials, in case of product service;
the returned product shall be packed in the original or equivalent materials to protect it from
damage during delivery.
1
Page 4
EDIMAX AC-M3000 / M1000
Quick Installation Guide
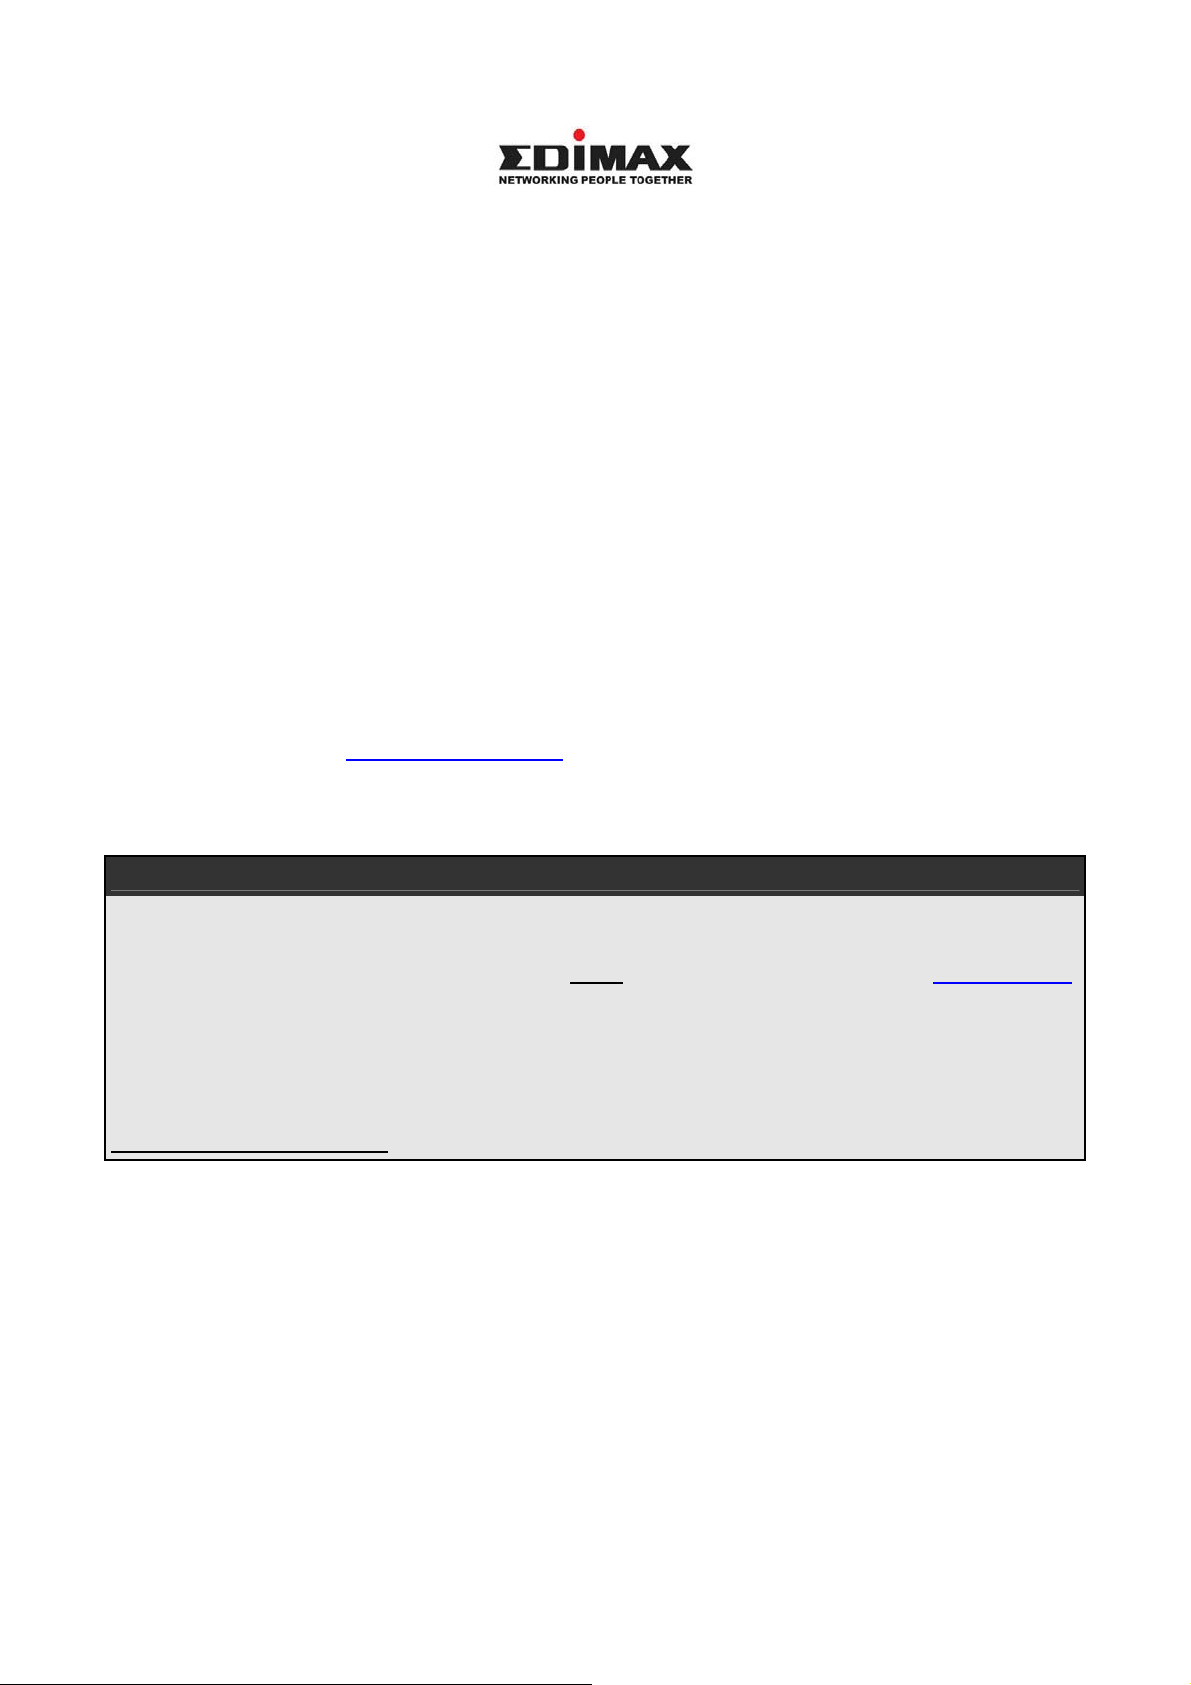
1.3 Hardware Introduction
Edimax AC-M3000 is implemented on an embedded platform with mini-desktop form factor. The
product dimension is 243 mm (W) by 150 mm (D) by 45.5 mm (H). The product outlook, front
panel, and rear panel are depicted as follows. The interface ports are installed on the front panel.
Ten fast Ethernet (100Mbps) ports are provided by Edimax AC-M3000. Two of them are
configured as WAN Ports. Eight of them are configured as LAN Ports. In addition, twelve LEDs
are used to indicate the system power, system status, and the link status of the ten fast Ethernet
ports. On the rear panel, a reset bottom, a console port, and the power socket are provided.
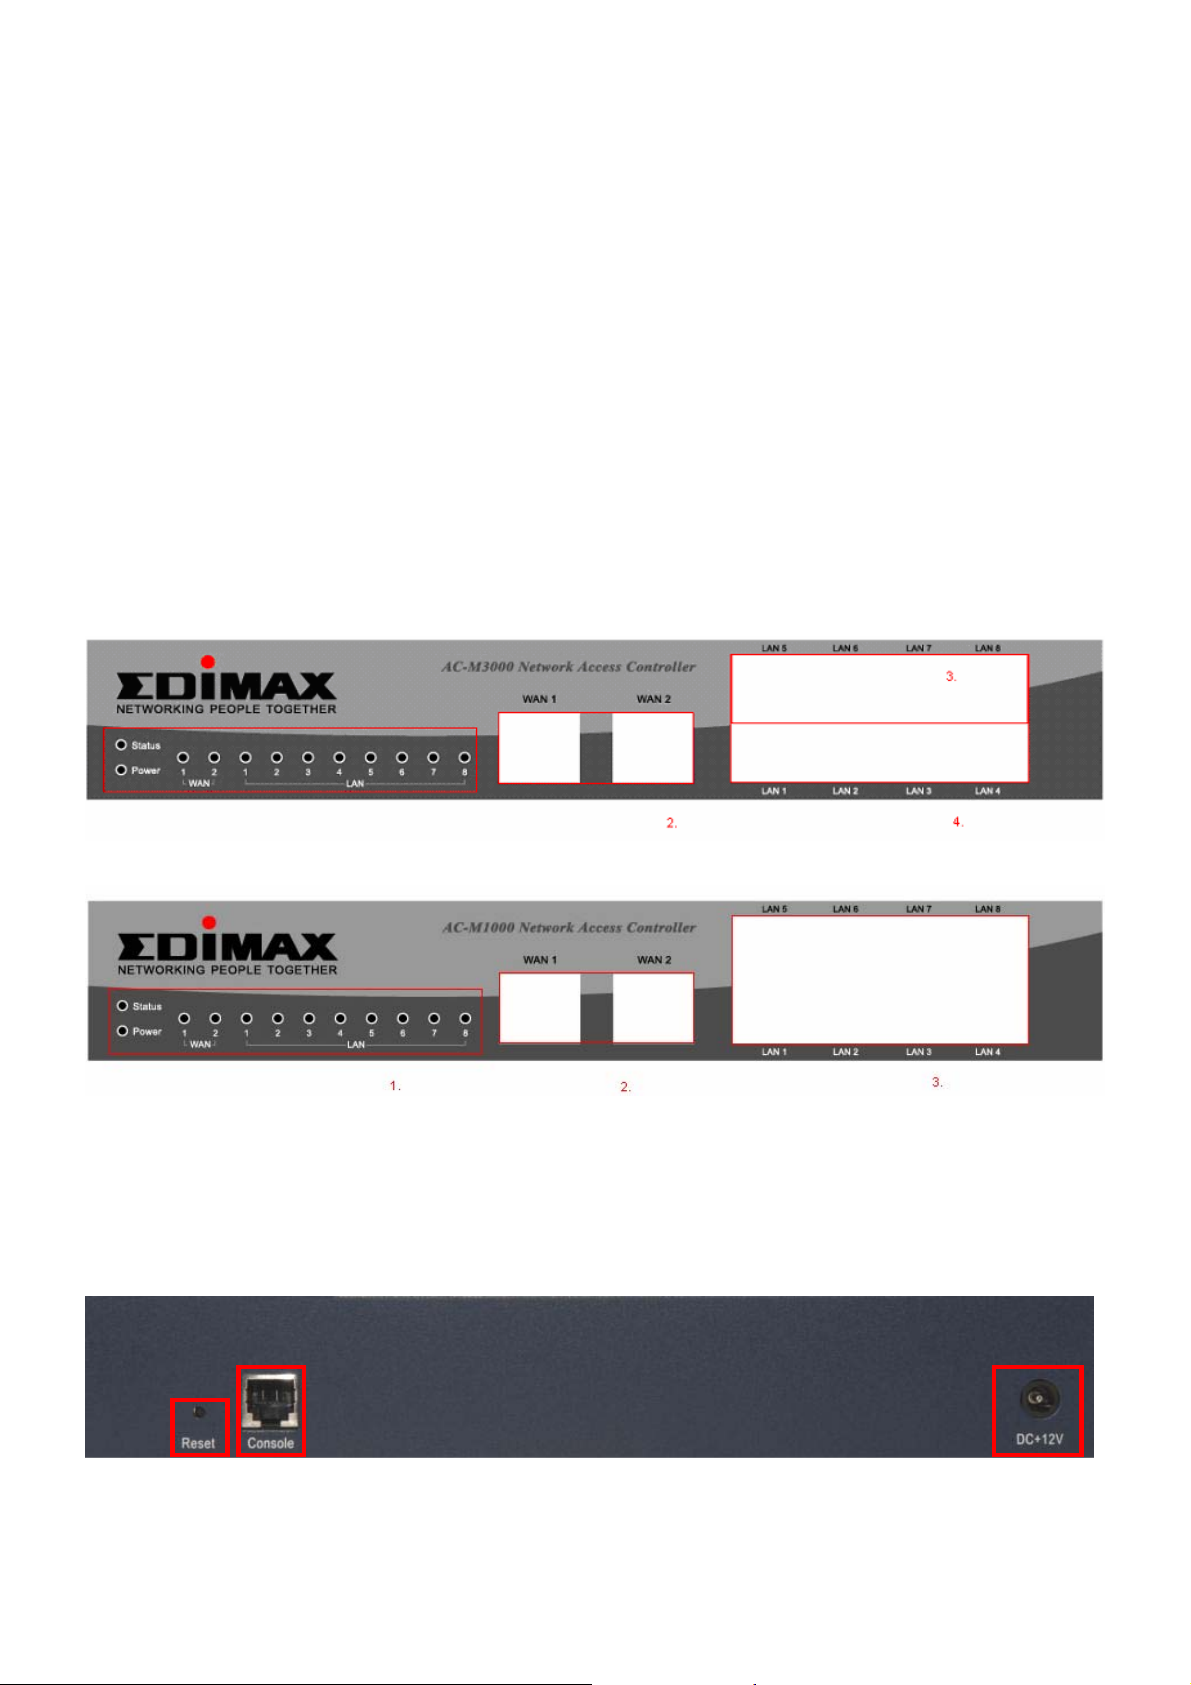
Front Panel
1. LED Indicators:Power x 1, Status x 1, WAN x 2, LAN x 8
2. WAN Ports:10 Base-T / 100Base-TX RJ-45 x 2
3. LAN Ports:10 Base-T / 100Base-TX RJ-45 x 8
Edimax AC-M3000 front panel:
Edimax AC-M1000 front panel:
Rear Panel
1. Reset button x 1
2. Console Port: RJ-11 x 1
3. Power socket x 1
2
1
3
2
Page 5
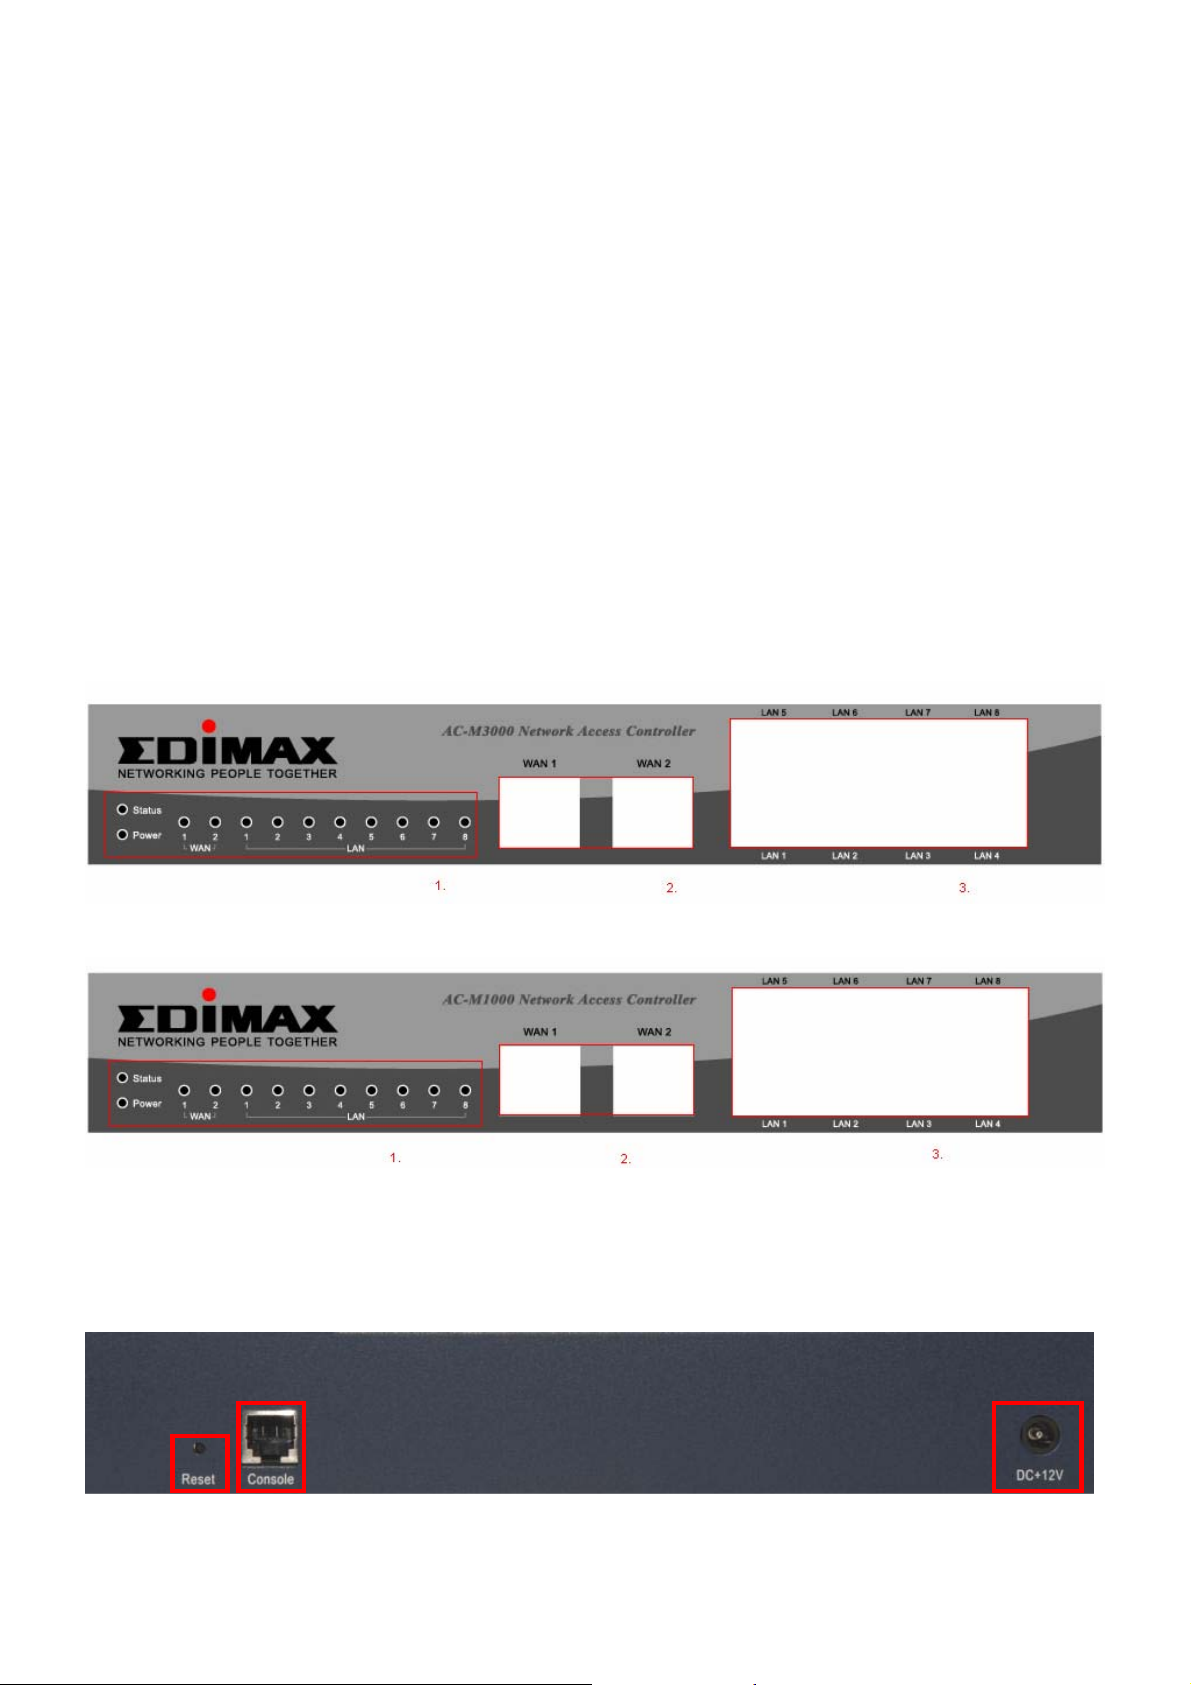
1.4 Hardware Installation
Please follow the steps to setup Edimax AC-M3000.
1. Connect the power adapter into the power socket of the rear panel.
Warning: Using a non-certified power supply will damage this product.
Edimax AC-M3000 front panel:
EDIMAX AC-M3000 / M1000
Quick Installation Guide
1
Edimax AC-M1000 front panel:
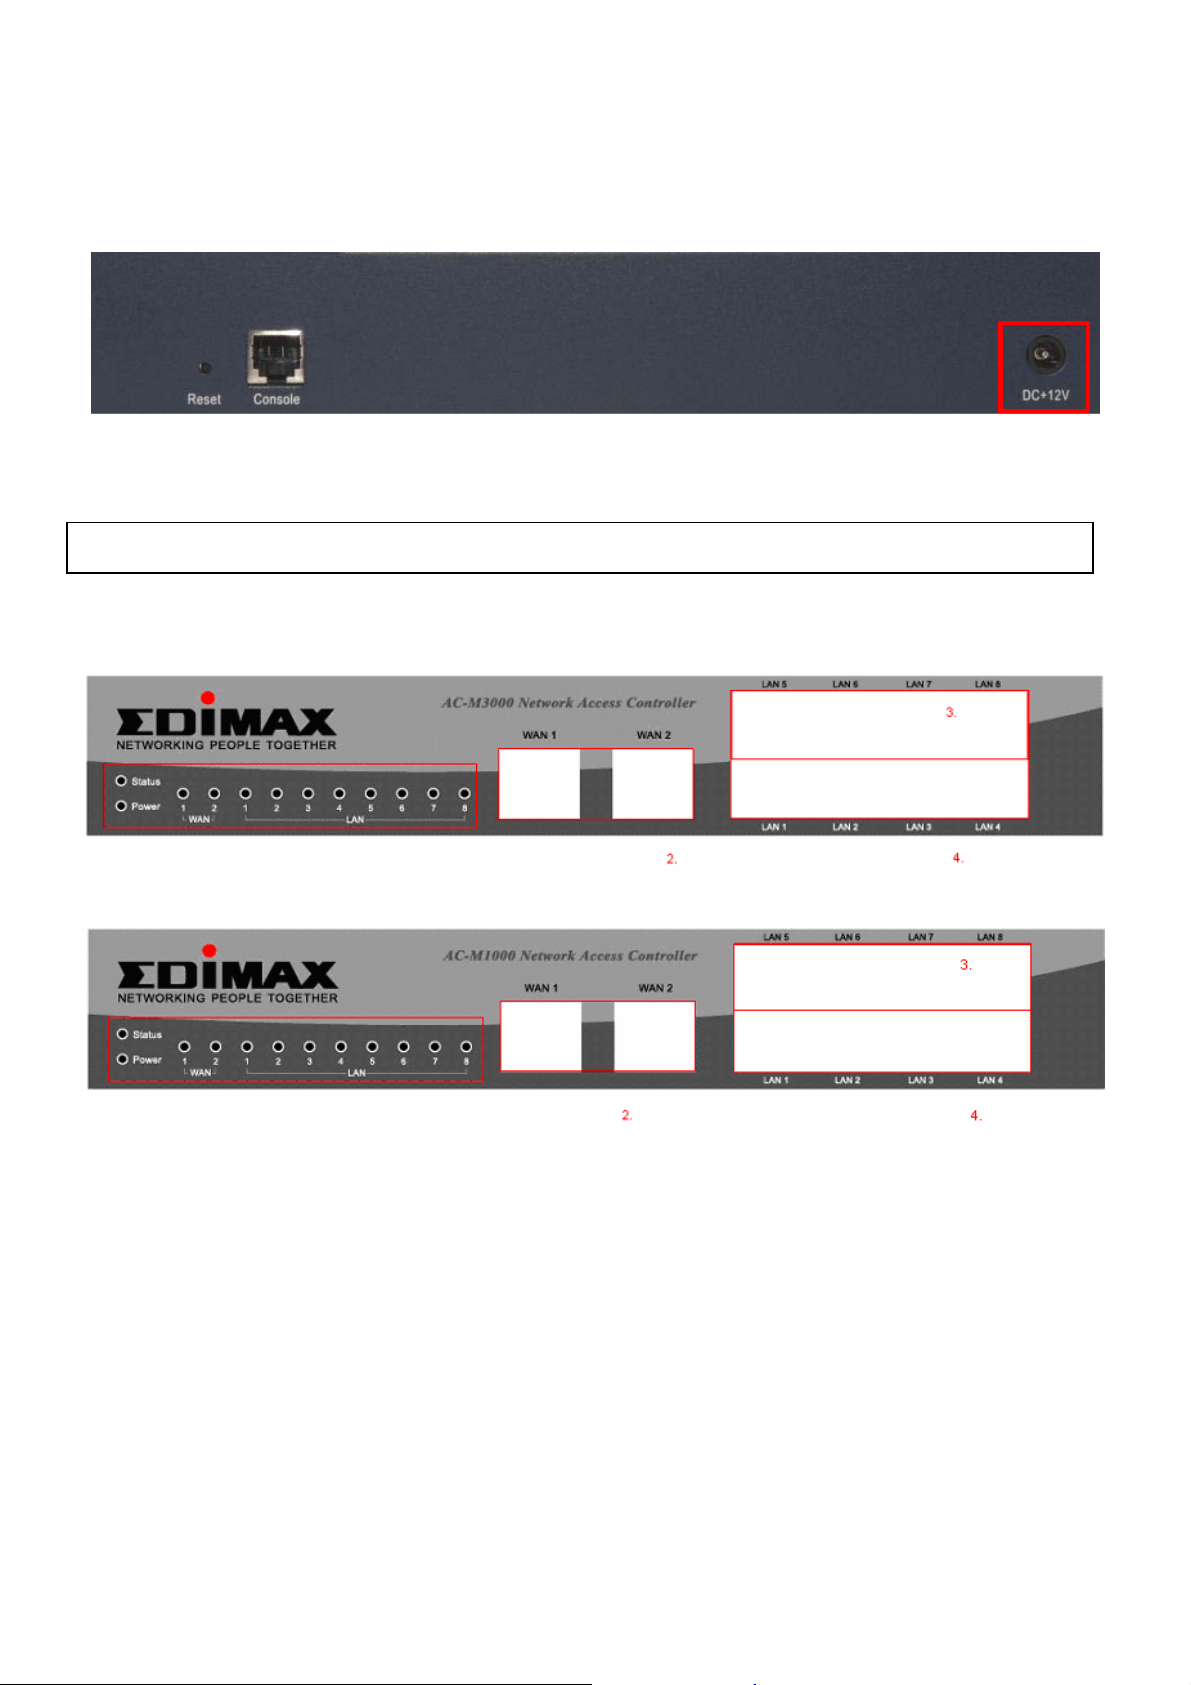
2. Connect an Ethernet cable to the WAN1 Port of the front panel. Connect the other end of the
cable to an external networking device such as an ADSL modem, a cable modem, a switch,
or a hub.
3. Connect an Ethernet cable to one of the LAN5~LAN8 Ports of the front panel. Connect the
other end of the cable to a user’s device such as a PC or a notebook.
4. Connect an Ethernet cable to one of the LAN1~LAN4 Ports on the front panel. Connect the
other end of the cable to networking devices such as an AP and/or a switch.
3
Page 6
EDIMAX AC-M3000 / M1000
Quick Installation Guide
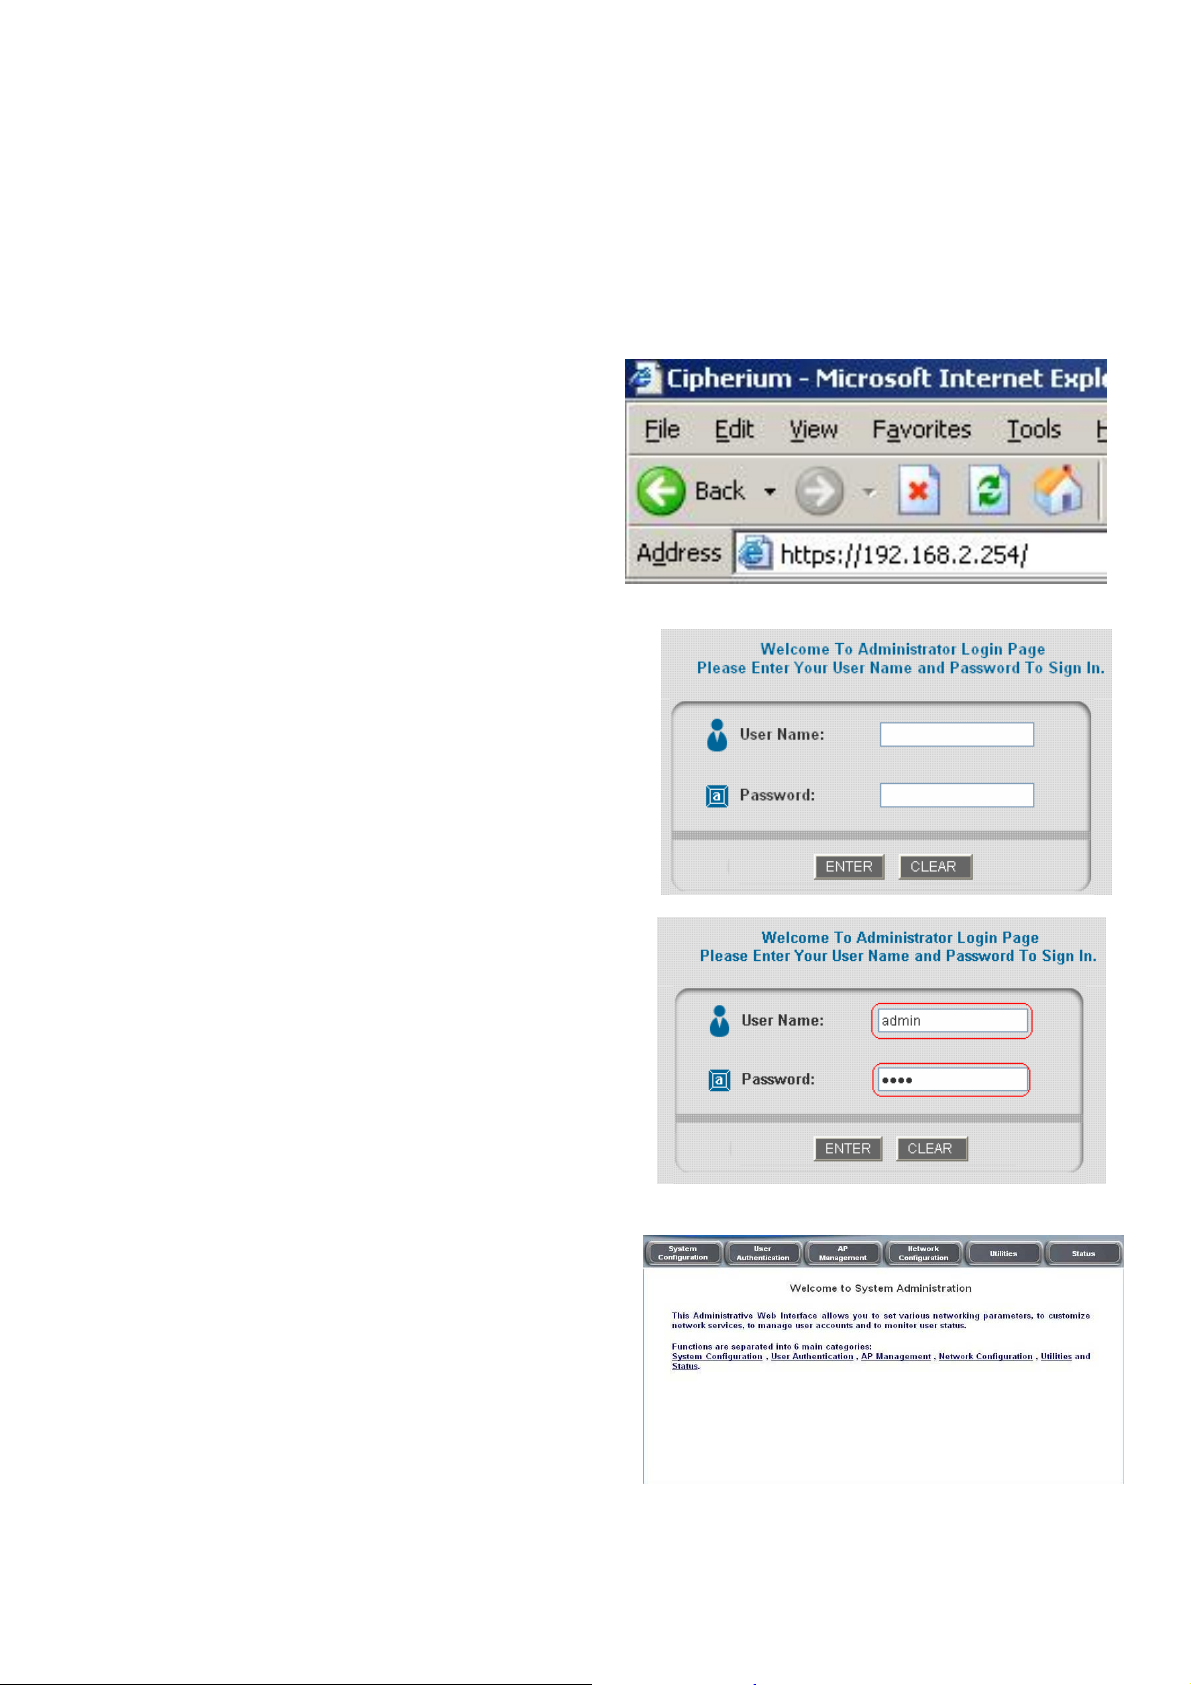
1.5 Web Management Interface
The Edimax AC-M3000 provides a web management interface for configuration. After completing
the hardware installation, the administrator can configure Edimax AC-M3000 via web browsers
with JavaScript enabled such as Internet Explorer version 6.0 and above.
Connect the PC to Edimax AC-M3000 via one
of the LAN5~LAN8 Ports. The IP address will
be assigned to the PC via DHCP automatically.
Launch the web browser to get access to the
Edimax AC-M3000 web management interface
via “https://192.168.2.254”. (Note: https is used
for a secured connection.)
The Administrator Login Page will appear.
Then, enter the default username “admin” and
password “1234”, and click Enter to login.
After successfully logging Edimax AC-M3000, a
“Welcome to System Administration” page will
appear on the PC screen.
4
Page 7
EDIMAX AC-M3000 / M1000
Quick Installation Guide
2. Applications for SMB
In this section, step by step configuration procedures are depicted on how to configure Edimax
AC-M3000 in an SMB network environment via configuration wizard.
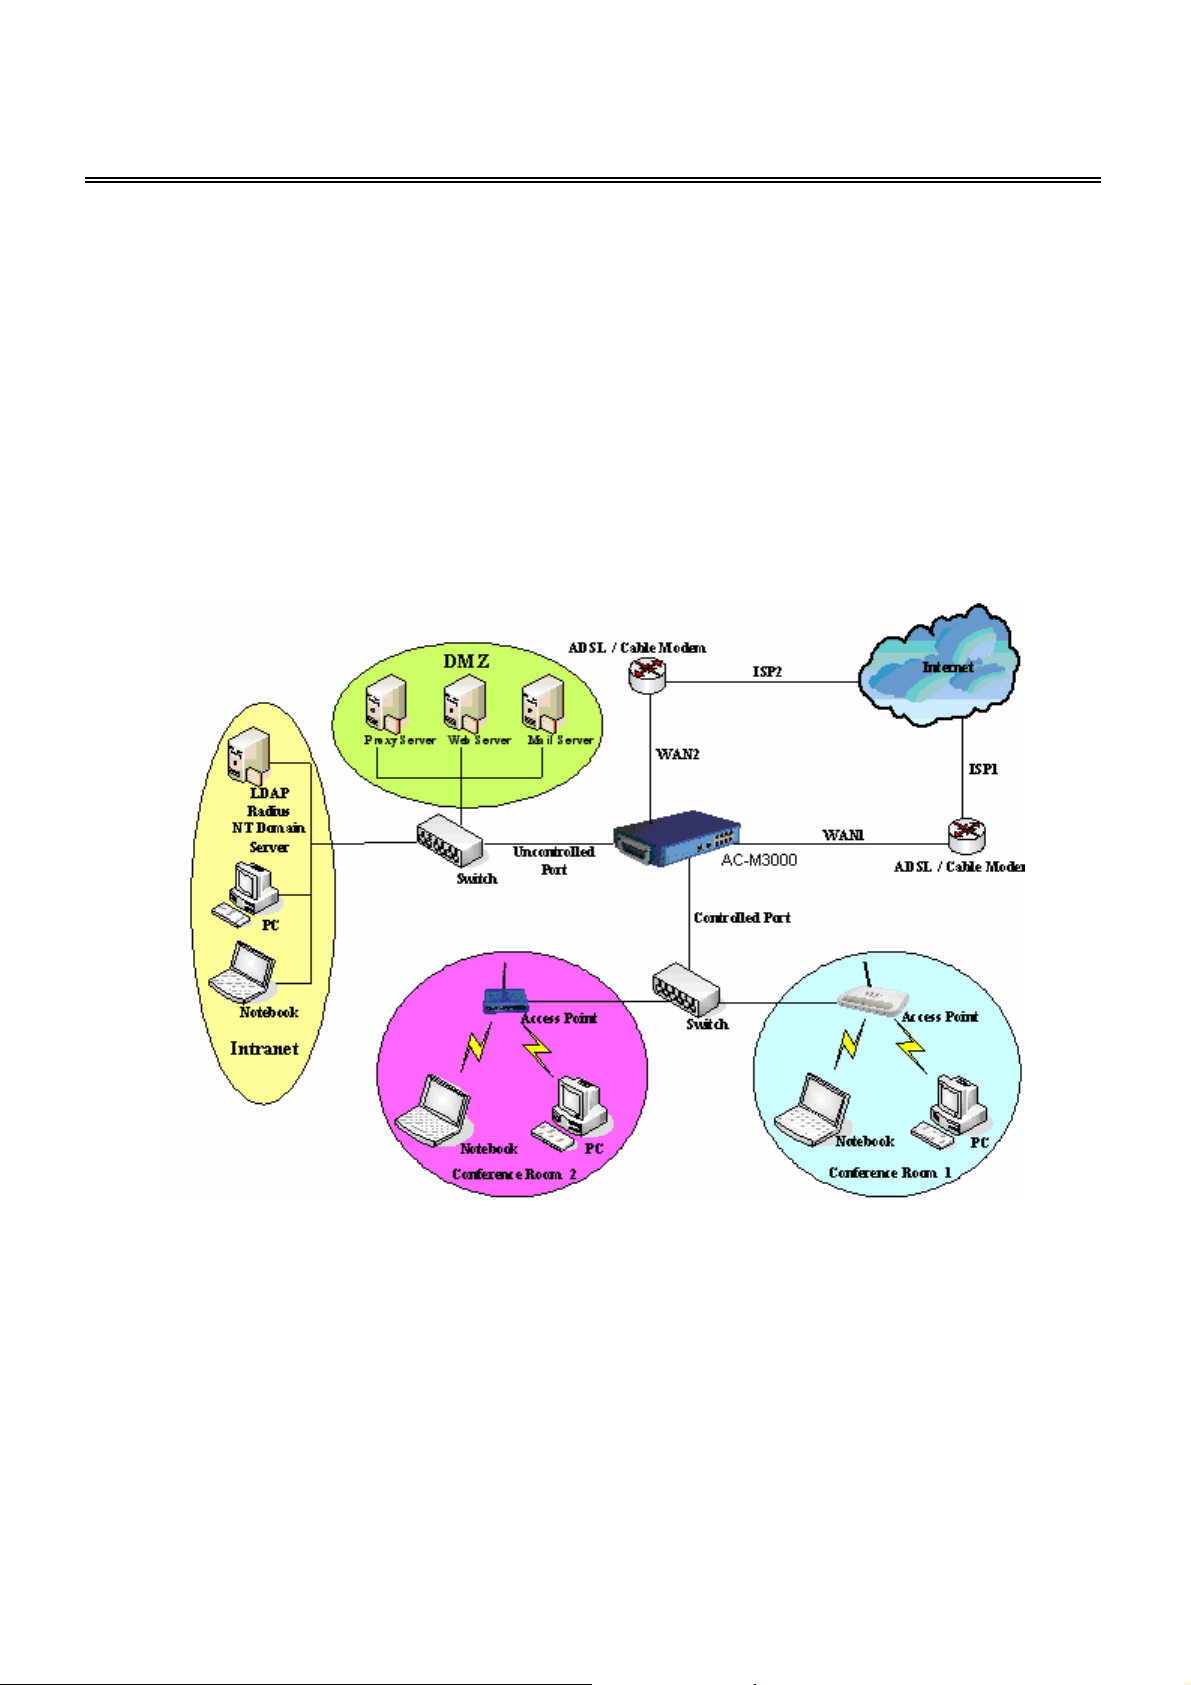
2.1 SMB network environment
In a SMB operating environment, it usually includes networking devices such as switches, hubs,
access points, etc. The Internet connection of a SMB is often via an ADSL or a cable modem.
The following figure is a typical SMB network example including switches, access points, and
connecting to Internet via ADSL.
5
Page 8
EDIMAX AC-M3000 / M1000
Quick Installation Guide
2.2 Quick configuration
The administrator can configure the Edimax AC-M3000 via its web management interface as
specified in section 1.5. In order to connect to the Internet, it is required to get the IP related
information such as IP address, subnet mask, and gateway address from your ISP first. Step by
step procedures are depicted in this section.
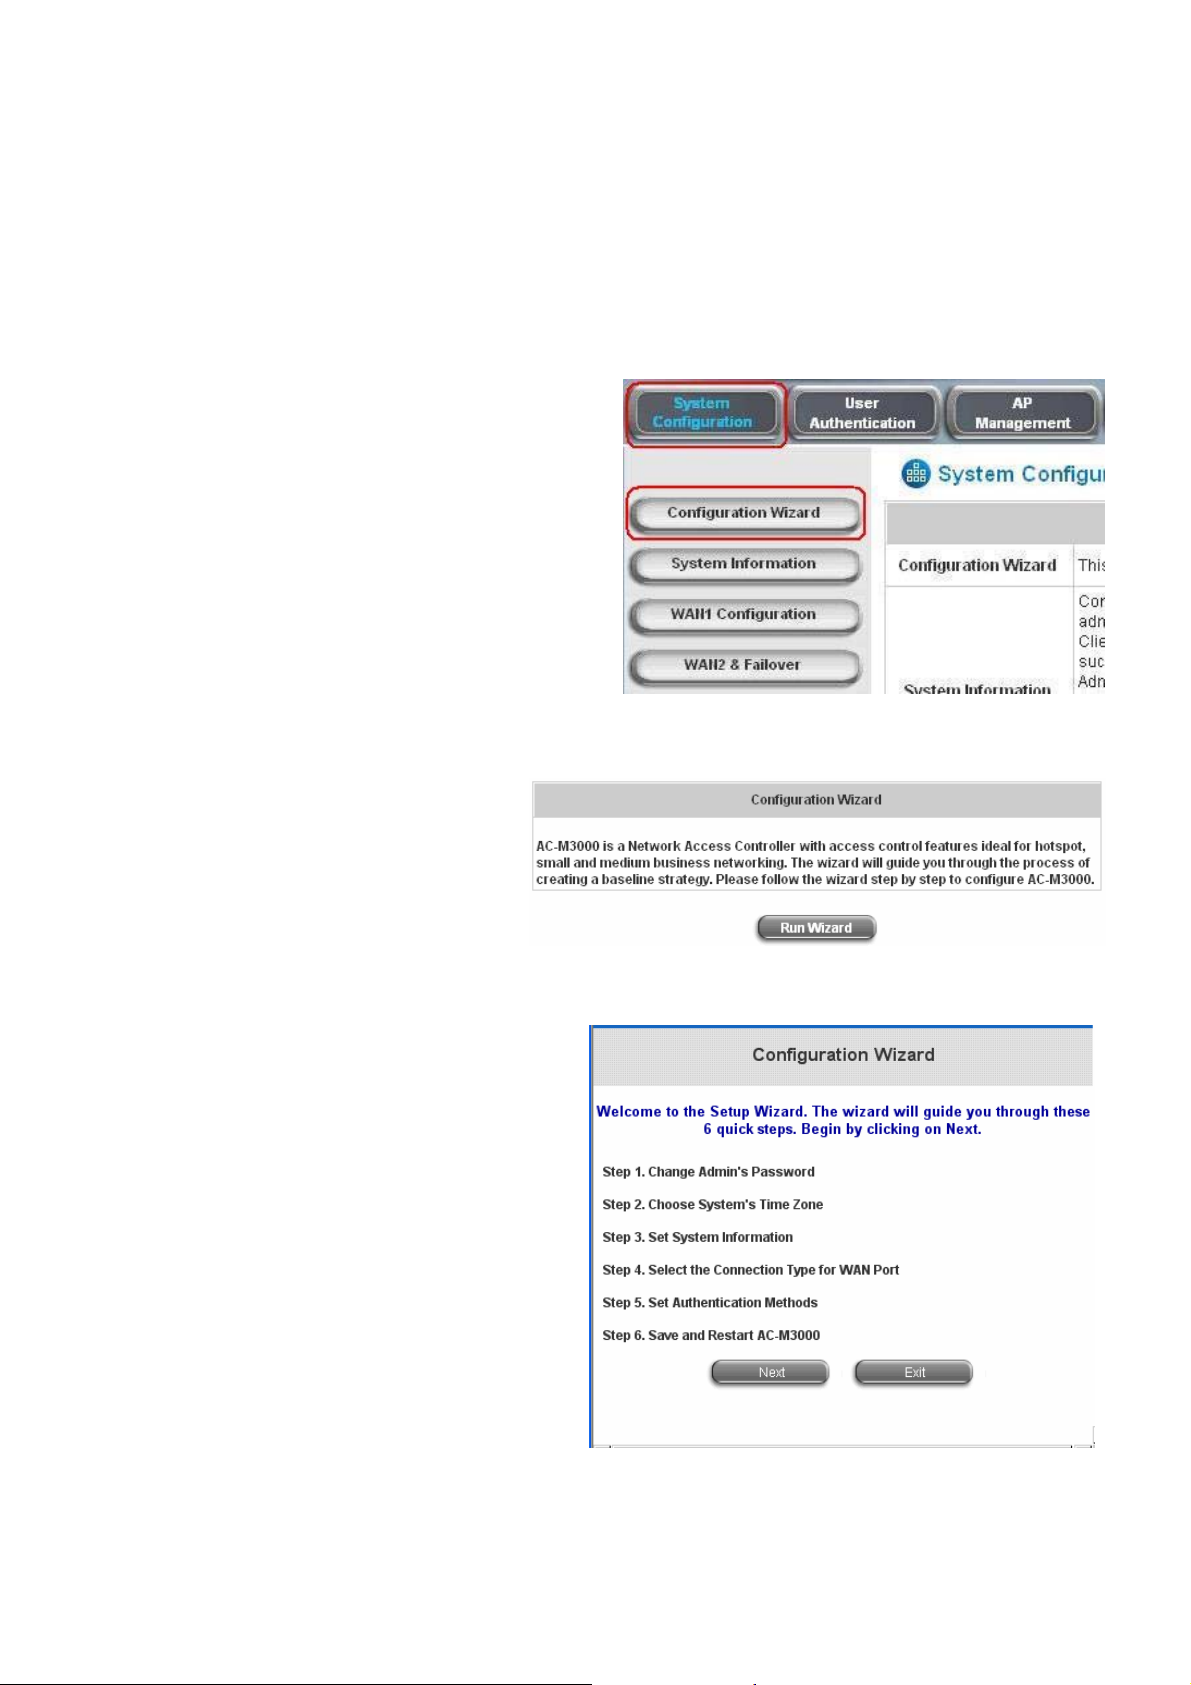
Click the System Configuration from the top
menu bar and the “System Configuration” page
will appear.
Click Configuration Wizard to start the
Configuration Wizard.
Click Run Wizard to begin the
Configuration Wizard process.
The Setup Wizard page appears. Please
click Next to start the “Configuration Wizard”.
6
Page 9

Step 1. Change Admin’s Password
Enter and verify the new password for the Admin
account if changing the password is needed
(Notice: 20 characters are the maximum and
spaces are not allowed).
Click Next to continue.
Step 2. Choose System’s Time Zone
Select a proper time zone via the combo box
EDIMAX AC-M3000 / M1000
Quick Installation Guide
menu.
Click Next to continue.
Step 3. Set System Information
y Home Page: Enter the URL that clients will
be redirected to after they successfully
login to Edimax AC-M3000.
y NTP Server: Enter the URL of an external
time server for Edimax AC-M3000 to
synchronize its system time or use the
default NTP Server setting.
DNS Server: Enter a DNS Server provided by
the ISP (Internet Service Provider) or use the
default DNS Server setting.
Click Next to continue.
7
Page 10

Step 4. Select the Connection Type for WAN
Port
Select the Internet connection type for WAN1
Port. Three Internet connection types can be
selected in this step, Static IP Address, Dynamic
IP Address, and PPPoE Client. PPPoE Client
connection type is selected for this example.
Click Next to continue.
Step 4 (Cont). Set PPPoE Client’s Information
Enter the Username and Password provided by
EDIMAX AC-M3000 / M1000
Quick Installation Guide
the ISP.
Click Next to continue.
Step 5. Set Authentication Methods
Enter an identified name as the postfix name in
the Postfix field (e.g. Local), and select a policy
to assign to users using this authentication
method (or use the default). Then select an
authentication method and click Next to
continue.
8
Page 11

Step 5 (Cont). Add User
A new user can be added into the local user
database. To add a user here, enter the
Username (e.g. test), Password (e.g. test),
MAC (optional) and assign the user to a policy
(or use the default). Upon completing a user
adding, more users can be added into this local
user account database by clicking the ADD
bottom.
Click Next to continue.
Step 6. Save and Restart AC-M3000
EDIMAX AC-M3000 / M1000
Quick Installation Guide
Click Restart to save the current settings and
restart Edimax AC-M3000. The Setup Wizard is
completed.
“Restarting now. Please wait for a moment...”
message will appear on the screen when Edimax
AC-M3000 is restarting.
Please don’t turn off Edimax AC-M3000 until the
restarting message is disappeared. This
indicates that the restart process has completed.
Now, the basic configuration for SMB environment is completed!
Page 12

EDIMAX AC-M3000 / M1000
Quick Installation Guide
After completing configuration, the user account generated by configuration wizard can be used
to login to the system to verify whether the configuration is done properly. First, connect to one of
the LAN1~LAN4 Ports with a client’s device such as a PC. The device will get an IP address
automatically via DHCP. Then open the web browser and access any URL, the default User
Login Page will appear.
Enter the User Name and Password created
in the local user account database by
configuration wizard, then click Submit to
connect to the network (e.g. test@Local for
the username and test for the password).
Attention: While using the local user account, please input “username@postfix” created
previously in the User Name field.
Congratulations!
Login page appearing means Edimax AC-M3000 has
been installed and configured successfully. Now, you
can access to the network.
Attention: For how to setup the “AP Management” feature, please refer to the “AP
Management” section of on the “Welcome to System Administration” page. The AP management
function of Edimax AC-M3000 supports Edimax 7206APg only. For other types of APs,
monitoring function is supported.
10
Page 13

EDIMAX AC-M3000 / M1000
Quick Installation Guide
‧ 若您安裝 / 使用本產品仍有任何疑問,歡迎撥打免費客服專線:0800-200-115 或 E-mail 客服
信箱:service@edimax.com.tw 詢問,我們將儘速為您處理。 謝謝您!
‧ 若需詳盡的設定方式請參考光碟片裏的使用手冊或至訊舟科技網站下載。
‧ 本手冊所記載之內容會因產品改良及軔體更新而有無預先通告的可能性,訊舟科技將隨時加以
改版或增編修訂,毋需另行通知,最新內容請以原廠網站 www.edimaxcom.tw 通告為準。
‧ 本手冊所提及之其他公司商標及產品名稱為所屬相關公司所有。
11
Page 14

EDIMAX AC-M3000 / M1000
Quick Installation Guide
1.
產品介紹
1.1 前言
訊舟 AC-M3000 是專為中小型之有線與無線網路環境,提供管理及存取控制所設計的網路存
取控制伺服器解決方案。主要的功能包括使用者管理、存取控制管理、AP 管理、及資安管理......
等。此快速安裝手冊係針對 AC-M3000 提供快速安裝與設定所需要的步驟與參考資料;並舉出一
個以中小型企業網路為範例,提供快速安裝與設定的方法。
註:此快速安裝手冊同時適用於
AC-M3000與AC-M1000
之差異,請參閱CD裡面使用者手冊。
Edimax AC-M3000
與
Edimax AC-M1000
,欲知
Edimax
1.2 包裝內容
請小心開啟包裝並確認以下所有附件無遺失或損壞。
z Edimax AC-M3000 x 1
z 快速安裝手冊 x 1
z 光碟片 (內含使用者手冊與快速安裝手冊) x 1
z 電源變壓器 (DC 12V) x 1
z RJ-45 網路線 (跳線) x 1
z Console 線 x 1
如果有任何附件遺失或損壞,請洽詢當地之供應商提供服務。
注意:建議不要丟棄產品之包裝材料,若產品需服務或退貨必須使用原包裝材料或相同之包裝材料
運送,以避免產品在運送過程中造成損壞。
12
Page 15
EDIMAX AC-M3000 / M1000
Quick Installation Guide
1.3 硬體介紹
Edimax AC-M3000 是一個以嵌入式平台所開發的 mini-desktop 產品。產品尺寸為:243 mm
(長) x 150 mm (寬) x 45.5mm (高),以下將從正面板與背面板來描述產品外觀。位於正面板的介面
包含:10 個(100Mbps)網路埠;其中 2 個為 WAN 埠、另 外 8 個為 LAN 埠。此外也提供 12 個 LED
燈號來顯示系統電源、系統狀態、以及 10 個高速乙太網路埠的連接狀態。背面板則提供包含:一
個 Reset 鍵、一個 console 埠、及電源插座。
.
正面板:
1. LED 燈號:Power x 1, Status x 1, WAN x 2, LAN x 8
2. WAN 埠:10 Base-T / 100Base-TX RJ-45 x 2
3. LAN 埠:10 Base-T / 100Base-TX RJ-45 x 8
Edimax AC-M3000 正面板:
Edimax AC-M1000 正面板:
背面板:
1. Reset 鍵 x 1
2. Console 埠: RJ-11 x 1
3. 電源插座 x 1
2
1
3
13
Page 16

1.4 硬體安裝
請依照以下步驟安裝 Edimax AC-M3000 硬體。
1. 將 DC 電源變壓器插入背面的電源插座上。
EDIMAX AC-M3000 / M1000
Quick Installation Guide
1
警告: 使用非包裝所附之電源變壓器將會照成機器損壞
。
Edimax AC-M3000 正面板:
Edimax AC-M1000 正面板:
2. 將網路線插入正面的 WAN1 埠,另一端請連接至 ADSL 數據機、纜線數據機 (Cable Modem)、
交換器 (Switch)、或集線器 (Hub) 上。
3. 將網路線插入正面的 LAN5~LAN8 埠,另一端請連接至個人電腦 (PC) 或筆記型電腦
(Notebook) 上。
4. 將網路線插入正面的 LAN1~LAN4 埠,另一端請連接欲管控的交換器 (Switch) 、或集線器
(Hub) 、或無線存取點 ( AP) 上。
14
Page 17

EDIMAX AC-M3000 / M1000
Quick Installation Guide
1.5 網路管理介面
Edimax AC-M3000 提供網路管理介面可進行設定,使用者可透過已安裝 JavaScript 的網路瀏
覽器 (例如微軟 IE 6.0 以上之版本) 來設定 Edimax AC-M3000。
將電腦連接至 LAN5~LAN8 其中的一個埠,再將您電腦的 IP
位址設為自動從 DHCP 取得。
開啟瀏覽器至之管理介面 URL “https://192.168.2.254”。
(請輸入 “https” 以確保連線之安全性。)
當連線至管理介面登入畫面。請先選擇需要的語言(預
設之語言為英文) ,管理介面將會更新並顯示至所選擇
的語言。
登入之預設使用者名稱為”admin”及預設密碼值
為”1234”。輸入 後按登入。
登入成功後,電腦視窗上即會出現歡迎使用管理系統
的畫面。
15
Page 18

EDIMAX AC-M3000 / M1000
Quick Installation Guide
2.
本單元以一個中小型企業網路為範例,描述如何利用設定精靈提供快速安裝與設定 Edimax
AC-M3000 的每一個步驟。
中小型企業網路應用
2.1 中小型企業網路環境
在中小型企業運作的網路環境中,通常包含了許多種類的網路設備,如交換器 (Switch)、集
線器 (Hub)、無線存取點 ( Access Point)….等, 並常以 ADSL 數據機 (ADSL Modem)或纜線數據
機 (Cable Modem)來連接至網際網路。下圖為一個典型的中小型企業網路例子,包含數台交換器、
無線存取點,並以 ADSL 連接至網際網路。
16
Page 19

EDIMAX AC-M3000 / M1000
Quick Installation Guide
2.2 快速設定
網路管理者可以透過在 1.5 節所提及的網路管理介面來設定 Edimax AC-M3000。為了網路設
定的需要,請先從 ISP 取得相關網路資訊,包含 IP 位址、子網路遮罩、及預設閘道器。本節將描
述利用設定精靈來設定 Edimax AC-M3000 的每一步驟,並使用內建的 Local
作為認證中小型企業網路內部員工的方法。
按一下上方選單的系統設定項目,即會看到系統設定的首
頁。再按一下左方設定精靈按鍵至設定精靈畫面。
按
執行精靈
即可開始執行設定精靈。
使用者認證方式
,
設定精靈出現後,按
下一步
開始設定。
17
Page 20

步驟 1. 變更管理者密碼
輸入一組新的系統管理員帳戶密碼並再重覆輸入
一次 (最多 20 個字元,不能有空格)。
按
下一步
到下一步驟。
步驟 2. 選擇時區
選擇系統所在地之時區。
EDIMAX AC-M3000 / M1000
Quick Installation Guide
按
下一步
到下一步驟。
步驟 3. 設定系統資訊
y 首頁︰使用者成功登入 Edimax AC-M3000 之
後將被導向您在此設定的網站位址。可輸入欲
設定的位址,或使用預設值。
y NTP 伺服器︰輸入網路上的校時伺服器網址以
提供 Edimax AC-M3000 校正時間,或使用預
設值。
y DNS 伺服器︰輸入 ISP 所提供的 DNS 伺服器
位址。如果不確定 DNS 的 IP 位址,請洽 ISP,
或使用預設值。
按
下一步
到下一步驟。
18
Page 21

步驟 4. 選擇 WAN 埠連線方式
依據您的網路對外連線模式選擇。系統提供了三種
連線方式:靜態 IP 位址、動態 IP 位址、PPPoE
用戶。在此選用 PPPoE 為設定範例。
EDIMAX AC-M3000 / M1000
Quick Installation Guide
例如:選擇 PPPoE 用戶,按
下一步
到下一步驟。
步驟 4 (續). 設定 PPPoE 用戶資訊
輸入 ISP 所提供之使用者名稱和密碼。
按
下一步
到下一步驟。
步驟 5. 設定認證方式
請先為認證方式設定 Postfix 名稱。在 Postfix 欄
位輸入一個易分辨使用者名稱來源的名稱 (例
如︰Postifx1),然後指定一個
政策
(或使用預設
值)。再選擇一個認證方式 (或使用預設值)。在本
範例中,將選擇 Local 使用者為認證方式。
按
下一步
到下一步驟。
19
Page 22

步驟 5 (續). 新增使用者
當選擇 Local 使用者認證方式時,可以新增使用者
到 local 使用者資料庫。如果要在這裡新增使用者,
請輸入使用者名稱 (例如︰test)、密碼 (例如︰
test)、MAC (非必填),並指定一個政策 (可使用預
設值)。按一下新增以新增使用者。
按
下一步
到下一步驟。
步驟 6. 儲存並重新啟動 AC-M3000
按
重新啟動
儲存所有設定值並重新啟動系統。設定
精靈到這裡完成所有步驟。
EDIMAX AC-M3000 / M1000
Quick Installation Guide
在等待重新啟動之過程中,將會看到 “重新啟動
中,請稍後
請勿中斷此程式的過程,並稍待一會兒直到歡迎登入使用管理系統畫面出現,即表示已完成重新啟
動。
” 畫面。
現在已經完成中小型企業網路的基本設定﹗
如果到目前為止所有的步驟都正確的完成了,接下來可進一步將用戶端連結到 Edimax AC-M3000
底下所管理的網路上,體驗網路存取環境。首先將一部用戶端設備連結到 Edimax AC-M3000
LAN1~LAN4 端的網路埠上,並且設定電腦使用動態取得 IP 的網路設定方式。用戶端取得網路位
20
Page 23

EDIMAX AC-M3000 / M1000
稱
@p
Quick Installation Guide
址之後,開啟一個網際網路瀏覽器,並連結任何一個網站。接下來預設的登入網頁會顯示在網際網
路瀏覽器中。
輸入在 Local 使用者料庫所建立之帳號名稱與
密碼 (例如︰在使用者名稱欄位輸入
test@Local,密碼欄位輸入 test) 來與網路連
線,然後按 Submit 登入。
注意︰如果所使用的為
ostfix” 。
local
使用者帳號,請在使用者名稱欄中輸入之前所建立之 “使用者名
恭禧﹗
使用者登入成功表示 Edimax AC-M3000 安裝設定
成功。將可使用瀏覽器連結至任何一個網頁。
如需更多訊息,請參閱使用者手冊。
注意:完整的
AP
管理功能,僅針對本公司的無線基地台
無線基地台則僅支援遠端監看功能。
21
7206APg
所設計,如您採用其他公司的
P/N: V10020061127
Page 24

EDIMAX AC-M3000 / M1000
Quick Installation Guide
22
Page 25

EDIMAX AC-M3000 / M1000
Quick Installation Guide
23
 Loading...