

EdgeWave IPRISM WSA7850, IPRISM WSA7750, IPRISM WSA7550, IPRISM 35G, IPRISM 75G Quick Start Manual
Page 1
iPrism Secure Web Gateway
Quick Start Guide - V8.x
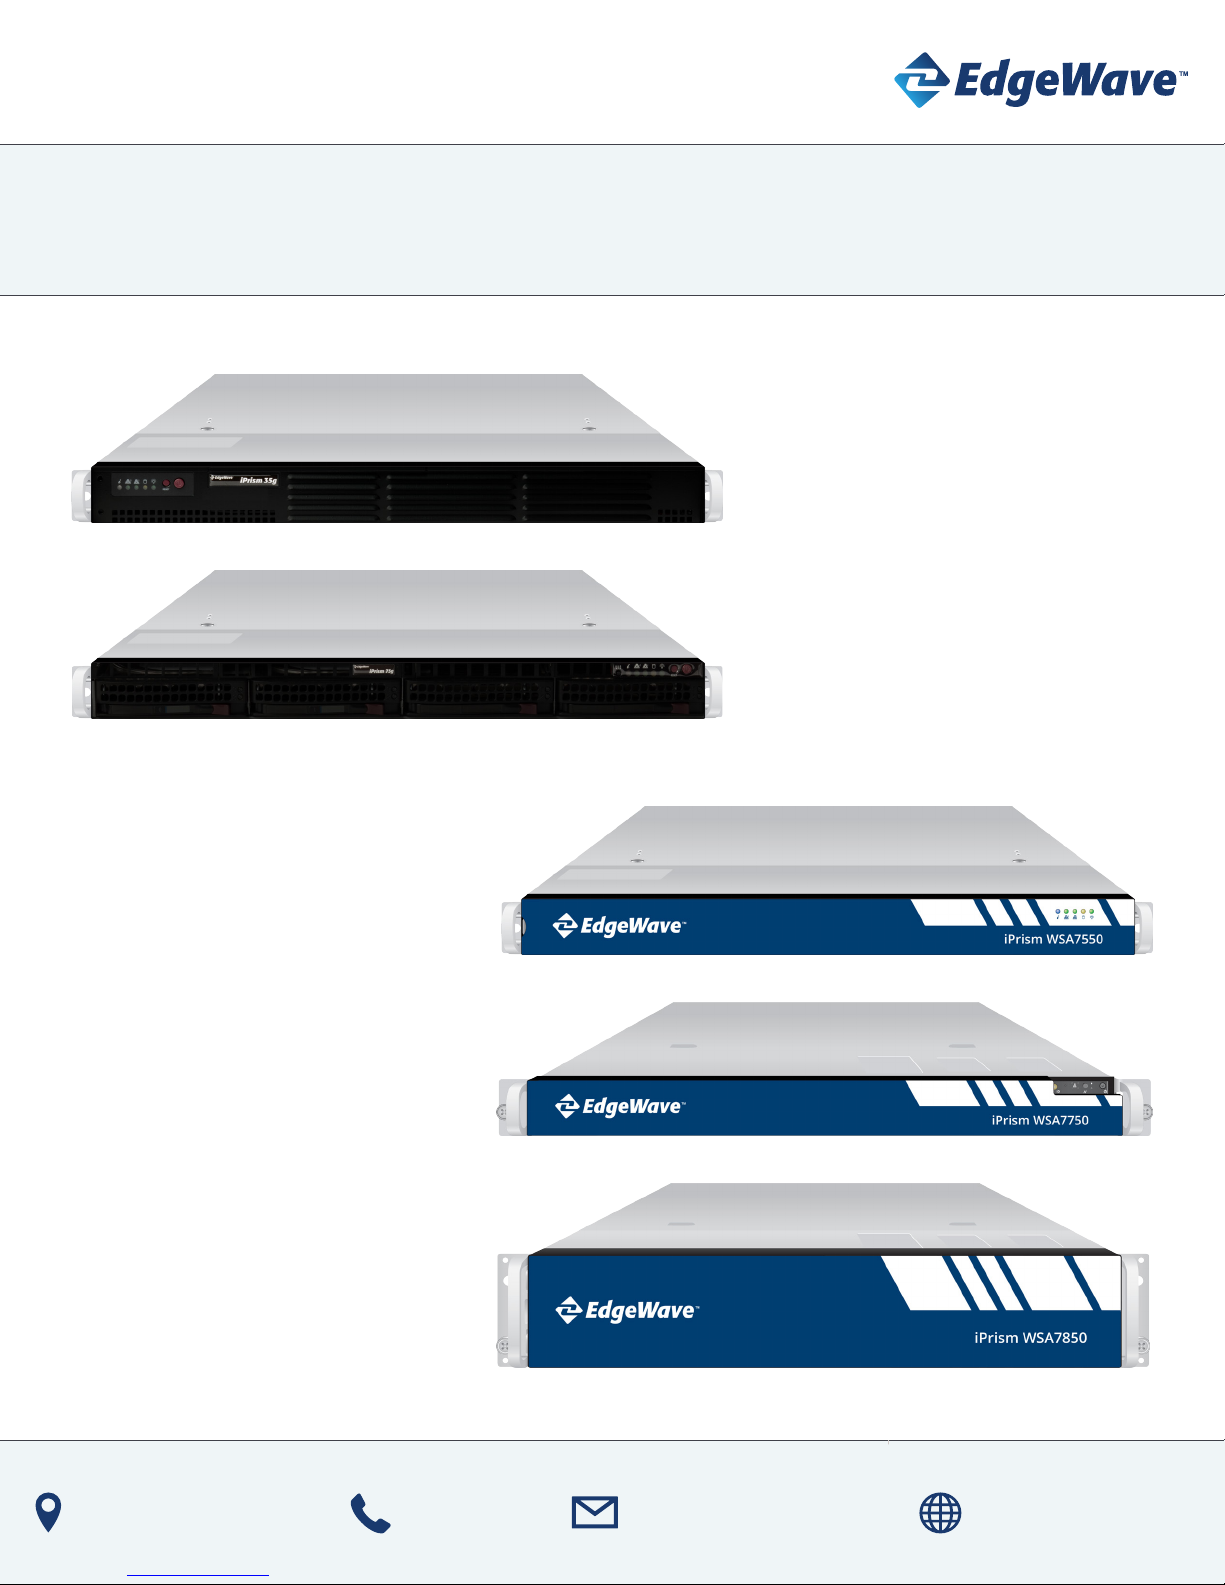
35G
75G
WSA7550
WSA7750
WSA7850
4225 Executive Sq, Ste 1600
La Jolla, CA 92037-1487
Call Us
1-800-782-3762
Email Us
wavesupport@edgewave.com
Visit Us
www.edgewave.com
Page 2
iPrism Secure Web Gateway
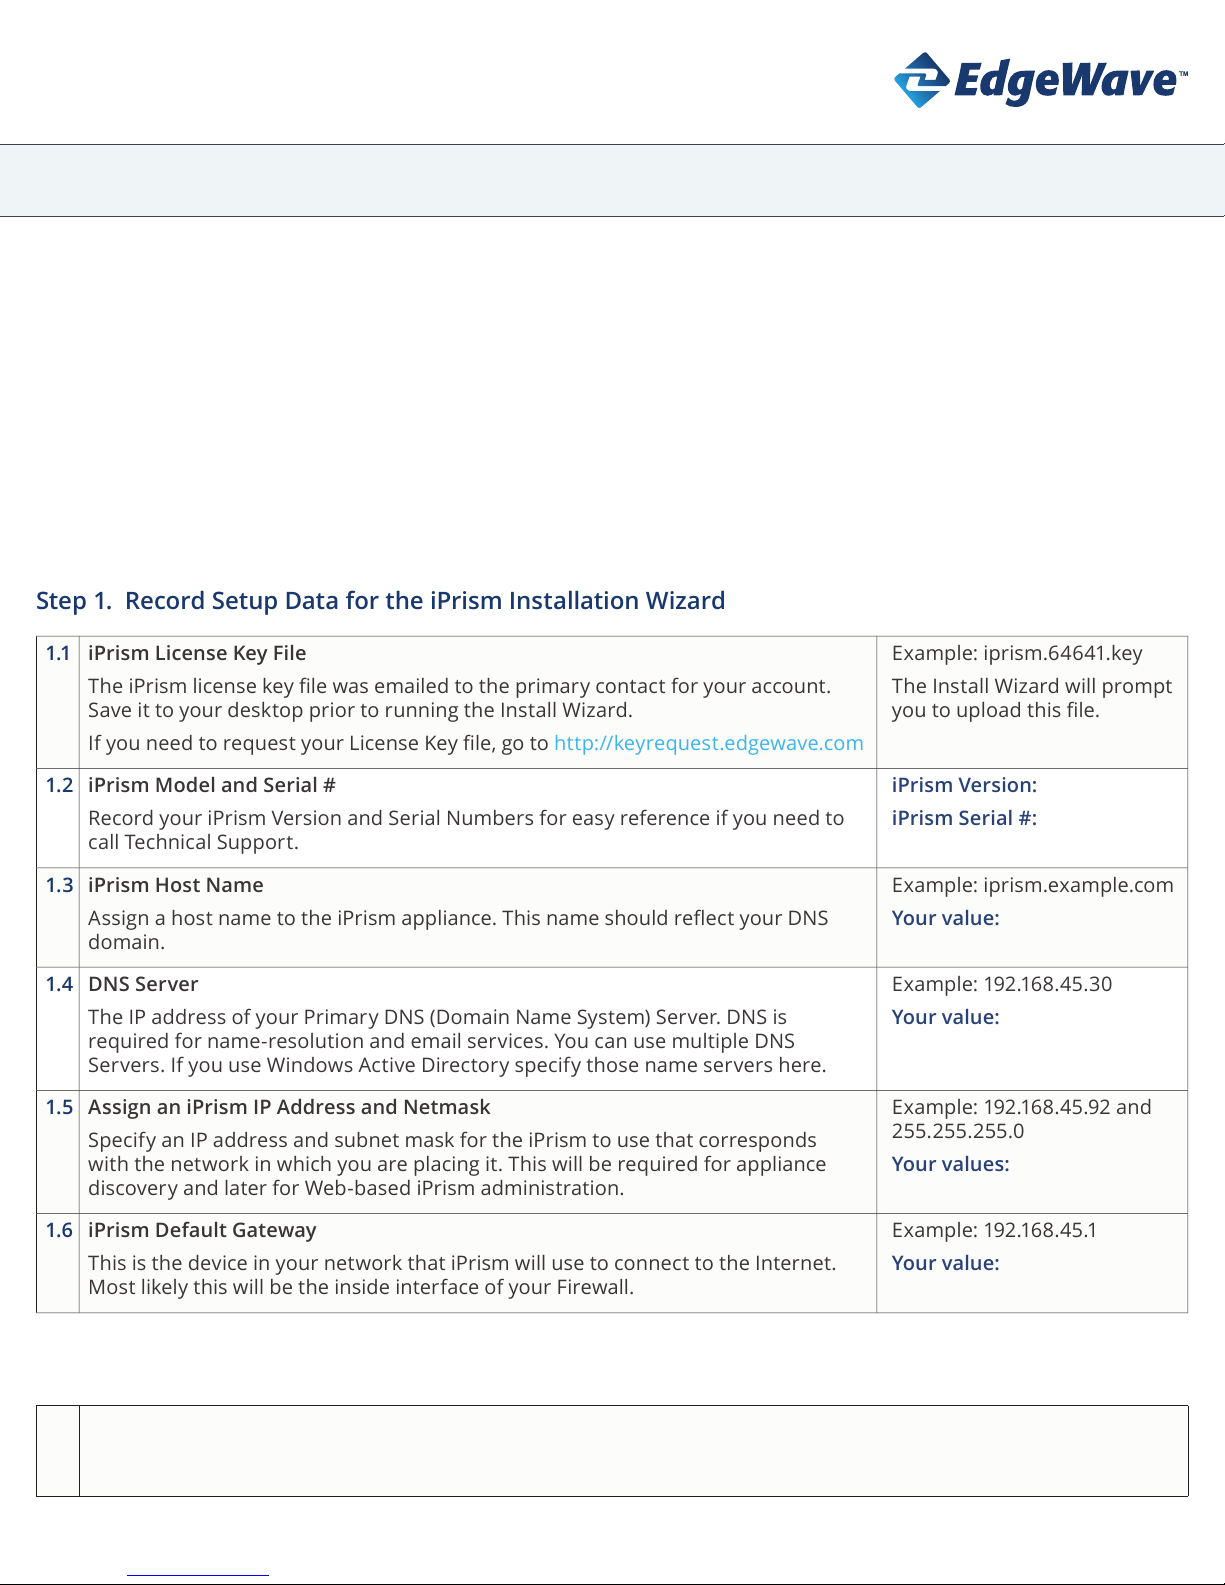
Step 1. Record Setup Data for the iPrism Installation Wizard
1.1 iPrism License Key File
The iPrism license key le was emailed to the primary contact for your account.
Save it to your desktop prior to running the Install Wizard.
If you need to request your License Key le, go to http://keyrequest.edgewave.com
Example: iprism.64641.key
The Install Wizard will prompt
you to upload this le.
1.2 iPrism Model and Serial #
Record your iPrism Version and Serial Numbers for easy reference if you need to
call Technical Support.
iPrism Version:
iPrism Serial #:
1.3 iPrism Host Name
Assign a host name to the iPrism appliance. This name should reect your DNS
domain.
Example: iprism.example.com
Your value:
1.4 DNS Server
The IP address of your Primary DNS (Domain Name System) Server. DNS is
required for name-resolution and email services. You can use multiple DNS
Servers. If you use Windows Active Directory specify those name servers here.
Example: 192.168.45.30
Your value:
1.5 Assign an iPrism IP Address and Netmask
Specify an IP address and subnet mask for the iPrism to use that corresponds
with the network in which you are placing it. This will be required for appliance
discovery and later for Web-based iPrism administration.
Example: 192.168.45.92 and
255.255.255.0
Your values:
1.6 iPrism Default Gateway
This is the device in your network that iPrism will use to connect to the Internet.
Most likely this will be the inside interface of your Firewall.
Exa m pl e : 192.16 8. 45.1
Your value:
V8.xQuick Start Guide
IMPORTANT: Please read through the Quick Start Guide prior to setup. Make sure to have your iPrism License Key le
saved to your desktop, and record the information listed in Step 1 prior to installation.
Quick Installation of iPrism
The proxy-mode conguration outlined in this guide provides an easy temporary setup for evaluating and testing iPrism
using proxied client trac. Once you are familiar with using iPrism in Proxy-Mode, we recommend reconguring iPrism for
Transparent-Mode deployment to fully utilize the trac management and reporting features.
For more information on installation and conguration (including transitioning to Transparent-Mode), see the iPrism
Installation Guide available on the iPrism support page at https://www.edgewave.com/support/iprism-documentation/
Step 2. Connect the iPrism and Log In
2.1 Connect a monitor and keyboard to the iPrism and log in as the user admin. At the menu, follow the instructions for
setting the IP address for iPrism, including the netmask and default gateway. Make sure these values are reachable
from the workstation you will use to perform the initial iPrism conguration.
Page 3

iPrism Secure Web Gateway
V8.xQuick Start Guide
2.2 Go to your workstation, and point your browser to the IP address that you just gave iPrism, using port 80 (it will
redirect to the https port).
Step 3. Run the Installation Wizard
To complete the Installation Wizard you will need the setup data from Step 1 and your iPrism License Key le (should be
saved to your desktop). The following is an outline of the Installation Wizard steps:
3.1 Username and Password
The Wizard will prompt you for a user name and password. The defaults are Username: iprism; Password: setup
3.2 Agree to License
You will be prompted to accept the License Agreement. Read the agreement and click Agree to continue
3.3 New or Restore Cong
New Customers should select Start a new conguration and click Next to continue.
Existing customers can restore their settings from their backup by selecting Restore from archive and then
uploading their archive. Once that is completed the iPrism will shut down. Proceed to Step 4
3.4 Upload License Key
Browse to the location where you saved your iPrism License Key le, then click Next to continue.
3.5 Enter Registration Information
Enter your contact information. Choose carefully as your Administrator email is used for delivering important iPrism
product update information. It is recommended that you change your password by selecting Set Password.
3.6 Network Settings
Enter the setup data you recorded in Step 1. To enter the IP address for your DNS, click DNS Settings then Add in the
Name Servers pop-up window. Enter your DNS address and click OK to continue. Enter your IP address recorded in
Step 1.5. Select OK then Next to continue.
Note: Some of the values on this page are pre-populated, they can be changed.
3.7 Filter Settings
Specify whether to monitor and/or block Web and application trac, and select the iPrism time zone.
3.8 Review Settings
Review the conguration settings and click Apply. To make changes to any of the settings, click Back.
Note: You can only use the Print option with a local printer. Conguration reports will be available once you reboot.
3.9 iPrism will save and apply the settings and reboot automatically – this may take 4-5 minutes.
Your iPrism Installation is Now Complete
Step 4. Shut Down and Relocate the iPrism Appliance (If it is not already located in a production setting)
Ensure proper shut down and relocate the iPrism to a network or subnet that will be convenient for testing, typically near
your Internet gateway. Connect a network cable between your switch and the INTERNAL iPrism interface, and turn on the
power.
Page 4

iPrism Secure Web Gateway
V8.xQuick Start Guide
Step 5. Redirect HTTP Trac to iPrism for Testing
Redirect Web requests to iPrism by conguring one or more clients to proxy to iPrism, using the default port 3128 and the
iPrism’s IP address. All HTTP/HTTPS requests originating from workstations that proxy to the iPrism will be ltered.
For more information on setting up and testing iPrism for evaluation purposes, refer to our Evaluation Guide. When you
are nished evaluating in Proxy-Mode, refer to the iPrism Installation Guide for transitioning to Transparent-Mode.
Both guides are available at https://www.edgewave.com/support/iprism-documentation/
In the unlikely event that you need to return your iPrism, contact Technical Support at (858) 676-5050 for a Return
Material Authorization (RMA) number. A replacement unit will be shipped to you. You can return the defective unit in
the box in which your replacement unit was shipped.
For further assistance submit a request at https://www.edgewave.com/support/iprism-support-ticket/ or contact
iPrism Technical Support at the number shown above.
Interested in Upgrading Your iPrism Appliance?
iPrism 35g - 35+ Mbps ltered throughput and up to 650 work stations
iPrism 75g - 75+ Mbps ltered throughput and up to 2,000 work stations
iPrism WSA7550 - 150+ Mbps ltered throughput and up to 4,000 work stations
iPrism WSA7750 - 500+ Mbps ltered throughput and up to 10,000 work stations
iPrism WSA7850 - 1+ Gbps ltered throughput and up to 20,000 work stations
Stop Phishing Attacks
EdgeWave ePrism Email Security provides exclusive Zero Minute Defense to ensure phishing and malware never reach
an employee’s inbox. Also available: Encryption, DLP, and Continuity
Learn more at https://www.edgewave.com/products/eprism-email-security/
Archive and Protect Your Sensitive Data
EdgeWave Secure Content Archive solution gives enterprises a robust, powerful information archiving solution that
reduces eDiscovery time, supports litigation and compliance needs, and complements MS Exchange and Oce 365
with more advanced features. Includes email, le and SharePoint.
Learn more at https://www.edgewave.com/products/secure-content-archive/
 Loading...