

Page 1
Administration Guide
V7.0
800-782-3762
www.edgewave.com
iPrism Web Security
Page 2

© 2001 – 2012 EdgeWave. All rights reserved. The EdgeWave logo, iPrism and iGuard are
trademarks of EdgeWave Inc. All other trademarks and registered trademarks are hereby
acknowledged.
Microsoft and Windows are either registered trademarks or trademarks of Microsoft Corporation in
the United States and/or other countries.
Other product and company names mentioned herein may be the trademarks of their respective
owners.
The iPrism software and its documentation are copyrighted materials. Law prohibits making
unauthorized copies. No part of this software or documentation may be reproduced, transmitted,
transcribed, stored in a retrieval system, or translated into another language without prior permission
of EdgeWave, Inc.
iPrismAdmin07.000.01
Page 3

Contents
Chapter 1 Introduction 1
About iPrism 1
About this Guide 1
Who Should Use this Guide? 1
Knowledgebase, Tutorials and Technical Support 2
Installation Notes 2
Chapter 2 Overview 4
How iPrism Works 4
The Filtering Database 4
Deciding What Gets Blocked 4
Assigning Profiles 7
Getting Past Blocked Sites 7
How iPrism Filters Internet Activity 8
Introduction to Profiles 9
Proxy Mode 10
Bridge (Transparent) Mode 11
Using the Management Interface 12
Logging In and Out of iPrism 13
Restarting and Shutting Down iPrism 14
The iPrism Home Page 14
Chapter 3 Profiles & Filters 15
Custom Filters 15
Adding a Custom Filter 16
Editing a Custom Filter 18
Deleting a Custom Filter 18
Importing and Exporting Custom Filters 19
Profiles 19
How iPrism Uses Profiles 20
iPrism’s Default Profiles 21
Web Profiles 21
Adding a Web Profile 22
Copying a Profile 23
Deleting a Profile 24
Application Profiles 24
Adding an Application Profile 25
iii
Page 4

Copying an Application Profile 27
Deleting an Application Profile 28
Authentication and Assigning Profiles to Users 28
Assigning Profiles to a Set of IP Addresses (Workstations) 28
Quotas and Warnings 28
Email Alerts 30
Adding an Email Alert 31
Editing an Email Alert 32
Deleting an Email Alert 33
Quotas 33
Adding a Quota 35
Editing a Quota 36
Deleting a Quota 37
Warnings 37
Adding a Warning 38
Editing a Warning 40
Deleting a Warning 40
Access Control Lists (ACLs) 40
Creating a New Web ACL 40
Creating a New Application ACL 42
Editing an ACL 43
Deleting an ACL 43
Lock ACL 43
Current Overrides 45
Pending Requests 46
Granting Requests 47
Denying Requests 47
Recent Blocks 48
Remote Filtering 48
Using Remote Filtering 49
Enabling Remote Filtering 49
Chapter 4 Users & Networks 53
Local Users 53
Adding Users 54
Editing a Local User 55
Deleting a Local User 56
Importing Users 56
Exporting Users 57
iv
Page 5

Groups 57
Adding a Group 58
Editing a Group 59
Deleting a Group 59
Mapping Groups to Profiles 59
Nested Groups 60
Privileges 61
Networks 63
Adding a Network Profile 64
Editing a Network Profile 67
Deleting a Network Profile 67
VLAN Management 67
Adding a VLAN Description 68
Editing a VLAN Description 69
Deleting a VLAN Description 69
Admin Roles 70
Adding an Admin Role 71
Editing an Admin Role 74
Deleting an Admin Role 75
Exceptions 75
Adding an Exception 75
Editing an Exception 77
Deleting an Exception 77
Remote Users 77
Adding a Remote User 79
Editing Remote Users 79
Deleting a Remote User 80
Importing Remote Users 80
Exporting Remote Users 81
Remote Upgrades 82
Chapter 5 Reporting 85
Chapter 6 Maintenance 86
Appliance Updates 86
Installing a New Hotfix 87
Rebooting after Installing Hotfixes 87
Uninstalling a Hotfix 87
Backup and Restore 88
Backing Up 88
v
Page 6

Restoring 89
Restoring Your System from a Local Backup 89
Restoring iPrism to its Default (Factory) Configuration 89
Event Log 89
Deleting Access Event Records 90
Policy Test 90
Self Check 91
Send Test Email 92
Site Rating & Test 92
Support Tunnel 93
Test Directory Services 93
Chapter 7 System Settings 95
Central Management 95
Customizable Pages 95
Customizing Pages 96
Authentication, Access Denied, Quota Notification, and Warning Notification
Pages 96
Customized HTML 96
Specified URL 97
All Other Pages 98
Reporting Logo 99
Customizable Page Tags 100
Directory Services 101
Choosing an Authentication Mechanism 102
Local Authentication 103
LDAP Authentication 103
Setting up the iPrism LDAP Client 103
Authentication from the User’s Perspective 105
Microsoft Windows Active Directory Authentication (Active Directory 2000/2003) 106
Assigning iPrism Profiles to Windows AD Global Groups 107
Microsoft Windows Active Directory Authentication (Active Directory 2008) 107
Prerequisites 107
Setting up iPrism to authenticate against a Windows 2008 server 108
Migrating from AD 2003 to AD 2008 111
Enterprise Reporting 111
Event Logging 111
Syslog Export 111
Email Settings 112
vi
Page 7

FTP Settings 113
High Availability 113
Setup 114
Recovery 116
License Key 117
iPrism Certificates 117
Uploading Your License Key 119
Local Categories 119
Network ID 120
Network Services 125
Network Hardening (Protecting Against DoS Attacks) 126
Enabling SNMP 126
The SNMP Community String 126
WCCP 127
Configuring WCCP Settings in iPrism 127
Configuring SMTP Relay Settings 128
Enabling the Co-Management Network 129
Pending Request Options 130
Ports 131
Proxy and Configuration Ports 132
Redirect and HTTPS Ports 133
Proxy 134
Slaving iPrism to a Parent Proxy (Proxy Mode) 135
Enabling an Upstream Proxy in Bridge (transparent) Mode 136
HTMLHeader Handling 136
Configuring the Filter List/System Update Proxy Server 137
System Preferences 137
Backup Settings 138
Bypass Authentication 139
Current Date and Time 139
Filter Failover Mode 140
Setting or Changing the Supervisor Password 140
Filter List (iGuard) Updates 141
Scheduling Filter List (iGuard) Updates 141
Checking iPrism’s Filter List Status 141
System Failover Mode 141
System Updates 142
Proxying for External Users 142
Scheduled Reboot 143
vii
Page 8

Unrated Pages (iARP) 144
User Settings 145
Chapter 8 System Status 146
About 146
Administration Log 146
Configuration Summary 147
Connectivity 147
Pinging a Host 148
Tracing Network Activity 148
Perform a DNS Lookup 148
Refreshing the System Updates Server 148
Routing Table 148
Security Log 149
Status 149
Chapter 9 Central Management 151
Before You Begin 151
Setting Up a Master/Slave Configuration 152
Designating Slave Systems 152
Designating the Master System 153
Changing the Master System 155
Removing a Slave System 156
Using Standalone Mode 156
Upgrading iPrisms in a Central Management Configuration 156
Chapter 10 Override Management 158
Access Denied Page Options 158
Using Override Privileges 159
Overriding a Blocked Web Site 159
Using Access Requests 161
Requesting Access to a Site 161
Managing Override Access 162
Appendix A Filtering Categories 163
Site Rating Categories 163
Sex Category 163
Adult 163
Lingerie/Bikini 164
Nudity 164
viii
Page 9

Pornography 165
Sexuality 165
Questionable Activities Category 166
Copyright Infringement 166
Computer Hacking 166
Intolerance/Extremism 167
Miscellaneous Questionable 167
Profanity 167
Tasteless 168
Weapons/Bombs 168
Violence 169
Security Exploits Category 169
Phishing 169
Spyware/Adware 169
Malware 170
Society Category 170
Alt/New Age 170
Art/Culture 171
Family Issues 171
Government 172
Politics 172
Social Issues 173
Keywords 173
News 173
Classifieds 173
Religion 174
Cult 174
Alternative Lifestyle 175
Internet (Web) Category 175
Anonymizer 175
Discussion Forums 175
Online Chat 176
Translators 176
Image Host 176
File Host 176
Peer to Peer 177
Email Host 177
Safe Search Engine 177
Sharewares Download 177
ix
Page 10

Web Banners 178
Web Host 178
Web Search 178
Portals 179
High Bandwidth 179
Dynamically Detected Proxies 179
Business Category 180
Specialized Shopping 180
Dining/Restaurant 180
Real Estate 180
Automotive 180
Internet Services 180
Corporate Marketing 180
Finance 181
Job/Employment Search 181
Professional Services 182
Online Auctions 182
Education Category 182
Continuing Education/Colleges 182
History 183
K-12 183
Reference Sites 184
Sci/Tech 184
Sex Education 184
Health Category 185
Alcohol/Tobacco 185
Drugs 185
Health 186
Adult Sex Education 186
Recreation Category 187
Entertainment 187
Gambling 187
Games 188
Hobbies/Leisure 188
Mature Humor 189
Televison/Movies 189
Music 189
Digital Media 189
Radio Stations 189
x
Page 11

Social Networking/Dating 190
Special Interests 190
Sports 191
Travel 191
Web Log (Blog) 192
Appendix B Configuring Browsers for Proxy Mode 193
Configuring Firefox for Proxy Mode 193
Configuring Safari (Mac OS X only) for Proxy Mode 193
Configuring Internet Explorer for Proxy Mode 194
Appendix C iPrism Error Messages 195
iPrism Rating Error 195
iPrism List Update 195
iPrism List Error 196
iPrism Filter Service Expired 196
Access Denied 196
Authentication is Required 197
Connection Failed 197
Unable to Determine IP Address 197
Invalid Request 198
Invalid URL 198
iPrism is in the Process of Reconfiguring Itself 198
Zero Sized Reply 198
Write Error / Broken Pipe 199
xi
Page 12

CHAPTER 1 Introduction
About iPrism
The iPrism Web Filter combines simplicity, performance and value to deliver unrivalled protection
from Internet-based threats such as malware, viruses, spyware, anonymizers, IM, P2P, and
inappropriate content. As a self-contained appliance-based solution, iPrism offers universal
interoperability on any platform and in any network environment, delivering Internet security at the
perimeter, to help enforce your Internet acceptable use and security policies. In addition, iPrism
seamlessly integrates with your directory services to automate authentication for fast and easy
deployment throughout your organization.
About this Guide
This guide is designed to provide you with both an overview of iPrism and the step-by-step
processes for implementing it in your organization. It is important to have a thorough understanding
of the iPrism appliance itself, as well as the bigger picture of how it functions within your network
environment, to get the best performance possible from your appliance.
This section introduces you to how information is arranged and presented. It also provides
information about how to access the iPrism tutorials and Knowledgebase, and contact information
for Technical Support.
This guidedoes not include installation instructions. Refer to the
iPrism Installation and Configuration
Guide
if you have not yet connected the iPrism to your network.
Who Should Use this Guide?
This guide was written for network administrators or those who are fulfilling that duty for their
organizations. The requirements for understanding this manual include:
• An understanding of TCP/IP networking
Chapter 1 Introduction 1
iPrism Administration Guide
Page 13

• Knowledge of your network’s topology
• The ability to configure networking settings on Windows workstations
Knowledgebase, Tutorials and Technical Support
If you are unable to resolve your issue using the manual, please check our Knowledgebase at:
www.edgewave.com/support/web_security/knowledgebases.asp
Embedded iLearn videos are a series of short task-oriented videos to help guide you through specific
iPrism configuration scenarios. These tutorials are available at:
www.edgewave.com/support/web_security/recorded_webinars_ilearn.asp
You may also contact the iPrism support team at:
www.edgewave.com/forms/support/web_security.asp
When contacting tech support, include all relevant information about how the iPrism is configured on
your network (e.g., topology, other hardware, networking software, etc.). Have your iPrism serial
number and registration key information handy. Also, to help our support staff solve your problem, it
is helpful if you can send us a network diagram showing the basic hardware that is in use on your
network.
Installation Notes
Important: This guide assumes that you have already connected the iPrism
appliance to your network using the instructions in the
iPrism Installation Guide.
There are a few situations that can complicate an iPrism installation that are not addressed in the
iPrism Installation Guide, such as:
• If other proxy servers are configured on your network.
• If you have a WAN serviced by a router that is also the Internet router.
• If you have a unique network setup, and you are unsure of its ability to interact with iPrism.
Chapter 1 Introduction 2
iPrism Administration Guide
Page 14

If one or more of these conditions exist on your network and you are not able to get iPrism to function
properly, check the EdgeWave website. This site contains the most current support information for
iPrism.
www.edgewave.com/support/web_security/default.asp
If you are still unable to find a solution, you may request assistance with your installation from the
iPrism technical support team. See Knowledgebase, Tutorials and Technical Support.
If your network uses a firewall or other device that masks IP addresses, it is important to install
iPrism inside the firewall/device. Otherwise, it may prevent iPrism from tracking individual users on
the network, in which case it will not be possible to perform user tracking. If you are unable to
configure iPrism inside the firewall, some iPrism features will not be available to you.
Chapter 1 Introduction 3
iPrism Administration Guide
Page 15

CHAPTER 2 Overview
This section describes how iPrism works and provides an overview of its features and capabilities.
How iPrism Works
In the simplest terms, iPrism is a filtering device that examines your Internet traffic stream for HTTP,
HTTPS, IM, and P2P traffic. In the case of HTTP and HTTPS requests, each URL request is
checked against a database in which URLs are classified into fixed categories, based on their
content. The client’s web request may be blocked or monitored by iPrism, depending on which
categories the iPrism administrator has elected to place limits according to the rules in the user’s
Web Profile.
The Filtering Database
The process by which URLs are evaluated and categorized is a URL database. As part of the
process, each website in question is submitted to an Internet analyst who reviews the site and
makes the appropriate category designations (e.g., adult, nudity, profanity, government, religion,
drugs, games, etc.). To ensure that each iPrism unit is always operating with the very latest filtering
database, the iPrism appliance automatically connects to the EdgeWave server daily and
downloads the most recent filtering database files. The URL database now contains more than 80
categories with millions of websites. See Filtering Categories for detailed information about
categories.
Deciding What Gets Blocked
The first step in setting up your filter is to create an Access Control List (ACL). This is a list that tells
iPrism what to do for each category of website. For example, you may want to block access to
websites of an “adult” nature (and monitor any attempt to access them), monitor any accesses to
sites categorized as “nudity” (and allow the user to access them), and let all other requests through
unmonitored and unblocked.
Chapter 2 Overview 4
iPrism Administration Guide
Page 16

To do this you need to create an ACL with the following settings:
Category Monitor Blocked
adult Yes Yes
nudity Yes No
everything else No No
The ACL controls what is blocked and monitored. iPrism needs to know when to apply the ACL and
who to apply it to.
The schedule controls when an ACL is applied. Suppose the company policy is “No Shopping during
working hours, but during lunch and after work, anything goes.” To implement this policy, you may
create an ACL called NoShopping which blocks all shopping and online auction sites. You can also
create an ACL called “WideOpen” which does not block any sites. You may want to apply the
WideOpen ACL during a standard lunch hour timeframe such as 12 – 1 p.m., and after working
hours.
Next, define a schedule that tells iPrism when to apply each of the two ACLs, as shown below.
Chapter 2 Overview 5
iPrism Administration Guide
Page 17
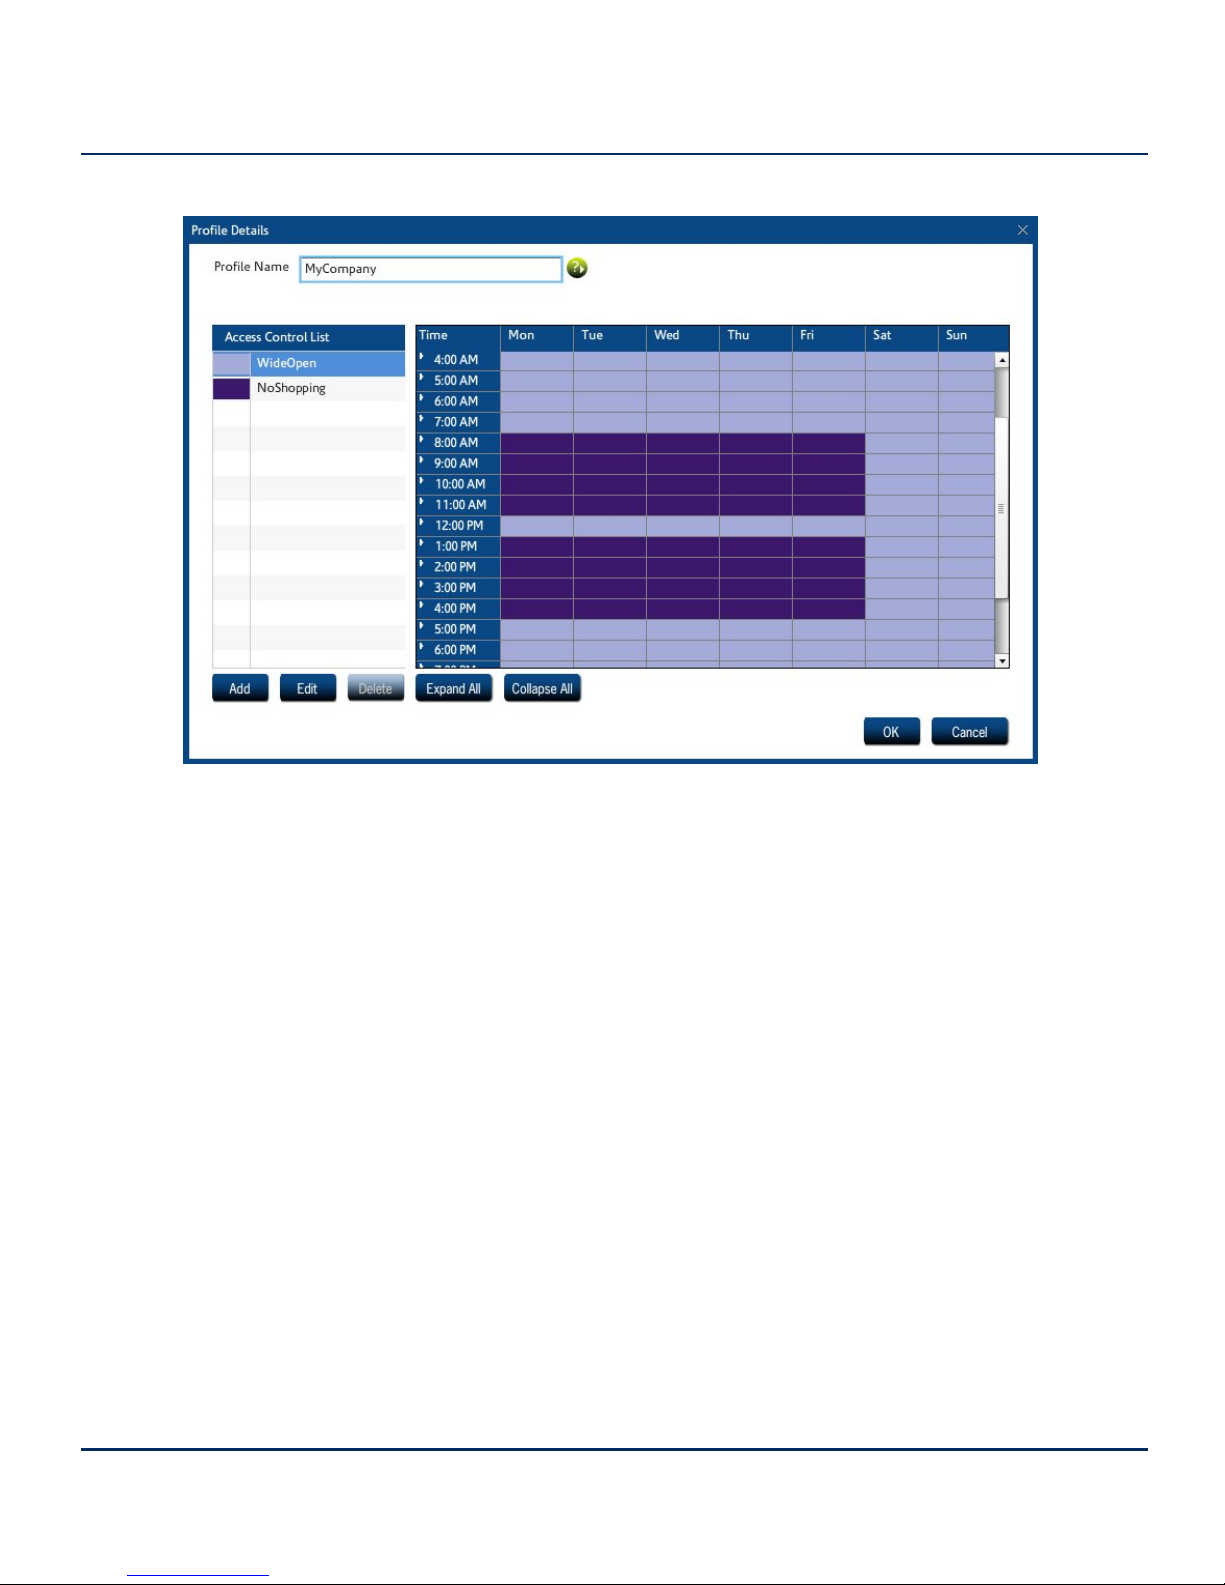
Figure 1. Profiles and Scheduling
In this example, the schedule applies to the entire company (Profile name = MyCompany). But
sometimes you need to give different users different access rights. For example, the Purchasing
department may legitimately need access to online shopping, and Finance may need access to
online gambling. In addition, upper management and iPrism administrators may have access to
everything.
iPrism uses two different types of profiles:
• Web Profiles are used to filter web surfing or HTTP/HTTPS traffic.
• Application Profiles filter IM and P2P usage.
Each profile is associated with a group of users. One way of identifying users is by the IP address of
the machine they are using. For example, you can define a profile called “Sales”, which is mapped to
the IP addresses in the range 192.168.77.0 to 192.168.77.255.
Users can also be identified by a username and password through an authentication process. There
are a number of authentications available including NTLM (for Microsoft Windows users), Kerberos
(for Microsoft Windows and Macintosh users) and LDAP (for Macintosh, UNIX, Linux, and Novell
users).
Chapter 2 Overview 6
iPrism Administration Guide
Page 18

Finally, you can manually add users to your iPrism. In practice, manual creation is usually only done
for iPrism administrators and sub-administrators.
Assigning Profiles
Now that you have set up profiles, you need to learn how to associate a profile with the people to
which it applies. The simplest way of doing this is to assign a profile to a set of IP addresses. Anyone
using a machine which has one of these addresses will be assigned the same profile. This is useful
when you have a lot of public or lab machines and wish to apply the same profile to everyone in the
room. For example, if you’re running a school, you can assign a profile called “KidSafe” to all the
machines in the student lab, and assign a profile called “NoBlocking” to the teacher’s offices.
You can also assign profiles to a set of authentication users. (Authentication means that you have a
username to work with which has been validated by a password.) Although each web access
message contains the IP address of the computer making the request, there is no user identification
included in the message.
Note: This is not always true. If you configure your iPrism and user computers
just right, you can create a system where each web access message will
contain user identification. This complex form of configuration is discussed in
Users & Networks.
iPrism interfaces with Windows NTLM authentication as well as LDAP, which is used by UNIX,
Linux, and Novell. If you want to use “user level” authentication, see Users & Networks for
instructions on getting your iPrism working with your existing authentication system.
Getting Past Blocked Sites
Users have options when they encounter a blocked site. The Access Denied page provides two
options for getting to a page that is being blocked by iPrism.
Override allows an administrator to log in. The administrator can then specify whether they want to
override just the blocked page, the entire domain, or the whole blocked category. They can then
select how long they want the override access to last before iPrism resumes normal blocking.
In addition, a user that has been granted override privileges (see Managing Override Access), can
override the blocked page. Whether or not users can override blocked pages is configured and
managed by the iPrism administrator.
Chapter 2 Overview 7
iPrism Administration Guide
Page 19

If the user’s request to unblock a site is granted, that site will be unblocked for all users if you are
using a custom filter to grant access. See Override Management for detailed instructions on
managing overrides and requests.
Request Access allows the user to “plead their case” to the iPrism administrator (or other
authorized user with override privileges), who can subsequently grant or deny access to the page.
The request is emailed to the iPrism administrator, who will then grant or deny the request (see
Granting Requests).
Note: If Request Access is not available, then access is being denied by the
active ACL in the current profile. You cannot request access to the site.
How iPrism Filters Internet Activity
iPrism filters both web traffic as well as IM and P2P services. Web traffic is filtered by checking each
client’s web request against an extensive database containing both URLs and IP addresses. This
database also classifies sub-domains or specific URL paths, in addition to the top-level domain.
If the requested path belongs to a “blocked” category, then the user may see an “access denied”
page instead (what the user sees is determined by how the iPrism administrator has chosen to
handle requests to blocked categories; for specifics, see Access Control Lists (ACLs). An Access
Denied page notifies the client that the web page they tried to access belongs to a category which is
currently being blocked.
Note: If the administrator has set General Options in the user’s ACL to Deny all
access to the web, the user will not see an Access Denied page.
The rules for IM and P2P filtering are based on protocols used by applications, but not by
applications themselves. In other words, the iPrism will check the protocols used by applications to
see if the traffic is permitted.
Note: Application filtering does not result in an Access Denied notification; the
traffic is silently dropped. The administrator may want to communicate this
behavior to end users, so they do not think the application is malfunctioning.
IM/P2P activity can be viewed in the Application Detailed Report, available
through the iPrism Report Manager (refer to the
iPrism Reporting Guide
at
http://edgewave.com/support/web_security/documentation.asp).
Chapter 2 Overview 8
iPrism Administration Guide
Page 20

Besides blocking web, IM, and P2P activity, the administrator also has the ability to simply monitor
the traffic. For websites, you can select which categories are monitored and when this monitoring is
to be done. For IM and P2P traffic, you can monitor based on the protocol used.
Monitoring allows you to see how your network in being used; for example, who visits which sites
and how often. All the power to block or monitor access lies in the hands of the administrator. iPrism
just gives them the means by which to do it.
Since a “one size fits all” approach to filtering is not suitable for most organizations, iPrism resolves
the issue by using filtering profiles. The iPrism uses two different types of profiles – one for web traffic
and another for non-web traffic. A profile tells iPrism which categories of traffic to block or monitor at
a particular moment. You can create as many different profiles as you need and assign them to
different users, or different networks and subnets.
How to create profiles and how to assign them to subnets or an entire network is covered in the
following sections. Details on how to assign these profiles to users is covered in Profiles & Filters.
Introduction to Profiles
Profiles are the elements within iPrism that determine what information is blocked, monitored, or
passed through. There are two types of profiles:
• Web Profiles determine which websites are filtered.
• Application Profiles determine which instant message (IM) and peer to peer (P2P) traffic is
allowed.
Profiles are at the very core of iPrism’s functionality. In addition to determining what gets blocked
where, profiles also determine when traffic is blocked. Thus, you don’t have to manually change
profiles to accommodate a situation where one group has access to the network for some part of the
day and another group has access to it for another. The active profile can automatically switch the
filtering criteria at a designated time of day, so you can be assured of having the protection you need,
when you need it.
Profiles are flexible and accommodating, as each profile is actually made up of one or more
individual filtering criteria, called an Access Control List (ACL). It is actually the ACL that specifies
which traffic gets blocked or monitored. A profile can consist of a single ACL, which would provide
the same degree of filtering all the time, or it can utilize several ACLs, allowing different degrees of
filtering at specific times. This is how a single profile is able to provide a different level of filtering at
various times of the day.
Chapter 2 Overview 9
iPrism Administration Guide
Page 21

Proxy Mode
Proxy mode is the simplest, and is the preferred mode in which to operate an iPrism when testing, as
well as when iPrism is installed “inside” a busy network with many different kinds of traffic. In proxy
mode, the iPrism is installed right off the switch. End users and workstations are pointed to the
iPrism via a proxy statement.
In proxy mode, iPrism uses a single internal interface to connect to the Internet. Only one (1) network
(NIC) connection is used, as only the internal interface is connected to the local network. The iPrism
acts as a filtering web proxy; web traffic that is explicitly directed to the iPrism is filtered.
In this configuration, HTTP and HTTPS requests are sent to the iPrism as proxy requests. The
iPrism determines if the request should be allowed or blocked and, if it is allowed, forwards the
request to the Internet. The reply goes back through the iPrism proxy to the user.
In this mode, the iPrism is not able to detect or regulate P2P traffic.
Proxy mode is best for testing, as since the iPrism is not placed in a network-critical location, any
problems that occur will not jeopardize your company’s entire access to the Internet. You can finetune the profile and network settings and test the results before moving the system into a networkcritical environment.
It also provides a way to demonstrate the capabilities of the iPrism before it is deployed for all users.
If you choose to deploy the system in proxy mode, all you have to do is to make the iPrism a proxy
server for all your users. (This can be done through group policy settings, or through a system
administrator edict.) You must also change your firewall rules to allow only the iPrism to access the
Internet, preventing anyone who didn’t change their proxy settings from directly accessing the
Internet.
Chapter 2 Overview 10
iPrism Administration Guide
Page 22
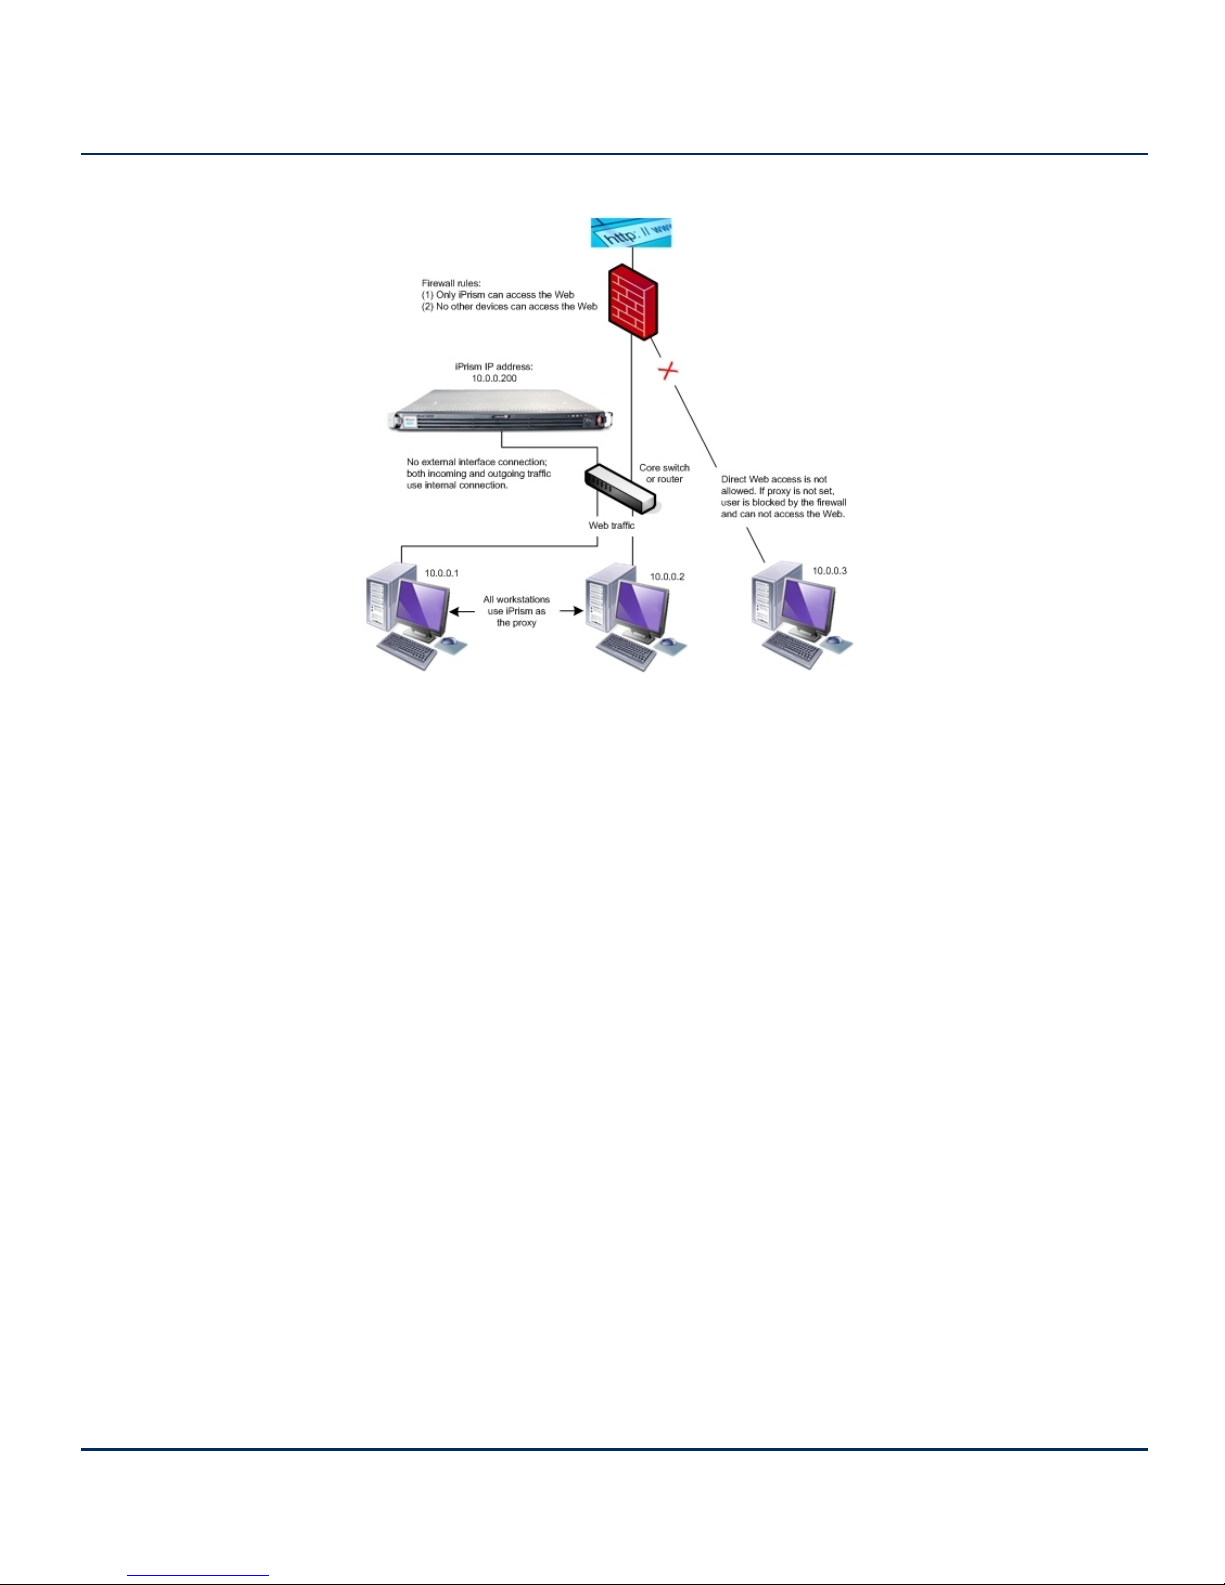
Figure 2. Deploying iPrism in Proxy Mode
Refer to the
iPrism Installation Guide
for detailed information.
Bridge (Transparent) Mode
In bridge (transparent) mode, the iPrism is an “in-line installation” which has 2 network (NIC)
connections. This mode is recommended for full network production deployment.
In this mode, iPrism is installed between the firewall and the switch. All network traffic destined for
the Internet (e.g., email and web) flows through the iPrism, and a single IP address is used by both
interfaces. This is the preferred mode in which to deploy and operate an iPrism in production.
Chapter 2 Overview 11
iPrism Administration Guide
Page 23
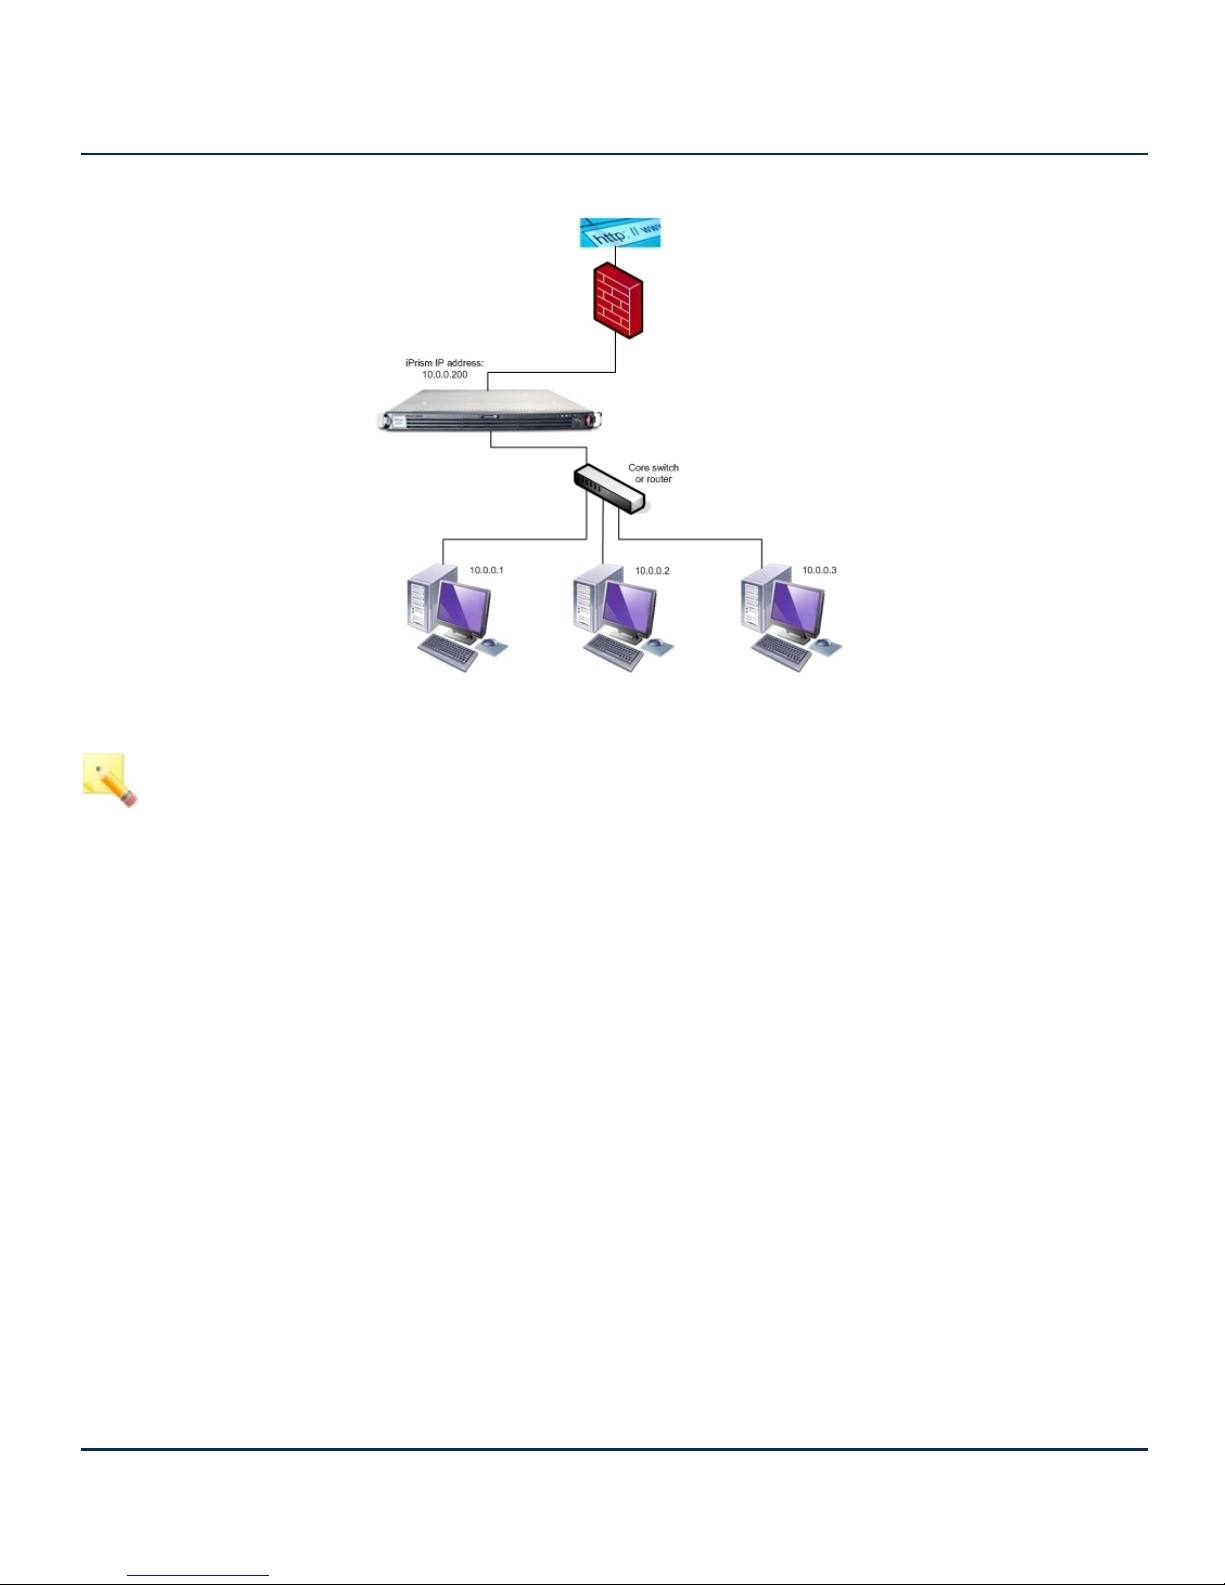
Figure 3. Deploying iPrism in Bridge (Transparent) Mode
Notes:
The iPrism can also act as a filtering web proxy when in bridge (transparent)
mode. Users can configure their browsers to point at the iPrism, just as they do
in proxy mode, although the iPrism is configured in bridge (transparent) mode.
Web and Application traffic will be filtered for these users.
For instructions on how to configure a browser to point at the iPrism, refer to
the
iPrism Installation Guide.
Older versions of iPrism (Versions 3.6 and earlier) had an additional mode
called Router mode. This mode had been discontinued. Bridge (transparent)
mode is now used in all situations where the iPrism is used in an in-line network
environment.
Using the Management Interface
The iPrism has a third network interface called the Management Interface. Normally you can
administer your iPrism from any system connected to the internal network. You can configure the
system to only accept configuration from the management interface. This allows you to create a
secure subnet from which to control your iPrism.
Chapter 2 Overview 12
iPrism Administration Guide
Page 24

Other uses of the management interface include:
• A secure way of transferring logging data from the iPrism to a management workstation. When
you configure the iPrism to send you periodic reports or logging information, the information is
transmitted in plain text. This means that anyone with a sniffer attached to your network could
see that data. If you want to make your network extremely secure you can use the management
interface to transfer this data on a secure network.
• High Availability. Paired iPrisms use the management interface to keep track of each other's
current running status. Interrupting this link results in a situation where both iPrisms believe the
other is not working, which results in both becoming active at the same time.
For more information on configuring and using the management interface, refer to the
Knowledgebase article “How do I enable the Management Interface?” at
www.edgewave.com/support/web_security/knowledgebases.asp.
Logging In and Out of iPrism
Logging into iPrism is done via the login page. It is recommended that you bookmark this page.
Within an iPrism session, you can log out via the Logout menu in the top right corner of the page.
Select Logout from the dropdown menu.
Users on shared computers should log out when finished. If they do not, the next person who uses
the machine will be able to access the Internet using the previous user’s profile.
Figure 4. Logging in
Chapter 2 Overview 13
iPrism Administration Guide
Page 25

Restarting and Shutting Down iPrism
• To restart iPrism, select Restart from the Logout menu in the top right corner of the page.
• To shut down iPrism, select Shut Down from the Logout menu in the top right corner of the page.
The iPrism Home Page
The primary method of administering the iPrism is via the configuration options available from the
iPrism home page. This is available online through your iPrism after you have gone through the
Installation Wizard (refer to the
iPrism Installation Guide
for steps on how to set up your iPrism
through the Installation Wizard).
For the end users, the iPrism will remain invisible depending on how the administrator configures it in
their network. The system may require them to authenticate themselves, and if they encounter a
blocked site, it allows them to request that it be unblocked. But for the most part, it operates in the
background, and users only become aware of it when they try to access a blocked site.
A variety of options are available from the iPrism home page which allow you to manage and
administer the iPrism.
The following tools are available from the iPrism home page. Each tool has its own section in this
guide:
• Profiles & Filters
• Users & Networks
• Reporting
• Maintenance
• System Settings
• System Status
For detailed information about and instructions how to use each tool, see the associated section.
Chapter 2 Overview 14
iPrism Administration Guide
Page 26

CHAPTER 3 Profiles & Filters
This section describes how iPrism’s profiles and filters work, and provides detailed procedures for
creating and implementing your own filtering profiles. Instructions for controlling access to specific
websites and other Internet services is also provided.
To access iPrism Profiles & Filters, click Profiles & Filters from the home page. A context menu lists
the Filtering features.
Custom Filters
Custom Filters provide a way of overriding or changing a specific site’s rating on a long-term basis,
and/or adding filters based on file extensions. A custom filter consists of one or more file extension
types, and/or a site location (URL) and new rating, and will remain on the iPrism until deleted. Upon
deletion, the URL will revert back to its original iGuard database rating. Custom filters allow you to
restrict or allow access to any file type or website, not just those included in iPrism’s URL database.
When you make a custom URL assignment, iPrism treats the URL as a member of that category
and either allows or denies access to the site based on the active filtering profile.
In the Custom Filters section, you can import, add, edit, and delete custom filters. You can obtain the
data for making a custom filter from several sources, including recent overrides or blocks, and
personal requests made from users on the network. You can also create custom filters manually,
entering the URL and ratings yourself.
1. From the iPrism home page, select Profiles & Filters, then Custom Filters.
Chapter 3 Profiles & Filters 15
iPrism Administration Guide
Page 27
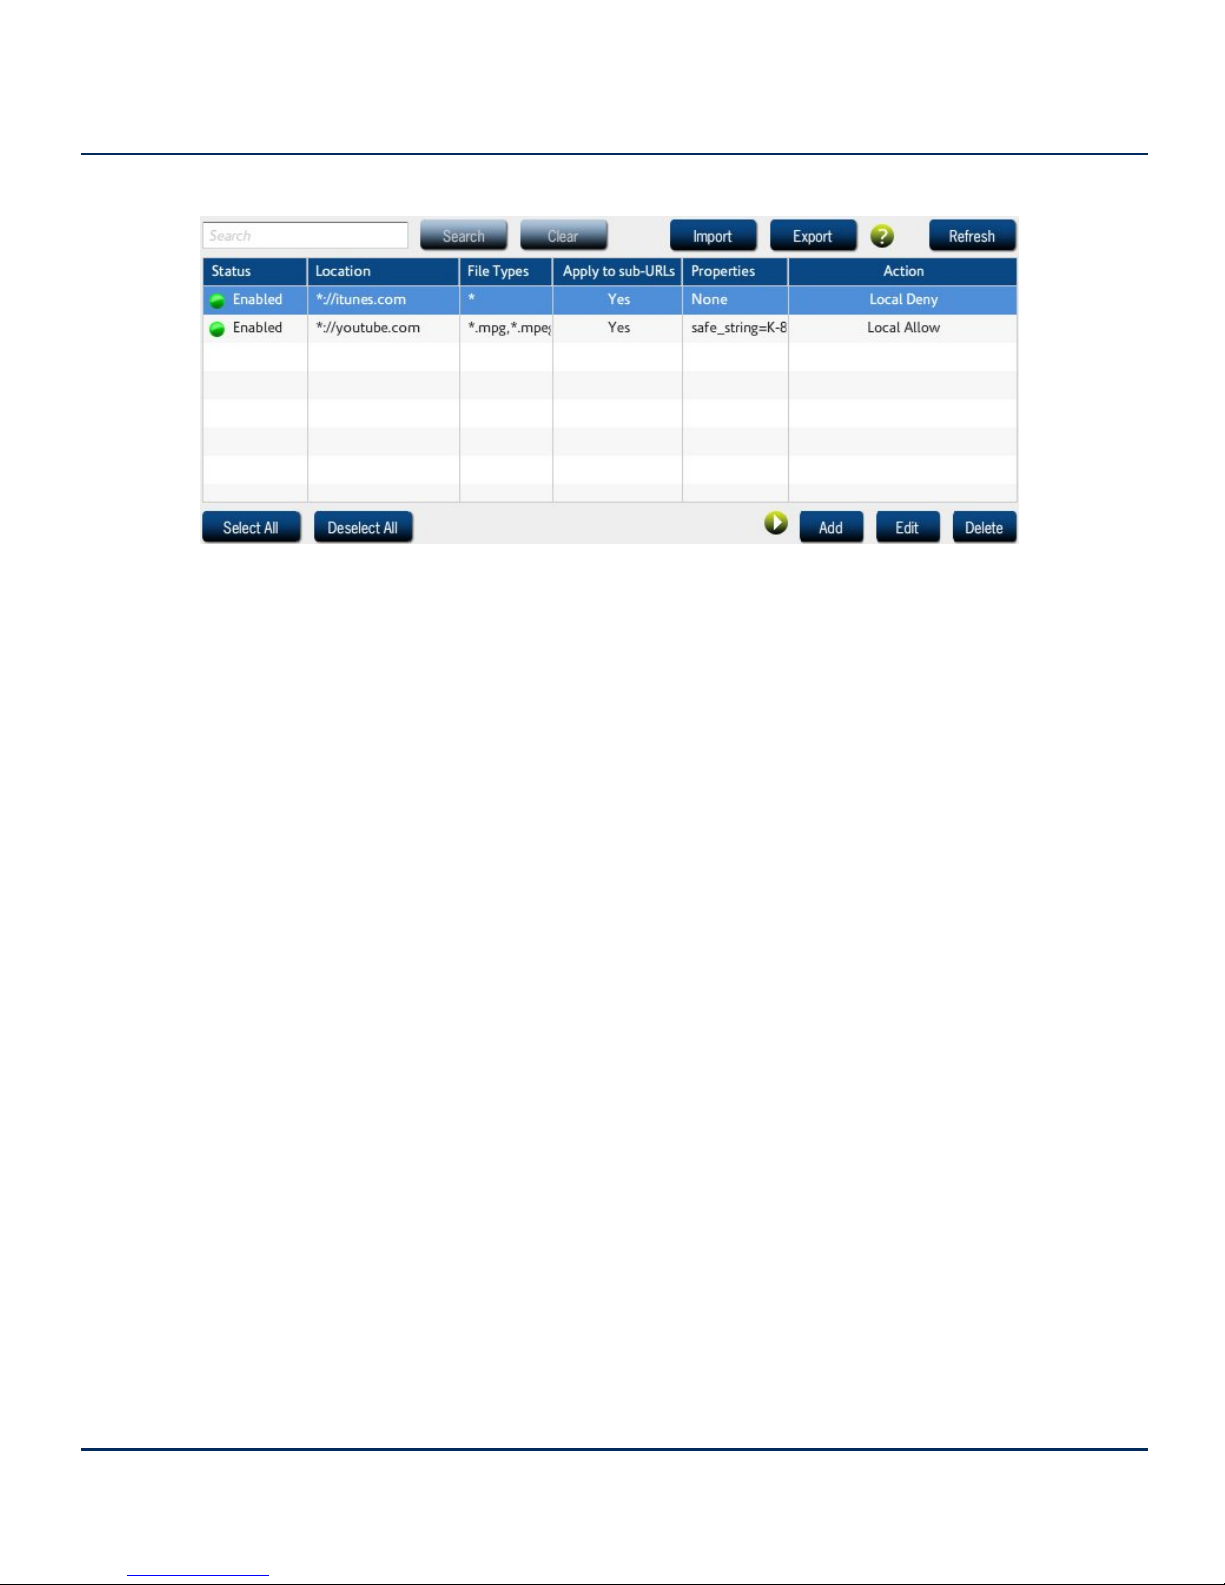
Figure 5. Custom Filters
2. If you want to search for a custom filter, type all or part of the filter name and click Search.
Adding a Custom Filter
1. In the Custom Filters window click Add.
Chapter 3 Profiles & Filters 16
iPrism Administration Guide
Page 28
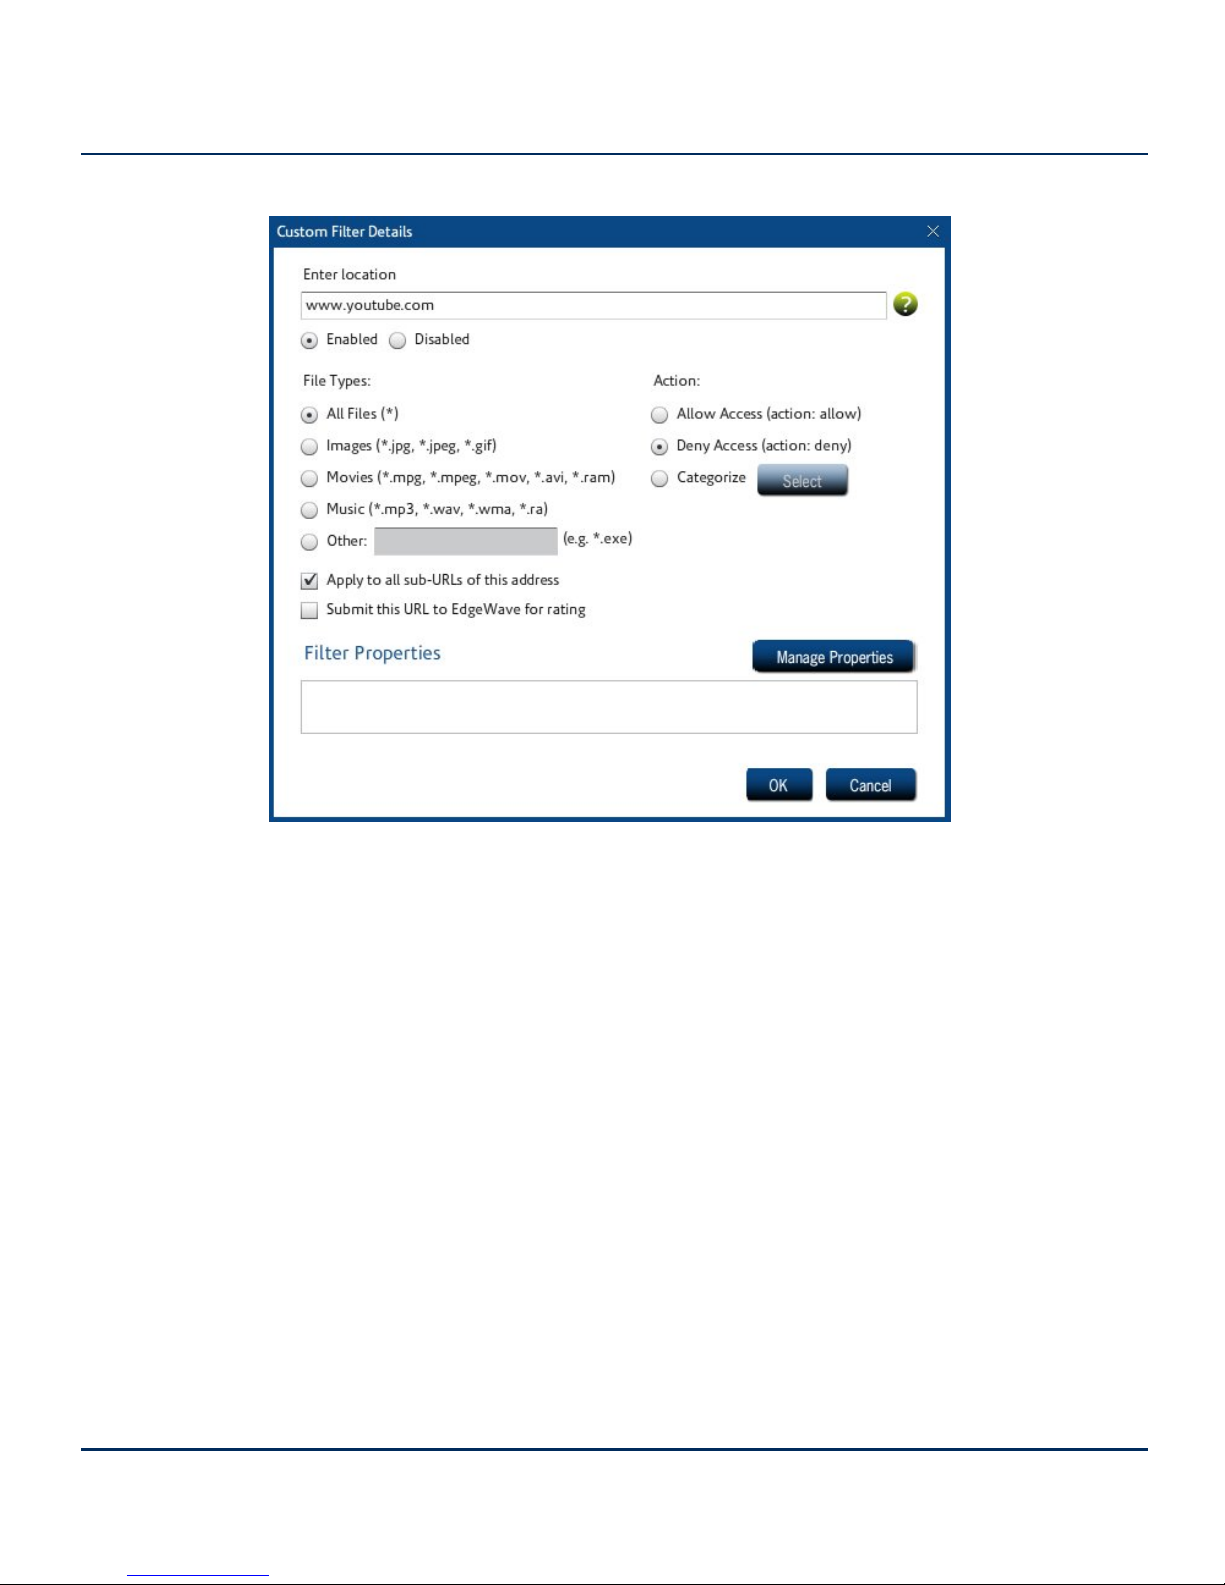
Figure 6. Filter Details
2. Make sure Enabled is selected, and type the URL to which this filter applies.
3. Select the file types to which this filter applies. If this filter applies to all file types, leave the default
(All Files (*)) selected.
4. If all sub-URLs of this address are to be included in the filter, check Apply to all sub-URLs of
this address.
5. If you want to have this URL submitted to the EdgeWave iGuard team for rating, check Submit
this URL to EdgeWave for rating.
6. Select the appropriate action (Allow Access, Deny Access, or Categorize). If you select
Categorize, click Select to assign this URL to an iGuard category.
7. If you want to specify properties for this filter, click Manage Properties. Select the applicable
options and click OK.
Chapter 3 Profiles & Filters 17
iPrism Administration Guide
Page 29
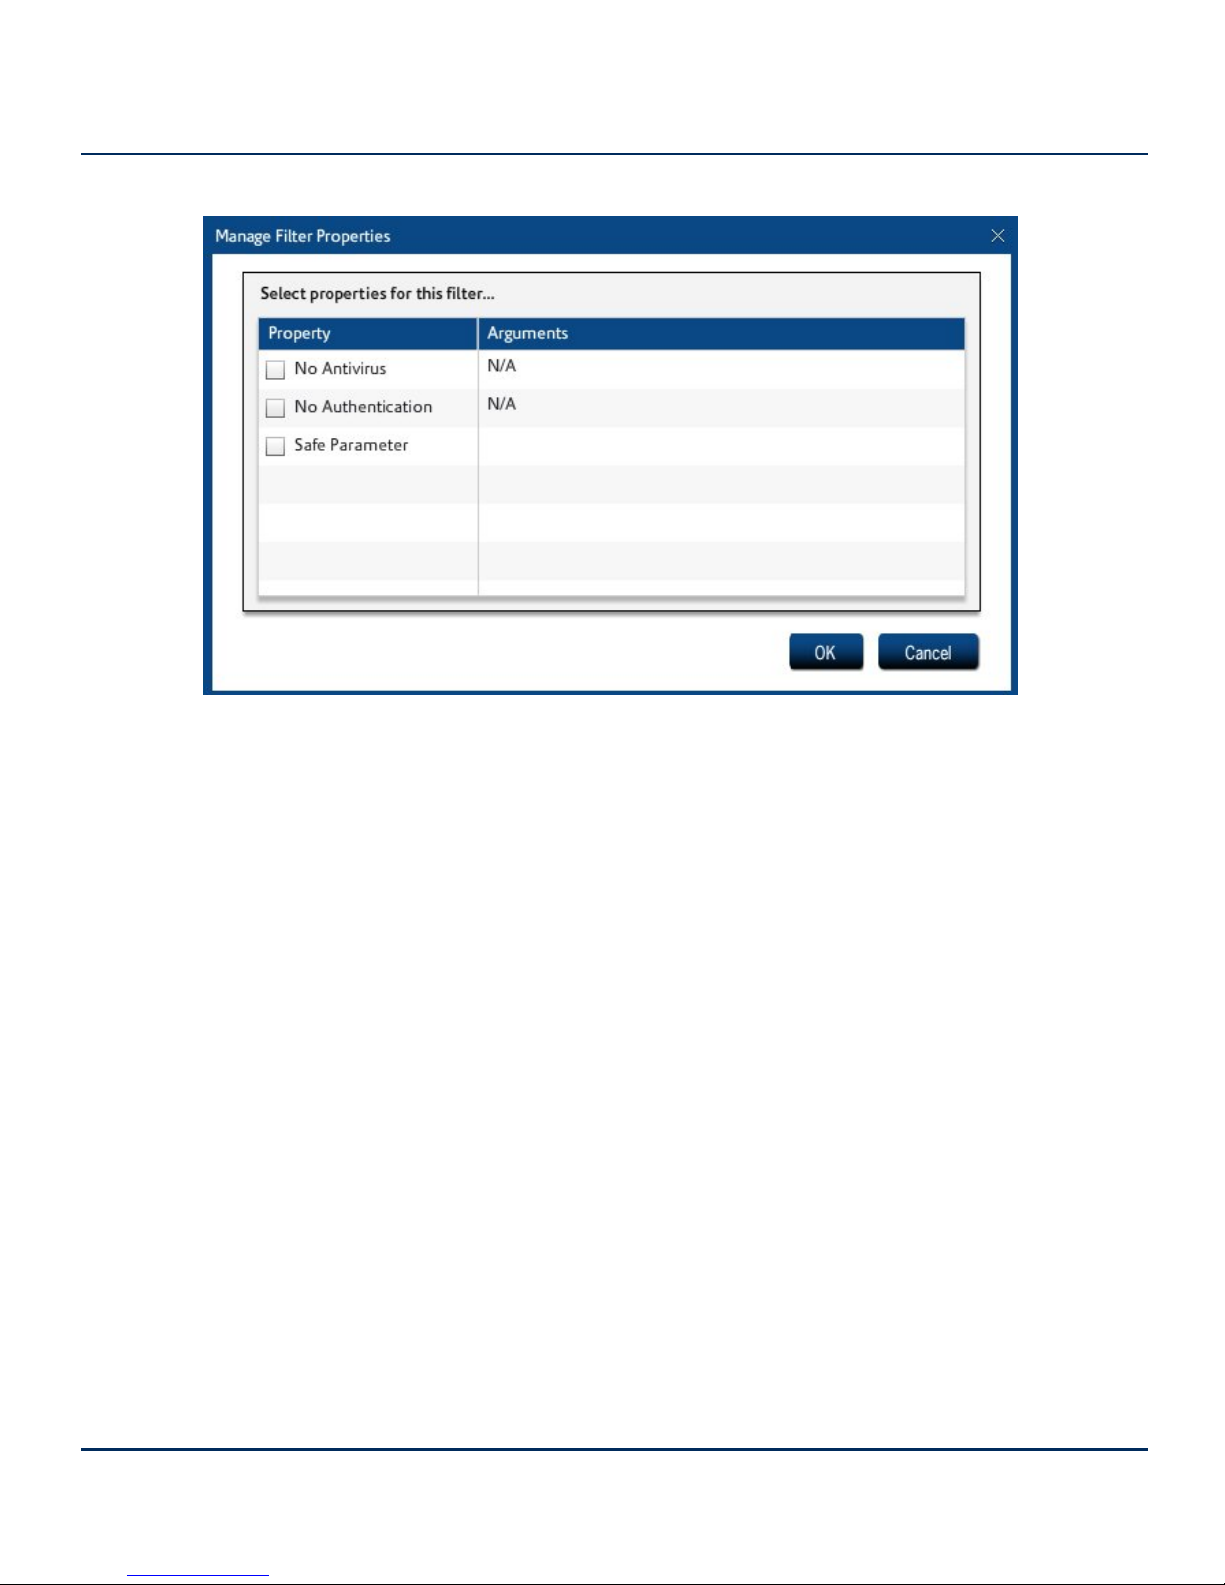
Figure 7. Manage Filter Properties
• No Antivirus - Turns off virus checking for this URL or file extension.
• No Authentication - Turns off authentication for this URL or file extension.
• Safe Parameter - Checks for the specified parameter and, if it matches this definition, allows
the content. The safe parameter takes the form <parameter> = <definition> or just
<definition>. Valid characters are: A-Z a-z 0-9 .',/;_+=()[]{}@!#$%*|-^\
8. When you are finished, click OK.
Editing a Custom Filter
• Select a filter in the Custom Filters window and click Edit.
Deleting a Custom Filter
To delete a custom filter:
• In the Custom Filters window, select a filter and click Delete.
Chapter 3 Profiles & Filters 18
iPrism Administration Guide
Page 30

Importing and Exporting Custom Filters
To import a custom filter:
1. In the Custom Filters window, click Import.
2. Click Yes to confirm.
3. Locate the file and click Open.
To export a custom filter:
1. In the Custom Filters window, select a filter and click Export.
2. Enter a name for the file and click Save.
Profiles
Profiles allow or block requests or protocols. Profiles tell iPrism which categories of web or IM/P2P
traffic to block and/or monitor at a particular moment, and allow different users to have different
access rights. You can create as many different profiles as you need and assign them to groups of
users, networks and users (local or remote).
Profiles assigned to a user are always applied to that user, regardless of which workstation they log
into.
iPrism uses two types of profiles:
• Web profiles (for filtering web or HTTP traffic)
• Application profiles (for filtering IM/P2P traffic)
Profiles are the core of iPrism’s functionality. In addition to determining what gets blocked where,
profiles also determine when traffic is blocked. Thus, you don’t have to manually change profiles to
accommodate a situation where one group has access to the network for some part of the day and
another group has access to it for another. The active profile can automatically switch the filtering
criteria at a designated time of day, so you can be assured of having the protection you need, when
you need it.
Chapter 3 Profiles & Filters 19
iPrism Administration Guide
Page 31

Profiles’ flexibility stems from the fact that each profile is made up of one or more individual filtering
criteria, called an Access Control List (ACL). An ACL tells iPrism what to do for each category of
website and specifies which traffic gets blocked or monitored. For example, ACLs can block access
to websites of an “adult” nature (and monitor any attempt to access them), monitor any accesses to
site categorized as “nudity” (and allow the user to access them), and let all other requests through
unmonitored and unblocked.
A profile can consist of a single ACL, which would provide the same degree of filtering all the time, or
it can utilize several ACLs, allowing different degrees of filtering at specific times. This is how a single
profile is able to provide a different level of filtering at various times of the day.
For detailed information about ACLs and how they work, see Access Control Lists (ACLs).
How iPrism Uses Profiles
There are different ways that iPrism can make use of a filtering profile, depending on how iPrism is
configured on your network and whether or not you are using authentication:
• Filtering by groups or local users, based on username. This type of filtering associates a
profile with a given user. It does not matter which machine they use, the user will always get the
same profile, as it is based on their username.
User-level filtering works well in environments where you want some people to have significantly
more (or less) access to the web than others. It also offers an additional layer of protection
because the user’s profile applies to them no matter which workstation they log into.
Before a user can access the Internet s/he must be authenticated. iPrism provides a variety of
authentication methods and can access authentication servers like NTLM (for Microsoft Windows users), Kerberos (for Microsoft Windows and Macintosh users) and LDAP (for Macintosh,
UNIX, Linux, and Novell users). See Directory Services for more information on authentication.
• Network-level filtering, based on a range of IP addresses. For network-level filtering, you
specify a set of IP addresses and associate a profile with them. For example, if your iPrism is for
a library, you can have one profile for the computers in the children’s reading area, and another
for the adult library users.
Note: If a user has been successfully authenticated and their username is not
included in an iPrism group, iPrism will fall back to network-level filtering; i.e.,
they will be assigned a profile based on their workstation’s IP address. Users
that cannot be authenticated will be blocked from all Web requests and IM/P2P
protocol traffic.
Chapter 3 Profiles & Filters 20
iPrism Administration Guide
Page 32

• Machine-level filtering, based on Machine ID, that applies only to remote users. The
Machine ID identifies a particular remote machine and defines a policy for all users on that
machine. It is treated like a username, and by default is the hostname of the machine when the
client is installed. For detailed information, see Remote Users.
iPrism’s Default Profiles
iPrism ships with five preconfigured (default) profiles, two for web filtering and three for application
filtering. This allows you to realize some level of filtering while you are learning how to create your
own profiles. You may find these to be useful and decide to keep them or, once you start creating
your own profiles, you may choose to edit or delete them. The preconfigured profiles are as follows:
• PassAll: This profile allows access to any site without monitoring.
• BlockOffensive: This web filtering profile blocks and monitors access to sites containing
pornography, profanity, violence, bomb-making, etc.
• BlockP2P: Blocks all P2P traffic only.
• BlockIMP2P: Blocks all IM and P2P traffic.
• PassIMP2P: Blocks no IM or P2P traffic.
Web Profiles
Web profiles are used to filter web surfing or HTTP/HTTPS traffic.
To work with web profiles:
1. From the iPrism home page, select Profiles & Filters, then Web Profiles.
2. When you have finished working with web profiles, click Save to save your changes.
3. If you have completed all your administrative changes, click Activate Changes to activate the
changes immediately. If you do not Activate Changes now, you will be prompted to do so before
logging out of iPrism.
Chapter 3 Profiles & Filters 21
iPrism Administration Guide
Page 33

Figure 8. Web Profiles
Adding a Web Profile
To add a profile:
1. Click Add in the main Web Profiles window.
2. Enter a name for the profile.
3. Add new Access Control Lists (ACLs) or edit existing ACLs. For details, see Access Control
Lists (ACLs)
4. For each ACL that is part of this profile, assign the days/times the ACL is in effect.
a. Select an ACL.
b. Click next to a time and drag to highlight the time blocks when the ACLis in effect.
Chapter 3 Profiles & Filters 22
iPrism Administration Guide
Page 34

Figure 9. ACL Times
5. Click OK to add the web profile.
Copying a Profile
To create a new profile by copying an existing profile:
1. Select a profile in the main Web Profiles window and click Copy.
2. Enter a name for the new profile.
3. Add new Access Control Lists (ACLs) or edit the existing ACLs. For details, see Access Control
Lists (ACLs)
Note: If any of the ACLs contain quotas and/or warnings, those are not copied.
Quotas and warnings must be assigned to each ACLwithin the new profile.
4. For each ACL that is part of this profile, assign the days/times the ACL is in effect.
5. Click OK to add the web profile.
Chapter 3 Profiles & Filters 23
iPrism Administration Guide
Page 35

Deleting a Profile
When you delete a profile, you need to specify a replacement profile.
1. Select a profile in the main Web Profiles window and click Delete.
2. Select a replacement profile from the dropdown list and click OK.
Important: Assigning a different profile may dramatically change what the user
sees. For specific information about the default profiles and what they allow and
do not allow, see iPrism’s Default Profiles.
Figure 10. Deleting a Profile
Application Profiles
Application profiles filter IM and P2P usage.
To work with application profiles:
1. From the iPrism home page, select Profiles & Filters, then Application Profiles.
2. When you have finished working with application profiles, click Save to save your changes.
3. If you have completed all your administrative changes, click Activate Changes to activate the
changes immediately. If you do not Activate Changes now, you will be prompted to do so before
logging out of iPrism.
Chapter 3 Profiles & Filters 24
iPrism Administration Guide
Page 36

Figure 11. Application Profiles
Adding an Application Profile
To add a profile:
1. In the Application Profiles window, click Add.
2. Enter a name for the profile.
3. Add new Access Control Lists (ACLs) or edit existing ACLs. For details, see Access Control
Lists (ACLs)
Chapter 3 Profiles & Filters 25
iPrism Administration Guide
Page 37

Figure 12. Application ACL
4. For each ACL that is part of this profile, assign the days/times the ACL is in effect.
a. Select an ACL.
b. Click next to a time and drag to highlight the time blocks when the ACLis in effect.
Chapter 3 Profiles & Filters 26
iPrism Administration Guide
Page 38

Figure 13. ACL Times
5. Click OK to add the application profile.
Copying an Application Profile
To create a new profile by copying an existing profile:
1. In the Application Profiles window, select a profile and click Copy.
2. Enter a name for the new profile.
3. Add new Access Control Lists (ACLs) or edit the existing ACLs. For details, see Access Control
Lists (ACLs)
4. For each ACL that is part of this profile, assign the days/times the ACL is in effect.
5. Click OK to add the application profile.
Chapter 3 Profiles & Filters 27
iPrism Administration Guide
Page 39

Deleting an Application Profile
When you delete a profile, you need to specify a replacement profile.
1. In the Application Profiles window, select a profile and click Delete.
2. Select a replacement profile from the dropdown list and click OK.
Important: Assigning a different profile may dramatically change what the user
sees. For specific information about the default profiles and what they allow and
do not allow, see iPrism’s Default Profiles.
Figure 14. Deleting a Profile
Authentication and Assigning Profiles to Users
Users can be authenticated on iPrism in a number of ways. See Directory Services for detailed
information and instructions.
Assigning Profiles to a Set of IP Addresses (Workstations)
For detailed instructions on how to assign a profile to an individual IP address or a range of IP
addresses, see Networks.
For detailed instructions on how to assign a profile to remote or mobile users, see Remote Filtering.
Quotas and Warnings
iPrism’s Quotas and Warnings keep users and administrators aware of specific Internet-related
events.
• Email Alerts send an email notification to one or more defined email addresses each time a
certain type of event occurs.
Chapter 3 Profiles & Filters 28
iPrism Administration Guide
Page 40

• Quotas generate a notification at a certain threshold of activity and then block the activity when
the quota is reached.
• Warnings notify the user that their activity is being monitored.
Quotas and warnings are attached to ACLs within web profiles. See Creating a New Web ACL for
more information.
Note: For email alerts, quotas, or warnings to be in effect for a category, that
category must be monitored.
To work with Quotas and Warnings:
1. From the iPrism home page, select Profiles & Filters, then Quotas & Warnings. The Quotas
and Warnings window appears. By default, the Show All tab is shown, listing all email alerts,
quotas, and warnings.
Figure 15. Show All Email Alerts, Quotas, and Warnings
2. Add, change, delete, enable and disable email alerts, quotas, and warnings as needed.
• To enable/disable an item, click the indicator to toggle the item on/off.
• To edit an item, select it in the list and click Edit.
• To delete an item, select it in the list and click Delete.
Chapter 3 Profiles & Filters 29
iPrism Administration Guide
Page 41

• To add a new item, select the appropriate tab. See Email Alerts, Quotas, or Warnings for
details.
3. When you are finished click Save at the bottom of the Quotas & Warnings window.
4. If you have completed all your administrative changes, click Activate Changes to activate the
changes immediately. If you do not Activate Changes now, you will be prompted to do so before
logging out of iPrism.
Email Alerts
Email Alerts are notifications about specific Internet-related events. You set them up based on the
kinds of events you want to generate the messages.
Once created, email alerts can be turned on and off as desired, so you can control when you are
notified of events.
To configure email alerts:
1. From the iPrism home page, select Profiles & Filters, then Quotas & Warnings.
2. Select the Email Alerts tab.
Figure 16. Email Alerts
Chapter 3 Profiles & Filters 30
iPrism Administration Guide
Page 42

Adding an Email Alert
1. From the Email Alerts window, click Add.
2. Enter a name for the email alert.
3. Select Enabled to turn on the alert or Disabled to turn it off (save for later use).
4. From the Monitoring dropdown list, select an option:
• Any: The access of any user (or from any workstation) will be considered when determining
if alert conditions are met.
• User: Only the specified user will be tracked for alert consideration. Enter the user’s iPrism
username or the workstation’s IP address in the associated field.
• Profile: Only users monitored by the profile selected from the dropdown list will be
considered.
• IP Range: Only workstations that have an IP address within the specified IP range will be
monitored for alert events. To track a single workstation, type the workstation’s IP address in
both the IP Start and IP End fields.
5. Check Group Utilization for Monitoring Selection if you want the threshold to be based on the
total usage for all profiles or IPsin the selected range. Leave this unchecked for each individual
profile or IP address to be subject to the threshold defined below.
6. In the Threshold frame, select the criteria, value, and time span that will cause an email alert to
be sent.
• Bandwidth (KB): An email alert will be sent when the specified amount of data is accessed
within the selected time span.
• Pages: An email alert will be sent when the specified number of pages are accessed within
the selected time span. A page is defined as an HTML access with a MIME content type of
text/*. This includes blocked attempts as well.
• Hits: An email alert will be sent when the specified number of web accesses of any content
type occur within the selected time span. Generally, Pages are a more useful selection type
than Hits, since Hits will track data for every access (images, etc.), even though they all fall
within a single page.
• Session Duration (minutes): An email alert will be sent when the specified number of
minutes are spent online within the selected time span. Since it is impossible for computer
software alone to track exactly how long someone spends browsing at a particular site, realworld usage heuristics have been used to approximate the time spent browsing.
Chapter 3 Profiles & Filters 31
iPrism Administration Guide
Page 43

7. In the ACL Categories frame, click Select and choose the categories that will trigger the alert.
Click OK to return to the Email Alerts window.
8. Type the email address(es) of the users to receive the email alert. Use commas to separate
multiple email addresses.
9. Click OK to save this email alert.
Figure 17. Adding an Email Alert
Editing an Email Alert
1. In the Email Alerts window, select the alert to edit.
2. Click Edit.
3. Make changes as needed.
4. Click OK to save your changes.
Chapter 3 Profiles & Filters 32
iPrism Administration Guide
Page 44

Deleting an Email Alert
Note: If you might use the email alert later, you can deactivate it instead of
deleting it. To deactivate an alert, click the green indicator on the far left. The
indicator turns red to show the email alert is disabled.
To delete an email alert:
1. In the Email Alerts window, select the alert to delete.
2. Click Delete.
3. Click Yes to confirm.
Quotas
Quotas are defined limits for Internet-related events. You set them up based on the kinds of access
you want to limit.
Once created, quota enforcement can be turned on and off as desired, so you can control when
users are subject to each quota.
To configure quotas:
1. From the iPrism home page, select Profiles & Filters, then Quotas & Warnings.
2. Select the Quotas tab.
Chapter 3 Profiles & Filters 33
iPrism Administration Guide
Page 45

Figure 18. Quotas
When a user has reached a specified percentage of the quota, the following message appears.
Figure 19. Percentage of Quota Reached
This message can be customized. See Customizable Pages.
When a user has reached the quota they are not able to access the requested page. The following
message appears.
Chapter 3 Profiles & Filters 34
iPrism Administration Guide
Page 46

Figure 20. Quota Reached
Adding a Quota
1. From the Quotas window, click Add.
2. Enter a name for the quota.
3. Select Enabled to turn on the quota or Disabled to turn it off (save for later use).
Note: When a quota is disabled, the ACLassociations still appear even though
the quota is not being enforced. iPrism will activate the quota enforcement for
those ACLs when the quota is enabled.
4. In the Threshold frame, specify the quota parameters.
• Criteria: Choose the measurement to be used for assessing the quota.
• Value: Enter the number of units (depends on the criteria) for this quota.
• Reset: Choose the duration of each unit for this quota. For example, if you chose Session
Duration as the criteria, and 60 for the value, choosing 1 day for the reset value means the
quota is reached if the user's session is 60 minutes in one day. The quota resets at the end of
the day so that the user has up to 60 minutes each day.
• Relative threshold: The user gets notified when this percentage of the quota has been
reached.
5. In the ACL Categories frame, click Select and choose the categories to be applied to the quota.
Click OK to return to the Quotas window.
Chapter 3 Profiles & Filters 35
iPrism Administration Guide
Page 47

Note: The quota calculation is a total of the usage in all the categories selected.
For example, a 100KB quota for selected categories of games and sports will
reach the quota if games is at 30KB and sports is at 70KB.
6. Type the email address(es) of the users to receive email notification when the quota has been
reached. Use commas to separate multiple email addresses.
7. Click OK to save this quota.
Figure 21. Adding a Quota
Once the quota has been defined it can be assigned to an access control list. See Creating a New
Web ACL for more information.
Editing a Quota
1. In the Quotas window, select the quota to edit.
Chapter 3 Profiles & Filters 36
iPrism Administration Guide
Page 48

2. Click Edit.
3. Make changes as needed.
4. Click OK to save your changes.
Deleting a Quota
Note: If you might use the quota later, you can deactivate it instead of deleting
it. To deactivate a quota, click the green indicator on the far left. The indicator
turns red to show the quota is inactive.
To delete a quota:
1. In the Quotas window, select the quota to delete.
2. Click Delete.
3. Click Yes to confirm.
Warnings
Warnings are notifications about specific Internet-related events. You define which events generate
warnings and how often those warnings are shown to the user.
Once created, warnings can be turned on and off as desired, so you can control when the warning
messages appear.
To configure warnings:
1. From the iPrism home page, select Profiles & Filters, then Quotas & Warnings.
2. Select the Warnings tab.
Chapter 3 Profiles & Filters 37
iPrism Administration Guide
Page 49

Figure 22. Warnings
When a user accesses a page that has a warning attached to it, the following message appears.
Figure 23. Warning
This message can be customized. See Customizable Pages.
Adding a Warning
1. From the Warnings window, click Add.
2. Enter a name for the warning.
Chapter 3 Profiles & Filters 38
iPrism Administration Guide
Page 50

3. Select Enabled to turn on the warning or Disabled to turn it off (save for later use).
Note: When a warning is disabled, the ACLassociations still appear even
though they are not affected. iPrism will activate the warnings for those ACLs
when the warning is enabled.
4. In the Frequency frame, specify how often the trigger should reset. For example, 2 hrs means
that, if the selected category generates a warning, the user will not receive another warning for 2
hours.
5. In the ACL Categories frame, click Select and choose the categories to be applied to the
warning. Click OK to return to the Warnings window.
Note: The warning will appear the first time a page from any category on the list
is accessed. It will not appear for pages in other categories from the same list,
within the reset trigger timeframe. The warning notification lists all of the
categories to which the warning applies.
6. Click OK to save this warning.
Figure 24. Adding a Warning
Once the warning has been defined it can be assigned to an access control list. See Creating a New
Web ACL for more information.
Chapter 3 Profiles & Filters 39
iPrism Administration Guide
Page 51

Editing a Warning
1. In the Warnings window, select the warning to edit.
2. Click Edit.
3. Make changes as needed.
4. Click OK to save your changes.
Deleting a Warning
Note: If you might use the warning later, you can deactivate it instead of
deleting it. To deactivate a warning, click the green indicator on the far left. The
indicator turns red to show the warning is inactive.
To delete a warning:
1. In the Warnings window, select the warning to delete.
2. Click Delete.
3. Click Yes to confirm.
Access Control Lists (ACLs)
Access Control Lists (ACLs) are the building blocks that make up every filtering profile. They alone
determine which types of traffic will get blocked, monitored and/or allowed to be accessed. Unlike
profiles, ACLs are not assignable to users or networks; they only exist in the context of a profile.
When creating a new profile, a default ACL (called ACL 1) is always provided. When a profile is
created, this is the default value used for all time blocks. You can create new ACLs and schedule
them by applying them to the time grid in the profile.
For each category you have the option to monitor access or block it completely. You can use email
alerts, quotas, and warnings to send notifications to the administrator and/or user, or to block access
(quotas) based on time or bandwidth.
Creating a New Web ACL
1. Create or edit a web profile. For details, see Web Profiles.
2. In the Profile Details window, click Add.
Chapter 3 Profiles & Filters 40
iPrism Administration Guide
Page 52

3. Enter a name for the ACL.
Figure 25. Web Access Control List
4. Select General Options.
• Deny all access to the web: No web traffic is allowed for this ACL. This is a quick way to set
all categories (even local allowed) to Blocked. This is the equivalent of setting everything to
Blocked/Monitored. If this option is selected, an Access Denied page will not be displayed to
users when they access the Internet.
• Force browsers to use safe search: If this is enabled, the iPrism will enable safe search for
Google, Yahoo, Alltheweb, Hotbot, Lycos, Dogpile, and Excite. Safe Search will be turned
on even if the user tries to do a search with this feature turned off.
5. Select Access Denied Page Options (web profiles only). These determine what will be shown
when a user encounters a blocked page.
Chapter 3 Profiles & Filters 41
iPrism Administration Guide
Page 53

• Override link: The Access Denied page will include an Override button, allowing users with
override privileges to gain access to the page.
• Request access link: The Access Denied page will include a Request Access button,
allowing users to petition the administrator for access when they are blocked from a site.
6. If you want to assign quotas and warnings to this ACL, click Assign Quotas & Warnings, select
the quotas and warnings to use, and click Apply. For more information about defining quotas
and warnings see Quotas and Warnings.
Note: For email alerts, quotas, or warnings to be in effect for a category, that
category must be monitored.
7. Check the categories you want to monitor and/or block. You can select individual categories or
block/monitor all categories.
• Monitor: Web pages are supplied to the user. Each access is recorded and can be viewed
using the reporting system or the Real-Time Monitor. Click Monitor All to monitor all
categories.
• Block: Web traffic is blocked for this ACL. Click Block All to block all categories.
8. Click OK to save the new ACL.
Creating a New Application ACL
1. Create or edit an application profile. For details, see Application Profiles.
2. In the Profile Details window, click Add.
3. Enter a name for the ACL.
4. Check the categories you want to monitor and/or block. You can select individual categories or
block/monitor all categories.
• Monitor: Applications are supplied to the user. Each access is recorded and can be viewed
using the reporting system or the Real-Time Monitor. Click Monitor All to monitor all
applications.
• Block: Application is blocked for this ACL. Click Block All to block all applications.
5. Click OK to save the new ACL.
Chapter 3 Profiles & Filters 42
iPrism Administration Guide
Page 54

Editing an ACL
1. Create or edit a web profile or an application profile.For details, see Web Profiles or Application
Profiles
2. In the Profile Details window, select the ACLto edit and click Edit.
3. Make your changes and then click OK.
Deleting an ACL
1. Create or edit a web profile or an application profile.For details, see Web Profiles or Application
Profiles
2. In the Profile Details window, select the ACLto delete and click Delete
3. If you are prompted to confirm, click Yes.
4. Click OK to close the application profile.
Lock ACL
Lock ACL provides a way for the SuperUser and the Global Policy Administrator to globally enforce
access restrictions on the same categories. By using Lock ACL, categories can be marked to be
blocked and/or monitored ( e.g., pornography or nudity). Lock ACLsettings override those in
individual profiles.
If a category is blocked and/or monitored in Lock ACL and a user requests an override for a blocked
page in that category, it will show up as Locked in Pending Requests (see Pending Requests). Lock
ACL will have to be turned off for that category before the Pending Request can be granted.
Note: Lock ACL is only available to the SuperUser, Global Policy
Administrator, and Full Access Administrator.
To lock ACLs:
1. From the iPrism home page, select Profiles & Filters, then Lock ACL.
Chapter 3 Profiles & Filters 43
iPrism Administration Guide
Page 55

Figure 26. Lock ACL
2. Check Lock ACLs in each profile.
3. Click Edit next to the type of ACL you want to lock (Web Lock ACL or Application Lock ACL).
4. Make your changes and then click OK.
5. Select whether the Override link will appear on the Access Denied page. You can specify that it
does not appear, or you can specify that this is determined by the Web Profile setting (and
restrict the login).
6. Select whether the Request access link will appear on the Access Denied page. You can specify
that it does not appear, or you can specify that this is determined by the Web Profile setting.
7. Click Save to save your changes.
8. If you have completed all your administrative changes, click Activate Changes to activate the
changes immediately. If you do not Activate Changes now, you will be prompted to do so before
logging out of iPrism.
Chapter 3 Profiles & Filters 44
iPrism Administration Guide
Page 56

Current Overrides
Override access allows users with the required privileges to be able to overrule the active filtering
policy and gain access to web pages that would otherwise be blocked. In iPrism, override privileges
are determined by a user’s administrator level assignment.
To view current overrides:
• From the iPrism home page, select Profiles & Filters, then Current Overrides. The iPrism
administrator can review all of the currently active overrides and revoke them, as desired.
Figure 27. Current Overrides
The following columns are available on the Current Overrides page:
• Expires: The date and time at which the override will expire.
• Administrator: The user who created the override. This is only relevant when using user
authentication. The override is only valid for the indicated user. When user authentication is not
used, or when the override is valid for all users, this column indicates Any.
• Profile: The profile to which the override applies. If this column reads Any, the override applies to
all profiles.
Chapter 3 Profiles & Filters 45
iPrism Administration Guide
Page 57

• Rating Category: The filtering profile affected by the override (e.g., News). This may be the
name of the profile overridden by the user, or it may read Any if the override is relevant to a
network, not a profile.
• User(s)/Workstation: The user, workstation, or range of workstations affected by the override,
using the IP addresses. If only one workstation is affected, this column shows its IP address. If
several workstations are affected, this column shows the IP network range.
• URL/Domain: The URL (single page or domain name) affected by the override. If the override
was performed for a list of categories instead of a URL, the categories affected is displayed.
To revoke one or more overrides:
• In the Current Overrides window, select the override(s) and click Revoke.
Pending Requests
When a user is surfing the Internet and receives an Access Denied message for a blocked page they
can click Request Access to send a message to the iPrism administrator to explain why they need
access to the site (see Overriding a Blocked Web Site). The administrator can review the request
and decide whether or not to grant access. No administration privileges are required to submit an
access request. If a request is granted, the requesting user will be allowed to access the site.
Note: The Request Access link appears in the Access Denied message if the
administrator has checked Request Access link when setting up the ACL. For
details, see Creating a New Application ACL
To view a list of pending requests:
• From the iPrism home page, select Profiles & Filters, then Pending Requests.
Figure 28. Pending Requests
Chapter 3 Profiles & Filters 46
iPrism Administration Guide
Page 58

Granting Requests
1. In the Pending Requests window, select the request(s) and click Grant.
Note: You cannot grant requests that are locked, which will be indicated by the
Locked column. Locked requests are set up via Lock ACL (see Lock ACL), and
can only be unlocked if the administrator unlocks them via the Lock ACL.
2. In the Grant Request page, choose Override Options.
• Apply the override to:
• User’s current workstation: Applies the override only to the given IP address
• Everyone: Applies the override to everyone.
• Override duration:
• Unlimited: Allows override access for an unlimited period of time
• ( ) days: By typing a number in the box, specifies a certain number of days for which this
override will be valid.
• Allow access to:
• Path: Allows access
only
to the given path
• Domain: Allows access to everything within the given domain
3. Click Grant to grant the request(s).
4. Click Save.
5. If you have completed all your administrative changes, click Activate Changes to activate the
changes immediately. If you do not Activate Changes now, you will be prompted to do so before
logging out of iPrism.
Denying Requests
To deny pending request(s):
1. In the Pending Requests window, select the request(s) and click Deny.
2. Click Deny to deny the request.
3. Click Save.
Chapter 3 Profiles & Filters 47
iPrism Administration Guide
Page 59

4. If you have completed all your administrative changes, click Activate Changes to activate the
changes immediately. If you do not Activate Changes now, you will be prompted to do so before
logging out of iPrism.
Recent Blocks
You can view a list of the 100 most recently blocked pages by selecting Profiles & Filters, then
Recent Blocks.
If you want to allow access to any of these blocked pages, select the page and click Allow Access.
Remote Filtering
iPrism provides comprehensive Internet security for off-premises flexible policy enforcement and
robust reporting.
• Once the iPrism Remote Filtering Client software is installed (see the
iPrism Remote Filtering
Client Guide
), mobile laptop and remote users are easily managed by iPrism without the client
being connected directly to a network containing iPrism. There’s no need to set up a DMZ
deployment or access the iPrism via VPN; thus, there is low latency and minimal impact on
network bandwidth.
• After mobile laptop and/or remote users are provisioned (see Remote Users for instructions),
policies are enforced no matter where the users are physically located. Policies are enforced at
the machine level; therefore, if multiple users use a particular laptop, the same policy will be
applied to all of them.
• The iPrism Remote Filtering clients are location-aware. So, whether users are on-premises or
off-network, their Web activities are filtered and tracked. Location awareness enables flexible
policy enforcement based on the laptop’s location relative to the corporate network. In addition,
there is no added security risk or point of failure.
• iPrism Remote Filtering allows employee Web surfing to be easily managed, regardless of
location and time. Administration tasks, policy enforcement, and drill-down reporting are
available, as are iPrism policy provisioning and fallback options.
• The client installation is tamper-proof and available for Windows 32- and 64-bit clients, as well as
Mac OS X.
Chapter 3 Profiles & Filters 48
iPrism Administration Guide
Page 60

• Unlike other remote Web filters, iPrism helps conserve network bandwidth. Because iPrism
Remote Filtering doesn’t require the use of a DMZ deployment, there is no need for additional
hardware. Once mobile laptop and/or remote users are provisioned from the iPrism, there is no
need to connect to the iPrism directly, eliminating the need to use your VPN. The EdgeWave
Data Center functions as an intermediary for the iPrism and the remote client.
• In reports, the remote filtering system attempts to adjust the time of events on remote clients to
the local time zone of the iPrism. This is so that remote events can be viewed side-by-side with
local events as they occurred.
• For iLearn video tutorials on Remote Filtering, go to http://edgewave.com/support/web_
security/recorded_webinars_ilearn.asp
Using Remote Filtering
To use Remote Filtering:
1. Upload a remote filtering license key (for details, see License Key).
2. Enable Remote Filtering and download the client software. See Enabling Remote Filtering.
3. Set up users in Users & Networks > Remote Users (see Remote Users) :
• Set up default actions and profiles
• Import or add remote users
4. Install the remote filtering client software on the remote users’ computers (see the
iPrism
Remote Filtering Client Guide
).
Enabling Remote Filtering
Once you have uploaded a remote filtering license key, logged out of your iPrism, and logged back
in, complete the following steps to enable remote filtering.
1. From the iPrism main window, select Profiles & Filters, then Remote Filtering.
Chapter 3 Profiles & Filters 49
iPrism Administration Guide
Page 61

Figure 29. Remote Filtering
2. Check Enable Remote Filtering.
3. Remote filtering is centrally administered. When a remote policy is enforced on the client, users
of the client will be presented with a Denied page. As the administrator, you have the opportunity
to influence the message on that page. In addition to the email addresses of the iPrism
administrators, you can type in the Administrator Contact Information field, any other
information you want to display on a block page. This information will be included in the page
presented to the user when they encounter a blocked URL. For example, you might choose to
also include something like “The requested page is currently unavailable. Your organization has
chosen to limit viewing of this site due to the rating of its content.”
4. If you have already provisioned your iPrism (i.e., uploaded a remote filtering license key and
completed step 2), you can click Download Client Auth File to create the key file that will be
used during the installation of the Remote Filtering client software (see the
iPrism Remote
Filtering Client Guide
).
5. Select the location where the code file should be saved. By default, this file is called iprism_
Client_Auth.key. This file will be used when installing the Remote Filtering client software.
6. Save this key file to a location of your choice.
Chapter 3 Profiles & Filters 50
iPrism Administration Guide
Page 62

7. To download the Remote Filtering client software, click Download Client Software. This will
take you to a website where you can complete the download. For more information about
configuring and using iprism_Client_Auth.key, refer to the
iPrism Remote Filtering Client Guide
.
8. Click Exceptions to define specific network ranges or ports for which filtering on the remote client
will not be enforced.
• Specify the target network ranges (IP address and Netmask) you do not want to monitor for
remote users, in Unmonitored Network Ranges.
• Specify the range of target ports you do not want to monitor for remote users, in
Unmonitored Ports.
• Click OK.
Figure 30. Remote Filtering Exceptions
9. Remote clients that are controlled by a policy in which monitoring is configured periodically send
event logs back to iPrism by way of the EdgeWave Data Center. The frequency at which iPrism
requests events from the Data Center can be adjusted with the Remote Filtering Logs
selection. To initiate an immediate log retrieval (i.e., not wait for the next cycle), click Initiate Log
Download.
10. When you are finished on this page, click Save.
Chapter 3 Profiles & Filters 51
iPrism Administration Guide
Page 63

11. You will be prompted to select a default web profile for remote users. Select a default profile from
the list and click OK.
Figure 31. Remote Default Behavior
12. You can now set up remote users (see Remote Users).
Note: The status of log downloads and policy uploads can be viewed in the
System Status section’s Status.
Chapter 3 Profiles & Filters 52
iPrism Administration Guide
Page 64

CHAPTER 4 Users & Networks
To access user and network information, click Users & Networks from the home page.
Local Users
The Local Users section allows you to view, import, add, delete, or modify locally defined iPrism
users. Local users exist in addition to and independent of users defined under Windows or LDAP
authentication systems.
To add, change, and delete local users:
1. From the iPrism home page, select Users & Networks, then Local Users.
2. When you have finished modifying local users, click Save to save your changes.
3. If you have completed all your administrative changes, click Activate Changes to activate the
changes immediately. If you do not Activate Changes now, you will be prompted to do so before
logging out of iPrism.
Chapter 4 Users & Networks 53
iPrism Administration Guide
Page 65

Figure 32. Local Users
Adding Users
1. In the Local Users window, click Add.
2. Type a Username and Password in the appropriate fields, and type the password again in the
Confirm Password field.
3. Assign a web profile by selecting it from the dropdown list;
OR
Check Use network profiles to assign the web profile based on the IP address of the user’s computer.
4. If this user is to have administrator privileges, select a type of Admin Privileges from the
dropdown list. Otherwise, selectNo access.
iPrism’s administrator levels are:
• Extended Override: Allows the user to log in to override management (see Override
Management) and grant access to others.
• Filter Management: Allows the user to change the categories associated with a website
(e.g., its site rating). Allows access to the Block/Unblock Site interface.
Chapter 4 Users & Networks 54
iPrism Administration Guide
Page 66

• Full Access: Allows the user to reply to administrative requests (overrides, access, etc.).
This user can access reports and the Block/Unblock Site interface, but cannot access the
Configuration interface or the Real-time Monitor.
• Global Policy Admin: This role is a user or login that is in charge of global filtering policies,
regardless of existing partitions.
• No Access: This basic user account has no administrative privileges.
• Reports Only: This user will be allowed access to iPrism’s report interface only.
• Single Override: Allows a user to grant access to themselves only. They cannot grant
access to others.
• Super Admin: This allows multiple iPrism administrator/Super Admin accounts. The Super
Admin account controls all iPrism access, configuration, and reporting.
Note: Admin Privileges created in Users & Networks > Admin Roles (Admin
Roles) are also available and may be selected here.
Figure 33. Adding a User
5. Click OK.
Editing a Local User
To edit a local user:
1. In the Local Users window, select a user and click Edit.
Chapter 4 Users & Networks 55
iPrism Administration Guide
Page 67

2. Make changes as needed and click OK.
Deleting a Local User
To delete a local user:
1. In the Local Users window, select a user and click Delete.
2. Click Yes to confirm.
Importing Users
1. In the Local Users window, click Import.
Figure 34. Import Local Users
2. In the Field Delimiter dropdown list, select the desired delimiter (Comma, Pipe, or Tab). This
character will be used to delimit individual users in the imported file.
3. In the Duplicate Policy dropdown list, select an option to specify how duplicate policies are
handled:
• Prompt for action: When a duplicate policy is encountered, you will be prompted to tell the
system how to handle it.
• Retain existing: When a duplicate policy is encountered, the existing policy on the iPrism will
be retained.
• Overwrite existing: When a duplicate policy is encountered, the policy being imported will
overwrite the policy on the iPrism.
4. Click OK.
5. Locate the file containing the users you want to import and click Open.
Chapter 4 Users & Networks 56
iPrism Administration Guide
Page 68

Exporting Users
1. In the Local Users window, click Export.
Figure 35. Export Local Users
2. In the Field Delimiter dropdown list, select the desired delimiter (Comma, Pipe, or Tab). This
character will be used to delimit individual users in the exported file.
3. Click Save As.
4. Locate the folder, enter a file name, and click Save.
Groups
Once iPrism has successfully joined the domain in System Settings > Directory Services, you can
map the user groups to iPrism’s Web Profiles and administrator privileges (if no mapping is defined,
the user will be assigned the Fallback Profile). Users who have been authenticated from a domain
controller can be associated with an iPrism profile. All users who are members of a particular user
group can be mapped to a particular iPrism access profile or administrator privilege.
To work with groups:
• From the iPrism home page, select Users & Networks, then Groups.
Chapter 4 Users & Networks 57
iPrism Administration Guide
Page 69

Figure 36. Groups
Adding a Group
1. In the Groups window, click Add.
2. In the Profile Maps window, determine the level of access for this group by selecting a Domain,
a Web Profile, and an Application Access profile.
3. Type a name for the group in the Group field.
4. Click OK to save your changes.
5. When you are finished adding all groups, click Save at the bottom of the Groups window.
Figure 37. Profile Map
Chapter 4 Users & Networks 58
iPrism Administration Guide
Page 70

Editing a Group
1. In the Groups window, click Edit.
2. Make any changes in the Profile Maps window.
3. Click OK to save your changes.
4. When you are finished editing all groups, click Save at the bottom of the Groups window.
Deleting a Group
1. In the Groups window, select a group and click Delete.
2. Click Yes to confirm the delete.
3. When you are finished modifying all groups, click Save at the bottom of the Groups window.
Mapping Groups to Profiles
Before doing any mapping, review the following guidelines.
Notes:
• It is very important to recognize that this particular list editor is ordered.
• LDAP mapping profiles use Attributes and Subquery Attributes, rather than the
DOMAIN\groupname notation.
When mapping groups to profiles, keep the following principles in mind:
• As iPrism is determining a user’s profile, a top-to-bottom search is performed on the list, with the
default assignment applied last (if no match is found).
• For the first group on the list in which the user is a member, the corresponding profile for that
map item is associated with the user. iPrism then uses this profile to define this user’s access to
iPrism.
• If the user is not a member of any group mappings on the list, the user is associated with the Web
Fallback and Application Fallback profiles.
Chapter 4 Users & Networks 59
iPrism Administration Guide
Page 71

• Whatever defines the group (DOMAIN or groupname) can be wildcarded (replaced with a single
asterisk (*)). The asterisk wildcard means that all domains or all groups are covered by the
mapping entry. An example of this convenience is if you want members of the ‘staff’ group (in any
domain) to be mapped to the MonitorAll profile:
( [*\staff > MonitorAll] )
Likewise, a wildcard can be used in the group position to cover all groups within a particular
domain (e.g., [DOMAIN\* > BlockOffensive] ).
• The Web Fallback and Application Fallback profiles are checked last and have the implied [*\* >
default profile] map.
The default profile should be carefully assigned, since any user who is not a member of one of
the group mappings will be associated with this profile. A common strategy is to plan that most
users will obtain the default profile, and use explicit mappings on the list for exceptions.
Note: Since *\* is implicitly mapped to the default profile, explicitly mapping *\*
on the list is not allowed.
In summary, an effective way to view mappings is to set the default profile as what most users will be
controlled by. Exceptions to the default profile can be configured via mappings, with the most specific
exceptions to be ordered at the top.
Nested Groups
When iPrism is joined to a Windows directory service that supports nested groups, such as Server
2000/2003 or Server 2008 mode, iPrism also supports nested groups.
Nested groups are supported when the iPrism is joined in either Server 2000/2003 or Server 2008
mode and the Windows domain controller is running in Windows 2000 Native mode or higher.
(Windows domain controllers running in Windows 2000 mixed mode do not support nested groups.)
When nested groups are in use, groups may be members of other groups. A user who is a member
of a group is also a member of any group of which that group is a member; e.g., if there is a group
“Color Printer Users”, and this group is a member of the group “Printer Users”, any user who is a
member of the “Color Printer Users” group is also a member of the “Printer Users” group.
Chapter 4 Users & Networks 60
iPrism Administration Guide
Page 72

iPrism assigns profiles and privileges based on the first group on the Groups page or Privileges page
of which the user is a member, whether the user is directly a member of that group or is a member
via the nested groups feature. Place direct-membership groups (e.g., “Color Printer Users”) before
nested groups (e.g., “Printer Users”) in the list of Groups or Privileges in order to have the profiles or
privileges of the direct-membership group (e.g., “Color Printer Users”) take effect.
Figure 38. Nested Groups Example
Privileges
Once iPrism has successfully joined the domain in System Settings > Directory Services and
mapped groups to profiles (see Groups), you can map the privileges to groups.
To add, edit, and delete privilege mappings:
1. From the iPrism home page, select Users & Networks, then Privileges.
Figure 39. Privileges
2. To add a privilege mapping, click Add; to edit an existing privilege mapping, click Edit.
Chapter 4 Users & Networks 61
iPrism Administration Guide
Page 73

3. Select a domain from the Domain dropdown list.
4. Type the group to which you are mapping this privilege; for information about setting up groups,
see Groups.
Figure 40. Privilege Map
5. Select a Privilege from the dropdown list:
• Extended Override: Allows the user to log in to override management (see Override
Management) and grant access to others.
• Filter Management: Allows the user to change the categories associated with a website
(e.g., its site rating). Allows access to the Block/Unblock Site interface.
• Full Access: Allows the user to reply to administrative requests (overrides, access, etc.).
This user can access reports and the Block/Unblock Site interface, but cannot access the
Configuration interface or the Real-time Monitor.
• Global Policy Admin: This role is a user or login that is in charge of global filtering policies,
regardless of existing partitions.
• No Access: This basic user account has no administrative privileges.
• Reports Only: This user will be allowed access to iPrism’s report interface only.
• Single Override: Allows a user to grant their own access. They cannot override a block page
for another user.
• Super Admin: This allows multiple iPrism administrator/Super Admin accounts. The Super
Admin account controls all iPrism access, configuration, and reporting.
Note: Admin Privileges created in Users & Networks > Admin Roles (Admin
Roles) are also available and may be selected here.
6. Click Save.
Chapter 4 Users & Networks 62
iPrism Administration Guide
Page 74

7. If you have completed all your administrative changes, click Activate Changes to activate the
changes immediately. If you do not Activate Changes now, you will be prompted to do so before
logging out of iPrism.
Networks
The Networks section allows you to manage network profiles. A network profile is a profile assigned
to a range of IP addresses. Any user whose IP address falls into that specified range will be
assigned that profile.
In the example below, we are defining several subnets; one for 192.168.100.1 – 192.168.100.100, as
well as one for 192.168.200.1 – 192.168.200.100. All are in proxy mode, but they have varying
authentication modes – No Authentication, Manual-Login (Basic, HTTP, or HTTPS), or Disable Web
Access. For a list of which options are available for each mode, see Adding a Network Profile.
At the top of the Networks window is a list of IP ranges. When iPrism sees network traffic, it will go
down the list looking for a range which matches the IP address associated with the network request.
If this address is on the 192.168.
x.x
network, the first entry in the list is matched, and profiles
associated with that entry are used.
If another address is making the request, the system falls through to the second entry which matches
everything and uses it. For more information on configuring profiles for your network, see Profiles
and Application Profiles.
Note: If you enter the range 0.0.0.0 – 255.255.255.255, any subnet in this range
is included in this profile.
To add, edit, and delete network profiles:
1. From the iPrism home page, select Users & Networks, then Networks.
2. When you are finished working with network profiles, click Save at the bottom of the Networks
window.
3. If you have completed all your administrative changes, click Activate Changes to activate the
changes immediately. If you do not Activate Changes now, you will be prompted to do so before
logging out of iPrism.
Chapter 4 Users & Networks 63
iPrism Administration Guide
Page 75

Figure 41. Networks
Adding a Network Profile
1. In the Networks window, click Add.
2. In the Details tab, enter the details of the Network Profile: the IP Start and IP End range,
whether the workstation is proxying to iPrism’s external interface (e.g., users are connecting to a
firewall VPN when iPrism is in bridge (transparent) mode), and the Web Profile and Application
Profile that will apply to this network profile.
Chapter 4 Users & Networks 64
iPrism Administration Guide
Page 76

Figure 42. Network Profile Details
3. Click the Authentication tab.
Figure 43. Authentication Tab – Proxy Mode
Chapter 4 Users & Networks 65
iPrism Administration Guide
Page 77

4. From the appropriate Authentication dropdown list, select which Authentication mode is to be
used if Always attempt manual login is selected in Advanced Auto-Login settings (see step 8
below). If Always attempt manual login is selected, one of the following options must be
selected here to specify how to handle the manual login.
5. From the Failed Option: dropdown list, select a failover option to specify what happens if
authentication fails (Use Network Profile or Disable Web Access). By default, Use Network
Profile is selected; the network profile will be applied to web filtering.
6. Configure your authentication mode and settings. For detailed explanations of authentication
modes and Auto-login in both proxy and bridge (transparent) modes, see Choosing an
Authentication Mechanism.
7. To specify a timeout value, select an option from the Timeout dropdown list and type the number
of minutes in the Min field.
8. Click Advanced Auto-Login to specify how to handle failed Auto-Login authentication. Available
options are:
• Always attempt manual login
• Never attempt manual login
Figure 44. Advanced Auto-Login
Notes:
For iPrism upgrades or a new iPrism setup, select Always attempt manual
login.
Chapter 4 Users & Networks 66
iPrism Administration Guide
Page 78

If Always attempt manual login is selected, select an option in step 4 above to
specify how to handle the manual login.
9. Click OK to save your changes.
Editing a Network Profile
1. In the Networks window, click Edit.
2. Make changes as necessary.
3. Click OK to save your changes.
Deleting a Network Profile
1. In the Networks window, select a profile and click Delete.
2. Click Yes to confirm.
VLAN Management
If your network includes VLANs, you can set up iPrism to filter VLAN tagged traffic on an 802.1Q
trunk.
If you want to make unique policy decisions on a per VLAN basis, it is advisable to create a separate
network entry for each VLAN on the networks list. This will come into play for non-authenticated
traffic as well as administrative privileges such as overrides.
To manage VLANs:
1. From the iPrism home page, select Users & Networks, then VLAN Management.
2. Add, change and remove VLANs as needed.
3. Click Save to save your changes.
4. If you have completed all your administrative changes, click Activate Changes to activate the
changes immediately. If you do not Activate Changes now, you will be prompted to do so before
logging out of iPrism.
Chapter 4 Users & Networks 67
iPrism Administration Guide
Page 79

Important: Activating changes to the VLAN configuration causes the iPrism
network interfaces to reset. This will cause a momentary interruption of network
traffic and may interrupt your administrative session. If your administrative
session is affected, use your browser to reconnect to the iPrism, then log in
again to continue.
Figure 45. VLANManagement
To toggle VLAN filtering:
• Click the filtering indicator for the VLAN. Red indicates filtering is ignored (turned off) for this
VLAN, green indicates filtering is turned on.
Adding a VLAN Description
1. In the VLAN Management window, click Add.
Chapter 4 Users & Networks 68
iPrism Administration Guide
Page 80

Figure 46. Adding a VLAN
2. Assign a VLAN ID in the range 0-4094.
3. Choose whether to add filtering to this VLAN, or specify that filtering should be ignored for this
VLAN.
4. Enter a DNS hostname, IP address, and subnet mask that the iPrism will use for participation on
this VLAN. Because user machines will be interacting at a TCP level with this address and
name, the IP address and DNS name must be unique.
5. Click OK.
Editing a VLAN Description
1. In the VLAN Management window, select a VLAN and click Edit.
2. Make changes as needed.
3. Click OK.
Deleting a VLAN Description
1. In the VLAN Management window, select a VLAN and click Delete.
2. Click Yes to confirm.
Chapter 4 Users & Networks 69
iPrism Administration Guide
Page 81

Admin Roles
Administrator Roles (Admin Roles) define the type of access an iPrism administrator has. Detailed
descriptions of each role are on Global Policy Administrator (GPA): The GPA has the right to log in to
UI Configuration tools and administer global filtering policies. The GPA can also access reports, filter
management, and overrides. Use this role to delegate management policies of the entire iPrism to a
user.
To work with administrator roles:
1. From the iPrism home page select Users & Networks, then Admin Roles.
2. Add, change or delete roles as needed.
3. When you are finished updating Admin Roles, click Save at the bottom of the Admin Roles
window.
4. If you have completed all your administrative changes, click Activate Changes to activate the
changes immediately. If you do not Activate Changes now, you will be prompted to do so before
logging out of iPrism.
Figure 47. Admin Roles
Chapter 4 Users & Networks 70
iPrism Administration Guide
Page 82

Adding an Admin Role
1. In the Admin Roles window, click Add.
2. Type a name for this Admin Role, and select a Role Type from the dropdown list. The following
roles are available:
• Global Policy Administrator (GPA): The GPA has the right to log in to UI Configuration
tools and administer global filtering policies. The GPA can also access reports, filter
management, and overrides. Use this role to delegate management policies of the entire
iPrism to a user.
• iPrism-wide Privileged User: This role assigns specific rights for the entire iPrism. For
example, with this option, you can create a privilege that has full reporting access and
overrides for the entire iPrism.
• Super User (also referred to as Super Admin): The Super User/Super Admin is the built-in
account with the username “iprism”, and has all rights. This role is not viewable or
configurable, and is the only “mandatory” role. The assignment of other roles and privileges
listed below is optional.
3. Select options in the Filtering tab:
• Manage profiles: This Admin role will be able to manage Profiles.
• Manage Overrides, Requests and Recent Blocks: Allow this Admin Role to manage
Overrides, Pending Requests, and Recent Blocks.
• Manage Antivirus and Remote Filtering settings: Allow this Admin Role to manage the
Antivirus and Remote Filtering settings.
4. Select the Access Control List tab.
Chapter 4 Users & Networks 71
iPrism Administration Guide
Page 83

Figure 48. Admin Roles – Access Control List Tab
5. One or more individual filtering criteria, or Access Control Lists (ACLs), make up a Web profile. A
Web ACL tells iPrism what to do for each category of website and specifies which traffic gets
blocked or monitored. Admin Roles can be set to allow for specific types of overrides and to have
those overrides be valid for custom durations.
6. Select a type of override from the Override dropdown list. The following types of overrides are
available:
• Cannot Override: Cannot override blocked pages. If this option is selected, no other ACL
options can be selected in this window; click OK to finish.
• Self Only: This role can override blocked pages only under its own login, but no others. You
can select Durations (step 7) and which contents can be overridden (step 10).
• Custom: Define what kind of overrides you want this role to have. Select Durations (step 7),
to whom this applies (step 9), and which contents can be overridden by this role (step10).
7. Select a duration for this override to be valid by clicking one of the following:
Chapter 4 Users & Networks 72
iPrism Administration Guide
Page 84

• Use Predefined Durations: Select either Unlimited, or select Minute(s), Hour(s), Day(s),
Week(s), from the dropdown list and type in the number of minute(s), hour(s), day(s), and/or
week(s) this override is valid (e.g., 1 hour 30 minutes).
• Use Customized Durations: Click Configure Durations, click Add, then specify the
durations you want in week(s), day(s), hour(s), and minute(s).
• Unlimited Duration: No duration is set.
If you want the duration you have specified to be used as the default, check Set this duration as
default.
Figure 49. Maximum Duration for Overrides
8. Click OK.
9. Back on the Access Control List tab, check to whom the Admin Role applies:
• Everyone
• Only the Current Workstation
• Only the Current User
• A Profile
• Current User profile
• PassAll profile
• BlockOffensive profile
• Any defined profile
• A specified Network Range you have typed (0.0.0.0 to 255.255.255.255 covers the entire
network).
10. Check which contents can be overridden by this role:
• Current URL: Only the entire URL can be overridden.
Chapter 4 Users & Networks 73
iPrism Administration Guide
Page 85

• Current Path: The path component is the part of the URL which appears after the host
name. This allows overriding based on a specific path, regardless of the host name.
• Current Domain: The domain name of the host part of the URL. For example, the domain for
http://www.yahoo.com is yahoo.com. iPrism is aware of country codes, so the domain for
http://www.amazon.co.uk/index.html is amazon.co.uk.
• Current Category: This option allows the administrator to override all users that belong to
the category of the URL being requested.
• Categories allowed by this user’s profile: This option allows the administrator to apply
his/her categories to override the requested URL being requested; i.e., the administrator is
overriding the URL request with his/her own profile.
• All URLs: The user can override any URL.
11. Select the Reporting tab to specify Reporting options:
• None: This role has no reporting rights.
• Full: Full reporting rights are allowed.
• Limit Results by Network Range: Enter a start and end IP range. The results will be limited
by this range.
• Limit Results by Profile: Select a profile (Current User Profile, PassAll, or BlockOffensive).
The results will be limited to this profile.
12. Select the Other tab.
13. Check the boxes next to what you want this Admin Role to be able to manage:
• Manage Users & Networks
• Manage Access Maintenance
• Manage System Settings
• Access System Status
14. Click OK to save your changes.
Editing an Admin Role
1. In the Admin Roles window, select a role and click Edit.
2. Make changes as needed.
3. Click OK.
Chapter 4 Users & Networks 74
iPrism Administration Guide
Page 86

Deleting an Admin Role
1. In the Admin Roles window, select a role and click Delete.
2. Click Yes to confirm.
Exceptions
iPrism’s goal on your network is to act as a web filter for access to the Internet. In fact, this is how it is
able to perform its monitoring and blocking tasks. You may want to implement reduced or additional
filtering for specific situations.
Exceptions make iPrism ignore traffic coming from or going to a range of hosts (e.g., a corporate
web server located in a DMZ or internal servers accessing the Internet without authentication).
Specific examples of the most commonly used types of exceptions are in the iPrism Knowledgebase
section on Exceptions.
Note: HTTPS (SSL) traffic on port 443 is now strictly enforced by default. If you
do not use SSL but do use port 443, either change the application port or create
a filter exception for the client/server addresses.
To work with exceptions:
1. From the iPrism home page, click Users & Networks, then Exceptions.
2. Add, change, and delete exceptions as needed.
3. When you are finished click Save at the bottom of the Exceptions window.
4. If you have completed all your administrative changes, click Activate Changes to activate the
changes immediately. If you do not Activate Changes now, you will be prompted to do so before
logging out of iPrism.
Adding an Exception
1. From the Exceptions window, click Add.
Chapter 4 Users & Networks 75
iPrism Administration Guide
Page 87

Figure 50. Managing Exceptions
2. Type a name for the exception in the Name field.
3. Select the type of exception:
• No Filter: Traffic will pass unfiltered through the specified Source and Destination range of
IP addresses, or the specified port.
• Block: Traffic destined for the specified IP address range OR the specified port(s) will be
blocked.
• NAT (Network Address Translation): NAT replaces the IP address of the sender (i.e., the
user) with the IP address of iPrism, for outbound traffic. A reverse translation is done to any
responses coming back. The effect of NAT is that requests look like are coming from iPrism
only. This setting hides the IP addresses of your internal workstations from the Internet
(transparent mode only).
• No Authentication: Traffic destined for the IP address range will not be authenticated.
• No Authentication & NAT: Combines NAT with No Authentication in one option.
Note: Exception types are applied in order of priority based on the type. For
example, if a “No Filter” exception has been created for an IP address range,
and later a subsequent “Block” exception is created for that same IP address
range, the “No Filter” exception wins, as iPrism encounters that type of
exception first; thus, traffic will pass unfiltered through that IP address range.
Chapter 4 Users & Networks 76
iPrism Administration Guide
Page 88

4. Type the IP address range for the sending machine or set of machines in the Source IP Start
and End fields.
5. Type the IP address range for the receiving machine or set of receiving machines in the
Destination IP Start and End fields.
6. If this exception applies to all ports, select All Ports. If it applies only to specific ports, select
Specific Ports and type the ports to which this exception applies. Use commas to separate
multiple ports. A range of ports can be specified as well (e.g., 80 – 120, or 1 – 79, 81 – 65535).
7. In Protocols, check either TCP or UDP. If you select both TCP and UDP, all IP protocols will be
blocked, including ICMP and others. At least one must be selected.
8. Click OK.
Editing an Exception
1. In the Exceptions window, select an exception and click Edit.
2. Make changes as needed.
3. Click OK to save your changes.
Deleting an Exception
1. In the Exceptions window, select an exception and click Delete.
2. Click Yes to confirm.
Remote Users
iPrism provides comprehensive Internet security for off-premises users (see Remote Filtering). The
mobile laptops and/or remote users must be provisioned in order to utilize this capability.
Before setting up remote users:
1. Upload a remote filtering license key (see License Key). You may be logged out and have to log
back into your iPrism.
2. Enable Remote Filtering and download the client software via Profiles & Filters > Remote
Filtering.
Chapter 4 Users & Networks 77
iPrism Administration Guide
Page 89

Important: The Machine Identifier identifies a particular remote machine and
defines a policy for all users on that machine. It is treated like a username, and
by default is the hostname of the machine when the client is installed (to locate
the computer’s hostname, see Locating a Hostname in the
iPrism Remote
Filtering Client Guide
). Thus, the names of the Remote Users you create in the
table below must match exactly the names of the mobile laptops to which they
are being mapped.
For example, if a mobile laptop’s Machine Identifier is “jsmith012-companyA”, the corresponding
Remote User must also be called “jsmith012-companyA”. Conversely, if you set up the Remote
User first, you must also make sure that when you provision the Remote Client (see the
iPrism
Remote Filtering Client Guide
), you give it the same name (“jsmith012-companyA”).
Generally speaking, the first thing to do is designate a default profile that will apply to remote clients.
If you want all remote clients to be controlled by that policy, you don’t need to do anything else here.
If you want to create exceptions to that default profile, specify those in Client Exceptions.
(Exceptions are specifically identified Machine IDs, whereas the default profile applies to all
undefined Machine IDs.) If exceptions are specified, iPrism remote filtering will first check if a user is
defined that matches the client Machine ID, and apply the specified profile. If there is no (exact)
matching Machine ID, then the default profile is applied. It is unlikely you will have more than a few
users defined in Client Exceptions.
Even though profile assignment is defined on a per-client machine basis, access events that make
their way into iPrism reporting will record the currently logged-on user and iPrism reporting events.
Note: Remote Filtering must be enabled via Profiles & Filters > Remote
Filtering prior to setting up remote clients.
To work with remote users:
1. From the iPrism home page, select Users & Networks, then Remote Users.
2. Add, edit, and delete remote users as needed.
3. Click Save to save your changes.
4. If you have completed all your administrative changes, click Activate Changes to activate the
changes immediately. If you do not Activate Changes now, you will be prompted to do so before
logging out of iPrism.
Chapter 4 Users & Networks 78
iPrism Administration Guide
Page 90

Adding a Remote User
1. In the Remote Users window, click Add.
2. Enter the username/machine ID. See Remote Users for details.
3. To enable this machine now, select Enabled.
4. Select the Web profile to apply for this machine.
5. Select the Failover action for this machine.
6. Click OK.
Figure 51. Add Remote User
When Remote Filtering is ON (see Remote Filtering), this user will be able to take advantage of
iPrism, including having profiles and filtering rules applied to them, downloading filter updates and
rules, uploading reports, and having their Internet activities tracked and reported upon.
Editing Remote Users
1. In the Remote Users window, select a user and click Edit.
2. Make changes as needed.
3. Click OK.
Chapter 4 Users & Networks 79
iPrism Administration Guide
Page 91

Deleting a Remote User
1. In the Remote Users window, select a user and click Delete.
2. Click Yes to confirm.
Importing Remote Users
If you already have a list of remote users, you may want to import them to iPrism.
1. In the Remote Users window, click Import.
Figure 52. Importing Remote Users
2. Select a field delimiter (comma, pipe, or tab) for the import file.
3. Select an option for handling duplicate policies (usernames):
Prompt for action: The administrator will specify how to handle each duplicate policy (username).
Retain existing: Retain the existing policy (username) on the iPrism; the policy (username) in
the import file will be overwritten.
Overwrite existing: Overwrite the existing policy (username) on the iPrism with the policy (username) from the file being imported.
4. Click OK.
5. Choose the .CSV file containing the list of users to import. The file might look something like this:
name,enabled,default_action,profile_name
Chapter 4 Users & Networks 80
iPrism Administration Guide
Page 92

ru_sonia,false,1,BlockOffensive
ru_tony,false,1,PassAll
ru_john,false,1,BlockOffensive
ru_mary,false,1,PassAll
ru_peter,false,1,PassAll
Exporting Remote Users
Note: You must Save & Activate any unsaved changes prior to exporting
users.
1. In the Remote Users window, click Export.
2. A check will be performed to verify whether any changes need to be saved and activated. If there
are changes, you must click Save, then click Activate Changes before you can perform an
export.
3. If there are no changes, select a field delimiter (comma, pipe, or tab) for the export file:
Figure 53. Exporting Remote Users
4. Click Save As.
5. Specify the location of the exported file.
An exported file might look something like this:
Name,Enabled,Action Id,Profile
ru_peter,true,2,PassAll
ru_mary,false,2,PassAll
ru_john,true,1,BlockOffensive
ru_tony,true,2,PassAll
ru_sonia,true,1,BlockOffensive
Chapter 4 Users & Networks 81
iPrism Administration Guide
Page 93

Remote Upgrades
System upgrades for remote users can be scheduled during non-peak periods if needed. Set up the
defaults that will apply to most systems, and then add exceptions if needed, for specific machines or
ranges of machines.
To set up remote upgrades:
1. From the iPrism home page, select Users & Networks, then Remote Upgrades.
Note: If you have just enabled Remote Filtering, the available Remote
Upgrades may not yet be visible on this page. If this occurs, log out then log in
again to see the available Remote Upgrades.
2. Set the defaults as they apply to PCand/or Mac systems.
• Select Enabled to turn on remote upgrades, or Disabled to turn off remote upgrades. If
remote upgrades are disabled for a type of machine (e.g., Mac), you can enable them for
specific IDs using the Exceptions settings.
• Select an upgrade package from the dropdown list. Only available packages for the machine
type are listed.
• Choose the dates and times during which this upgrade will be applied. If a specific machine is
unavailable at this time, it will not get the upgrade.
• Check Force Reboot if you want each machine to automatically reboot and complete the
upgrade.
Chapter 4 Users & Networks 82
iPrism Administration Guide
Page 94

Figure 54. Remote Upgrade Settings
3. To add exceptions, click Add, enter the information, and click OK.
• To enter a range of machine IDs, use the * wildcard (only available at the end of the ID).
• Select Enabled to turn the exception setting on, or Disabled to turn off this exception setting.
Figure 55. Remote Upgrade Exceptions
4. Click Save to save your changes.
Chapter 4 Users & Networks 83
iPrism Administration Guide
Page 95

5. If you have completed all your administrative changes, click Activate Changes to activate the
changes immediately. If you do not Activate Changes now, you will be prompted to do so before
logging out of iPrism.
Chapter 4 Users & Networks 84
iPrism Administration Guide
Page 96

CHAPTER 5 Reporting
The iPrism Report Manager contains predefined, commonly needed reports, such as who was
visiting what website and when. You can also create your own custom reports for IM, P2P and URL
events. Refer to the
iPrism Reporting Guide
at http://www.edgewave.com/support/web_
security/documentation.asp for detailed instructions on how to manage and use the Report
Manager.
Note: Email Alerts are now located in the Profiles & Warnings menu, in Quotas
& Warnings. See Email Alerts for details.
Chapter 5 Reporting 85
iPrism Administration Guide
Page 97

CHAPTER 6 Maintenance
This section describes how to change iPrism’s internal settings and set your preferences for
common iPrism activities such as managing updates, backing up, restoring, running tests, and doing
self-checks.
Appliance Updates
Also known as the Hotfix Manager, Appliance Updates provide a convenient interface for tracking
iPrism updates and patches (called Hotfixes). With Appliance Updates, you can instantly check for
new updates, view available updates, see which updates have already been installed, and manually
install or uninstall a Hotfix.
Note: Only the iPrism administrator/Super Admin account (iprism) can access
Appliance Updates.
To access Appliance Updates:
1. From the iPrism home page, select Maintenance, then Appliance Updates.
2. Click Hotfix Manager.
3. Click Yes to confirm.
iPrism automatically checks for updates to its filtering database and system (software) files daily.
You can disable this function to allow only manual updates, or specify the time of day when you want
iPrism to run its update utility.
Note: Disabling automatic updates is not advised. With automatic updates
disabled, your system will not automatically install critical Hotfixes.
By default, iPrism is set up to automatically check for system updates in the early morning hours,
when network traffic is likely to be at a minimum. If this is convenient for you, there is no reason to
change the default setting.
Chapter 6 Maintenance 86
iPrism Administration Guide
Page 98

Installing a New Hotfix
1. If you need to update the Available Hotfixes list, click Check for New Hotfixes in the Hotfix
Manager.
2. Select the desired Hotfixes from the Available Hotfixes list and click Install. The Install Hotfixes
web page opens.
3. Click Install.
If the Hotfix you selected is dependent upon earlier Hotfixes that are not installed, all required
Hotfixes are installed automatically once you authorize the installation of the new Hotfix.
Note: The same dependency principle applies when uninstalling Hotfixes.
Uninstalling a Hotfix on which others are dependent results in all dependent
Hotfixes being uninstalled.
Rebooting after Installing Hotfixes
To enable Hotfixes, iPrism typically must be rebooted after the Hotfix has been installed. When you
are done installing a Hotfix, you normally see a message indicating that a reboot is required, and a
button to click to go back to the Hotfix Manager.
1. Click Back.
2. Click Reboot the system.
3. Confirm the reboot by clicking Reboot the system.
Uninstalling a Hotfix
Although it is unlikely you will ever need to do this, you can uninstall a Hotfix if you suspect it is
causing issues with your iPrism, or if you are directed to do so by EdgeWave Technical Support.
To uninstall a Hotfix:
1. In the Installed Hotfixes list, select the Hotfix you want to remove and click Uninstall. A
confirmation message appears.
2. Click Yes.
Chapter 6 Maintenance 87
iPrism Administration Guide
Page 99

Note: If you uninstall a Hotfix on which others are dependent, all dependent
Hotfixes are also uninstalled.
Backup and Restore
You can back up all of your settings to a file on your local hard drive, restore the iPrism configuration
to a previously saved version, or reset to factory default settings. In addition, the backup
configuration file can be useful to provide configuration data to iPrism Technical Support.
To access the backup and restore options:
• From the iPrism home page, select Maintenance, then Backup & Restore.
Figure 56. Backup & Restore
Backing Up
Backing up your iPrism configuration stores all of your settings to a file on your local hard drive. If
necessary, you can restore your settings from this file. The data in backup files is encrypted for
security.
By default, iPrism automatically prompts every 6 days, when you exit, to back up your iPrism System
Configuration.
To perform an immediate backup:
• In the Backup &Restore window, click Backup.
Chapter 6 Maintenance 88
iPrism Administration Guide
Page 100

If you need to change your backup preferences:
• Click Settings. See Backup Settings for details.
Restoring
You can restore your iPrism from a local backup or to its original factory configuration.
Restoring Your System from a Local Backup
1. In the Backup &Restore window, select Restore from backup from the dropdown list.
2. Click Restore.
Note: iPrism v4.0 introduced a new database format. Backups created prior to
version 4.0 are NOT compatible and cannot be restored.
Restoring iPrism to its Default (Factory) Configuration
Restoring the iPrism to its factory settings clears all user-defined configuration information. You
should do a backup of your current configuration before performing this procedure. (See Backing
Up).
1. In the Backup &Restore window, select Restore Factory Configuration from the dropdown list.
Note: This restores iPrism to its “out of the box” state. All settings, including
network settings, are lost or set back to their default values.
2. Click Restore.
3. Click Yes to confirm.
The iPrism reboots within two minutes, and your iPrism session is ended.
When you log into iPrism again, you will be presented with the installation wizard, as if you were
setting up iPrism for the first time. Refer to your
iPrism Installation Guide
for assistance with this
wizard.
Event Log
The Event Log provides a status record of Access Events – the number of web and application
accesses. Also provided is the date of the oldest record accessed.
Chapter 6 Maintenance 89
iPrism Administration Guide
 Loading...