

Page 1
Quick Start Guide
V6.52X / V7.0
iPrism Web Security
800-782-3762
www.edgewave.com
Page 2
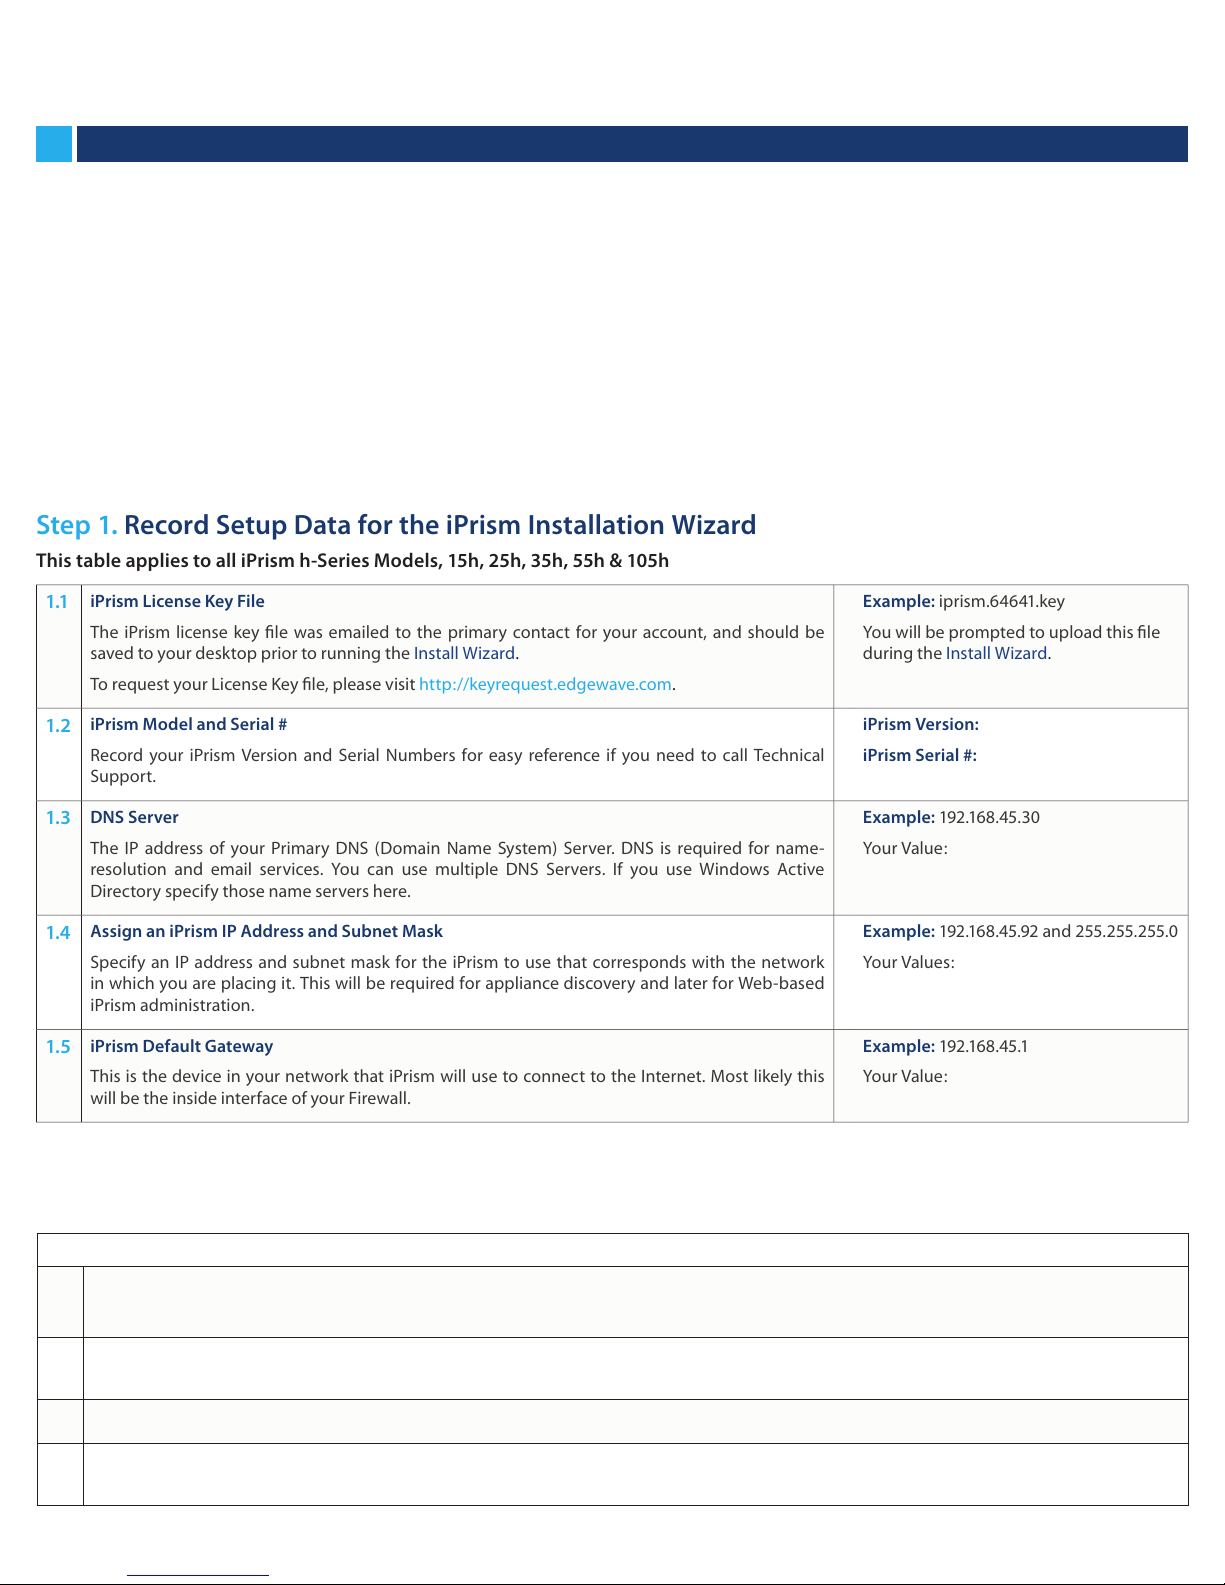
Step 1. Record Setup Data for the iPrism Installation Wizard
This table applies to all iPrism h-Series Models, 15h, 25h, 35h, 55h & 105h
1.1
iPrism License Key File
The iPrism license key file was emailed to the primary contact for your account, and should be
saved to your desktop prior to running the Install Wizard.
To request your License Key file, please visit http://keyrequest.edgewave.com.
Example: iprism.64641.key
You will be prompted to upload this file
during the Install Wizard.
1.2
iPrism Model and Serial #
Record your iPrism Version and Serial Numbers for easy reference if you need to call Technical
Support.
iPrism Version:
iPrism Serial #:
1.3
DNS Server
The IP address of your Primary DNS (Domain Name System) Server. DNS is required for name-
resolution and email services. You can use multiple DNS Servers. If you use Windows Active
Directory specify those name servers here.
Example: 192 .16 8 .45. 30
Your Value :
1.4
Assign an iPrism IP Address and Subnet Mask
Specify an IP address and subnet mask for the iPrism to use that corresponds with the network
in which you are placing it. This will be required for appliance discovery and later for Web-based
iPrism administration.
Example: 192.168.45.92 and 255.255.255.0
Your Values:
1.5
iPrism Default Gateway
This is the device in your network that iPrism will use to connect to the Internet. Most likely this
will be the inside interface of your Firewall.
Example: 192 .16 8 .45.1
Your Value:
Quick Start Guide
iPrism Web Security
V6.52X / V7.0
IMPORTANT: Please read through the Quick Start Guide prior to setup. Make sure to have your iPrism License Key file saved to your desktop, and record the
information listed in Step 1 prior to installation.
Quick Installation of iPrism
The proxy-mode configuration outlined in this guide provides an easy temporary setup for evaluating and testing iPrism using proxied
client traffic. Once you are familiar with using iPrism in Proxy-Mode, we recommend reconfiguring iPrism for Bridge-Mode deployment to
fully utilize the transparent-mode traffic management and reporting features offered by iPrism.
For more information on installation and configuration (including transitioning to Bridge-Mode), see the iPrism Installation Guide available
on the iPrism support page at: http://supportdocs.edgewave.com.
Step 2. Connect the iPrism and Login
Models 15h & 25h – DHCP
Connect one end of the white Ethernet Cable to the iPrism’s internal interface and the other end to a switch in your LAN (where DHCP is working).
2.1
Important: Do not connect the external side of the iPrism at this point
Power up your iPrism by pressing and holding the red power button. A DHCP server automatically assigns an IP address and valid network
2.2
parameters to the iPrism.
Wait a few minutes and then go to: https://portal.edgewave.com/ipconfig.aspx
2.3
When prompted, enter the 5-digit iPrism serial number and click submit.
2.4
You will be redirected to the Installation Wizard (Step 3)
Page 3

Step 3. Run the Installation Wizard
To complete the Installation Wizard you will need the setup data you recorded in Step 1 and your iPrism License Key file which should be
saved to your desktop.
The following is an outline of the Installation Wizard steps:
3.1
Username and Password
The Wizard will prompt you for a user name and password. The defaults are Username: iprism; Password: setup
3.2
Agree to License
You will be prompted to accept the License Agreement. Read the agreement and click Agree to continue
3.3
New or Restore Cong
New Customers should select Start a New Configuration and click Next to continue.
Existing customers can restore their settings from their backup by selecting Restore from Archive and then uploading their archive. Once that is
completed the iPrism will shut down. Existing customers may proceed to Step 4
3.4
Enter Install Key
When prompted, browse to the directory where you saved your iPrism License Key file and select Next to continue.
3.5
Enter Contact Info
On the Registration Information screen fill out your contact information. Choose carefully, your Administrator email is used for delivering
important iPrism product update information. It is recommended that you change your password by selecting Set Password.
3.6
Network Screen Setup
On the Network Settings page enter the setup data you recorded in Step 1. To enter the IP address for your DNS, select DNS Settings then Add in
the Name Servers pop-up window. Enter your DNS address and select OK to continue. Enter your IP address recorded in Step 1.4. Select OK then
Next to continue.
Please Note: Some values on this page may be pre-populated but can be changed.
3.7
Filter Settings
Determine whether you wish to monitor or block your Web and application traffic and select the iPrism time zone from the drop-down menu.
3.8
Review Settings
When prompted, review your configuration settings and click Finish. To make changes to your settings, click Back.
Please note: You will only be able to use the Print option with a local printer. Conguration reports will be available once you reboot.
3.9
Once you save your settings, iPrism will save and apply them and reboot automatically – this may take 4-5 minutes.
Quick Start Guide
iPrism Web Security
V6.52X / V7.0
Models 35h, 55h, 105h - LCD Panel
Connect one end of the white Ethernet Cable to the iPrism’s internal interface and the other end to a switch in your LAN.
2.1
Important: Do not connect the external side of the iPrism at this point
Power up your iPrism by pressing and holding the red power button. LCD screen displays the software version number (this may take 2-3 minutes).
2.2
Each of the LCD front panel buttons has a function – up and down arrows move through menu items, check mark selects the option and “x” button
2.3
saves and/or exits.
Use buttons to do the following: Proceed to the Installation Wizard (Step 3)
• Set the IP Address
• Set the netmask
• Set the gateway
Proceed to the Installation Wizard (Step 3)
2.4
• Set the link speed (default is auto)
• Set the link duplex (full is used for most systems)
• Select YES to save your settings
Page 4

Quick Start Guide
iPrism Web Security
V6.52X / V7.0
Your iPrism installation is now complete.
Step 4. Shut Down and Relocate the iPrism Appliance (If it is not already located in a production setting)
Ensure proper shut down and Relocate the iPrism into a network or subnet that will be convenient for testing, typically near your Internet
Gateway. Connect a network cable between your switch and the INTERNAL iPrism interface, and turn on the power.
Step 5. Redirect HTTP Trac to iPrism for Testing
Redirect Web requests to iPrism by configuring one or more clients to proxy to iPrism, using the default port 3128 and the iPrism’s IP
address. All HTTP/HTTPS requests originating from workstations that proxy to the iPrism will be filtered. For more information on setting
up and testing iPrism for evaluation purposes, please see our Evaluation Guide. When finished evaluating in Proxy-Mode, refer to the
iPrism Installation Guide for transitioning to Bridge-Mode. Both guides are available at http://supportdocs.edgewave.com.
In the unlikely event that you need to return your iPrism, please contact Technical Support at 1-858-676-5050 for a Return Material
Authorization (RMA) number. A replacement unit will then be shipped to you, and you can return the defective unit in the box in which your
replacement unit was shipped.
For further assistance submit a request at http://supportdocs.edgewave.com or contact iPrism Customer Support at 1-858-676-5050
Interested in upgrading your iPrism appliance?
iPrism 35h - 30 Mbps filtered throughput and up to 1,000 work stations.
iPrism 55h - 50 Mbps filtered throughput and up to 2,500 work stations.
iPrism 105h - 100 Mbps filtered throughput and up to 10,000 work stations.
iPrism 500h - 500 Mbps filtered throughput and up to 20,000 work stations.
We also oer comprehensive, fully-hosted email security solutions!
Email Filtering (EMF) - Industry-leading inbound/outbound Spam and Antivirus filtering, policy categorization and
automated seamless directory integration.
Data Loss Protection (DLP) - Content analysis and policy engine utilizing proprietary technology to scan outgoing email
attachments for confidential data and prevents it from leaving your network.
Email Encryption - Ensures secure delivery of email to any recipient with easy-to-use technology that eliminates the cost
and complexity of other encryption services.
Email Continuity - Ensures continued email operations in case of planned or unplanned email server outages by spooling
all your email.
Email Archiving - Retain your email in an unalterable easy searchable state to help meet regulatory requirements and
enable efficient eDiscovery processes.
Corporate Oce
15333 Avenue of Science, San Diego, CA 92128
Phone: 858-676-2277 Toll Free: 800-782-3762 Fax: 858-676-2299 Email: info@edgewave.com
©2011 EdgeWave, Inc. All rights reserved.
The EdgeWave logois a trademark of EdgeWave Inc. All other trademarks and registred trademarks are hereby acknowledged.
 Loading...