

Page 1
Edgewater Networks / 2895 Northwestern Parkway, Santa Clara, CA 95051
Phone: +1 (408) 351-7200 / Email: support@edgewaternetworks.com
Getting Started with the
EdgeView 5300LF2
Version 1.0
Page 2

ii
Copyright (c) 2011, Edgewater Networks, Inc.
Edgewater Confidential, All Rights Reserved
Part Number: EWN021-02-K001
This document is protected by copyright and distributed under licenses restricting its use,
copying, distribution , and decompilation. No part of this document may be reproduced in
any form by any means without prior written authorization of Edgewater Networks, Inc.
Documentation is provided “as is” without warranty of any kind, either express or implied,
including any kind of implied or express warranty of non-infringement of the implied
warranties of merchantability or fitness for a particular purpose.
EdgeMarc is a trademark of Edgewater Networks, Inc. in the United States and other countries. Any other
trademarks appearing in this manual are owned by their respective companies.
Export Notice
This product, software and related technology is subject to U.S. export control and may be subject to
export or import regulations in other countries. Purchaser must strictly comply with all such laws and
regulations. A license to export or re-export may be required by the U.S. Department of Commerce.
Regulatory Compliance
This product was tested to comply with FCC standards for home and office use.
Licensing
Use of this product is subject to Edgewater Networks Software License Agreement.
Portions of this product include software sponsored by the Free Software Foundation and are covered by
the GNU GENERAL PUBLIC LICENSE.
See the VOS for EdgeMarc User Manual for more information regarding licenses.
Software Version
This documentation was written for EdgeView software version 11.2.
Release Date
June 13, 2011
Warranty
Product warranty does not apply to damage caused by lightning, power surges, or wrong voltage usage.
Typographical Errors
This publication could include technical inaccuracies or typographical errors, for which Edgewater
Networks never can or shall be held liable. Changes are made periodically to the information herein;
these changes will be incorporated in new releases of this publication. Edgewater Networks may make
improvements or changes in the product or products described in this publication at any time, without
prior notice.
Documentation Feedback
Edgewater Networks considers your satisfaction with this documentation a priority. If you would like to
provide us with feedback regarding your experience with our documentation or should you have any other
quality-related comment concerning its delivery, please visit the following URL:
http://www.edgewaternetworks.com/feedback.htm
Page 3

iii
Additional EdgeView Publications
• EdgeView 5300LF2 Hardware Installation Guide
• EdgeView 5300LF2 System Administration Guide
You can download these documents and additional application notes to help you configure, administer,
and troubleshoot your EdgeView appliance from http://www.edgewaternetworks.com/kb.
Page 4

iv
Contents
Starting EdgeView............................................................................................................ 2!
EdgeView Quick Tour....................................................................................................... 3!
License .............................................................................................................................. 4!
System Security Overview .............................................................................................. 6!
Adding an EdgeMarc........................................................................................................ 10!
EdgeView GUI................................................................................................................. 10!
Using Auto-Discovery...................................................................................................... 17!
Adding a Group ................................................................................................................ 23!
EdgeMarc Management ................................................................................................... 25!
Backing Up EdgeMarcs................................................................................................... 25!
Upgrading EdgeMarcs..................................................................................................... 29!
Resetting an EdgeMarc Password .................................................................................. 32!
Device Status View ......................................................................................................... 34!
System Functions............................................................................................................ 36!
Database Administration ................................................................................................. 37!
Database Check (and Repair)......................................................................................... 37!
Backup Database (and Restore) ..................................................................................... 39!
Page 5

1
Overview
This Quickstart guide is designed to let the main Administrator of EdgeView learn the basic functions
EdgeView provides. This includes:
• Starting EdgeView
• A quick tour of the EdgeView Web-based application
• Licensing
• System Security Overview
• Adding an EdgeMarc and Group via GUI and Auto Discovery
• Some of the basic EdgeMarc Management functions
• Device Status View
• Administrator Tools
The Quickstart guide does not include more advanced topics which are covered in the EdgeView User
Guide. Some of the common advanced topics are:
● Creating a Tenant and assigning Users
● Creating and deploying (pushing) EdgeMarc configuration templates
● Restoring and Comparing backup files
● Setting up email and SNMP trap notifications
● Syslog filtering and Syslog matching (triggering)
● Upgrading and patching EdgeView
● VPN configuration
● MOS Analysis and Signal Capturing
● Active and Bulk Line tests
● Reconfiguring phones and phone templates
● Managing WAN phones
● Plug-N-Dial
● Automatic backup and Automatic Upgrade of all EdgeMarcs in a Group
● Automatic handling of EdgeMarcs that are unreachable for a period of time
● Export and import of managed devices to an XML document
● Advanced System Security and Radius setup
● System Settings
● Web-Service API (separate document)
These topics and others are covered in the EdgeView User Guide.
Page 6
2
Start ing EdgeView
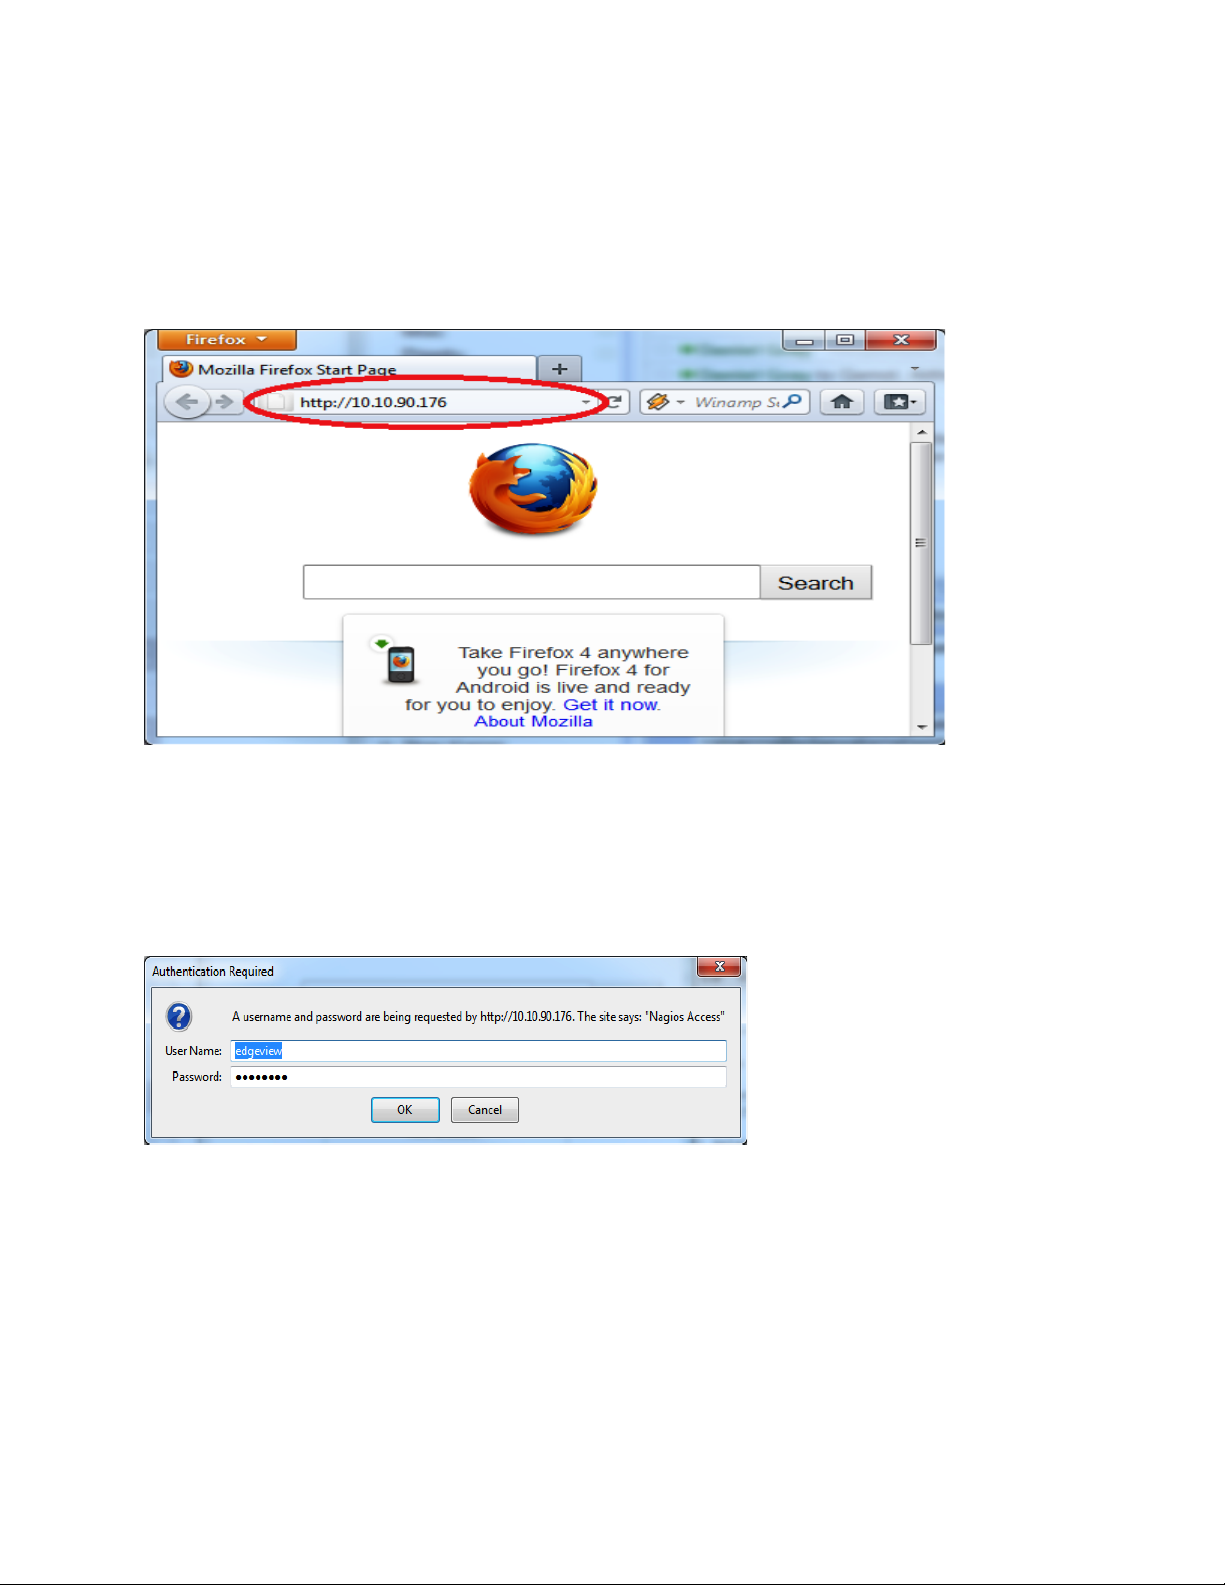
Go to a browser (e.g. latest version of Chrome, Firefox or IE) and enter the IP address or fully qualified
domain name (FQDN) of the EdgeView. In this example, the EdgeView IP address was 10.10.90.176.
Get the IP address or FQDN from the System Administrator. See the EdgeView 5300LF2 System
Administration Guide to set the IP Address for this EdgeView (you can find this document at
http://www.edgewaternetworks.com/kb). If not set, the default IP address is 192.168.1.1.
Next, the EdgeView Authorization prompt dialog appears.
Enter the default login credentials edgeview, edgeview for both the user name and password, and hit the
OK button.
NOTE: It is recommended that the login password be changed.
After hitting OK, the EdgeView Main Landing page appears:
Page 7

3
EdgeV iew Quick Tour
The EdgeView is divided into separate panels for easy navigation and views.
Page 8
4
The top panel consisting of menu icons, which provide access to the general EdgeView functions. It also
displays the currently logged in EdgeView user and the Message of the day
The left side panel is the “Device Tree”. It contains Groups, EdgeMarcs, EdgeConnects, Phones,
Configuration Files and other devices in a hierarchical file explorer-type format.
The main panel is the area that changes when an EdgeView function is selected. This area offers specific
views and submenus according to the EdgeView function selected.
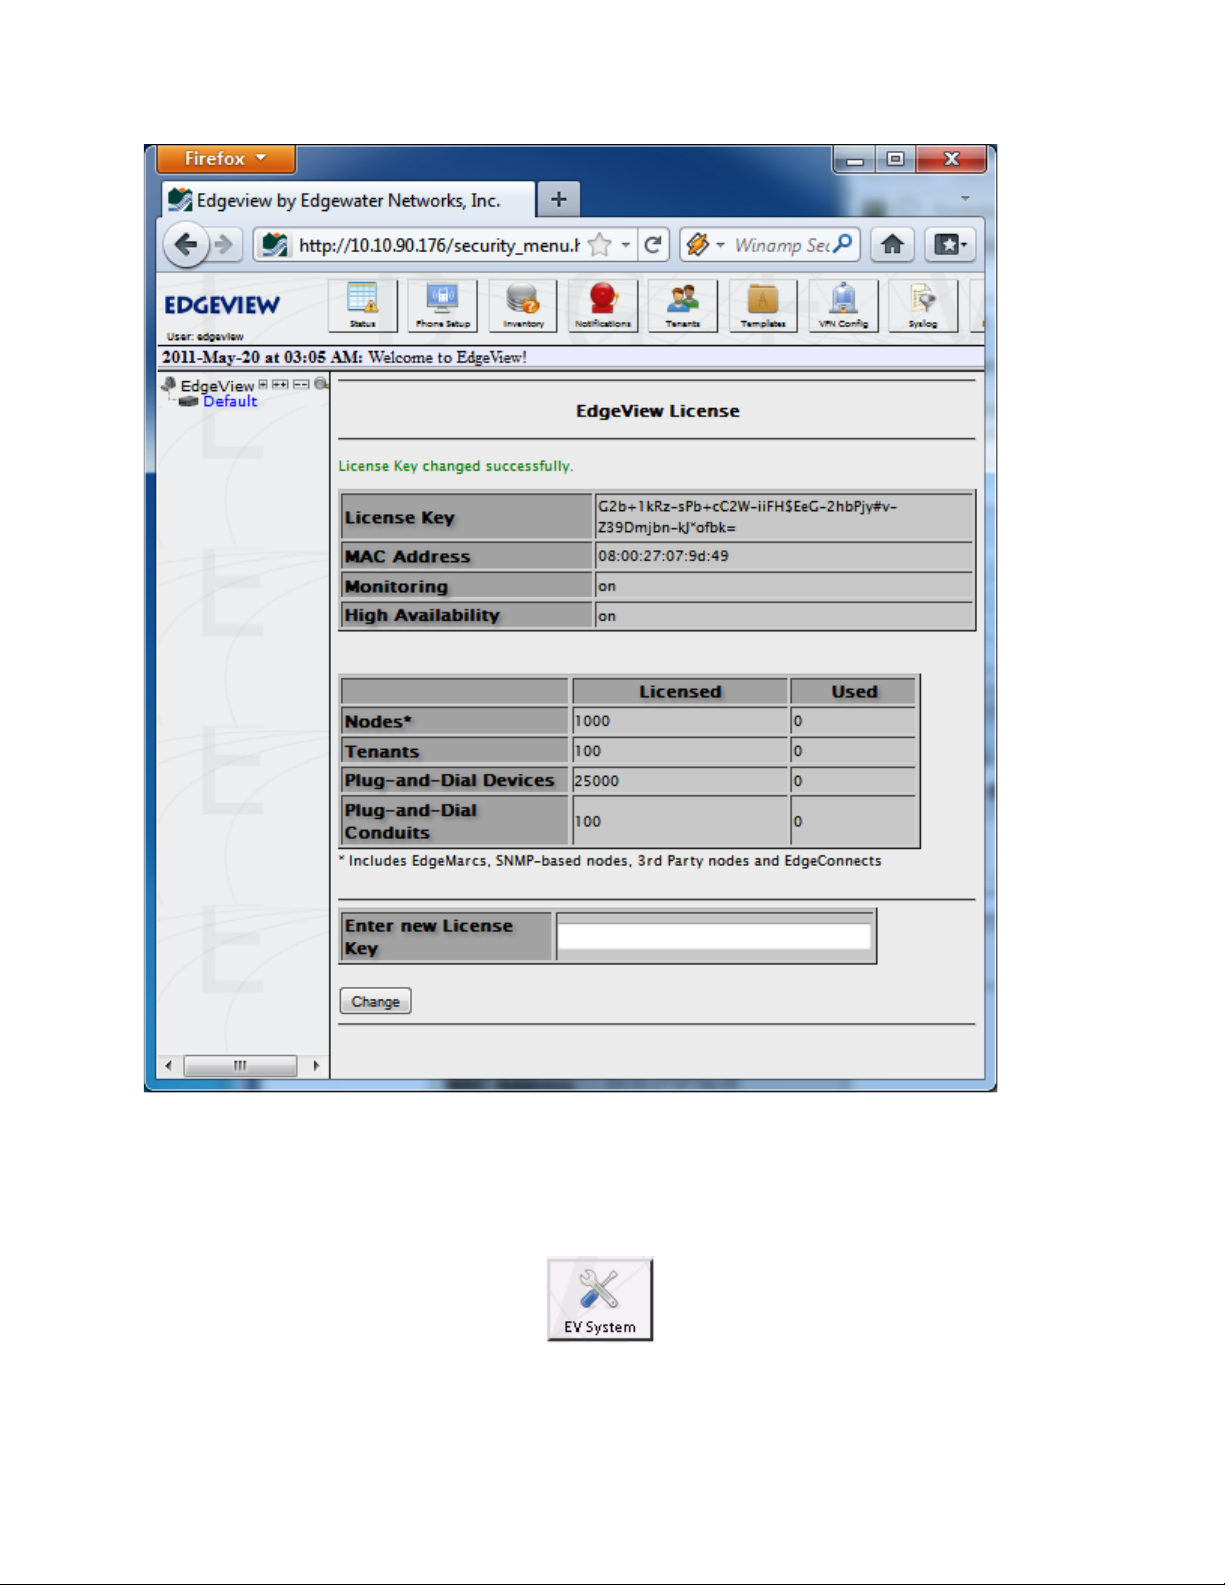
Licen se
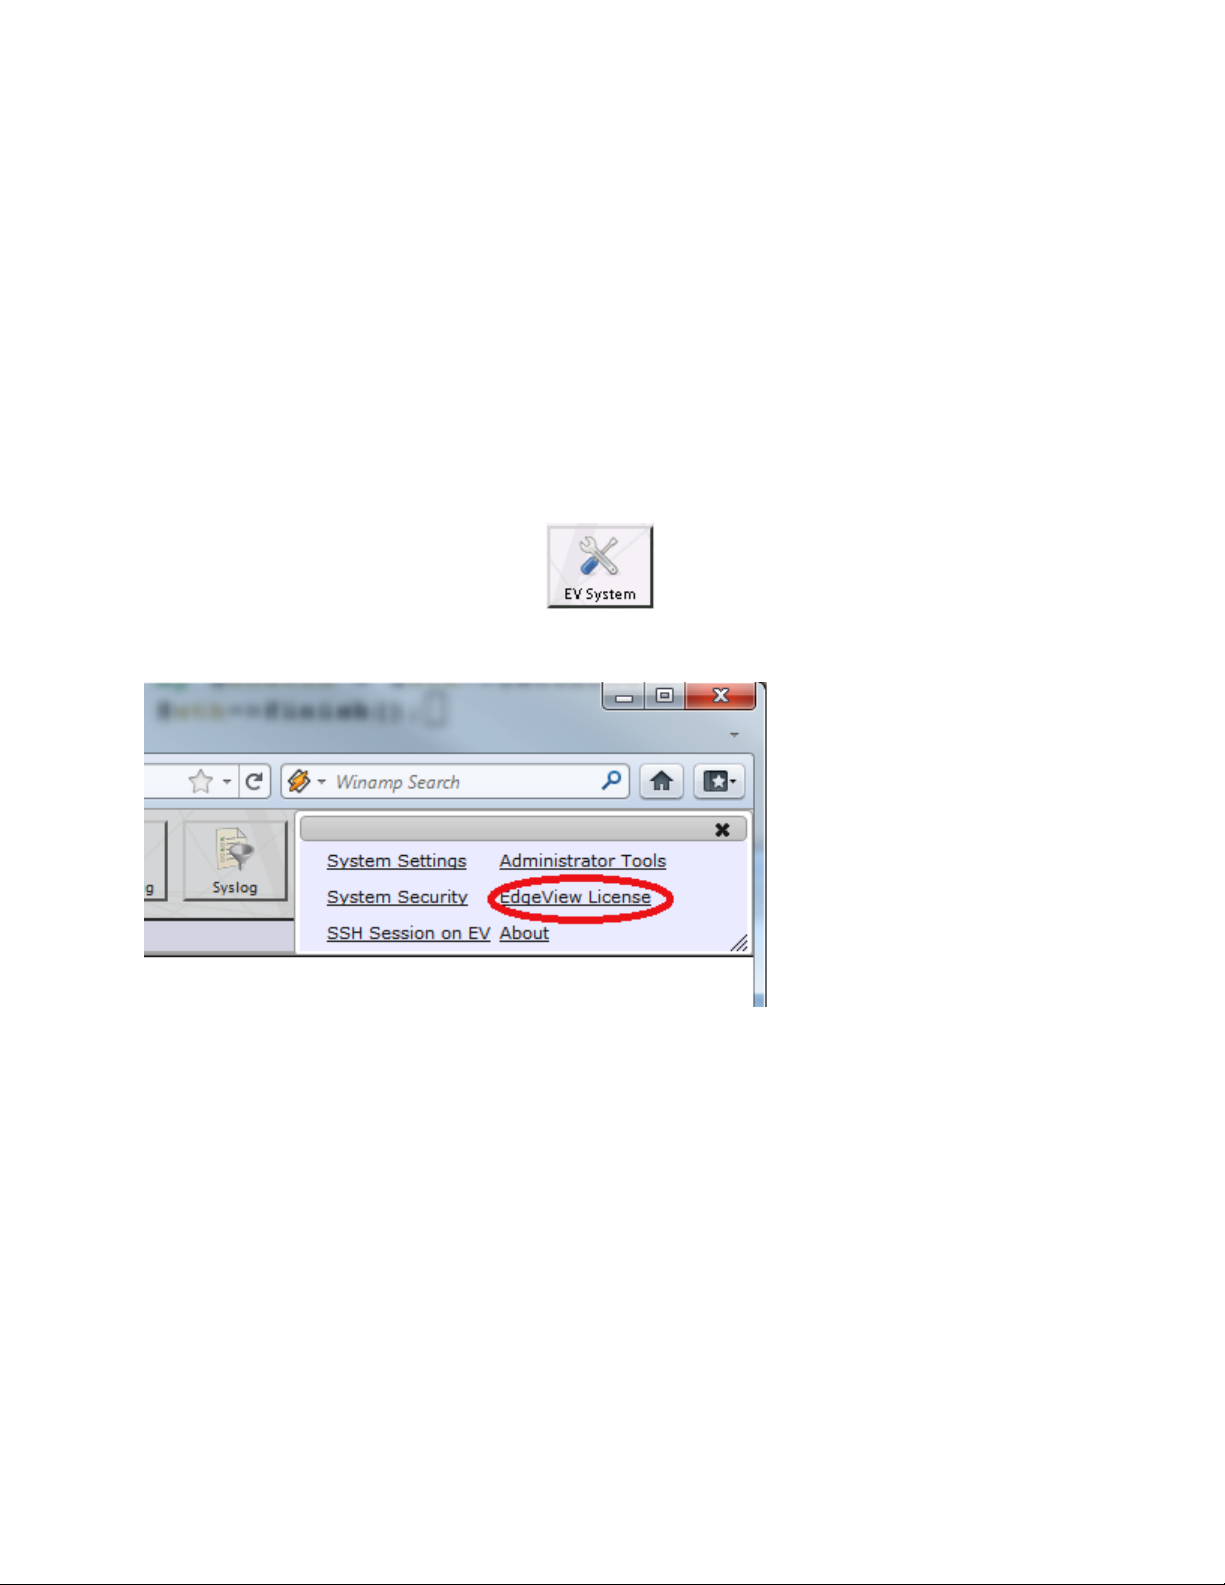
If EdgeView has not been licensed through the TUI command line interface, then it can be licensed now.
Click on EV System:
In the top panel select the EV System icon:
When the sub-menu comes up, click on EdgeView License:
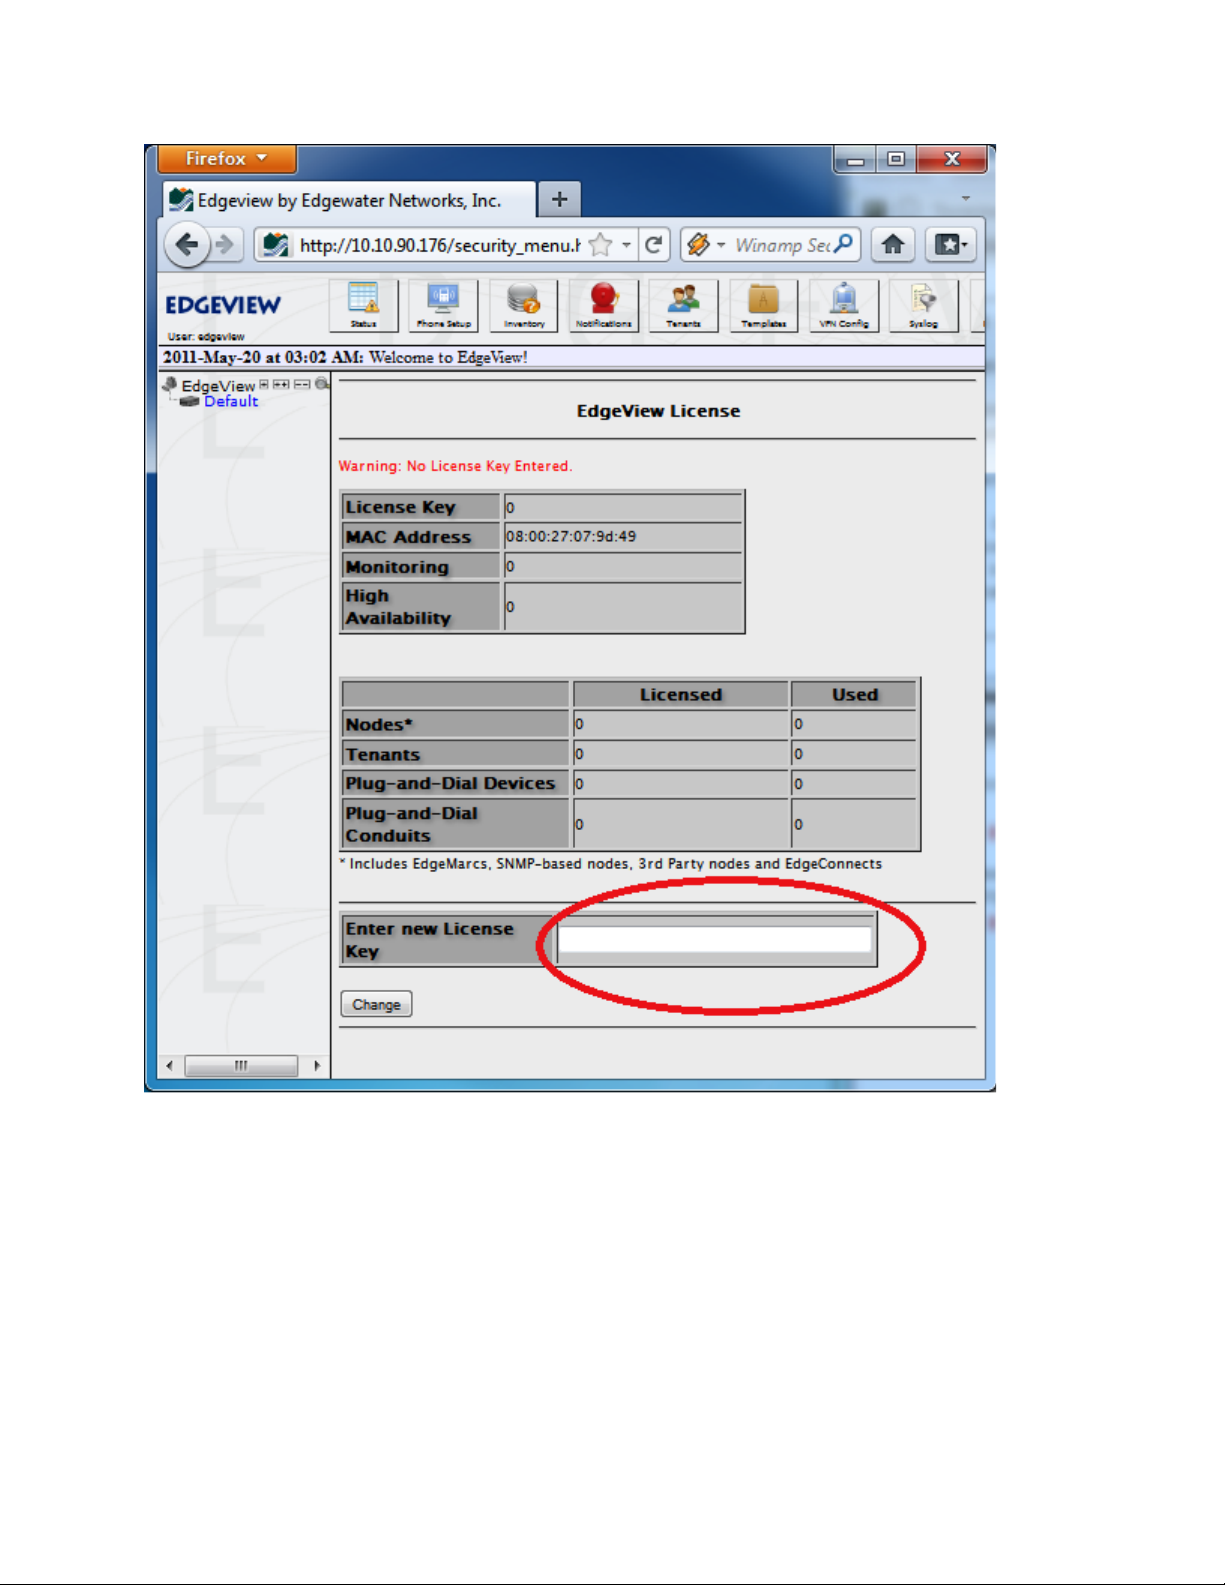
This will bring up the EdgeView License Page. Enter your license key here and hit the Change button.
License keys can be acquired from your support contact.
Page 9
5
When completed successfully, the page will be updated with the values.
Page 10
6
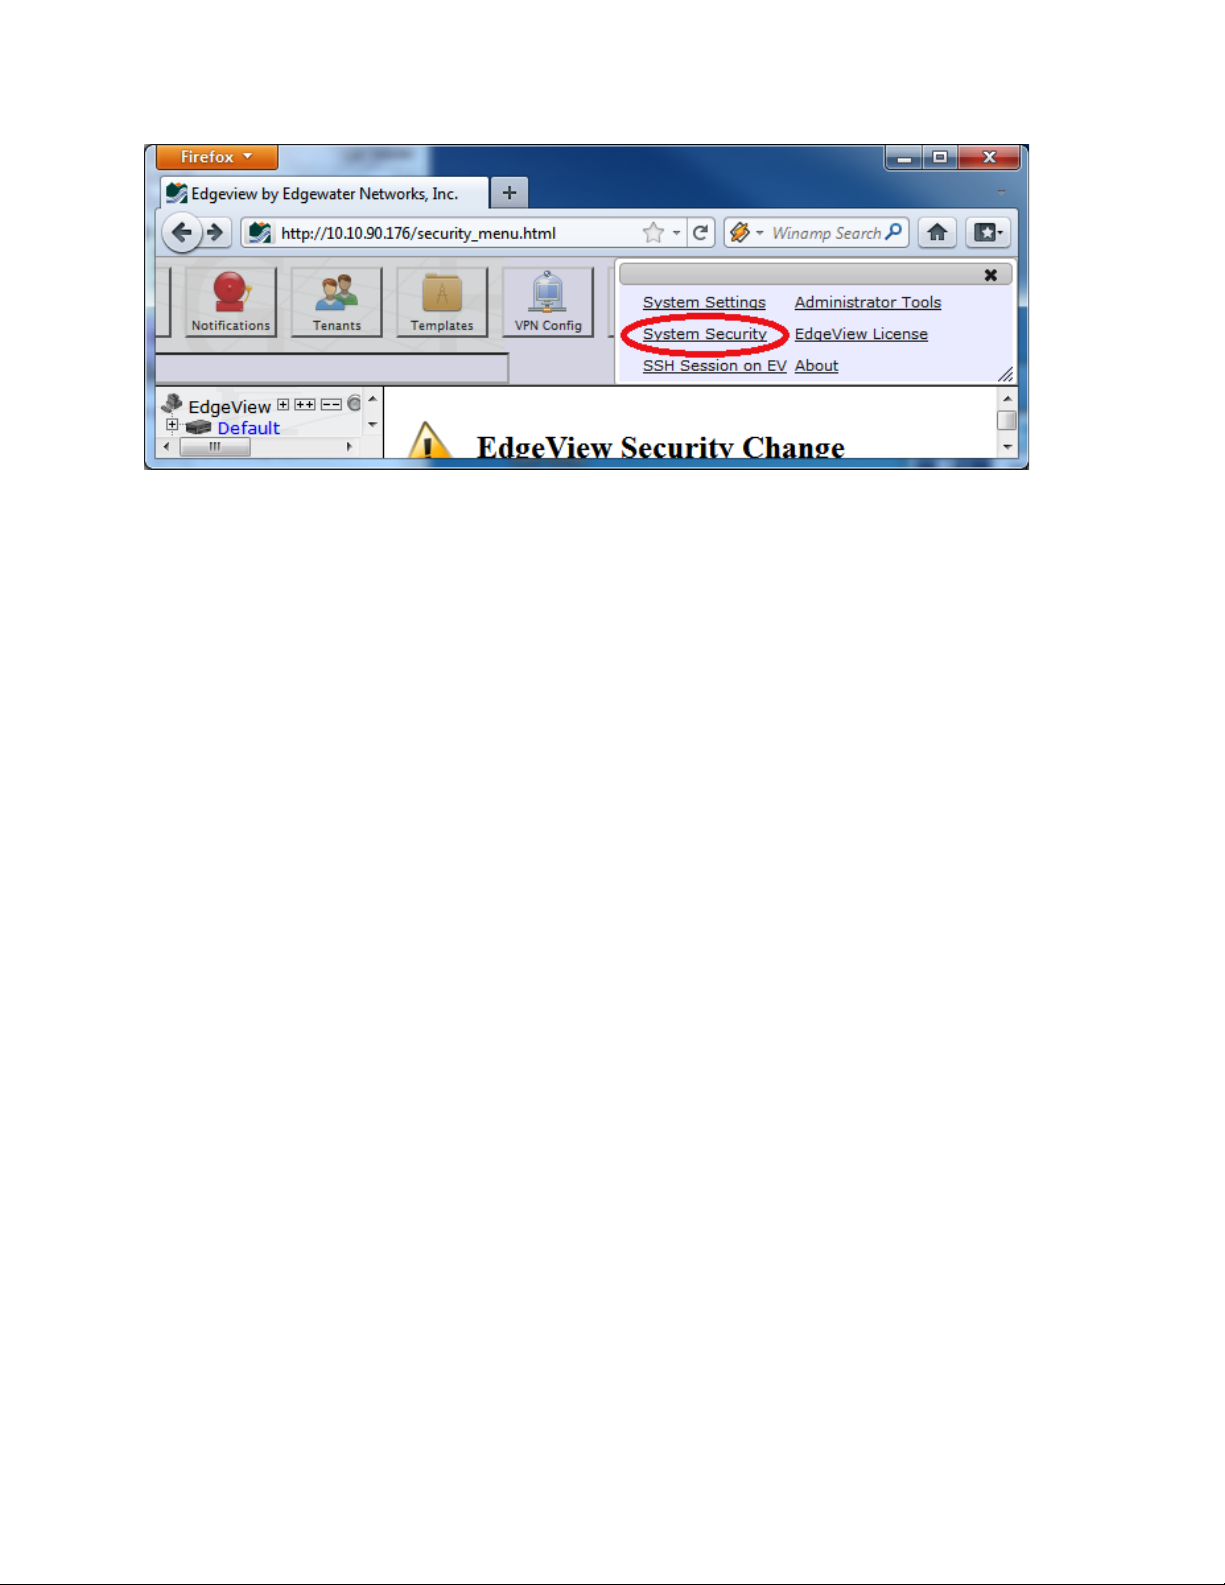
Syste m Secur ity Ove rview
The EdgeView offers a build in Firewall for advanced security access control. You can manage the
system security in details via the EV System -> System Security Menu:
In the top panel select the EV System icon:
A sub-menu within the top panel opens up, click on System Security:
Page 11
7
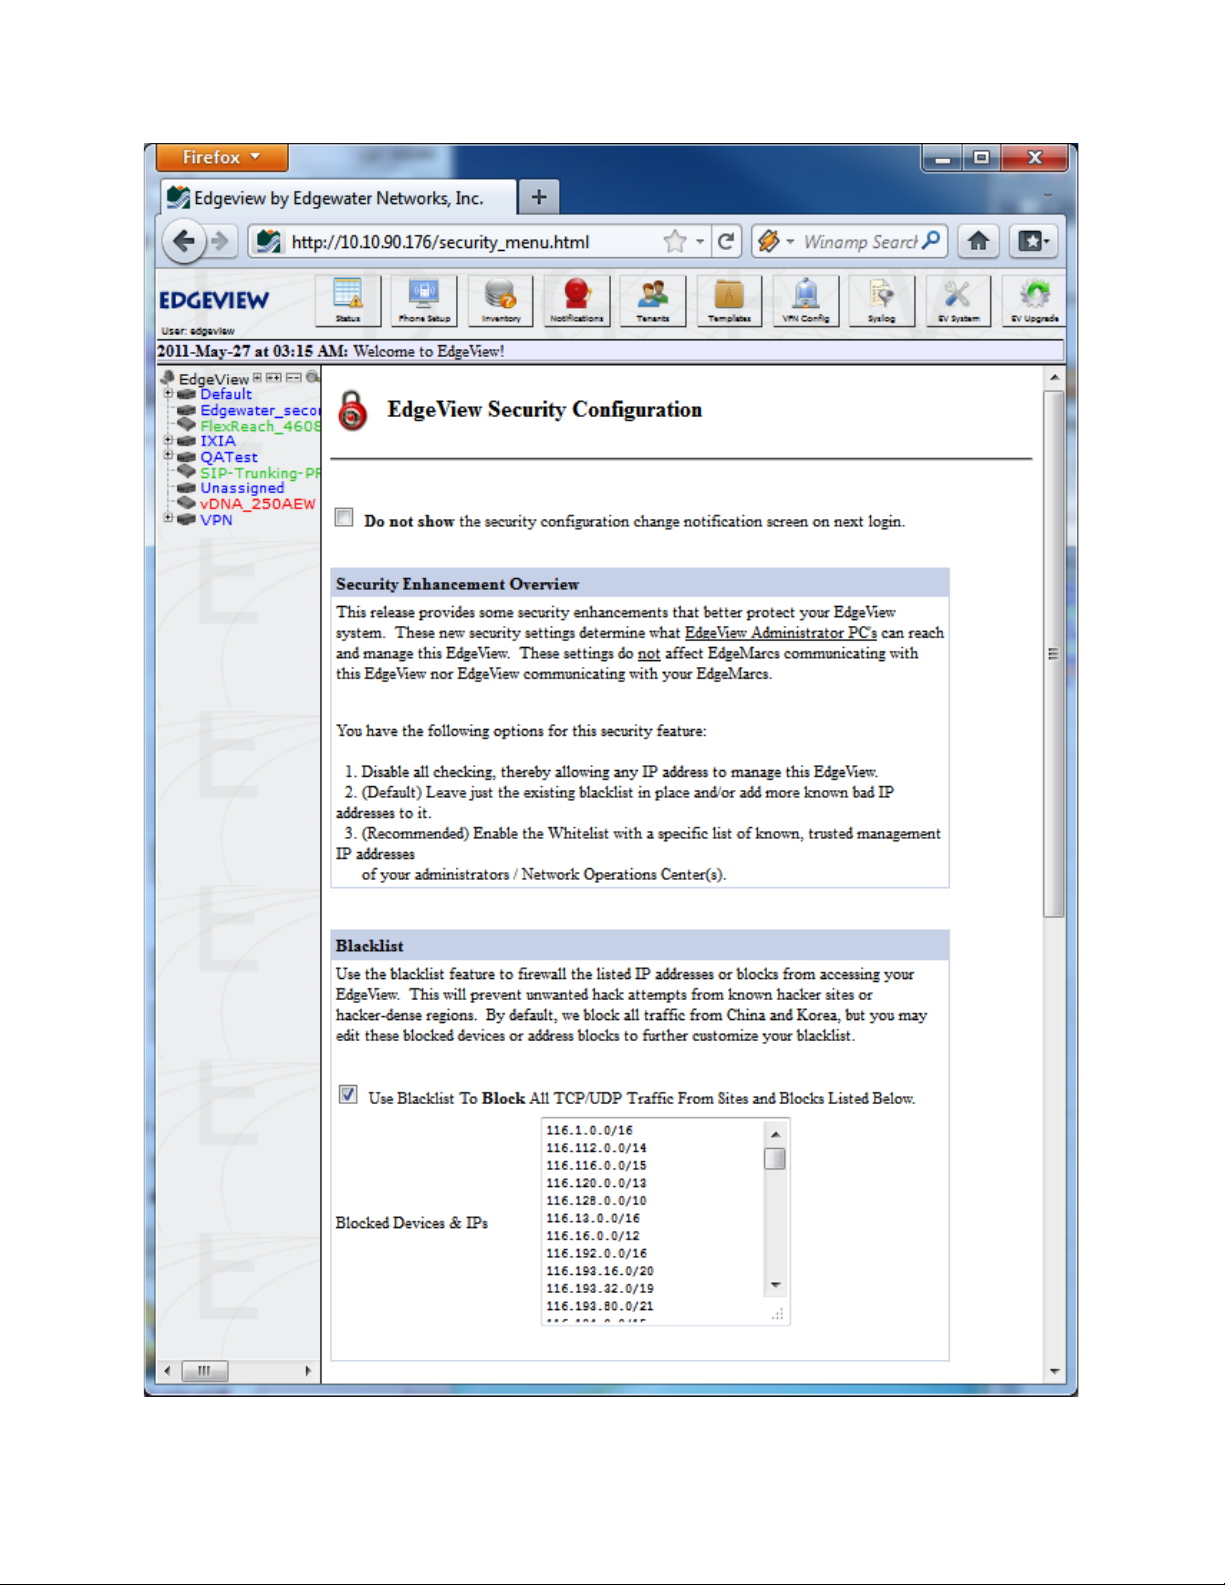
The System Security page itself provides detailed instructions to set up the blacklist, the whitelist and
whether to enable anonymous FTP. The whitelist in particular can be used to restrict access to EdgeView
to only those IP Addresses in the whitelist. Users should review this page thoroughly to ensure EdgeView
follows the security policy of the organization.
The top part of the System Security page lets the user manage the Blacklist:
Page 12
8
Page 13
9
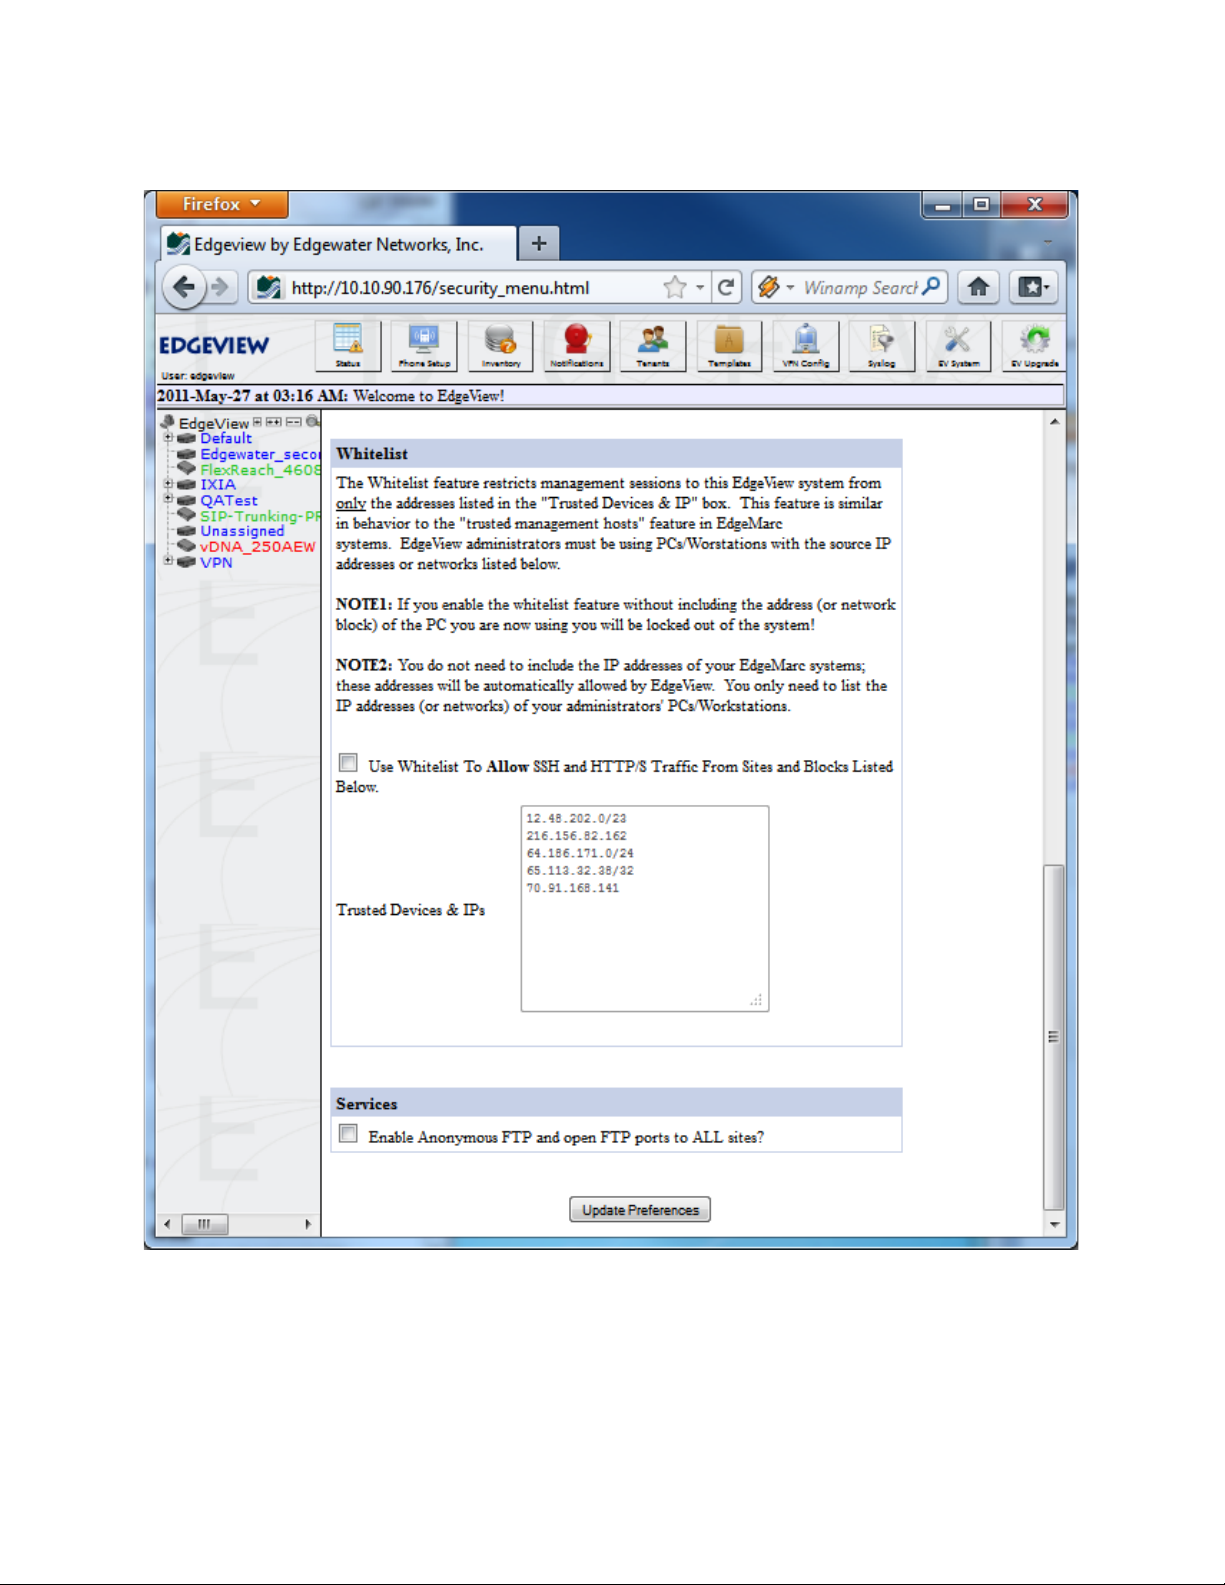
The bottom half of the page manages the Whitelist and whether anonymous FTP is allowed:
Note: It is strongly recommended a Whitelist be specified if EdgeView is accessible from
unauthorized users.
Page 14

10
Addin g an EdgeMarc
To manage EdgeMarcs, they must first be added to EdgeView through one of the following methods:
● EdgeView Web-based User Interface (GUI)
● Auto-discovery
● Web Service API
● Importing from an XML document
Setting up Auto-discovery and using the Web-based User Interface will be discussed in this Quickstart
guide.
EdgeView GUI
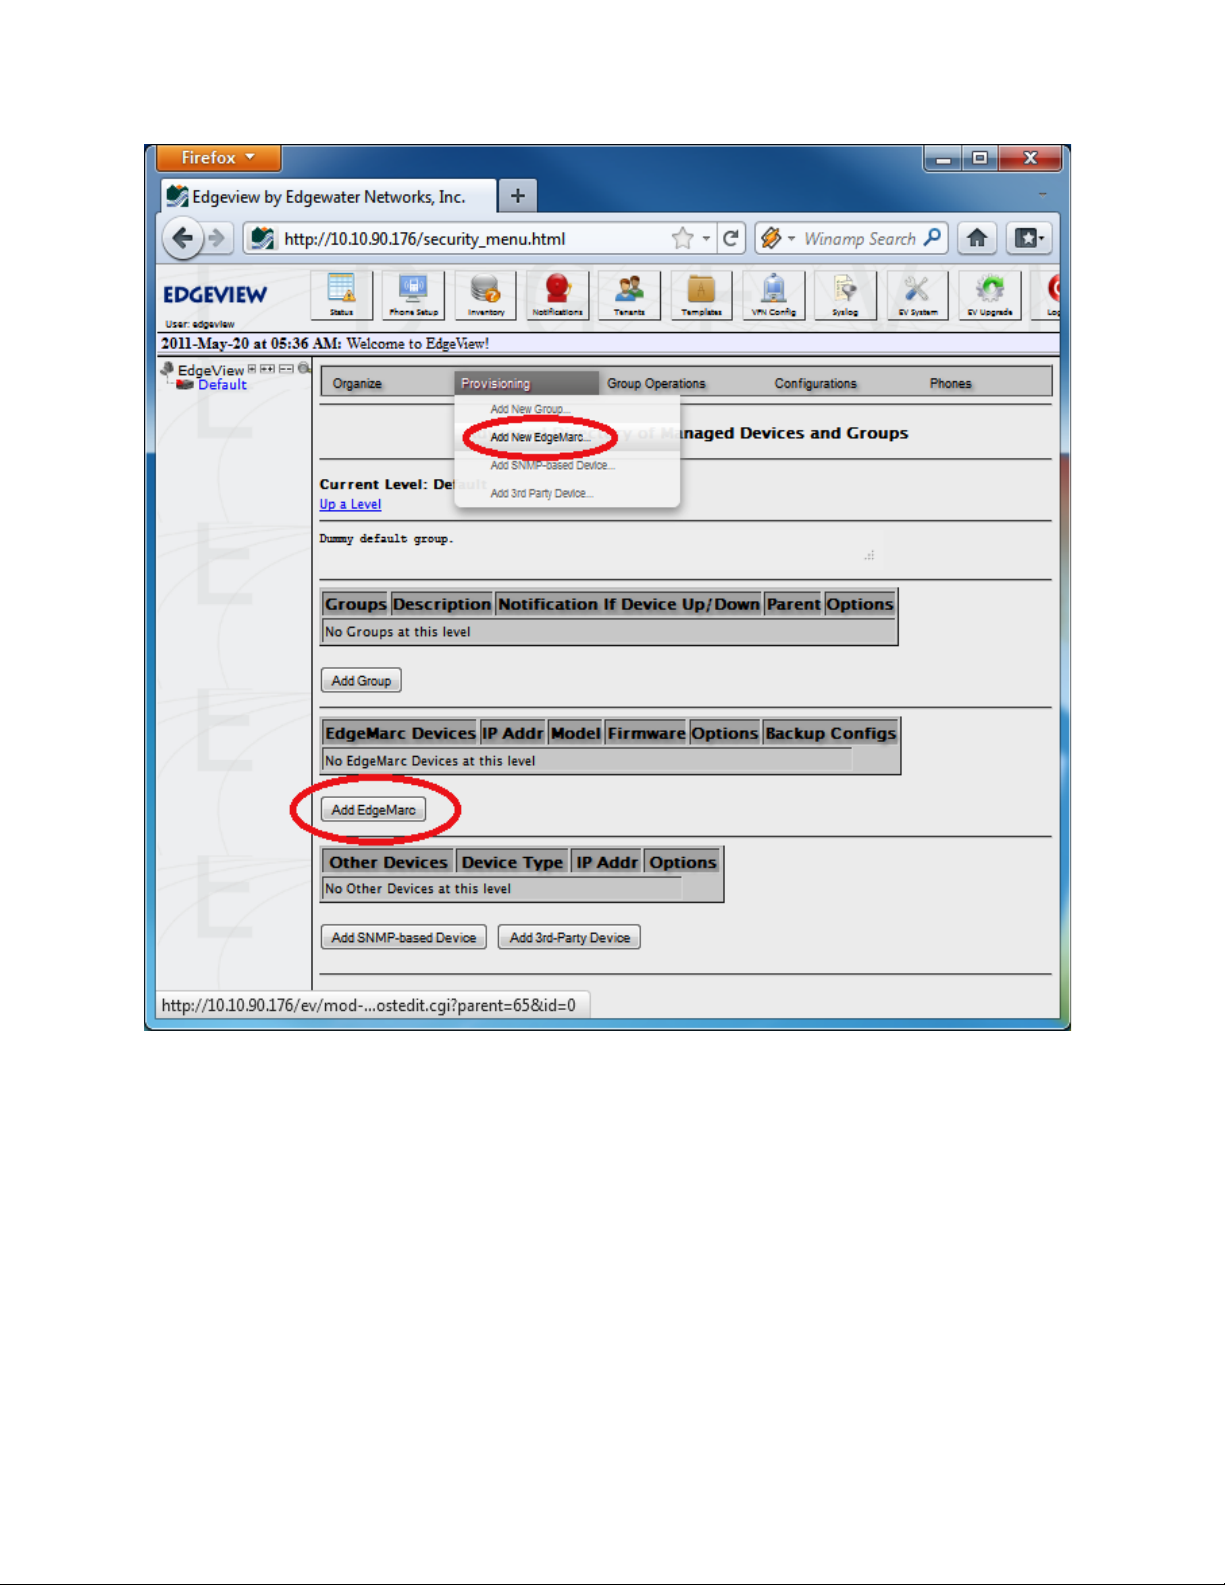
To add an EdgeMarc to a group or to the top-level using the EdgeView GUI, click on the Group in the
device tree (or the root for the top-level). For example, to add an EdgeMarc to the “Default” Group, click
on Default as shown here:
After selecting the group, then select Provisioning->Add New EdgeMarc... from the menu bar or click
on the Add EdgeMarc button.
Page 15
11
Page 16

12
This brings up the EdgeMarc Edit
page.
Page 17

13
Page 18

14
Enter a Name, Address (IP or FQDN) and the ssh password for the EdgeMarc at a minimum. The MAC
address does not need to be entered unless the auto-discovery feature is used.
When complete, hit Save. After saving, it is strongly recommended users “test” the ssh connection using
the Test button.
It may take a couple of minutes to complete the ssh and SNMP tests, but this is recommended as running
the test now can save a lot of troubleshooting time later. The Test button can be access again later by
Page 19

15
first clicking on the EdgeMarc in the device tree, then on the menu select Monitoring/Control->Edit
Device...
The result of a successful test looks like this:
If the tests are successful, then EdgeView will automatically begin managing the EdgeMarc!
To see the status of the EdgeMarc, click on the EdgeMarc in the device tree. This will bring up the
EdgeMarc Status page:
Page 20

16
The EdgeMarc Status page has several different areas indicating different status values. The green
balloon represented in this screen shot shows the status of the SIP servers connected to the EdgeMarc
(i.e., Green is Up). There may be more than one SIP server shown here. In addition, the user can click on
the balloon for more information. Underneath the SIP Server status we provide the general information
which may have been gathered during the most recent successful polling cycle.
To gather information, EdgeView will ssh into each EdgeMarc on a (default) 5-minute interval. Some of
the information is shown here such as the EdgeMarc’s model, the VOS (firmware) version, RAM statistics,
calls, etc. If there is a problem with ssh polling, a warning will also be shown on this page on the Last
SSH Poll line.
The box of Known Telephone Numbers contains those phone number that have been explicitly managed
through EdgeView. The Device Client List Snapshot contains the identifiers of all the devices attached to
the EdgeMarc. These devices may or may not be explicitly managed by EdgeView. To explicitly manage
the device, click on the button with the plus (+) sign.
Page 21

17
The Get Info From EdgeMarc button manually initiates the call to gather the attached devices from the
EdgeMarc.
On the right side of the page, some additional statistics are included from the last polling cycles.
And on the bottom, up to the 10 most recent call records for that EdgeMarc are shown.
Using Auto-Discovery
EdgeMarcs can be “Auto-Discovered” by EdgeView when they come online. This requires some initial
setup on both the EdgeMarc and EdgeView in order for EdgeView to “see” the EdgeMarc and for
EdgeView to automatically “create” the EdgeMarc as a device to be managed.
First, point the EdgeMarc syslog feed to EdgeView using the EdgeMarc GUI. Go to the Services
Configuration link on the EdgeMarc Configuration Menu, enter the EdgeView’s IP address or FQDN
into the Remote Syslog Hosts entry, and be sure the Syslog filter is set to Debug.
Page 22

18
Next, verify that the EdgeView is accepting Auto-Discovered EdgeMarcs. Under the EV System menu,
click on System Settings, then if the Automatically Add Discovered EdgeMarc checkbox is
unchecked, check it and hit Change:
Page 23

19
Sometime later when the EdgeMarc comes online or is rebooted, it sends a message through syslog and
EdgeView will then automatically add it to the Unassigned group (the Unassigned group is automatically
created if necessary).
Page 24

20
Once the EdgeMarc appears in the Unassigned group, it can (and should) be moved to its proper group.
To move the EdgeMarc, first select it on the Device Tree, then select Monitoriing/Control->Edit Device.
Page 25

21
Modify the Group, and hit Save.
Page 26

22
Page 27
23
In a minute or so, the EdgeMarc should appear under the new group in the Device Tree!
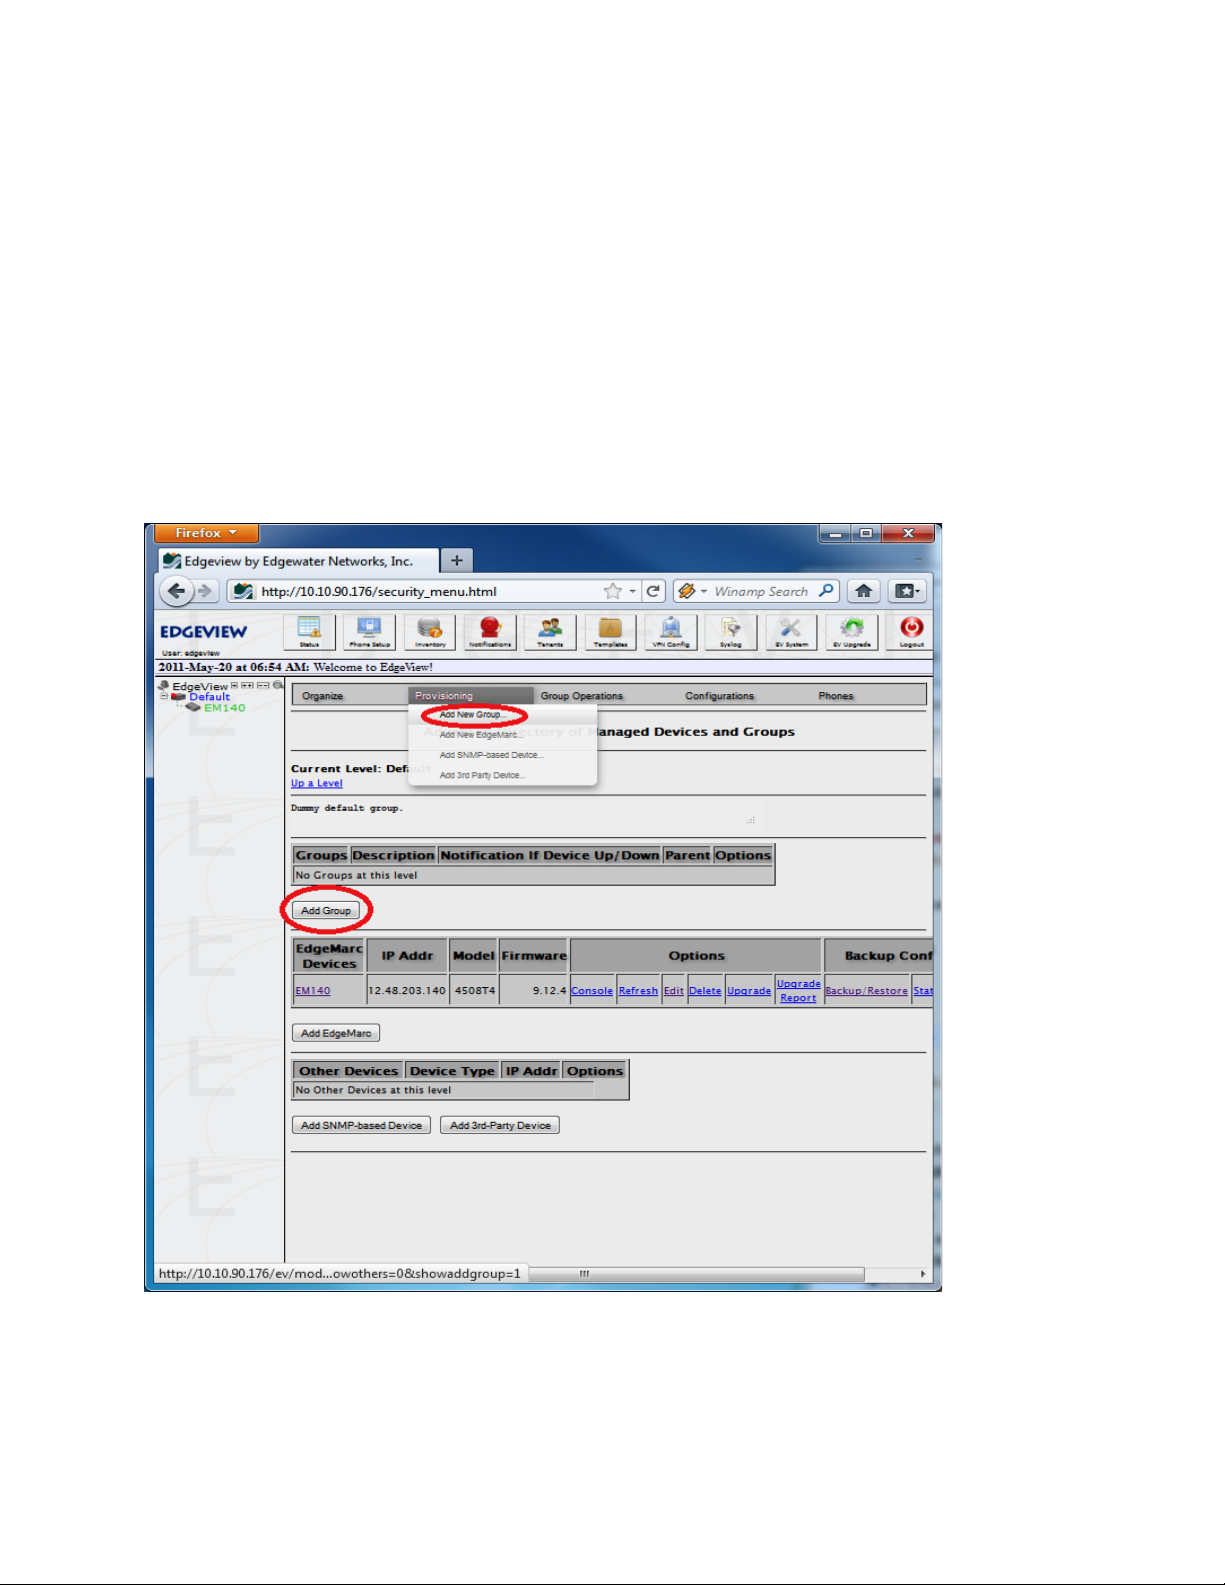
Addin g a Group
Generally, it is easier to manage sets of EdgeMarcs by grouping them using some kind of logical criteria,
such as geographic location. With groups, sets of EdgeMarcs can be managed with one operation. For
example an entire group of EdgeMarcs can be backed up at one time rather than individually. EdgeView
also supports adding groups within groups providing a powerful way to manage entire hierarchies of
EdgeMarcs.
To add a group, to an existing group or to the top level group, first click on the parent group (or the root)
in the Device Tree, then click on either the Provisioning->Add New Group menu item or the Add Group
button.
This brings up the page where a group can be added.
Page 28
24
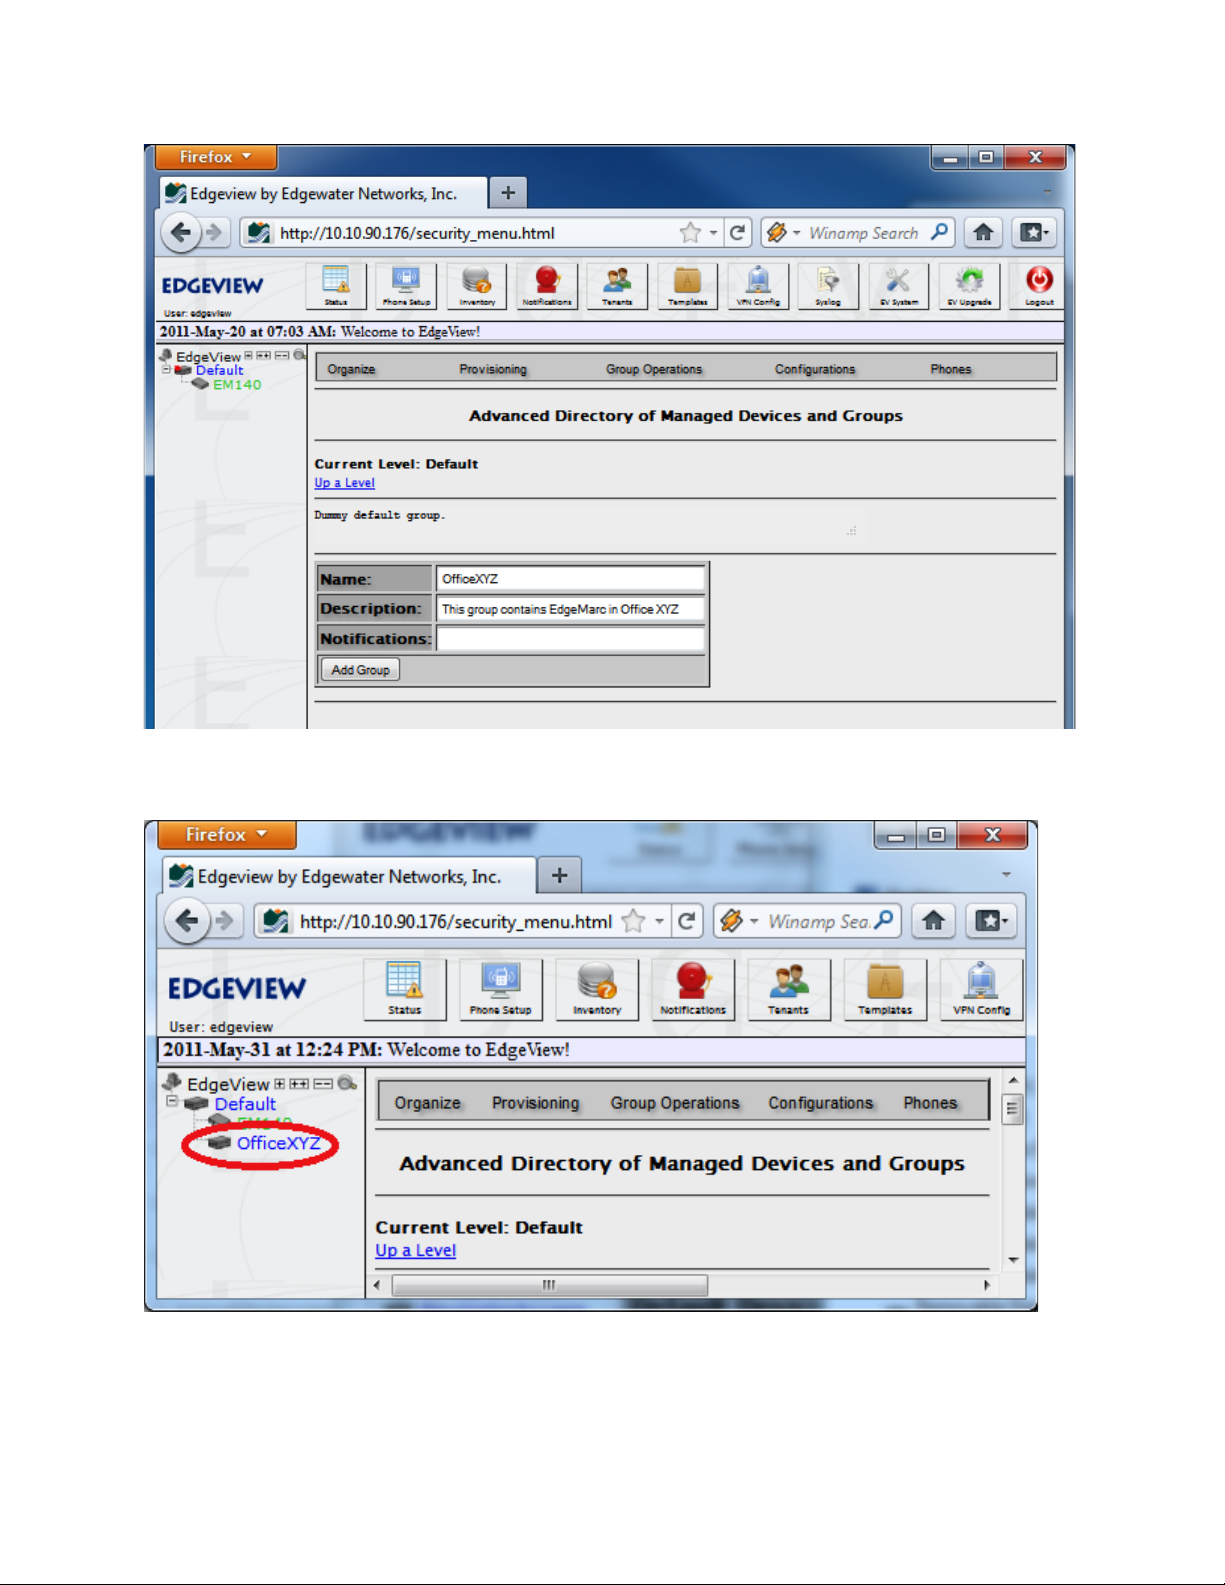
Enter a Name and some descriptive text under Description. Hit Add Group when done.
In a minute or two, the new Group will appear in the Device Tree.
Page 29

25
EdgeM arc Man agement
Note that the menu is now available from the EdgeMarc Status page. This menu provides management
functions initiated by EdgeView for that particular EdgeMarc.
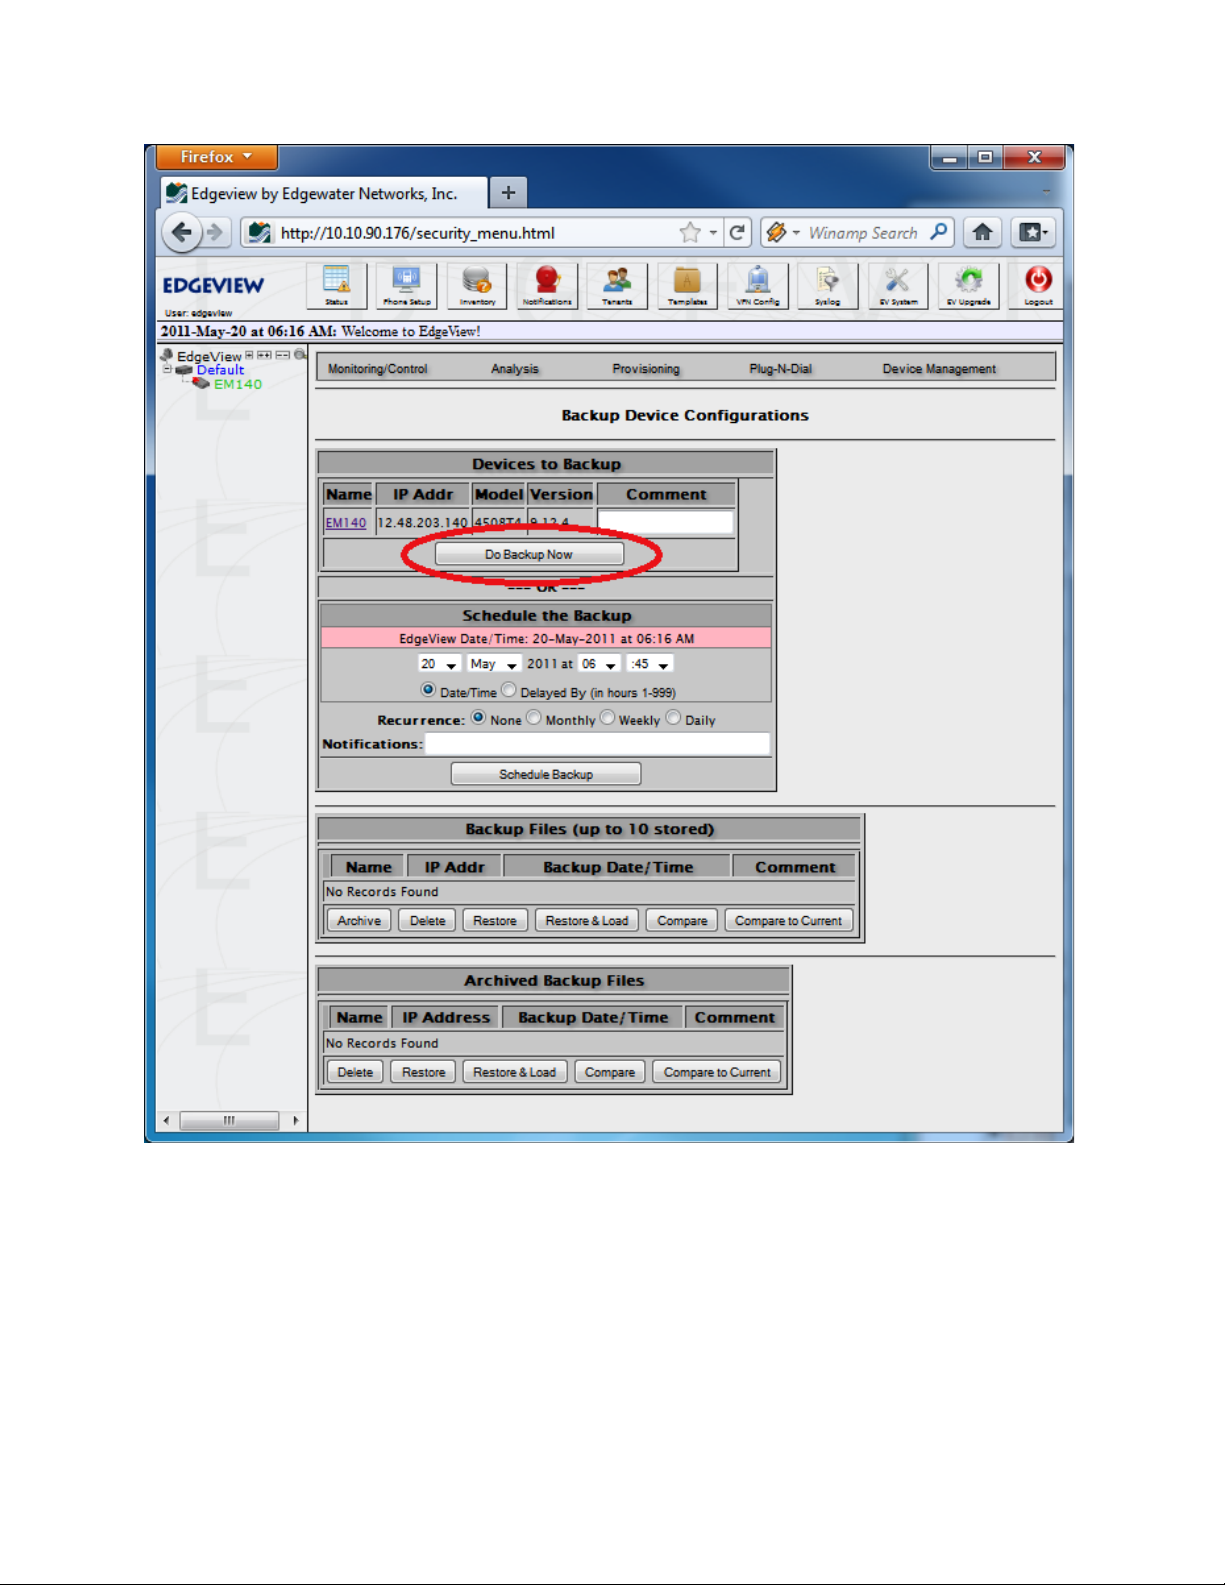
Backing Up EdgeMarcs
To backup the EdgeMarc configuration, select Backup/Restore from the Device Management menu as
shown here:
This brings up the EdgeMarc Backup/Restore page:
Page 30
26
To do a simple backup, click on the Do Backup Now button. This will bring up the Backup/Restore
Device Status page which monitors the command to the EdgeMarc.
Page 31

27
This page will indicate whether the backup was completed successfully or if there was an error.
Next, click on the Click Here text to return. Notice that the backed up file is in the Archived section:
Page 32

28
Normally backed up files go into the transitional area (up to 10 stored), but the first one goes in the
Archived section! Archived backup files are only deleted explicitly by the user, whereas the transitional
backups have a rule that automatically deletes the oldest backup file once there are 10 and a new one is
added. Backup files can be moved from the transitional area to the Archived area by hitting the Archive
button.
Any configuration backup can be Restored or Compared against other backup files or the current
configuration. Those operations are outside the scope of this document.
Page 33

29
Upgrading EdgeMarcs
EdgeView can initiate an EdgeMarc upgrade to the latest VOS firmware version. From the EdgeMarc
Status Page menu, select Upgrade Device:
This brings up the EdgeMarc Upgrade page.
Page 34

30
Hit the Do Upgrade Now to initiate an EdgeMarc upgrade.
Note: Calls will be interrupted if the Force Upgrade checkbox is checked!
The Upgrade Status Report page will then monitor the EdgeMarc upgrade process.
Page 35

31
The upgrade status will show “Completed Successfully” upon completion of the upgrade.
Page 36

32
Resetting an EdgeMarc Password
To change the EdgeMarc root password or the EdgeMarc GUI password, go to the Reset Password
menu item under the Status page Device Management menu:
Page 37

33
This brings up the Reset Password page:
Page 38

34
From this page, a new root password and/or GUI password can be entered. If successfully changed, the
Reset Password Status page will indicate the password(s) were set:
Device Status View
The Device Status View shows EdgeMarcs, Groups, Phones, etc. in a tabular format. Access the Device
List from the Status icon on the top:
Page 39

35
When selected, the Device Status View is shown. Most columns are sortable, and the Search option
provides a way to find a particular device or group, or show only a limited set. In addition, the user can
specify how many items to show on a page, and at what rate the page refreshes from data stored in the
EdgeView database.
Page 40

36
System Functions
EdgeView has several system-level or administrative capabilities, but we’ll only cover the Administrator
Tools in this Quickstart guide.
In the top panel select the EV System icon:
Then select Administrator Tools.
This will bring up the Administrator Tools page:
Page 41

37
From this page, a System Administrator can:
● Verify the database has or does not have corrupted tables and backup and restore operations
● Remove old or outdated log files
● View a log file without going into a command prompt
● Check the Operating System
● Verify all the EdgeView processes are running as expected or restart them if not.
We will briefly cover the Database section.
Database Adm inistra tion
Database Check (and Repair)
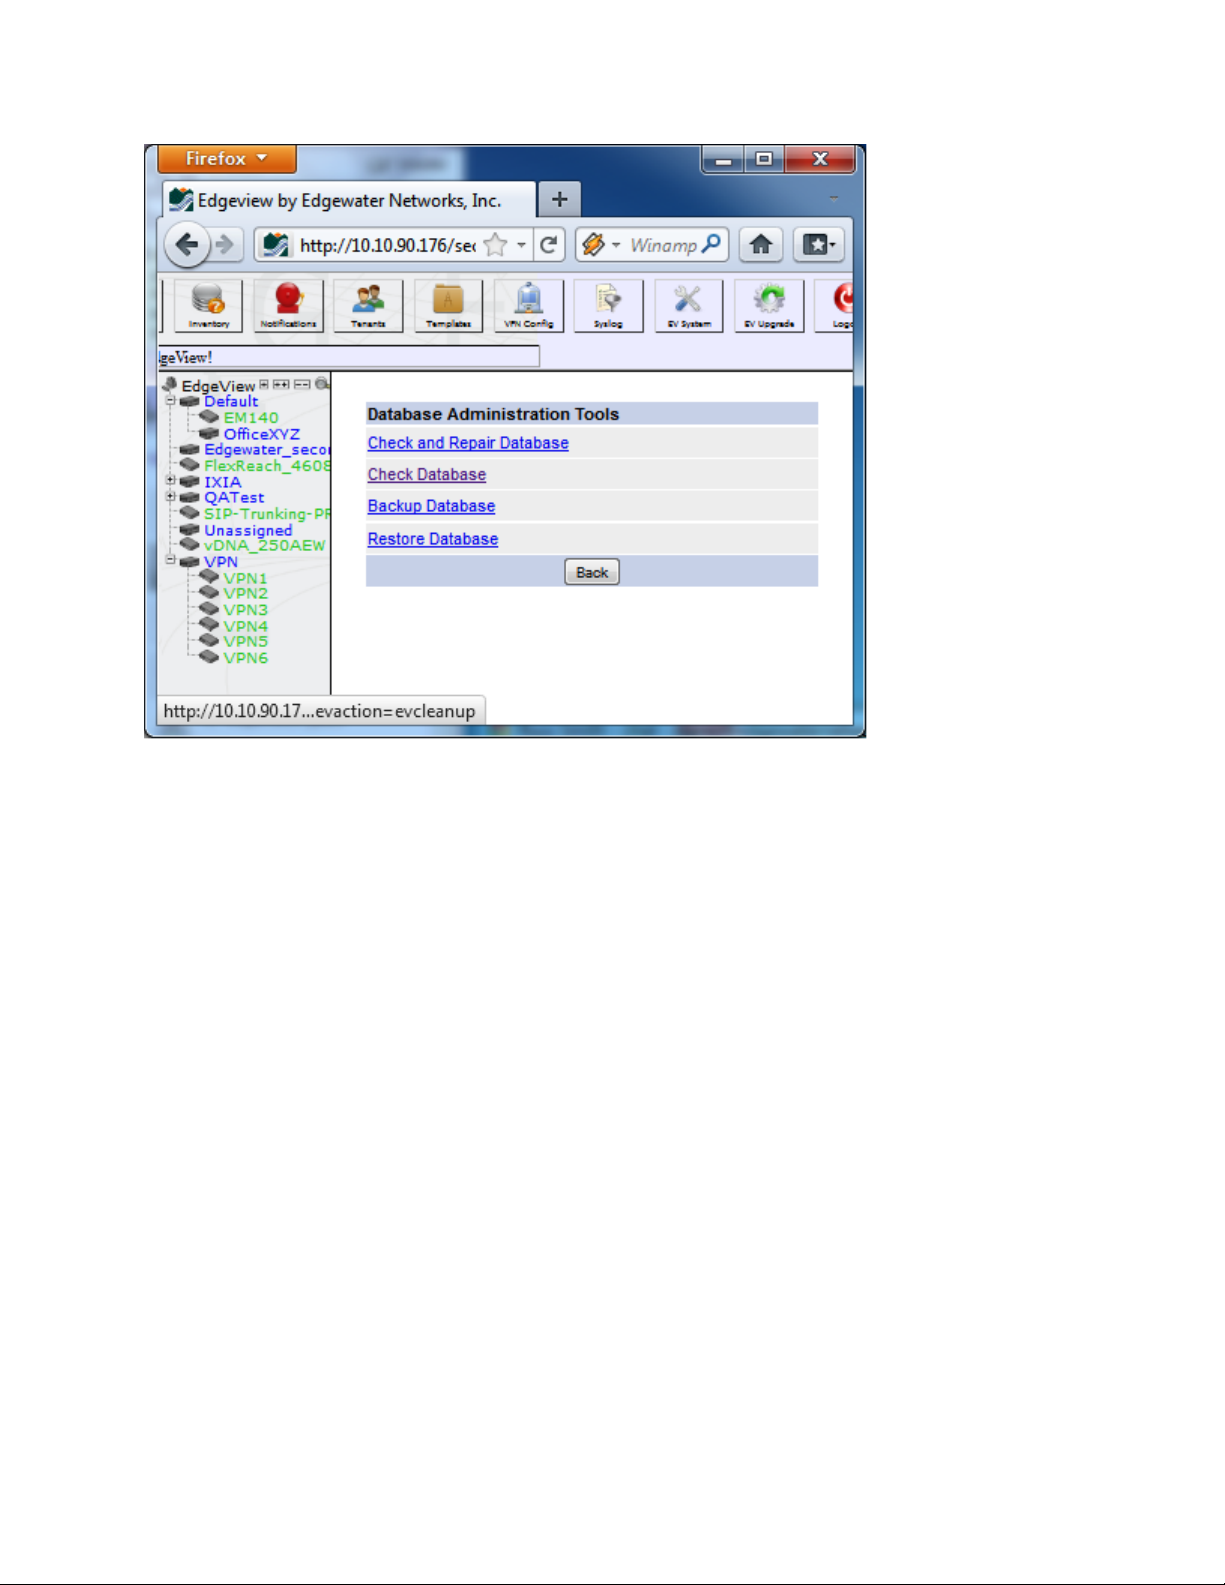
Access the Administrator tools menu again, and this time select the Database link. This brings up the
Database Administration Tools view.
Page 42
38
System Administrators should periodically check the EdgeView database to verify that all the tables are
working properly. This is particularly important if the system seems to be having problems or if there was
a hard reboot or unexpected shutdown.
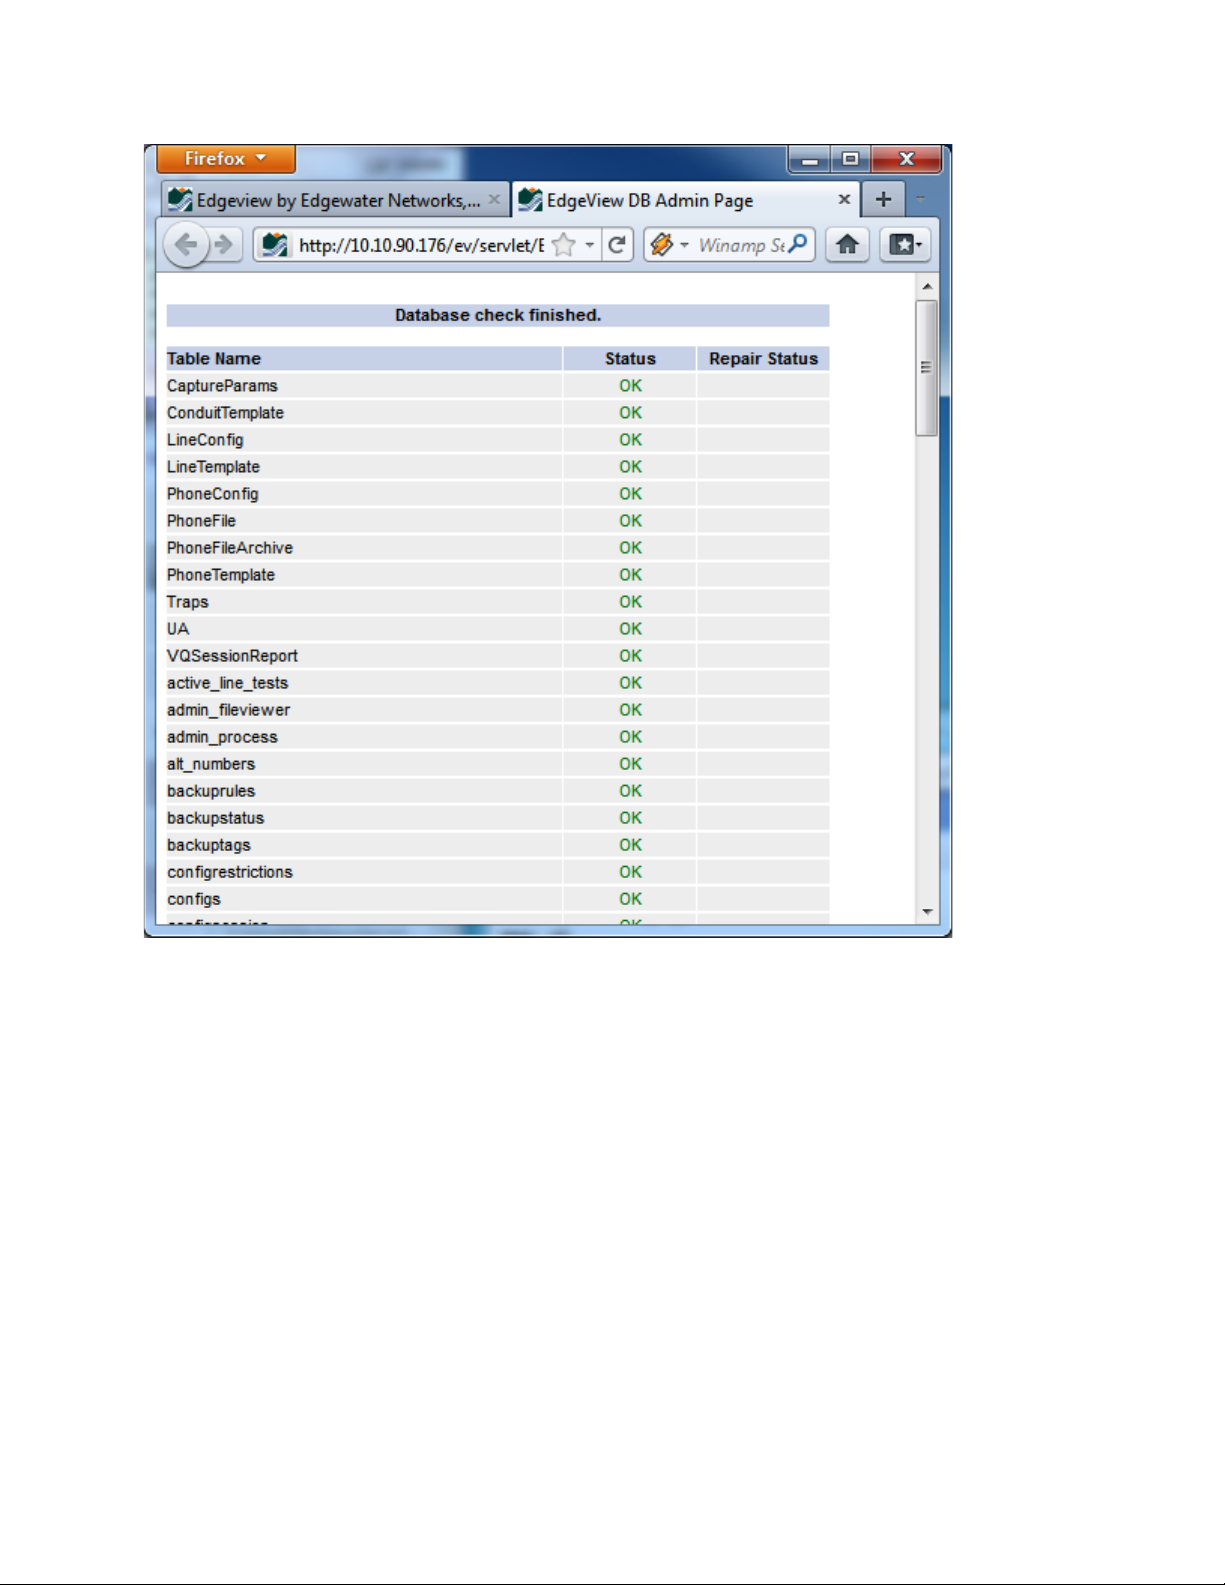
To check the database, click on the Check Database link. This will bring up the Database Check page,
shown partially here:
Page 43
39
If any of the Status values are not “OK” (i.e. Needs Repair), then the System Administrator can click on
the Check and Repair link. This operation locks the database so other EdgeView users should be
warned or asked to not use the system until this is complete.
Backup Database (and Restore)
EdgeView should be backed up on a regular basis, especially before an upgrade. The Backup Database
function provides a straightforward way to do periodic backups. This function is accessed from the
Database Administration view Backup Database link.
Page 44

40
The System Administrator can backup the database locally or to an external FTP server.
When needed, the Restore Database link will let the System Administrator select the backup file and
restore the EdgeView database.
Page 45

Edgewater Networks, Inc.
2895 Northwestern Parkway
Santa Clara, CA 95051
Phone: (408) 351-7200
info@edgewaternetworks.com
Copyright © 2011 Edgewater Networks, Inc. All rights reserved.
Converged Networking. Simplified.
 Loading...