

Page 1

© 2010 Edge Lighting. All Rights Reserved.
1718 W. Fullerton Ave
Chicago, IL 60614
Tel: 773-770-1195
Fax: 773-935-5613
www.edgelighting.com
info@edgelighting.com
SS-CL
SS-CT
SS-CX
Installation Instructions for "L", "T", & "X" Soft Strip Connectors
IMPORTANT INFORMATION
- These products are ETL Listed for indoor locations.
SAVE THESE INSTRUCTIONS!
Installing the "L" Connector Soft Strip
904-SS-C-01
A
MALE
JOINER
FEMALE END OF
THE SOFT STRIP
"L" CONNECTOR
MALE JOINER
"L" CONNECTOR
1: Push the male joiner (provided with the "L" connector) into
the female end of the Soft Strip.
2: Based on direction of the next Soft Strip, connect one end of
1
2
2
the "L" connector onto the male joiner.
3: Connect the male end of the other Soft Strip into the other
end of the "L" connector.
4: Refer to the Soft Strip instructions to complete the
installation.
3
MALE END OF
THE SOFT STRIP
1
Page 2
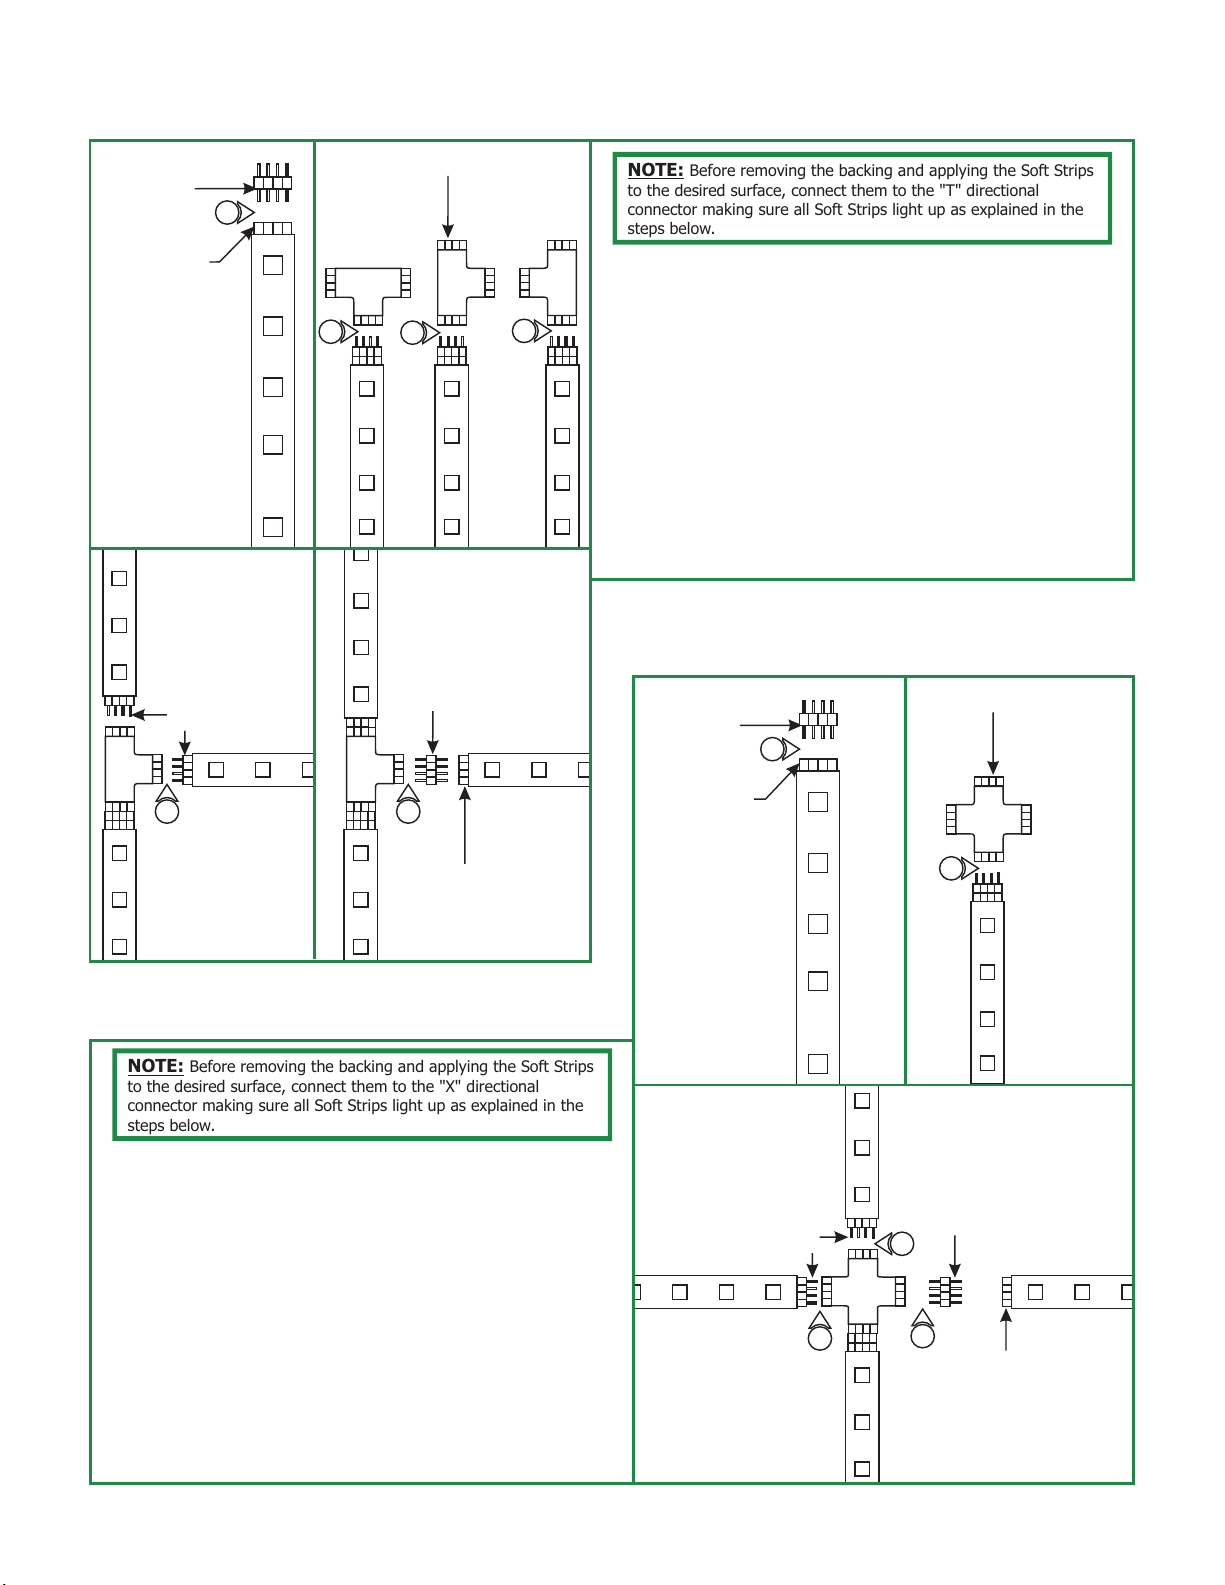
Installing the "T" Connector Soft Strip
B
MALE
JOINER
FEMALE END OF
THE SOFT STRIP
MALE END OF
THE SOFT STRIP
"T" CONNECTOR
1
2
2
2
NOTE: Before removing the backing and applying the Soft Strips
to the desired surface, connect them to the "T" directional
connector making sure all Soft Strips light up as explained in the
steps below.
1: Push one of the male joiners (provided with the "T"
connector) into the female end of the Soft Strip.
2: Based on the direction of the next two Soft Strips, connect
one end of the "T" connector onto the male joiner.
3: Connect the male end of the other Soft Strips into the ends
of the "T" connector.
4: In case one of the two Soft Strips does not turn on, then
disconnect and reconnect the other end (female end) to the
"T" connector by using the additional male joiner.
5: Refer to the Soft Strip instructions to complete the
installation.
Installing the "X"
Soft Strip
Connector
MALE JOINER
C
MALE
JOINER
1
"X" CONNECTOR
3 4
FEMALE END OF
THE SOFT STRIP
NOTE: Before removing the backing and applying the Soft Strips
to the desired surface, connect them to the "X" directional
connector making sure all Soft Strips light up as explained in the
steps below.
1: Push one of the male joiners (provided with the "X"
connector) into the female end of the Soft Strip.
2: Connect one end of the "X" connector onto the male joiner.
3: Connect the male end of the other three Soft Strips into the
ends of the "X" connector.
4: In case one of the three Soft Strips does not turn on, then
disconnect and reconnect the other end (female end) to the
"X" connector by using the additional male joiner (provided
with the "X" connector).
FEMALE END OF
THE SOFT STRIP
MALE END OF
THE SOFT STRIP
2
MALE JOINER
3
3
4
FEMALE END OF
THE SOFT STRIP
5: Refer to the Soft Strip instructions to complete the
installation.
2
 Loading...