

Page 1
904-CRYSTAL-UV-01
®
© 2010 Edge Lighting. All Rights Reserved.
1718 W. Fullerton Ave
Chicago, IL 60614
Tel: 773-770-1195
Fax: 773-935-5613
www.edgelighting.com
info@edgelighting.com
CRYSTALU-S-IV
CRYSTALVE-S-WH
Installation Instructions for Crystal Union & Crystal Veil Chandeliers
IMPORTANT INFORMATION
- This product is UL listed for indoor dry locations.
- This product is ceiling mounted only.
- This product can mount to either a 4" square electrical box
with round plaster ring or an octagon electrical box.
- This product can be dimmed with a standard incandescent
dimmer.
SAVE THESE INSTRUCTIONS!
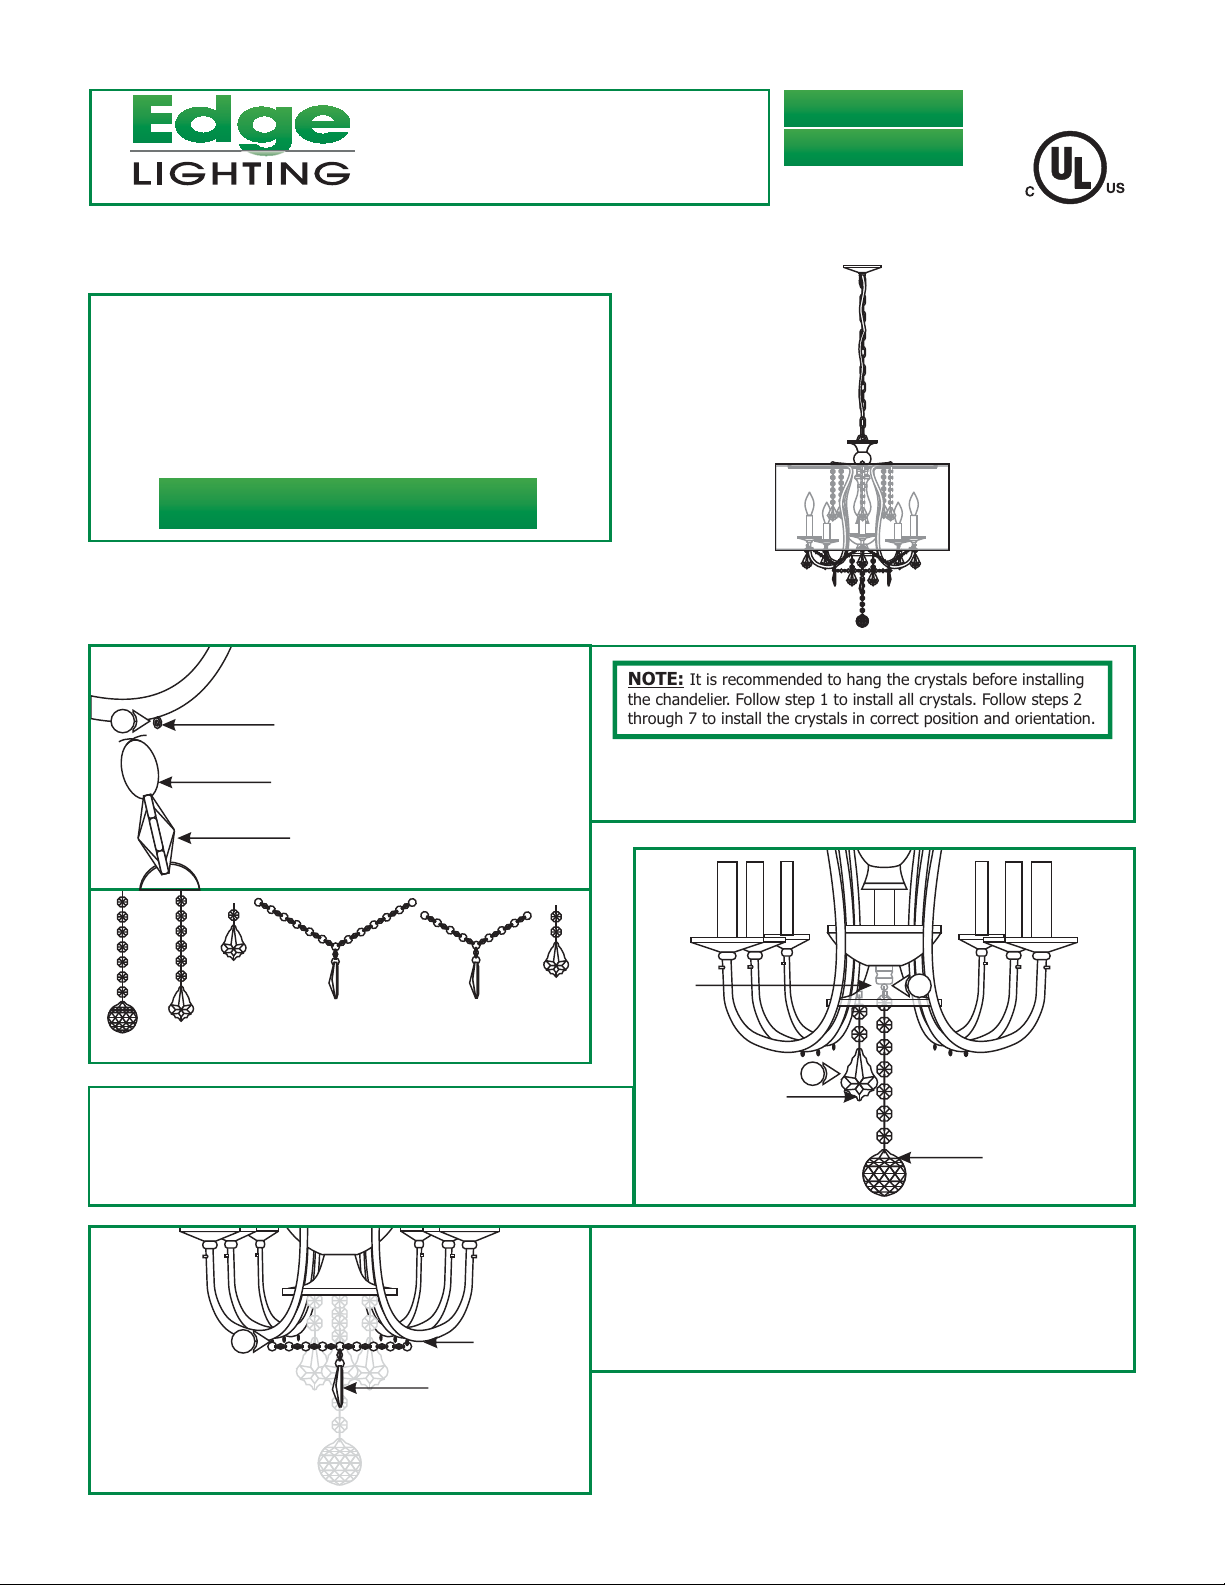
Install the Crystals
A
1
B:6pcs
A:6pcs
A1:1pc
2: Install the single crystal marked "A1" into the hoop located
in the center of the bottom glass.
3: Install the six pieces of crystals marked "E" into the hoops
located around the perimeter of the bottom glass.
HOOP
KEY RING
CRYSTAL
C:6pcs
CRYSTAL NAME:QUANTITY
E:6pcs
D:6pcs
C
4
CURVED STEM
"D" CRYSTAL
NOTE:
the chandelier. Follow step 1 to install all crystals. Follow steps 2
through 7 to install the crystals in correct position and orientation.
1: To install a crystal, squeeze the key ring to open the end.
Slide the end through the designated hoop and rotate it
inside the hoop to lock in place.
It is recommended to hang the crystals before installing
B
BOTTOM
GLASS
3
"E" CRYSTAL
4: Install the six pieces of crystal marked “D” into the hoops
located on the bottom of each curved socket stem, so that
one end is hooked into one socket stem hoop and the other
end into the adjacent socket stem hoop. Each curved socket
stem will hold two crystal key rings when all crystals are
installed.
2
"A1" CRYSTAL
1
Page 2
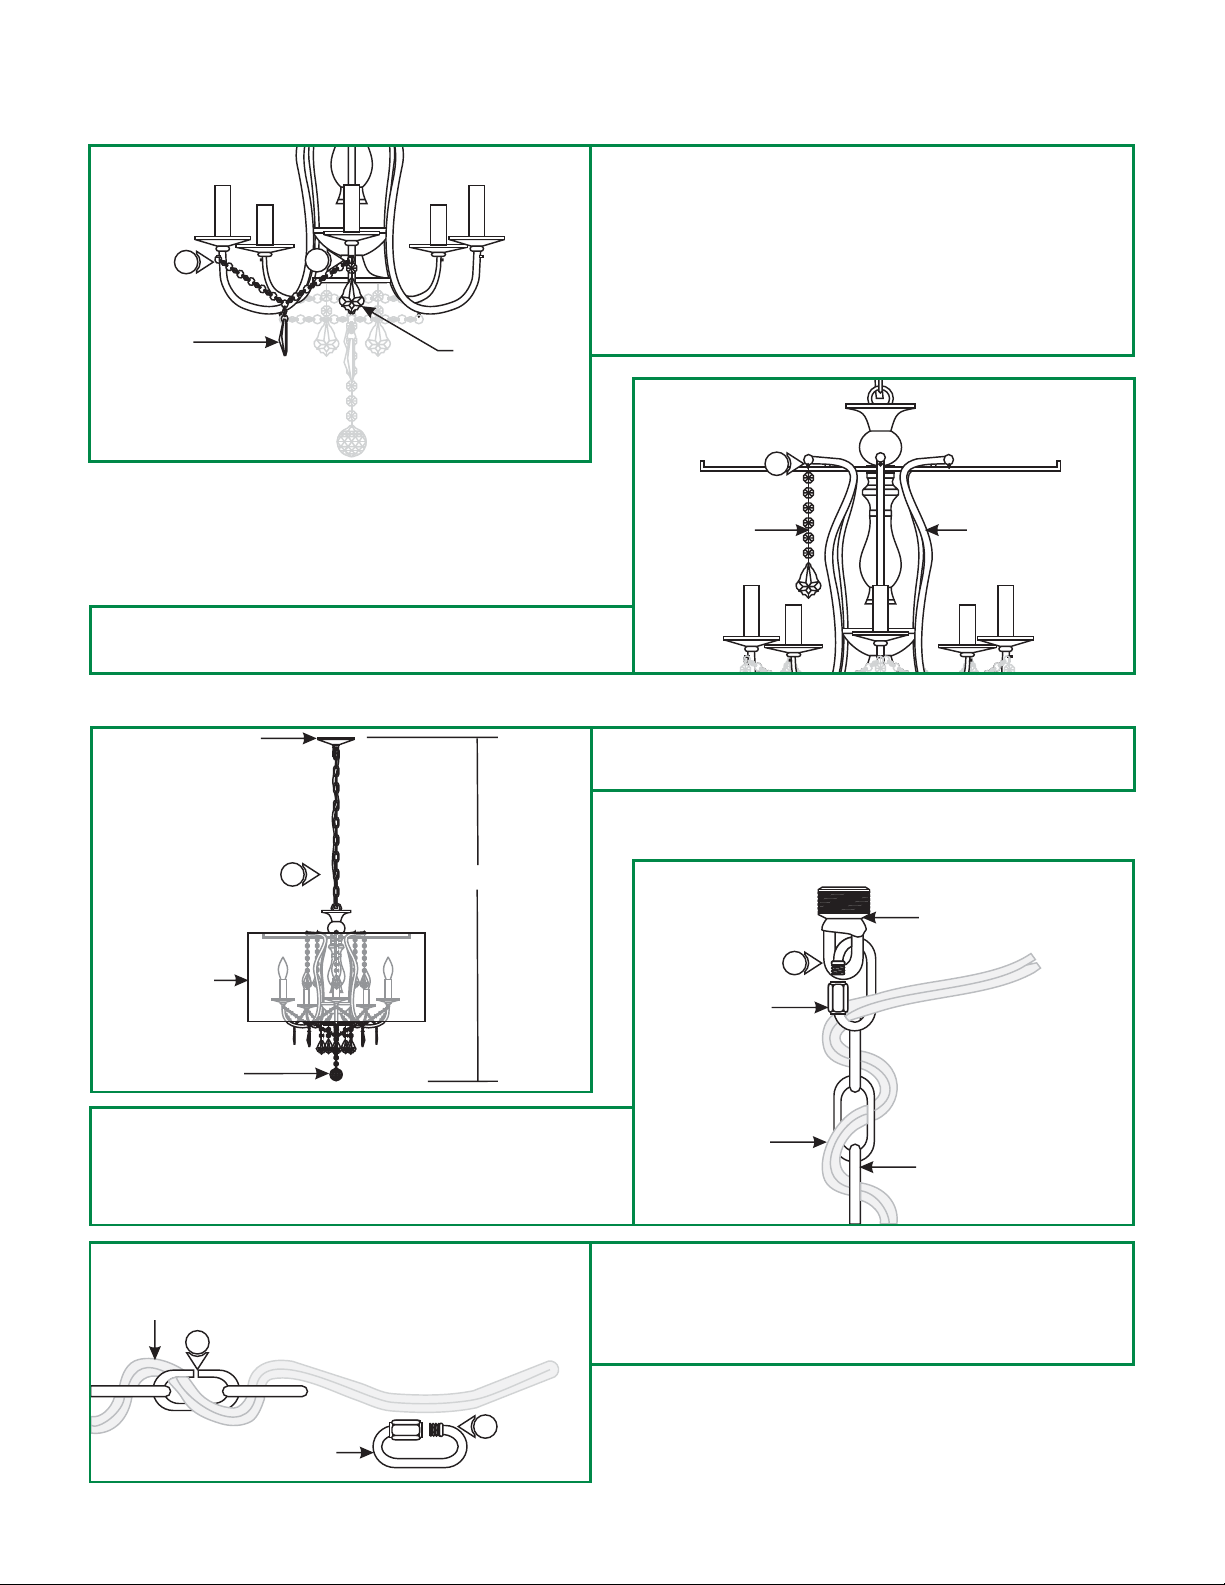
D
"C" CRYSTAL
5:
Install the six pieces of crystals marked “C” into the hoops
located under each socket assembly so that one end is
hooked into one socket assembly hoop and the other end
into the adjacent socket assembly hoop.
5
6
"B" CRYSTAL
6:
Install the six pieces of crystal marked “B” into each socket
assembly hoop. Each socket assembly hoop will hold three
key rings when all crystals are attached (one “B” and two “C”
crystals).
E
7
7: Install the six pieces of crystal marked “A” into each hoop at
the top end of the curved stems.
Install the Fixture
F
FABRIC SHADE
CANOPY
CRYSTAL
1
H
"A" CRYSTAL
1: Determine the desired fixture height (H), from the bottom of
the crystals to the top the canopy.
CURVED STEMS
G
HOOK
BUSHING
2
ADJUSTABLE LINK
2: Loosen the nut on the adjustable link and remove it from the
hook bushing.
3: If not adjusting the fixture height, then omit steps 4 through
6.
H
CLEAR CORD
5
4
ADJUSTABLE LINK
CORD
CHAIN
4: Remove the adjustable link from end of the chain.
5: Use two pairs of pliers to open the link closest to desired
height. Remove the excess links from the chain. Make sure to
consider the adjustable link as part of the fixture height.
2
Page 3

I
6: Replace the adjustable link to the end of the chain.
CLEAR CORD
5
ADJUSTABLE LINK
8: Mount the crossbar assembly to the electrical box holes with
the two provided #8-32 screws
4
8" CORD
K
ELECTRICAL
BOX
9
CROSSBAR
ASSEMBLY NIPPLE
7: Run the fixture cord zigzag through the links. Trim end of the
cord leaving 8" behind the adjustable link for power
connection.
J
ELECTRICAL
CROSSBAR
ASSEMBLY
8
#8-32 SCREW
9: Tighten the hook bushing completely to the crossbar
assembly nipple.
BOX HOLE
8
L
CANOPY
HOOK BUSHING
10: Feed the cord through the flat section of the knurled nut
(lip facing up) and the canopy hole.
M
ELECTRICAL BOX
HOOK BUSHING
11
CORD
ADJUSTABLE LINK
12
KNURLED NUT
10
CHAIN
CORD
11: Feed the cord through the hook bushing into the electrical
box.
12: Hook the adjustable link into the hook bushing and tighten
the nut to secure it in place.
3
Page 4

N
13:
Make sure that the crossbar assembly is grounded in
accordance with local electrical codes.
13
14
15
16:
Place all wires and wire nut connections inside electrical
box.
17: Slide the canopy up against the electrical box. Tighten the
knurled nut to the hook bushing threads. If necessary
loosen the hook bushing a little bit so that the knurled nut
can reach the hook bushing threads.
14: Connect the smooth edge wire of the cord to the hot power
wire with a wire nut.
15: Connect the rough edge wire of the cord to the neutral
power wire with a wire nut.
ELECTRICAL
O
BOX
16
CANOPY
KNURLED NUT
17
Install the Lamp & Shade
P
LAMP
SOCKET
1
1
1
CAUTION: To reduce risk of a burn or electrical shock during
lamping, disconnect the power to the fixture.
Use MAX 60 Watt Type E12 base, Torpedo Style
Candelabra Base Lamp For Each Socket.
1: Screw each lamp completely into one socket.
1
Q
2
SHADE TAB
SUPPORT ARM
2: Slide the fabric shade from the bottom of the chandelier up.
Align and set the shade tab holes onto the support arm ends.
4
 Loading...