

Page 1
© 2009 Edge Lighting. All Rights Reserved.
1718 W. Fullerton Ave
Chicago, IL 60614
Tel: 773-770-1195
Fax: 773-935-5613
www.edgelighting.com
info@edgelighting.com
M2S-SL-_
904-M2S-SL-02
Installation Instructions for
Monorail 2 Circuit Sloped Ceiling Standoffs
IMPORTANT INFORMATION
- This product is ETL listed for indoor dry locations.
- The product is intended to be used with Edge Lighting
Monorail 2 Circuit systems only.
- Use Monorail 2 Circuit standoffs where the Monorail 2
Circuit sections join together and approximately every 3
feet max throughout the Monorail run.
SAVE THESE INSTRUCTIONS!
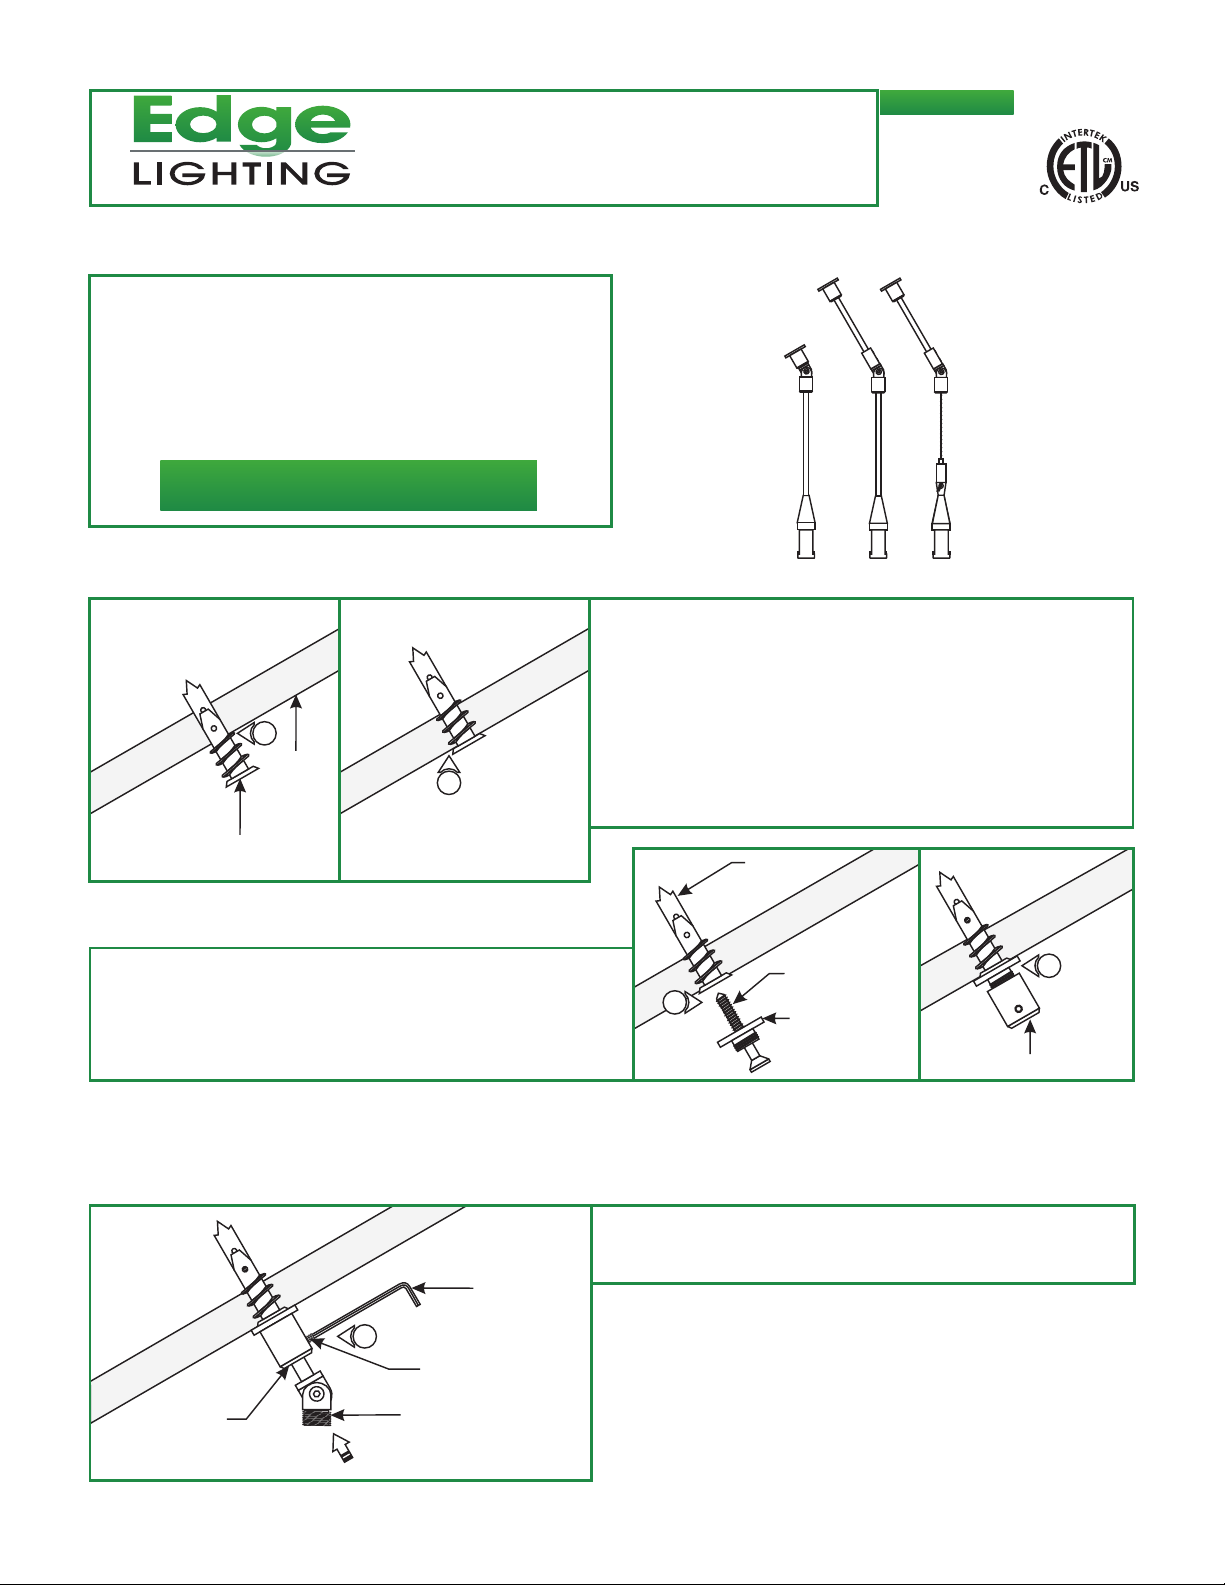
Install the Standoff Hardware
A
2
CEILING
3
1: Hold the Monorail 2 circuit section against the ceiling or use
a plumb bob to mark the sloped standoff locations onto the
ceiling (this may require more than one person).
2: Tap the anchors onto the marked locations up to the
threaded portion with a hammer.
3: Screw the threaded portion of the anchors in with a Phillips
screwdriver.
ANCHOR
4: Mount the integrated washer-nipple to the anchor with the
#8 screw provided.
5: Tighten the threaded post completely onto the integrated
washer-nipple.
Sloped Standoff Connector
Installation for Monorail 2 Circuit
Power Feed Canopies
C
1.5MM ALLEN
WRENCH
1
M3 SET SCREW
THREADED
POST
SLOPED STANDOFF
CONNECTOR
B
4
1: Push the sloped standoff connector completely into the
threaded post and tighten the M3 set screw with the 1.5mm
Allen wrench.
ANCHOR
#8 SCREW
INTEGRATED
WASHER-NIPPLE
5
THREADED POST
1
Page 2
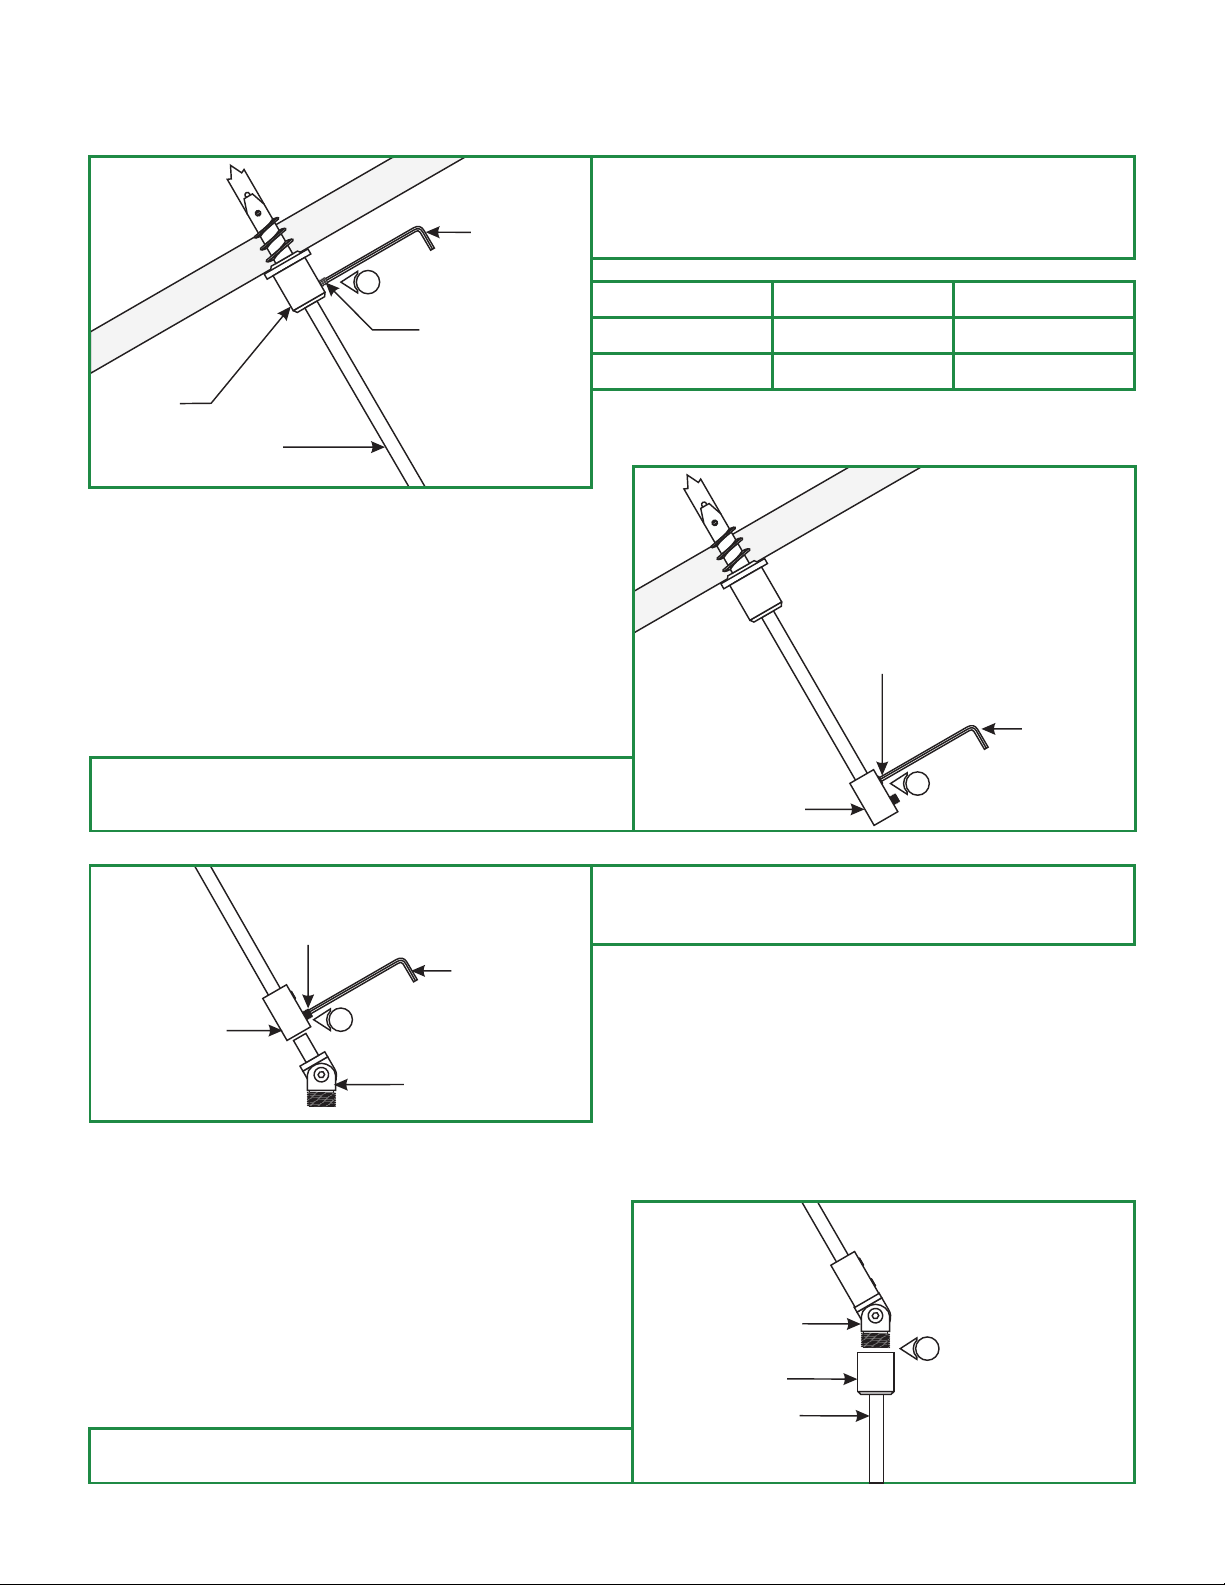
Sloped Standoff Connector Surface TransformersInstallation for
D
THREADED
POST
JOINING ROD
1
1.5MM ALLEN
WRENCH
M3 SET SCREW
1: See the chart below to determine the joining rod size.
2: Push the joining rod completely into the threaded post and
tighten the M3 set screw with the 1.5mm Allen wrench.
Transformer Type
2X150 Watt
2X250 Watt
Model Number
M2T-2X150- 4"
M2T-2X250- 4.8"
Joining Rod Size
E
M3 SET SCREW
1.5MM ALLEN
WRENCH
3: Push the joining post half way onto the other end of the
joining rod and tighten the M3 set with the 1.5mm set
screw.
F
M3 SET SCREW
1.5MM ALLEN
WRENCH
JOINING POST
4
SLOPED STANDOFF
CONNECTOR
3
JOINING POST
4: Push the sloped standoff connector completely into the
joining post and tighten the M3 set screw with the 1.5mm
Allen wrench.
Install the Monorail to Rigid
Standoff
G
SLOPED CONNECTOR
4
THREADED POST
1: Tighten the rigid standoff threaded post completely onto the
sloped connector threaded post.
STANDOFF
2
Page 3

H
MONORAIL
2 CIRCUIT
2: Slightly loosen the M3 set screw on the conical nipple of
each of the standoffs with the 1.5mm Allen wrench so that
the conical nipples can rotate easily.
3: Place the Monorail 2 Circuit into the threaded housings
2
M3 SET SCREW
1.5MM ALLEN
WRENCH
CONICAL NIPPLE
4
(this may require more than one person).
4: Tighten the threaded housings to the conical nipples (this
may require more than one person). Make sure threaded
housings are not cross threaded.
I
3
THREADED HOUSING
5: Tighten the M3 set screw on the conical nipples with the
1.5mm Allen wrench.
Mounting the Monorail to Adjustable Standoff
J
SLOPED CONNECTOR
1
THREADED POST
1: Tighten the adjustable standoff threaded post completely
onto the sloped connector threaded nipple.
K
AIRCRAFT CABLE
M3 SET SCREW
5
1.5MM ALLEN WRENCH
3
TAB
AIR CRAFT CABLE
2: Remove the threaded housings from the conical nipples.
3: Push the tab on the adjustable connector and feed the
aircraft cable through the top of the tab.
4: Pull the aircraft cable coming out of the side of the
adjustable connector. Release the tab to lock the adjustable
connector in place.
SIDE HOLE
ADJUSTABLE
CONNECTOR
4
CONICAL NIPPLE
2
THREADED HOUSING
3
Page 4

L
5: Slightly loosen the M3 set screw on the conical nipple of
each of the standoffs with the 1.5mm Allen wrench so that
the conical nipples can rotate easily.
6: Place the Monorail 2 Circuit into the threaded housings (this
may require more than one person).
5
MONORAIL
2 CIRCUIT
6
7
THREADED HOUSING
8: Tighten the M3 set screw on the conical nipples with the
1.5mm Allen wrench.
M3 SET SCREW
1.5MM ALLEN
WRENCH
CONICAL NIPPLE
N
9
11
10
TAB
ADJUSTABLE
CONNECTOR
7: Tighten the threaded housings to the conical nipples (this
may require more than one person). Make sure threaded
housings are not cross threaded.
M
M3 SET SCREW
8
1.5MM ALLEN WRENCH
9: To adjust the standoff height, hold the end of the aircraft
cable while pushing the tab on the adjustable connector
down and sliding the standoff up or down.
10: When desired height is achieved release the tab to lock the
adjustable standoff in place.
11: Trim off excess aircraft cable coming out of the adjustable
connector side hole for a neat finished look.
4
 Loading...