

Page 1
Installation Instructions For
Reveal Light Channel
© 2013 Pure Lighting. All Rights Reserved.
IMPORTANT INFORMATION
- Reveal channel can be used as a toe kick or for cove
lighting.
- This instruction shows a typical installation.
SAVE THESE INSTRUCTIONS!
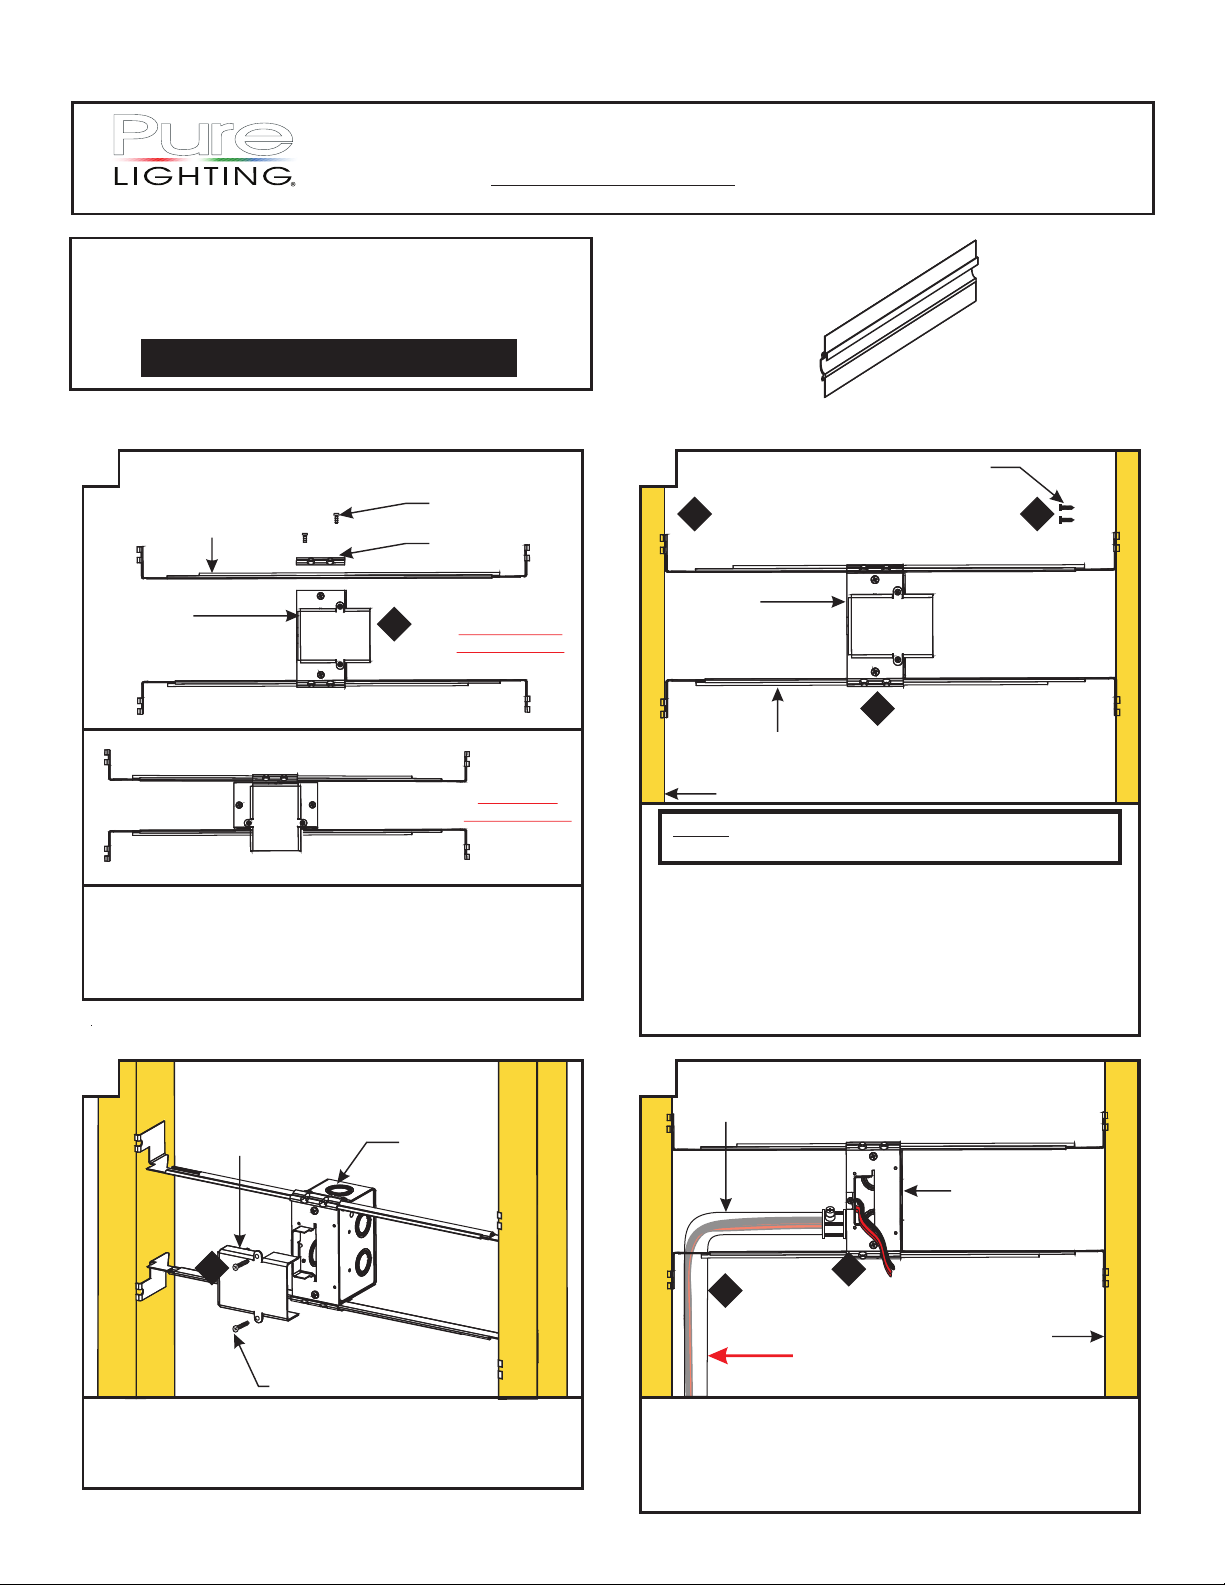
Install the Junction Box (C-1RE-JBOX)
INS# 902-RV-24VDC-02
1718 W. Fullerton Ave
Chicago, IL 60614
Tel: 773-770-1195
Fax: 773-935-5613
www.purelighting.com
info@purelighting.com
A
ADJUSTABLE
MOUNTING BAR
JUNCTION
BOX
1: Mount each adjustable mounting bar to one side of the
junction box (mounts to any side of the housing
depending on the orientation of the channel) and secure
them with the mounting brackets and two Phillips screws
provided.
PHILLIPS SCREW
MOUNTING
BRACKET
1
HORIZONTAL
ORIENTATION
VERTICAL
ORIENTATION
B
#8 SCREW
3 4
JUNCTION
BOX
2
ADJUSTABLE
MOUNTING BAR
STUD
NOTE: The adjustable mounting bars mount to studs that
are spaced 14.5" to 24" apart.
2: Select the location between the two studs for the junction
box to be mounted.
3: Place the adjustable mounting bars between the studs.
4: Make sure the lips on the adjustable mounting bars are
against the studs. Secure the adjustable bars to the studs
with the eight #8 screws.
C
DRYWALL CUTOUT
TEMPLATE
5
PHILLIPS SCREW
5: Remove the two Phillips screws to pull the drywall cutout
template completely off the junction box face. Save the
template and screws (these screws will be reused for step
9 on page 2).
JUNCTION
BOX
D
CONDUIT
JUNCTION BOX
6
7
FROM REMOTE
POWER SUPPLY
6: Remove a knockout on the junction box to install conduit
into the power feed electrical box.
7: Install the conduit and run the low voltage 24V DC power
wires.
1
STUD
Page 2
E
0.35"
3.00"
1.06"
F
CONDUIT
JUNCTION BOX
8
2.25"
2.80"
DRYWALL
CUTOUT
TEMPLATE
DRYWALL CUTOUT
TEMPLATE
9
10
ROTOZIP
DRYWALL
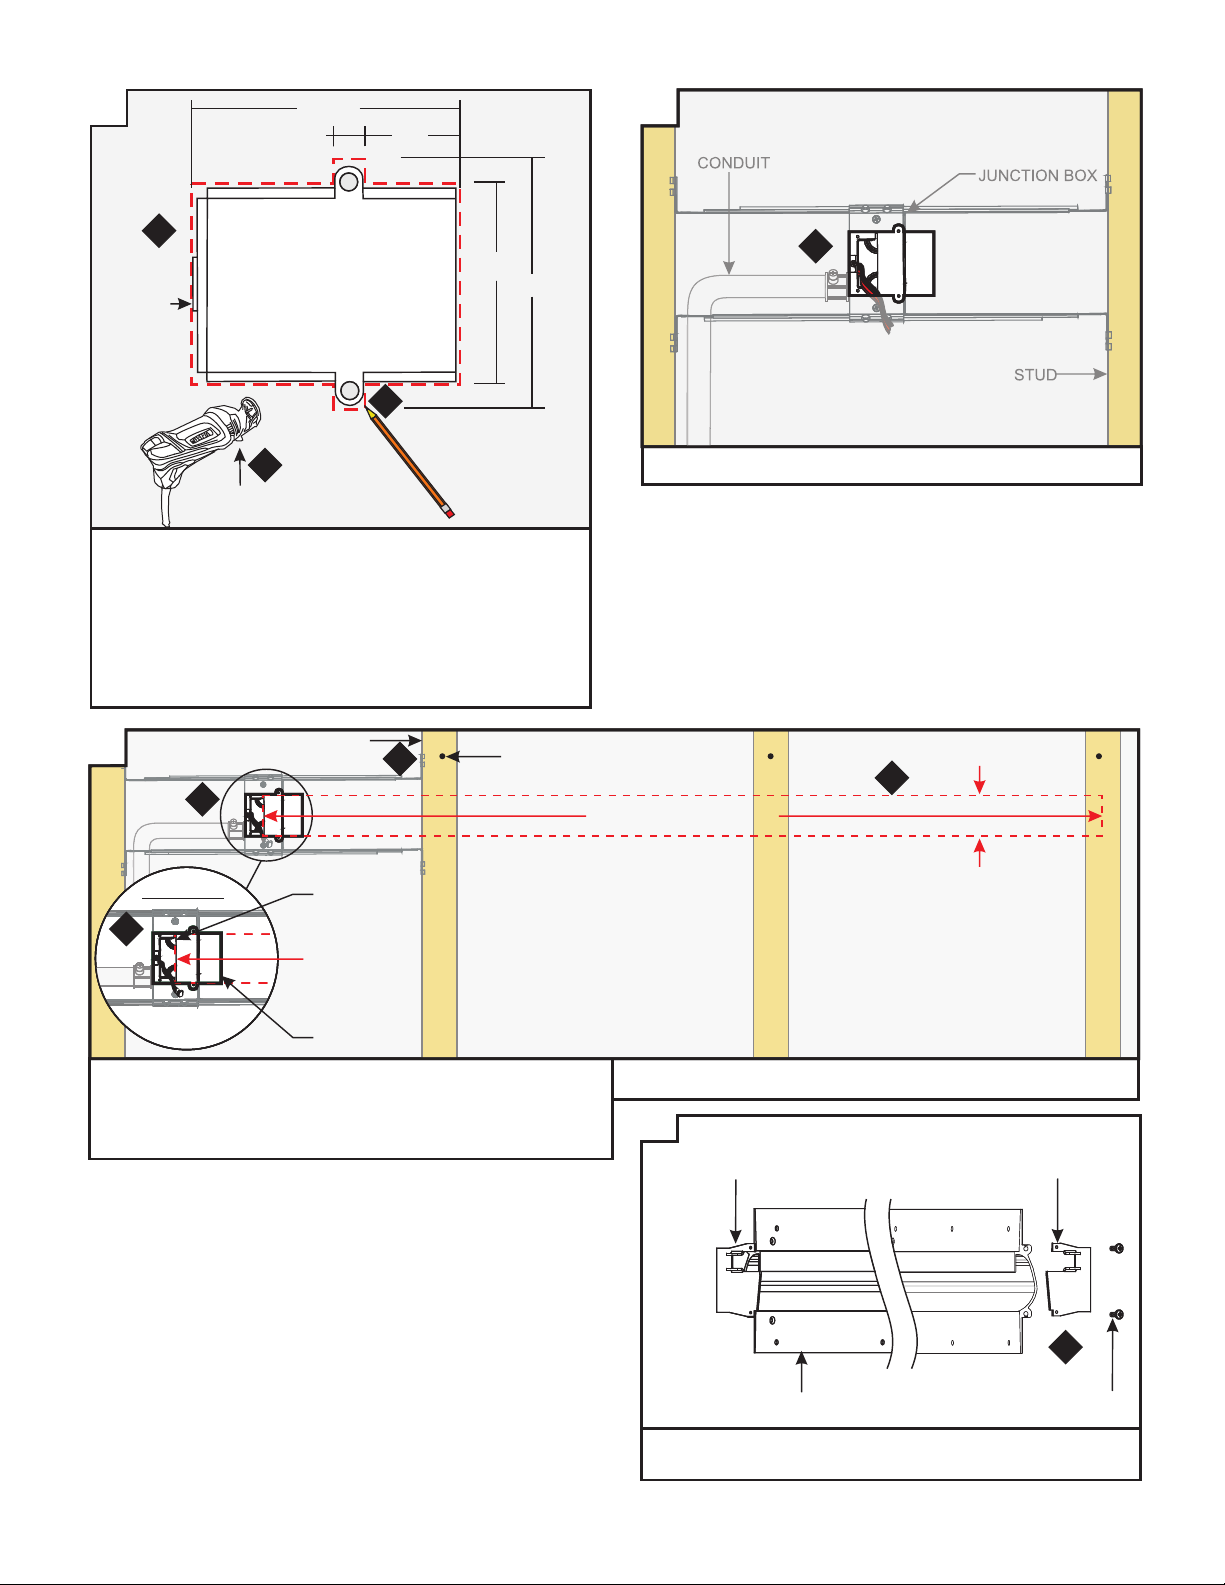
8: Mark a location on the drywall where the junction box will
be located.
9: Trace the drywall cutout template onto the drywall at
the junction box location.
10: Remove drywall cutout template and cut out the
marked area using a "Rotozip” tool.
G
STUD
14
MARKING
121
11
STUD
11:Install the drywall.
13
LENGTH OF CHANNEL
CLOSE UP
JUNCTION
BOX SLOT
12
CHANNEL
START
DRYWALL
OPENING
12: Using the drywall opening as reference, mark 2.25" wide
lines the complete length of the channel along the drywall.
13: Cut out the mark line on the drywall.
2.25" CUTOUT
14: Mark the location to the studs for future reference.
H
POWER FEED
END CAP
REVEAL
CHANNEL
15: Remove one included power feed end cap from the
channel end opposite the junction box.
POWER FEED
END CAP
15
SCREW
2
Page 3

I
JOINING ROD
16
CHANNEL 1
CHANNEL 2
16
NOTE: Channel may be cut in the field. For installation over
120" join two or more Reveal channels together shown on
diagram B
NOTE: It is recommended more than one person to install
the Reveal channel.
16: OPTIONAL: Insert the joining rods half way into the
each channel circular ends sliding them towards each
other.
J
POWER FEED
END CAP
17
REVEAL
CHANNEL
17: Install the dead end cap to the end of the channel
opposite the junction box.
DEAD END CAP
17
SCREW
K
CONDUIT
18
18: Connect the red power supply (24VDC+) wires to each
red power wire with a wire nut inside the electrical
box.
19: Connect the black power supply (24VDC-) wires to each
black power wire with a wire nut inside the electrical box.
20: Place the wire nut connections inside junction box.
JUNCTION BOX
19
20
L
WOOD
SCREW
JUNCTION
BOX SLOT
21
POWER FEED
END CAP
21: Align the power feed end cap into the junction box
opening slot and push channel into the drywall cutout.
22: Make sure channel is aligned straight using a laser
level.
23: Insert the power feed end cap into the junction box slot
and align the channel to the drywall cutout. First secure
the channel using the two Phillips screws to the junction
box (same screws as in step 5 page 1) followed by
fastening the drywall screws through the pre-drilled
holes onto the studs.
If necessary drill new holes on channel flange where
they line up with the studs using the #6 X 1-5/8"
square trim screw with the square recess bit
provided.
NOTE: Make sure screw head is flush with the channel
flange.
PHILLIPS
SCREW
23
CHANNEL
FLANGE
3
Page 4

M
PLASTER
25
BLUE
CONTRACTORS
TAPE
24
CHANNEL
PLASTER
WALL
22: Cover up the opening section of the Reveal channel with
24: Cover up the opening section of the Reveal channel with
contractors blue tape to prevent plaster and dust
contractors blue tape to prevent plaster and dust
entering inside the channel.
entering inside the channel.
N
FEMALE POWER
CONNECTOR
MALE ADAPTER
SOFT STRIP
FEMALE END
(BACK OF SOFT STRIP)
SOFT STRIP
MUST BE
INSTALLED
HERE
+
-
27
SOFT STRIP MALE END
29
LEFT END
(BACK OF SOFT STRIP)
RIGHT END
REVERSE
+
28
POLARITIES
-
SOFT STRIP
GOES HERE
FEMALE POWER
CONNECTOR
SIDE
VIEW
25: Plaster the channel flange edge to the wall & fill screw holes
(highlighted in green). Finish the wall properly.
26: Remove the blue contractor tape & clean the inside of
the channel.
O
COVER
31
SCREW
CHANNEL
PHILLIPS SCREW
PLASTER
33
32
SOFT STRIP
TEST LED & CONNECTOR, PRIOR TO POWER!!!
27: If the male end of the soft strip is facing the power
electrical box, then connect the female power connector
to the male soft strip connector so that the red wires of
the power connector are inline with the "+24VDC"
marking of the soft strip.
28: If the female end of the soft strip is facing the power
electrical box, then connect the male adapter to the
female soft strip and power connector so that the black
wires of the power connector are inline with the
"+24VDC" marking of the soft strip.
29: Remove the backing from the soft strip and installed it
inside the channel. Make sure that the soft strip is firmly
attached to the channel.
30: After trimming the soft strip on cuttable section, place
the excess soft strip behind the drywall
31: Make sure all wire connections are inside the junction
box and install the electrical box cover with the provided
two screws.
32: OPTIONAL: For the other side of the channel, extra
cover is included that can be mounted to the drywall
using drywall screws to secure in place.
33: OPTIONAL: For cleaner finished look apply plaster over
screw holes and end cap edges.
4
Page 5

GENERAL WIRING DIAGRAM
INPUT
120VAC
LIGHTOLIER:
ZP600FAM120
CONTROLLER
4 WIRES FOR
0-10V DIMMING
PSB-96W-010-24VDC
+24VDC
REVEAL CHANNEL
5
 Loading...