

Page 1
0
Advanced Display Systems
LCD Monitor User Manual
Model:W193/W223/W243/W243h
Note: The W243h with adjustable stand.
The display comes with a three years on site warranty.
To activate your warranty please register your display at
www.edge10.com/support
Page 2

1
INTRODUCTION
Thank you for purchasing this LCD monitor produced by our
company. This monitor uses a TFT (thin film transistor) liquid
crystal display (LCD) panel, and it’s designed with high quality
and highly efficient production technology to provide a more
professional and consistent image quality to the user. Besides,
this TFT LCD monitor is designed to save space and to offer
different display positions, complying with the living space of
modern age. Please read the instructions and precautions in this
booklet before you start to use it.
Features
Uses TFT (thin film transistor) active matrix color LCD (liquid
crystal display) panel. Offers high resolution image.
Elegant ultra-slender with small footprint saves more space for users.
Complies with the latest standard of European ergonomics.
5 ゚ forward and 15 ゚ backward tilt flexibility lets you adjust to the most favorable
angle.
Low power consumption, low heat and zero radiation emission protect the user.
Check Package Content
After you open the package, make sure the following items are
included. If anything is missing or damaged, please contact your
local dealer or supplier:
TFT LCD Monitor
User’s manual
Power Cord
VGA Cable
Audio Cable
Page 3

2
Precautions
Please read the following instructions carefully first to prevent unnecessary
hazards. This manual should be retained for future reference.
0 Before you clean or move this monitor, make sure it is power off and the AC
power cord is unplugged, so as to avoid accidental injury to the monitor or
human body.
0 Please keep the radiator at the back of the monitor unobstructed.
0 Keep the monitor away from any liquid.
0 Some of the components and parts carry high voltage. To avoid unnecessary
danger, please don’t disassemble the monitor yourself.
0 If smoke comes out from the monitor, please disconnect the power
immediately and get in touch with your local dealer.
0 Please don’t apply pressure onto the screen panel to avoid permanent
damage.
0 Before you clean this monitor, please make sure the AC power cord is
removed first, and please don’t spray liquid cleaner onto the unit directly.
Clean the screen with a slightly dampened rag gently without applying
excess pressure.
Page 4
3
¾ Installation of the Monitor
Please switch off the power supply to the computer and its peripheral
equipments first.
1. Connect the power cord to the AC power input socket at the back
of the unit, and connect the other end to the AC power socket.If
using an external power supply,you need to connect the AC power
cord to the external power supply and connect the DC plug in to
the DC socket at the back of the unit. Next connect the AC mains
plug to the AC power socket.
2. Connect the VGA Analog Signal Cable to the 15-pin connecting
port of the unit.
3. Turn on the screen and the power supply of the computer.
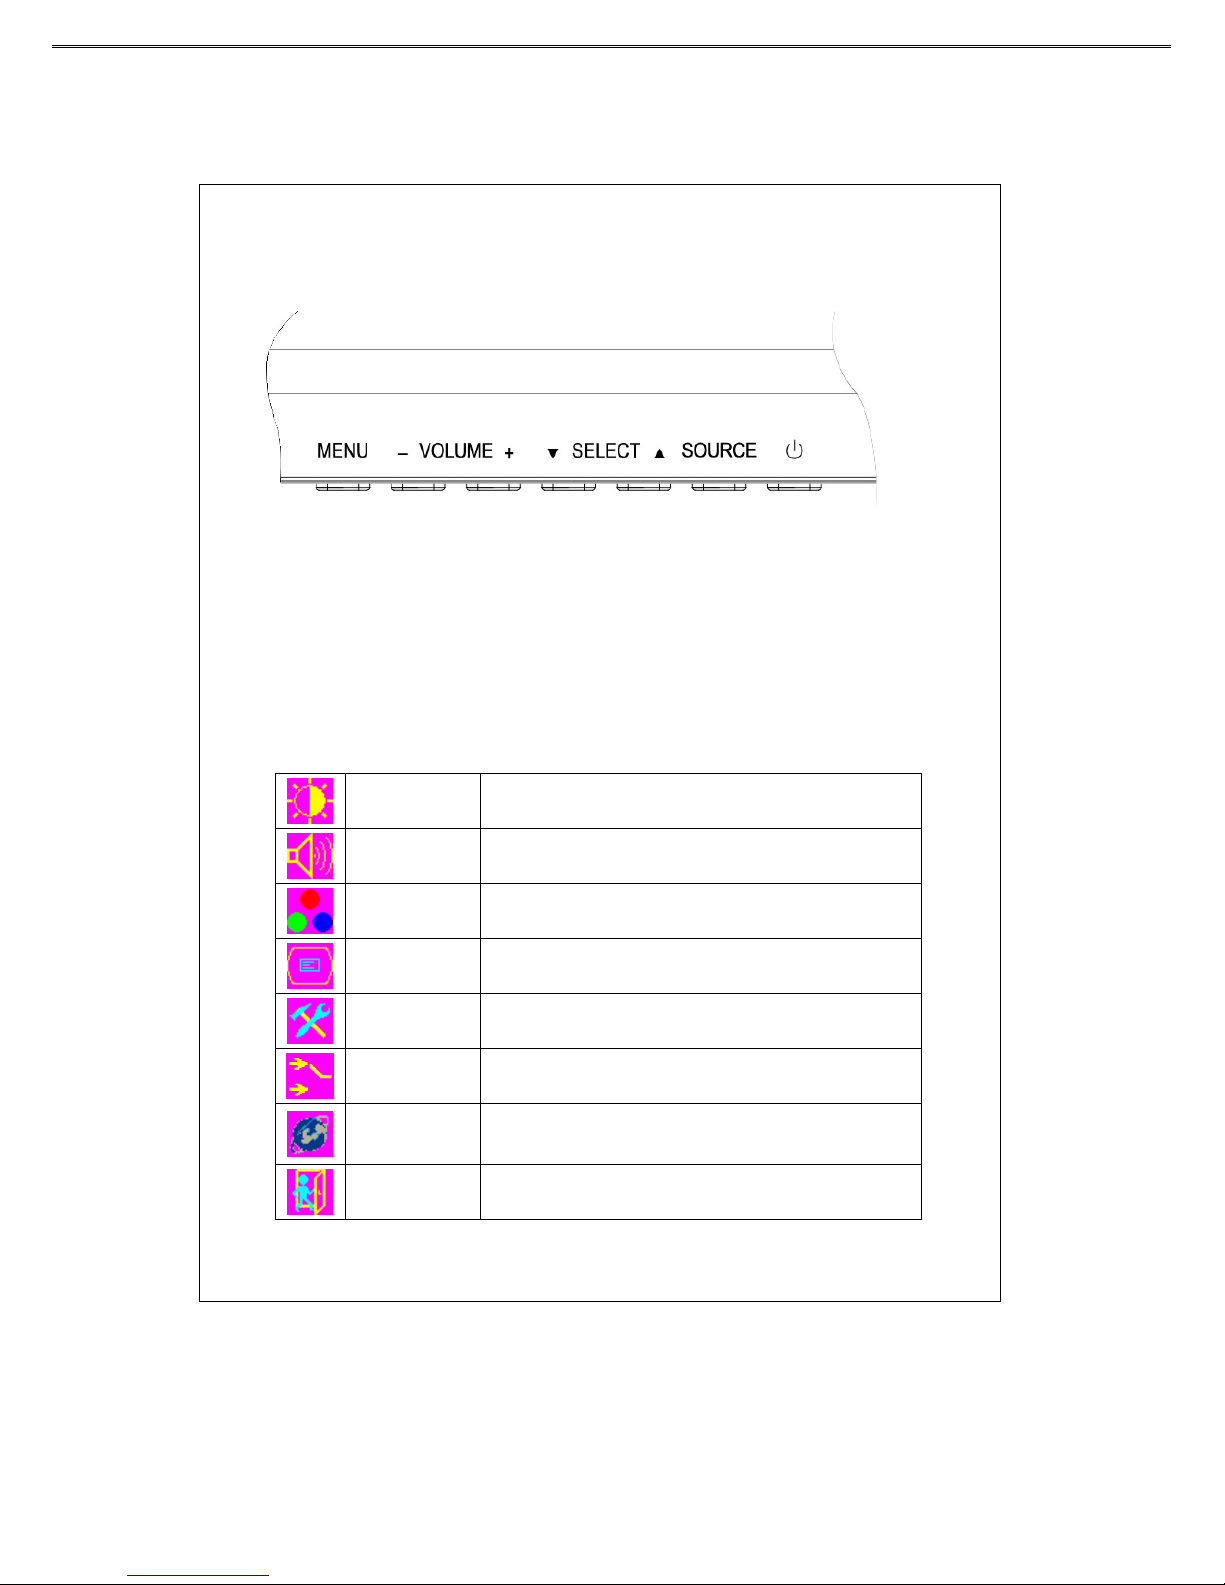
¾ Front Control Panel :
Tilting and Swiveling of the Screen
You can tilt the panel up by 15 ゚ or down by 5 ゚.
Page 5
4
OSD (On-Screen Display) Adjustment Control
Step 1: Press “menu” to activate the OSD on-screen display menu.
Step 2: Press “ ▼”or“▲”
key to move the cursor to select the function.
Step 3: Press “source” to open the input source OSD menu
Step 4: Press “+”or “-”ke y t o m o v e t he c u r so r t o adjust the volume.
Quick Menu Functions
.
You can press “ ▼”or“▲” to adjust
Bright Contrast
To adjust the brightness and contrast of the background.
Volume
To adjust the volume of the speakers.
Color
To adjusts the parameters for red, green and blue
colors on the screen.
Image Config
To adjust the vertical and horizontal positions of the screen.
OSD menu
To set the position of OSD display status automatically.
VGA/DVI
To select the signal source option (D-SUB or DVI)
Language
To select English, Traditional Chinese , French, German, Italian,
Spanish, Polish and Korean for OSD language display on your
own preference. The user can select a preferred language.
Exit
To quit from the OSD Menu.
Page 6

5
Secondary Menu Settings
Bright Contrast
To adjust the brightness and contrast of the background.
Function Description
Press “+”or “-” key to adjust the numerical level of brightness (0~100). Press
“menu” key to save and menu key return to the previous page.
Press“+”or “-” key to adjust the numerical value of contrast (0-100). Press
“menu” key to save and menu key return to the previous page.
Press “menu” key to select the display mode (4:3 or 16:10)
Page 7

6
Back to the previous menu.
Volume
To adjust the volume of the speakers.
Function Description
Press “+”or “-” key to adjust the volume, and press “menu” key to
save and return to the previous page.
Press “menu” key to turn the speaker on or off.
Page 8

7
Back to the previous page.
Color
Press “ ▼”or“▲” key to choose the function, and press “menu” key
to make adjustment.
Image
Config
Press “ ▼”or“▲” key to select a function, and press “menu” key to enter the
adjustment menu. After the adjustment is finished, press “menu” key to save and
“source” key exit.
Function Description
Press the “menu” key to adjust H/V positions, clock and phase automatically.
When there is distortion between characters, press “+”or “-” key to
correct this problem.
Press “+”or “-” ke y t o adjust the ADC sampling real image value.
Press “+”or “-” key to move the screen right or left.
Page 9

8
Press “+”or “-” key to move the screen up or down.
Back to the previous menu.
OSD menu
Press “ ▼”or “▲” key to select a function, and press “menu” to adjust. After the
adjustment is done, press “menu” key to save and “source” key to return to the
previous page.
Function Description
Press “+”or “-” key to move the OSD display position to the right or the left of the
screen.
Pr e s s “+”or “-” k e y to move the OSD display position up or down the screen.
Press “+”or “-” key to set the OSD off time and press “menu” key
to save it.
Page 10

9
Sets the system to factory default value.
Back to the previous page.
VGA/DVI
Press“▲”or“▼”key to select the signal source option (D-SUB or DVI)
Language
Press
“▲”or“▼” key to select a language of OSD menu, and press
“menu” key to confirm.
Exit
To quit from the OSD Menu.
Power Saving Mode
This monitor meets the criteria of NUTEK/TCO and VESA DPMS
mode for display power management. It has a effective built-in power
management system that reduces power consumption automatically
when the PC is not used.
Page 11

10
No. Description H-Freq. (KHz) V-Freq. (Hz)
1 VESA 640×400 31.480 60
2 VESA 640×480 31.649 70
3 VESA 640×480 37.862 72
4 VESA 640×480 37.500 75
5 VESA 800×600 60
6 VESA 800×600 70
7 VESA 800×600 48.077 72
8 VESA 800×600 46.875 75
9 VESA 1024×768 48.363 60
10 VESA 1024×768 56.476 70
11 VESA 1024×768 56.476 72
12 VESA 1024×768 60.023 75
13 VESA 1152×864 54.948 60
14 VESA 1152×864 66.095 70
15 VESA 1152×864 60.000 72
16 VESA 1152×864 66.095 75
17 VESA 1280×768 60.000 60
18 VESA 1280×768 60.000 70
19 VESA 1280×768 60.000 75
20 VESA 1280×800 75.000 60
21 VESA 1280×800 75.000 70
22 VESA 1280×800 75.000 75
23 VESA 1280×1024 63.981 60
24 VESA 1280×1024 79.977 70
25 VESA 1280×1024 63.981 72
26 VESA 1280×1024 79.977 75
27 VESA 1360×768 79.977 60
28 VESA 1440×900 79.977 60
29 VESA 1400×1050 79.977 60
30 VESA 1600×1200 79.977 60
31 VESA 1680×1050 79.977 60
32 VESA 1920×1200 79.977 60
Display Mode Support
19” Series Support 01~28 Mode
22” Series Support 01~31 Mode
24” Series Su
pp
ort 01~32 Mode
Page 12

11
Preliminary Troubleshooting
If the monitor does not run normally, please use the following table to resolve
the most common and possible causes of the problem before you call the
service personal. If the problems still can't be solved, please contact the local
dealer for assistance.
Symptom Correct Action
No Display on
Screen
1. Check the connection of the VGA or DVI Signal Cable.
2. Check to make sure the power is turned on, or that the power
adaptor is on.
3. Check whether the power cord of TFT LCD monitor is loose.
Fuzzy image.
1. The power supply may not be stable. Try connect the unit to
another power socket.
2. Move the LCD monitor away from magnetic objects.
No sound from
the speakers.
1. Please check if the audio cable is plugged in.
2. The speakers may have been muted or the volume adjusted to
the minimum. Rectify the situation.
Page 13

12
19” Specifications
Panel
19” TFT LCD Panel
Resolution
1440 x 900 (WXGA+)
Display Area (H x V)
408.24 mm x 255.15 mm
Pixel Pitch
0.2835 mm (Horizontal) x 0.2835 mm (Vertical)
View Angle
160º Vertical / 160º Horizontal
Input Signals
Analog RGB: 0.7 Vp-p
Sync: 5V (pos./net. Separate)
Color Display
16.7M colors
Signal System
D-sub / DVI input( if there is a DVI connector)
Luminance (typical)
300 cd/m
2
Input Connectors
15-pin D-sub Type, DVI (if there is a DVI
connector), a power input socket and an earphone
socket.
Audio Output
Built-in 2W/8ohm x2 Speakers.
Maxim Power Consumption
45 watts (typical)
Power Management
VESA DPMS standard, EPA/Energy Star compliant
PnP Compatibility
VESA DDC 1& 2B standards compliant
E M I Ergonomics
FCC, CE(CISPR-II)
External Dimension
446 mm (L) X 160 mm (W) X 367 mm (H)
Net Weight
4.2 kg
Temperature
Operating: 0°C to 40°C Storage: -10° C to 65° C
Humidity
Operating: 25% to 90% RH Storage: 0% to 90% RH
Page 14

13
22” Specifications
Panel
22” TFT LCD Panel
Resolution
1680 x 1050 (WSXGA+)
Display Area (H x V)
473.76 mm x 296.1 mm
Pixel Pitch
0.282 mm (Horizontal) x 0.282 mm (Vertical)
View Angle
160º Vertical / 170º Horizontal
Input Signals
Analog RGB: 0.7 Vp-p
Sync: 5V (pos./net. Separate)
Color Display
16.7M colors
Signal System
D-sub / DVI input( if there is a DVI connector)
Luminance (typical)
300 cd/m
2
Input Connectors
15-pin D-sub Type, DVI (if there is a DVI
connector), a power input socket and an earphone
socket.
Audio Output
Built-in 2W/8ohm x2 Speakers.
Maxim Power Consumption
49 watts (typical)
Power Management
VESA DPMS standard, EPA/Energy Star compliant
PnP Compatibility
VESA DDC 1& 2B standards compliant
E M I Ergonomics
FCC, CE(CISPR-II)
External Dimension
512 mm (L) X 160 mm (W) X 405 mm (H)
Net Weight
4.7 kg
Temperature
Operating: 0°C to 40°C Storage: -10° C to 65° C
Humidity
Operating: 25% to 90% RH Storage: 0% to 90% RH
Page 15

14
24” Specifications
Panel
24” TFT LCD Panel
Resolution
1920 x 1200 (WUXGA)
Display Area (H x V)
518.4 mm x 324 mm
Pixel Pitch
0.270 mm (Horizontal) x 0.270 mm (Vertical)
View Angle
160º Vertical / 170º Horizontal
Input Signals
Analog RGB: 0.7 Vp-p
Sync: 5V (pos./net. Separate)
Color Display
16.7M colors
Signal System
D-sub / DVI input( if there is a DVI connector)
Luminance (typical)
500 cd/m
2
Input Connectors
15-pin D-sub Type, DVI (if there is a DVI
connector), a power input socket and an earphone
socket.
Audio Output
Built-in 2W/8ohm x2 Speakers.
Maxim Power Consumption
90 watts (typical)
Power Management
VESA DPMS standard, EPA/Energy Star compliant
PnP Compatibility
VESA DDC 1& 2B standards compliant
E M I Ergonomics
FCC, CE(CISPR-II)
External Dimension
566 mm (L) X 160 mm (W) X 436 mm (H)
Net Weight
5.2 kg
Temperature
Operating: 0°C to 40°C Storage: -10° C to 65° C
Humidity
Operating: 25% to 90% RH Storage: 0% to 90% RH
Page 16

15
 Loading...