

Edey & Duff DOVEKIE Owner's Manual
OWNER'SMANUAL
Harbor Road, Mattapoisett
Massachusetts 02739 617-758-2743

*
DOVEKIE OWNERS MANUAL
1.
2.
3.
4.
5.
6.
7.
8.
9.
10.
11.
12.
13.
14.
15.
INDEX X
Subject
Page
General
.................................................................. .2
Trailers &
Trailering..
..............................................
3
Getting Under
Way
................................................
.5
Trim
& Tuning..
....................................................
-7
Reefing .................................................................
11
Putting Her to Bed..
.............................................
.12
Rowing
& Sculling..
........
.
....................................
.13
Anchors & Anchoring
..........................................
.15
Safety.. .................................................................
16
Cooking,
Stowage,
& Domestic
Arts..
...................
.17
Maintenance
& Modifications
...............................
.18
Heaving To
.........................................................
..2 0
Help & Information
.............................................
..2 1
Cruising checklist..
................................................
.22
Riging Lid.. .........................................................
23
General Revision 03/94
’ j
Page 2
1. GENERAL: There are a number of “immutable” rules concerning DOVEKIE that best
fall in this section. Also, this manual includes some subjective thoughts, as well as
objective instructions. We recommend you follow them until you thoroughly understand
the boat and’its workings.
Then feel f?ee to experiment.
Please tell us if you find better
ways to do things!
k NEVER GO ON DECK. While DOVEKIE’S deck is strong enough to support
you, her stability is probably not. Everything you need to do to operate DOVEKJE can be
done Tom below. There is no anti-skid on the deck, and its crown is quite high. Both are
done to enhance the prohibition against going on deck. Of the few accidental capsizes we
know of, one occurred because a very heavy man was on deck.
He lost his balance,
grabbed the mast to regain it and simply levered the boat over...to windward!
DON’T GO
ON DECK! The only exception to this is to’go out over the bow when you’ve beached
for a picnic, or whatever.
B. DOVEKIE is incredibly tough, so you can afford to be a bit relaxed about piloting.
But KEEP AN EYE ON THE WEATHER.
DOVEKIE is a very stable, seaworthy boat
but she has limitations.
Asking her to do more than she can is rather unprofitable.
Excesses will almost invariably be a result of inattention to the weather.
C. KEEP EVERYTBING AS LIGHT AS POSSIBLE. The more junk you leave at
home, the better. The Cruising Check List, Section 14, is amazingly long, but almost
everythmg you’d normally need on a cruising sailboat is there.
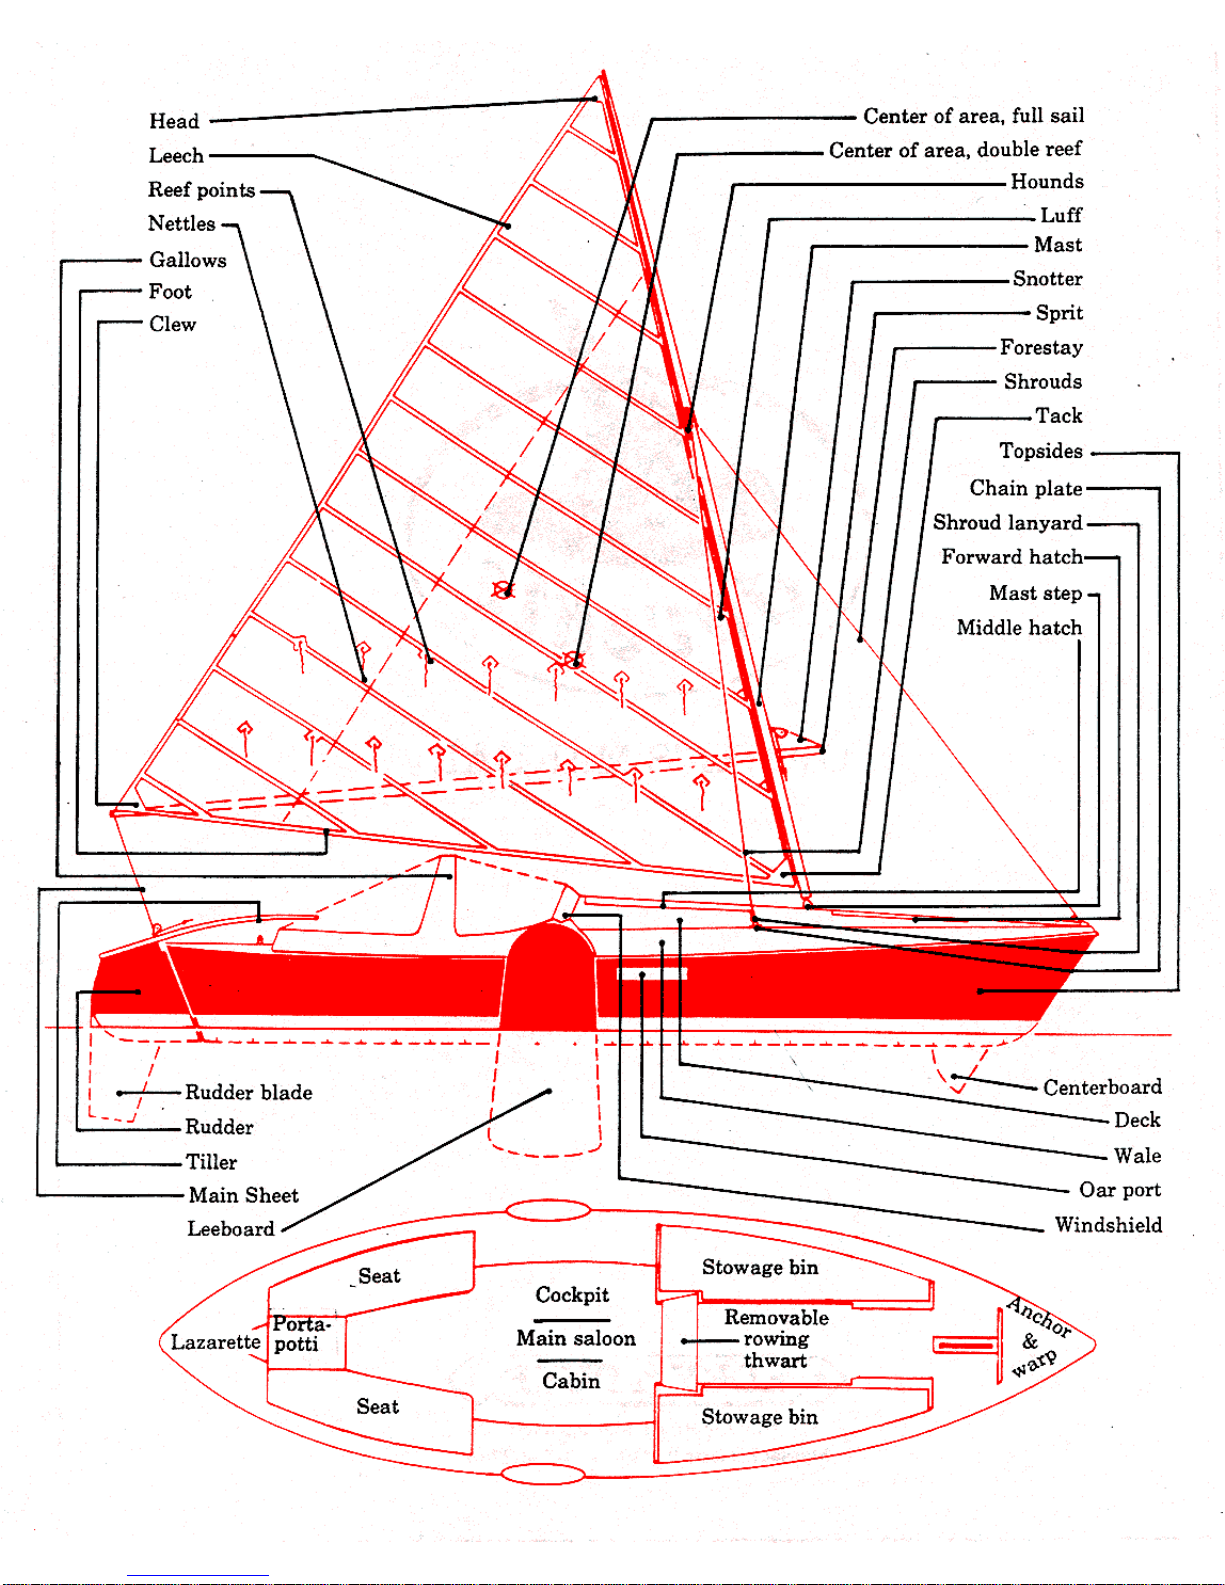
D. TERMINOLOGY: Nautical terminology is used throughout this manual. It is
perhaps the oldest form of jargon.
Nautical terminology is a precise, concise, shorthand
language that has evolved over 2000 years. We will use it here where ever it saves words
over saying something in non nautical English. You’ll find most, if not all, of these terms in
all but the slimmest of English dictionaries.
iVOT?T: A.UDOF5?Z~S amplteffy much the sami Howeker, since tbey appeared
io 1979, there have been some modSkabbos and e&.@men f changes done in the
split of hnprov&g their tiheren f good quaMt~. In th& Iaft& re@ion of, TKE
DOJG?iZUE OI;yNER’SIM;4NuAL *, we have done our beef not onIy to cover the
currant model and equipmend but also address the major opera fingpoinb of the
prevlbus models where there was a si@Skanf difference.
Page 3
2. TRAILERS AND TRAILERING:
A. Vehicle menarations for towinp a DOVEKIE
1.
Wiring: A wiring harness to couple the DOVEKIE trailer wiring to your car is
included with the purchase of the trailer. You should be able to install and wire it yourself,
if you want. A competent auto mechanic should be able to install and wire the socket in
two hours or’less. Wiring alone should take him less than an hour.
2. The wiring socket may be installed:
a. Inside the car’s trunk, attached to something or left loose, as long as the wire
Tom the trailer, (which, in most cases, is flat), can pass between the trunk lid and sill
without being cut or chafed, or---
b. Outside, in a hole drilled through the body work, bumper, or in a bracket you’ve
made for it. Locate it as close to the hitch as possible. Use marine bedding compound to
seal the wires in the hole.
3. Towing Hitch:
. .
a. The hitch should be VERY robust! Except for “step” bumpers on trucks, a
bumper hitch should NOT be used. Use a bolt-on hitch, such as those made by Valley
Tow Rite, Reese, etc. The loads on the hitch will be: vertical = adjustable from 75-100
lbs, depending on how the boat is loaded, (Trailering Instructions will tell you how to
adjust this for proper towing.); Horizontal = the weight of trailer, boat and load (about
1350 lb. maximum).
b.
Ball size is 1 7/8. The top of the ball should be about 19” above the ground for
the beat to be level. An inch or two one way or the other poses no problem.
B. Launchirw tech&we:
To avoid accelerated corrosion of the frame and to
reduce
the probability of bearing failure, use the following instructions to launch and retrieve
DOVEKJE:
1.
Before backing down the launching ramp:
a. Walk down and have a look at the ramp. Is it crowded? Will you have to
launch and be away quickly? Are there other boats milling about to confuse the issue?
Where is the wind, and how strong is it? Decide now what you will do to vacate the ramp
as expeditiously, and with as little confusion to other boats as the conditions permit. If you
expect to have to row or scull away from the ramp, make as many preparations as possible
to do so before moving to the ramp.
b.
Remove the temporary leeboard pendants and boat hold down strap.
c Install the rudder, shrouds, and main sheet, if any- were removed for towing.
d.
Open the forward and middle hatches. Remove the canopy. Open and furl the
dodger.
e. Tie a bow line to the forestay block stand. It should be at least 20’ long, and
3/8” diameter.
X BE SURE THE DRAIN PLUG IS IN PLACE!
2. back the trailer down the ramp so the wheels are at the water’s edge. There is no
need for any part of the trailer to go into the water except an inch or two of the tires. ’
3. Set the parking brake, put the transmission in Park, (or lst, if manual), and shut
the engiue off.
4. Release the winch yawl and trailer bed tilt lock. Do not unhook the winch line.
Do notletgo of the winch handle.
Unwind 8-10 turns on the winch. ‘A small push will
get the boat moving aft. S671
withoutletG.uggo of the r,~incb handle,
unwind the winch
line.
Page 4
BE WARE: If you Jet go, ff~e handJc wiJJ spin rapidly, out of conirol The boat wiu
race back, also out of control and you ‘Uprobably break your wrikt should you &v
to stop tie winch handJe!
(Boats on EDEY & DUFF built., flat, plank bed trailers, will require a considerably harder
push to launch.)
5.
Once afIoat, unhook the winch line.
6. Have your assistant or bystander, hold the boat, or secure the bow line somehow
to the ramp. Drive the car and trailer up the ramp, and park them.
7. Go aboard.
C. Retrieval techniaue:
1.
Depending on congestion, space available, wind direction and strength, etc. at the
ramp, sail, row, or scull to the ramp, or to the wharf serving it
2. Raise and lock the rudder blade, leeboards, and bow centerboard.
3.
Release the click stop on the winch. Haul the winch rope out until‘the hook is a
foot aft of the rear center roller.
4.
Back the trailer to the water’s edge.
As when you launched, there is no reason to
get the trailer wet.
5. Move the bow of the boat to center of the center roller. Try to hold the stern out
so it’s in line with the trailer. Attach the winch line hook to the bow eye.
Unlock trailer bed
tilt mechanism.
6. Crank a small amount of tension into the winch line. Lock.the winch pawl. Now
take up on the winch in earnest.
Line tension wiIl pull the bow right up over the roller.
The energy accumulated in the nylon winch line will do most of the work. Once the bow
surmounts the roller, cranking should become pretty easy. Line tension should straighten
the boat as it comes onto the trailer, but it may need some help.
Crank until the bow is
tight against the rubber V-block on the winch stand.
BE WARE:
ne nylon wi0cJ1 fine wiu stretch a Jot as it is tensioned. As it
s&-e&her, tie nyJon absorbs ener&y...a LOT of energy! If tie fine shouJd break, or
come unhitched when s&etcJxed, #iaf energy wiu be d&s@aied vew quicMy.
Should
you, or anyone else be standhg in the way of tbatproces, if wouJd do much more
than stiug. And stand&g at tie winch crankhgpufs yoy by a ratier vuloerable
position. So, it behooves you to be absolutely sure the snap hook between the winch
J&e and boaf is done up properJy, and that fhe Ji’e sfays in good conditi%nl
7. Move up to the parking area.
8. Secure spars, install hatch covers and canvas for travel. Install hold down strap.
9. Have a nice ride home.
D. Towing tim:
1.
On the new type trailers the tongue weight can be adjusted by moving the front
trailer standard forward or back. We adjust it at 85 lbs which is correct for most situations.
On trailers without adjustable standards, tongue weight is adjusted by moving equipment
and supplies forward or aft in the boat.
2.
Stop after the first 20-30 miles to check the trailer’s wheel bearings. Simply feel
the hubs to see if they are warm or hot. Ideally, they should be the same temperature as the
&ame
of the trailer--cool. If either is warm, stop after another 50-75 miles, and feel them
again. If either is noticeably warm, keep an eye on it by checking every 25-50 miles.
Page 5
Ifit is warmer than you can touch comfortably, drive slowly to the nearest gas station, or
better yet, the nearest RV/trailer service center.
If you must attend to it yourself:
a. Jack the wheel up.
b.
Remove the bearing cap. It is lightly pressed onto the hub. It should be pried
off with a screw driver, applied at several places around the perimeter.
c. Spin the wheel. Try to remember how it feels and sounds.
d. Remove the cotter pin. Loosen the nut l/6 of a revolution. Replace the cotter
pin but don’t spread its legs.
e. Spin the wheel again. Compare feel and sound with the previous spin. Ifit feels
improved (your subjective impression), okay.
If not, try loosening the nut another 1/6th
turn. Once you’re satisfied with the sound and feel, try wiggling the wheel on the axle to
see if yodve loosened the nut too much. Also examine the grease to see if you think it
might have suffered from being overheated. Again, you’ll have to depend on your
subjective impressions.
f; Spread the legs of the cotter pin and tap the cap back on.
g. Stop to check for overheating fairly frequently.
Go to a garage or trailer service
center, and have them inspect the hub.
3. On EDEY & DUFF built trailers, beware of steep or abrupt entrances to gas
stations, restaurants, etc, where DOVEKIE’S extreme length can cause her to drag her
stern. New type trailers are higher which minimizes the problem.
4. When you back a trailer down a launching ramp behind a dar with a standard
manual transmission, it’s a good idea to shut the engine off to add it’s holding power to that
of the often questionable parking brake. Before you get out of the car, put the
transmission in first gear. DO NOT LEAVE IT IN REVERSE. Then if someone else gets
in to drive the car and empty trailer away, it’ll be more likely to go up the ramp than down.
5. Dimensions of DOVEIUE on her trailer. (These measurements are for the current
generation of DOVEIUE trailers. All earlier models made by Edey & Duff are
lower, and some are wider).
a. LENGTH: 25’ including the rudder, 23’ with the rudder removed. (These
dimensions are with the tongue blocked so the boat is approximately level.)
b. WIDTH: 6’8” to the outside of the fender.
c. HEIGHT: 7’3” to the top of the mast stowed on its ‘dhocks, with the tongue of
the trailer blocked so the boat is level. With the tongue on the ground, the tip of
the stowed mast rises to 8’2” high. 6’7” to the top of the gallows, with the mast
and sprit removed, and the boat level. This height can be reduced a bit by
raising the tongue.
d. WEIGHT: The tare weight of the trailer is 325 lbs. The maximum permissible
weight components is 1350 lbs. The G.V.W.R is 1675 lbs.
3. GETTING UNDER WAY
k If space is restricted. the wind does not serve, or for some other reason you
cannot sail away from the wharf, float, mooring, beach, launching ramp, or other starting
place, row or scull to an unobstructed area, deep enough to use the leeboards at their full
depth. Anchor. (See separate instructions about Rowing, Sculling, and, Anchoring.)
Page 6
B. Shit, and stow the oars.
C. Close sort covers. THIS IS VERY IMPORTANT! The amount of water that
could get in through an open oar port could be more than embarrassing. In f&t it could
spoil your whole day!
D. Lower both leeboards: Rotate a handle so it points out into the middle of the
boat. This unlocks a cam at the junction of the handle and the bronze beating. Holding
the handle pointed inboard, turn the other leg of the handle so it is pointed down. As you
probably noticed, this lowered the leeboard. Rotate the handle forward against the hull to
lock the cam. This holds the leeboard down. Should the Ieeboard hit something, the cam
will slip, allowing the leeboard to swing aft and up. Repeat to put the other leeboard down.
To raise the leeboards, just reverse the operation.
E. Lower the rudder blade: Untie any stopper knots in the lift and downhaul
lanyards on the rudder. (Do not untie the figure eight knots in the bitter ends of the
lanyards.) Push the blade aft and down as far as is convenient.
Pull it the rest of the way
down with the downhaul lanyard. A paradox occurs here: the rudder is most effective,
and the steering forces least, with the blade all the way down. At this point, it will be
somewhat forward of vertical. Thus, ifit hits the bottom and tries to swing aft, it must lift
the stern a little (pole vault) as it swings down to the vertical position. This puts a large
stress on the rudder and its hardware.
While everything is strong enough to withstand all
but the most violent of such encounters, it’ll scare the pants off you., So if you expect to be
near the bottom, it’d be prudent to swing the blade until it’s just aft of vertical.
F. Prepare the spars for raisins:
1. Shroud Lanyards: Lace the shrouds to the chainplates with the l/4” lanyards
spliced to the bottom thimbles as follows:
a. Pass the lanyard through the chainplate, then back up through the shroud
thimble. Repeat twice more, so there are six lengths of line between the thimble and
chainplate.
6. The first time you sail your DOVEIUE, adjust the lanyard so the spacing
between the thimble and the chainplate is 5 inches. This is just a tentative dimension.
You’ll probably need to readjust it once the sail is set. Secure it at the 5” length by doing a
series of half hitches around itself The lanyards on the ends of the shrouds should be
adjusted so the foot of the sail just brushes the top of the gallows. This moves the center
of sail area as far aft as possible, to help avoid a lee helm. It also maximizes the
effectiveness of the shrouds as backstays.
2. Release the ties that hold the mast and sprit to the gallows. See that the mainsheet
is uncleated and can run freely.
3. Release the snotter so that the mast can be moved aft.
4. Release all but the bottom loop of the shock cord that holds the furled sail to the
mast. Release the forestay from its cleat just forward of the middle hatch.
Move the mast
aft and toward the center of the boat. Engage the tenon fitting at its base with the mast step
on the deck. Check the shrouds to see that they will not get caught under anything as you
raise the mast. Check also that the shackles at the hounds (where the shrouds and forestay
attach to the mast) lead fair. Be sure that the lanyards at the bottom of the shrouds are
secured to the chainplates!
 Loading...