

Page 1

VideoManager 12.0
User Guide
This document is intended to serve as a reference to administrators when using basic
VideoManager features.
Page 2
Copyright
Convention Description
► For more
information...
A cross-reference to a related or more detailed topic.
[ ] Text enclosed in square brackets indicates optional qualifiers,
arguments or data.
<> Text enclosed in angle brackets indicates mandatory
arguments or data.
Edesix Limited
16 Forth Street
Edinburgh
EH1 3LH
United Kingdom
Copyright © 2015 - 2019 Edesix. All Rights Reserved.
Contains information owned by Edesix and/or its affiliates. Do not copy,
store, transmit or disclose to any third party without prior written
permission from Edesix
Other product and company names may be trademarks or registered
trademarks of other companies, and are the property of their owners. They
areused only for explanation, without intent to infringe.
Intended purpose
Conventions
Contact address
Safety notices
This document is intended to serve as a reference to administrators when
using basic VideoManager features.
This document uses the following conventions:
Indicates a hazardous situation which, if not avoided, could
result in moderate injury, damage the product, or lead to loss
of data.
Additional information relating to the current section.
Indicates a hazardous situation which, if not avoided, may
seriously impair operations.
Edesix ED-012-134-08
2
Page 3

VideoManager - User Guide
Contents
1 Welcome to VideoManager 5
2 Home 6
3 Videos - how to... 7
3.1 Search Videos 8
3.2 Access A Video's Details Pane 11
3.2.1 Watch Videos 12
3.2.2 View Assets 15
3.2.3 View and Edit Video Properties 17
3.2.4 View and Edit Asset Properties 19
3.2.5 Perform Video Actions 21
3.2.6 Create, Edit and Delete Location Information 23
3.3 Import Videos 24
3.4 Change Viewing Options 25
3.5 Prepare Media 27
3.6 Bulk Edit Videos 29
4 Incidents - how to... 31
4.1 Search Incidents 32
4.2 Create, Edit and Delete Incidents 34
4.3 Clip Footage in an Incident 37
4.4 Redact a Video 39
4.4.1 Create, Edit and Delete Foreground Redactions 41
4.4.2 Create, Edit and Delete Background Redactions 43
4.4.3 Create, Edit and Delete Audio Redactions 45
4.4.4 Create, Edit and Delete Text Annotations 46
4.4.5 Create, Edit and Delete Brightness Redactions 48
4.4.6 Create, Edit and Delete Zoom Redactions 50
4.4.7 Create Other Redactions 52
4.4.8 Access the Redaction Advanced Dropdown 53
4.5 Bulk Edit Incidents 55
4.6 Create, Edit and Delete Bookmarks 57
Edesix ED-012-134-08
3
Page 4

VideoManager - User Guide
5 Devices - how to... 60
5.1 Search Devices 61
5.2 Assign Devices 65
5.3 Generate DockController Configurations 67
5.4 Perform DockController Actions 68
5.5 View Device Info 71
5.5.1 Perform Device Actions 73
5.5.2 Edit Device Properties 75
5.6 Bulk Edit Devices 76
5.7 Bulk Edit DockControllers 77
6 Frequently Asked Questions 78
6.1 Videos FAQs 79
6.1.1 Q: After recording, how do I download videos from my device to VideoManager? 80
6.1.2 Q. Why are some of the headings on my videos green? 81
6.1.3 Q: I can't see some of the videos on VideoManager. Why is this? 82
6.1.4 Q. Can I share videos with people who aren't on VideoManager? 83
6.1.5 Q. Why do some of my videos have a cloud symbol instead of a thumbnail? 84
6.1.6 Q. Why is the timestamp on my video incorrect? 85
6.1.7 Q. What is the difference between the operator and the owner of a video? 86
6.2 Devices FAQs 87
6.2.1 Q: Why can't VideoManager find my devices when I dock them for the first time? 88
6.2.2 Q. Why isn't my device streaming? 89
6.2.3 Q. Why isn't my VideoBadge docking? 90
6.2.4 Q. Can I move my devices from one VideoManager system to another one? 91
6.2.5 Q. Why does my device appear as "locked" on VideoManager? 92
Edesix ED-012-134-08
4
Page 5

VideoManager - User Guide
1 Welcome to VideoManager
1 Welcome to VideoManager
Thank you for choosing Edesix's VideoManager as your aggregator of evidential-ready footage.
VideoManager is designed as an intuitive browser-based system, requiring minimal training and input.
However, if there is a question or process that you can't find in this guide, useful contact information is
listed below:
l Support - edesix.com/support.
This gives you information regarding FAQs and returning equipment.
l Customer login - edesix.com/customer-login.
If you have software assurance, this will provide you with the latest VideoManager
software.
Chapters are arranged by the corresponding tabs on VideoManager (Videos, Incidents, Devices, Status,
and Admin). From there, the sub-chapters are arranged by actions you can perform in each tab. The
exception for this is the Admin tab - this is broken down into the panes and sections of the Admin UI.
Edesix ED-012-134-08
5
Page 6
VideoManager - User Guide
2 Home
2 Home
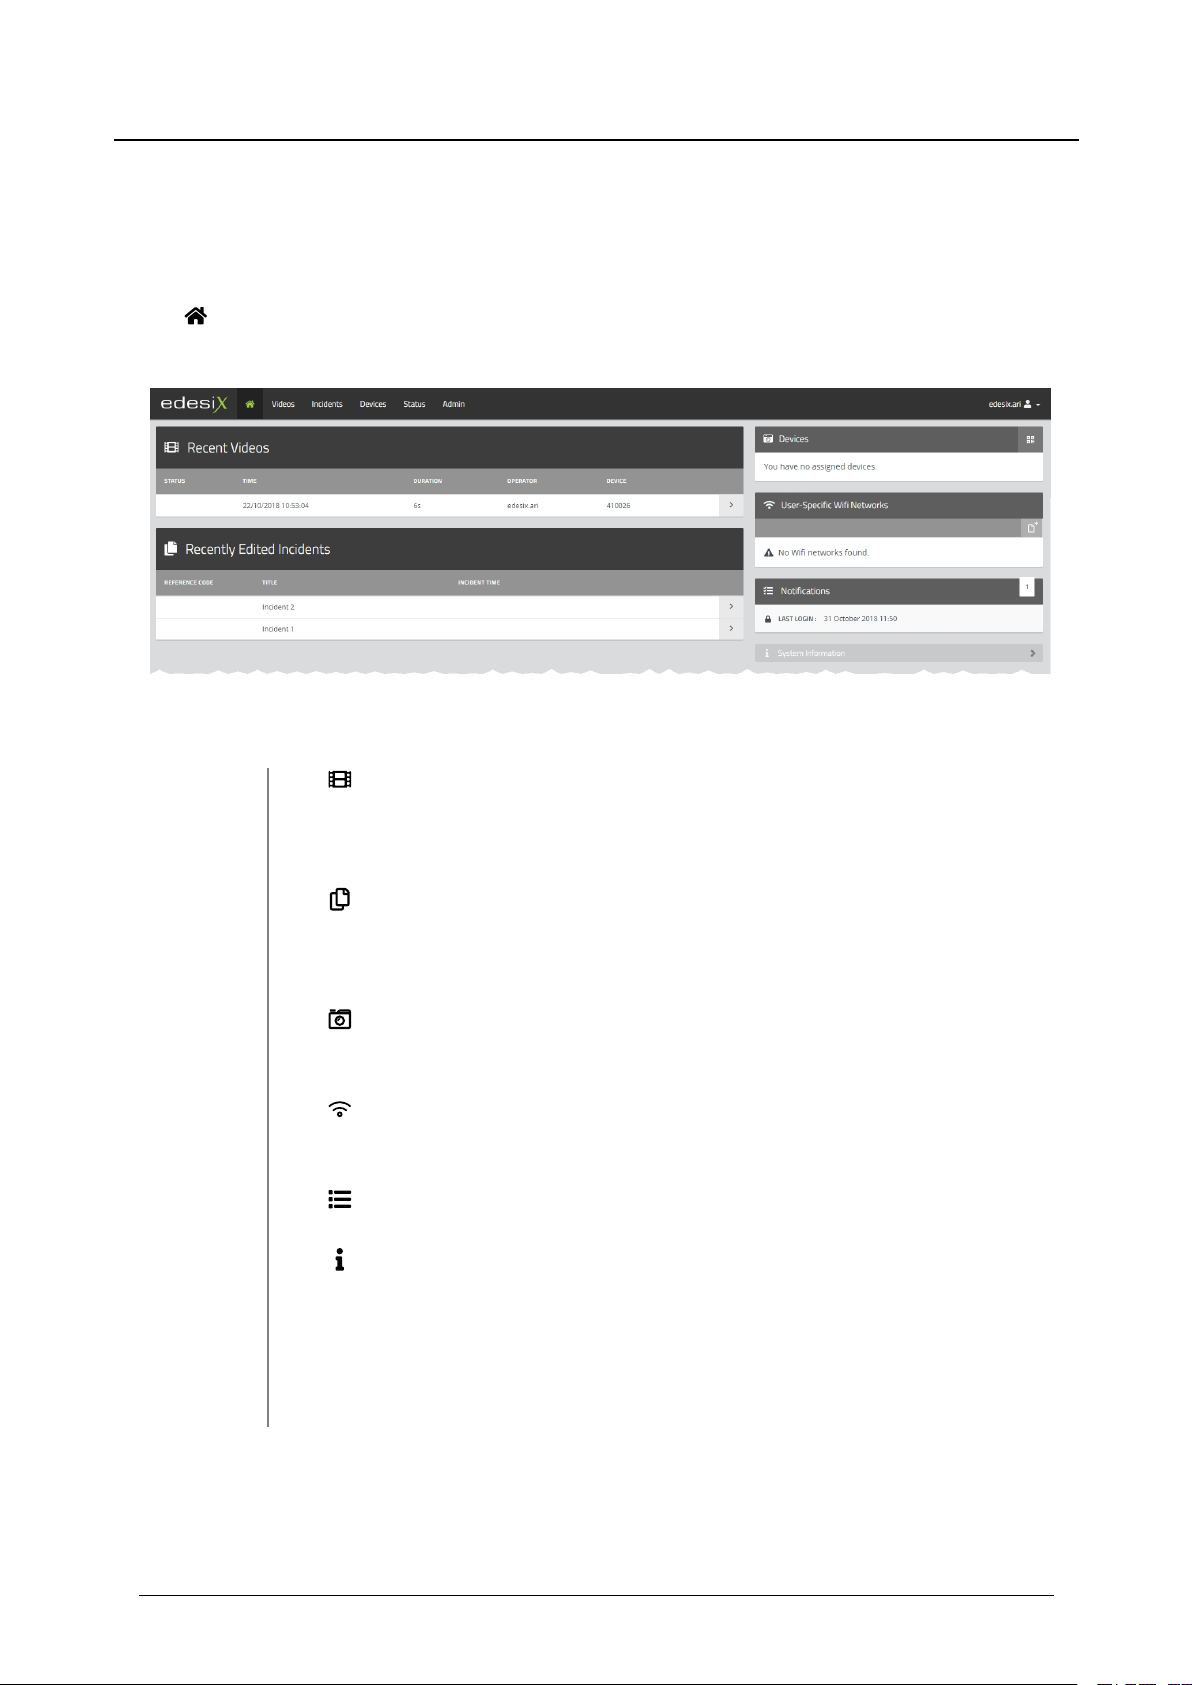
The Home tab provides a summary of the information and footage availableto the user in
VideoManager. It gives an easy-to-read overview of information for the user to view when they first log in.
The following information is displayed:
l
Recent Videos - gives details about the videos most recently downloaded
from a device. The user can navigate to a chosen video for more details and
editing functions.
l
Recently Edited Incidents - gives details about the most recently created
and edited incidents. Users can navigate to a chosen incident for more details
and editing functions.
l
Devices - VideoBadges assigned to the current users are shown here, as
well as the option to create QR codeconfigurations for VideoTags.
l
User-Specific Wifi Networks - this shows any user-specific WiFi networks
created by the user.
l
Notifications - a list of event notifications from VideoManager.
l
System Information - this provides information about the current version
of VideoManager and the option to export system logs, as well as listing any
licensed features the user owns.
l Messages - this displays the messages set by either the user or an admin-
istrator.
A number by a heading indicates that some actions (e.g. exports) have been completed and are ready
for review.
Edesix ED-012-134-08
6
Page 7
VideoManager - User Guide
3 Videos - how to...
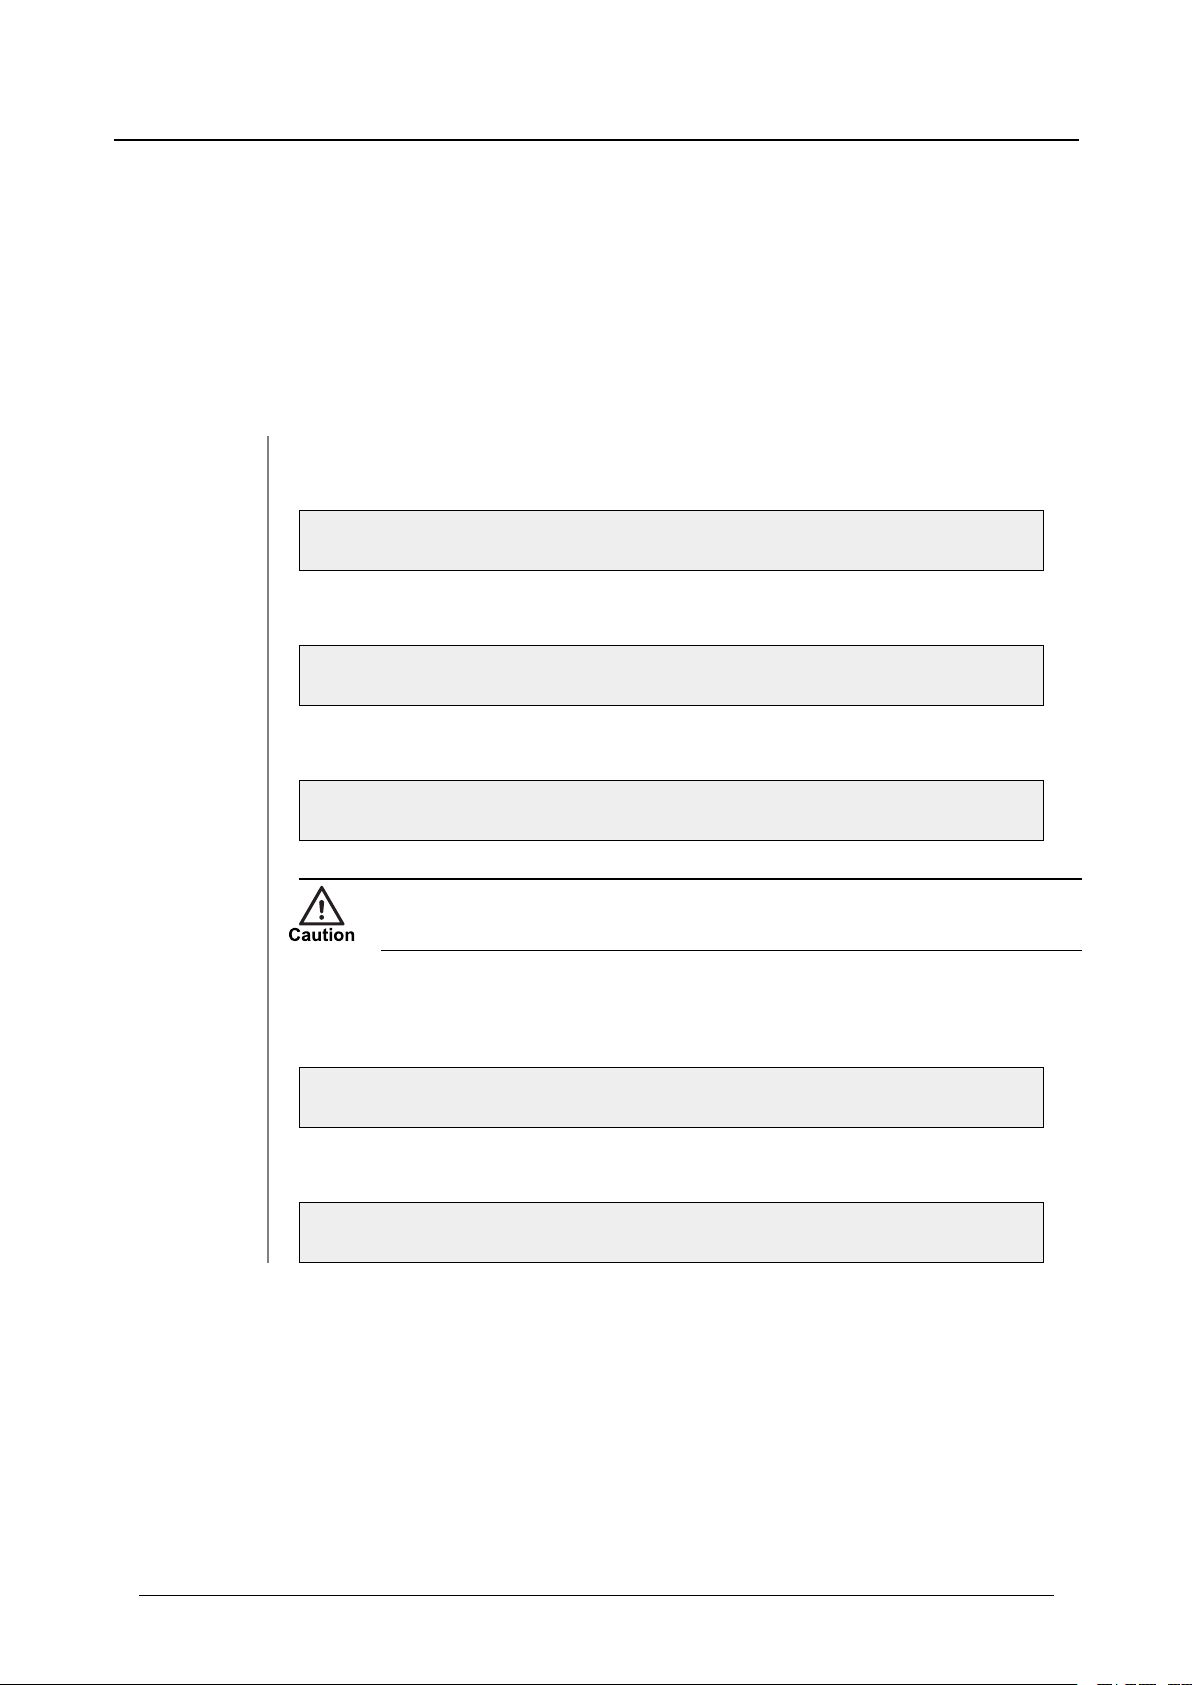
3 Videos - how to...
The Videos area provides access to all videos available to a user in VideoManager and related functions
which they can perform on videos.
If users have sufficient permissions, they can:
l Search for videos, filter them by a number of criteria, and perform advanced
searches.
>> For more information, see Search Videos on page 8.
l View, edit, and share videos and assets.
>> For more information, see Access A Video's Details Pane on page 11.
l Import videos into VideoManager.
>> For more information, see Import Videos on page 24.
It is only possible to import non-PSS files if the feature has been licensed to the
user. Contact Edesix Support for more information.
l Change the way users view videos.
>> For more information, see Change Viewing Options on page 25.
l Bulk edit videos.
>> For more information, see Bulk Edit Videos on page 29.
Videos which have been downloaded from a device assigned to a user are shown under the My Videos
tab. Videos which have been shared with a user by another user are shown under the Shared Videos tab.
If a user supervises other users, their videos are shown under the Supervised Videos pane.
Edesix ED-012-134-08
7
Page 8
VideoManager - User Guide
3 Videos - how to...
3.1 Search Videos
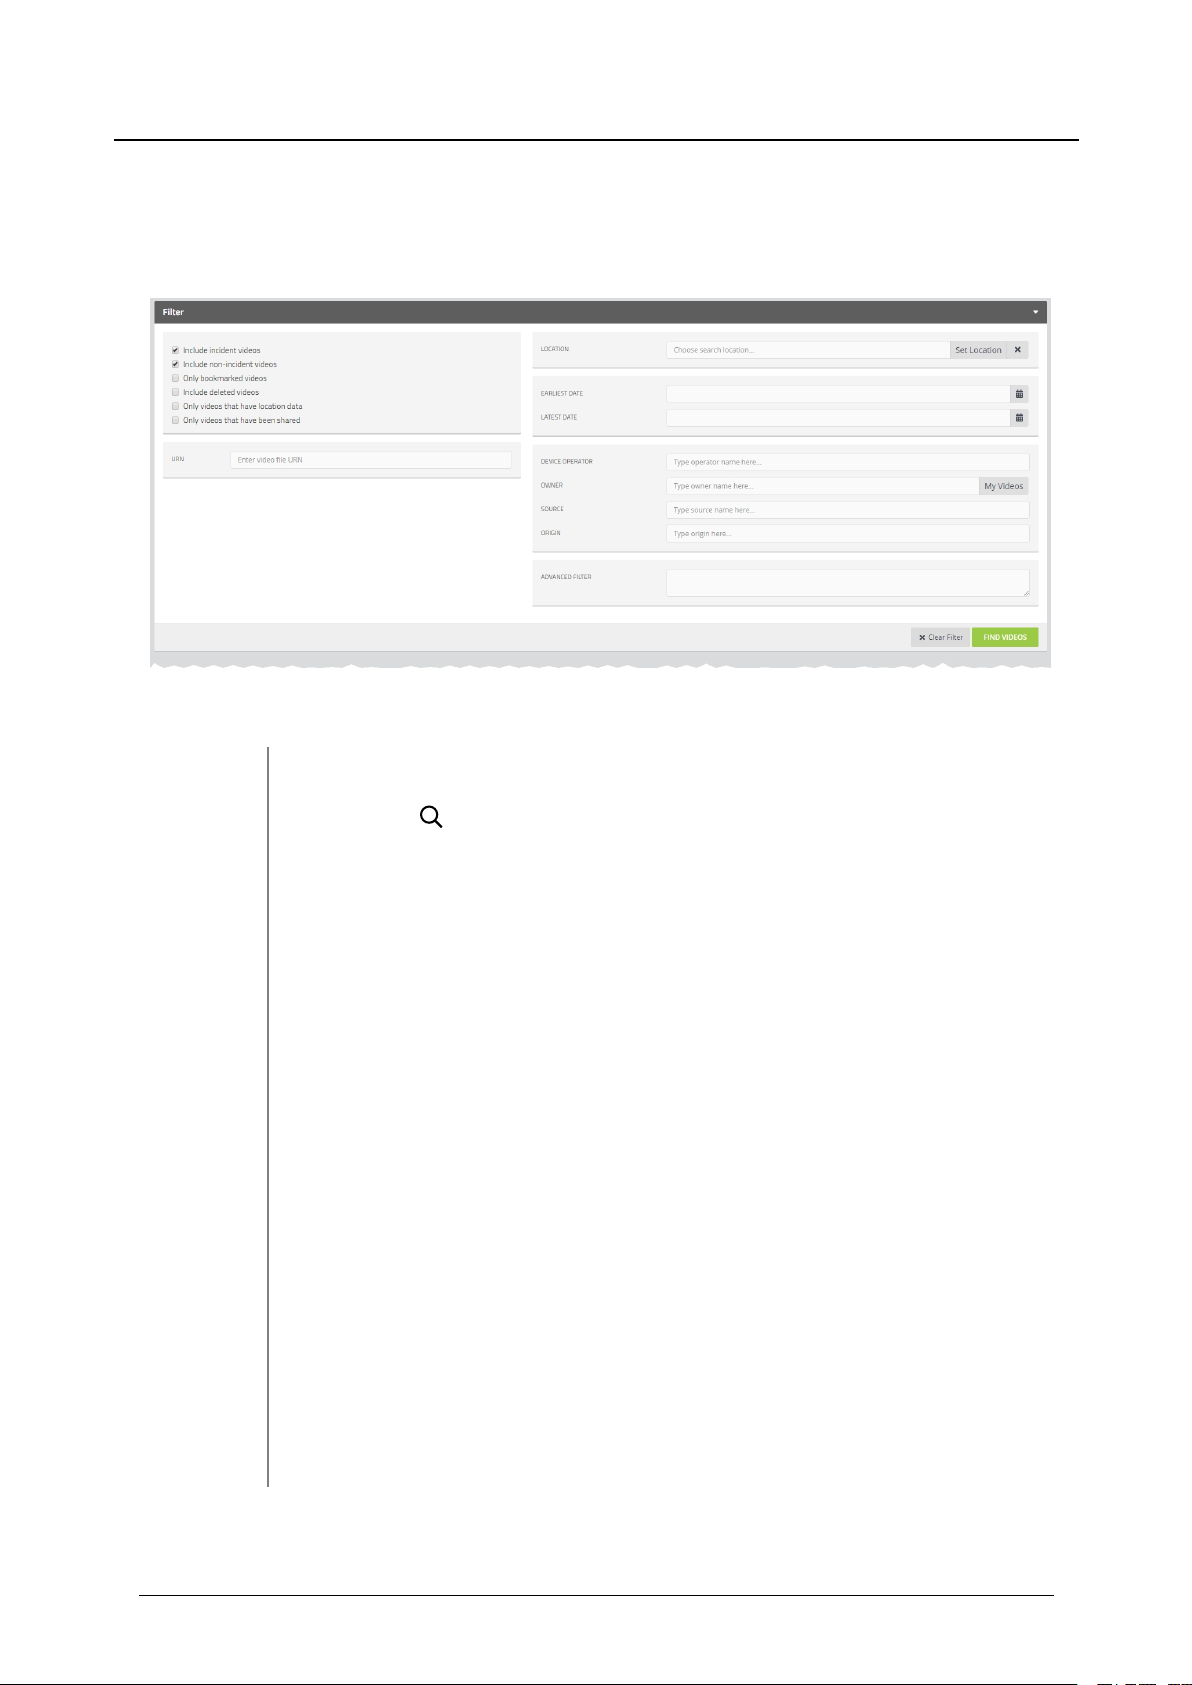
Users can search for individual videos on VideoManager. This is useful if there are too many videos on
VideoManager to scroll through manually.
Videos can be searched by a number of criteria.
1. Navigate to the Videos tab.
2.
Select the Search Videos pane to search for videos by the following fea-
tures:
l Location - search for videos which were recorded in a specific place.
This can be done by clicking Set Location, where users can choose the
relevant location on a map, and set a radius to search (minimum radius
= 75ft, maximum radius = 6.25 miles).
l Earliest Date and Latest Date - search for videos between set earli-
est and latest dates. Users can also choose a specific time of day (in 24
hour format).
l Device operator - search only for videos uploaded by a specified
user.
l Owner - search for videos from a specified owner.
the person who originally recorded the video has left the organisation and their user
has been reassigned to someone else, that user becomes the owner of all their
footage. From the Video Details page, it is also possible to edit who the owner of
the footage is.
Edesix ED-012-134-08
This is usually the same as the device operator, but not always - for instance, if
Click My Videos to search only for videos that the logged-in user owns.
8
Page 9
VideoManager - User Guide
There are also filters which can be checked:
3 Videos - how to...
l Source - search for videos from a specified device (or other source, if
the user has enabled Advanced Import). This should be done by serial
number.
l Origin - this will filter videos by the location to which they were down-
loaded. This could be a DockController, a mobile phone, or the PC on
which VideoManager is running.
To find videos which have been downloaded directly to the user's PC,
enter local into the search box.
l URN - search for a video by its unique Uniform Resource Locator.
l Advanced Filter - users with knowledge of using sequence conditions
can input more advanced search queries here.
l Include incident videos - select whether to include videos which are
part of one or more incidents.
l Include non-incident videos - select whether to include videos
which arenot part of oneor more incidents.
l Only bookmarked videos - select whether only bookmarked videos
areshown.
l Include deleted videos - select whether or not to include deleted
videos.
l Only videos that have location data - select whether only videos
with location data are shown.
l Only videos that have been shared - select whether only videos
that have been shared with other users on the system are shown.
These conditions have a cumulative effect (e.g. if both Only
bookmarked videos and Only videos that have location data
are checked, then only videos which are both bookmarked and have
location data will be shown).
Edesix ED-012-134-08
9
Page 10

VideoManager - User Guide
3. Click Find Videos to display all matching videos below the search options.
4.
Click Clear Filter to clear the search filters.
Users are only ableto search for videos if they have the corresponding permissions
(Access, under the Video Permissions pane).
3 Videos - how to...
l Advanced Filter - users with knowledge of using sequence conditions
can input more advanced search queries here.
Edesix ED-012-134-08
10
Page 11
VideoManager - User Guide
3 Videos - how to...
3.2 Access A Video's Details Pane
The Video Details pane gives the user detailed information about a video. It can be accessed by any user
whose roles allow them to search for or list videos.
To access the pane:
1. Navigate to the Videos tab.
2. Next to the video in question, click > More Details.
Users can find the relevant video by navigating to the My Videos, Shared Videos, or
Supervised Videos panes. They can also search for the relevant video from the
Search Videos pane.
>> For more information, see Search Videos on page 8.
Users can perform a variety of operations from the Video Details pane if they have the relevant
permissions. These operations include:
l Access a video's details pane, where users can watch the video and perform
video actions.
>> For more information, see Watch Videos on page 12.
l Edit video properties (change the device associated with a video, etc.).
>> For more information, see View and Edit Video Properties on page 17.
l Edit asset properties (changethe owner of an asset, etc.).
>> For more information, see View and Edit Asset Properties on page 19.
l Perform video actions (rotate a video, view an audit log, etc.).
>> For more information, see Perform Video Actions on page 21.
l Change the location information for a video.
>> For more information, see Create, Edit and Delete Location Information on
page23.
Edesix ED-012-134-08
11
Page 12
VideoManager - User Guide
3 Videos - how to...
3.2.1 Watch Videos
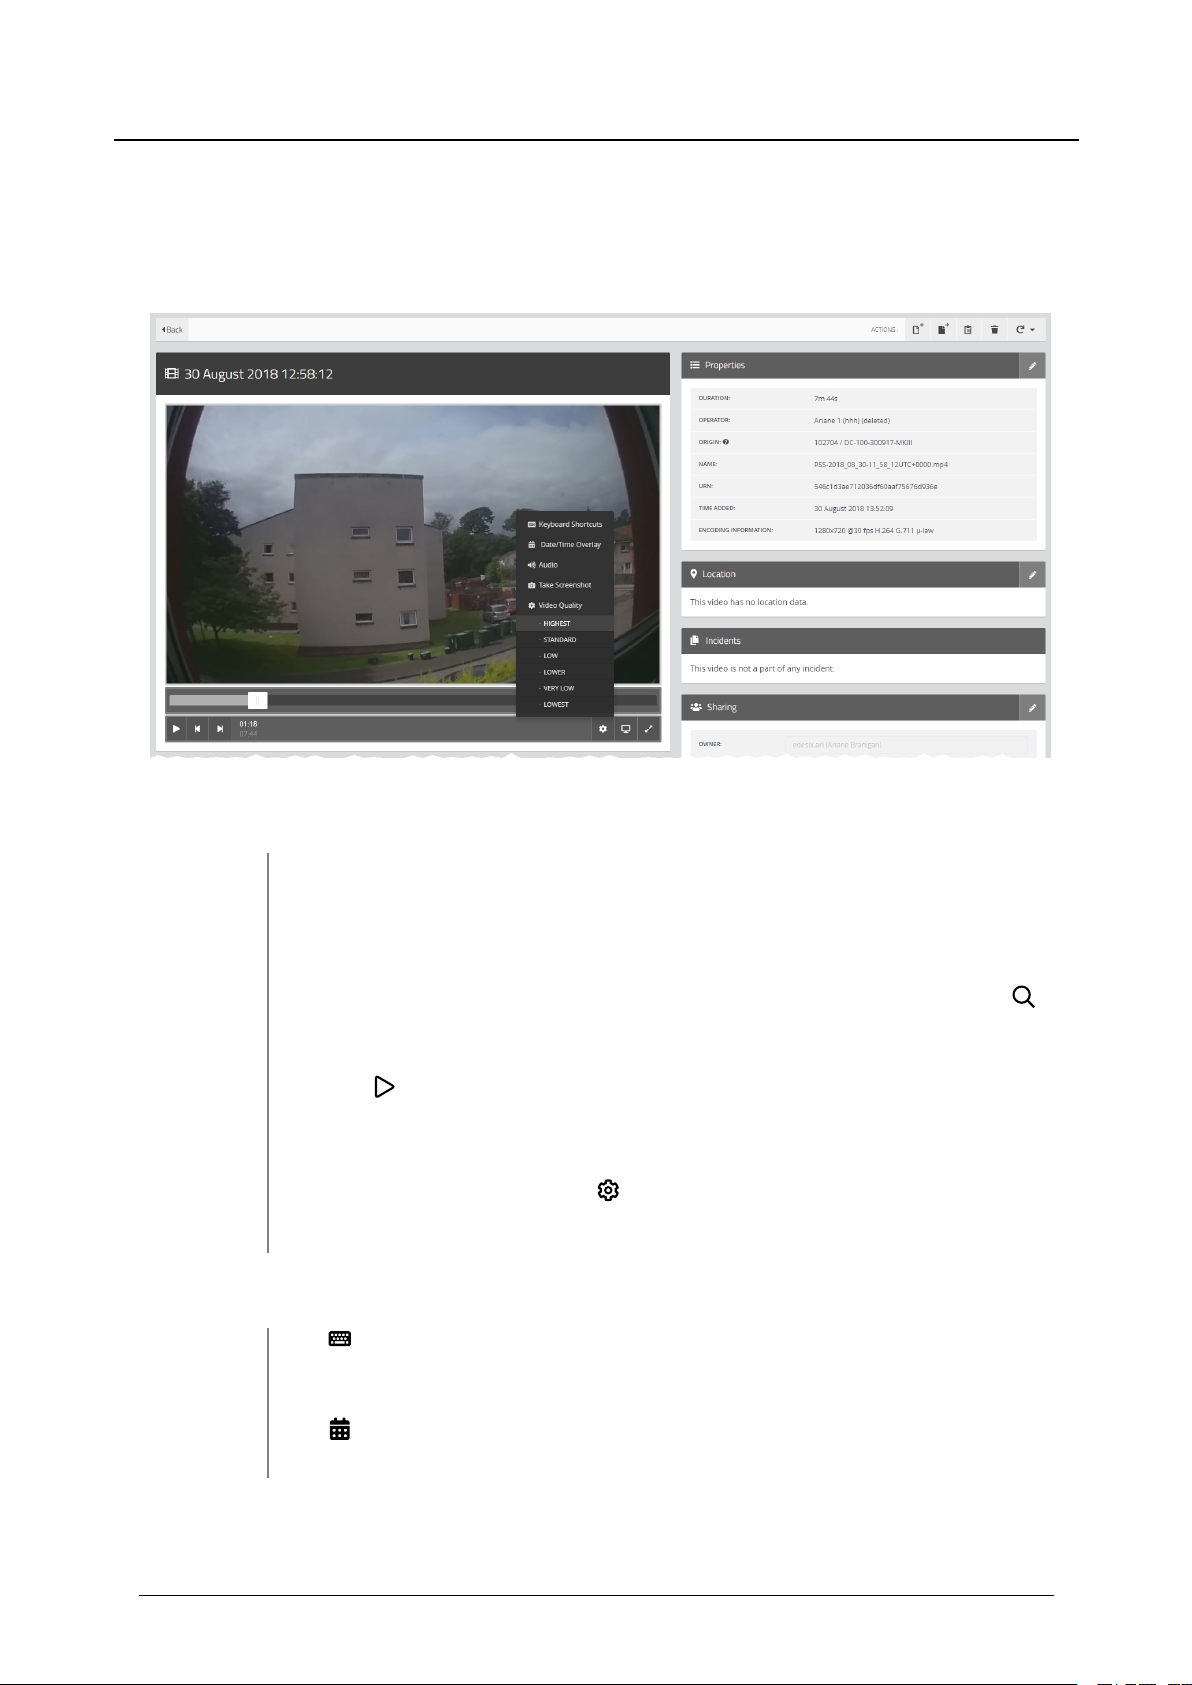
From the More Details pane, users can watch the specified video and configure playback controls - this
allows the user to change the way they view the video.
To watch a video and configure playback controls:
1. Navigate to the Videos tab.
2. Find the relevant video, and click > More Details next to it.
Users can find the relevant video by navigating to the My Videos, Shared Videos, or
Supervised Videos panes. They can also search for the relevant video from the
Search Videos pane.
3.
Click Play Video.
The bottom menu bar will appear.
4.
In the bottom menu bar, click Settings.
The Playback Controls menu will open.
From here, users can perform various actions:
l
Keyboard Shortcuts - Lists certain keyboard shortcuts that users can
take.
l
Date/Time Overlay - Displays or hides the date and time the video was
recorded.
Edesix ED-012-134-08
12
Page 13

VideoManager - User Guide
l
l Take Screenshot - Takes a screenshot of the video in playback.
Audio - Switches audio on or off.
3 Videos - how to...
The screenshot will be automatically downloaded to the user's PC.
l
Video Quality - Changes the quality of the video in playback. This option is
only available to users with the correct permissions.
The default video quality setting is Low. It is recommended that the Highest setting is
only used if there is a good data transfer connection.
Users can also skip through the video using the following controls, found in the bottom menu bar:
l Cursor handle - Use to track backwards and forwards through the video.
l
Play - Plays or pauses the video.
l
Step Backward - Steps backwards through the video one frame at a time.
l
Step Forward - Steps forward through the video one frame at a time.
To put the video in Theatre mode:
1. Navigate to the Videos tab.
2. Find the relevant video, and click > More Details next to it.
Users can find the relevant video by navigating to the My Videos, Shared Videos, or
Supervised Videos panes. They can also search for the relevant video from the
Search Videos pane.
3.
Click Theatre.
This maximises the playback screen to fill the entire active window - clicking this again
will return the video to its normal size.
To put the video in Fullscreen mode:
1. Navigate to the Videos tab.
2. Find the relevant video, and click > More Details next to it.
Users can find the relevant video by navigating to the My Videos, Shared Videos, or
Supervised Videos panes. They can also search for the relevant video from the
Search Videos pane.
3.
Click Fullscreen.
Edesix ED-012-134-08
13
Page 14

VideoManager - User Guide
This maximises the playback screen to fill the entire screen - clicking this again will
return the video to its normal size.
3 Videos - how to...
Edesix ED-012-134-08
14
Page 15
VideoManager - User Guide
3 Videos - how to...
3.2.2 View Assets
If the user has licensed Asset Import, they can view assets in the same way that they would view a video.
However, there are some asset-specfic actions they can take. The actions in question depend on the type of
file that has been imported.
To access playback controls:
1. Navigate to the Videos tab.
2. Find the relevant asset, and click > More Details next to it.
If the user has imported a PDF file, the actions they can take are as follows:
l
View Image - the PDF will open in a new tab, and can be viewed and down-
loaded like normal.
l
Download File - the PDF will be downloaded to the user's default down-
load location.
If the user has imported an audio file, the actions they can take are as follows:
l
Play Video - the audio file will play. Users can skip, pause, and step
through the file like a normal video.
l
Settings - this is similar to the Settings control for videos, but only has
options for Keyboard Shortcuts, Date/Time Overlay, and Audio
Edesix ED-012-134-08
15
Page 16
VideoManager - User Guide
Quality.
>> For more information, see Watch Videos on page 12.
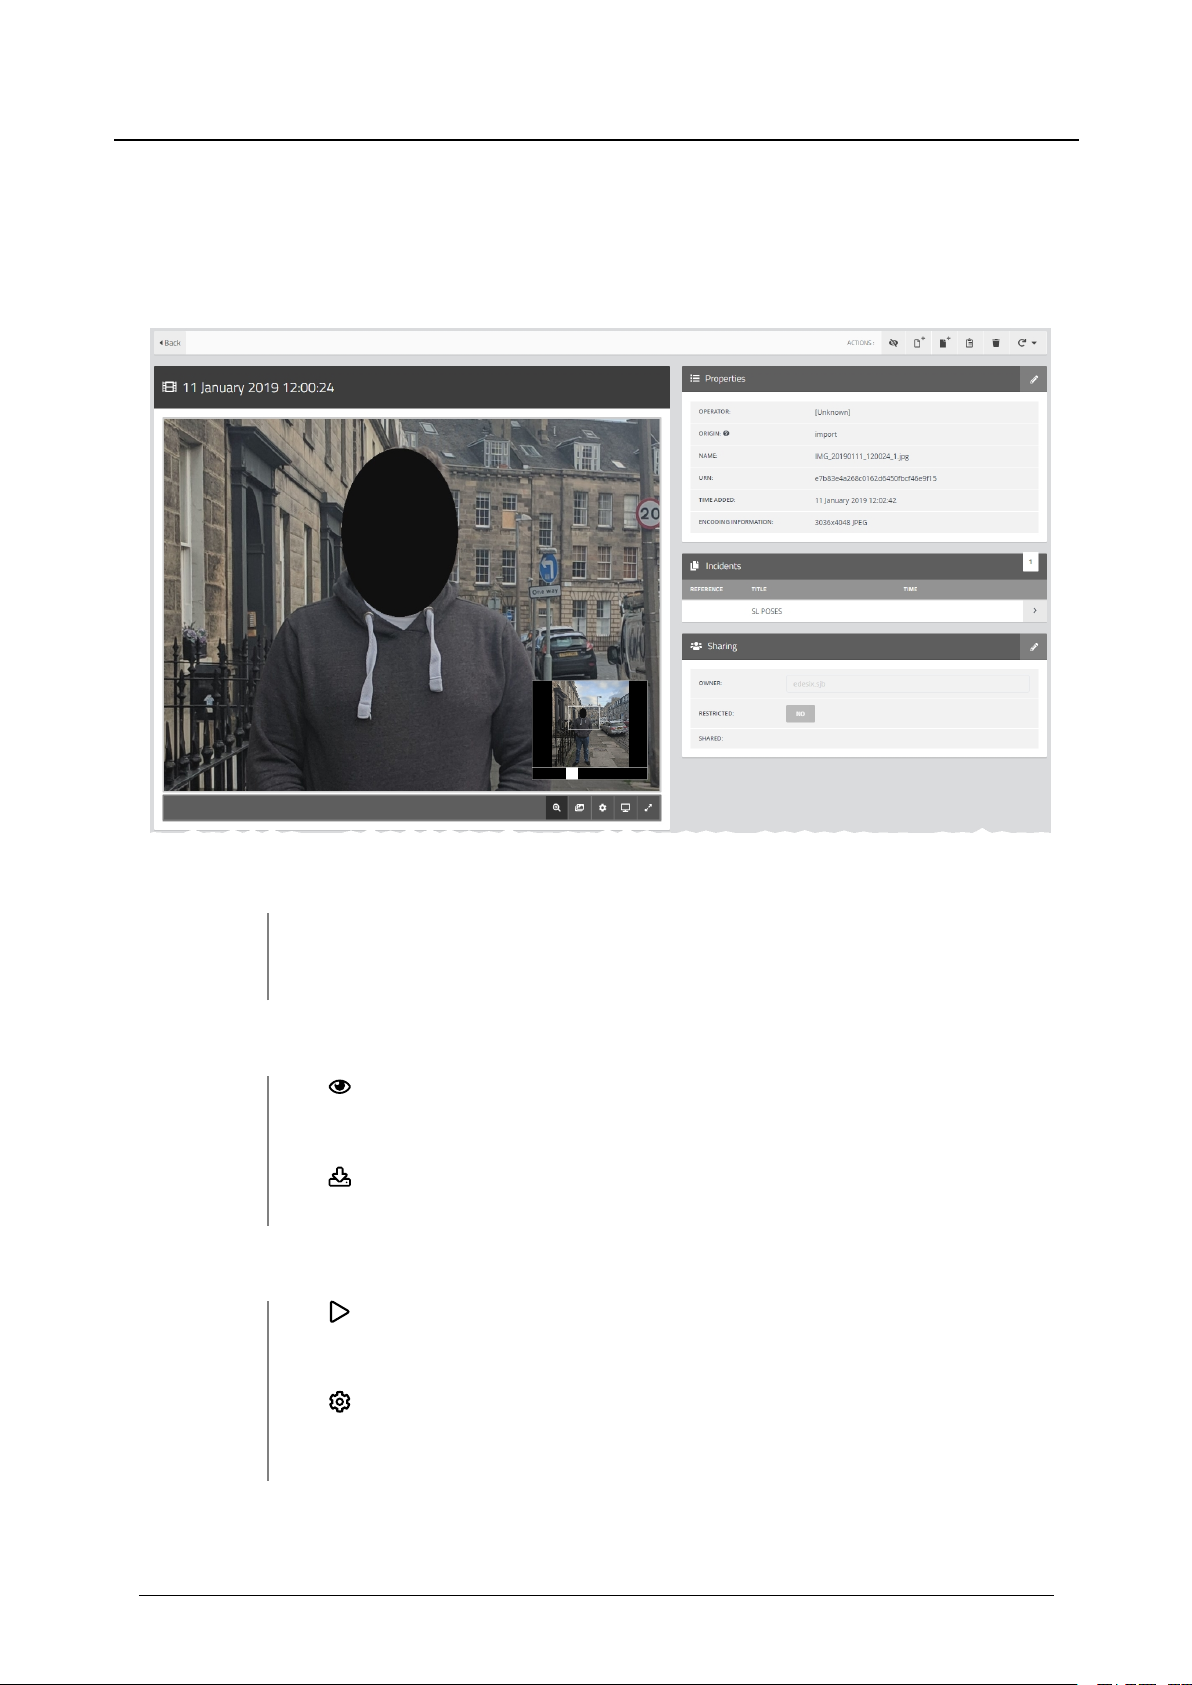
If the user has imported a still image, the actions they can take are as follows:
l View Image - the bottom menu bar will open, and users can perform image-
specific actions on the asset. These are:
1.
Show/Hide zoom panel - toggles whether the zoom panel is visible
or not. If it is set to Visible, the white slider can be used to zoom in and
out on a specific aspect of the still image. The panel can be moved to
focus on different parts of the image.
2.
Preparations - toggles between the original still image and the prepared version.
>> For more information, see Prepare Media on page 27.
3 Videos - how to...
3.
Settings - this is similar to the Settings control for videos, but only
has options for Keyboard Shortcuts and Take Screenshot.
The Theatre and Fullscreen controls function as normal.
>> For more information, see Watch Videos on page 12.
If the user has imported a file whose file type is different from those mentioned above, the action they
can take is as follows:
l
Download File - the file will be downloaded to the user's default down-
load location.
Edesix ED-012-134-08
16
Page 17
VideoManager - User Guide
3.2.3 View and Edit Video Properties
Users with sufficient permissions can edit video properties.
To view the properties of a video:
3 Videos - how to...
1. Navigate to the Videos tab.
2. Find the relevant video, and click > More Details next to it.
Users can find the relevant video by navigating to the My Videos, Shared Videos, or
Supervised Videos panes. They can also search for the relevant video from the
Search Videos pane.
3.
In the Properties pane, the following information will be displayed:
l Duration: - the length of the clip.
l Operator: - the name of the operator who filmed the footage.
l Origin: - the device on which the video was filmed.
l URN: - the unique URN assigned to this video.
l Time added: - the time and date of when the video was uploaded to
VideoManager.
l Resolution: - the FPS of the video.
Users can edit some of a video's properties. To do so:
1. Navigate to the Videos tab.
2. Find the video in question, and click > More Details next to it.
Edesix ED-012-134-08
17
Page 18

VideoManager - User Guide
Users can find the relevant video by navigating to the My Videos, Shared Videos, or
Supervised Videos panes. They can also search for the relevant video from the
Search Videos pane.
3.
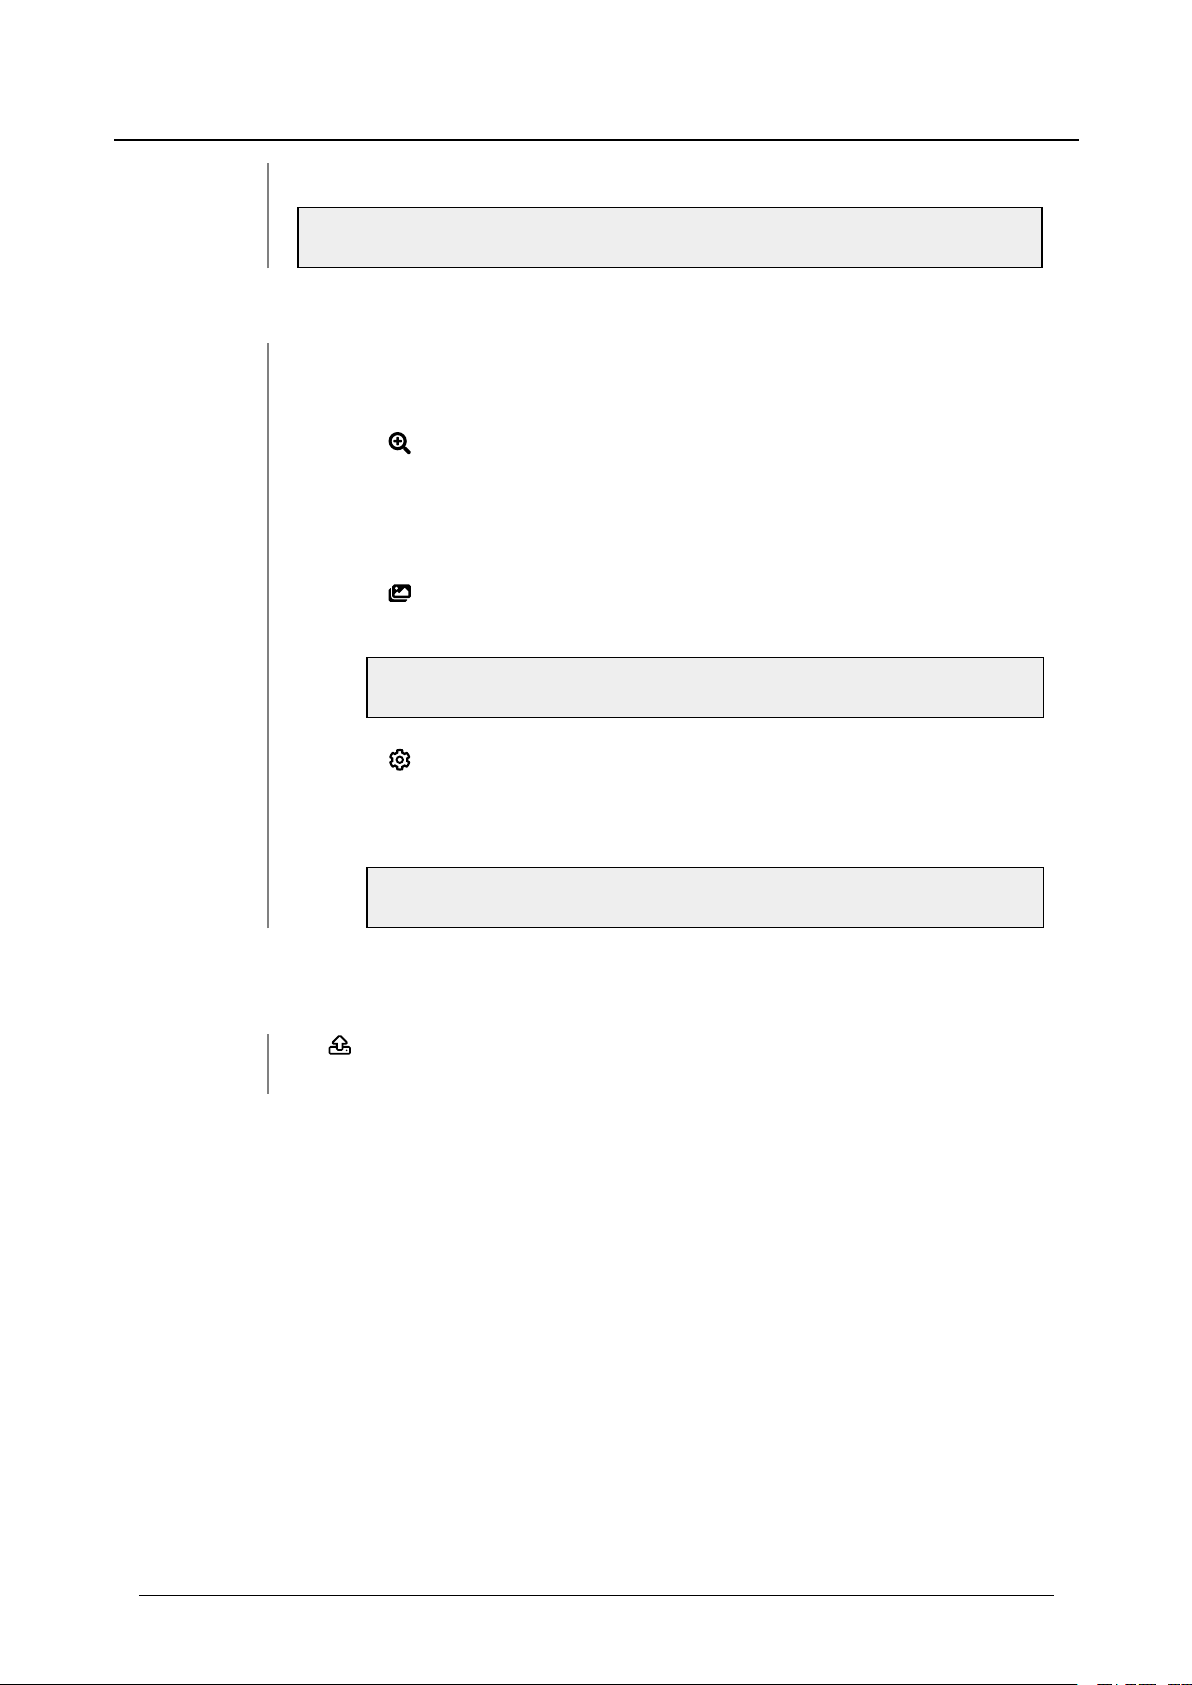
In the Properties pane, click Edit Video Properties.
4. Here, users will be able to edit:
3 Videos - how to...
l Operator Name - who recorded the video.
l Device Name - which device recorded the video.
l
Start Time - when the video was initially added to VideoManager.
This either means when the device it was filmed on was docked, or
when it was uploaded from the user's PC. This does not change when
the video was actually recorded.
l Any user-defined media fields which have been created.
5. Click save changes.
Edesix ED-012-134-08
18
Page 19
VideoManager - User Guide
3.2.4 View and Edit Asset Properties
Users with sufficient permissions can edit asset properties.
To view the properties of an asset:
3 Videos - how to...
1. Navigate to the Videos tab.
2. Find the relevant asset, and click > More Details next to it.
3.
In the Properties pane, the following information will be displayed:
l Operator: - the name of the operator who created the asset.
l Origin: - the device on which the video was filmed.
l URN: - the unique URN assigned to this video.
l Time added: - the time and date of when the video was uploaded to
VideoManager.
Users can edit some of an asset's properties. To do so:
1. Navigate to the Videos tab.
2. Find the asset in question, and click > More Details next to it.
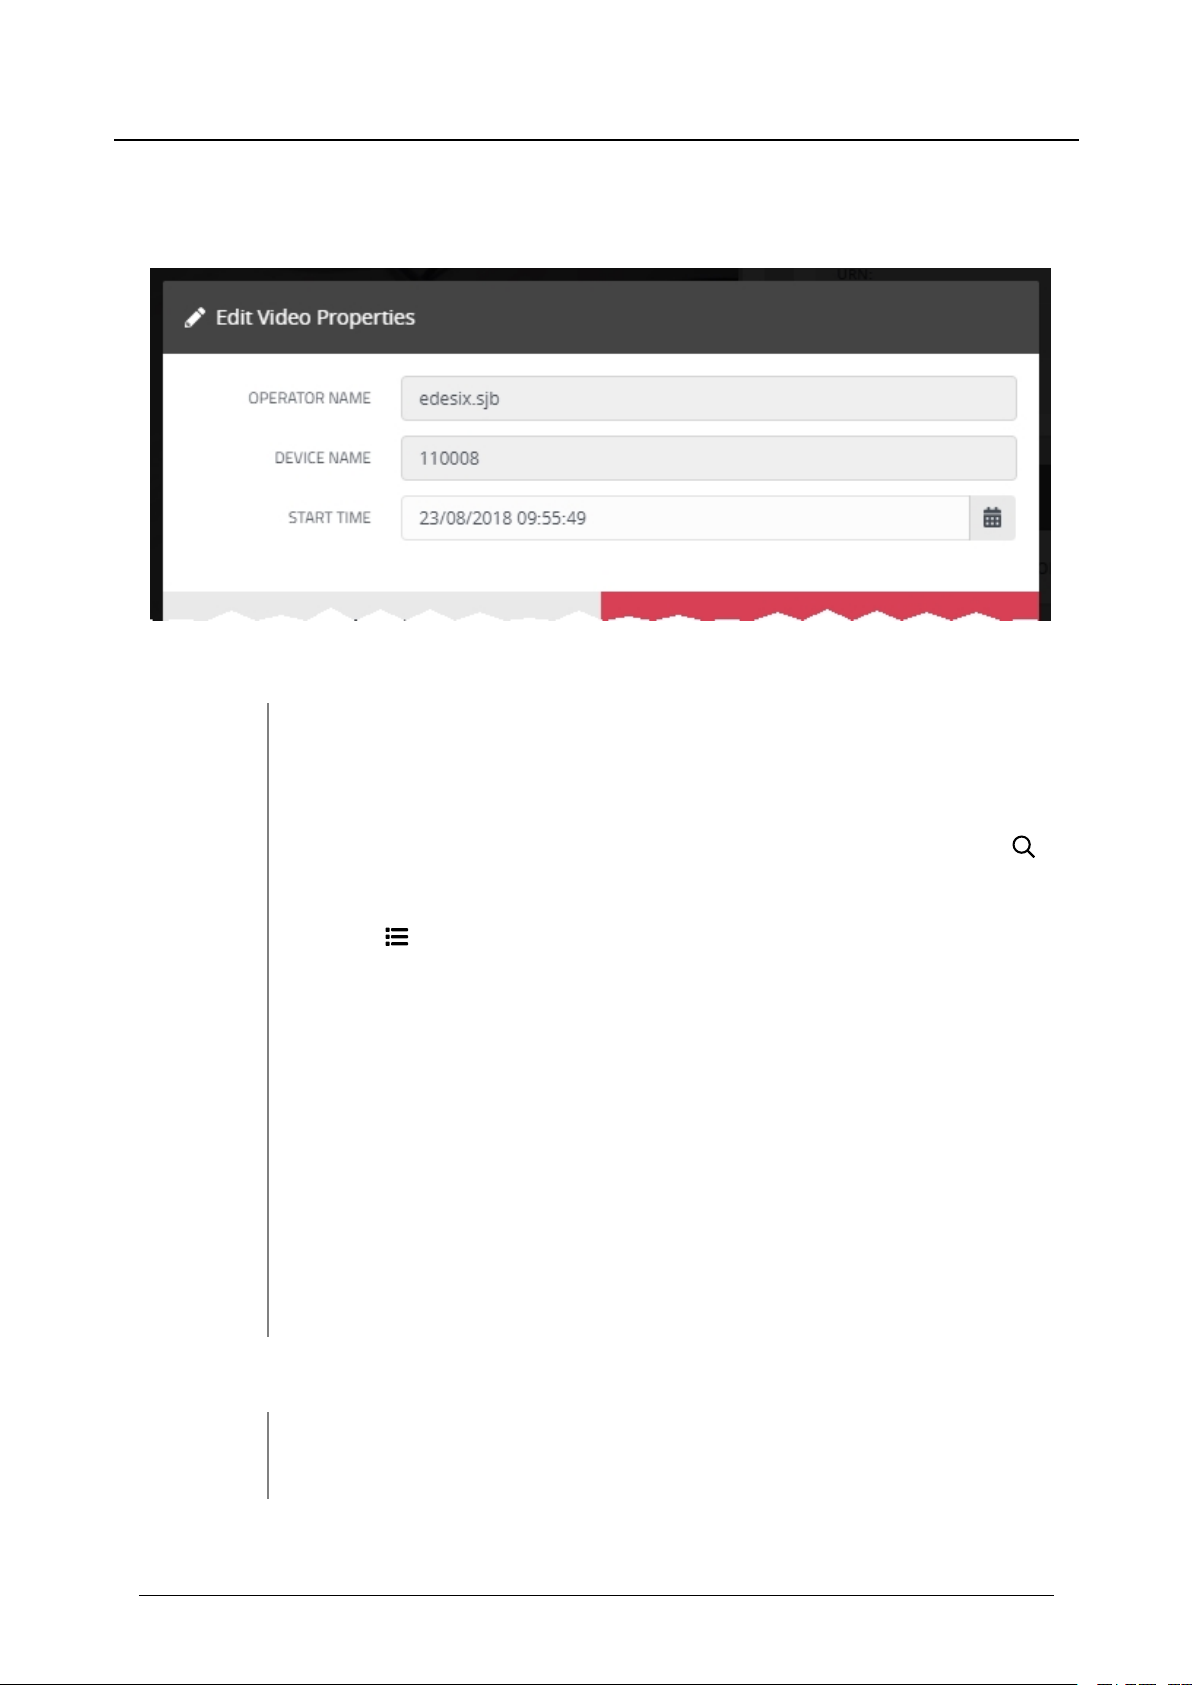
3.
In the Properties pane, click Edit Video Properties.
4. Here, users will be able to edit:
Edesix ED-012-134-08
l Operator Name - who owns the asset.
l Device Name - which device is associated with the asset.
19
Page 20

VideoManager - User Guide
5. Click save changes.
l
Start Time - when the asset was imported to VideoManager.
l Any user-defined media fields which have been created.
3 Videos - how to...
Edesix ED-012-134-08
20
Page 21

VideoManager - User Guide
3 Videos - how to...
3.2.5 Perform Video Actions
VideoManager gives users the option to perform actions on their videos from the More Details pane.
There are five actions which sufficiently privileged users can perform on videos from this pane: Create
New Incident, Add Video To Existing Incident, View Video Audit Logs, Delete Video, and flip
videos (Rotate clockwise, Rotate anti-clockwise, Horizontal flip).
To create a new incident including the video:
1. Navigate to the Videos tab.
2. Find the relevant video, and click > More Details next to it.
Users can find the relevant video by navigating to the My Videos, Shared Videos, or
Supervised Videos panes. They can also search for the relevant video from the
Search Videos pane.
3.
Click Create New Incident.
This will create an incident containing the video.
>> For more information, see Create, Edit and Delete Incidents on page 34
To add a video to an already-existing incident:
1. Navigate to the Videos tab.
2. Find the relevant video, and click > More Details next to it.
Users can find the relevant video by navigating to the My Videos, Shared Videos, or
Supervised Videos panes. They can also search for the relevant video from the
Search Videos pane.
3.
Click Add Video To Existing Incident.
4. Select either the My Incidents, Shared Incidents, Supervised Incidents or
Search Incidents tab.
Edesix ED-012-134-08
21
Page 22

VideoManager - User Guide
5. Click Add video to this Incident next to the incident the video will be added
to.
To view the video's audit log:
1. Navigate to the Videos tab.
2. Find the relevant video, and click > More Details next to it.
Users can find the relevant video by navigating to the My Videos, Shared Videos, or
Supervised Videos panes. They can also search for the relevant video from the
Search Videos pane.
3.
Click View Video Audit Log.
Here, the audit log can be filtered to only show certain actions performed on the video.
To delete a video:
1. Navigate to the Videos tab.
3 Videos - how to...
To flip a video:
2. Find the relevant video, and click > More Details next to it.
3.
Click Delete Video.
If the video is part of an incident, it cannot be deleted until it has either been removed
from all incidents manually, or the incidents themselves have been deleted.
1. Navigate to the video which will be flipped.
2. Find the relevant video, and click > More Details next to it.
Users can find the relevant video by navigating to the My Videos, Shared Videos, or
Supervised Videos panes. They can also search for the relevant video from the
Search Videos pane.
3.
Click Rotate.
4. Choose whether the video will be flipped to the left, to the right, or horizontally.
Apart from audit logs, it is possible to perform these actions from the Search Videos page as
well.
Edesix ED-012-134-08
22
Page 23
VideoManager - User Guide
3 Videos - how to...
3.2.6 Create, Edit and Delete Location Information
Sufficiently privileged users can add location data to VideoManager videos. This is useful if the original
video was recorded on a device without GPS, and the user wants to add location data retroactively. Users
cannot edit location information that was recorded alongside a video.
To add location information to a video, or edit previously existing location information:
1. Navigate to the Videos tab.
2. Find the relevant video, and click > More Details next to it.
Users can find the relevant video by navigating to the My Videos, Shared Videos, or
Supervised Videos panes. They can also search for the relevant video from the
Search Videos pane.
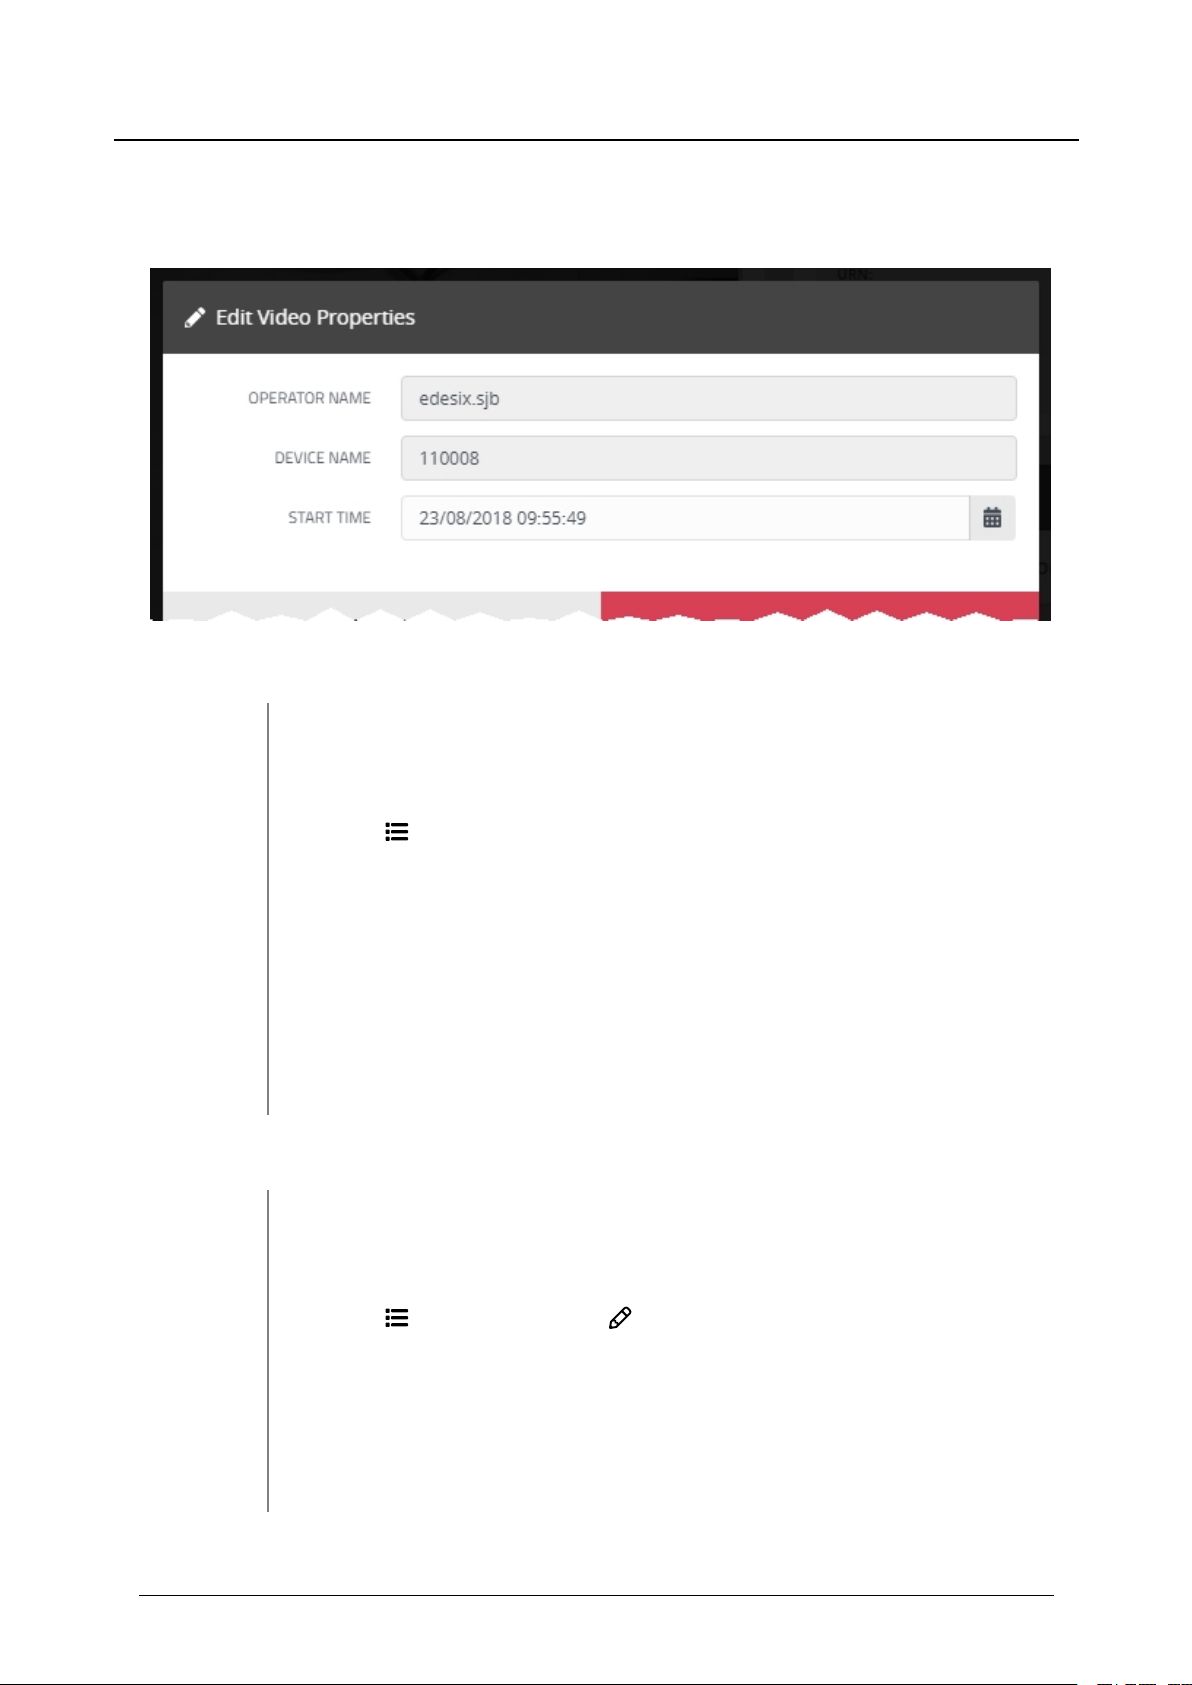
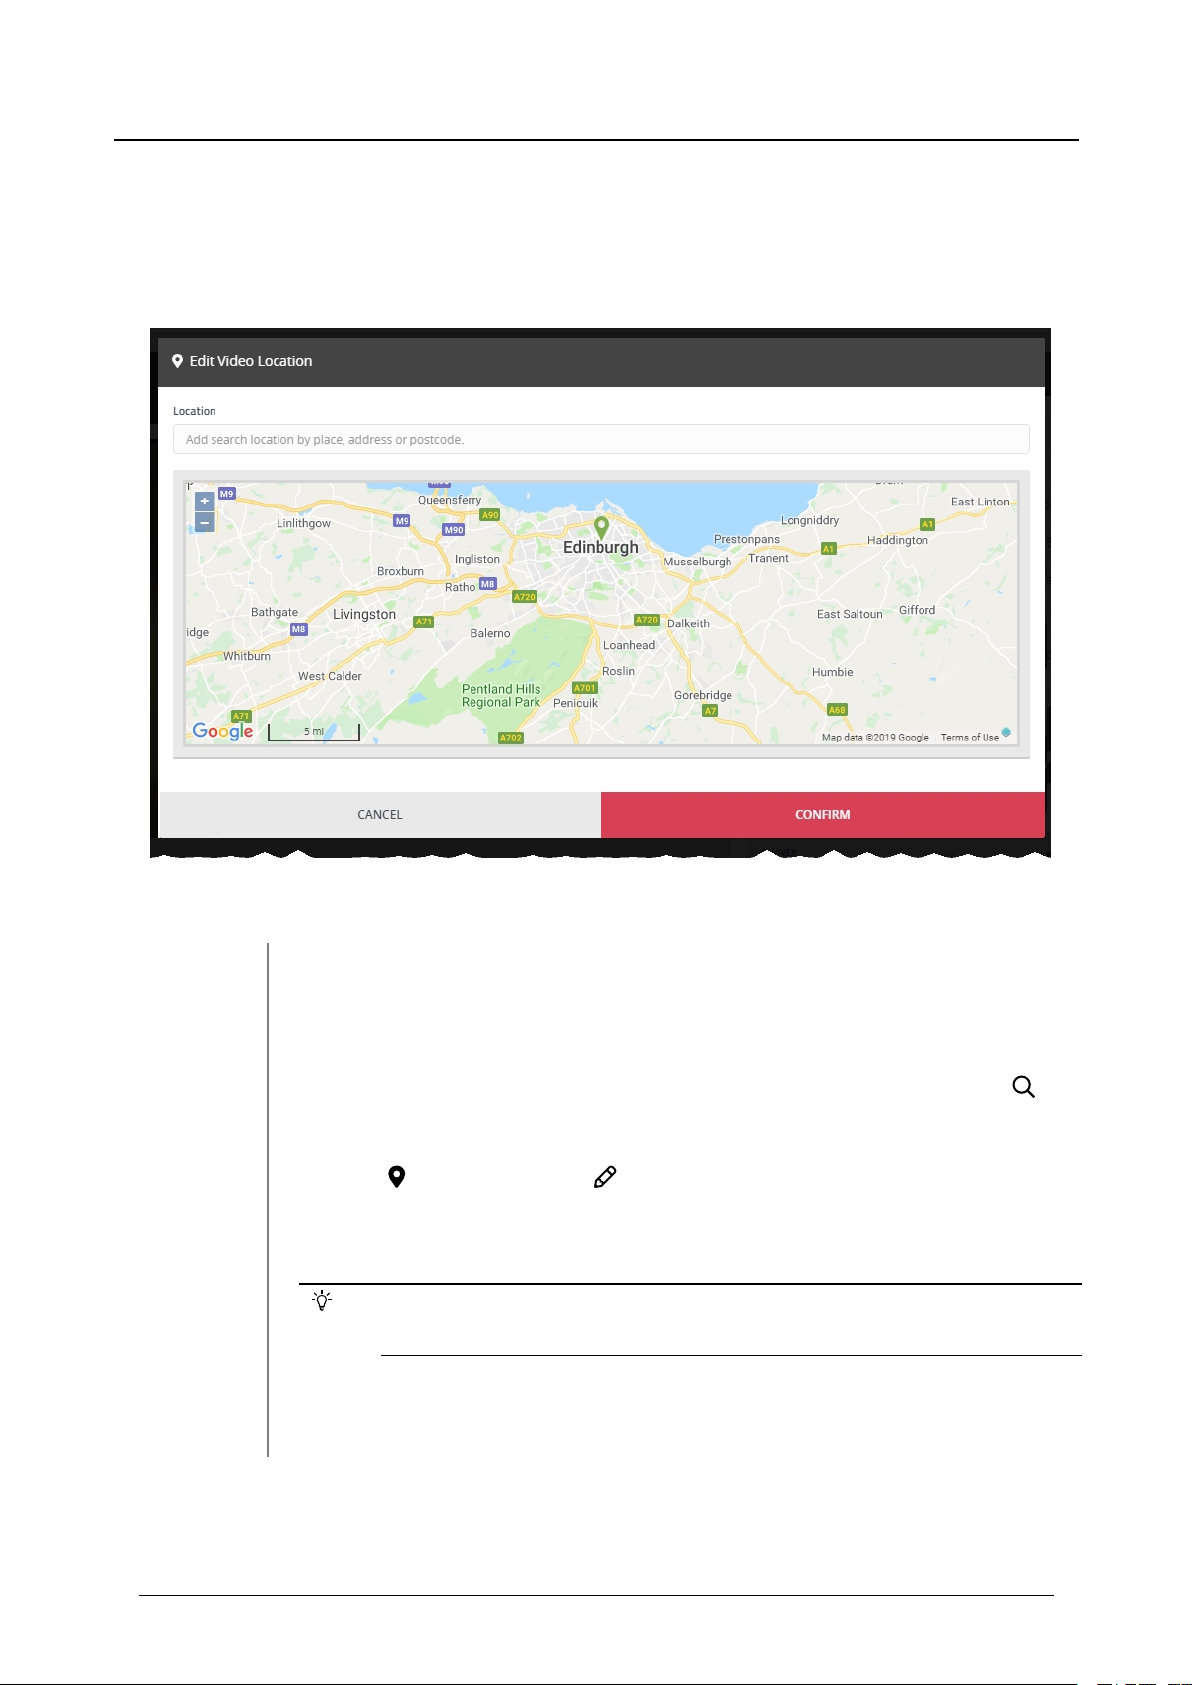
3.
In the Location pane, click Edit Location.
4. Click and drag the map to position the marker at the desired location.
If the user has chosen a lookup provider from the Maps pane, in the Admin
tab, they can also manually search for a location.
5. Click confirm to save.
Edesix ED-012-134-08
23
Page 24
VideoManager - User Guide
3 Videos - how to...
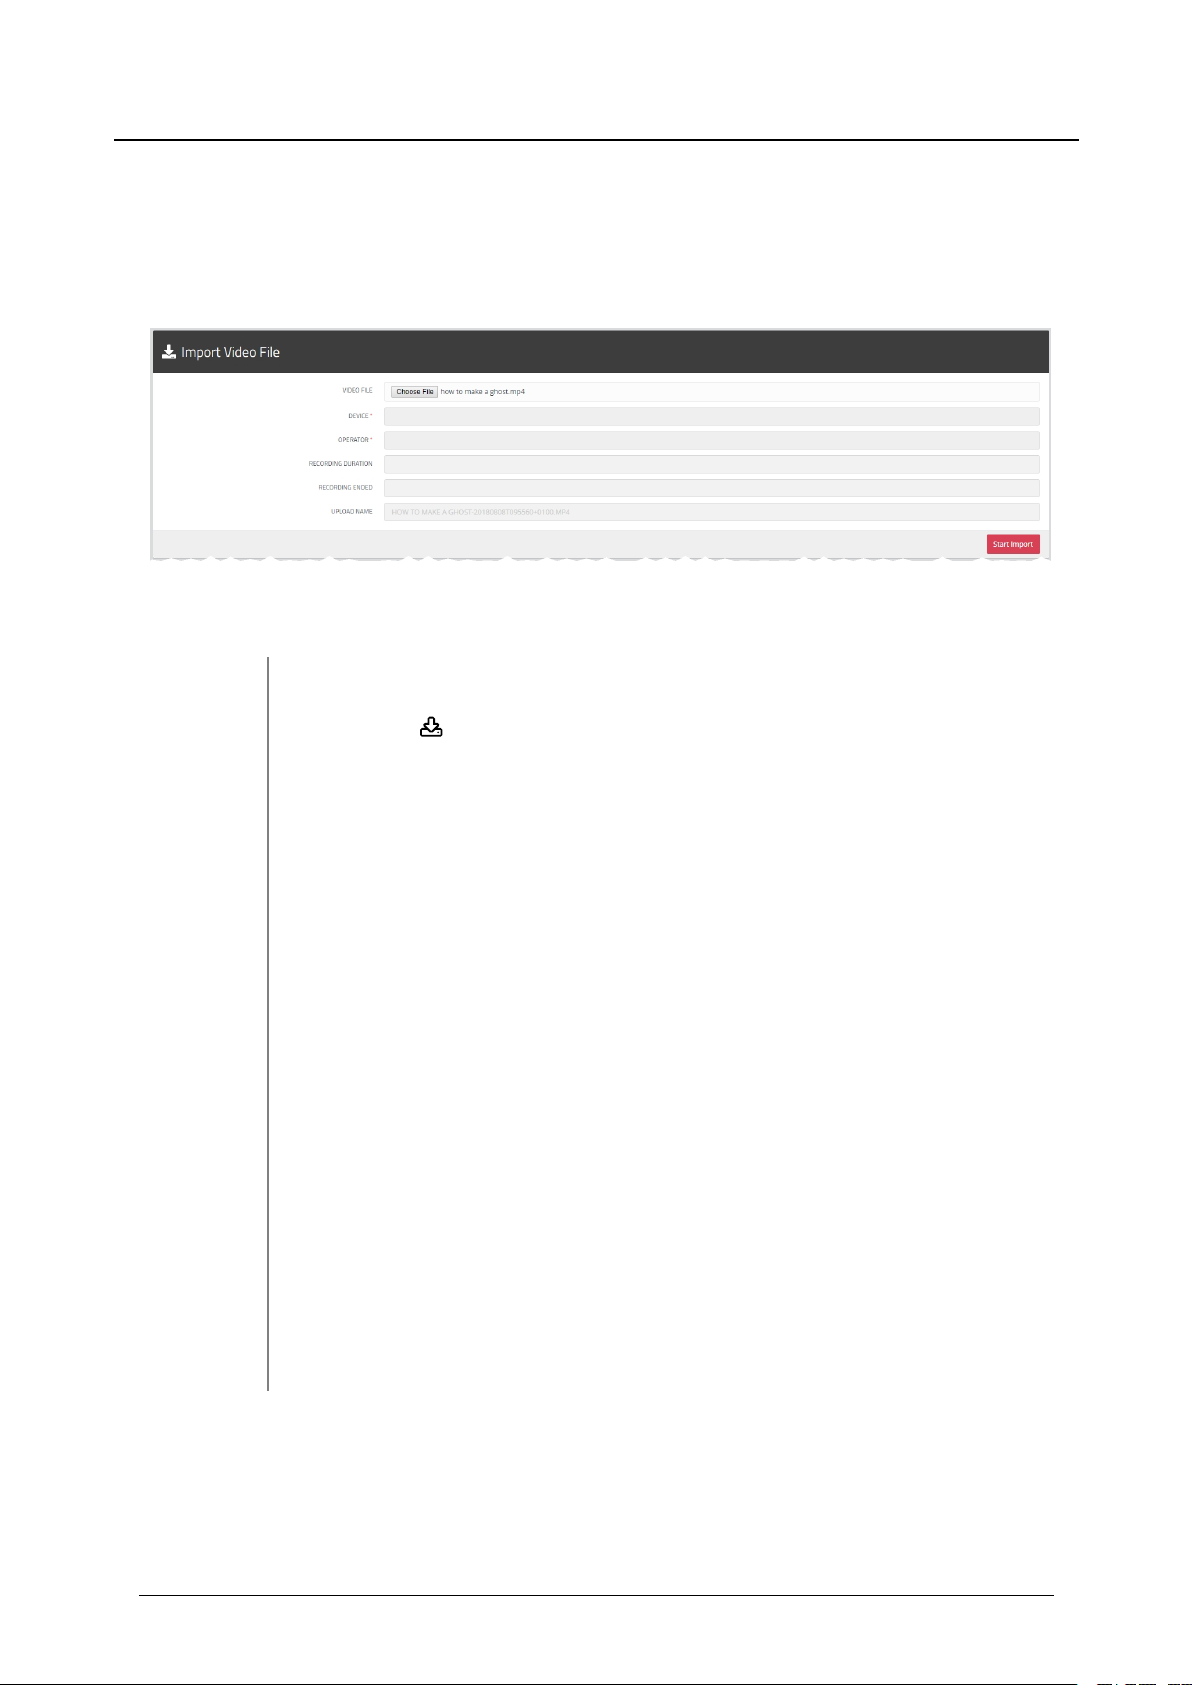
3.3 Import Videos
Users with the Import licence can import videos to VideoManager. This may be useful if there are videos
from other camera systems that users wish to integrate with VideoManager, or if there are relevant external
videos which should be added to an incident.
To import a video:
1. Navigate to the Videos tab.
2.
Select the Import pane.
3. Click Choose File.
Users should select the relevant video file.
4. Users will have the chance to enter:
l Device - which device will beassociated with this video.
Users should enter the relevant device's serial number.
l Operator - which operator will be associated with this video.
l Recording Duration - this is the length of the video, and cannot be
edited.
l Recording Ended - this is when the video ended, and cannot be
edited.
l Upload Name - this will be the name the video has on the user's PC,
and cannot be edited.
5. Click Start Import.
Edesix ED-012-134-08
24
Page 25
VideoManager - User Guide
3 Videos - how to...
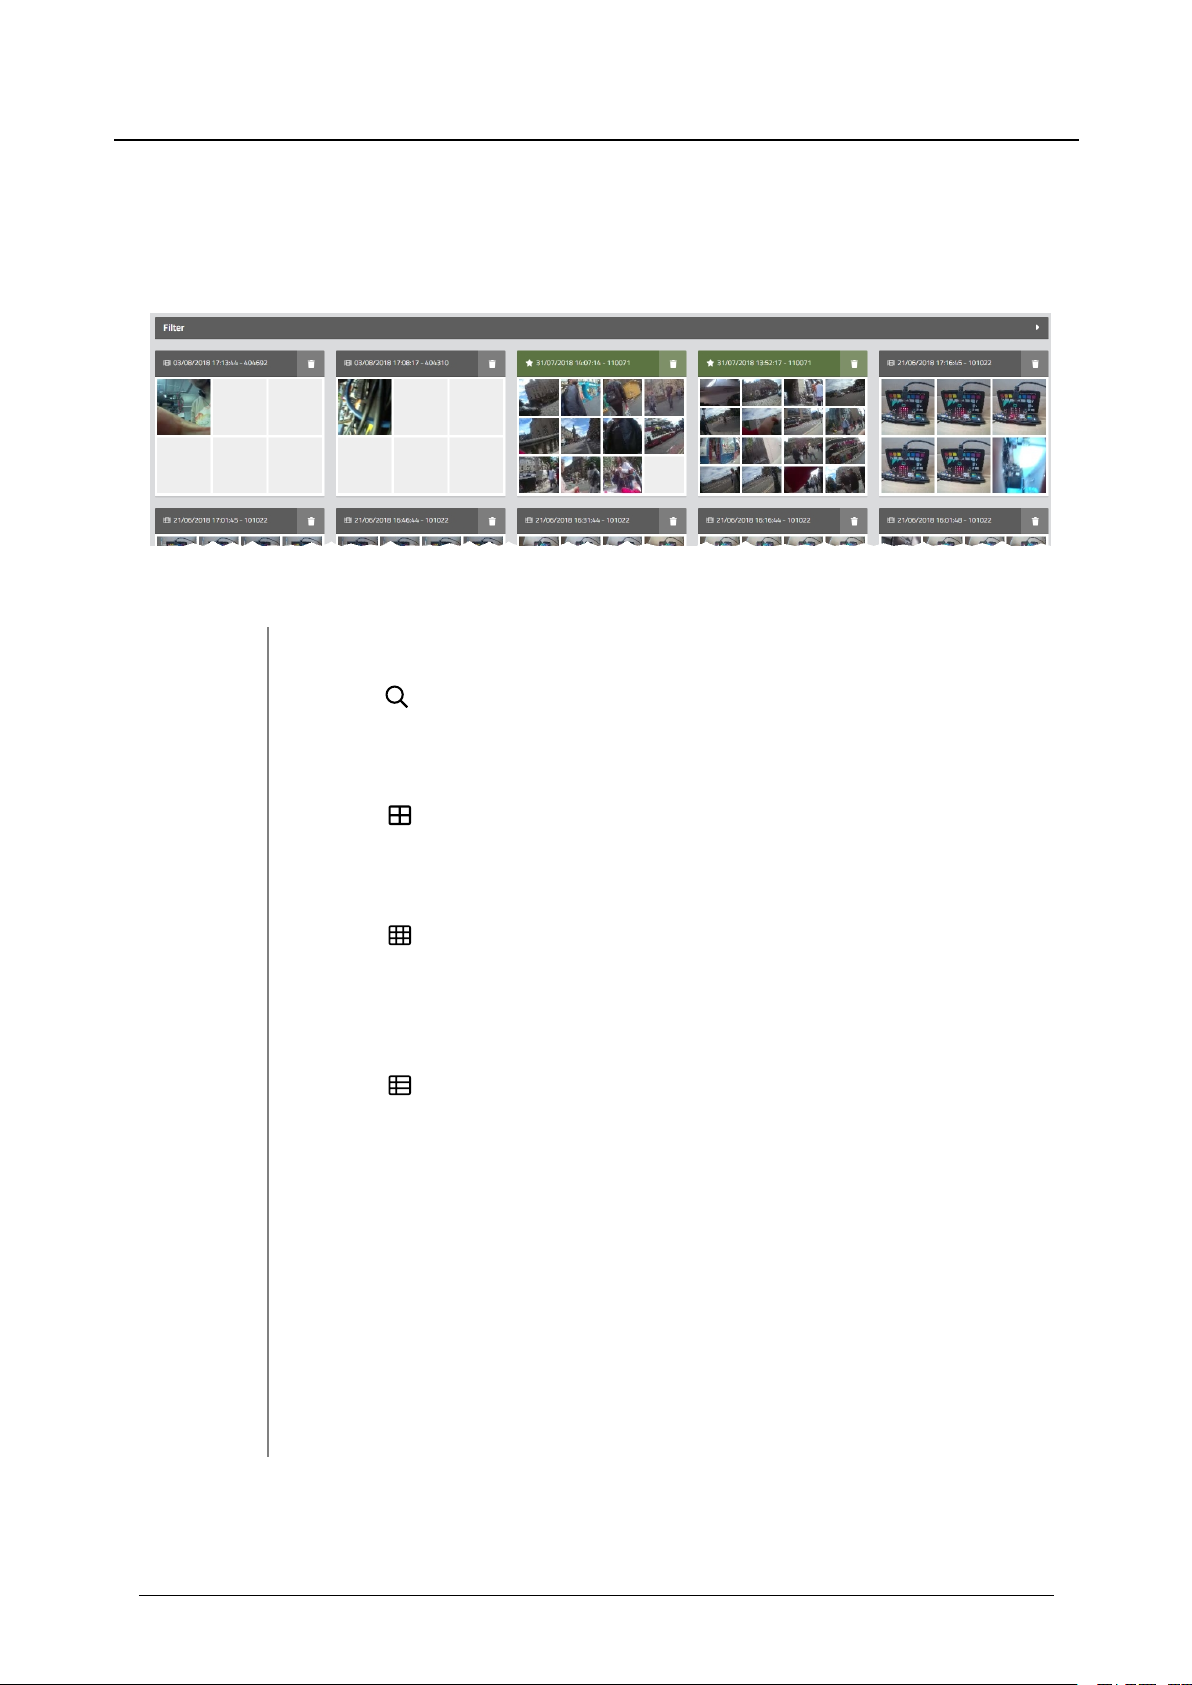
3.4 Change Viewing Options
Users can change video presentation options. This helps users to locate videos faster, and is done from
the Videos tab. Users can only change the preferences for their own session on VideoManager.
To change how videos are presented:
1. Navigate to the Videos tab.
2.
Select Search Videos pane.
3. Click the relevant viewing option from the top right-hand menu.
l
Large - this displays the first frame of each video, and allows video
playback. Basic information about the video is displayed, with a list of
the Video Actions available for this video.
l
Gallery - this displays each video in a grid. Each image in the grid is
a still frame from one minute of the video. Click an image to jump to
that point in the video. No other information is displayed, and the only
action that can be performed is to delete the video.
l
List - this displays detailed information about each video:
l Video status (whether the video has been uploaded from a site)
l When the video was recorded (date and
hours/minutes/seconds).
Edesix ED-012-134-08
l Duration of the video (hours/minutes/seconds).
l Operator (who recorded the video).
l Device (which camera recorded the video, and its serial num-
ber).
25
Page 26
VideoManager - User Guide
This preference will be reset to Large when the user logs out.
To change how videos are ordered:
1. Navigate to the Videos tab.
3 Videos - how to...
l Number of incidents which use this video - clicking on this will
either open the relevant incident (if the video only belongs to
one) or present the list of incidents (if the video belongs to
more than one).
l Video Actions available for this video.
>> For more information, see Perform Video Actions on page
21
2.
Select Search Videos pane.
3. Click the relevant filter from the top right-hand dropdown menu.
l Recording Date - this will present videos from most recently recor-
ded to least recently recorded.
l Date Added - this will present videos from most recently uploaded to
least recently uploaded.
Edesix ED-012-134-08
26
Page 27
VideoManager - User Guide
3 Videos - how to...
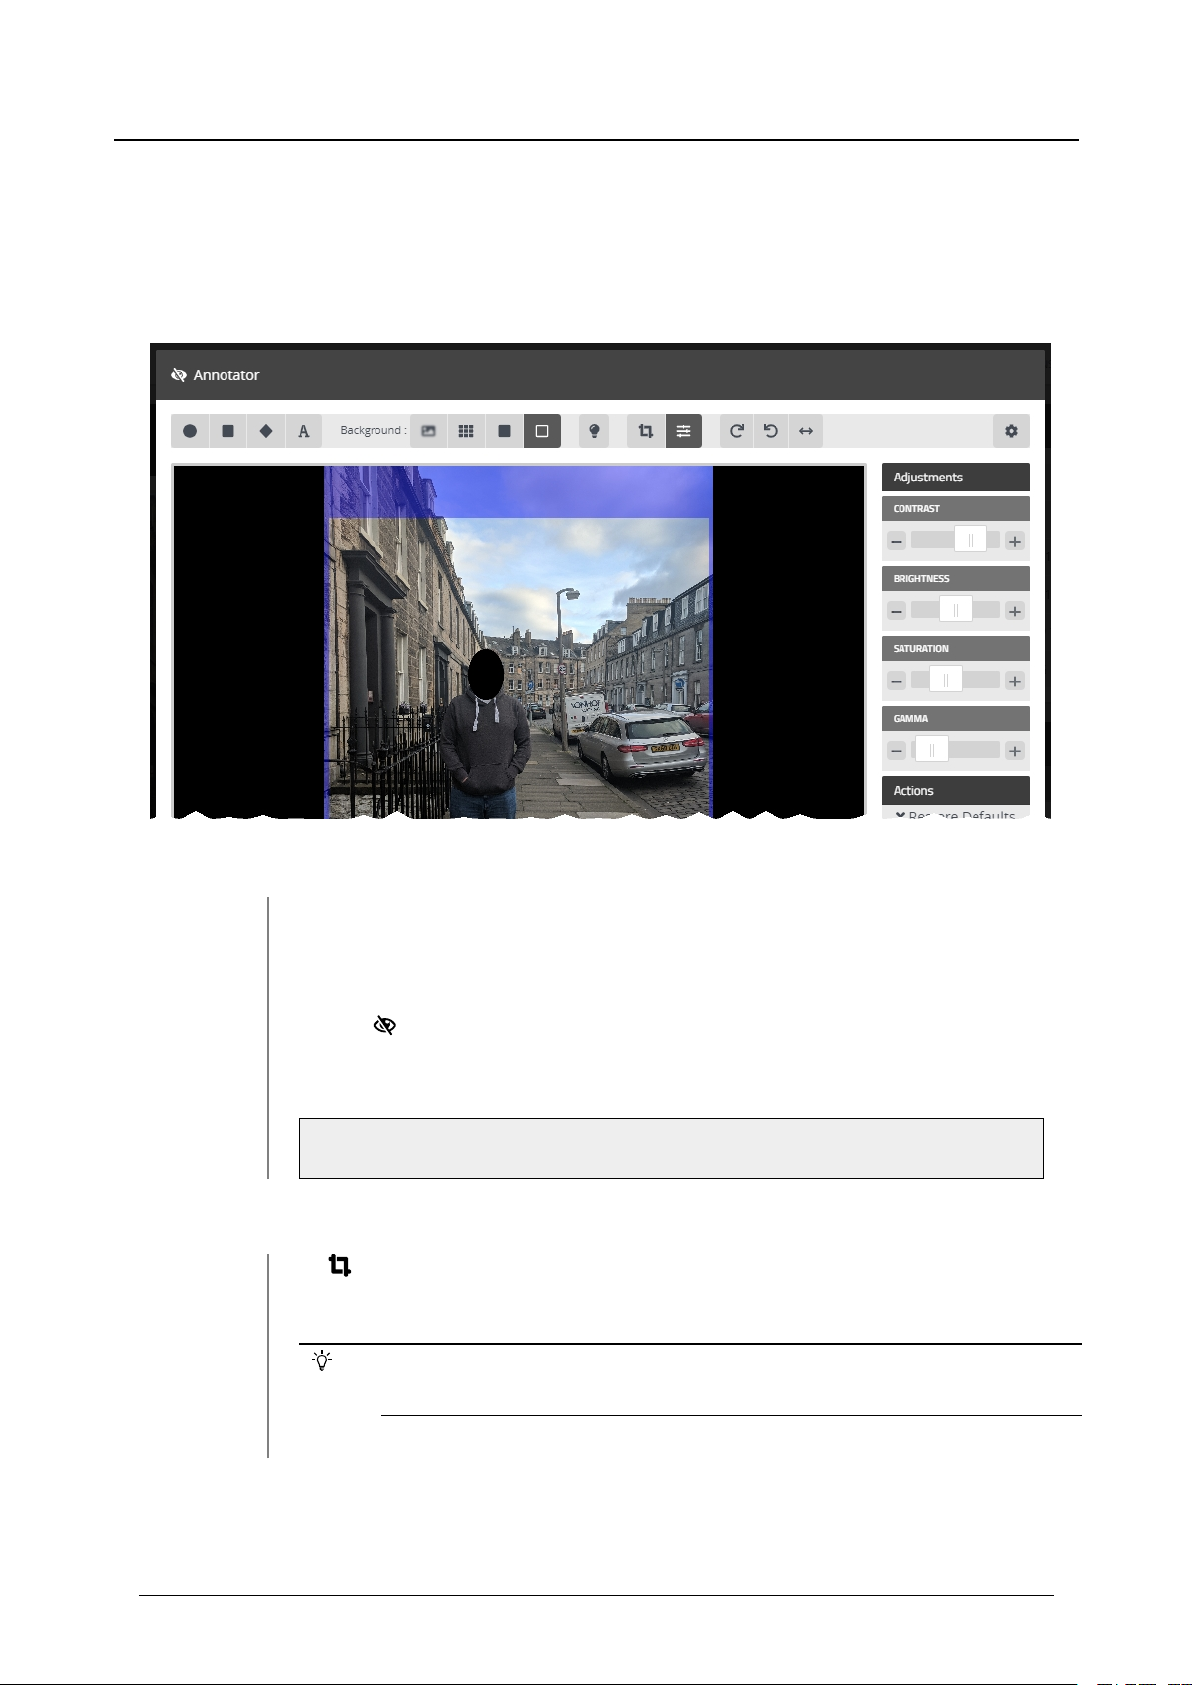
3.5 Prepare Media
Media Preparations is a licensed feature that gives users the ability to prepare still images in the same
manner that they would redact footage in an incident - however, unlike footage, still images do not need to
be part of an incident in order to be prepared.
To prepare media:
1. Navigate to the Videos tab.
2. Find the relevant asset, and click > More Details next to it.
3.
Click Prepare Media.
4. The user can now prepare media in the same way they would redact a video.
>> For more information, see Redact a Video on page 39.
There are some image-exclusive actions that users can take when preparing media. These are:
l
Crop the image to size - draw the square around the subject of the image
- anything in the blue section will not be featured in the finished media.
The cropped version of the image will not be shown until the user is finished
with their preparation and clicks confirm.
Edesix ED-012-134-08
27
Page 28

VideoManager - User Guide
l
right-hand menu. These sliders control the following:
Users can click Restore Defaults to restore the default settings for each slider.
3 Videos - how to...
Adjust the image - if the user clicks this, a set of sliders will appear in the
l
Contrast
l
Brightness
l
Saturation
l
Gamma
Edesix ED-012-134-08
28
Page 29

VideoManager - User Guide
3 Videos - how to...
3.6 Bulk Edit Videos
Bulk edits allow users to perform actions on multiple videos at once. This is useful if either there are too
many videos to manually edit/delete, or if the user has enabled their VideoManager to act as a Central
VideoManager. In the second case, every video held in connected sites can be automatically fetched in bulk.
This means that they will become editable in the Central VideoManager and unviewable in the original sites.
To bulk edit videos:
1. Navigate to the Videos tab.
2.
Select the Search Videos pane.
3. Filter the devices as necessary, and click Find Videos.
>> For more information, see Search Videos on page 8.
4. Click Bulk Edit.
The bulk edit user interface appears. The following actions are now possible:
l
Toggle selection of ALL rows. - this selects all rows visible on
VideoManager (if there is an overflow of videos, VideoManager will
give users the option to select the videos which aren't onscreen too).
Users can also manually select and de-select individual videos by clicking on their row.
l
ROTATE - this gives users the ability to rotate multiple videos clockwise, anti-clockwise, 180 degrees, or horizontally.
l
CREATE INCIDENT - this gives users the ability to create an incident
with all the selected videos included.
Edesix ED-012-134-08
l
DELETE - this gives users the ability to delete all of the selected
videos simultaneously. The user will beasked to confirm their choice.
29
Page 30

VideoManager - User Guide
To exit bulk edit mode, click CANCEL.
3 Videos - how to...
l
FETCH - this option is only available if VideoManager is enabled as a
Central VideoManager. It gives users the ability to fetch all of the selected videos from their sites simultaneously. This is useful if the user's
network is too weak to keep Auto-Fetch on continuously. Once they
have been fetched, the videos are editable likenormal in Central
VideoManager but are not viewable on the original site.
Edesix ED-012-134-08
30
Page 31

VideoManager - User Guide
4 Incidents - how to...
4 Incidents - how to...
The Incidents tab provides access to all incidents available to VideoManager and related functions which
they can perform on incidents. Users can:
l Search incidents, create saved searches, and perform advanced searches.
>> For more information, see Search Incidents on page 32
l Create, edit and delete incidents.
>> For more information, see Create, Edit and Delete Incidents on page 34.
l Prepare evidential footage.
>> For more information, see Clip Footage in an Incident on page37 and Redact
a Video on page 39.
l Bulk edit incidents.
>> For more information, see Bulk Edit Incidents on page 55.
l Create, edit and delete bookmarks.
>> For more information, see Create, Edit and Delete Bookmarks on page 57.
Edesix ED-012-134-08
31
Page 32

VideoManager - User Guide
4 Incidents - how to...
4.1 Search Incidents
It is possible to use VideoManager's search functions to locate incidents in the Incidents tab. This allows
users to filter through a large number of incidents quickly.
Incidents can be searched by a number of criteria.
1. Navigate to the Incidents tab.
2.
Select the Search Incidents pane to search for videos by the following fea-
tures:
l Title - search for incidents whose name matches the one entered.
l Incident Time - using the From: and To: fields, search for incidents
whose time matches the dates entered here.
This refers to the customisable Incident time field users can
populate when they are creating an incident - not the creation time of
the incident itself.
l Reference Code - search for incidents whose Reference Code field
matches the text entered here.
Edesix ED-012-134-08
l Notes - search for incidents whose Notes field matches the text
entered here.
l
Earliest Date and Latest Date - search for incidents whose
videos were recorded between set dates.
32
Page 33

VideoManager - User Guide
4 Incidents - how to...
l Device operator - search for incidents containing footage uploaded
by a specified download slave.
l Owner - search for incidents owned by a specified user.
Click My Incidents to search only for incidents that the logged-in user owns.
l Source - search for incidents containing videos from a specified device
or import sources.
l Match text - search for incidents whose text (including title, reference
code, and notes) matches the text entered here.
l Show current incidents and Show recently deleted incidents - select
whether or not to include current incidents and recently deleted incidents.
l Only show shared incidents and Only show incidents with external
links - select whether or not to include current incidents which have
been shared within the system, or shared with people outside the system using links.
l Advanced Filter - users with knowledge of using sequence conditions
can input more advanced search queries here.
3. Click Find Incidents to display all matching incidents below the search
options.
4.
Click Clear Filter to clear the search filters.
Some of these search options may not be available depending on how the
user's access permissions have been configured.
Edesix ED-012-134-08
33
Page 34

VideoManager - User Guide
4 Incidents - how to...
4.2 Create, Edit and Delete Incidents
Users can create incidents, which retain video videos and highlight specific portions of footage. These
incidents can have documents attached to them. Incidents allow users to collect evidence and condense it
into one place, which can then be shared with users either on the VideoManager system or outside of it.
There are two ways to create an incident.
The first way to create an incident is from the Videos tab. Users should follow these steps if there is a
specific video they know they want to include in an incident.
1. Navigate to the Videos tab.
2.
Find the relevant video, and click Create New Incident next to it.
Users can find the relevant incident by navigating to the My Incidents, Shared
Incidents, or Supervised Incidents panes. They can also search for the relevant
incident from the Search Incidents pane.
The second way to create an incident is from the Incidents page. Users should follow these steps if they
arenot sure of which videos they will include in the incident.
1. Navigate to the Incidents page.
2.
Click Create Incident.
3. If users wish to include videos from VideoManager in the incident:
1. Navigate to the Videos pane.
2. Next to the relevant video, click Add Video To Existing
Incident.
From here, the process for filling in an incident's fields are identical, regardless of the way the incident
was created:
Edesix ED-012-134-08
34
Page 35

VideoManager - User Guide
1. Give the incident a Title.
2. Provide additional information about the incident.
4 Incidents - how to...
l Creation time - this is when the incident was first created, and cannot
be edited.
l Update time - this is when the incident was last edited.
l Incident time - this field allows users to assign the incident a specific
time.
l Notes - here, the user can enter notes regarding the incident.
l Clip Count - this is the number of clips within the incident, and is
updated automatically if a clip is added or taken away.
l Owner - this field is populated with the username of whoever is cre-
ating the incident, and cannot be edited.
l Signature - this field is populated automatically by VideoManager
upon creation and cannot be edited.
3.
Click Create Incident Attachment to add attachments to the incident. The
user will be given the opportunity to choose a file to upload from their PC.
4. Click Create Incident.
The incident is created and the whole video is included.
Incidents can be edited to include more footage, notes on the incident, or have still pictures or
documents attached.
1.
Next to the incident to be edited, click Edit Incident.
The Edit Incident form will open.
2. Make the required changes to the incident - adding video or incident attachments, editing location data, or bookmarking or redacting videos.
Incidents can be duplicated.
1. Next to the incident to be duplicated, click > View Incident.
2.
Click Duplicate Incident, and make any necessary changes to the copy of
Edesix ED-012-134-08
35
Page 36

VideoManager - User Guide
the incident.
3. Click Create Incident to save.
Incidents can be deleted once they are no longer relevant.
1.
Next to the incident to be deleted, click Delete Incident.
2. The user must confirm that they want to delete the incident in the pop-out
window.
The incident will be deleted.
4 Incidents - how to...
Edesix ED-012-134-08
36
Page 37

VideoManager - User Guide
4 Incidents - how to...
4.3 Clip Footage in an Incident
Videos in an incident can be clipped to focus only on the relevant aspects of the evidence. This is useful if
a device has recorded many hours of footage, of which only a few minutes are relevant. However, the
original video is never shortened - only the version in the incident.
To clip footage:
1. Navigate to the Incidents tab.
2.
Find the relevant incident, and click Edit Incident next to it.
Users can find the relevant incident by navigating to the My Incidents, Shared
Incidents, or Supervised Incidents panes. They can also search for the relevant
incident from the Search Incidents pane.
3.
Click Edit Clip start/end time next to the relevant video.
4. There are two steps in editing a clip:
1. To shorten the video roughly, select the start and end timeof the clip
by dragging the toggles in the top video progress bar.
Edesix ED-012-134-08
37
Page 38

VideoManager - User Guide
4 Incidents - how to...
2. For a more precise clipping, drag the toggle in the bottom video progress bar to the relevant point and click Set Start of Clip in the bottom
right-hand corner. This will shorten the video to the point specified. Do
the same for the end of the clip, using Set End of Clip.
Edesix ED-012-134-08
38
Page 39

VideoManager - User Guide
4 Incidents - how to...
4.4 Redact a Video
The Incident Clip Redactor lets users apply a variety of redactions, text annotations and redaction
effects to a video. This is useful if data protection laws require certain features of the video to be obscured
(e.g. faces), or if users want to highlight a specific aspect of the footage.
To open the Incident Clip Redactor:
1. Navigate to the Incidents tab.
2.
Find the relevant incident, and click Edit Incident next to it.
Users can find the relevant incident by navigating to the My Incidents, Shared
Incidents, or Supervised Incidents panes. They can also search for the relevant
incident from the Search Incidents pane.
3.
Click Redact parts of this Clip.
4. The Incident Clip Redactor opens.
There are several types of redaction effect available in VideoManager:
Edesix ED-012-134-08
39
Page 40

VideoManager - User Guide
l Foreground redactions.
>> For more information, see Create, Edit and Delete Foreground Redactions on page
41
l Background redactions.
>> For more information, see Create, Edit and Delete Background Redactions on page
43
l Audio redactions.
>> For more information, see Create, Edit and Delete Audio Redactions on page 45
l Text redactions.
4 Incidents - how to...
>> For more information, see Create, Edit and Delete Text Annotations on page 46
l Brightness redactions.
>> For more information, see Create, Edit and Delete Brightness Redactions on page 48
l Zoom redactions.
>> For more information, see Create, Edit and Delete Zoom Redactions on page 50
l Other redactions.
>> For more information, see Create Other Redactions on page 52
l Access the redaction Advanced dropdown.
>> For more information, see Access the Redaction Advanced Dropdown on page 53
Edesix ED-012-134-08
40
Page 41

VideoManager - User Guide
4 Incidents - how to...
4.4.1 Create, Edit and Delete Foreground Redactions
A circle, rectangle, or quadrilateral redaction can blur, pixelate or solidly cover the focus of a video. It is
also possible to redact the background and have the area inside the redaction show the original video. This
allows users to redact faces or other sensitive information, in accordance with data protection laws.
To create a foreground redaction:
1. Move the cursor handle to the point where the redaction will start.
2.
Click either Insert oval, Insert square, or Insert quadilateral.
3. Draw a shape around the area to be redacted. This shapewill be saved immediately.
If quadrilateral has been selected, the user can drag out the corners of the shape to fit
the area which must be redacted.
4. A right-hand menu will appear.
If relevant, check the Redaction box, and select the type of redaction that will fill the
highlighted area. Users have a choice of Blurred, Pixelated, and Solid.
Edesix ED-012-134-08
41
Page 42

VideoManager - User Guide
If relevant, check the Brightness box and adjust the brightness of the redaction using
the slider.
5.
Move the bottom cursor handle forward a small amount manually, or use
Step Backward / Step Forward, and re-position the redaction shape over
the area to be redacted.
Users do not need to redraw the annotation, just re-position it.
6. Repeat this process until the subject of the video is no longer visible.
7. Click End.
8. Review the video by replaying it from the beginning, to check that the subject
is fully redacted.
9. Click confirm.
10. Click Save Incident.
4 Incidents - how to...
Edesix ED-012-134-08
42
Page 43

VideoManager - User Guide
4 Incidents - how to...
4.4.2 Create, Edit and Delete Background Redactions
By redacting a background, the subject of evidential footage is made the sole focus. VideoManager
allows for all redactions applicable to an area to be applied to a background, leaving an area or areas
unaffected by the redaction. This allows users to blur places and surroundings, in accordance with data
protection laws.
To create a background redaction:
1. Step forwards through the footage to the point that the redaction should
start.
2. Draw a redaction area around the area or areas of the video which should
remain unredacted.
3. For each redaction area, set the redaction type to Unredact.
4. In the top menu, select the kind of background redaction required.
Users have a choice of Blurred, Pixelated, and Solid.
5. Step through the video as normal, scaling and moving the redaction area if
necessary.
Edesix ED-012-134-08
43
Page 44

VideoManager - User Guide
6. New redaction areas can be added at any point in the video, and redactions
can be ended by clicking End in the sidebar.
To edit a foreground redaction:
1. In the top menu, select the kind of background redaction required.
Users have a choice of Blurred, Pixelated, and Solid.
To delete a foreground redaction:
1. In the top menu, change the background redaction to None.
4 Incidents - how to...
Edesix ED-012-134-08
44
Page 45

VideoManager - User Guide
4 Incidents - how to...
4.4.3 Create, Edit and Delete Audio Redactions
VideoManager offers the ability to mute audio for specific periods of time, with the option of displaying
an icon when these redactions are in effect. This allows users to redact voices and other noises, in
accordancewith data protection laws.
To create an audio redaction:
1. Step forwards through the footage to the point that the redaction should
start.
2.
From the top toolbar, click Insert audio effect, and draw it over an area of
the footage. This will automatically mute this portion of the footage.
If no icon is desired, deselect the Show Icon option in the sidebar.
3. Skip to the part of the video where the audio redaction is no longer required,
and click End.
Edesix ED-012-134-08
45
Page 46

VideoManager - User Guide
4 Incidents - how to...
4.4.4 Create, Edit and Delete Text Annotations
Text annotations are text boxes which can be moved and resized in the same way as redactions. This
allows users to provide information directly in evidential footage.
To create a text annotation:
1. Move the cursor to the start point of the text annotation.
2.
Click Insert text.
3. Click the area of the video frame where the text annotation should be displayed.
The Text panel is displayed.
4. In the right-hand menu, enter the text to be displayed.
Click to make the text annotation bigger.
Click to make the text annotation smaller.
Click to change the colour of a text annotation.
Edesix ED-012-134-08
46
Page 47

VideoManager - User Guide
5. From here, the user has two options:
6. Click confirm to save the annotation.
4 Incidents - how to...
Users can either choose a colour from the selection presented by
VideoManager, or enter their own colour using Hex code. By clicking C, the Hex
code colour will be saved and can be selected again from the row at the top.
l If the subject of the video is moving, step through the video frame-by-
frame and reposition the text manually to ensure that it is focused on
the subject at all time. When the user reaches the part of the video
where the redaction should end, click End.
l If the subject of the video is static, skip to the part of the video where
the redaction should end, and click End.
As many text annotations can be created as necessary.
Edesix ED-012-134-08
47
Page 48

VideoManager - User Guide
4 Incidents - how to...
4.4.5 Create, Edit and Delete Brightness Redactions
Brightness Redaction effects are used to darken or brighten areas of the video. This can be used to
highlight the relevant parts of a piece of evidential footage, and applies to both foreground and background
redactions.
To create a foreground brightness redaction effect:
1. Move the cursor to the start point of the redaction effect.
2.
Click either Insert oval, Insert square, or Insert quadilateral around the
area that should bebrightened or darkened.
3. In the side bar, select Unredact. This will leave the area inside the redaction
unredacted.
4. Next to the Brightness panein the right-hand menu, check the checkbox.
5. Use the slider to adjust the required brightness inside the redaction effects
area.
6. From here, the user has two options:
Edesix ED-012-134-08
48
Page 49

VideoManager - User Guide
l If the subject of the video is moving, step through the video frame-by-
frame and reposition the shape manually to ensurethat it is focused
on the subject at all time. When the user reaches the part of the video
where the redaction should end, click End.
l If the subject of the video is static, skip to the part of the video where
the redaction should end, and click End.
To create a background brightness redaction effect:
1.
Select the Background brightness option from the top menu bar.
2. From the dropdown menu, choose the desired brightness level. This will
apply to the entire duration of the video.
4 Incidents - how to...
Edesix ED-012-134-08
49
Page 50

VideoManager - User Guide
4 Incidents - how to...
4.4.6 Create, Edit and Delete Zoom Redactions
Zoom redaction effects focus on specific aspects of the video. This can be used to highlight the relevant
parts of a piece of evidential footage.
To create a zoom redaction effect:
1. Skip forward through the video to where the redaction effect should start.
2.
Click Zoom in on one area.
3. Draw the square around the area of the video which should be zoomed in (or
out) on.
4.
Use Zoom in, Zoom out, and Centre in frame to move and scalethe
redaction over the area which will be affected.
The redaction effect will not appear until the video is played like normal.
5. From here, the user has two options:
Edesix ED-012-134-08
50
Page 51

VideoManager - User Guide
6. Click confirm.
4 Incidents - how to...
l If the subject of the video is moving, step through the video frame-by-
frame and reposition the quadrilateral manually to ensure that it is
focused on the subject at all time. When the user reaches the part of
the video where the redaction should end, click End.
l If the subject of the video is static, skip to the part of the video where
the redaction should end, and click End.
Edesix ED-012-134-08
51
Page 52

VideoManager - User Guide
4.4.7 Create Other Redactions
There are some other redaction effects which can be performed on a video.
4 Incidents - how to...
These other redaction effects are:
l
Rotate clockwise - this rotates the video by 90 degrees left.
l
Rotate anti-clockwise - this rotates the video by 90 degrees right.
l
Horizontal flip this flips the video horizontally.
l
Show metadata - this turns on overlay text that displays the device, date,
and time position.
Clicking this icon multiple times changes the position of the overlay text, then toggles it
off.
Edesix ED-012-134-08
52
Page 53

VideoManager - User Guide
4 Incidents - how to...
4.4.8 Access the Redaction Advanced Dropdown
There are some actions which can be performed on redactions once they have been created. To access
these, click Advanced in the top right-hand corner.
The actions which can be performed are as follows:
l
Help - this presents a brief summary of how to create a redaction effect.
l
Toggle Handle Size - if a redaction effect is selected, the handles on the
redaction will get bigger. This is useful if the user wants to create a small redaction which needs more precise parameters.
l
Keyboard Shortcuts - this will give the user information about the possible keyboard shortcuts they can perform to move through the video more
quickly.
l
Cycle Between Annotations - if a redaction effect is selected, clicking this
will cycle through all the redaction effects in the video, then go back to the
beginning and begin again.
l
Go To Next Annotation - if a redaction effect is selected, clicking this will
move to the next redaction effects one by one, then stop at the last one.
l
Go To Previous Annotation - if a redaction effect is selected, clicking this
will move to the previous redaction effects one by one, then stop at the first
Edesix ED-012-134-08
53
Page 54

VideoManager - User Guide
one.
l
4 Incidents - how to...
Clear all - this will delete all redactions in the video.
Edesix ED-012-134-08
54
Page 55

VideoManager - User Guide
4 Incidents - how to...
4.5 Bulk Edit Incidents
Bulk edits allow users to perform actions on multiple incidents at once. This is useful if either there are
too many incidents to manually edit/delete, or if the user has enabled their VideoManager to act as a
Central VideoManager. In the second case, every incident held in connected sites can beautomatically
fetched in bulk. This means that they will become editable in the Central VideoManager and unviewable in
the original sites.
To use incident bulk edits:
1. Navigate to the Incidents tab.
2.
Select the Search Incidents pane.
3.
Click BULK EDIT.
The bulk edit UI appears. The following actions are now possible:
l
Toggle selection of ALL incidents.
l
Take control - if a user's instance of VideoManager is acting as a Central VideoManager, this action will take control of all selected incidents
from the connected sites.
l
Submit - if a user's instance of VideoManager is acting as a site, this
action will submit all selected incidents to the connected Central
VideoManager.
l
Create Incident Collection - if the user has licensed Nested Incidents,
this will allow them to create an incident collection containing the selected incidents.
To exit bulk edit mode, click CANCEL.
Edesix ED-012-134-08
If there are more incidents than can be displayed on one page, VideoManager
55
Page 56

VideoManager - User Guide
4 Incidents - how to...
will give users the option to select all incidents on the system.
Edesix ED-012-134-08
56
Page 57

VideoManager - User Guide
4 Incidents - how to...
4.6 Create, Edit and Delete Bookmarks
Bookmarks can be used to mark a specific time in a video. This is useful when a user needs to highlight a
specific event or an item of interest - it also allows administrators to skip straight to the necessary parts of a
video for review purposes.
To add a bookmark to a video:
1. Navigate to the Incidents tab.
2.
Find the relevant incident, and click Edit Incident next to it.
Users can find the relevant incident by navigating to the My Incidents, Shared
Incidents, or Supervised Incidents panes. They can also search for the relevant
incident from the Search Incidents pane.
3.
In the video pane, click Play.
The playback controls will be displayed at the bottom of the video pane. Drag the
progress bar of the video to a position where the bookmark will be placed.
4.
Click Pause.
5.
Click Bookmarks.
Edesix ED-012-134-08
57
Page 58

VideoManager - User Guide
6. Click Add bookmark here.
The Add a bookmark window opens.
The default name for the bookmark is the date and time position on the video. Users
can overwrite this with their own text.
7. Click confirm.
The bookmark is added to the video.
8. Repeat this process to add more bookmarks.
9. Click Save Incident.
To edit an existing bookmark:
1. Navigate to the Incidents tab.
2.
Find the relevant incident, and click Edit Incident next to it.
4 Incidents - how to...
Users can find the relevant incident by navigating to the My Incidents, Shared
Incidents, or Supervised Incidents panes. They can also search for the relevant
incident from the Search Incidents pane.
3.
Click Play.
The playback controls are displayed.
4.
Click Bookmarks.
5.
Next to the bookmark to be edited, select Edit.
6. The Edit this bookmark window will open.
Make the required edits.
To delete an existing bookmark:
1. Navigate to the Incidents tab.
2.
Find the relevant incident, and click Edit Incident next to it.
Users can find the relevant incident by navigating to the My Incidents, Shared
Incidents, or Supervised Incidents panes. They can also search for the relevant
incident from the Search Incidents pane.
3.
Click Play.
Edesix ED-012-134-08
58
Page 59

VideoManager - User Guide
The playback controls are displayed.
4.
Click Bookmarks.
5.
Next to the bookmark to be deleted, select Delete.
6. The bookmark will be deleted.
To immediately jump to a bookmark in a video, click Bookmarks under the relevant video, and select
the bookmark in question. This will skip the video forward or backward to the bookmark's position.
4 Incidents - how to...
Edesix ED-012-134-08
59
Page 60

VideoManager - User Guide
5 Devices - how to...
5 Devices - how to...
The Devices page enables the user to administer their VideoBadges and DockControllers. From here, it is
possible to view and configure all VideoBadges and DockControllers on the network. Any devices connected
to the user's instance of VideoManager will be shown at the top.
If users have sufficient permissions, they can:
l Filter devices by a number of criteria.
>> For more information, see Search Devices on page 61.
l Assign a device (normally, or using bulk Touch Assign).
>> For more information, see Assign Devices on page 65.
l View device info.
>> For more information, see View Device Info on page 71.
l Bulk edit devices
>> For more information, see Bulk Edit Devices on page 76
l Bulk edit DockControllers
>> For more information, see Bulk Edit DockControllers on page 77
Edesix ED-012-134-08
60
Page 61

VideoManager - User Guide
5 Devices - how to...
5.1 Search Devices
If they have the appropriate permissions, users can utiliseVideoManager's search functions to locate
devices in the Devices tab. This is necessary if a user would like to discover the states of various devices
(e.g. whether they are recording, and who is using them).
Devices can be searched by a number of criteria.
1. Navigate to the Devices tab.
2.
Select the Search Devices pane to search for devices by the following fea-
tures:
l Device - this will return the device whose serial number matches the
serial number specified.
l Operator - this will return any devices assigned to the operator spe-
cified (regardless of whether they are recording, charging, etc.).
l Location - this will return any devices who are plugged into the
EdgeController, DockController, or site specified.
l Status - this will return any devices who have the status specified.
These are:
l ALL - this will return all devices on the system, regardless of the
status they are in.
Edesix ED-012-134-08
l Docked - this will return all devices which are physically docked
to either a PC, a DockController, or an EdgeController associated
with the instance of VideoManager. If a VideoTag has a WiFi profile with the Enable Docking setting enabled, they will also
appear on this list when connected to the WiFi network in question.
61
Page 62

VideoManager - User Guide
5 Devices - how to...
l Assigned - this will return all devices which have been assigned
to a user on the system.
l Assigned to me - this will return all devices which have been
assigned to the user performing the search.
l Available for assignment - this will return all devices which
areready to be assigned - this means it will return all devices
which aresimultaneously docked, unassigned, and have finished downloading any footage.
l Stream Available - this will return all devices which are con-
nected to a WiFi network and streaming successfully to
VideoManager.
l Downloading - this will return all devices which are docked and
currently downloading recorded footage to VideoManager.
l Ready - this will return all devices which are ready to be
undocked (all devices which are simultaneously docked,
assigned to a user, and have finished downloading any footage).
l In Use - this will return all devices which are assigned to a user
and undocked. Devices which arestreaming as well as recording
will be shown here as well.
l Busy, Unavailable or Unknown - this will return all devices
who are Busy (the device is preparing to download and therefore cannot be used), Unavailable (the instance of VideoMan-
ager does not have the correct access control key to unlock the
device), or Unknown (the device was undocked without being
assigned to a user).
l Error - this will return all devices which are in an error state: this
is usually because the device cannot download its recorded footage (either because VideoManager has no more storage space,
or because the device itself is faulty).
Edesix ED-012-134-08
l Unknown - this will return all devices whose status is Unknown
(the device was undocked without being assigned to a user).
l Allocated - this will return all devices which are assigned to a
specific user but have not been tapped out with an RFID tag.
62
Page 63

VideoManager - User Guide
5 Devices - how to...
l Firmware - this allows the user to filter their devices by the firmware
they are running. There are three options:
l Default Firmware - this will return all devices running the
default firmware, as specified from the Device Images section.
l Non-Default Firmware - this will return all devices running firm-
ware other than the default firmware.
l Other... - this will give the user the option to enter the name of a
specific firmware image. This search is useful if the user wants
to find specific devices running out-of-date firmware. If the user
does not enter anything, all devices will be returned.
l Touch Assign - if set to Yes, all devices with Touch Assign enabled will
be returned. If set to No, devices with Touch Assign disabled will be
returned.
l Auto Upgrade Enabled - if set to Yes, all devices with auto-upgrade
enabled will be returned. If set to No, devices with auto-upgrade disabled will be returned.
If VideoManager has been configured as a Central VideoManager, users will also
have the option to include remote devices in their search. This will show the devices
associated with the Central VideoManager's connected sites as well.
3. Click Find Devices to display all matching devices below the search options.
4.
Click Reset Filter to clear the search filters.
Some of these search options may not be available depending on how access
permissions have been configured.
Once videos have been filtered, there are some actions that users can take:
l
Change viewing options.
>> For more information, see Change Viewing Options on page 25
l
PAUSE
This will freeze the list, and no devices can be added or removed until it is unpaused.
Edesix ED-012-134-08
63
Page 64

VideoManager - User Guide
l
>> For more information, see Bulk Edit Devices on page 76
5 Devices - how to...
Bulk edit devices
Edesix ED-012-134-08
64
Page 65

VideoManager - User Guide
5 Devices - how to...
5.2 Assign Devices
Before a device can be used to record or stream footage, it must be assigned to an already-created user.
This ensures that all footage can be traced back to the user who recorded it. If a device is undocked without
being first assigned to a user, it will not record any footage.
To assign a device:
1. Navigate to the Devices tab.
2.
Select the Search Devices pane.
3. Filter the devices as necessary, and click Find Devices.
4.
Find the relevant device, and click Assign Device next to it.
This device must be connected to VideoManager and unassigned. To unassign
a device, click Return Device.
The Assign Device dialogue opens. Users must do the following:
5. In the Operator Name field, enter the name of the user who will be recording
with this device. This must be a valid username on VideoManager.
If the user's name does not appear in the dropdown menu, they do not have the ability
to operate devices. This is due to the roles they inhabit. Their roles must be changed
before they can use a device.
6. Select which Assignment Mode the device will use.
a one-off trip, and personal issue, when a user is given a device that they will use
Edesix ED-012-134-08
There are two types of assignment - pool issue, when a user is given a device for
65
Page 66

VideoManager - User Guide
multiple times.
5 Devices - how to...
l Single Issue (pool) - the device will be assigned to the user and when
it is redocked, it will become unassigned and must be reassigned manually.
l RFID assignment (pool) - this allows users to undock devices quickly, in
case of an emergency. One default user is "assigned" an entire organisation's devices, which are then tapped out by individual users. When
the devices are redocked, all footage is associated with the default
user. This must be configured from the Admin tab.
l Permanent Issue (personal) - the device will be assigned to the user
and when it is redocked, it will stay assigned to the same user.
l Permanent Allocation (personal) - the device will be assigned to the
user, who must then tap an RFID tag before they can useit in the field.
When it is redocked, it will stay assigned to the same user.
Some of these options may not be visible, depending on how the permissions
have been configured.
If Permanent Allocation has been chosen, the user can now click Assign Device. The device profile
will be chosen depending on what roles the user inhabits, and the WiFi profile will be the default one (if the
default WiFi profile has user-specific WiFi networks enabled, the device will connect to the user's userspecific WiFi networks).
If Single Issue or Permanent Issue have been chosen, the user must do the following:
1. Select the relevant device profile from the Device Profile dropdown. This dic-
tates how the device will behave - which buttons perform which actions, etc.
2. Select the previously created WiFi profile. This dictates which WiFi profilethe
device will connect to, and is only relevant if the device will be streaming in
the field.
3. Click Assign Device.
Wait until the Status changes to Ready. At this point, the device can be undocked and videos can be
recorded like normal.
When the device is returned, the videos are automatically downloaded - this will change the status to
Busy. Once the videos have finished downloading, the status changes back to Unassigned. If the device
has been permanently allocated, the status changes back to Allocated.
Edesix ED-012-134-08
66
Page 67

VideoManager - User Guide
5 Devices - how to...
5.3 Generate DockController Configurations
DockControllers allow more VideoBadges to connect to one instance of VideoManager over network
instead of USB. This makes it possible for remote workers to operate VideoBadges without needing
VideoManager installed on their own computer. Once set up, there is minimal user input required.
Configuring a DockController is a simple process.
1. Navigate to the Devices tab.
2.
Click Advanced in the top right-hand corner.
3.
Click Generate DockController Config.
4. Enter the device's serial number and name.
The serial number is found on the bottom of the DockController.
5. Enter the server settings, including host name and port number - theseare
the credentials of the VideoManager it will be associated with.
6. Toggle the IP settings.
If Use static IP is set to On, then the user must enter additional information such as
the IP address it will befixed to.
7. Click Generate.
8. The config file will be downloaded to the PC's default downloads location.
Deliver file by USB to the DockController.
Edesix ED-012-134-08
67
Page 68

VideoManager - User Guide
5 Devices - how to...
5.4 Perform DockController Actions
Once a DockController has been associated with VideoManager, users can perform actions pertaining to
them.
To access any DockControllers associated with the user's instance of VideoManager:
1. Navigate to the Devices tab, and select the DockControllers pane.
2. Find the relevant DockController, and click > View details next to it.
Users can filter by Name, Serial, and Version.
If a DockController is offline, the user will be given an opportunity to view its serial number, mac address,
device name, hardware revision, version and status. If a DockController is online, this information will still be
visible, as well as the Bandwidth Rule settings, and devices connected to the DockController.
To configure a DockController:
1. Navigate to the Devices tab, and select the DockControllers pane.
2. Find the relevant DockController, and click > View details next to it.
Users can filter by Name, Serial, and Version.
3.
Click Configure DockController in the top right-hand corner.
4. Here, users can change the DockController's name, server settings, and IP settings.
A DockController can betransferred to another instance of VideoManager, using the
Configure for this VideoManager? toggle. However, for this to be possible, the user
must know the API and the API secret for the other instance of VideoManager.
5. Click Configure to save the changes.
As well as configuring it, there are many other actions that users can perform on a DockController:
Edesix ED-012-134-08
68
Page 69

VideoManager - User Guide
l Restart a DockController.
l Upgrade a DockController.
5 Devices - how to...
1. Navigate to the Devices tab, and select the DockControllers pane.
2. Find the relevant DockController, and click > View details next to it.
Users can filter by Name, Serial, and Version.
3.
Click Restart DockController in the top right-hand corner.
4. Choose Yes to restart it.
5. The DockController will be restarted.
1. Navigate to the Devices tab, and select the DockControllers pane.
2. Find the relevant DockController, and click > View details next to it.
Users can filter by Name, Serial, and Version.
3.
Click Upgrade DockController in the top right-hand corner.
4. The user will be given an opportunity to choose a DockController
image to use.
5. Click Upgrade DockController to confirm the choice.
l Download logs from a DockController:
1. Navigate to the Devices tab, and select the DockControllers pane.
2. Find the relevant DockController, and click > View details next to it.
Users can filter by Name, Serial, and Version.
3.
Click Download Logs from DockController in the top right-hand
corner.
The log will be downloaded to the user's PC as a ZIP file.
l Delete a DockController:
1. Navigate to the Devices tab, and select the DockControllers pane.
2. Find the relevant DockController, and click > View details next to it.
Edesix ED-012-134-08
69
Page 70

VideoManager - User Guide
l Set the bandwidth rules and priority level for a DockController:
5 Devices - how to...
Users can filter by Name, Serial, and Version.
3.
Click Delete DockController in the top right-hand corner.
4. The user will be required to confirm the deletion of the DockController,
by clicking on Yes.
1. Navigate to the Devices tab, and select the DockControllers pane.
2. Find the relevant DockController, and click > View details next to it.
Users can filter by Name, Serial, and Version.
3. In the Bandwidth Rule pane, click the dropdown menu.
Select the relevant rule.
4. Toggle whether High Priority DockController is set to On or Off.
If set to On, all footage from this DockController will be uploaded as quickly as
possible - this means that if the DockController is part of a bandwidth rule that has
the Shared Bandwidth Group setting enabled, it will halt the downloads of other
DockControllers in the group until all of its footage has been uploaded.
Edesix ED-012-134-08
70
Page 71

VideoManager - User Guide
5 Devices - how to...
5.5 View Device Info
The View Device Info page allows users with sufficient permissions to perform actions on a specific
device.
To reach the View Device Info page:
1. Navigate to the Devices tab.
2.
Select the Search Devices pane.
3. Filter the devices as necessary, and click Find Devices.
4. Find the relevant device, and click > View Device Info next to it.
Users can now view Device Details, such as the device ID, name, serial number, and the
firmware it runs.
Users can now perform the following actions::
l Device actions -
l
Assign Device
l
Upgrade this Device
l
Factory Reset this Device
l
View Device Audit Log
>> For more information, see Perform Device Actions on page 73
Edesix ED-012-134-08
l
Download Device Audit Log
71
Page 72

VideoManager - User Guide
l Edit device properties - name, custom status, Touch Assign, static IP.
>> For more information, see Edit Device Properties on page75
5 Devices - how to...
Edesix ED-012-134-08
72
Page 73

VideoManager - User Guide
5.5.1 Perform Device Actions
Users can perform actions on a device from its specific page. To do so:
1. Navigate to the Devices tab.
2.
Select the Search Devices pane.
3. Filter the devices as necessary, and click Find Devices.
4. Find the relevant device, and click > View Device Info next to it.
This will open the device's information pane.
To upgrade a device's firmware to the latest version:
1. Ensure that the device is docked (either with a dock or plugged directly into
the PC running VideoManager) and charging.
2.
Click Upgrade this Device.
5 Devices - how to...
The Upgrade this Device window will open.
The most recent firmware will appear at the top of the list.
3. To upgrade the device, click Upgrade Device.
To factory reset a device:
1. Ensure that the device is docked and charging.
2.
Click Factory Reset this Device in the top right-hand corner.
3. To factory reset the device, click Yes, Reset Device
Downgrading firmware (e.g. from V10.0.0 to V9.1.0) is generally not
recommended - Edesix support should be contacted first.
Factory resetting a device will cause all footage on it to be overwritten.
To view the audit log for a device:
Edesix ED-012-134-08
73
Page 74

VideoManager - User Guide
1.
Click View Device Audit Log in the top right-hand corner.
Users will be given the opportunity to filter the audit log by a number of criteria,
including the user, signature, and video URN.
2. Click Filter Audit Log.
To download the audit log as a .zip:
1.
Click Download Device Audit Log in the top right-hand corner.
The audit log will be downloaded to the browser's default download location.
If a device has been undocked from VideoManager, it can be forgotten. To forget a device:
1.
Click Forget Device in the top right-hand corner.
2. Click Yes to confirm.
If a device has been forgotten, it will not appear on VideoManager until it is re-docked.
5 Devices - how to...
Edesix ED-012-134-08
74
Page 75

VideoManager - User Guide
5.5.2 Edit Device Properties
Users can edit the properties of a device from its specific page. To do so:
1. Navigate to the Devices tab.
2.
Select the Search Devices pane.
3. Filter the devices as necessary, and click Find Devices.
4. Click > View Device Info next to the device to be edited.
5.
Click Edit Device Properties.
Here, users can edit:
l Device name - if this is changed while the device is disconnected from
VideoManager, the old device name will be overwritten once the device is
reconnected.
5 Devices - how to...
l Custom status - this allows the user to record notes about the device in ques-
tion - for example, if the device has recently been upgraded. All users can see
custom statuses, if they have the permission which allows them to view the
devices list.
l Touch assign? - this toggle gives the user control over whether the specific
device can be assigned using an RFID card. Depending on how the device settings have been configured, it may only be possible to assign a device using
Touch Assign if its battery is full.
l Auto-upgrade - this toggle gives the user control over whether the specific
device follows the auto-upgrade rules determined from the Auto Upgrade Settings section.
l Use static IP - if toggled to On, the device will use the IP address entered by
the user.
This toggle is only available to view if the device is assigned and disconnected from
VideoManager. If toggled to On, the device will be unassigned and the previously
assigned user can assign themselves another device.
Edesix ED-012-134-08
75
Page 76

VideoManager - User Guide
5 Devices - how to...
5.6 Bulk Edit Devices
Bulk edits can be used to quickly edit all devices on an instance of VideoManager. This is useful if, for
instance, there is a firmware upgrade that applies to many devices owned by a user.
To bulk edit devices:
1. Navigate to the Devices tab.
2.
Select the Search Devices pane.
3. Filter the devices as necessary, and click Find Devices.
4.
Click BULK EDIT.
The bulk edit user interface appears. The following actions are now possible:
l Toggle selection of ALL devices.
l
UPGRADE - If there is an upgrade available, this will upgrade all selec-
ted devices.
l
RETURN - This will unassign all selected devices.
l
FACTORY RESET - This will reset all selected devices.
l
UPDATE - This will update all selected devices - users can change the
touch assign and auto-update settings.
l
FORGET - This will delete all selected devices from the instance of
VideoManager.
To exit bulk edit mode, click CANCEL.
Edesix ED-012-134-08
76
Page 77

VideoManager - User Guide
5 Devices - how to...
5.7 Bulk Edit DockControllers
Bulk edits can be used to quickly upgrade and restart DockControllers visible to the system.
To bulk edit DockControllers:
1. Navigate to the Devices tab.
2. Select the DockControllers pane.
3. Click BULK EDIT.
The bulk edit user interface appears. The following actions are now possible:
l
Toggle selection of ALL devices.
l
UPGRADE
l
Restart
To exit bulk edit mode, click CANCEL.
Edesix ED-012-134-08
77
Page 78

VideoManager - User Guide
6 Frequently Asked Questions
6 Frequently Asked Questions
Here are some of the most common Frequently Asked Questions (FAQs) regarding VideoManager:
l Questions regarding the Videos tab.
>> For more information, see Videos FAQs on page 79.
l Questions regarding the Devices tab.
>> For more information, see Devices FAQs on page 87.
Edesix ED-012-134-08
78
Page 79

VideoManager - User Guide
6.1 Videos FAQs
Some FAQs regarding the Videos pane are as follows:
6 Frequently Asked Questions
l
Q: After recording, how do I download videos from my device
to VideoManager? on page 80.
l
Q. Why are someof the headings on my videos green? on page
81.
l
Q: I can't see some of the videos on VideoManager. Why is this?
on page 82.
l
Q. Can I share videos with people who aren't on VideoManager?
on page 83.
l
Q. Why do some of my videos have a cloud symbol instead of a
thumbnail? on page84.
l
Q. What is the difference between the operator and the owner
of a video? on page 86.
Edesix ED-012-134-08
79
Page 80

VideoManager - User Guide
6 Frequently Asked Questions
6.1.1 Q: After recording, how do I download videos from my device to VideoManager?
A. To download videos from your device:
1. Either dock your device or plug it in to your PC using a USB cable.
2. Navigate to the Devices tab.
3. Locate the device you've just plugged in. Click > View Device Info.
4. In the Status window, you should see the Downloading sign.
The video should now be available to view under the Videos tab.
Edesix ED-012-134-08
80
Page 81

VideoManager - User Guide
6 Frequently Asked Questions
6.1.2 Q. Why are some of the headings on my videos green?
A. If a video is part of an incident, its heading will become green instead of grey. It will also have a star
next to its name.
You can click the This video is in (1) incident button, which will take you to the incident it is part of.
Edesix ED-012-134-08
81
Page 82

VideoManager - User Guide
6 Frequently Asked Questions
6.1.3 Q: I can't see some of the videos on VideoManager. Why is this?
A: There are two possible reasons for this - permissions and deletion policies.
l Permissions - VideoManager gives administrators lots of control over what
actions can be performed by other users on the site. It does this through
roles - these affect how much privilege a user has on the site. It’s possible that
when you were creating your admin user after logging in for the first time,
you didn’t assign it the privileges which will allow you to see the videos filmed
by yourself and others on the system. To fix this:
1. Navigate to the Admin tab.
2. Select the People tab.
3. Select the Roles pane.
4. Click the Edit Role button next to your role.
5. Scroll down to the Video Permissions window.
6. Next to the relevant permissions, toggle each button to On.
Remember that these permissions apply to either your videos, videos which
have been shared with you, videos which have been recorded by people you
supervise, or all videos on the system.
l Deletion Policies - you may want to check the configuration of your deletion
policy, in case it is configured to delete footage almost immediately. To do so:
1. Navigate to the Admin tab.
2. Select the Deletion Policy pane.
3. Change the number of days that footage is kept for after it has been
recorded and downloaded.
Edesix ED-012-134-08
82
Page 83

VideoManager - User Guide
6 Frequently Asked Questions
6.1.4 Q. Can I share videos with people who aren't on VideoManager?
A. If you need to share a video with someone outside of VideoManager, you can share them as part of
an incident, using a link via email.
Edesix ED-012-134-08
83
Page 84

VideoManager - User Guide
6 Frequently Asked Questions
6.1.5 Q. Why do some of my videos have a cloud symbol instead of a thumbnail?
A. A cloud symbol indicates that a video has been transferred to a Central VideoManager as part of an
incident.
This could be because:
l It was manually taken control of from the Central VideoManager.
l Control was submitted from the site itself.
This means that it is no longer editable on the original site.
Edesix ED-012-134-08
84
Page 85

VideoManager - User Guide
6 Frequently Asked Questions
6.1.6 Q. Why is the timestamp on my video incorrect?
A. VideoBadges and VideoTags gets their time from the PC or server they are docked to. Check that the
time and date within your operating system are correct.
Edesix ED-012-134-08
85
Page 86

VideoManager - User Guide
6 Frequently Asked Questions
6.1.7 Q. What is the difference between the operator and the owner of a video?
A. The operator of a video is the one who physically recorded it on their device. The owner has full
administrative control over the video. Normally this will be the same person - however, if the footage in
question is too sensitive for more junior users to retain control of, it may be necessary to reallocate who the
owner is.
Edesix ED-012-134-08
86
Page 87

VideoManager - User Guide
6.2 Devices FAQs
Some FAQs regarding the Devices pane are as follows:
6 Frequently Asked Questions
l
Q: Why can't VideoManager find my devices when I dock them
for the first time? on page 88.
l
Q. Why isn't my device streaming? on page 89.
l
Q. Why isn't my VideoBadge docking? on page 90.
l
Q. Can I move my devices from one VideoManager system to
another one? on page 91.
l
Q. Why does my device appear as "locked" on VideoManager?
on page 92.
Edesix ED-012-134-08
87
Page 88

VideoManager - User Guide
6 Frequently Asked Questions
6.2.1 Q: Why can't VideoManager find my devices when I dock them for the first time?
A. It is possible that you haven't enabled Device Discovery. To do so:
1. Navigate to the Devices tab.
2. Click the Advanced button.
3. Click Device Settings.
4. Under the Device Discovery title, toggle the Enable device discovery setting
to On.
5. Restart VideoManager.
Edesix ED-012-134-08
88
Page 89

VideoManager - User Guide
6.2.2 Q. Why isn't my device streaming?
A. If your devices aren't streaming, there are three possible reasons for this:
1. The WiFi profile which has been assigned to the streaming device is incorrectly configured.
l WiFi networks within the WiFi profile must have a valid SSID and pass-
phrase. If you are unsure of what a network's SSID and passphrase is,
see the bottom of the router.
l VideoBadge streaming must be toggled to On for the entire profile.
2. The device doesn't have the most recent firmware. To fix this:
1. Ensure that the device is docked.
2. Navigate to the Devices tab.
6 Frequently Asked Questions
3. Next to the device, click > View Device Info.
4. Click Upgrade this Device.
5. Select the newest firmware and click Upgrade Device.
3. The WiFi network you're using is public.
You can configure this setting from your PC. This depends on the operating system
you're using.
Edesix ED-012-134-08
89
Page 90

VideoManager - User Guide
6.2.3 Q. Why isn't my VideoBadge docking?
A. The solution for this depends on the type of device you are using.
If you have a VB-300:
1. Hold the device so it is facing you.
2. Simultaneously press and hold the two plastic buttons on the top-left and
bottom-right corners of the device for 5 to 10 seconds.
3. All the lights on the device should come on and start flashing.
4. Release the two buttons.
5. Once the lights have stopped flashing, try re-docking the device again.
If you have a VB-200 or VB-100:
1. Turn the device upside down.
6 Frequently Asked Questions
2. Pull the rubber charging cover upwards gently and rotate it to the side, so
you can see the charging/docking port.
3. To the right of the charging/docking port, there is a small plastic switch. Press
this switch down for 5 to 10 seconds.
4. Keep looking at the top of the device. The green power light will go out. It will
then glow orange and red, and the other lights on the top of the device will
glow green.
This indicates that the device is rebooting.
5. Once the lights have stopped flashing, try re-docking the device again.
If the procedure above doesn't work, leave the device off its charging base until the battery is completely
flat (this could take over 24 hours). Once the battery is flat, try re-docking the device.
Edesix ED-012-134-08
90
Page 91

VideoManager - User Guide
6 Frequently Asked Questions
6.2.4 Q. Can I move my devices from one VideoManager system to another one?
A: Yes. Before starting this process, ensure that all footage on the device has been uploaded to the
instance of VideoManager it was originally associated with - once the device has been factory reset, all
footage that wasn't uploaded already will be lost.
To move a device from one instance of VideoManager to another:
1. Undock your VideoBadge or VideoTag from the PC or DockController associated with the old version of VideoManager.
2. Dock the device to the PC or DockController associated with the VideoManager it should be moved to.
3. Navigate to the Devices tab, and click > View Device Info next to the rel-
evant device (it will appear as locked).
4. Click Factory Reset this Device. This will automatically associate the device
with the new instance of VideoManager.
Edesix ED-012-134-08
91
Page 92

VideoManager - User Guide
6 Frequently Asked Questions
6.2.5 Q. Why does my device appear as "locked" on VideoManager?
A. Your device will appear as locked if it has been undocked from one instance of VideoManager and
redocked at a different VideoManager which does not have its access control key. This means that all
footage on the device will be inaccessible.
The device will beunlocked immediately if you export its access control key from the original
VideoManager to the VideoManager which the device is connected to now.
Edesix ED-012-134-08
92
 Loading...