

Page 1
To ensure you get the best results from your portable heater,
please read this manual first and keep it for future reference.
For additional information please call 1-800-839-0966
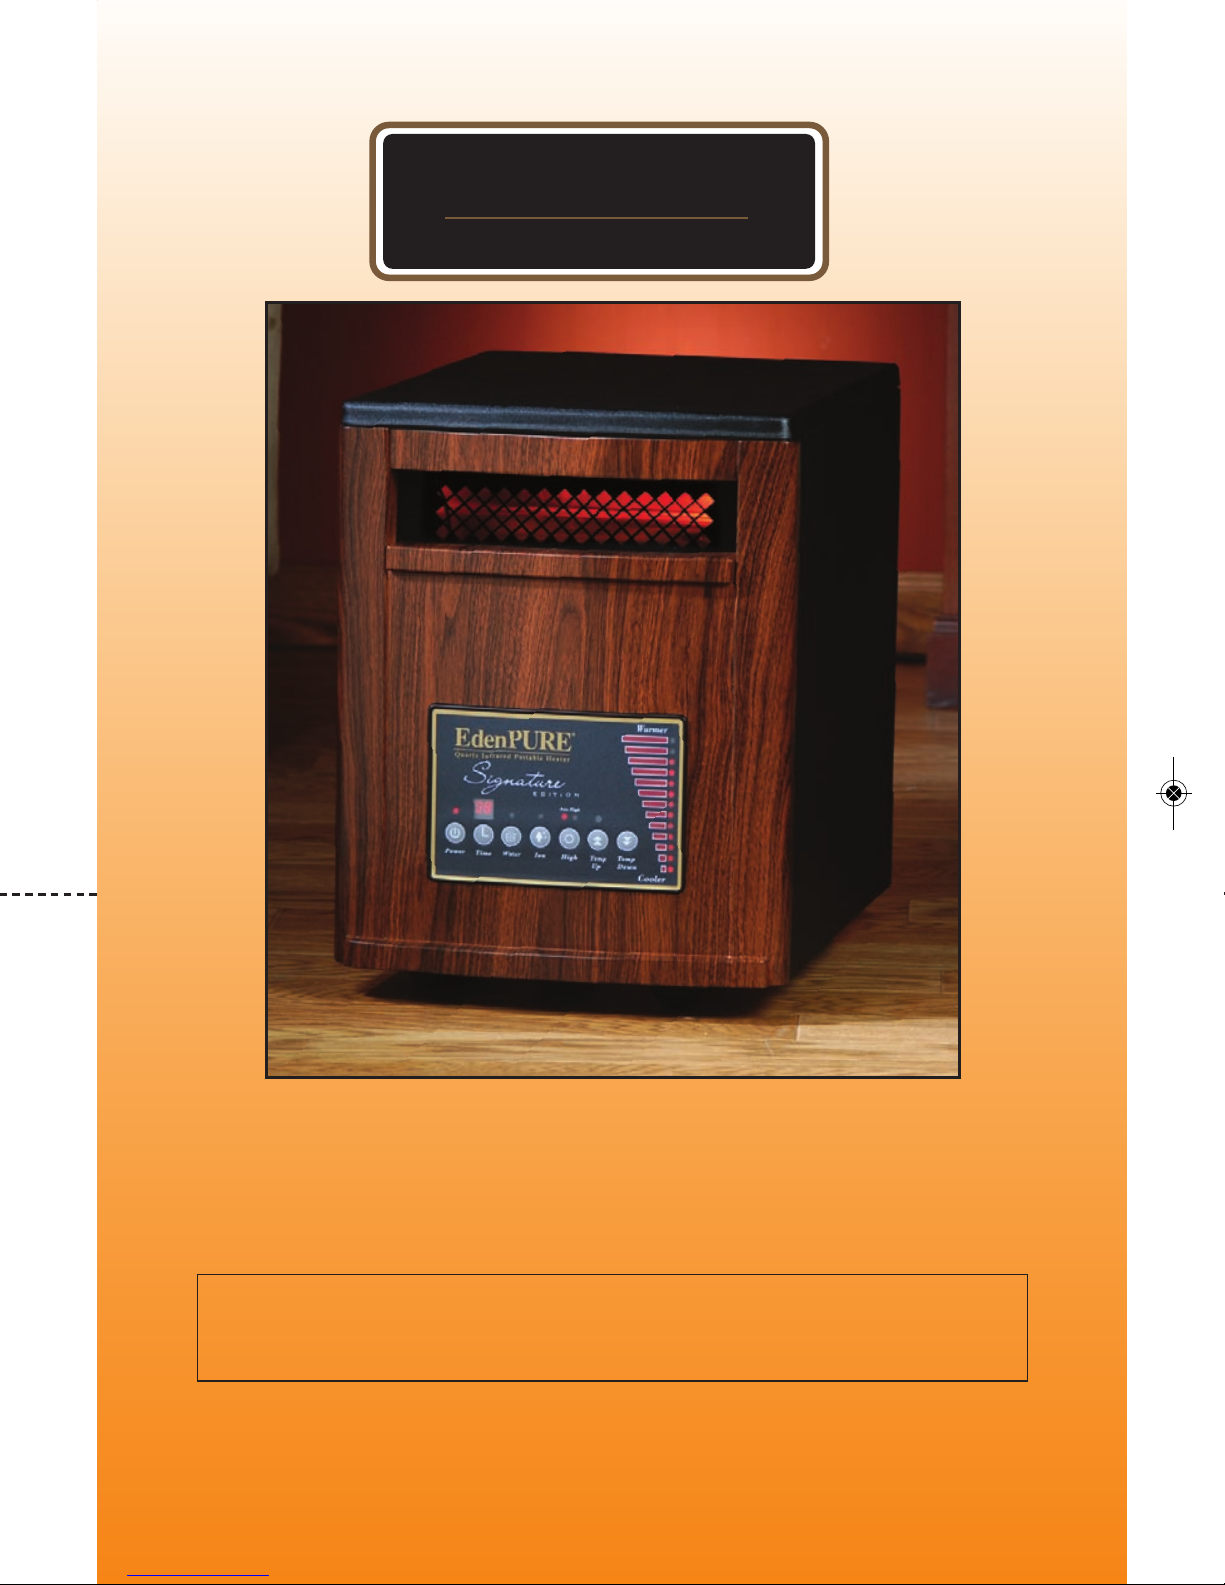
Thank you for purchasing the EdenPURE® Signature Model
U.S. PATENT NO. 7,046,918. FOREIGN PATENTS PENDING.
OPERATION AND WARRANTY MANUAL
EdenPURE®Signature Model
IMPORTANT
SAVE THESE INSTRUCTIONS
®
EdenPURE
Q U A R T Z I N F R A R E D P O R TA B L E H E AT E R
EdenPURE
Page 2

Please return this card within 30 days of purchase to activate your warranty. Thank You.
E-mail Address _________________________@ ______________
Firstname _______________ M.I. _____ Lastname______________________________
Street ______________________________ Apt.# ______________
City ___________________ State _______ Zip code ___________
Model purchased _______ Serial# _________________ Date of purchase: Month _______ Day ___ Year _____
Por favor, para activar su garantía, devuelva esta tarjeta durante los treinta (30) días siguientes de realizar su
Dirección de E-mail______________________@ _____________
Nombre________________________________________________________________
Apellido__________________________________________________________
Calle__________________________________#Apt.___________
Ciudad__________________ Estado_________ Código _______________
Modelo comprado _______ # de serie _________________ Fecha de compra: mes _______ día ___ año _____
Veuillez s’il vous plaît retourner cette carte dans un délai de 30 jours à compter de la date d’achat pour activer
Adresse E-mail _________________________@ ______________
Prénom _______________ Initiale 2nd prénom . _____ Nom de Famille________________________
Rue ______________________________ No Appartement ______________
Ville ___________________ État _______ Code Postal ___________
Modèle acheté _______ N0 de Série _________________ Date d’achat: Mois _______ Jour ___ Année _____
Table of Contents
Important Instructions ..................................................................1, 2
Care ..................................................................................................3,4
Operation..........................................................................................3,4
Service ..............................................................................................3,4
Filter Maintenance ............................................................................5
Benefits................................................................................................6
Performance Suggestions ..................................................................7
Questions and Answers..................................................................8, 9
Warranty ..........................................................................................10
Warranty Card ................................................................................37
WARNING
IMPROPER USE OF THIS HEATER COULD RESULT IN RISK
OF FIRE, ELECTRIC SHOCK, AND INJURY TO PERSONS
WARNING
ANY REQUIRED SERVICE OTHER THAN FILTER
MAINTENANCE SHOULD ONLY BE PERFORMED BY AN
AUTHORIZED SERVICE REPRESENTATIVE AND ANY
OTHER REPAIRS ATTEMPTED BY ANYONE
OTHER THAN AN AUTHORIZED SERVICE
REPRESENTATIVE WILL VOID THE WARRANTY
CAUTION
RISK OF ELECTRICAL SHOCK
DO NOT OPEN
NO USER-SERVICEABLE PARTS INSIDE
Page 3

1
Important Instructions
READ ALL INSTRUCTIONS BEFORE USING THE HEATER
1) The grill of the heater can be hot when in use. Although there is a
protective “cool to the touch” coating on the grill, to avoid burns do not
let bare skin touch hot surfaces. If provided, use handles when moving
this heater. Keep combustible materials such as furniture, pillows,
bedding, papers, clothes and curtains at least 3 feet (0.9m) from the front
of the heater and keep them away from the sides and the rear.
2) Extreme caution is necessary when any heater is used by or near
children or invalids and whenever the heater is left operating and
unattended.
3) Always unplug heater when not in use.
4) Do not operate any heater with a damaged cord, plug or after the heater
malfunctions, has been dropped or damaged in any manner. Return
heater to authorized service facility for examination, electrical or
mechanical adjustment, or repair.
5) Do not use the heater outdoors or for heating construction sites.
6) The heater is not intended for use in bathrooms, laundry areas and
similar indoor locations, areas with standing water, a shower or
swimming pool. Never locate heater where it may fall into a bathtub
or other water container.
7) Do not run cord under carpeting. Do not cover cord with throw rugs,
runners, or similar coverings. Arrange cord away from traffic area and
where it will not be tripped over.
8) To disconnect heater, turn controls to off, then remove plug from outlet.
9) Do not plug heater into any other cord connected device such as a
power strip, surge protector, multiple outlet adapter, grounding adapter
or outlet-type air fresheners. Plug into a 3-prong 110v 15amp or higher
grounded circuit receptacle only.
10) Do not insert or allow foreign objects to enter any ventilation or exhaust
opening as this may cause an electric shock or fire, or damage the heater.
11) To prevent a possible fire, do not block air intakes or exhaust in any
manner. Do not use on soft surfaces, like a bed, where openings may
become blocked.
12) Do not block the front or rear of the heater.
13) Do not place anything directly in front of the heater.
14) Do not force the filter to dry using alternative methods when performing
filter maintenance; doing so could damage the filter.
Page 4
2
15) Do not use it in areas where gasoline, paint, or flammable liquids are
used or stored. A heater has hot or arcing or sparking parts inside.
16) Do not plug the heater into a loose fitting or broken receptacle.
17) Do not alter the heater’s design or you will void the warranty.
18) In the event that you open the cabinet of the heater, do not touch the
heating elements with your bare hands. Moisture, oils or residue from
the skin can weaken the glass and shorten the life span of the element.
19) The heater must be located immediately below a socket outlet.
20) Avoid the use of an extension cord because the extension cord may
overheat and cause a risk of fire. However, if you have to use an
extension cord, the cord should be No. 14 AWG minimum size and rated
not less than 1875 watts. The extension cord shall be a 3 wire cord with a
grounding type cord and plug connector.
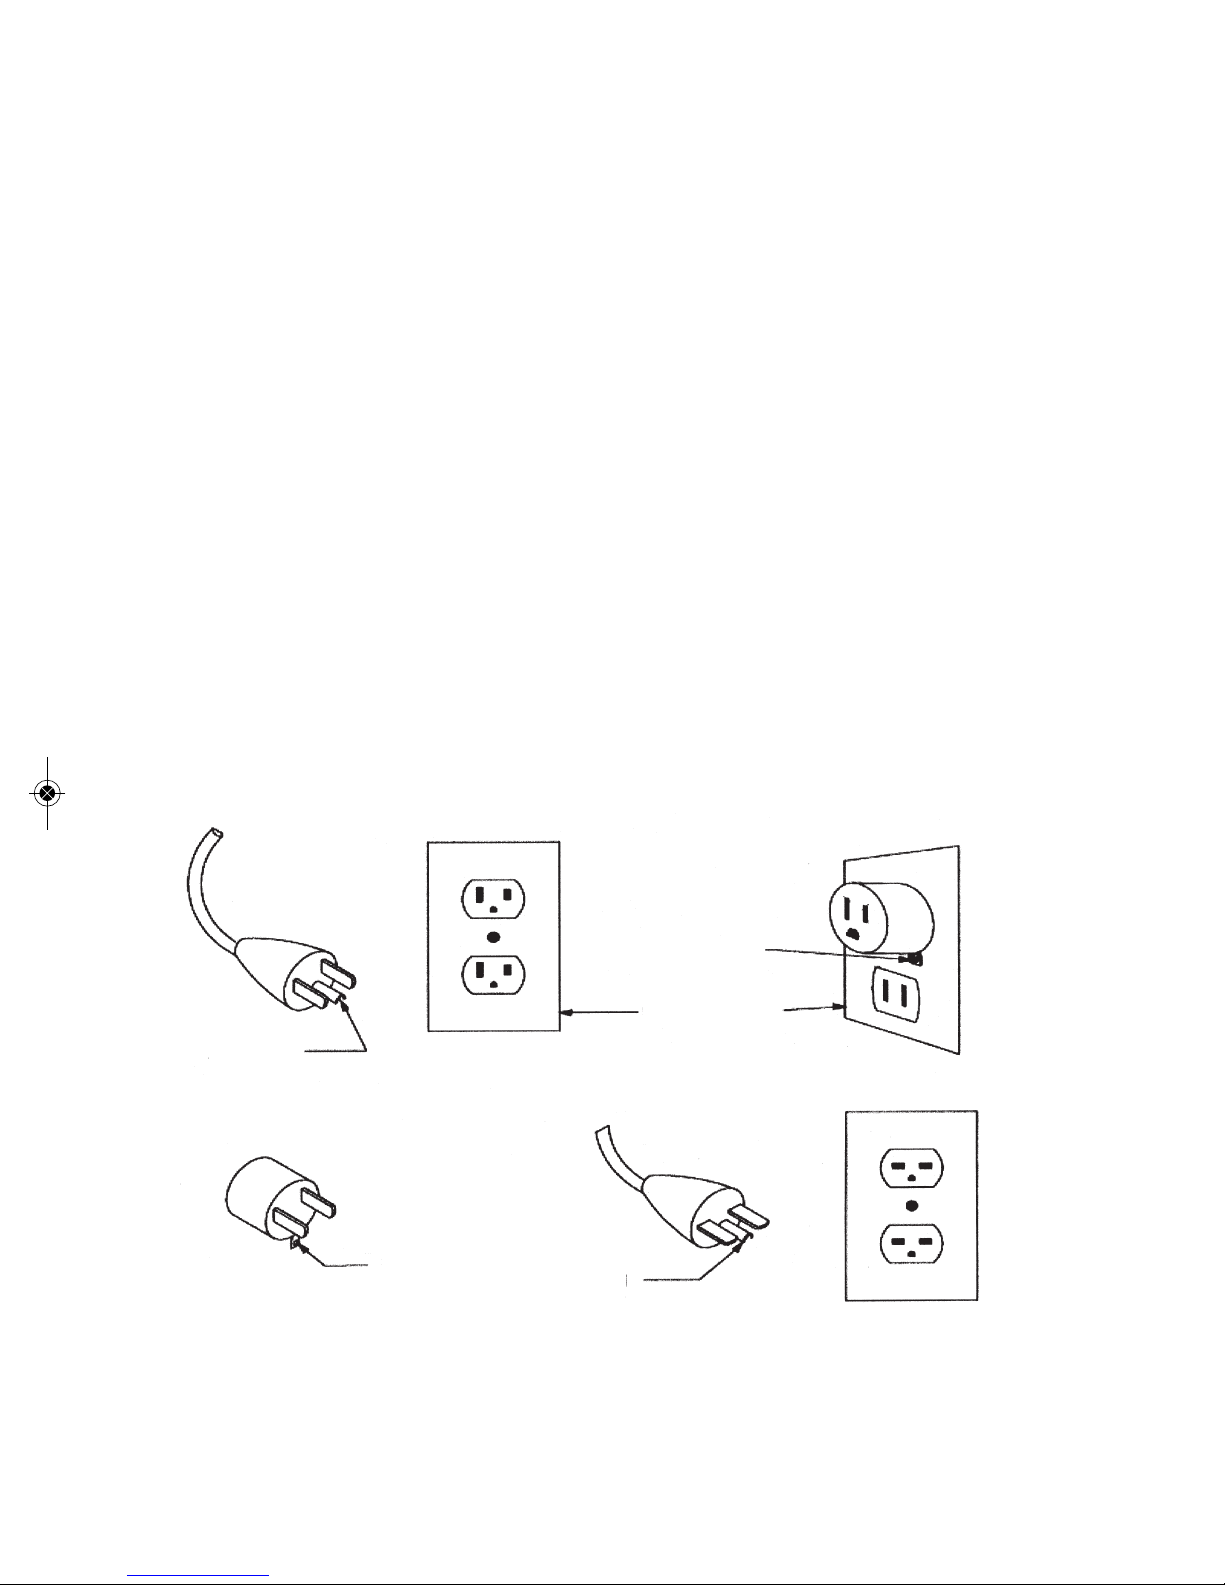
21) The heater is for use on 110 volt outlets. The cord has a plug as shown
at “A” in Figure below. An adapter as shown at “C” is available for
connecting three-blade grounding type plugs to two-slot receptacles.
The green grounding plug extending from the adapter must be
connected to a permanent ground such as properly grounded outlet box.
The adapter should not be used if a three-slot grounded receptacle is
available. Figure (D) European type plug.
22) Manual restart is required if power to the unit is interrupted.
WARNING: In order to avoid overheating, do not cover the heater.
SAVE THESE INSTRUCTIONS
GROUNDING
PIN
GROUNDING
PIN
GROUNDING
MEANS
COVER OF GROUNDED
OUTLET BOX
ADAPTER
(C)
(D)
(A)
METAL SCREW
Page 5
3
READ ALL INSTRUCTIONS BEFORE USING THE HEATER
Operation – 12 step set-up for EdenPURE® Signature Model
1) Unpackage heater. Cut open tape area, fold back flaps and gently turn entire
box upside down. Lift box from styrofoam packing. Remove styrofoam, turn
upright. We recommend keeping the packaging for off-season storage and any
transporting needs.
2) Find a level and unobstructed location to place the unpackaged heater.
3) Plug the power cord directly into an unused grounded 110 volt 15 amp or higher
circuit receptacle. The power switch will illuminate and the heater will beep 3
times indicating the unit is plugged into the receptacle.
4) Insert 2 “AAA” batteries into the battery compartment on the remote control.
5) Push the “Power” button located on the front of the heater or the remote control to
turn the heater on. Set the Mode Key to “Auto”. Adjust the “temp up” and “temp
down” buttons until the desired temperature is reached. Once the desired
temperature is reached the heater will cycle on and off to maintain the room
temperature. When the Signature Model is set on the “Auto” mode and cycling off
and on, it has been equipped with an Energy Savings feature. The unit will run on
full power until it gets to within 2 degrees of the desired temperature. At this point
it will automatically go into an energy savings mode which shuts down 2 of the
heating elements and lowers the fan speed. Not only will this save energy, it also
keeps the room temperature closer to the desired temperature. The fan will run
periodically to circulate the room air through the heater in order to monitor the
room temperature more accurately. If the room temperature should fall below 2
degrees of the desired temperature, the unit will return to the full power mode until
the desired temperature is reached again.
6) Switch the Mode Key to “High” in order to have the heater stay on high heat
and not cycle on and off.
7) To turn the heater off, press the “Power” button, the fan will continue to run
until all of the heat has been expelled and will then turn off.
8) The heater is equipped with a temperature limiting control contained inside the
unit. If the heater stops working, shut the power off and let the unit cool down.
Turn the power back on and resume use. If the unit continues to shut down or the
unit does not reset itself, please contact us for service.
9) Humidifier: Use caution when filling the humidifier water chamber if the Heater
has been in use as the plastic can be hot.
To fill the humidifier chamber, make sure the heater is turned off. Open the
compartment on the left side of the heater. To open the door, pull gently down and
outward on the handle provided. Remove the water bottle. Fill the bottle with
distilled water and invert the bottle into the humidity tray. Once the water has filled
the tray refill the bottle a second time and invert it on to the humidity tray. The
humidifier is now primed. Close the humidifier compartment. Turn the humidifier
on. Once the unit is primed a bottle of water should last approximately 10 hours.
When the water has diminished the water light on the front of the unit will blink
and the humidifier will shut off until the water is replenished.
Yes: The heater can be safely and effectively operated without water.
Care • Operation • Service
Page 6
P
eut-on déplacer le radiateur quand il est en marche?
Nous ne le recommandons pas. Attendez que le ventilateur se soit arrêté avant de transporter
l’appareil.
Quelle est la longévité des éléments de quartz?
La durée moyenne est de 5000 heures ou plus, soit de 3 à 5 ans. Vous pouvez faire remplacer
ces éléments chez un concessionnaire agréé.
Qu’entendez-vous par « zone thermique »?
La zone thermique vise à concentrer la chaleur là où les gens passent la plus grande partie de
leur temps. En effet, à quoi bon chauffer à 68 degrés ou plus (20 C) diverses pièces qu’on
n’utilise pas?
Combien de kilowatts par heure consomme l’appareil de chauffage?
Selon les tests effectués par un laboratoire indépendant dans une maison pour le modèle Signature,
on a estimé la consommation à 1.45 kilowatts á l’heure en le mode de courant complet et 30.9 en
le mode de gagner d’énergie.
Quelle est la puissance thermique BTU (Unités thermiques Britanniques) de ces appareils
de chauffage?
Pour le modèle Signature, c’est à peu près 5000 BTU.
En fait, les BTU n’ont plus aucun sens puisque le procédé de chauffage breveté de l’EdenPure
délibérément choisi de ne pas utiliser cette méthode désuète et inefficace de combustion thermique
basée sur les BTU. Notre méthode de chauffage est infiniment supérieure sur le plan efficacité,
sécurité, confort et crée un climat sain et naturel chez vous.
Puis-je utiliser cet appareil de chauffage et simultanément me servir d’un autre appareil
électrique?
Oui, bien sûr, tant qu’ils ne sont pas branchés sur le même circuit. Ces chauffages de zone
sont considérés comme des appareils ménagers. Il est recommandé de ne pas utiliser plus d’un
appareil sur un même disjoncteur. Votre congélateur, réfrigérateur, micro-ondes, machine à
laver, séchoir électrique et autres appareils ne doivent pas être branchés sur un même
disjoncteur.
Peut-on utiliser une rallonge, un paratenseur ou une multiprises avec cet appareil de
chauffage?
Ce n’est pas recommandé. Cet appareil est conçu pour être branché directement sur un circuit
relié à la terre, de 110 volts 15 amp ou plus. Si toutefois vous devez utiliser une rallonge, le
calibre de ce cordon de rallonge devra être un No 14 AWG minimum calibré à 1875 watt . Ce
doit être un cordon à 3 fils doté d’une fiche reliée à la terre et d’une fiche de raccordement.
Je n’ai pas de prise de courant avec prise de terre. Puis-je utiliser un adaptateur de
cordon ou enlever la broche?
Absolument pas. Si vous n’avez pas de branchement électrique relié à la terre, contactez un
électricien local agréé et demandez-lui conseil. Toute modification effectuée sur cet appareil
annule automatiquement la garantie.
La chaufferette peut elle fonctionner efficacement et sans danger sans eau?
Oui, l’humidificateur ne doit pas fonctionner à moins que vous ne le vouliez.
Est-ce que les accessoires Humidificateur et Ion peuvent fonctionner sans le chauffage?
Non, l’appareil est conçu pour que ces accessoires fonctionnent en même temps que le
chauffage.
Est-ce que les accessoires Humidificateur et Ion vont se mettre en marche lorsque je règle
la minuterie pour une mise en marche automatique de la chaufferette?
Oui, lorsque la caractéristique minuterie auto-on est utilisée, la chaufferette va se mettre en
marche suivant exactement le même réglage que lors de l’utilisation précédente.
4
10) Timer: the heater is equipped with a timer feature that will either shut the unit off
after a desired amount of time or delay the time for the unit to turn on.
Automatically turn off: With the unit running at the desired temperature, press the timer
button, 00 will illuminate in red led numbers, then push the temp up or temp down
arrow to select the desired number of hours you would like the heater to run before
shutting off. The hours range from (1-24) in 1 hour increments. Once the number of
hours is set, the unit will automatically shut off once the set amount of time has
passed.
Automatically turn on: With the power button off, push the timer button, 00 will
illuminate in red led numbers, then push the temp up or temp down arrow to select
the desired number of hours (1-24) you would like to delay the start of your heater.
The heater will come on at the last heat setting used once the set amount of time has
passed.
11) Ion: Press the Ion button to turn on the negative ion generator. Press it again to turn
off the generator.
12) This heater is equipped with a safety “tip over” feature. If the unit is tipped, even
slightly while operating the power will shut off to the unit. Once the unit is returned
to its upright position you will need to push the power button to restart your unit and
it will return to the last settings used
Cabinet Care – Wipe clean with a soft damp cloth.
Heater Storage – When the heater is not going to be used for an extended period of
time, please do the following:
1) Unplug Heater.
2) Drain the water receptacle for the Humidifier feature and allow to completely
air dry
3) Wind up electrical cord so as to keep it off the ground.
4) Cover the heater to prevent dust from accumulating on the filter or
internally.
5) Store the heater in a dry, low dust environment.
Service – To replace a heating element or for other repairs or service, please
call us toll-free at 1-800-839-0966.
SAVE THESE INSTRUCTIONS
Page 7

5
WASHABLE LIFETIME FILTER SYSTEM
The EdenPURE®Heaters come equipped with a washable lifetime filter
on the rear of the unit which is easy to clean.
IMPORTANT INFORMATION: If you have allergies and/or are
sensitive to dust you will want to use this filter. When choosing to use
the filter it must be cleaned daily, a clogged filter will cause the heater
not to work to it full capacity.
Using the heater with the dust filter attached is an optional feature.
Operating the heater without the filter will in no way harm or alter the
operation of the heater. If you are not sensitive to dust or do not want to
clean the filter daily, please remove it from the back of unit and use your
heater without it.
To clean the filter:
1) Press the tab on the top of the filter to release the filter and pull it
straight out.
2) Run warm tap water over the filter, the opposite direction of air flow,
until water runs clear. The filter might excrete some filtered residue,
so be cautious not to drip on any stainable surfaces such as carpeting.
You can also soak the filter in water mixed with a small amount of
mild dish soap (don’t forget to rinse with water after soaking filter).
3) Shake the filter over a sink until excess water is removed and allow it
to drip dry completely before reinstalling. DO NOT force the filter to
dry using any alternative methods.
4) Reinstall the filter to the rear of the unit by positioning the filter back
in place.
Filter Maintenance
WARNING
ANY REQUIRED SERVICE OTHER THAN FILTER MAINTENANCE SHOULD
ONLY BE PERFORMED BY AN AUTHORIZED SERVICE REPRESENTATIVE
Page 8
Suggestions pour un Rendement Optimal
Pour maximaliser le rendement de votre radiateur EdenPURE
suivants:
1) Éviter de placer le radiateur dans un endroit à fortes infiltrations d’air et de grand
passage, ce qui épuise rapidement l’air chaud.
2) Placer si possible l’appareil à proximité d’un mur intérieur toujours plus chaud et
diriger la puissance de sortie vers un mur extérieur plus froid. Ce mur extérieur
attirera la chaleur générée dans sa direction, ce qui permettra de chauffer plus
efficacement.
3) Placer un radiateur près d’un retour d’air froid dissipera l’air chaud de cet endroit.
Fermez ou essayez de couvrir la bouche d’air froid de façon à optimiser le rendement.
Essayez plusieurs possibilités de placement pour votre appareil. Voyez ce qui vous
convient le mieux.
4) Pour assurer une efficacité maximum de chauffage, il est nécessaire de maintenir 40%
(minimum) d’humidité relative.
5) Ces appareils de chauffage ont été conçus pour opérer à un maximum d’efficacité de
70 à 72 degrés F (=21.10–22.20 C). Selon le concept de chaleur douce, une
température de 68 degrés F (20 degrés C) vous donne la même sensation de chaleur
qu’une température de 72 degrés (22.2 degrés C). Ceci, en raison du mélange égal de
la chaleur avec l’humidité ambiante, vous donne un confort « de la tête aux pieds »
6) Lorsque l’appareil est placé dans un endroit peu fréquenté comme un sous-sol ou une
salle de jeux, les registres et les grilles de retour d’air du système en place doivent
être fermés si possible.
7) Dans les pièces à larges surfaces de ciment nu, essayez de placer l’appareil de
chauffage à quelques pieds au-dessus du sol. Assurez-vous que l’appareil est bien
ancré et ne basculera pas. Cette précaution vous octroiera un rendement thermique
plus efficace puisque le ciment absorbe la chaleur et l’attirera donc dans sa direction.
8) Essayez de baisser votre système de chauffage central de quelques degrés et placez le
radiateur dans la pièce où vous passez la plus grande partie de votre temps. Puis
choisissez la température de votre EdenPURE
à rien de chauffer à 68 degrés F+ (200 C) diverses pièces dont vous ne vous servez
pas.
9) Pour chauffer de vastes espaces, placez le radiateur au centre de la salle. S’il y a un
ventilateur de plafond, faites-le marcher en même temps de façon à répartir la chaleur
de manière égale. Essayez! C‘est à vous de voir ce qui vous convient le mieux.
10) Si l’emplacement choisi pour votre appareil est excessivement sale ou
poussiéreux, il est impératif de nettoyer le filtre plus fréquemment, vu que ce
filtre peut s’obstruer et causer un mauvais fonctionnement de l’appareil.
11) Ce radiateur est brûlant lorsqu’il est en marche. Évitez tout contact physique pour
éviter toute brûlure. S’il en est équipé, servez-vous des poignées de transport pour
déplacer cet appareil. Mettez hors de portée toute matière inflammable: meubles,
coussins, literie, papiers, vêtements et rideaux. Éloignez-les à un minimum de 2 pieds
(= 60cm) en face du radiateur ainsi que de chaque côté et à l’arrière.
12) Une extrême vigilance s’impose quand un appareil de chauffage est utilisé à
proximité d’enfants ou d’invalides, ou quand cet appareil de chauffage est en marche
sans supervision aucune.
13) Pour arrêter le radiateur, mettez la commande de contrôle sur Arrêt (Off) puis
débranchez la prise d’électricité.
14) Toujours débrancher la prise de l’appareil de chauffage quand il n’est pas en marche!
6
Benefits
Safety
The EdenPURE®Heaters have an excellent safety record. They produce safe, clean,
economical heat by using Infrared Quartz Heating Elements. The unique
EdenPURE®Heaters use a process that virtually prevents wasteful accumulation of
heat on the ceiling. These heaters deliver ultimate comfort by keeping the heat
virtually even from “head-to-toe.”
Zone Heating Control
EdenPURE®Heaters provide heat only where and when it is needed. These heaters
are less expensive per heated square foot and do not require costly duct installation.
The heaters use standard 110 volt current and do not require special 220 volt wiring
or a chimney vent.
Healthy Heat
EdenPURE®Heaters produce heat that is as safe as the infrared rays of the Earth’s
sun, producing natural outdoor heat indoors.
The EdenPURE®Heaters have low operating and maintenance costs. The fan
motor is the only moving part and is equipped with quality trouble-free controls.
There are no burners to rust, corrode, adjust, and no pilot light to waste energy.
Safe, clean, long life infrared Heating Elements provide the heat energy. Average
element life is 20,000 hours. The heaters are constructed of lifetime metals
(Zincification metal plate and Bronze).
Ultimate Comfort
EdenPURE®Heaters provide even heat distribution and warm floors. The heaters
thermostatically control, circulate, and recycle heated air at the floor for maximum
use and comfort. The floor to ceiling temperature differential is minimal.
As the Quartz Infrared Elements operate, you will notice the heater’s ability to heat
does not depend on a high-speed flow of air. Instead, the gentle flow of air
promotes more effective heat mixing action and air stability at the floor.
These heaters will not burn, dry out, or otherwise pollute the air with impurities.
This protects the humidity level and air quality important to breathing comfort and
personal health.
EdenPURE
®
Heaters have no messy tanks to fill, wicks to clean, wood to hassle
with, ashes to carry, and leave no soot film on walls or draperies. The heaters are
convenient to use, just plug it into any unused grounded 110 volt 15 amp or higher
circuit receptacle.
Humidifier Feature
By adding vapor mist into the direct path of the heaters grill, the maximum
moisture is added to the heaters output. This synergized addition of adding
moisture to the infrared heat output dramatically increases the heat rise and spread
as well as producing a super level of therapeutic comfort especially for children and
the elderly.
Ion Feature
The Ion Feature generates negative ions that cause floating particulates in the air to
magnetize together forming a mass which drops them to the floor to be swept up.
Page 9
7
Performance Suggestions
To assure maximum performance of the EdenPURE®Heater, please note
the following recommendations:
1) For best result, do not locate the heater in an area with a high rate of
air filtration and movement as the warm air will be exhausted.
2) Try placing the heater near a warmer inside wall and direct the output
towards a cooler outside wall. The cooler outside wall will tend to
draw the generated heat towards itself, which will allow for more
efficient heating.
3) Placing the heater next to a cold air return will draw the heat away
from area to be heated. Try closing or covering the cold air return.
This will allow for more efficient heating. Experiment with the
placement of the heater to see what works best for you.
4) To ensure maximum efficiency, a 40% (minimum) relative humidity
should be maintained in the heated environment.
5) The heaters are designed to operate for maximum efficiency up to 7072 degree range. Due to the soft heat concept, temperatures at 68
degrees feel as though it were 72 degrees. This is due to the heat
mixing with humidity evenly for “head-to-toe” comfort.
6) When the heater is placed in an isolated area, i.e. basement or
recreation area, the delivery registers and air return grills of the
existing system should be closed in that area if possible.
7) Try placing the heater a few feet above the floor in rooms with large
areas of bare concrete. Make sure the heater is secure and won’t fall.
This will allow for more efficient heating since concrete acts as a heat
sink and will tend to draw the heat its direction.
8) Try lowering your central heating system to a lower temperature and
placing the heater in the area you spend the majority of your time.
Now set the EdenPURE®heater to your comfort level. After all, there
is no point to heating multiple rooms to 68+ degrees when not in use.
9) When heating larger areas, place the heater in a central location. If a
ceiling fan is nearby, try using it at the same time to help distribute the heat
evenly. Our suggestion, give it a try and see what works best for you.
10) If used in an extremely dirty or dusty area, the filter must be cleaned
more frequently as the filter can clog and cause the heater to stop
working.
11) The heater grill is hot when in use. To avoid burns, do not let bare skin
touch hot surface. If provided, use handles when moving this heater. Keep
combustible materials, such as furniture, pillows, bedding, papers, clothes,
and curtains at least three feet from the front of the heater and keep them
away from the sides and rear.
12) Extreme caution is necessary when any heater is used by or near children
or invalids and whenever the heater is left operating and unattended.
13) To disconnect heater, turn controls to off, then remove plug from outlet.
14) Always unplug heater when not in use.
Page 10

SYSTÉME DE FILTRE PERMANENT LAVABLE
Les appareils de chauffage EdenPURE
filtre est situé à l’arrière de l’appareil et est facile à laver.
IMFORMATION IMPORTANTE: Si vous souffrez d’allergies et/ou êtes sensible à la
poussière, nous vous conseillons d’utiliser ce filtre. Si vous décidez d’utiliser le filtre, il
doit être lavé tous les jours car un filtre obstrué empêchera l’appareil de fonctionner à
pleine capacité.
L’utilisation de l’appareil de chauffage avec le filtre à poussière est une option. Faire
fonctionner l’appareil sans le filtre ne va, en aucun cas, affecter ou modifier le
fonctionnement de l’appareil. Si vous n’êtes pas sensible à la poussière ou ne souhaitez
pas devoir laver le filtre tous les jours, enlevez-le de l’arrière de l’appareil et utilisez
l’appareil sans filtre
1) Pour dégager le filtre, relever les loquets situés de chaque côté du filtre. Ôter ce filtre de
l’arrière de l’appareil en inclinant et soulevant en même temps.
2) Faire couler de l’eau chaude du robinet sur le filtre, dans la direction opposée au
passage d’air jusqu’à ce que l’eau devienne propre. Il se peut que le filtre rejette des
résidus filtrés; en conséquence, faites attention à ne pas le laisser s’égoutter sur des
surfaces susceptibles d’être tachées comme une moquette par exemple. Vous pouvez
aussi laisser tremper le filtre dans de l’eau mélangée à une petite quantité de liquide
vaisselle doux (n’oubliez pas de rincer à l’eau après avoir laissé tremper le filtre).
3) Secouer le filtre au-dessus d’un évier jusqu’à ce que l’excès d’eau disparaisse et le
laisser sécher complètement avant de le remettre en place. Ne pas accélérer le
processus de séchage du filtre par d’autres méthodes.
4) Remettre le filtre en place à l’arrière de l’appareil et bien installer les loquets
latéraux en les soulevant et les fermant à l’endroit prévu.
TOUTE INTERVENTION NÉCESSAIRE AUTRE QUE L’ENTRETIEN DU FILTRE DOIT
Ê
TRE IMPÉRATIVEMENT EFFECTUÉE PAR UN PROFESSIONNEL D’UN CENTRE
8
Why does the Blower Fan keep running after I have turned off the
rocker switch?
The Blower Fan will continue to run until the proprietary heat chambers have
cooled down. After a few minutes the fan will shut off automatically.
Can the heating elements be replaced?
Yes. Please contact your place of purchase.
The heater’s airflow seems to have diminished?
Make sure the rear intake is not blocked and that the filter is clean. Follow
the Filter Maintenance procedure on page 5.
Once I initially plug the unit in and turn it on, how long will it take to
heat my room?
Generally, it takes less than an hour. Please remember that with any type of
heating process there are many variables. Size of the room, how well the
room is insulated, how many doors/windows, how much bare concrete
(which acts as a heat sink with any type of heating), the opening and closing
of an exterior door, etc…
Can I use the heater to heat multiple rooms at the same time?
Yes. Keep in mind the heating will vary based on how open your floor
plan is and the sizes of the rooms involved. We have heard back from
customers stating that with the help of ceiling fans they have been able to
heat multiple rooms simultaneously by placing the unit in a central room.
Our suggestion, give it a try and see what works best for you.
My home is not insulated very well, will this heater help me?
Yes, but keep in mind that rooms with little insulation will not retain the
heat as efficiently.
Can I use the heater if I have vaulted or cathedral ceilings?
Yes, but it will take a little longer to heat the room initially. Once the room
has reached the desired temperature it will cycle on and off accordingly.
Can the heater be used in a bathroom?
It is not recommended due to the high level of moisture in a bathroom.
Will I be able to use the heater in a basement or garage?
Yes, but keep in mind that rooms with little insulation will not retain the
heat as efficiently. Bare concrete floors which act as a heat sink with any
type of heating will absorb some of the heat. Placing the heater a few feet
above the floor will allow for more efficient heating.
Can I use more than one heater at a time?
Yes, but you should make sure they are not on the same circuit. Each
heater and appliance should be on its own circuit.
Can I use the heater on a job/construction site?
The heater was not designed to be used in a high dust construction
environment. Using the heater for this purpose will void your warranty.
Questions and Answers
Page 11

9
Can I move the heater around while it is operating?
It is not recommended to move any portable heater while it is operating. We
recommend moving the heater once the fan has completely turned off.
What is the life expectancy for the Quartz Elements?
Average element life is 20,000 hours. The Quartz Elements are replaceable
by an authorized service dealer.
What is Zone Heating?
Zone heating is all about focusing heat where people spend the most time.
After all, there is no point to heating multiple rooms to 68+ degrees when not
in use.
How many kilowatts per hour does the heater use?
EdenPURE
®
Signature Model was tested by an independent lab in a home
environment and determined to use approximately 1.45 kilowatts per hour on
Full Power mode and 0.9 on Energy Saving mode.
What is the BTU Rating for the heaters?
EdenPURE®Signature Model is approximately 5000 BTUs.
The BTUs are basically irrelevant as a unit of measure since the patented
heating process of the EdenPURE®INTENTIONALLY does not operate using
old inefficient methods of heat combustion, which is rated by using the BTU
rule. Our heating method is far superior for efficiency, safety, comfort, and
providing a natural healthy indoor environment.
Can I use the heater and another appliance at the same time?
Yes, as long as they are not on the same circuit. Zone heaters are considered
to be an appliance. You should not run more than one larger appliance on a
single circuit breaker. Your freezer, refrigerator, microwave oven, washing
machine, dryer, and other such appliances should not share a circuit breaker.
Can I use an extension cord, surge protector, or power strip with my
heater?
It is not recommended. It is designed to plug directly into a grounded 110 volt
15 amp or higher circuit receptacle. However, if you have to use an extension
cord, the cord should be No. 14 AWG minimum size and rated not less than
1875 watts. The extension cord should be a 3 wire cord with a grounding type
cord and plug connector.
I don’t have a grounded outlet; can I use a cord adapter or remove the
grounding plug?
NO. If you don’t have a grounded outlet, contact a licensed electrician in
your area for advice. Removing or altering any part of the heater will void
the warranty.
Can the Heater safely and effectively be operated without water?
Yes, you do not need to run the Humidity feature unless you so desire.
Will the Humidity or Ion features work without using the Heat feature?
No, the unit is designed for those features to work in conjunction with the
heat.
Will the Humidity or Ion features come on when I set the timer for my
heater to automatically come on?
Yes, when the auto-on timer feature is used, the heater will come on exactly at
the last setting it was used at.
Page 12

10
Three Year Limited Warranty
GUARANTEE
This product carries a 30-day guarantee. If you find your unit to be defective within the
first 30 days of purchase, you may return it for a refund or a new unit.
In the event you need to return your heater, it must be returned in the
original packaging to avoid damage to the heater during shipping.
THREE YEAR LIMITED WARRANTY
WARRANTY: The Company warrants this product, to the original purchaser or gift recipient, to be free from
defects in workmanship and materials under normal use and service, for a period of three years from the date of
purchase.
Warranty will be null and void if any of the following occur: The mechanics of the heater and/or the electrical
cord and plug have been altered or tampered with in any way. Heaters not used correctly or not maintained
according to the care instructions.
LIMITATIONS: ALL WARRANTIES IMPLIED BY LAW, INCLUDING THE IMPLIED WARRANTIES OF
MERCHANTABILITY AND FITNESS FOR A PARTICULAR PURPOSE, ARE EXPRESSLY LIMITED TO THE
DURATION OF THE LIMITED WARRANTIES SET FORTH ABOVE.
Some jurisdictions do not allow
limitations on the length of the implied warranty, so the above limitation may not apply to you. IN NO
EVENT SHALL THE COMPANY BE LIABLE FOR ANY INCIDENTAL OR CONSEQUENTIAL DAMAGES, LOSS OF
PROFIT OR MEDICAL EXPENSES CAUSED BY ANY DEFECT, FAILURE, MISUSE, OR MALFUNCTION OF THE
PRODUCT.
Some jurisdictions do not allow the exclusion or limitation of incidental or consequential damages, so the
above limitation or exclusion may not apply to you. The Company will not be responsible for damages or
losses, direct or indirect, caused by misuse, abuse, accident, negligence, conditions of transportation or
storage, or failure to follow instructions. The Company will not be responsible for any statements that are
made or published, written or oral, that are inconsistent with this written warranty, or which are
misleading or inconsistent with the facts as published in the literature or specifications by the Company.
In the unlikely event that your unit does not appear to be working properly,
you must contact your Sales Representative for immediate assistance.
Prior to your call, we encourage you to visit our service-related website www.edenpureservice.com
for numerous troubleshooting tips and possible service instructions if needed.
If you are unable to reach your Sales Representataive and www.edenpureservice.com does not
answer your questions, you may contact our Resource Partner’s Customer Service Team by calling
1-866-786-8946 or email us at custserv@rppurchase.com. Please have your proof of purchase
handy when you make your call or Resource Partners will be unable to assist you. The information
necessary for us to help you will be on your proof of purchase.
Thank you!
LIRE ATTENTIVEMENT TOUTES LES INSTRUCTIONS AVANT
D’UTILISER L’APPAREIL DE CHAUFFAGE
F
onctionnement- Installation en 12 étapes pour modèle EdenPure
1) Déballer l’appareil: couper la partie recouverte de ruban adhésif, rabattre les volets et
r
enverser doucement la boîte entière la tête en bas. Soulever la boîte pour l’extraire
de l’emballage de polystyrène. Enlever ce dernier, tourner en remontant vers le haut.
Nous vous recommandons de garder l’emballage pour l’entrepôt de l’article durant la
p
ériode de non utilisation et au cas où vous auriez besoin de le transporter.
2) Trouver un endroit stable et non encombré pour y mettre l’appareil une fois déballé.
3) Brancher le cordon d’alimentation directement sur une prise de courant reliée à la terre
110 volt 15 amp ou plus, non en service. L’interrupteur d’alimentation va s’allumer et
l’appareil de chauffage va biper trois fois pour signaler qu’il est branché à la prise de
courant.
4) Insérer 2 piles (type “AAA”) dans le compartiment à piles de la télécommande.
5) Appuyer sur la commande « Marche » située sur la partie avant de l’appareil de
chauffage ou sur la télécommande pour allumer l’appareil. Ajuster le bouton de
réglage sur « Auto ». Ajustez les commandes « Haute température » et « Basse
température » jusqu’à ce que vous obteniez la température que vous désirez.
Lorsque la température aura atteint le niveau de confort suffisant, le thermostat
enclenchera ou arrêtera l’appareil de chauffage suivant le cas pour maintenir la
température désirée à un niveau constant. Lorsque l’appareil Signature sera
programmé sur « Auto » et que le thermostat enclenchera et arrêtera la marche, vous
bénéficierez alors des avantages d’une consommation énergétique minimale.
L’appareil fonctionnera à plein régime jusqu’à ce qu’il atteigne la température
souhaitée à 2 degrés près. A ce moment précis, il se mettra automatiquement en
position de consommation énergétique minimale qui aura pour effet de fermer 2 des
éléments chauffants et d’abaisser la vitesse du ventilateur. Non seulement cela vous
économisera de l’énergie mais aussi maintiendra la température de la pièce proche de
la température désirée. Le ventilateur va fonctionner par intermittence pour faire
circuler l’air de la pièce à travers l’appareil de chauffage pour contrôler la
température avec plus de précision. Dans le cas où la température de la pièce
tomberait 2 degrés en-dessous de la température désirée, l’appareil reviendra au
mode de pleine puissance jusqu’à ce que la température désirée soit de nouveau
atteinte.
6) Mettez le bouton de réglage sur “Haute Température” de façon à ce que le chauffage
reste constant et n’ait pas à s’allumer et à s’éteindre périodiquement.
7) Pour arrêter l’appareil de chauffage, poussez le bouton “Marche”; le ventilateur va
continuer à tourner jusqu’à ce que toute la chaleur soit évacuée et ensuite il va
s’arrêter.
8) Humidificateur: Faites attention lorsque vous remplissez le réservoir d’eau; si la
chaufferette a été en service, le plastic pourrait être très chaud. Pour remplir le réservoir
de l’humidificateur, assurez-vous que la chaufferette est arrêtée. Ouvrez le compartiment
à gauche de la chaufferette. Pour ouvrir le portillon, tirez délicatement vers le bas et
dehors avec la poignée. Enlevez la bouteille d’eau. Remplissez la bouteille avec de l’eau
du robinet et inversez la bouteille dans le plateau de l’humidificateur. Dès que la bouteille
a rempli le plateau, remplissez-la de nouveau et inversez-la dans le plateau de
l’humidificateur. L’humidificateur est maintenant amorcé. Fermez le compartiment de
l’humidificateur. Mettez l’humidificateur en marche. Lorsque l’appareil est amorcé, une
bouteille d’eau devrait durer environ 10 heures. Lorsque le niveau d’eau a diminué, le
témoin d’eau à l’avant de l’appareil va clignoter et l’humidificateur va s’arrêter tant
qu’on ne rajoute pas d’eau.
Entretien • Fonctionnement • Service
GARDEZ CES INSTRUCTIONS
Page 13

Para asegurar que obtiene los mejores resultados, por favor lea este manual y consérvelo para
futuras referencias.
Si necesita más información no dude en llamar gratuitamente a nuestro servicio
al cliente1-800-839-0966
¡GRACIAS POR COMPRAR EL CALENTADOR
U.S. PATENT NO. 7,046,918. FOREIGN PATENTS PENDING.
MANUAL DE OPERACION
Y GARANTIA
MODELO SIGNATURA
IMPORTANTE
CONSERVE ESTAS INSTRUCCIONES
®
EdenPURE
Q
U A R T Z I N F R A R E D P O R T A B L E H E A T E R
EdenPURE
Page 14

LISEZ TOUTES LES RECOMMANDATIONS AVANT D’UTILISER
VOTRE APPAREIL DE CHAUFFAGE
1) Pendant son utilisation, le gril de l’appareil de chauffage peut brûler au toucher en
dépit du procédé d’isolation prévu à cet effet sur ce gril. Pour éviter de se brûler, ne
pas mettre la peau nue au contact des surfaces chaudes. S’il en est équipé, utiliser les
poignées de transport pour bouger cet appareil de chauffage. Éloigner tous matériaux
combustibles tels que meubles, oreillers, literie, papiers, vêtements et rideaux à au
moins 3 pieds (0.9m) de la partie frontale de l’appareil de chauffage et les garder aussi
à distance des côtés et de l’arrière.
2) Une vigilance extrême s’impose quand un appareil de chauffage est utilisé à proximité
d’enfants ou d’invalides ou quand cet appareil de chauffage est en marche sans
supervision.
3) Toujours débrancher la prise de l’appareil de chauffage quand il n’est pas en marche.
4) Ne pas utiliser d’appareil de chauffage avec un cordon d’alimentation ou une prise
endommagés ou après un problème de fonctionnement. Ne pas utiliser un appareil de
chauffage s’il est tombé ou a subi un dommage quelconque. Le retourner au Centre
Service Agréé pour inspection, ajustement mécanique ou électrique, ou réparation.
5) Ne pas utiliser l’appareil de chauffage à l’extérieur ou sur des chantiers de
construction.
6) Cet appareil de chauffage n’est pas conçu pour être utilisé dans des salles de bains,
buanderies et endroits similaires à l’intérieur de la maison ou par exemple près d’une
douche ou d’une piscine. Ne jamais placer l’appareil dans un endroit où il pourrait
tomber dans une baignoire ou tout autre réservoir d’eau.
7) Ne pas laisser le cordon d’alimentation courir sous la moquette. Ne pas le recouvrir de
couvertures, tapis ou choses semblables. Disposer le cable d’alimentation à l’écart du
passage, là où personne ne pourra le bousculer.
8) Pour débrancher l’appareil de chauffage, mettre en position arrêt puis ôter la prise.
9) Ne pas brancher l’appareil sur un autre dispositif à cordon comme un multiprises, un
parasurtenseur, un adaptateur de terre, ou sur la prise d’un déodoriseur. Brancher sur
une prise de courant à 3 têtes avec conducteur de terre de 110v 15 amp ou plus.
10) Ne pas insérer, ne pas laisser d’objets étrangers pénétrer dans un conduit de ventilation
ou de sortie d’air en raison d’un risque de choc électrique, d’incendie ou de dommage
pour l’appareil.
11) Pour prévenir tout risque d’incendie, ne pas boucher les prises d’air ou de sortie d’air.
Ne pas utiliser sur des surfaces moelleuses, un lit par exemple, les ouvertures risquant
d’être bouchées.
12) Ne pas bloquer l’avant ou l’arrière de l’appareil de chauffage.
13) Ne rien mettre directement en face de l’appareil de chauffage
14) Ne pas accélérer le processus de séchage du filtre en utilisant des méthodes alternatives
quand vous effectuez l’entretien; vous risqueriez d’endommager le filtre.
Tabla de Contenido
Instrucciones importantes ........................................................13, 14
Cuidado ........................................................................................15,16
Operación ....................................................................................15,16
Servicio ........................................................................................15,16
Mantenimiento de filtro ..................................................................17
Beneficios ..........................................................................................18
Sugerencias de uso ..........................................................................19
Preguntas y respuestas ..............................................................20, 21
Garantía ............................................................................................22
Tarjeta de garantía ..........................................................................37
12
ADVERTENCIA
EL USO INAPROPIADO DE ESTE CALENTADOR PUEDE RESULTAR EN
RIESGO DE FUEGO, CHOQUE ELECTRICO Y LESIONES
ADVERTENCIA
SE REQUIERE PERSONAL AUTORIZADO PARA REALIZAR CUALQUIER
SERVICIO EXCEPTO EL DE MANTENIMIENTO DE FILTRO
Y
CUALQUIER REPARACIÓN REALIZADA POR ALGUNA PERSONA
QUE NO SEA DEL SERVICIO AUTORIZADO ANULARÁ
LA GARANTÍA
PRECAUCION
RIESGO DE CHOQUE ELECTRICO
NO ABRIR
PARTES DE SERVICIO INEXISTENTES
Page 15

13
Instrucciones Importantes
LEA TODAS LAS INSTRUCCIONES ANTES DE UTILIZAR EL CALENTADOR
1) La parrilla del calentador podría estar caliente cuando el calentador está en
funcionmiento. A pesar de que el calentador posee una capa de protección al
tacto, para evitar quemaduras no toque superficies calientes. Si se
proporcionan, utilizar asas al mover el calentador. Evitar materiales
combustibles como muebles, cojines, ropa de cama, papeles, ropa y cortinas al
menos a 3 pies (0.9m) de la parte frontal del calentador y manténgalos
alejados de la parte lateral y posterior.
2) Gran precaución es necesaria cuando el calentador se utiliza cerca de niños o
es operado por niños o personas inválidas y cuando el calentador se deja en
funcionamiento y desatendido.
3) Siempre desenchufar el calentador sino se utiliza.
4) No ponga en funcionamiento cualquier calentador con enchufe o cordón
eléctrico en malas condiciones, en caso de mal funcionamiento, o si se ha
caído o dañado de alguna manera. Devolver el calentador para ser examinado
o reparado sólo a lugares de servicio autorizados.
5) No utilizar el calentador en espacios abiertos o para calentar áreas de
construcción.
6) El calentador no está pensado para ser utilizado en baños, áreas de limpiar ropa
y habitaciones similares, áreas con agua, ducha o piscinas. Nunca poner el
calentador donde se pueda caer a un baño u otro tipo de contenedor de agua.
7) No ponga el cordón eléctrico bajo moqueta. No tape el cordón eléctrico con
alfombras o similares. Intente poner el cordón eléctrico en áreas de poco
tráfico donde pueda evitar caídas.
8) Para desconectar el calentador, primero apáguelo y luego desenchúfelo.
9) No enchufe el calentador a otro cable o adaptador como cable de extension,
toma de tierra o protector eléctrico. Encufe el calentador sólo a un receptáculo
de 3 salidas de 110 voltios o superior.
10) No introduzca o deje pasar objetos extraños en las aperturas del calentador ya
que pueden producir choque eléctrico, fuego o daño al aparato.
11) Para prevenir un posible fuego no bloquee las salidas de aire o escapes. No lo
utilice en superficies blandas como camas donde salidas de aire pueden ser
bloqueadas.
12) No bloquee la parte frontal ni lateral del calentador.
13) No ponga nada justo enfrente del calentador.
14) No fuerce el filtro a secarse con métodos alternativos al realizar su
mantenimiento ya que puede dañarlo.
Page 16

Pour vous assurer d’obtenir un rendement optimal de votre appareil de chauffage
portable, veuillez d’abord lire attentivement ce guide d’utilisation et le conserver en
cas de besoin dans l’avenir. Pour tous renseignements complémentaires, veuillez
appeler le 1-800-839-0966.
GUIDE D’UTILISATION ET DE
MODÈLE SIGNATURE
GARDEZ CES INSTRUCTIONS
CONSERVE ESTAS INSTRUCCIONES
14
15) No utilice el calentador en áreas donde se utilice o guarde gasolina, pintura o
algún tipo de sustancia inflamable. El calentador posee partes en su interior que
calientan o producen chispa.
16) No enchufe el calentador en un receptáculo de corriente eléctrica flojo o roto.
17) No altere el diseño del calentador o su garantía será anulada.
18) En el caso de abrir la puerta del calentador, no toque los elementos de calor
con las manos al descubierto. Humedad y aceite en la piel pueden interferir
en la vida del aparato.
19) El calentador debe ser puesto inmediatamente bajo un enchufe.
20) Evite utilizar cable de extensión ya que se puede sobrecalentar y producir fuego.
Pero si usted debe utilizarlo, debe ser No. 14 AWG y no ser menor de 1875
vatios. El cable de extensión debe poseer 3 alambres y poder ser enchufado.
21) El calentador debe funcionar en 110 voltios. El cable tiene un enchufe como
se presenta en la figura A. Un adaptador como se presenta en la figura C está
disponible para conectar enchufes de tres salidas a enchufes de dos. El
enchufe verde que se extiende desde el adaptador debe ser conectado a un
enchufe de pared.
22) Si el calentador se apaga, es necesario que se encienda otra vez de forma
manual.
ADVERTENCIA: para no producir sobrecalentamiento no cubra el aparato
CLAVIJA
CLAVIJA
CUBIERTA DE
RECEPTÁCULO
ADAPTADOR
(C)
(D)
(A)
(B)
TORNILLO DE
METAL
Page 17

15
LEA ESTAS INSTRUCCIONES ANTES DE UTILIZAR EL CALENTADOR
Operación – 12 pasos a seguir para poner en funcionamiento el calentador
EdenPURE
®
modelo Signatura
1) Desempaque del calentador: corte la zona cubierta por cinta adhesiva, doble
hacia abajo las solapas y vuelque la caja. Separe la caja de la espuma
protectora y retire la espuma. Se recomienda guardar la caja para
almacenamiento o transporte del producto.
2) Encuentre el lugar adecuado para poner el calentador.
3) Enchufe directamente el cordón eléctrico a un receptáculo de corriente
eléctrica de 110 voltios y 15 amperios o superior. El interruptor se encenderá
y el calentador producirá tres sonidos indicando que el aparato está
enchufado al receptáculo.
4) Ponga 2 pilas “AAA” en el mando a distancia.
5) Para encender el calentador apretar el botón “Power” situado en la parte
frontal del aparato o en el control remoto. Programar el calentador en la
posición “Auto”. Ajuste los botones de “temp up” y “temp down” hasta que
se alcance la temperatura deseada. Una vez la temperatura deseada se ha
alcanzado, el calentador se encenderá y apagará, por si solo, para mantener
la temperatura en la habitación. Una vez programado en la posición “Auto”,
usted empezara a ahorrar energía. El aparato funcionará hasta llegar a 2
grados por debajo de la temperatura deseada. En este momento
automáticamente se programará en posición de ahorro de energía apagando 2
elementos de calor y bajando la velocidad del ventilador. Esto no sólo le hará
ahorrar energía, sino que también mantendrá la habitación a la temperatura
deseada. El ventilador seguirá en funcionamiento para que el aire en la
habitación circule y la temperatura se pueda controlar con más precisión. Si
la temperatura de la habitación desciende 2 grados por debajo de la
temperatura deseada, el aparato volverá a su posición inicial hasta que la
temperatura deseada se mantenga.
6) Cambie la programación al botón “High” para que el calentador se mantenga
generando una temperatura alta constantemente.
7) Para apagar el calentador, apriete el botón “Power”, el ventilador seguirá
funcionando hasta que todo el aire caliente se haya expulsado y
posteriormente se apagará.
8) El calentador contiene un control de temperatura en el interior. Si el
calentador deja de funcionar, desenchúfelo por 30 minutos y vuélvalo a
enchufar. Si el calentador no se pone en funcionamiento o no funciona
adecuadamente, llámenos para ofrecerle servicio.
9) Humidificador: tener cuidado al rellenar la cámara de agua cuando el
calentador ha estado funcionando ya que el plástico puede estar caliente.
Para rellenar la cámara del humidificador, asegúrese que el calentador está
apagado. Abra el compartimento en la parte izquierda del calentador. Para
abrir la puerta utilice el agarradero y presione con delicadeza hacia abajo y
hacia fuera.Saque la botella de agua. Rellene la botella con agua del grifo y
ponga la botella boca abajo en la bandeja del humidificador. Una vez la
botella ha llenado la bandeja, ponga agua en la botella una segunda vez y
póngala boca abajo en la bandeja del compartimento. El humidificador está
Cuidado • Operación • Servicio
CONSERVE ESTAS INSTRUCCIONES
Page 18

¿Puedo mover el calentador mientras está en funcionamiento?
No es recomendable mover cualquier calentador portátil mientras está en
funcionamiento. Se recomienda mover el calentador cuando el ventilador está
completamente apagado.
¿Cuál es la esperanza de vida de los elementos de cuarzo?
La media aproximada es de 5000+ horas o aproximadamente de 3 a 5 años. Los
elementos de cuarzo se pueden reemplazar por un fabricante autorizado.
¿Qué es el área calentada?
Área calentada es un término utilizado para describir la zona en la que la gente pasa
el mayor tiempo. Después de todo, ¿para qué calentar áreas a 68+ cuando no se
utilizan?
¿Cuántos kilovatios por hora utiliza el calentador?
Un laboratorio independiente experimentó con el Modelo Signature y determinó
que aproximadamente usó 1.45 kilovatios por hora en modo Full Power y 30.9 en
modo Energy Saving.
¿Cuál es la calificación BTU de los calentadores?
El calentador Modelo Signatura es aproximadamente 5000 BTUs.
Los BTUs es una unidad de medición irrelevante ya que el proceso patentado de
EdenPURE
®
por BTU. Nuestro método de calentamiento es muy superior en eficacia, seguridad,
confort y producción de un ambiente sano y natural.
¿Puedo utilizar el calentador y otros electrodomésticos al mismo tiempo?
Sí, si no están en el mismo circuito. Los calentadores se consideran un
electrodoméstico. No debería utilizar dos grandes electrodomésticos en un mismo
circuito. Su nevera, congelador, lavadora, microndas, secadora y demás
electrodomésticos no deberían compartir circuitos.
¿Puedo utilizar con mi calentador un cable de extensión, toma polarizada o
protector eléctrico?
No es recomendable. Este calentador está diseñado para ser enchufado directamente
en corriente eléctrica de 110 voltios y 15 amperios o superior. Pero si usted necesita
utilizar un cable de extension, éste tiene que ser del número 14 AWG y no ser
menor de 1875 vatios. El cable de extension debe ser de 3 alambres y enchufe.
¿No tengo un enchufe de tierra, puedo utilizar un adaptador o quitar el
enchufe existente?
No. Si usted no posee un enchufe de tierra póngase en contacto con un electricista.
Modificando cualquier parte del calentador cancelará la garantía.
¿Puede el calentador funcionar a la perfección y de manera segura sin agua?
Sí, usted no tiene que poner en funcionamiento el humidificador si no lo desea
¿La característica de Humedad o Ion pueden funcionar sin utilizar la
característica de calor?
No, el calentador está diseñado para que estas características funcionen conjuntamente
con el calor
¿Las características de Humedad o Ion funcionarán cuando ponga el
temporizador?
Sí, cuando el temporizador se utiliza, el calentador volverá a la misma posición en que
se dejó. Modificando cualquier parte del calentador cancelará la garantía.
ahora preparado. Cierre el compartimento del humidificador. Enciéndalo. El
calentador está ahora preparado, una botella de agua suele durar
aproximadamente 10 horas. Cuando el agua se está acabando la luz del agua
en la parte frontal del calentador empezará a parpadear y el humidificador se
parará hasta que el agua se haya repuesto otra vez.
Sí: el calentador puede funcionar a la perfección sin agua
10) Temporizador: el calentador está equipado con un temporizador que apagará
el aparato cuando haya pasado el tiempo deseado o bien retrasará el tiempo de
poner el aparato en funcionamiento.
Se apaga automáticamente: con el calentador funcionando a la temperatura
deseada, presione el botón del temporizador, se iluminarán los números 00,
presione la temperatura hacia arriba o hacia abajo para designar el número de
horas que quiere que el calentador funcione antes de apagarse. Las horas van
de (1-24) en incrementos de una hora. Una vez el número de horas se ha
escogido, el calentador se apagará automáticamente cuando el tiempo haya
pasado.
Se enciende automáticamente: con el botón de encendido apagado, presione
el botón del temporizador, 00 aparecerá iluminado en números rojos, presione
el botón de temperatura hacia arriba o hacia abajo para designar las horas (1-
24) para retrasar la puesta en marcha del calentador
11) Ion: presione el botón de ion para conectar el generador de ion negativo.
Presiónelo otra vez para apagar el generador.
12) Este calentador está equipado con una característica de seguridad “por si se
cae”. Si el calentador se inclina, aún ligeramente mientras está funcionando, se
apagará. Una vez el calentador vuelva a su posición inicial, usted tendrá que
volver a encender el calentador para que vuelva a funcionar donde lo dejó.
Cuidado del calentador – Limpiar la parte exterior del calentador suavemente
con un trapo húmedo.
Guardado del calentador – Cuando el calentador no se vaya a utilizar por un
gran período de tiempo haga lo siguiente:
1. Desenchufe el calentador.
2. Quite todo el agua existente en el compartimento del humidificar y déjelo
secar.
3. Recoja el cable eléctrico para que no se quede en el suelo.
4. Cubra el calentador para que no entre polvo ni en el filtro ni en su interior.
5. Guarde el calentador en un lugar seco con poco polvo.
Servicio – Para cambiar alguna parte u otro tipo de reparaciones o servicio, por
favor llámenos gratuitamente al 1-800-839-0966.
16
Page 19

17
SISTEMA DE FILTRO LAVABLE DE POR VIDA
Los calentadores EdenPURE®poseen un filtro, lavable y duradero de por vida,
en la parte trasera del aparato, que es muy fácil de limpiar.
INFORMACIÓN IMPORTANTE: Si usted padece alergías y/o es sensible al
polvo, querrá utilizar este filtro. Si usted opta por utilizar el filtro lo tendrá que
limpiar a diario ya que el filtro sucio hará que el calentador no funcione a la
perfección. Utilizar el calentador con el filtro para polvo es opcional. Utilizar el
calentador sin el filtro no dañará ni alterará el funcionaniento del aparato si
usted no es sensible al polvo o no quiere linpiar el filtro a diario, haga el favor
de removerlo de la parte trasera y utilice el calentador sin él.
Para limpiar el filtro:
1. En la parte trasera del calentador se encuentra el filtro. Presione los
picaportes en la parte superior, estire y sáquelo.
2. Ponga agua caliente sobre el filtro, en la dirección opuesta al paso del aire,
para limpiar el polvo y suciedad hasta que el agua aparezca transparente otra
vez. Tener cuidado al limpiar el filtro ya que puede estar sucio y desprender
sustancias en áreas no deseadas como moquetas. Si se desea se puede
limpiar el filtro con una pequeña cantidad de jabón suave (no se olvide de
aclarar el filtro si utiliza jabón).
3. Sacuda el filtro para desprender exceso de agua y espere a que esté
completamente seco antes de ponerlo nuevamente en el calentador. NO
UTILICE métodos alternativos de secado.
4. Coloque el filtro otra vez en la parte trasera del aparato presionando los
picaportes.
Mantenimiento de Filtro
ADVERTENCIA
SE REQUIERE PERSONAL AUTORIZADO PARA REALIZAR CUALQUIER
SERVICIO EXCEPTO EL DE MANTENIMIENTO DE FILTRO
Page 20

18
Beneficios
Seguridad
Los calentadores EdenPURE®poseen un historial excelente en seguridad. Generan energía
segura, limpia y económica utilizando elementos de calor infrarrojos de cuarzo. Los
calentadores EdenPURE
®
generan calor a través de un proceso que virtualmente previene la
innecesaria acumulación de calor en el techo. Estos calentadores proporcionan confort
calentando uniformemente “de pies a cabeza”.
Calefacción y superficie
Los calentadores EdenPURE®generan calor sólo donde y cuando se necesite. Estos
calentadores son más baratos por pie cuadrado calentado y no necesitan instalaciones
costosas. Estos calentadores utilizan 110 vatios para su funcionamiento y no requieren 220
vatios o ventilación de chimenea.
Calor saludable
Los calentadores EdenPURE®producen calor tan saludable como el producido por los
rayos del sol creando calor natural en el interior. Los calentadores EdenPURE
®
poseen bajo
costo de mantenimiento y operación. El ventilador del motor es la única parte que se
mueve y está equipada con controles de calidad. Estos calentadores no poseen quemadores
que se oxiden, corroan, o ajusten y no poseen una luz piloto que gaste energía. Elementos
de calor infrarrojos seguros, limpios y de larga duración son los que proporcionan energía
y son fáciles y baratos para reemplazar. La media de vida de estas partes son unas 20,000
horas. Los calentadores se crean con metales duraderos de por vida (Zinc y Bronce)
Confort
Los calentadores EdenPURE®distribuyen calor uniformemente y proporcionan suelos
calientes. Estos calentadores, que se regulan con un termostato, hacen circular y reciclan
aire caliente en el suelo. La diferencia de calor entre el suelo y techo es mínima.
Usted observará que la capacidad de calentar de EdenPURE
®
no depende de un flujo de
alta velocidad de aire. Por el contrario, baja velocidad de aire proporciona un calor más
efectivo.
Estos calentadores no queman, secan o contaminan el aire. EdenPURE
®
protege el nivel de
humedad y calidad del aire tan importantes para la salud.
Los calentadores EdenPURE
®
no poseen depósitos de agua que rellenar, mechas que
limpiar, madera o cenizas. Estos calentadores son muy fáciles de utilizar, sólo enchufe
directamente el cordón eléctrico a un receptáculo de corriente eléctrica de 110 voltios y 15
amperios o superior.
Característica Humidificador
Añadiendo vapor directamente hacia la parrilla del calentador, se añade la máxima
humedad en el calentador. Esta característica de añadir humedad al calor infrarrojo
aumenta drásticamente la subida y la propagación del calor y también produce un confort
terapéutico sobre todo para niños y ancianos.
Característica Ion
La característica de Ion genera iones negativos que crean partículas en el aire que se
magnetizan juntas formando una masa que caerá al suelo para poder limpiarse.
Para asegurar los mejores resultados con el calentador EdenPURE
que haga lo siguiente:
1. Para mejores resultados no ponga el calentador en un área con elevado
porcentaje de filtración de aire y movimiento ya que el calor se agotará.
2. Intente colocar el calentador cerca de una pared de interior caliente y dirija la
salida de aire hacia una pared de aire más frío. El aire frío de la pared intentará
atraer el aire caliente por lo que creará un calor más eficiente.
3. Al poner el calentador al lado de una zona con salida de aire frío hará que el
calor se retire de la zona a calentar. Intente cubrir o cerrar la salida de aire
frío. Esto creará un calor más eficiente. Estudie donde colocar su calentador
para mejores resultados.
4. Para asegurar la mayor eficiencia, un 40% (mínimo) de humedad relativa
tiene que ser mantenida en la zona calentada.
5. Los calentadores están diseñados para funcionar con máxima eficiencia hasta
70-72 grados. Debido al concepto de “calor suave” temperaturas de 68
grados se sienten como si fuesen de 72. Esto es debido a la mezcla de calor y
humedad uniformemente para un confort “de pies a cabeza”.
6. Cuando el calentador se coloca en una zona aislada como sótanos o salas
para jugar, las salidas y entradas de aire de estas zonas se tendrán que cerrar.
7. Al colocar el calentador en una zona con superficie de suelo de piedra,
intente colocarlo a tres pies sobre la superficie del suelo. Asegúrese de que el
calentador no se caerá. Esto hará que el calor sea más eficiente ya que la
piedra actúa como aislante y tiende a dirigir el calor hacia si.
8. Intente bajar la temperatura de su hogar y colocar el calentador en el área en
la que usted pase más tiempo. Ajuste la temperatura de su EdenPURE
gusto. No tiene sentido calentar habitaciones en las que no se habita.
9. Cuando se intente calentar áreas grandes, ponga el calentador en el centro. Si
existe un ventilador de techo en el área a calentar, utilícelo ya que ayudará a
distribuir el calor. Le sugerimos que lo intente de esta manera y vea como
funciona
10. Si utiliza el calentador en un área con mucho polvo y suciedad, el filtro
necesitará ser limpiado más a menudo ya que se puede obstruir y hacer
que el calentador deje de funcionar.
11. Este calentador está caliente en funcionamiento. Para evitar quemaduras
evitar el contacto con la piel. Utilizar asas al mover el calentador si se
proporciona. Evitar materiales combustibles como muebles, cojines, ropa de
cama, papeles, ropa y cortinas al menos a 3 pies de la parte frontal del
calentador y manténgalos alejados de la parte lateral y posterior.
12. Gran precaución es necesaria cuando el calentador se utiliza cerca de niños o
es operado por niños o personas invalidas y cuando el calentador se deja en
funcionamiento y desatendido.
13. Para desconectar el calentador primero apague el interruptor y después
desenchufe el aparato.
14. Siempre desenchufe el calentador cuando no se utilice.
Page 21

19
Sugerencias de Uso
Para asegurar los mejores resultados con el calentador EdenPURE®, le sugerimos
que haga lo siguiente:
1. Para mejores resultados no ponga el calentador en un área con elevado
porcentaje de filtración de aire y movimiento ya que el calor se agotará.
2. Intente colocar el calentador cerca de una pared de interior caliente y dirija la
salida de aire hacia una pared de aire más frío. El aire frío de la pared intentará
atraer el aire caliente por lo que creará un calor más eficiente.
3. Al poner el calentador al lado de una zona con salida de aire frío hará que el
calor se retire de la zona a calentar. Intente cubrir o cerrar la salida de aire
frío. Esto creará un calor más eficiente. Estudie donde colocar su calentador
para mejores resultados.
4. Para asegurar la mayor eficiencia, un 40% (mínimo) de humedad relativa
tiene que ser mantenida en la zona calentada.
5. Los calentadores están diseñados para funcionar con máxima eficiencia hasta
70-72 grados. Debido al concepto de “calor suave” temperaturas de 68
grados se sienten como si fuesen de 72. Esto es debido a la mezcla de calor y
humedad uniformemente para un confort “de pies a cabeza”.
6. Cuando el calentador se coloca en una zona aislada como sótanos o salas
para jugar, las salidas y entradas de aire de estas zonas se tendrán que cerrar.
7. Al colocar el calentador en una zona con superficie de suelo de piedra,
intente colocarlo a tres pies sobre la superficie del suelo. Asegúrese de que el
calentador no se caerá. Esto hará que el calor sea más eficiente ya que la
piedra actúa como aislante y tiende a dirigir el calor hacia si.
8. Intente bajar la temperatura de su hogar y colocar el calentador en el área en
la que usted pase más tiempo. Ajuste la temperatura de su EdenPURE®a su
gusto. No tiene sentido calentar habitaciones en las que no se habita.
9. Cuando se intente calentar áreas grandes, ponga el calentador en el centro. Si
existe un ventilador de techo en el área a calentar, utilícelo ya que ayudará a
distribuir el calor. Le sugerimos que lo intente de esta manera y vea como
funciona
10. Si utiliza el calentador en un área con mucho polvo y suciedad, el filtro
necesitará ser limpiado más a menudo ya que se puede obstruir y hacer
que el calentador deje de funcionar.
11. Este calentador está caliente en funcionamiento. Para evitar quemaduras
evitar el contacto con la piel. Utilizar asas al mover el calentador si se
proporciona. Evitar materiales combustibles como muebles, cojines, ropa de
cama, papeles, ropa y cortinas al menos a 3 pies de la parte frontal del
calentador y manténgalos alejados de la parte lateral y posterior.
12. Gran precaución es necesaria cuando el calentador se utiliza cerca de niños o
es operado por niños o personas invalidas y cuando el calentador se deja en
funcionamiento y desatendido.
13. Para desconectar el calentador primero apague el interruptor y después
desenchufe el aparato.
14. Siempre desenchufe el calentador cuando no se utilice.
Page 22

SISTEMA DE FILTRO LAVABLE DE POR VIDA
Los calentadores EdenPURE
en la parte trasera del aparato, que es muy fácil de limpiar.
INFORMACIÓN IMPORTANTE: Si usted padece alergías y/o es sensible al
polvo, querrá utilizar este filtro. Si usted opta por utilizar el filtro lo tendrá que
limpiar a diario ya que el filtro sucio hará que el calentador no funcione a la
perfección. Utilizar el calentador con el filtro para polvo es opcional. Utilizar el
calentador sin el filtro no dañará ni alterará el funcionaniento del aparato si
usted no es sensible al polvo o no quiere linpiar el filtro a diario, haga el favor
de removerlo de la parte trasera y utilice el calentador sin él.
Para limpiar el filtro:
1. En la parte trasera del calentador se encuentra el filtro. Presione los
picaportes en la parte superior, estire y sáquelo.
2. Ponga agua caliente sobre el filtro, en la dirección opuesta al paso del aire,
para limpiar el polvo y suciedad hasta que el agua aparezca transparente otra
vez. Tener cuidado al limpiar el filtro ya que puede estar sucio y desprender
sustancias en áreas no deseadas como moquetas. Si se desea se puede
limpiar el filtro con una pequeña cantidad de jabón suave (no se olvide de
aclarar el filtro si utiliza jabón).
3. Sacuda el filtro para desprender exceso de agua y espere a que esté
completamente seco antes de ponerlo nuevamente en el calentador. NO
UTILICE métodos alternativos de secado.
4. Coloque el filtro otra vez en la parte trasera del aparato presionando los
picaportes.
SE REQUIERE PERSONAL AUTORIZADO PARA REALIZAR CUALQUIER
20
¿Por qué sigue funcionando el ventilador cuando he apagado el interruptor?
El ventilador seguirá funcionando hasta que las cámaras de calor se hayan
enfriado. Unos minutos después el ventilador se apagará automáticamente.
¿Se pueden remplazar partes del calentador?
Sí. Usted debe contactar su lugar de la compra.
¿Parece que la ventilación de aire caliente ha disminuido?
Asegúrese que la salida del aire del calentador no está bloqueada y de que el
filtro está limpio. Siga las instrucciones de limpieza y mantenimiento de filtro en
la página 17.
¿Una vez haya enchufado y prendido el calentador, cuánto tiempo tardará la
habitación en calentarse?
Generalmente toma menos de una hora. Por favor, recuerde que el proceso de
calentamiento depende de muchas variables. El tamaño de una habitación, lo bien
aislada que está, cuántas puertas/ventanas existen, suelos de piedra, la apertura o
cierre de puertas exteriores etc.…
¿Puedo utilizar el calentador para calentar varias habitaciones a la vez?
Sí. Tenga en consideración que el calor variará dependiendo de lo abiertos que
sean sus suelos y del tamaño de las habitaciones. Clientes nos han comentado
que con ayuda de ventiladores de techo han sido capaces de calentar varias
habitaciones simultáneamente colocando el calentador en la habitación central.
Nuestro consejo es que trate de hacerlo y ver si funciona.
¿Mí casa no está correctamente aislada, este calentador me puede ayudar?
Sí, pero tenga en consideración que habitaciones con poco aislamiento no
mantienen el calor eficientemente.
¿Puedo utilizar el calentador teniendo techos abovedados?
Sí, pero tardará un poquito más en calentar la habitación en su inicio. Una vez la
habitación se ha calentado a la temperatura deseada se calentará automáticamente.
¿Se puede utilizar el calentador en baños?
No se recomienda utilizarlo en baños debido al alto nivel de humedad.
¿Puedo utilizar el calentador en sótanos y garajes?
Sí, pero tenga en consideración que habitaciones con poco aislamiento no
mantienen el calor eficientemente. Suelos de piedra absorben parte del calor.
Colocando el calentador a unos pies del suelo hará que el calor sea más eficiente.
¿Puedo utilizar más de un calentador al mismo tiempo?
Sí, pero asegúrese de que no corren a través del mismo circuito. Cada calentador
y electrodoméstico deben poseer su circuito.
¿Puedo utilizar el calentador en zonas de construcción?
El calentador no ha sido diseñado para ser utilizado en áreas con elevado polvo.
Utilizar el calentador en este tipo de ambientes anulará la garantía.
Preguntas y Respuestas
Page 23

¿Puedo mover el calentador mientras está en funcionamiento?
No es recomendable mover cualquier calentador portátil mientras está en
funcionamiento. Se recomienda mover el calentador cuando el ventilador está
completamente apagado.
¿Cuál es la esperanza de vida de los elementos de cuarzo?
La media aproximada es de 5000+ horas o aproximadamente de 3 a 5 años. Los
elementos de cuarzo se pueden reemplazar por un fabricante autorizado.
¿Qué es el área calentada?
Área calentada es un término utilizado para describir la zona en la que la gente pasa
el mayor tiempo. Después de todo, ¿para qué calentar áreas a 68+ cuando no se
utilizan?
¿Cuántos kilovatios por hora utiliza el calentador?
Un laboratorio independiente experimentó con el Modelo Signature y determinó
que aproximadamente usó 1.45 kilovatios por hora en modo Full Power y 30.9 en
modo Energy Saving.
¿Cuál es la calificación BTU de los calentadores?
El calentador Modelo Signatura es aproximadamente 5000 BTUs.
Los BTUs es una unidad de medición irrelevante ya que el proceso patentado de
EdenPURE®intencionadamente no utiliza viejos métodos de combustión, medidos
por BTU. Nuestro método de calentamiento es muy superior en eficacia, seguridad,
confort y producción de un ambiente sano y natural.
¿Puedo utilizar el calentador y otros electrodomésticos al mismo tiempo?
Sí, si no están en el mismo circuito. Los calentadores se consideran un
electrodoméstico. No debería utilizar dos grandes electrodomésticos en un mismo
circuito. Su nevera, congelador, lavadora, microndas, secadora y demás
electrodomésticos no deberían compartir circuitos.
¿Puedo utilizar con mi calentador un cable de extensión, toma polarizada o
protector eléctrico?
No es recomendable. Este calentador está diseñado para ser enchufado directamente
en corriente eléctrica de 110 voltios y 15 amperios o superior. Pero si usted necesita
utilizar un cable de extension, éste tiene que ser del número 14 AWG y no ser
menor de 1875 vatios. El cable de extension debe ser de 3 alambres y enchufe.
¿No tengo un enchufe de tierra, puedo utilizar un adaptador o quitar el
enchufe existente?
No. Si usted no posee un enchufe de tierra póngase en contacto con un electricista.
Modificando cualquier parte del calentador cancelará la garantía.
¿Puede el calentador funcionar a la perfección y de manera segura sin agua?
Sí, usted no tiene que poner en funcionamiento el humidificador si no lo desea
¿La característica de Humedad o Ion pueden funcionar sin utilizar la
característica de calor?
No, el calentador está diseñado para que estas características funcionen conjuntamente
con el calor
¿Las características de Humedad o Ion funcionarán cuando ponga el
temporizador?
Sí, cuando el temporizador se utiliza, el calentador volverá a la misma posición en que
se dejó. Modificando cualquier parte del calentador cancelará la garantía.
21
Page 24

22
GARANTÍA
Este producto posee una garantía de satisfacción de treinta (30) días. Si usted no está
completamente satisfecho, se le devolverá el precio total de su compra al devolver su
EdenPURE™ GEN3 a los treinta (30) días. Sin preguntas.
Si necesita devolver su calentador, se debe hacer con la caja original para evitar
daños durante el envío.
TRES AÑOS DE GARANTÍA LIMITADA
Garantía: La compañía ofrece garantía de producto al comprador o al que recibe este producto
como regalo por un período de un tres años por defectos de fabricación, mano de obra o partes.
Esta garantía será anulada si de alguna manera se ha alterado el funcionamiento del calentador o
el cable eléctrico y los calentadores que no se utilicen correctamente o no se cuiden como se
indica en el manual de uso.
Limitaciones: Cualquier garantía implícita que se aplique, incluyendo garantías de comerciabilidad
e idoneidad para un propósito en particular, esta limitada a la duración de esta garantía. Algunos
estados no permiten la exclusión o limitación de daños emergentes o incidentales, de manera que
las limitaciones o exclusiones anteriores pueden no ser aplicables a usted. En ningún caso esta
compañía será responsable por daños emergentes o incidentales, facturas médicas relacionadas
con defectos, fallos, o mal funcionamiento del producto.
Algunas jurisdicciones no permiten limitaciones sobre daños emergentes o incidentales, de
manera que las limitaciones o exclusiones anteriores pueden no ser aplicables a usted. La
compañía no se hace responsable por daños o perdidas, directas o indirectas, relacionadas con
el mal uso, abuso, accidente, negligencia, fallo en transporte o mantenimiento, o fallo en seguir las
instrucciones. La compañía no se hace responsable por comentarios, en forma escrita u oral, que
son inconsistentes con esta garantía, o por comentarios que son inconsistentes o inciertos
cuando comparados con lo expresado en los folletos o especificaciones de esta compañía.
En el caso extraño de que su calentador no funcione apropiadamente, usted debe
contactar con su representante de venta para una asistencia inmediata.
Antes de llamar le aconsejamos que visite nuestra página Web de servicio al cliente
www.ednepureservice.com para informarse sobre instrucciones de uso y numerosos consejos.
Si usted es incapaz de contactar con su representante de venta y la página Web
www.edenpureservice.com no le ayuda con sus dudas, usted puede contactar con nuestro equipo
de servicio al cliente Resource Partener’s Customer Service Team llamando al 1-866-786-8946 o
envíenos un mensaje electrónico a custserv@rppurchase.com. Al hacer la llamada, tenga a mano
su prueba de compra ya que sino no le podremos ayudar. La información necesaria para poderle
ayudar estará en su prueba de compra.
¡Muchas gracias!
Tres Años de Garantía Limitada
LEA ESTAS INSTRUCCIONES ANTES DE UTILIZAR EL CALENTADOR
Operación – 12 pasos a seguir para poner en funcionamiento el calentador
EdenPURE
1) Desempaque del calentador: corte la zona cubierta por cinta adhesiva, doble
hacia abajo las solapas y vuelque la caja. Separe la caja de la espuma
protectora y retire la espuma. Se recomienda guardar la caja para
almacenamiento o transporte del producto.
2) Encuentre el lugar adecuado para poner el calentador.
3) Enchufe directamente el cordón eléctrico a un receptáculo de corriente
eléctrica de 110 voltios y 15 amperios o superior. El interruptor se encenderá
y el calentador producirá tres sonidos indicando que el aparato está
enchufado al receptáculo.
4) Ponga 2 pilas “AAA” en el mando a distancia.
5) Para encender el calentador apretar el botón “Power” situado en la parte
frontal del aparato o en el control remoto. Programar el calentador en la
posición “Auto”. Ajuste los botones de “temp up” y “temp down” hasta que
se alcance la temperatura deseada. Una vez la temperatura deseada se ha
alcanzado, el calentador se encenderá y apagará, por si solo, para mantener
la temperatura en la habitación. Una vez programado en la posición “Auto”,
usted empezara a ahorrar energía. El aparato funcionará hasta llegar a 2
grados por debajo de la temperatura deseada. En este momento
automáticamente se programará en posición de ahorro de energía apagando 2
elementos de calor y bajando la velocidad del ventilador. Esto no sólo le hará
ahorrar energía, sino que también mantendrá la habitación a la temperatura
deseada. El ventilador seguirá en funcionamiento para que el aire en la
habitación circule y la temperatura se pueda controlar con más precisión. Si
la temperatura de la habitación desciende 2 grados por debajo de la
temperatura deseada, el aparato volverá a su posición inicial hasta que la
temperatura deseada se mantenga.
6) Cambie la programación al botón “High” para que el calentador se mantenga
generando una temperatura alta constantemente.
7) Para apagar el calentador, apriete el botón “Power”, el ventilador seguirá
funcionando hasta que todo el aire caliente se haya expulsado y
posteriormente se apagará.
8) El calentador contiene un control de temperatura en el interior. Si el
calentador deja de funcionar, desenchúfelo por 30 minutos y vuélvalo a
enchufar. Si el calentador no se pone en funcionamiento o no funciona
adecuadamente, llámenos para ofrecerle servicio.
9) Humidificador: tener cuidado al rellenar la cámara de agua cuando el
calentador ha estado funcionando ya que el plástico puede estar caliente.
Para rellenar la cámara del humidificador, asegúrese que el calentador está
apagado. Abra el compartimento en la parte izquierda del calentador. Para
abrir la puerta utilice el agarradero y presione con delicadeza hacia abajo y
hacia fuera.Saque la botella de agua. Rellene la botella con agua del grifo y
ponga la botella boca abajo en la bandeja del humidificador. Una vez la
botella ha llenado la bandeja, ponga agua en la botella una segunda vez y
póngala boca abajo en la bandeja del compartimento. El humidificador está
Cuidado • Operación • Servicio
CONSERVE ESTAS INSTRUCCIONES
Page 25

Pour vous assurer d’obtenir un rendement optimal de votre appareil de chauffage
portable, veuillez d’abord lire attentivement ce guide d’utilisation et le conserver en
cas de besoin dans l’avenir. Pour tous renseignements complémentaires, veuillez
appeler le 1-800-839-0966.
Merci d’avoir acheté l’EdenPure®Signature
Appareil de chauffage Portable Infrarouge à Quartz.
GUIDE D’UTILISATION ET DE
GARANTIE
MODÈLE SIGNATURE
IMPORTANT
GARDEZ CES INSTRUCTIONS
®
EdenPURE
Q
U A R T Z I N F R A R E D P O R T A B L E H E A T E R
EdenPURE
Page 26

LEA TODAS LAS INSTRUCCIONES ANTES DE UTILIZAR EL CALENTADOR
1) La parrilla del calentador podría estar caliente cuando el calentador está en
funcionmiento. A pesar de que el calentador posee una capa de protección al
tacto, para evitar quemaduras no toque superficies calientes. Si se
proporcionan, utilizar asas al mover el calentador. Evitar materiales
combustibles como muebles, cojines, ropa de cama, papeles, ropa y cortinas al
menos a 3 pies (0.9m) de la parte frontal del calentador y manténgalos
alejados de la parte lateral y posterior.
2) Gran precaución es necesaria cuando el calentador se utiliza cerca de niños o
es operado por niños o personas inválidas y cuando el calentador se deja en
funcionamiento y desatendido.
3) Siempre desenchufar el calentador sino se utiliza.
4) No ponga en funcionamiento cualquier calentador con enchufe o cordón
eléctrico en malas condiciones, en caso de mal funcionamiento, o si se ha
caído o dañado de alguna manera. Devolver el calentador para ser examinado
o reparado sólo a lugares de servicio autorizados.
5) No utilizar el calentador en espacios abiertos o para calentar áreas de
construcción.
6) El calentador no está pensado para ser utilizado en baños, áreas de limpiar ropa
y habitaciones similares, áreas con agua, ducha o piscinas. Nunca poner el
calentador donde se pueda caer a un baño u otro tipo de contenedor de agua.
7) No ponga el cordón eléctrico bajo moqueta. No tape el cordón eléctrico con
alfombras o similares. Intente poner el cordón eléctrico en áreas de poco
tráfico donde pueda evitar caídas.
8) Para desconectar el calentador, primero apáguelo y luego desenchúfelo.
9) No enchufe el calentador a otro cable o adaptador como cable de extension,
toma de tierra o protector eléctrico. Encufe el calentador sólo a un receptáculo
de 3 salidas de 110 voltios o superior.
10) No introduzca o deje pasar objetos extraños en las aperturas del calentador ya
que pueden producir choque eléctrico, fuego o daño al aparato.
11) Para prevenir un posible fuego no bloquee las salidas de aire o escapes. No lo
utilice en superficies blandas como camas donde salidas de aire pueden ser
bloqueadas.
12) No bloquee la parte frontal ni lateral del calentador.
13) No ponga nada justo enfrente del calentador.
14) No fuerce el filtro a secarse con métodos alternativos al realizar su
mantenimiento ya que puede dañarlo.
Table des Matières
Instructions Importantes ..........................................................25, 26
Entretien......................................................................................27, 28
Fonctionnement..........................................................................27, 28
Service ........................................................................................27, 28
Entretien du Filtre ..........................................................................29
Avantages ..........................................................................................30
Suggestions pour Rendement Optimal ..........................................31
Questions et Réponses................................................................32, 33
Garantie ............................................................................................34
Carte de Garantie ............................................................................37
24
DANGER
TOUT USAGE INAPPROPRIÉ DE CET APPAREIL DE CHAUFFAGE
PEUT RÉSULTER EN UN RISQUE D’INCENDIE, DE CHOC
ÉLECTRIQUE, ET DE BLESSURES GRAVES
AVERTISSEMENT
TOUTE INTERVENTION NÉCESSAIRE AUTRE QUE L’ENTRETIEN
DU FILTRE DOIT ÊTRE EFFECTUÉE UNIQUEMENT PAR UN
PROFESSIONNEL DE SERVICE APRÈS VENTE AGRÉÉ;
DE PLUS,
TOUTE RÉPARATION EFFECTUÉE PAR UNE PERSONNE NON
AGRÉÉ PAR NOS SERVICES ENTRAÎNERA
AUTOMATIQUEMENT L’ANNULATION DE LA GARANTIE.
ATTENTION
RISQUE DE CHOC ÉLECTRIQUE
NE PAS OUVRIR
CET APPAREIL NE CONTIENT PAS DE PIÈCES
RÉPARABLES PAR L'UTILISATEUR
Page 27

Instructions Importantes
LISEZ TOUTES LES RECOMMANDATIONS AVANT D’UTILISER
VOTRE APPAREIL DE CHAUFFAGE
1) Pendant son utilisation, le gril de l’appareil de chauffage peut brûler au toucher en
dépit du procédé d’isolation prévu à cet effet sur ce gril. Pour éviter de se brûler, ne
pas mettre la peau nue au contact des surfaces chaudes. S’il en est équipé, utiliser les
poignées de transport pour bouger cet appareil de chauffage. Éloigner tous matériaux
combustibles tels que meubles, oreillers, literie, papiers, vêtements et rideaux à au
moins 3 pieds (0.9m) de la partie frontale de l’appareil de chauffage et les garder aussi
à distance des côtés et de l’arrière.
2) Une vigilance extrême s’impose quand un appareil de chauffage est utilisé à proximité
d’enfants ou d’invalides ou quand cet appareil de chauffage est en marche sans
supervision.
3) Toujours débrancher la prise de l’appareil de chauffage quand il n’est pas en marche.
4) Ne pas utiliser d’appareil de chauffage avec un cordon d’alimentation ou une prise
endommagés ou après un problème de fonctionnement. Ne pas utiliser un appareil de
chauffage s’il est tombé ou a subi un dommage quelconque. Le retourner au Centre
Service Agréé pour inspection, ajustement mécanique ou électrique, ou réparation.
5) Ne pas utiliser l’appareil de chauffage à l’extérieur ou sur des chantiers de
construction.
6) Cet appareil de chauffage n’est pas conçu pour être utilisé dans des salles de bains,
buanderies et endroits similaires à l’intérieur de la maison ou par exemple près d’une
douche ou d’une piscine. Ne jamais placer l’appareil dans un endroit où il pourrait
tomber dans une baignoire ou tout autre réservoir d’eau.
7) Ne pas laisser le cordon d’alimentation courir sous la moquette. Ne pas le recouvrir de
couvertures, tapis ou choses semblables. Disposer le cable d’alimentation à l’écart du
passage, là où personne ne pourra le bousculer.
8) Pour débrancher l’appareil de chauffage, mettre en position arrêt puis ôter la prise.
9) Ne pas brancher l’appareil sur un autre dispositif à cordon comme un multiprises, un
parasurtenseur, un adaptateur de terre, ou sur la prise d’un déodoriseur. Brancher sur
une prise de courant à 3 têtes avec conducteur de terre de 110v 15 amp ou plus.
10) Ne pas insérer, ne pas laisser d’objets étrangers pénétrer dans un conduit de ventilation
ou de sortie d’air en raison d’un risque de choc électrique, d’incendie ou de dommage
pour l’appareil.
11) Pour prévenir tout risque d’incendie, ne pas boucher les prises d’air ou de sortie d’air.
Ne pas utiliser sur des surfaces moelleuses, un lit par exemple, les ouvertures risquant
d’être bouchées.
12) Ne pas bloquer l’avant ou l’arrière de l’appareil de chauffage.
13) Ne rien mettre directement en face de l’appareil de chauffage
14) Ne pas accélérer le processus de séchage du filtre en utilisant des méthodes alternatives
quand vous effectuez l’entretien; vous risqueriez d’endommager le filtre.
25
Page 28

Para asegurar que obtiene los mejores resultados, por favor lea este manual y consérvelo para
Si necesita más información no dude en llamar gratuitamente a nuestro servicio
¡GRACIAS POR COMPRAR EL CALENTADOR
MODELO SIGNATURA
CONSERVE ESTAS INSTRUCCIONES
26
15) Ne pas s’en servir dans des endroits où, soit on utilise, soit on entrepose de l’essence, de
la peinture ou autres liquides inflammables. Un appareil de chauffage comporte des
pièces brûlantes, ou d’allumage à l’intérieur.
16) Ne pas brancher l’appareil de chauffage sur une prise de courant endommagée ou mal
fixée.
17) Ne rien modifier des caractéristiques de l’appareil de chauffage sous peine
d’annulation de la garantie.
18) Au cas où il deviendrait nécessaire d’ouvrir la porte de l’appareil, évitez de poser les
mains sur les éléments chauffants. Tout contact de la peau peut affaiblir le bon
fonctionnement et réduire la longévité de l’appareil.
19) L’appareil de chauffage doit être placé juste en-dessous d‘une prise.
20) Évitez d’utiliser une rallonge qui pourrait surchauffer et provoquer un risque
d’incendie. Si toutefois vous devez utiliser une rallonge, le calibre de ce cordon devra être
de 14 AWG et son homologation supérieure à 1875 Watts. Le cordon de rallonge devra
être un cordon à 3 fils doté d’une fiche reliée à la terre et d’une fiche de raccordement.
21) Cet appareil de chauffage est conçu pour être utilisé sur le 110 Volts. Le cordon
d’alimentation est équipé d’une fiche (voir A sur l’illustration ci-dessous). Il existe un
adaptateur [illustration C] pour connecter les fiches de branchement à 3 broches avec
mise à la terre aux prises de courant à 2 trous seulement. Ce fil vert de mise à la terre,
attaché à l’adaptateur, doit être également connecté à une prise de terre permanente
comme par exemple le boîtier. Nul besoin d’utiliser un adaptateur si vous avez accès à
une prise de courant à 3 trous. Illustration (D) d’un fiche européene.
22) En cas de coupure de courant à l'appareil, il faut procéder à un redémarrage manuel.
AVERTISSEMENT: Afin d’éviter la surchauffe, ne pas recouvrir l’appareil
de chauffage.
GARDEZ CES INSTRUCTIONS
FICHE DE
TERRE
FICHE DE
MISE A LA
TERRE
BROCHE
DE MISE A
LA TERRE
PLAQUE DE COUVERTURE
DU BOÎTIER
ADAPTATEUR
(C)
(D)
(A)
(B)
VIS DE
MONTAGE
MÉTAL
Page 29

27
LIRE ATTENTIVEMENT TOUTES LES INSTRUCTIONS AVANT
D’UTILISER L’APPAREIL DE CHAUFFAGE
F
onctionnement- Installation en 12 étapes pour modèle EdenPure
®
S
ignature
1) Déballer l’appareil: couper la partie recouverte de ruban adhésif, rabattre les volets et
r
enverser doucement la boîte entière la tête en bas. Soulever la boîte pour l’extraire
de l’emballage de polystyrène. Enlever ce dernier, tourner en remontant vers le haut.
Nous vous recommandons de garder l’emballage pour l’entrepôt de l’article durant la
p
ériode de non utilisation et au cas où vous auriez besoin de le transporter.
2) Trouver un endroit stable et non encombré pour y mettre l’appareil une fois déballé.
3) Brancher le cordon d’alimentation directement sur une prise de courant reliée à la terre
110 volt 15 amp ou plus, non en service. L’interrupteur d’alimentation va s’allumer et
l’appareil de chauffage va biper trois fois pour signaler qu’il est branché à la prise de
courant.
4) Insérer 2 piles (type “AAA”) dans le compartiment à piles de la télécommande.
5) Appuyer sur la commande « Marche » située sur la partie avant de l’appareil de
chauffage ou sur la télécommande pour allumer l’appareil. Ajuster le bouton de
réglage sur « Auto ». Ajustez les commandes « Haute température » et « Basse
température » jusqu’à ce que vous obteniez la température que vous désirez.
Lorsque la température aura atteint le niveau de confort suffisant, le thermostat
enclenchera ou arrêtera l’appareil de chauffage suivant le cas pour maintenir la
température désirée à un niveau constant. Lorsque l’appareil Signature sera
programmé sur « Auto » et que le thermostat enclenchera et arrêtera la marche, vous
bénéficierez alors des avantages d’une consommation énergétique minimale.
L’appareil fonctionnera à plein régime jusqu’à ce qu’il atteigne la température
souhaitée à 2 degrés près. A ce moment précis, il se mettra automatiquement en
position de consommation énergétique minimale qui aura pour effet de fermer 2 des
éléments chauffants et d’abaisser la vitesse du ventilateur. Non seulement cela vous
économisera de l’énergie mais aussi maintiendra la température de la pièce proche de
la température désirée. Le ventilateur va fonctionner par intermittence pour faire
circuler l’air de la pièce à travers l’appareil de chauffage pour contrôler la
température avec plus de précision. Dans le cas où la température de la pièce
tomberait 2 degrés en-dessous de la température désirée, l’appareil reviendra au
mode de pleine puissance jusqu’à ce que la température désirée soit de nouveau
atteinte.
6) Mettez le bouton de réglage sur “Haute Température” de façon à ce que le chauffage
reste constant et n’ait pas à s’allumer et à s’éteindre périodiquement.
7) Pour arrêter l’appareil de chauffage, poussez le bouton “Marche”; le ventilateur va
continuer à tourner jusqu’à ce que toute la chaleur soit évacuée et ensuite il va
s’arrêter.
8) Humidificateur: Faites attention lorsque vous remplissez le réservoir d’eau; si la
chaufferette a été en service, le plastic pourrait être très chaud. Pour remplir le réservoir
de l’humidificateur, assurez-vous que la chaufferette est arrêtée. Ouvrez le compartiment
à gauche de la chaufferette. Pour ouvrir le portillon, tirez délicatement vers le bas et
dehors avec la poignée. Enlevez la bouteille d’eau. Remplissez la bouteille avec de l’eau
du robinet et inversez la bouteille dans le plateau de l’humidificateur. Dès que la bouteille
a rempli le plateau, remplissez-la de nouveau et inversez-la dans le plateau de
l’humidificateur. L’humidificateur est maintenant amorcé. Fermez le compartiment de
l’humidificateur. Mettez l’humidificateur en marche. Lorsque l’appareil est amorcé, une
bouteille d’eau devrait durer environ 10 heures. Lorsque le niveau d’eau a diminué, le
témoin d’eau à l’avant de l’appareil va clignoter et l’humidificateur va s’arrêter tant
qu’on ne rajoute pas d’eau.
Entretien • Fonctionnement • Service
GARDEZ CES INSTRUCTIONS
Page 30

Can I move the heater around while it is operating?
It is not recommended to move any portable heater while it is operating. We
recommend moving the heater once the fan has completely turned off.
What is the life expectancy for the Quartz Elements?
Average element life is 20,000 hours. The Quartz Elements are replaceable
by an authorized service dealer.
What is Zone Heating?
Zone heating is all about focusing heat where people spend the most time.
After all, there is no point to heating multiple rooms to 68+ degrees when not
in use.
How many kilowatts per hour does the heater use?
EdenPURE
®
environment and determined to use approximately 1.45 kilowatts per hour on
Full Power mode and 0.9 on Energy Saving mode.
What is the BTU Rating for the heaters?
EdenPURE
®
The BTUs are basically irrelevant as a unit of measure since the patented
heating process of the EdenPURE
old inefficient methods of heat combustion, which is rated by using the BTU
rule. Our heating method is far superior for efficiency, safety, comfort, and
providing a natural healthy indoor environment.
Can I use the heater and another appliance at the same time?
Yes, as long as they are not on the same circuit. Zone heaters are considered
to be an appliance. You should not run more than one larger appliance on a
single circuit breaker. Your freezer, refrigerator, microwave oven, washing
machine, dryer, and other such appliances should not share a circuit breaker.
Can I use an extension cord, surge protector, or power strip with my
heater?
It is not recommended. It is designed to plug directly into a grounded 110 volt
15 amp or higher circuit receptacle. However, if you have to use an extension
cord, the cord should be No. 14 AWG minimum size and rated not less than
1875 watts. The extension cord should be a 3 wire cord with a grounding type
cord and plug connector.
I don’t have a grounded outlet; can I use a cord adapter or remove the
grounding plug?
NO. If you don’t have a grounded outlet, contact a licensed electrician in
your area for advice. Removing or altering any part of the heater will void
the warranty.
Can the Heater safely and effectively be operated without water?
Yes, you do not need to run the Humidity feature unless you so desire.
Will the Humidity or Ion features work without using the Heat feature?
No, the unit is designed for those features to work in conjunction with the
heat.
Will the Humidity or Ion features come on when I set the timer for my
heater to automatically come on?
Yes, when the auto-on timer feature is used, the heater will come on exactly at
the last setting it was used at.
28
Oui : La chaufferette peut fonctionner efficacement et en sécurité sans eau.
9
) Minuterie: La chaufferette est équipée d’une minuterie qui peut soit arrêter l’appareil après un
c
ertain temps de fonctionnement voulu ou retarder le moment de mise en marche de
l’appareil.
A
rrêt automatique:
A
vec l’appareil fonctionnant à la température voulue, poussez le bouton
de la minuterie, 00 va apparaître en chiffre DEL rouges, poussez ensuite la flèche de
température vers le haut ou vers le bas pour sélectionner le nombre d’heures que vous
s
ouhaitez que la chaufferette fonctionne avant de s’arrêter. La gamme d’heures va de 1 à 24
heures par échelons de 1 heure. Lorsque le nombre d’heures est introduit, l’appareil va
s’arrêter automatiquement dès que le temps de consigne est atteint.
Mise en marche automatique:
Avec l’interrupteur en position arrêt, poussez le bouton de la
minuterie, 00 va apparaître en chiffre DEL rouges, poussez ensuite la flèche de température
vers le haut ou vers le bas pour sélectionner le nombre d’heures (de 1 à 24) que vous souhaitez
pour retarder le démarrage de la chaufferette. Lorsque le temps de consigne est passé, la
chaufferette va démarrer au réglage de température utilisé en dernier.
10) Ion:
Poussez le bouton Ion pour démarrer le générateur ion négatif. Poussez de nouveau pour
arrêter le générateur.
11) Cette chaufferette est équipée d’un accessoire sécurité « renversement ». Si l’appareil est
basculé, même légèrement, lorsqu’il est en service, le courant d’alimentation de l’appareil
sera coupé. Lorsque l’appareil est remis dans sa position normale verticale, vous devrez
pousser le bouton d’alimentation pour remettre l’appareil en marche et il reviendra aux
derniers réglages utilisés.
Entretien du matériel – Essuyer avec un chiffon souple et humide.
Rangement de l’appareil de chauffage – Quand l’appareil de chauffage ne va pas être
utilisé pendant une période assez prolongée, faire les choses suivantes s’il vous plaît:
1) Débranchez la chaufferette.
2) Videz le récipient d’eau de l’humidificateur et laissez-le sécher complètement à l’air.
3) Enroulez le câble d’alimentation électrique de manière à ne pas le laisser traîner au sol.
4) Couvrez la chaufferette pour éviter toute accumulation de poussière sur le filtre ou à
l’intérieur.
5) Rangez la chaufferette en un endroit sec et sans poussière.
Service – Pour remplacer un élément de chauffage ou dans le cadre d’autres réparations ou
d’un service spécifique, veuillez nous contacter par teléphone au 1-800-839-0966.
Page 31

29
SYSTÉME DE FILTRE PERMANENT LAVABLE
Les appareils de chauffage EdenPURE®sont équipés d’un filtre permanant lavable ; le
filtre est situé à l’arrière de l’appareil et est facile à laver.
IMFORMATION IMPORTANTE: Si vous souffrez d’allergies et/ou êtes sensible à la
poussière, nous vous conseillons d’utiliser ce filtre. Si vous décidez d’utiliser le filtre, il
doit être lavé tous les jours car un filtre obstrué empêchera l’appareil de fonctionner à
pleine capacité.
L’utilisation de l’appareil de chauffage avec le filtre à poussière est une option. Faire
fonctionner l’appareil sans le filtre ne va, en aucun cas, affecter ou modifier le
fonctionnement de l’appareil. Si vous n’êtes pas sensible à la poussière ou ne souhaitez
pas devoir laver le filtre tous les jours, enlevez-le de l’arrière de l’appareil et utilisez
l’appareil sans filtre
1) Pour dégager le filtre, relever les loquets situés de chaque côté du filtre. Ôter ce filtre de
l’arrière de l’appareil en inclinant et soulevant en même temps.
2) Faire couler de l’eau chaude du robinet sur le filtre, dans la direction opposée au
passage d’air jusqu’à ce que l’eau devienne propre. Il se peut que le filtre rejette des
résidus filtrés; en conséquence, faites attention à ne pas le laisser s’égoutter sur des
surfaces susceptibles d’être tachées comme une moquette par exemple. Vous pouvez
aussi laisser tremper le filtre dans de l’eau mélangée à une petite quantité de liquide
vaisselle doux (n’oubliez pas de rincer à l’eau après avoir laissé tremper le filtre).
3) Secouer le filtre au-dessus d’un évier jusqu’à ce que l’excès d’eau disparaisse et le
laisser sécher complètement avant de le remettre en place. Ne pas accélérer le
processus de séchage du filtre par d’autres méthodes.
4) Remettre le filtre en place à l’arrière de l’appareil et bien installer les loquets
latéraux en les soulevant et les fermant à l’endroit prévu.
Entretien du Filtre
AVERTISSEMENT
TOUTE INTERVENTION NÉCESSAIRE AUTRE QUE L’ENTRETIEN DU FILTRE DOIT
Ê
TRE IMPÉRATIVEMENT EFFECTUÉE PAR UN PROFESSIONNEL D’UN CENTRE
SERVICE AGRÉÉ
Page 32

30
Avantages
Sécurité
Les radiateurs EdenPURE®ont une excellente réputation de sécurité. Ils émettent une chaleur sûre,
saine, propre et économique due à l’utilisation des éléments chauffants infrarouges à quartz. Ces
appareils de chauffage exceptionnels EdenPURE
®
ont été conçus selon un procédé de fabrication
prévenant toute accumulation inutile de chaleur au niveau du plafond. Ces radiateurs vous offrent le
summum du confort en maintenant pratiquement une chaleur toujours constante “de la tête aux pieds.”
Contrôle De La Zone Thermique
Les radiateurs EdenPURE®vous procurent de la chaleur uniquement à l’endroit et au moment où vous
le désirez. Ces appareils de chauffage vous reviennent en fait moins cher par pied carré chauffé et ne
requièrent aucune installation coûteuse. Vous les branchez tout simplement sur le 110 volt standard.
Nul besoin de prévoir d’installation spéciale sur le 220 ni même de ventilation.
Une chaleur saine
Les appareils EdenPURE®émettent une chaleur aussi saine et sûre que celle des rayons infrarouges du
soleil, et de ce fait, vous bénéficiez à domicile d’une chaleur naturelle identique.
Sur le plan frais d’exploitation et d’entretien, les radiateurs EdenPURE
®
sont peu onéreux. Le
ventilateur qui est la seule pièce mobile est équipé d’excellents contrôles de haute qualité. On n’a ni
brûleur susceptible de rouiller, se corroder, à ajuster ni aucune veilleuse gaspillant de l’énergie. Seuls,
des éléments chauffants infrarouges sûrs, propres et durables fournissent cette énergie thermique. La
durée de vie moyenne de ces éléments est de 20.000 heures. Ces radiateurs sont faits de métaux de
grande durabilité (Zinc et Bronze).
Summum du confort
Les radiateurs EdenPURE®assurent une distribution toujours constante de la chaleur et gardent vos
sols confortablement chauds. Réglés par thermostat, ces radiateurs commandent, font circuler et
réutilisent l’air chauffé au niveau du sol pour vous donner un maximum de confort. Il en résulte une
différence minime de température entre la température au niveau du sol et celle du plafond.
Alors que les éléments infrarouges à quartz sont en marche, vous remarquerez que la puissance
thermique de ce radiateur n’est pas due à un débit d’air ultra-rapide mais plutôt à une arrivée d’air
douce et modérée qui contribue à un brassage efficace d’air ainsi qu’à la stabilité de l’air au niveau du
sol.
Ces appareils de chauffage ne brûlent pas, n’assèchent pas et ne polluent pas l’air ambiant de leurs
impuretés. Cela aide à maintenir le niveau d’humidité ainsi que la qualité de l’air ambiant si
importants pour respirer confortablement et se maintenir en bonne santé.
Avec les radiateurs EdenPURE
®
vous n’avez pas de réservoirs sales et malodorants à remplir, de
mèches à changer ou de bois à transporter, ni de cendres à vider. De plus, ces appareils ne laissent
aucune trace de suie sur les murs ou les rideaux. Ces appareils de chauffage sont d’un usage très
facile. Il vous suffit tout simplement de les brancher à une prise mise à la terre de 110 volts 15 amp
ou plus.
Accessoire Humidificateur
En ajoutant un brouillard de vapeur dans la ligne de la grille des éléments chauffants, on ajoute
l’humidité maximum à la sortie des éléments. Cette addition synergétique d’humidité à la sortie de la
chaleur infrarouge augmente sensiblement la poussée de température et sa dispersion de même qu’elle
produit un niveau extrême de confort thérapeutique spécialement pour les enfants et les vieillards.
Accessoire Ion
Cette caractéristique Ion produit des ions négatifs qui vont faire que les particules flottant dans
l’air s’agglomèrent magnétiquement pour former une masse qui va se déposer au sol pour être
nettoyée.
To assure maximum performance of the EdenPURE
the following recommendations:
1) For best result, do not locate the heater in an area with a high rate of
air filtration and movement as the warm air will be exhausted.
2) Try placing the heater near a warmer inside wall and direct the output
towards a cooler outside wall. The cooler outside wall will tend to
draw the generated heat towards itself, which will allow for more
efficient heating.
3) Placing the heater next to a cold air return will draw the heat away
from area to be heated. Try closing or covering the cold air return.
This will allow for more efficient heating. Experiment with the
placement of the heater to see what works best for you.
4) To ensure maximum efficiency, a 40% (minimum) relative humidity
should be maintained in the heated environment.
5) The heaters are designed to operate for maximum efficiency up to 70-
72 degree range. Due to the soft heat concept, temperatures at 68
degrees feel as though it were 72 degrees. This is due to the heat
mixing with humidity evenly for “head-to-toe” comfort.
6) When the heater is placed in an isolated area, i.e. basement or
recreation area, the delivery registers and air return grills of the
existing system should be closed in that area if possible.
7) Try placing the heater a few feet above the floor in rooms with large
areas of bare concrete. Make sure the heater is secure and won’t fall.
This will allow for more efficient heating since concrete acts as a heat
sink and will tend to draw the heat its direction.
8) Try lowering your central heating system to a lower temperature and
placing the heater in the area you spend the majority of your time.
Now set the EdenPURE
is no point to heating multiple rooms to 68+ degrees when not in use.
9) When heating larger areas, place the heater in a central location. If a
ceiling fan is nearby, try using it at the same time to help distribute the heat
evenly. Our suggestion, give it a try and see what works best for you.
10) If used in an extremely dirty or dusty area, the filter must be cleaned
more frequently as the filter can clog and cause the heater to stop
working.
11) The heater grill is hot when in use. To avoid burns, do not let bare skin
touch hot surface. If provided, use handles when moving this heater. Keep
combustible materials, such as furniture, pillows, bedding, papers, clothes,
and curtains at least three feet from the front of the heater and keep them
away from the sides and rear.
12) Extreme caution is necessary when any heater is used by or near children
or invalids and whenever the heater is left operating and unattended.
13) To disconnect heater, turn controls to off, then remove plug from outlet.
14) Always unplug heater when not in use.
Page 33

31
Suggestions pour un Rendement Optimal
Pour maximaliser le rendement de votre radiateur EdenPURE®veuillez noter les conseils
suivants:
1) Éviter de placer le radiateur dans un endroit à fortes infiltrations d’air et de grand
passage, ce qui épuise rapidement l’air chaud.
2) Placer si possible l’appareil à proximité d’un mur intérieur toujours plus chaud et
diriger la puissance de sortie vers un mur extérieur plus froid. Ce mur extérieur
attirera la chaleur générée dans sa direction, ce qui permettra de chauffer plus
efficacement.
3) Placer un radiateur près d’un retour d’air froid dissipera l’air chaud de cet endroit.
Fermez ou essayez de couvrir la bouche d’air froid de façon à optimiser le rendement.
Essayez plusieurs possibilités de placement pour votre appareil. Voyez ce qui vous
convient le mieux.
4) Pour assurer une efficacité maximum de chauffage, il est nécessaire de maintenir 40%
(minimum) d’humidité relative.
5) Ces appareils de chauffage ont été conçus pour opérer à un maximum d’efficacité de
70 à 72 degrés F (=21.10–22.20 C). Selon le concept de chaleur douce, une
température de 68 degrés F (20 degrés C) vous donne la même sensation de chaleur
qu’une température de 72 degrés (22.2 degrés C). Ceci, en raison du mélange égal de
la chaleur avec l’humidité ambiante, vous donne un confort « de la tête aux pieds »
6) Lorsque l’appareil est placé dans un endroit peu fréquenté comme un sous-sol ou une
salle de jeux, les registres et les grilles de retour d’air du système en place doivent
être fermés si possible.
7) Dans les pièces à larges surfaces de ciment nu, essayez de placer l’appareil de
chauffage à quelques pieds au-dessus du sol. Assurez-vous que l’appareil est bien
ancré et ne basculera pas. Cette précaution vous octroiera un rendement thermique
plus efficace puisque le ciment absorbe la chaleur et l’attirera donc dans sa direction.
8) Essayez de baisser votre système de chauffage central de quelques degrés et placez le
radiateur dans la pièce où vous passez la plus grande partie de votre temps. Puis
choisissez la température de votre EdenPURE
®
idéale pour votre confort. Cela ne sert
à rien de chauffer à 68 degrés F+ (200 C) diverses pièces dont vous ne vous servez
pas.
9) Pour chauffer de vastes espaces, placez le radiateur au centre de la salle. S’il y a un
ventilateur de plafond, faites-le marcher en même temps de façon à répartir la chaleur
de manière égale. Essayez! C‘est à vous de voir ce qui vous convient le mieux.
10) Si l’emplacement choisi pour votre appareil est excessivement sale ou
poussiéreux, il est impératif de nettoyer le filtre plus fréquemment, vu que ce
filtre peut s’obstruer et causer un mauvais fonctionnement de l’appareil.
11) Ce radiateur est brûlant lorsqu’il est en marche. Évitez tout contact physique pour
éviter toute brûlure. S’il en est équipé, servez-vous des poignées de transport pour
déplacer cet appareil. Mettez hors de portée toute matière inflammable: meubles,
coussins, literie, papiers, vêtements et rideaux. Éloignez-les à un minimum de 2 pieds
(= 60cm) en face du radiateur ainsi que de chaque côté et à l’arrière.
12) Une extrême vigilance s’impose quand un appareil de chauffage est utilisé à
proximité d’enfants ou d’invalides, ou quand cet appareil de chauffage est en marche
sans supervision aucune.
13) Pour arrêter le radiateur, mettez la commande de contrôle sur Arrêt (Off) puis
débranchez la prise d’électricité.
14) Toujours débrancher la prise de l’appareil de chauffage quand il n’est pas en marche!
Page 34

WASHABLE LIFETIME FILTER SYSTEM
The EdenPURE
on the rear of the unit which is easy to clean.
IMPORTANT INFORMATION: If you have allergies and/or are
sensitive to dust you will want to use this filter. When choosing to use
the filter it must be cleaned daily, a clogged filter will cause the heater
not to work to it full capacity.
Using the heater with the dust filter attached is an optional feature.
Operating the heater without the filter will in no way harm or alter the
operation of the heater. If you are not sensitive to dust or do not want to
clean the filter daily, please remove it from the back of unit and use your
heater without it.
To clean the filter:
1) Press the tab on the top of the filter to release the filter and pull it
straight out.
2) Run warm tap water over the filter, the opposite direction of air flow,
until water runs clear. The filter might excrete some filtered residue,
so be cautious not to drip on any stainable surfaces such as carpeting.
You can also soak the filter in water mixed with a small amount of
mild dish soap (don’t forget to rinse with water after soaking filter).
3) Shake the filter over a sink until excess water is removed and allow it
to drip dry completely before reinstalling. DO NOT force the filter to
dry using any alternative methods.
4) Reinstall the filter to the rear of the unit by positioning the filter back
in place.
ANY REQUIRED SERVICE OTHER THAN FILTER MAINTENANCE SHOULD
ONLY BE PERFORMED BY AN AUTHORIZED SERVICE REPRESENTATIVE
32
Pourquoi la soufflerie continue-t-elle de fonctionner une fois l’appareil éteint?
La soufflerie va continuer à tourner jusqu’à ce que les chambres de chaleur se soient
refroidies. Après quelques minutes, le ventilateur s’éteindra automatiquement.
Peut-on remplacer les éléments chauffants?
Oui. Contactez tout simplement votre endroit d’achat.
Le flux d’air de l’appareil de chauffage semble avoir diminué?
Assurez-vous que la sortie d’air n’est pas obstruée et aussi que le filtre est propre.
Référez-vous aux instructions d’entretien du filtre page 29.
Après avoir branché l’appareil et l’avoir mis en marche, combien de temps cela
prendra-t-il pour chauffer ma pièce?
Généralement, il faut un peu moins d’une heure. Rappelez-vous que quel que soit le type de
chauffage utilisé, de nombreux facteurs entrent en ligne de compte. Par exemple, les
dimensions de la pièce, l’isolation ou la non-isolation des lieux, le nombre de portes et de
fenêtres, la superficie de ciment nu (ce dernier agit comme dissipateur de chaleur) la
fréquence d’ouverture et de fermeture d’une porte extérieure, etc.
Puis-je utiliser cet appareil pour chauffer plusieurs pièces à la fois?
Oui. Souvenez-vous toutefois que cela va dépendre de l’agencement, du plan de la maison
et de la grandeur des pièces. Au dire de nombre de nos clients, l’adjonction de ventilateurs
de plafond permet de chauffer et de distribuer la chaleur dans plusieurs pièces à la fois,
spécialement lorsque l’appareil de chauffage est placé dans une pièce centrale. Nous vous
conseillons d’essayer vous aussi et de voir la solution qui vous convient le mieux.
Ma maison n’est pas très bien isolée. Ce radiateur va-t-il me suffire?
Oui. Mais n’oubliez pas que toute pièce insuffisamment isolée ne retiendra pas aussi
efficacement la chaleur.
Puis-je utiliser cet appareil avec des plafonds voûtés ou des plafonds « style cathédrale » ?
Oui. Mais cela prendra davantage de temps initialement pour chauffer la pièce. Une fois
que la pièce aura atteint le confort de chaleur désiré, alors l’ajustement se fera
automatiquement.
Peut-on utiliser cet appareil dans une salle de bains?
Ce n’est pas recommandé étant donné l’humidité ambiante fréquente dans une salle de
bains.
Pourrai-je utiliser cet appareil de chauffage dans un sous-sol ou dans un garage?
Bien sûr, mais n’oubliez pas que les pièces peu isolées ne retiendront pas la chaleur aussi
efficacement. Les sols de ciment dissipateurs de chaleur absorberont une partie de cette
chaleur. La solution pour améliorer l’efficacité thermique serait de hausser à quelques
pieds du sol votre appareil de chauffage.
Peut-on utiliser plus d’un radiateur à la fois?
Oui, mais assurez-vous qu’ils ne sont pas branchés sur le même circuit. L’idéal serait que
chaque appareil de chauffage ait son propre circuit.
Puis-je utiliser cet appareil de chauffage professionnellement sur un chantier de
construction?
Cet appareil n’est pas conçu pour être utilisé sur les chantiers de construction ou règne un
environnement de forte poussière. Utiliser cet appareil dans de telles conditions annulera
la garantie.
Questions et Réponses
Page 35

33
P
eut-on déplacer le radiateur quand il est en marche?
Nous ne le recommandons pas. Attendez que le ventilateur se soit arrêté avant de transporter
l’appareil.
Quelle est la longévité des éléments de quartz?
La durée moyenne est de 5000 heures ou plus, soit de 3 à 5 ans. Vous pouvez faire remplacer
ces éléments chez un concessionnaire agréé.
Qu’entendez-vous par « zone thermique »?
La zone thermique vise à concentrer la chaleur là où les gens passent la plus grande partie de
leur temps. En effet, à quoi bon chauffer à 68 degrés ou plus (20 C) diverses pièces qu’on
n’utilise pas?
Combien de kilowatts par heure consomme l’appareil de chauffage?
Selon les tests effectués par un laboratoire indépendant dans une maison pour le modèle Signature,
on a estimé la consommation à 1.45 kilowatts á l’heure en le mode de courant complet et 30.9 en
le mode de gagner d’énergie.
Quelle est la puissance thermique BTU (Unités thermiques Britanniques) de ces appareils
de chauffage?
Pour le modèle Signature, c’est à peu près 5000 BTU.
En fait, les BTU n’ont plus aucun sens puisque le procédé de chauffage breveté de l’EdenPure
®
a
délibérément choisi de ne pas utiliser cette méthode désuète et inefficace de combustion thermique
basée sur les BTU. Notre méthode de chauffage est infiniment supérieure sur le plan efficacité,
sécurité, confort et crée un climat sain et naturel chez vous.
Puis-je utiliser cet appareil de chauffage et simultanément me servir d’un autre appareil
électrique?
Oui, bien sûr, tant qu’ils ne sont pas branchés sur le même circuit. Ces chauffages de zone
sont considérés comme des appareils ménagers. Il est recommandé de ne pas utiliser plus d’un
appareil sur un même disjoncteur. Votre congélateur, réfrigérateur, micro-ondes, machine à
laver, séchoir électrique et autres appareils ne doivent pas être branchés sur un même
disjoncteur.
Peut-on utiliser une rallonge, un paratenseur ou une multiprises avec cet appareil de
chauffage?
Ce n’est pas recommandé. Cet appareil est conçu pour être branché directement sur un circuit
relié à la terre, de 110 volts 15 amp ou plus. Si toutefois vous devez utiliser une rallonge, le
calibre de ce cordon de rallonge devra être un No 14 AWG minimum calibré à 1875 watt . Ce
doit être un cordon à 3 fils doté d’une fiche reliée à la terre et d’une fiche de raccordement.
Je n’ai pas de prise de courant avec prise de terre. Puis-je utiliser un adaptateur de
cordon ou enlever la broche?
Absolument pas. Si vous n’avez pas de branchement électrique relié à la terre, contactez un
électricien local agréé et demandez-lui conseil. Toute modification effectuée sur cet appareil
annule automatiquement la garantie.
La chaufferette peut elle fonctionner efficacement et sans danger sans eau?
Oui, l’humidificateur ne doit pas fonctionner à moins que vous ne le vouliez.
Est-ce que les accessoires Humidificateur et Ion peuvent fonctionner sans le chauffage?
Non, l’appareil est conçu pour que ces accessoires fonctionnent en même temps que le
chauffage.
Est-ce que les accessoires Humidificateur et Ion vont se mettre en marche lorsque je règle
la minuterie pour une mise en marche automatique de la chaufferette?
Oui, lorsque la caractéristique minuterie auto-on est utilisée, la chaufferette va se mettre en
marche suivant exactement le même réglage que lors de l’utilisation précédente.
Page 36

34
GARANTIE
Ce produit comporte une garantie de 30 jours. Dans le cas où votre appareil s’avèrerait
défectueux dans les 30 jours suivant votre achat, vous pouvez le retourner en échange
d’un remboursement ou d’un nouvel appareil.
DANS L’HYPOTHÈSE OÙ VOUS AURIEZ BESOIN DE RETOURNER VOTRE APPAREIL DE
CHAUFFAGE, CE DERNIER DOIT ÊTRE RETOURNÉ DANS L’EMBALLAGE D’ORIGINE POUR
ÉVITER TOUT DOMMAGE À L’APPAREIL DURANT LE TRANSPORT.
GARANTIE LIMITEE DE TROIS ANS
GARANTIE: La Compagnie garantit ce produit à l’acheteur initial ou au bénéficiaire de ce cadeau comme
étant sans défaut au niveau de la fabrication et des matériaux sous condition d’usage et d’entretien normal
pour une période de trois ans à compter de la date d’achat.
La garantie sera nulle et sans objet s’il se produit un des faits suivants: si la mécanique de l’appareil de
chauffage et/ou le cordon d’alimentation et la prise ont subi des modifications ou ont été retouchés de
quelque façon que ce soit; Si les appareil de chauffage ont été utilisés de façon inappropriée ou non
entretenus conformément aux instructions d’entretien.
RESTRICTIONS: TOUTES LES GARANTIES QUI SONT IMPLICITES EN VERTU DE LA LOI, Y COMPRIS
LES GARANTIES IMPLICITES DE QUALITE MARCHANDE ET DE CONVENANCE POUR UN BUT PRECIS
SONT EXPRESSEMENT LIMITEES A LA DUREE DES GARANTIES LIMITEES SUSMENTIONNEES.
Certaines juridictions n’autorisant pas de restrictions concernant la longueur de la garantie
impliquée, il se peut, en conséquence, que la restriction ci-dessus ne s’applique pas à vous. En
aucun cas, la Compagnie ne sera tenue responsable de dommages liés ou résultants, de perte de
bénéfice ou de frais médicaux causés par un défaut, une défaillance, un mauvais usage ou un
mauvais fonctionnement du produit.
Certaines juridictions n’autorisant pas l’exclusion ou la restriction de dommages liés ou résultants,
la restriction ci-dessus peut ne pas s’appliquer à vous. La Compagnie ne sera pas tenue
responsable de dommages ou de pertes, de façon directe ou indirecte, causés par un mauvais
usage, un accident dû à la négligence, des conditions de transport ou de rangement, ou un manque
d’attention aux instructions fournies. La Compagnie ne sera pas tenue responsable de
déclarations orales ou écrites qui ne sont pas en conformité exacte avec les termes de cette
garantie écrite, ou non conformes aux indications techniques livrées par la Compagnie et
finalement susceptibles d’induire en erreur.
DANS LE CAS PEU PROBABLE OÙ VOTRE APPAREIL S’AVÈRERAIT DÉFECTUEUX, VOUS
POUVEZ CONTACTER VOTRE AGENT AGRÉE POUR ASSISTANCE IMMÉDIATE.
Avant de nous contacter, nous vous encourageons vivement à consulter notre site Internet ayant
trait aux services sur www.edenpureservice.com. Vous y trouverez diverses solutions pratiques
pour identifier et remédier à la cause du problème si nécessaire.
Si vous êtes dans l’incapacité de contacter votre agent agrée et que le site Internet
www.edenpureservice.com n’apporte pas de réponse à vos questions, vous pouvez alors
contacter notre service –clientèle en composant le 1-866-786-8946 ou encore contactez-nous
par e-mail à custserv@rppurchase.com. Lors de votre appel téléphonique, ne négligez pas
d’avoir en main votre preuve d’achat sans laquelle notre service ne saurait venir à votre aide,
tout renseignement nécessaire figurant sur cette preuve d’achat.
Merci!
Garantie limitée de trois ans
READ ALL INSTRUCTIONS BEFORE USING THE HEATER
Operation – 12 step set-up for EdenPURE
1) Unpackage heater. Cut open tape area, fold back flaps and gently turn entire
box upside down. Lift box from styrofoam packing. Remove styrofoam, turn
upright. We recommend keeping the packaging for off-season storage and any
transporting needs.
2) Find a level and unobstructed location to place the unpackaged heater.
3) Plug the power cord directly into an unused grounded 110 volt 15 amp or higher
circuit receptacle. The power switch will illuminate and the heater will beep 3
times indicating the unit is plugged into the receptacle.
4) Insert 2 “AAA” batteries into the battery compartment on the remote control.
5) Push the “Power” button located on the front of the heater or the remote control to
turn the heater on. Set the Mode Key to “Auto”. Adjust the “temp up” and “temp
down” buttons until the desired temperature is reached. Once the desired
temperature is reached the heater will cycle on and off to maintain the room
temperature. When the Signature Model is set on the “Auto” mode and cycling off
and on, it has been equipped with an Energy Savings feature. The unit will run on
full power until it gets to within 2 degrees of the desired temperature. At this point
it will automatically go into an energy savings mode which shuts down 2 of the
heating elements and lowers the fan speed. Not only will this save energy, it also
keeps the room temperature closer to the desired temperature. The fan will run
periodically to circulate the room air through the heater in order to monitor the
room temperature more accurately. If the room temperature should fall below 2
degrees of the desired temperature, the unit will return to the full power mode until
the desired temperature is reached again.
6) Switch the Mode Key to “High” in order to have the heater stay on high heat
and not cycle on and off.
7) To turn the heater off, press the “Power” button, the fan will continue to run
until all of the heat has been expelled and will then turn off.
8) The heater is equipped with a temperature limiting control contained inside the
unit. If the heater stops working, shut the power off and let the unit cool down.
Turn the power back on and resume use. If the unit continues to shut down or the
unit does not reset itself, please contact us for service.
9) Humidifier: Use caution when filling the humidifier water chamber if the Heater
has been in use as the plastic can be hot.
To fill the humidifier chamber, make sure the heater is turned off. Open the
compartment on the left side of the heater. To open the door, pull gently down and
outward on the handle provided. Remove the water bottle. Fill the bottle with
distilled water and invert the bottle into the humidity tray. Once the water has filled
the tray refill the bottle a second time and invert it on to the humidity tray. The
humidifier is now primed. Close the humidifier compartment. Turn the humidifier
on. Once the unit is primed a bottle of water should last approximately 10 hours.
When the water has diminished the water light on the front of the unit will blink
and the humidifier will shut off until the water is replenished.
Yes: The heater can be safely and effectively operated without water.
Page 37

EdenPURE®Warranty Registration
Please return this card within 30 days of purchase to activate your warranty. Thank You.
E-mail Address _________________________@ ______________
Firstname _______________ M.I. _____ Lastname______________________________
Street ______________________________ Apt.# ______________
City ___________________ State _______ Zip code ___________
Model purchased _______ Serial# _________________ Date of purchase: Month _______ Day ___ Year _____
Registro de garantía EdenPURE
®
Por favor, para activar su garantía, devuelva esta tarjeta durante los treinta (30) días siguientes de realizar su
compra. Gracias.
Dirección de E-mail______________________@ _____________
Nombre________________________________________________________________
Apellido__________________________________________________________
Calle__________________________________#Apt.___________
Ciudad__________________ Estado_________ Código _______________
Modelo comprado _______ # de serie _________________ Fecha de compra: mes _______ día ___ año _____
Enregistrement de garantie EdenPURE
®
Veuillez s’il vous plaît retourner cette carte dans un délai de 30 jours à compter de la date d’achat pour activer
votre garantie. Merci.
Adresse E-mail _________________________@ ______________
Prénom _______________ Initiale 2nd prénom . _____ Nom de Famille________________________
Rue ______________________________ No Appartement ______________
Ville ___________________ État _______ Code Postal ___________
Modèle acheté _______ N0 de Série _________________ Date d’achat: Mois _______ Jour ___ Année _____
37
Please clip and return the warranty card below.
Por favor desprenda y devuelva la tarjeta de garantía en la
parte inferior.
Découpez et retournez la carte de garantie ci-dessous:
Warranty Card
Carte de Garantie
Tarjeta de garantía
Page 38

Thank you for purchasing the EdenPURE
OPERATION AND WARRANTY MANUAL
EdenPURE
SAVE THESE INSTRUCTIONS
©2010 Resource Partners, LLC I-4814 BR9305R-1
Thank you for purchasing the EdenPURE®!
Please register your warranty information by mail
within 30 days of purchase.
Resource Partners Enterprises, LLC
7800 Whipple Ave. NW
Canton, Ohio 44767
1-800-839-0966
¡GRACIAS POR COMPRAR EdenPURE®!
Por favor, mande la garantía por correo durante los treinta (30) días
siguientes de realizar y recibir su compra.
Resource Partners Enterprises, LLC
7800 Whipple Ave. NW
Canton, Ohio 44767
1-800-839-0966
Merci d’avoir acheté l’EdenPURE
®
Veuillez expédier les renseignements concernant votre garantie par
courrier postal dans les 30 jours qui suivent votre achat.
Resource Partners Enterprises, LLC
7800 Whipple Ave. NW
Canton, Ohio 44767
1-800-839-0966
RESOURCE PARTNERS ENTERPRISE LLC
7800 WHIPPLE AVE NW
CANTON OH 44767-0002
Postage Required
Post Office will not
deliver without
proper postage
 Loading...