

EdenPURE Namath Rapid Cooker Product Manual
PRODUCT
GUIDE
IMPORTANT:
Fill out the product record information below.
Serial Number:
Date Purchased:
Located either on the bottom of the unit, or in the back right corner
FOR OUTDOOR USE ONLY
CAUTION:
Read and follow all safety statements, assembly
instructions, and use and care directions before
attempting to assemble and cook.
If you have questions or need assistance during assembly, please call 888-444-4134.
To ensure your satisfaction and for follow-up service, register your appliance online at www.namathproducts.com/register
KEEP THIS MANUAL FOR FUTURE REFERENCE.
Failure to follow all manufacturer’s instructions
could result in serious personal injury and/or
property damage.
WARNING:

Congratulations and
Welcome to the Team!
Executive Chef, Jon Molnar and Football Legend, Joe Namath
Thank you for purchasing the Namath Rapid Cooker™!
We hope you’re ready to become the MVP of your outdoor cooking experience!
The Namath Rapid Cooker
Chef Jon Molnar—combines the quality of a restaurant with the convenience
of portability. Whether it’s backyard barbeques, tailgating, camping, picnics
or anywhere else you might take it, the Namath Rapid Cooker
enough to make virtually any venue the perfect place for restaurant-quality food!
Forget what you know about traditional grilling. The Namath Rapid Cooker’s
revolutionary technology, innovative design and easy-to-use features and
functions will take food beyond where your old grill could. In order to
maximize your cooking experience, flip this card over for some basic tips
from Chef Jon Molnar.
™
—inspired and designed by Joe’s own cousin,
™
is powerful
2

How to Use the 9 Temperature Zones
The Namath Rapid Cooker™ has 9 cooking temperature zones—three
(3) temperature settings: high, medium, low—and three (3) adjustable heights:
high, medium, low, to account for 9 different zones of heat! With this fully
customizable range, you can get the perfect “steak house char” by searing
your meat on the “High-High” setting or warm food and melt cheeses on
the “Low-Low” setting. Please see the chart below for some general
cooking suggestions:
Always preheat your Namath Rapid Cooker
™
on “High-High”
for 3-5 minutes prior to cooking.
Cooking times will vary depending on the weight, size and thickness of
the product being cooked. Consuming raw or undercooked meats, poultry,
seafood, shellfish or eggs may increase your risk of food borne illness,
especially if you have a medical condition.
3 Heat Settings
High / Medium / Low
3 Adjustable Heights
High / Medium / Low
9 ZONE TEMP
COOKING
HIGH MEDIUM LOW
High
Medium
Low
Sear
Grill
Heat
Broil
Brown
Slow Cook W
Cook
Roast
arm/Melt
3

TABLE OF CONTENTS
Operating Procedures 5
Maintenance & Cleaning 6
Emergencies 7
SAFETY SYMBOLS
The symbols and boxes shown below explain what
each heading means. Read and follow all of the
messages found throughout the manual.
Troubleshooting 7-8
Cooking Tips & Recommendations 9
Wa 10
rnings
Warranty 11-12
DANGER
DANGER: Indicates an imminently hazardous situation
which, if not avoided, will result in death or serious injury.
WARNING
WARNING: Indicates a potentially hazardous situation
which, if not avoided, could result in death or serious injury.
WARNING
Always follow leak check procedures
located in this manual fully, prior to
operating your grill.
ALWAYS READ
YOUR ENTIRE
MANUAL PRIOR
TO OPERATING
YOUR GAS GRILL
YOUR GRILL IS DESIGNED
FOR OUTDOOR USE ONLY
DANGER
If you smell gas:
1. Immediately shut off the gas to the grill
2. Extinguish any flames
3. Open drawer
4. If you continue to smell gas, keep away
from the grill and call your gas supplier
or fire department
Leaking gas may cause an explosion or
a fire, which could cause serious bodily
injury, property damage or death.
WARNING
Consuming raw or undercooked meats,
poultry, seafood, shellfish or eggs may
increase your risk of food borne illness,
especially if you have a medical condition.
4

OPERATING PROCEDURES
• Keep openings of valves and cylinder clear and free
from debris.
• Check for leaks.*
• Keep hoses away from hot surfaces.
• Hose (sold separately) must not be pinched
or kinked to allow for free transfer of gas.
• Do not store spare gas cylinders or other fl ammable
liquids or gases near or around the appliance.**
• Do not use the cooker within 2 feet of anything
that may be combustible.
• Only use this appliance outdoors in well-ventilated
areas. It should not be used in any confi ned or enclosed
areas including breezeways, alcoves, and garages.
• It is not intended for use in boats or recreational
vehicles.
• Do not leave the unit unattended. The entire cook box
will become HOT during use.
• Do not use unit near sparks or if it sparks.
TO IGNITE COOKER:
• Attach 1 lb. propane tank to the regulator located
on the side of the Namath Rapid Cooker™. Be sure
the liquid propane tank is fastened tightly and always
check the integrity of the tank prior to connecting.
If using a connector hose for a larger liquid propane
tank, be sure that the attachments are fastened tight
at each end and turn on the large tank fi rst to allow
the propane to travel through the connector hose.
Always read safety instructions and product warnings
prior to use.
• Never lean over the cooking unit.
• Depress knob and turn counter-clockwise
to the LIGHTING POSITION.
STORAGE
• The gas must be turned off at the liquid propane
cylinder when the cooker is not in use.***
• Disconnect the gas fully from the appliance
whenever storing indoors.
• Store liquid propane cylinder separate from
cooker in a well-ventilated outdoor space.
KEEP OUT OF THE REACH
OF CHILDREN
HOW TO CHECK FOR LEAKS
*
Make a soap and water solution. Apply liquid to all areas with fi ttings
or connections. Turn on the gas. DO NOT IGNITE the unit. If the soap
bubbles, you have a leak at that location. Check all connections and
repeat the steps above. You should repeat this check each time you
disconnect anything with a fi tting.
ALWAYS FOLLOW GUIDELINES PROVIDED
**
BY YOUR TANK AND GAS SUPPLIERS
HOW TO CHECK THAT THE VALVES ARE OFF
***
Valves are shipped in the off position.
Always check that they are turned off
before using. Check by pushing down
on the black knob and turning in a
clockwise direction. If the knob
does not turn in a clockwise
motion when it is depressed
it is off.
DO NOT LOOK INTO THE OPENING WHILE
LIGHTING. STAND OFF TO THE SIDE OF THE UNIT
WHILE LIGHTING. IF UNIT DOES NOT IGNITE, SEE
TROUBLESHOOTING GUIDE (Page 5).
• Press the igniter button on the front of the cooker
for 2-3 seconds. You will hear a snap and a spark to
the burner and you should feel the unit warming up.
If you do not, turn off the unit and open the drawer
for 5 minutes to allow all gas and fumes to clear.
Repeat the steps.
• If this fails for a third time, make certain that your
liquid propane tank is not empty and then call
1-888-444-4134 for further instruction.
• Once you have the cooker lit, leave on HIGH
for 3-5 minutes before setting desired temperature.
TO EXTINGUISH COOKER:
• Tu rn gas off at the source.
• Depress knob and turn clockwise
to the OFF POSITION and release knob.
Make sure that the burner valve
is set to the OFF POSITION
before opening the gas valve.
5
MAINTENANCE & CLEANING
• Always allow the unit to cool completely before cleaning.
• DO NOT clean ceramic core or burner box.
• DO NOT use abrasive cleaners or cleaning pads
on the outside of your cooker.
• Wash your cooker with warm soapy water, and then
rinse with clean water. Use the same steps to clean
the grease tray after removal from the cooled unit.
• Grates and internal burner tubes may be cleaned
with a stainless steel bristle wire brush. Use a soft
bristle brush for stubborn debris on the outside
of the unit to prevent scratching.
• Stainless steel cleaner may also be purchased.
For best results, always clean with the grain of
the stainless steel and use only a soft cloth.
• DO NOT use aluminum foil. Disposable trays
are available (see pg.12 to order replacements).
• Cleaning is important to avoid grease fi res.
• DO NOT use water on a grease fi re. Personal injury
may result. If a grease fi re develops, turn knob off
and disconnect Liquid Propane tank.
BATTERY INSTALLATION/
REPLACEMENT
• To replace or install the battery, fi rst unscrew the ignitor
knob on the front of the unit. Next, insert the AA lithium
battery (included), negative end fi rst.
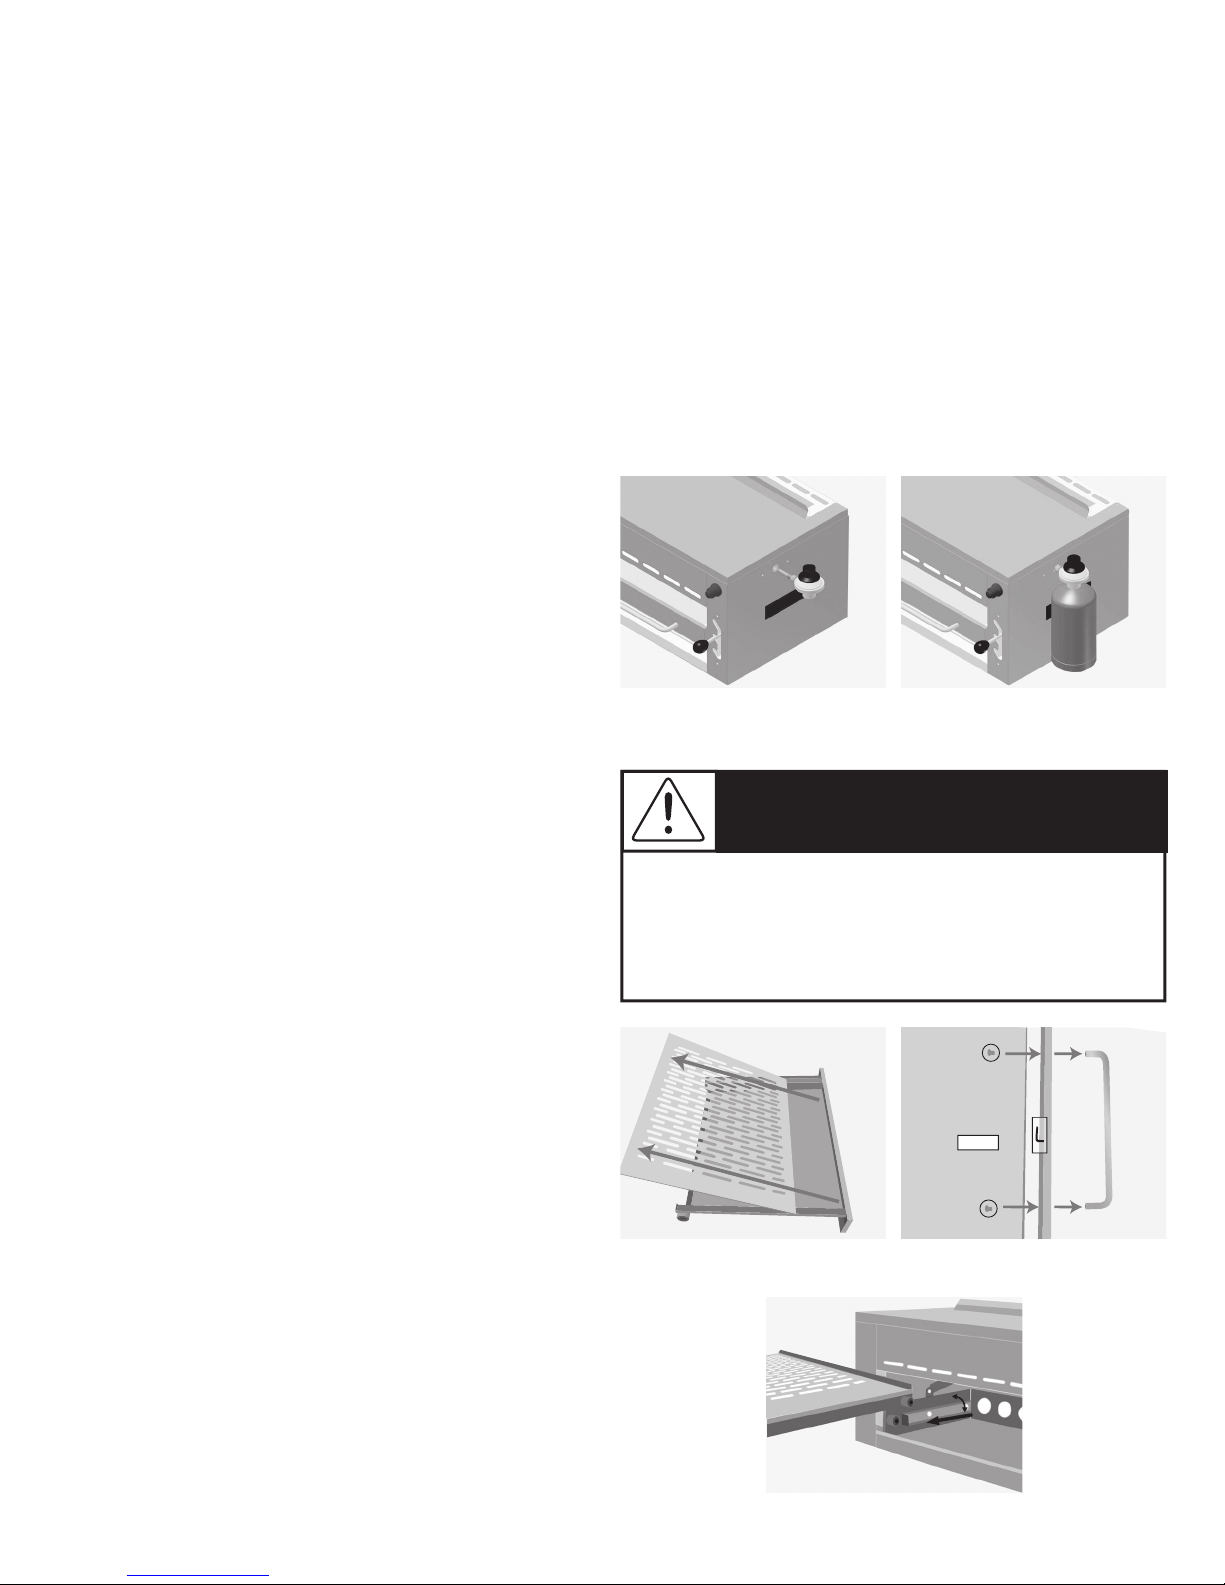
ATTACHING REGULATOR
& PROPANE TANK
• Attach regulator to thread on right side (See Figure A)
and propane (not included) to the regulator
(See Figure B).
• All other items ship fully assembled and ready for use.
REMOVING AND INSERTING
THE DRAWER
Removing the drawer:
1. Slide drawer into closed position.
2. Lift the drawer upward with rear end angled up
to unlock the wheels from tracks. (See Figure 3).
3. Pull drawer out of unit.
Inserting the drawer:
1. Place drawer over rails and slowly slide into
closed position.
2. Allow wheels to set into slots in the rear
of railings for secured position. (See Figure 3).
Inserting the drawer latch:
For your convenience, the Namath Rapid Cooker™
includes a drawer latch. This latch is designed to
keep the drawer from sliding open on bumpy car rides
or when it’s being carried from one place to another.
To insert the drawer latch, please follow these steps:
1. Remove the drawer from unit.
2. Remove the steel grate from the top of the drawer
(See Figure 1).
3. Acquire the front piece of the drawer, two screws
(included) and the drawer handle.
4. Make sure the front of the drawer is positioned
with the latch down.
5. Position the screws, the front of the drawer and the
door handle so that they all line up with the two holes
cut into the drawer handle. (See Figure 2).
6. Screw the two pieces together.
6
Figure A
Figure B
DANGER
If a gas leak cannot be stopped, or a fi re
occurs due to gas leakage, call the fi re
department.
Latch on
the Bottom
Figur
Figure 1
Figure 3
e 2

EMERGENCIES
EMERGENCIES POSSIBLE CAUSE PREVENTION/SOLUTION
Gas leaking from
cracked/cut/burned hose.
Gas leaking from
Liquid Propane cylinder.
Gas leaking from
Liquid Propane cylinder valve.
Gas leaking between Liquid
Propane cylinder and regulator
connection.
Fire coming through control panel.
Damaged Hose. Turn off gas at Liquid Propane cylinder
or at source on natural gas systems.
If anything but burned, replace valve/
hose/regulator. If burned, discontinue
use of product and replace the hose or
call 1-888-444-4134 to speak with a
Customer Service representative.
Mechanical failure due to rusting
or mishandling.
Failure of cylinder valve from
mishandling or mechanical failure.
Improper installation, connection
not tight, failure of rubber seal.
Fire in burner tube section of burner
due to blockage.
Replace Liquid Propane cylinder.
Turn off Liquid Propane cylinder valve.
Return Liquid Propane cylinder to gas
supplier.
Turn off Liquid Propane cylinder valve.
Remove regulator from cylinder and
visually inspect rubber seal for damage.
See Liquid Propane Cylinder Leak Test
(Page 5) and Connecting Regulator to
the Liquid Propane Cylinder (Page 6).
Turn off control knob and liquid propane
cylinder valve. Leave drawer open to
allow fl ames to die down. After fi re is
out and grill is cold, remove burner and
inspect tube for spider nests or rust.
Grease fi re or continuous excessive
fl ames above cooking surface.
TROUBLESHOOTING
PROBLEM POSSIBLE CAUSE PREVENTION/SOLUTION
GAS ISSUES:
Burner will not light using ignitor.
Too much grease buildup
in burner area.
Burner not engaged with control valve. Make sure valve is positioned inside
Obstruction in burner. Ensure burner tube is not obstructed
No gas fl ow. Make sure Liquid Propane cylinder is not
Turn off control knob and Liquid Propane
cylinder valve. Leave drawer open to
allow fl ames to die down. After cooling,
clean food particles and excess grease
from inside fi rebox area, grease tray,
and other surfaces.
of burner tube.
with spider webs or other matter. See
Maintenance & Cleaning (Page 6).
empty. If Liquid Propane cylinder is not
empty, refer to “Sudden drop in gas fl ow”
(Page 8).
Vapor lock at coupling nut to
Liquid Propane cylinder.
Turn off knobs and disconnect coupling
nut from Liquid Propane cylinder.
Reconnect and retry.
7

TROUBLESHOOTING
PROBLEM POSSIBLE CAUSE PREVENTION/SOLUTION
continued...
GAS ISSUES:
Burner will not light using ignitor.
ELECTRICAL ISSUES.
Sudden drop in gas fl ow
or low fl ame.
Flames blow out.
Persistent grease fi re.
Coupling nut and Liquid Propane
cylinder valve not fully connected.
Wire and/or electrode covered with
cooking residue.
Wires are shorting (sparking) between
ignitor and electrode.
Dead Battery. Replace with a new alkaline battery.
Out of gas. Check for gas in Liquid Propane
Vapor lock at coupling nut/
Liquid Propane cylinder connection.
High or gusting winds. Turn front of grill to face wind or
Low on Liquid Propane gas. Refi ll Liquid Propane cylinder.
Grease trapped by food buildup
around burner system.
Turn off the coupling nut approximately
one-half to three-quarters additional
turn until solid stop. Tighten by hand
only - do not use tools.
Clean wire and/or electrode with
rubbing alcohol and clean swab.
Replace ignitor wire/electrode
assembly.
cylinder. Refi ll/replace if necessary.
Turn off knobs and Liquid Propane
cylinder valve. Disconnect coupling
nut from cylinder. Reconnect and
retry.
increase fl ame height.
Turn knobs to OFF. Turn gas off at
Liquid Propane cylinder. Leave lid
in position and let fi re burn out.
After grill cools, remove and clean
all parts.
Flashback (fi re in burner tube).
Unable to fi ll Liquid Propane cylinder.
Burner and/or burner tube is blocked. Turn knobs OFF.
Clean grill (see page 6).
Some dealers have older fi ll nozzles
with worn threads.
The worn nozzles don’t have enough
“bite” to engage the valve. Try a
second Liquid Propane dealer.
8

COOKING TIPS AND
RECOMMENDATIONS
How to Use the 9 Temperature Zones
The Namath Rapid Cooker™ has 9 cooking temperature
zones—three (3) temperature settings: high, medium,
low—and three (3) adjustable heights: high, medium, low,
to account for 9 different zones of heat! With this fully
customizable range, you can get the perfect “steak house
char” by searing your meat on the “High-High” setting or
warm food and melt cheeses on the “Low-Low” setting.
Please see the chart below for
some general cooking suggestions:
9 ZONE TEMP
COOKING
High
Medium
Low
Always preheat your Namath Rapid Cooker™ on
“High-High” for 3-5 minutes prior to cooking.
Meats
Sear the meat, for a few minutes per side, in the “Sear”
zone to seal in the juices. After searing both sides, drop
down to the “Grill” or “Heat” zone and fl ip the meat to
achieve the desired level of doneness. For more even,
well-done cooking with less of a sear, use the lower
zones.
Vegetables
Prior to cooking, lightly oil and season the vegetables
to your liking. Cook in the “Broil” zone or “Slow Cook”
zone depending on the desired doneness and level of
crispness you prefer.
HIGH MEDIUM LOW
Sear Broil Cook
Grill Brown Roast
Heat Slow Cook Warm/Melt
3 Heat Settings
High / Medium / Low
3 Adjustable Heights
High / Medium / Low
Sautéing
Create sautéed dishes by simply placing a metal sauté
pan into the Namath Rapid Cooker™. Do not use pans
that are made from materials other than metal. Place the
food in the pan, along with the appropriate liquids or oils.
Place the pan on the grate and adjust the Namath Rapid
Cooker™ to “Grill” (Medium-High). Monitor pan and liquids
during the cooking process. Use caution as the pan and
handle will be hot.
Other Items
The Namath Rapid Cooker™ can be used for a variety
of items; the only limit is your culinary imagination!
Use the 9 Zones to caramelize sugar on a crème brûlée
or melt cheese on French onion soup. Create a crispy
fi nish to ribs and other barbeque in the “Sear” or “Grill”
zones or use a cast-iron pan to make fajitas! The
possibilities are endless!
NOTE: Fish, vegetables, seafood, beef tips, kabobs,
sliced meat and other items can be placed directly
on the plate instead of on foil.
IMPORTANT: Cooking times will vary depending on the
weight, size and thickness of the product being cooked.
Consuming raw or undercooked meats, poultry, seafood,
shellfi sh or eggs may increase your risk of foodborne
illness, especially if you have a medical condition.
9

The following information is per the U.S. Department of Health and Human Services:
SAFE MINIMUM COOKING
TEMPERATURES
Use this chart and a food thermometer to ensure that
meat, poultry, seafood and other cooked foods reach
a safe minimum internal temperature.
REMEMBER: you can’t tell whether meat is safely
cooked by looking at it. Any cooked, uncured red meats
– including pork – can be pink, even when the meat has
reached a safe internal temperature.
CATEGORY FOOD TEMP °F REST TIME
Ground Meat
& Meat Fixtures
Fresh Beef, Veal, Lamb
Poultry
Beef, Pork, Veal, Lamb, 160°F None
Turkey, Chicken 165°F None
Steaks, Roasts, Chops 145°F 3 minutes
Chicken, Turkey (Whole)
Poultry Breasts, Roasts
Poultry Thighs, Legs, Wings
Duck & Goose
Stuffi ng
(cooked alone or in bird)
WHY THE REST TIME
IS IMPORTANT
After you remove meat from a grill, oven, or other heat
source, allow it to rest for the specifi ed amount of time.
During the rest time, its temperature remains constant
or continues to rise, which destroys harmful germs.
165°F None
Pork & Ham
Eggs & Egg Dishes
Leftovers & Casseroles
Seafood
Pork
Fresh Ham (Raw)
Precooked Ham (to reheat) 140°F None
Eggs Cook until yolk & white are fi rm None
Egg Dishes 160°F None
Leftovers 165°F None
Casseroles 165°F None
Fin Fish 145°F or cook until fl esh is
Shrimp, Lobster, Crabs Cook until fl esh is pearly
Clams, Oysters, Mussels Cook until shells open
Scallops Cook until fl esh is milky white
145°F 3 minutes
None
opaque & separated easily
with a fork
None
and opaque
None
during cooking
None
or opaque & fi rm
10

WARRANTY
This 1-YEAR LIMITED WARRANTY applies only to
units purchased from an authorized party. Manufacturer
warrants to the original consumer-purchaser only that
this product shall be free from defects in workmanship
and materials after correct assembly and under normal
and reasonable home use for the periods indicated below
beginning on the date of purchase*. The manufacturer
reserves the right to require that defective parts be
returned, postage and/or freight pre-paid by the
consumer for review and examination.
*Note:
warranty service.
The original consumer-purchaser will be responsible
for all shipping charges for parts replaced under the
terms of this 1-YEAR LIMITED WARRANTY.
This 1-YEAR LIMITED WARRANTY is applicable in the
United States and Canada only, is only available to the
original owner of the product and is not transferable.
Manufacturer requires proof of your date of purchase.
Therefore, you should retain your sales slip or invoice.
Registering your product is not a substitute for proof
of purchase and the manufacturer is not responsible for
or required to retain proof of purchase records.
A dated sales receipt WILL be required for
ITEMS MANUFACTURER WILL NOT PAY FOR:
1. Shipping cost, standard or expedited, for warranty
and replacement parts.
2. Service calls to your home.
3. Repairs when your product is used for other than
normal, single-family household or residential use.
4. Damage, failures or operating diffi culties resulting
from accident, alteration, careless handling, misuse,
abuse, fi re, fl ood, acts of God, improper installation
or maintenance, installation not in accordance with
electrical or plumbing codes, or use of products not
approved by the manufacturer. RUST is not considered
a manufacturing or materials defect.
5. Any food loss due to product failures or
operating diffi culties.
6. Replacement parts or repair labor costs for units
operated outside the United States or Canada.
7. Pickup and delivery of your product.
8. Repairs to parts or systems resulting from unauthorized
modifi cations made to the product.
9. The removal and/or re-installation of your product.
DISCLAIMER OF IMPLIED WARRANTIES and
LIMITATION OF REMEDIES
Repair or replacement of defective parts is your exclusive
remedy under the terms of this 1-YEAR LIMITED
WARRANTY. In the event of parts availability issues,
the manufacturer reserves the right to substitute like
or similar parts that are equally functional.
This 1-YEAR LIMITED WARRANTY applies to the
functionality of the product ONLY and does not cover
cosmetic issues such as scratches, dents, corrosions
or discoloring by heat, abrasive and chemical cleaners
or any tools used in the assembly or installation of the
appliance, surface rust, or the discoloration of stainless
steel surfaces.
This 1-YEAR LIMITED WARRANTY will not reimburse
you for the cost of any inconvenience, food, personal
injury or property damage.
Manufacturer will not be responsible for any
consequential or incidental damages arising from the
breach of either this 1-YEAR LIMITED WARRANTY
or any applicable implied warranty, or for failure or
damage resulting from acts of God, improper care
and maintenance, grease fi re, accident, alteration,
replacement of parts by anyone other than Manufacturer,
misuse, transportation, commercial use, abuse, hostile
environments (inclement weather, acts of nature, animal
tampering), improper installation or installation not in
accordance with local codes or printed manufacturer
instructions.
11

THIS 1-YEAR LIMITED WARRANTY IS THE
SOLE EXPRESS WARRANTY GIVEN BY THE
MANUFACTURER. NO PRODUCT PERFORMANCE
SPECIFICATION OR DESCRIPTION WHEREVER
APPEARING IS WARRANTED BY MANUFACTURER
EXCEPT TO THE EXTENT SET FORTH IN THIS
1-YEAR LIMITED WARRANTY. ANY IMPLIED
WARRANTY PROTECTION ARISING UNDER THE
LAWS OF ANY STATE, INCLUDING IMPLIED
WARRANTY OF MERCHANTABILITY OR FITNESS
FOR A PARTICULAR PURPOSE OR USE, IS HEREBY
LIMITED IN DURATION TO THE DURATION OF THIS
1-YEAR LIMITED WARRANTY.
Manufacturer’s maximum liability, in any event, shall not
exceed the purchase price of the product paid by the
original consumer.
NOTE:
incidental or consequential damages, so some of the above
limitations or exclusions may not apply to you. This 1-YEAR
LIMITED WARRANTY gives you specific legal rights as set forth
herein. You may also have other rights which vary from state to
state. In the state of California only, if refinishing or replacement
of the product is not commercially practicable, the retailer
selling this product or the Manufacturer will refund the purchase
price paid for the product, less the amount directly attributable
to use by the original consumer-purchaser prior to discovery
of the nonconformity. In addition, in the state of California only,
you may take the product to the retail establishment selling
this product in order to obtain performance under this 1-YEAR
LIMITED WARRANTY.
Some states do not allow an exclusion or limitation of
If you wish to obtain performance of any obligation under
this 1-YEAR LIMITED WARRANTY, you should write to:
Namath Rapid Cooker
7800 Whipple Ave. NW
North Canton, OH 44720
Consumer returns will not be accepted unless a valid
Return Authorization is first acquired. Authorized returns
are clearly marked on the outside of the package with an
RA number and the package is shipped freight/postage
pre-paid. Consumer returns that do not meet these
standards will be refused.
To order replacement parts,
please call 1-888-444-4134 or visit
12
www.namathproducts.com
 Loading...