

Page 1
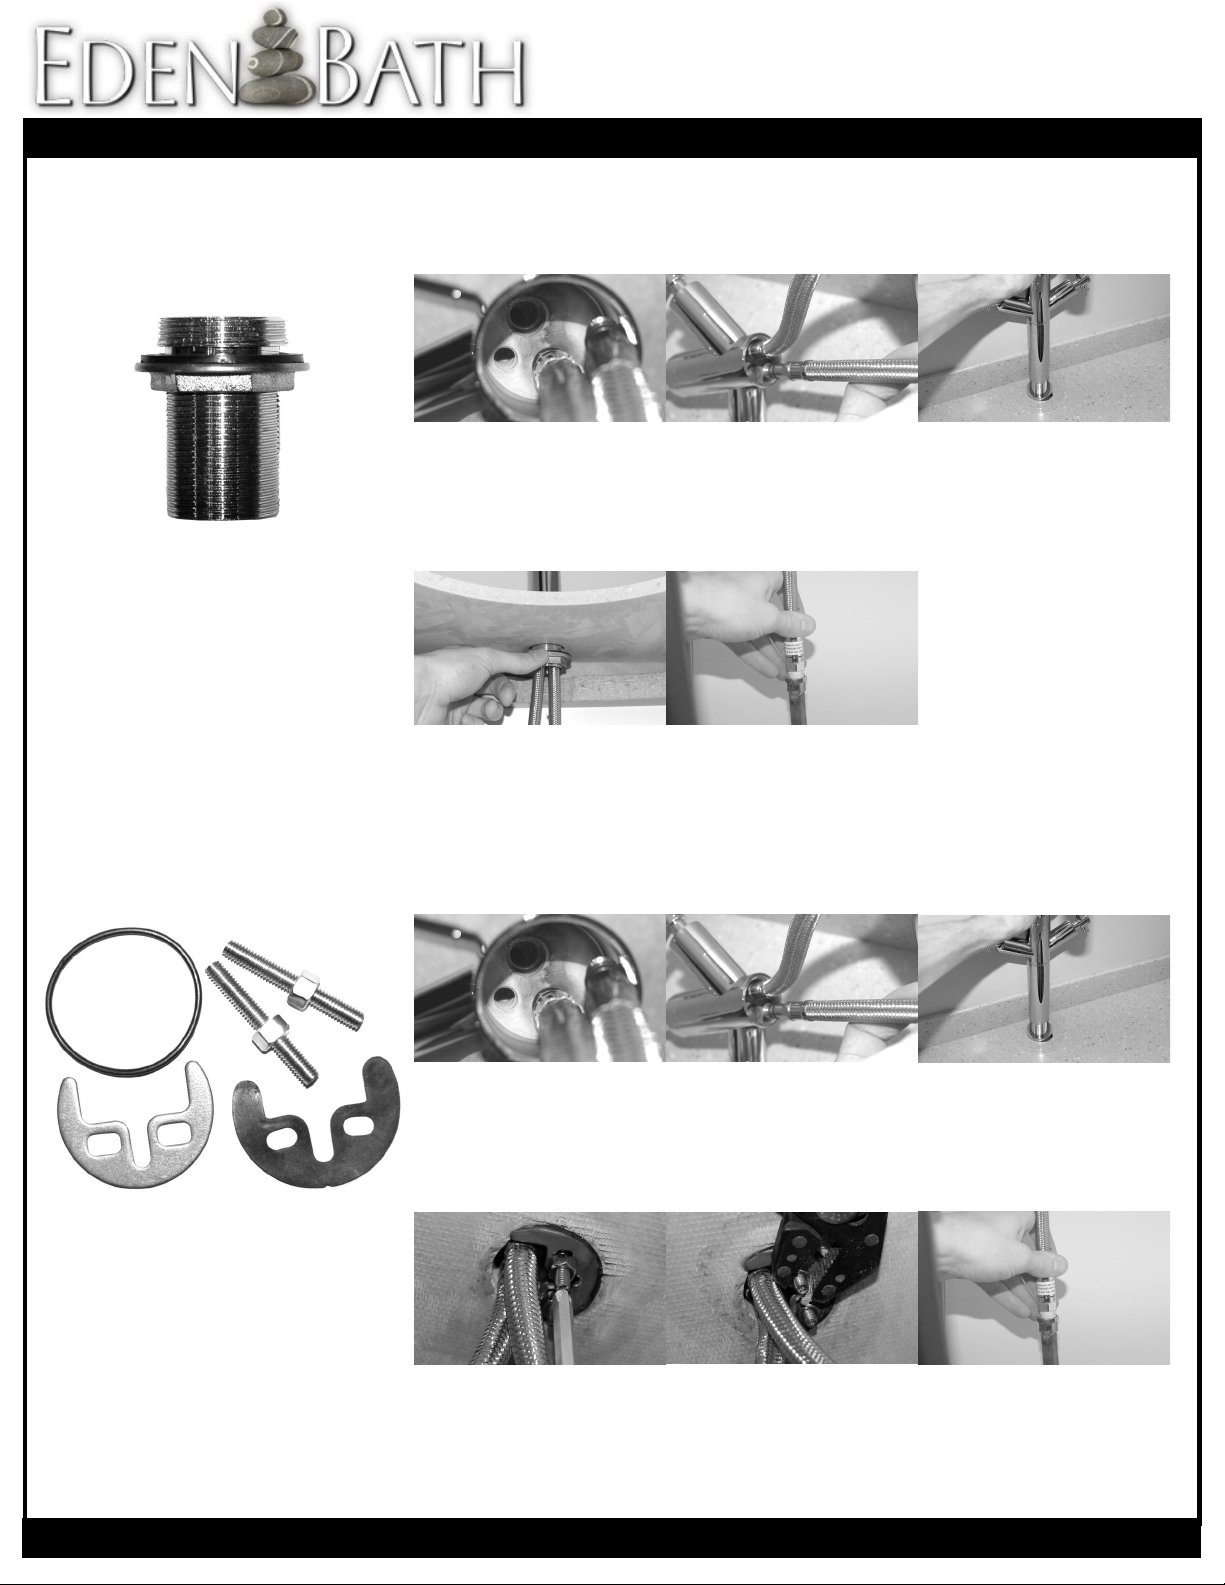
Large Nut Type Installation
The following installation guide and its associated photos are merely an informative example of how the faucet is installed and may not be an exact representation
of the faucet you are installing. We recommend that installation should only be completed by a trained plumber. Eden Bath, its dealers, and affiliates take no responsibility for the information provided below and will not be liable for any misuse or damages caused by using this information.
1. Ensure the water in your home
is turned off. Attach both hold and
cold steel braided water supply
lines provided, to their respective
threaded connectors at the bottom of the faucet. Hot: Left - Cold:
Right.
2. Tighten both supply lines by
hand, and then with a wrench or
grips, but be careful not to over
tighten or you may strip or crack
the threaded connectors.
3. Attach the threaded pipe to the
bottom of the faucet if it isn't already attached. Remove the
large nut and matching rubber
gasket. Insert the water supply
lines and faucet into the mounting
hole in your countertop.
4. Attach the nut sized rubber
gasket, then the large nut provided to the threaded pipe from
underneath the countertop and
tighten with a wrench or grips
until the faucet is secured.
5. Apply plumbers tape / Teflon
tape to the threaded connectors
of your homes supply pipes. Attach the steel braided water supply lines from the faucet, to each
of the hot and cold supply valves/
connectors and tighten.
All Eden Bath products are covered under a 1 year limited warranty against manufacturing defects.
© 2016 ∙ Eden Bath ∙ www.edenbath.com ∙ (877) 578-5584
Faucet Installation Guide
If your faucet includes the above mounting hardware, please follow the set of instructions to the
right. This threaded pipe and nut may be attached to
the bottom of your faucet already.
Screw And Horseshoe Plate Type Installation
1. Ensure the water in your home
is turned off. Attach both hold and
cold steel braided water supply
lines provided, to their respective
threaded connectors at the bottom of the faucet. Hot: Left - Cold:
Right.
2. Tighten both supply lines by
hand, and then with a wrench or
grips, but be careful not to over
tighten or you may strip or crack
the threaded connectors.
3. If a thin circular rubber ring
was provided, place it between
the faucet and the top of the
countertop. Insert the water supply lines and faucet into the
mounting hole in your countertop.
4. Place the horseshoe shaped
rubber gasket and metal plate
under the countertop with the
supply lines coming through the
open area. Attach provided
screws through plate holes and
into the faucet body and tighten.
5. Attach the nuts provided to the
threaded screw shaft and hand
tighten until flush with the metal
plate. Then do a final tightening
with a wrench or grips until the
faucet is secure.
If your faucet includes the above mounting hardware, please follow the set of instructions to the
right.
6. Apply plumbers tape / Teflon
tape to the threaded connectors
of your homes supply pipes. Attach the steel braided water supply lines from the faucet, to each
of the hot and cold supply valves/
connectors and tighten.
Page 2
Vessel Sink Installation
The following installation guide and its associated photos are merely an informative example of how a vessel sink is installed and may not be an exact representation of the sink you are installing. We recommend that installation should only be completed by a trained plumber. Eden Bath, its dealers, and affiliates take no
responsibility for the information provided below and will not be liable for any misuse or damages caused by using this information.
All Eden Bath products are covered under a 1 year limited warranty against manufacturing defects.
© 2016 ∙ Eden Bath ∙ www.edenbath.com ∙ (877) 578-5584
Sink Installation Guide
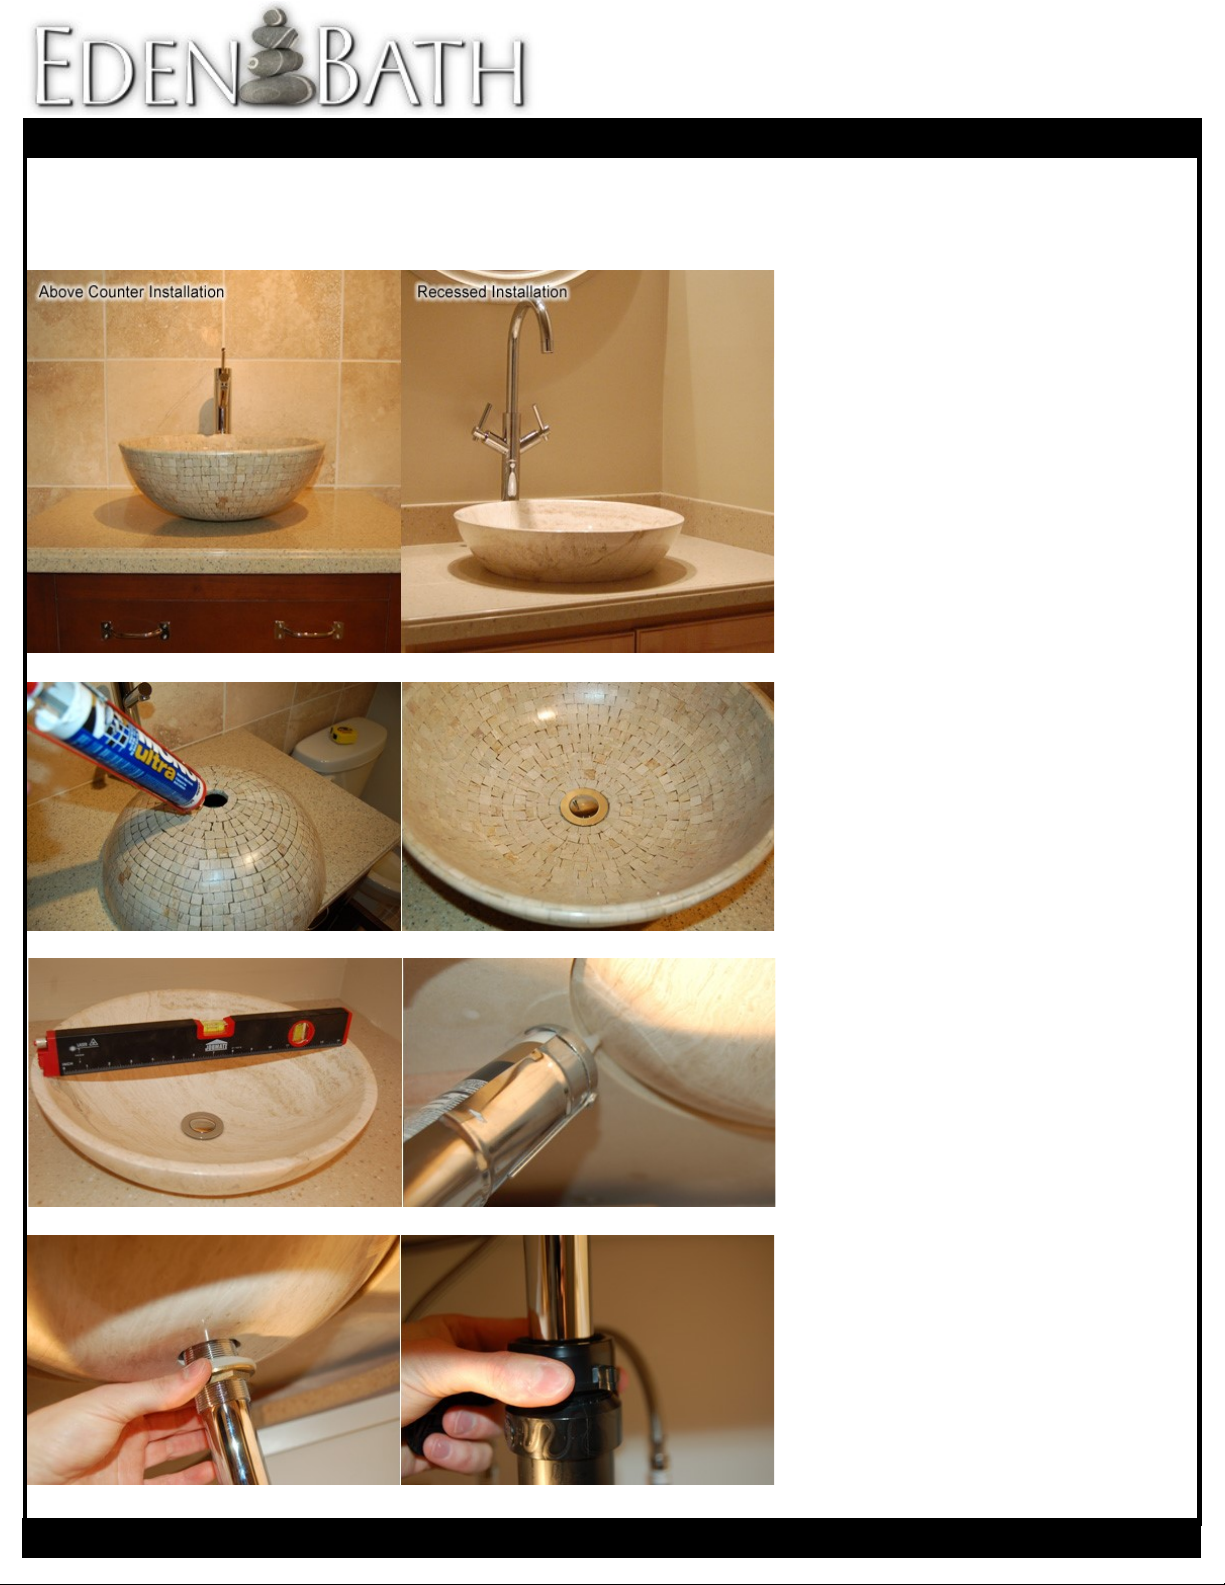
There are two different ways to mount a vessel sink.
The first is the "above counter method" which is the most
popular method and can be used for any shape or style of
vessel sink. The second is the "recessed method" which
can only be used for perfectly rounded vessel sinks (bowl
or cone) that have a smooth outer edge and are made of
a solid material such as stone, wood or copper.
In the "above counter method" the vessel sink is held in
place by the drain, adhesive between the flat bottom of
the sink and the countertop, and the weight of the sink
itself.
The “recessed method” results in a much sturdier installation as a larger contact area between the sink and countertop exists, adhesive used underneath the counter holds
the sink in place. The process for installing a glass vessel
is the same, however a mounting ring or thick rubber
gasket needs to be used between the top of the counter
and the bottom of the sink to prevent cracking.
ABOVE COUNTER MOUNTING
Ensure you have the appropriate sized hole in your countertop. It should be just large enough to allow the threaded drain pipe to fit through it but not the nut that is
screwed on to this pipe.
Apply a moderate amount of clear kitchen and bath rated
adhesive / caulking underneath the sink on the flattest
part around the drain. Flip the sink over and set it on your
countertop, lining up the hole in your sink and the hole in
the countertop.
Remove the nut attached to the threaded pipe of the drain
and place the drain assembly along with the upper most
rubber drain gasket (if provided) into the sinks drain hole.
RECESSED MOUNTING
Ensure you have a hole cut out in your countertop large
enough to accommodate the sink without letting it fall
through the opening.
Place the sink in the cut out area, leveling each axis to
make sure the fit is correct. From underneath the counter,
apply a bead of silicone between the sink and countertop.
Remove the nut attached to the threaded pipe of the drain
and place the drain assembly along with the upper most
rubber drain gasket (if provided) into the sinks drain hole.
DRAIN ATTACHMENT
From underneath the countertop, attach the lower most
rubber gasket and the nut onto the drain pipe. Ensure the
drain tail pipe is seated inside the P trap adapter / female
trap adapter as shown.
Thoroughly tighten the nut onto the threaded pipe of the
drain, securing the sink and drain in place.
Tighten the female trap adapter attached to your drainage
pipe until it securely grips the drains tailpipe.
* Occasionally plumbers putty or silicone may be required
between the drain and sink to ensure a leak proof seal.
Test this by running the water and evaluating.
Above: Process for “Above Counter Mounting”
Above: Process for “Recessed Mounting”
Above: Drain Attachment
Above: Above Counter Vs. Recessed Installation
 Loading...