

Page 1

Access control
PACK SOLO
Standalone Biometric reader
Technical manual
Page 2

Technical manual PACKSOLO – V1.5 p.2/24
Contents
Contents ......................................................................................................................... 2
Warning .......................................................................................................................... 3
Acknowledgement ......................................................................................................... 4
Information and recommendations .............................................................................. 5
Technical characteristics .............................................................................................. 6
1) Biometric reader ...................................................................................................... 6
2) Remote control opening .......................................................................................... 6
Wiring diagram ............................................................................................................... 7
3) Connecting the reader to the control module .......................................................... 7
4) Connecting to a third party intrusion control unit ..................................................... 8
5) Connecting an exit push button and a door contact ................................................ 8
6) Switch configuration ................................................................................................ 9
7) Power failure door activator .................................................................................. 10
8) Electromagnetic door lock triggered by a power failure ......................................... 10
9) Standard door activator: triggered by a voltage pulse ........................................... 11
Initial power-on – Factory configuration .................................................................... 12
Installation of more than one reader on the same site ............................................. 13
User management ........................................................................................................ 14
1) Add a user with a badge plus fingerprint ............................................................... 14
2) Add a user with badge only ................................................................................... 15
3) Add user with a fingerprint only ............................................................................. 15
4) Add an “Alarm” user with a badge and fingerprint ................................................. 16
5) Add an “Alarm” user with fingerprint only .............................................................. 17
6) Deleting a badge ................................................................................................... 17
7) Deleting a user with fingerprint only ...................................................................... 18
8) Deleting all users (fingerprints and badges only) .................................................. 18
Restore to factory settings ......................................................................................... 19
Signaling LEDs ............................................................................................................ 20
Connector blocks ........................................................................................................ 21
Check list ...................................................................................................................... 22
Notes ............................................................................................................................. 23
Page 3

Technical manual PACKSOLO – V1.5 p.3/24
Warning
Caution: This product is designed to work only in a standalone mode
Page 4

Technical manual PACKSOLO – V1.5 p.4/24
Acknowledgement
Dear client,
You have just purchased a “PACKSOLO” reader with remote control opening built by the
French company EDEN INNOVATIONS.
The entire EDEN INNOVATIONS team would like to thank you for your interest as well as
your confidence in our security solution.
We hope that you will be completely satisfied with the level of security it provides for your
company’s premises.
Should you have any comments, please contact us via our web site at
www.eden-innovations.com
The EDEN INNOVATIONS team.
Page 5

Technical manual PACKSOLO – V1.5 p.5/24
Information and recommendations
Pursuant to European directive UTE C00-200, incorporating directives 89/336 EEC and
92/31 EEC, PACKSOLO complies with the following standards:
NF EN 50081-1 governing electromagnetic radiation, and
NF EN 50082-1 governing electromagnetic susceptibility.
Cabling recommendations: the cables used to connect readers, the network and other
peripherals must be installed in accordance with the instructions for Level 2 (protected
environment) of standard NF EN 61000-4-4.
This product must be installed by an approved company. Incorrect installation and usage
may result in electric shock or fire. Before installing the product, read the technical
information and comply with the recommendations.
Once the power is turned off, all the internal capacitors will discharge themselves to a
safe level after 60 seconds under normal conditions. However, in the event of a power
failure, the charge may be maintained for much longer and suitable precautions
should be taken before handling the product.
Page 6

Technical manual PACKSOLO – V1.5 p.6/24
Technical characteristics
1) Biometric reader
Maximum power consumption ........ 300mA @12V
Power supply voltage ...................... 9 – 14VDC
Weight ............................................. 175 g
Housing dimensions ........................ 119 x 77 x 40 mm
Operating temperature .................... - 20°C to + 50°C
........................................................ - 4°F to +122°F
Fingerprints ..................................... 500 templates
2) Remote control opening
Maximum power consumption ........ 200mA @12V
Power supply voltage ...................... 9 – 14VDC
Weight ............................................. 200g
Housing dimensions ........................ 77 x 55 x 25 mm
Operating temperature .................... - 20°C to + 50°C
........................................................ - 4°F to +122°F
Control relay .................................... 1A / 12V – 1A / 24V
Transistored output ......................... 100mA/active at 0V
Page 7

Technical manual PACKSOLO – V1.5 p.7/24
Wiring diagram
3) Connecting the reader to the control module
Data sheet:
4 wires (3 pairs recommended)
1200 m (2730 ft)
Ø
0.6 mm (1/30 in) (SYT recommended)
Characteristic: Sensitive connection
Screen: Mandatory
To achieve 1200 m (2730 ft), you need to install a 120 resistor at each end of the network
between points A and B (see above).
Note: The total length must not exceed the recommended distance.
12 V DC power supply
Page 8

Technical manual PACKSOLO – V1.5 p.8/24
4) Connecting to a third party intrusion control unit
5) Connecting an exit push button and a door contact
Note: To connect a third party
intrusion control unit, ensure that
a common earth is connected
between the control module and
the control unit.
If the input is set to 0V: The alarm is activated
(opening impossible, mandatory inactivation of the
alarm before opening, using an alarm fingerprint or
manually)
Third party intrusion control unit
Input: intrusion trigger
Input: “activation”
Output: “Status of the control unit”
Intrusion trigger
Press button
Commutator outputs
Input: dry
Page 9

Technical manual PACKSOLO – V1.5 p.9/24
6) Switch configuration
The control module has 3 configuration switches:
Switches 1 and 2: configuration of the time delay for the opening control
Switch 3: configuration of the “Alarm activation/inactivation” output
(activation/inactivation of a third party intrusion control unit)
Bistable mode
5 seconds
10 seconds
20 seconds
Bistable mode
Impulsion 1 second
Page 10
Technical manual PACKSOLO – V1.5 p.10/24
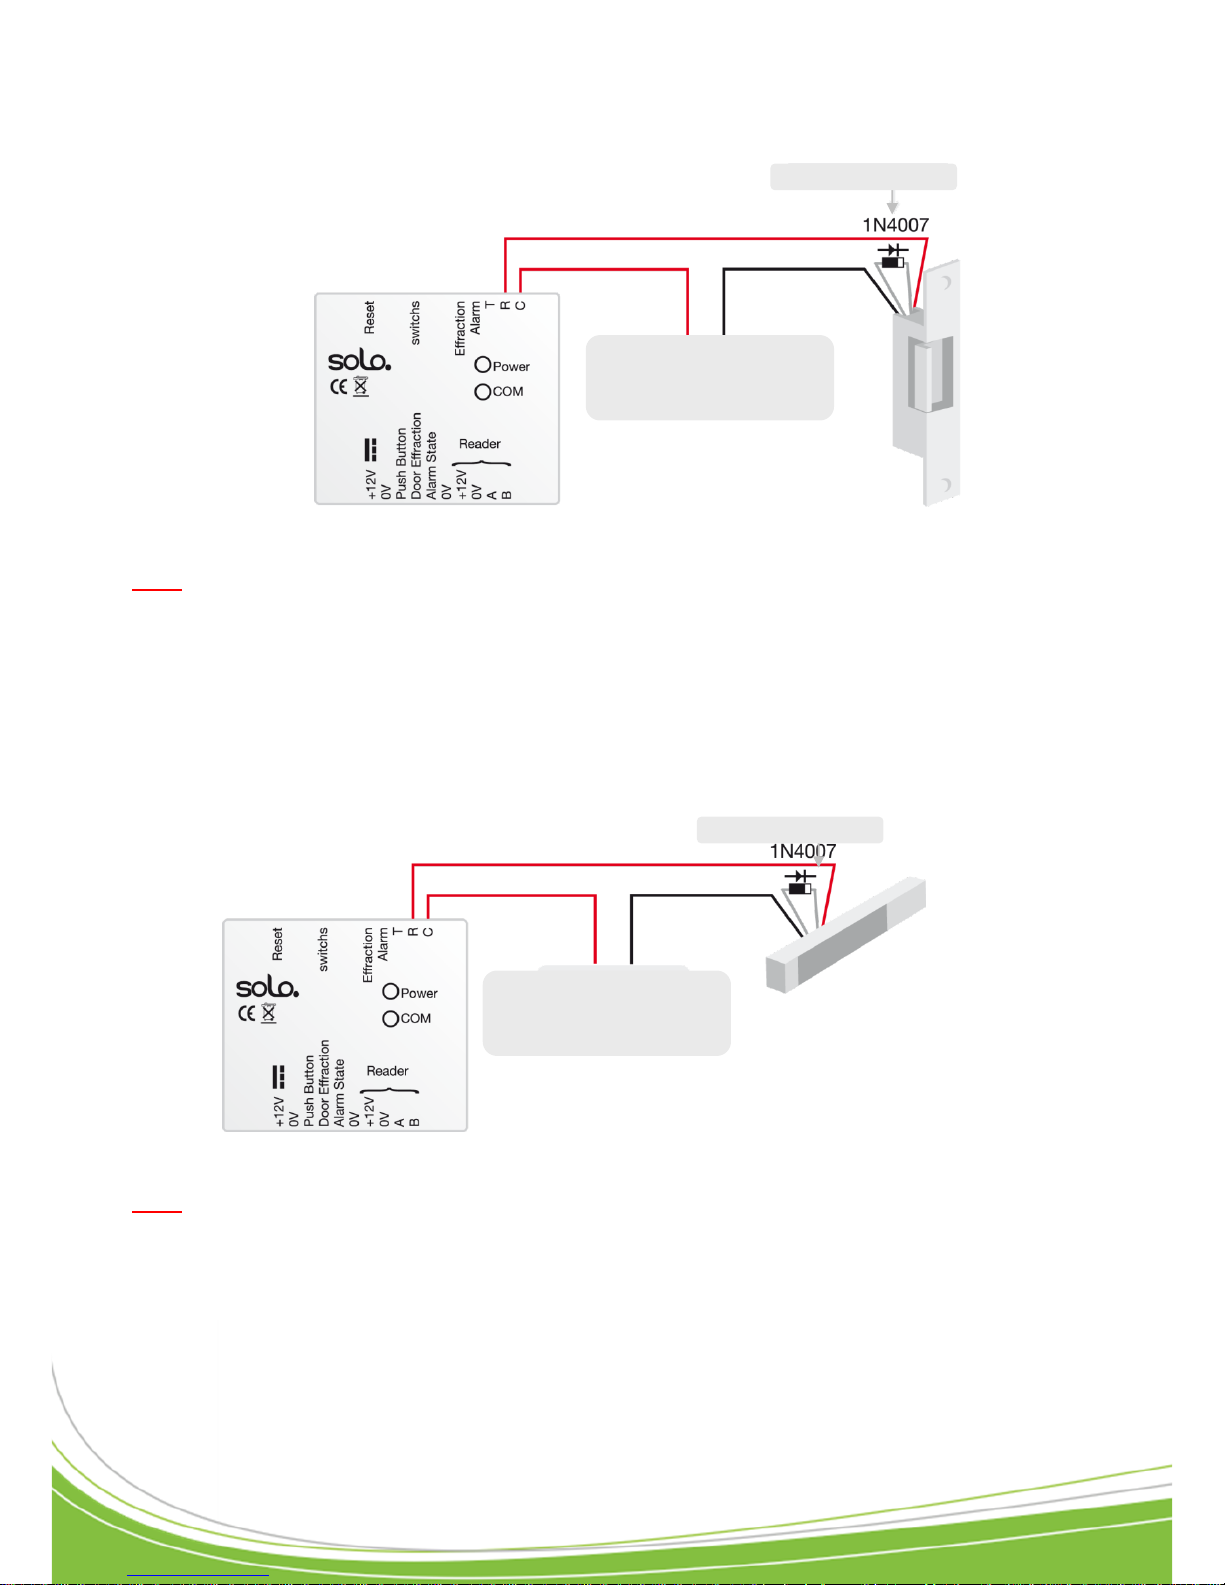
7) Power failure door activator
Note: In order to avoid any random malfunctions that may interfere with the correct use of the
system caused by return currents, it is essential to use and connect the non-return diodes
supplied with the product in accordance with the wiring diagram above.
Even when using an additional backed-up power supply for locking, which is separate from the
reader's power supply, it is obligatory to follow the wiring diagram above.
8) Electromagnetic door lock triggered by a power failure
Note: In order to avoid any random malfunctions that may interfere with the correct use of the
system caused by return currents, it is essential to use and connect the non-return diodes
supplied with the product in accordance with the wiring diagram above.
Even when using an additional backed-up power supply for locking, which is separate from the
reader's power supply, it is obligatory to follow the wiring diagram above.
12V 0V
Power supply
Non-return diode
12V 0V
Power supply
Non-return diode
Page 11
Technical manual PACKSOLO – V1.5 p.11/24
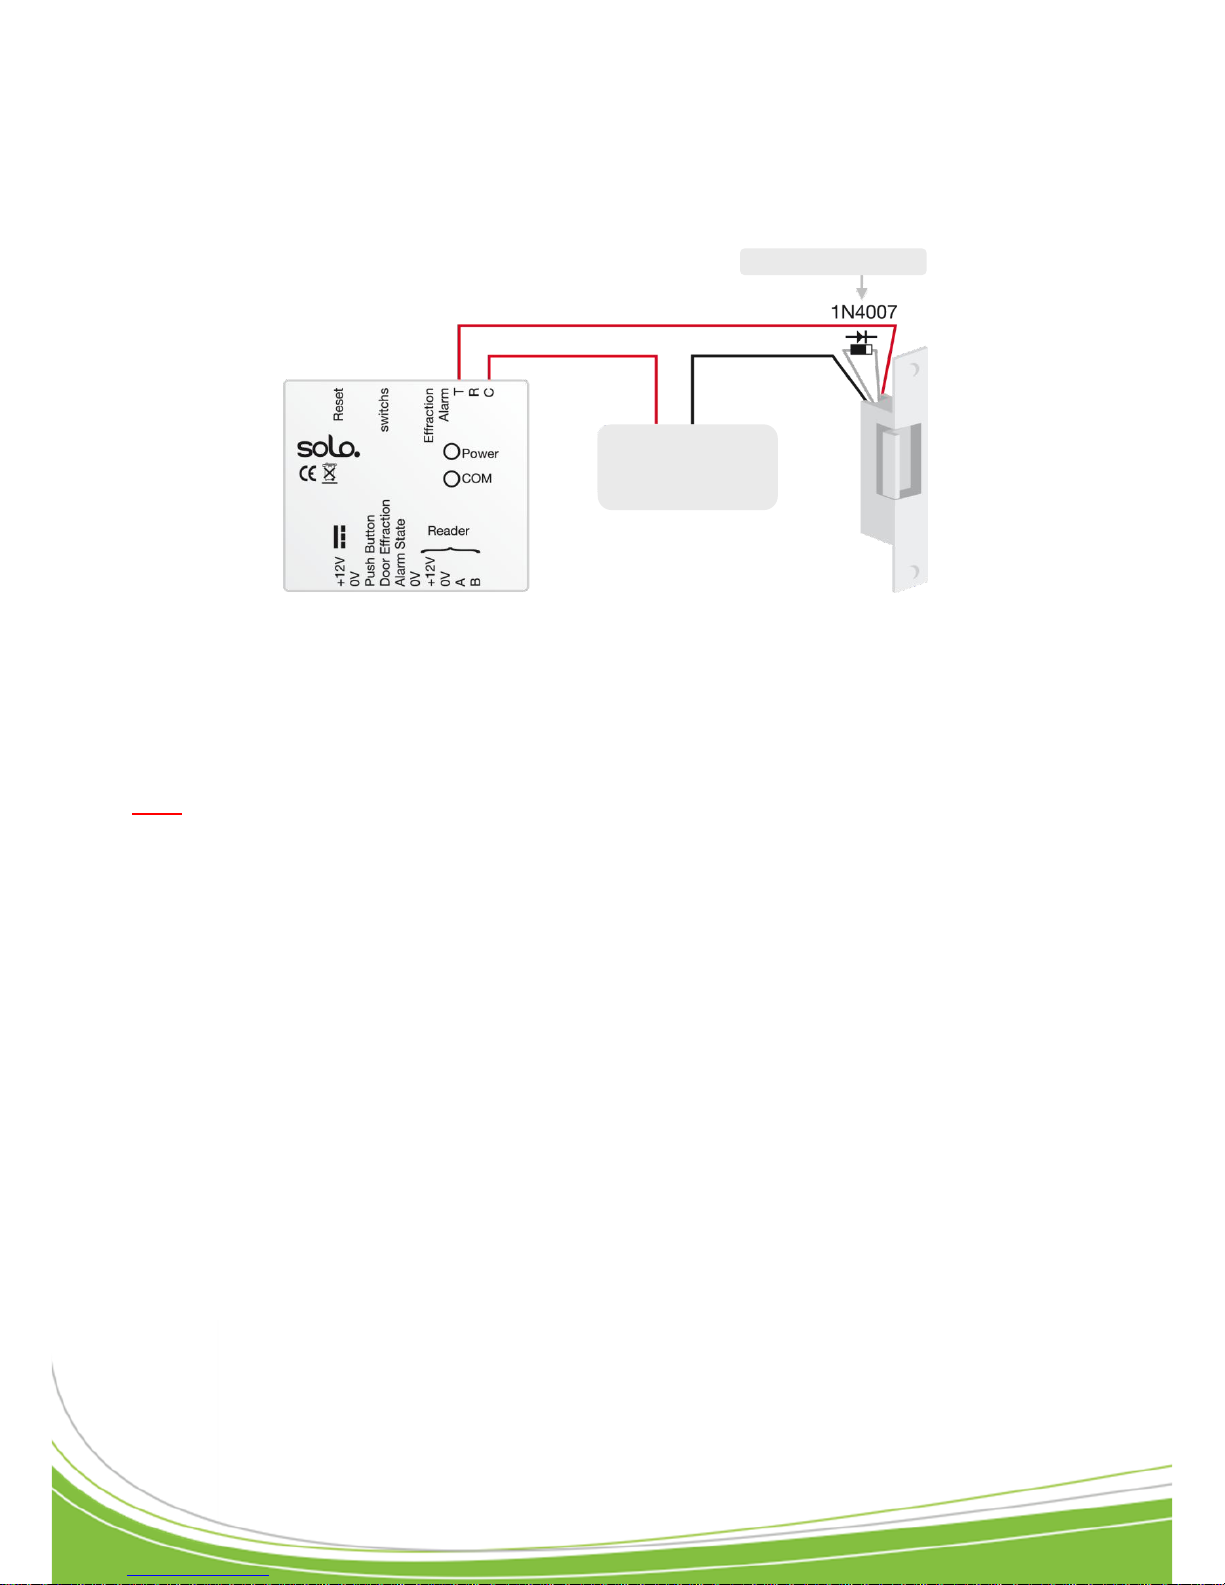
9) Standard door activator: triggered by a voltage pulse
Note: In order to avoid any random malfunctions that may interfere with the correct use of the
system caused by return currents, it is essential to use and connect the non-return diodes
supplied with the product in accordance with the wiring diagram above.
Even when using an additional backed-up power supply for locking, which is separate from the
reader’s power supply, it is obligatory to follow the wiring diagram above.
+12V 0V
Power supply
Non-return diode
Page 12
Technical manual PACKSOLO – V1.5 p.12/24
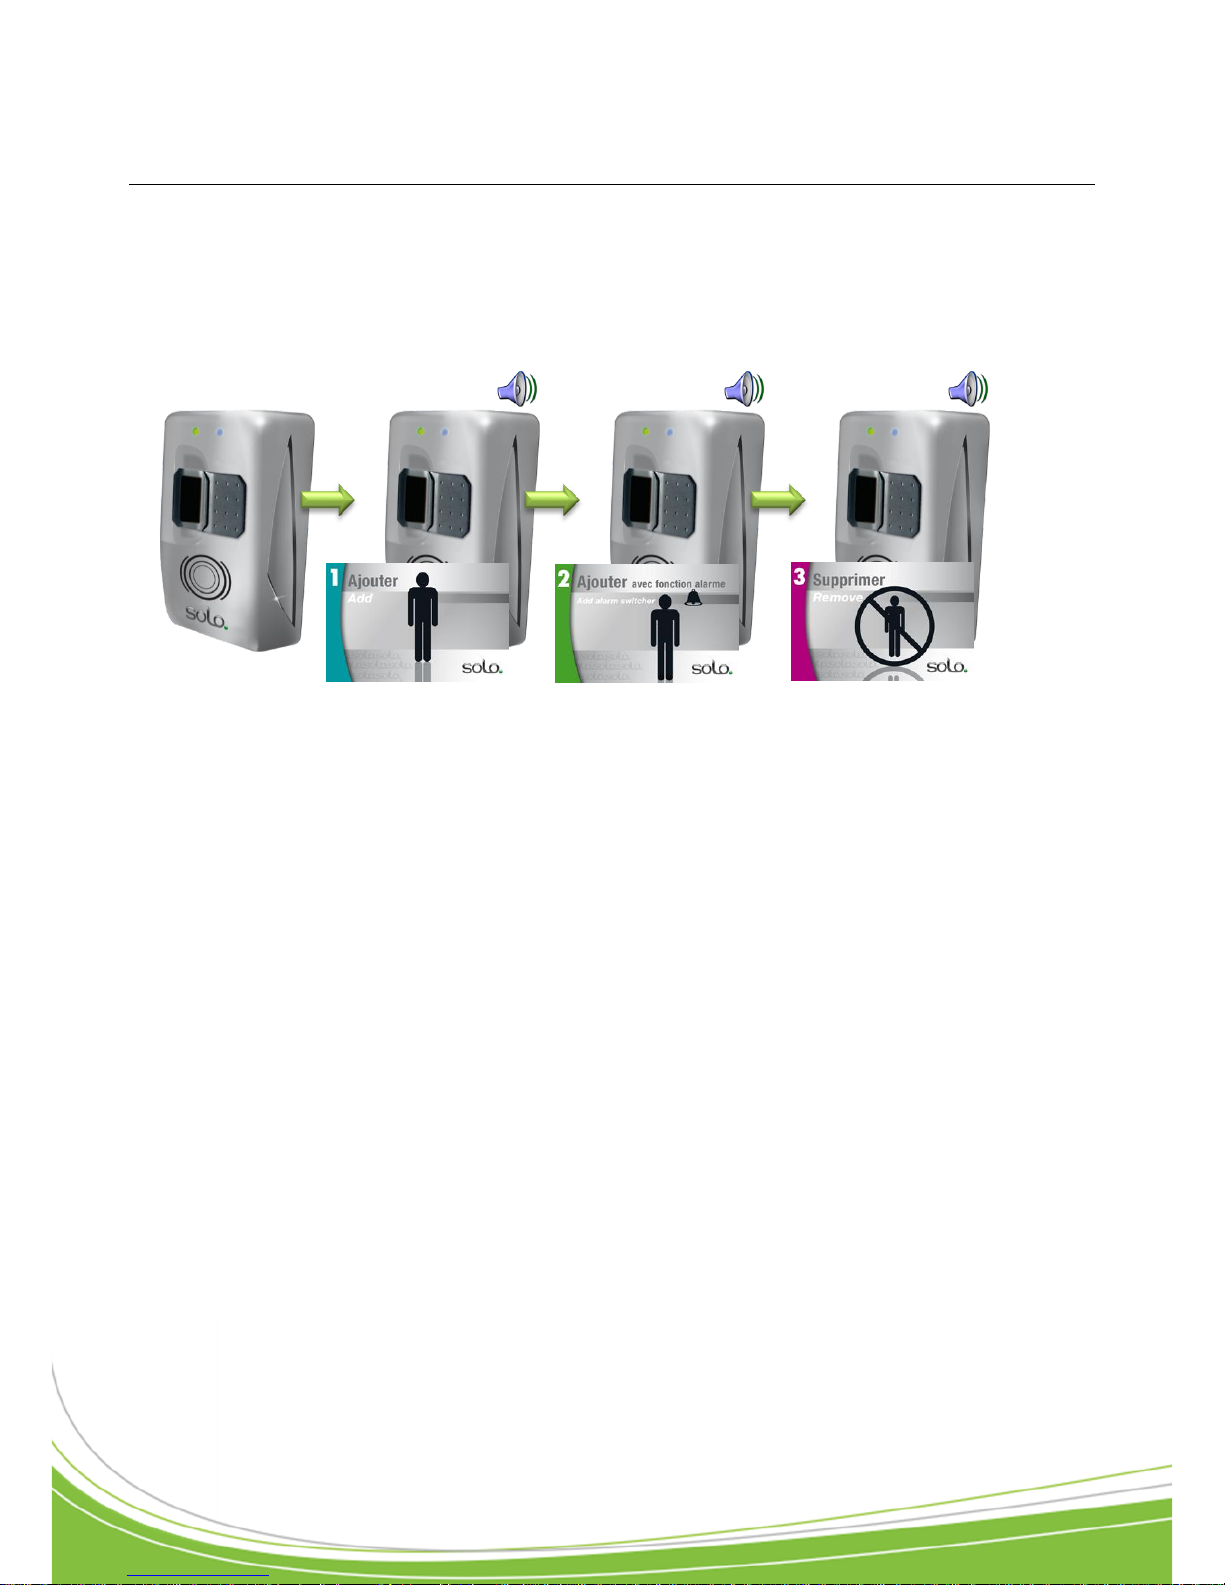
Initial power-on – Factory configuration
When you first start the product, you need to register the 3 configuration cards (Add, Add Alarm
and Delete) with the reader in order to activate it. To do this, follow the procedure below:
After this stage, your product is activated.
Present the
Add badge
Present the
Add Alarm badge
Present the
Delete badge
(Blue LED blink)
(blue and green LEDs blink
alternately)
Page 13
Technical manual PACKSOLO – V1.5 p.13/24
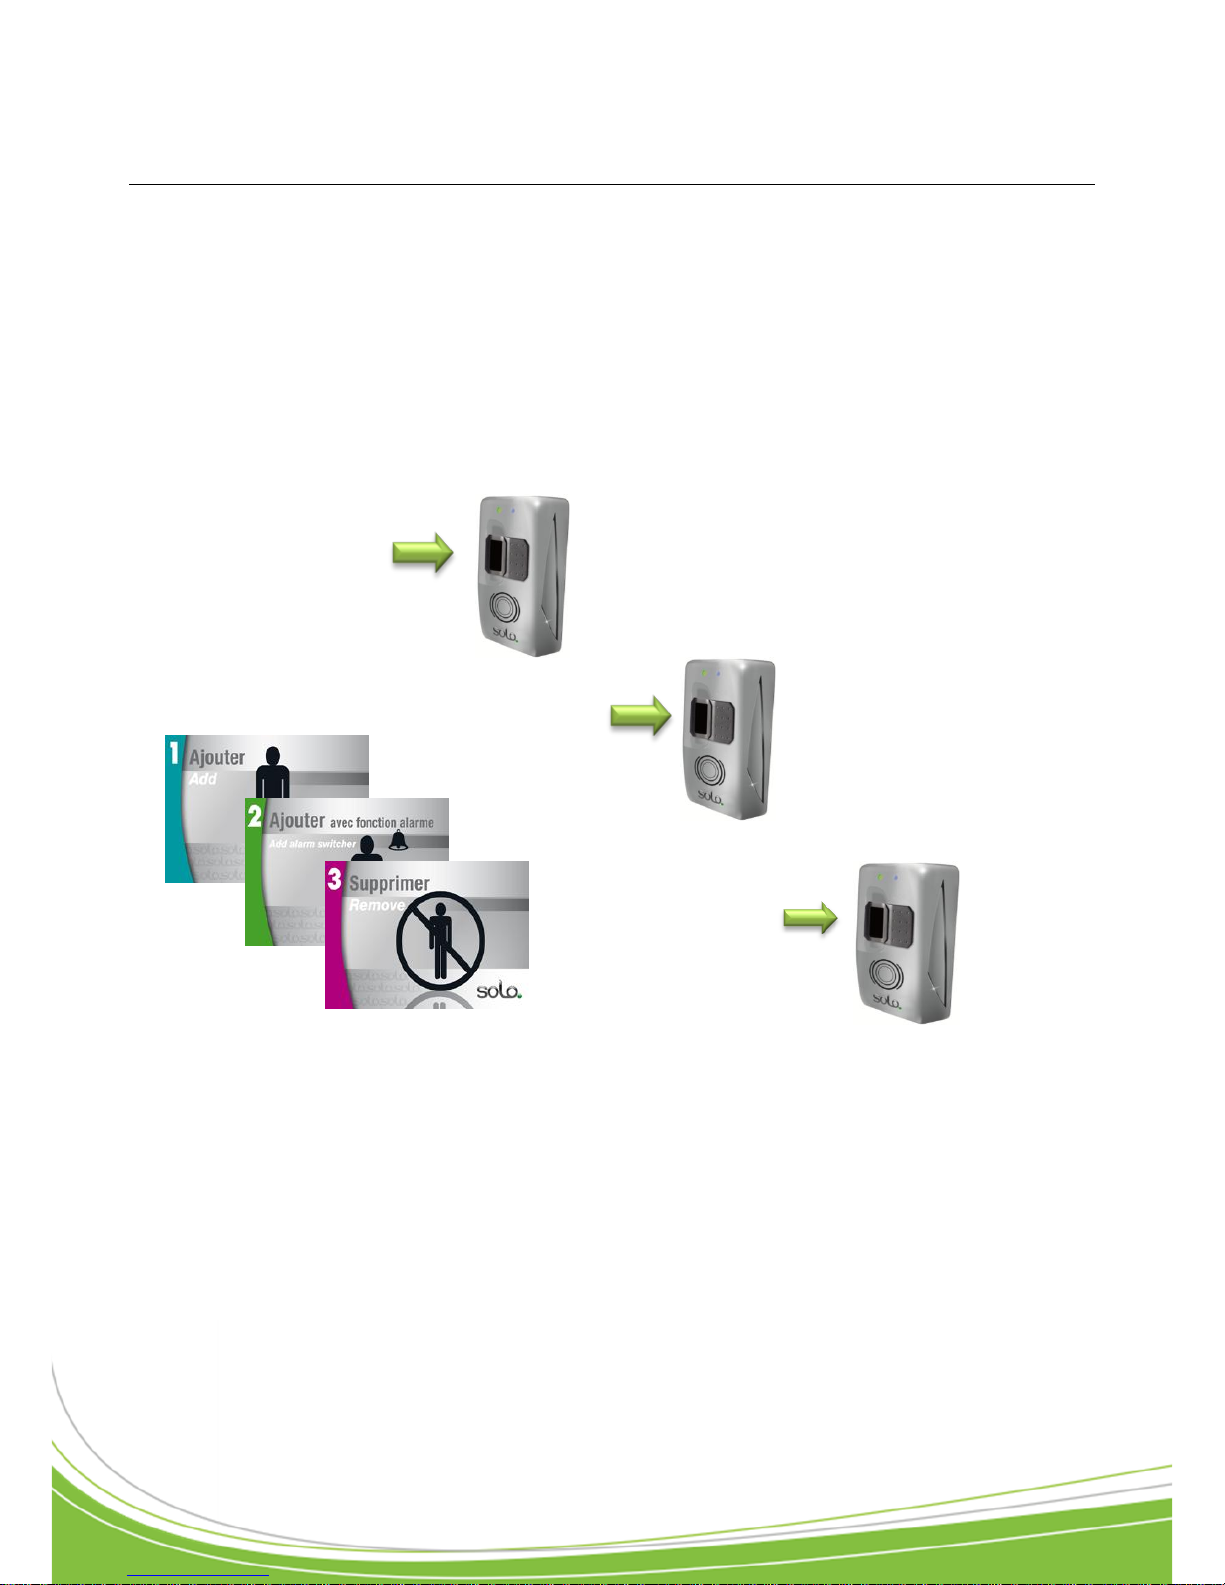
Installation of more than one reader on the same site
If you use the badge with fingerprint access for several readers on the same site, so as to
remember the same code for each reader (therefore to not repeat the addition of badges on
each reader), you must only use one set of configuration badges for all readers on the same
site.
Reader 3
Reader 2
Reader 1
Page 14
Technical manual PACKSOLO – V1.5 p.14/24
User management
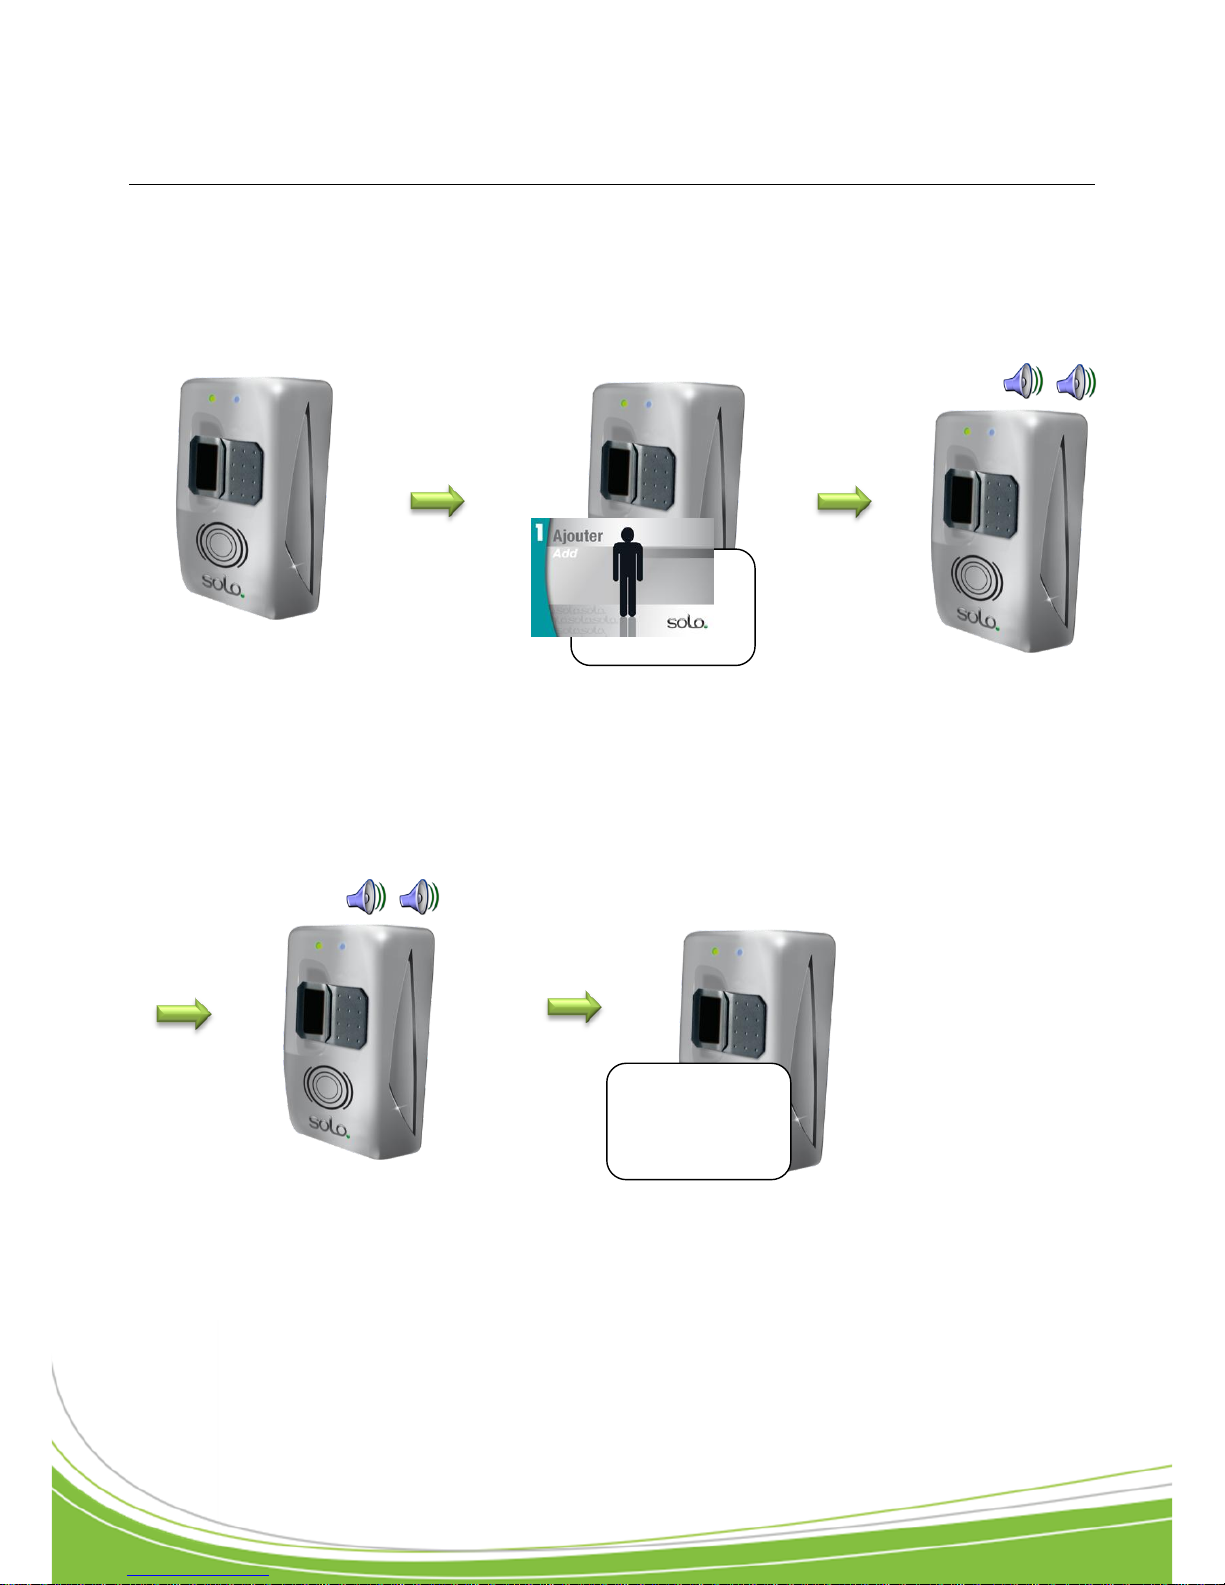
1) Add a user with a badge plus fingerprint
Present the Add badge at the
same time as the badge for the
user you wish to add
You have 10 seconds to
present the first finger of
the user to be added 3
times
You have 10 seconds to present
the second finger of the user to be
added 3 times (if you only want to
enrol one finger, wait for 10
seconds)
Present the badge for
the user that you want
to add again and wait
for the enrolment
confirmation BEEP
Page 15
Technical manual PACKSOLO – V1.5 p.15/24
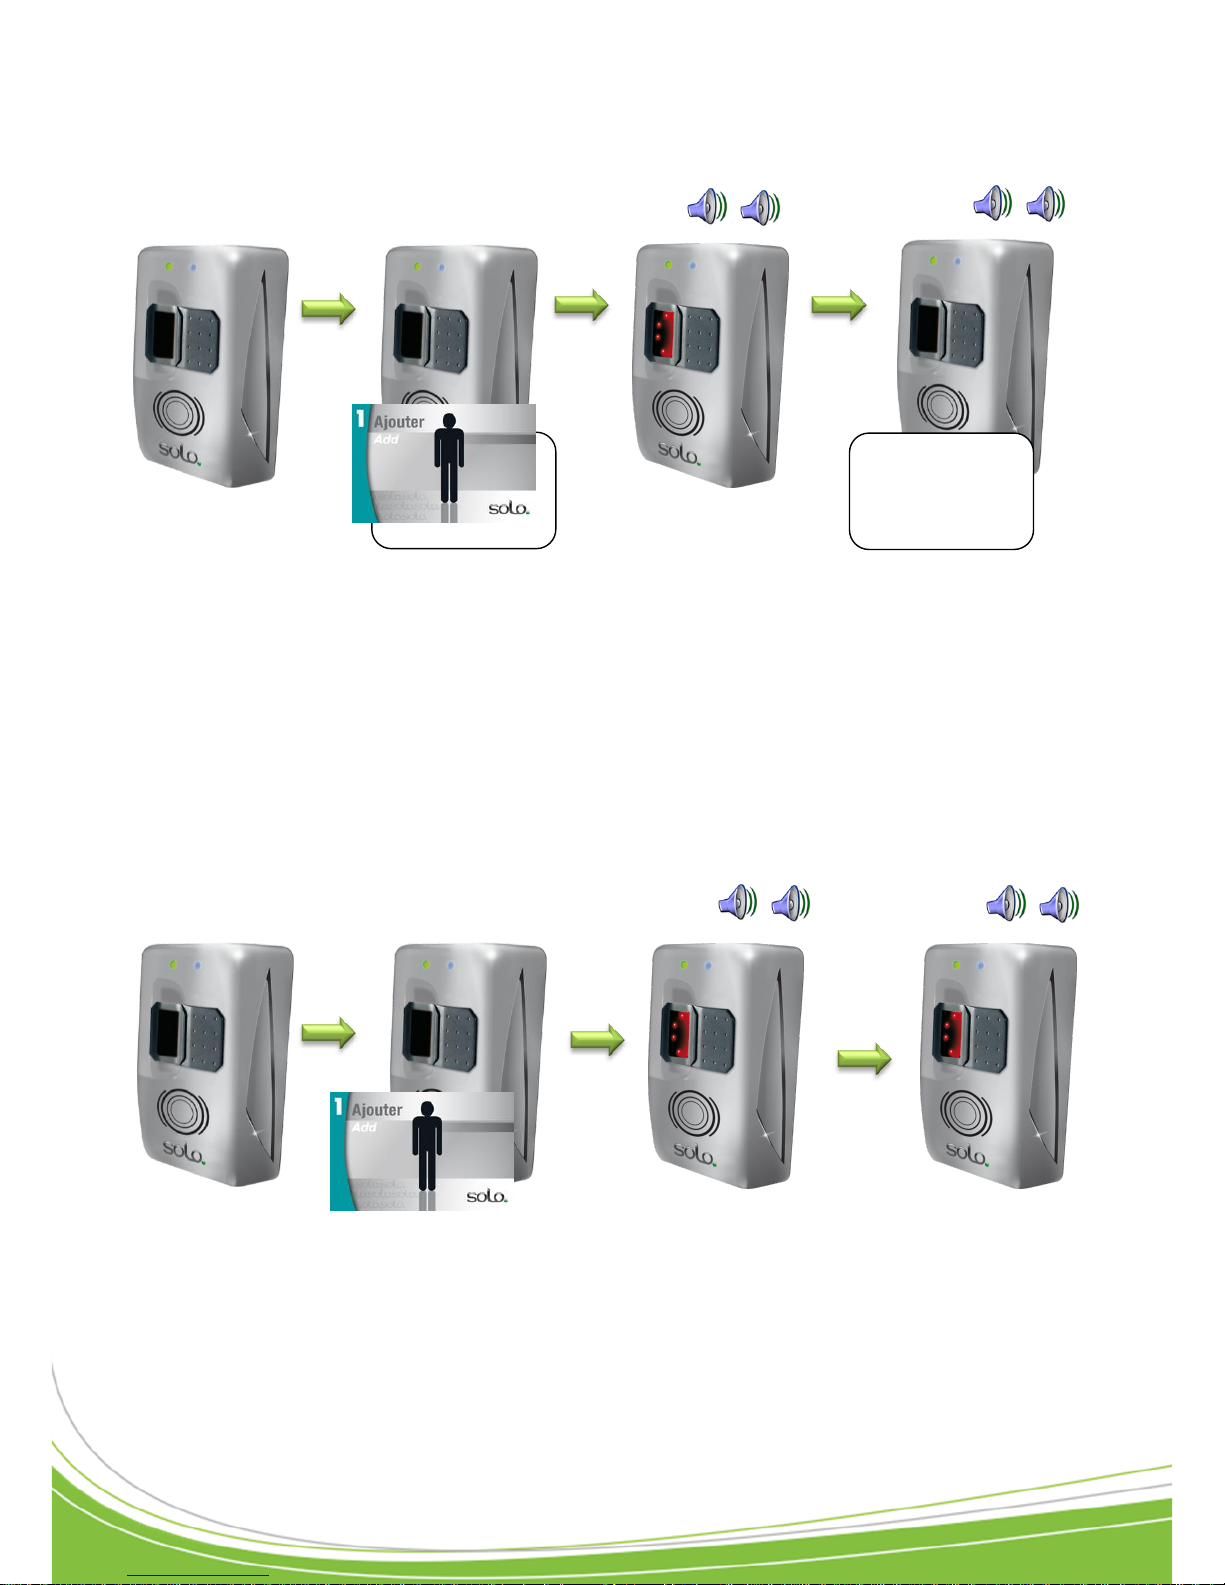
2) Add a user with badge only
3) Add user with a fingerprint only
Present the Add badge
You have 10
seconds to present
3 times the first
finger of the user to
be added
You have 10 seconds
to present 3 times the
second finger of the
user to be added (if
you only want to enrol
one finger, wait for 10
seconds)
Present the Add badge
at the same time as the
badge for the user you
want to add
Wait 10 seconds
Present the badge for
the user that you want
to add again and wait
for the enrolment
confirmation BEEP
Page 16
Technical manual PACKSOLO – V1.5 p.16/24
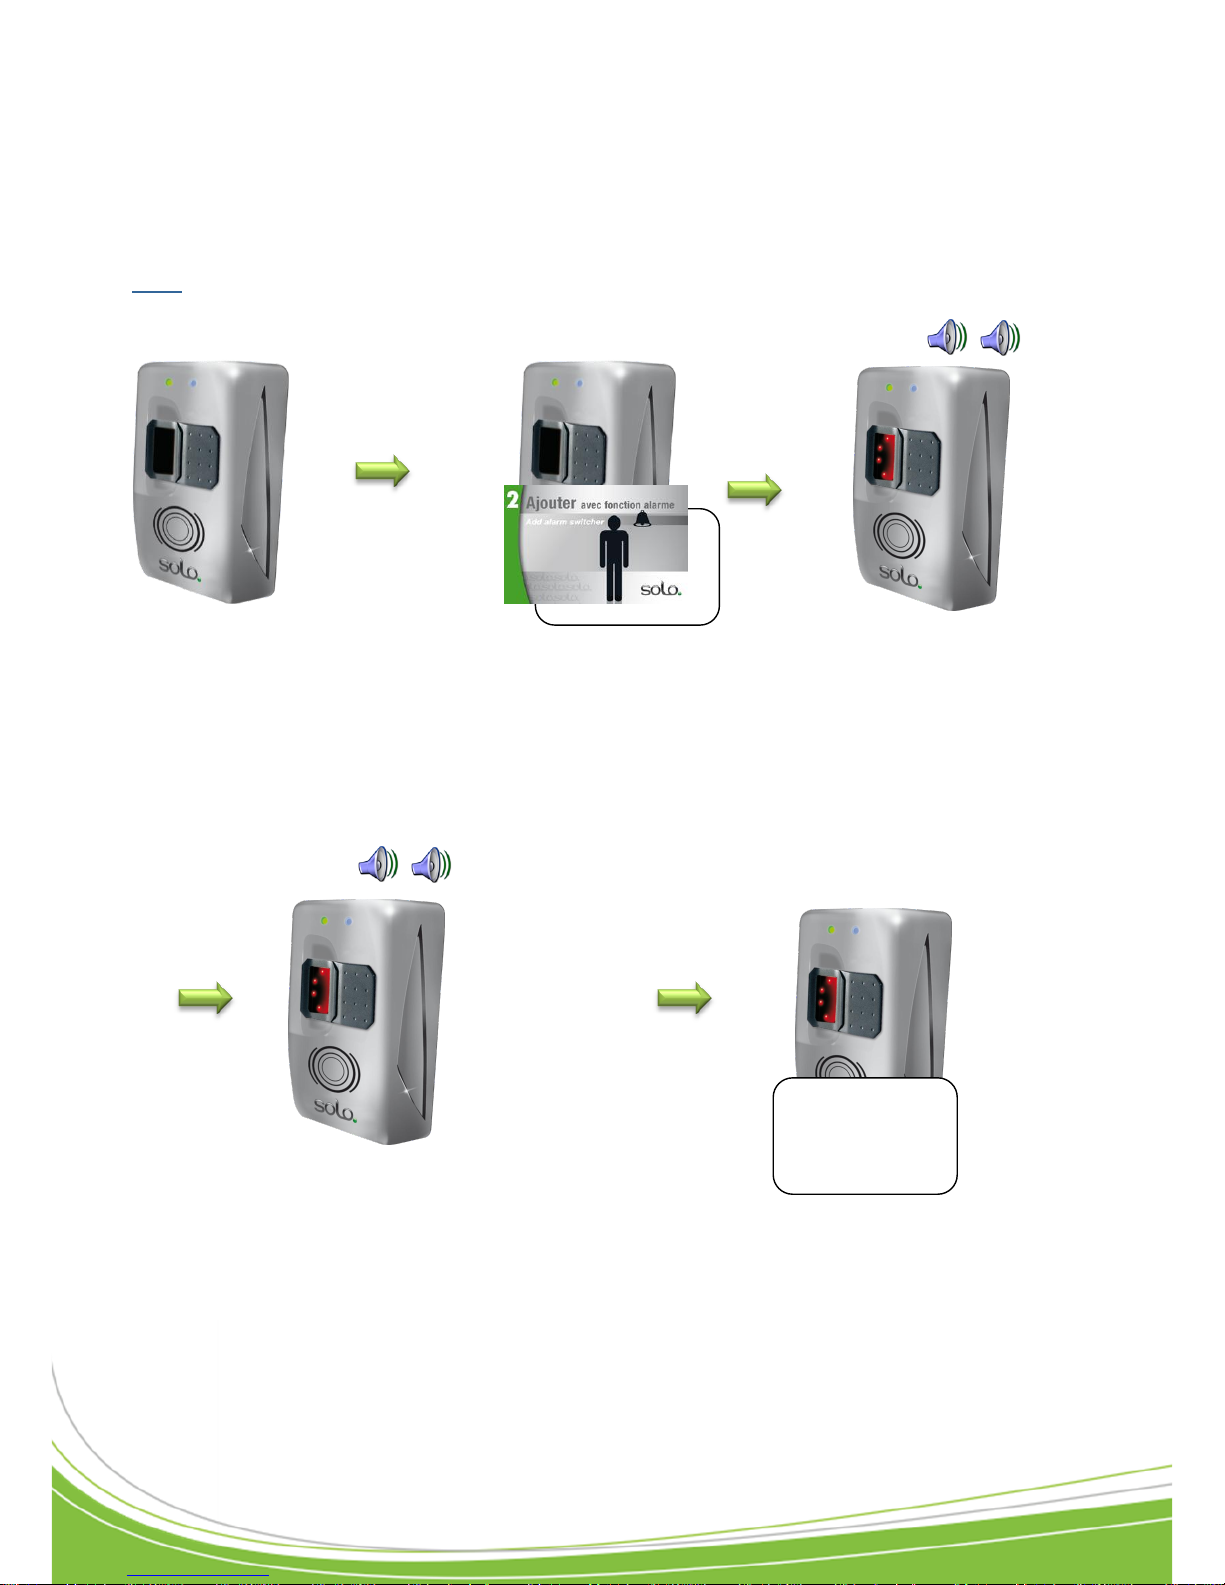
4) Add an “Alarm” user with a badge and fingerprint
Note: An “Alarm” user can, by presenting his/her second fingerprint, activate or inactivate a
third party alarm system.
You have 10 seconds to
present the access
finger of the user to be
added 3 times
You have 10 seconds to present
the alarm finger of the user to be
added 3 times (if you do not enrol
a second fingerprint, the badge
added will be encrypted as for a
standard user – without an alarm
function)
Present the badge for the user
that you want to add again and
wait for the enrolment
confirmation BEEP
Present the Add Alarm
badge at the same time
as the badge for the
user you want to add
Page 17
Technical manual PACKSOLO – V1.5 p.17/24
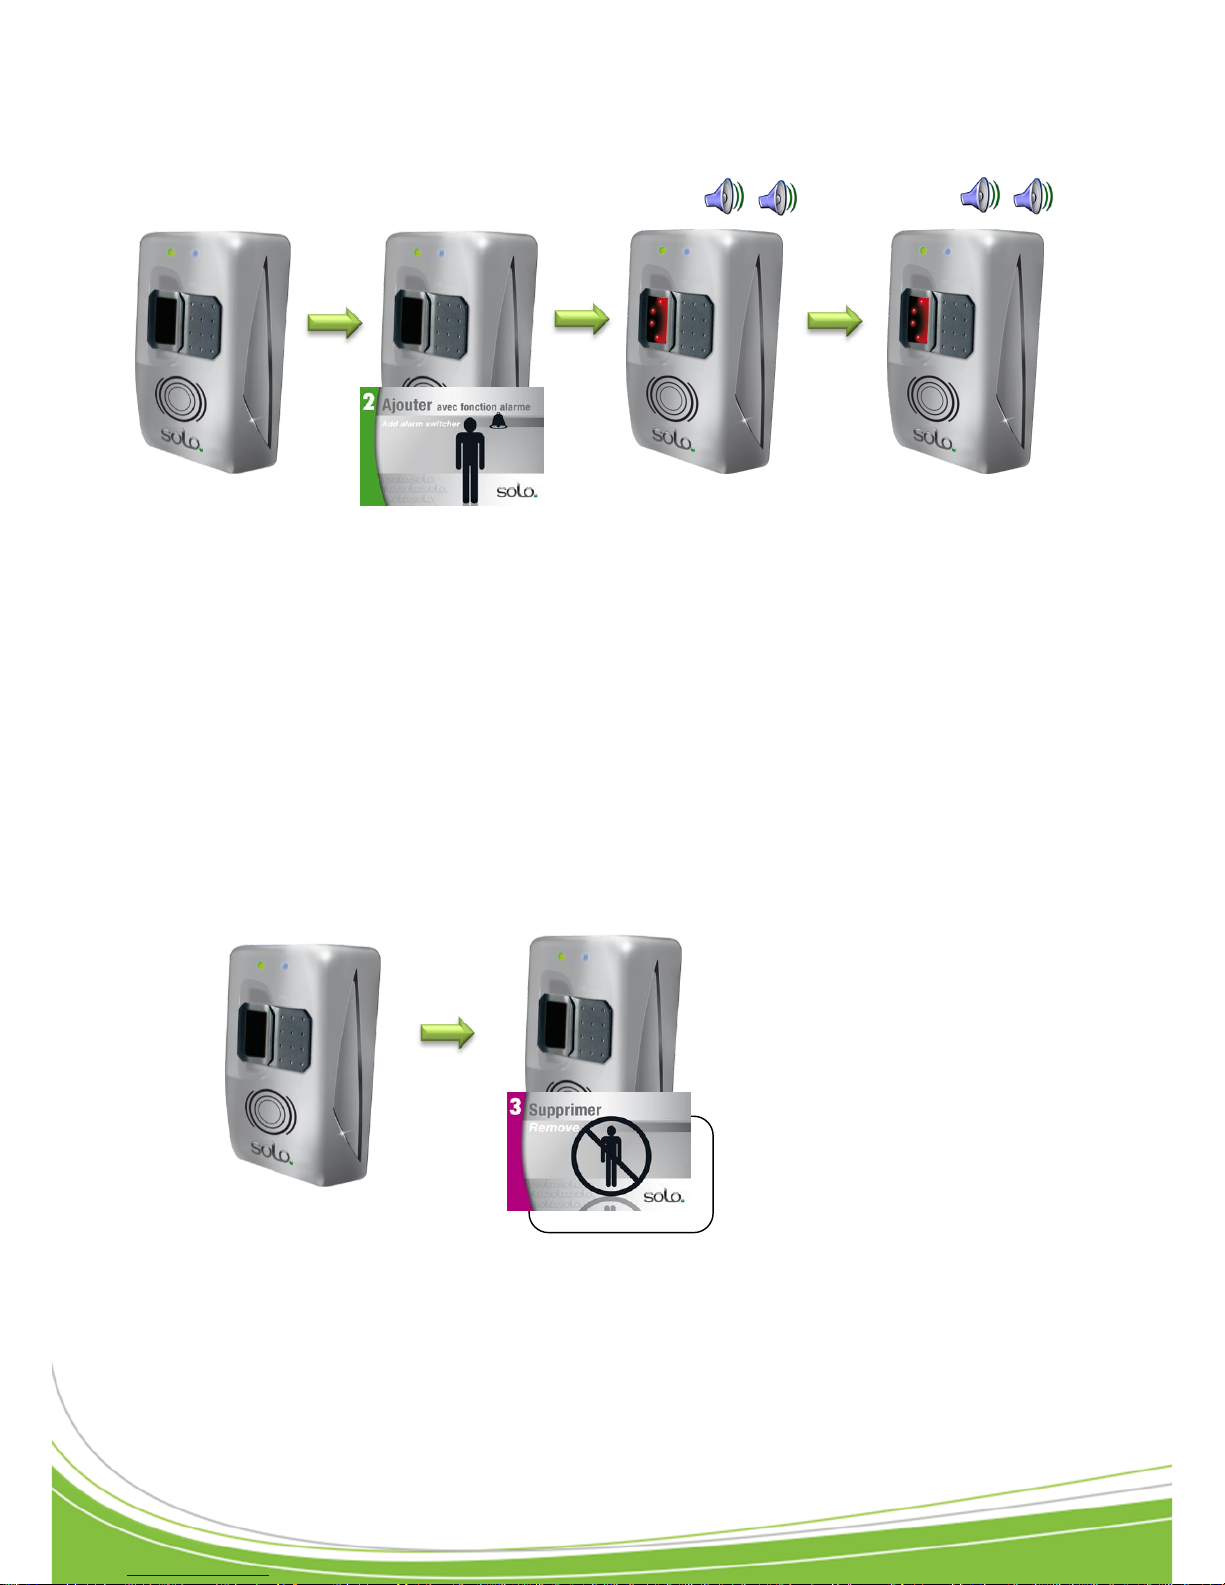
5) Add an “Alarm” user with fingerprint only
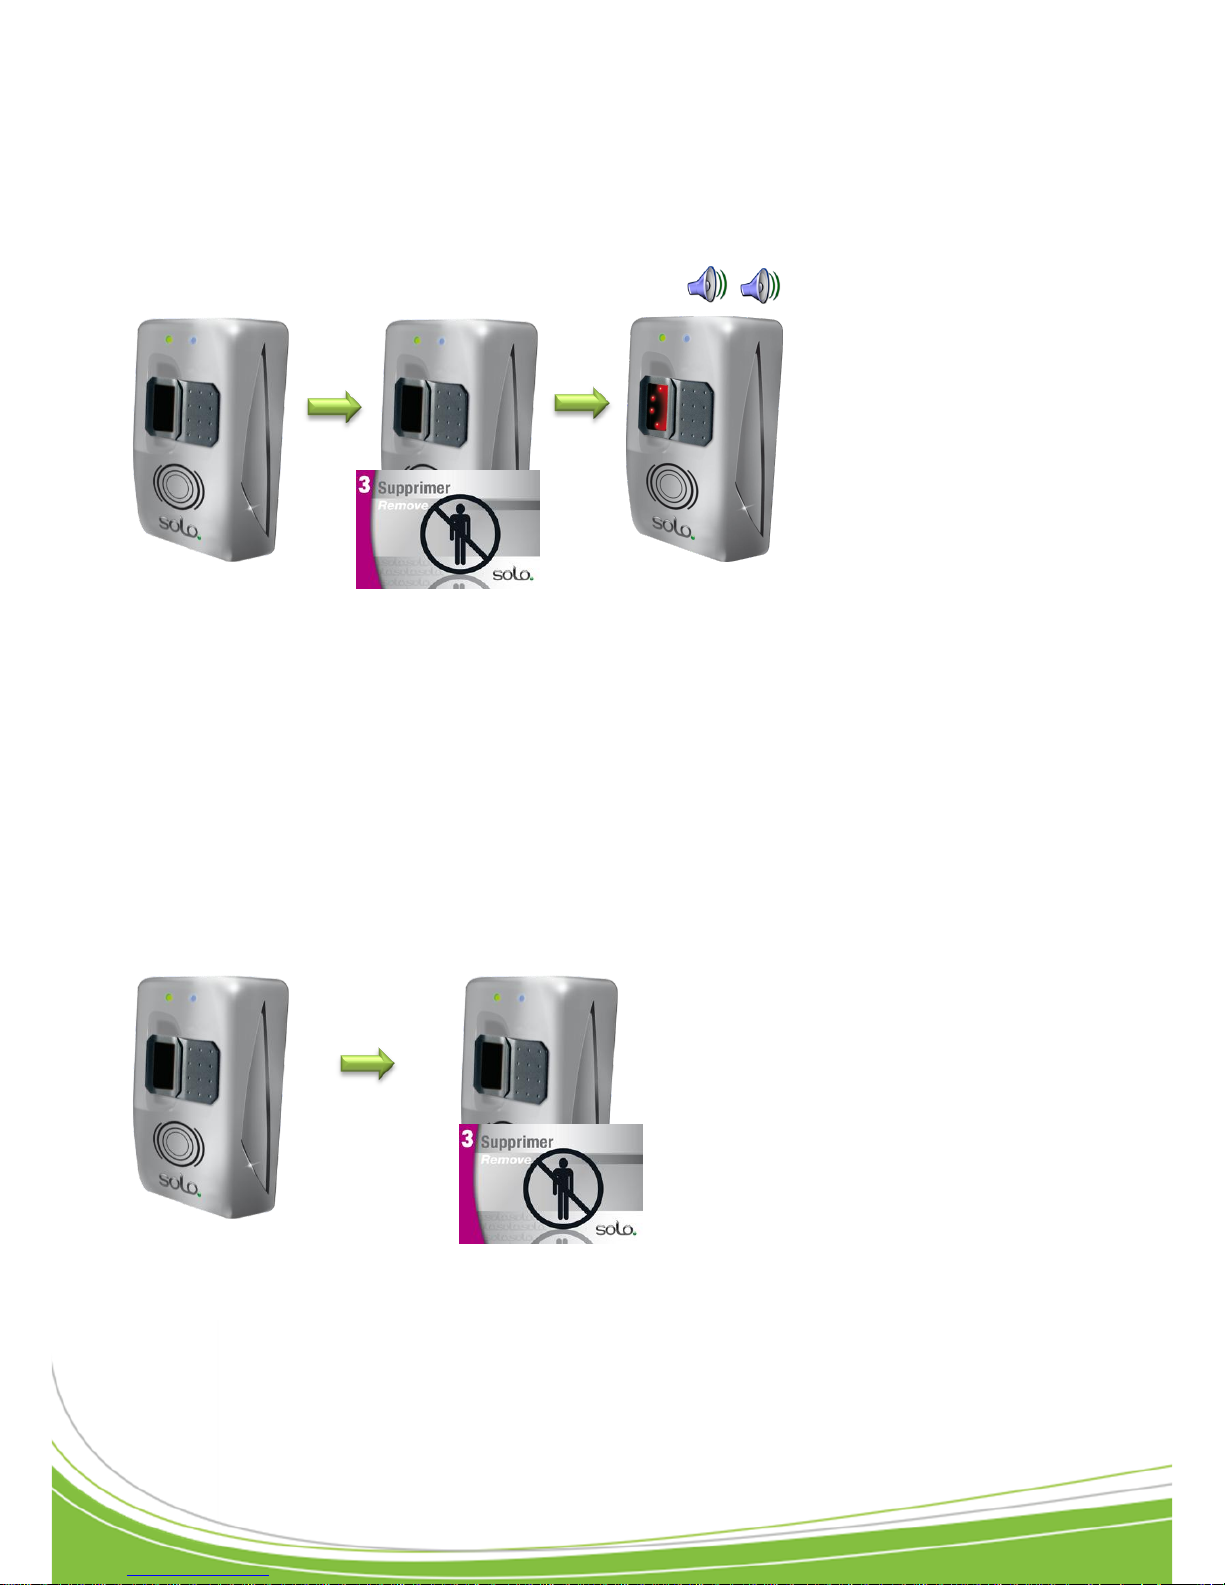
6) Deleting a badge
Present the Add Alarm
badge
You have 10
seconds to present
the access finger of
the user to be
added 3 times
You have 10 seconds to
present the alarm finger
of the user to be added
3 times (if you do not
enrol a second
fingerprint, the user
added will not have an
alarm function)
Present the Delete badge at the
same time as the badge for the
user you want to delete then
wait for the confirmation BEEP
Page 18
Technical manual PACKSOLO – V1.5 p.18/24
7) Deleting a user with fingerprint only
8) Deleting all users (fingerprints and badges only)
Present the Delete
badge
You have 10 seconds to
present one of the 2 fingers of
the user to be deleted. If the
user is recognised, he/she will
immediately be deleted
Present the Delete badge and leave
it in front of the reader for 10
seconds then wait for the
confirmation BEEP
Page 19
Technical manual PACKSOLO – V1.5 p.19/24
Restore to factory settings
Note: Should you lose your configuration badges, you need to reset the reader to its factory
settings in order to register a new set of configuration badges. This process will delete all the
users (fingerprints only and badges).
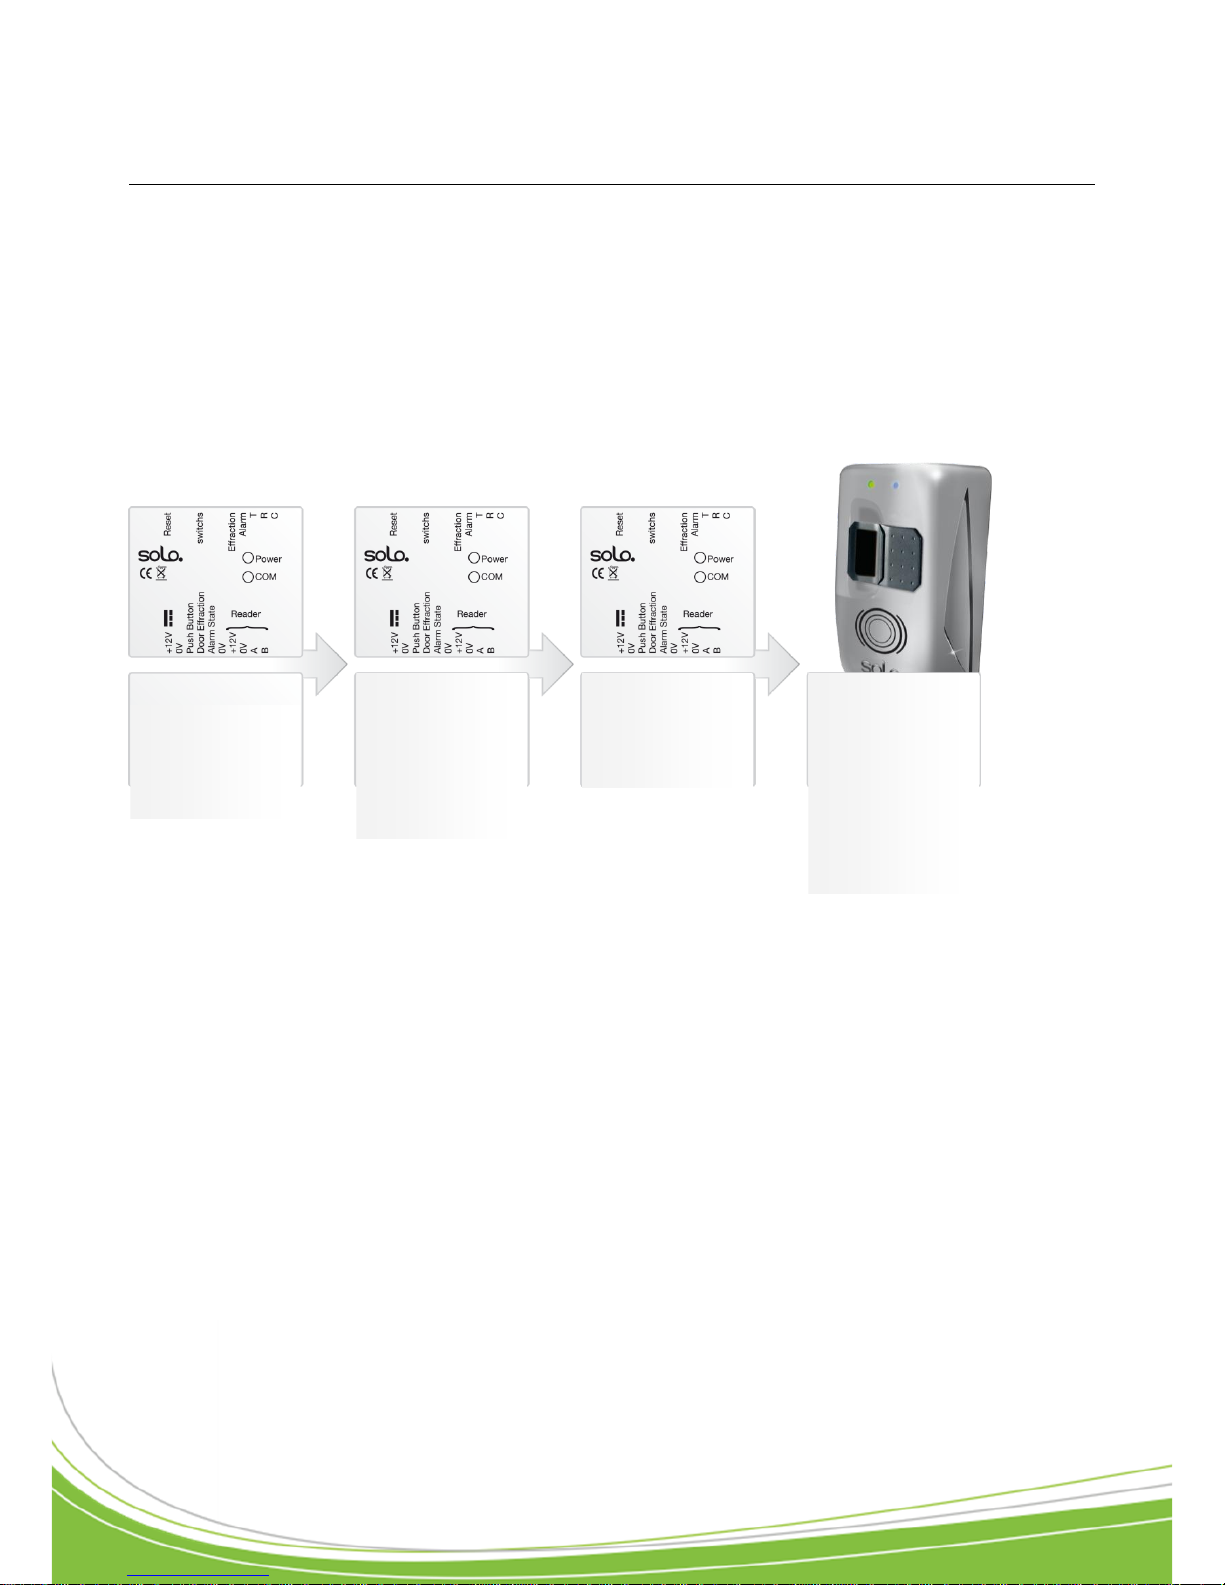
To restore to factory settings:
Switch off
the power
Press the
RESET button
and hold
it down while
switching the
power back on
Wait for 10
seconds
After 10
seconds, the
green and blue
LEDs will flash
alternately, now
proceed with
activation
Page 20

Technical manual PACKSOLO – V1.5 p.20/24
Signaling LEDs
An explanation of the different status of the blue and green LEDs:
Blue LED
Green LED
Reader status
Flashing alternately
Reader in factory configuration: waiting for configuration
badges/cards (Add, Add Alarm, Delete)
Flashing
Off
Normal operation: waiting for a user
-
On
Door open
On
-
Alarm activated: Refusing “standard” users and waiting for
inactivation of the alarm (alarm fingerprint or manual
inactivation)
The fingerprint sensor is off when no fingerprint is stored. The fingerprint is on (red) when at
least one fingerprint is stored.
Page 21
Technical manual PACKSOLO – V1.5 p.21/24
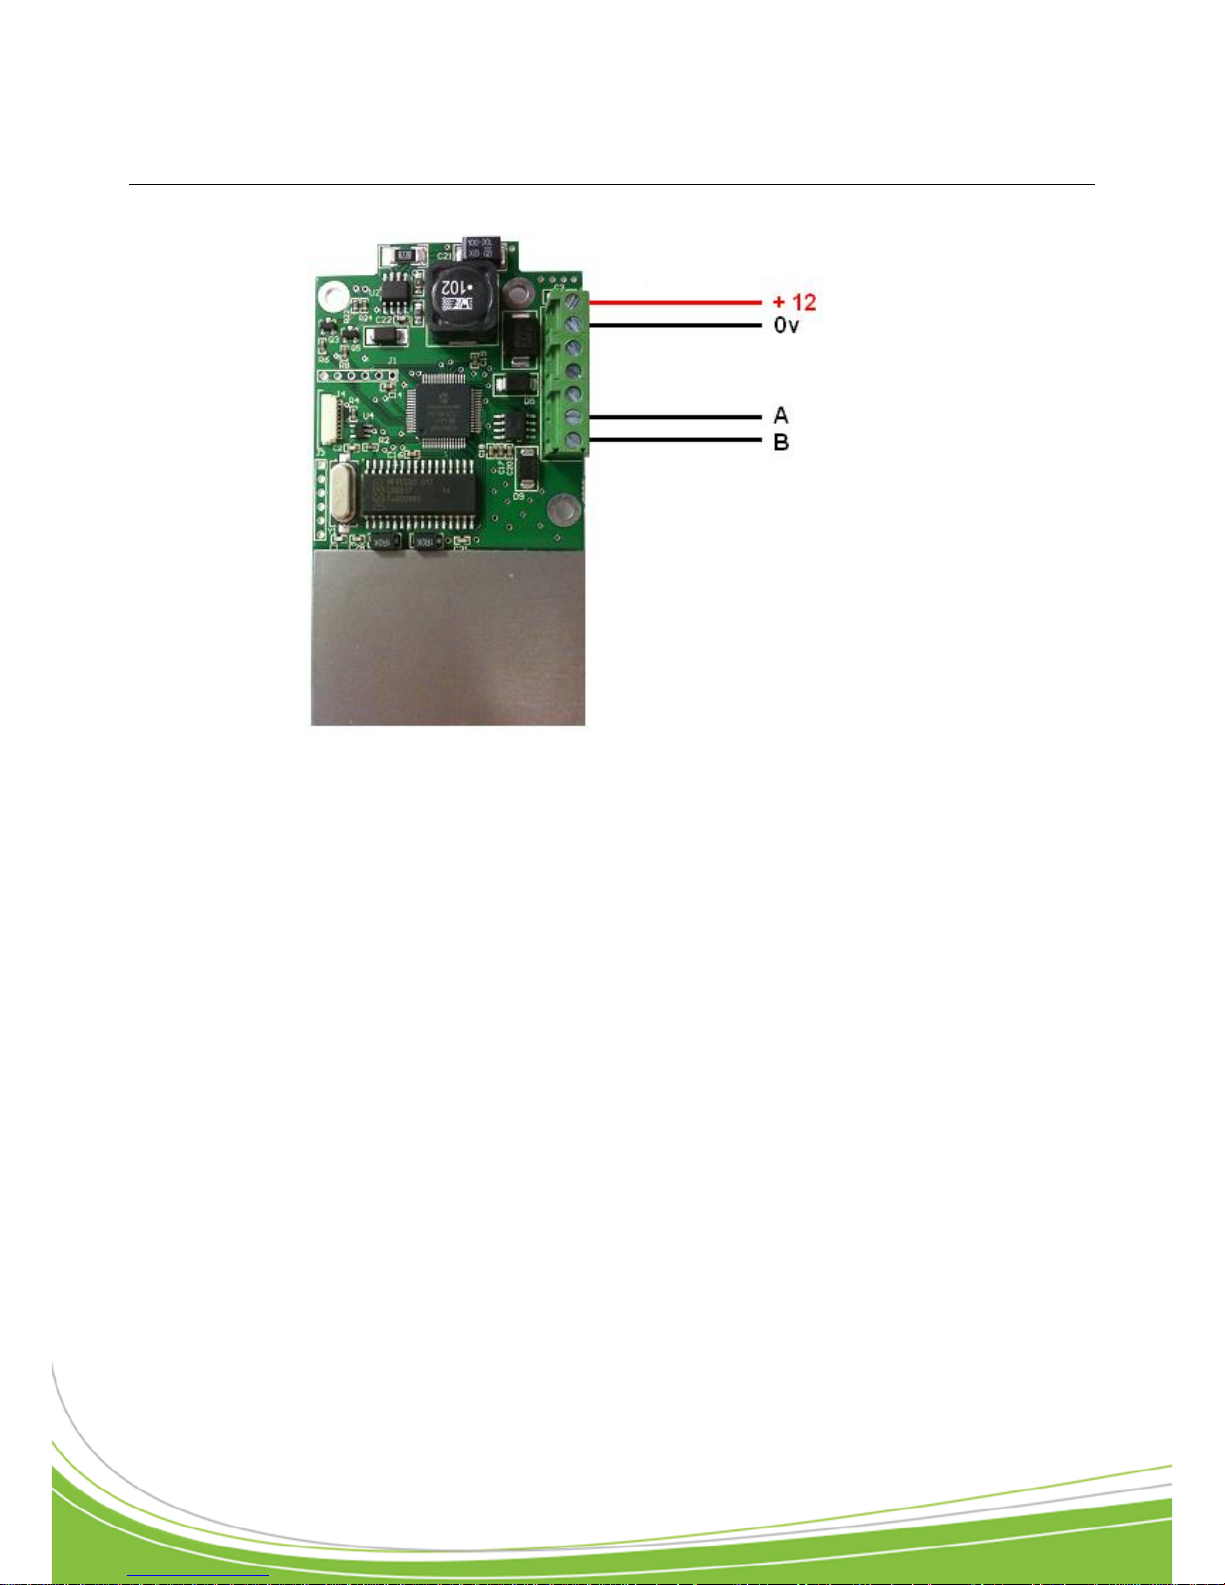
Connector blocks
Page 22

Technical manual PACKSOLO – V1.5 p.22/24
Check list
Pack SOLO
Serial number :
ID number :
Gasket :
Torx bit :
Torx screw :
Bag :
Wall seal :
Page 23

Technical manual PACKSOLO – V1.5 p.23/24
Technical Support:
Notes
-------------------------------------------------------------------------------------------------------------------------------
-------------------------------------------------------------------------------------------------------------------------------
-------------------------------------------------------------------------------------------------------------------------------
-------------------------------------------------------------------------------------------------------------------------------
-------------------------------------------------------------------------------------------------------------------------------
-------------------------------------------------------------------------------------------------------------------------------
-------------------------------------------------------------------------------------------------------------------------------
-------------------------------------------------------------------------------------------------------------------------------
-------------------------------------------------------------------------------------------------------------------------------
-------------------------------------------------------------------------------------------------------------------------------
-------------------------------------------------------------------------------------------------------------------------------
-------------------------------------------------------------------------------------------------------------------------------
-------------------------------------------------------------------------------------------------------------------------------
-------------------------------------------------------------------------------------------------------------------------------
-------------------------------------------------------------------------------------------------------------------------------
-------------------------------------------------------------------------------------------------------------------------------
-------------------------------------------------------------------------------------------------------------------------------
-------------------------------------------------------------------------------------------------------------------------------
-------------------------------------------------------------------------------------------------------------------------------
-------------------------------------------------------------------------------------------------------------------------------
-------------------------------------------------------------------------------------------------------------------------------
-------------------------------------------------------------------------------------------------------------------------------
-------------------------------------------------------------------------------------------------------------------------------
-------------------------------------------------------------------------------------------------------------------------------
Page 24

Zone Commerciale et Artisanale
670, route de Berre
13510 EGUILLES
France
www.eden-innovations.com
 Loading...