

ACTION MODULE
USER’S MANUAL
Before operating your edelkrone,
please watch the users manual video.
TABLE OF CONTENTS
WHAT’S IN THE BOX & THE BASICS.
MOUNTING YOUR ACTION MODULE TO YOUR SLIDERPLUS
CAUTIONS AND TIPS
WIZARD MODE
MACRO MODE
PHOTO TIMELAPSE MODE
VIDEO TIMELAPSE MODE
STOP MOTION MODE
1.
2.
3.
4.
5.
6.
7.
8.
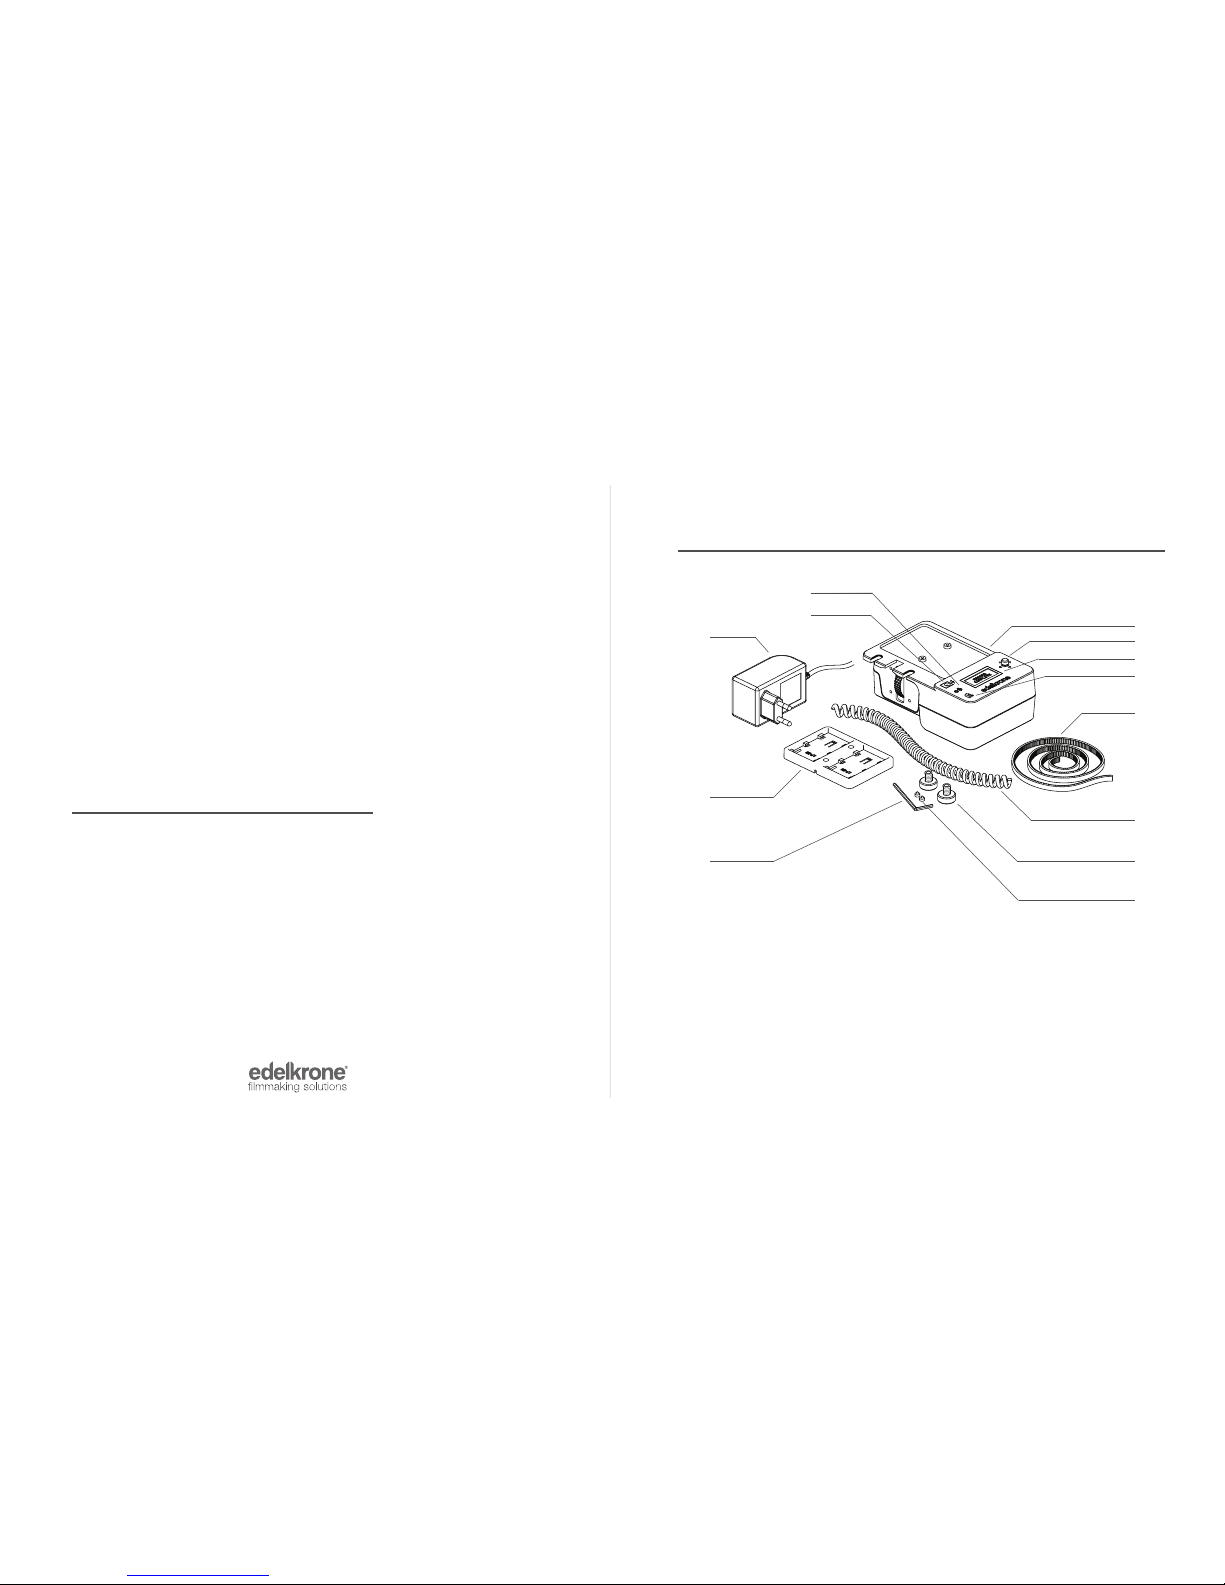
1. WHAT’S IN THE BOX & THE BASICS
1
7
2
3
4
6
5
8
9
11
10 12
13
Action Module
Control button
Screen
On/O switch
Shutter trigger port
1/
2/
3/
4/
5/
6/
7/
8/
9/
10/
DC socket
AC-DC adaptor*
Motion control belt
Battery bracket
Allen wrench
11/
12/
13/
Shutter trigger cable*
Attachment screws
Battery bracket screws
*Shutter trigger cable sold separately.
*The shape of the plug adapter varies with the country or region

2. MOUNTING YOUR ACTION MODULE TO YOUR SLIDERPLUS
1
1/
2/
3/
2
4
3
Attach the belt
Place the action module to its position
Place the screws to their positions
*Detailed video explaining how to attach this belt and mountaing details can be found
from : manuals.edelkrone.com
4/
Detailed video explaining how to attach this belt and mountaing details can be found
from : manuals.edelkrone.com
If the action module is going to be
powered by batteries, place the battery
bracket to its position & attach the
screws
3. CAUTIONS & TIPS
During inclined operations, you may need to
assist the slider movement with your hands
by carrying the weight of your equipment.
Action module only assists the momentum
of the movement to smoothen your shot. Do
not take your
hands o your camera for the safety of your
equipment.
Do not slide too fast in order to prevent
skipping on the belt.
Do not attempt to move the slider by hand
except when using wizard mode.
Do not attempt to operate the slider when
Action is mounted to SliderPLUS even when
the unit is powered o.
When Action is set to recording mode, do
not apply excessive speed to the unit.
Use fully charged batteries or ac-dc adaptor
to get better results.
Do not attempt to disassemble the module.
This will void your warranty.
*Before operating your product, please watch the users manual videos from the link:
manual.edelkrone.com
Before operating your product, please watch the users manual videos from the link:
manuals.edelkrone.com
HOLD OK TO START RECORDING
REC.
1. Manually slide to your start position. Then press
OK and hold for 3 sec till see the “REC.” on the screen.
2. While “REC” is blinking move the camera
LEFT/RIGHT until you reach your end
point then stop and wait till “REC” goes away.
4.
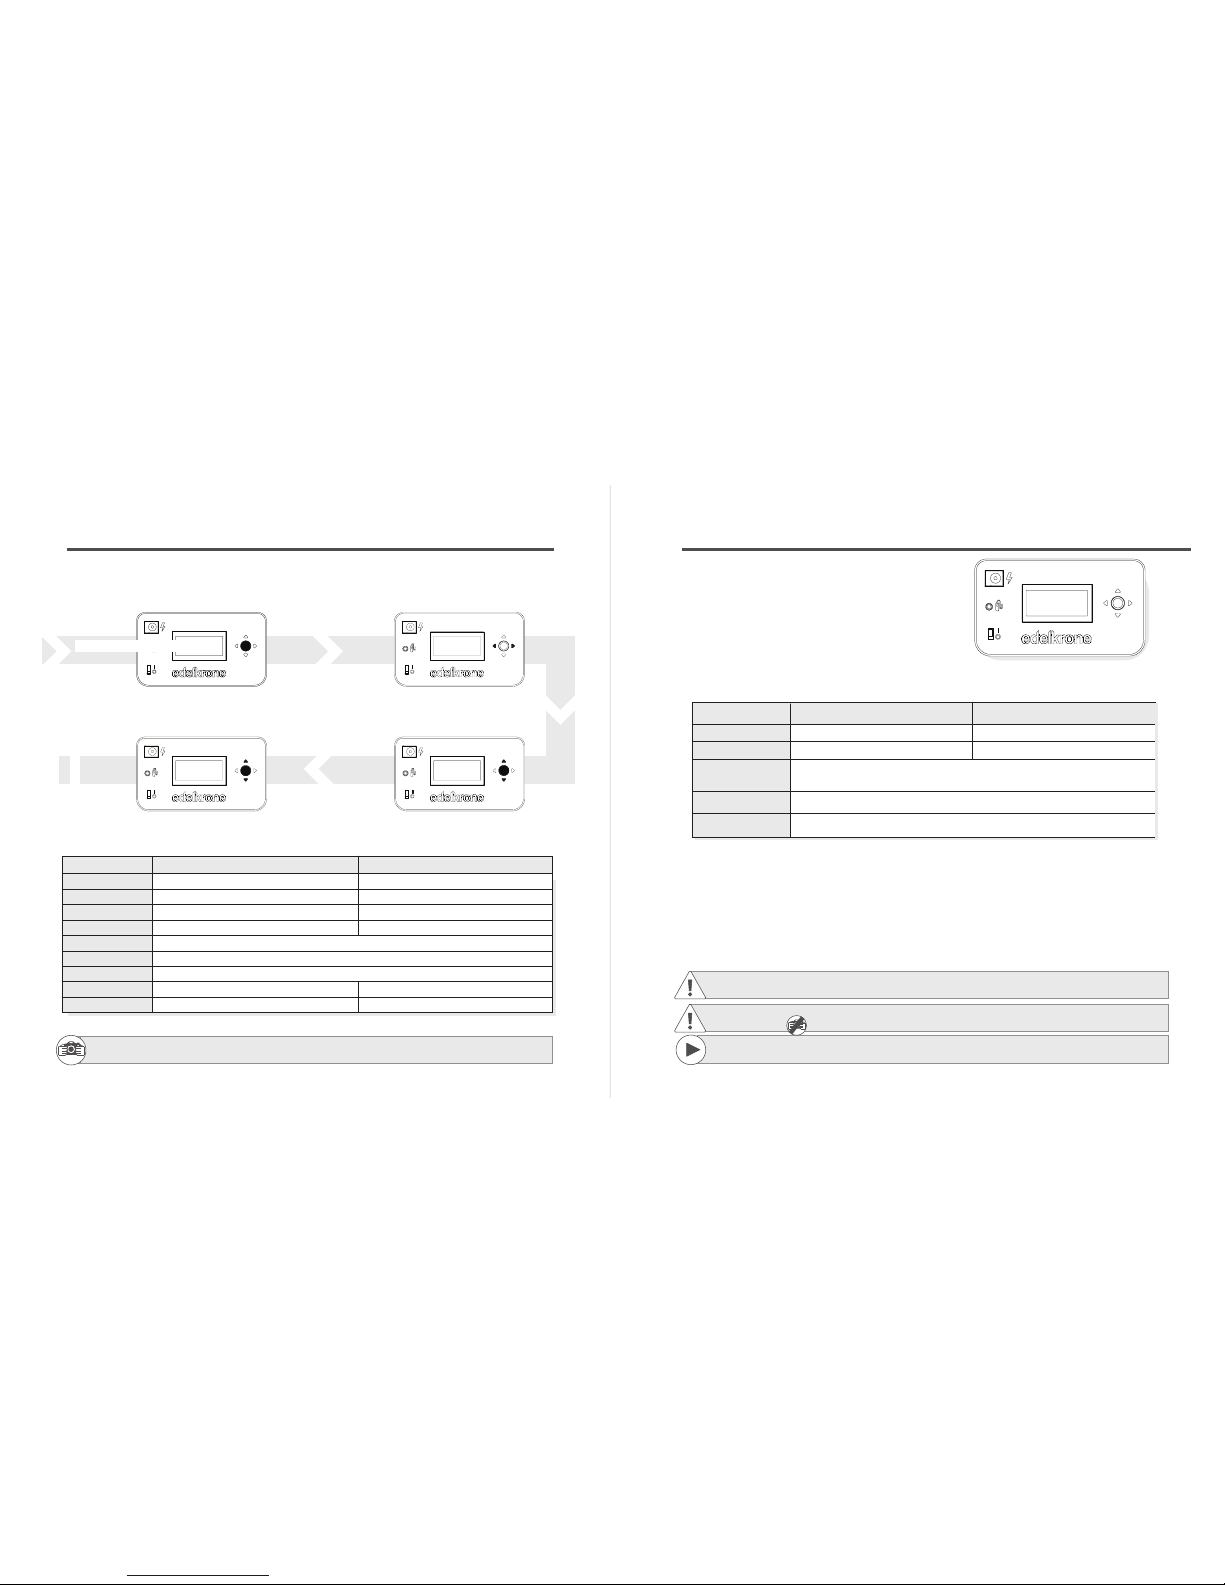
STATIONARY IN MOTION
RIGHT
Go to right point
Go to right point
LEFT
Go to left point
Go to left point
Stop
Stop
Stop
Stop
Stop
Stop
HOLD RIGHT
HOLD LEFT
UP
Increase speed
DOWN
Decrease speed
PRESS OK
Changes to the selection between “acceleration-speed”
DOUBLE RIGHT
Loop between right & left point
Loop between right & left point
DOUBLE LEFT
SPEED
ACCEL.
In Wizard mode, Action Module records and repeats your slides. It will record the start and end positions and
average speed of your slide instantly. Also learns your avarege speed instantly. After selecting the mode,
follow these steps to record and playback your slides.
4. Press OK to switch between acceleration &
speed. Push UP/DOWN to decide your speed.
3. Press OK to switch between acceleration & speed. Push
UP/DOWN to adjust your acceleraiton.
In this mode use hand control to move the camera
”WIZARD MODE”
5.
Notice
MACRO MODE
050/100
STATIONARY IN MOTION
RIGHT Starts moving to the right
Starts moving to the left
LEFT
Stop
Stop
press and hold to LEFT/RIGHT to move faster and once the button
is released, Action Module will revert to the orginal speed.
HOLD RIGHT/LEFT
UPWARDS
increase speed
DOWNWARDS
decrease speed
”MACRO MODE”
In macro mode system works in higher torques which may help you to operate in
inclined operations.
Macro Mode designed to perform extreme slow
slides.
You don’t need trigger cable for this mode. Select the
mode and follow these steps. If action module is not
on macro mode, turn o the device and turn it on
again to be able to choose macro mode.
*Before operating your product, please watch the users manual videos from the link:
manual.edelkrone.com
Before operating your product, please watch the users manual videos from the link:
manual.edelkrone.com
In these modes use left/right control buttons to move the camera. Do not operate the
slider by hand.
6.
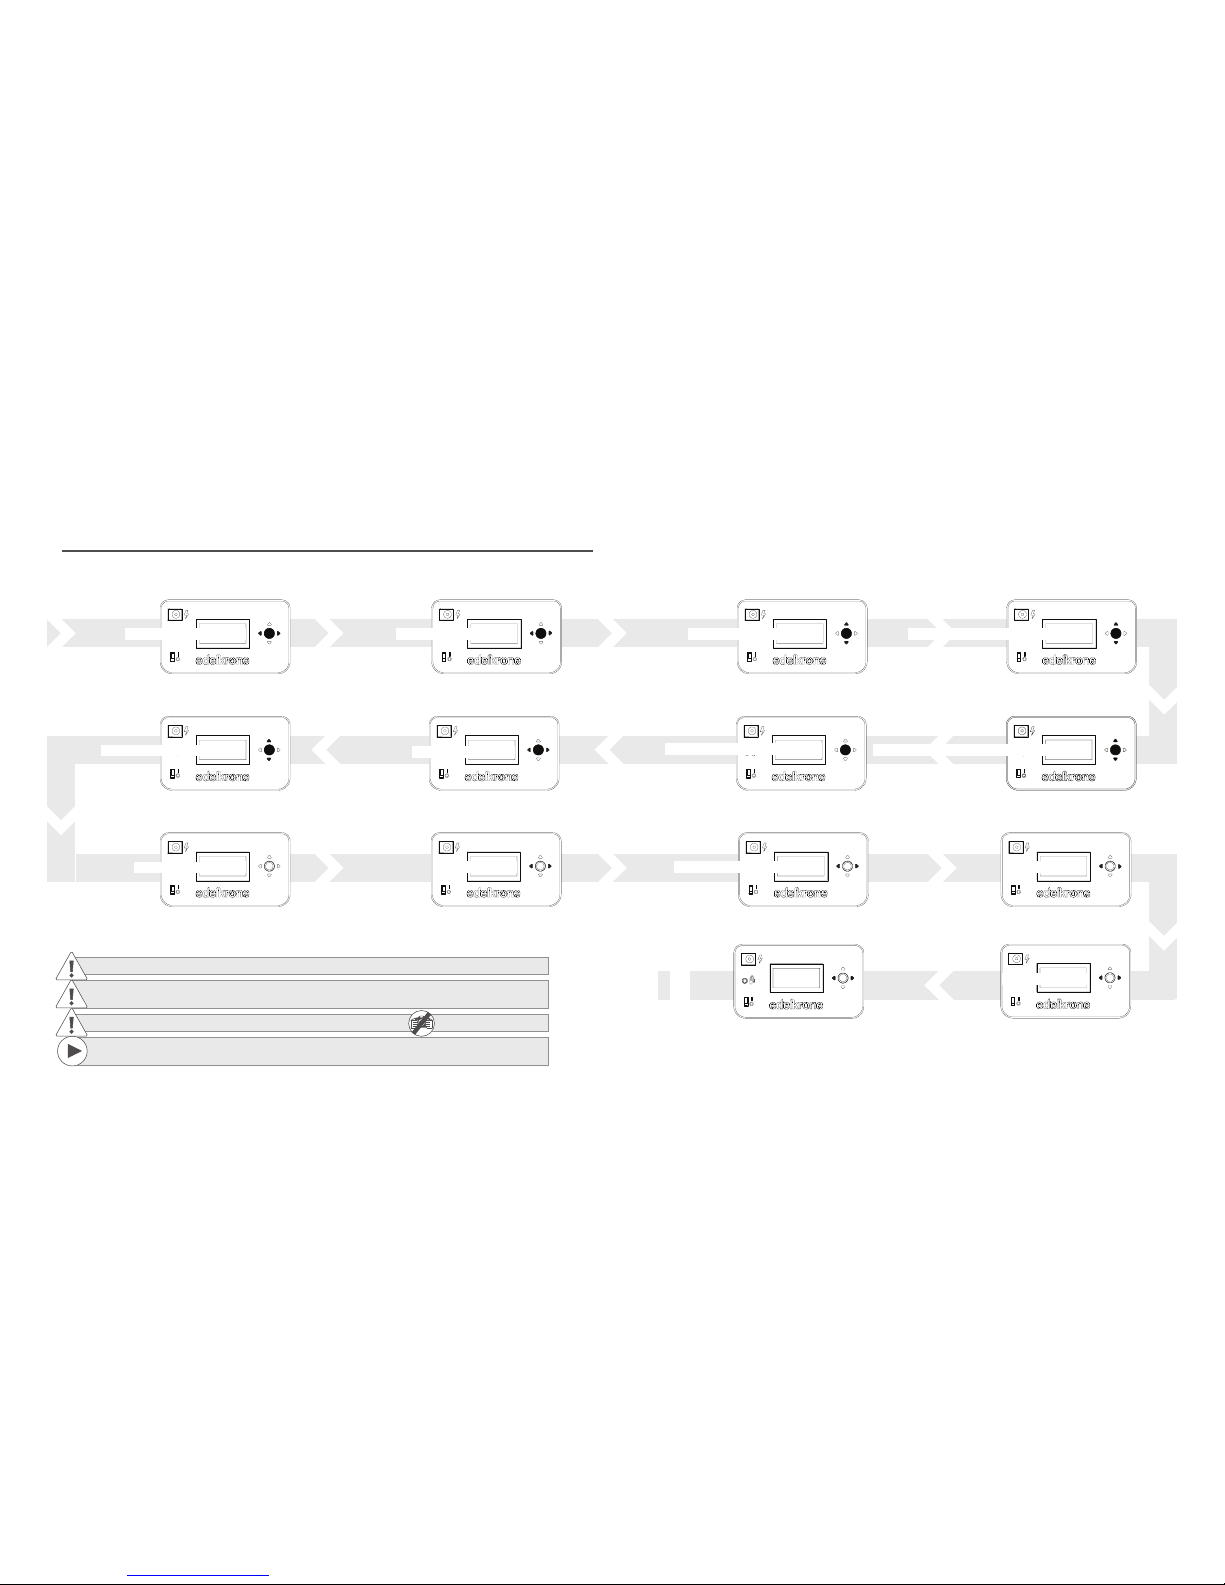
”PHOTO TIME LAPSE MODE”
If you are a DSLR / mirrorless user, you could perform time lapse shots with the help of the Photo Time Lapse Mode. Attach the
trigger cable, select the mode and follow these steps. If Action Module is not on Photo Time Lapse Mode, turn o the device
and turn it on again to be able to choose Photo Time Lapse Mode.
1. Use LEFT/RIGHT buttons to move your camera
to the end point position. By choosing same end and
start points you could perform Steady Time-Lapse.
2. Use LEFT/RIGHT buttons to move your camera
to the start point position.
GET ME TO MY END POINT!
8. Push UP/DOWN buttons to choose
when to start. Now, or set a countdown.
6. Set up your camera’s shutter speed according to
value on the screen in order to prevent slide overlaps.
9. The system will start begin the countdown to your
time lapse.
10.1. While in operation, pushing LEFT/RIGHT buttons
shows the information of percentage completed and
continues as.
4. Push UP/DOWN buttons to set your frame
rate.
WHAT SHOULD BE OUR FINAL VIDEO FPS?
EASE IN OUT OPTION
TIMELAPSE STARTS IN
SHOW ME WHERE TO START!
10.2. The duration of the nal video so far.
% COMPLETE
10.3. Elapsed time so far
FINAL VIDEO DURATION SO FAR TIME ELAPSED
3. Push UP/DOWN buttons to set duration of time
lapse.
HOW LONG ARE WE HERE FOR?
DON’T EXCEED SHUTTER SPEED OF
10.5. Pause the process and it will memorize where
it paused.
10.4. Remaining time to nish.
TIME REMAINING
PAUSE?
5. Push UP/DOWN buttons to set your
nal video duration.
WHAT SHUOLD BE OUR FINAL VIDEO DURATION?
7. Push LEFT/RIGHT buttons to enable/disable ease
in/out option.
In this mode use left/right control buttons to move the camera.
To go back to previous question press OK and wait 3 secs.
Action Module can perfom time lapses up to 365 days. Be prepared the unit by either hot
swapping or using an AC-DC adapter.
WHEN SHALL WE GET STARTED?
Before operating your product, please watch the users manual videos from the link:
manuals.edelkrone.com

If you are a DSLR / mirrorless user, you could perform stop motion shots with the help of the Stop Motion Mode.
Attach the trigger cable, select the mode and follow these steps. If Action Module is not on Stop Motion Mode,
turn o the device and turn it on again to choose Stop Motione Mode.
7.
8.
1. Push LEFT/RIGHT buttons to move your camera
to the end point position.
2. Push LEFT/RIGHT buttons to move your camera
to the start point position.
2. Push LEFT/RIGHT buttons to move your camera
to the start point position.
GET ME TO MY END POINT!
PAUSE?
4. Then timelapse start in 10 secs.
TIMELAPSE STARTS INSHOW ME WHERE TO START!
TIME REMAINING
3. Push UP/DOWN to choose how long you
are going to spend for this shot.
HOW LONG ARE WE HERE FOR?
GET ME TO MY END POINT!
4. Push UP/DOWN to set your nal video duration.
5. Push LEFT/RIGHT buttons to enable/disable ease
in/out option.
3. Push UP/DOWN to set your frame rate.
WHAT SHOULD BE OUR FINAL VIDEO FPS?
EASE IN OUT OPTIONSTOP MOTION POSITION
SHOW ME WHERE TO START! WHAT SHUOLD BE OUR FINAL VIDEO DURATION?
6. Press LEFT/RIGHT buttons to take the other shot
or with UP/DOWN buttons to select a frame in the
stop motion shoot.
*Before operating your product, please watch the users manual videos from the link:
manual.edelkrone.com
Before operating your product, please watch the users manual videos from the link:
manual.edelkrone.com
5.1. While in operation pushing LEFT/RIGHT buttons
shows the amount of percent completed and continues
as.
5.2. The duration of the nal video so far.5.4. Pause the process and it will memorise where
it paused.
5.3. Remaining time to nish.
”VIDEO TIME LAPSE MODE”
”STOP MOTION MODE”
This mode is desgined for video cameras to get time lapse shots which do not have shutter trigger port to use it in Photo Time
Lapse Mode. A Shutter trigger cable is not necessary for this. Select the mode and follow these steps. If Action Module is not on
video time lapse mode, turn o the device and turn it on again to be able to choose Photo Time Lapse Mode.
%COMPLETEFINAL VIDEO DURATION SO FAR
1. Push LEFT/RIGHT buttons to move your camera
to the end point position. By choosing same end and
start points you could perform steady stop motion.
In these modes use left/right control buttons to move the camera. Do not operate the
slider by hand.

© 2016, edelkrone
DISPOSAL OF THE PRODUCT
DISCLAIMER
Should the product become damaged beyond repair, or if you wish to dispose it, it must be disposed
separately from the municipal waste stream via designated collection facilities appointed by the
government or the local authorities. Observe the regulations of your area and country that relate to
the disposal of electronic products.
edelkrone cannot be responsible for damage caused by improper use or modication of the product.
► Keep your electronic Motion Control Unit away from all sorts of liquids.
► In order to preserve your Motion Control Unit and battery performance at their best, use exact same type of
batteries with equivalent level of charge during dual-battery operation.
► Do not attempt to disassemble or modify any internal parts of your Motion Control Unit. If the device appears to
be malfunctioning, discontinue use immediately and contact support for qualied service.
► Never force a dierent type of connector into a port.
► Never use or store your Motion Control Unit in areas subject to extreme temperatures, or high levels of vibration.
► If your motion control unit becomes unresponsive, disconnect and re-connect the power source. Make sure your
AC/DC adapter is plugged in or your batteries are properly charged. If the problem persists, contact
our support team.
► Environmental factors may aect your Motion Control Unit’s performance. Keep your product away from
environmental hazards such as dust or heavy resonance. Do not use chemical materials to clean your product.
► Only use included battery plate, AC/DC adapter or equivalent power sources. Use of an inappropriate power
source may permanently damage your Motion Control Unit.
► If there is an impairment on the power or connector cable, stop using the Motion Control Unit immediately.
► Avoid dropping or causing physical damage to your Motion Control Unit.
► Do not place heavy objects on top of your Motion Control Unit.
www.edelkrone.com
 Loading...