

Page 1
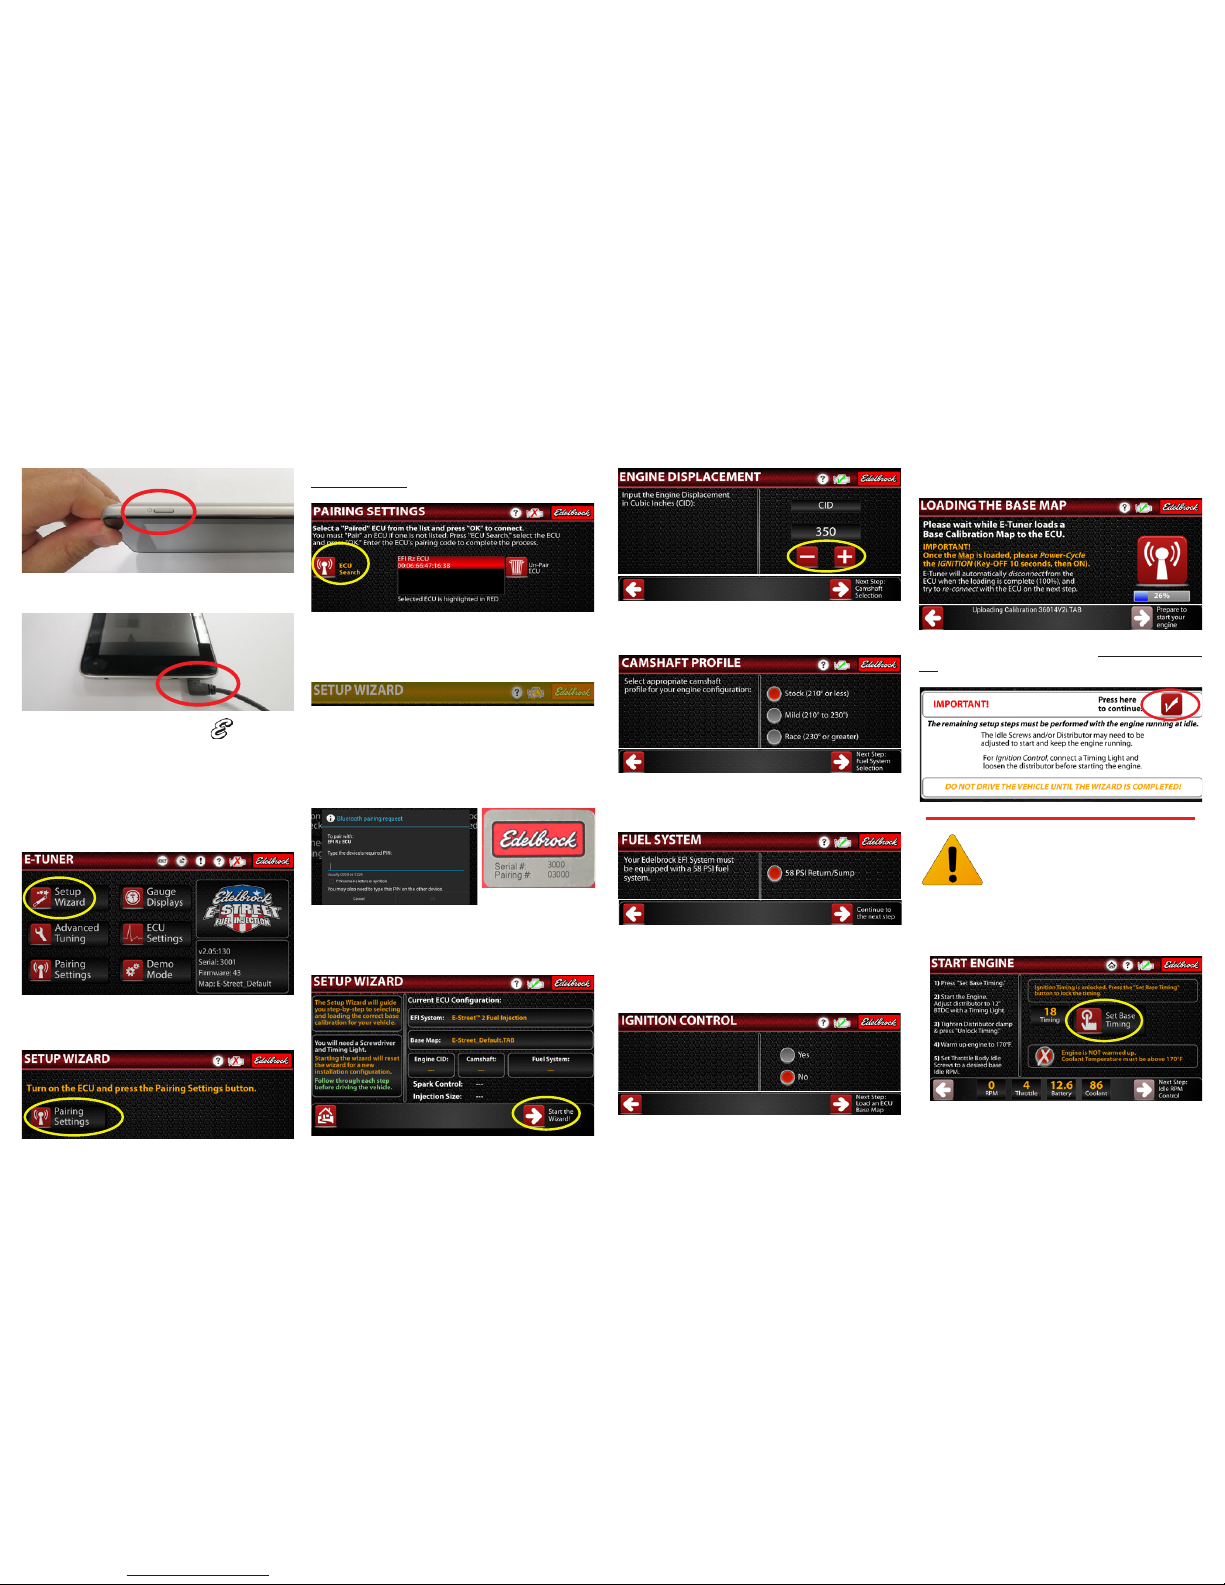
1. Power on the tablet by pressing and holding down the
power button until the screen turns on.
2. If the tablet isn’t adequately charged, or isn’t turning on,
connect a USB charger to the MicroUSB slot.
3. Find the Edelbrock E-Tuner App Icon on the Home
screen. Select the icon to launch the E-Tuner App. NOTE: If
you are supplying your own Android device and need to
download the E-Tuner App, do so now from the Google Play
Store. To do so, follow the Downloading the E-Tuner App
section on the back of these instructions.
4. From the E-Tuner Home page, select Setup Wizard to
launch the E-Tuner Wizard.
5. Power on the ECU by turning the ignition to the “ON”
position and press the Pairing Settings button. Do NOT
start the engine until prompted to do so!
6. On the Pairing Settings screen, verify that an EFI Rz ECU
is listed and highlighted in RED. Press OK to continue.
If an ECU is not listed, press the ECU Search icon to search for
the ECU. Select the EFI Rz ECU and press OK to pair.
7. The title bar across the top of the screen will flash yellow,
indicating that the device is attempting to communicate with
the ECU. If the ECU is already paired, E-Tuner will take you to
the Setup Wizard screen. Proceed to Step 8.
NOTE: If you encounter a popup screen requesting a Bluetooth
Pairing Request, you must manually pair the ECU to the Android
device. To do so, enter the Pairing Code found on the ECU label
and select OK. Proceed to Step #8 once the ECU has been
successfully paired. NOTE: If the pairing fails, you may have to
turn the ECU off and back on and then repeat this procedure.
8. The screen below will show how the system is currently
configured. Select Start the Wizard to continue. NOTE: You
will need a screwdriver and a timing light to complete the Wizard
Setup.
9. Use the “-” and “+” keys to enter the displacement of your
engine. Click the Right Arrow to proceed.
10. Select the proper camshaft profile. Please refer to the cam
card included with your camshaft, if applicable. Click the Right
Arrow to proceed.
11. Select the 58 PSI fuel system option. This includes both a
Return-Style fuel system as well as the Edelbrock Fuel Sump
System.
12. If you have installed the optional Ignition Control Kit, select
Yes to enable the Ignition Control feature. Otherwise select NO
to keep it disabled. Click the Right Arrow to proceed. NOTE:
Additional Ignition Control components are required to utilize
the Ignition Control feature.
13. The Wizard will automatically start loading a base map.
When the map is finished loading, you will be prompt to turn the
ignition off for 10 seconds and then back on. Click OK to close
the popup window and then click the Right Arrow to proceed.
14. Read the important warning then select the Check Mark
next to My Engine is Ready to Start. Do NOT start the engine
or drive the vehicle until prompted to do so.
Step 15 ONLY applies to applications using
Ignition Control. If you have not installed the
additional Ignition Control components, skip
to Step 16.
15. Connect a timing light, remove the air cleaner (if installed)
and loosen the distributor clamp.
a. Click the Set Base Timing icon to lock the timing at 12°
BTDC.
Page 2
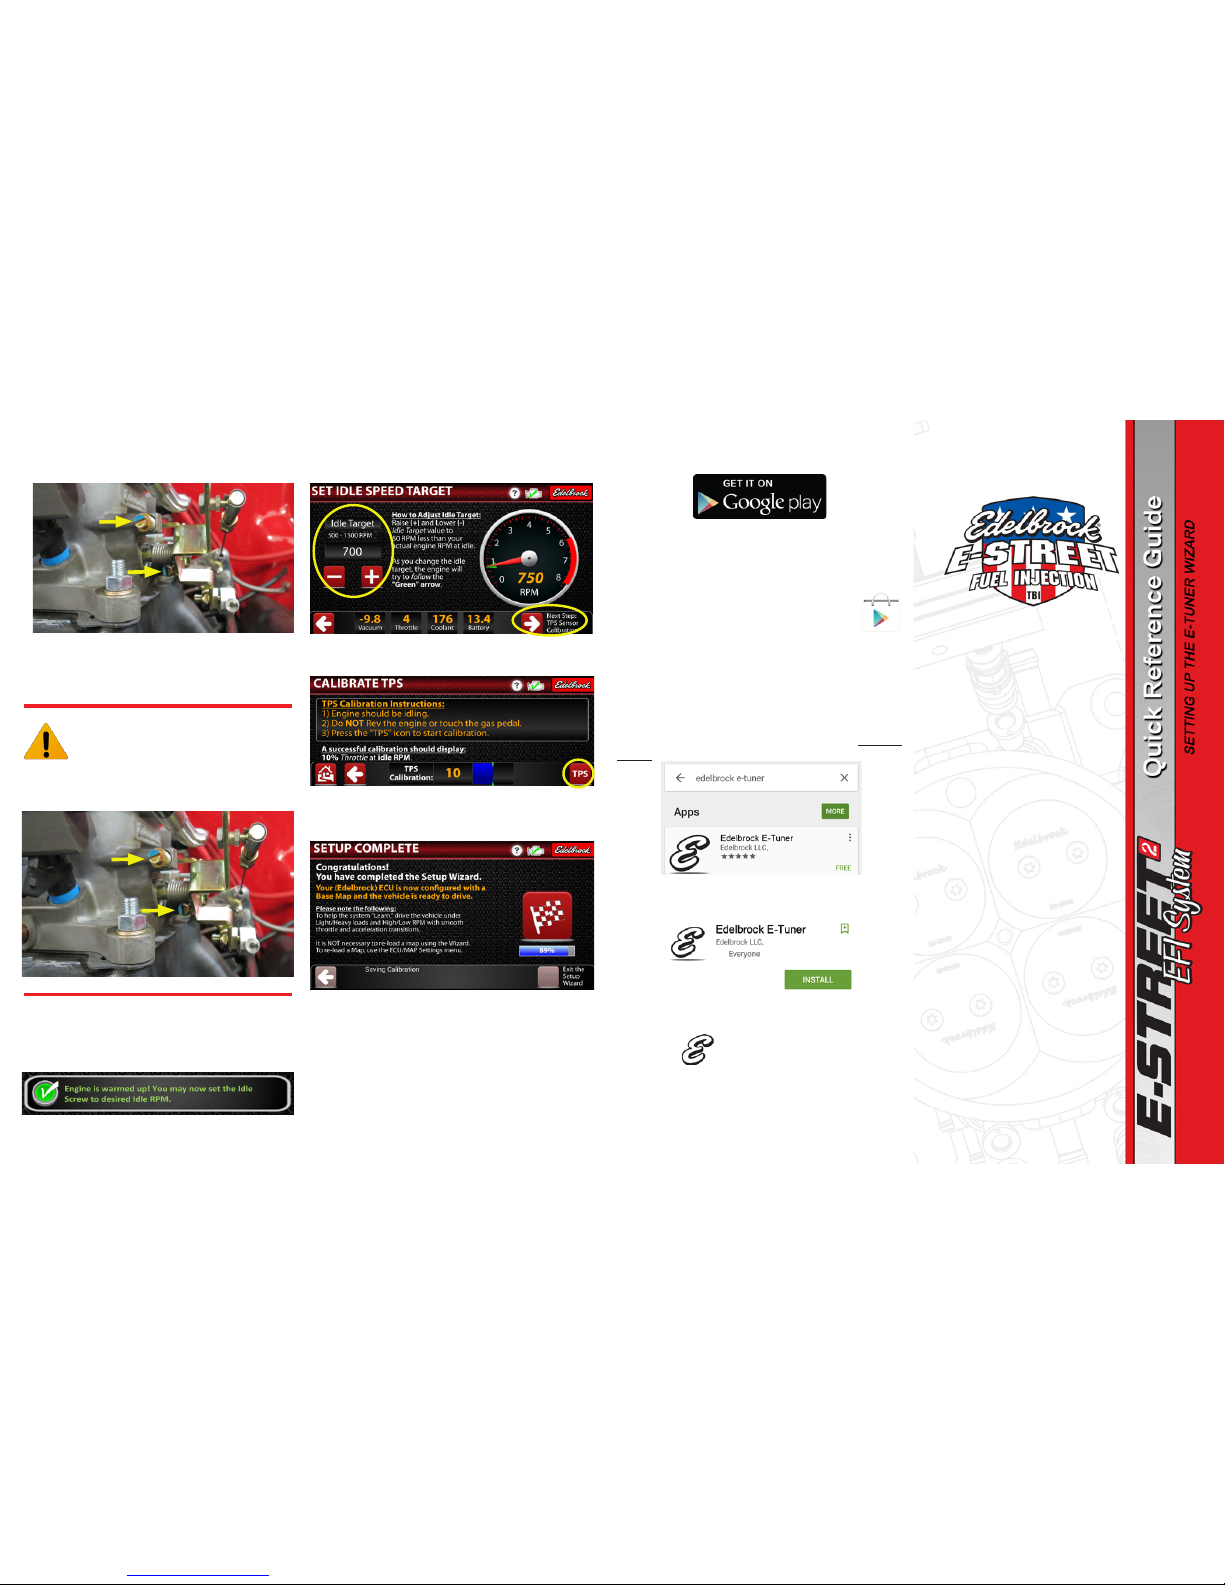
b. Start the engine and evenly adjust both throttle body
screws, as needed, to maintain idle. Do NOT drive the
vehicle yet.
c. Using a timing light, adjust the distributor to 12° BTDC.
Then tighten down the distributor clamp.
d. Click Unlock Timing and proceed to Step 17.
Proceed with Step 16 if you have NOT installed
the additional Ignition Control components.
Disregard otherwise and proceed to Step 17.
16. Start the engine and evenly adjust both throttle body
screws, as needed, to maintain idle. Proceed to Step 17. Do
NOT drive the vehicle yet.
17. Warm the engine up to 170°F. Once the proper engine
temperature is reached, adjust both throttle body idle screws
equally to set your desired base Idle RPM (engine idle speed).
Click the Right Arrow to proceed.
DOWNLOADING THE E-TUNER APP ONTO YOUR OWN
ANDROID DEVICE
NOTE: This is a general guide on how to download the Edelbrock
E-Tuner app from the Google Play Store. Because the Android
platform varies from device to device, the images below may
vary. NOTE: If not using Wi-FI, standard Data charges may apply
when downloading the E-Tuner app.
1. Launch the Google Play store App by selecting
the “Play Store” icon:
NOTE: Most of the time, the app can be found in the All Apps
section.
2. If you don’t have a Google account, you must create one to
continue. In most cases, you can follow the instructions on your
device to set one up.
3. In the Google Play store app, search for the “Edelbrock
E-Tuner” app.
4. Select the Edelbrock E-Tuner app and click install to
download.
5. The E-Tuner app should appear on your Home screen. If
not, select ALL APPS and scroll through the apps to find the
E-Tuner icon:
6. Launch the E-Tuner app and proceed with the Setup Wizard
to start configuring your E-Street 2 EFI System with a base map.
18. Now you can set your Idle Speed Target. This should be 50
RPM less than your base engine idle. Click the Right Arrow to
proceed.
19. Select TPS to calibrate the Throttle Position Sensor. Do
NOT rev the engine or move the throttle during this procedure.
20. The E-Tuner app will now automatically save a backup
copy of the Base Map calibration to My Maps. Click Finish to
exit the Setup Wizard.
21. The vehicle can now be driven. It’s highly recommended
to put the vehicle through various loads and conditions to help
the system learn.
TIP: The key to driving your vehicle initially with the E-Street
2 EFI System is to employ smooth slow throttle transitions and
accelerations. Try to drive the vehicle in a manner that covers
all conditions, such as: light load, heavy load, high RPM and low
RPM.
Brochure 63-36641 Rev 10/15
 Loading...