

Page 1

©2007 Edelbrock Corporation
Brochure #63-5658
Page 1 of 2
Catalog #5658
Rev. 3/07 - DA/mc
EDELBROCK CAT-BACK EXHAUST SYSTEM
for 1995-1997 Camaro / Firebird with 3.8L V6 Engine
Catalog #5658
INSTALLATION INSTRUCTIONS
Suggested Tools for Installation:
❑ 3/8” rachet set and metric sockets ❑ 15mm wrench
❑ Jackstands and jack ❑ Liquid penetrant and rubber lubricant
DISASSEMBLY
1. Raise vehicle and support with the proper jackstands for
the weight, leaving the suspension hanging.
2. Use caution around hot exhaust systems to avoid burns.
3. Use penetrating oil on all nuts and bolts.
4. Remove all nuts, bolts, and hanger lances from the rear of
the catalytic converter to the tailpipes and save them.
5. Remove the old system. In some cases, you will find it
easier to cut the overaxle pipe to remove it.
ASSEMBLY
NOTE: Do not fully tighten anything until the complete system
has been installed and adjusted for proper clearance.
1. Slip the intermediate pipe over the catalytic outlet and
use the 2-1/4” band clamp at this connection.
2. Bolt the stock hanger on the overaxle pipe bracket, and
put the overaxle pipe in over the axle from the rear. As
you rotate it into position, slip the hanger lance in to the
stock frame mounter rubber hanger. Line the
intermediate pipe rear outlet up with the front of the
overaxle pipe and slip them together. Install one of the 3”
band clamps on the connection and just snug it so that
you can adjust.
3. Install muffler onto outlet of overaxle pipe along with a 3”
band clamp.
Please study these instructions carefully before installing your new Cat-Back Exhaust System. If you have any questions, please
contact our Technical Hotline at: 1-800-416-8628, 7:00 am to 5:00 pm, Monday through Friday, Pacific Standard Time or
e-mail us at Edelbrock@Edelbrock.com
.
WARNING: Exhaust gas contains carbon monoxide, a deadly invisible gas. Correct any leaks before driving!
4. Install elbow #25-3224 on the left side outlet of the
muffler and elbow #25-3225 on the right side outlet using
2-1/2” band clamps.
5. Install left hanger clamp #23-4068 onto O.E. rubber
isolator using supplied bolt, nut, and washers. Larger
fender washer goes against isolator. Snug clamp.
6. Install tailpipes onto elbows, snug the hanger clamp on
the left side. Install a 3” band clamp on the right side
elbow and snug the clamp.
7. Now begin at the front of the vehicle, align the system,
paying particular attention to the overaxle area. When
you have the overaxle pipe centered between the inner
panel and the gas tank shield, tighten up the band clamp
behind converter and 3” band clamp on the overaxle
connection. Make sure that you rotate the band clamp to
clear suspension-to-chassis movement.
8. Rotate the muffler up at the rear (about 10 degrees), align
the tailpipes and tighten everything up as you align.
NOTE: Due to large production tolerances on GM F-Body
cars, it may be necessary to trim overaxle pipe at the
muffler inlet. CAUTION: There needs to be a minimum of
2” slipped into muffler for proper clamping. Tailpipe
centering can be affected by how muffler is positioned on
vehicle; muffler should be parallel to the rear axle.
Trimming of the elbows at the muffler can also be used to
adjust tailpipe centering.
9. Check for leaks and correct as needed.
I
MPORTANT NOTE:
Proper installation is the responsibility of the installer. Improper installation will void warranty and may
result in poor performance and engine or vehicle damage.
Page 2
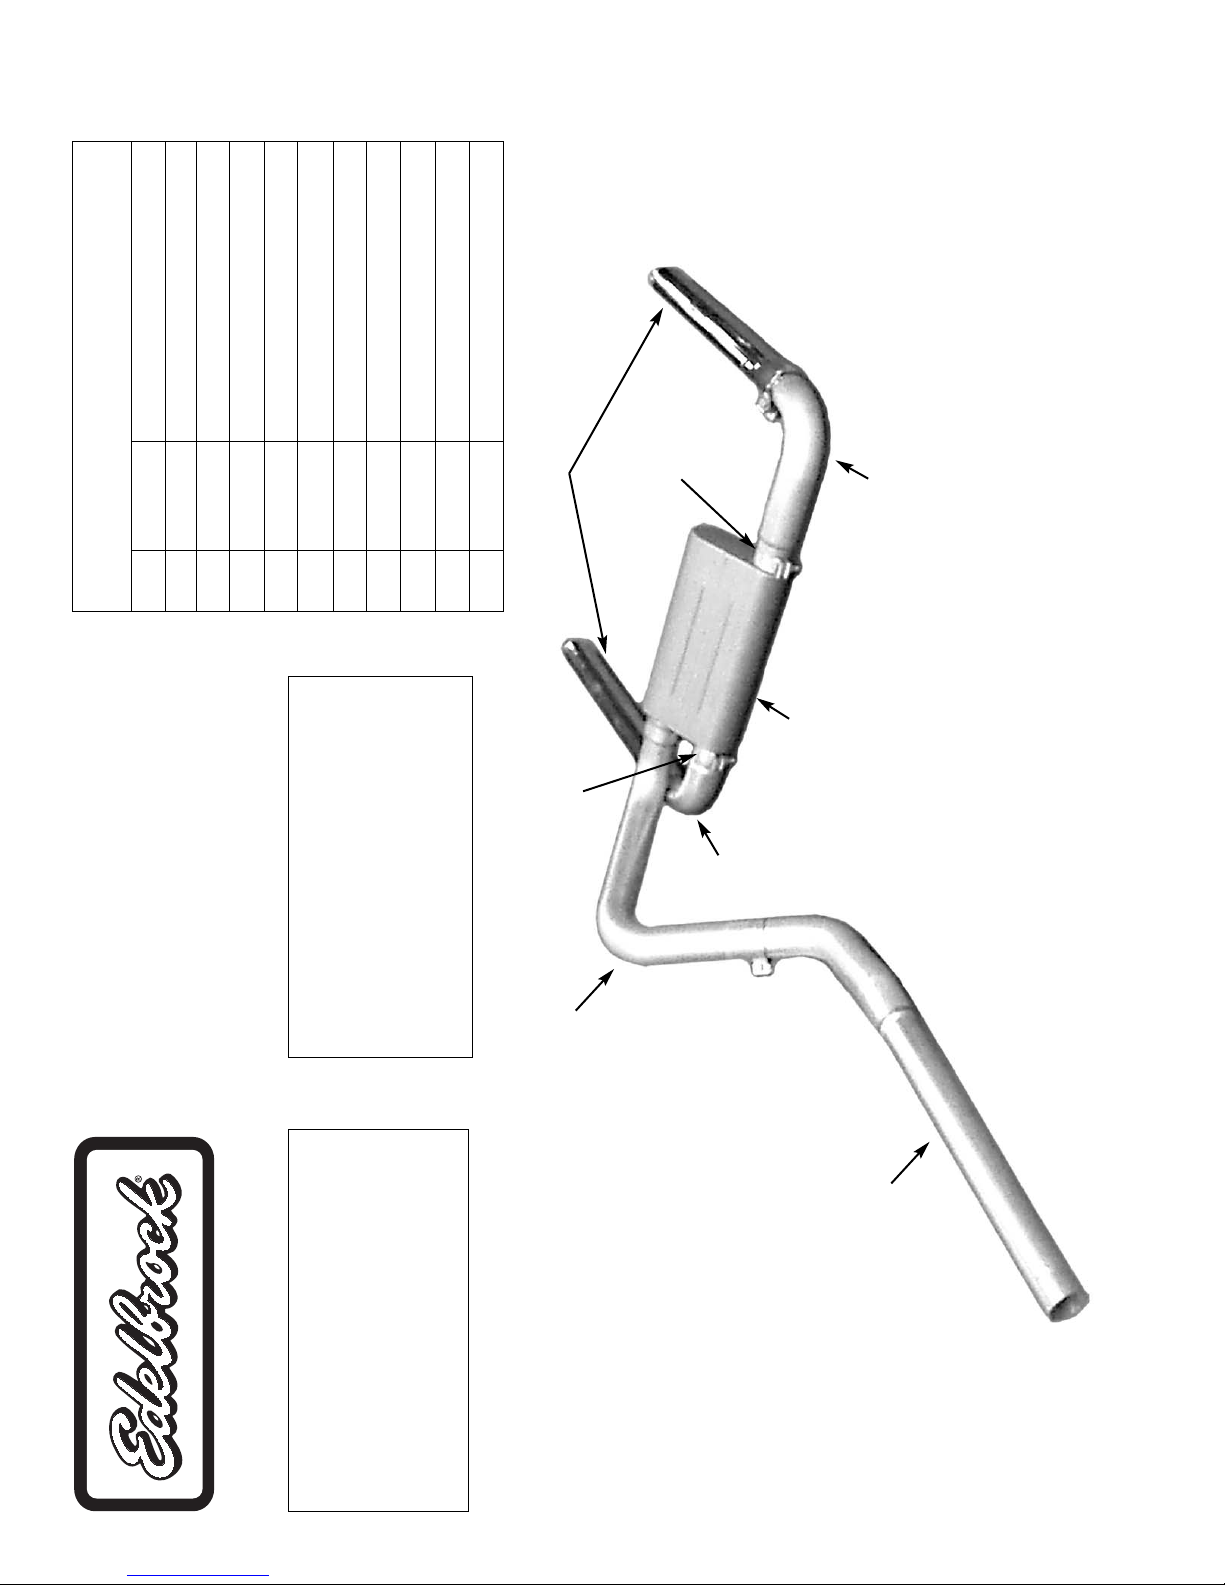
KIT CONTENTS
Catalog #5658
Qty. Part # Description
1 55763 Muffler (SDT)
1 25-3115 I-Pipe
1 25-3060 Overaxle Pipe
1 25-3224 Elbow (Left)
1 25-3225 Elbow (Right)
1 25-3226 Tailpipes (Polished Stainless)
1 23-4068 Hanger Clamp
2 46-6612 3” Band Clamps
2 46-6610 2-1/2” Band Clamps
1 46-6614 2-1/4” Band Clamps
Band Clamp
Band Clamp
Muffler (SDT)
Overaxle Pipe
WARNING: Support your vehicle with
proper jackstands rated for the total
vehicle weight. Place stands so that
the rear axle is allowed to hang free
for easy system removal.
WARNING: These cat-back systems are
engineered to fit stock catalytic
converters or equivalent replacements.
If you original system has been modified,
Edelbrock will not warranty fit or
performance.
©2007 Edelbrock Corporation
Brochure #63-5658
Page 2 of 2
Elbow (Left)
Elbow (Right)
Tailpipes (Polished)
Intermediate Pipe
Catalog #5658
Rev. 3/07 - DA/mc
 Loading...