

Page 1

Edelbrock Cat-back Exhaust Systems
Catalog #5759
Application: 2001 PT Cruiser
Please study these instructions carefully before installing your new Cat-
questions or problems, please contact our Technical Hotline at : 1-800-416- –
through Friday, Pacific Standard Time.
Installation of this system will require the relocation of the spare tire. The spare tire can be placed in the rear
area of the vehicle on the floor with the adjustable shelf in its lowest position covering the spare.
Suggested tools needed fo
• 15 mm & 9/16” deep socket and ratchet
• Floor jack & jack stands
• Penetrating oil
• Punch and hammer
• Tin snipes
• Half round file
• Grease pencil and masking tape
DISASSEMBLY
1. Raise rear of vehicle on smooth flat stable surface and support using jack stands.
2. Remove spare tire and spare
3. Use penetrating oil on clamp that attaches front I-pipe to over axle pipe. Loosen stock clamp. Carefully
bber hangers off of the stock exhaust system (these will be reused) , these hangers are all that
e, so use caution. Remove OEM system at this time.
4. Unbolt front muffler hanger from floor pan (this will be reused in anoth
1. Find the exact center of the vehicle and mark it on the valance below the license plate location. The
o find the center of the vehicle is to find the center of the license plate opening.
2. Cut out supplied template and tape to valance panel using lower edge of the bumper as a guide, starting
at the center line of the vehicle and working to the right side
3. Mark the opening in the template for the exhaust tip and carefully remove the template. Visually check the
tip cut out mark for being symmetrical, remember measure twice cut once! Carefully cut out the marked
it is best to cut to the inside of the marked line and then file or sand to the
cutting is also the bumper cover and will be very
4. Place supplied over axle pipe stamped #25- -pipe with supplied 2 ¼ u-
tighten clamp at this time.
5. -clamps on to muffler crossover inle -3179 and install pipe into over axle pipe
only snug one of the 2 ¼ clamp at the slip connection.
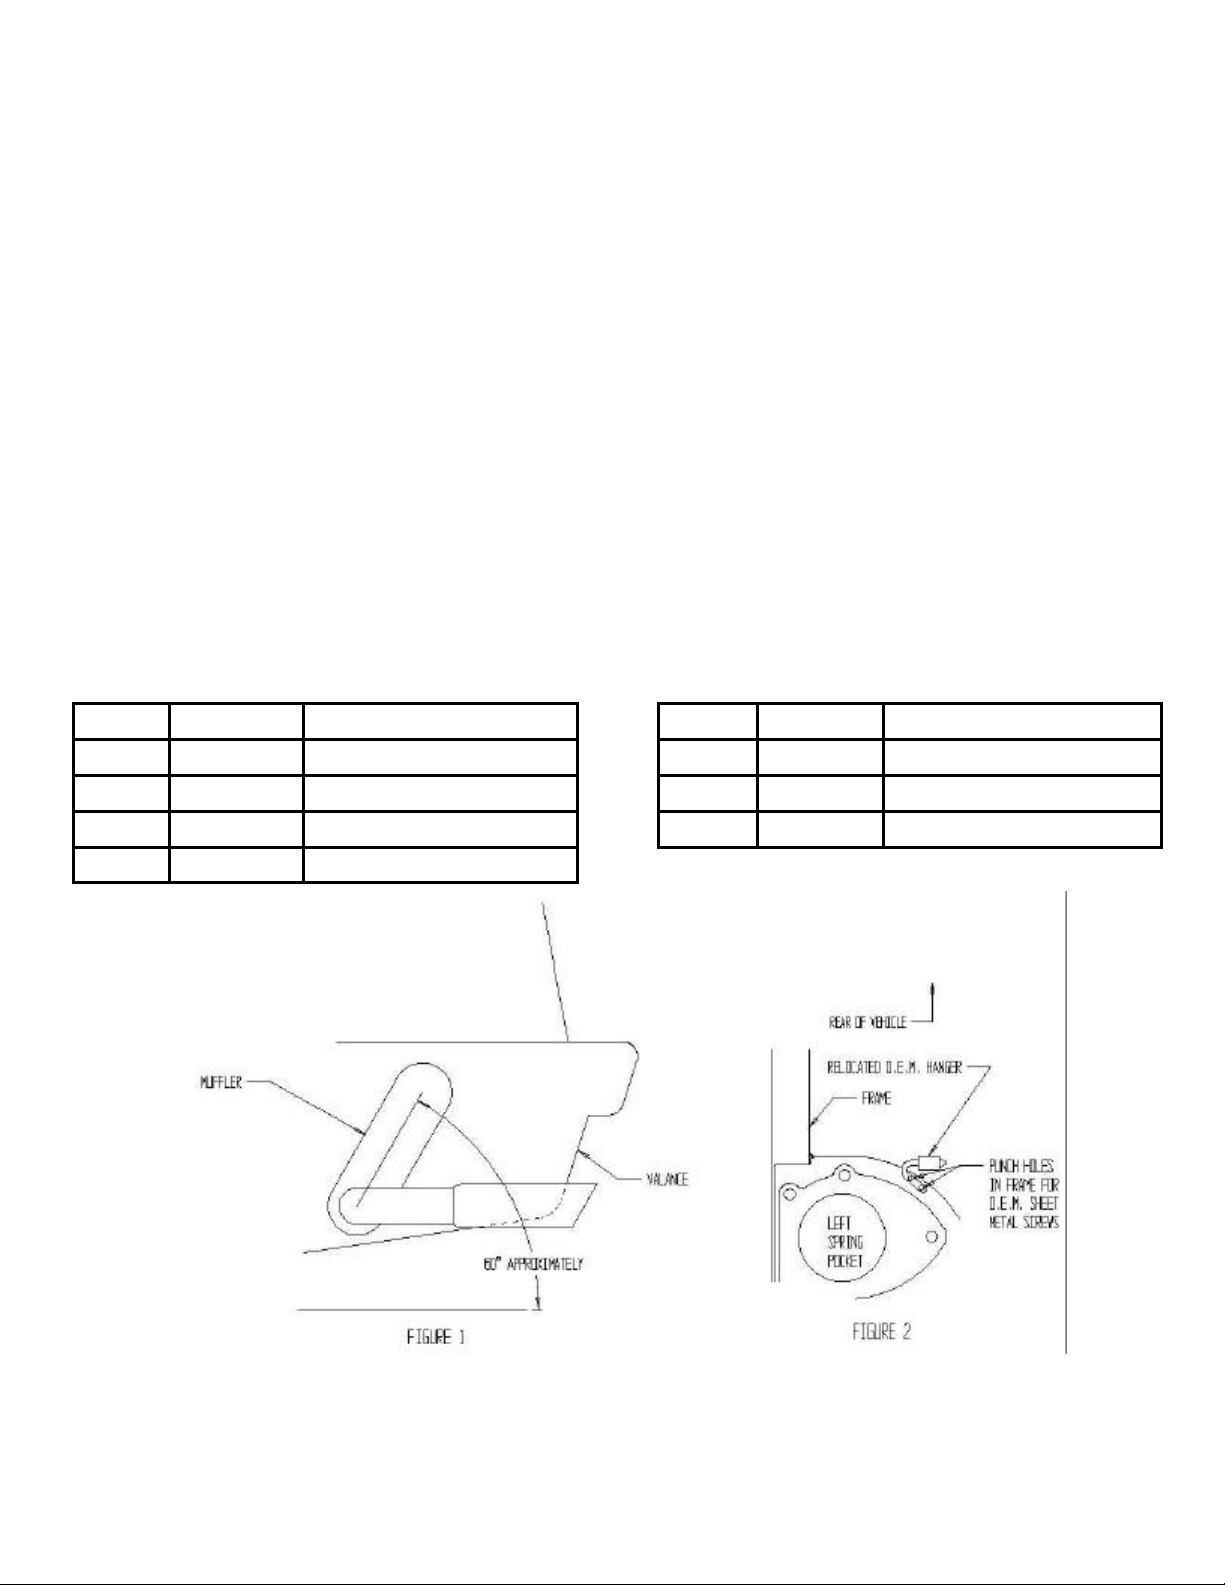
6. Install the 2 ½ clamp on to muffler inlet pipe. Slide muffler on to the muffler crossover pipe, support and
tilt the muffler approximately 60° (se
7. Install supplied hanger strap to the spare tire rack support tab on the right side of the vehicle, using the
supplied 5/16” bolt, washers, and nut. Slip the hanger strap clamp end under the unused 2 ¼ clamp on
; this strap is used to align the system laterally in the vehicle. Hanger strap
Page 2
ASSEMBLY (Continued)
8. Place clamp hanger assembly #23-4038 on to the left muffler outlet and slip hanger bar into the rear OEM
rubber hanger, slide left tail pipe in to the muffler outlet. Long arm of hanger goes toward rear of vehicle.
over right muffler outlet and install right tailpipe. Position the system in the cut outs in the
9. Slide OEM hanger assembly removed earlier on to the left tailpipe hanger assembly (see figure 2). Punch
holes for sheet metal screws and screw in the OEM hanger assembly with OEM sheet metal screws. Hole
an drilled so as to reduce chance that screws will work loose.
10. Centering of the whole system can be done at both the over axle and the muffler crossover pipe. Center
tailpipes in the cut outs in the valance, using the hanger strap on the right side in fr
adjust so tailpipes extend equally on both sides. Height and amount of total extension for the tailpipes can
be adjusted by tilting the muffler. When system has been adjusted for position, check system for
sion, brake lines, fuel lines, and floor pan. When system is positioned
11. Open up ground strap eyelet end to 3/8 diameter and using supplied 3/8 nut. Install onto hanger clamp
WARNING: Exhaust gas contains carbon monoxide, a deadly invisible gas. Correct any leaks
PARTS LIST
Qty. Part No. Description Qty. Part No. Description
1 25-5519 Muffler 1 25-3180 Tailpipe
1 25-3178 Over axle pipe 1 25-3181 Tailpipe
1 25-3179 Muffler crossover pipe 1 22-5759 Instruction kit
1 23-4038 Hanger clamp assembly
©2001 Edelbrock Corporation
Edelbrock Corporation
2700 California St.
Torrance, CA 90503
Tech Line: (800) 416-8628
E-Mail: Edelbrock@edelbrock.com
Rev. 3/01
 Loading...