

Page 1

English-Serbo-Croatian Electronic Dictionary User's Guide
CONTENTS
INTRODUCTION ........................................... 3
Keyboard .................................................... 4
Direct function shortcuts .......................... 5
Control and editing keys .......................... 6
Icons Menu ................................................. 7
POWER SUPPLY.......................................... 8
SETUP MAIN MENU ................................... 10
1. Password.............................................. 11
2. Key Tone .............................................. 14
3. Date Format.......................................... 14
4. Time Format ......................................... 15
5. Set Local Time...................................... 16
6. Alarm On/Off......................................... 17
7. Set Daily Alarm..................................... 18
8. Memory Used ....................................... 19
9. Display Language ................................. 19
DICTIONARY............................................... 20
General Dictionary Function ..................... 20
Advanced Word Recognition .................... 23
Cross Search............................................ 24
Spell-Checker Vector Ultima
.................. 25
USER'S DICTIONARY................................. 27
1
Page 2

Language Teacher® model ESC200D
IRREGULAR VERBS................................... 28
AMERICAN IDIOMS.................................... 30
PHRASES.................................................... 31
PC - LINK .................................................... 33
TELEPHONE DIRECTORY......................... 34
MEMO ......................................................... 36
SCHEDULE ................................................. 38
CALENDAR ................................................. 40
TIME ............................................................ 42
Home Time ............................................... 42
World Time ............................................... 43
ANNIVERSARY........................................... 44
CALCULATOR............................................. 46
ACCOUNT MANAGER................................ 47
METRIC AND CURRENCY CONVERSION 49
Metric Conversion..................................... 50
Currency Conversion ................................ 51
GAMES........................................................ 53
Master Mind.............................................. 54
Hangman .................................................. 55
DATA DELETION ........................................ 56
AUTOMATIC SHUT-OFF ............................ 56
2
Page 3

English-Serbo-Croatian Electronic Dictionary User's Guide
INTRODUCTION
Congratulations on purchasing the EnglishSerbian Electronic Dictionary & Business
Organizer Language Teacher ESC200D.
This extraordinary language assistant is
loaded with such features as:
• Main vocabulary of over 450,000 words,
including general words and idioms,
medical, technical, legal, business terms, as
well as slang and general expressions
• 128K bilingual business organizer
comprising Telephone Directory, Schedule,
Memo, and Anniversary List
• New words recording function for dictionary
expansion
• Instant reverse translation
• Vector Ultima
spell-checking system
• Advanced word recognition system
• 200 most popular American idioms
• English irregular verbs
• Over 1000 topically arranged phrases
• Game center
3
Page 4

Language Teacher® model ESC200D
• PC-Link for data exchange with PC
• Account manager
• Calendar
• Currency and Metric conversion
• Home and World Time
• Calculator
Enjoy your Language Teacher ESC200D
and make it your personal travel and
business guide.
As continuous efforts are maid by the
manufacturer to improve quality and
performance of the Language Teacher
products, some characteristics or the design
of the actual device you purchased may
slightly differ from their description in this
manual.
Keyboard
The standard American QWERTY keyboard
layout enhanced with additional Serbian
letters allows you to enter any word just in
seconds.
English and Serbian character sets and a
numeric layout can be switched between in
4
Page 5

English-Serbo-Croatian Electronic Dictionary User's Guide
repeating sequence by pressing the key.
In the main dictionary, however, the input
language selection is handled automatically
to comply with the current source language,
and the
key is disabled.
To access specific Serbian letters, as well
as hyphen, period, and apostrophe, press
and release Ï prior to using the
corresponding key.
An additional symbols set is available
through pressing Ï+SYMB. Use ∧ ∨ to see
more symbols. Press the indicated number
key to insert a selected symbol.
Direct function shortcuts
Main Dictionary
Home and World Time
Calculator
Phrases
Telephone Directory
Setup Main Menu
VERB Irregular Verbs
IDIOM American Idioms
5
Page 6

Language Teacher® model ESC200D
Control and editing keys
∧ ∨ Page by screenful
SPELLER Check spelling in main
dictionary
◄ ► Move cursor
▲▼ Move cursor / scroll lines
Ï+▼ Start a new line
DEL Delete character or record
↵ Enter
Switch English / Serbian /
numeric
INS Toggle Insert / Overwrite
13 Enter space
Ï+SYMB Show symbols (∨∧ for more)
EDIT Enable record editing
ESC Close or clear screen
Computational symbols and operations are
available when using the Calculator
function.
6
Page 7
English-Serbo-Croatian Electronic Dictionary User's Guide
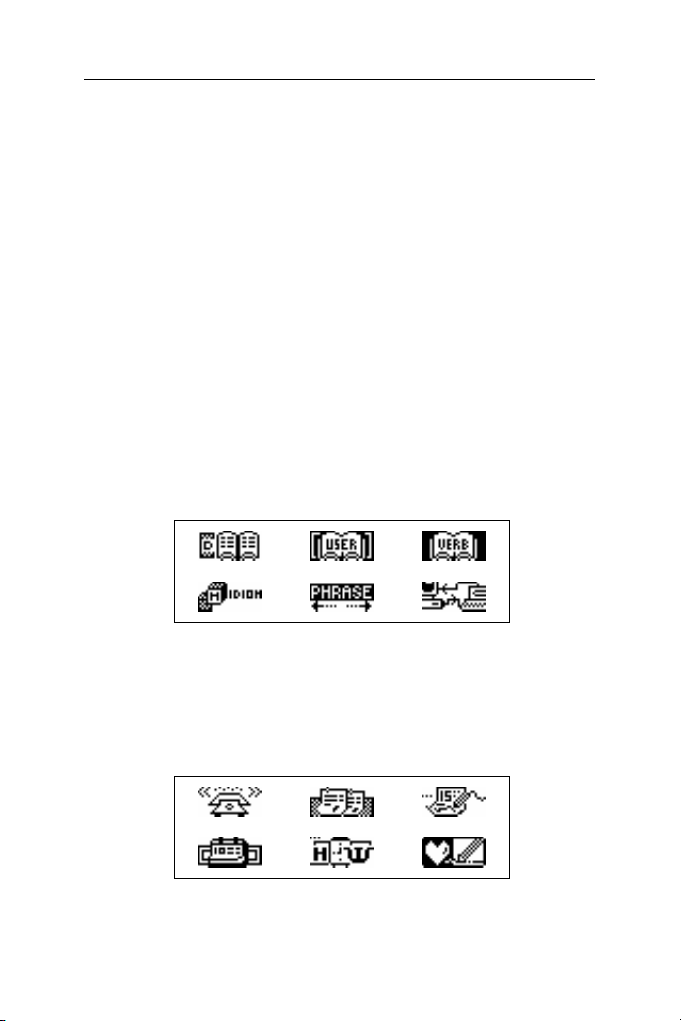
Icons Menu
The Language Teacher ESC200D
features a new start-up interface with
functional icons, which visually organize and
facilitate access to the dictionary's multiple
sections.
The Icons Menu appears after system
initialization or whenever you exit a section
by pressing the ESC key. The upper portion
of the Icons Menu includes, from left to
right, top to bottom: Dictionary, User’s
Dictionary, Irregular Verbs, Idioms, Phrases,
PC-Link.
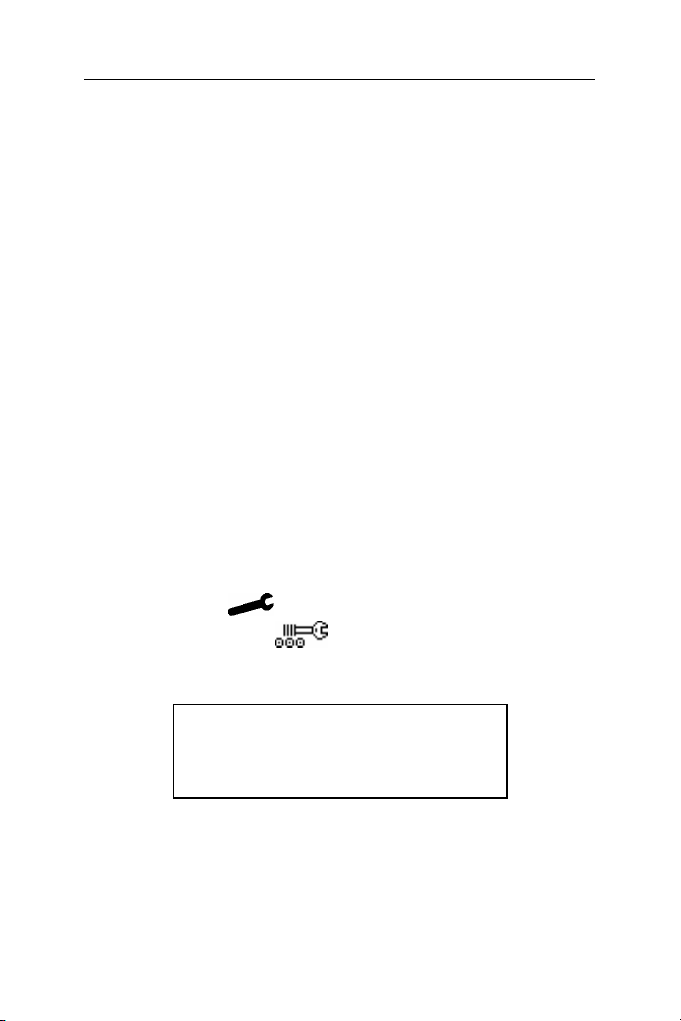
Page down to reveal the middle screen,
which contains the following icons:
Telephone Directory, Memo, Schedule,
Calendar, Home and World Time,
Anniversary.
7
Page 8

Language Teacher® model ESC200D
The bottom set of icons represents the
sections Calculator, Account Manager,
Metric and Currency Conversion, Game,
Data Deletion, Setup Main Menu:
Use the ∧ ∨ keys to move between the
Icons Menu screens. Use the arrow keys to
highlight icons of the displayed Menu
portion. Press ↵ to open the section whose
icon is highlighted.
POWER SUPPLY
The Language Teacher ESC200D is
powered by two main CR2032 batteries and
a CR1220 memory backup battery.
♦ Note: After purchasing the Language
Teacher
ESC200D install the main
batteries (included) as described below.
When the batteries become weak, a
warning message will be displayed. In order
to prevent a complete discharge of batteries
and possible loss of data in RAM, replace
8
Page 9

English-Serbo-Croatian Electronic Dictionary User's Guide
the whole set of main batteries promptly. Do
not mix old and new batteries.
• Press the ON/OFF key to turn the unit off.
• Remove the battery compartment cover by
sliding it away from the unit.
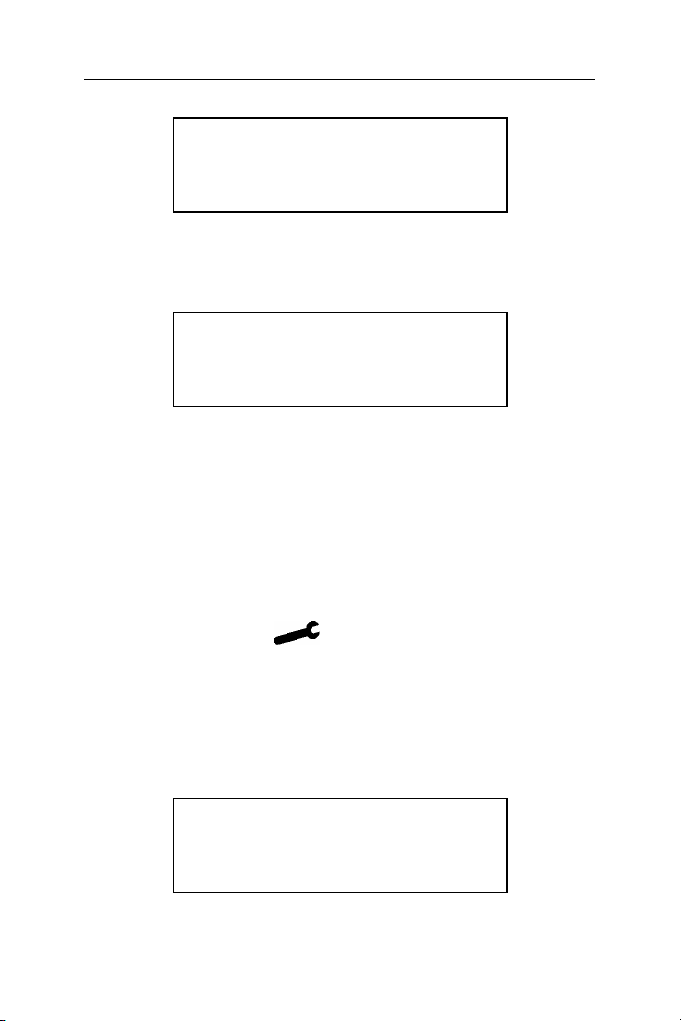
• Use a small screwdriver to remove the
metallic brace that holds batteries in place.
• Take out the old batteries and put in new
ones.
♦ Note: Make sure to place both batteries so
that the plus signs (+) are on top.
• Secure the batteries in place with the
metallic brace.
• Put back the battery compartment cover by
sliding it toward the unit. Make sure the
cover sits in place properly.
♦ Note: You have 2 minutes to replace the
batteries without risk of losing data stored in
RAM. Do not exceed the 2 min. limit!
Neither manufacturer nor dealer may be
held responsible for the loss of user’s
data.
♦ Note: Never try to remove batteries from
the translator when the power is on. This
can seriously damage the device. If you
9
Page 10

Language Teacher® model ESC200D
experience difficulty turning the unit off,
press the RESET button located on the
back near the battery compartment cover to
reinitialize the system.
During a system reset, press N at the
prompt <CLEAR DATA? Y/N> or <ERROR!
CLEAR? Y/N> to attempt preserving user’s
data and the customized system
configuration. However, if RAM has been
corrupted, or if you turn the dictionary on for
the first time, you will have to press Y to
reinitialize the system.
SETUP MAIN MENU
For best results and to ensure that you can
fully employ all of the Language Teacher
ESC200D's diverse features, you have to
familiarize yourself with options of the Setup
Main Menu, which will allow you to adjust
the device configuration to better suit your
needs.
• Password
• Key Tone
• Date Format
10
Page 11
English-Serbo-Croatian Electronic Dictionary User's Guide
• Time Format
• Set Local Time
• Alarm On/Off
• Set Daily Alarm
• Memory Used
• Display Language
♦ Note: All prompts and messages appear in
English by default. To change the display
language to Serbian, start the customization
from option 9. Display Language.
1. Password
• Press ON/OFF to turn the translator on.
• Press the
select the icon
key on the keyboard or
on the bottom Icons
Menu.
1.PASSWORD
2.KEY TONE
3.DATE FORMAT
4.TIME FORMAT
• Press 1 or make sure the Password line is
highlighted and press ↵ to see the
Password menu:
11
Page 12
Language Teacher® model ESC200D
SET PASSWORD |
CLEAR PASSWORD
• Select Set Password to open the Password
setup screen.
ENTER NEW PASSWORD:
_
• Enter a password up to 8 characters long.
• Press ↵ to save the password and return to
the Password menu. A key sign will appear
in the upper left-hand corner of the screen
indicating that user’s records are passwordprotected.
• Press ESC or
to return to the Setup
main menu.
• To change the password, re-open the
Password menu and select the Set
Password option.
ENTER OLD PASSWORD:
_
12
Page 13

English-Serbo-Croatian Electronic Dictionary User's Guide
• Specify your password. If the input didn’t
match the current setting, the message
Wrong Password will appear.
• If the input matched the actual password,
the prompt will change to Enter New
Password. Type in a new password and
press ↵ to save and return to the Password
menu.
• Press ESC or
to return to the Setup
main menu.
• To delete the password, thus removing the
data protection, re-open the Password
menu and select the Clear Password option.
• Specify your password at the prompt. If the
input didn’t match the current setting, the
message Wrong Password will appear.
• If the input matched the actual password,
the key sign will disappear, and the display
will return to the Password menu. User’s
records will no longer be passwordprotected.
♦ Note: Always remember your password. If
you forget it you will need to reset the
dictionary, which will cause loss of user's
data stored in RAM.
13
Page 14
Language Teacher® model ESC200D
2. Key Tone
• On the Setup main menu, press the 2 key,
or highlight the Key Tone line and press ↵ to
enter the Key Tone setup.
SET KEY TONE
ON |
OFF
• This feature is designed to produce an
audible signal every time you press a key on
the keyboard of the Language Teacher
.
The Key Tone is activated by the system's
default.
• Press ▲ or ▼ to move the highlight bar to
OFF or ON, respectively.
• Press ↵ to confirm your setting and return
to the Setup main menu. With the Key Tone
turned on, an note sign is displayed on the
right-hand side of the screen.
3. Date Format
• On the Setup main menu, press the 3 key,
or highlight the Date Format line and press
↵ to enter the Date Format setup.
14
Page 15

English-Serbo-Croatian Electronic Dictionary User's Guide
SET DATE FORMAT
DD/MM/YYYY
MM/DD/YYYY
YYYY/MM/DD
The day/month/year date format is chosen
by default in the system.
• Use the ▲▼ keys to highlight a desired
format.
• Press ↵ to confirm your setting and return
to the Setup main menu.
4. Time Format
• On the Setup main menu, press the 4 key,
or highlight the Time Format line and press
↵ to enter the Time Format setup.
SET TIME FORMAT
24-HOUR
12-HOUR
The 24-hour time format is chosen by
default in the system.
• Use the ▲▼ keys to highlight the desired
format.
15
Page 16
Language Teacher® model ESC200D
• Press ↵ to confirm your setting and return
to the Setup main menu.
5. Set Local Time
• On the Setup main menu, move the
highlight bar to option 5 and press ↵ to
display the home city selection screen.
ENTER FIRST LETTER
FOR CITY OR COUNTRY
CITY:_ COUNTRY:
• Select the field CITY or COUNTRY using
the ◄► keys, and type a letter. Names of a
city and country first on the alphabetical list
in the selected category, as well as date and
time, will appear on the screen. For
example:
MADRID, SPAIN
01/01/1999 (FR)
02:05:35 PM
• Use the ▲▼ keys to move through the
alphabetical list of cities, or use ∧ ∨ to move
by countries. Press ↵ to confirm your
16
Page 17
English-Serbo-Croatian Electronic Dictionary User's Guide
selection and display the date and time
setup screen.
0 1/01/1999
08:06 AM
• Change values above the cursor by
pressing appropriate number keys on the
keyboard. Move the cursor with the arrow
keys. If you prefer the 12-hour American
time format, specify PM by pressing P or
AM by pressing A in the last position.
• Press ↵ to save the settings. The previous
screen will be shown reflecting the new
settings.
• Press ESC or
to return to the Setup
menu.
6. Alarm On/Off
• On the Setup main menu, move the
highlight bar to option 6 and press ↵ to enter
the Alarm On/Off setup.
SET ALARM
ON
OFF |
17
Page 18

Language Teacher® model ESC200D
• Use the ▲▼ keys to turn the Alarm signal
on or off. This setting affects both Schedule
alarm and Daily Alarm.
• Press ↵ to leave the Alarm On/Off setup
and return to the Setup main menu. With
the Alarm turned on, a bell sign is displayed
on the right-hand side of the screen.
7. Set Daily Alarm
• On the Setup main menu, move the
highlight bar to option 7 and press ↵ to enter
the Daily Alarm time setup.
SET DAILY ALARM
12:00 PM
• To set the alarm time, change values
above the cursor by pressing the
appropriate number keys on the keyboard.
Move the cursor with the ◄► keys. If you
prefer using the 12-hour American time
format, specify PM by pressing P or AM by
pressing A.
• Press ↵ to leave the Daily Alarm Setup and
return to the Setup main menu.
18
Page 19

English-Serbo-Croatian Electronic Dictionary User's Guide
8. Memory Used
• On the Setup main menu, move the
highlight bar to option 8 and press ↵ to open
the Memory Used chart.
MEMORY USED
O N |
15.20%
• Press ESC to return to the Setup main
menu.
9. Display Language
• On the Setup main menu, move the
highlight bar to option 9.
6.SET ALARM
7.SET DAILY ALARM
8.MEMORY USED
9.DISPLAY LANGUAGE
• Press the ↵ key.
SET DISPLAY LANGUAGE
ENGLISH
SERBIAN
19
Page 20

Language Teacher® model ESC200D
• Highlight the Serbian line and press ↵. The
options names will change to Serbian.
JEZIK DISPLEJA
ENGLESKI
SRPSKI
• Press ESC to return to the Setup main
menu. Now all messages will appear in
Serbian.
DICTIONARY
The Language Teacher
ESC200D
contains the most advanced EnglishSerbian and Serbian-English electronic
dictionaries on the market. In order to fully
utilize the potential of this dictionary
carefully read this section of the User's
Guide.
General Dictionary Function
• Press the ON/OFF key to turn the
dictionary on.
20
Page 21

English-Serbo-Croatian Electronic Dictionary User's Guide
• Press the key on the keyboard or
select the icon
on the top Icons Menu
to enter the main Dictionary menu.
• Select a translation direction by moving the
highlight bar to the corresponding icon, and
press ↵.
ENGLISH -> SERBIAN
_
♦ Note: To reverse the translation direction,
press ESC to exit to the Dictionary menu
and select the opposite icon.
• Using the keyboard enter the word you
want to have translated.
♦ Note: To input Serbian accented characters
on the Serbian->English dictionary’s input
screen, use Ï before pressing the
corresponding letter key.
Suppose you want to translate the English
word CATCH into Serbian.
21
Page 22
Language Teacher® model ESC200D
ENGLISH -> SERBIAN
PATCH
PATCH
♦ Note: Use INS to switch between the Insert
_
and Overwrite input options, DEL to delete a
character, ESC to clear the screen.
• Press ↵ to display the dictionary entry.
PATCH
N
PARČE;PRAMEN;SLOJ;
ZAKRPA
• Press the ▲ key to see more translations
of the word CATCH. To scroll back up, use
▼.
Words of the same spelling are contained
within one entry. The translations are
organized under appropriate part of speech
abbreviations. Within a part of speech,
distinctive meanings are numbered, close
synonyms are separated by commas.
Individual translations or meanings may
include indicating material, for example
geographical labels, field labels, style and
usage labels and other sense-differentiating
22
Page 23

English-Serbo-Croatian Electronic Dictionary User's Guide
information in parentheses (AMERICAN) or
in square brackets [COLLOQUIAL].
All Serbian nouns include indication of
grammatical gender (M or F). Nouns used in
plural are, in addition, marked PL.
• Press the ∨ or ∧ key to go to the
alphabetically next or previous entry,
respectively.
♦ To translate another word in the same
dictionary, start typing, and the input screen
appears automatically.
♦ Press ESC to return to the input screen.
Advanced Word Recognition
Your Language Teacher
ESC200D is
equipped with an Advanced Word
Recognition feature. While you are typing
the word you want to translate, a word
closest to it in spelling appears on the
screen's bottom line. If the desired word
appeared before you finished typing, press
↵ to see its translations.
• Start typing, for example, APPOINT in the
English-Serbian dictionary. When you reach
the letter O the word appears at the bottom.
23
Page 24
Language Teacher® model ESC200D
ENGLISH -> SERBIAN
APPO_
APPOINT
• Press ↵ to display the translations.
APPOINT
V
IMENOVATI;ODREDITI;
POSTAVITI(ZA)
Proper usage of this function allows you to
accelerate your work while translating larger
texts.
Cross Search
Your Language Teacher
ESC200D is
equipped with a Cross Search function,
which provides an instant reverse
translation for all words in the main
Dictionary.
• Type, for example, APPOINT in the
English-> Serbian dictionary and press ↵ to
see the translations.
APPOINT
V
IMENOVATI;ODREDITI;
POSTAVITI (ZA)
24
Page 25

English-Serbo-Croatian Electronic Dictionary User's Guide
• Press ► to highlight the first translation,
then use any arrow key to highlight a word
of your choice, for example:
V
IMENOVATI
• Press ↵ for an instant reverse translation of
the highlighted word:
IMENOVATI
V
APPOINT;DENOMINATE;
DESIGNATE
• To make another Cross Search, repeat
steps 2 and 3. You may use this feature up
to 20 times during one session.
♦ Note: Pressing ESC returns one step back
in a series of reverse translations.
Spell-Checker Vector Ultima
The spelling checker Vector Ultima
is one
of the most advanced English proofing tools
on the market. It comes in handy when you
are unsure of a word’s exact spelling.
• Type, for example, RICIT for receipt.
25
Page 26

Language Teacher® model ESC200D
ENGLISH -> SERBIAN
RICIT_
RICK
• Press SPELLER. A list of suggestions is
displayed on the screen.
RACIST
RECEIPT
RECEIPTS
RECIPIENT
• Press the ▲ key to move the highlight bar
to the word RECEIPT.
• Press the ↵ key to display the translations.
RECEIPT
N
PRIZNANICA
♦ Note: If the spelling checker is unable to
suggest alternative words, the message
ENTRY NOT FOUND will be shown.
26
Page 27

English-Serbo-Croatian Electronic Dictionary User's Guide
_
USER'S DICTIONARY
The Language Teacher
ESC200D allows
you to create your own vocabulary which
automatically links to the main dictionary.
• Select the icon
on the top Icons Menu
to enter the User's Dictionary menu.
• Select a translation direction by highlighting
the corresponding icon and pressing ↵.
♦ Note: If a Password has been set up in the
Setup main menu, you will be prompted to
enter the valid password.
E:
S:
• Fill out the record, using the ◄► keys to
move the cursor within a line, the ▲▼ keys
to alternate between English and Serbian
lines (you may also press ↵ to move to the
lower line). See section Keyboard p.4 for
editing instructions and control keys
27
Page 28

Language Teacher® model ESC200D
assignments. Press ↵ while on the bottom
line to save the record.
• Note: The input language is adjusted
automatically.
• List existing records with the ∧∨ keys.
• To change an existing record, press EDIT.
• To open a new record template while an
existing record is being displayed in the
viewing mode, press ESC.
♦ Note: If you press ESC after editing, you will
be prompted to decide whether the new
record or changes to an old record are to be
saved.
• To delete a record, press DEL and confirm
the displayed prompt.
• To open a User's Dictionary record from
the main Dictionary, enter your record's
headword in full on the input screen of the
appropriate main Dictionary, and press ↵.
IRREGULAR VERBS
All commonly used English irregular verbs
are stored in the Language Teacher
28
Page 29
English-Serbo-Croatian Electronic Dictionary User's Guide
ESC200D's Irregular Verbs directory in the
alphabetical order.
• Select the icon
on the top Icons Menu
to open the input screen of the Irregular
Verbs section.
VERBS
_
• Start typing the verb whose basic forms
and a Serbian translation you want to see.
VERBS
FORG_
FORGET
• Press ↵ when the desired verb appears on
the bottom line.
FORGET;FORGOT;
FORGOTTEN
ZABORAVITI
• Use the ∨ and ∧ keys to page through
records.
• Use the ▲ and ▼ keys to scroll a record, if
necessary.
29
Page 30

Language Teacher® model ESC200D
You may use the Cross Search feature to
display the main dictionary entries for both
English and Serbian verbs. Refer to the
Dictionary section for details.
AMERICAN IDIOMS
Over 200 popular American idioms and their
Serbian equivalents or translations are
included in the Language Teacher
ESC200D's Idioms directory. The idioms are
listed in the alphabetical order.
• Select the icon
on the top Icons Menu
to open the input screen of the Idioms
section.
IDIOMS
_
• Start typing an idiom, for example:
IDIOMS
SK_
SKELETON IN THE
CLOSET
30
Page 31

English-Serbo-Croatian Electronic Dictionary User's Guide
• Press ↵ when the desired idiom appears on
the bottom line.
SKELETON IN THE
CLOSET
SRAMNA TAJNA; PRLJAV
VEŠ
• Use the ∨ and ∧ keys to page through
records.
• Use the ▲ and ▼ keys to scroll a record, if
necessary.
You may use the Cross Search feature to
display the main dictionary entries for both
English and Serbian words. Refer to the
Dictionary section for details.
PHRASES
There are over 1000 conversational phrases
stored in the Language Teacher
ESC200D's memory. For your convenience,
they have been divided into topical
categories listed below:
1. Conversation 7. Communication
2. Traveling 8. In the Bank
31
Page 32

Language Teacher® model ESC200D
3. Hotel 9. Transport
4. In the restaurant 10. Health
5. Shopping 11. Beauty Care
6. Sightseeing 12. Call for Police
• Press the
select the icon
key on the keyboard or
on the top Icons Menu
to open the Phrases menu.
1.CONVERSATION
2.TRAVELING
3.HOTEL
4.IN THE RESTAURANT
• Highlight a topic using the ▲▼ keys and
press ↵. For example, select 4. In the
Restaurant.
4A.APPOINTMENT _
4B.ORDERING FOOD
4C.SERVICE
4D.PAYMENT
• Select an episode.
• Use the ∨ and ∧ keys to list phrases up and
down.
• Use the ▲ and ▼ keys for scrolling.
You may use the Cross Search feature to
display the main dictionary entries for both
32
Page 33

English-Serbo-Croatian Electronic Dictionary User's Guide
English and Serbian words. Refer to the
Dictionary section for details.
PC - LINK
Using the Language Teacher PC-Link
cable (to be purchased separately) and the
LT ESC200Dlink software, you may transfer
data from the organizer sections of your
Language Teacher ESC200D to a
personal computer and back.
• Connect the unit to a PC by the optionally
supplied cable.
• Select the icon
on the top Icons Menu
to open the menu of the PC-Link section.
1.PERSONAL TELEPHONE
2.BUSINESS TELEPHONE
3.SCHEDULE
4.MEMORANDUM
• Select a section for data transfer, for
example:
_____________________
3. SCHEDULE
SEND
RECEIVE
33
Page 34

Language Teacher® model ESC200D
• Select a transfer mode: Send or Receive.
• Start the ESC200Dlink application on the
PC and choose the transfer mode
complementing the unit's transfer mode.
• Start the receiving device first, then the
sending one.
• If the communication was successful,
number of bytes transferred will be reported
by the ESC200Dlink program.
TELEPHONE DIRECTORY
You may store names, telephone numbers,
and addresses in the Telephone Directory in
English and Serbian languages, view,
delete, edit entries, and lock them with your
password.
• Press the
select the icon
key on the keyboard or
on the middle Icons
Menu to open the Telephone Directory.
34
Page 35

English-Serbo-Croatian Electronic Dictionary User's Guide
• Using the ► or ◄ key highlight one of the
icons representing parts of the Telephone
Directory, e.g.
, and press ↵. A new
record template opens automatically.
♦ Note: If a Password has been set up in the
Setup main menu, you will be prompted to
enter the current password.
NAME:
TEL.:
FAX:
E-MAIL:
• Fill out the record, using the ◄► keys to
move the cursor within a line, the ▲▼ keys
to change lines (↵ to move to the lower
line). See section Keyboard p.4 for editing
instructions and control keys assignments.
Press ↵ while on the bottom line to save the
record.
♦ Note: You may enter information in the
English or Serbian language. To switch
between them and a numeric layout in
sequence, press the
key.
• List existing records with the ∧∨ keys.
• To change an existing record, press EDIT.
35
Page 36

Language Teacher® model ESC200D
• To open a new record while an existing
record is being displayed in the viewing
mode, press ESC.
♦ Note: If you press ESC after editing, you will
be prompted to decide whether the new
record or changes to an old record are to be
saved.
• To delete a record, press DEL and confirm
the displayed prompt.
MEMO
Section Memo of your Language Teacher
ESC200D provides you with a handy
storage for short notes and messages.
• Select the icon
on the middle Icons
Menu to open a new Memo record template.
♦ Note: If a Password has been set up in the
Setup main menu, you will be prompted to
enter the current password.
TITLE:
CONTENT:
36
Page 37

English-Serbo-Croatian Electronic Dictionary User's Guide
• Fill out the record, using the ◄► keys to
move the cursor within a line, the ▲▼ keys
to change between Title and Content (or
press ↵ to move to the lower line). See
section Keyboard p.4 for editing instructions
and control keys assignments. Press ↵ on
the Content line to save the record.
♦ Note: You may enter information in the
English or Serbian language. To switch
between them and a numeric layout in
sequence, press the
key.
• List existing records with the ∧∨ keys.
• To change an existing record, press EDIT.
• To open a new record while an existing
record is being displayed in the viewing
mode, press ESC.
♦ Note: If you press ESC after editing, you will
be prompted to decide whether the new
record or changes to an old record are to be
saved.
• To delete a record, press DEL and confirm
the displayed prompt.
37
Page 38

Language Teacher® model ESC200D
SCHEDULE
You can effectively plan out your time using
the Schedule section of your Language
Teacher
ESC200D. You may enter
records in English and Serbian, edit, search,
or delete them.
• Select the icon
on the middle Icons
Menu to open a new Schedule record
template.
♦ Note: If a Password has been set up in the
Setup main menu, you will be prompted to
enter the current password.
DATE: 01/01/1999
START TIME: 08:26A
END TIME: 08:26A
AFFAIR:
♦ Note: The first two lines show the current
date and the current time in the format
customized in the Setup menu. Should you
need to change the format, go to the Setup
menu and make the required modifications.
• Press ▼ or ↵ to move to the next line when
creating a record with today's date.
Otherwise, type a new date with the number
38
Page 39

English-Serbo-Croatian Electronic Dictionary User's Guide
keys, using the ◄► keys if needed to move
the cursor.
• Specify the starting and ending time of the
affair on the second and third line,
respectively. In the 12-hour format the letter
A stands for AM, P for PM.
♦ Note: Use the ▲▼ keys if necessary to
move to the next or previous line (you may
also press ↵ for the next line). If date or time
specified is invalid, the record will not be
saved.
• Fill out the Affair line, using the ◄► keys
to move the cursor within the line. See
section Keyboard p.4 for editing instructions
and control keys assignments.
• On the last line Alarm indicate by entering
Y or N whether an audible signal should
announce the start time of the affair. In
order for this to happen, both the Schedule
signal and the general Alarm (option 6 of the
Setup main menu) must be turned on.
• Press ↵ on the Alarm line to save the
record.
♦ Note: You may enter information in the
English or Serbian language. To switch
39
Page 40

Language Teacher® model ESC200D
between them and a numeric layout in
sequence, press the
key.
• List existing records with the ∧∨ keys.
• To change an existing record, press EDIT.
• To open a new record while an existing
record is being displayed in the viewing
mode, press ESC.
♦ Note: If you press ESC after editing, you will
be prompted to decide whether the new
record or changes to an old record are to be
saved.
• To delete a record, press DEL and confirm
the displayed prompt.
♦ Note: You can use the Calendar section
(see p.40) to open existing Schedule
records, dates of which are marked on the
Calendar with an apostrophe.
CALENDAR
The Calendar gives you a convenient way to
search and open the Schedule and
Anniversary records.
40
Page 41

English-Serbo-Croatian Electronic Dictionary User's Guide
• Select the icon on the middle Icons
Menu to enter the Calendar screen.
01/01/1999 FR
1 2’
3 4 5 6 7 8 9
10 11 12 13 14 15 16
• Note: The Calendar opens on the current
date shown in the upper left-hand corner of
the screen. The date format depends on the
option chosen in the Setup main menu.
Dates of existing Schedule and Anniversary
records are apostrophized or framed,
respectively.
• Move by date using the ◄►▲▼ keys.
Move by months with the ∧∨ keys.
• To open either a Schedule or an
Anniversary record, the date of which is
marked on the Calendar, highlight this date
and press ↵.
• Note: If the selected date applies to both
Schedule and Anniversary, an intermediate
menu will be shown:
ANNIVERSARY |
SCHEDULE
41
Page 42

Language Teacher® model ESC200D
Highlight an option and press ↵ to open the
appropriate record.
TIME
• Press the
the icon
key on the keyboard or select
on the middle Icons Menu.
Home Time
• Select
01/01/1999 (FR)
08:25:36
♦ Note: New York, USA is chosen by default.
on the Time menu.
NEW YORK, USA
Should you need to select another city, or
modify the date and time or their display
format, go to the Setup main menu and
make the required changes.
42
Page 43

English-Serbo-Croatian Electronic Dictionary User's Guide
World Time
• Select
on the Time menu. The
following prompt will be displayed:
ENTER FIRST LETTER
FOR CITY OR COUNTRY
CITY:_ COUNTRY:
• Select the field CITY or COUNTRY with the
◄► keys and specify a letter. Names of the
city and country first on the alphabetical list
in the selected category, as well as date and
time, will appear on the screen. For
example, type ‘P’ for city.
PANAMA, PANAMA
01/01/1999 (FR)
10:28:35 PM
• Use the ▲▼ keys to move through the
alphabetical list of cities, ∧ ∨ to move by
countries. For example, press ▲ once to
reach Paris, France:
PARIS, FRANCE
01/01/1999 (FR)
04:28:43 PM
43
Page 44

Language Teacher® model ESC200D
ANNIVERSARY
In the Anniversary section of your Language
Teacher
ESC200D you can conveniently
store information on birthdays, various
commemorative dates and other recurrent
events.
• Select the icon
on the middle Icons
Menu to open a new Anniversary record
template.
♦ Note: If a Password has been set up in the
Setup main menu, you will be prompted to
enter the current password.
DATE : 01/01
CONTENT:
♦ Note: The first line shows the current date
in the format selected in the Setup menu.
Should you need to change the format, go
to the Setup menu and make the required
modifications.
• Press ▲ or ↵ to move to the next line when
creating a record with today's date.
Otherwise, type a new date with the number
44
Page 45

English-Serbo-Croatian Electronic Dictionary User's Guide
keys, using the ◄► keys if needed to move
the cursor.
• Fill out the Content line using the ◄► keys
to move the cursor within the line. See
section Keyboard p.4 for editing instructions
and control keys assignments. Press ↵ on
the Content line to save the record.
♦ Note: If date specified is invalid, the record
will not be saved.
♦ Note: You may enter information in the
English or Serbian language. To switch
between them and a numeric layout in
sequence, press the
key.
• List existing records with the ∧∨ keys.
• To change an existing record, press EDIT.
• To open a new record while an existing
record is being displayed in the viewing
mode, press ESC.
♦ Note: If you press ESC after editing, you will
be prompted to decide whether the new
record or changes to an old record are to be
saved.
• To delete a record, press DEL and confirm
the displayed prompt.
45
Page 46

Language Teacher® model ESC200D
♦ Note: You can use the Calendar section
(see p.40) to open existing Anniversary
records, dates of which are framed on the
Calendar .
CALCULATOR
The Calculator is one of the Language
Teacher
ESC200D's features designed for
your convenience.
• Press the
0.
the icon
key on the keyboard or select
CALCULATOR
on the bottom Icons Menu.
• Use this function as a regular pocket
calculator.
46
Page 47

English-Serbo-Croatian Electronic Dictionary User's Guide
ACCOUNT MANAGER
The Account Manager section of the
Language Teacher
ESC200D allows you
to keep track of your banking transactions.
• Select the icon
on the bottom Icons
Menu to enter the Account Manager.
ACCOUNT MANAGER
ACCOUNT
DEPOSIT
WITHDRAWAL
• Using the ▲▼ highlight one of the options:
Account, Deposit, Withdrawal, or Transfer,
and press ↵ to open a new record template.
♦ Note: If a Password has been set up in the
Setup main menu, you will be prompted to
enter the current password.
• Enter data using the ◄► keys to move the
cursor within a line, the ▲▼ keys to change
lines (↵ to move to the next line). See
section Keyboard p.4 for editing instructions
and control keys assignments. Press ↵
while on the bottom line to save the record.
• In the Date line of any record press ▲ to
move to the next line when creating a record
47
Page 48

Language Teacher® model ESC200D
with today's date. Otherwise, type a new
date with the number keys using the ◄►
keys if needed to move the cursor.
♦ Note: If date specified is invalid, the record
will not be saved.
• Specify an account number when filling out
lines A/C No, Fr. A/C, To A/C.
♦ Note: If an account number line is left empty
or refers to an invalid account (or, in the
Account option, if numbers are duplicated),
the record will not be saved.
• Amount refers to money sums used to
calculate the current account balance in the
option Balance of the Account Manager
menu. A withdrawal up to the negative
balance over specified Credit Limit will
generate a warning message.
• Lines Owner, Details are for reference and
can be filled out as needed.
♦ Note: You may enter information in the
English or Serbian language. To switch
between them and a numeric layout in
sequence, press the
key.
• List existing records with the ∧∨ keys.
• To change an existing record, press EDIT.
48
Page 49

English-Serbo-Croatian Electronic Dictionary User's Guide
• To open a new record while an existing
record is being displayed in the viewing
mode, press ESC.
♦ Note: If you press ESC after editing, you will
be prompted to decide whether the new
record or changes to an old record are to be
saved.
• To delete a record, press DEL and confirm
the displayed prompt.
• To inquire on the current balances of
existing accounts, open the last menu
option Balance.
A/C NO.: 344 756 883
$: +3550.
A/C NO.: 993 745 876
$: -6.30
METRIC AND CURRENCY CONVERSION
• Select the icon
on the bottom Icons
Menu to open the Metric and Currency
Conversion menu.
49
Page 50

Language Teacher® model ESC200D
Metric Conversion
With your Language Teacher
ESC200D
you may easily convert measurements from
the American system into the metric system
commonly used in Europe and vice versa.
• Select the icon
to enter the Metric
Conversion section.
METRIC CONVERSION
LENGTH _
AREA
VOLUME
• Use the ▲▼ keys to highlight an option,
e.g. Length, and press ↵:
LENGTH
FT<>M
YD<>M
MILE<>KM
• Select a unit pair, for example,
yard<>meter
50
Page 51

English-Serbo-Croatian Electronic Dictionary User's Guide
LENGTH
YD: _ 0.
M: 0.00
• Choose a source measurement unit,
moving the highlight bar with the ▲▼ keys.
• Enter a numeric value in the highlighted
field. Its equivalent will be calculated
instantly and shown on the other line.
• Use ESC to return to the previous screen.
Currency Conversion
The Currency Conversion function built into
your Language Teacher
ESC200D allows
you to instantly convert amounts in 12
currencies.
• Select the icon
to enter the Currency
Conversion section.
CURRENCY CONVERSION
SET CURRENCY NAME
SET CURRENCY RATE
CONVERSION
• To change or add a currency label, select
the option Set Currency Name.
51
Page 52

Language Teacher® model ESC200D
SET CURRENCY NAME
USD
CHF
CAD
• Highlight a pre-specified currency
abbreviation or one of reserve lines at the
bottom (marked * * *) and press ↵.
• Type in a new currency name and press ↵
to save. Repeat the procedure if necessary.
• Press ESC to return to the Currency
Conversion menu.
• Select the option Set Currency Rate.
SET CURRENCY RATE
USD 1.000_
CHF 1.000
CAD 1.000
• To specify a rate for a currency, highlight
the corresponding line using the ▲▼ keys
and press ↵, for example:
SET CURRENCY RATE
CHF 1.000
0.
• Type in an exchange rate based, for
example, on the US dollar (the rate of which
52
Page 53

English-Serbo-Croatian Electronic Dictionary User's Guide
has to remain at 1.000), pressing the ↵ key
to save the value.
• Specify exchange rates for other
currencies.
• Press ESC to return to the Currency
Conversion menu.
• Select the option Conversion.
• Highlight a currency name using the ▲▼
keys and press ↵.
• Enter an amount for conversion and press
↵ to see equivalents in other currencies.
GAMES
The Language Teacher
ESC200D features
a number guessing game Master MInd and
a learning game Hangman, which improves
your spelling skills and enhances your
personal vocabulary
• Select the icon
on the bottom Icons
Menu to open the Games menu.
53
Page 54

Language Teacher® model ESC200D
Master Mind
• On the Games menu, select the icon
to
enter the Master Mind menu.
• Choose a difficulty level. On the high level
the number may contain repeated digits.
You have 12 attempts to guess a four-digit
number.
• Type in a number and touch ↵ to see the
result of the guess on the right-hand side of
the screen.
1. 1234
2. 2345
____
3. 2456
A solid circle means that one of the digits
you entered is present in the number but
occupies another position. A ring indicates
54
Page 55

English-Serbo-Croatian Electronic Dictionary User's Guide
the presence of a correctly guessed digit in
its proper position.
If you succeed or use up all tries, a
corresponding message will be shown.
Hangman
• On the Games menu, select the icon
to
start the Hangman Word Game.
WORD GAME
?????
--------
• Enter letters trying to guess the word. The
correctly guessed letters appear in place of
question marks in their actual positions in
the word. The missed letters are shown for
reference on the dash line. An element is
added to the picture at right with every nonrepeated missed letter.
When the game ends, the message
Congratulation! or You lost!, depending on
the outcome, appears on the screen for a
second. If you could not guess the word, the
translation of the word is also displayed.
Press ESC to start a new game.
55
Page 56

Language Teacher® model ESC200D
DATA DELETION
Using the Data Deletion function of the
Language Teacher
ESC200D you can free
up the memory by deleting user’s data from
selected organizer sections.
• Select the icon
on the bottom Icons
Menu to enter the Data Deletion menu.
PERSONAL TELEPHONE
BUSINESS TELEPHONE
ANNIVERSARY
SCHEDULE
• Select an option and confirm the displayed
prompt.
AUTOMATIC SHUT-OFF
In order to conserve the power of batteries,
the Language Teacher
ESC200D
automatically shuts the power off if none of
the keys has been pressed for five minutes.
56
 Loading...