

Page 1
Address: 1000 Seville Road, Wadsworth, OH 44281
Phone: 1.800.924.5172
Web: www.ecstuning.com
best viewed in Acrobat® Reader
®
VW MKIV Golf/GTI
This tutorial is provided as a courtesy by ECS Tuning.
Proper service and repair procedures are vital to the safe, reliable operation of all engine vehicles as well as the personal safety of those performing the repairs. Standard safety procedures and precautions (including use of safety goggles and proper tools and equipment) should be
followed at all times to eliminate the possibility of personal injury or improper service which could damage the vehicle or compromise its safety.
Although this material has been prepared with the intent to provide reliable information, no warranty (express or implied) is made as to its accuracy or completeness. Neither is any liability assumed for loss or damage resulting from reliance on this material. SPECIFICALLY, NO WARRANTY OF MERCHANTABILITY, FITNESS FOR A PARTICULAR PURPOSE OR ANY OTHER WARRANTY IS MADE OR TO BE IMPLIED WITH RESPECT TO THIS
MATERIAL. In no event will ECS Tuning, Incorporated or its aliates be liable for any damages, direct or indirect, consequential or compensatory,
arising out of the use of this material.
Installation
Instructions
ES2661176
Page 2

Address: 1000 Seville Road, Wadsworth, OH 44281
Phone: 1.800.924.5172
Web: www.ecstuning.com
VW MKIV Golf/GTI Hatch Pop Kit
2
Now you can pop your rear hatch with the press of a single button
on your key fob. The innovative Hatch Pop Kit includes a solenoidoperated latch release, wire harness, and two strong lifting struts
that raise the hatch as soon as the latch is released.
Installation requires removal of the rear hatch inner trim panel.
Inside the hatch, you will install mounting grommets, a new solenoid
actuator, and a special patch harness designed for plug-and-play
simplicity.
Tools required are simple, and include a non-marring plastic trim
removal tool, Phillips and common head screwdrivers, and pliers.
Let’s get started.
• Raise the rear hatch.
• Remove the two Phillips head screws located inside the pull
recesses in the rear trim panel (circled).
• Use a trim removal tool to pry the inner panel away from the hatch.
The panel is held in place by metal spring clips (arrows) that should pop free one at a
time as you pry around the perimeter in the panel.
See next page for photos.
Hatch trim panel rear view.
ES2661176
Installation Instructions
Page 3

Address: 1000 Seville Road, Wadsworth, OH 44281
Phone: 1.800.924.5172
Web: www.ecstuning.com
VW MKIV Golf/GTI Hatch Pop Kit
3
Installation Instructions
ES2661176
After removing the two screws in the trim panel,
pry down with a plastic trim removal tool.
Work around the perimeter of the panel until it
comes loose. Remove it.
Note: The trim tool shown is from the 5-piece
trim removal set, ES517779.
With the panel removed, the lock and latch
mechanisms are exposed.
Page 4
Address: 1000 Seville Road, Wadsworth, OH 44281
Phone: 1.800.924.5172
Web: www.ecstuning.com
VW MKIV Golf/GTI Hatch Pop Kit
4
Installation Instructions
ES2661176
grommet
oem wire
harness
latch
release lever
lock control
solenoid
wiper motor/door glass
hole
hole
latch release rod
1
2
3
3
grommet
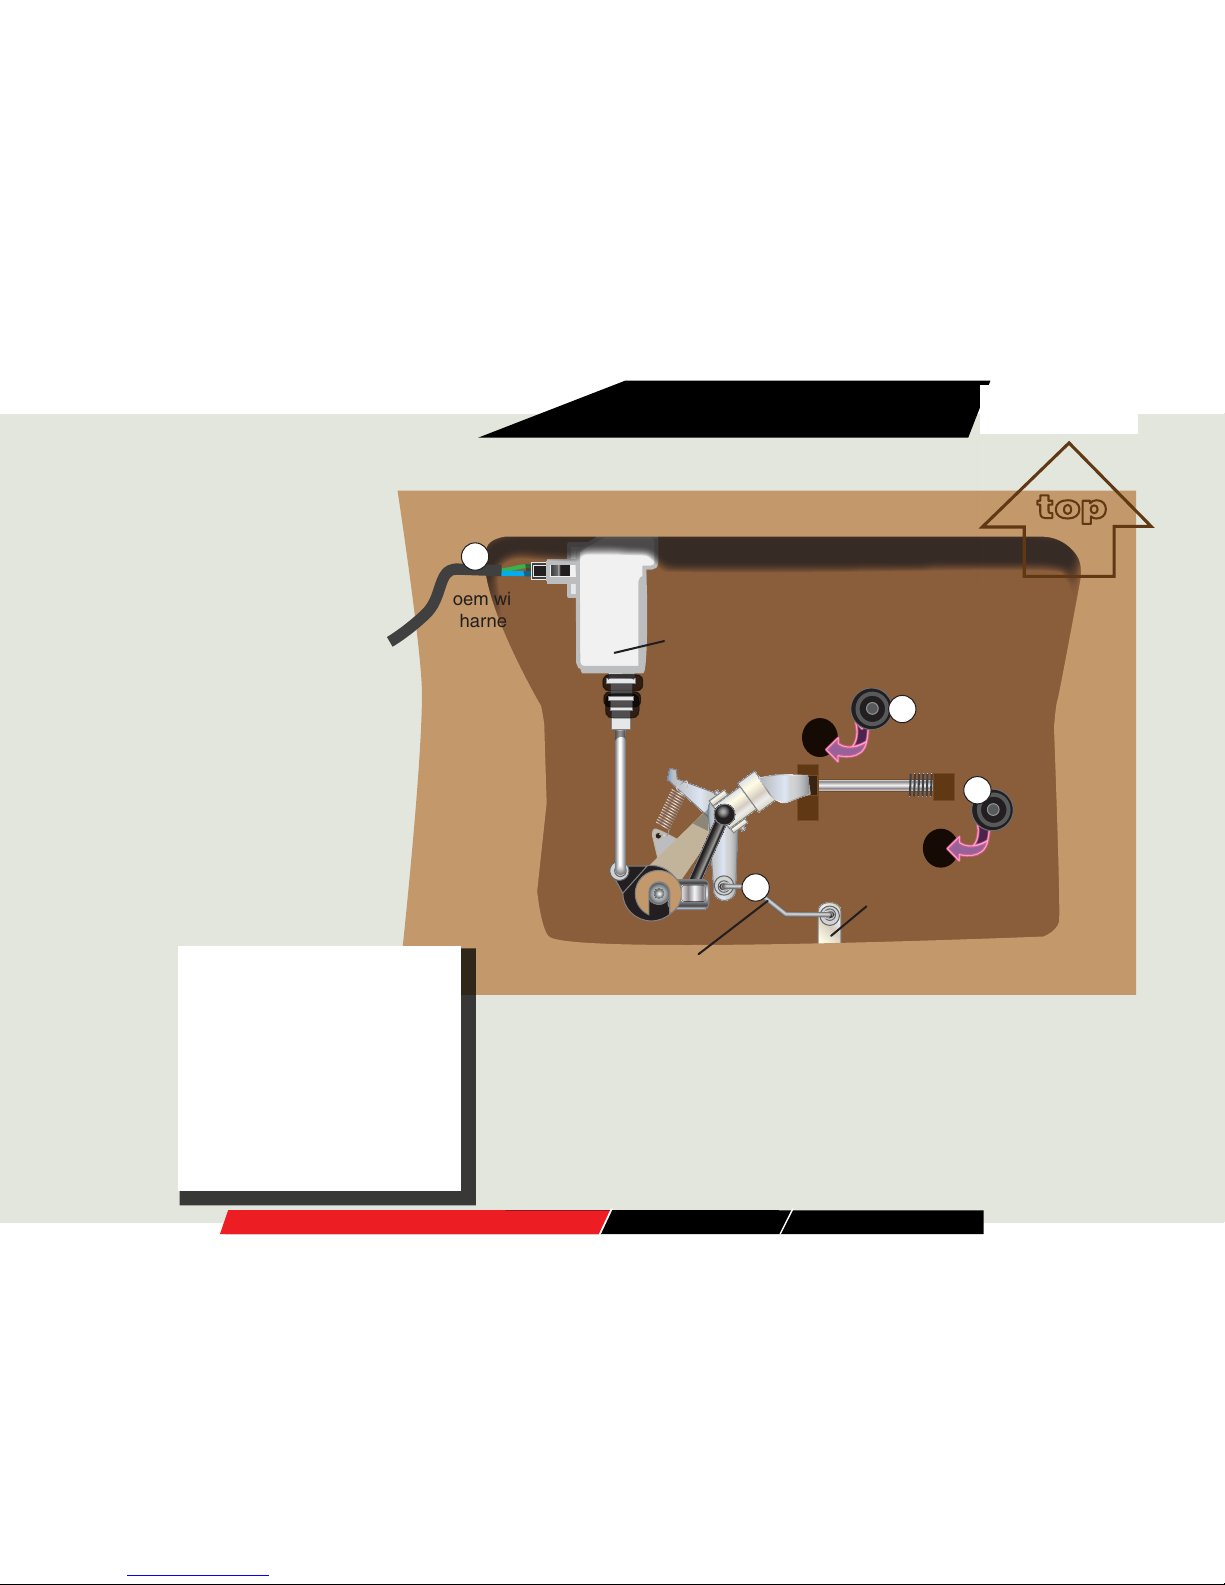
This schematic illustrates the factory
installed components and their general
locations inside the rear hatch.
We’ll concentrate on the components
involved in the installation.
A voltage signal on the OEM wire
harness (1) activates the lock control
solenoid when the unlock button is
pressed on the key fob.
The latch release rod (2) connects the
hatch pull handle to the latch release lever.
This will be replaced with the new latch
release rod in the kit.
Press the two mounting grommets (3) in
your kit into the factory holes in the hatch
metal. These grommets will be used to
mount your new latch release solenoid.
Original Hatch Components
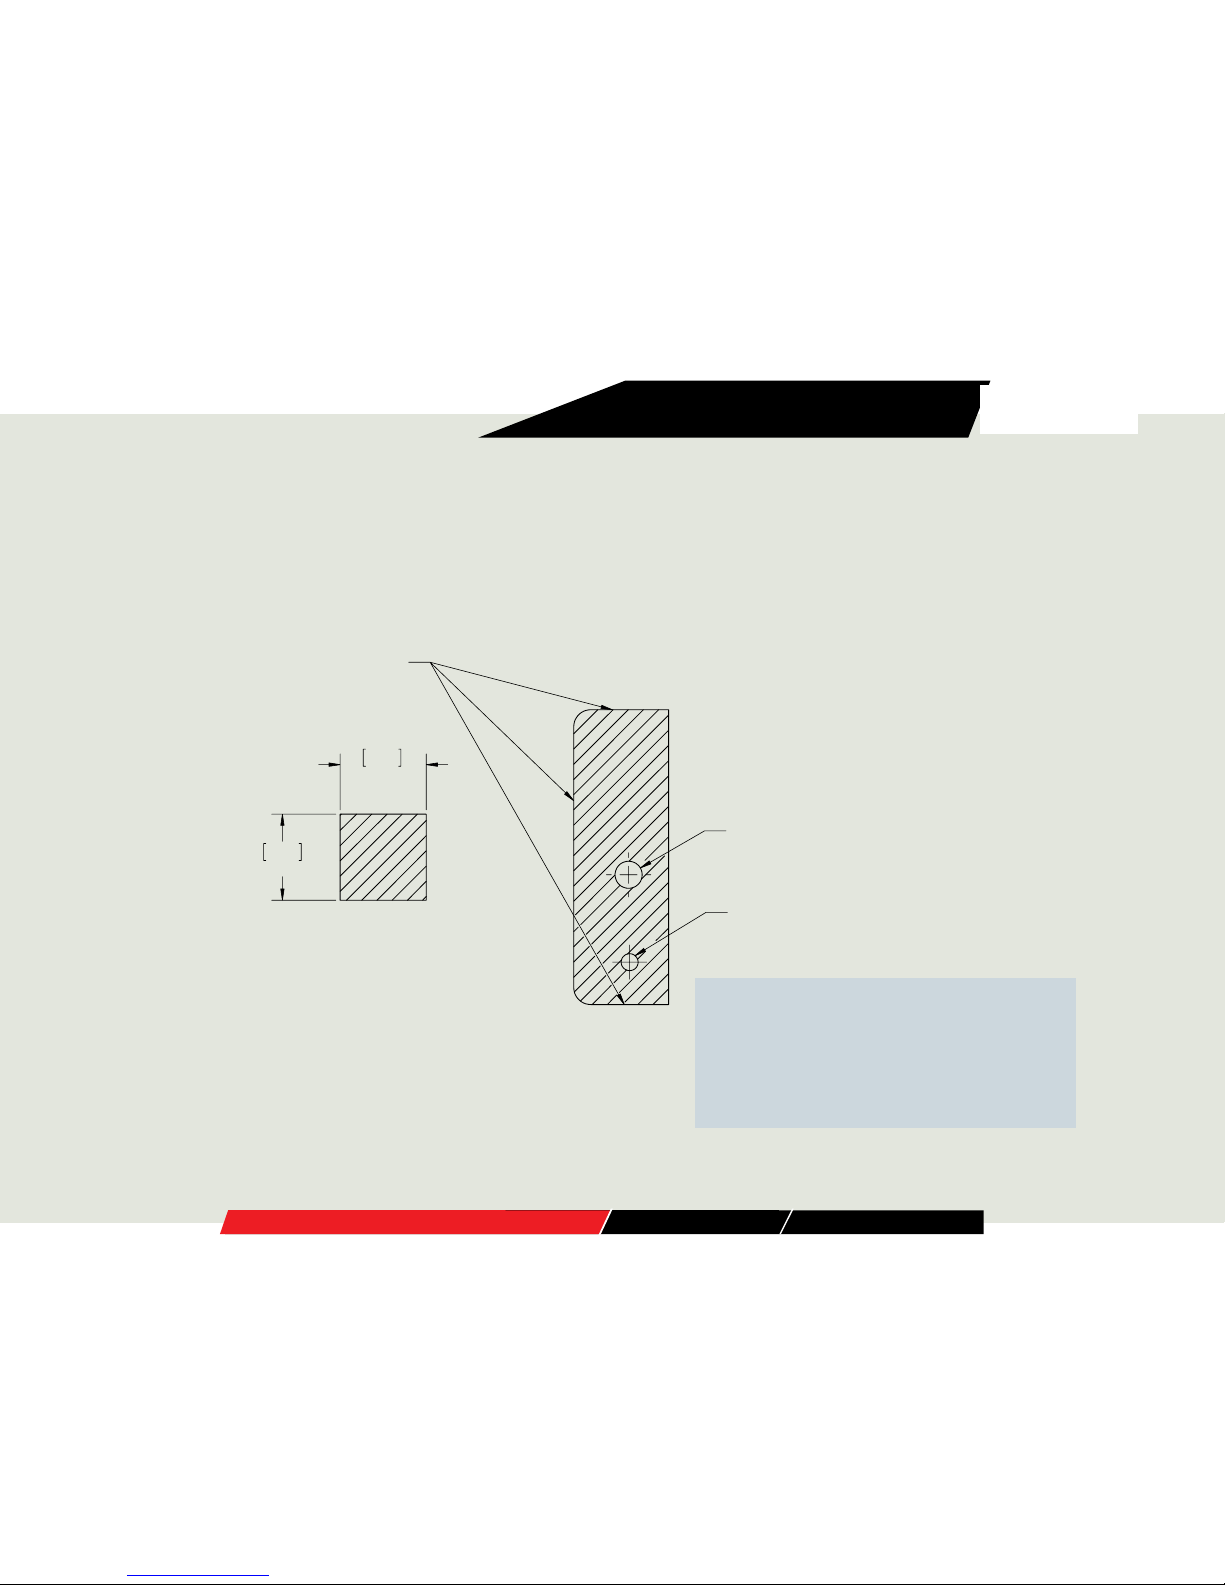
Special Note: On some early 1999-2000 Golfs, there is no hole for the lower grommet. If
this happens, print out the template on page 11 of this pdf. Be sure to print it at 100%!
Mount the template as shown in the photo, temporarily locating it with the Torx head
screw for the latch handle. Using the template, drill a new 5/16-inch hole and install the
lower grommet in the newly drilled hole.
Caution: Be careful as the drill bit breaks through the inner bracket. Do not let the bit
strike the inner surface of the rear hatch outer skin or you may leave a dent that can be
seen from the outside.
Page 5

Address: 1000 Seville Road, Wadsworth, OH 44281
Phone: 1.800.924.5172
Web: www.ecstuning.com
VW MKIV Golf/GTI Hatch Pop Kit
5
Installation Instructions
ES2661176
Preparing the solenoid module for installation
The rear hatch mounting grommet hole locations in German and
Brazilian-made Golf hatches are slightly different. To accommodate
these differences, your ECS hatch kit mounting plate has extra
mounting holes.
Start by identifying your car’s country of origin using the rst three
characters of the VIN (Vehicle Identication Number). This number
can be see through the windshield on a plate mounted to the lower left
hand corner of the dash.
If the rst three characters are
WVW, the car is German-made.
If the rst three characters are
9BW, the car is Brazilian-made.
The pivot arm
stud in your new
assembly ships
in the Brazilian
location. If you
are installing the
assembly in a
German-made Golf,
loosen and remove
the locknut on the
back of the pivot
stud. Re-locate the
stud to the upper
(German) hole, then
reinstall the locknut
and tighten it.
Note that the solenoid assembly mounting holes are elongated slots
that allow sideways movement of the mechanism on the grommets. This
allows the mechanism to be adjusted against the relay rod that connects
the pivot arm to the latch release lever. See adjustment details on page 8.
Here is the solenoid assembly with the pivot stud
mounted in the default Brazilian mounting hole.
front and rear views of the
rear hatch solenoid assembly
Page 6
Address: 1000 Seville Road, Wadsworth, OH 44281
Phone: 1.800.924.5172
Web: www.ecstuning.com
VW MKIV Golf/GTI Hatch Pop Kit
6
Installation Instructions
ES2661176
car
harness
latch
release lever
lock control
solenoid
patch
harness
(in kit)
wiper motor/door glass
1
2
3
4
new latch
release rod
grommets
installed
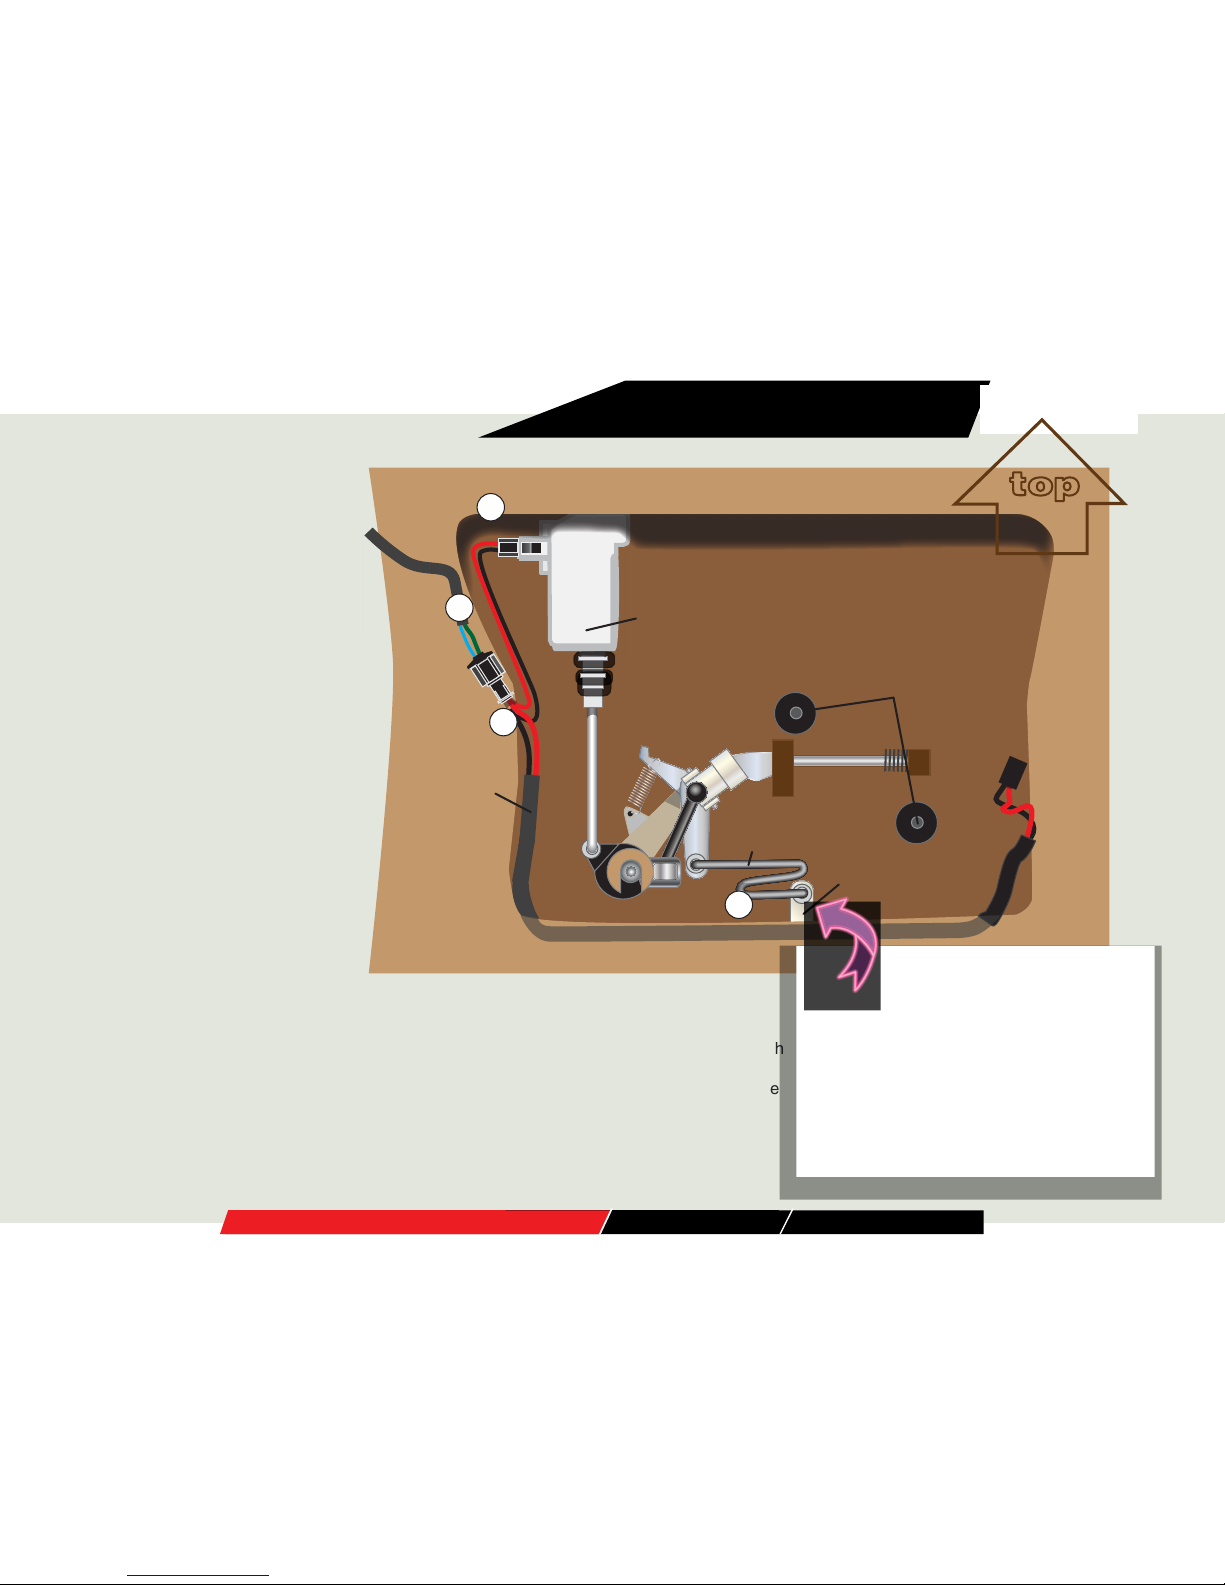
Unplug the car harness (1) from the
lock control solenoid.
Connect the car harness (1) to the
short side of the patch harness (2).
Plug the shorter lead from the
patch harness into the lock control
solenoid (3).
Remove the original latch release
rod (see item 2 on page 4) and
replace it with the new latch release
rod in the kit (4).
Install the New Release Mechanism,
Your hatch pop kit includes a 3mm steel push nut.
When installing the new latch release rod, push the end of the rod through
the white plastic grommet in the latch release lever. With the rod fully
inserted, reach around from behind and press the 3mm push nut over the
end of the rod to lock it in place, as shown in the illustration to the right.
Page 7
Address: 1000 Seville Road, Wadsworth, OH 44281
Phone: 1.800.924.5172
Web: www.ecstuning.com
VW MKIV Golf/GTI Hatch Pop Kit
7
Installation Instructions
ES2661176
R
car
harness
latch
release lever
oe harness retainer clip
lock control
solenoid
latch control
assembly
patch
harness
(in kit)
wiper motor/door glass
extra clip (in kit)
9
6
8
7
new latch
release rod
mounting
screws
5
mounting
screw
locations shown
are for
German VIN
applications
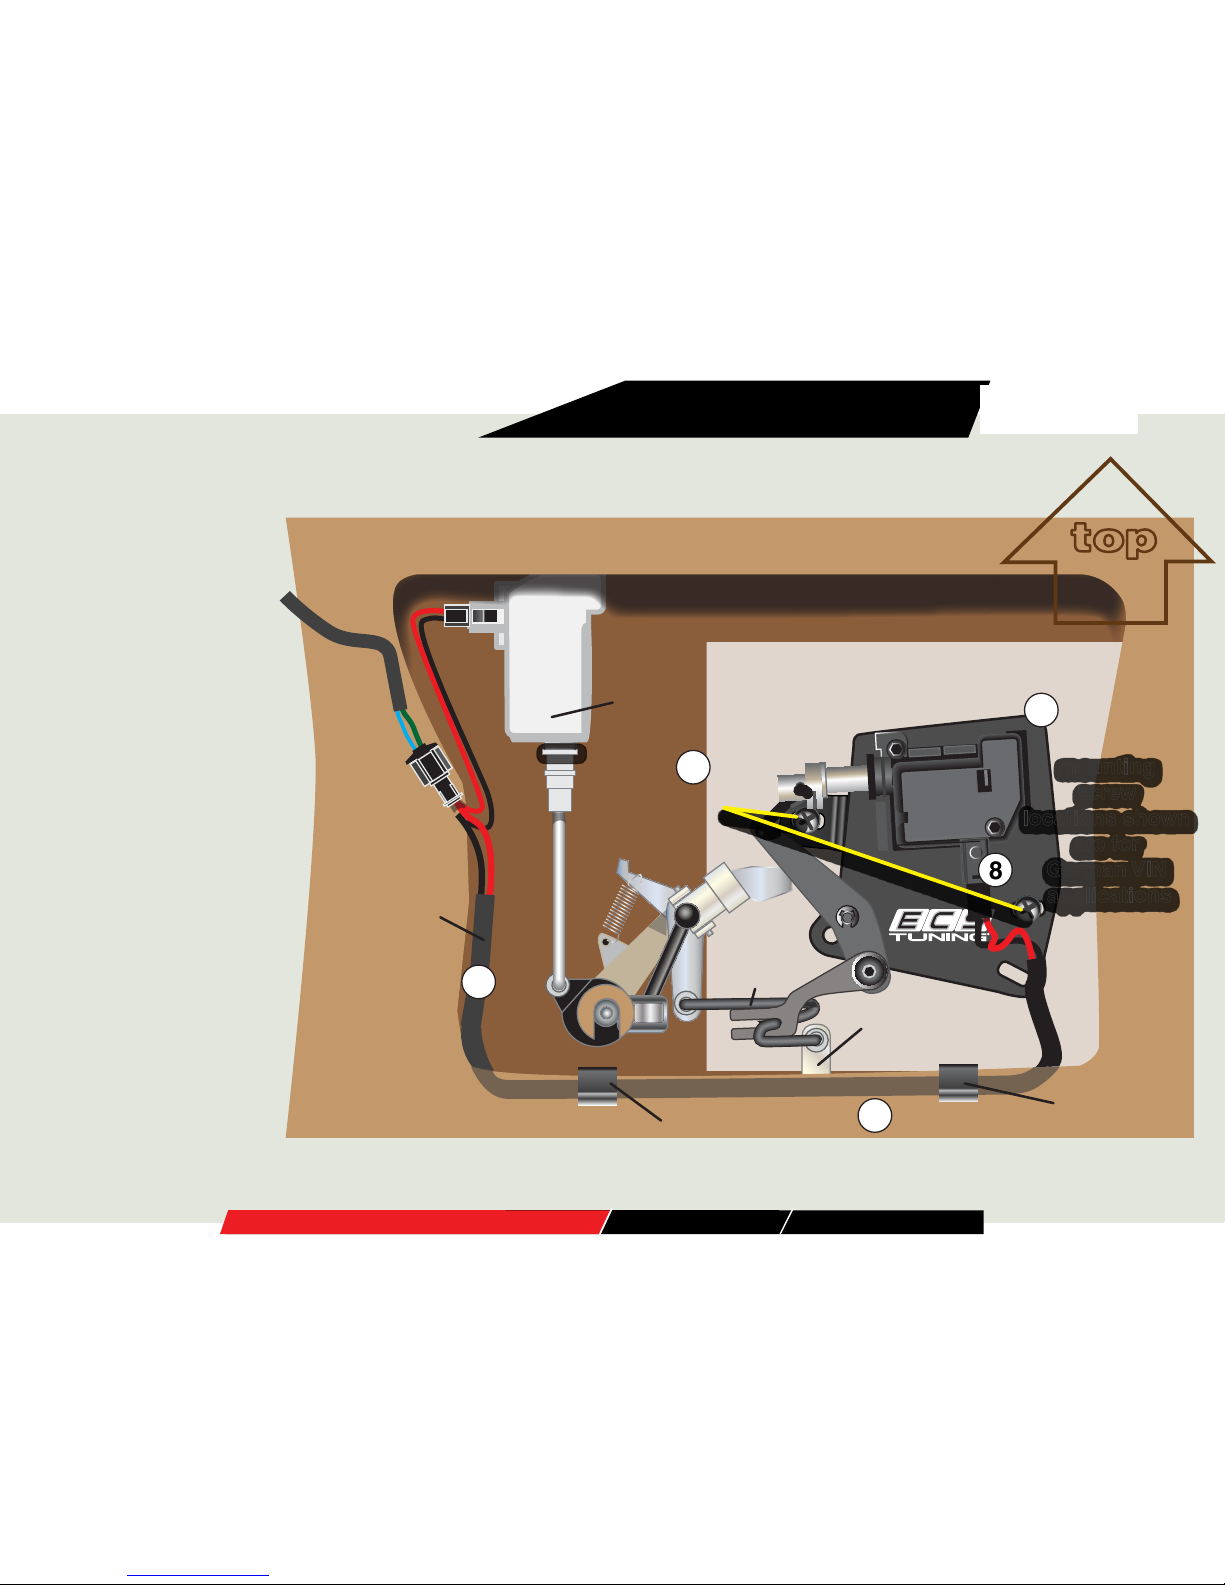
Use the silver mounting
screws (5) from the kit to
attach the latch control
solenoid assembly (6)
to the grommets. Do
not tighten the screws
completely; just snug
them enough that the
assembly can still be
shifted side-to-side on
the grommets.
Run the long lead from
the patch harness (7)
along the edge of the
stamped metal opening
in the hatch, and plug
it into the latch control
solenoid (8).
Secure the patch
harness to the edge of
the opening in the hatch
using the OEM harness
clip and the extra clip
included in your kit (9).
Install the New Release Mechanism,
Page 8
Address: 1000 Seville Road, Wadsworth, OH 44281
Phone: 1.800.924.5172
Web: www.ecstuning.com
VW MKIV Golf/GTI Hatch Pop Kit
8
Installation Instructions
ES2661176
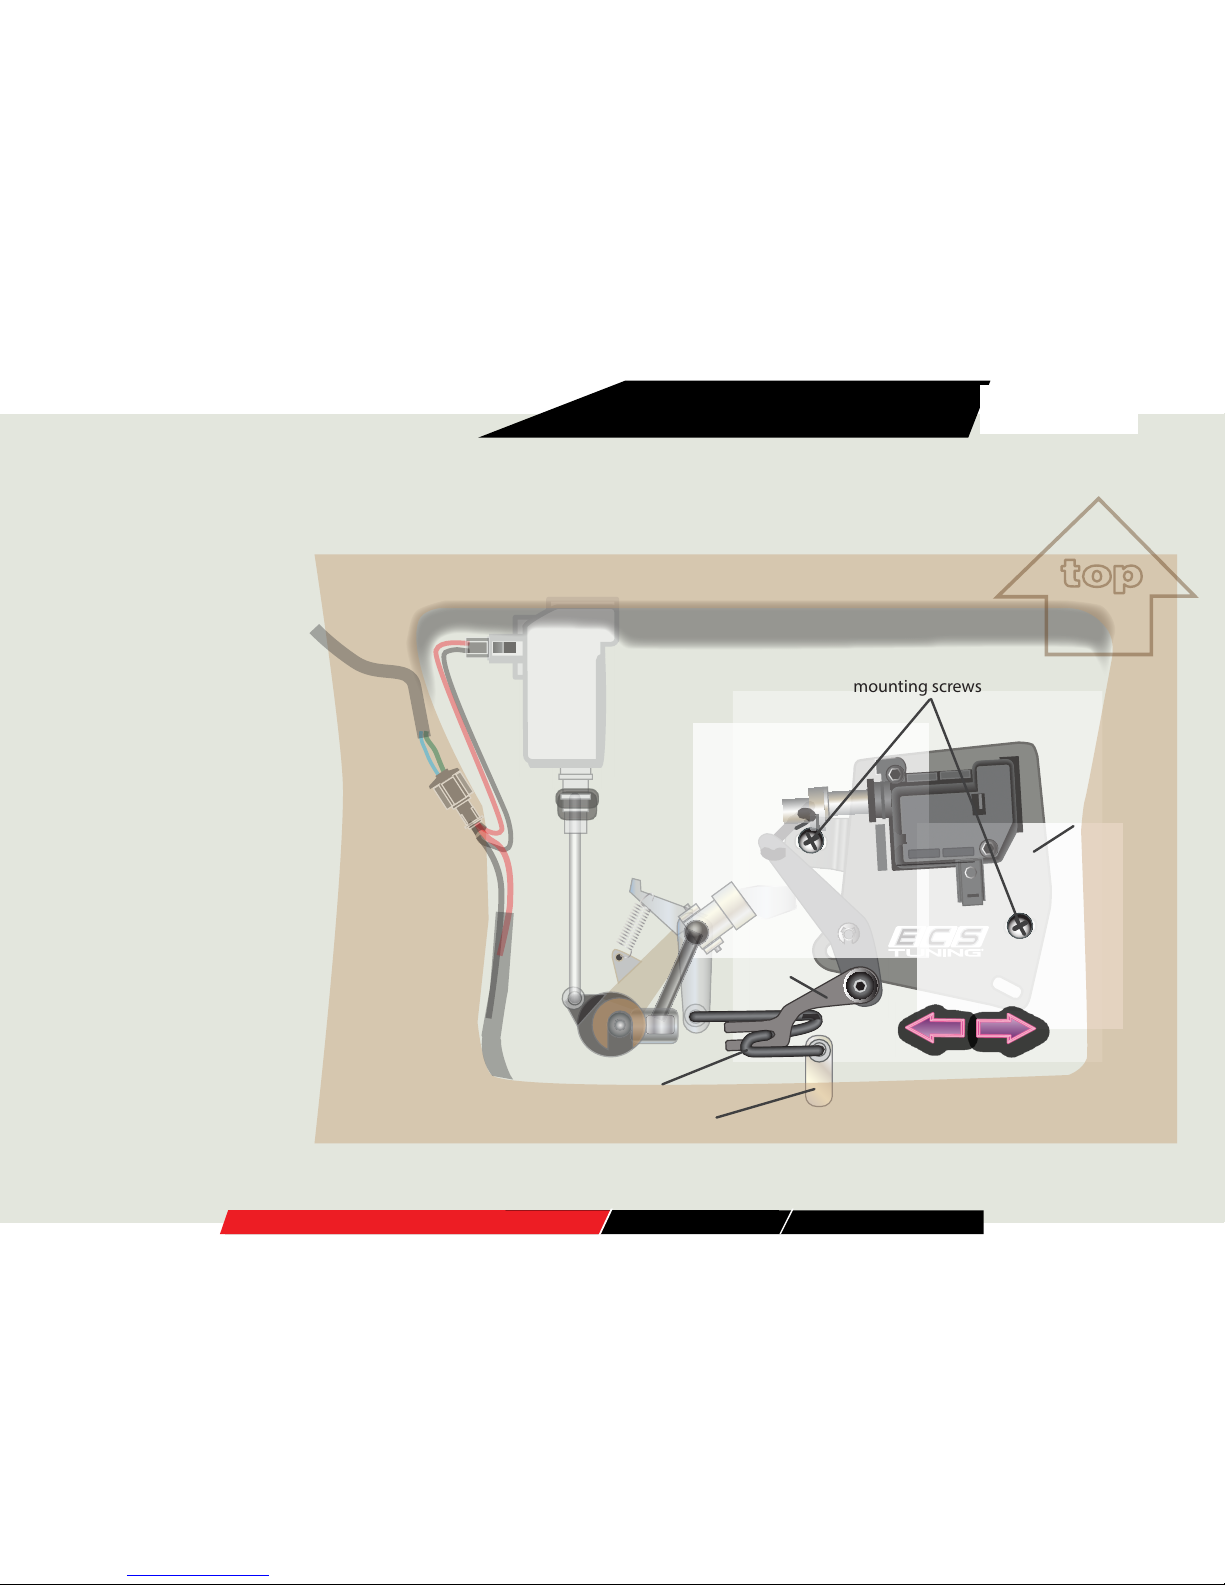
Adjust the New Release Mechanism,
R
link arm
mounting screws
Slide the latch control assembly left or right on
the mounting screws to push the link arm against the
new latch release rod until it exerts a small pre-load
pressure on the latch release lever.
latch release lever
new latch release rod
latch control
assembly
In this step, we will use
the elongated holes in the
assembly to adjust the
contact point for the linkage.
Proper adjustment ensures
that the solenoid will move
the linkage the correct
distance to open the hatch.
• With the mounting screws
just snug enough that the
assembly can still be slid
side-to-side, move the
assembly laterally until
the link arm just touches
the new latch release rod.
Then bump assembly a
little farther in the same
direction until the latch
release lever just starts
to move. This slight preload ensures positive
engagement and full latch
lever travel.
• Tighten the screws so the
adjustment will not change.
• Test hatch operation
before reinstalling the
interior trim, and adjust
again, if necessary.
Page 9
Address: 1000 Seville Road, Wadsworth, OH 44281
Phone: 1.800.924.5172
Web: www.ecstuning.com
VW MKIV Golf/GTI Hatch Pop Kit
9
Installation Instructions
ES2661176
Install the Struts
CAUTION: Prop the hatch open with a rigid support that will
not allow the hatch to fall on you as your remove the old struts
and install the new ones.
Use a pick or small screwdriver to pry out the retainer clips
at top and bottom that secure the ball sockets to the chassis
studs.
Your new struts come pre-assembled. Just push the open end
of the each socket over the ball studs until they snap and lock
in place.
Make sure the springs are located at the bottom with the door
closed.
Page 10

Address: 1000 Seville Road, Wadsworth, OH 44281
Phone: 1.800.924.5172
Web: www.ecstuning.com
VW MKIV Golf/GTI Hatch Pop Kit
10
Installation Instructions
ES2661176
Test and Reassemble
CAUTION: The rear hatch will open VERY quickly when
released. Stand clear as you press the hatch release button on
the key fob.
Note: Your hatch can still be opened manually using the
bayonet key and hatch release handle.
When you have tested hatch operation, snap the inner trim
panel back in place and replace the two Phillips screws
removed earlier.
This completes the installation of the ECS Tuning MKIV
Golf/GTI Hatch Pop Kit.
Thanks for purchasing the
ECS Tuning Hatch Pop Kit.
We appreciate your business,
and hope this tutorial has
been helpful and informative.
ES2661176
Page 11
Address: 1000 Seville Road, Wadsworth, OH 44281
Phone: 1.800.924.5172
Web: www.ecstuning.com
VW MKIV Golf/GTI Hatch Pop Kit
11
Installation Instructions
ES2661176
1.00
25.40
1.00
25.40
DRILL USING 5/16" DRILL BIT
INSERT HATCH LOCK ASSEMBLY TORX SCREW
LINE EDGES TO PANELING
INSIDE HATCH
EARLY MK4 HATCH POP DRILL TEMPLATE
CHECK SCALE OF PRINTOUT!
WHEN PRINTING FROM ADOBE ACROBAT,
SET THE PRINT SCALE TO 100%. SOME OF THE
PAGE MAY BE CLIPPED WHEN PRINTING,
HOWEVER IT IS IMPORTANT THAT THE TEMPLATE
IS PRINTED TO SCALE.
See page 5 for instructions
on using this template on
some 1999-2000 Golfs.
 Loading...