

Page 1
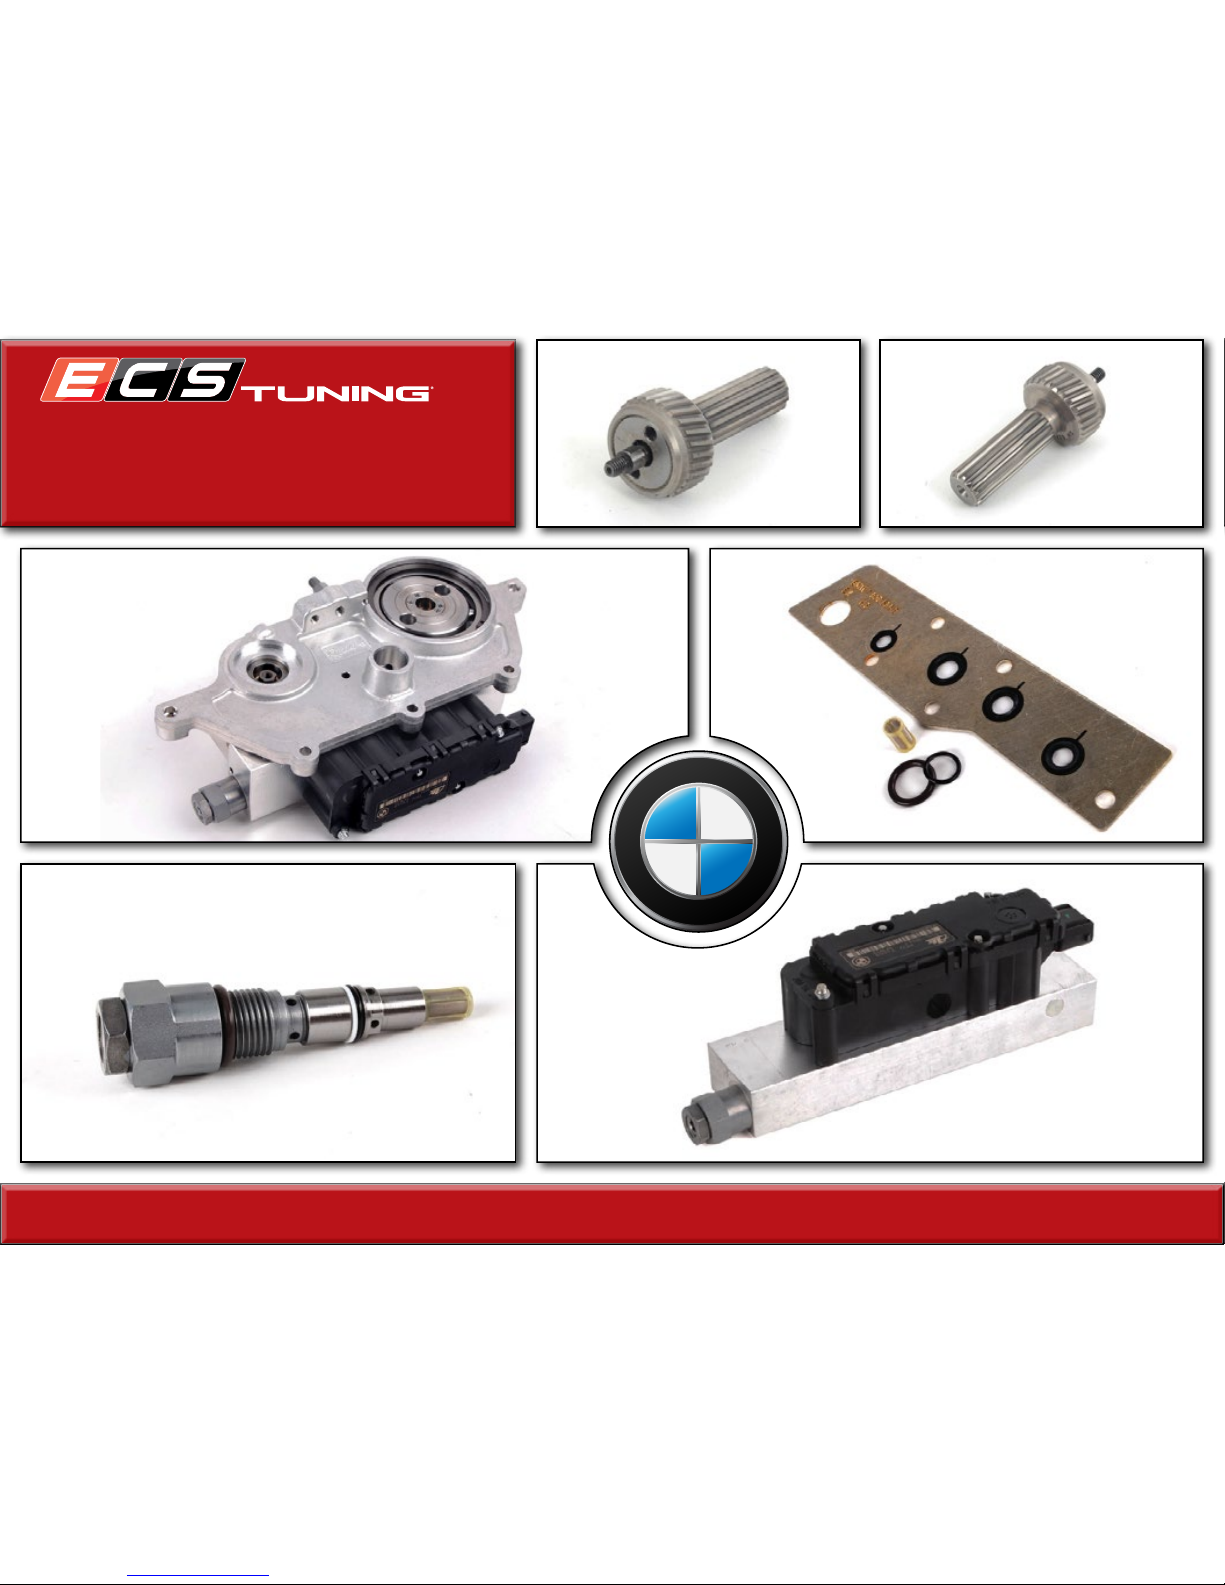
BMW S54
Vanos Rebuild Kit
Installation Instructions
Proper service and repair procedures are vital to the safe, reliable operation of all motor vehicles as well as the personal safety of those performing the repairs. Standard safety procedures and precautions (including
use of safety goggles and proper tools and equipment) should be followed at all times to eliminate the possibility of personal injury or improper service which could damage the vehicle or compromise its safety.
B
M
W
Page 2
ECS TUNING 1000 SEVILLE RD. WADSWORTH, OH 44281 1.800.924.5172 WWW.ECSTUNING.COM
2
BMW S54 DUAL VANOS REBUILD
®
ECS Difficulty Gauge
I
I
I
I
I
I
I
I
I
I
I
I
I
I
I
I
I
I
I
I
I
I
I
I
I
I
I
I
I
I
I
I
I
I
I
I
I
I
I
I
I
I
I
1
2 4
3
Advanced - 3
Pro - 4
2 - Moderate
1 - Easy
BMW S54 Dual Vanos Rebuild
INTRODUCTION
BMW’s Vanos variable valve timing system is one of the most recognized systems in the industry. There are a number of different designs, and they all
work off of ingeniously simple mechanical principals. Their notoriety, however, is not likely to be from their design and performance, but more so from
the fact that they frequently wear out. Today we’re going to be working on the dual Vanos unit that is found in the 6 cylinder S54 engines. The most
common Vanos problem is worn out seals. We’ll be replacing them all, and In the case of the S54 Vanos, there are a few other well known issues that we
will also be dealing with. The oil pump drive tabs on the Vanos exhaust hubs are known to break. The problem is caused by improperly sized holes in
the oil pump rotor, and we’ll show you how to replace it. Another common problem, known as Vanos “rattle”, is one we will take care of by repairing the
Vanos transfer gear sets and replacing the diaphragm springs behind the Vanos hub. To finish things off we’ll also replace the Vanos hub bolts and cam
sprocket hub bolts - which are known to loosen over time, and the upper timing chain guide as well. Rebuilding the S54 dual Vanos is time consuming
due to a lot of steps, but overall it’s not too difficult of a job. The best part is that it’ll restore smooth, consistent performance, some of which you may
not even realize you’ve lost.
An experienced technician can complete the job in a day, however if this is the first time you’ve done
one or if you’re light on experience, it’s best to plan a couple days - a perfect weekend project. There
are a number of steps that require precision and patience, and this is not something you want to rush
through. The best advice, as always, is to read through these instructions first to familiarize yourself with
the project and make sure you have all of the required tools on hand.
Thank you for looking to ECS Tuning for all your performance and repair needs.
We appreciate your business!
While you’re in the middle of this, there are a few jobs that you’ll have the perfect opportunity to
do. Take a look at the list below and consider these before you start. It’ll save you a lot of time
down the road!
• Valve cover gasket replacement
• Spark plug replacement
• Valve adjustment
Page 3
ECS TUNING 1000 SEVILLE RD. WADSWORTH, OH 44281 1.800.924.5172 WWW.ECSTUNING.COM
3
BMW S54 DUAL VANOS REBUILD
®
Required Tools and Equipment ................................................................................pg.4
Shop Supplies and Materials .....................................................................................pg.6
Installation and Safety Information ........................................................................pg.7
Vanos Repair Procedures ............................................................................................pg.8
Torquing Tips ..................................................................................................................pg.102
Torque Specications ...................................................................................................pg.103
Schwaben Tools .............................................................................................................pg.104
TABLE OF CONTENTS
Due to the depth of this repair, there are a lot of different components that you may choose to replace
or leave alone if they have already been done. These instructions are designed around a complete
Vanos service, as well as replacement/repair of the most common problems that develop in the related
areas. As you work your way through the repair, be sure and closely follow the links/directions next to
any of the yellow street signs. These will direct you where to go depending on the step you are on or
the components that you are replacing.
Page 4
ECS TUNING 1000 SEVILLE RD. WADSWORTH, OH 44281 1.800.924.5172 WWW.ECSTUNING.COM
4
BMW S54 DUAL VANOS REBUILD
®
Return to Table of Contents
• Protecta-Sockets (for lug nuts) ........................................................ES#2221243
• 3/8” Drive Ratchet ..................................................................... ES#2765902
• 3/8” Drive Torque Wrench ....................................................... ES#2221245
• 3/8” Drive Deep and Shallow Sockets ................................. ES#2763772
• 3/8” Drive Extensions ............................................................... ES#2804822
• Hydraulic Floor Jack ................................................................... ES#240941
• Torx Drivers and Sockets .................................................................ES#11417/8
• 1/2” Drive Deep and Shallow Sockets ................................. E S#2839106
• 1/2” Drive Ratchet
• 1/2” Drive Extensions
• 1/2” Drive Torque Wrench....................................................... ES#2221244
• 1/2” Drive Breaker Bar ................................................................ ES#2776653
• File Set
• Air Nozzle/Blow Gun
• Bench Mounted Vise
• Crows Foot Wrenches
• Hook and Pick Tool Set ............................................................ ES#2778980
• 1/4” Drive Ratchet ...............................................................................ES#2823235
• 1/4” Drive Deep and Shallow Sockets ................................. ES#2823235
• 1/4” Drive Extensions ............................................................... ES#2823235
• 1/4” Drive Torque Wrench
• Plier and Cutter Set ................................................................... ES#2804496
• Flat and Phillips Screwdrivers .......................................................ES#2225921
• Jack Stands ............................................................................................. ES#2763355
• Ball Pein Hammers
• Pry Bar Set ...............................................................................................ES#1899378
• Electric/Cordless Drill
• Wire Strippers/Crimpers
• Adjustable (Crescent) Type Wrenches
• Drill Bits
• Punch and Chisel Set
• Hex Bit (Allen) Wrenches and Sockets .......................................ES#11420
• Thread Repair Tools .............................................................................ES#1306824
• Open/Boxed End Wrench Set ........................................................ES#2765907
Standard Automotive Tools Available On Our WebsiteRequired For This Install
• BMW Fan Clutch Tool Set ................................................................. ES#2627584
Specialty Tools
Note: The tools required for each step will be listed by the step number throughout these instructions.
REQUIRED TOOLS
• S54 Camshaft Alignment Tool Kit ................................................ES#3145744
See Page 5 for additional information on specialty tools.
Page 5
ECS TUNING 1000 SEVILLE RD. WADSWORTH, OH 44281 1.800.924.5172 WWW.ECSTUNING.COM
5
BMW S54 DUAL VANOS REBUILD
®
Return to Table of Contents
SPECIALTY TOOLS
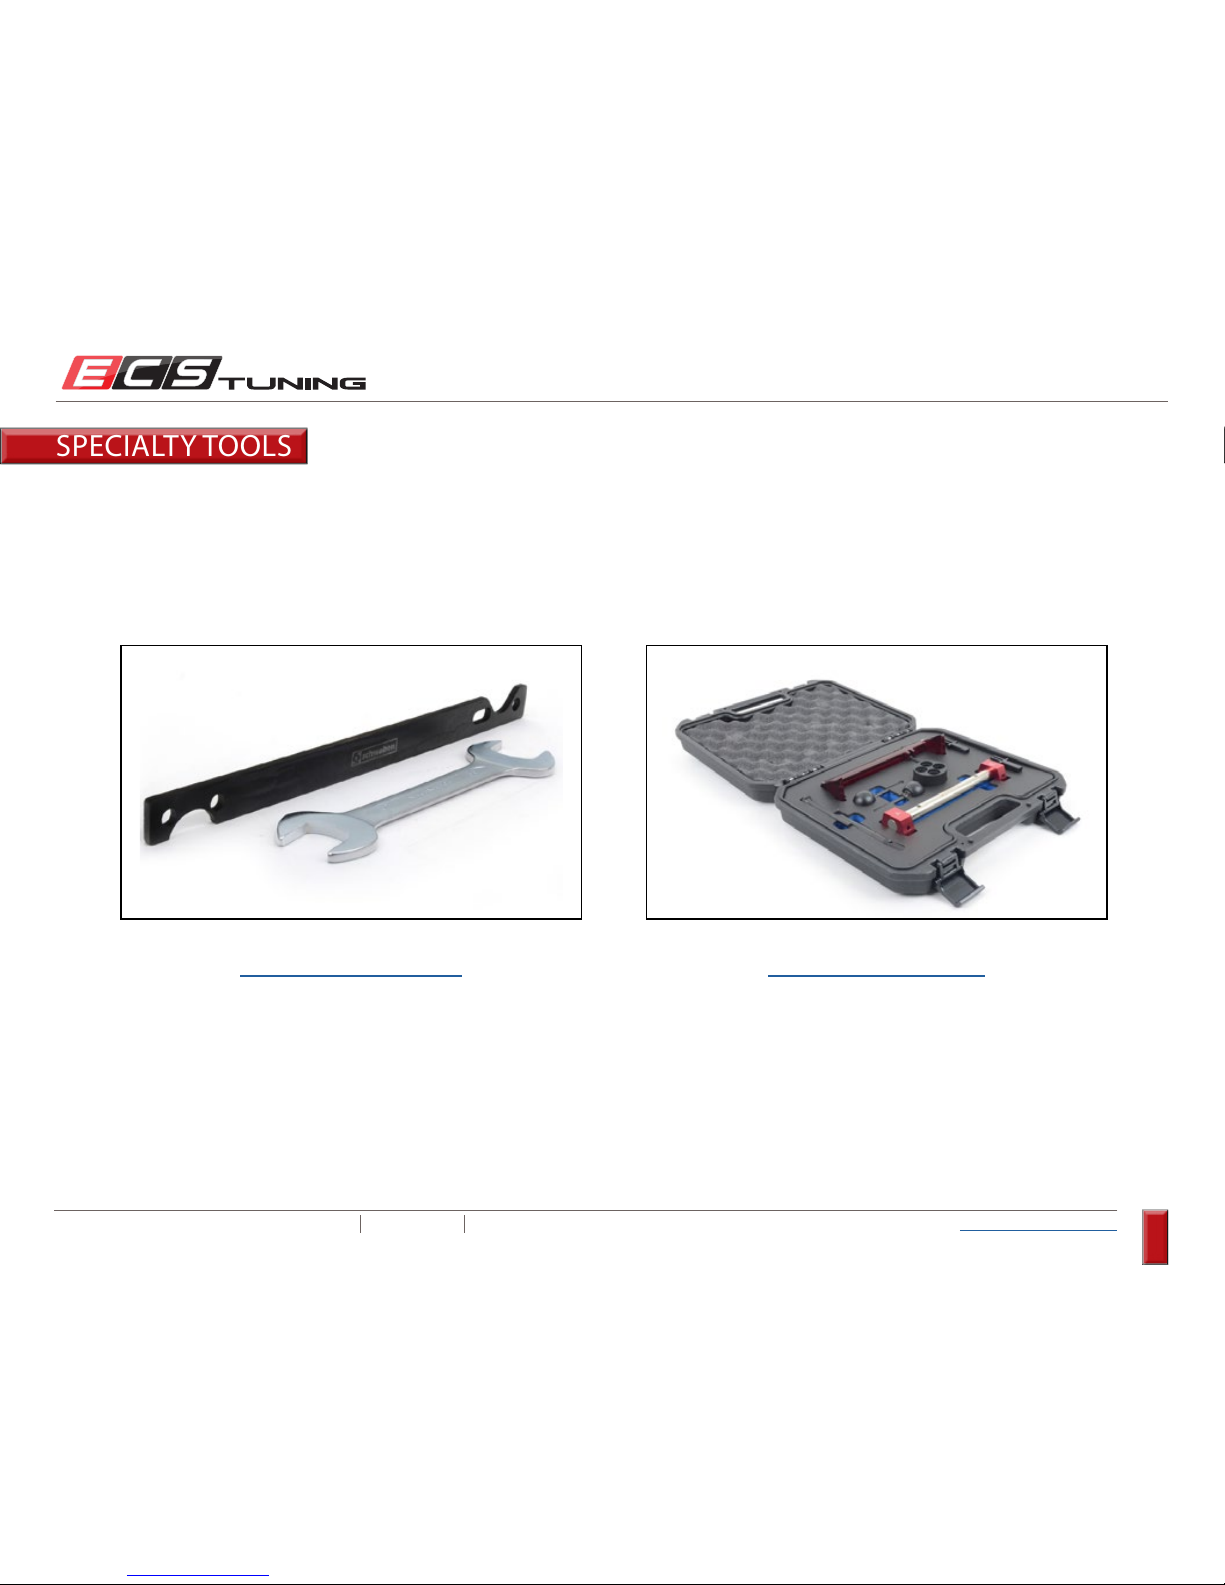
The BMW fan clutch tools are very helpful for removing the
fan/clutch. The wrench fits the large nut that holds the fan/
clutch to the water pump and the holding fixture will lock
onto two of the water pump bolts so you can hold it stationary
to break the fan loose.
The BMW S54 camshaft alignment tool set is required for
engine timing. During this repair, you will need to lock the
crankshaft in place and use the camshaft bridge and pins to
properly time the engine. For some cars, you will also need
the special crankshaft socket.
ES#2627584 ES#3145744
Page 6
ECS TUNING 1000 SEVILLE RD. WADSWORTH, OH 44281 1.800.924.5172 WWW.ECSTUNING.COM
6
BMW S54 DUAL VANOS REBUILD
®
Return to Table of Contents
Standard Shop Supply Recommendations: We recommend that you have a standard inventory of automotive shop supplies before
beginning this or any automotive repair procedure. The following list outlines the basic shop supplies that we like to keep on hand. Shop
supplies with a hyperlink are available on our website.
• Hand Cleaner/Degreaser - Click Here
• Pig Mats - for protecting your garage floor and work area from spills and stains - Click Here
• Spray detailer - for rapid cleaning of anything that comes into contact with your paint such as brake fluid - Click Here
• Micro Fiber Towels - for cleaning the paint on your car - Click Here
• Latex Gloves - for the extra oily and dirty jobs - Click Here
• Medium and High Strength Loctite Thread lock compound - to prevent bolts from backing out - Click Here
• Anti-Seize Compound - to prevent seizing, galling, and corrosion of fasteners - Click Here
• Aerosol Brake/Parts Cleaner - for cleaning and degreasing parts
• Shop Rags - used for wiping hands, tools, and parts
• Penetrating oil - for helping to free rusted or stuck bolts and nuts
• Mechanics wire - for securing components out of the way
• Silicone spray lube - for rubber components such as exhaust hangers
• Paint Marker - for marking installation positions or bolts during a torquing sequence
• Plastic Wire Ties/Zip Ties - for routing and securing wiring harnesses or vacuum hoses
• Electrical tape - for wrapping wiring harnesses or temporary securing of small components
SHOP SUPPLIES AND MATERIALS
Note that both medium and high strength thread locking compounds are required for the S54 Dual Vanos repair.
Page 7
ECS TUNING 1000 SEVILLE RD. WADSWORTH, OH 44281 1.800.924.5172 WWW.ECSTUNING.COM
7
BMW S54 DUAL VANOS REBUILD
®
Return to Table of Contents
• RH refers to the passenger side of the vehicle.
•
LH refers to the driver side of the vehicle.
• Always use the proper torque specifications.
• If applicable to this installation, torque specifications will be listed throughout the document and at the end as well.
• Please read all of these instructions and familiarize yourself with the complete process
BEFORE you begin.
• Park your car in a safe, well lit, level area.
• Shut the engine off and remove the key from the ignition switch.
• Make sure any remote start devices are properly disabled.
•
ALWAYS wear safety glasses.
• Make sure the parking brake is applied until the vehicle is safely lifted and supported.
• If using an automotive lift, be sure and utilize the factory specied lift points. Lifting a vehicle in an incorrect location can cause damage to the
• suspension/running gear.
• When lifting a vehicle using a jack, always utilize the factory specified lift points. Lifting a vehicle in an incorrect location can cause
• damage to the suspension/running gear.
ALWAYS support the vehicle with jack stands.
•
ALWAYS read and follow all safety information and warnings for the equipment you are using.
ECS Tuning cares about your health and safety. Please read the following safety information. This information pertains to automotive service
in general, and while it may not pertain to every job you do, please remember and share these important safety tips.
Never get underneath a vehicle that is supported only by a jack. Always make
sure that the vehicle is securely supported on jack stands.
INSTALLATION NOTES
PREPARATION AND SAFETY INFORMATION
Page 8

ECS TUNING 1000 SEVILLE RD. WADSWORTH, OH 44281 1.800.924.5172 WWW.ECSTUNING.COM
8
BMW S54 DUAL VANOS REBUILD
®
Return to Table of Contents
1a: Initial component removal and Vanos system access ............................................................................................................................... Page 9
Section 1: Getting Started
2a: Removing the valve block .................................................................................................................................................................................P a g e 11
Section 2: Valve Block Service
2b: Cleaning and solenoid/valve operation ........................................................................................................................................................P age 13
2c: Seal and filter replacement ............................................................................................................................................................................... Pa ge 15
3a: Piston housing removal ..................................................................................................................................................................................... Page 18
Section 3: Piston Housing Service
3b: Oil system service ................................................................................................................................................................................................Page 27
3c: Intake piston seal replacement ........................................................................................................................................................................ Page 39
3d: Exhaust piston seal replacement ..................................................................................................................................................................... Page 49
4b: Vanos hub service ................................................................................................................................................................................................ Page 71
Section 4: Anti Rattle Repairs
4d: Upper timing chain guide replacement ........................................................................................................................................................ Page 79
5a: Reassembly ............................................................................................................................................................................................................ Page 85
Section 5: Reassembly
VANOS REPAIR PROCEDURES
4a: Vanos transfer gear service ............................................................................................................................................................................... Page 56
4c: Cam sprocket service .......................................................................................................................................................................................... Page 76
Page 9
ECS TUNING 1000 SEVILLE RD. WADSWORTH, OH 44281 1.800.924.5172 WWW.ECSTUNING.COM
9
BMW S54 DUAL VANOS REBUILD
®
Return to Vanos Repair Table of Contents
SECTION 1A: VANOS SYSTEM ACCESS
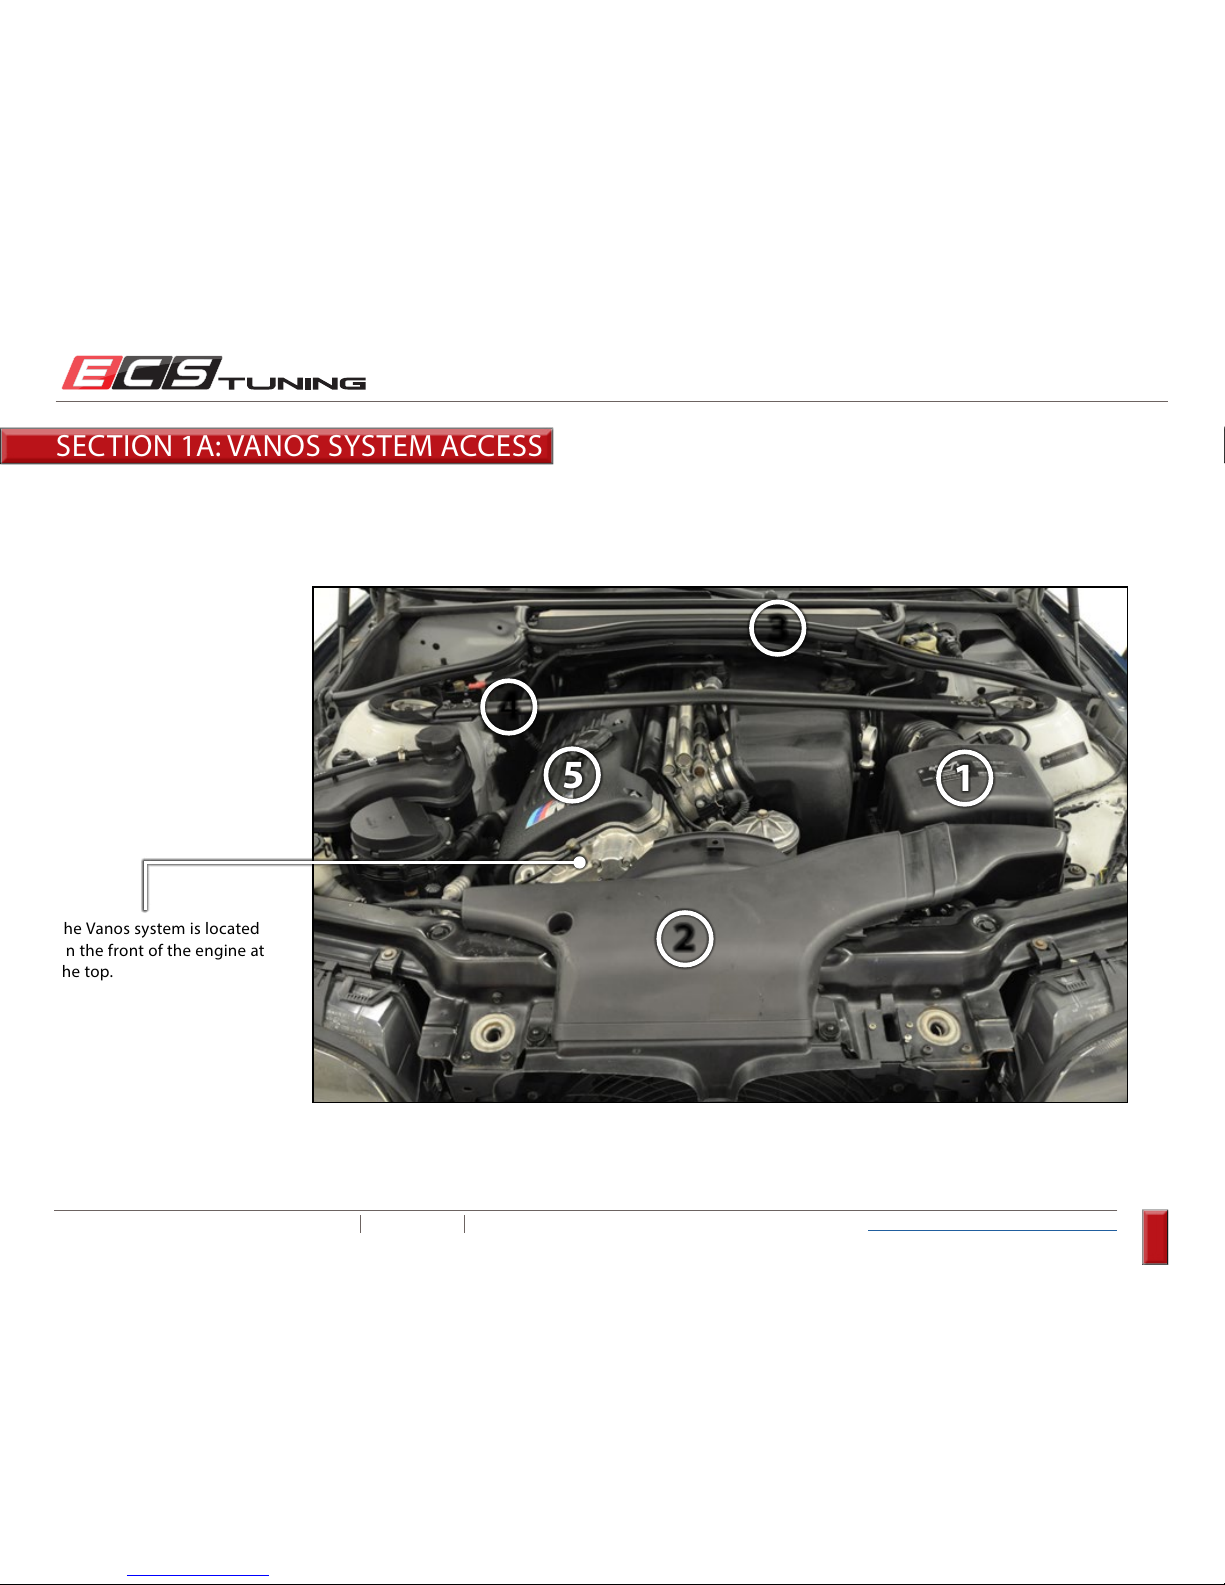
Component removal to get down to the Vanos system is pretty basic, and we’re betting if you’re going to tackle this job you don’t need us to step
you through the easy stuff, but we’ll give you a quick run-down anyhow. The following items will need to be removed:
2. Radiator Fan and Shroud
1. Air Box
3. Cabin Filter Housing
4. Suspension Cross Brace
5. Engine Top Cover, Valve
Cover, and Ignition Coils
1
3
5
2
4
The Vanos system is located
on the front of the engine at
the top.
Page 10
ECS TUNING 1000 SEVILLE RD. WADSWORTH, OH 44281 1.800.924.5172 WWW.ECSTUNING.COM
10
BMW S54 DUAL VANOS REBUILD
®
Return to Vanos Repair Table of Contents
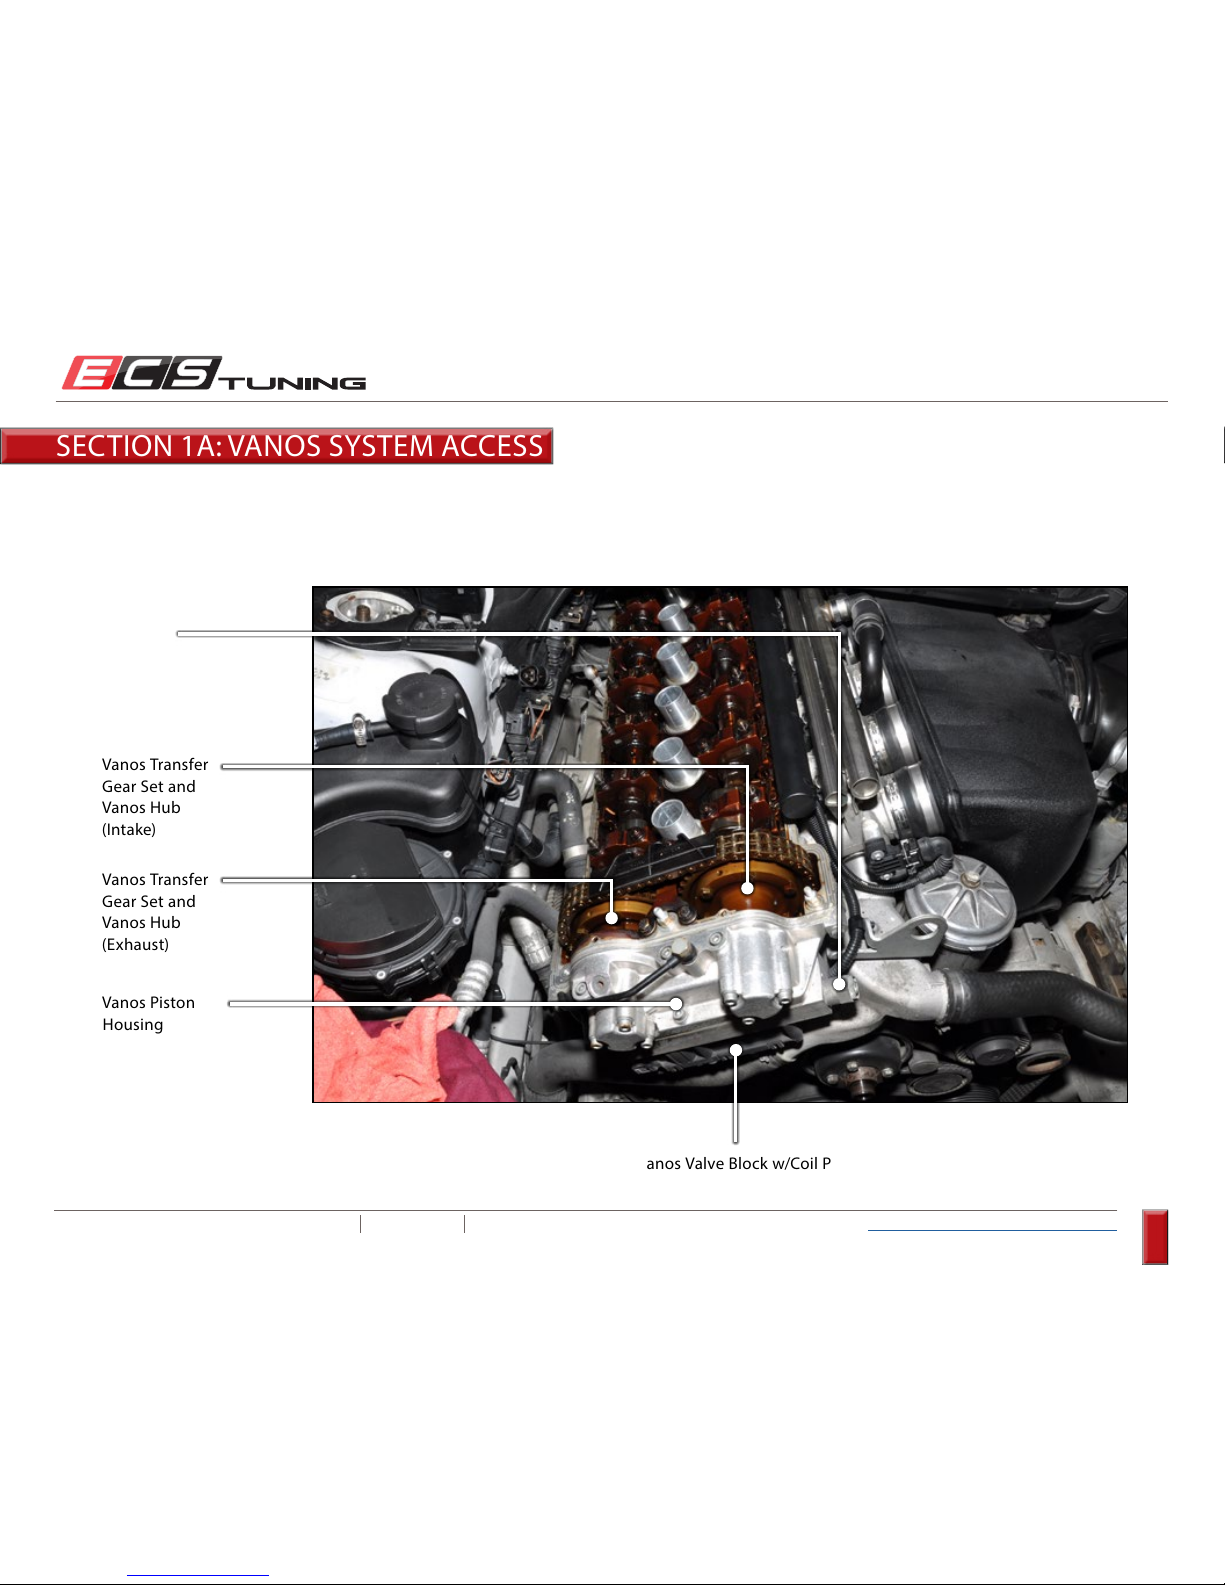
With all the preliminary components removed, you’ll have plenty of room to access the Vanos system, timing chains, and camshafts. As we
mentioned in the introduction, this is a perfect time to perform a valve adjustment.
Vanos Transfer
Gear Set and
Vanos Hub
(Intake)
Vanos Transfer
Gear Set and
Vanos Hub
(Exhaust)
Vanos Valve Block w/Coil Pack
Vanos Piston
Housing
Pressure
Limiting
Valve
SECTION 1A: VANOS SYSTEM ACCESS
- End of Section 1a -
Page 11
ECS TUNING 1000 SEVILLE RD. WADSWORTH, OH 44281 1.800.924.5172 WWW.ECSTUNING.COM
11
BMW S54 DUAL VANOS REBUILD
®
Return to Vanos Repair Table of Contents
Step 1:
Step 2:
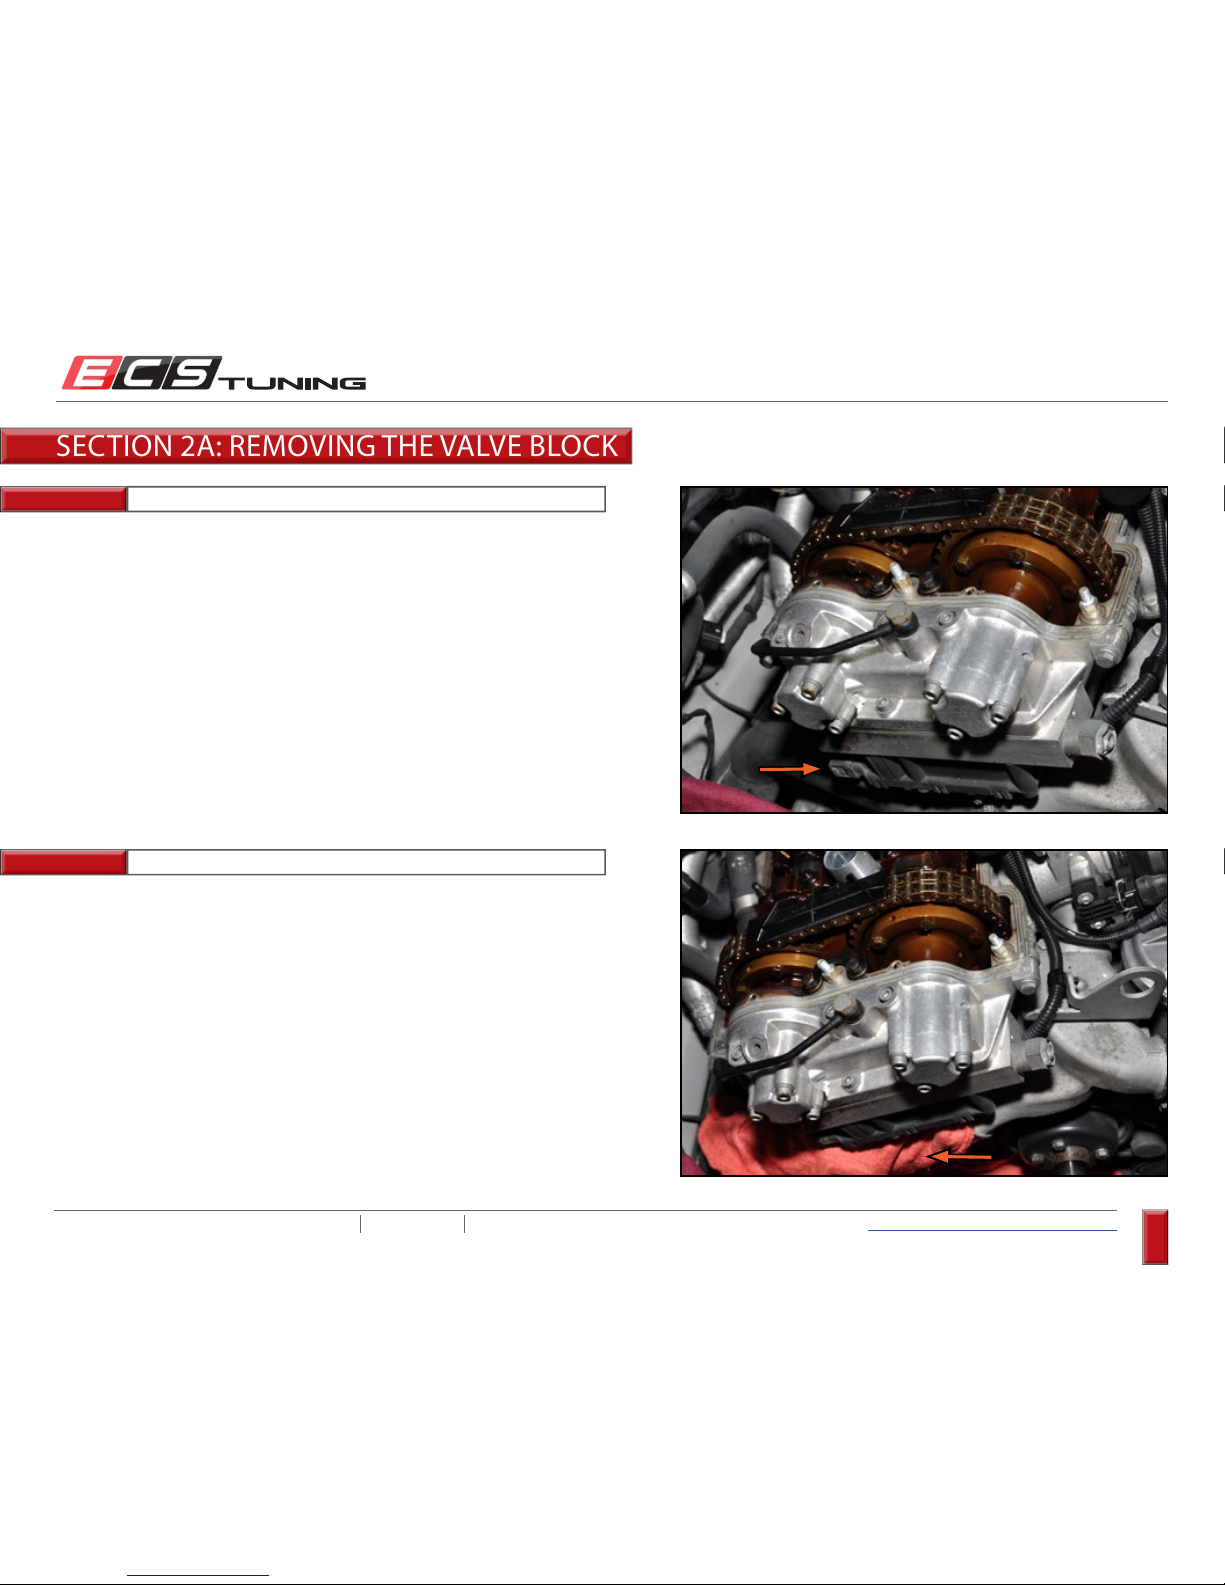
Disconnect the electrical plug from the coil pack. It’s located on the lower
left side, and should unplug pretty easily by hand.
Place shop rags underneath the valve block to protect the coolant hose
and belts from oil that you’ll lose when you loosen the bolts.
SECTION 2A: REMOVING THE VALVE BLOCK
There may be a cable tie near the plug that secures the harness in place. If
so, remove it by cutting it off.
Page 12
ECS TUNING 1000 SEVILLE RD. WADSWORTH, OH 44281 1.800.924.5172 WWW.ECSTUNING.COM
12
BMW S54 DUAL VANOS REBUILD
®
Return to Vanos Repair Table of Contents
Step 3:
Step 4:
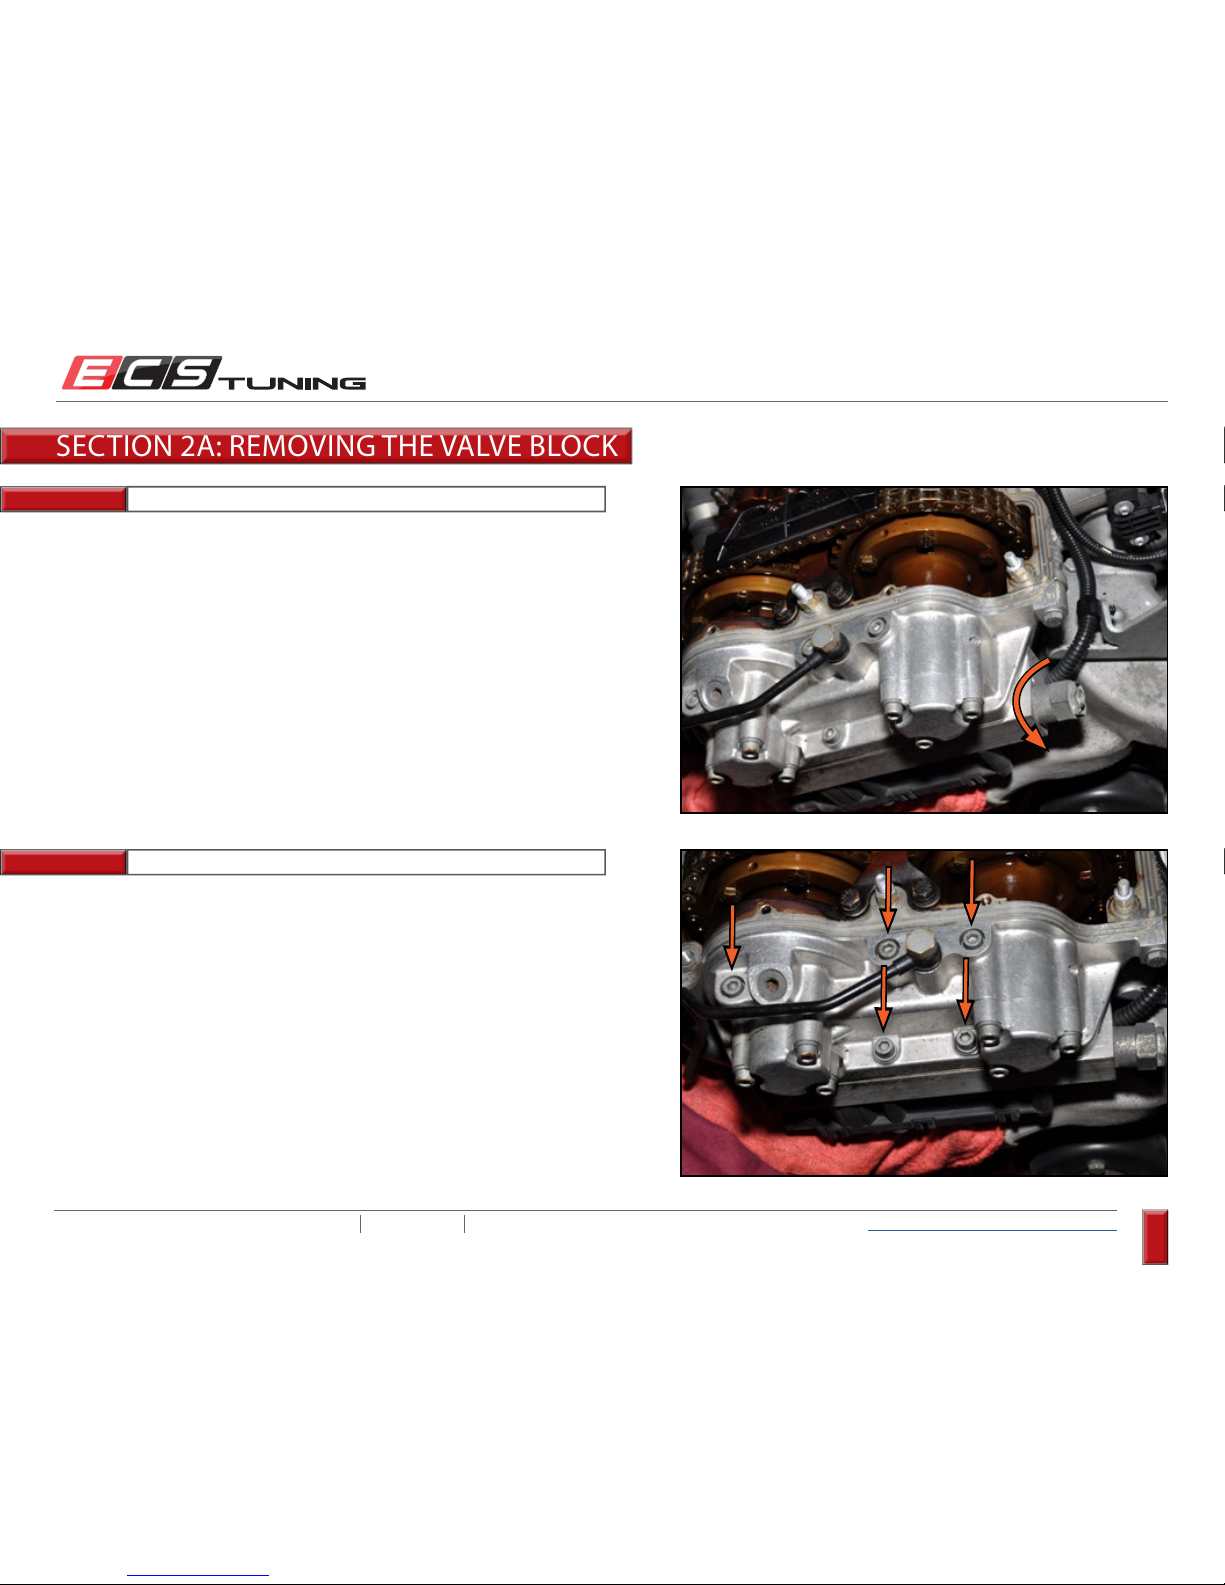
22mm Wrench
5mm Allen (Hex Bit)
Loosen the pressure limiter in the valve block. Do not remove it at this
time, just break it loose.
Remove the five mounting bolts, then pull the valve block out from
underneath the piston housing and remove it along with the sealing plate.
SECTION 2A: REMOVING THE VALVE BLOCK
- End of Section 2a -
Page 13
ECS TUNING 1000 SEVILLE RD. WADSWORTH, OH 44281 1.800.924.5172 WWW.ECSTUNING.COM
13
BMW S54 DUAL VANOS REBUILD
®
Return to Vanos Repair Table of Contents
Step 1:
Step 2:
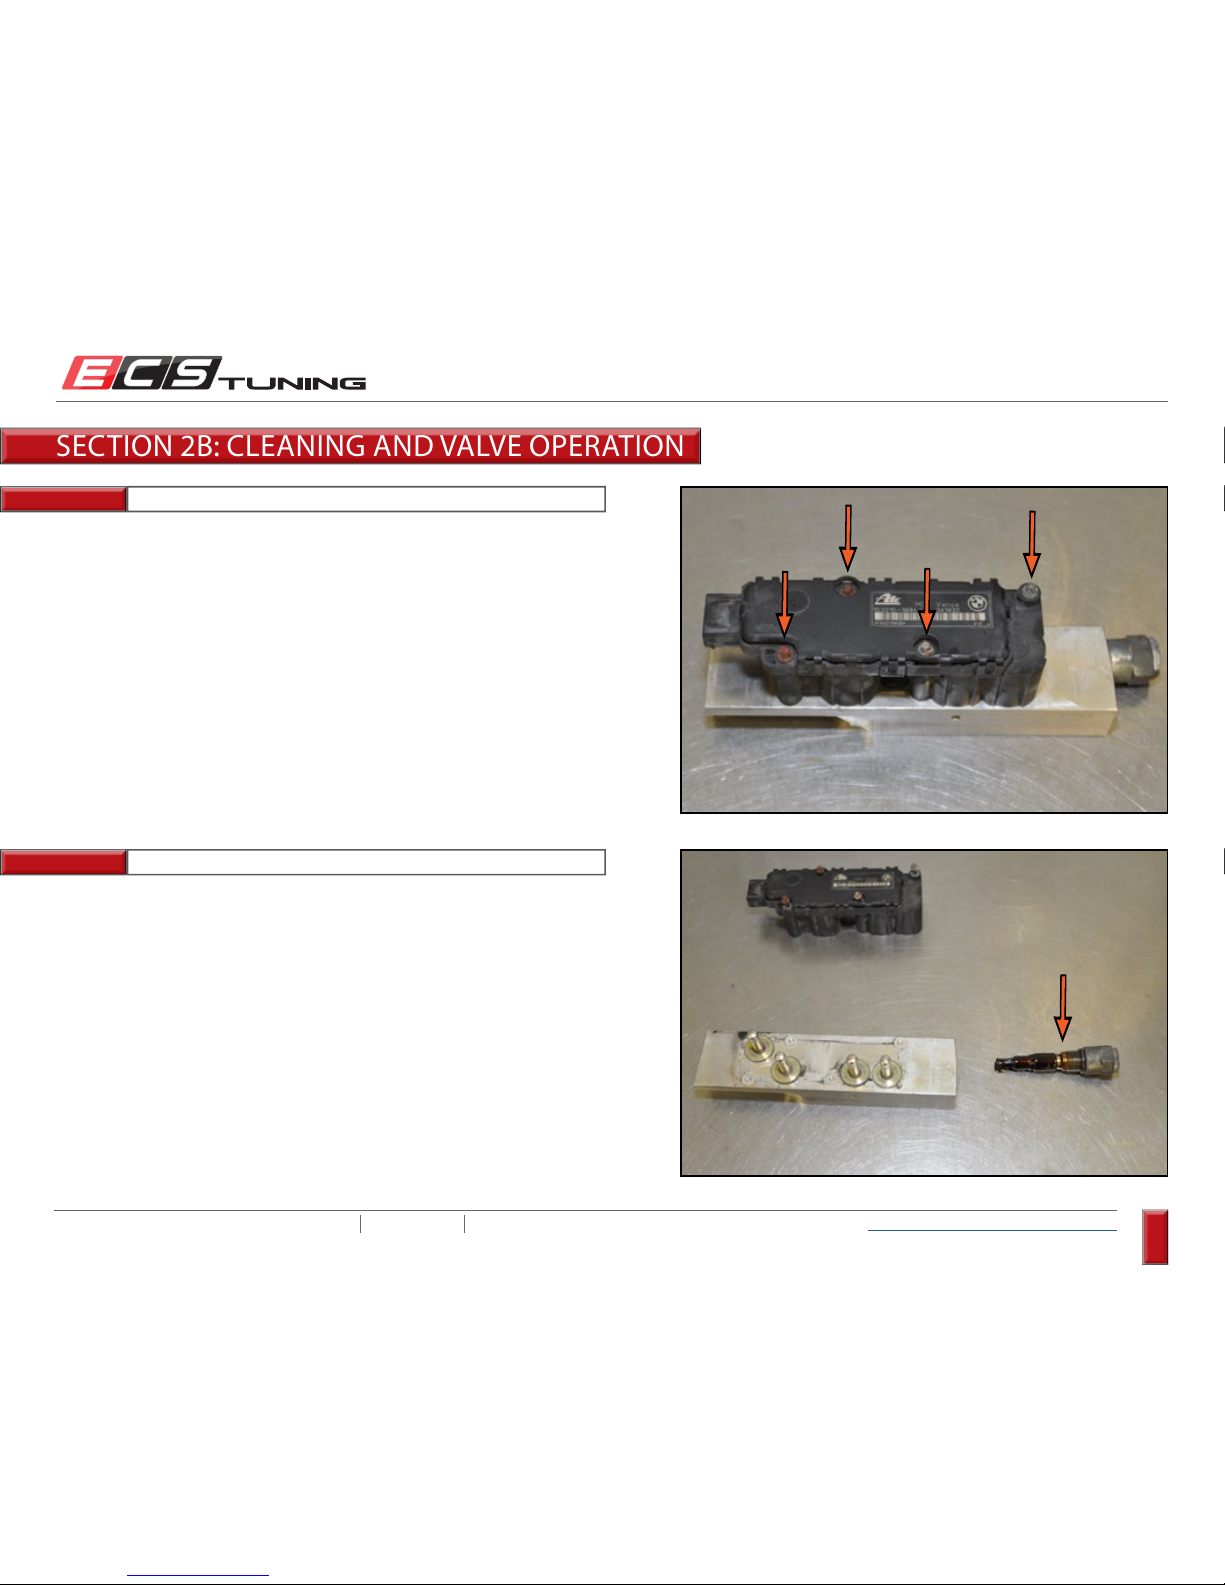
E5 Torx Socket
Remove the four coil pack mounting screws and lift the coil pack off of the
valve block.
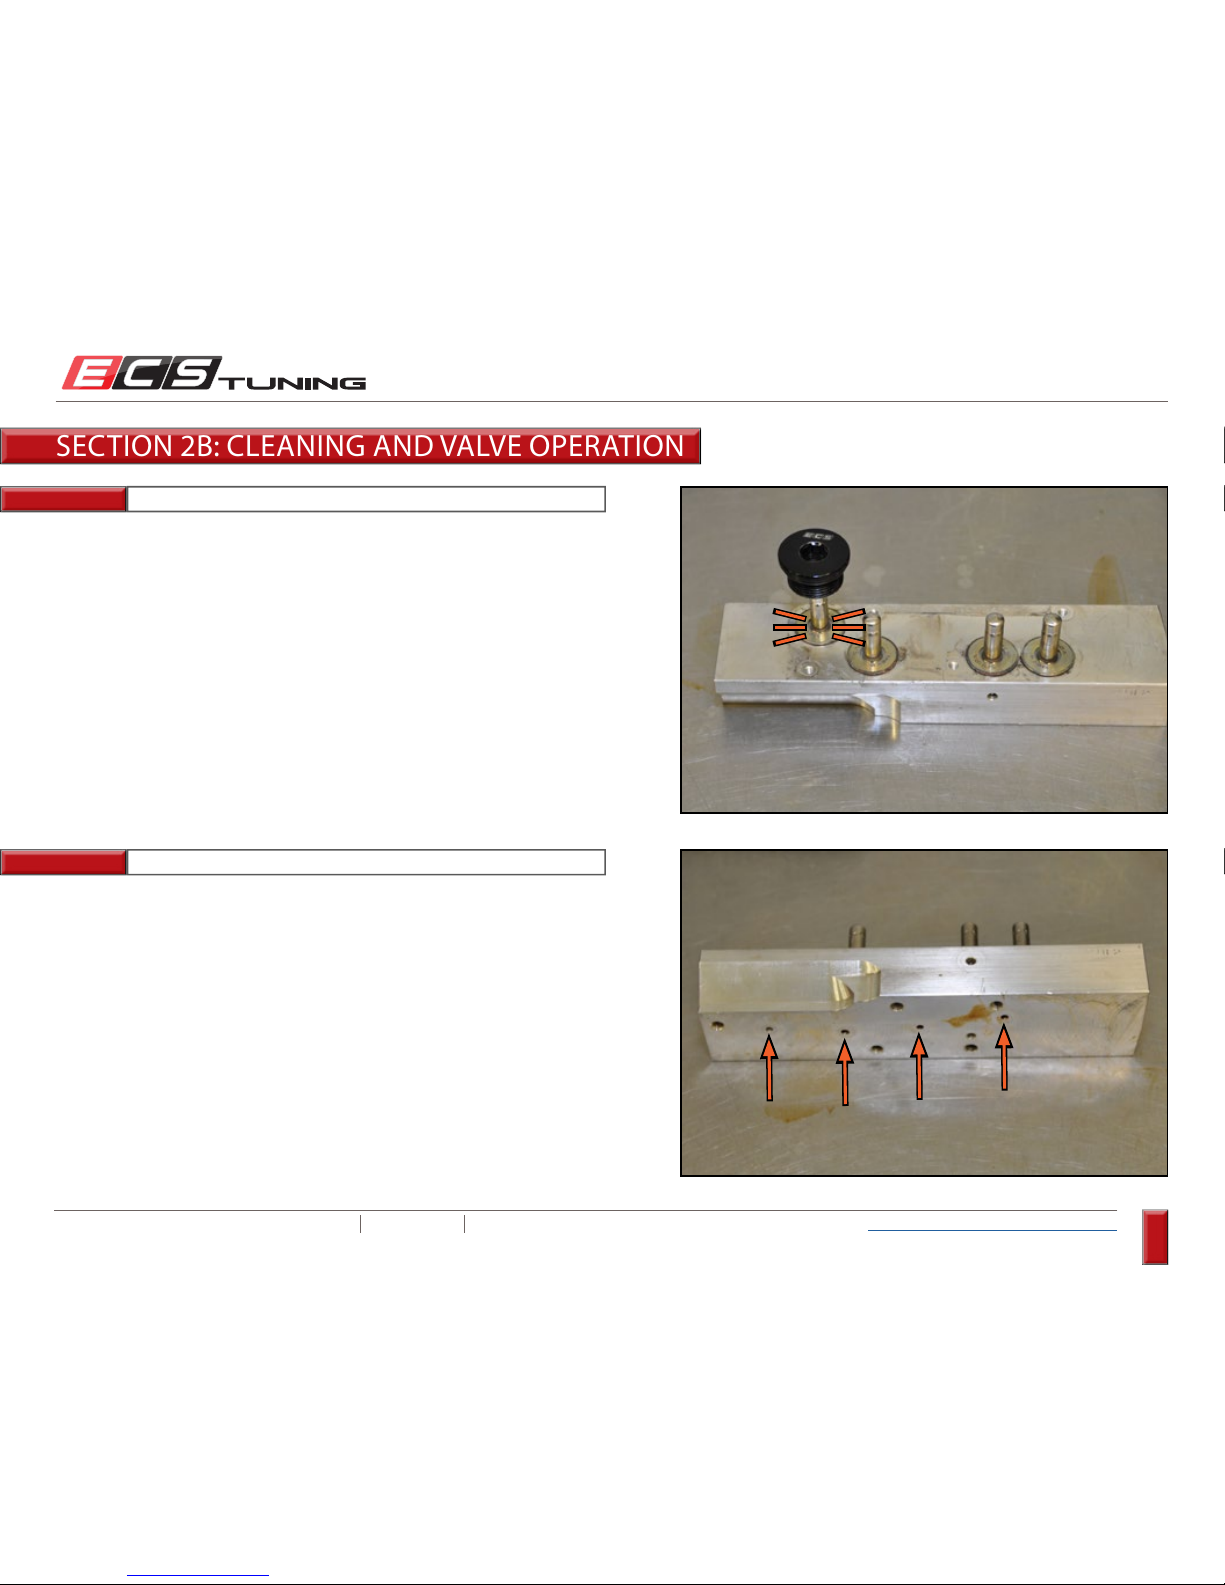
Unthread and remove the pressure limiter from the valve block (you
should have loosened this on page 12).
SECTION 2B: CLEANING AND VALVE OPERATION
Page 14
ECS TUNING 1000 SEVILLE RD. WADSWORTH, OH 44281 1.800.924.5172 WWW.ECSTUNING.COM
14
BMW S54 DUAL VANOS REBUILD
®
Return to Vanos Repair Table of Contents
Step 3:
Step 4:
Strong Magnet
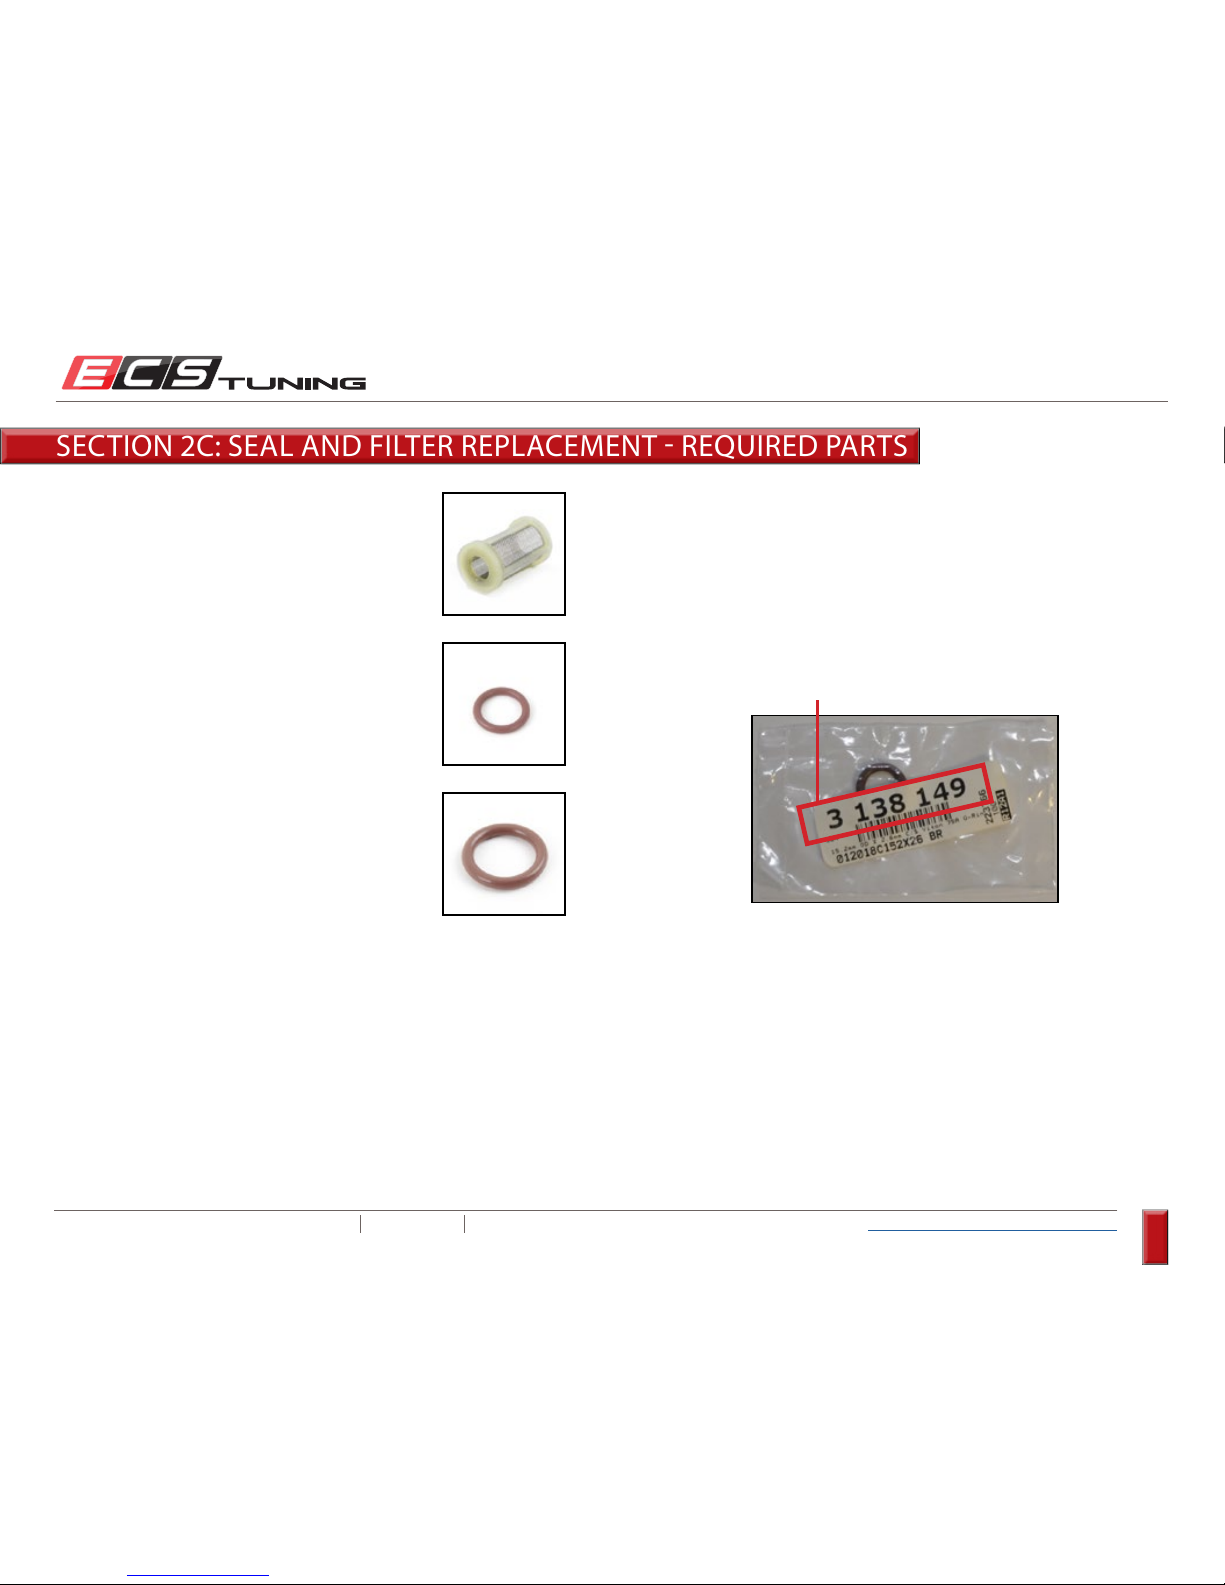
Clean the outside of the valve block thoroughly. Next, place a magnet
onto the end of each solenoid plunger. We are using a large drain plug
magnet here. Listen very closely as you place the magnet onto the
plunger, then remove it. You will hear a faint “click” as the valve opens
and closes.
One at a time, place the magnet on top of each plunger and confirm that
you hear the “click” of the valve opening. With the valve open, spray
brake cleaner into the corresponding hole underneath to flush out any
debris.
SECTION 2B: CLEANING AND VALVE OPERATION
- End of Section 2b -
Page 15
ECS TUNING 1000 SEVILLE RD. WADSWORTH, OH 44281 1.800.924.5172 WWW.ECSTUNING.COM
15
BMW S54 DUAL VANOS REBUILD
®
Return to Vanos Repair Table of Contents
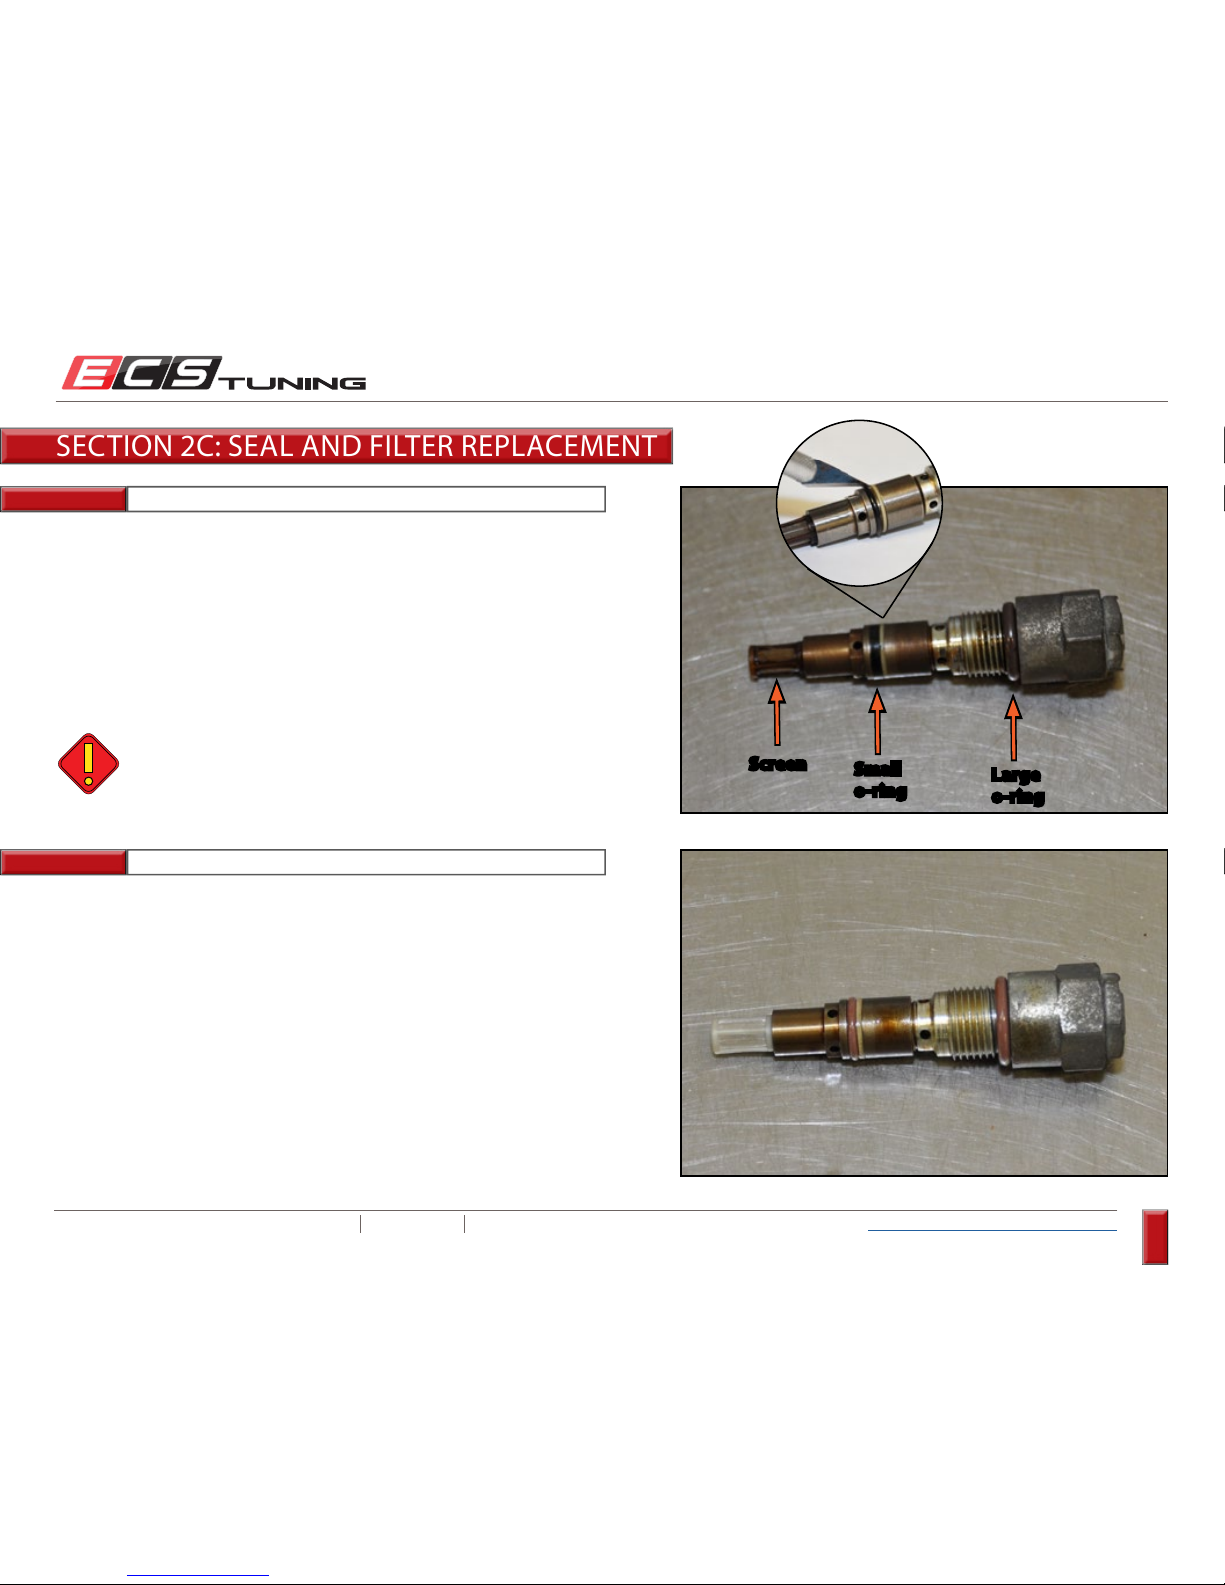
ES#23069
Description...............Vanos Filter
Location .................... Pressure Limiting Valve
Quantity .................... 1
ES#3138145
Description...............14mm OD x 2.0mm o-Ring
Location .................... Pressure Limiting Valve Small
Quantity .................... 1
ES#313814 6
Description...............14.5mm ID x 3mm o-Ring
Location .................... Pressure Limiting Valve Large
Quantity .................... 1
All o-rings and Teflon rings will be sealed in individual poly bags
- do not unpack them until you are ready to install them. Prior to
use, always positively identify each seal by the ES# on the label.
ES#
NOTE:
SECTION 2C: SEAL AND FILTER REPLACEMENT REQUIRED PARTS
Page 16
ECS TUNING 1000 SEVILLE RD. WADSWORTH, OH 44281 1.800.924.5172 WWW.ECSTUNING.COM
16
BMW S54 DUAL VANOS REBUILD
®
Return to Vanos Repair Table of Contents
Step 1:
Step 2:
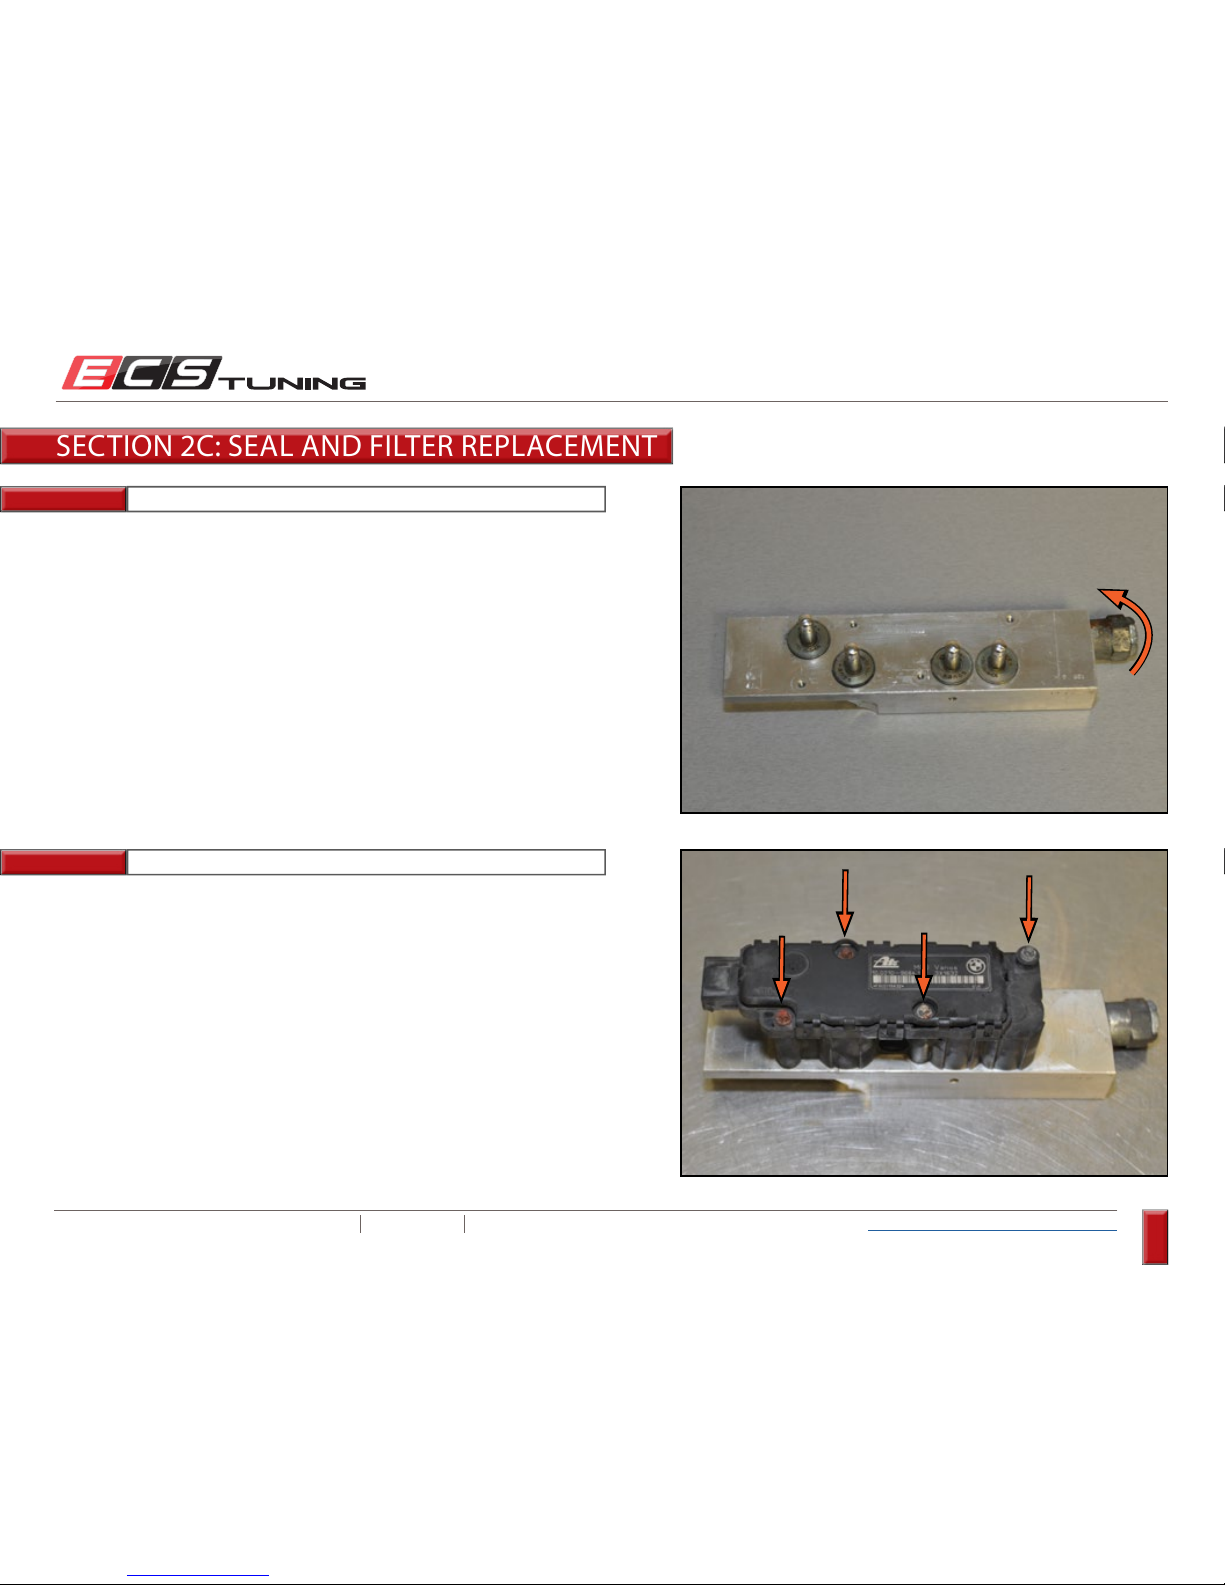
Remove the large o-ring, small o-ring, and the screen from the pressure
limiter, using the following guidelines:
Install the new large and small o-rings, and the new screen onto the
pressure limiter.
SECTION 2C: SEAL AND FILTER REPLACEMENT
1) Pull the screen off the end of the limiter using a pair of pliers.
Screen
Small
o-ring
Large
o-ring
2) Carefully cut the small o-ring off using an exacto knife.
3) Remove the large o-ring.
Be careful not to cut the nylon washer when removing the
small o-ring. You may also notice a split in the washer. This is
normal. The washer is split for the purpose of installation.
Page 17
ECS TUNING 1000 SEVILLE RD. WADSWORTH, OH 44281 1.800.924.5172 WWW.ECSTUNING.COM
17
BMW S54 DUAL VANOS REBUILD
®
Return to Vanos Repair Table of Contents
Step 3:
Step 4: E5 Torx Socket, 1/4” Torque Wrench
Lubricate the o-rings with clean engine oil, then thread the pressure
limiter back into the valve block. You do not have to tighten it at this
point, you’ll tighten it later after it is installed.
Reinstall the coil pack and torque the mounting screws in an even manner
to 4 Nm (3 Ft-lbs).
SECTION 2C: SEAL AND FILTER REPLACEMENT
You’re all done with the valve block! You can set it aside for now
until it’s time for reassembly.
- End of Section 2c -
Page 18
ECS TUNING 1000 SEVILLE RD. WADSWORTH, OH 44281 1.800.924.5172 WWW.ECSTUNING.COM
18
BMW S54 DUAL VANOS REBUILD
®
Return to Vanos Repair Table of Contents
Step 1:
Step 2:
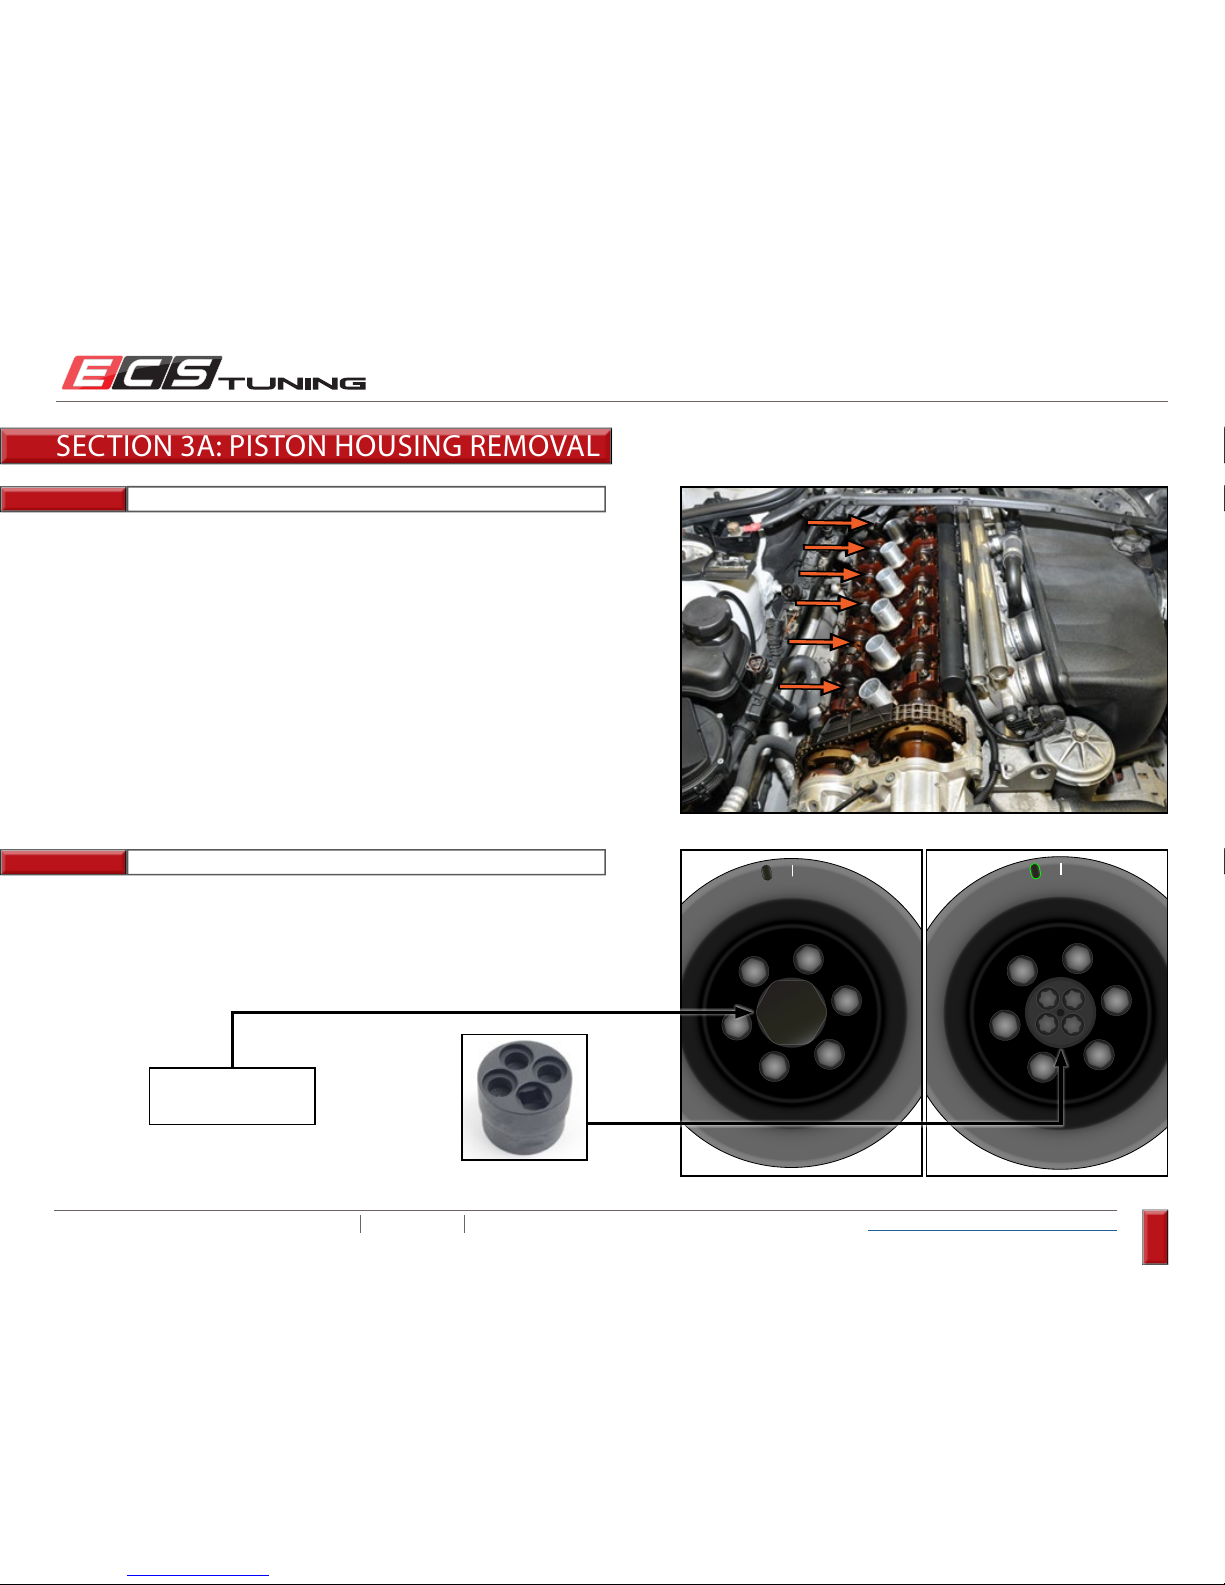
Remove the spark plugs. You’re going to have to rotate the engine over a
few times during this repair, and this will make it much easier.
Inspect the front of the crankshaft pulley (you may need to use a mirror).
You will see either a large hex or four Torx bolts. The large hex will require
a 32mm socket, and if equipped with the four Torx bolts, you will need the
special socket that is included in the S54 camshaft alignment tool kit.
O T
SECTION 3A: PISTON HOUSING REMOVAL
O T
Requires 32mm
Socket
Page 19
ECS TUNING 1000 SEVILLE RD. WADSWORTH, OH 44281 1.800.924.5172 WWW.ECSTUNING.COM
19
BMW S54 DUAL VANOS REBUILD
®
Return to Vanos Repair Table of Contents
Step 3:
Step 4: 1/2” Drive Ratchet
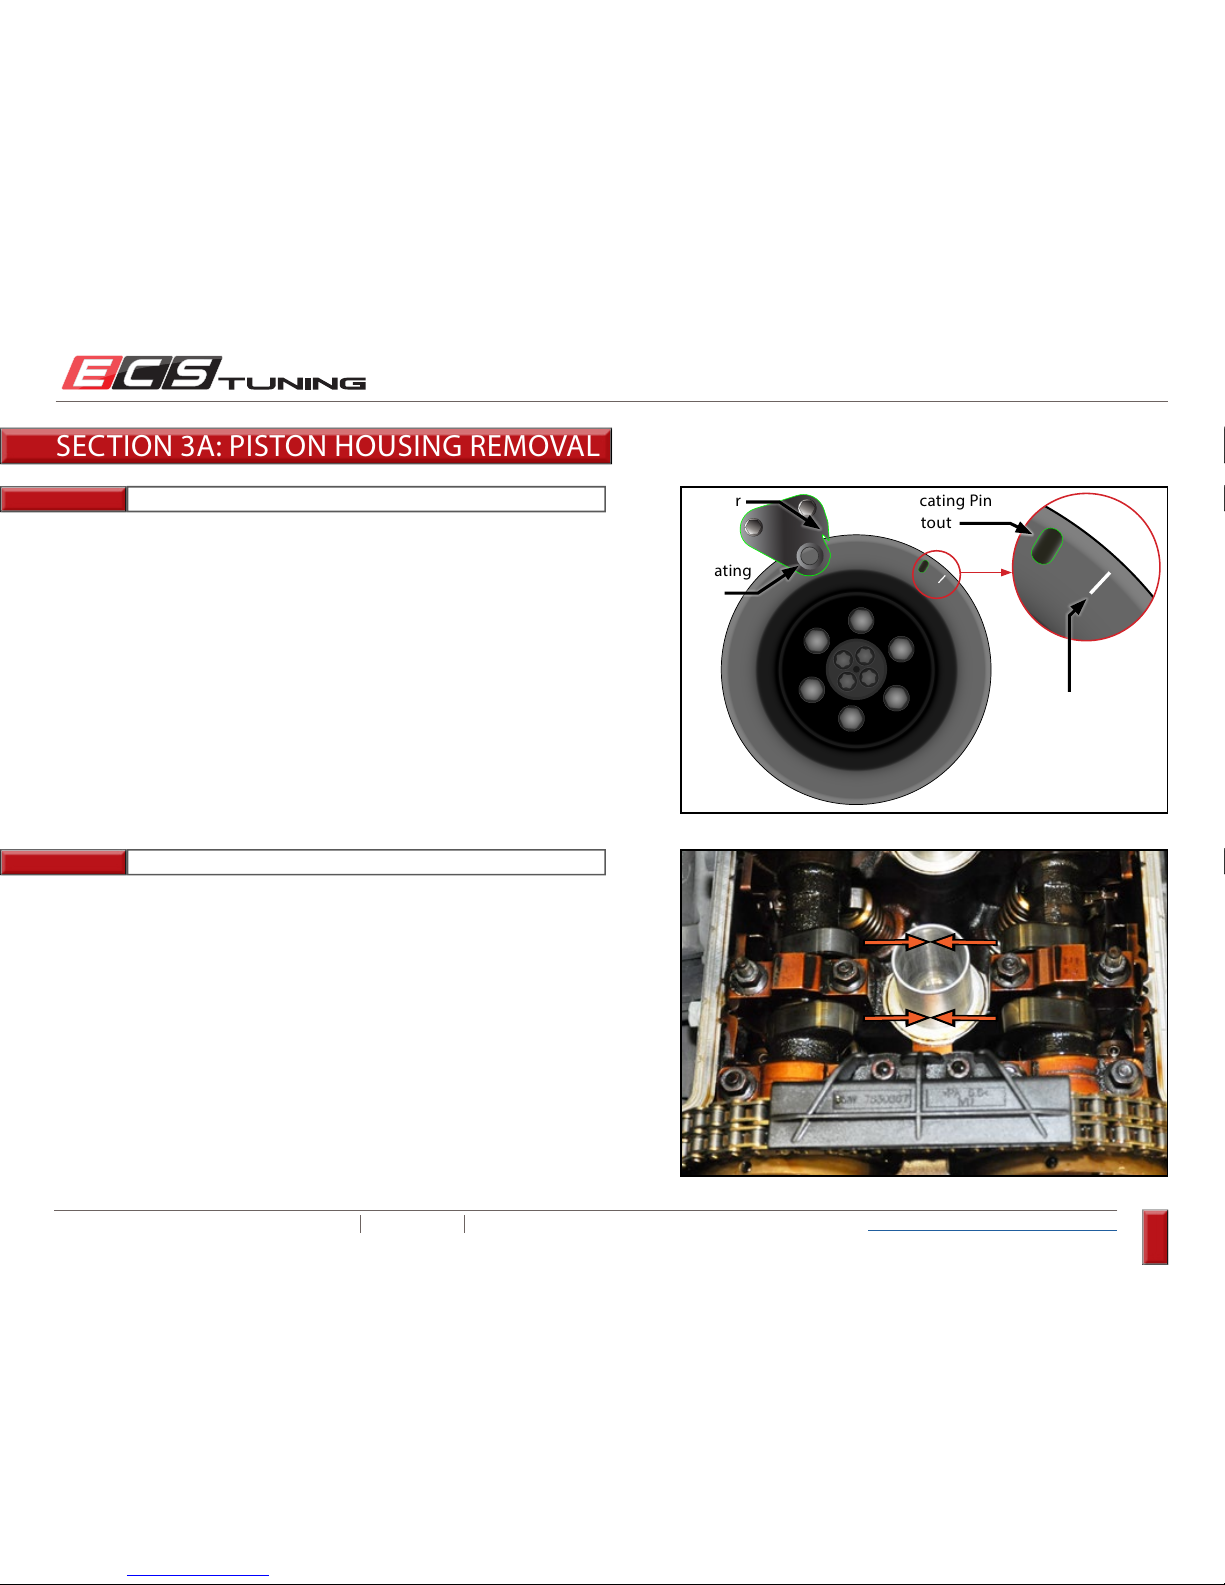
The crankshaft pulley has a line that indicates top dead center and a small
recessed cutout for the crankshaft locating pin. Locate these marks and
also note that there is a fixed pointer that is located in approximately
the 11 o’clock position. The pointer also has a hole in it to accept the
crankshaft locating pin.
Using a long ratchet and the socket needed for your engine (step 2), rotate
the engine in a clockwise direction until the intake and exhaust cam lobes
on cylinder #1 are pointing together in an approximate 45 degree angle.
O T
O T
TDC indicating
mark
Locating Pin
Cutout
When the cylinder #1 cam lobes are pointing at each other, this indicates
that the engine is at (approximately) TDC.
Pointer
Locating
Pin
SECTION 3A: PISTON HOUSING REMOVAL
Page 20
ECS TUNING 1000 SEVILLE RD. WADSWORTH, OH 44281 1.800.924.5172 WWW.ECSTUNING.COM
20
BMW S54 DUAL VANOS REBUILD
®
Return to Vanos Repair Table of Contents
Step 5:
Step 6:
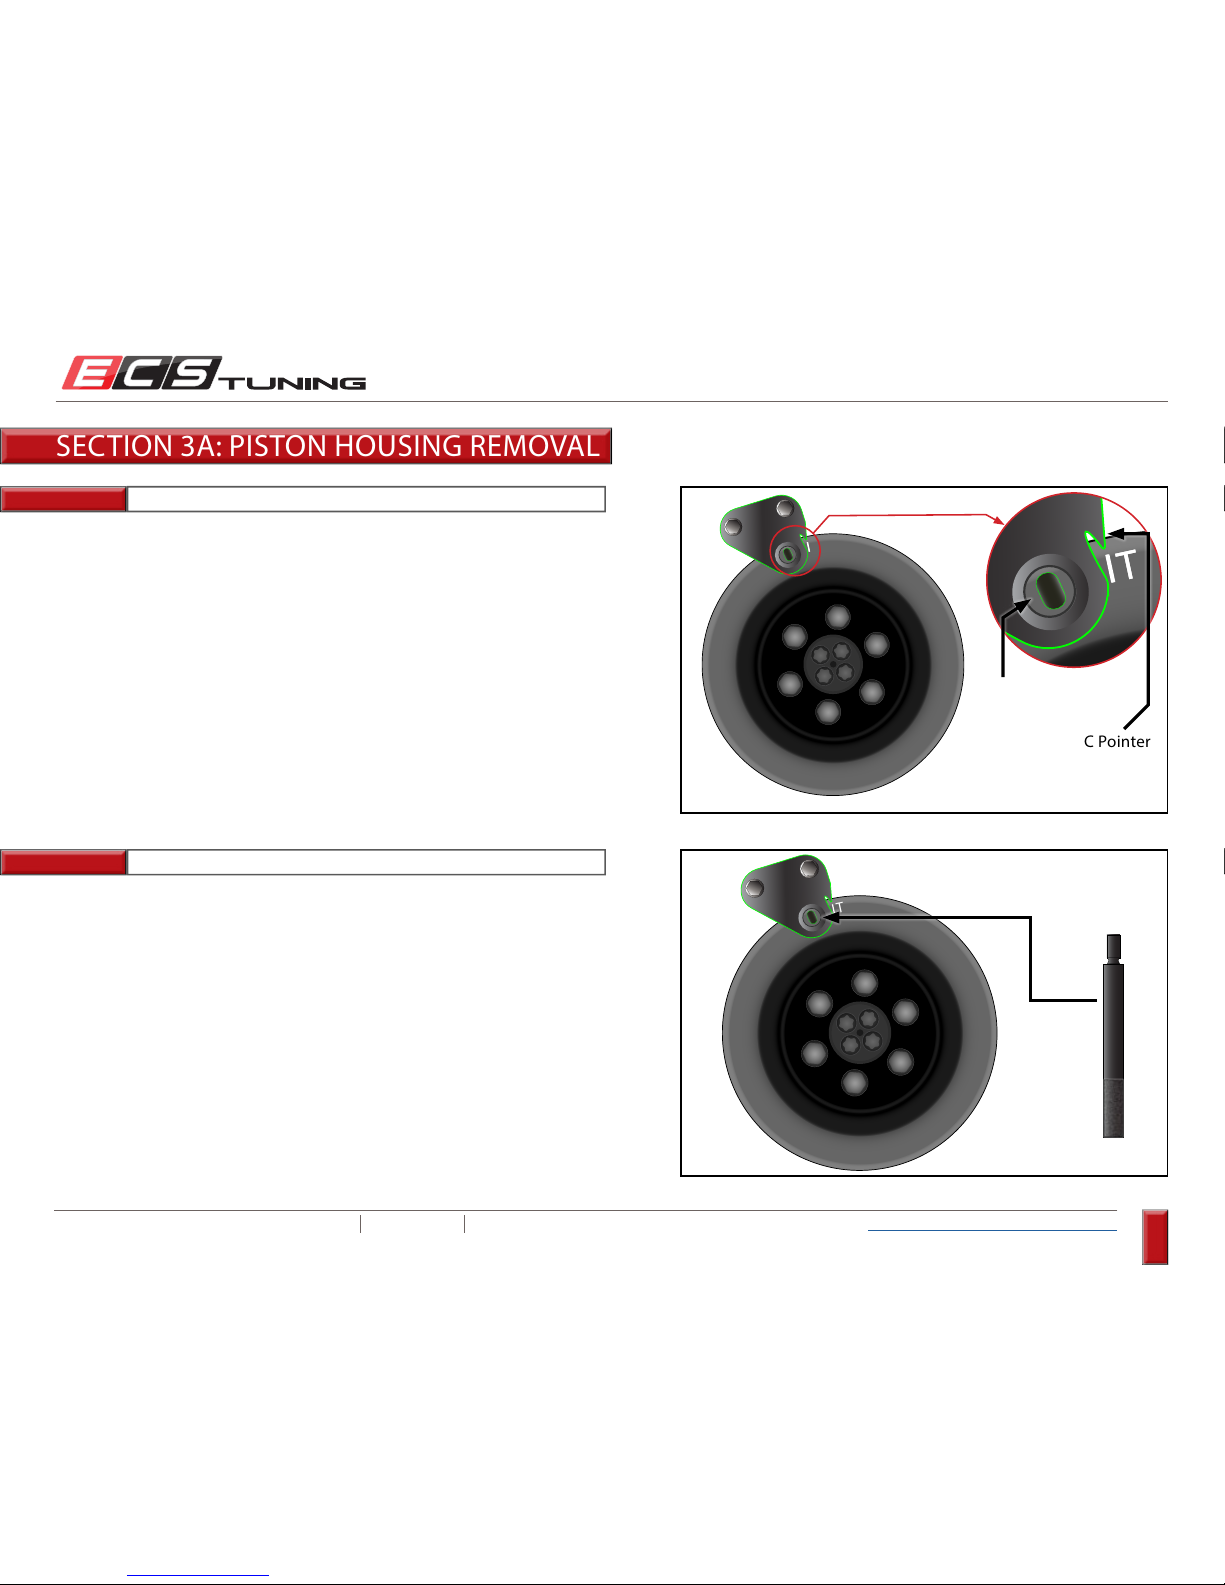
Make fine adjustments as needed so the TDC pointer is lined up with the
TDC indicating mark on the crank pulley. In this position, the locating pin
cutout will be centered perfectly in the hole in the pointer.
Insert the crankshaft locking pin into the hole in the pointer and into the
crankshaft pulley. Make sure that the end of the pin is fully seated into the
crank pulley.
O T
O T
O T
O T
O T
TDC Pointer
Locating Pin
Cutout
It is OK to rotate the crankshaft counter clockwise in order to line up the
marks.
SECTION 3A: PISTON HOUSING REMOVAL
Page 21
ECS TUNING 1000 SEVILLE RD. WADSWORTH, OH 44281 1.800.924.5172 WWW.ECSTUNING.COM
21
BMW S54 DUAL VANOS REBUILD
®
Return to Vanos Repair Table of Contents
Step 7:
Step 8:
24mm Open End Wrench
24mm Open End Wrench
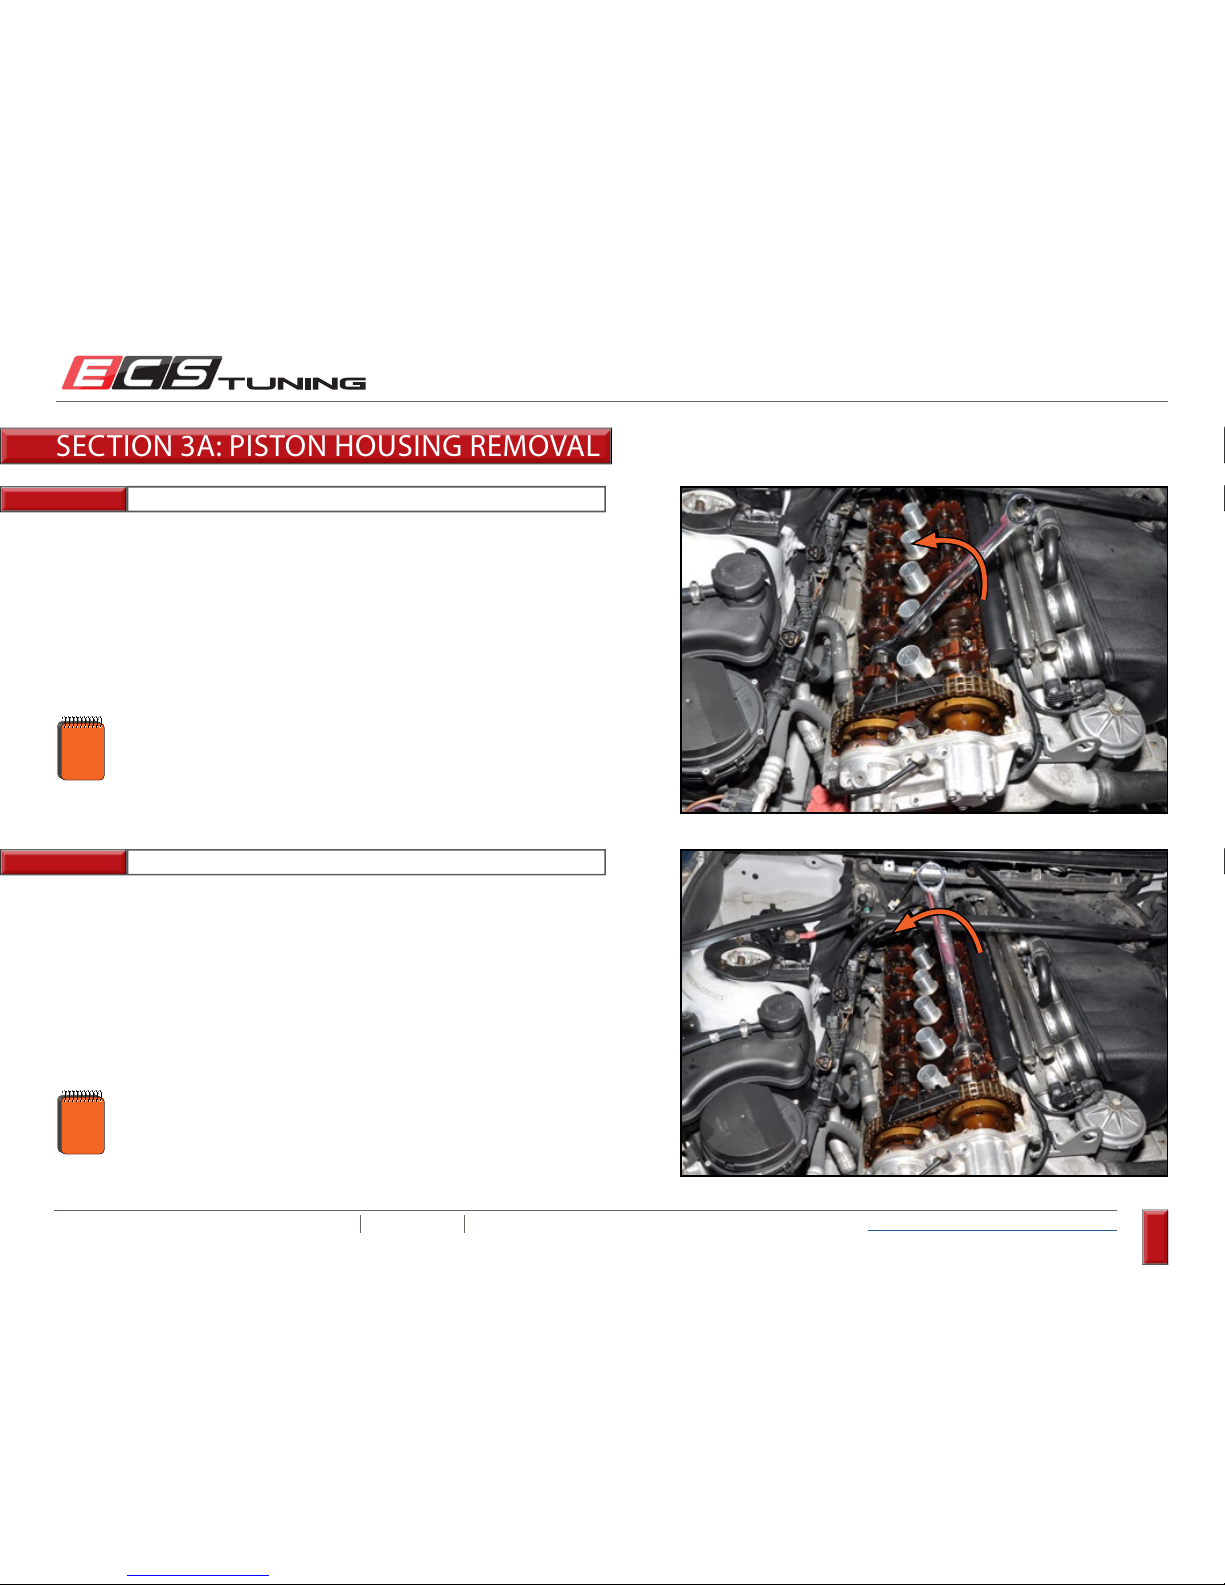
Fully retard the exhaust camshaft by rotating it counter clockwise. There
is a hex on the camshaft so you can engage a 24mm wrench.
You may have to rock the cam back and forth at first to get it
to rotate, and it does not have to rotate very far for the transfer
gear to fully extend.
Doing this causes the transfer gear to extend fully out the front of the
Vanos hub, making it easier to disconnect if from the Vanos piston.
NOTE
Fully retard the intake camshaft by rotating it counter clockwise. There is
a hex on the camshaft so you can engage a 24mm wrench.
Reference Step 9 for fully retarded position
Reference Step 9 for fully retarded position
SECTION 3A: PISTON HOUSING REMOVAL
You may have to rock the cam back and forth at first to get it
to rotate, and it does not have to rotate very far for the transfer
gear to fully extend.
Doing this causes the transfer gear to extend fully out the front of the
Vanos hub, making it easier to disconnect if from the Vanos piston.
NOTE
Page 22
ECS TUNING 1000 SEVILLE RD. WADSWORTH, OH 44281 1.800.924.5172 WWW.ECSTUNING.COM
22
BMW S54 DUAL VANOS REBUILD
®
Return to Vanos Repair Table of Contents
Step 9:
Step 10: 5mm Allen (Hex Bit)
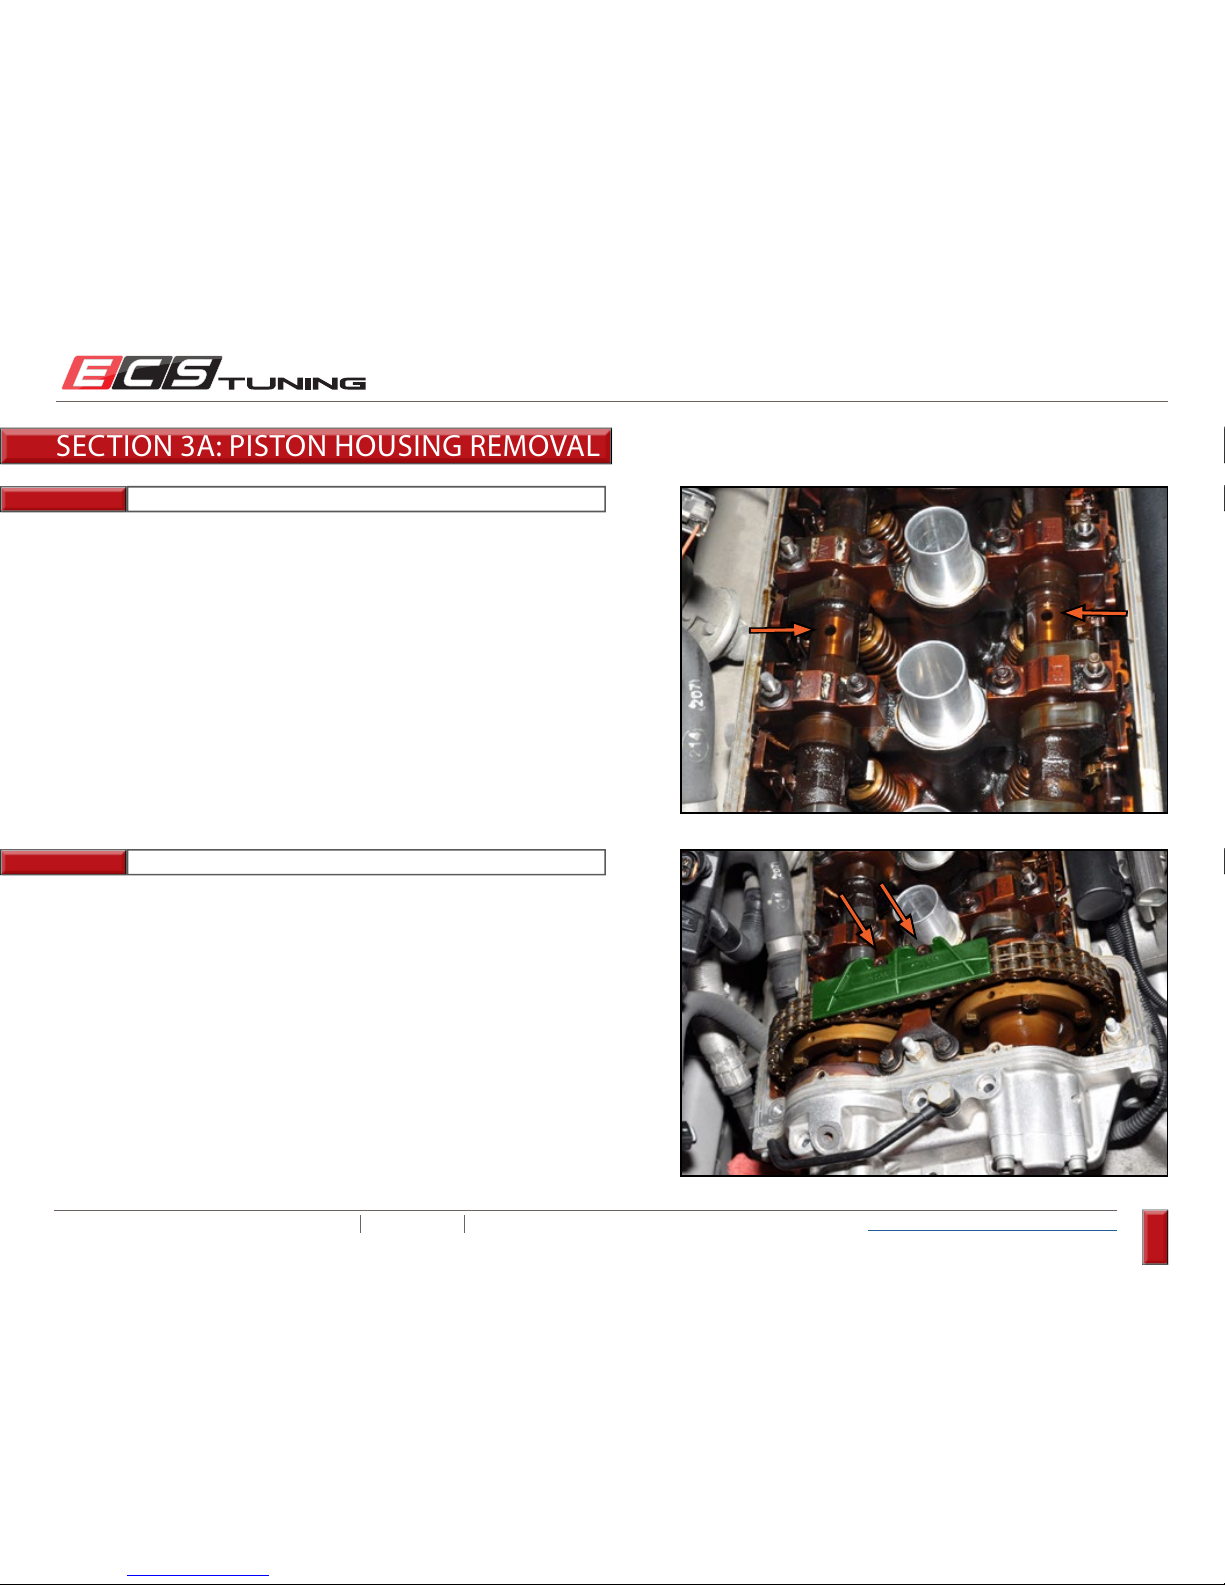
There is a hole in each camshaft between cylinders 2 and 3. When both
cams are fully retarded, the holes will be facing upward in approximately a
90 degree angle to the cylinder head.
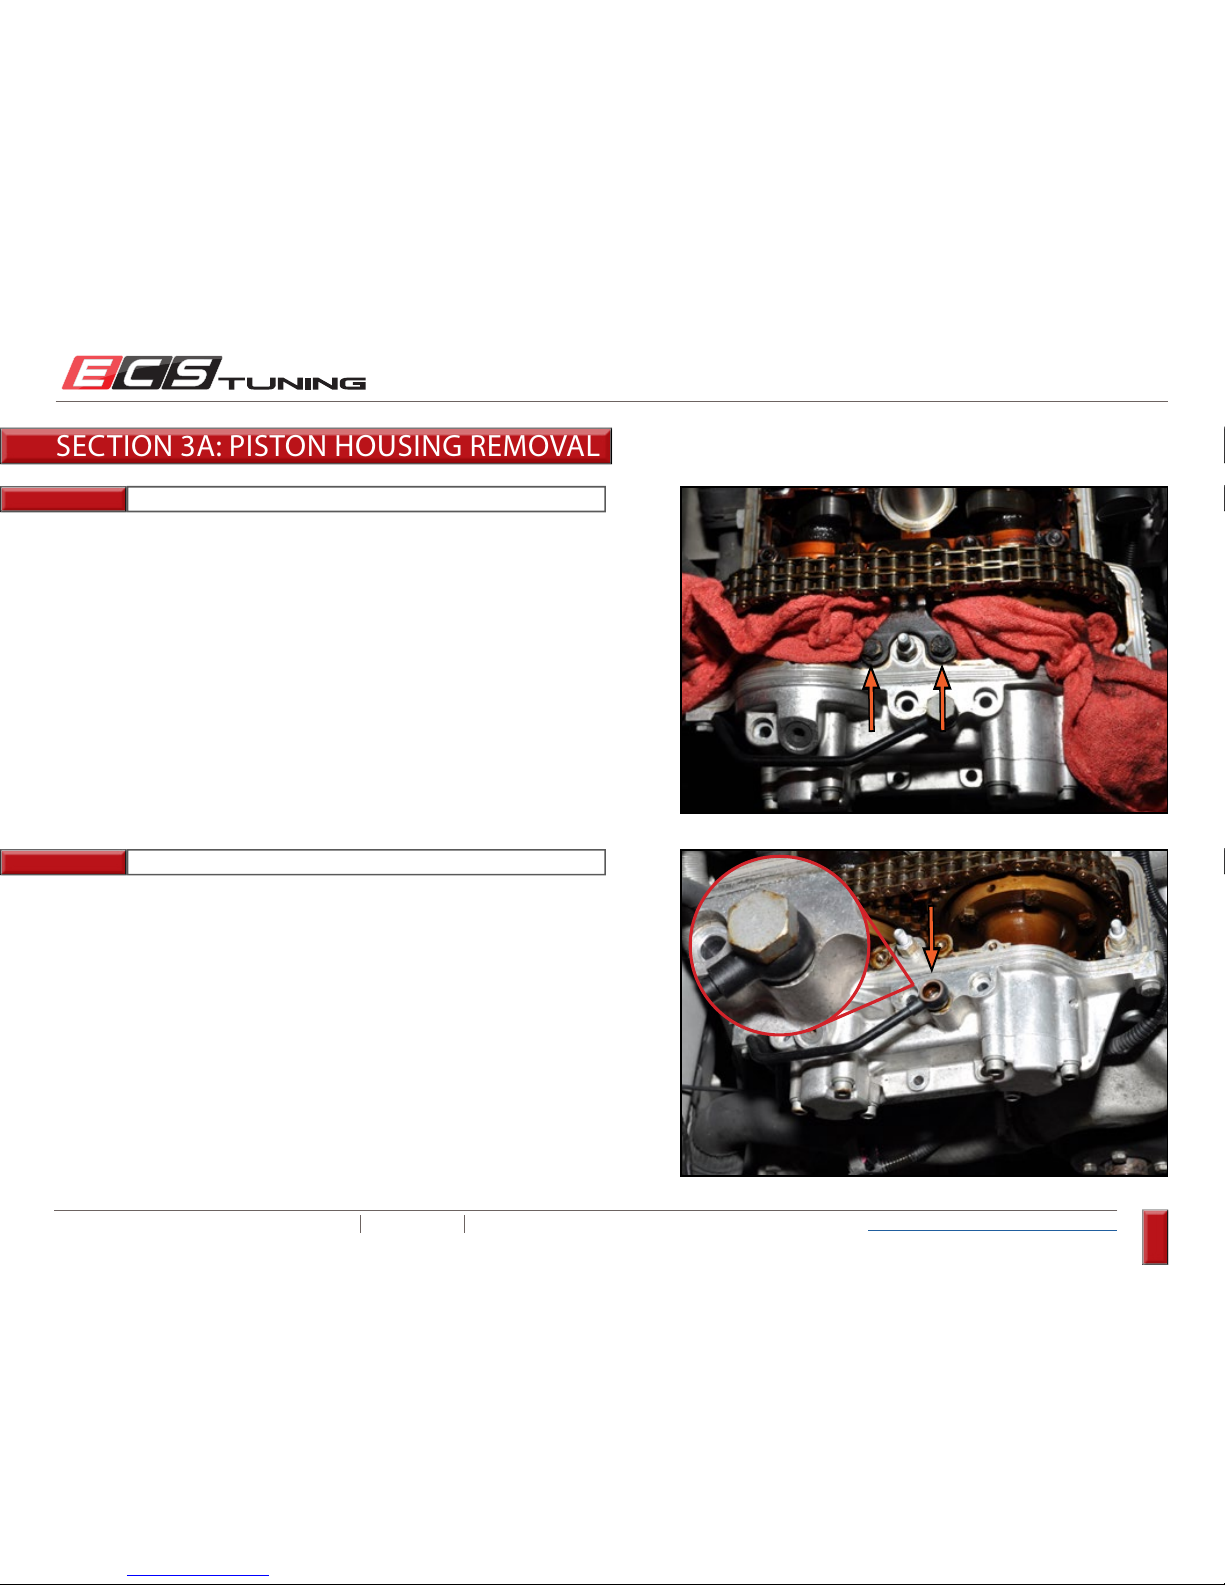
Remove the two screws and lift off the cam chain guide.
SECTION 3A: PISTON HOUSING REMOVAL
Page 23
ECS TUNING 1000 SEVILLE RD. WADSWORTH, OH 44281 1.800.924.5172 WWW.ECSTUNING.COM
23
BMW S54 DUAL VANOS REBUILD
®
Return to Vanos Repair Table of Contents
Step 11:
Step 12:
10mm Socket, Ratchet
14mm Socket, Ratchet
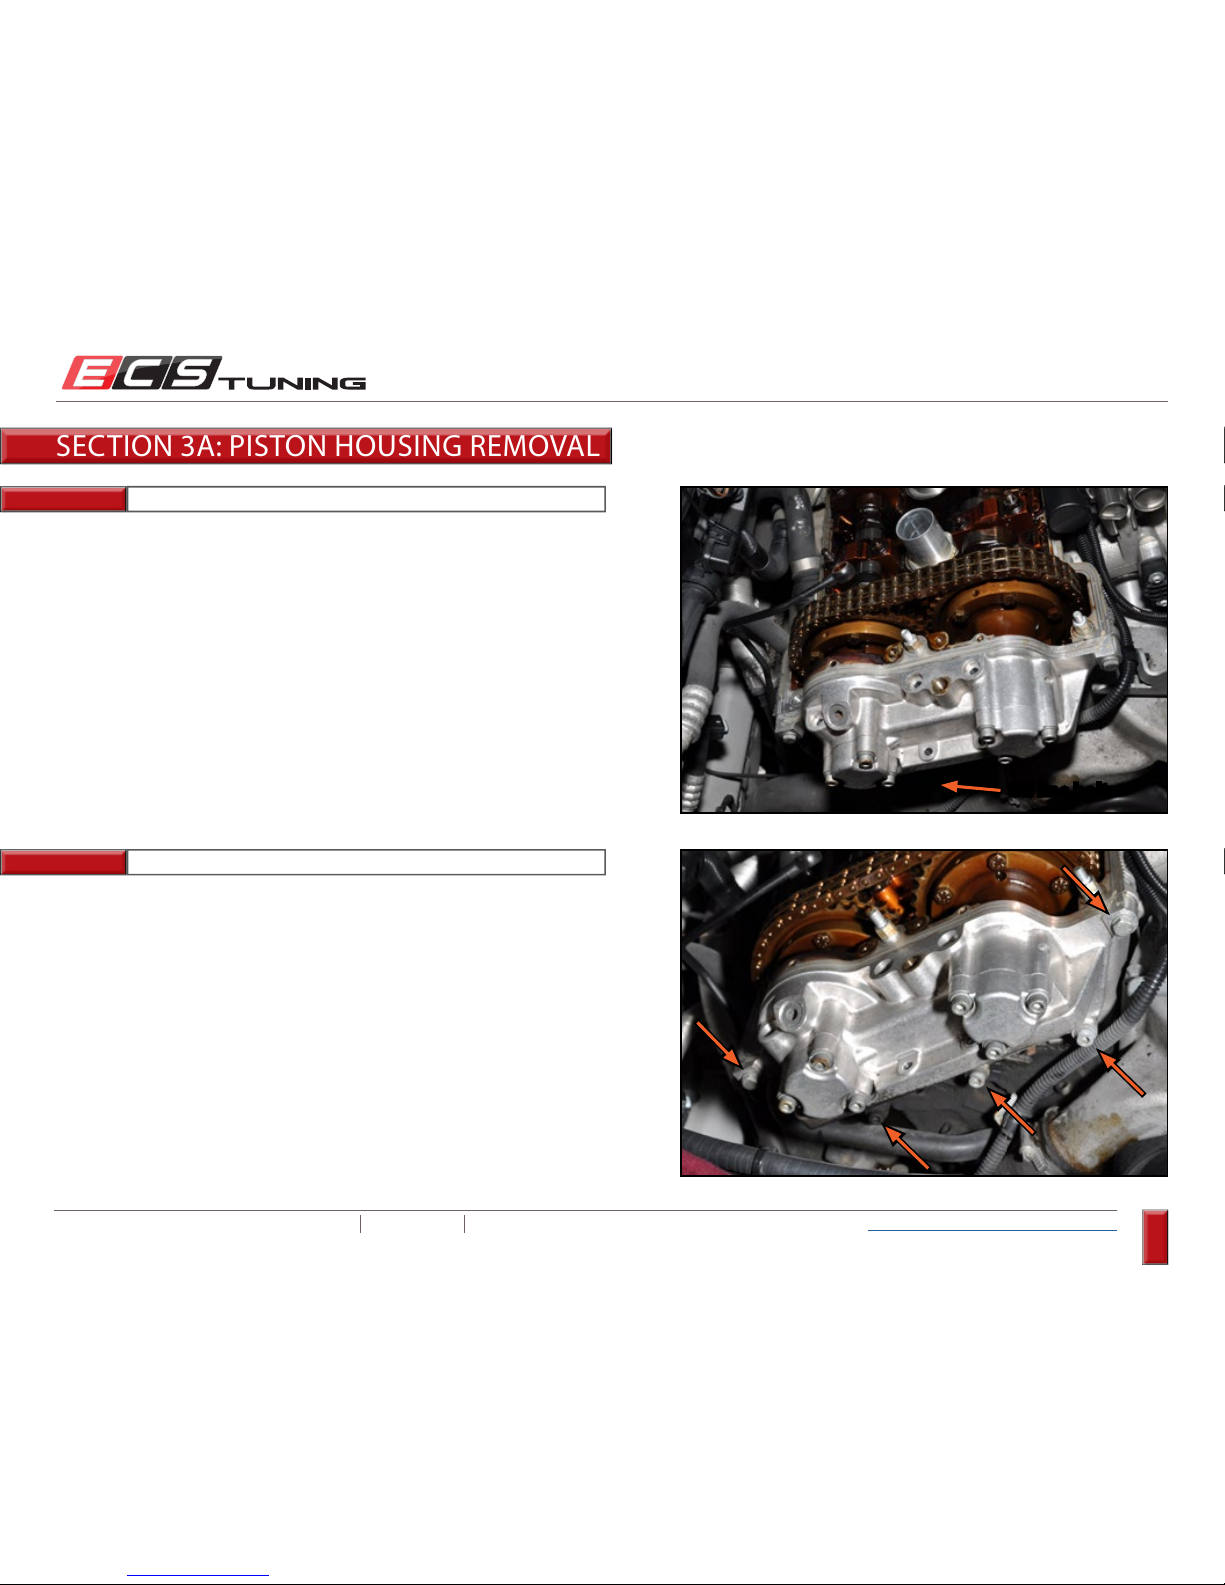
Cover the area between the Vanos hubs and piston housing to keep from
dropping anything down into the engine, then remove the two bolts and
remove the Vanos bracket.
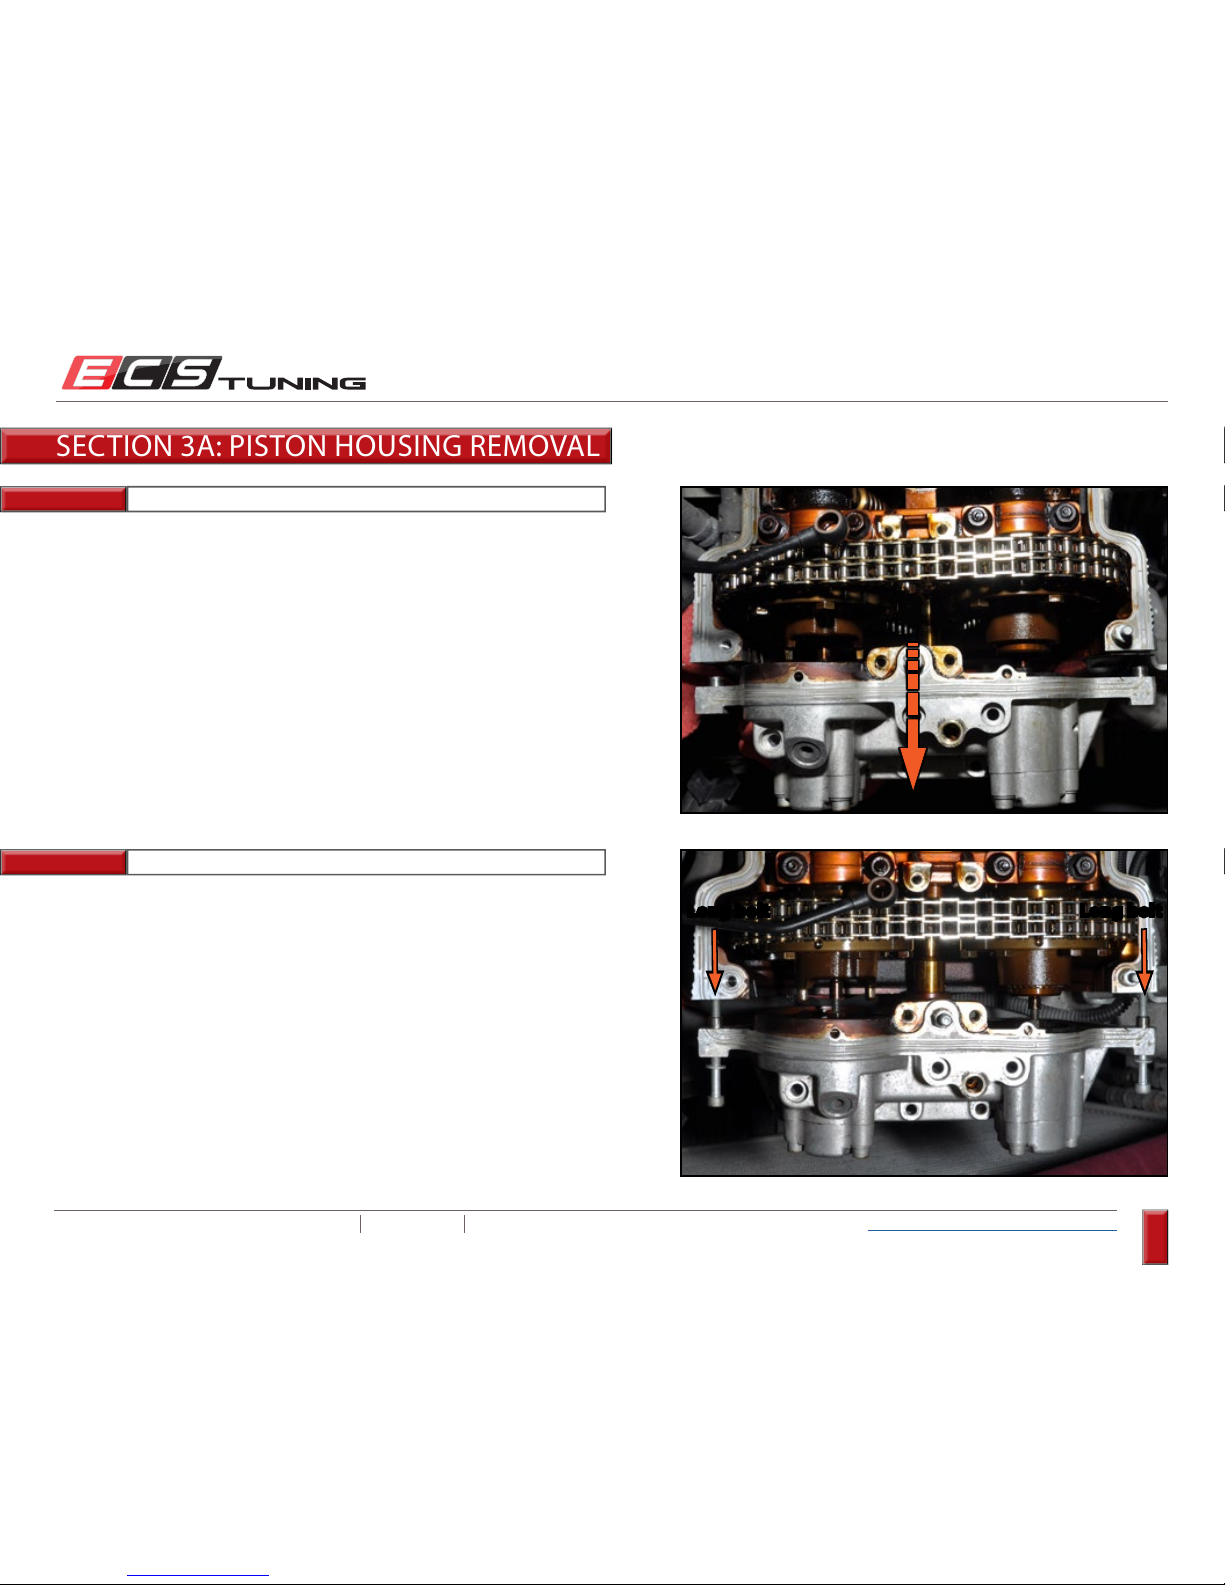
Remove the banjo bolt holding the oil pipe to the top of the Vanos piston
housing.
SECTION 3A: PISTON HOUSING REMOVAL
Page 24
ECS TUNING 1000 SEVILLE RD. WADSWORTH, OH 44281 1.800.924.5172 WWW.ECSTUNING.COM
24
BMW S54 DUAL VANOS REBUILD
®
Return to Vanos Repair Table of Contents
Step 13:
Step 14:
10mm Socket, Ratchet, Extension
10mm Socket, 5mm Allen (Hex) Socket, Ratchet, Extension
Difficult to see but easy to remove, there is a 10mm bolt that holds the
oil pipe in place. It’s located on the front of the engine behind the lower
radiator hose. Remove it and then you can move the oil pipe out of the
way.
Remove the five piston housing mounting bolts. There are two hex bolts
in the upper corners, and three Allen bolts along the bottom edge. You
can see them all in this picture.
Oil line bolt
SECTION 3A: PISTON HOUSING REMOVAL
Page 25
ECS TUNING 1000 SEVILLE RD. WADSWORTH, OH 44281 1.800.924.5172 WWW.ECSTUNING.COM
25
BMW S54 DUAL VANOS REBUILD
®
Return to Vanos Repair Table of Contents
Step 15:
Step 16:
Gently pry the piston housing forward off of the cylinder head so you can
access the transfer gear sets in order to disconnect them from the Vanos
pistons.
“Borrow” the two long bolts from the valve block and install them through
the upper corners of the piston housing, then thread them into the
cylinder head. This will support the piston housing as you disconnect the
transfer gear sets in the next step.
SECTION 3A: PISTON HOUSING REMOVAL
Long bolt Long bolt
Page 26
ECS TUNING 1000 SEVILLE RD. WADSWORTH, OH 44281 1.800.924.5172 WWW.ECSTUNING.COM
26
BMW S54 DUAL VANOS REBUILD
®
Return to Vanos Repair Table of Contents
Step 17:
Step 18:
7mm, 10mm Open End Wrench
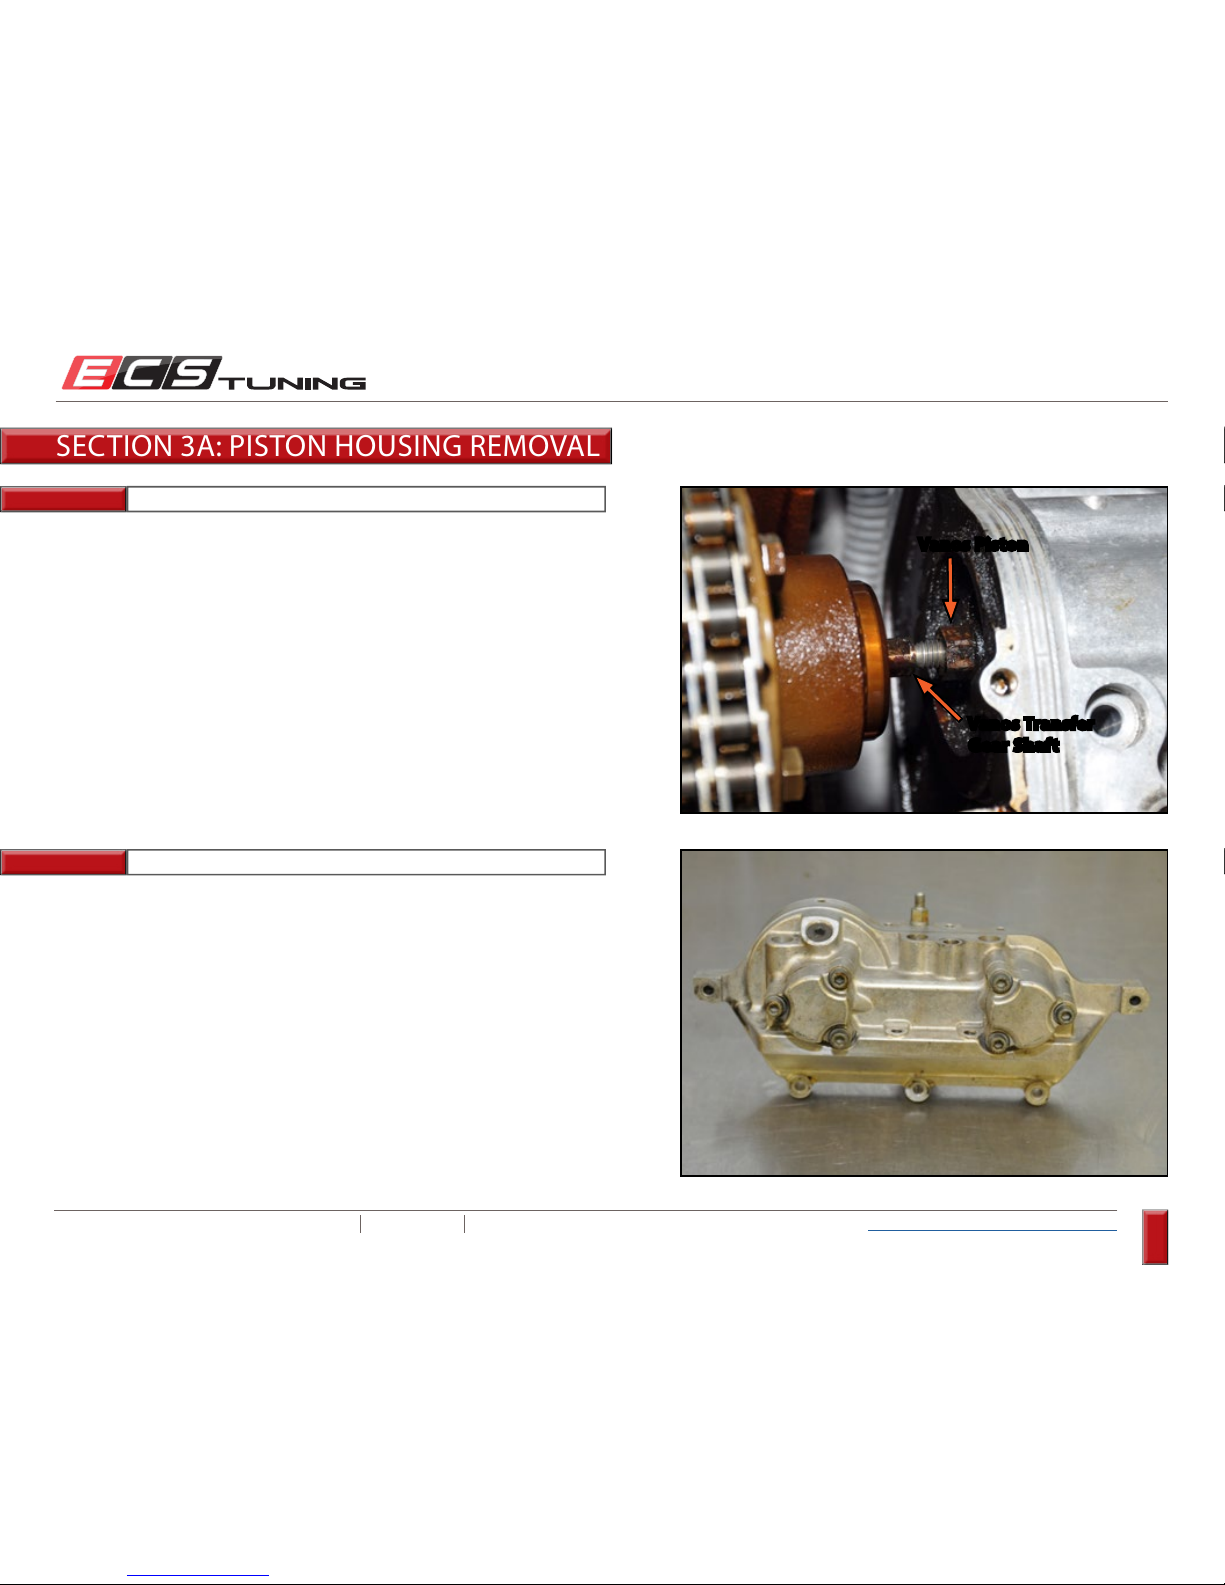
Disconnect both transfer gear sets from the Vanos pistons. These are LH
Thread
, so you will loosen them in the opposite direction as normal.
The picture on the right shows the Vanos transfer gear shaft unthreaded
most of the way from the Vanos piston. The shaft is 7mm and the piston is
10mm.
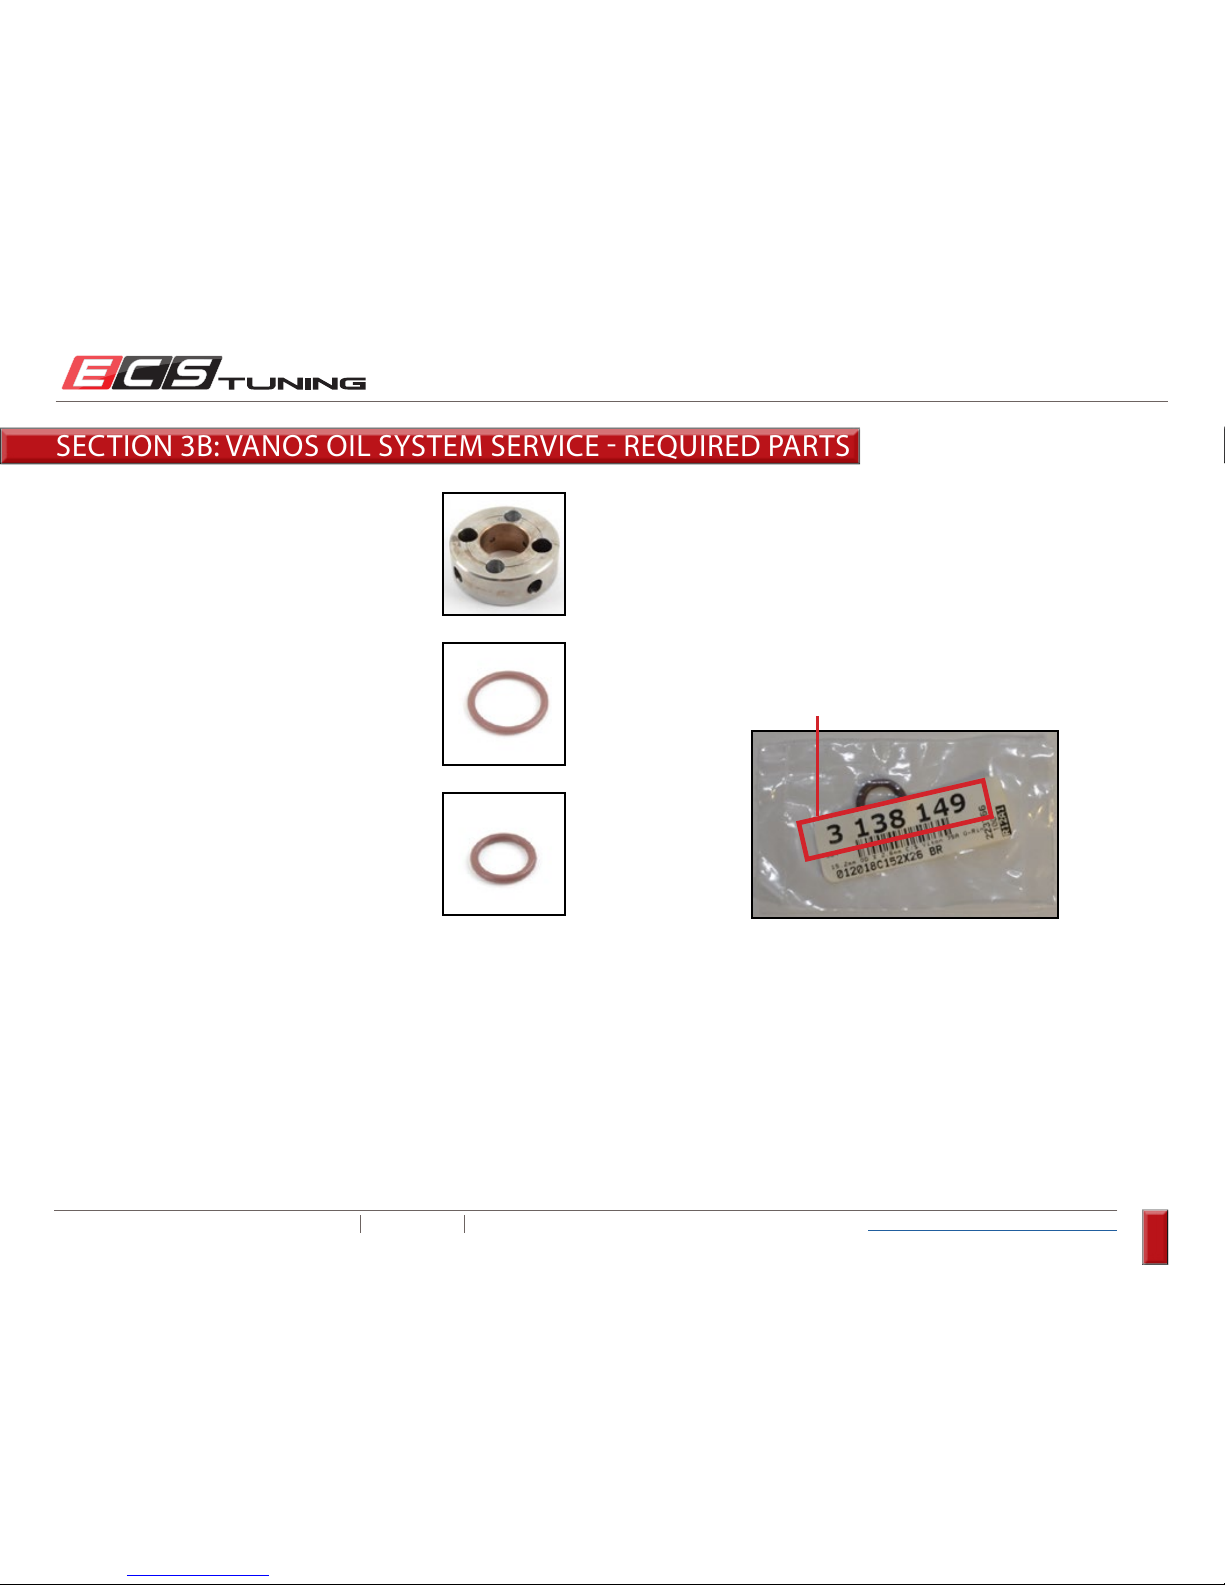
With both transfer gear shafts disconnected from the Vanos pistons,
remove the long valve block mounting bolts, then remove the piston
housing from the engine and place it on a clean workbench.
Vanos Piston
Vanos Transfer
Gear Shaft
SECTION 3A: PISTON HOUSING REMOVAL
- End of Section 3a -
Page 27
ECS TUNING 1000 SEVILLE RD. WADSWORTH, OH 44281 1.800.924.5172 WWW.ECSTUNING.COM
27
BMW S54 DUAL VANOS REBUILD
®
Return to Vanos Repair Table of Contents
SECTION 3B: VANOS OIL SYSTEM SERVICE REQUIRED PARTS
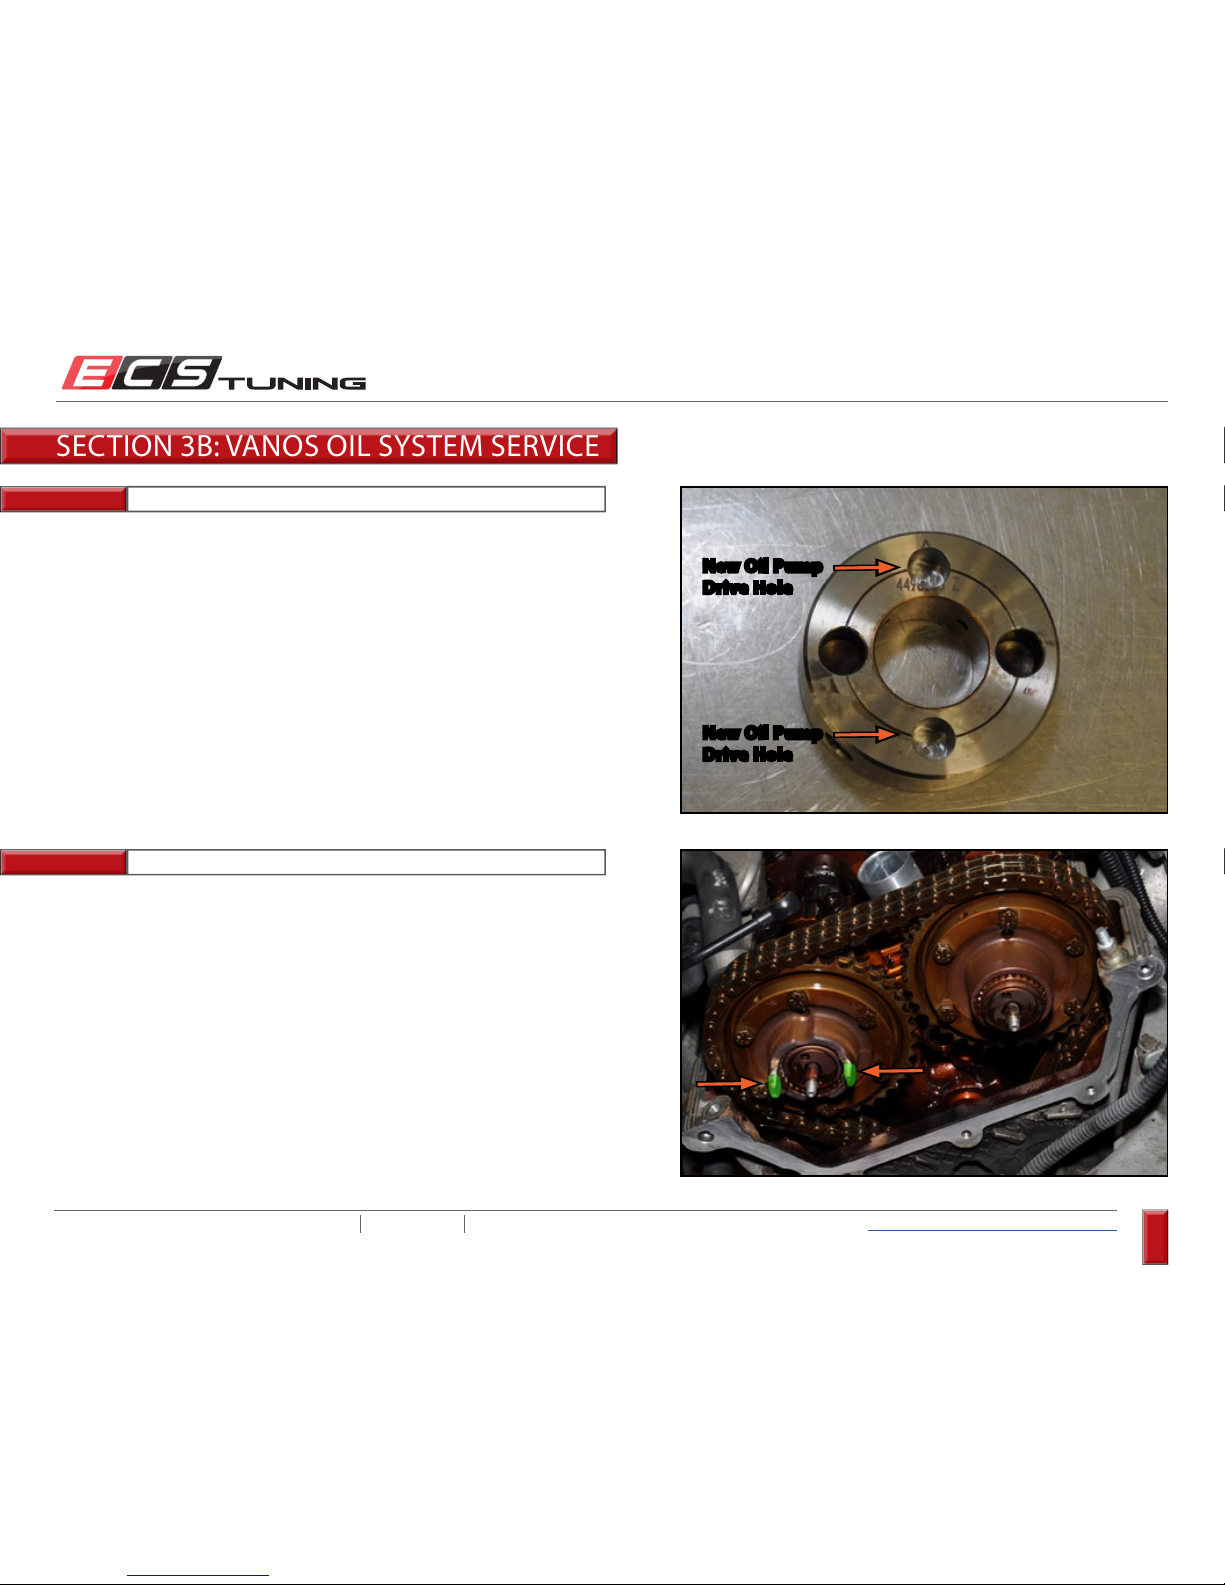
ES#3138159
Description...............Revised Oil Pump Rotor
Location .................... Vanos Oil Pump
Quantity .................... 1
ES#3138142
Description...............20mm OD x 2.0mm o-Ring
Location .................... Oil Regulator Large End
Quantity .................... 1
ES#3138143
Description...............15mm OD x 2.0mm o-Ring
Location .................... Oil Regulator Small End
Quantity .................... 1
ES#
All o-rings and Teflon rings will be sealed in individual poly bags
- do not unpack them until you are ready to install them. Prior to
use, always positively identify each seal by the ES# on the label.
NOTE:
Page 28
ECS TUNING 1000 SEVILLE RD. WADSWORTH, OH 44281 1.800.924.5172 WWW.ECSTUNING.COM
28
BMW S54 DUAL VANOS REBUILD
®
Return to Vanos Repair Table of Contents
Step 1:
Step 2:
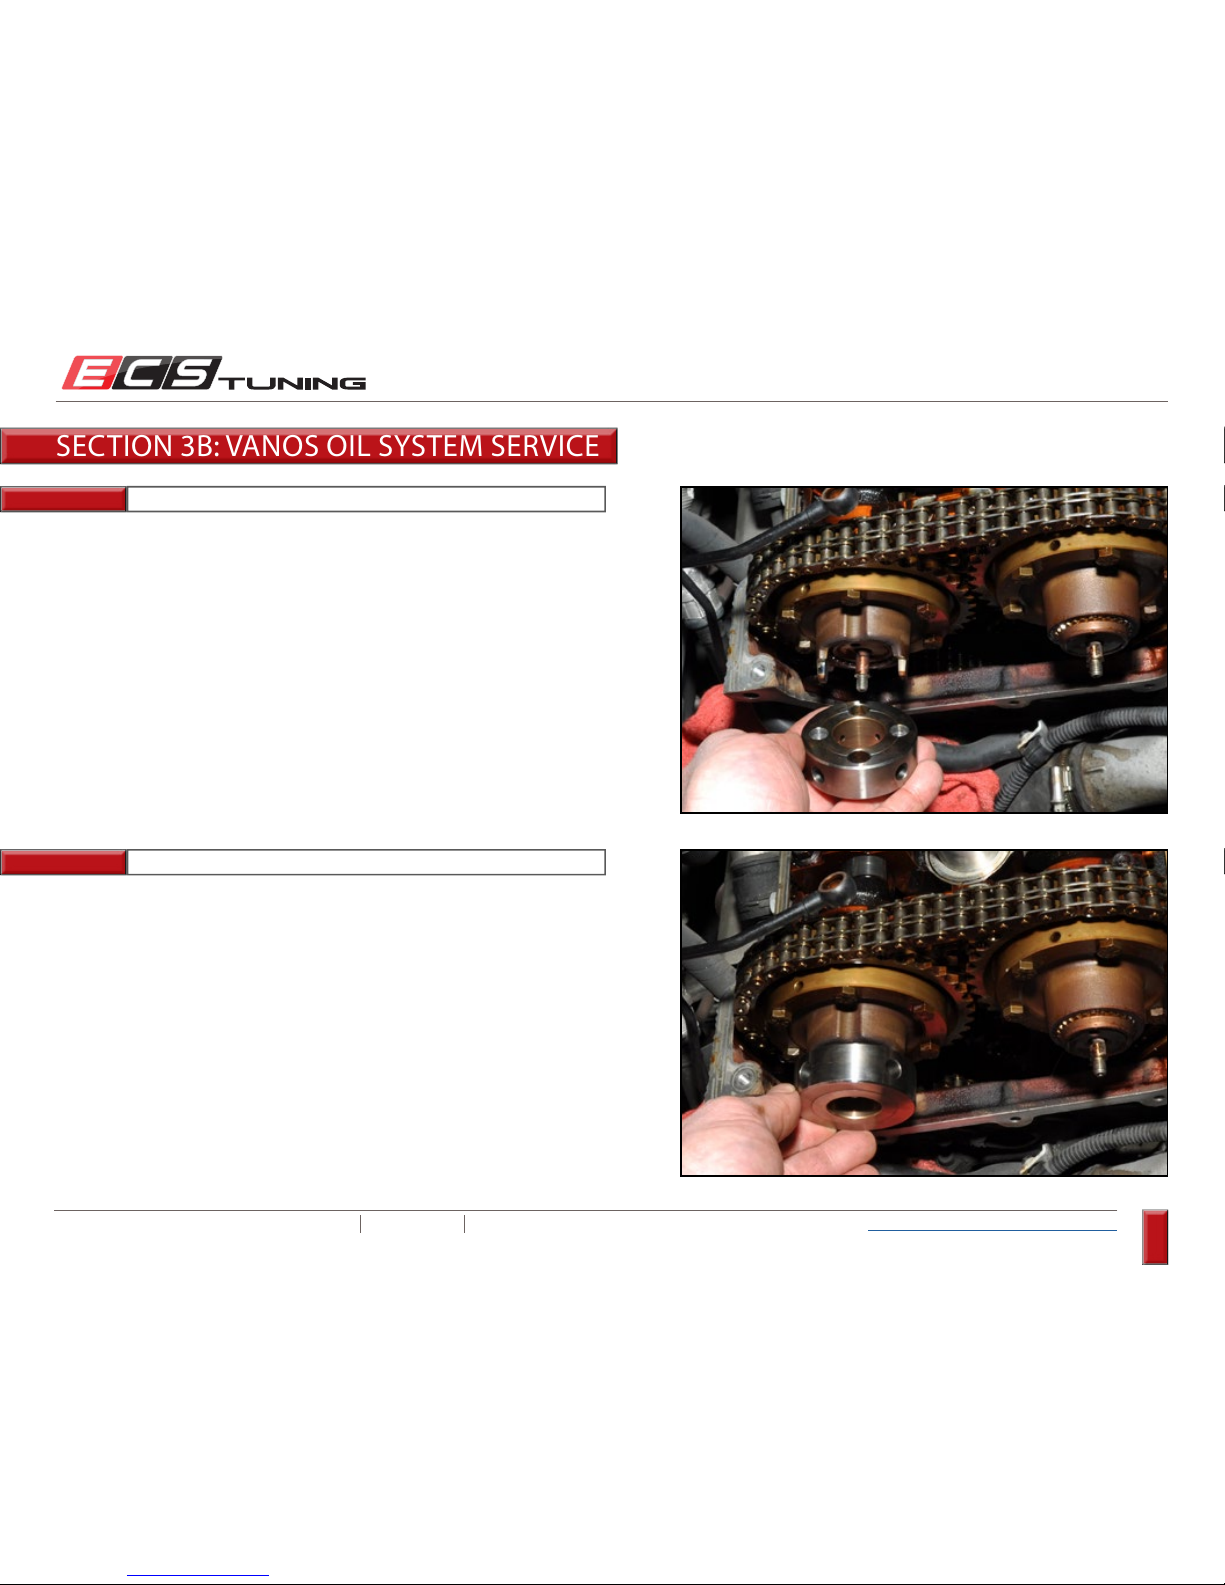
Inspect the revised oil pump rotor in your kit. Two new holes have been
machined into it and sized properly to fit the oil pump drive tabs on the
Vanos exhaust hub. You’ll notice that the new holes are smaller, which will
eliminate tab breakage over time resulting from a continuous impacting
between the tabs and the large holes.
Closely inspect the oil pump drive tabs on the Vanos exhaust hub. Make
sure they are not worn or cracked. If these are visibly worn, you will have
to order a replacement hub.
SECTION 3B: VANOS OIL SYSTEM SERVICE
New Oil Pump
Drive Hole
New Oil Pump
Drive Hole
Page 29
ECS TUNING 1000 SEVILLE RD. WADSWORTH, OH 44281 1.800.924.5172 WWW.ECSTUNING.COM
29
BMW S54 DUAL VANOS REBUILD
®
Return to Vanos Repair Table of Contents
Step 3:
Step 4:
Now we’re going to check the fit of the revised oil pump rotor to the drive
tabs. Align the new (smaller) holes in the rotor with the tabs on the Vanos
exhaust hub.
Slide the revised oil pump rotor onto the drive tabs. It should slide easily
into place and only have very slight back and forth movement.
Once you have confirmed fit of the revised oil pump rotor, pull it back off
and set it aside for the moment.
SECTION 3B: VANOS OIL SYSTEM SERVICE
Page 30
ECS TUNING 1000 SEVILLE RD. WADSWORTH, OH 44281 1.800.924.5172 WWW.ECSTUNING.COM
30
BMW S54 DUAL VANOS REBUILD
®
Return to Vanos Repair Table of Contents
Step 5:
Step 6: Snap Ring Pliers
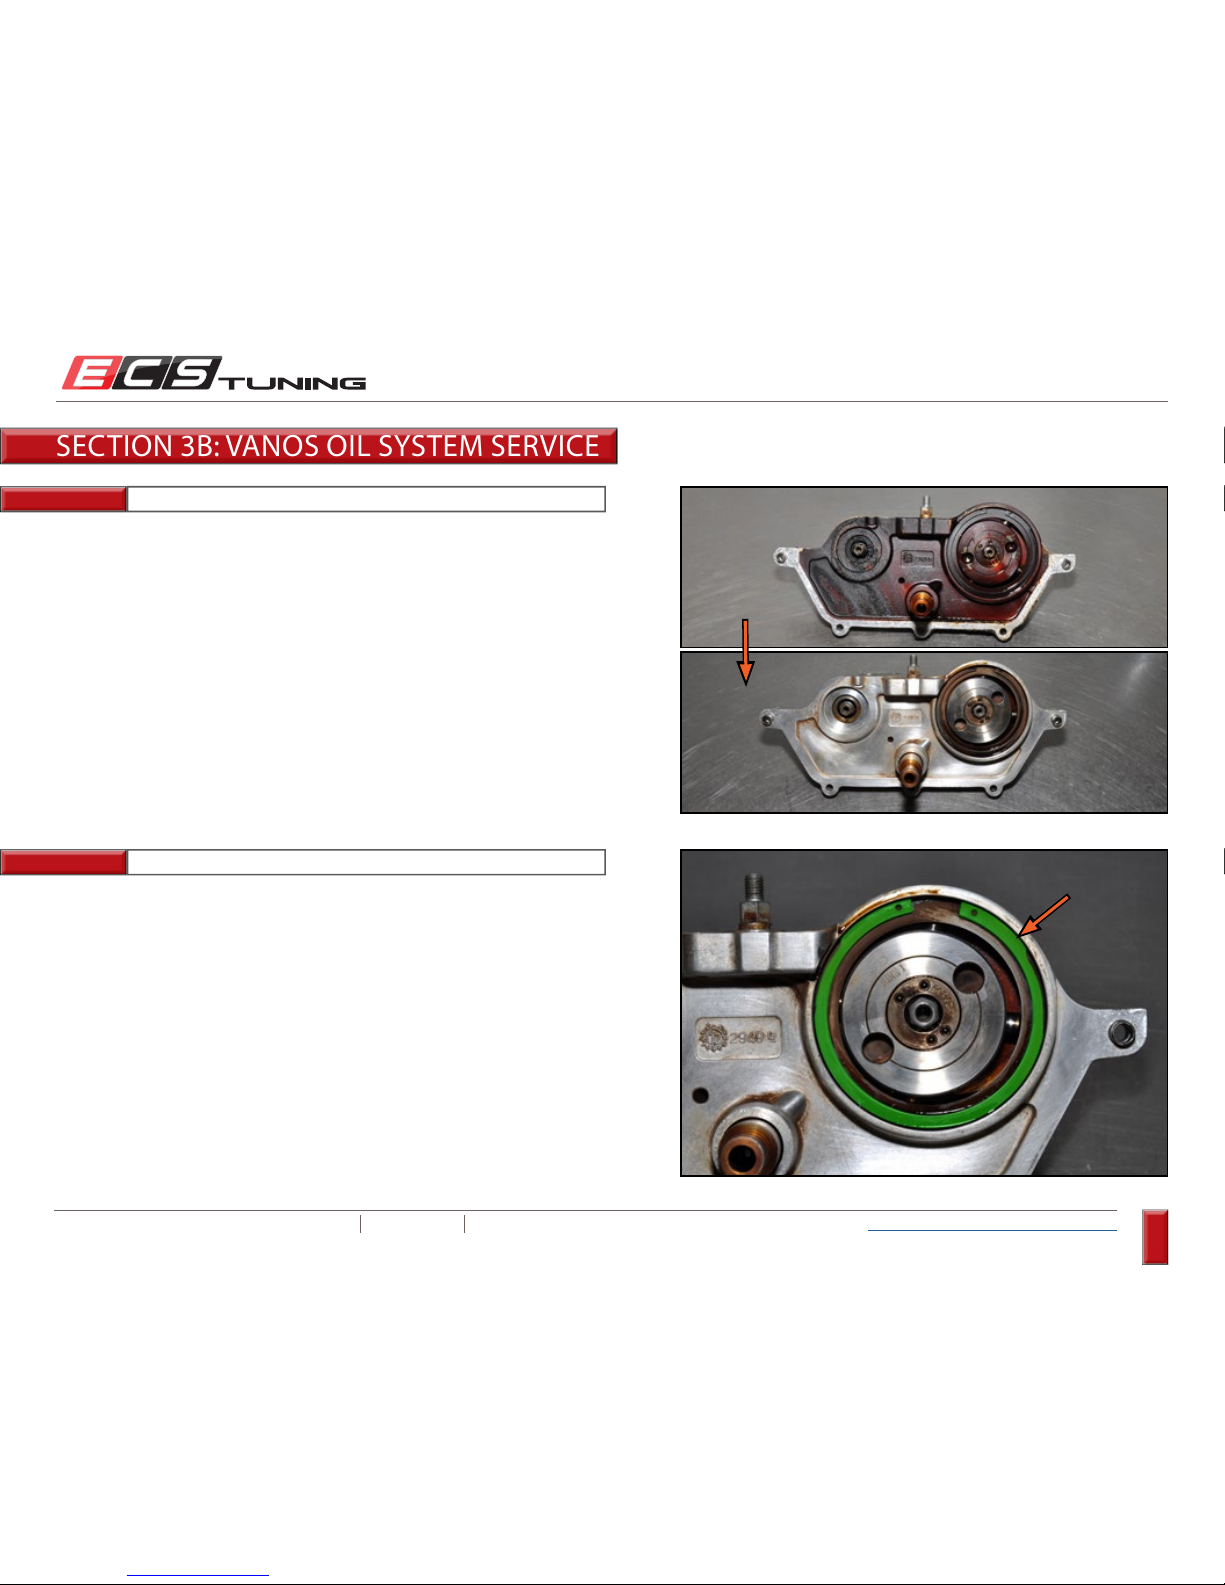
Thoroughly clean the piston housing using brake cleaner and shop rags,
then rest it on the front side so you are looking at the oil pump.
Remove the oil pump snap ring.
SECTION 3B: VANOS OIL SYSTEM SERVICE
Page 31
ECS TUNING 1000 SEVILLE RD. WADSWORTH, OH 44281 1.800.924.5172 WWW.ECSTUNING.COM
31
BMW S54 DUAL VANOS REBUILD
®
Return to Vanos Repair Table of Contents
Step 7:
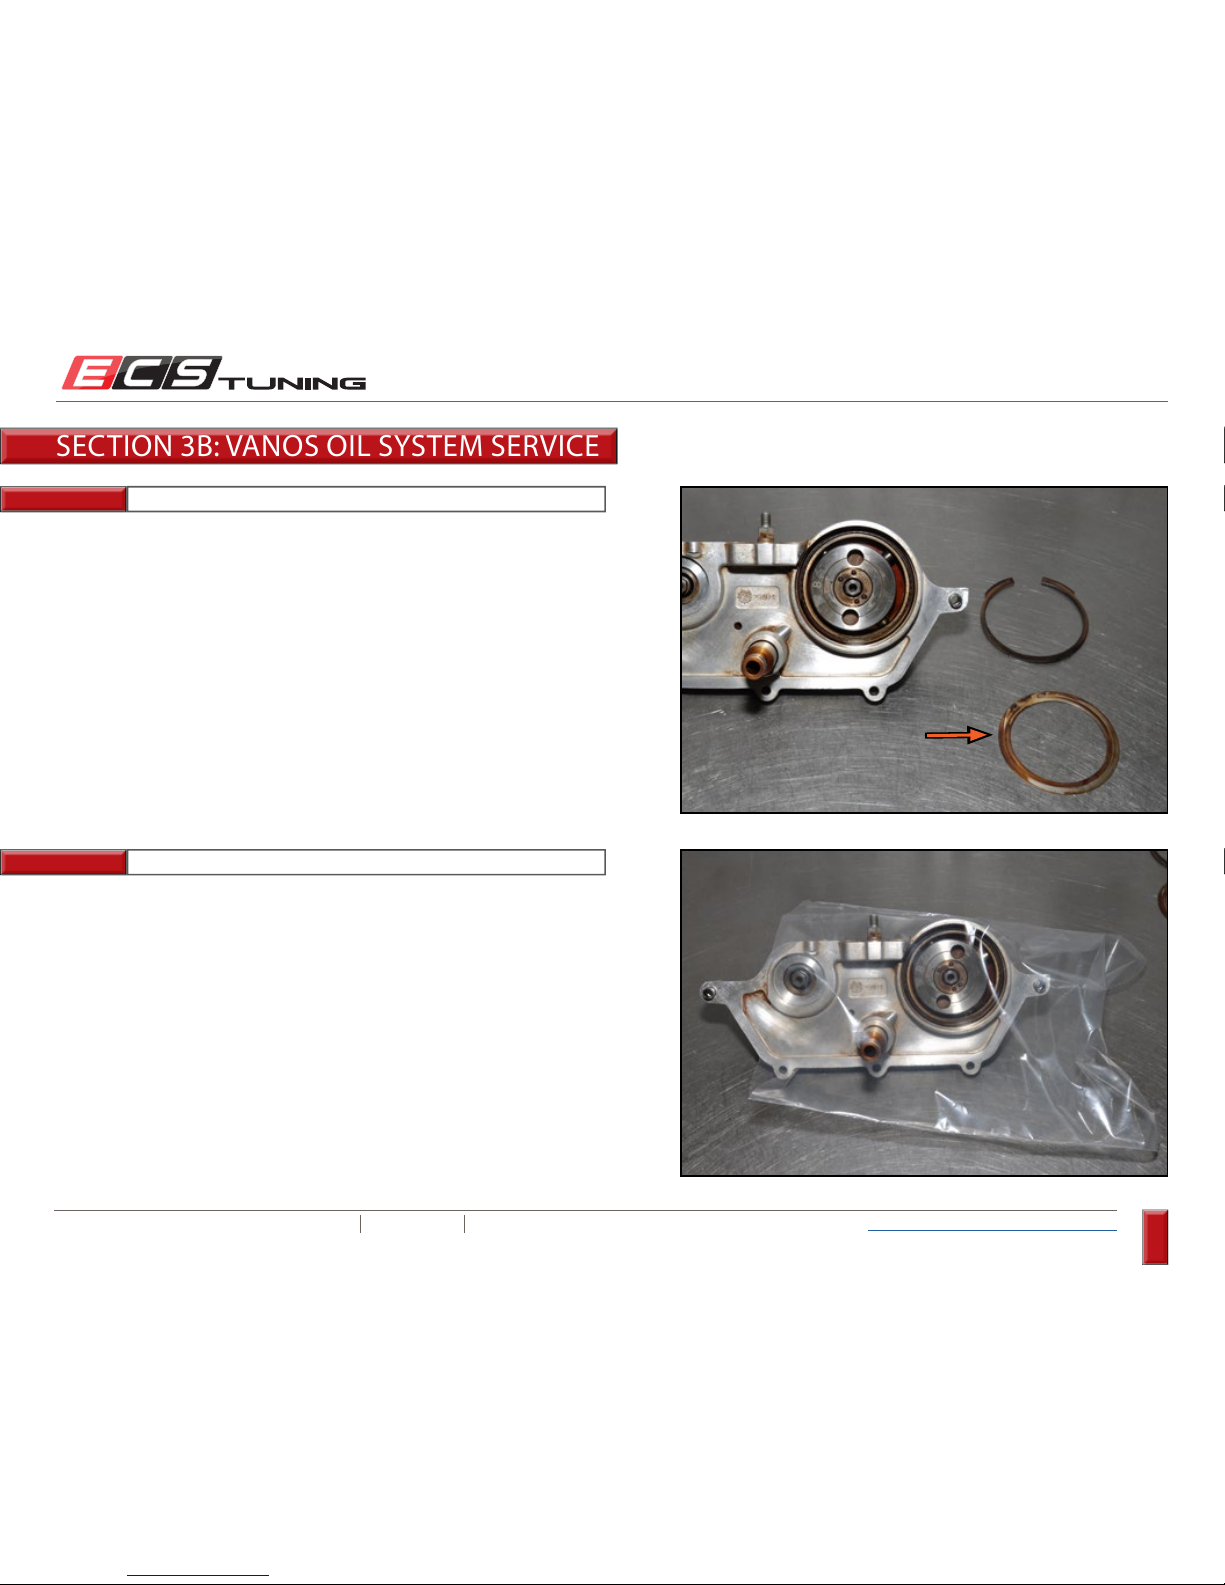
Step 8:
Small Angled Pick
Remove the oil pump retaining washer.
Place the piston housing into a plastic bag as shown.
SECTION 3B: VANOS OIL SYSTEM SERVICE
Page 32
ECS TUNING 1000 SEVILLE RD. WADSWORTH, OH 44281 1.800.924.5172 WWW.ECSTUNING.COM
32
BMW S54 DUAL VANOS REBUILD
®
Return to Vanos Repair Table of Contents
Step 9:
Step 10:
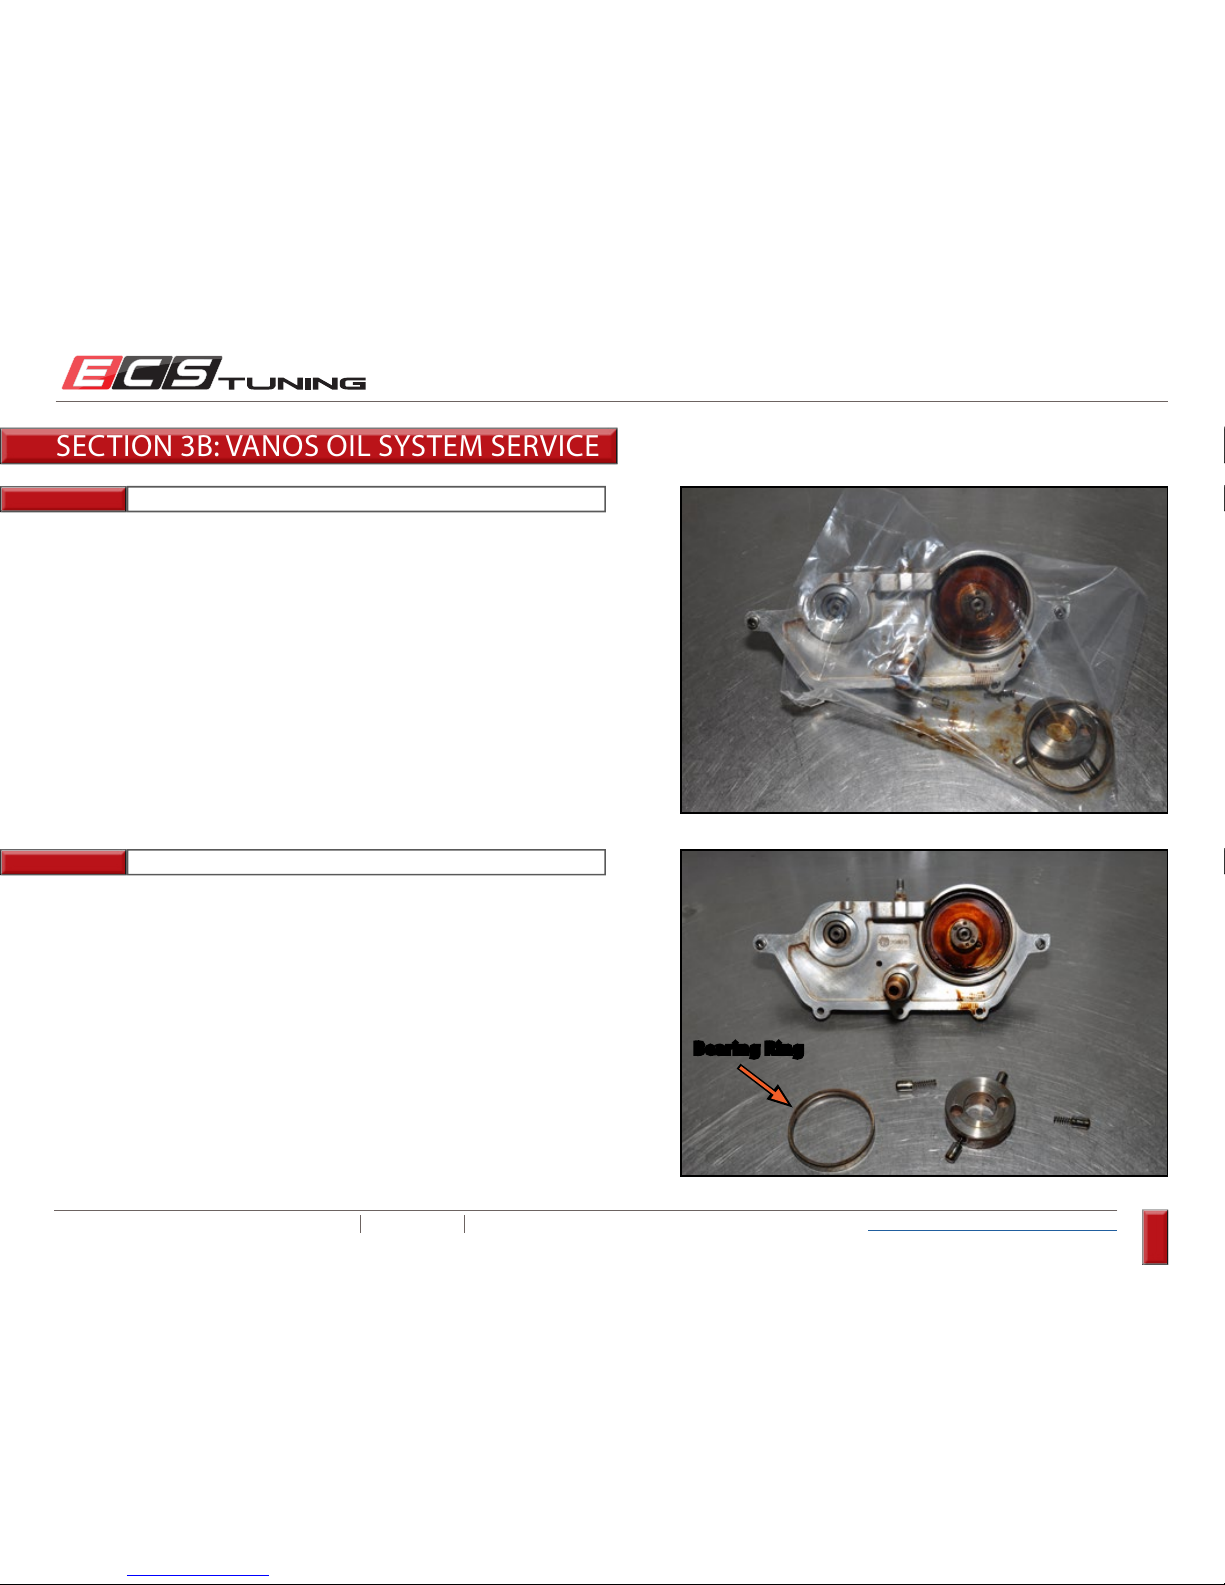
Turn the housing over and bump it against your hand or a piece of wood
until the oil pump pops out of the housing. You will see that many of the
small pieces of the oil pump will shoot out and be caught by the bag.
Remove all parts from the bag. If the bearing ring is still inside the
housing, remove it at this time as well.
Bearing Ring
SECTION 3B: VANOS OIL SYSTEM SERVICE
Page 33
ECS TUNING 1000 SEVILLE RD. WADSWORTH, OH 44281 1.800.924.5172 WWW.ECSTUNING.COM
33
BMW S54 DUAL VANOS REBUILD
®
Return to Vanos Repair Table of Contents
Step 11:
Step 12:
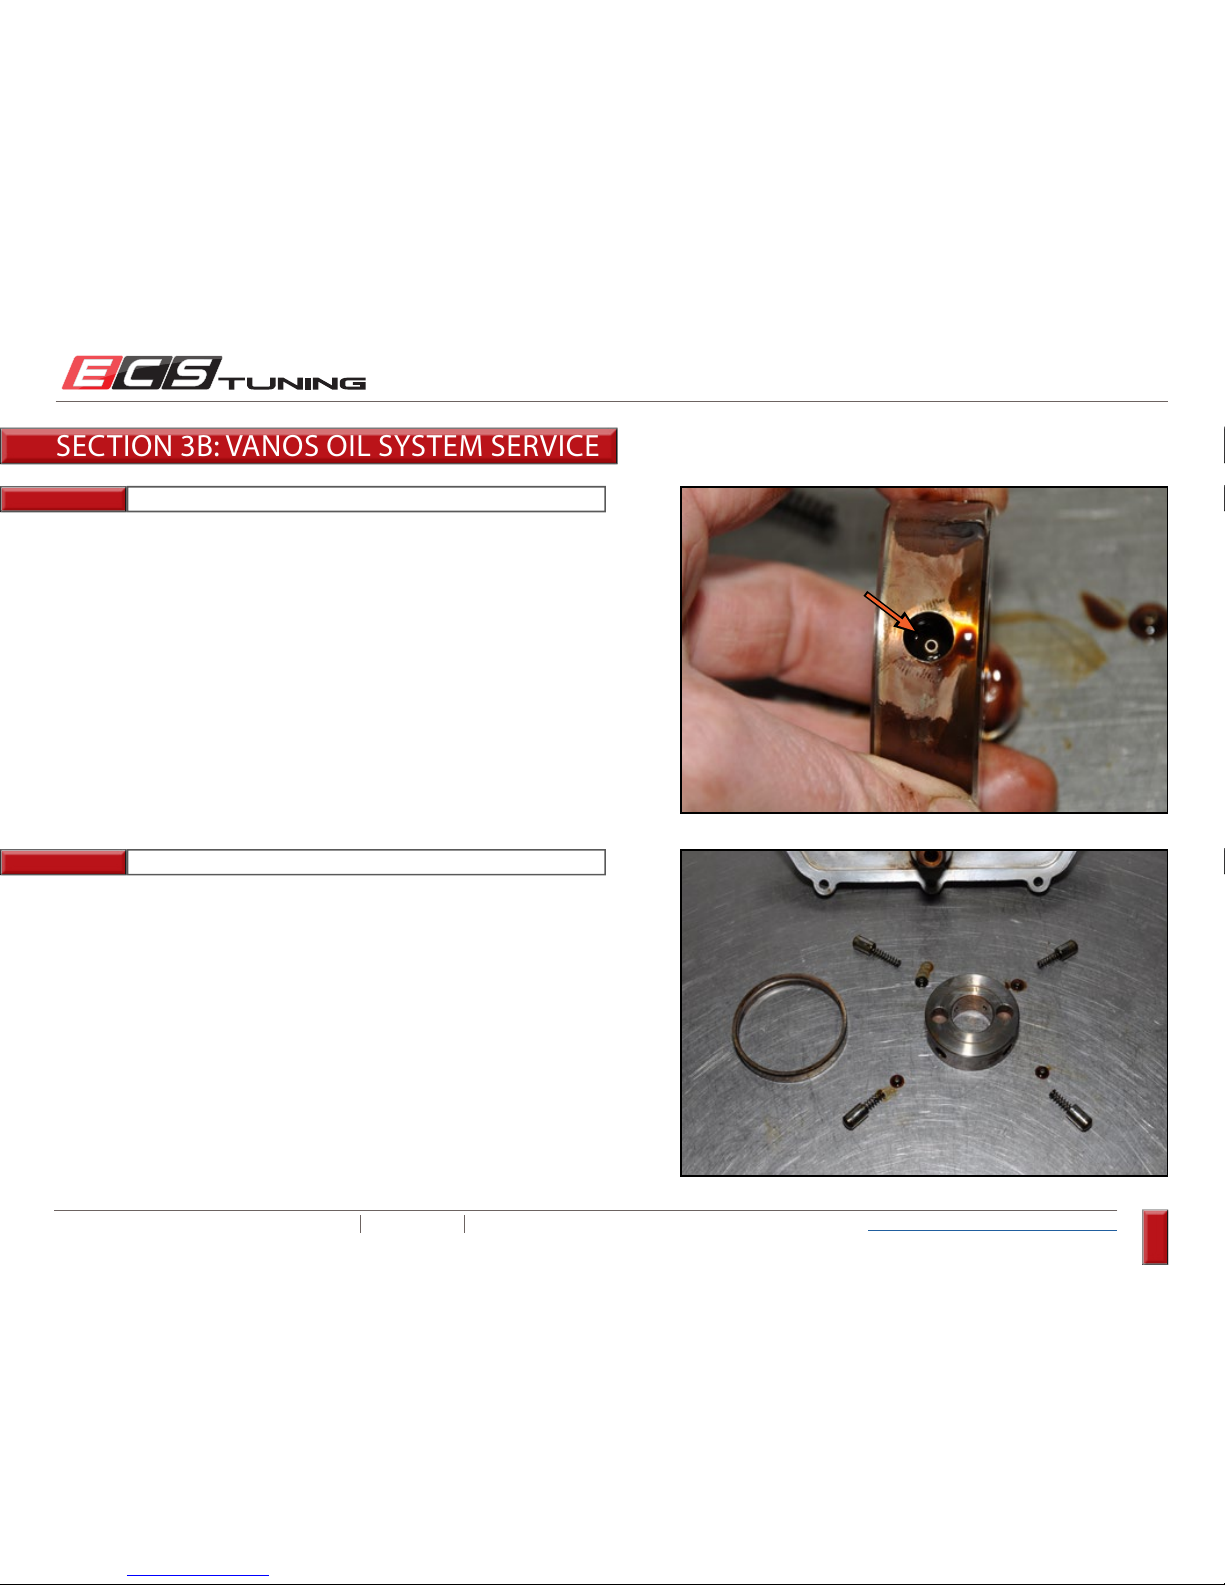
Look into the four holes around the perimeter of the oil pump rotor.
There is a spring seat in the bottom of each one. Some of these may have
fallen out already, but if any are remaining, gently pull them out with a
small angled pick.
Take stock of what you have to make sure nothing has been lost. The oil
pump components should consist of:
(1) Oil Pump Rotor
(1) Bearing Ring
(4) Spring Seats
(4) Springs
(4) Spring Caps
SECTION 3B: VANOS OIL SYSTEM SERVICE
Page 34
ECS TUNING 1000 SEVILLE RD. WADSWORTH, OH 44281 1.800.924.5172 WWW.ECSTUNING.COM
34
BMW S54 DUAL VANOS REBUILD
®
Return to Vanos Repair Table of Contents
Step 13:
Step 14:
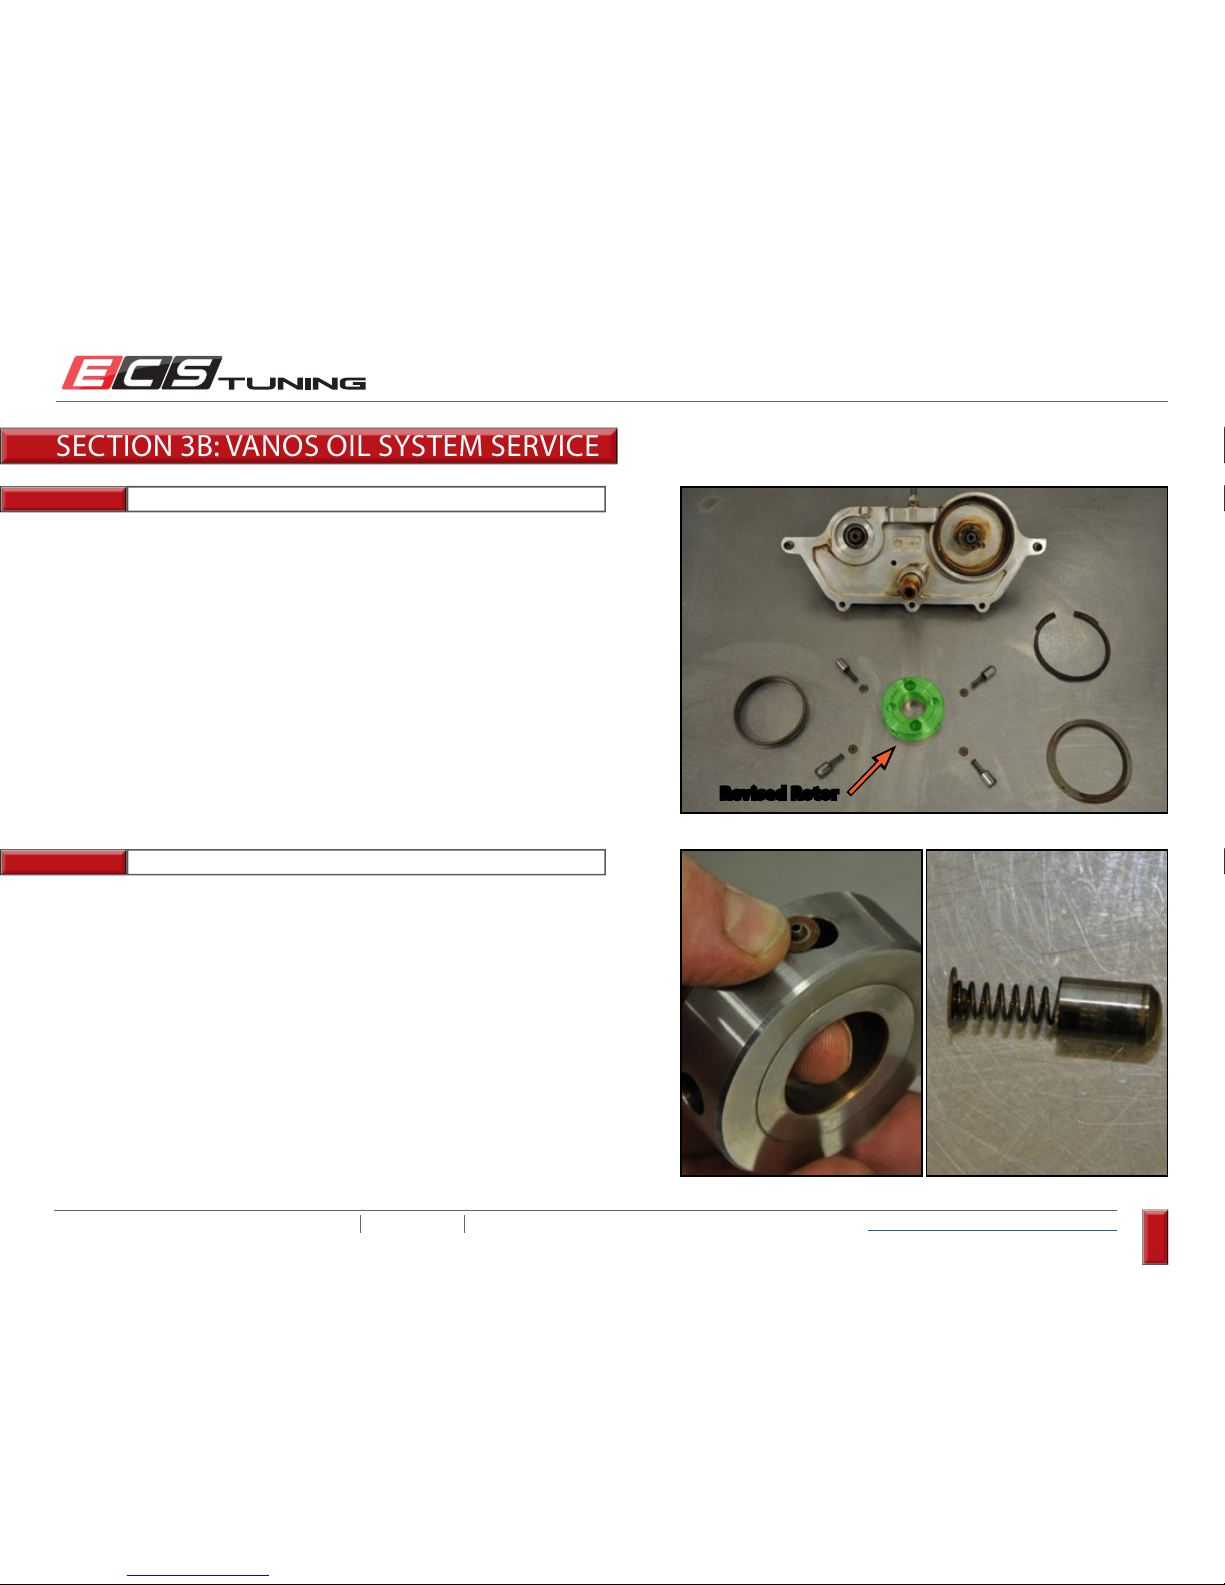
Thoroughly clean all oil pump components including the oil pump bearing
which is still located in the piston housing.
Note the reassembly position of the components. When placed back into
the holes in the perimeter of the oil pump rotor, the spring seat nipples
must face up, or outward.
Lay the components out in preparation for reassembly and replace the
original oil pump rotor with the new revised rotor.
Revised Rotor
As demonstrated in the RH photo, the spring seat nipple must protrude
into the spring.
SECTION 3B: VANOS OIL SYSTEM SERVICE
Page 35
ECS TUNING 1000 SEVILLE RD. WADSWORTH, OH 44281 1.800.924.5172 WWW.ECSTUNING.COM
35
BMW S54 DUAL VANOS REBUILD
®
Return to Vanos Repair Table of Contents
Step 15:
Step 16:
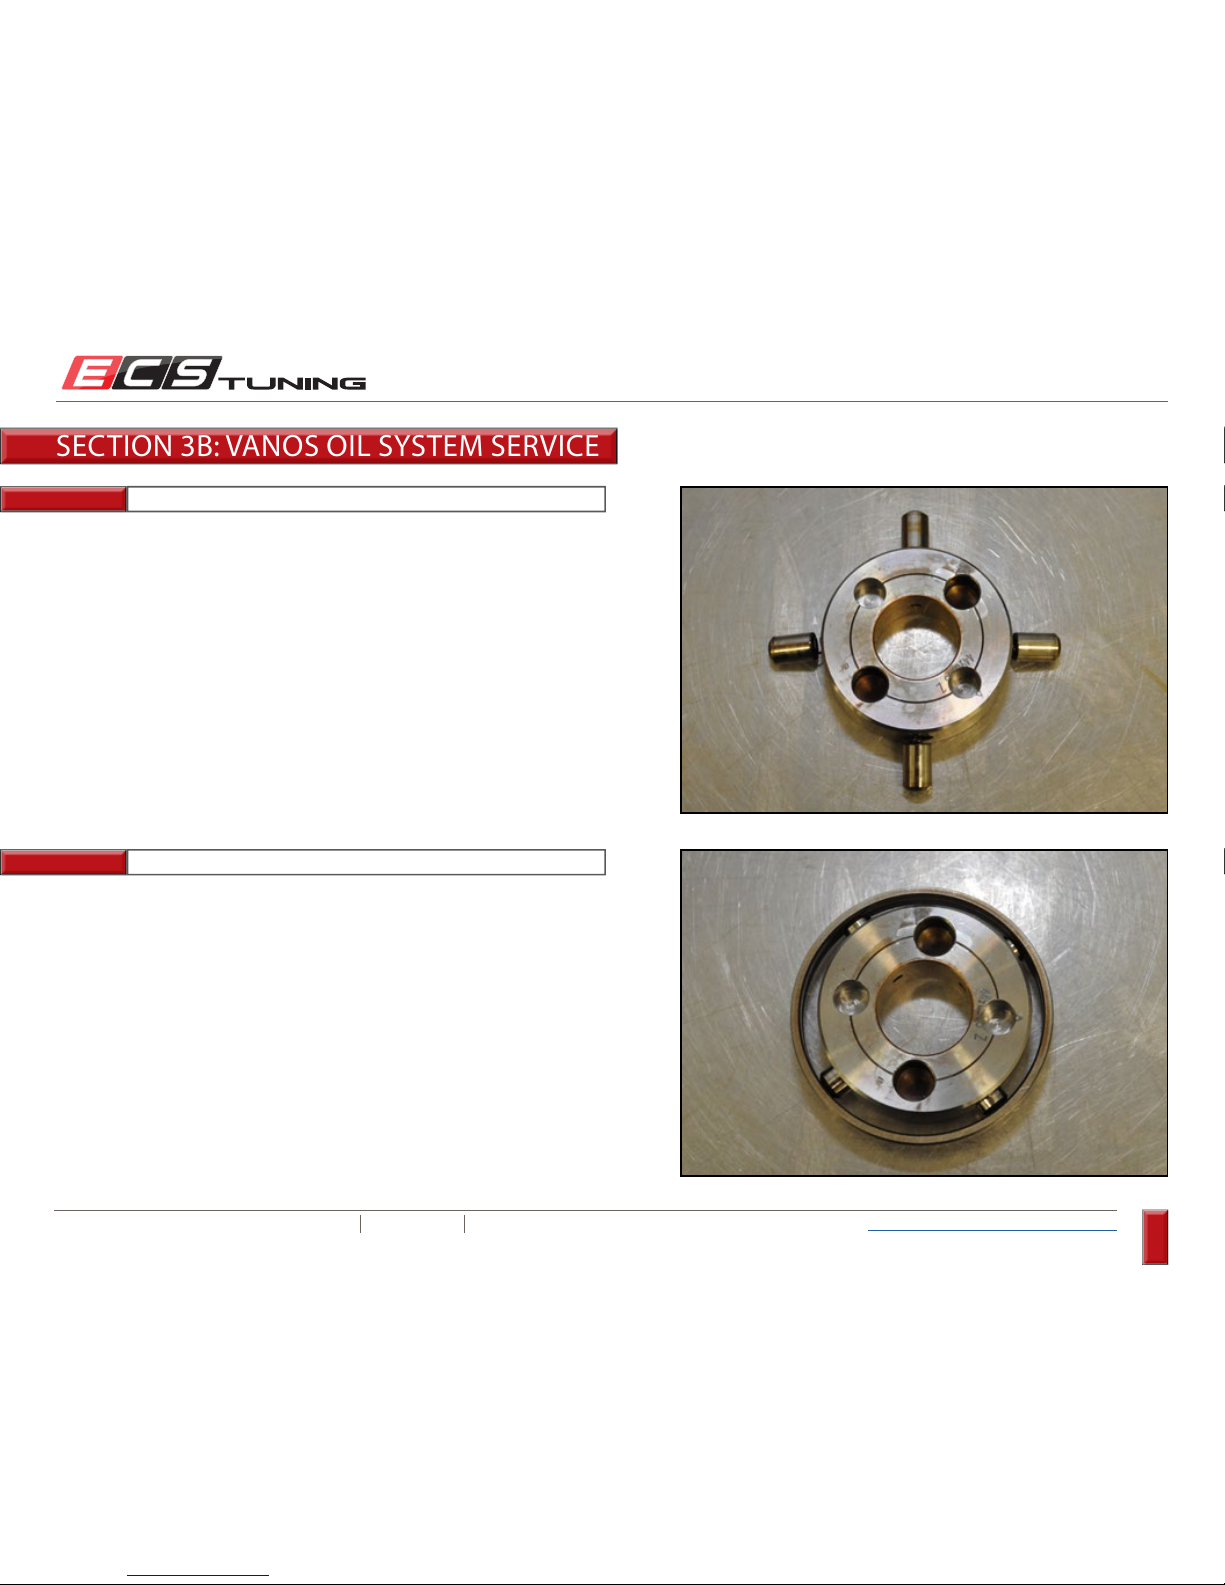
Reassemble the oil pump rotor by inserting the spring seats, springs, and
spring caps into each of the four holes in the rotor perimeter.
Pushing and holding the spring caps into the rotor, insert the rotor into
the middle of the bearing ring as shown.
SECTION 3B: VANOS OIL SYSTEM SERVICE
Page 36
ECS TUNING 1000 SEVILLE RD. WADSWORTH, OH 44281 1.800.924.5172 WWW.ECSTUNING.COM
36
BMW S54 DUAL VANOS REBUILD
®
Return to Vanos Repair Table of Contents
Step 17:
Step 18: Snap Ring Pliers
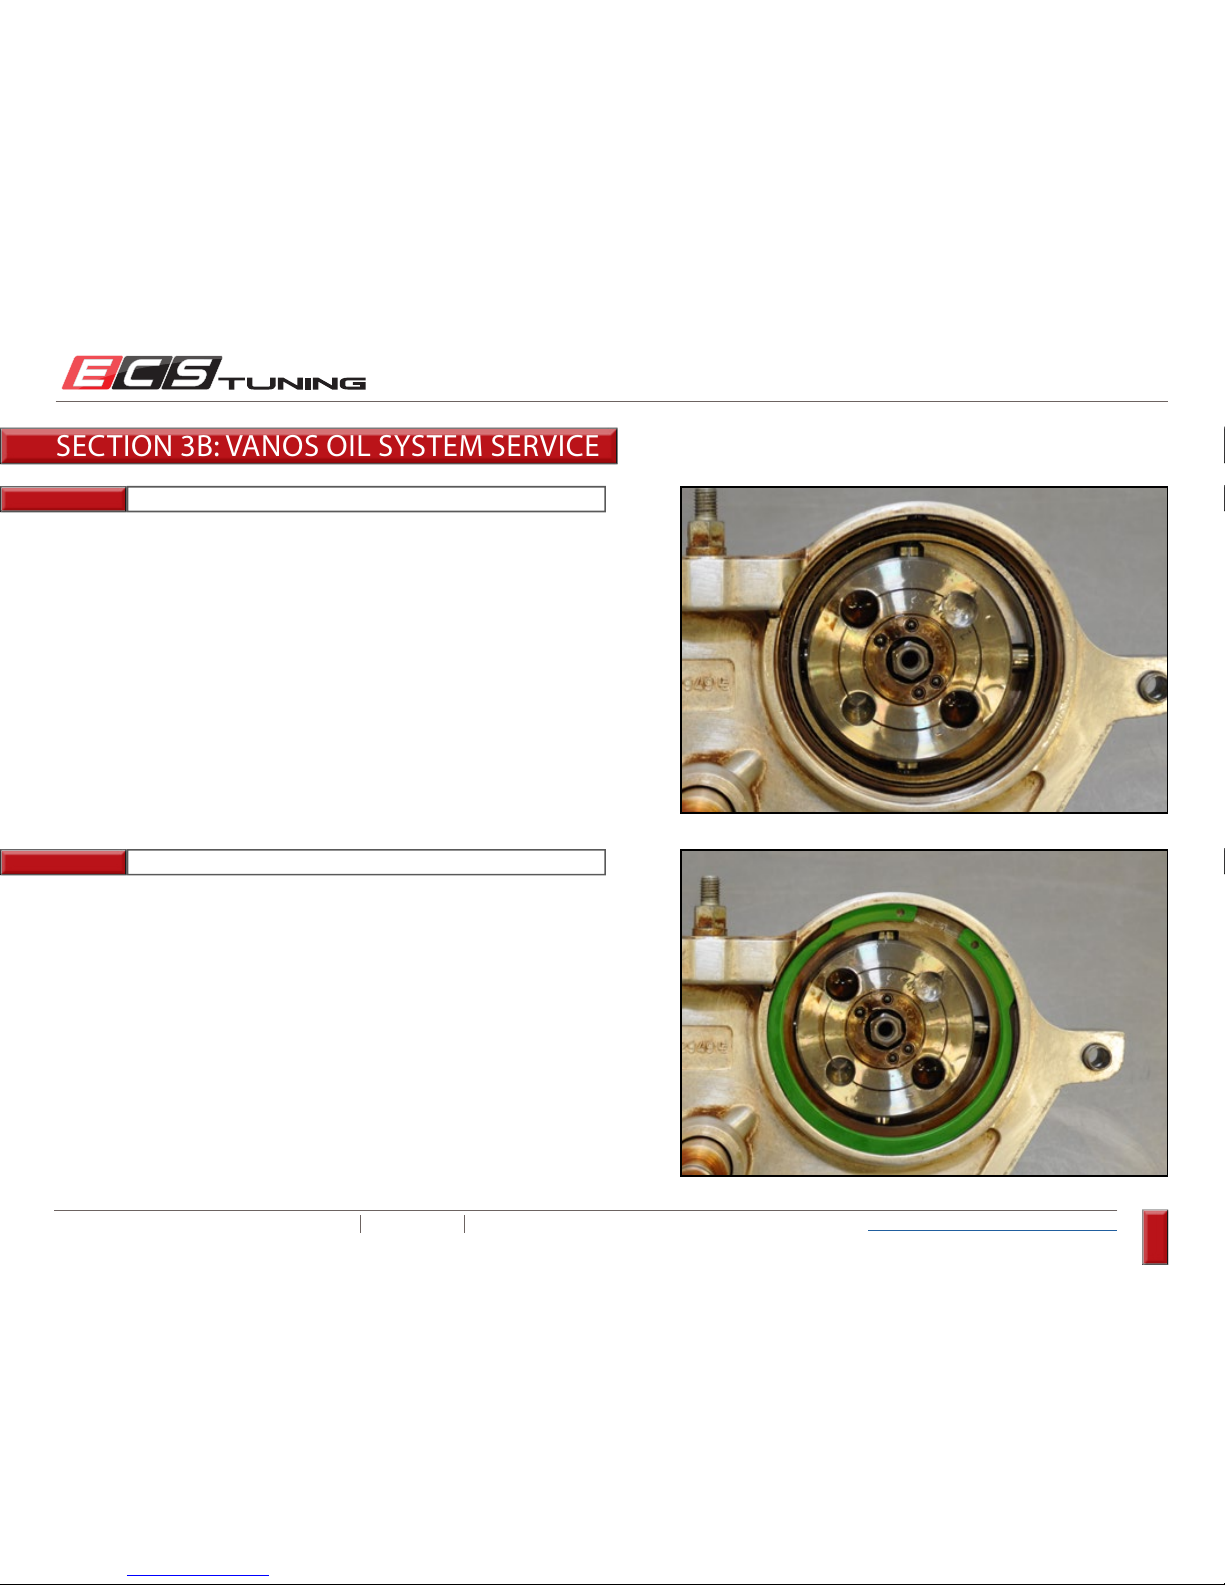
Lubricate the oil pump bearing and rotor with clean engine oil, then
reinstall the rotor and bearing ring assembly into the piston housing.
Install the oil pump retaining washer and snap ring.
Note that the rotor is off center in relation to the bearing ring. As you
slide the rotor into place, you’ll have to adjust the position of the bearing
ring to line up with the bearing.
SECTION 3B: VANOS OIL SYSTEM SERVICE
Page 37
ECS TUNING 1000 SEVILLE RD. WADSWORTH, OH 44281 1.800.924.5172 WWW.ECSTUNING.COM
37
BMW S54 DUAL VANOS REBUILD
®
Return to Vanos Repair Table of Contents
Step 19:
Step 20:
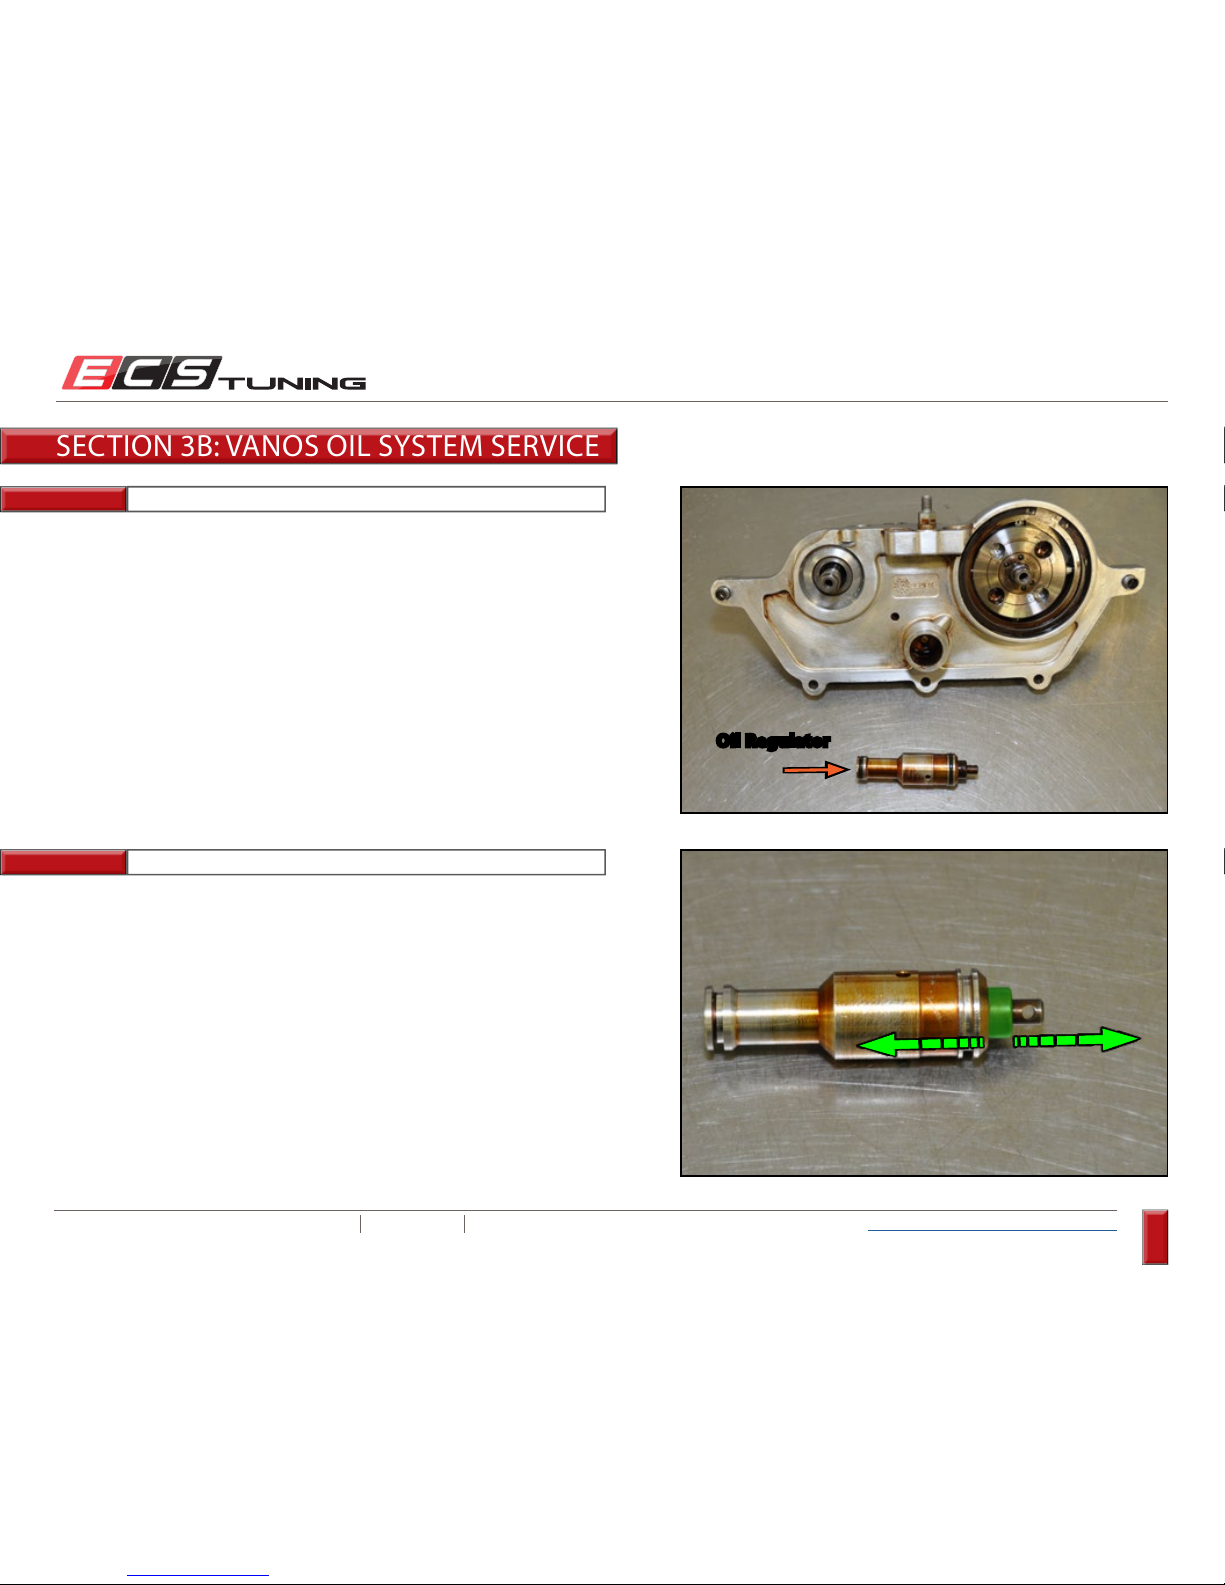
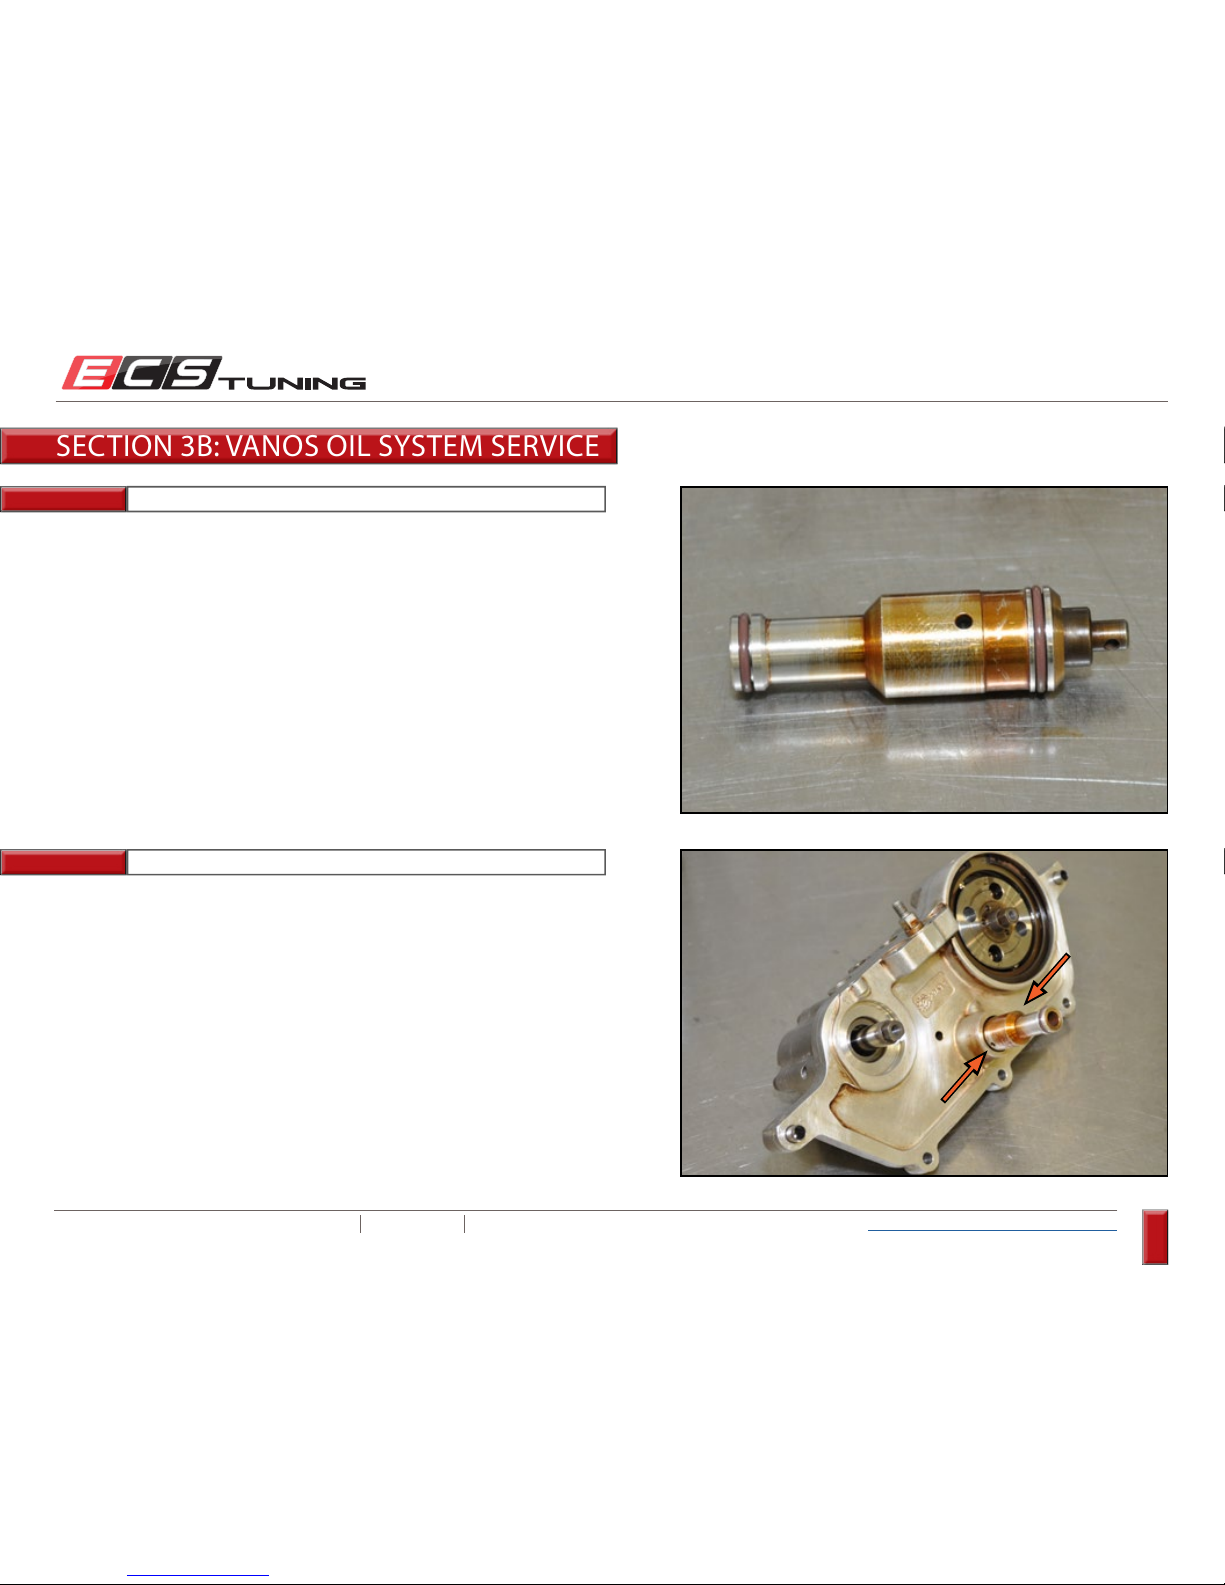
Pull the oil regulator out of the piston housing.
Remove the original o-rings and thoroughly clean the oil regulator using
brake clean to flush out any old oil.
Oil Regulator
Check the operation of the oil flow regulator valve. The highlighted
component should push into the regulator and spring back out.
SECTION 3B: VANOS OIL SYSTEM SERVICE
Page 38
ECS TUNING 1000 SEVILLE RD. WADSWORTH, OH 44281 1.800.924.5172 WWW.ECSTUNING.COM
38
BMW S54 DUAL VANOS REBUILD
®
Return to Vanos Repair Table of Contents
Step 21:
Step 22:
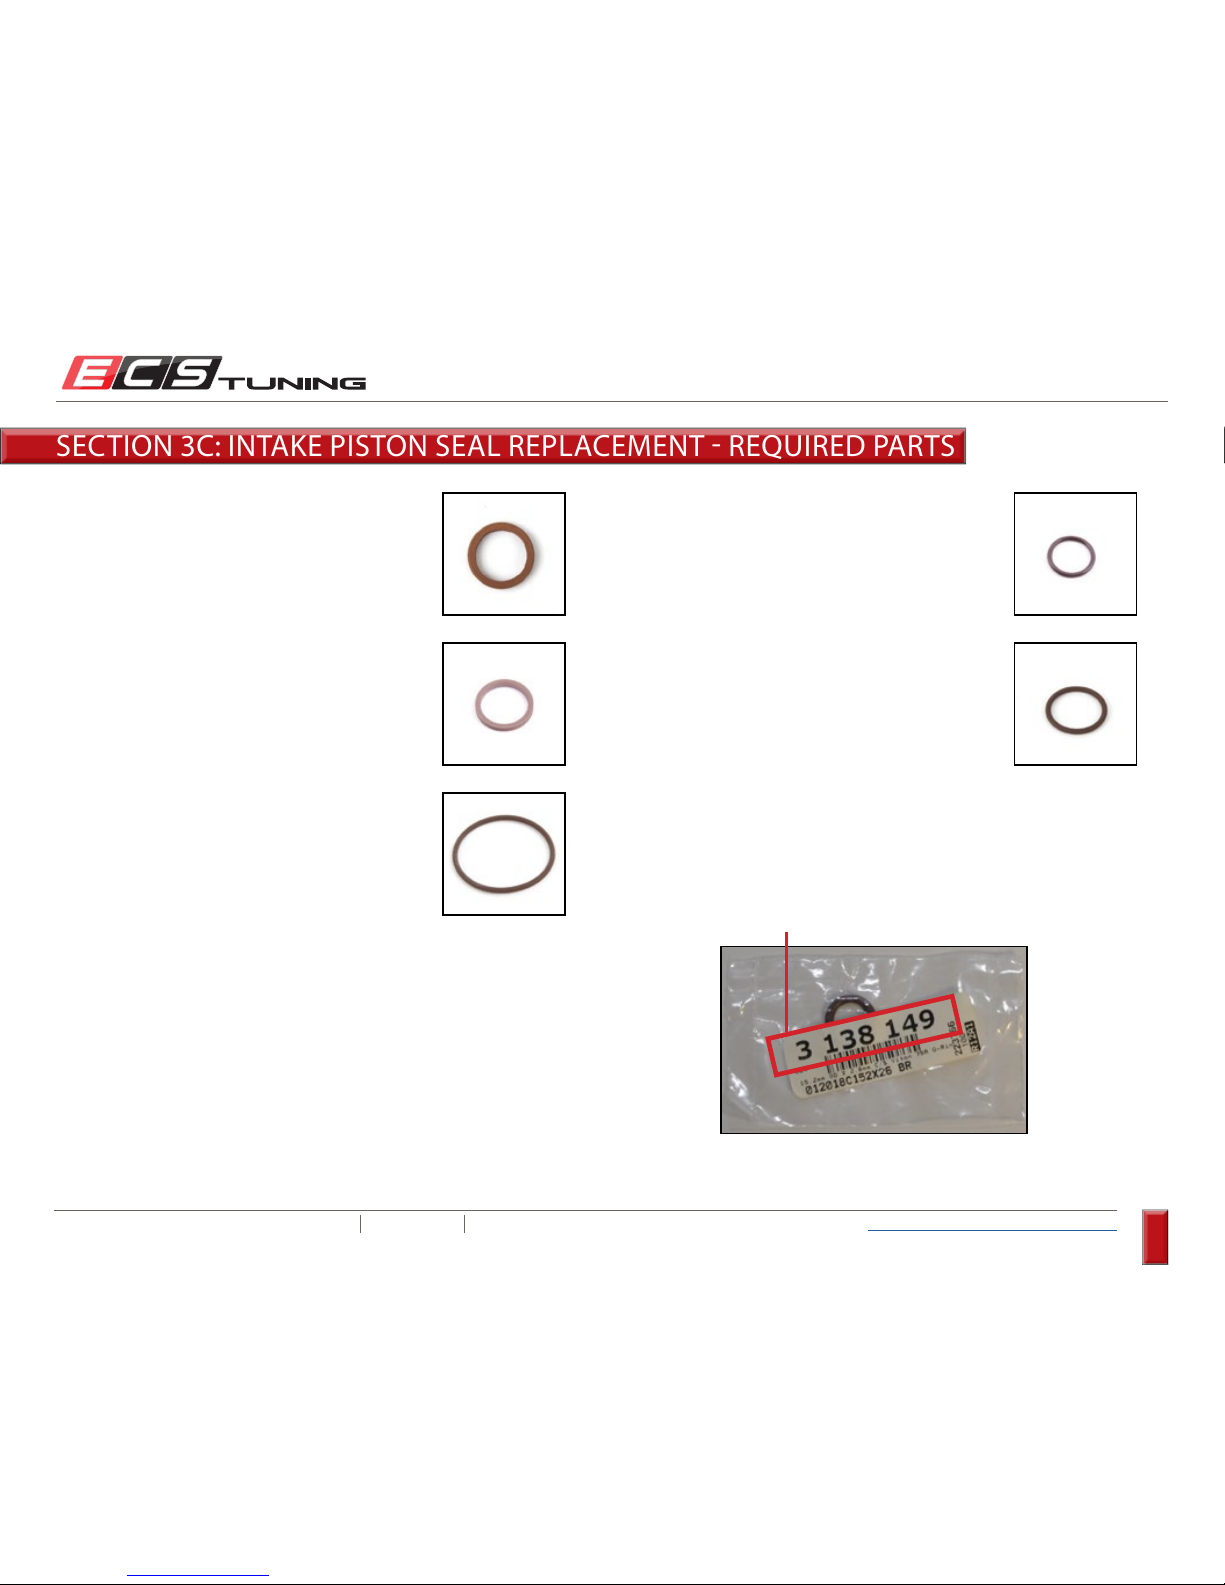
Install the new o-rings into place on the large and small ends.
Lubricate the large o-ring with clean engine oil and push the oil regulator
into place in the piston housing. Be sure to locate the holes at the sides as
shown.
- End of Section 3b -
SECTION 3B: VANOS OIL SYSTEM SERVICE
Page 39
ECS TUNING 1000 SEVILLE RD. WADSWORTH, OH 44281 1.800.924.5172 WWW.ECSTUNING.COM
39
BMW S54 DUAL VANOS REBUILD
®
Return to Vanos Repair Table of Contents
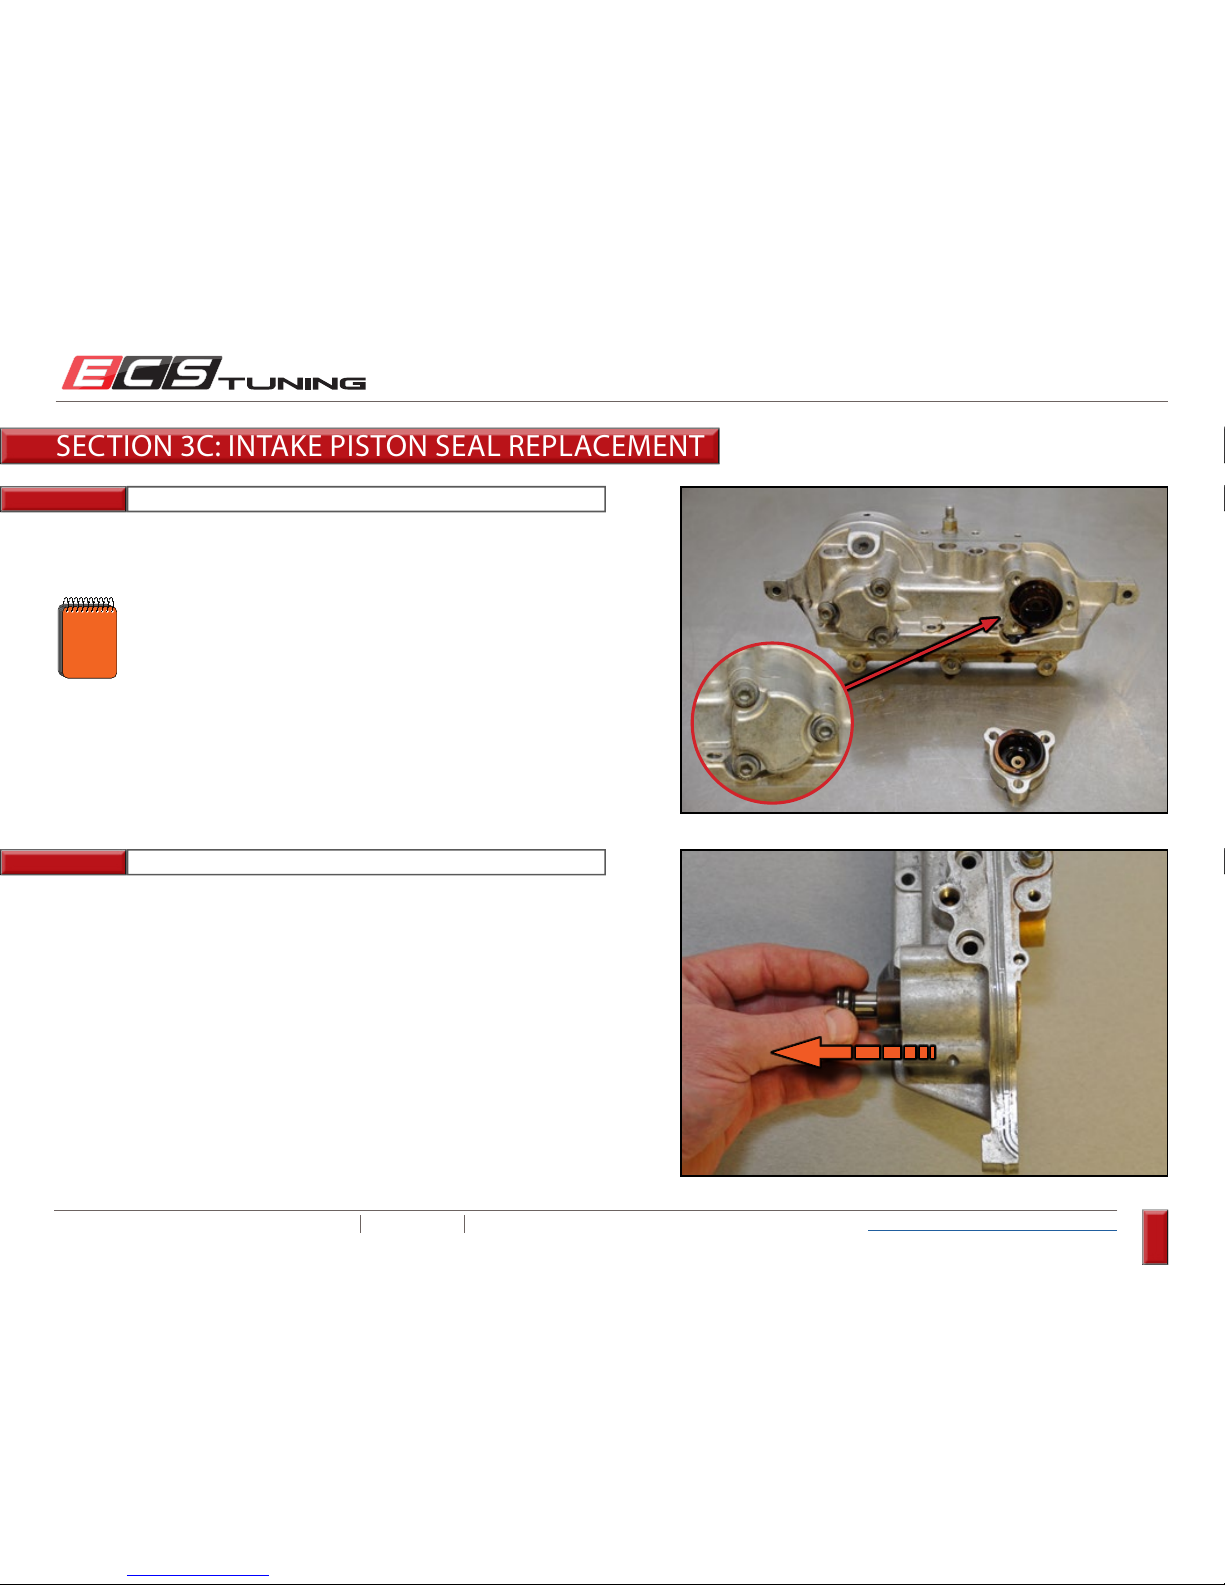
ES#3138134
Description...............Large Teflon Sealing Ring
Location .................... Intake Piston
Quantity .................... 1
ES#3138138
Description...............Inverted Teflon Sealing Ring
Location .................... Intake Piston Cylinder
Quantity .................... 1
ES#3138141
Description...............15.5mm ID x 1.7mm o-Ring
Location .................... Intake Piston Cylinder
Quantity .................... 1
ES#3138139
Description...............13mm ID x 1.7mm o-Ring
Location .................... Intake Piston
Quantity .................... 1
ES#313814 4
Description...............36mm OD x 2.0mm o-Ring
Location .................... Intake Piston Cap
Quantity .................... 1
SECTION 3C: INTAKE PISTON SEAL REPLACEMENT REQUIRED PARTS
Identical seal also used on exhaust piston - a total of two are included in the kit.
ES#
*
* *
*
All o-rings and Teflon rings will be sealed in individual poly bags
- do not unpack them until you are ready to install them. Prior to
use, always positively identify each seal by the ES# on the label.
NOTE:
Page 40
ECS TUNING 1000 SEVILLE RD. WADSWORTH, OH 44281 1.800.924.5172 WWW.ECSTUNING.COM
40
BMW S54 DUAL VANOS REBUILD
®
Return to Vanos Repair Table of Contents
Step 1:
Step 2:
5mm Allen (Hex Bit) Socket, Ratchet
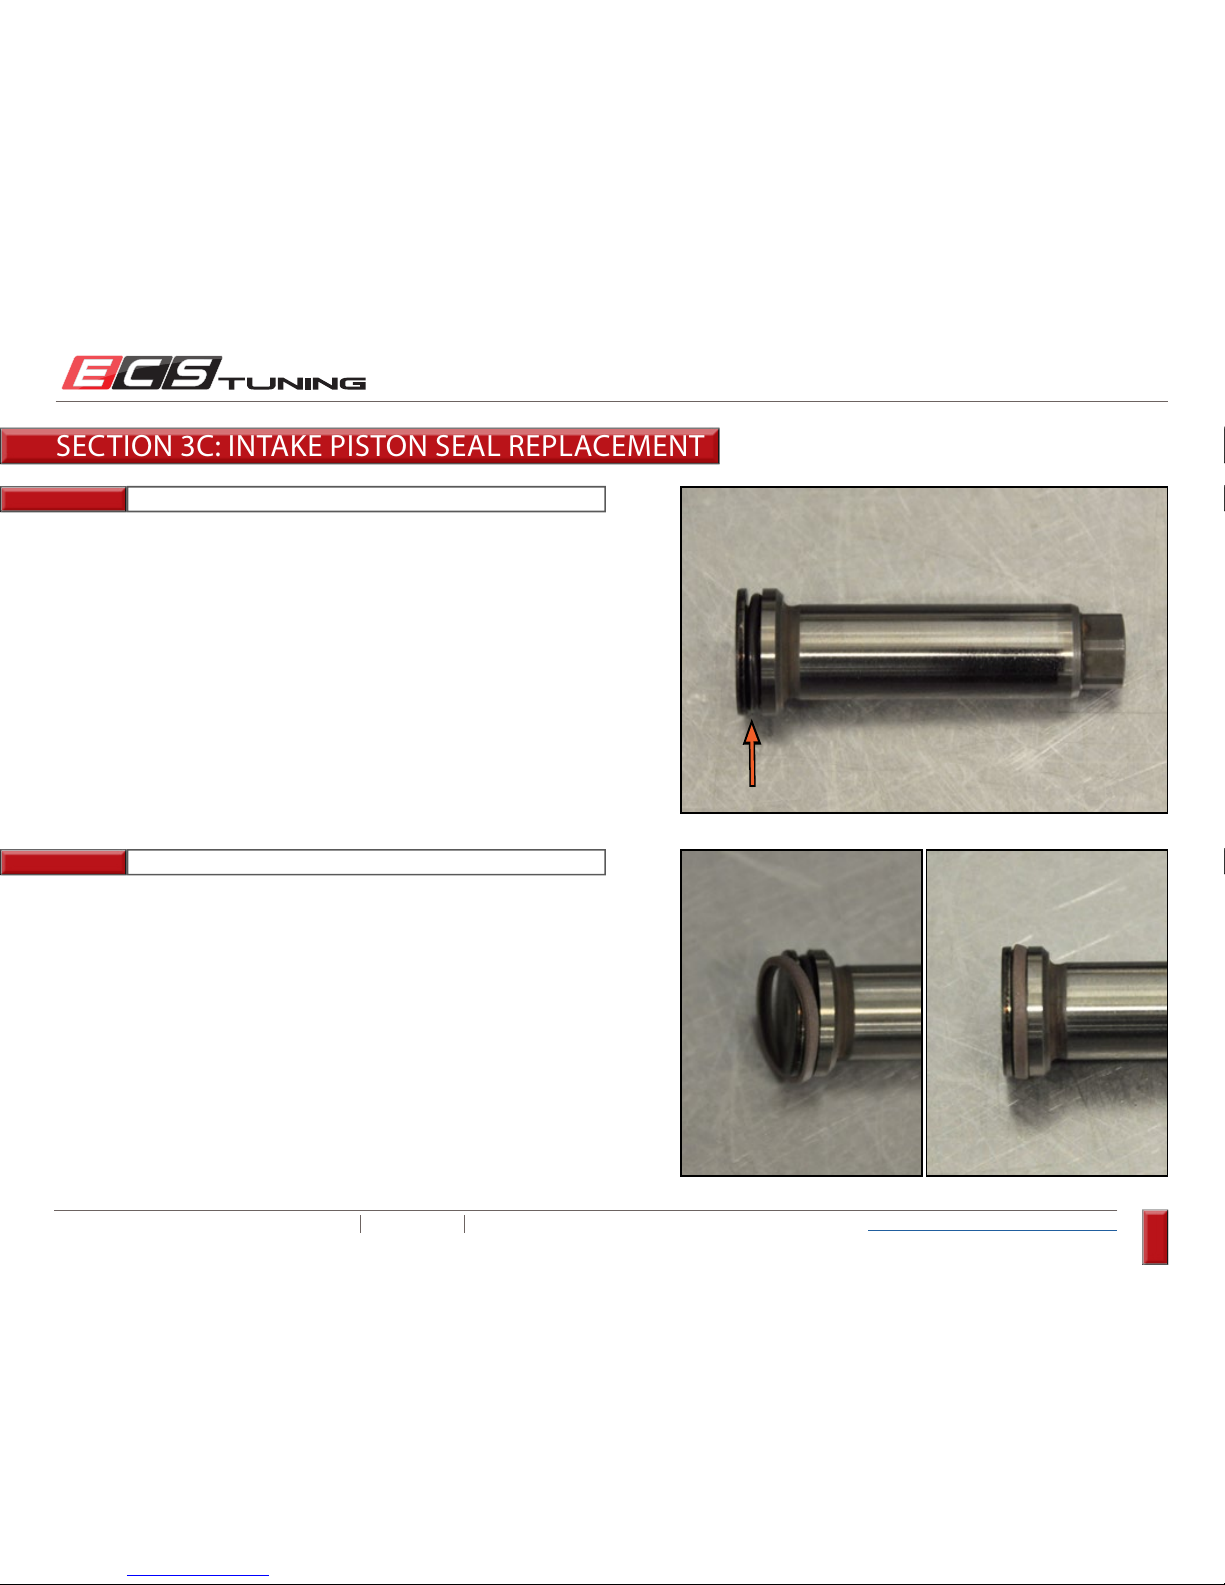
Remove the three bolts and pull off the intake piston cap.
Push/pull the intake piston out of its cylinder towards the direction of the
cap.
SECTION 3C: INTAKE PISTON SEAL REPLACEMENT
These can be difficult to remove due to a stuck
seal. You may have to use a thin scraper/putty
knife or similar tool to help pry the cap loose.
NOTE
Page 41

ECS TUNING 1000 SEVILLE RD. WADSWORTH, OH 44281 1.800.924.5172 WWW.ECSTUNING.COM
41
BMW S54 DUAL VANOS REBUILD
®
Return to Vanos Repair Table of Contents
Step 3:
Step 4: Exacto Knife
Inspect the intake piston. One end has a groove with a rubber o-ring
surrounded by a Teflon sealing ring.
Carefully cut the sealing ring and o-ring using an exacto knife, then
remove them from the piston ring groove.
SECTION 3C: INTAKE PISTON SEAL REPLACEMENT
Use caution not to cut or damage the surface of
the intake piston.
Page 42
ECS TUNING 1000 SEVILLE RD. WADSWORTH, OH 44281 1.800.924.5172 WWW.ECSTUNING.COM
42
BMW S54 DUAL VANOS REBUILD
®
Return to Vanos Repair Table of Contents
Step 5:
Step 6:
Clean the piston thoroughly then install the new o-ring into the groove.
Warm the Teflon sealing ring slightly by dipping it in warm water, or even
holding it in your hand and blowing on it for a minute.
SECTION 3C: INTAKE PISTON SEAL REPLACEMENT
Start the Teflon sealing ring on one side of the groove as shown, then
keeping constant tension on it with your finger(s), slowly stretch it and
little by little work it around the edge of the piston and into the groove.
Page 43
ECS TUNING 1000 SEVILLE RD. WADSWORTH, OH 44281 1.800.924.5172 WWW.ECSTUNING.COM
43
BMW S54 DUAL VANOS REBUILD
®
Return to Vanos Repair Table of Contents
Step 7:
Step 8: Angled Pick
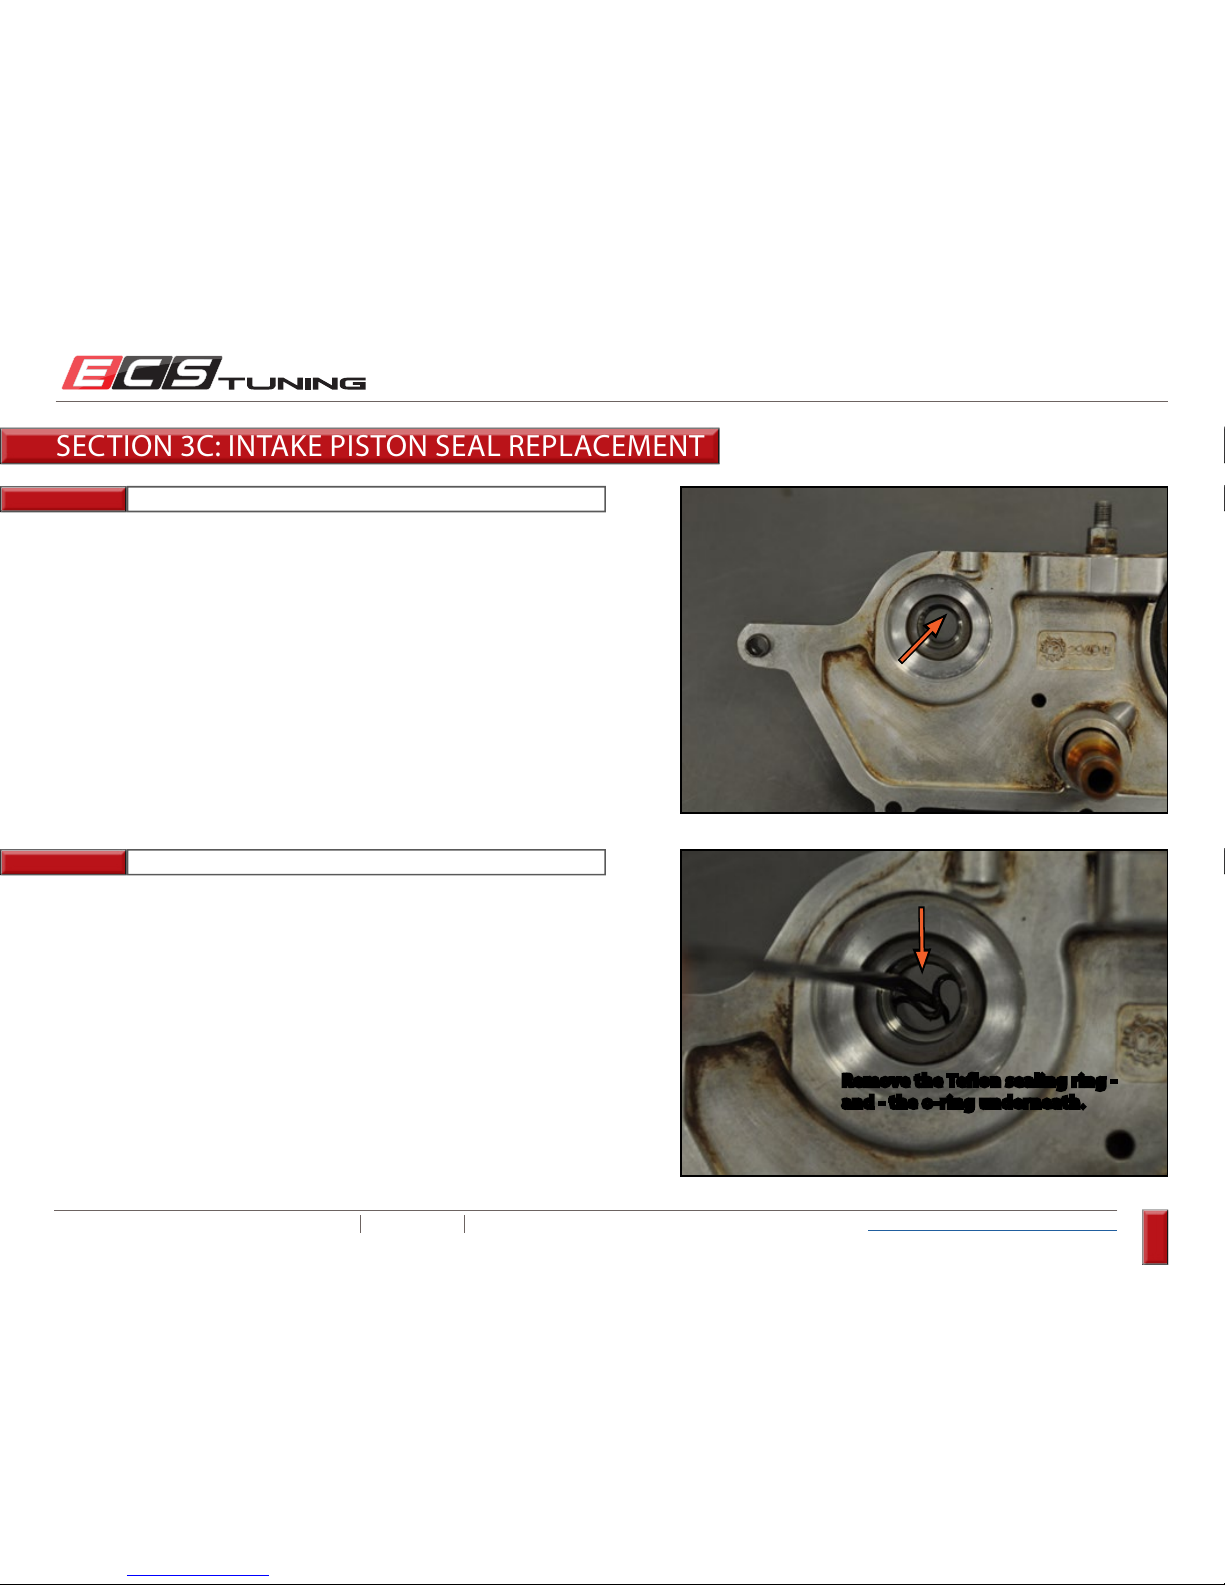
Look into the intake piston cylinder. You will see a Teflon sealing ring, and
like the piston, there is an o-ring underneath.
Use an angled pick to snag the Teflon sealing ring and pull it out, then
do the same for the o-ring. The Teflon ring is a little trickier, and you may
have to dig down into a little with the pick to get a hold of it.
SECTION 3C: INTAKE PISTON SEAL REPLACEMENT
Remove the Teflon sealing ring and - the o-ring underneath.
Page 44
ECS TUNING 1000 SEVILLE RD. WADSWORTH, OH 44281 1.800.924.5172 WWW.ECSTUNING.COM
44
BMW S54 DUAL VANOS REBUILD
®
Return to Vanos Repair Table of Contents
Step 9:
Step 10:
Needle Nose Pliers
Needle Nose Pliers
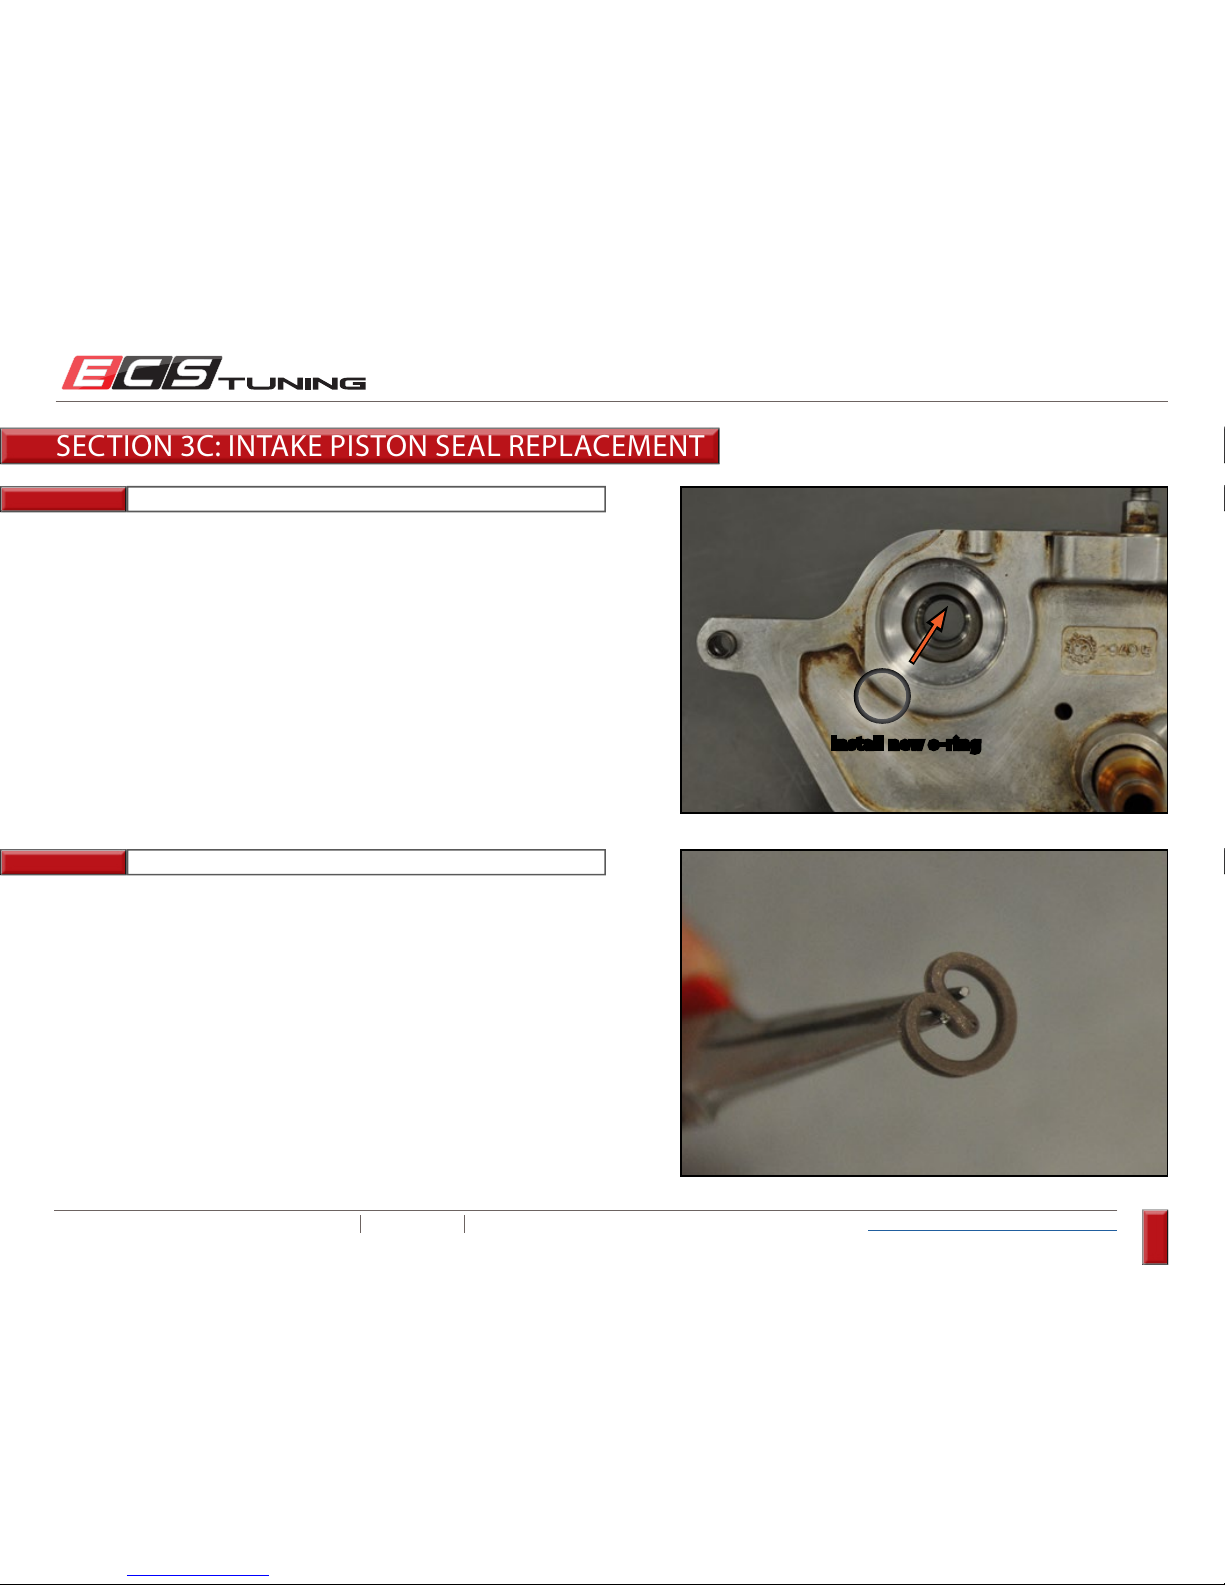
Clean out the groove and cylinder, then install the new o-ring into the
cylinder. You can guide the o-ring into place using needle nose pliers and
a small pick.
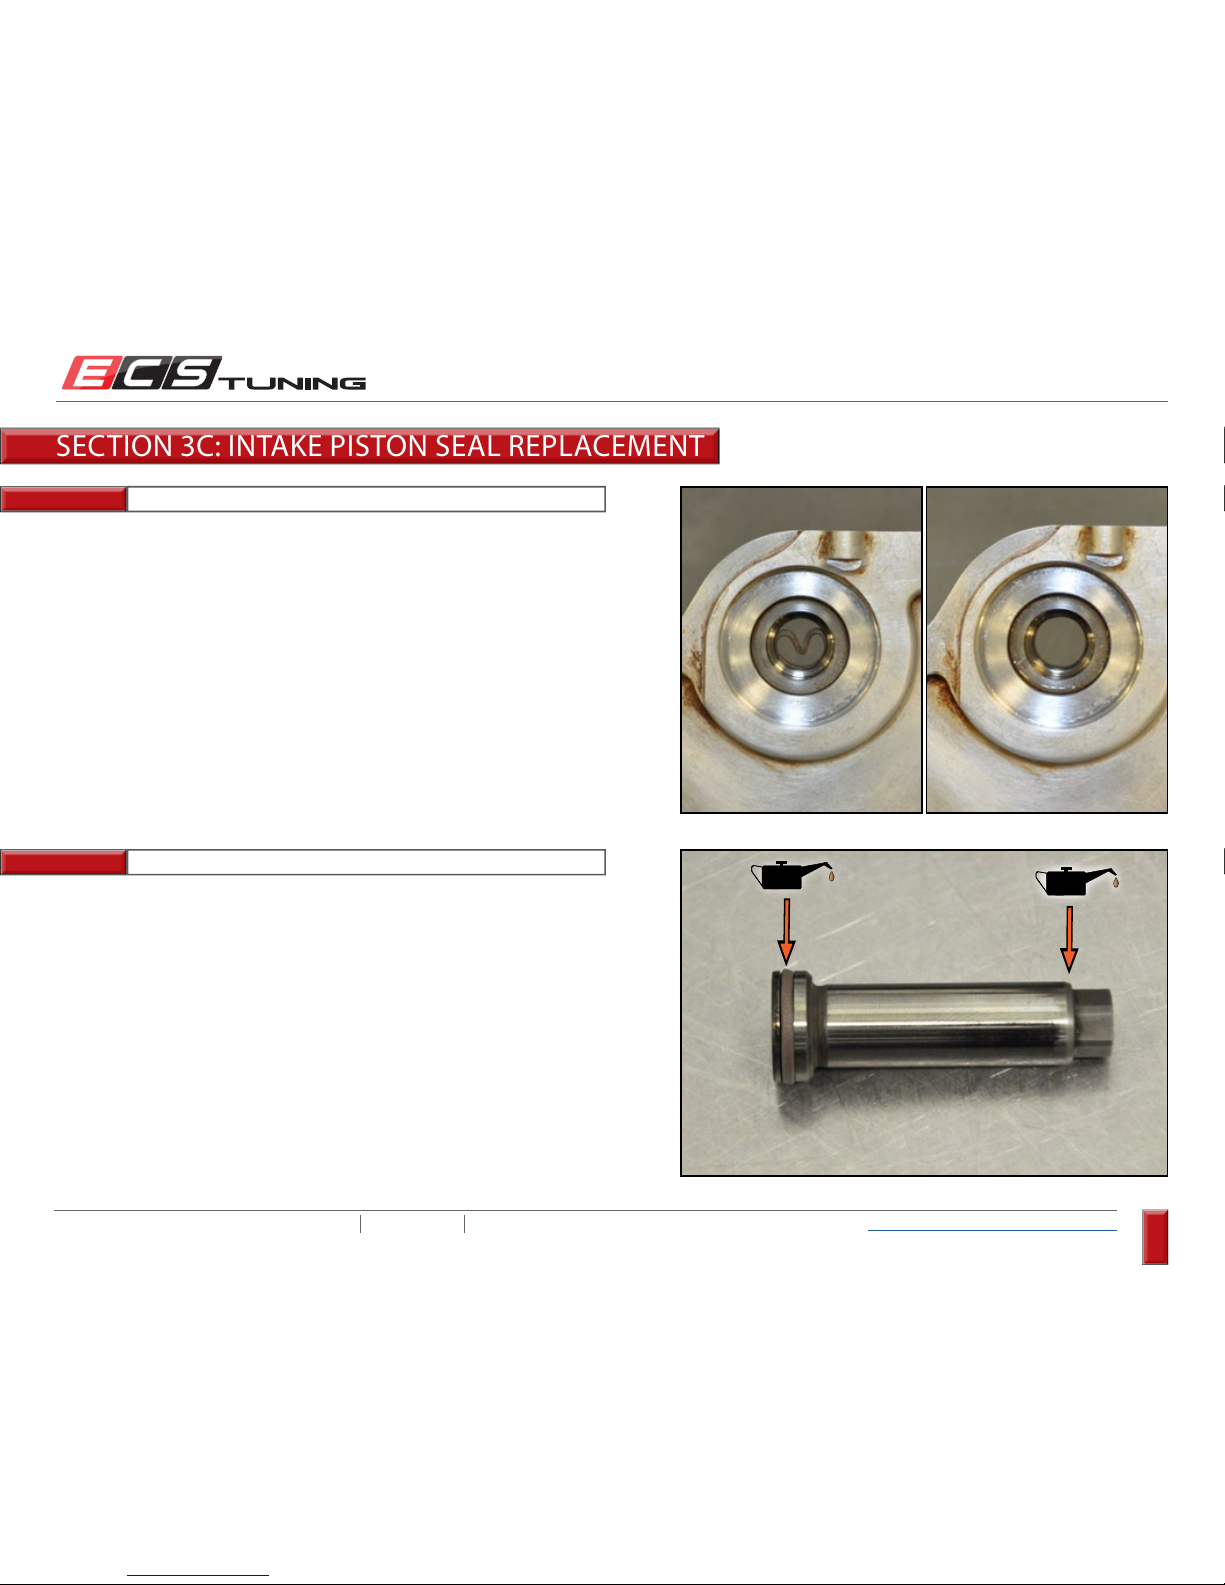
The Teflon sealing ring is a little trickier. First, warm the Teflon sealing ring
slightly by dipping it in warm water, or even holding it in your hand and
blowing on it for a minute. Next, fold it inward and grab it with a pair of
needle nose pliers as shown in the picture. This might seem damaging
at first, but the Teflon is very resilient and will return to shape after it is
installed.
SECTION 3C: INTAKE PISTON SEAL REPLACEMENT
Install new o-ring
Page 45
ECS TUNING 1000 SEVILLE RD. WADSWORTH, OH 44281 1.800.924.5172 WWW.ECSTUNING.COM
45
BMW S54 DUAL VANOS REBUILD
®
Return to Vanos Repair Table of Contents
Step 11:
Step 12:
Needle Nose Pliers
Guide the Teflon sealing ring into the groove as shown, then once it is
seated on top of the o-ring, use the end of the pliers to push the folded
part of the seal upward until it returns to its normal shape.
Use the rounded edge of the pliers to work the seal around its
circumference, helping it to seat fully on top of the o-ring.
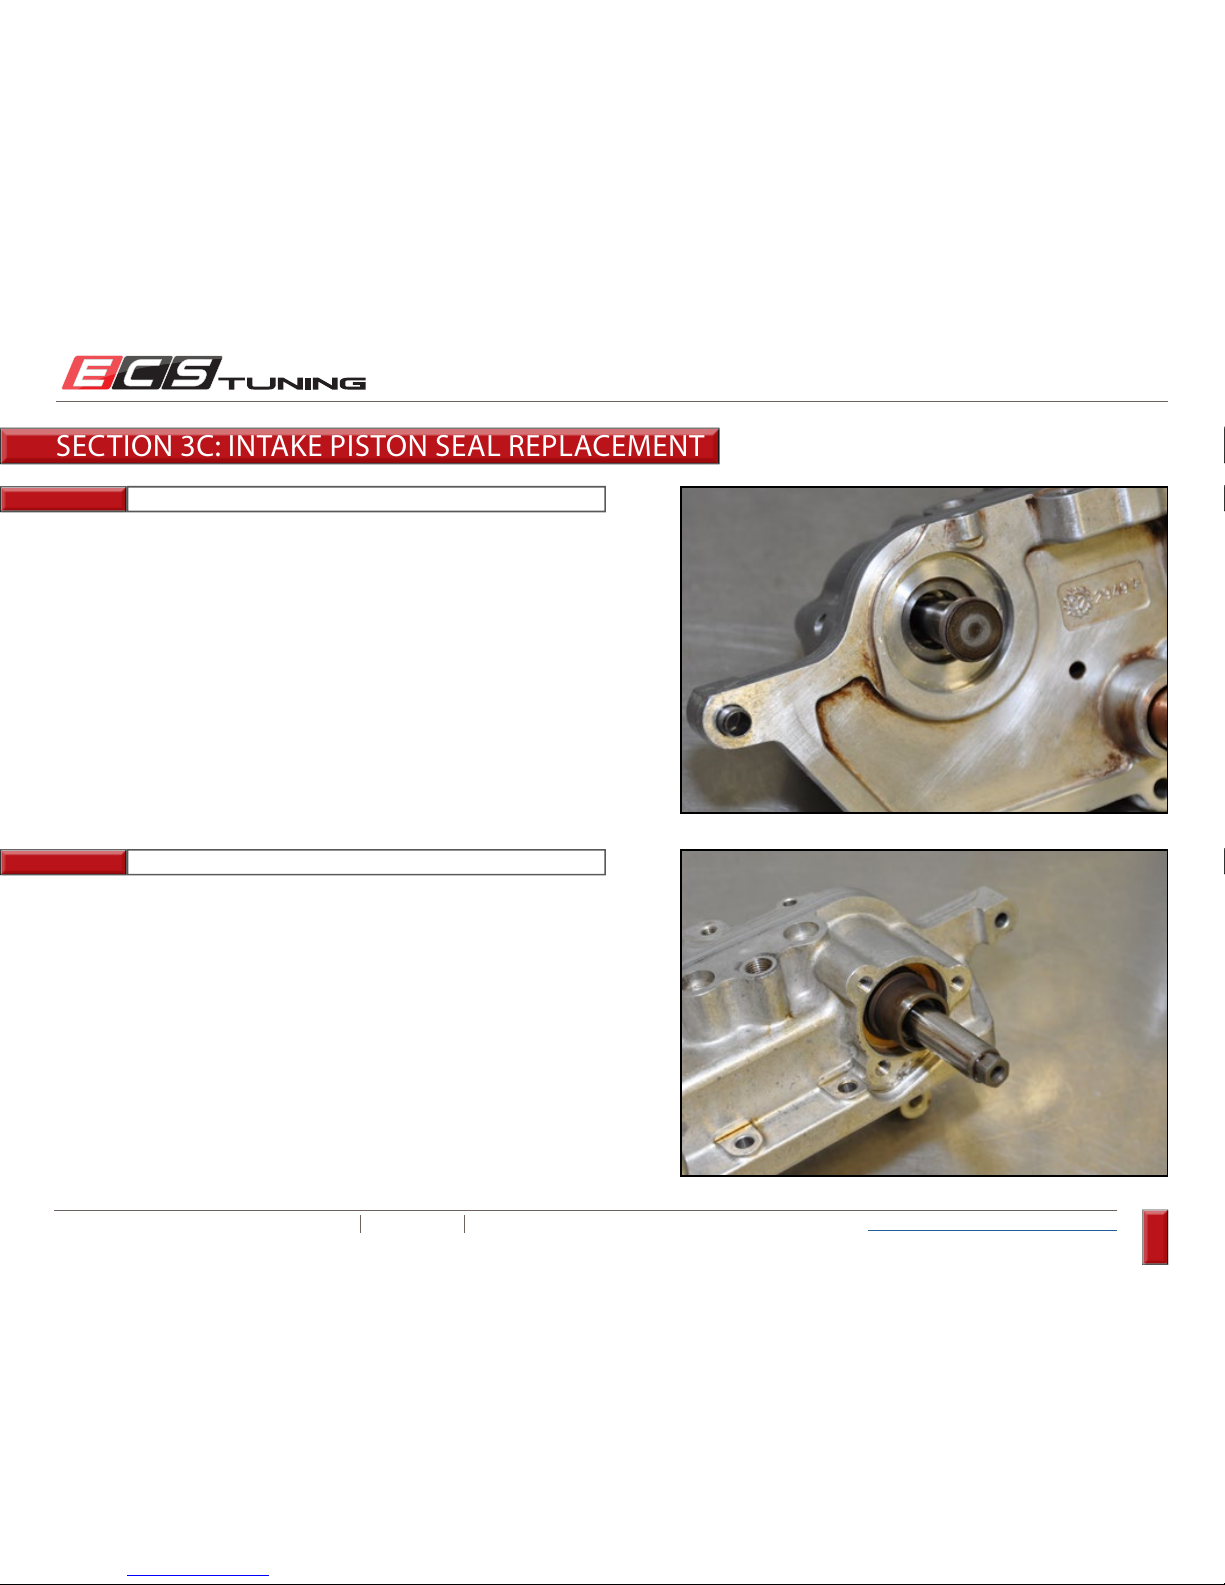
Lubricate both ends of the intake piston with clean engine oil.
SECTION 3C: INTAKE PISTON SEAL REPLACEMENT
Page 46
ECS TUNING 1000 SEVILLE RD. WADSWORTH, OH 44281 1.800.924.5172 WWW.ECSTUNING.COM
46
BMW S54 DUAL VANOS REBUILD
®
Return to Vanos Repair Table of Contents
Step 13:
Step 14:
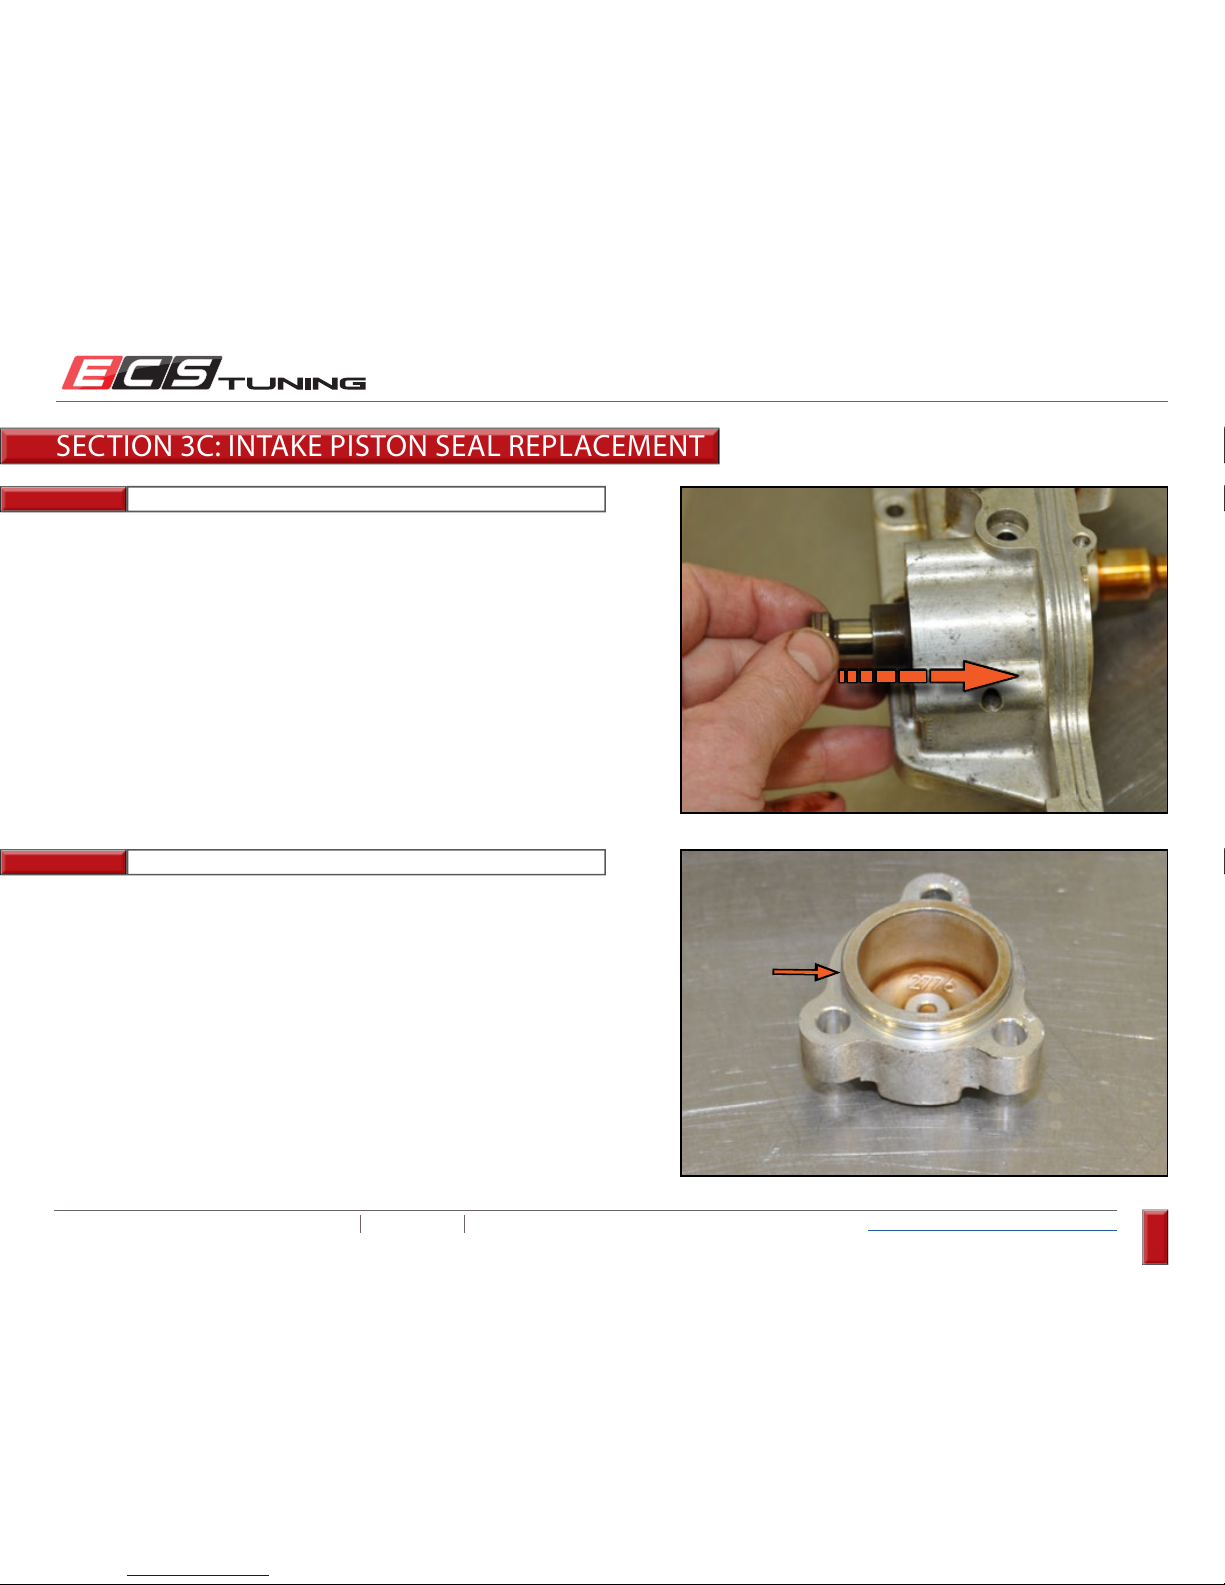
Insert the intake piston into the cylinder from the inboard side (opposite
the cap) and wiggle it around gently until it slides through the new Teflon
sealing ring in the cylinder. Allow it to remain installed for one minute,
then remove it. This process will fully seat the Teflon ring in the cylinder.
Now insert the piston into the outboard side (cap end) of the cylinder
as shown, wiggling it around gently as needed until it pushes into the
cylinder. Allow it to remain installed for one minute, then remove it. This
process will fully seat the Teflon ring onto the intake piston.
SECTION 3C: INTAKE PISTON SEAL REPLACEMENT
Page 47
ECS TUNING 1000 SEVILLE RD. WADSWORTH, OH 44281 1.800.924.5172 WWW.ECSTUNING.COM
47
BMW S54 DUAL VANOS REBUILD
®
Return to Vanos Repair Table of Contents
Step 15:
Step 16: Angled Pick
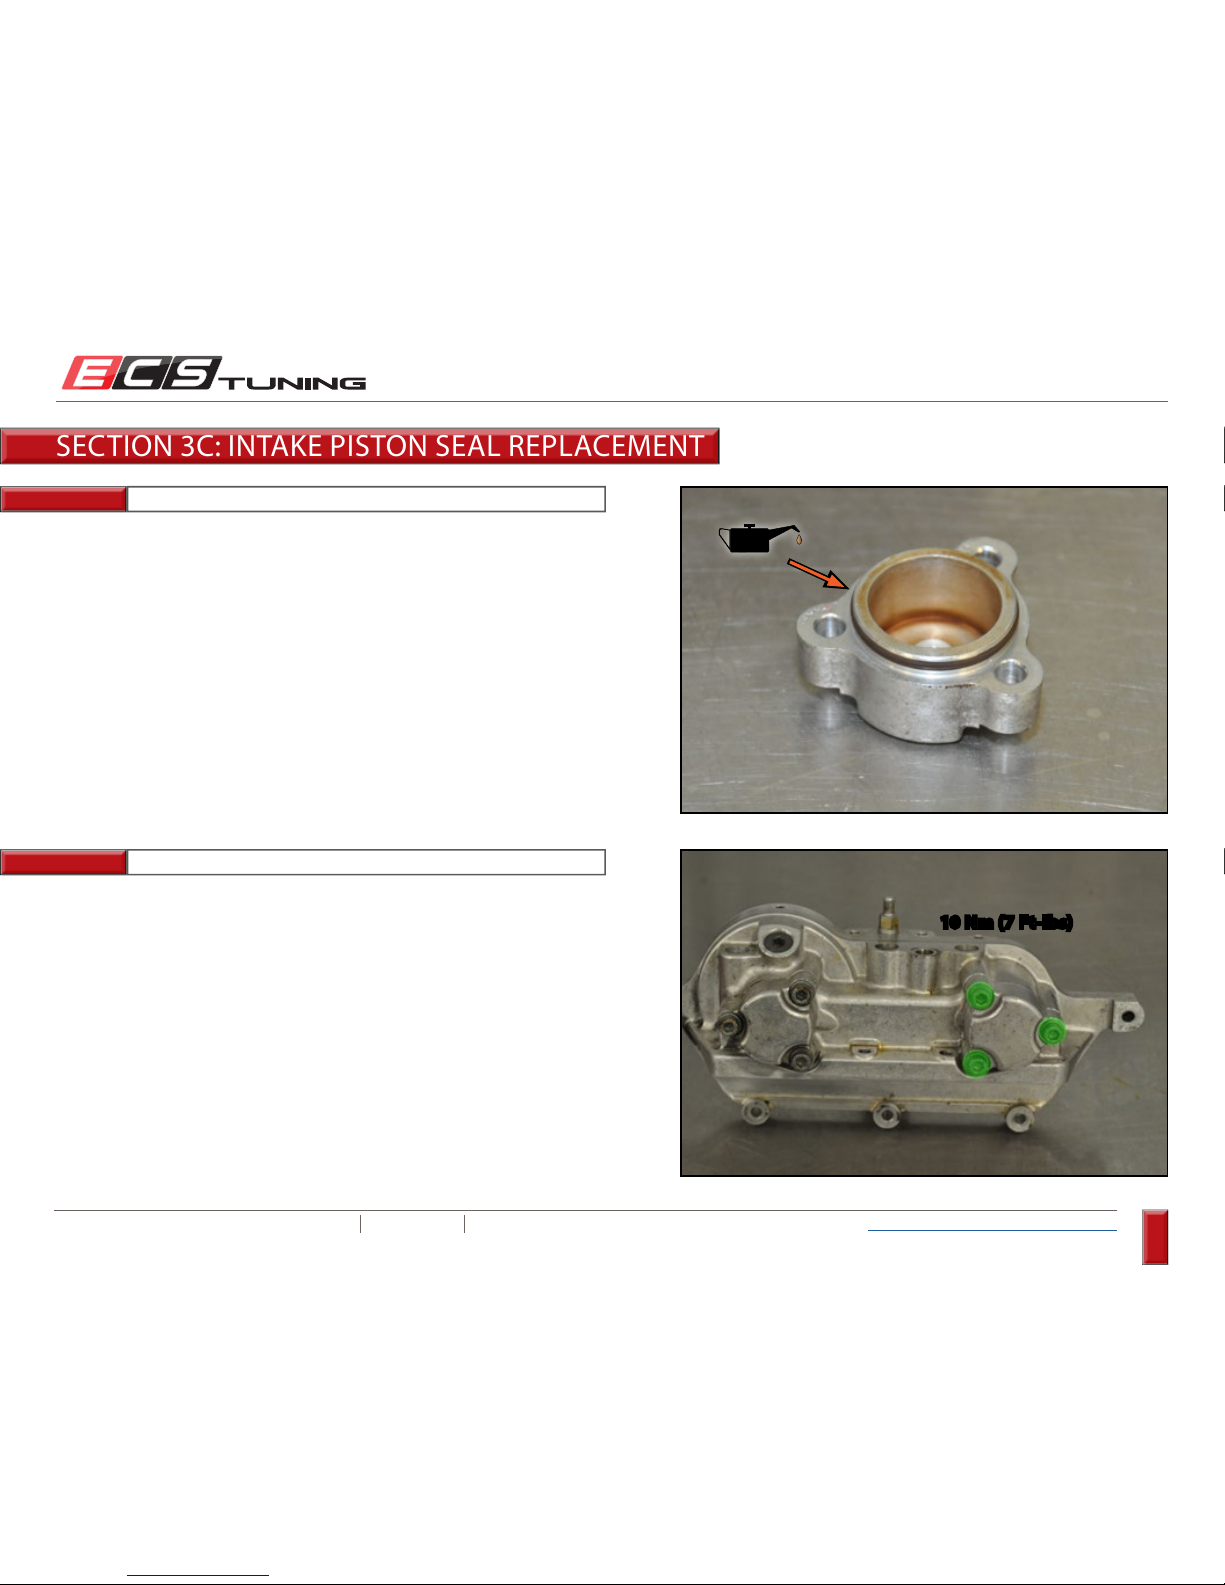
Insert the intake piston into the cylinder for the final time from the
outboard side and push it all the way into the cylinder.
Remove the old seal from the piston cap and clean the groove thoroughly.
SECTION 3C: INTAKE PISTON SEAL REPLACEMENT
Page 48
ECS TUNING 1000 SEVILLE RD. WADSWORTH, OH 44281 1.800.924.5172 WWW.ECSTUNING.COM
48
BMW S54 DUAL VANOS REBUILD
®
Return to Vanos Repair Table of Contents
Step 17:
Step 18: 5mm Allen (Hex Bit) Socket, Torque Wrench
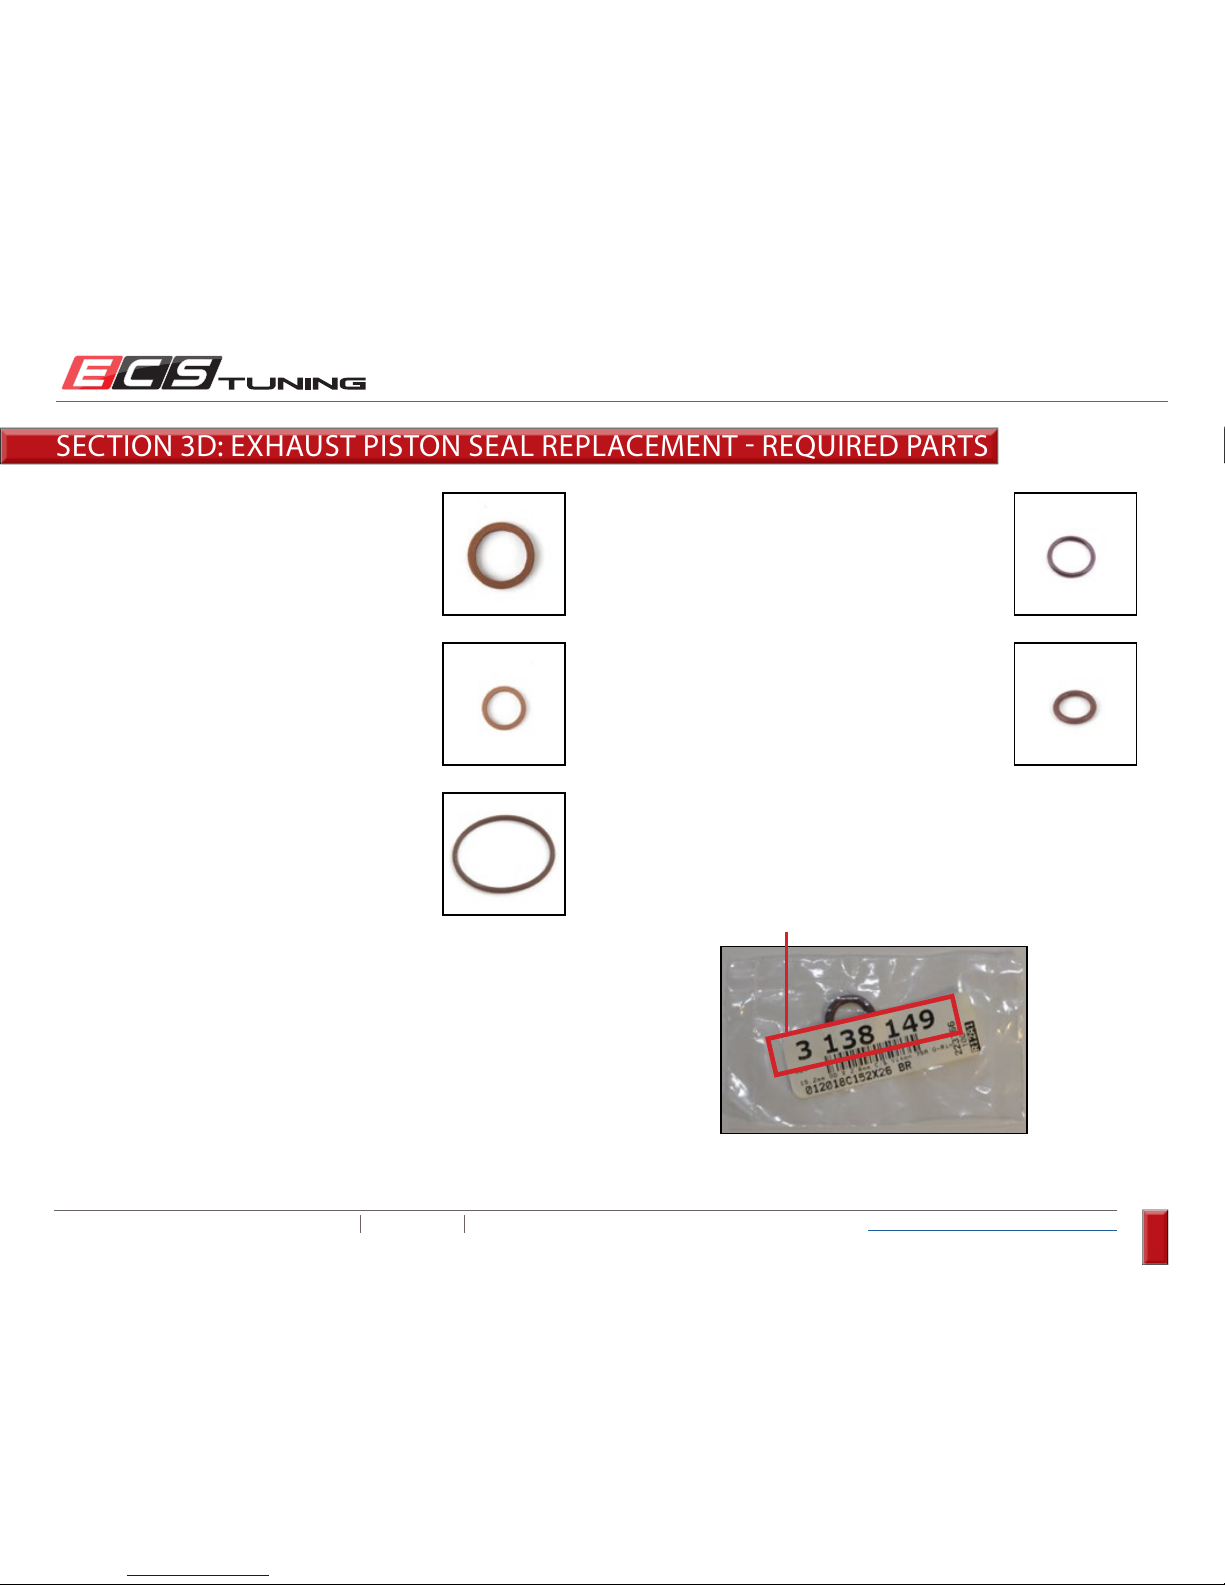
Install the new seal onto the piston cap and lubricate it with clean engine
oil.
Install the intake piston cap and torque the bolts to 10 Nm (7 Ft-lbs).
SECTION 3C: INTAKE PISTON SEAL REPLACEMENT
10 Nm (7 Ft-lbs)
- End of Section 3c -
Page 49
ECS TUNING 1000 SEVILLE RD. WADSWORTH, OH 44281 1.800.924.5172 WWW.ECSTUNING.COM
49
BMW S54 DUAL VANOS REBUILD
®
Return to Vanos Repair Table of Contents
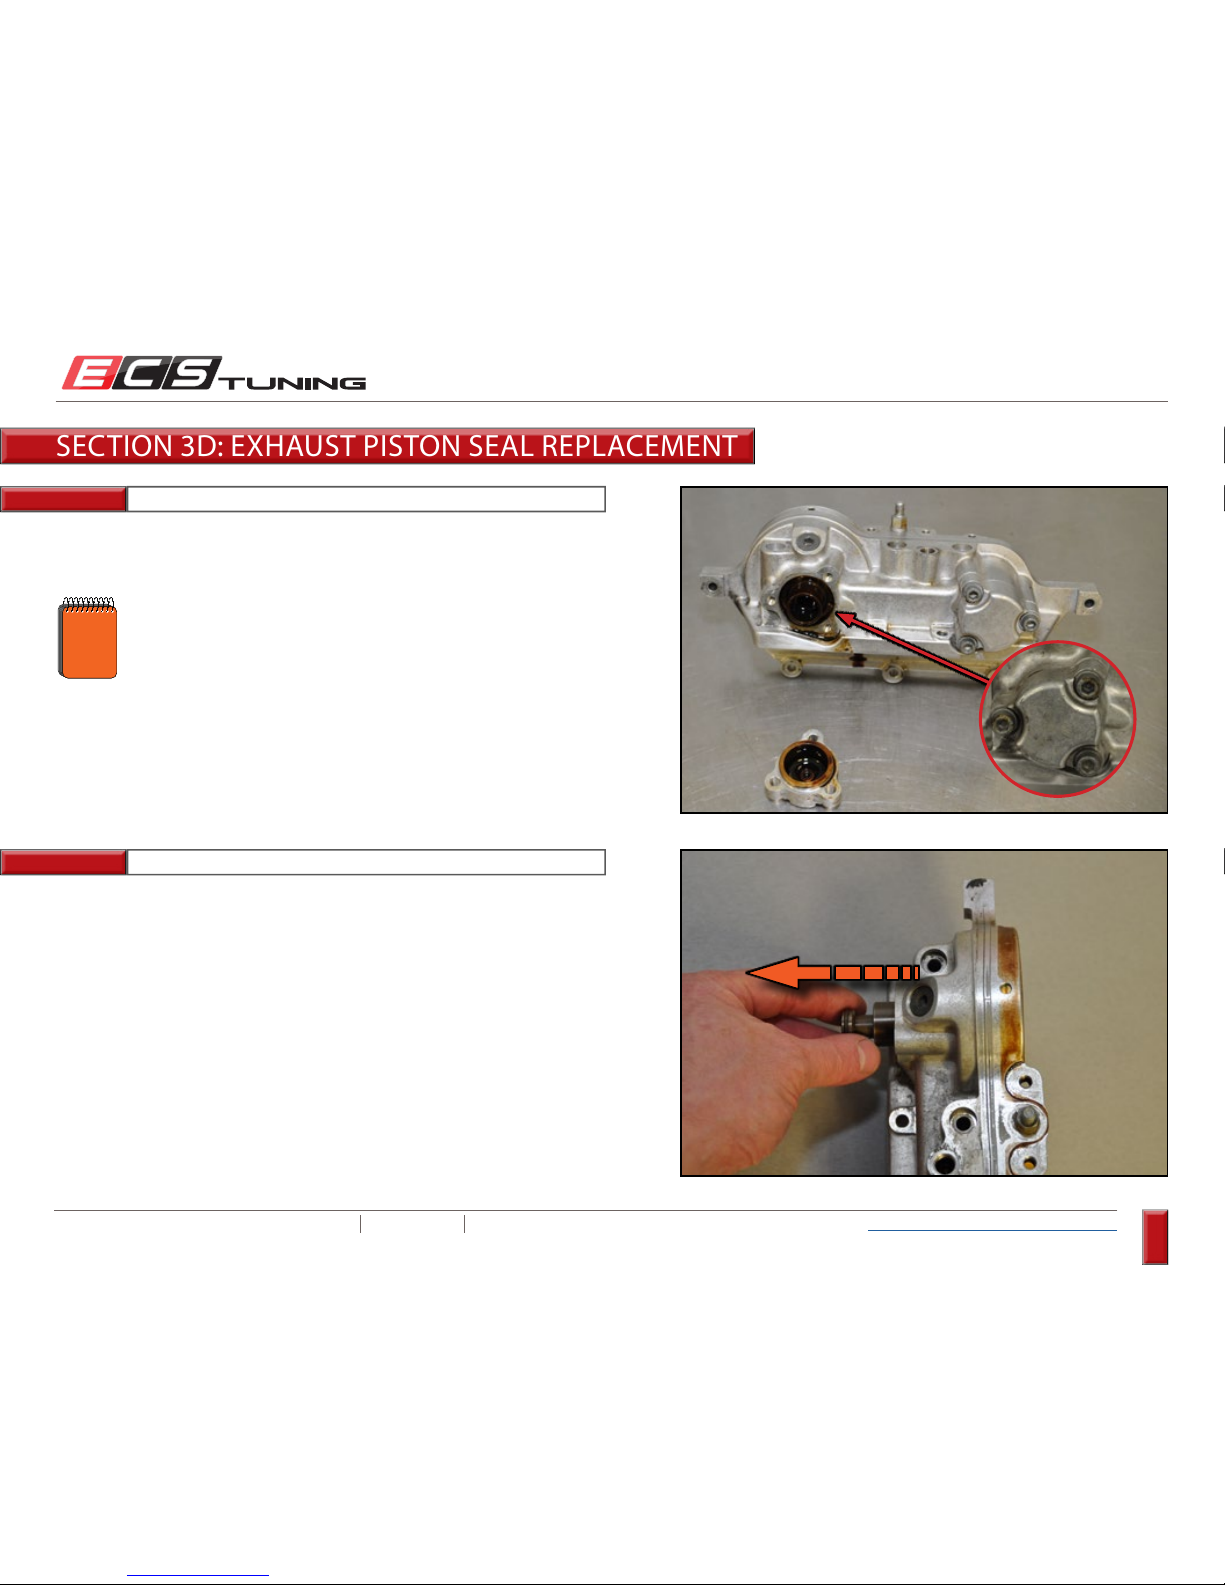
SECTION 3D: EXHAUST PISTON SEAL REPLACEMENT REQUIRED PARTS
ES#3138136
Description...............Small Teflon Sealing Ring
Location .................... Exhaust Piston Small End
Quantity .................... 1
ES#313814 4
Description...............36mm OD x 2.0mm o-Ring
Location .................... Exhaust Piston Cap
Quantity .................... 1
ES#3138134
Description...............Large Teflon Sealing Ring
Location .................... Exhaust Piston Large End
Quantity .................... 1
ES#3138139
Description...............13mm ID x 1.7mm o-Ring
Location .................... Exhaust Piston Large End
Quantity .................... 1
ES#313814 0
Description...............8.75mm ID x 1.7mm o-Ring
Location .................... Exhaust Piston Small End
Quantity .................... 1
ES#
Identical seal also used on intake piston - a total of two are included in the kit.
*
*
*
*
All o-rings and Teflon rings will be sealed in individual poly bags
- do not unpack them until you are ready to install them. Prior to
use, always positively identify each seal by the ES# on the label.
NOTE:
Page 50
ECS TUNING 1000 SEVILLE RD. WADSWORTH, OH 44281 1.800.924.5172 WWW.ECSTUNING.COM
50
BMW S54 DUAL VANOS REBUILD
®
Return to Vanos Repair Table of Contents
SECTION 3D: EXHAUST PISTON SEAL REPLACEMENT
Step 1:
Step 2:
Remove the three bolts and pull off the exhaust piston cap.
Push/pull the exhaust piston out of its cylinder towards the direction of
the cap.
These can be difficult to remove due to a stuck
seal. You may have to use a thin scraper/putty
knife or similar tool to help pry the cap loose.
NOTE
Page 51
ECS TUNING 1000 SEVILLE RD. WADSWORTH, OH 44281 1.800.924.5172 WWW.ECSTUNING.COM
51
BMW S54 DUAL VANOS REBUILD
®
Return to Vanos Repair Table of Contents
SECTION 3D: EXHAUST PISTON SEAL REPLACEMENT
Step 3:
Step 4: Exacto Knife
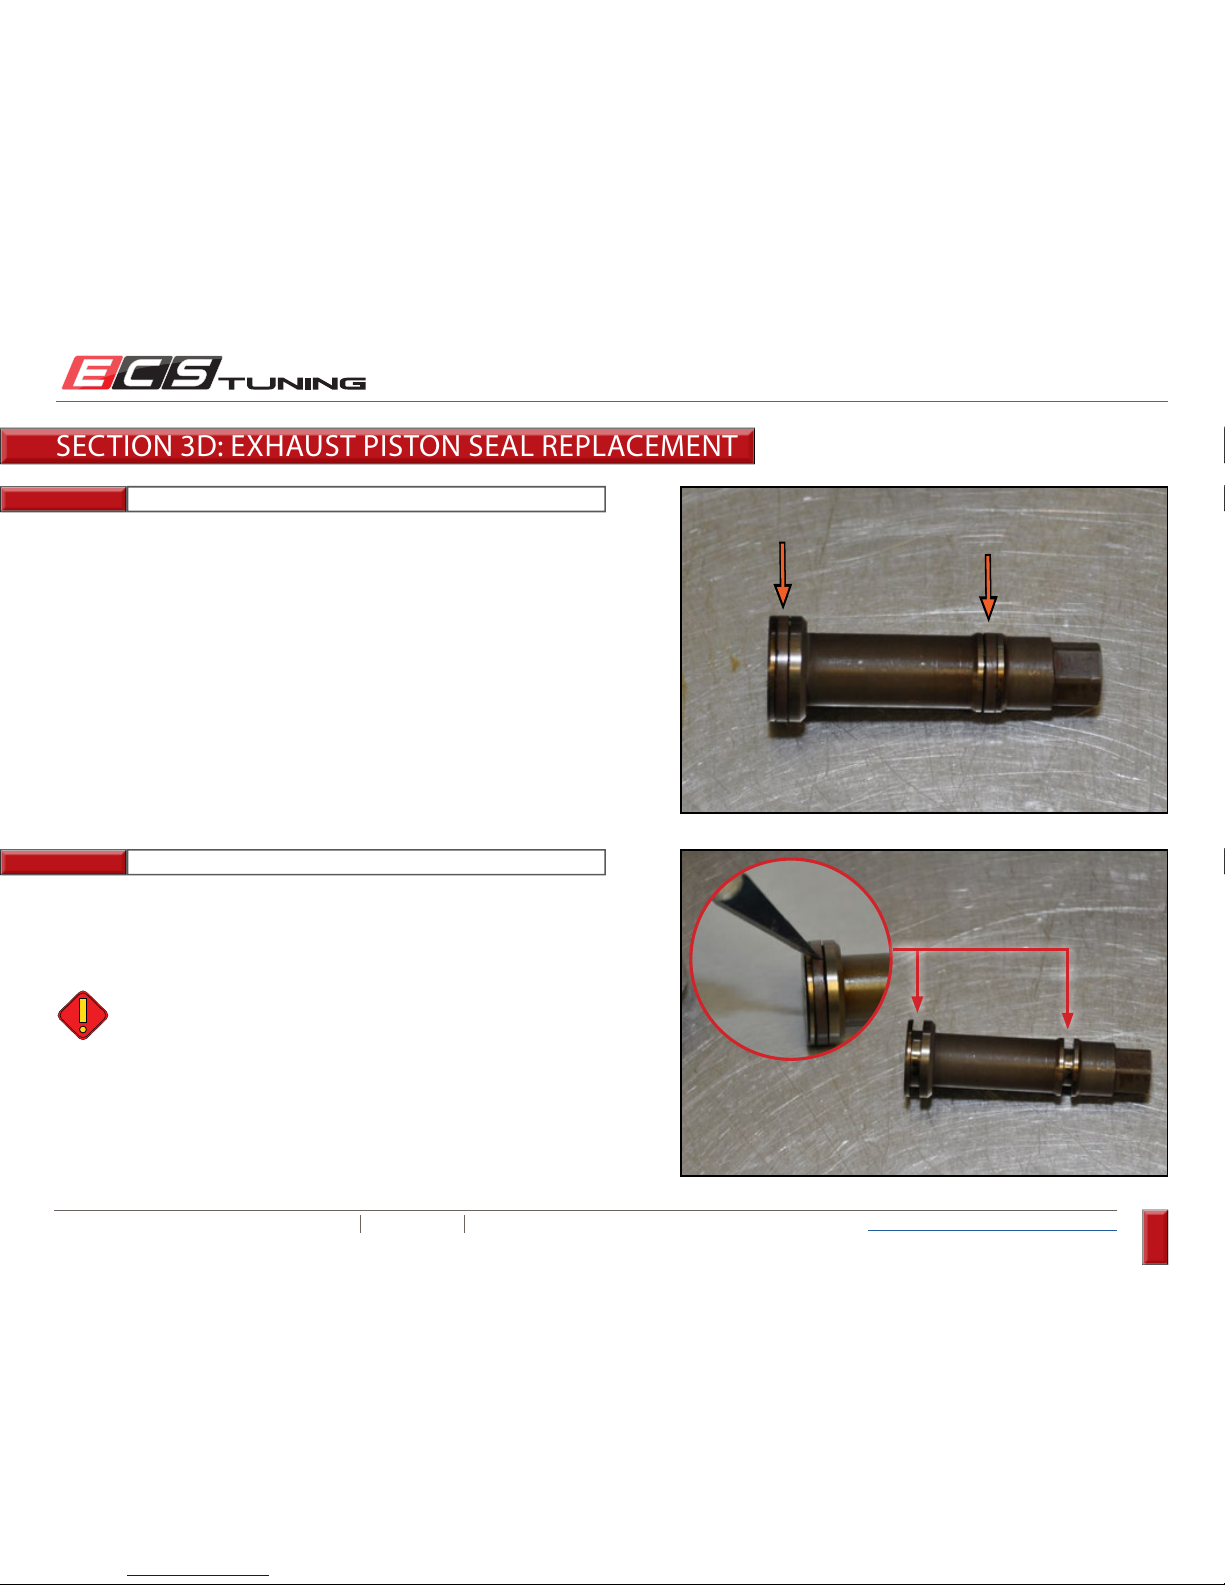
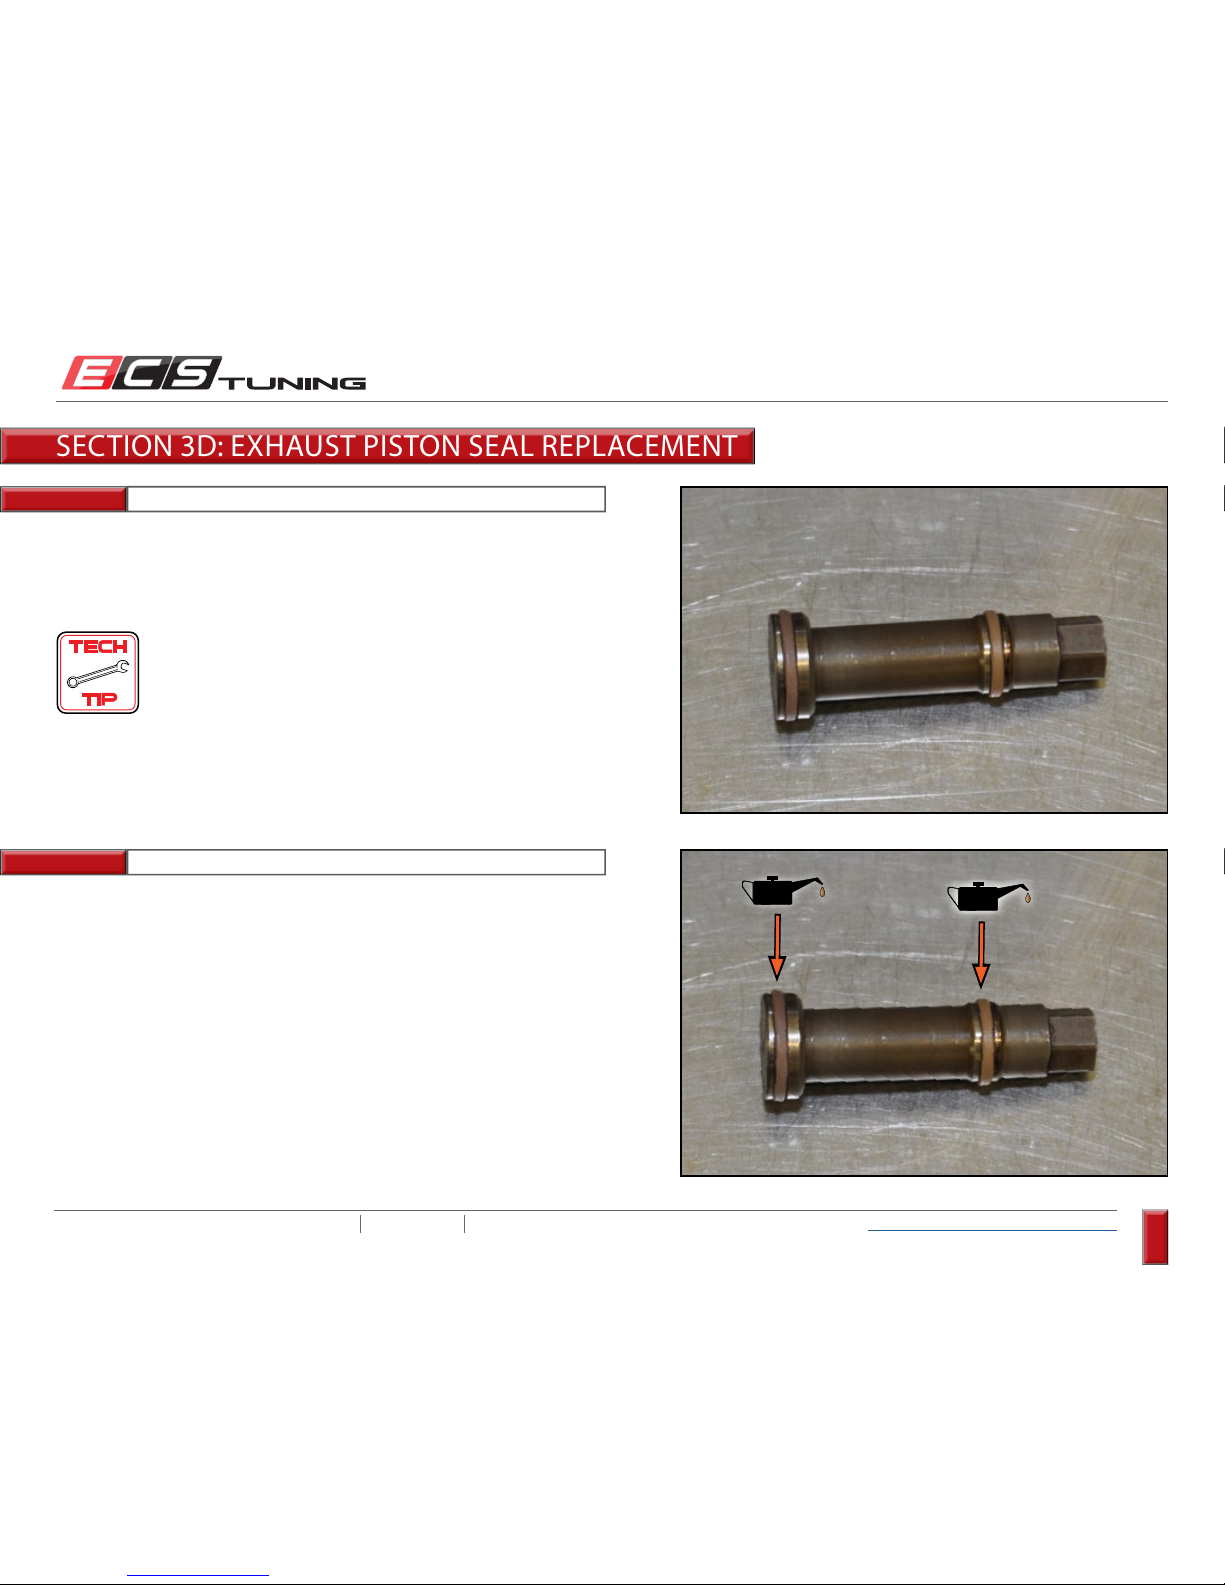
There are two grooves in the exhaust piston and each one has a rubber
o-ring surrounded by a Teflon sealing ring.
Carefully cut the sealing rings and o-rings using an exacto knife, then
remove them from the piston ring grooves.
Use caution not to cut or damage the surface of
the exhaust piston.
Page 52
ECS TUNING 1000 SEVILLE RD. WADSWORTH, OH 44281 1.800.924.5172 WWW.ECSTUNING.COM
52
BMW S54 DUAL VANOS REBUILD
®
Return to Vanos Repair Table of Contents
SECTION 3D: EXHAUST PISTON SEAL REPLACEMENT
Step 5:
Step 6:
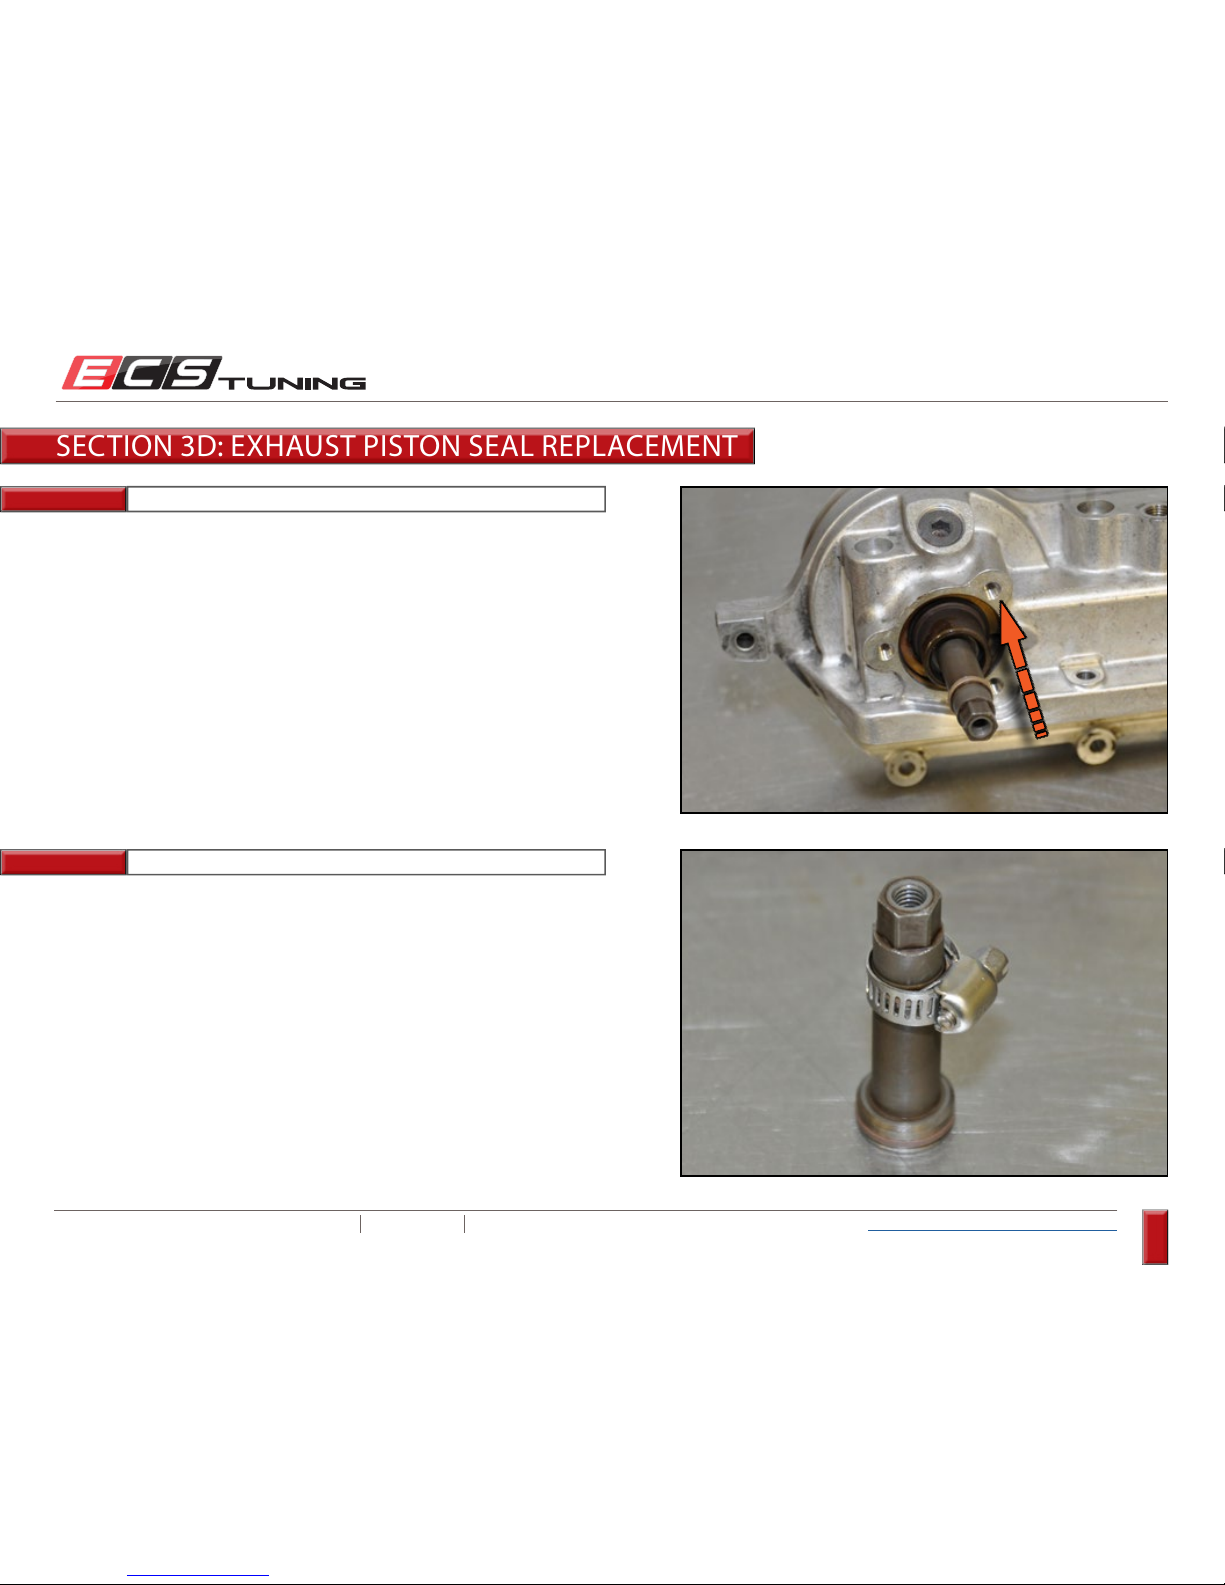
Clean the ring grooves, then install the new o-rings and Teflon sealing
rings onto the exhaust piston.
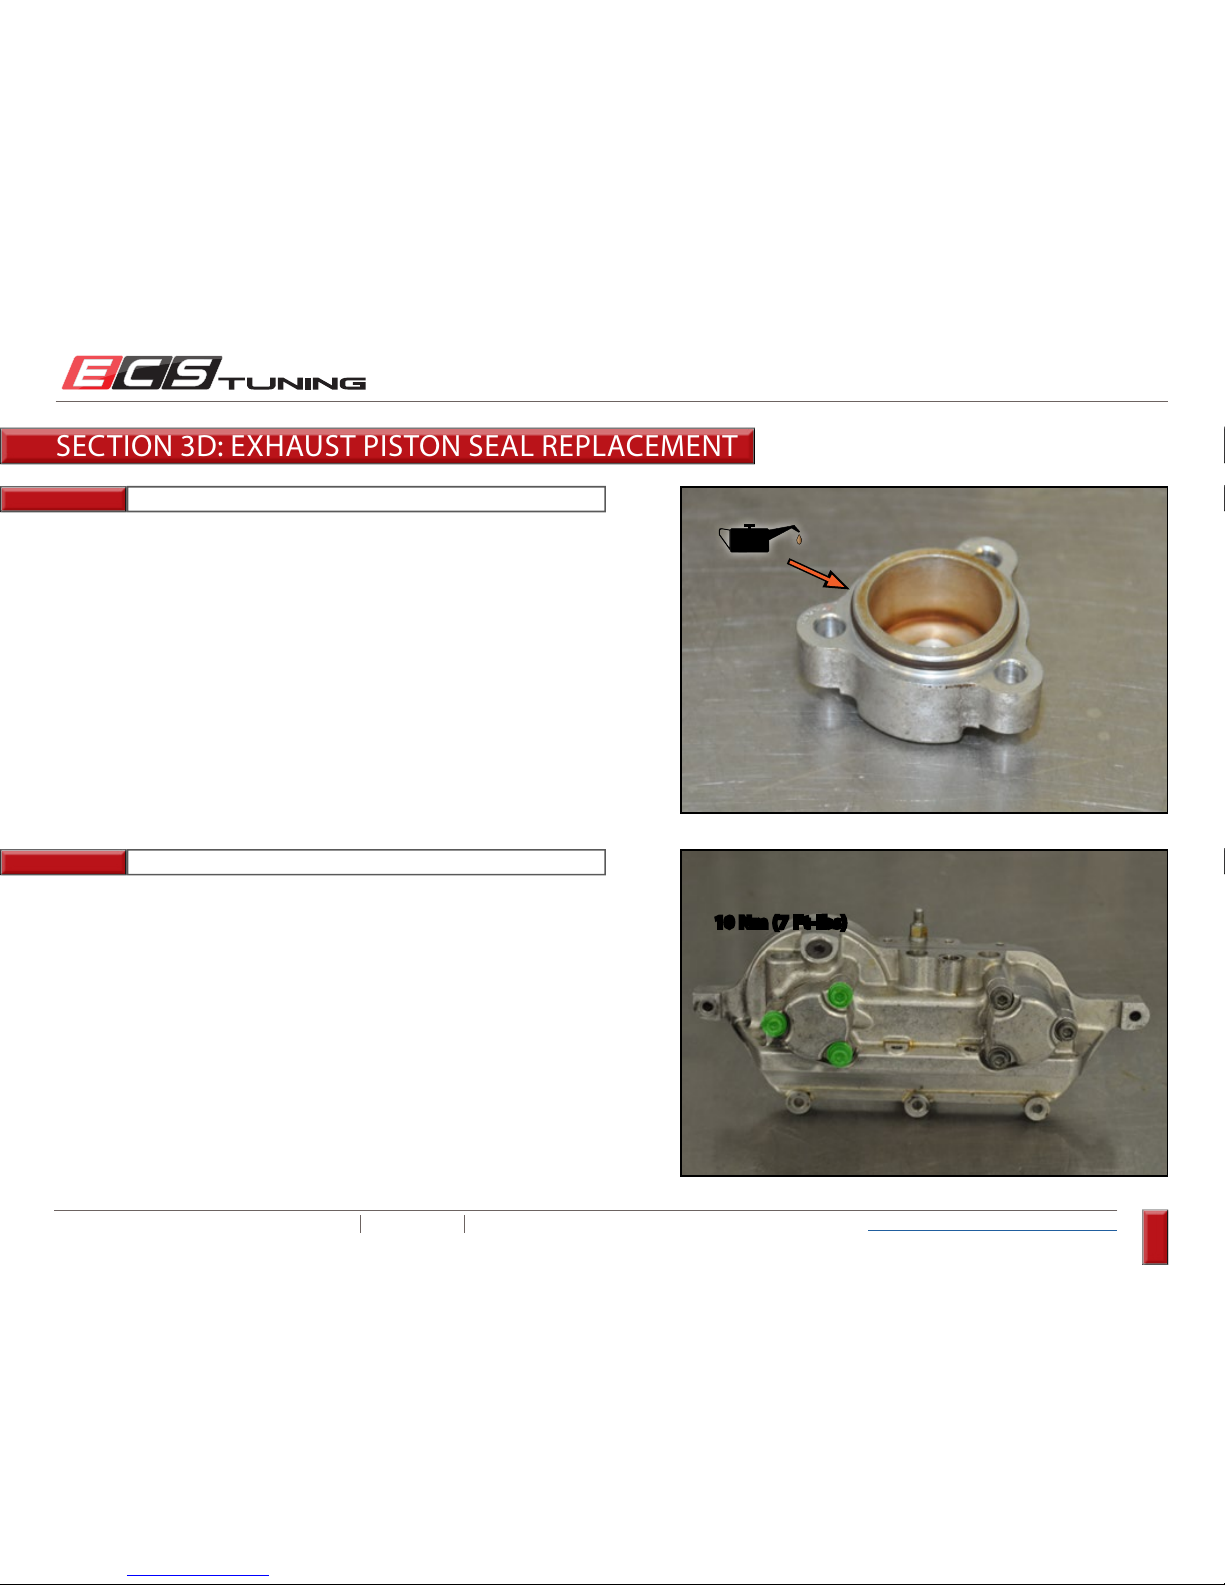
Lubricate the Teflon seals with clean engine oil.
Be sure and use the o-ring and Teflon sealing ring
installation tips and procedures learned during intake
piston seal replacement.
Page 53
ECS TUNING 1000 SEVILLE RD. WADSWORTH, OH 44281 1.800.924.5172 WWW.ECSTUNING.COM
53
BMW S54 DUAL VANOS REBUILD
®
Return to Vanos Repair Table of Contents
SECTION 3D: EXHAUST PISTON SEAL REPLACEMENT
Step 7:
Step 8:
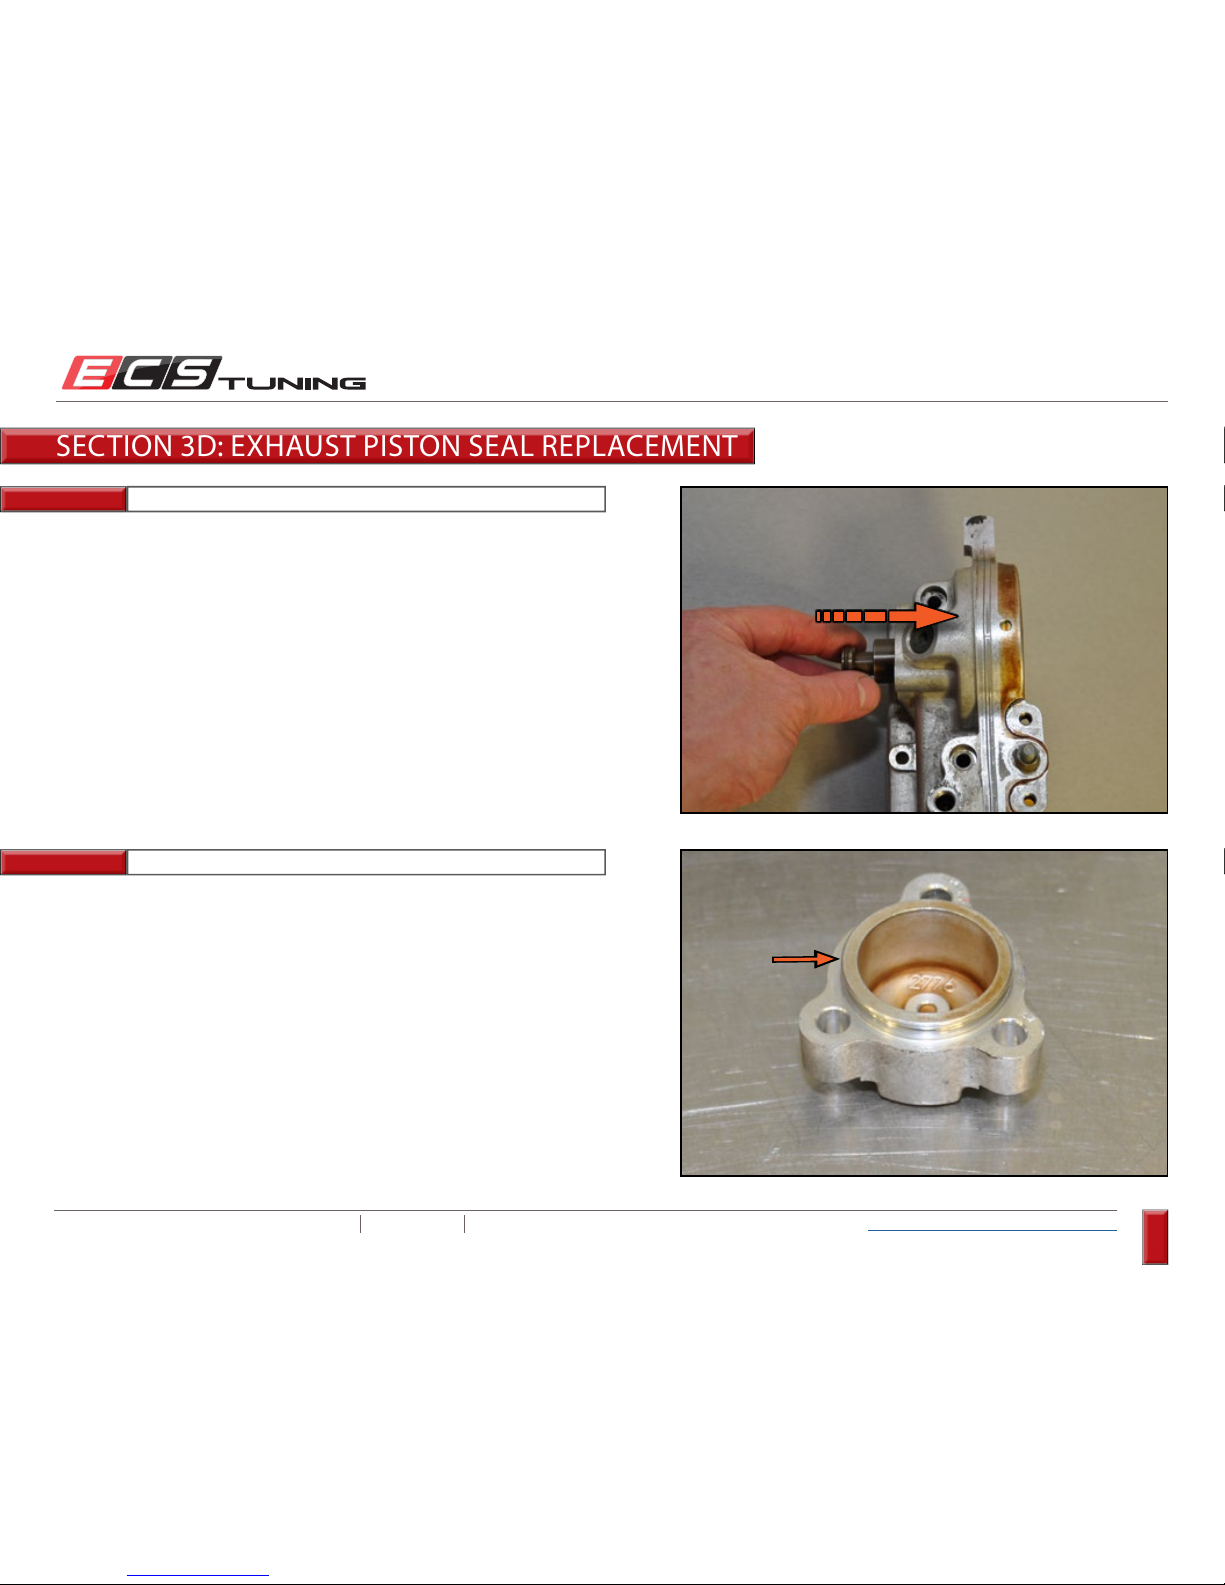
Insert the large end of the exhaust piston into the exhaust cylinder on the
outboard side (cap end), wiggling it around gently until it pushes into the
cylinder. Allow it to remain installed for one minute, then remove it. This
process will fully seat the Teflon ring onto the large end of the exhaust
piston.
Install and lightly tighten a small hose clamp onto the small Teflon ring of
the exhaust piston. Leave it installed for a minute, then remove it. This
process will fully seat the Teflon ring onto the small end of the exhaust
piston.
Page 54
ECS TUNING 1000 SEVILLE RD. WADSWORTH, OH 44281 1.800.924.5172 WWW.ECSTUNING.COM
54
BMW S54 DUAL VANOS REBUILD
®
Return to Vanos Repair Table of Contents
SECTION 3D: EXHAUST PISTON SEAL REPLACEMENT
Step 9:
Step 10:
Insert the exhaust piston into the cylinder for the final time from the
outboard side and push it all the way into the cylinder.
Angled Pick
Remove the old seal from the piston cap and clean the groove thoroughly.
Page 55
ECS TUNING 1000 SEVILLE RD. WADSWORTH, OH 44281 1.800.924.5172 WWW.ECSTUNING.COM
55
BMW S54 DUAL VANOS REBUILD
®
Return to Vanos Repair Table of Contents
SECTION 3D: EXHAUST PISTON SEAL REPLACEMENT
Step 11:
Step 12: 5mm Allen (Hex Bit) Socket, Torque Wrench
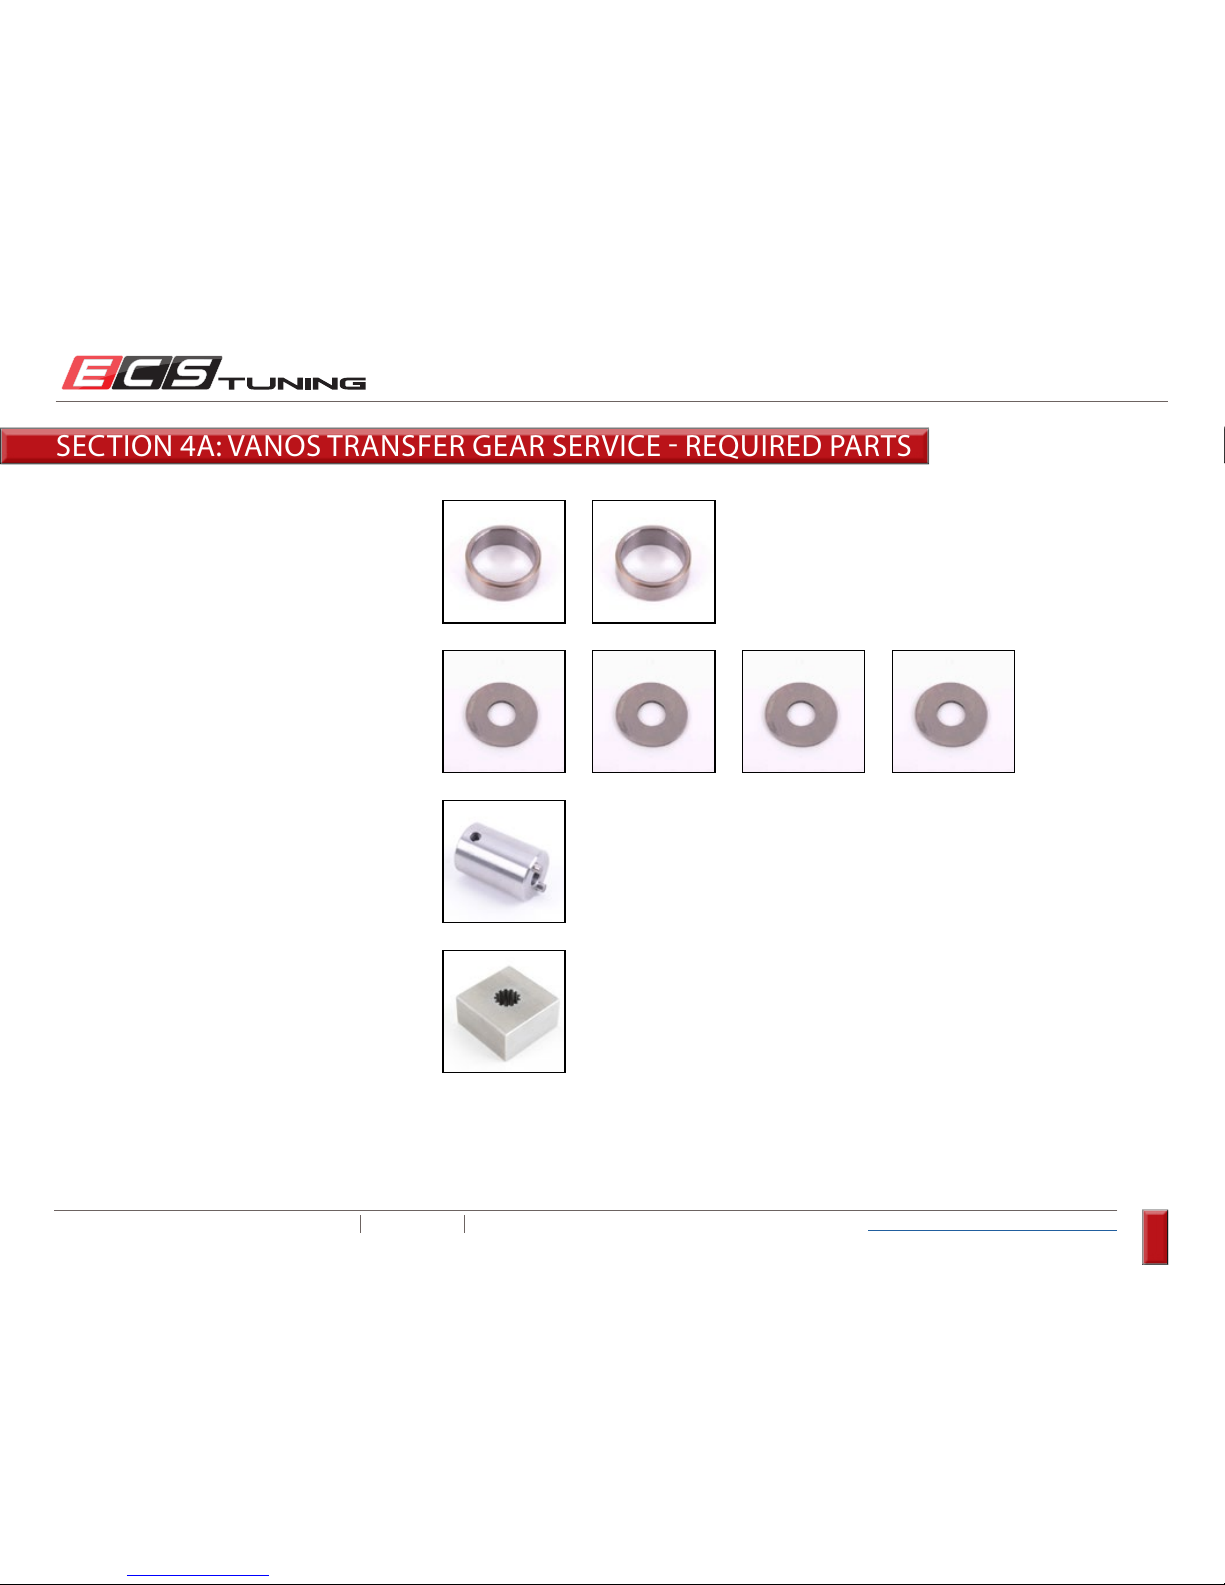
Install the new seal onto the piston cap and lubricate it with clean engine
oil.
Install the exhaust piston cap and torque the bolts to 10 Nm (7 Ft-lbs).
10 Nm (7 Ft-lbs)
- End of Section 3d -
Page 56
ECS TUNING 1000 SEVILLE RD. WADSWORTH, OH 44281 1.800.924.5172 WWW.ECSTUNING.COM
56
BMW S54 DUAL VANOS REBUILD
®
Return to Vanos Repair Table of Contents
SECTION 4A: VANOS TRANSFER GEAR SERVICE REQUIRED PARTS
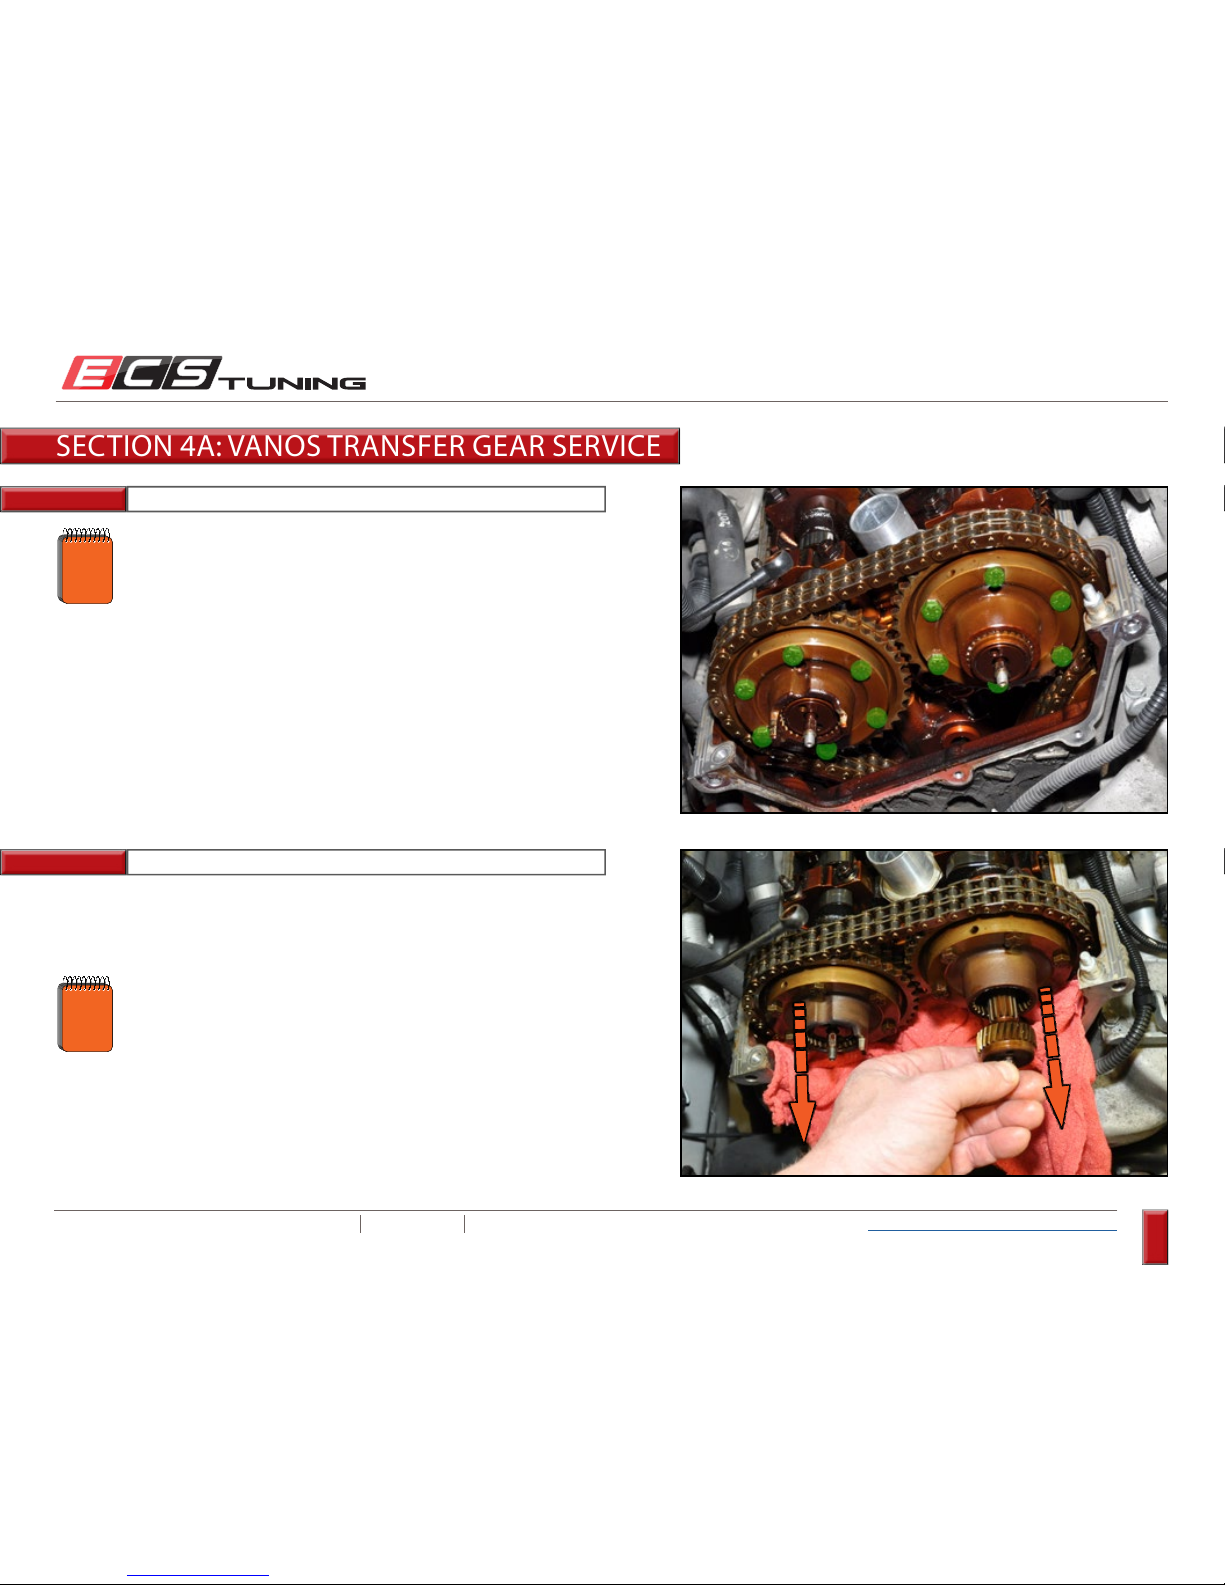
ES#3138157
Description...............Bearing Ring
Location .................... Vanos Transfer Gear
Quantity .................... 2
ES#3138155
Description...............End Washer
Location .................... Vanos Transfer Gear
Quantity .................... 4
ES#3138153
Description...............Transfer Gear Holding Tool
Location .................... N/A
Quantity .................... 1
ES#3138151
Description...............Transfer Gear Cap Socket
Location .................... N/A
Quantity .................... 1
Page 57
ECS TUNING 1000 SEVILLE RD. WADSWORTH, OH 44281 1.800.924.5172 WWW.ECSTUNING.COM
57
BMW S54 DUAL VANOS REBUILD
®
Return to Vanos Repair Table of Contents
Step 1:
Step 2:
10mm Socket, Ratchet
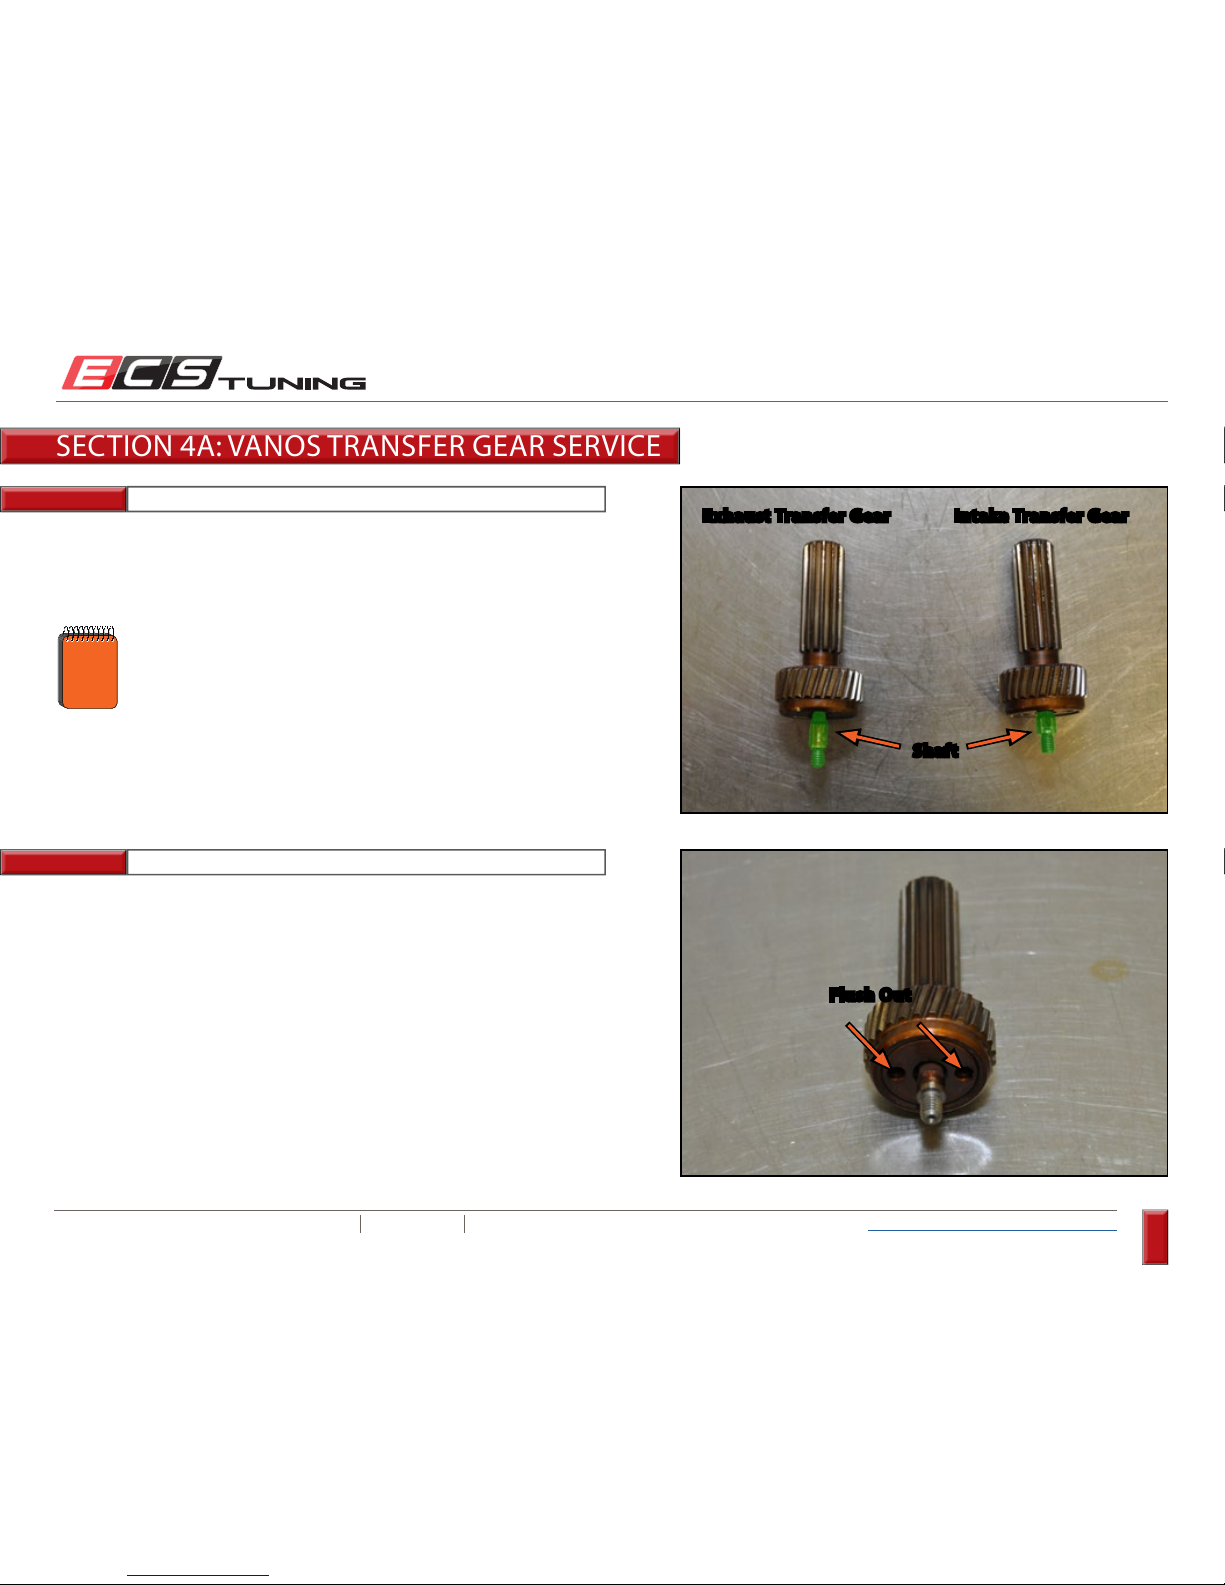
Cover the open area underneath the camshaft sprockets with a rag, then
pull both transfer gears out of the Vanos hubs.
SECTION 4A: VANOS TRANSFER GEAR SERVICE
The engine should still be at TDC and the crankshaft pulley
should be locked in position with the crankshaft locking pin.
View pages 18 through 22 for reference.
NOTE
Begin by loosening each of the Vanos hub bolts (6 on each hub for a total
of 12) by approximately 3 full turns.
The Vanos hubs will rotate slightly as you pull out the transfer
gears. If you are unable to easily pull out them out, you may
need to loosen the hub bolts an additional turn.
NOTE
Page 58
ECS TUNING 1000 SEVILLE RD. WADSWORTH, OH 44281 1.800.924.5172 WWW.ECSTUNING.COM
58
BMW S54 DUAL VANOS REBUILD
®
Return to Vanos Repair Table of Contents
Step 3:
Step 4:
Inspect the transfer gears. Notice the length of each transfer gear shaft.
The shaft on the exhaust transfer gear is longer than the one on the intake
transfer gear.
Using brake cleaner, thoroughly clean the transfer gear and flush out the
oil through the two holes in the cover plate.
Exhaust Transfer Gear Intake Transfer Gear
Shaft
Flush Out
NOTE
The following transfer gear service procedure is the
same for both gears. Begin with either one, then once
finished, repeat the process on the other.
SECTION 4A: VANOS TRANSFER GEAR SERVICE
Page 59
ECS TUNING 1000 SEVILLE RD. WADSWORTH, OH 44281 1.800.924.5172 WWW.ECSTUNING.COM
59
BMW S54 DUAL VANOS REBUILD
®
Return to Vanos Repair Table of Contents
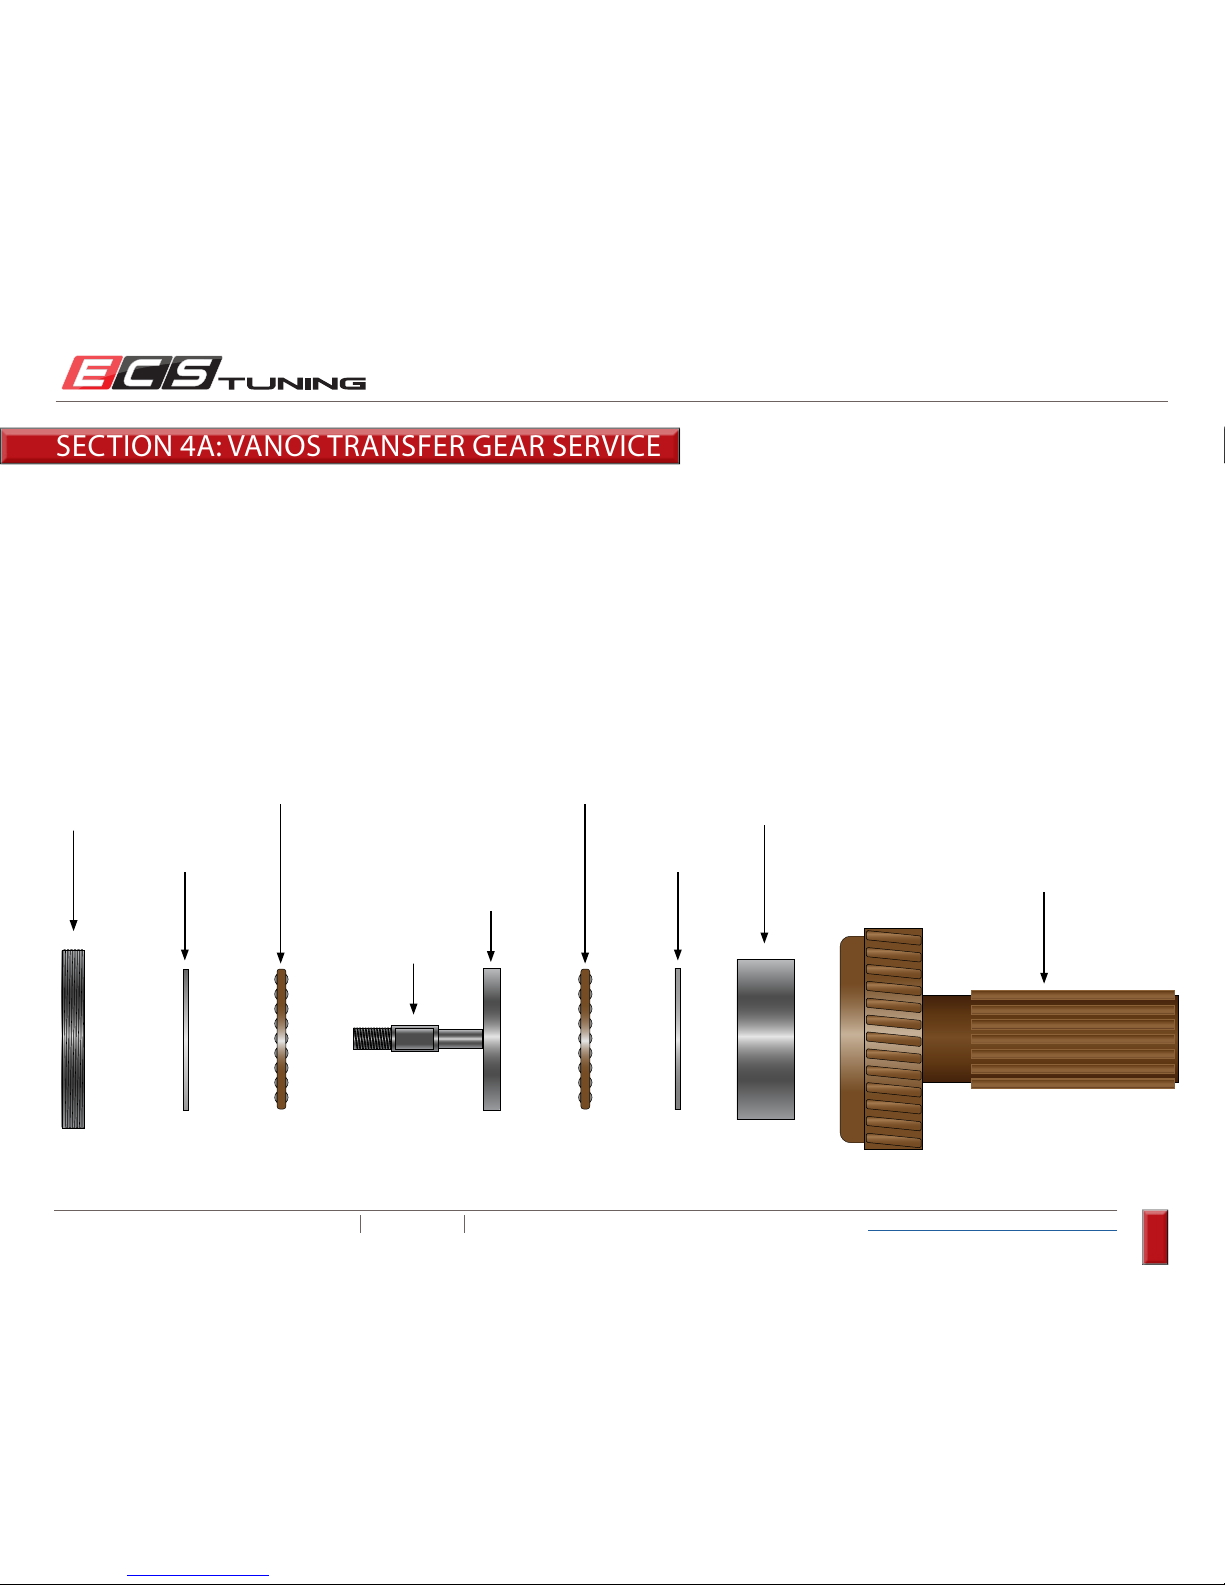
The actual Vanos “rattle” is caused by axial play in the bearings which are housed inside the transfer gear. The key to solving this problem is to
remove the axial play (tighten), and ideally, provide a slight preload on the roller bearings. To accomplish this, you’ll check the amount of play, install
the new bearing rings and end washers in place of the originals, then recheck the amount of play. Due to very strict tolerances and the different
rates of component wear from car to car, some fine tuning may be required. After bearing ring installation, you may find that the bearings are still
too loose (axial play), that they are too tight (not good), or that they have no axial play and a slight preload (perfect). If necessary, adjustments are
made by removing material from either the new bearing ring (tightening the bearing) or the end washers (loosening the bearing). This is a very
critical adjustment, (approximately .005 -.015mm), but it’s easy to do. We’ll show you how in just a little bit, but first, use the exploded view below to
familiarize yourself with all of the transfer gear components, then continue on the next page.
Transfer Gear
End Washer
Gear Cap
Roller Bearing Roller Bearing
Bearing Race
Bearing Ring
End Washer
Shaft
Before you keep going, here’s a quick run down on the internal components and workings of the transfer gears.
SECTION 4A: VANOS TRANSFER GEAR SERVICE
Page 60
ECS TUNING 1000 SEVILLE RD. WADSWORTH, OH 44281 1.800.924.5172 WWW.ECSTUNING.COM
60
BMW S54 DUAL VANOS REBUILD
®
Return to Vanos Repair Table of Contents
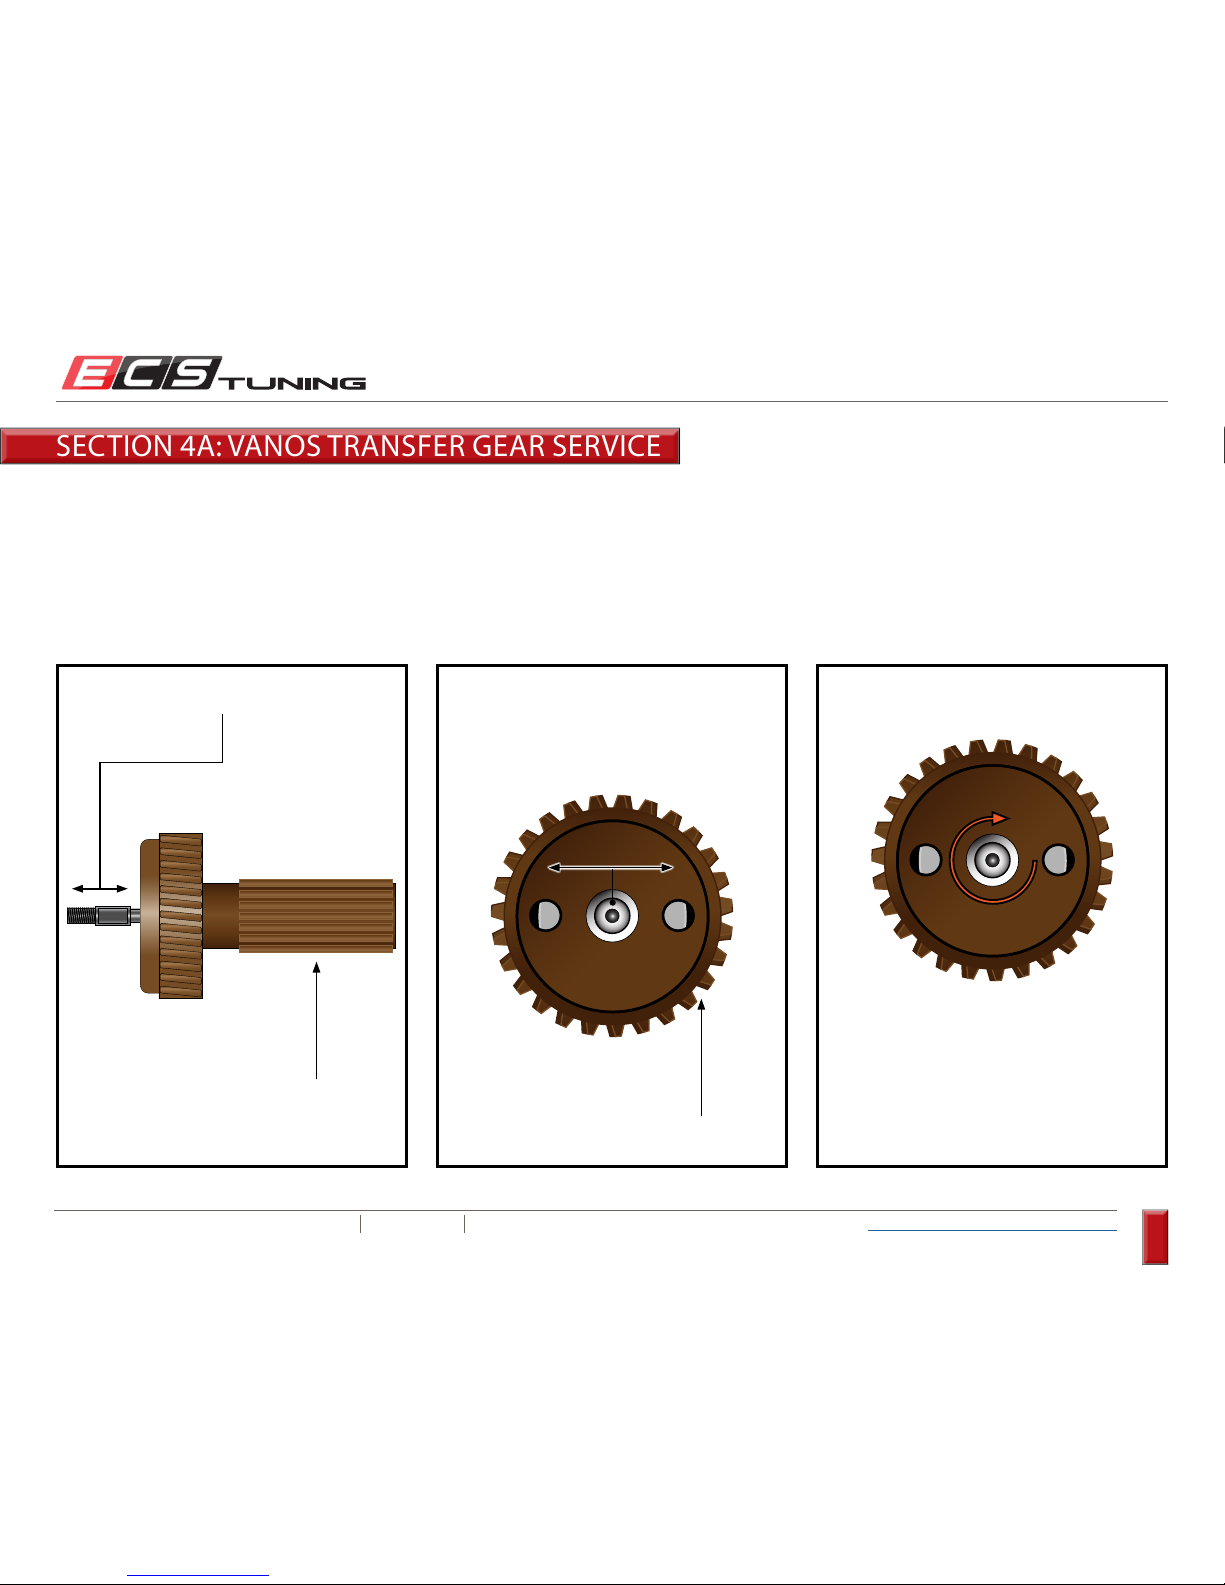
Axial Play, Radial Play, and Preload:
Any in and out movement of the transfer gear shaft is axial play. This measurement is strictly determined by “feel” and is easily detectable. The way
you check it is by holding the transfer gear stationary with one hand and gently moving the shaft in and out with the other. Side - to - side, or radial
play, which is felt by moving the transfer gear shaft left and right when looking directly at the face of the transfer gear, is normal.
Hold stationary
Axial Play Radial Play Preload
Hold stationary
A smooth, even resistance while rotating
the shaft indicates bearing preload. Any
amount of resistance is acceptable as long
as the shaft can be turned by hand using no
more than light to medium force.
SECTION 4A: VANOS TRANSFER GEAR SERVICE
Page 61
ECS TUNING 1000 SEVILLE RD. WADSWORTH, OH 44281 1.800.924.5172 WWW.ECSTUNING.COM
61
BMW S54 DUAL VANOS REBUILD
®
Return to Vanos Repair Table of Contents
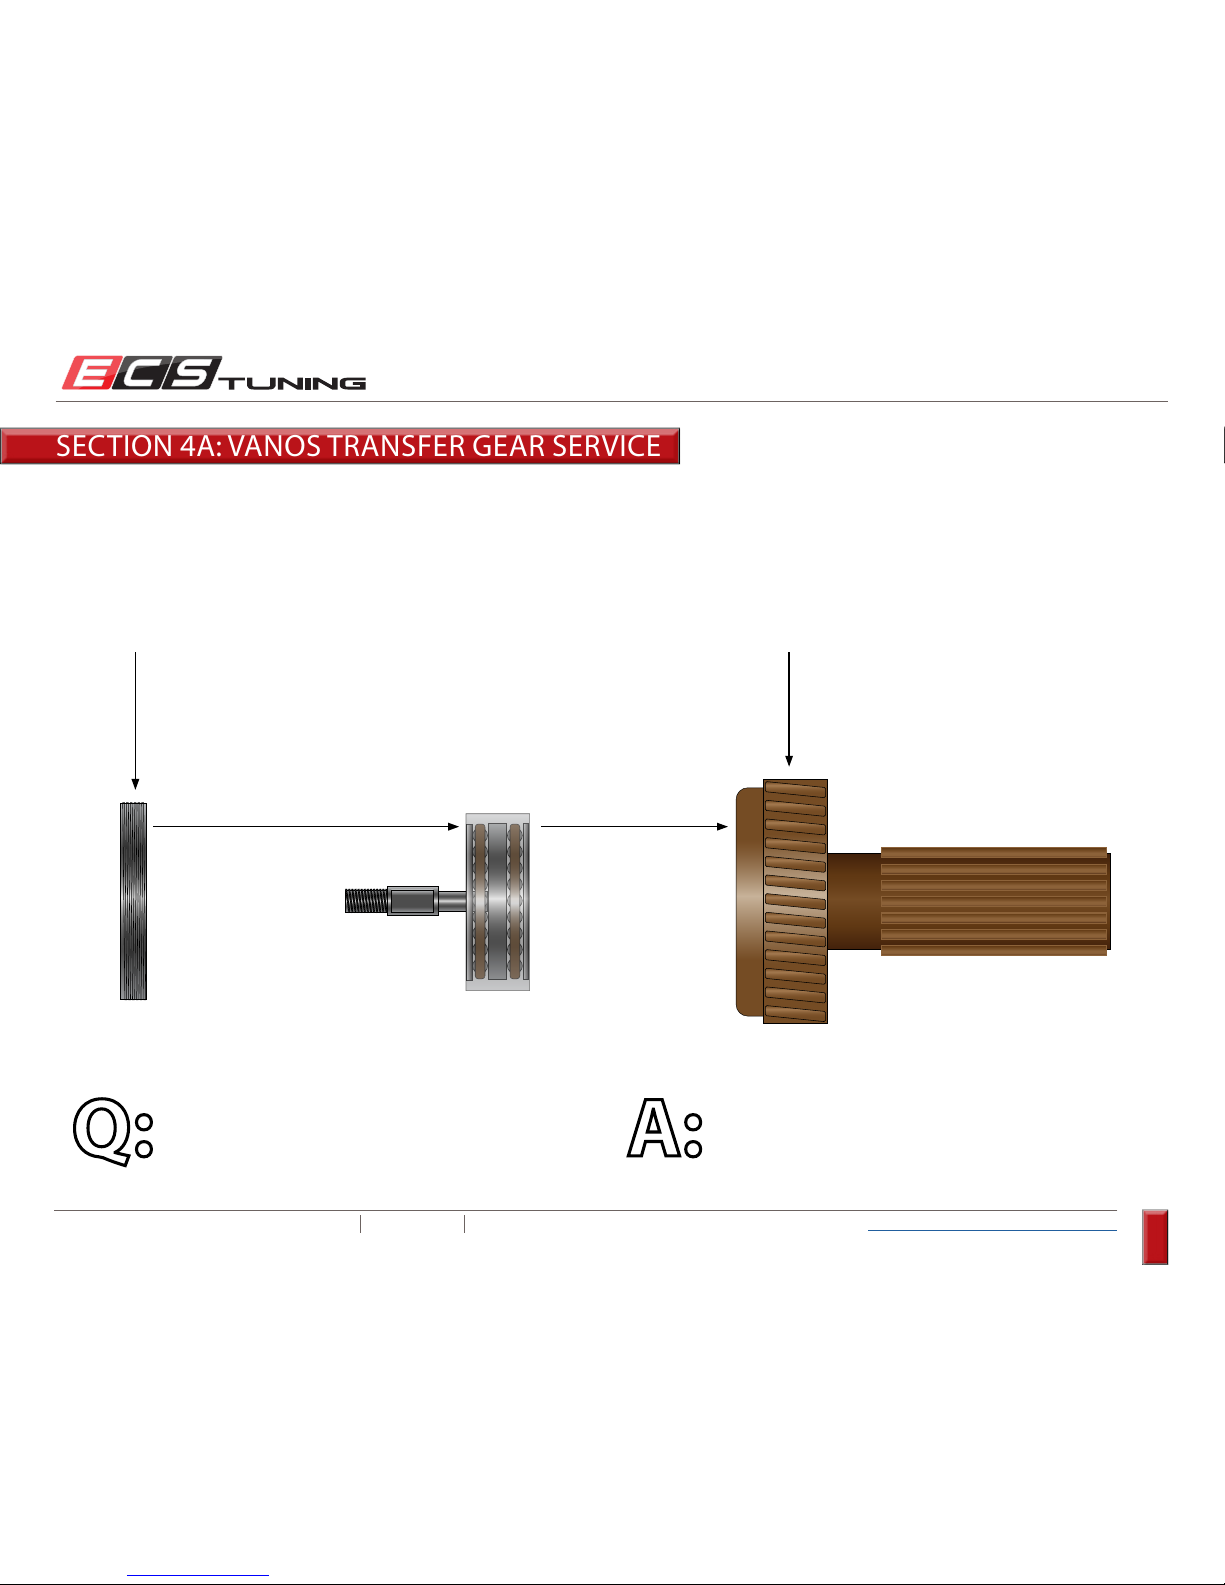
When the transfer gear is assembled, the bearing race, roller bearings, and end washers fit inside the bearing ring (which we have made transparent
in this illustration), and are then “sandwiched” in place as they are installed in the transfer gear and the gear cap is tightened. For Vanos rattle to be
eliminated, the gear cap must apply a consistent, even pressure against the bearing ring and end washers, creating bearing preload and allowing no
clearance between the roller bearings, the bearing race, and the end washers.
Transfer Gear
Gear Cap
What is the difference between the original bearing
ring and the new ECS bearing ring, if an adjustment
may still need to be made after installation?
The ECS Tuning bearing ring is narrower than the
original, getting the adjustment very close, so fine
tuning is a quick and easy procedure.
Q: A:
SECTION 4A: VANOS TRANSFER GEAR SERVICE
Page 62
ECS TUNING 1000 SEVILLE RD. WADSWORTH, OH 44281 1.800.924.5172 WWW.ECSTUNING.COM
62
BMW S54 DUAL VANOS REBUILD
®
Return to Vanos Repair Table of Contents
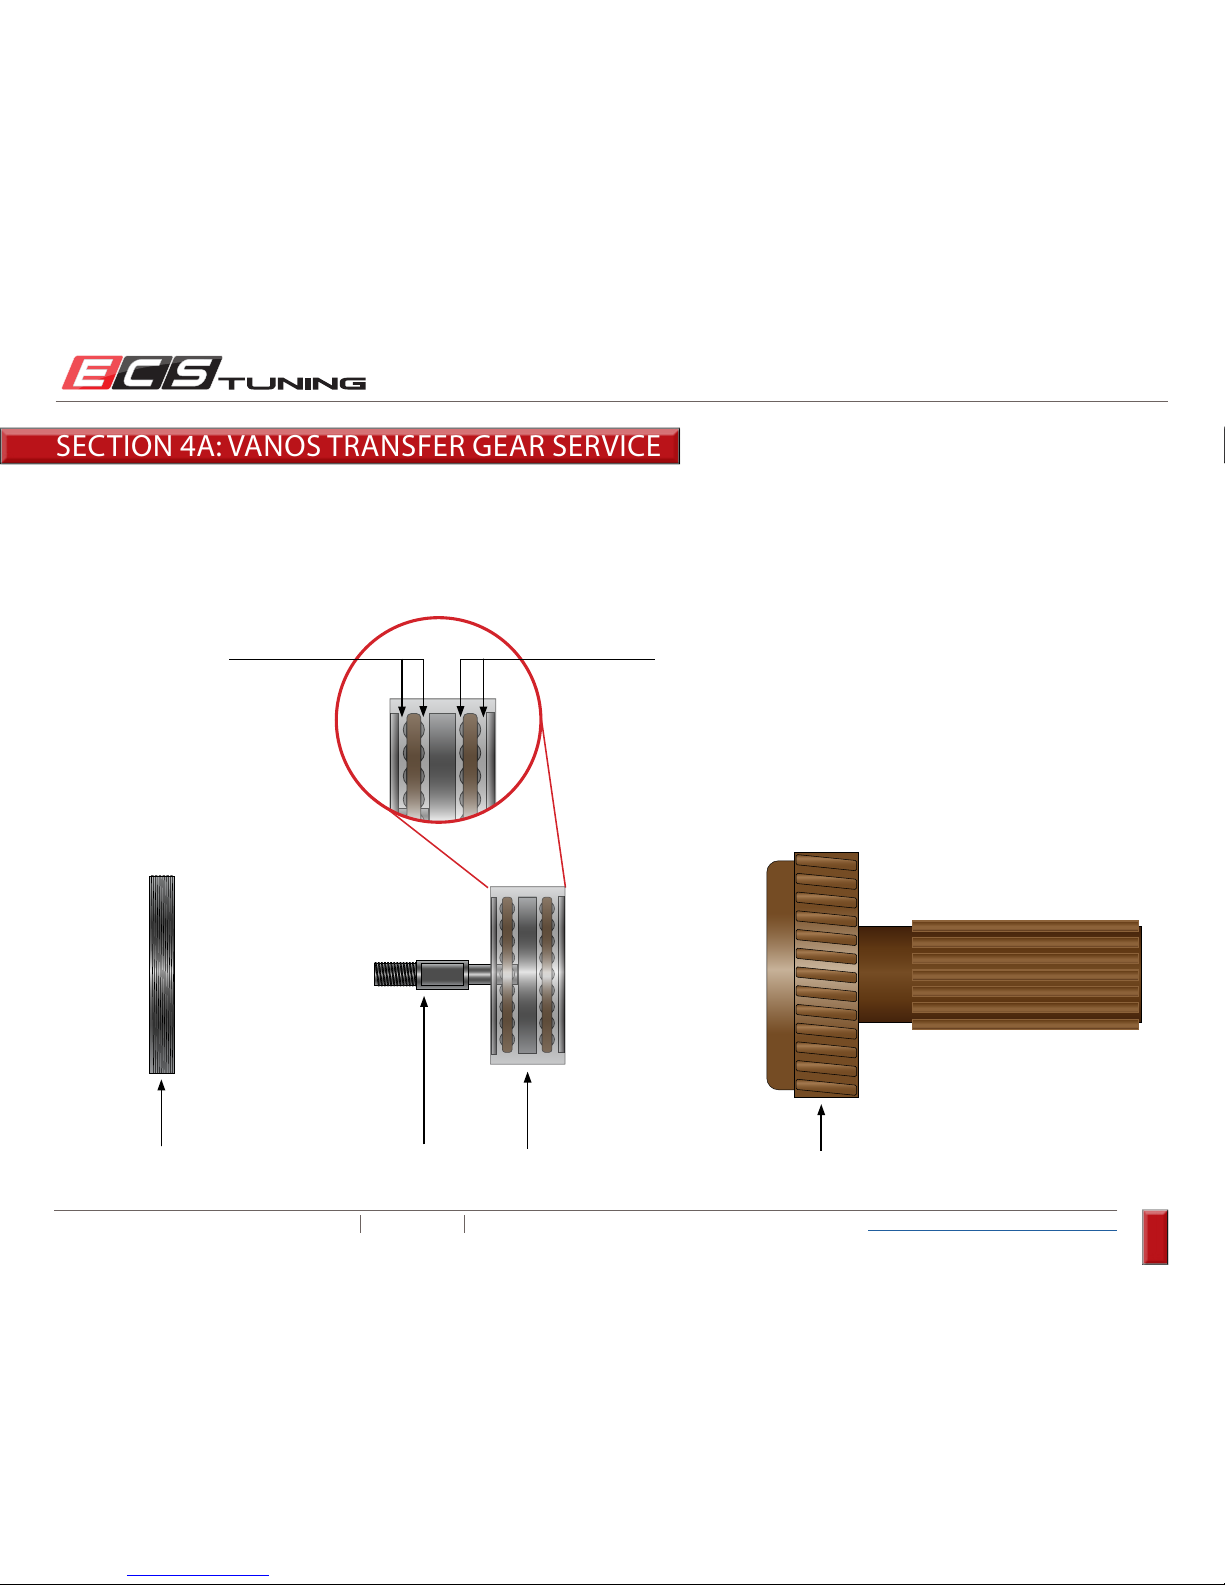
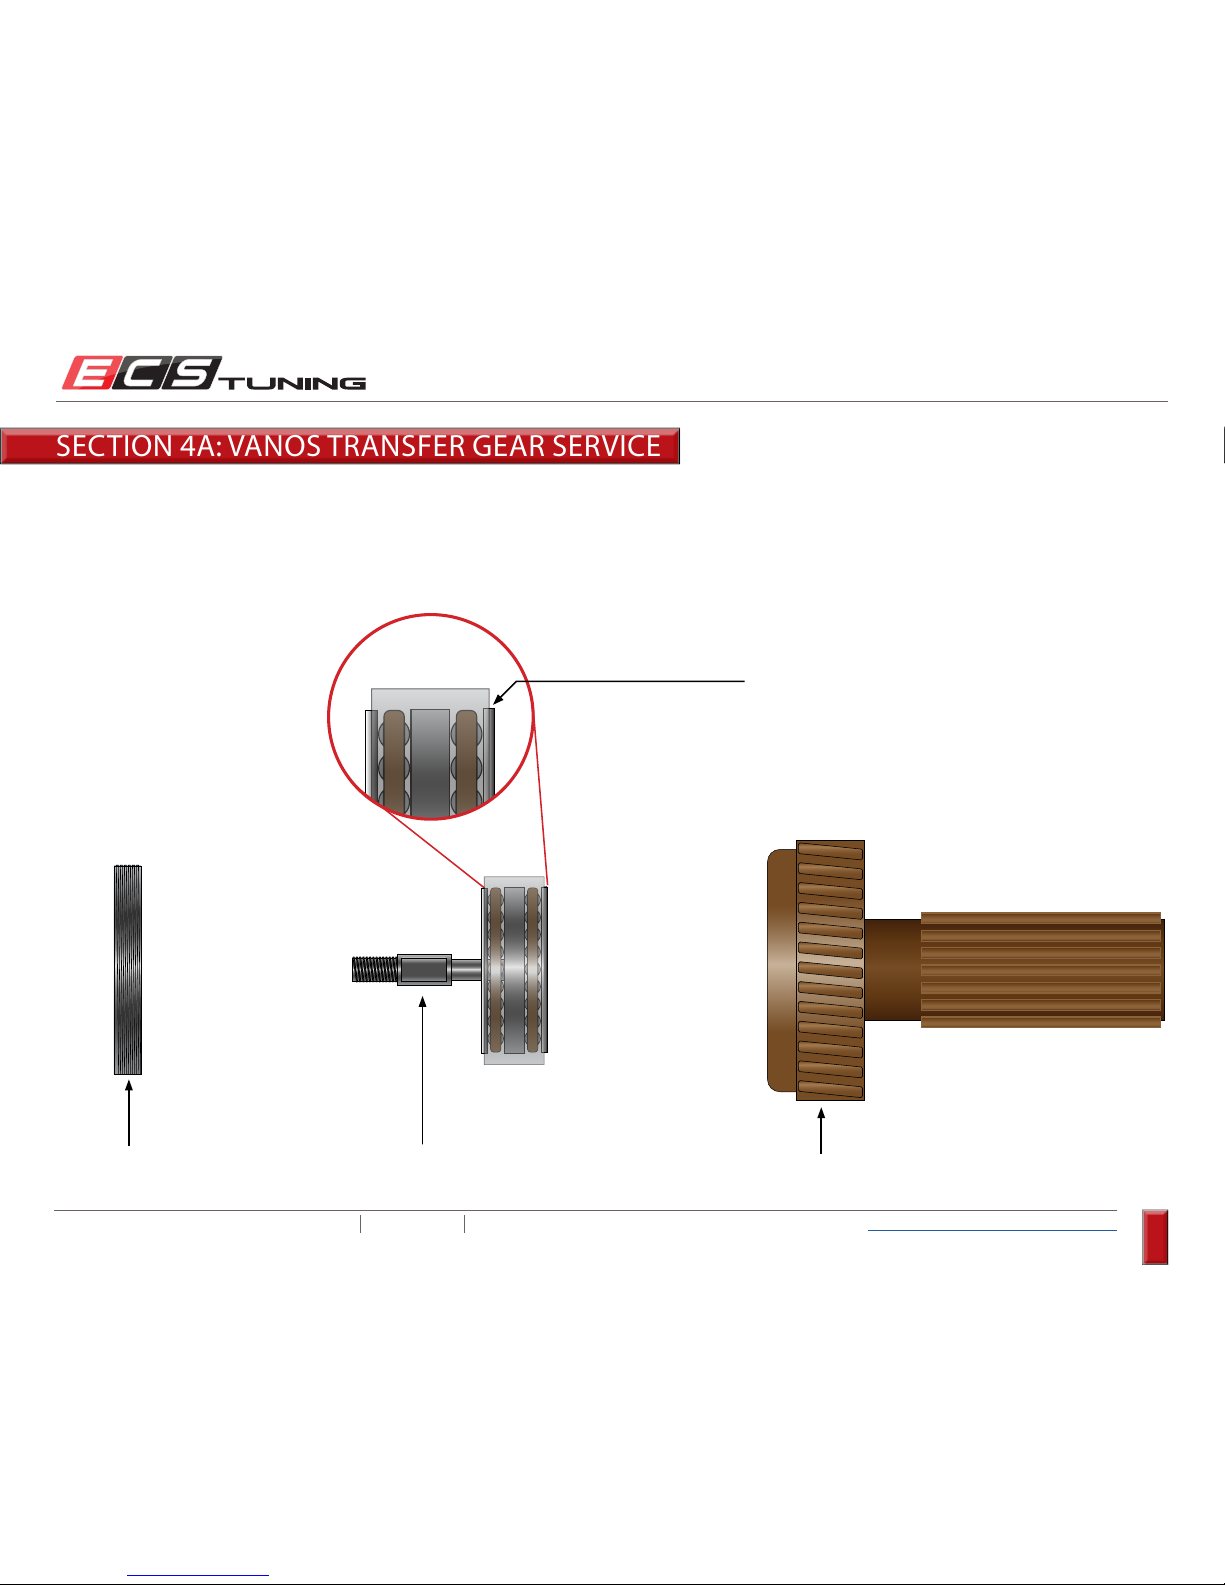
This illustration shows the cause of axial play in the bearings (Vanos rattle). When the transfer gear is assembled and the gear cap is tightened, there
is clearance between the roller bearings, the bearing race, and the end washers. The bearing in this case is too loose and must be tightened. The
clearance is eliminated and the bearing tightened by decreasing the width of the bearing ring until all axial play is removed and bearing preload is
created.
Clearance
Clearance
Transfer GearGear Cap Shaft Bearing Ring
SECTION 4A: VANOS TRANSFER GEAR SERVICE
Page 63
ECS TUNING 1000 SEVILLE RD. WADSWORTH, OH 44281 1.800.924.5172 WWW.ECSTUNING.COM
63
BMW S54 DUAL VANOS REBUILD
®
Return to Vanos Repair Table of Contents
This illustration shows what would cause the bearings to be too tight and make the shaft difficult to turn. The bearing ring in this case is, in effect,
too narrow. When the transfer gear is assembled and the gear cap tightened, the end washers will “crush” the bearings as the gear cap attempts to
seat against the bearing ring. In this situation, since you cannot increase the width of the bearing ring, to solve the problem you would decrease the
thickness of each of the end washers, until the gear cap can apply a consistent, even pressure against both the bearing ring and the end washers.
Bearing ring is too narrow, allowing the
End washers to extend past the edges and
get “crushed” into the bearings.
Transfer Gear
Gear Cap Shaft
SECTION 4A: VANOS TRANSFER GEAR SERVICE
Page 64

ECS TUNING 1000 SEVILLE RD. WADSWORTH, OH 44281 1.800.924.5172 WWW.ECSTUNING.COM
64
BMW S54 DUAL VANOS REBUILD
®
Return to Vanos Repair Table of Contents
Step 5:
Now, getting back to it, follow the flow chart below to check and
adjust axial play/preload of the transfer gear shaft.
Rotate the shaft by
hand and select one of
the following results:
Preload and axial play are set perfectly!
Skip to Step 15 on Page 70 to continue.
Install the new
bearing ring.
Step 6, Page 65
Hold the transfer gear
and move the shaft in
and out.
Is any amount of axial
play present?
YesNo
The shaft has noticeable preload
and can be rotated by hand with
light or moderate effort.
The shaft spins freely with no
noticeable preload.
The shaft is difficult to rotate and
requires considerable effort.
Reduce the
thickness of the
end washers.
Step 6, Page 65
Remember, radial play is normal.
Axial Play
Shaft
Reduce the
width of the
bearing ring.
Step 6, Page 65
Rotate to check for preload
Has the new
bearing ring been
installed?
Yes
No
SECTION 4A: VANOS TRANSFER GEAR SERVICE
Page 65
ECS TUNING 1000 SEVILLE RD. WADSWORTH, OH 44281 1.800.924.5172 WWW.ECSTUNING.COM
65
BMW S54 DUAL VANOS REBUILD
®
Return to Vanos Repair Table of Contents
Step 6:
Step 7:
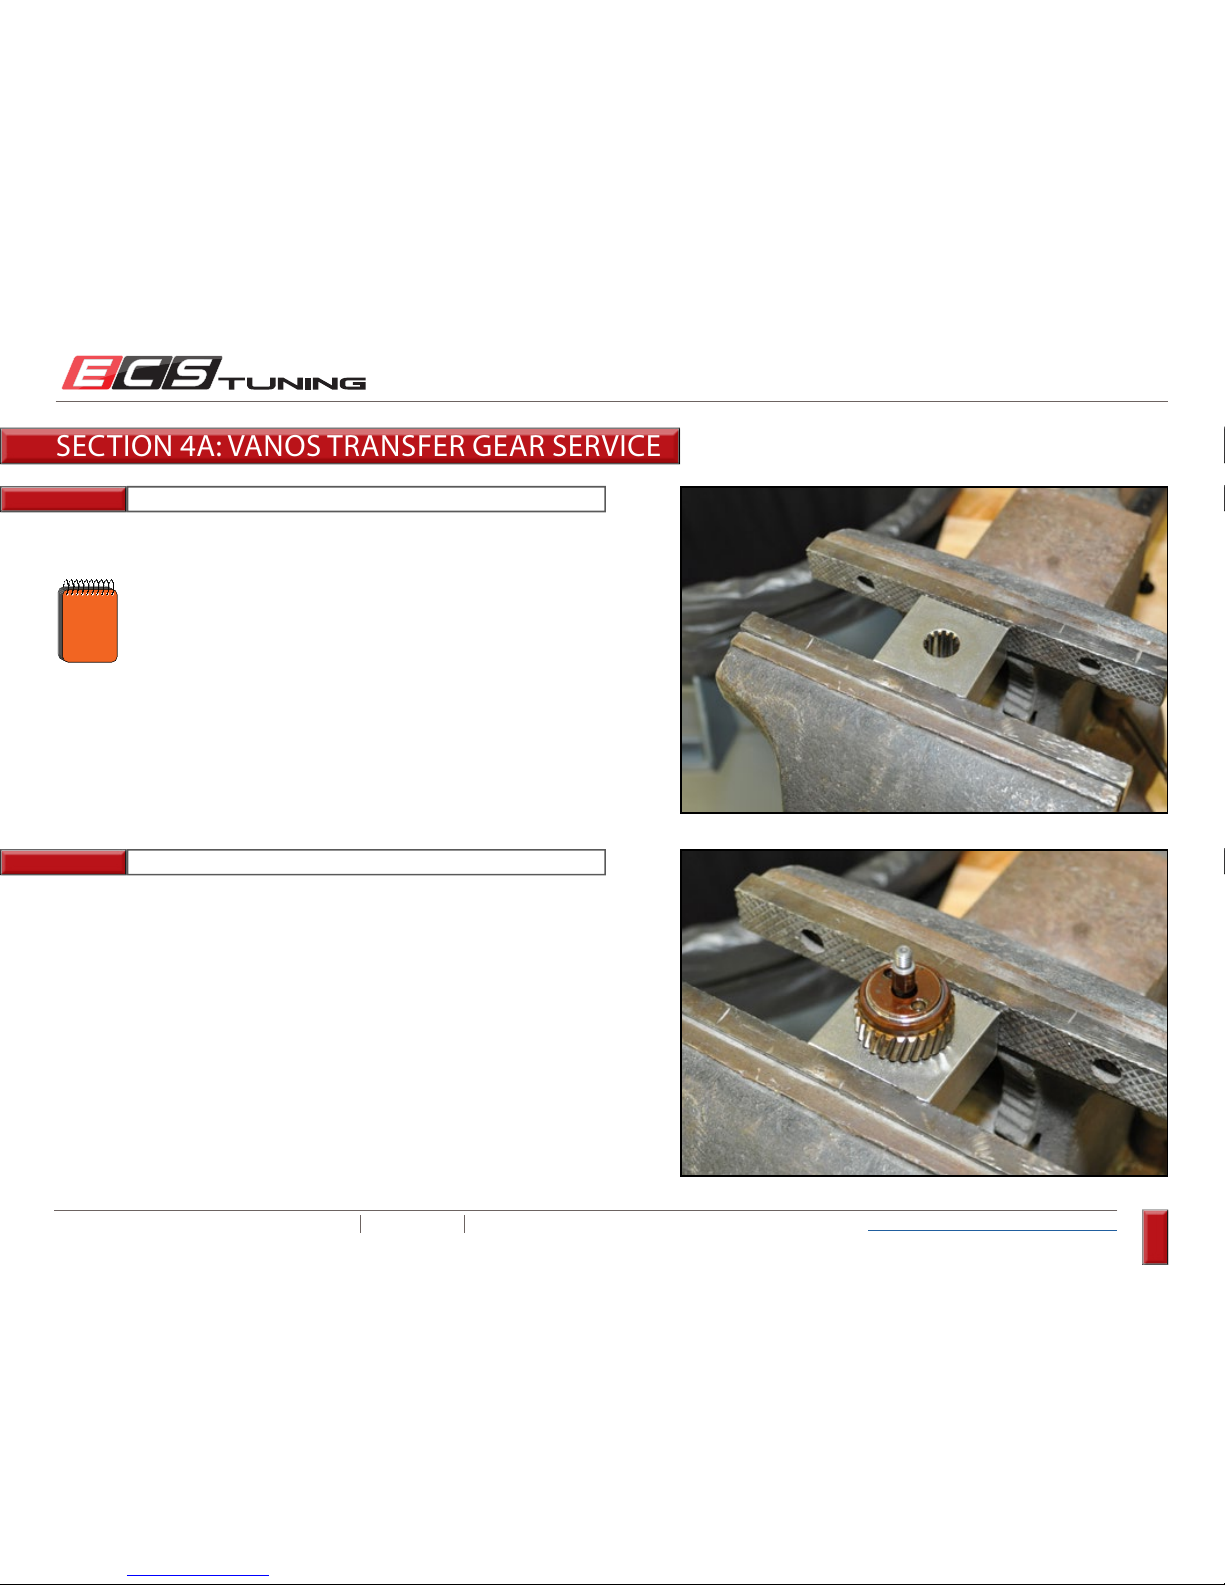
Tighten the transfer gear holding tool in a vise.
Slide the transfer gear into the holding tool.
One side is beveled and should face “up” to make it
easier to slide the transfer gear in place.
NOTE
SECTION 4A: VANOS TRANSFER GEAR SERVICE
Page 66
ECS TUNING 1000 SEVILLE RD. WADSWORTH, OH 44281 1.800.924.5172 WWW.ECSTUNING.COM
66
BMW S54 DUAL VANOS REBUILD
®
Return to Vanos Repair Table of Contents
Step 8:
Step 9:
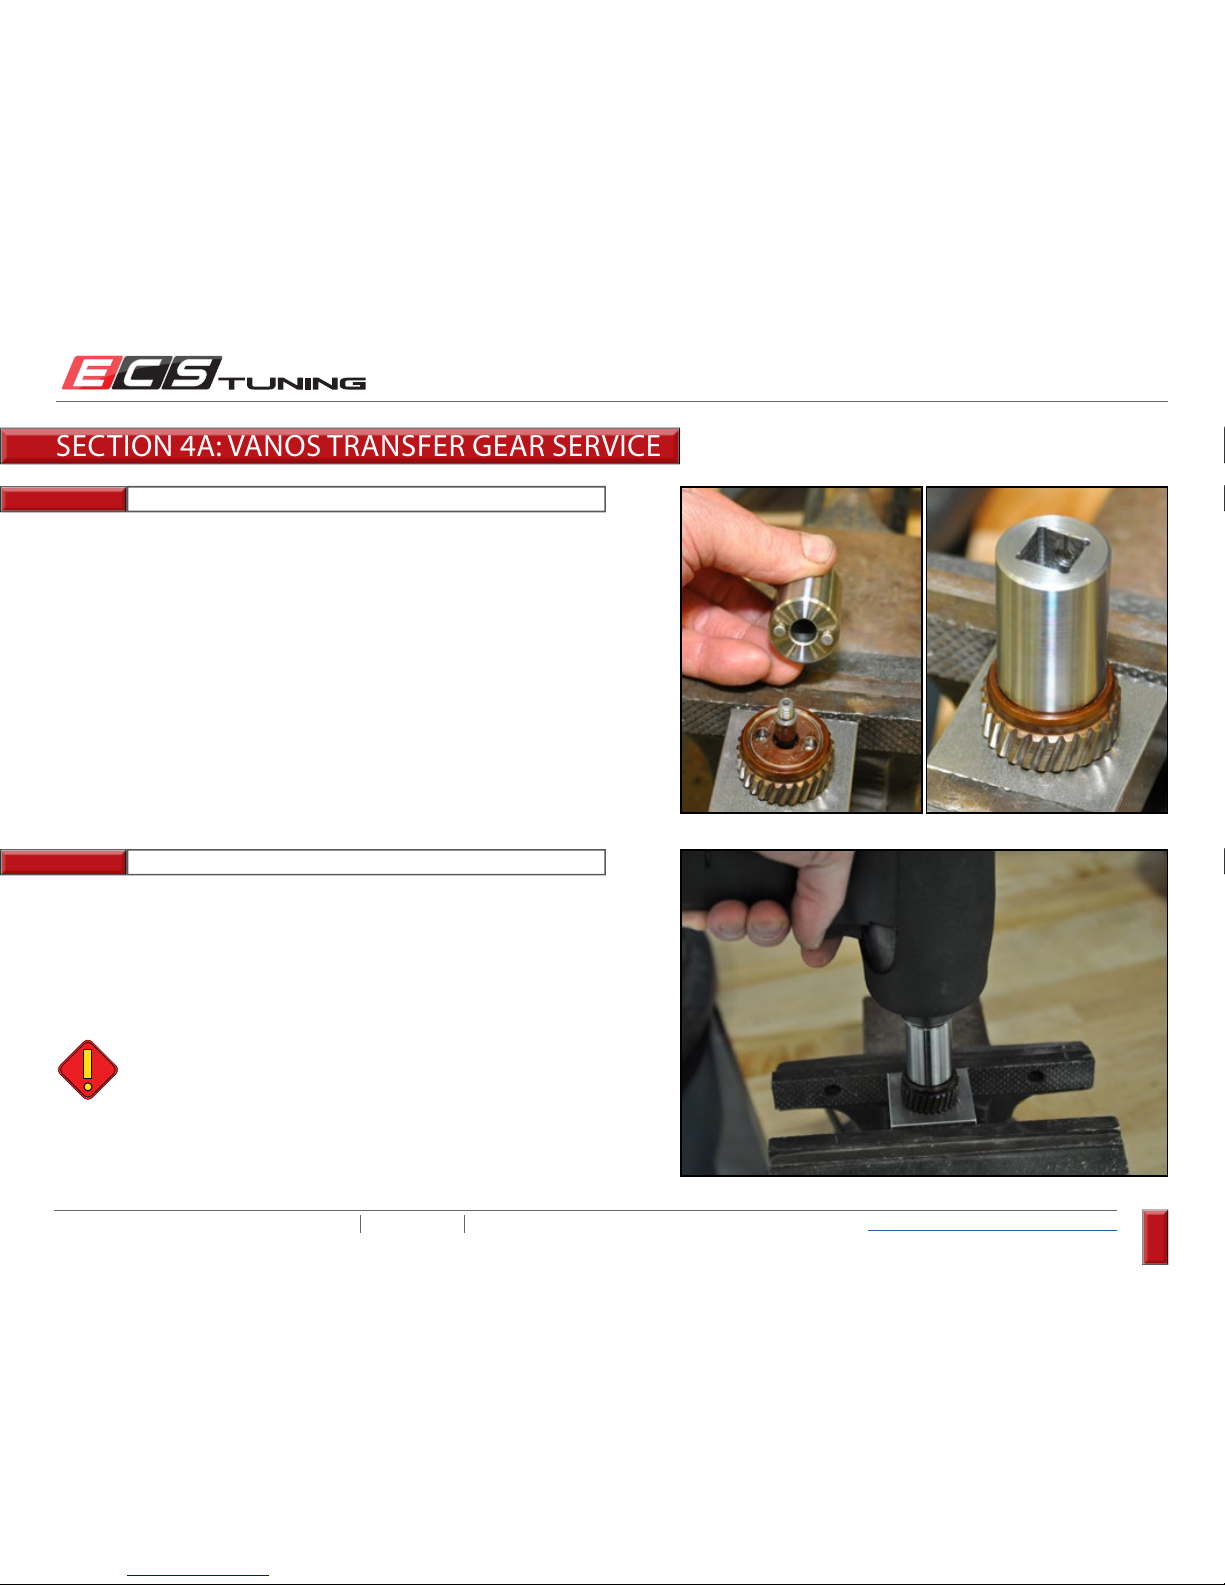
Engage the transfer gear cap socket into place.
Keep the socket squarely installed with even downward pressure, then
loosen the transfer gear cap with a 1/2” impact wrench by giving it brief
repeated blasts until it breaks loose. Do not hold the trigger and apply
continuous impacting. Once it is loose, you can remove it the rest of the
way using a ratchet. It will not spin off freely due to loctite on the threads.
Using an impact is the recommended and only procedure
that should be used to loosen the transfer gear cap. Using
a ratchet shifts the weight distribution on the socket, and
it is very easy for the socket to slip out and damage the
shaft.
SECTION 4A: VANOS TRANSFER GEAR SERVICE
Page 67
ECS TUNING 1000 SEVILLE RD. WADSWORTH, OH 44281 1.800.924.5172 WWW.ECSTUNING.COM
67
BMW S54 DUAL VANOS REBUILD
®
Return to Vanos Repair Table of Contents
Step 10: Small Angled Pick
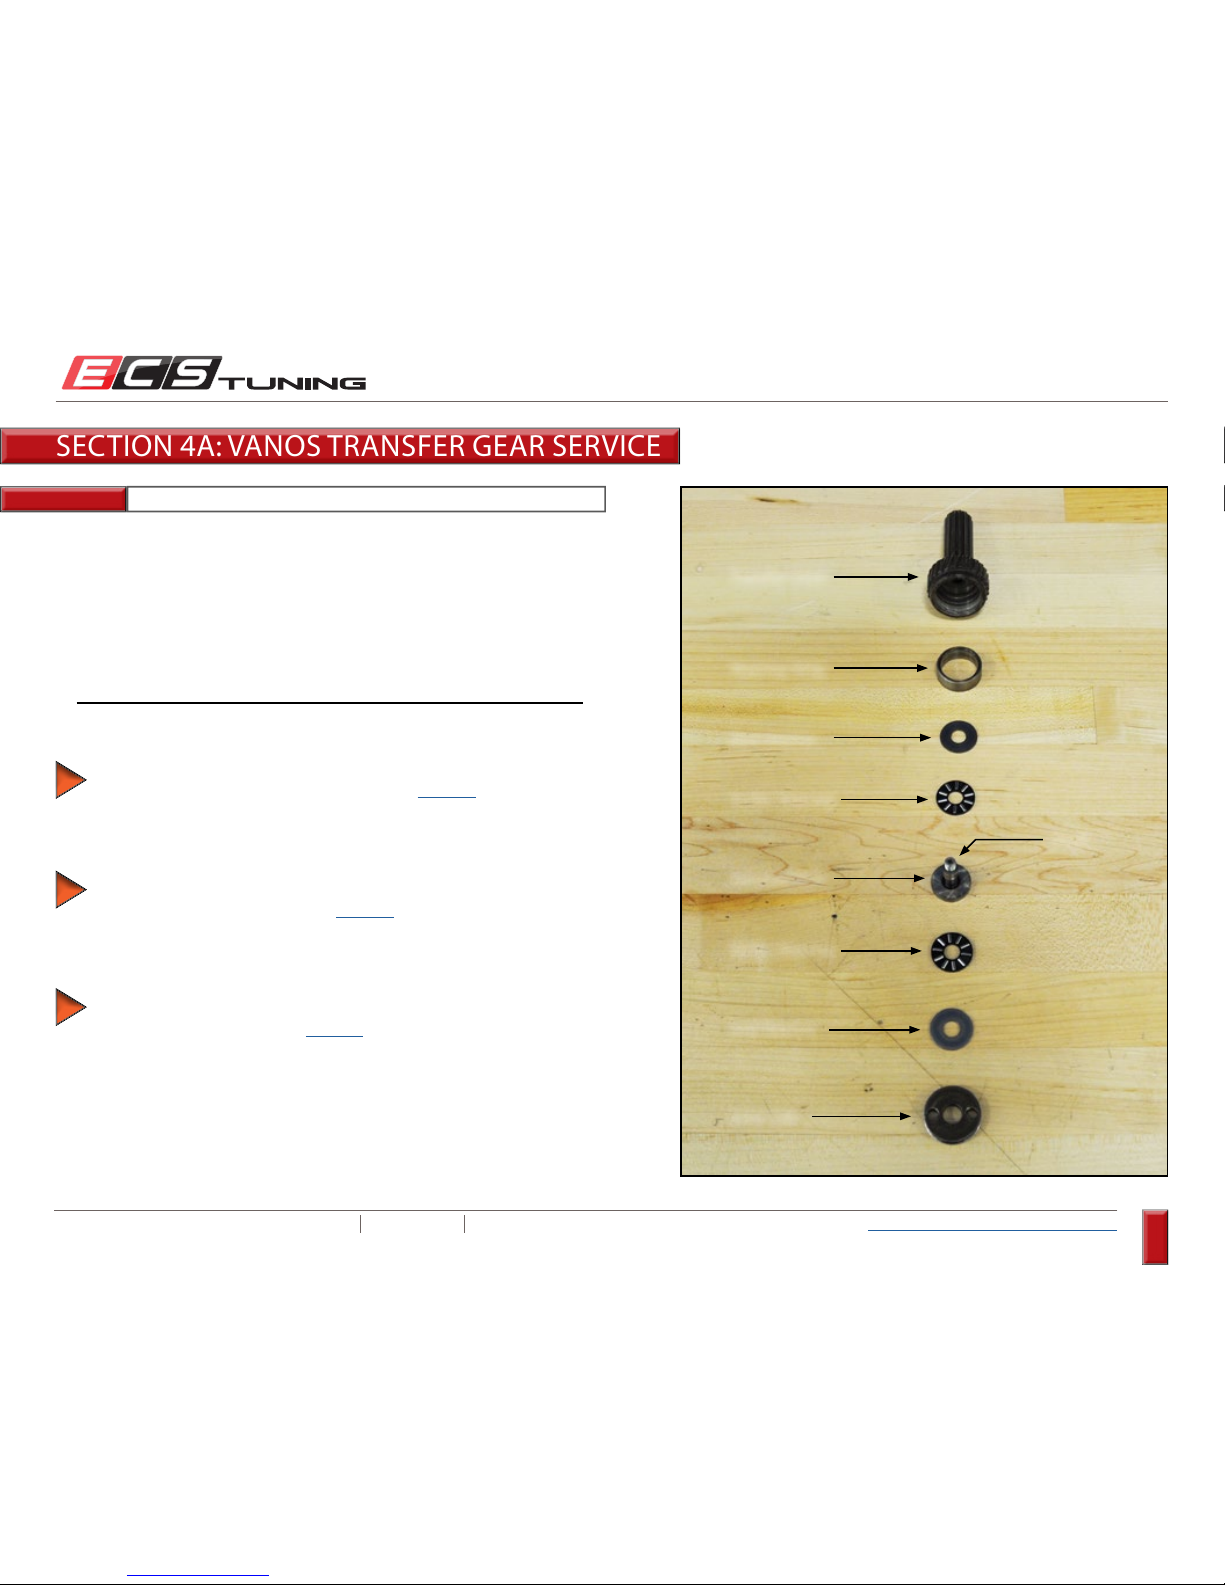
Once you have removed the gear cap, remove all of the internal
components and lay them out in order.
Thoroughly clean all components using brake cleaner.
End Washer
Gear Cap
Roller Bearing
Bearing Race
Bearing Ring
End Washer
Shaft
If you are installing the new bearing ring and end washers
for the first time, continue with Step 11 on Page 68.
Choose the appropriate action below, based on your
results from the Page 64 flow chart:
If you have axial play or no preload present and need
to tighten the bearing by reducing the thickness of the
bearing ring, skip to Step 13 on Page 69.
If the transfer gear shaft is too tight and you need to
loosen the bearing by reducing the thickness of the end
washers, skip to Step 14 on Page 70.
Roller Bearing
Transfer Gear
SECTION 4A: VANOS TRANSFER GEAR SERVICE
Page 68
ECS TUNING 1000 SEVILLE RD. WADSWORTH, OH 44281 1.800.924.5172 WWW.ECSTUNING.COM
68
BMW S54 DUAL VANOS REBUILD
®
Return to Vanos Repair Table of Contents
Step 11:
Clean all remaining thread
locking compound out of the
transfer gear threads
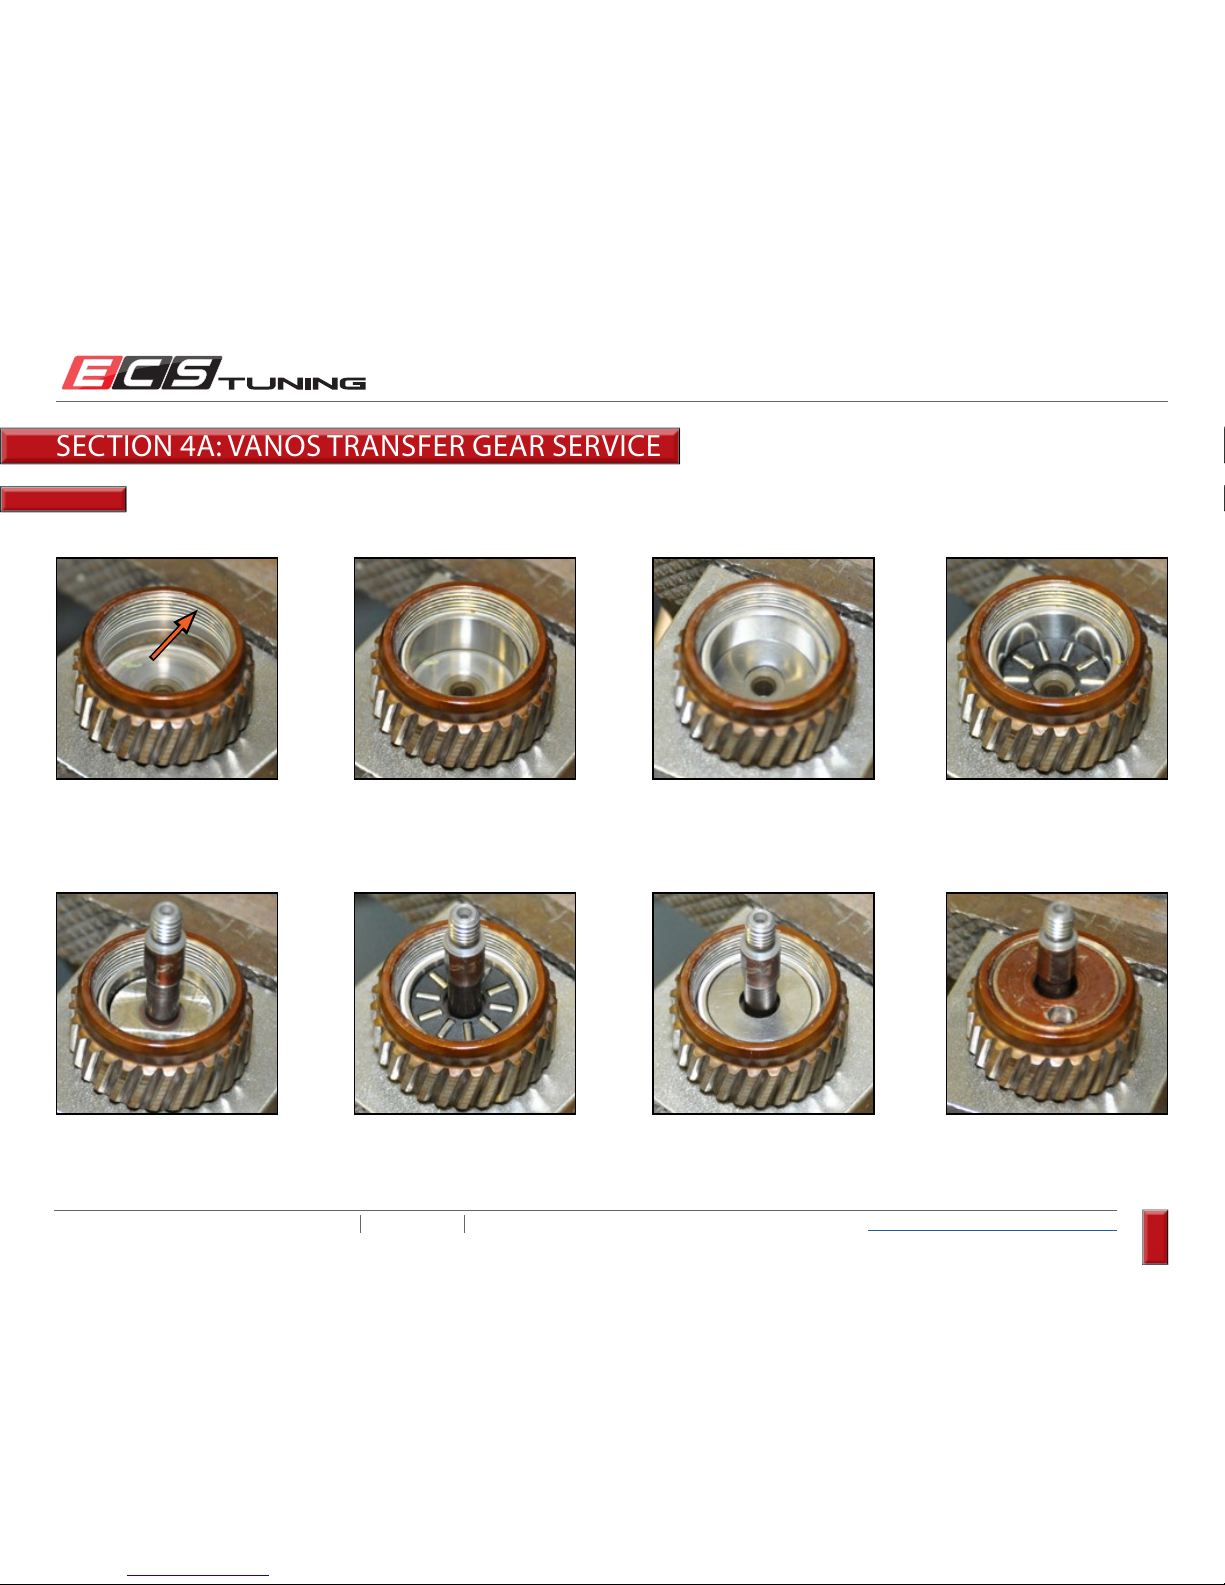
Install the bearing ring Install one end washer Install one bearing
Thread the gear cap into placeInstall the other end washerInstall the other bearingInstall the bearing race/shaft
Using the new bearing ring and end washers, reassemble the transfer gear in the following order:
Continue with Step 12 on the next page.
SECTION 4A: VANOS TRANSFER GEAR SERVICE
Page 69
ECS TUNING 1000 SEVILLE RD. WADSWORTH, OH 44281 1.800.924.5172 WWW.ECSTUNING.COM
69
BMW S54 DUAL VANOS REBUILD
®
Return to Vanos Repair Table of Contents
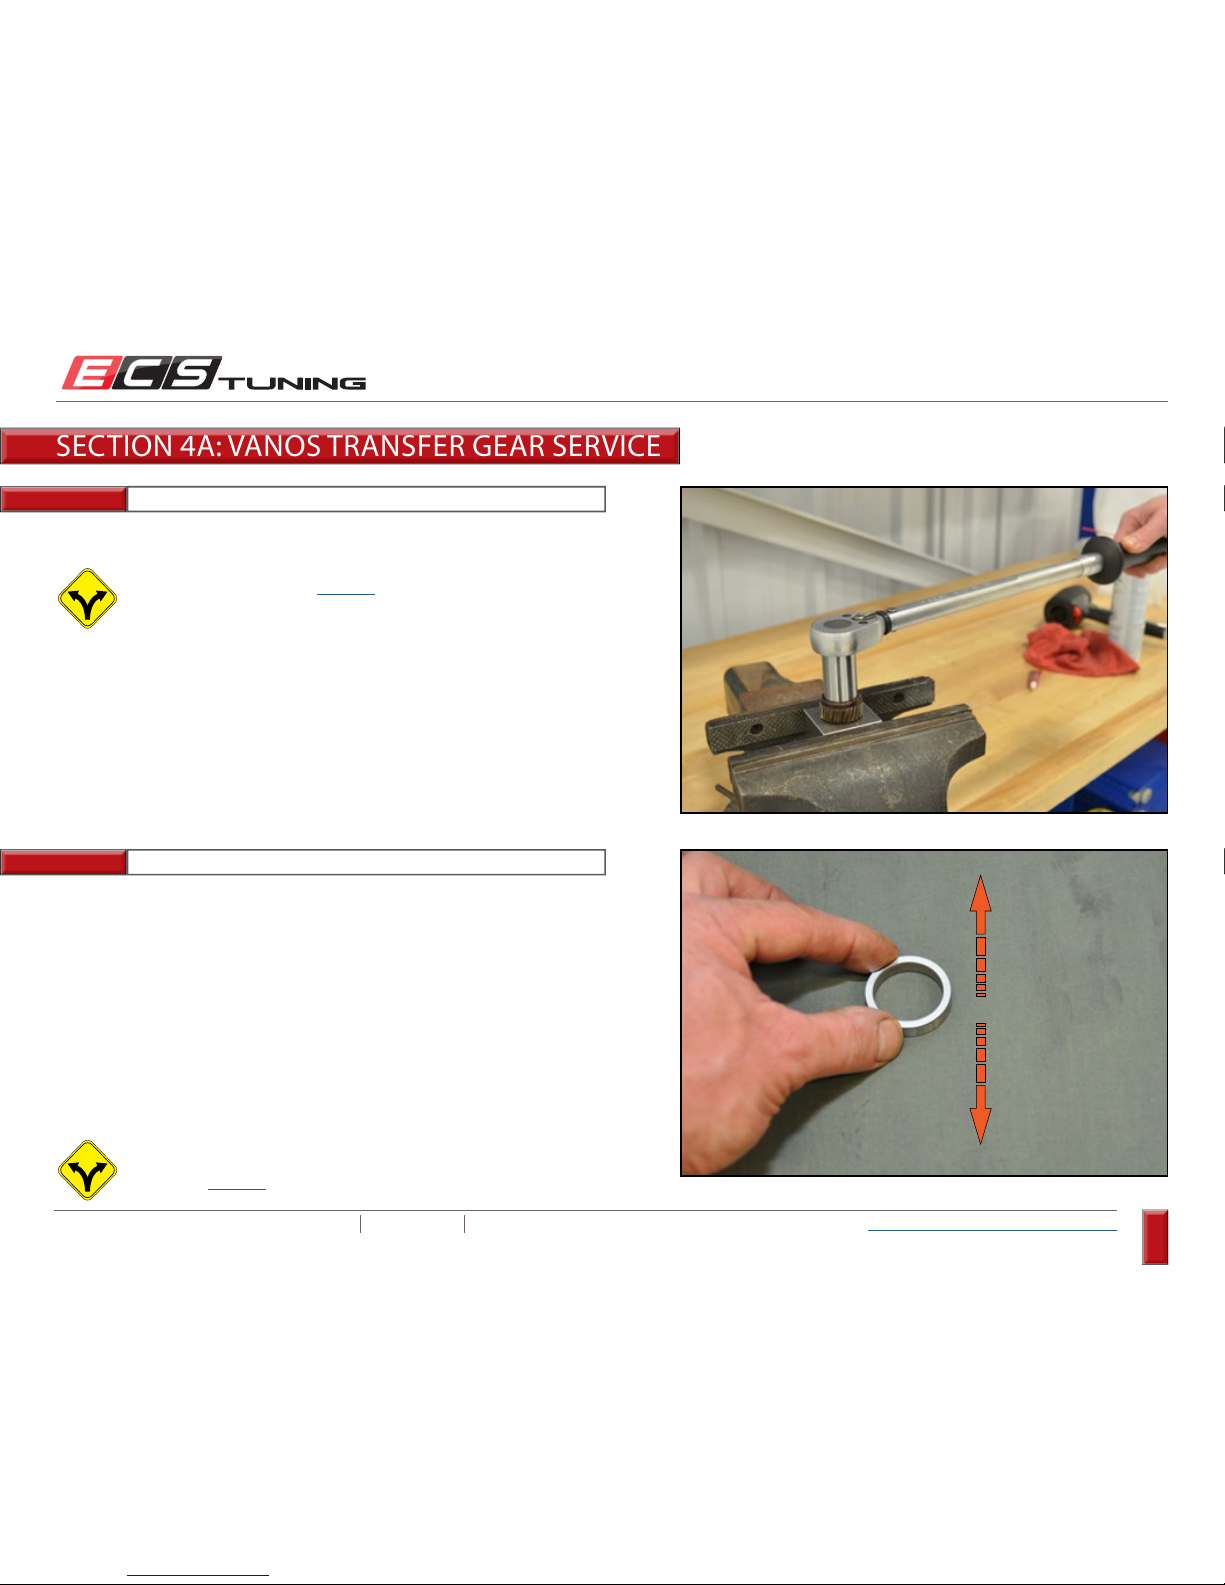
Step 12: Torque Wrench, Gear Cap Socket
Torque the transfer gear cap to 55 Nm (40.5 Ft-Lbs).
Follow the flow chart on Page 64 to check and
adjust axial play/preload of the transfer gear shaft.
Step 13: 400 Grit Sandpaper
To tighten the bearing (when axial play or no preload is present) - sand the
bearing ring using the following procedure:
1. Place a sheet of 400 grit sandpaper on a solid, flat surface.
2. Using medium pressure, sand one surface of the ring back and
forth 6-8”, approximately 30-40 times.
3. Rotate the ring 90 degrees, and repeat the sanding procedure.
4. Flip the ring over and repeat the sanding procedure.
5. Rotate the ring 90 degrees and repeat the sanding procedure.
Thoroughly clean the bearing ring and continue with
Step 11 on Page 68.
This procedure will remove a very small amount of material, approximately
.004 - .006mm from the total thickness of the ring.
SECTION 4A: VANOS TRANSFER GEAR SERVICE
Page 70
ECS TUNING 1000 SEVILLE RD. WADSWORTH, OH 44281 1.800.924.5172 WWW.ECSTUNING.COM
70
BMW S54 DUAL VANOS REBUILD
®
Return to Vanos Repair Table of Contents
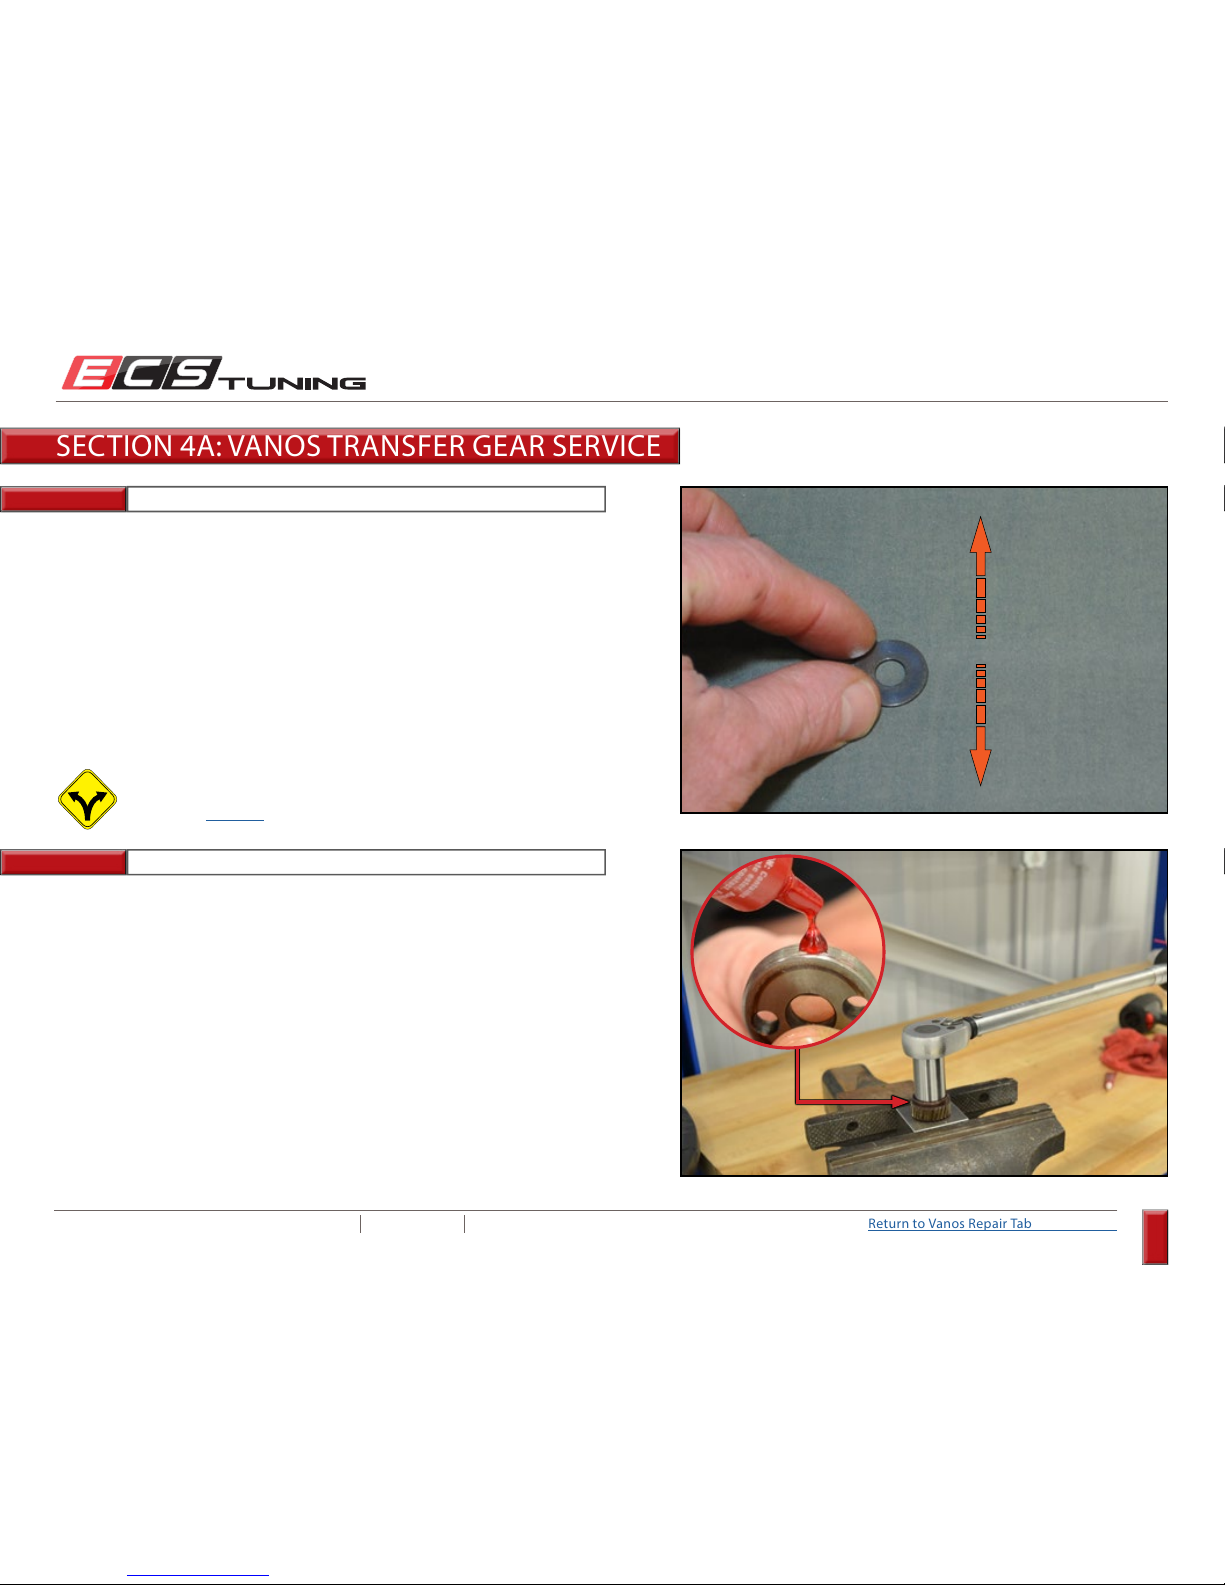
Step 15: Torque Wrench, Gear Cap Socket
Once you have achieved no axial play and have sufficient preload on the
transfer gear bearing, remove the gear cap, apply high strength (red)
threadlocker, then reinstall the cap for the final time, torquing it to 55 Nm
(40.5 Ft-Lbs).
Do not install the transfer gears back into the vanos hubs. Set them aside
for now as you complete sections 4B and 4C. Installation will be covered
in section 5.
Step 14: 400 Grit Sandpaper
To loosen the bearing (when excessive force is required to rotate the shaft)
- sand both of the end washers using the following procedure:
1. Place a sheet of 400 grit sandpaper on a solid, flat surface.
2. Using medium pressure, sand one surface of the washer back and
forth 6-8”, approximately 30-40 times.
3. Rotate the washer 90 degrees, and repeat the sanding procedure.
4. Flip the washer over and repeat the sanding procedure.
5. Rotate the washer 90 degrees and repeat the sanding procedure.
Thoroughly clean the end washers and continue with
Step 11 on Page 68.
This procedure will remove a very small amount of material, approximately
.0025mm from the total thickness of each washer.
- End of Section 4a -
SECTION 4A: VANOS TRANSFER GEAR SERVICE
Page 71
ECS TUNING 1000 SEVILLE RD. WADSWORTH, OH 44281 1.800.924.5172 WWW.ECSTUNING.COM
71
BMW S54 DUAL VANOS REBUILD
®
Return to Vanos Repair Table of Contents
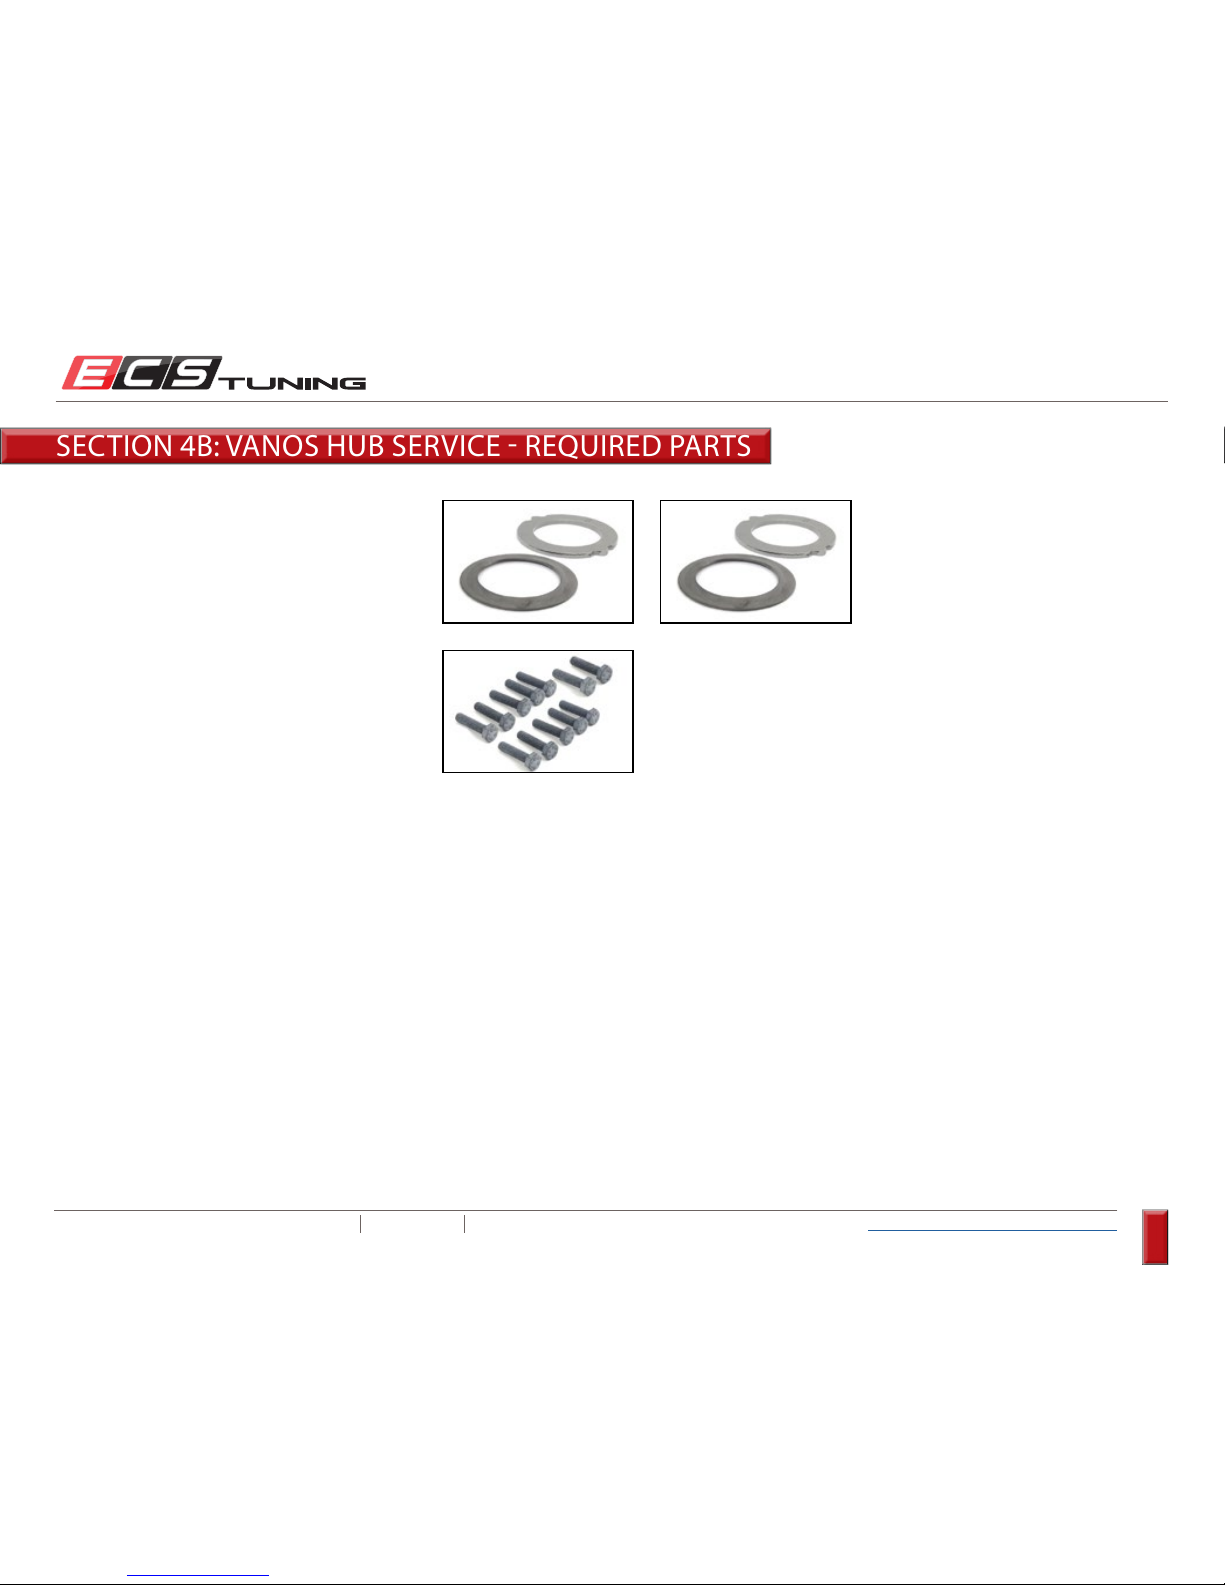
ES#23235
Description...............Vanos Diaphragm Spring Sets
Location .................... Vanos Hubs
Quantity .................... 2
ES#15158
Description...............M6 x 25 Hex Bolt
Location .................... Vanos Hubs
Quantity .................... 12
SECTION 4B: VANOS HUB SERVICE REQUIRED PARTS
Page 72
ECS TUNING 1000 SEVILLE RD. WADSWORTH, OH 44281 1.800.924.5172 WWW.ECSTUNING.COM
72
BMW S54 DUAL VANOS REBUILD
®
Return to Vanos Repair Table of Contents
Step 1:
Step 2:
10mm Socket, Ratchet
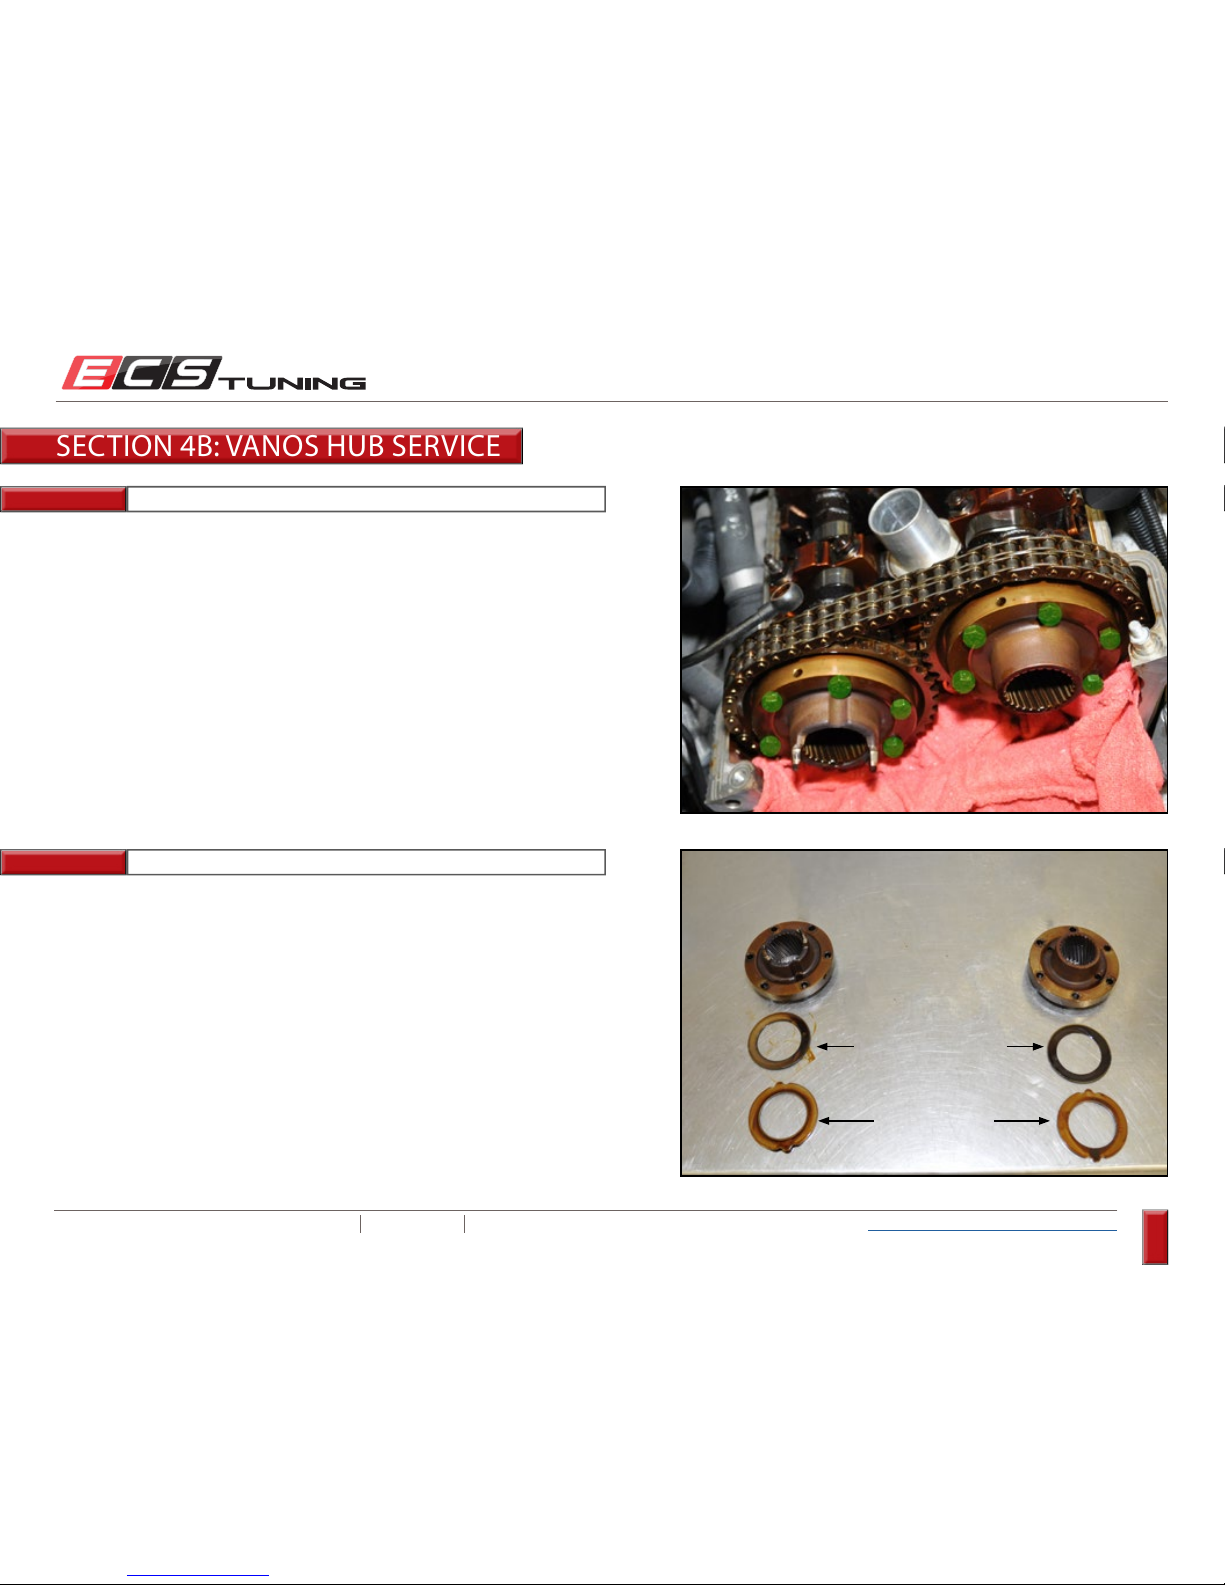
Make sure a rag is still in place to keep anything from falling into the
engine, then remove the Vanos hub bolts (6 on each hub for a total of 12).
These should already be loose from section 4A.
Remove both Vanos hubs. You will notice that underneath each one is a
diaphragm spring and pressure plate, remove these as well. Occasionally,
the springs and plates will remain in the back of the Vanos hubs. Make
sure you remove them.
SECTION 4B: VANOS HUB SERVICE
Diaphragm Spring
Pressure Plate
Page 73
ECS TUNING 1000 SEVILLE RD. WADSWORTH, OH 44281 1.800.924.5172 WWW.ECSTUNING.COM
73
BMW S54 DUAL VANOS REBUILD
®
Return to Vanos Repair Table of Contents
Step 3:
Step 4:
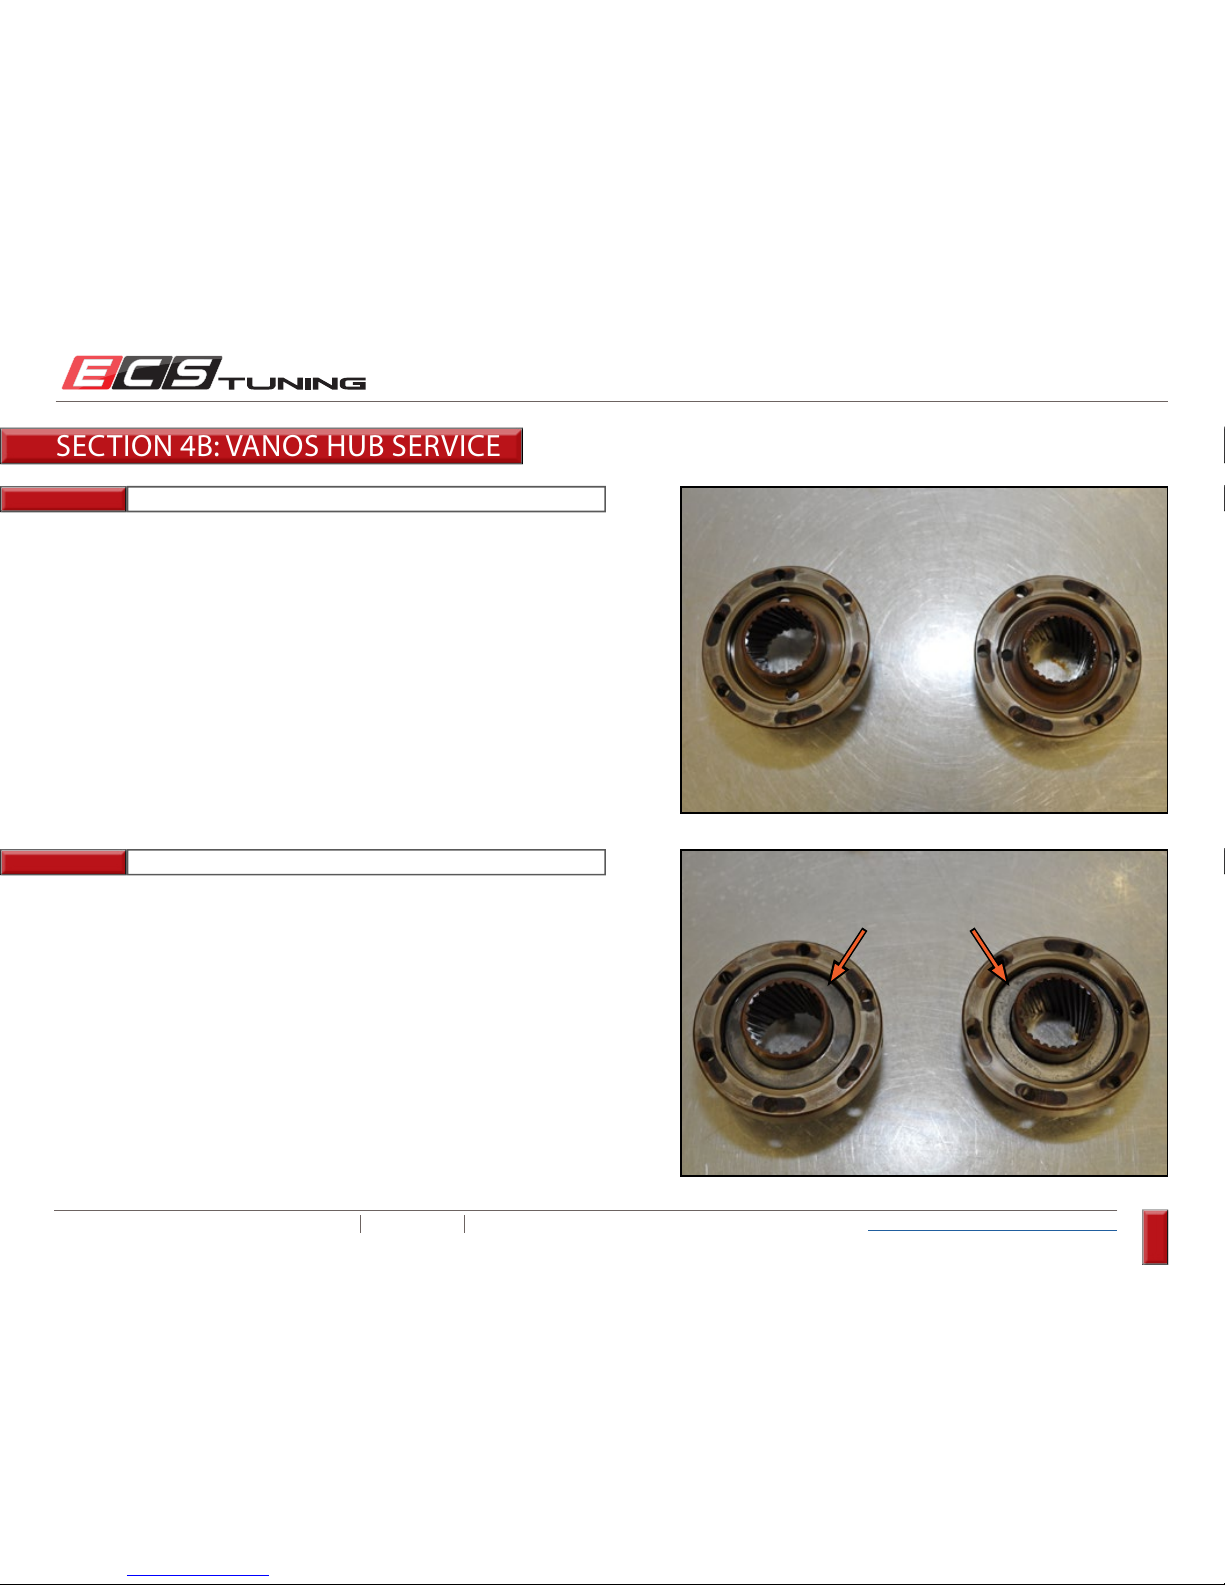
Thoroughly clean the Vanos hubs.
Install the new diaphragm spring into the back side of each Vanos hub
with the cupped side down.
SECTION 4B: VANOS HUB SERVICE
Page 74
ECS TUNING 1000 SEVILLE RD. WADSWORTH, OH 44281 1.800.924.5172 WWW.ECSTUNING.COM
74
BMW S54 DUAL VANOS REBUILD
®
Return to Vanos Repair Table of Contents
Step 5:
Step 6: Small Pick or Screwdriver
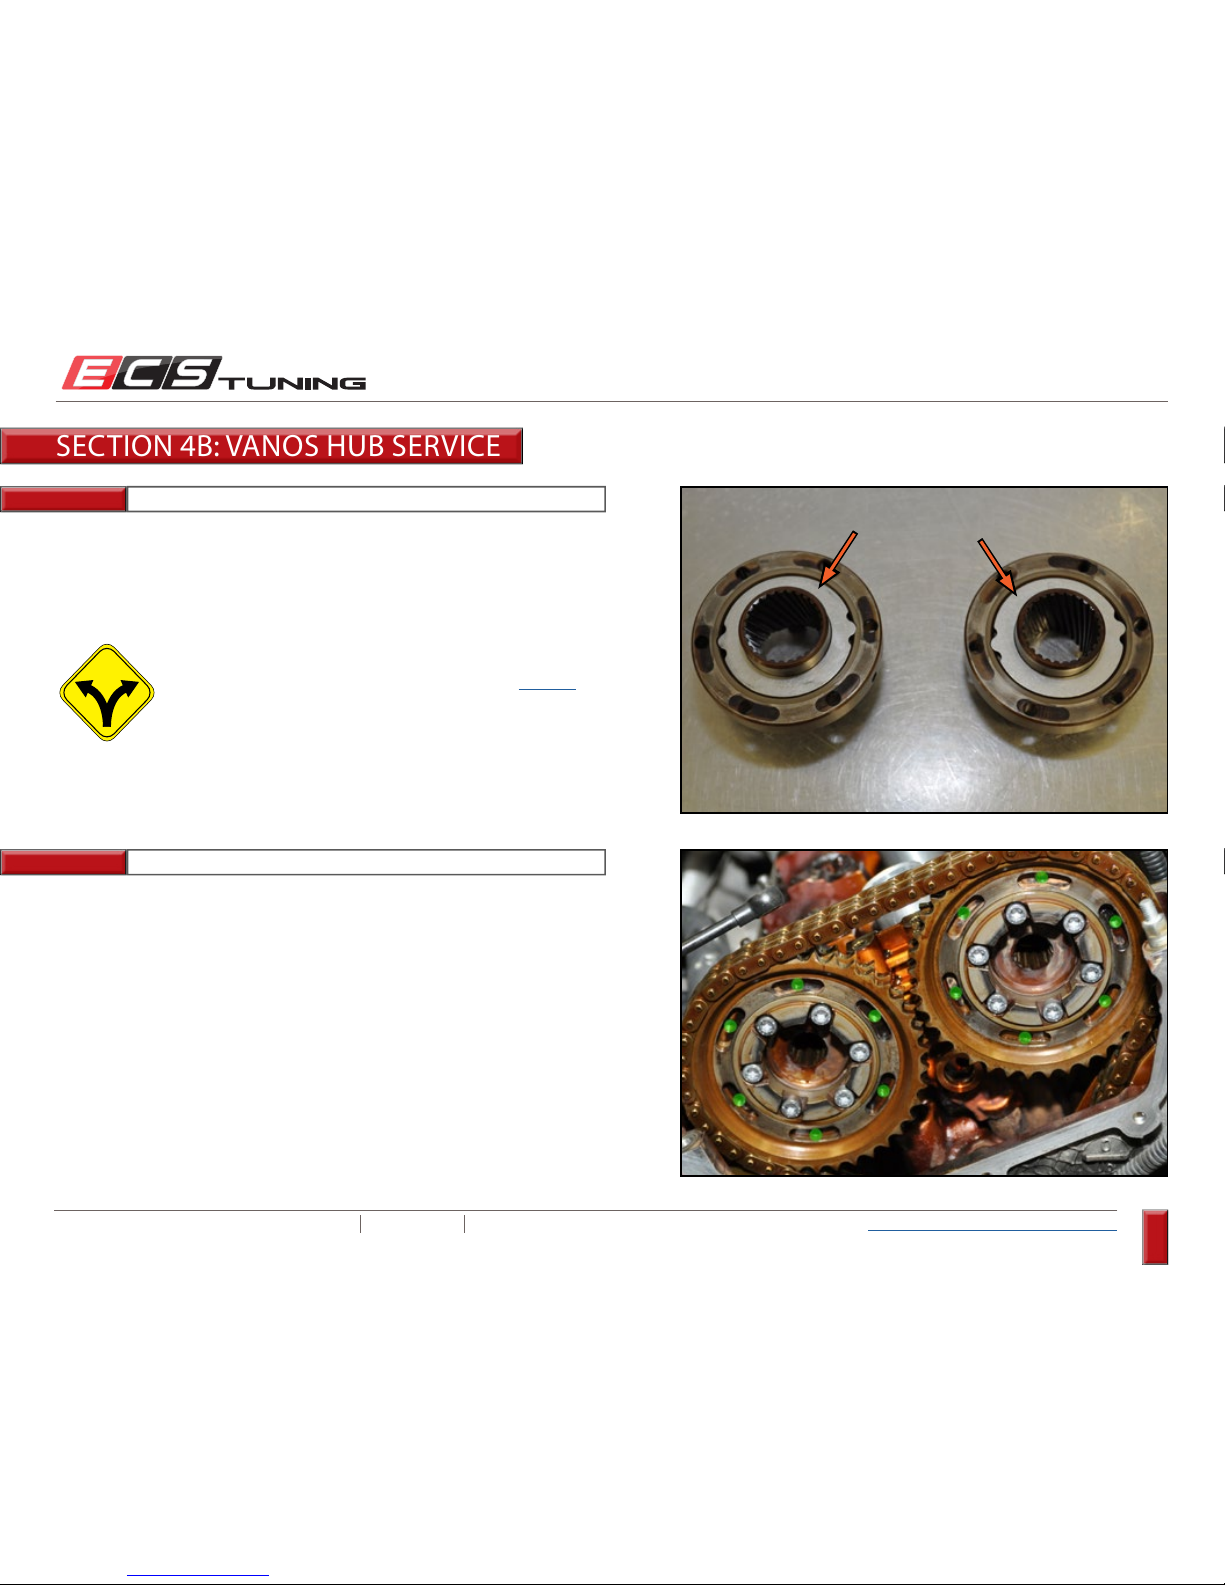
Install a new pressure plate into the back of each Vanos hub, on top of the
diaphragm spring.
Rotate the cam sprocket rear plates so that the bolt holes are centered in
the slots of the cam sprockets.
If you are replacing the cam sprocket bolts and upper
timing chain guide, proceed with section 4c on Page 76.
You will be directed to return back to this step at a later
point.
SECTION 4B: VANOS HUB SERVICE
Page 75
ECS TUNING 1000 SEVILLE RD. WADSWORTH, OH 44281 1.800.924.5172 WWW.ECSTUNING.COM
75
BMW S54 DUAL VANOS REBUILD
®
Return to Vanos Repair Table of Contents
Step 7:
Step 8:
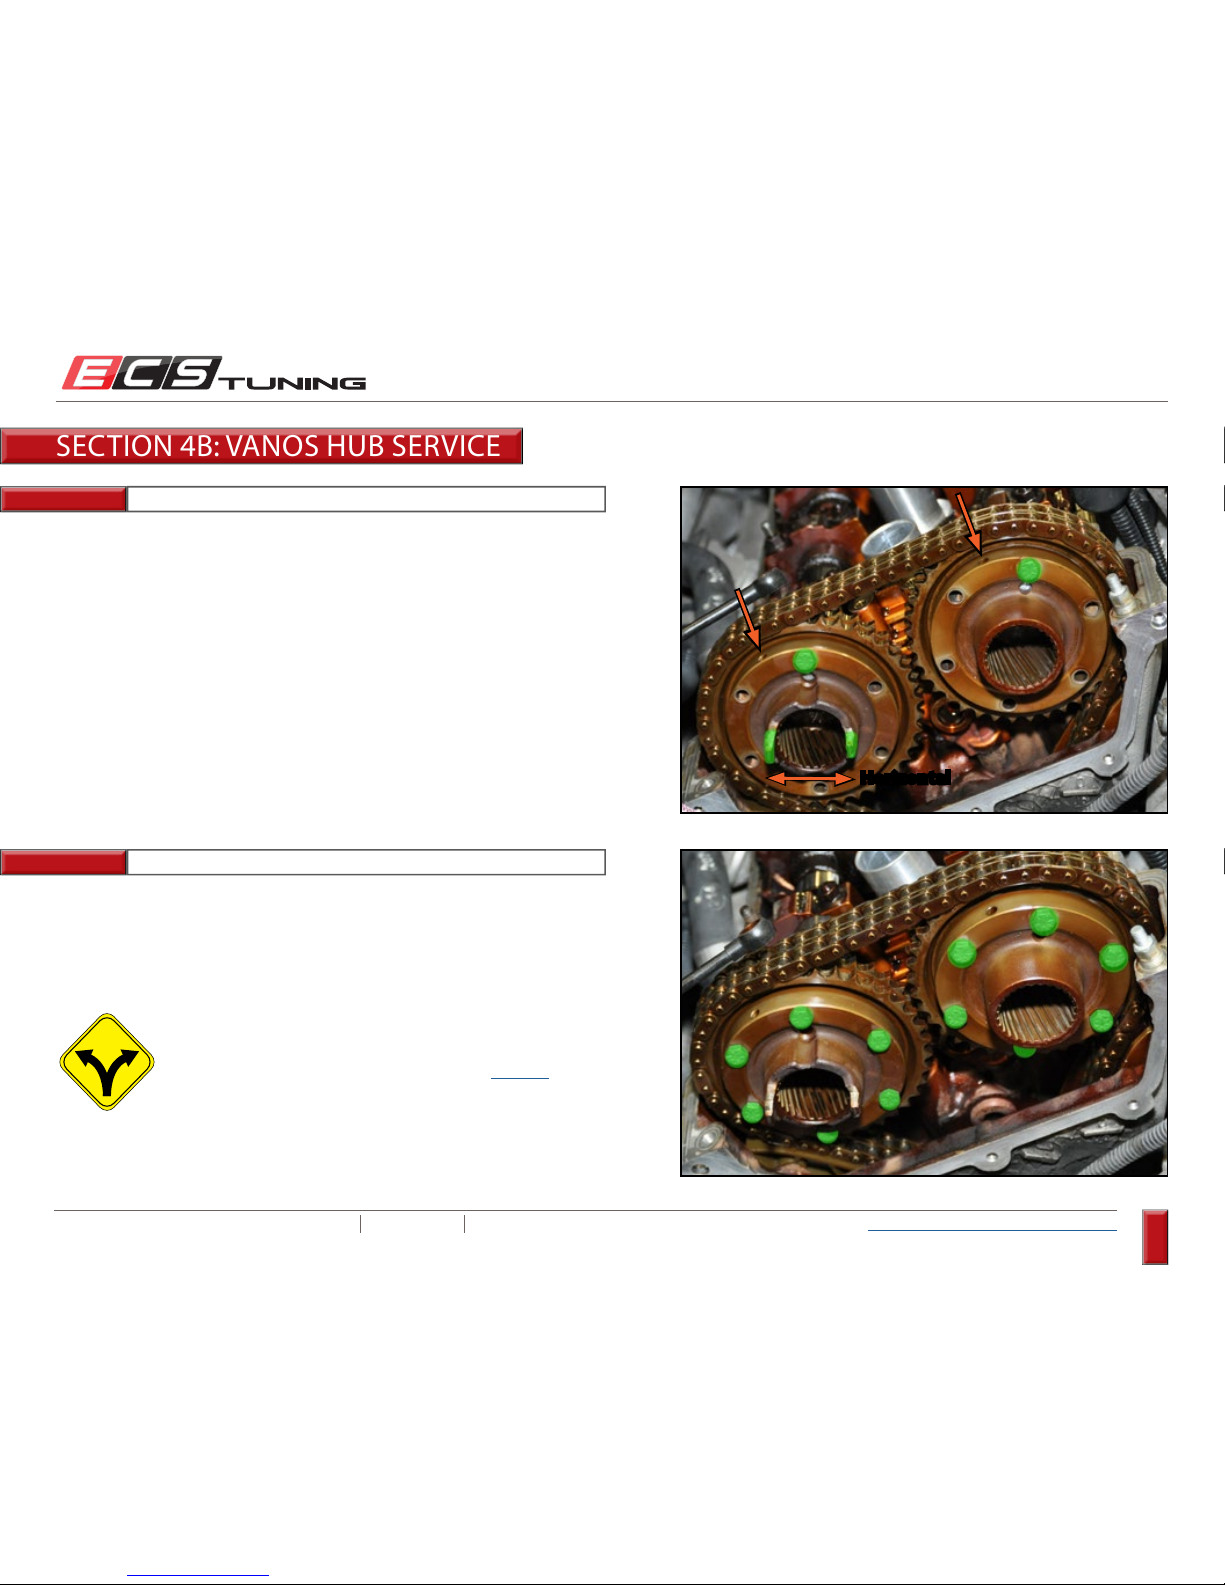
Install the Vanos hubs onto the cam sprockets using one new M6 x 25 bolt
at the top of each one. Make sure the following points apply:
Install the remaining new M6 x 25 bolts into the Vanos hubs. Thread them
in by hand, and leave them hand tight only.
A: Make sure the diaphragm springs and pressure plates
remain in place during installation.
B: Make sure one of the Vanos hub side holes is located at the
top for each hub (arrows).
C: The oil pump drive tabs on the exhaust hub will be in a
horizontal position.
D: Install one bolt, hand tight only, in the positions shown.
Horizontal
- End of Section 4b -
You are now ready to completely reinstall the Vanos and
finish the job. Continue with section 5A on Page 85.
SECTION 4B: VANOS HUB SERVICE
Page 76
ECS TUNING 1000 SEVILLE RD. WADSWORTH, OH 44281 1.800.924.5172 WWW.ECSTUNING.COM
76
BMW S54 DUAL VANOS REBUILD
®
Return to Vanos Repair Table of Contents
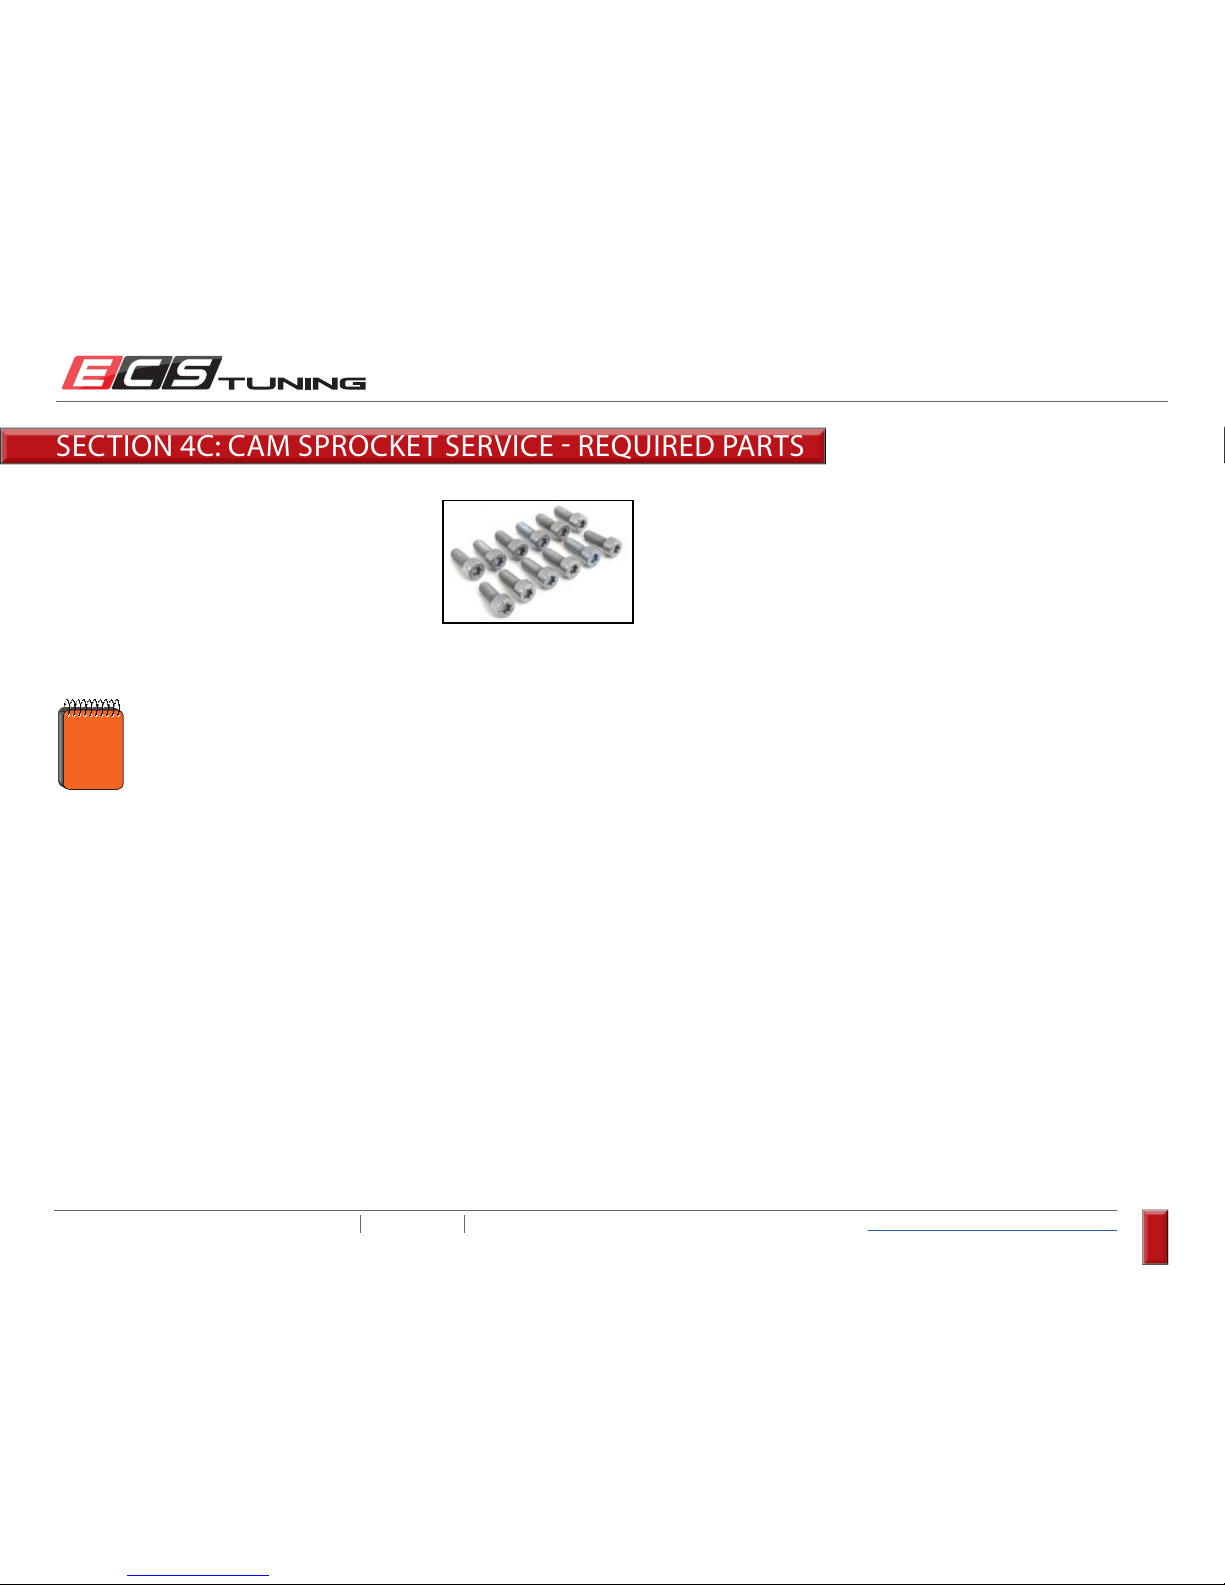
SECTION 4C: CAM SPROCKET SERVICE REQUIRED PARTS
ES#16140
Description...............M6 x 16 Torx Bolt
Location .................... Camshaft Sprocket Hubs
Quantity .................... 12
The original cam sprocket hub bolts commonly loosen up, and this service
replaces the original bolts which addresses the problem and prevents it
from reoccurring.
NOTE
Page 77
ECS TUNING 1000 SEVILLE RD. WADSWORTH, OH 44281 1.800.924.5172 WWW.ECSTUNING.COM
77
BMW S54 DUAL VANOS REBUILD
®
Return to Vanos Repair Table of Contents
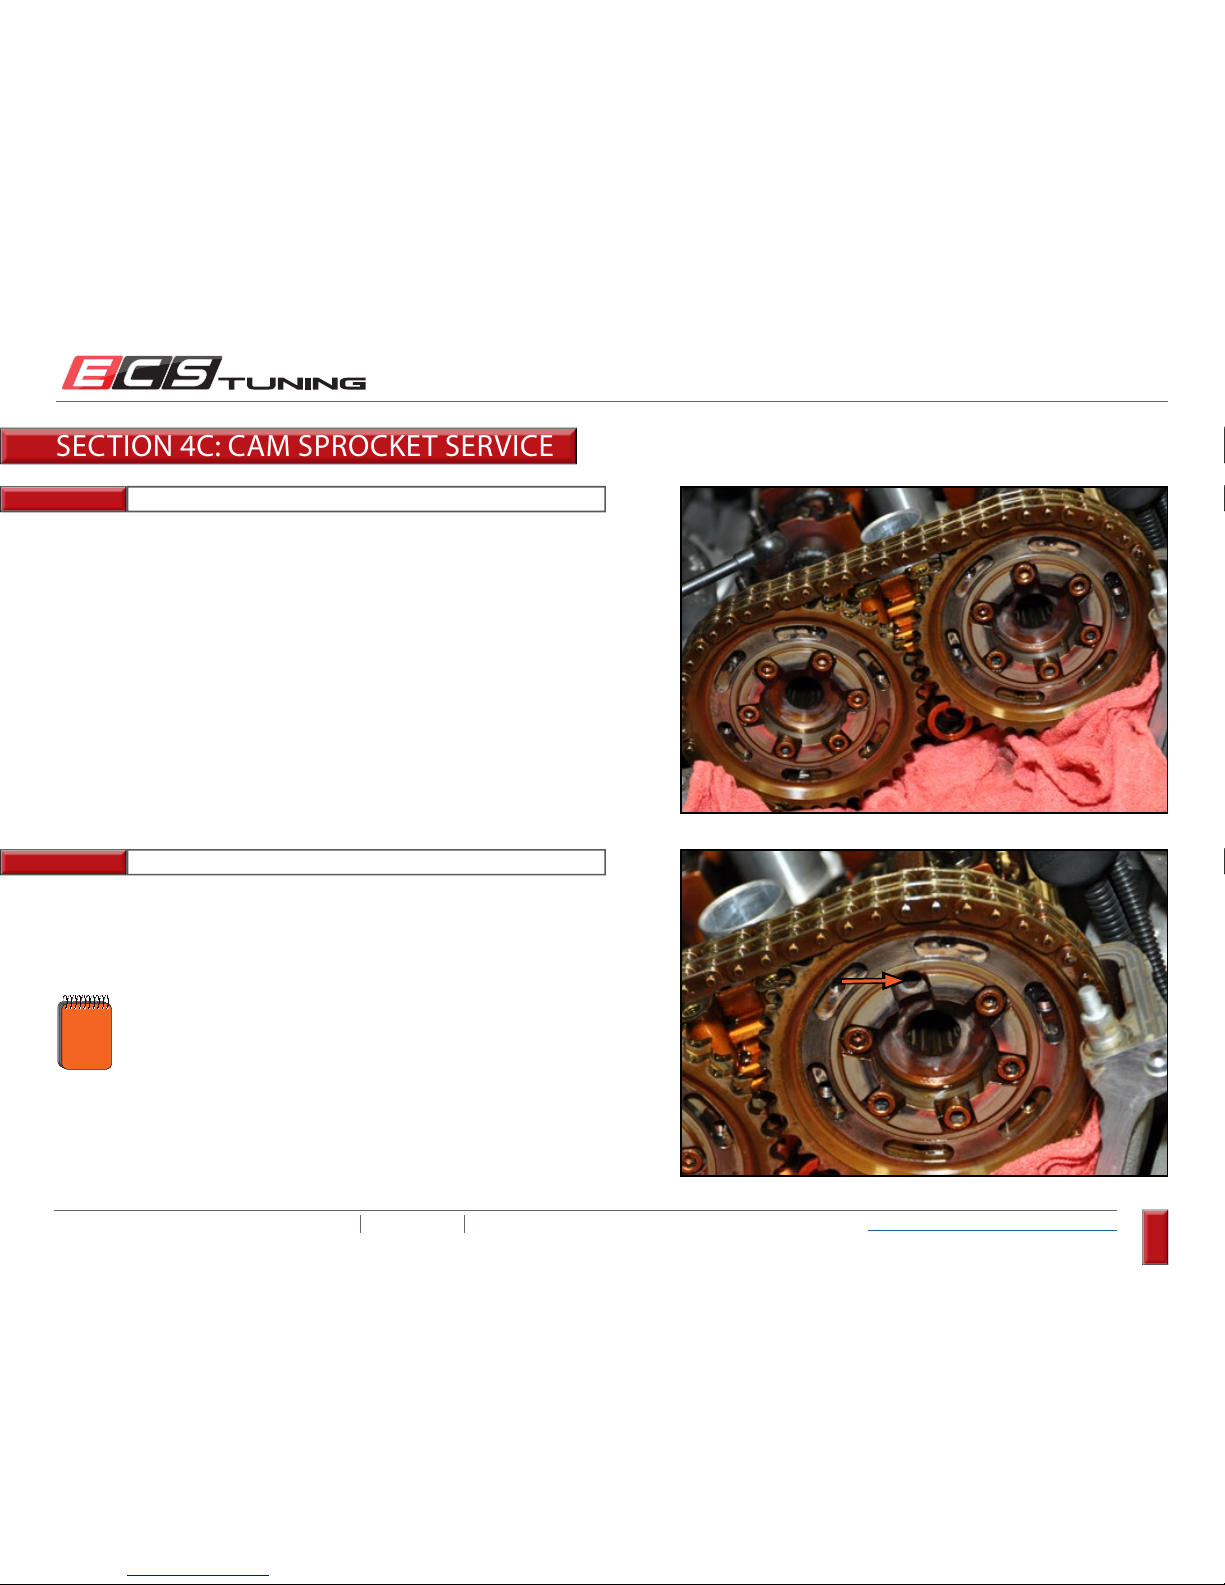
Step 1:
Step 2: 5mm Hex Bit (Allen) Socket
Clean the face of the camshaft sprockets with brake cleaner and rags.
Remove the top most bolt on one of the sprocket hubs, then clean the
hole with brake cleaner and dry it with a shop rag.
SECTION 4C: CAM SPROCKET SERVICE
You will be replacing these bolts one at a time, working from
top to bottom in order to prevent the cleaning solvent from
getting onto the newly installed bolts.
NOTE
Page 78
ECS TUNING 1000 SEVILLE RD. WADSWORTH, OH 44281 1.800.924.5172 WWW.ECSTUNING.COM
78
BMW S54 DUAL VANOS REBUILD
®
Return to Vanos Repair Table of Contents
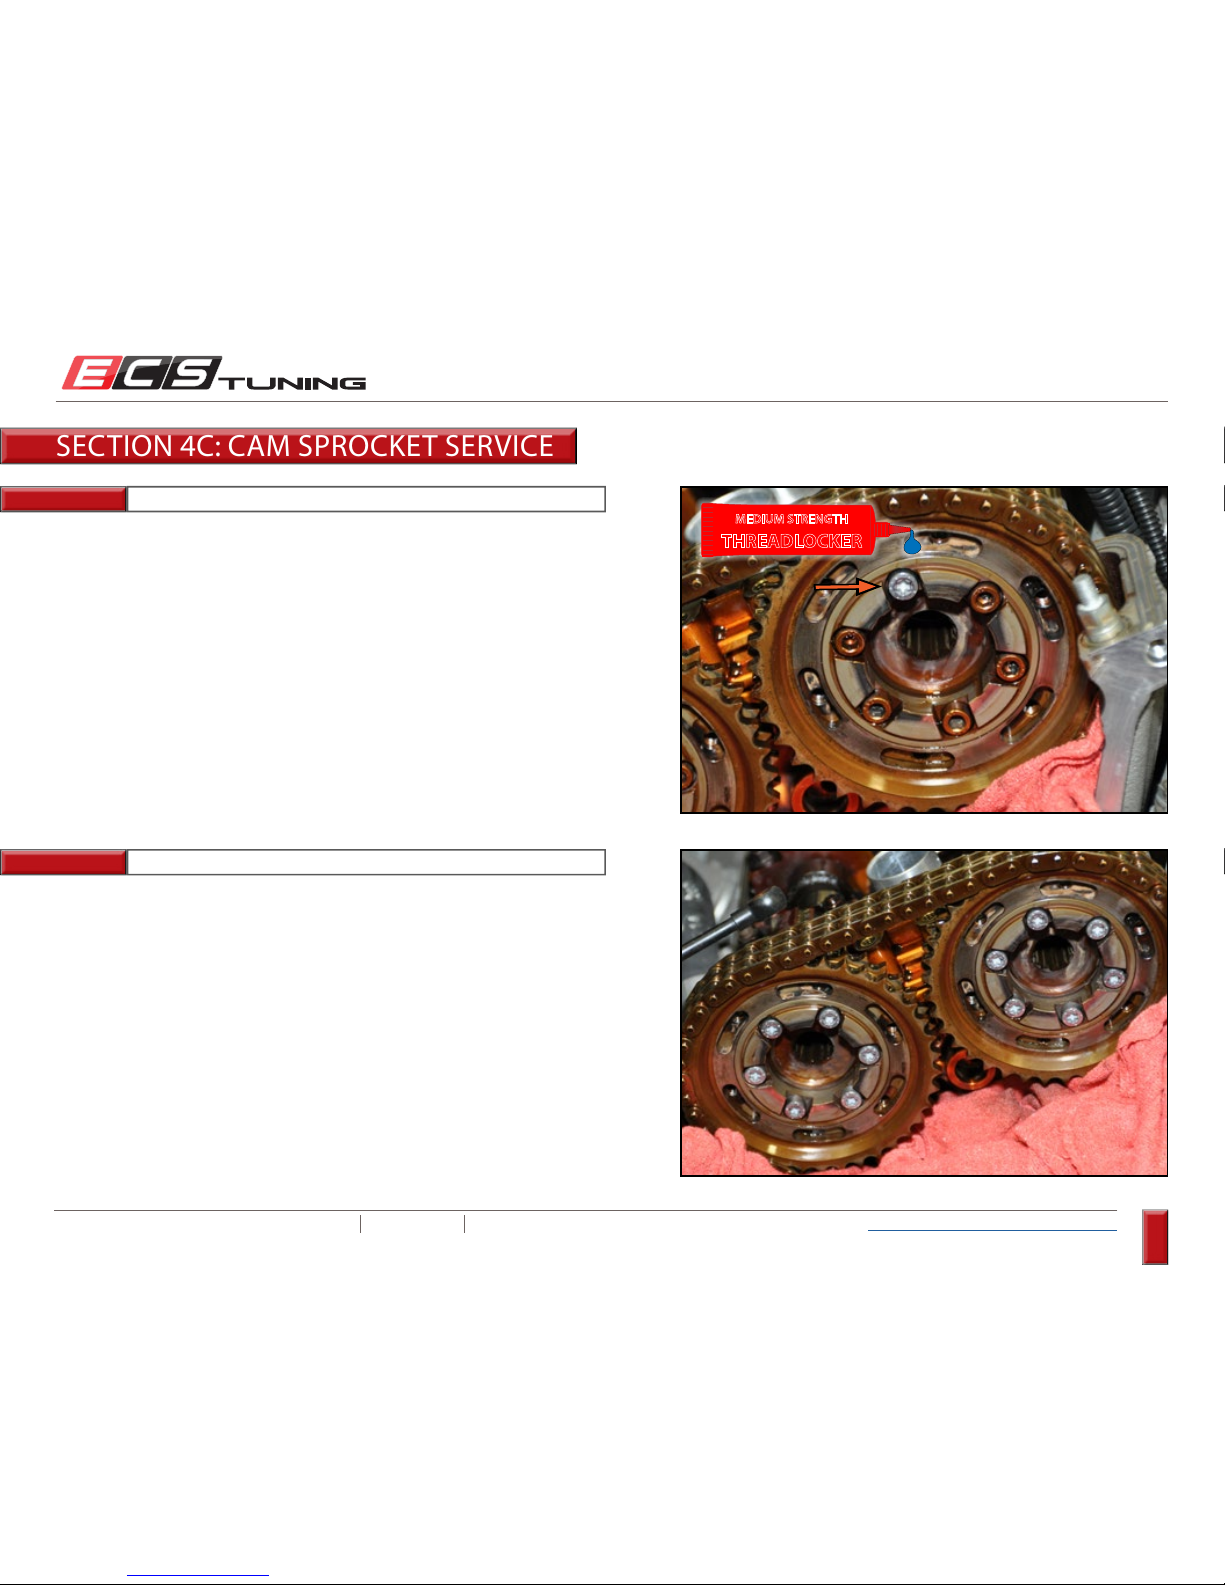
Step 3:
Step 4:
T30 Torx Socket, Torque Wrench
Apply medium strength (BLUE) threadlocker to the threads of a new M6 x
16 Torx bolt, then install the bolt and torque it to 12 Nm (9 Ft-lbs).
Repeat the procedure for all of the remaining cam sprocket hub bolts
and once you are complete, clean any debris/solvent out of the internal
camshaft splines.
- End of Section 4c -
THREADLOCKER
MEDIUM STRENGTH
SECTION 4C: CAM SPROCKET SERVICE
Page 79
ECS TUNING 1000 SEVILLE RD. WADSWORTH, OH 44281 1.800.924.5172 WWW.ECSTUNING.COM
79
BMW S54 DUAL VANOS REBUILD
®
Return to Vanos Repair Table of Contents
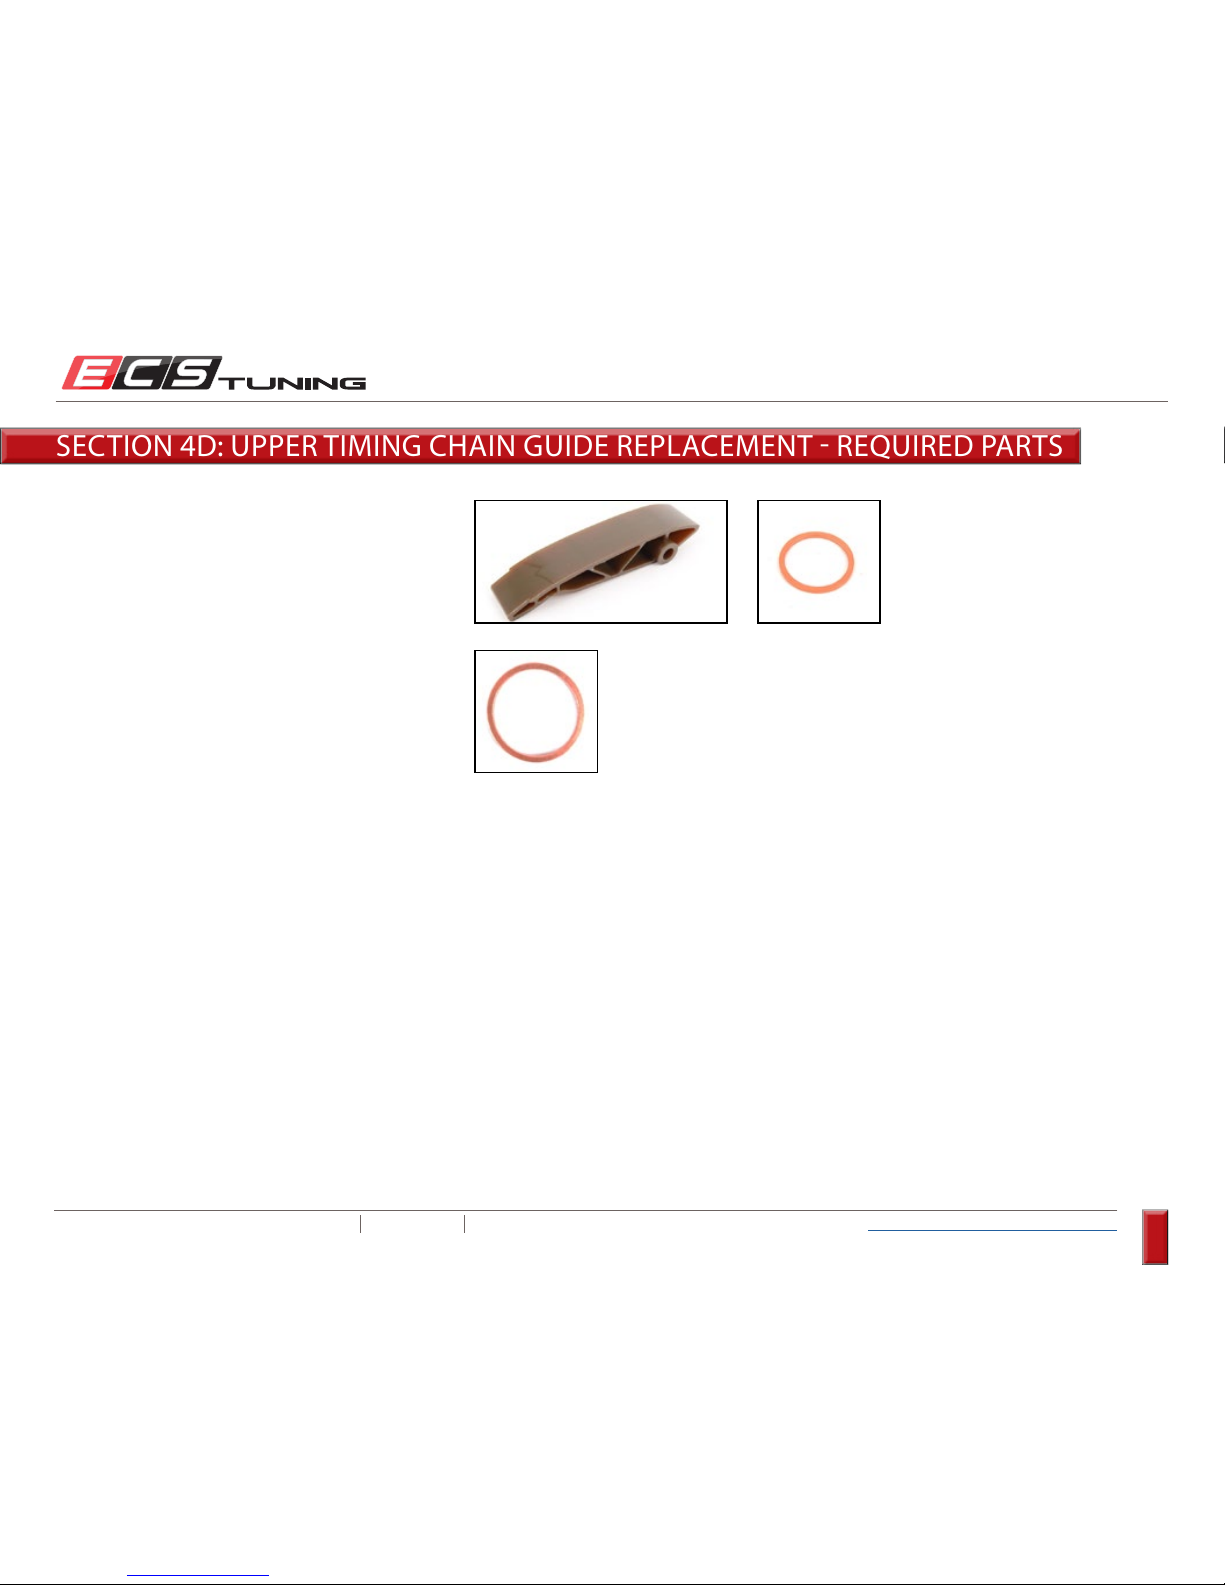
ES#3038773
Description...............Upper Timing Chain Guide
Location .................... Engine Front RH Side
Quantity .................... 1
ES#2603148
Description...............Chain Tensioner Sealing Washer
Location .................... Chain Tensioner Large End
Quantity .................... 1
SECTION 4D: UPPER TIMING CHAIN GUIDE REPLACEMENT REQUIRED PARTS
ES#3038773 also includes the
Timing Chain Guide mounting
bolt sealing washer.
Page 80
ECS TUNING 1000 SEVILLE RD. WADSWORTH, OH 44281 1.800.924.5172 WWW.ECSTUNING.COM
80
BMW S54 DUAL VANOS REBUILD
®
Return to Vanos Repair Table of Contents
Step 1:
Step 2:
32mm Deep Socket, Ratchet
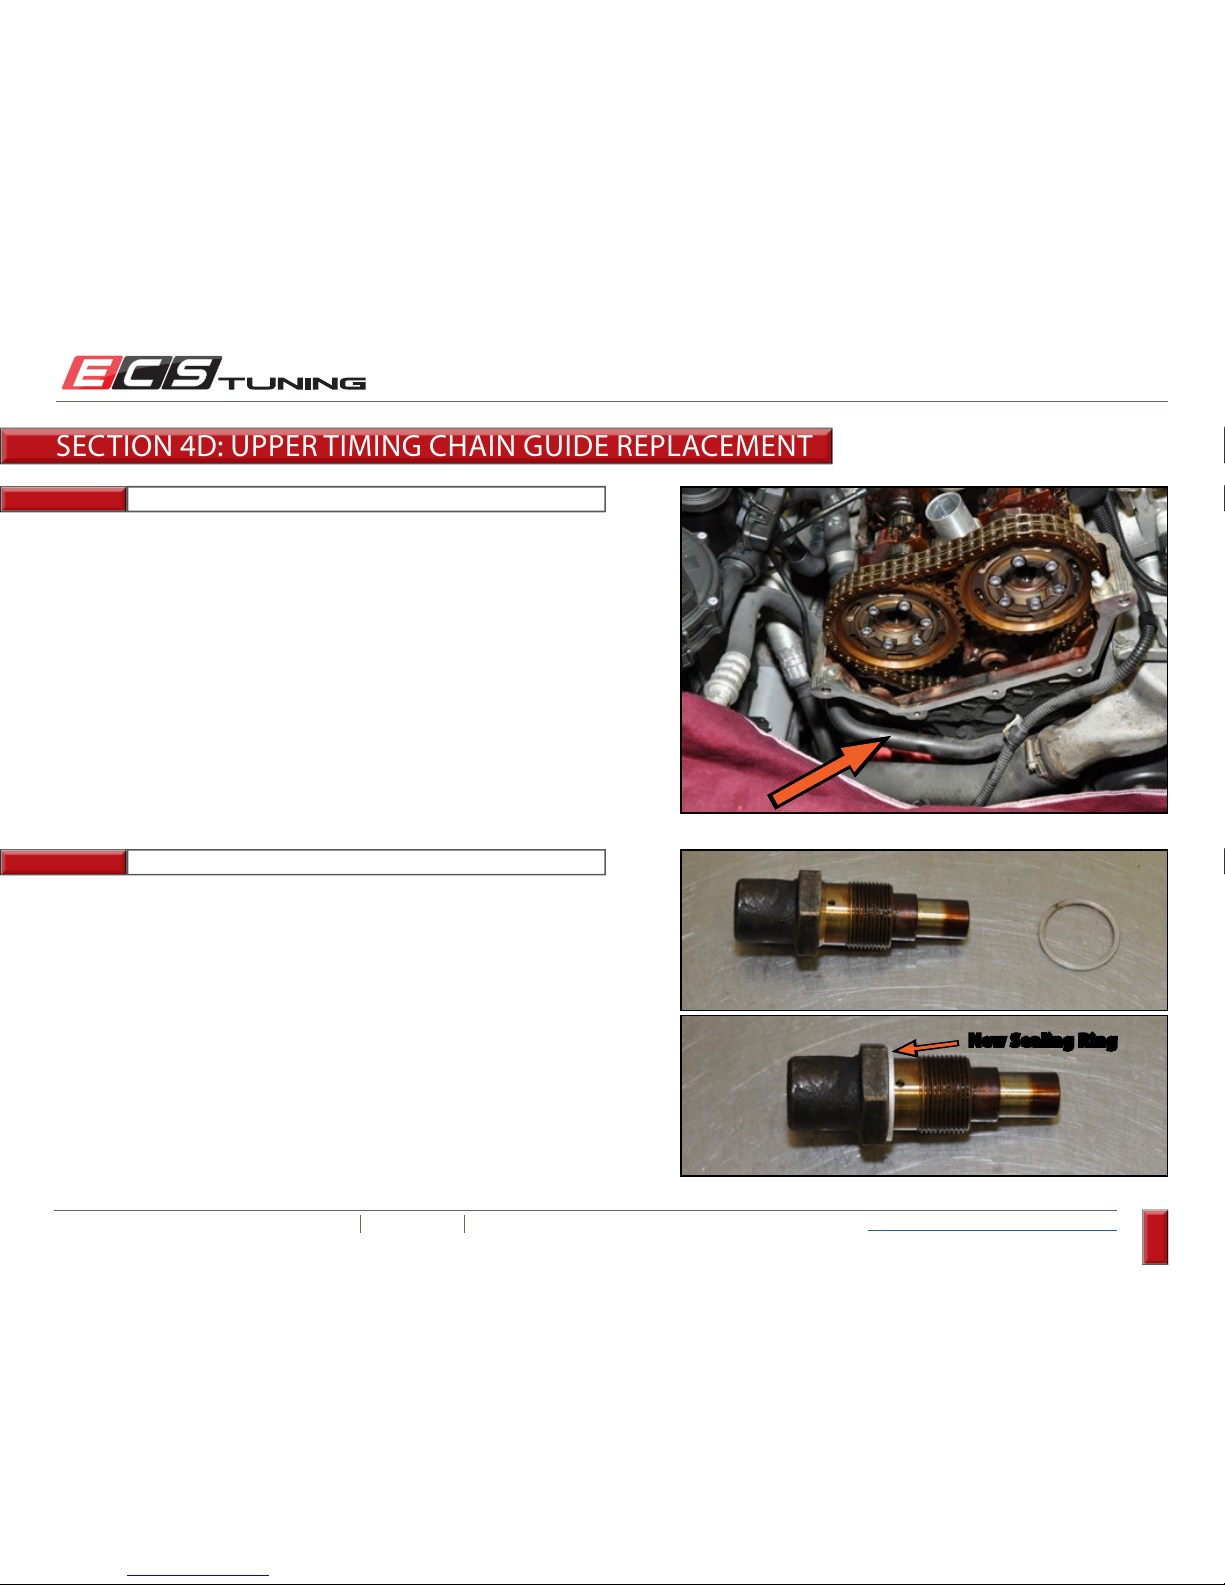
Remove the timing chain tensioner. It’s located on the RH (Passenger) side
front of the engine, just a little bit below the exhaust cam sprocket.
You can’t see it in this picture, but it’s down there, and easy to find.
There’s also plenty of room between the engine and body to get a socket
and ratchet in to loosen it up.
You’ll want to stuff an extra rag underneath because you’ll lose some oil
when you remove it.
Remove the old sealing ring, clean up the tensioner, and install the new
sealing ring. Set the tensioner aside for now.
SECTION 4D: UPPER TIMING CHAIN GUIDE REPLACEMENT
New Sealing Ring
Page 81
ECS TUNING 1000 SEVILLE RD. WADSWORTH, OH 44281 1.800.924.5172 WWW.ECSTUNING.COM
81
BMW S54 DUAL VANOS REBUILD
®
Return to Vanos Repair Table of Contents
Step 3:
Step 4:
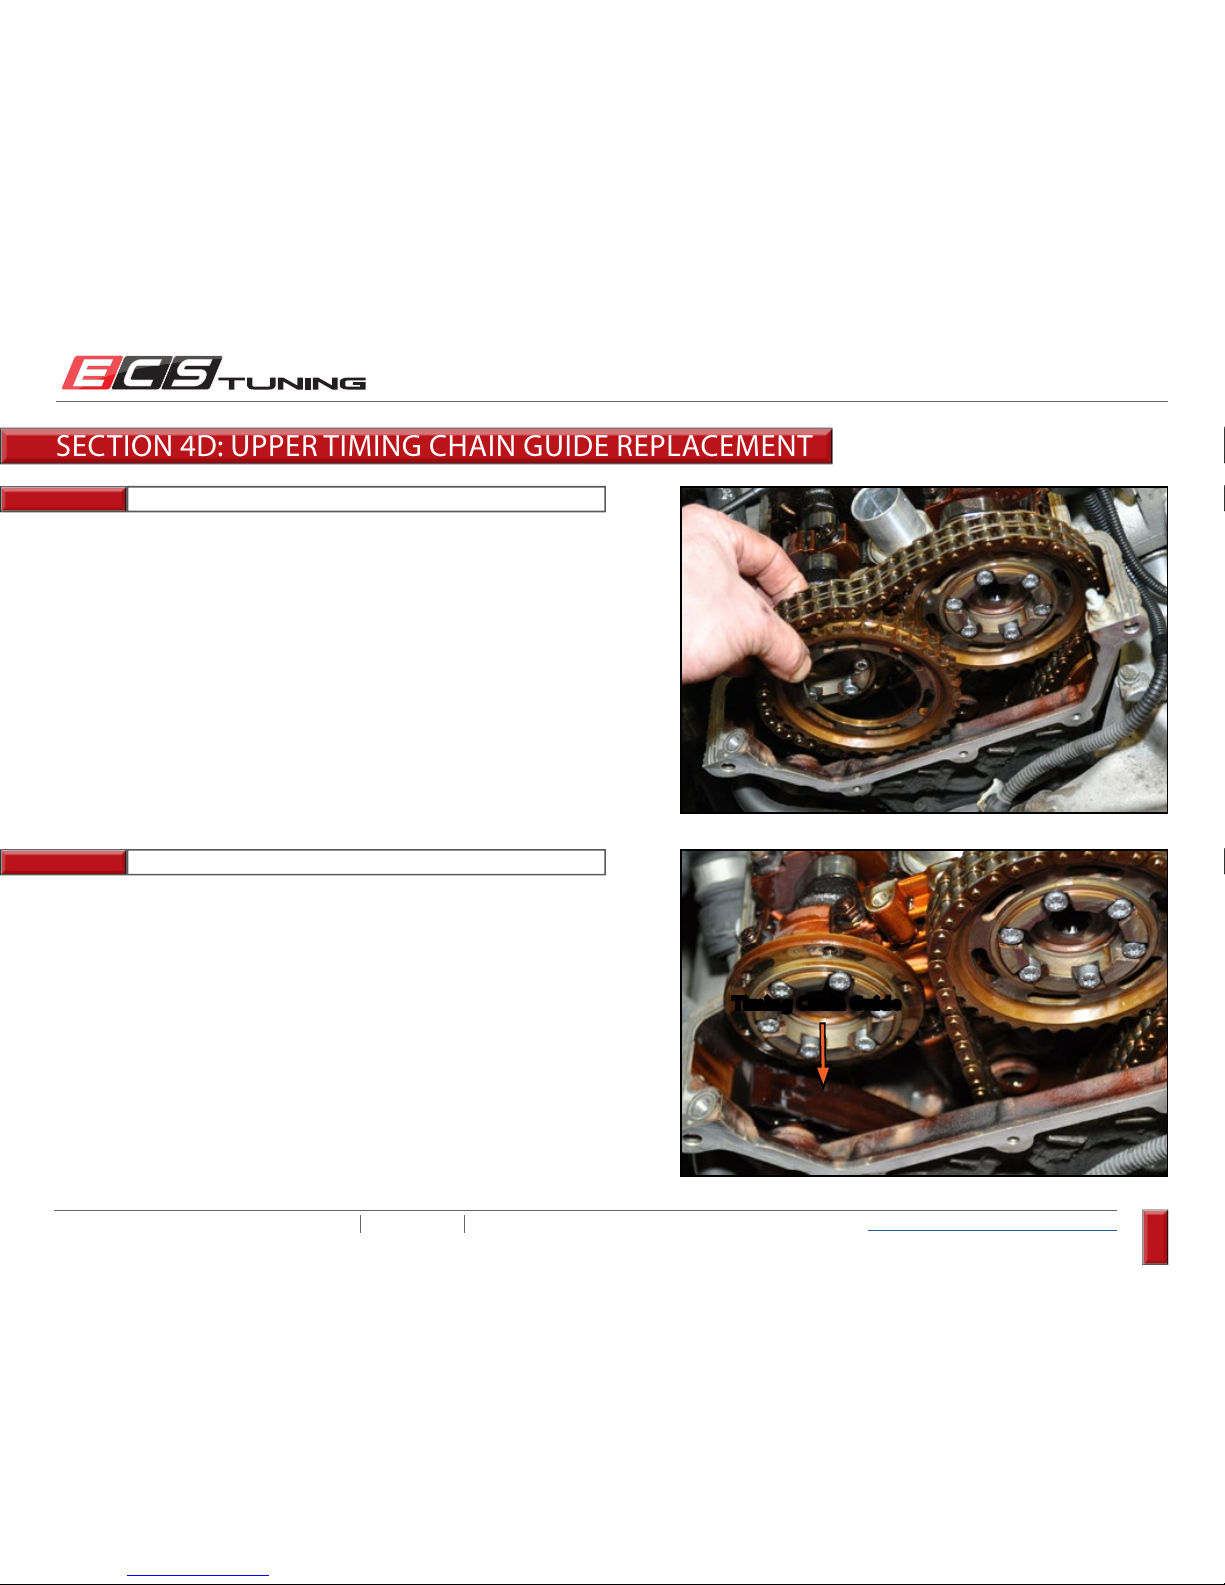
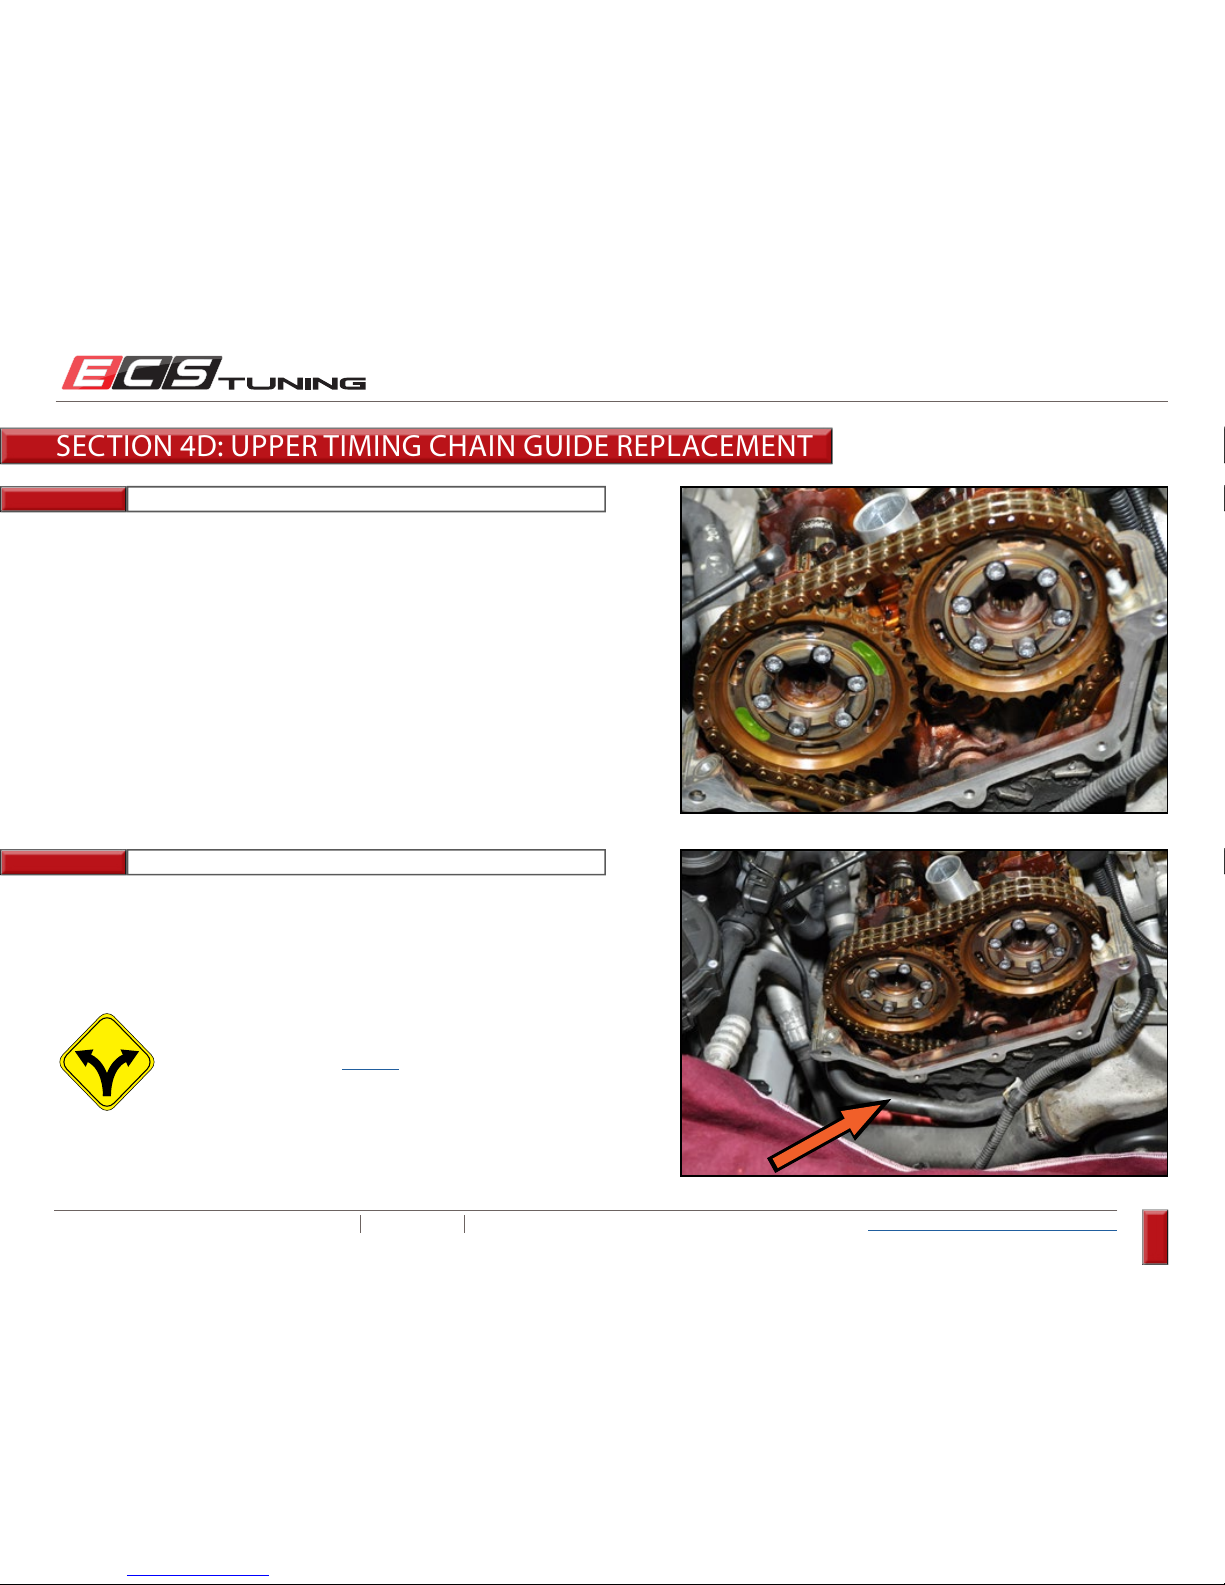
Slide the exhaust cam sprocket forward off the cam sprocket hub, then
remove it from the chain.
Allow the chain to hang over the intake sprocket so it is out of the way of
the timing chain guide.
Timing Chain Guide
SECTION 4D: UPPER TIMING CHAIN GUIDE REPLACEMENT
Page 82
ECS TUNING 1000 SEVILLE RD. WADSWORTH, OH 44281 1.800.924.5172 WWW.ECSTUNING.COM
82
BMW S54 DUAL VANOS REBUILD
®
Return to Vanos Repair Table of Contents
Step 5:
Step 6: 10mm Hex Bit (Allen) Socket, Ratchet
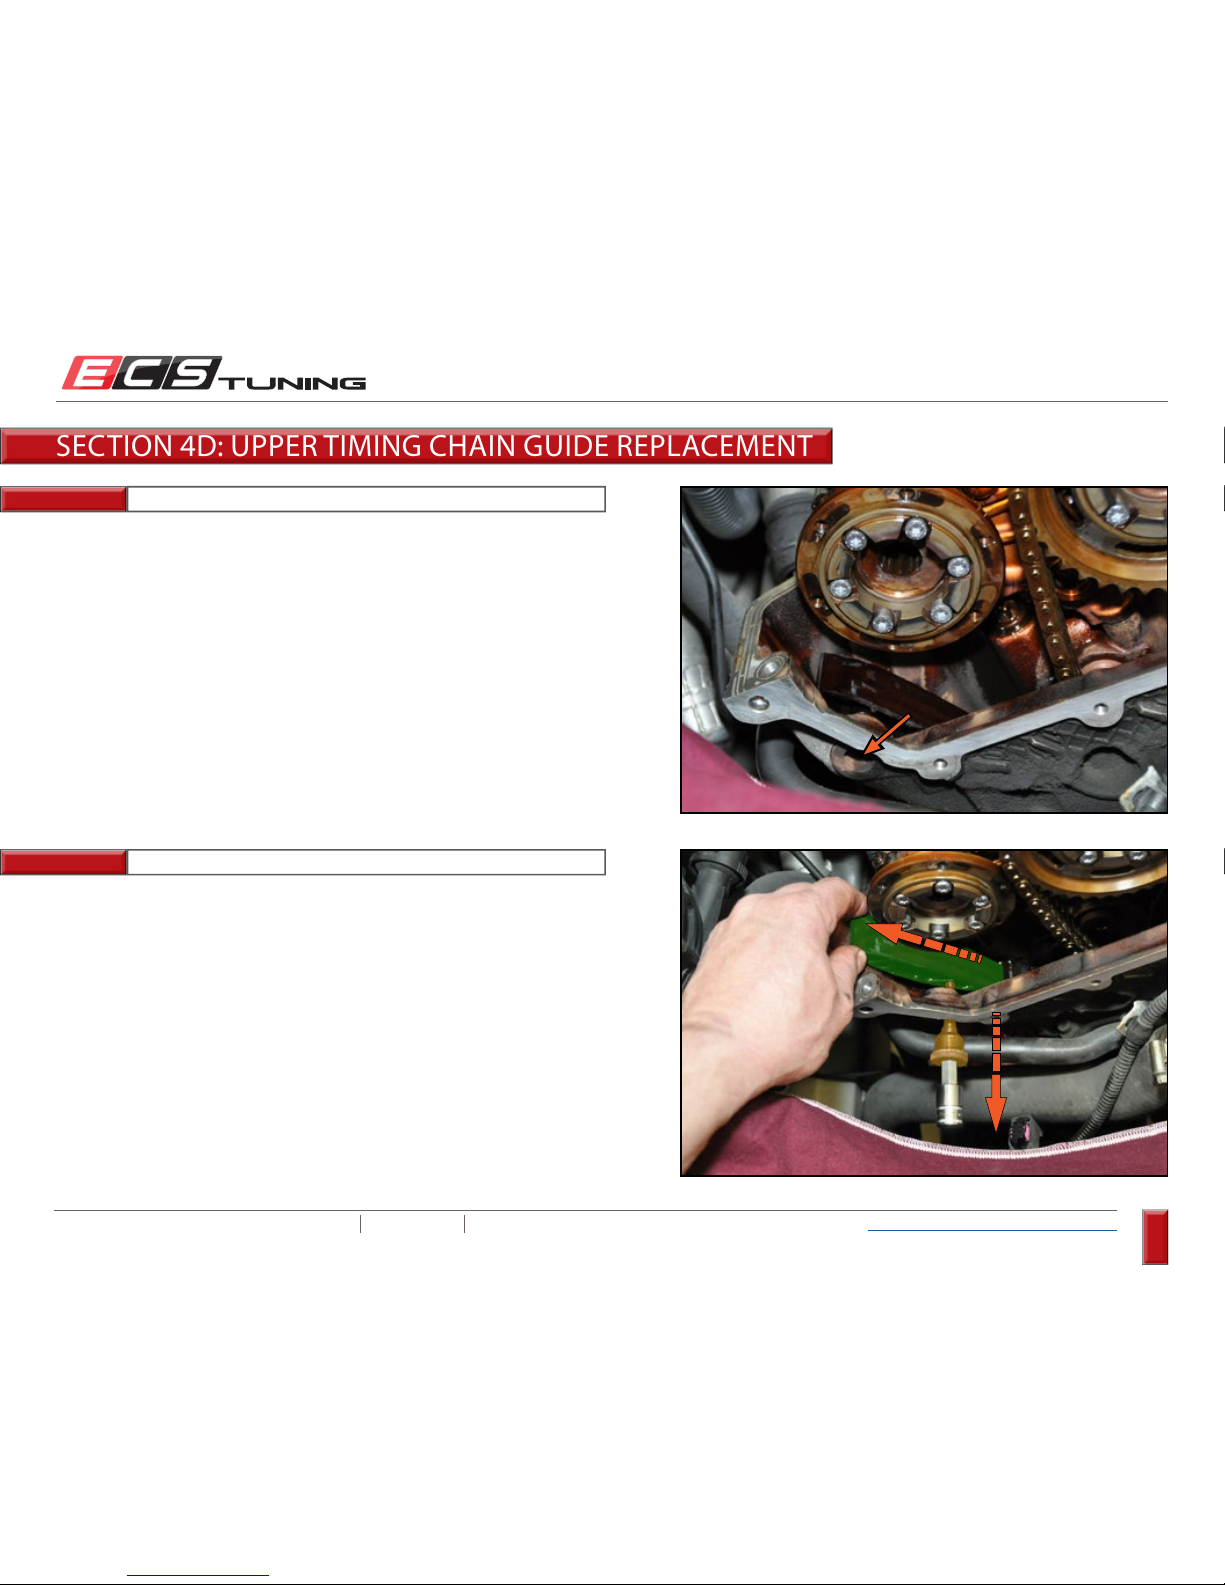
The upper timing chain guide bolt is located on the RH (Passenger) side
of the front timing cover, near the top where the Vanos piston housing is
mounted.
Loosen the upper timing chain guide bolt, then pull it part way out. Make
sure you get a good grip on the timing chain guide, then pull the bolt the
rest of the way out and remove the guide.
SECTION 4D: UPPER TIMING CHAIN GUIDE REPLACEMENT
Page 83
ECS TUNING 1000 SEVILLE RD. WADSWORTH, OH 44281 1.800.924.5172 WWW.ECSTUNING.COM
83
BMW S54 DUAL VANOS REBUILD
®
Return to Vanos Repair Table of Contents
Step 7:
Step 8:
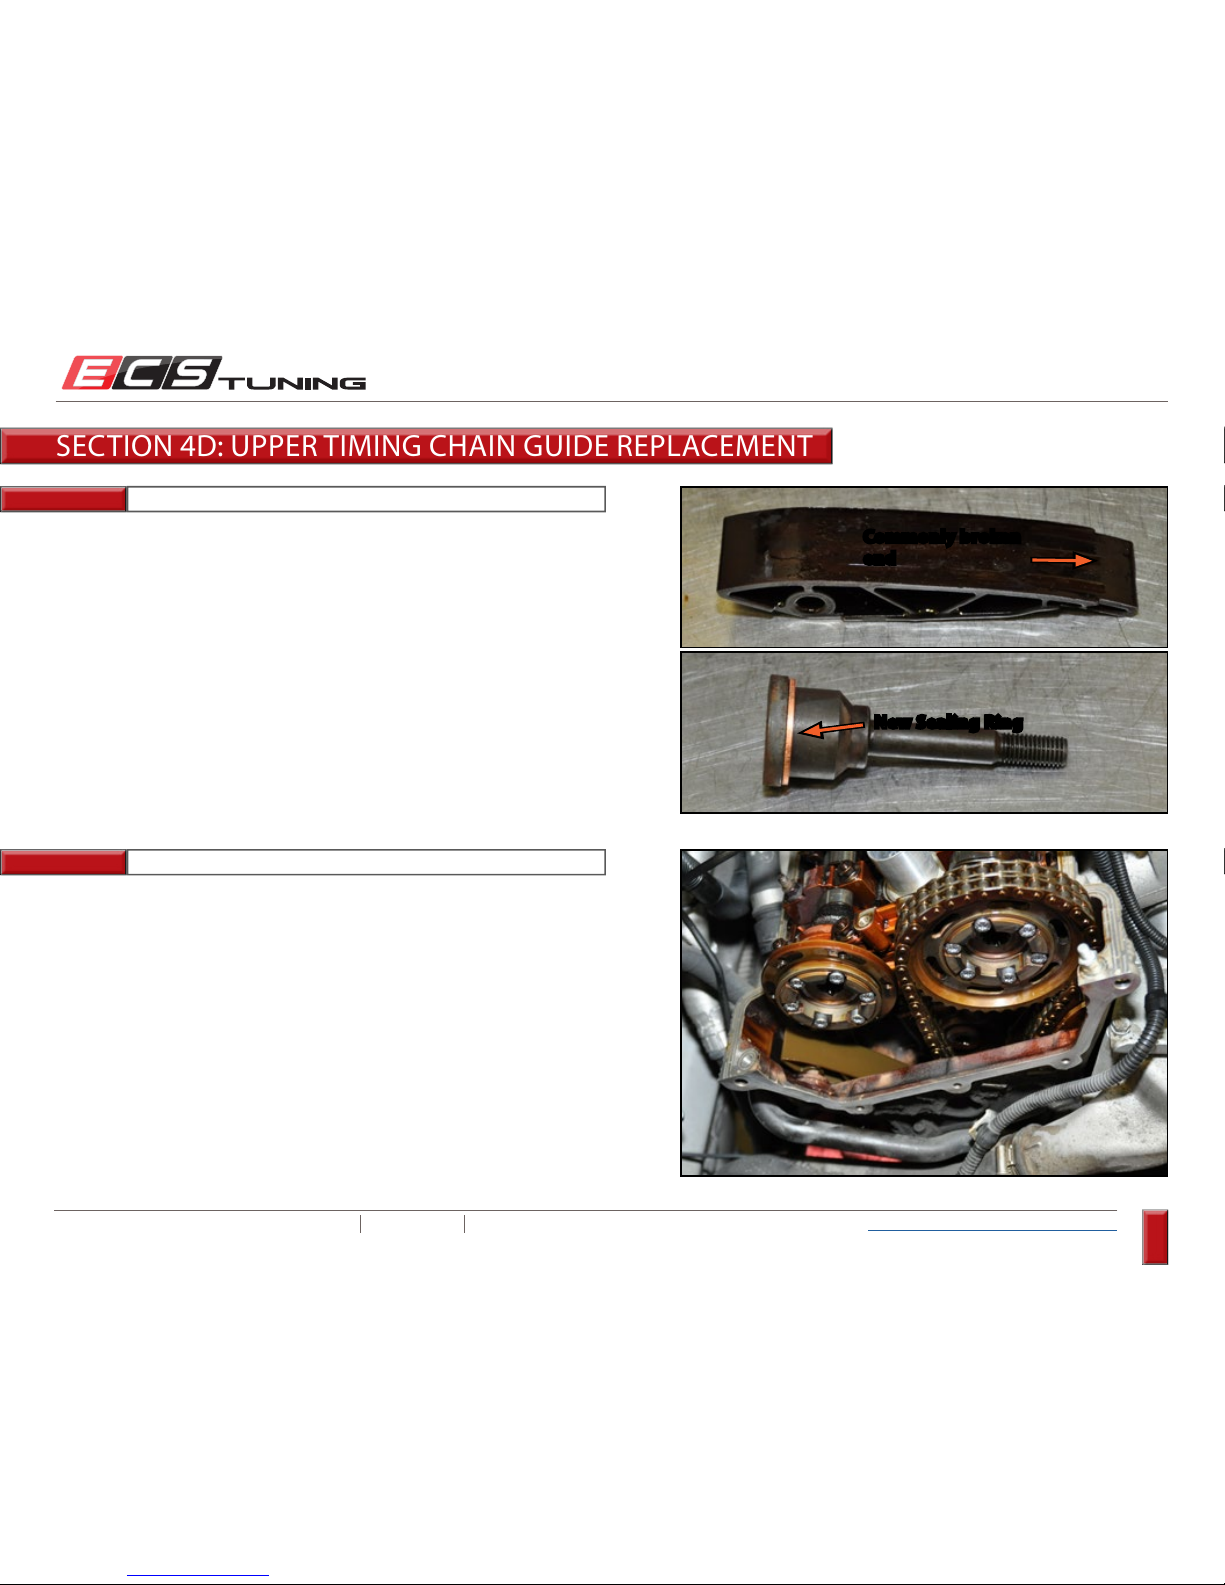
Inspect the original upper timing chain guide, and compare it to the new
one. It is common for the ends to crack or break, if yours is broken, make
sure you find and remove the broken piece.
Clean the timing chain guide bolt, remove the old sealing ring and install
the new one.
New Sealing Ring
Commonly broken
end
Lower the new Upper timing chain guide into place and install the guide
bolt. Torque the bolt to 24 Nm (18 Ft-lbs).
10mm Hex Bit (Allen) Socket, Torque Wrench
SECTION 4D: UPPER TIMING CHAIN GUIDE REPLACEMENT
Page 84
ECS TUNING 1000 SEVILLE RD. WADSWORTH, OH 44281 1.800.924.5172 WWW.ECSTUNING.COM
84
BMW S54 DUAL VANOS REBUILD
®
Return to Vanos Repair Table of Contents
Step 9:
Step 10: 32mm Deep Socket, Ratchet
Reinstall the timing chain onto the exhaust sprocket, then the sprocket
onto the exhaust hub. Precise positioning is not necessary, however
it is important to make sure that two of the bolt slots are located
approximately on the left and right as shown.
Proceed with step 6 on Pag e 74.
- End of Section 4d -
Reinstall the timing chain tensioner and once it is snug, tighten it
approximately an additional 1/2 turn to “crush” the sealing washer.
SECTION 4D: UPPER TIMING CHAIN GUIDE REPLACEMENT
Page 85
ECS TUNING 1000 SEVILLE RD. WADSWORTH, OH 44281 1.800.924.5172 WWW.ECSTUNING.COM
85
BMW S54 DUAL VANOS REBUILD
®
Return to Vanos Repair Table of Contents
SECTION 5A: REASSEMBLY REQUIRED PARTS
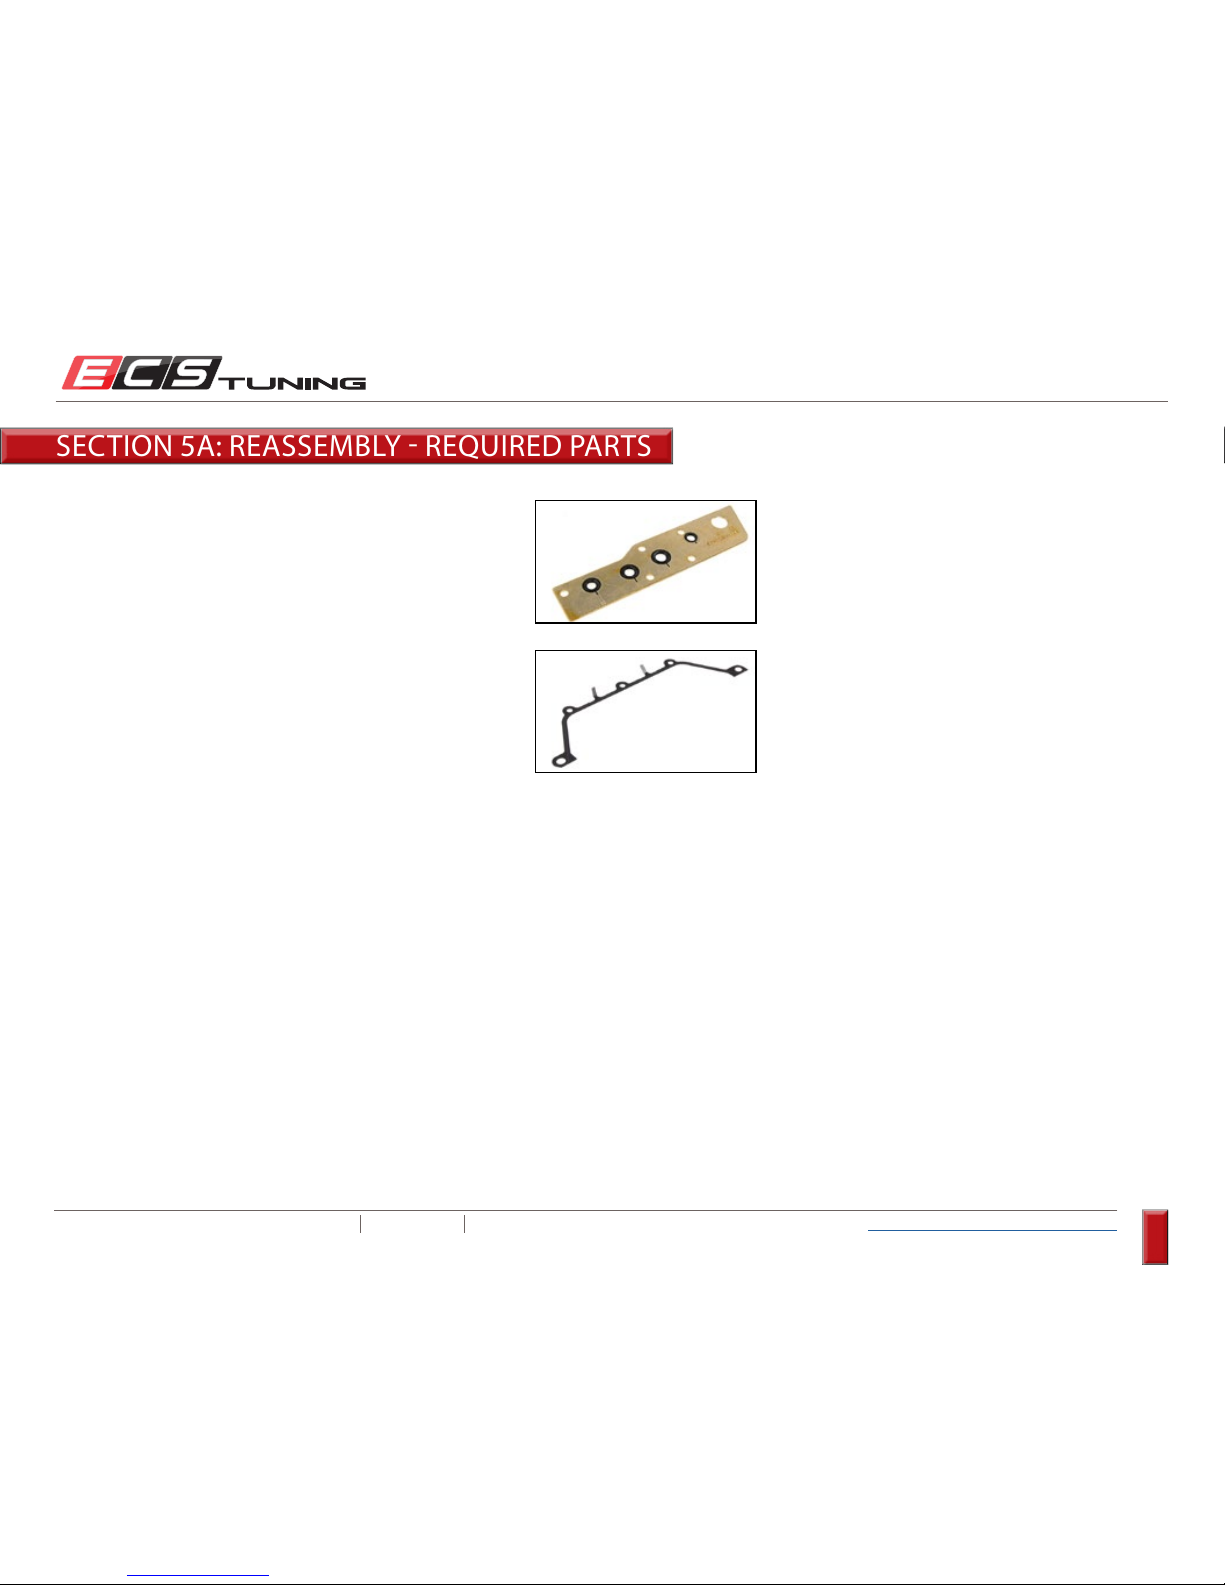
ES#23224
Description...............Vanos Valve Block Sealing Plate
Location .................... Between Coil Pack and Valve Block
Quantity .................... 1
ES#2702388
Description...............Piston Housing Gasket
Location .................... Between Piston Housing and Cyl Head
Quantity .................... 1
Page 86
ECS TUNING 1000 SEVILLE RD. WADSWORTH, OH 44281 1.800.924.5172 WWW.ECSTUNING.COM
86
BMW S54 DUAL VANOS REBUILD
®
Return to Vanos Repair Table of Contents
Step 1:
Step 2:
On the intake, or “E” side, insert the dowel pin through the alignment
bridge and into the hole in the camshaft. Move the camshaft back and
forth as necessary using a 24mm wrench in order to align the pin. Once
the pin is fully inserted, rotate the cam as required until the camshaft
bridge sits flat against the cylinder head.
SECTION 5A: REASSEMBLY
Make sure the engine is still at TDC and the crankshaft pulley is locked in
position with the crankshaft locking pin. View pages 18 through 22 for
reference.
NOTE
Place the camshaft alignment bridge onto the cylinder head between
cylinders 2 and 3. Note the two holes in the bridge that correspond with a
hole in each of the intake and exhaust camshafts.
Our Schwaben camshaft bridge, as well as many others, is
marked with the letter “E” for the intake side and “A” for the
exhaust side, abbreviating the German words. Make sure it
is installed properly.
A
E
Holes
Once the intake camshaft is aligned as described above, pull out the
dowel pin.
Page 87
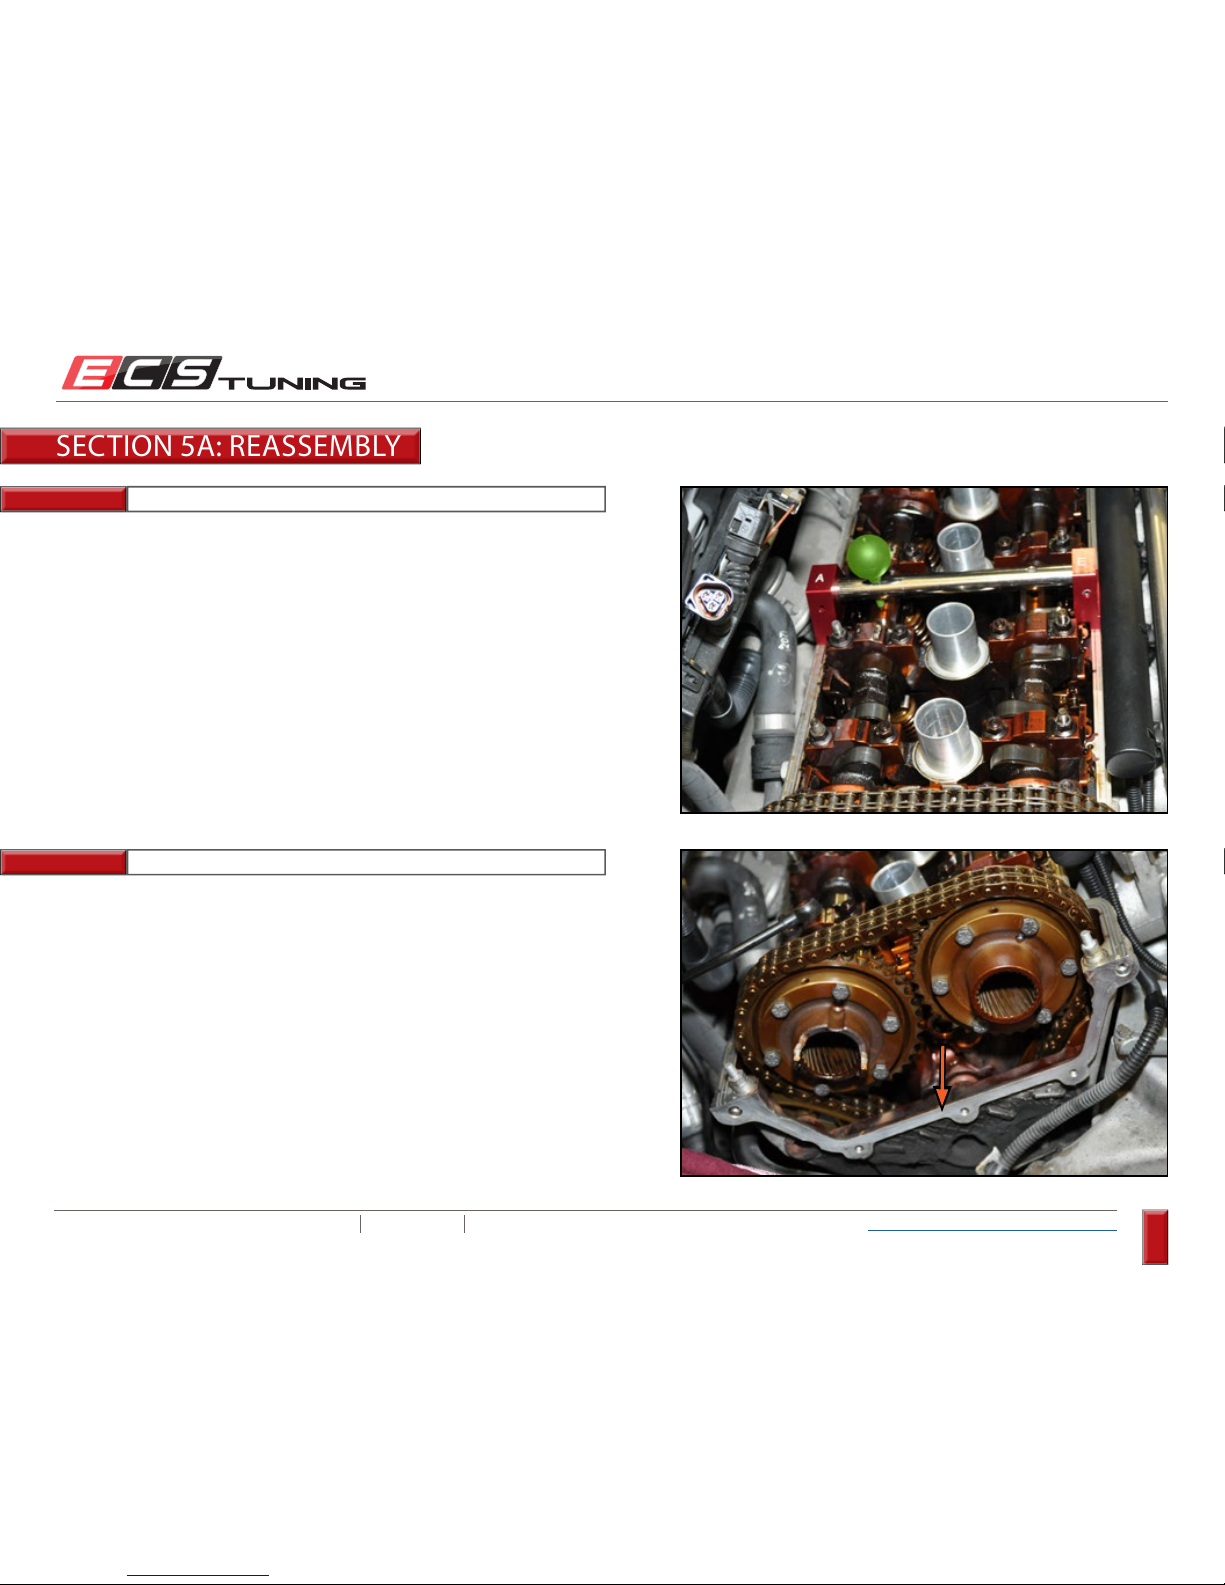
ECS TUNING 1000 SEVILLE RD. WADSWORTH, OH 44281 1.800.924.5172 WWW.ECSTUNING.COM
87
BMW S54 DUAL VANOS REBUILD
®
Return to Vanos Repair Table of Contents
Step 3:
Step 4:
Thoroughly clean the Vanos gasket surface on the front of the cylinder
head.
On the exhaust, or “A” side, Insert the dowel pin through the alignment
bridge and into the hole in the camshaft. Move the camshaft back and
forth as necessary using a 24mm wrench in order to align the pin. Once
the pin is fully inserted, rotate the cam as required until the camshaft
bridge sits flat against the cylinder head.
Once the exhaust camshaft is aligned as described above, pull out the
dowel pin and remove the camshaft bridge.
SECTION 5A: REASSEMBLY
Page 88
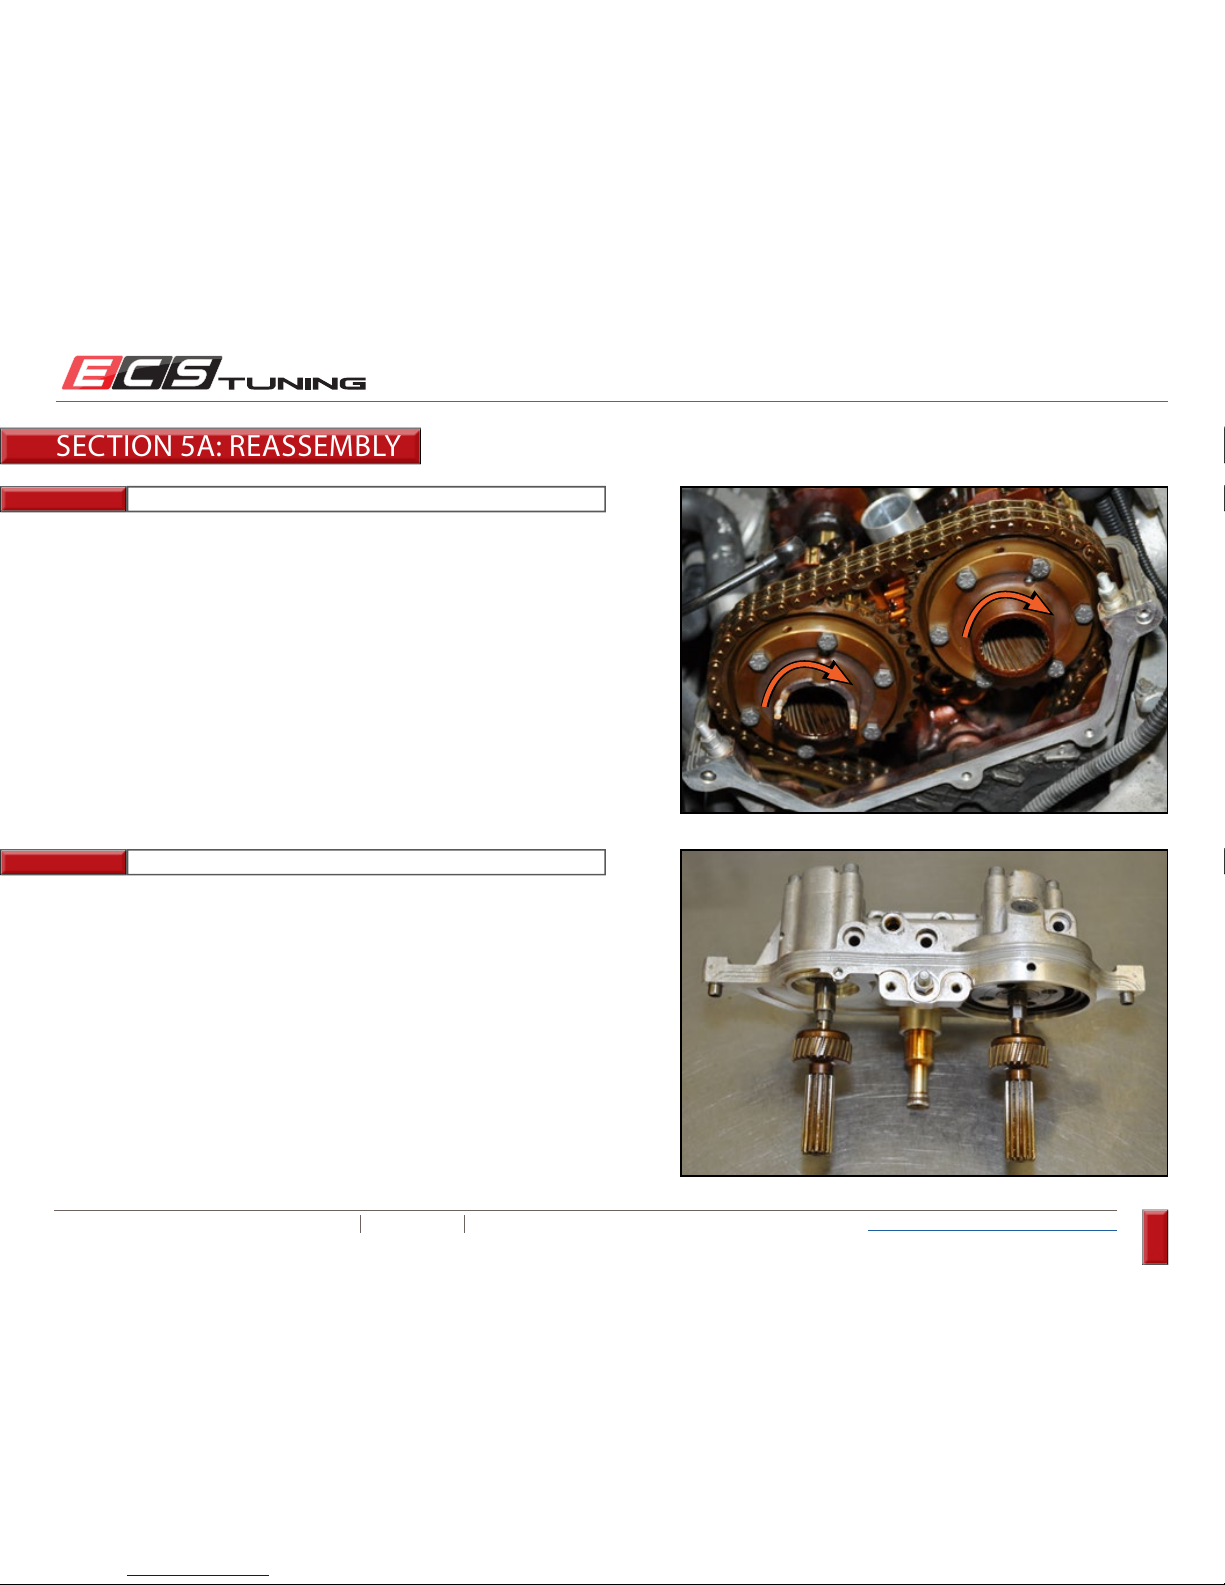
ECS TUNING 1000 SEVILLE RD. WADSWORTH, OH 44281 1.800.924.5172 WWW.ECSTUNING.COM
88
BMW S54 DUAL VANOS REBUILD
®
Return to Vanos Repair Table of Contents
Step 5:
Step 6: 7mm, 10mm Open End Wrench
Rotate the intake and exhaust Vanos hubs by hand in a clockwise direction
as far as they will go. The bolts should only be hand tight and the hubs
should rotate easily. Loosen the bolts a few turns if necessary.
Install both transfer gears onto the Vanos pistons, paying attention to the
following points:
1) Be sure to install the exhaust transfer gear (with the longer shaft) on the
exhaust side (with the oil pump rotor).
2) The thread is reverse thread.
3) Tighten them by hand and be careful not to over tighten them. Due to
the left hand thread, they do no need to be excessively tightened.
SECTION 5A: REASSEMBLY
Page 89
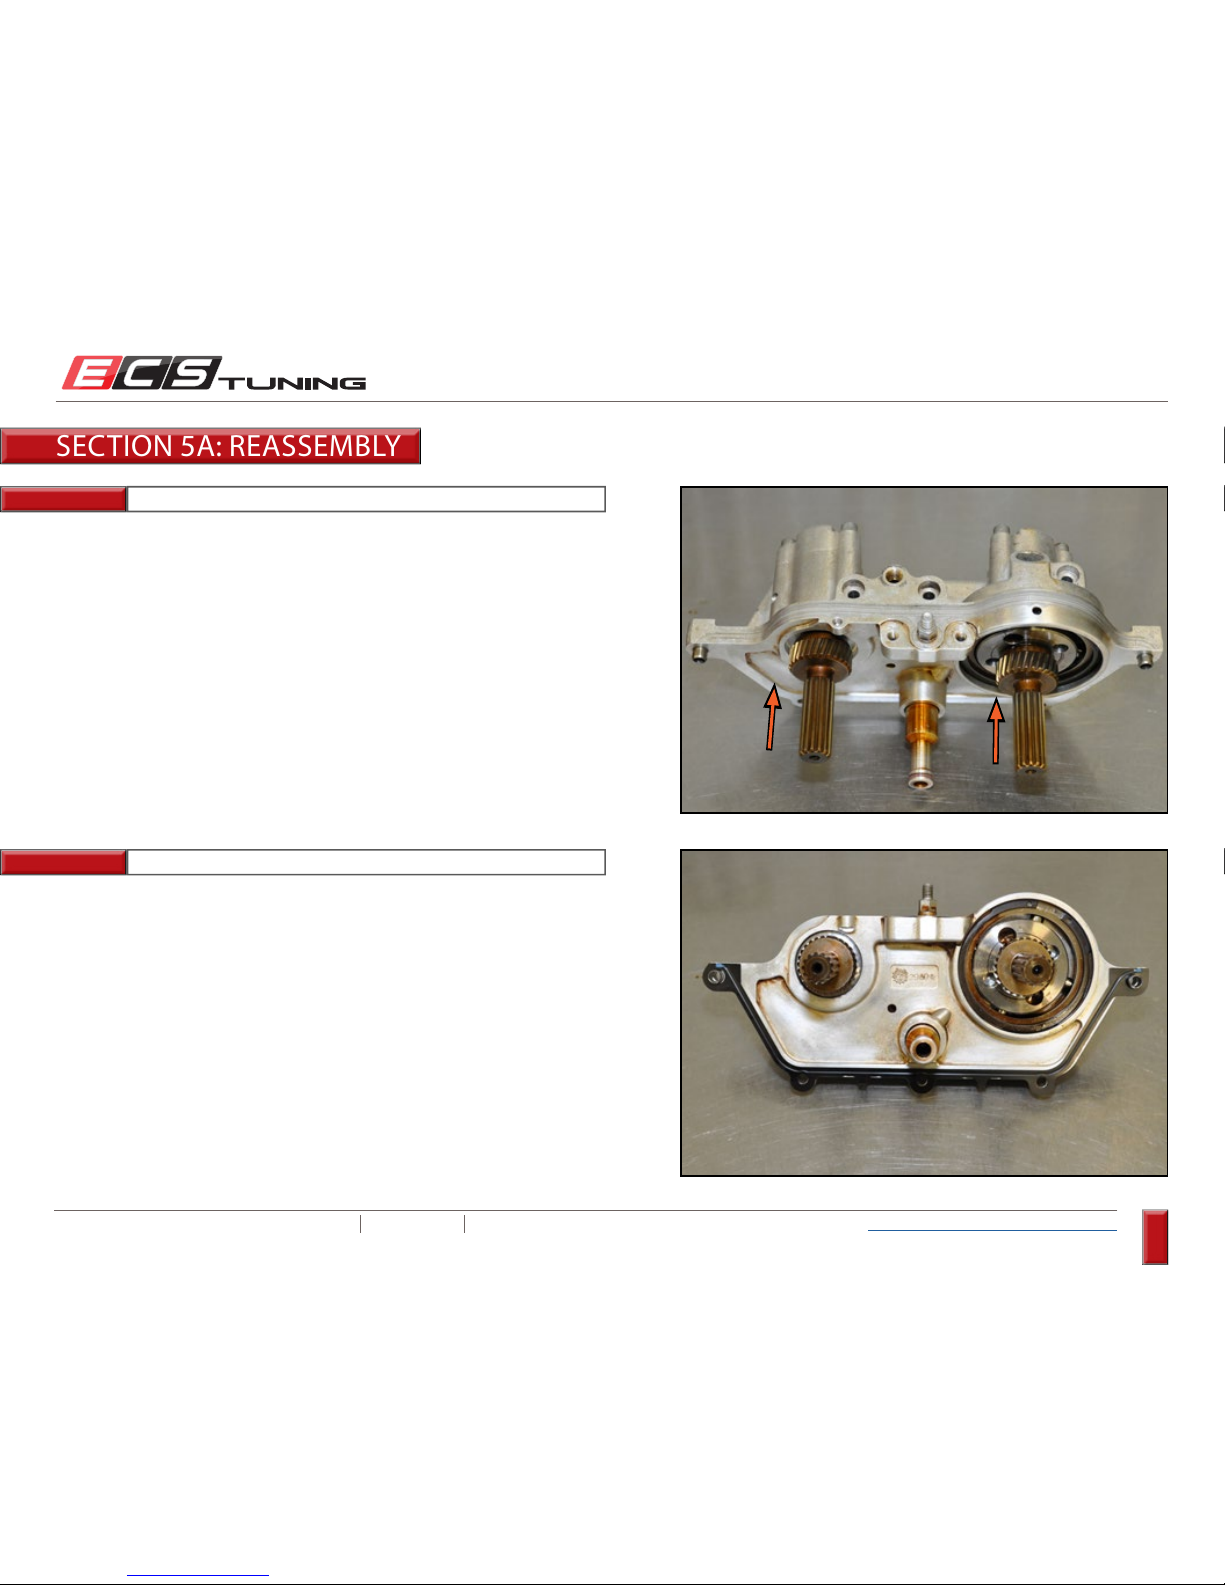
ECS TUNING 1000 SEVILLE RD. WADSWORTH, OH 44281 1.800.924.5172 WWW.ECSTUNING.COM
89
BMW S54 DUAL VANOS REBUILD
®
Return to Vanos Repair Table of Contents
Step 7:
Step 8:
Push the vanos pistons all the way into the housing.
Install the new piston housing gasket into place. Here we have placed it
onto the piston housing. The dowels will hold it in place. You may find
that the dowels have remained in the cylinder head and you can install
the gasket there instead. It works either way. If you have a preference,
you can move the dowels from one component to the other - your call.
SECTION 5A: REASSEMBLY
Page 90
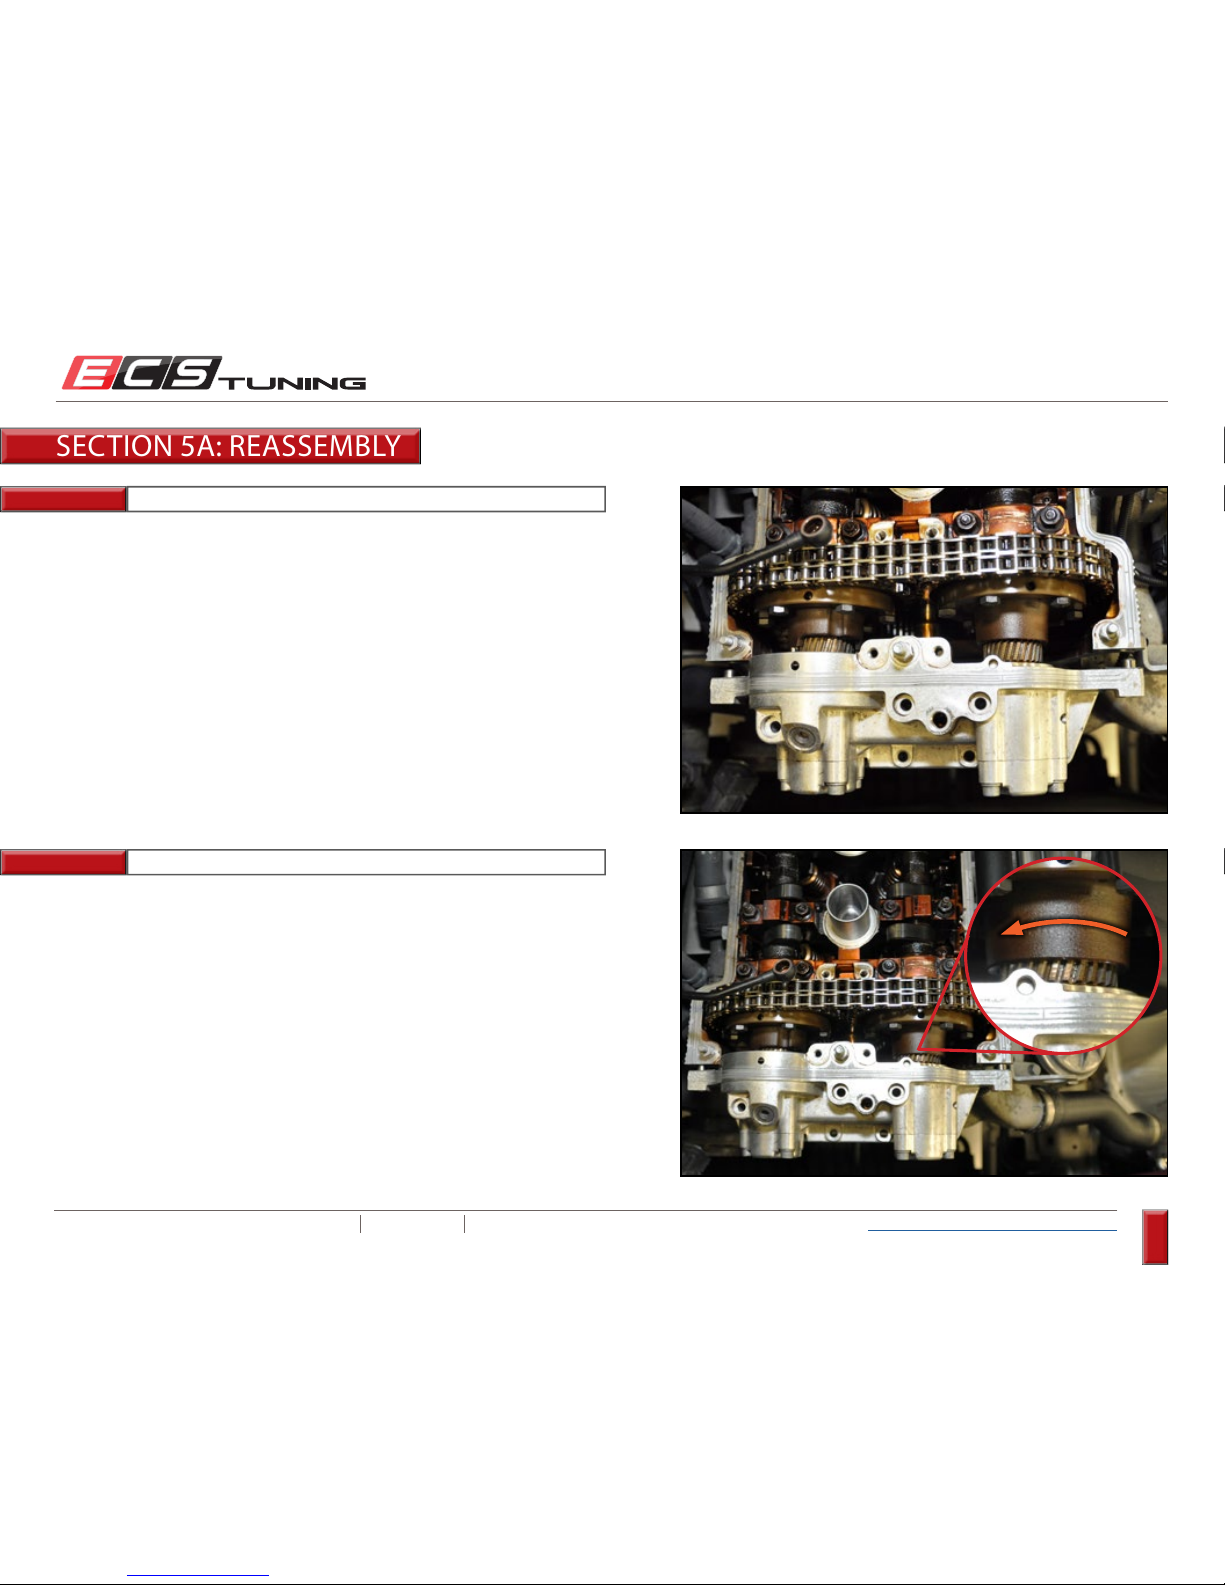
ECS TUNING 1000 SEVILLE RD. WADSWORTH, OH 44281 1.800.924.5172 WWW.ECSTUNING.COM
90
BMW S54 DUAL VANOS REBUILD
®
Return to Vanos Repair Table of Contents
Step 9:
Step 10:
Align the straight splines on each transfer gear with the splines in the
center of each camshaft, then slide the piston housing inward until the
angled splines meet the end of the vanos hubs.
Rotate each Vanos hub just slightly counter-clockwise until the angled
splines line up, allowing the transfer gear to slide further into the hub.
Keep in mind the following points:
1) It will only take slight rotation of the hubs until the splines engage.
2) Once engaged, only push them in a short way, the oil pump rotor still
need to be aligned.
3) The Vanos hubs will rotate counter-clockwise as the transfer gears are
pushed in.
SECTION 5A: REASSEMBLY
Page 91
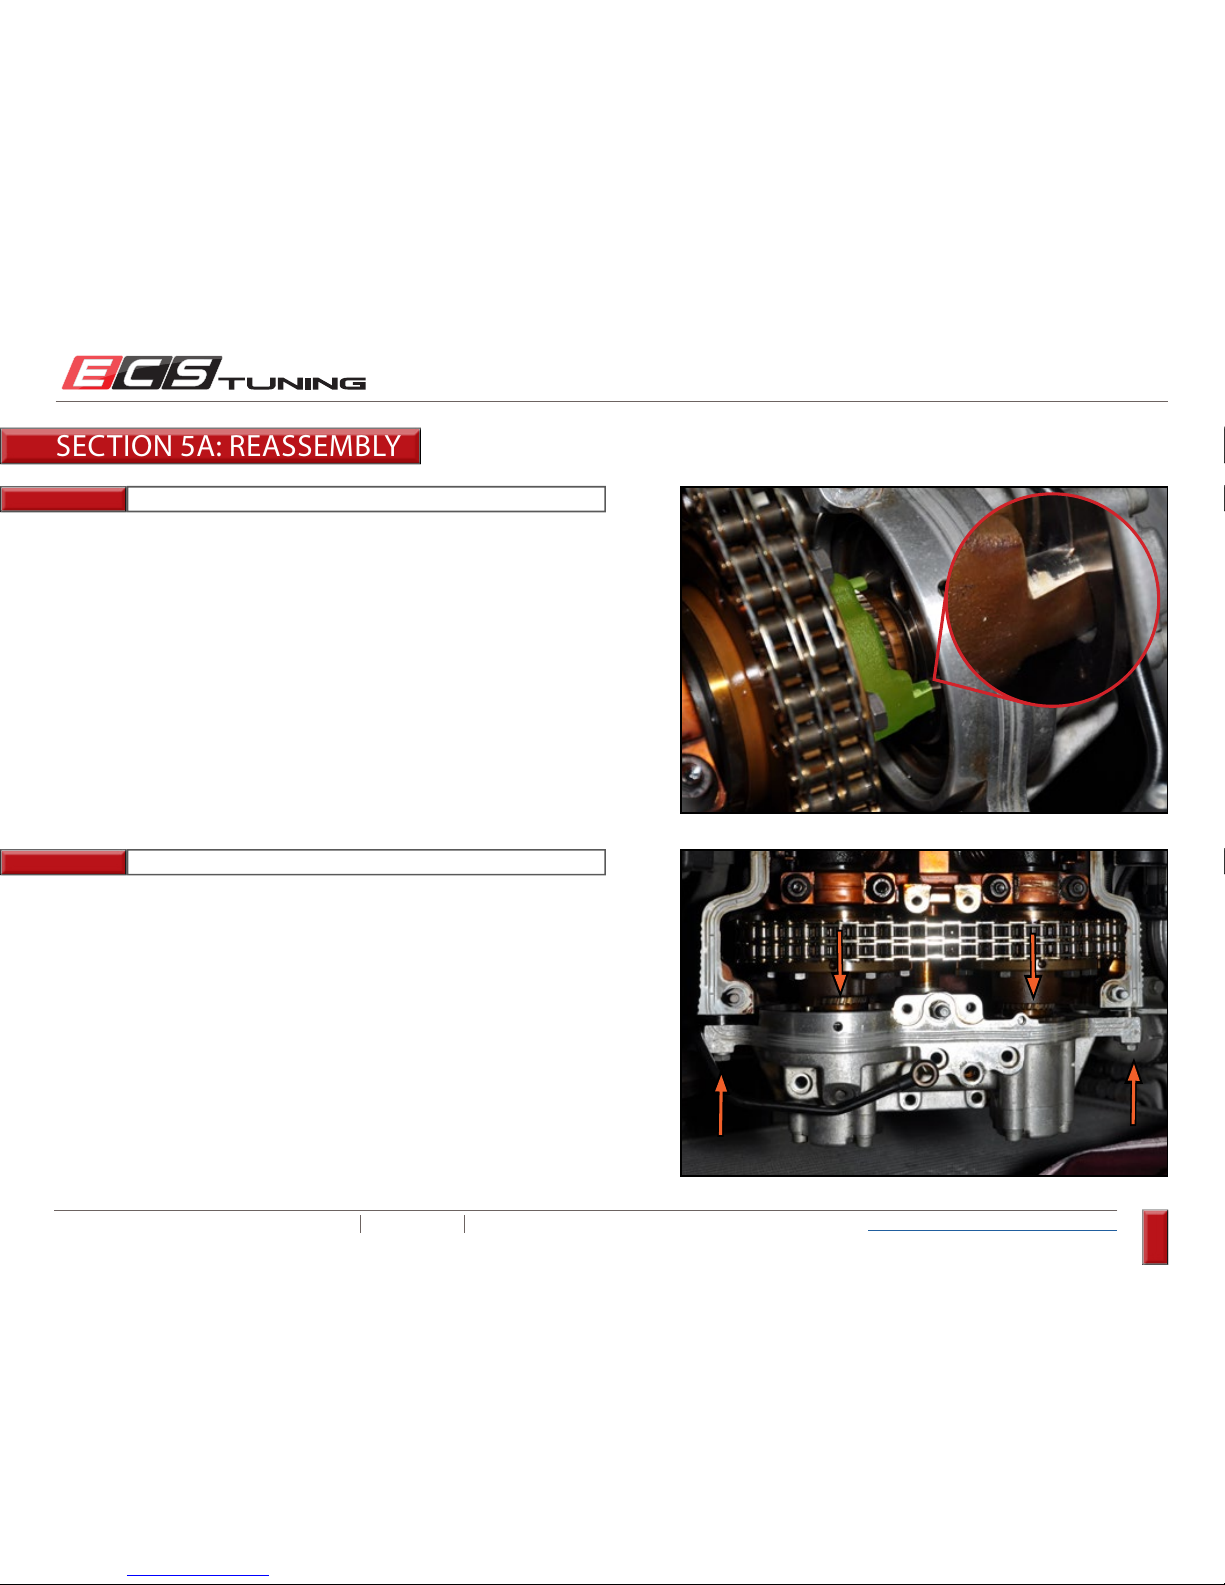
ECS TUNING 1000 SEVILLE RD. WADSWORTH, OH 44281 1.800.924.5172 WWW.ECSTUNING.COM
91
BMW S54 DUAL VANOS REBUILD
®
Return to Vanos Repair Table of Contents
Step 11:
Step 12:
Look between the Vanos piston housing and the exhaust cam and align
the oil pump drive tabs with the new (smaller) holes in the oil pump rotor.
Push the piston housing further in until it reaches the dowels, then
thread the top corner mounting bolts in just until they contact the piston
housing. Do not tighten them.
Confirm that the Vanos pistons are pushed all the way back into the
housing. Push them back in if necessary.
SECTION 5A: REASSEMBLY
Page 92
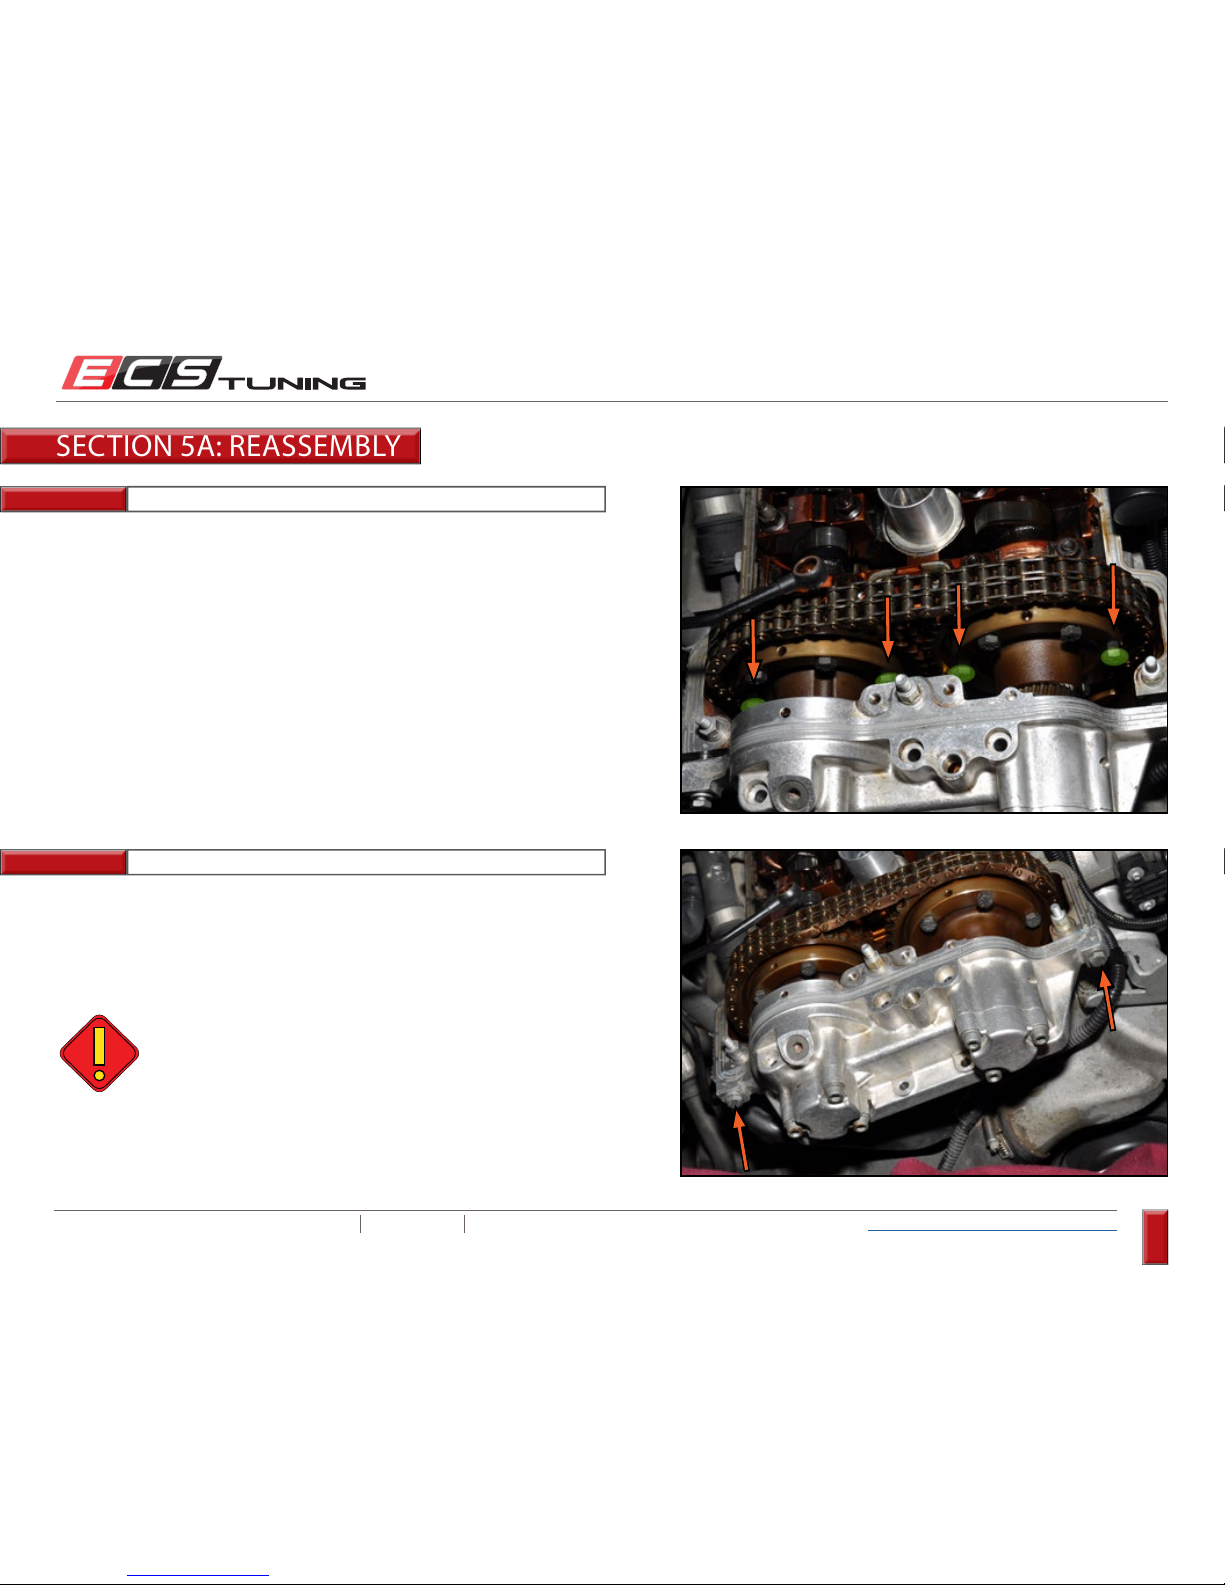
ECS TUNING 1000 SEVILLE RD. WADSWORTH, OH 44281 1.800.924.5172 WWW.ECSTUNING.COM
92
BMW S54 DUAL VANOS REBUILD
®
Return to Vanos Repair Table of Contents
Step 13:
Step 14:
10mm Wrench
10mm Socket, Ratchet
First, tighten the four side bolts (highlighted) evenly on the vanos hubs,
until they are fully seated.
Double check to make sure the gasket is still in place, then tighten the two
Vanos piston housing corner bolts evenly until the piston housing is fully
seated onto the cylinder head.
Next, loosen each of them ¼ turn.
The Vanos hubs will rotate, but the camshafts should
not rotate
when drawing the piston housing into place.
If the camshafts rotate, the bolts in step 13 are not loose
enough. You will have to remove the Vanos piston
housing w/transfer gears, reset the cam position, then
reinstall it, making sure the bolts are loose enough.
SECTION 5A: REASSEMBLY
Page 93
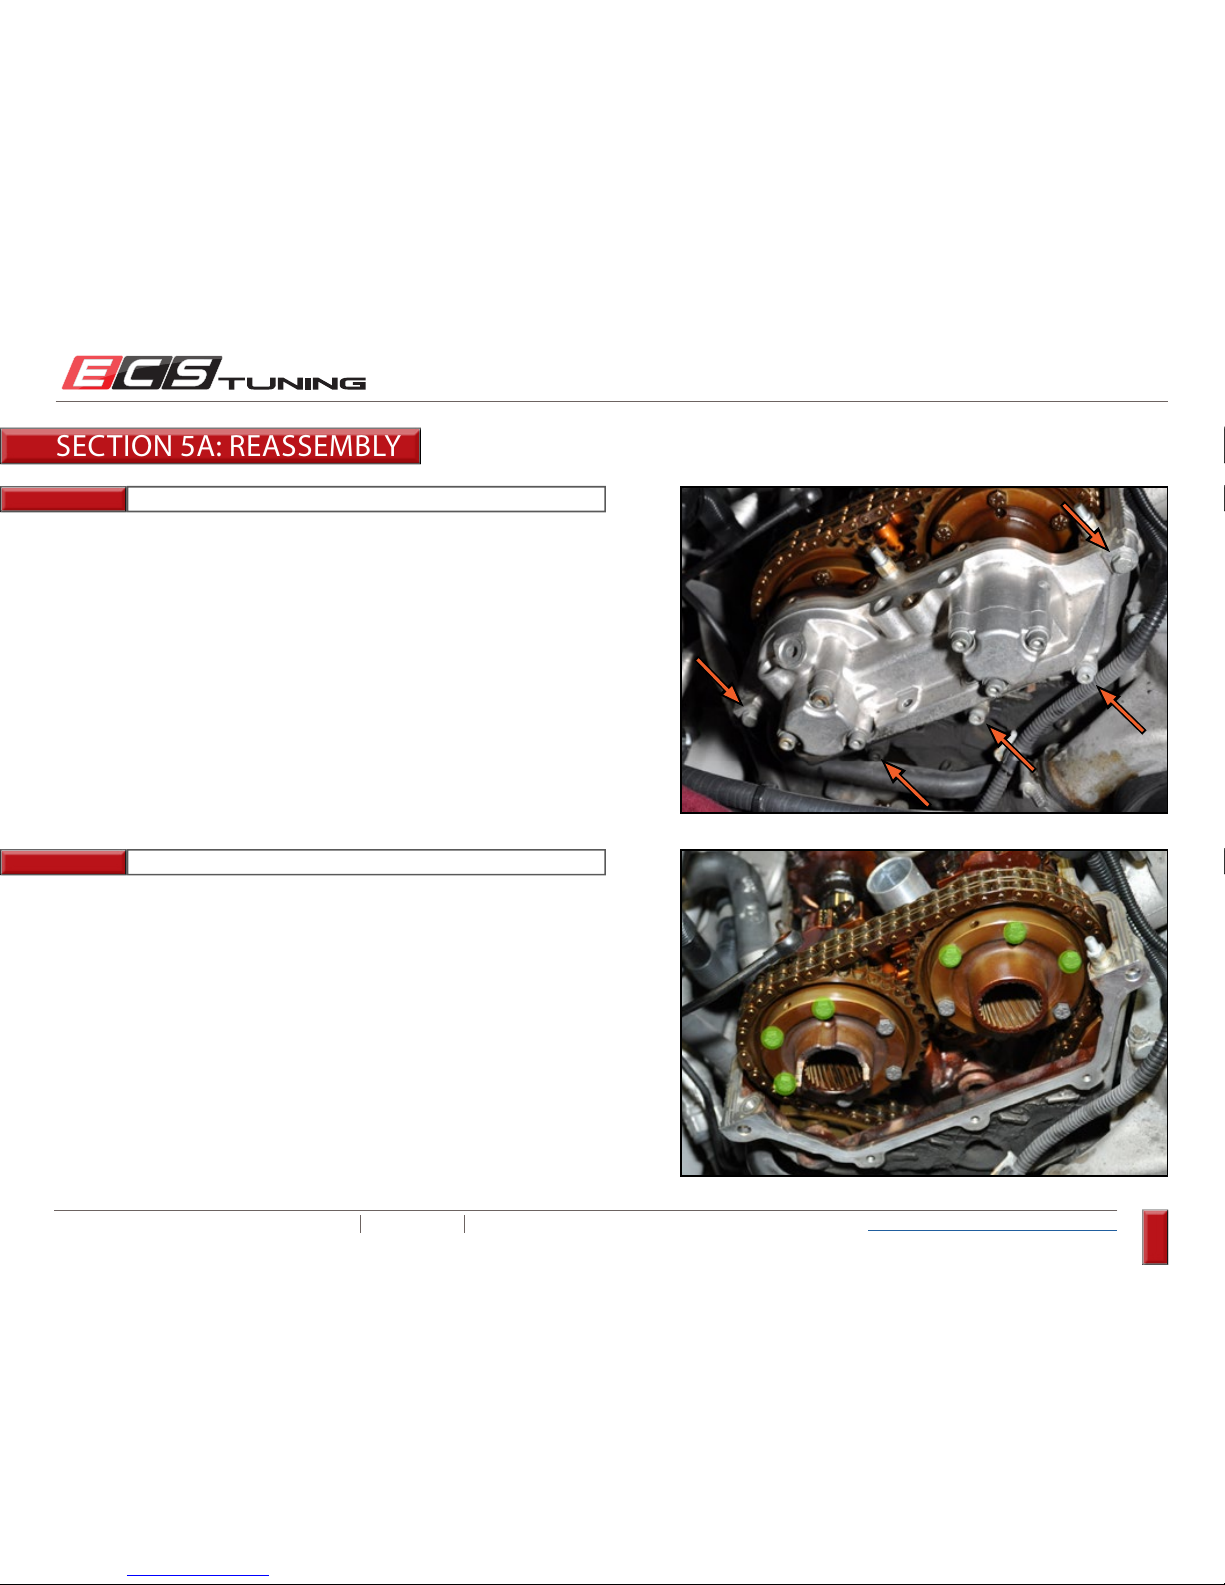
ECS TUNING 1000 SEVILLE RD. WADSWORTH, OH 44281 1.800.924.5172 WWW.ECSTUNING.COM
93
BMW S54 DUAL VANOS REBUILD
®
Return to Vanos Repair Table of Contents
Step 15:
Step 16:
5mm Allen, 10mm Socket, Torque Wrench
10mm Wrench
Install the lower three Vanos piston housing mounting bolts, then torque
them all to 10 Nm (7 Ft-lbs).
On the intake hub, evenly tighten the two upper and RH bolts
(highlighted), on the exhaust hub, evenly tighten the two upper and LH
bolts (highlighted). Note the following:
1) For clarity, the photo is shown without the piston housing installed.
2) Tighten the bolts only until they are snug.
SECTION 5A: REASSEMBLY
Page 94
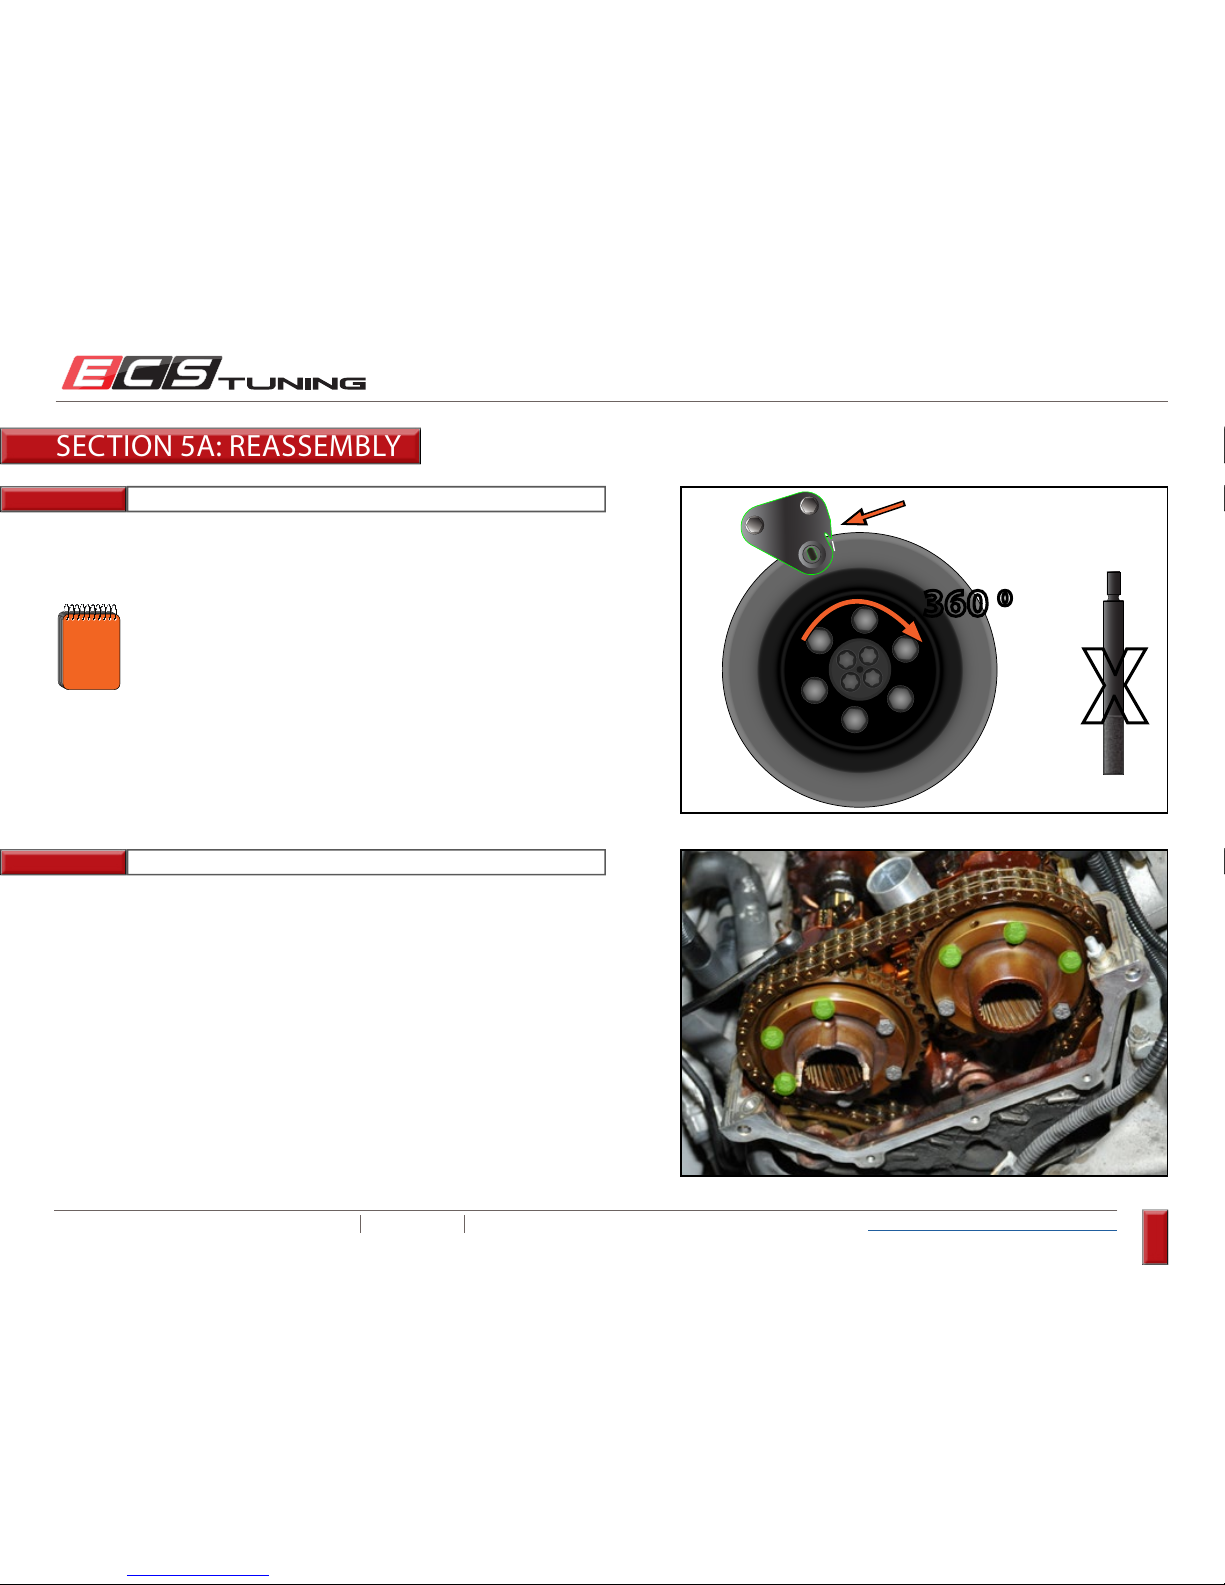
ECS TUNING 1000 SEVILLE RD. WADSWORTH, OH 44281 1.800.924.5172 WWW.ECSTUNING.COM
94
BMW S54 DUAL VANOS REBUILD
®
Return to Vanos Repair Table of Contents
Step 17:
Step 18:
32mm or Special Crank Socket, 1/2” Ratchet
Remove the crankshaft locking pin, then rotate the engine clockwise 360
degrees (one full rotation) and line up the TDC timing mark.
O T
X
360
1) For clarity, the photo is shown without the piston housing installed.
2) There is not enough room for a torque wrench, so you will have to
estimate the torque by feel.
On the intake hub, evenly tighten the two upper and RH bolts
(highlighted), on the exhaust hub, evenly tighten the two upper and
LH bolts (highlighted). Fully tighten these bolts to 14 Nm (10.5 Ft-lbs).
Note the following:
Do not reinstall the crankshaft locking pin.
NOTE
10mm Wrench
SECTION 5A: REASSEMBLY
Page 95
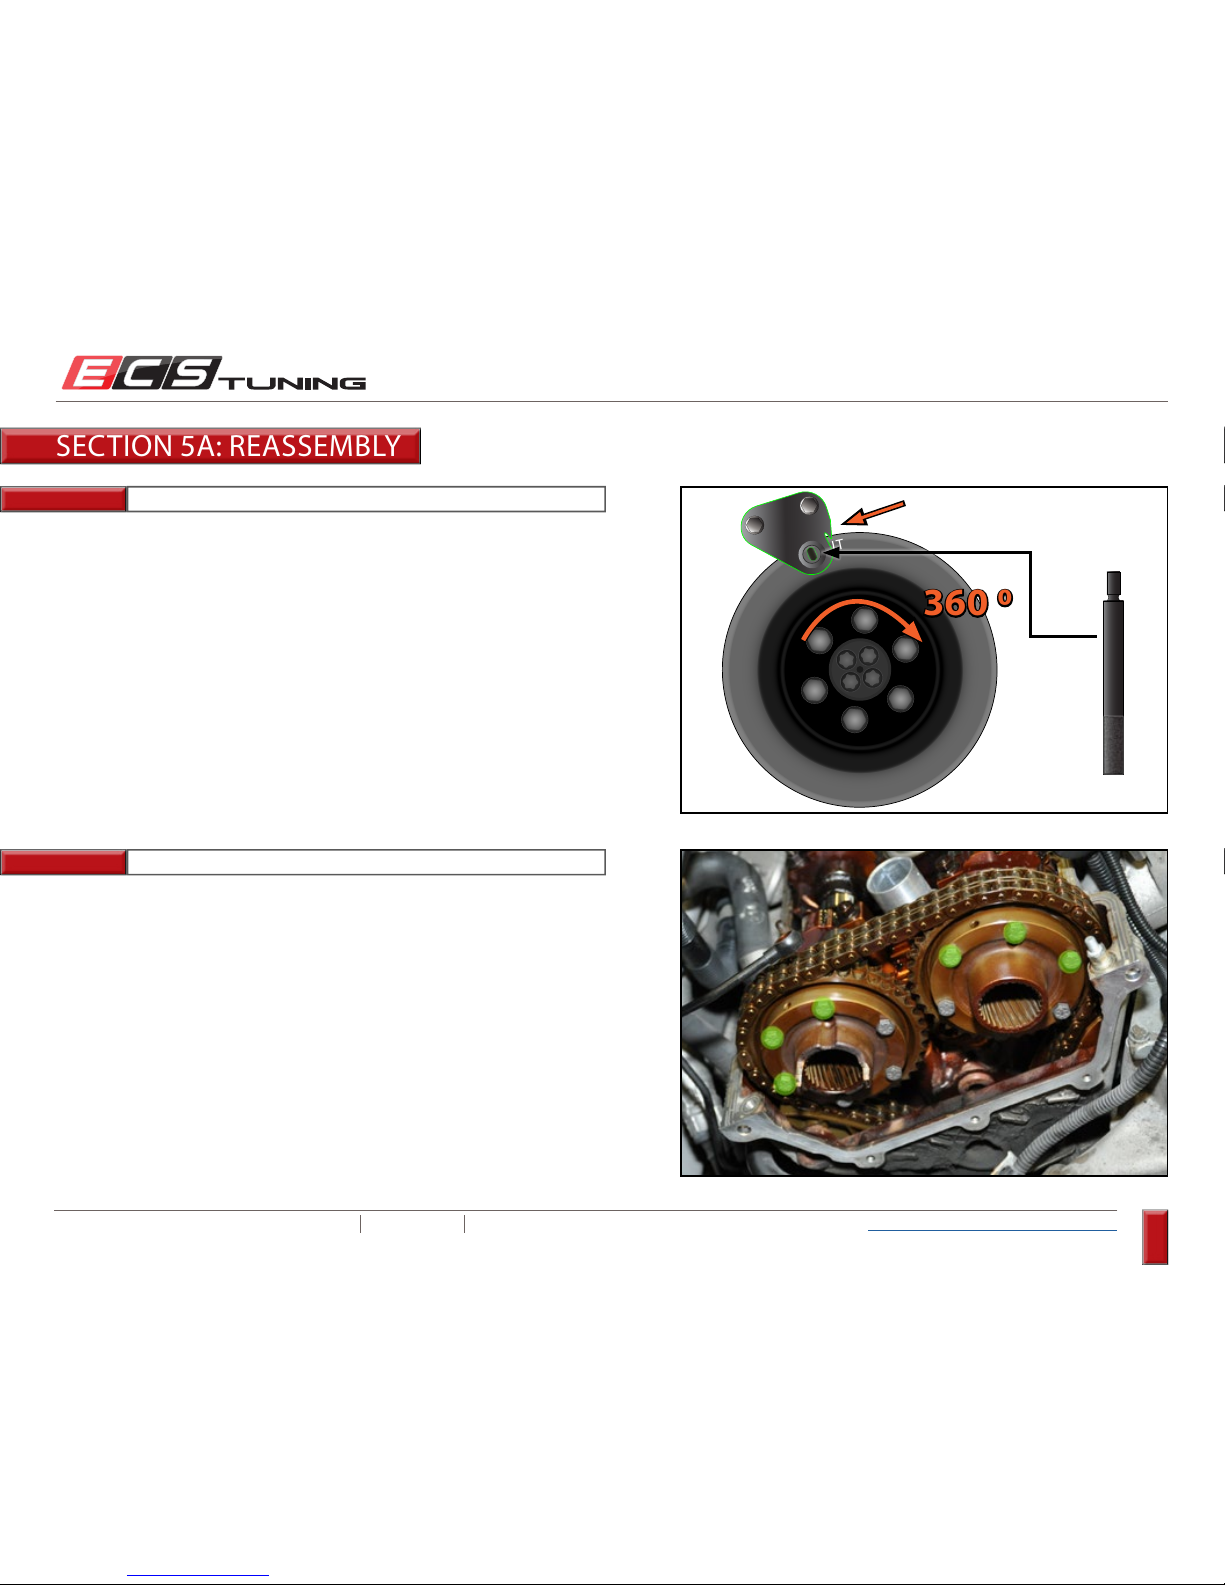
ECS TUNING 1000 SEVILLE RD. WADSWORTH, OH 44281 1.800.924.5172 WWW.ECSTUNING.COM
95
BMW S54 DUAL VANOS REBUILD
®
Return to Vanos Repair Table of Contents
Step 19:
Step 20:
Rotate the engine clockwise 360 degrees (one full rotation) and line up
the TDC timing mark.
O T
360
32mm or Special Crank Socket, 1/2” Ratchet
1) For clarity, the photo is shown without the piston housing installed.
2) There is not enough room for a torque wrench, so you will have to
estimate the torque by feel.
On the intake hub, fully tighten the two upper and RH bolts
(highlighted), on the exhaust hub, fully tighten the two upper and LH
bolts (highlighted) to 14 Nm (10.5 Ft-lbs). Note the following:
10mm Wrench
Reinstall the crankshaft locking pin.
SECTION 5A: REASSEMBLY
Page 96
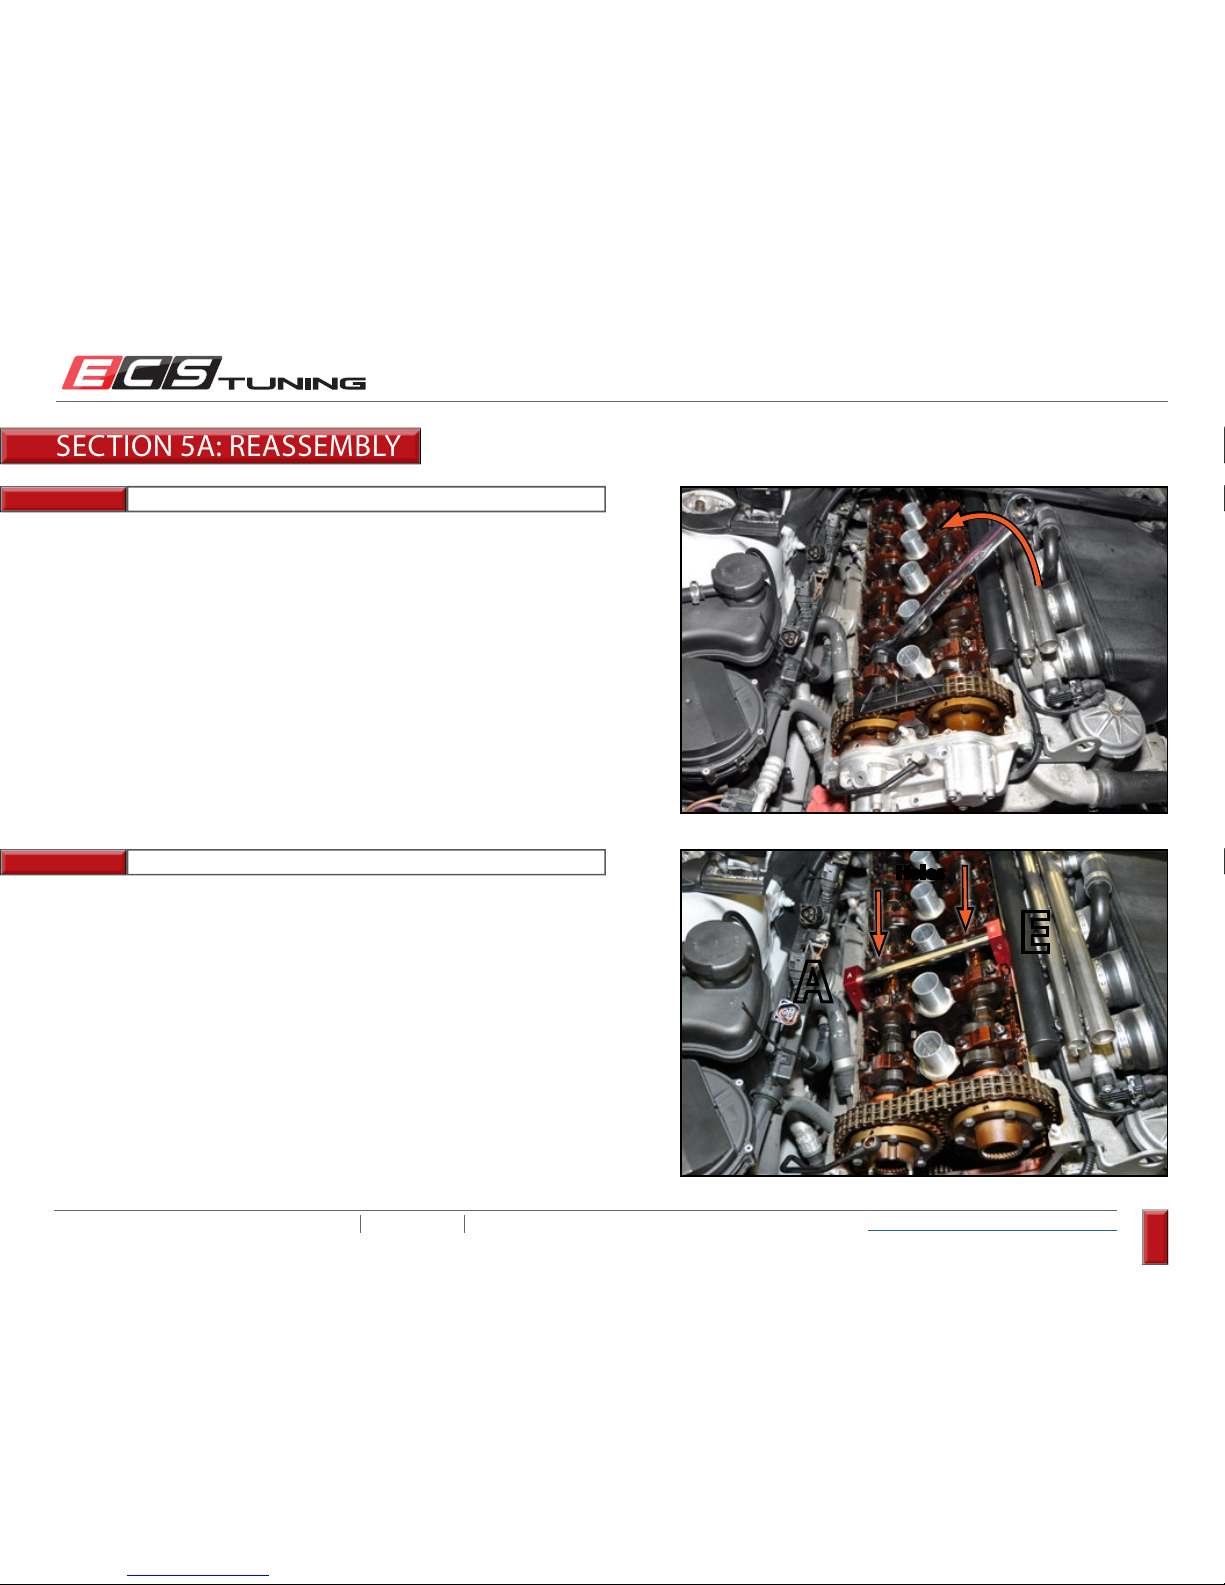
ECS TUNING 1000 SEVILLE RD. WADSWORTH, OH 44281 1.800.924.5172 WWW.ECSTUNING.COM
96
BMW S54 DUAL VANOS REBUILD
®
Return to Vanos Repair Table of Contents
Step 21:
Step 22:
Fully retard the intake and exhaust camshafts. Reference page 21 for
additional information.
Install the alignment bridge between cylinders 2 and 3 as you did before.
A
E
Holes
SECTION 5A: REASSEMBLY
Page 97
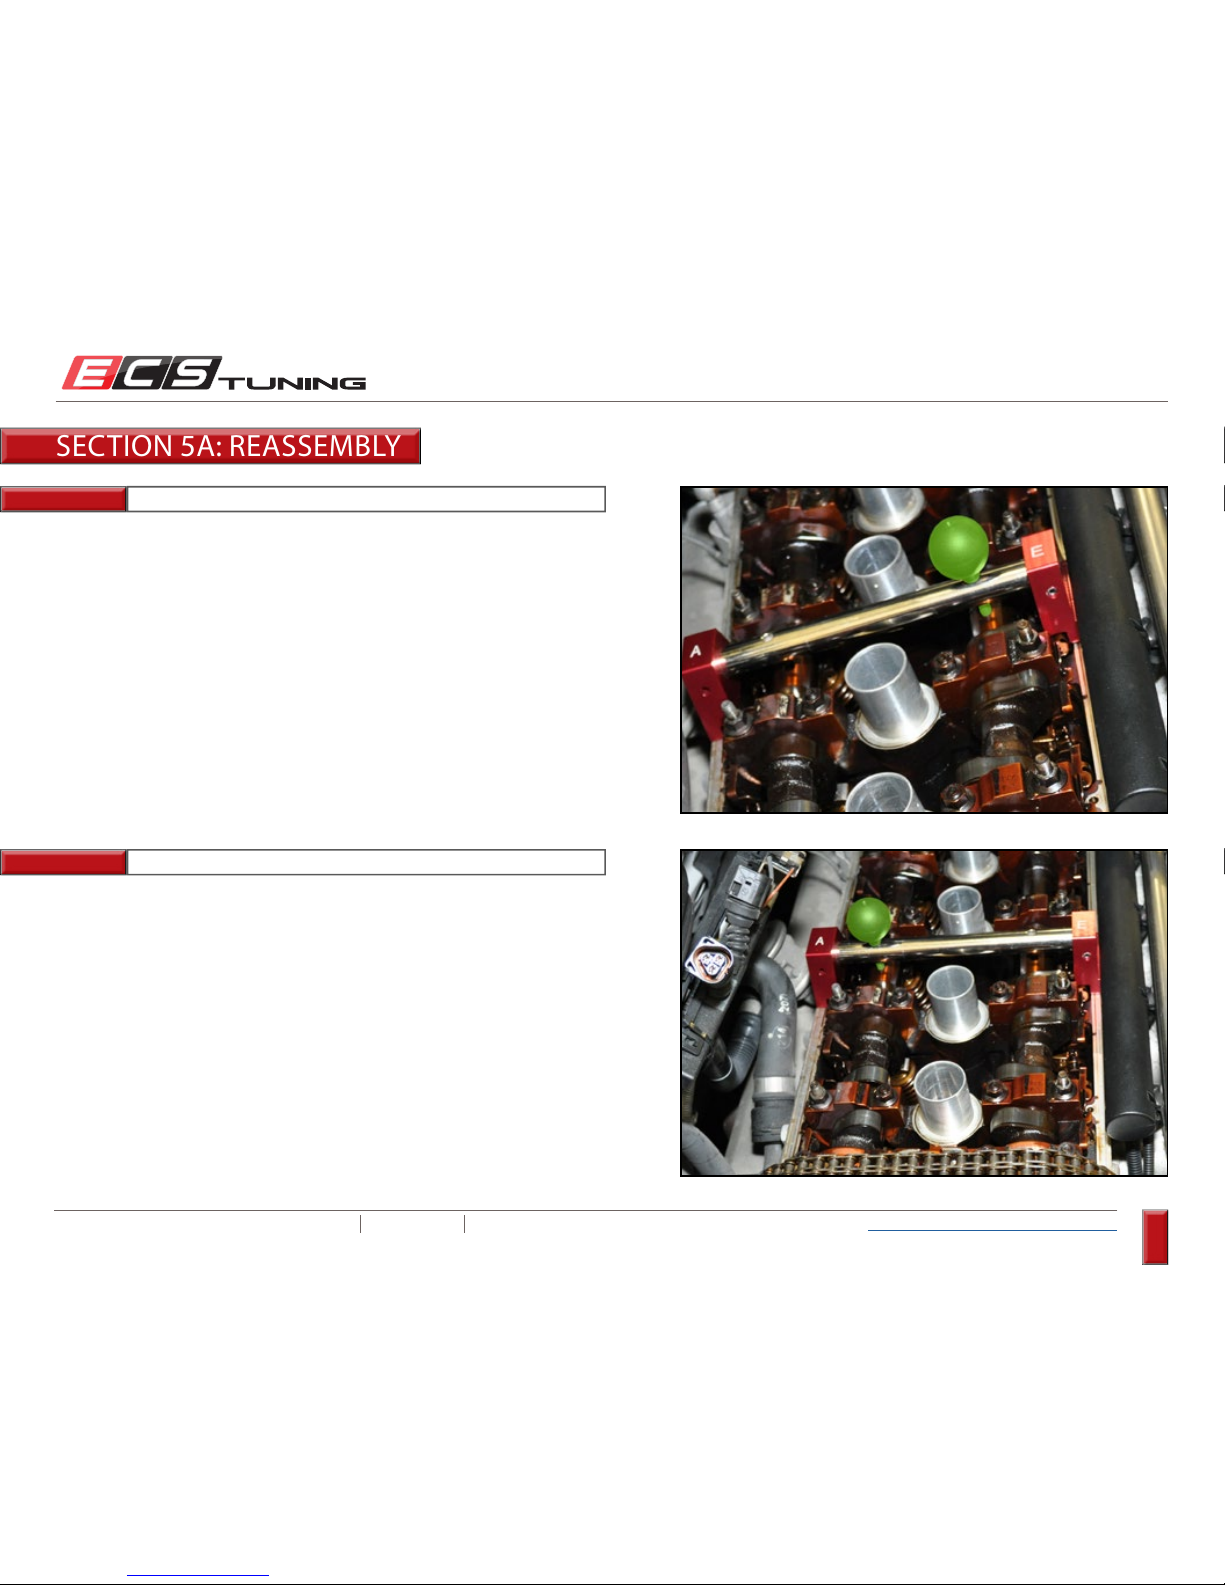
ECS TUNING 1000 SEVILLE RD. WADSWORTH, OH 44281 1.800.924.5172 WWW.ECSTUNING.COM
97
BMW S54 DUAL VANOS REBUILD
®
Return to Vanos Repair Table of Contents
Step 23:
Step 24:
Insert the alignment dowel through the bridge and into the intake
camshaft. If engine timing is correct, the alignment bridge will remain flat
on the cylinder head (a small gap - approximately .5mm - between the
head and the feet of the bridge is acceptable).
Insert the alignment dowel through the bridge and into the exhaust
camshaft. If engine timing is correct, the alignment bridge will remain
flat on the cylinder head (a small gap - approximately .5mm - between the
head and the feet of the bridge is acceptable).
SECTION 5A: REASSEMBLY
Page 98
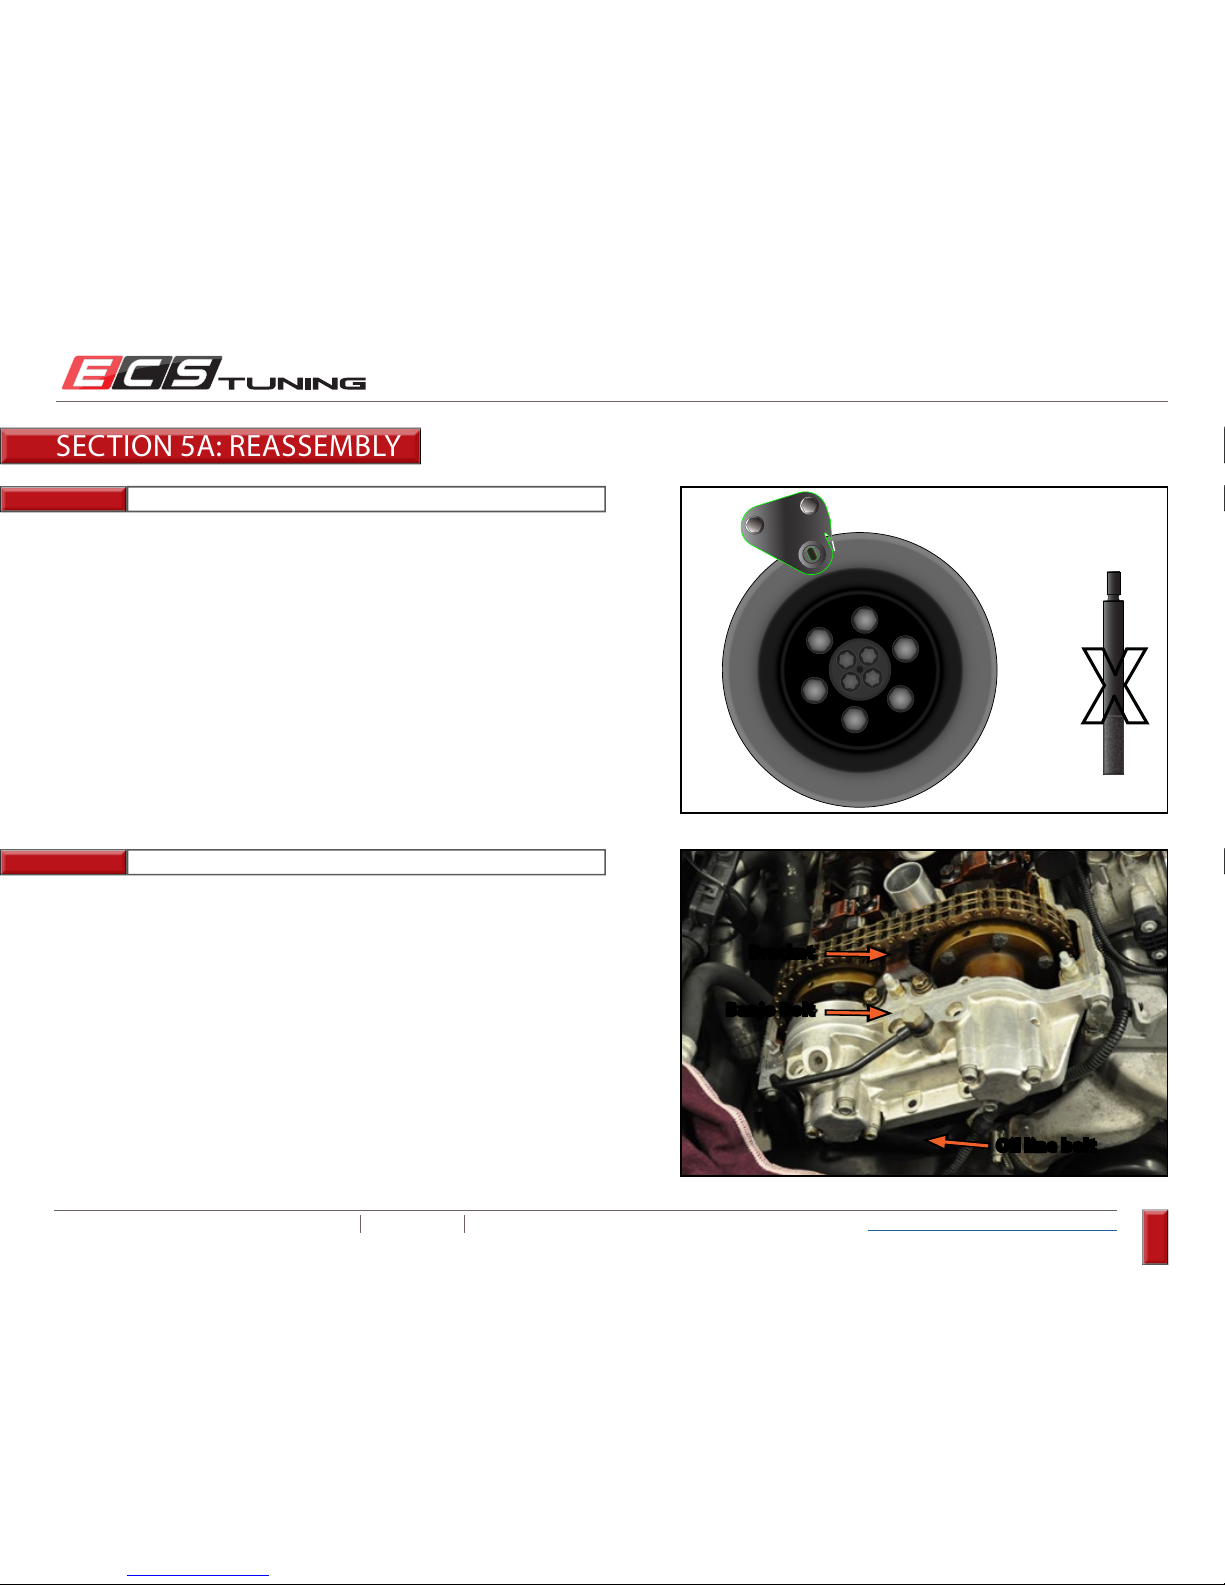
ECS TUNING 1000 SEVILLE RD. WADSWORTH, OH 44281 1.800.924.5172 WWW.ECSTUNING.COM
98
BMW S54 DUAL VANOS REBUILD
®
Return to Vanos Repair Table of Contents
Step 25:
Step 26: 5mm Allen Socket, Torque Wrench
Remove the crankshaft locking pin.
O T
X
Reinstall the oil pipe banjo bolt, the oil pipe securing bolt, and the Vanos
bracket.
Oil line bolt
Banjo Bolt
Bracket
SECTION 5A: REASSEMBLY
Page 99

ECS TUNING 1000 SEVILLE RD. WADSWORTH, OH 44281 1.800.924.5172 WWW.ECSTUNING.COM
99
BMW S54 DUAL VANOS REBUILD
®
Return to Vanos Repair Table of Contents
Step 27:
Step 28:
Tighten the pressure limiting valve and connect the electrical connector.
5mm Allen Socket, Torque Wrench
Reinstall the valve block using the new sealing plate and torque the bolts
to 10 Nm (7 Ft-lbs).
Electrical
Connector
Pressure
Limiting
Valve
SECTION 5A: REASSEMBLY
Page 100
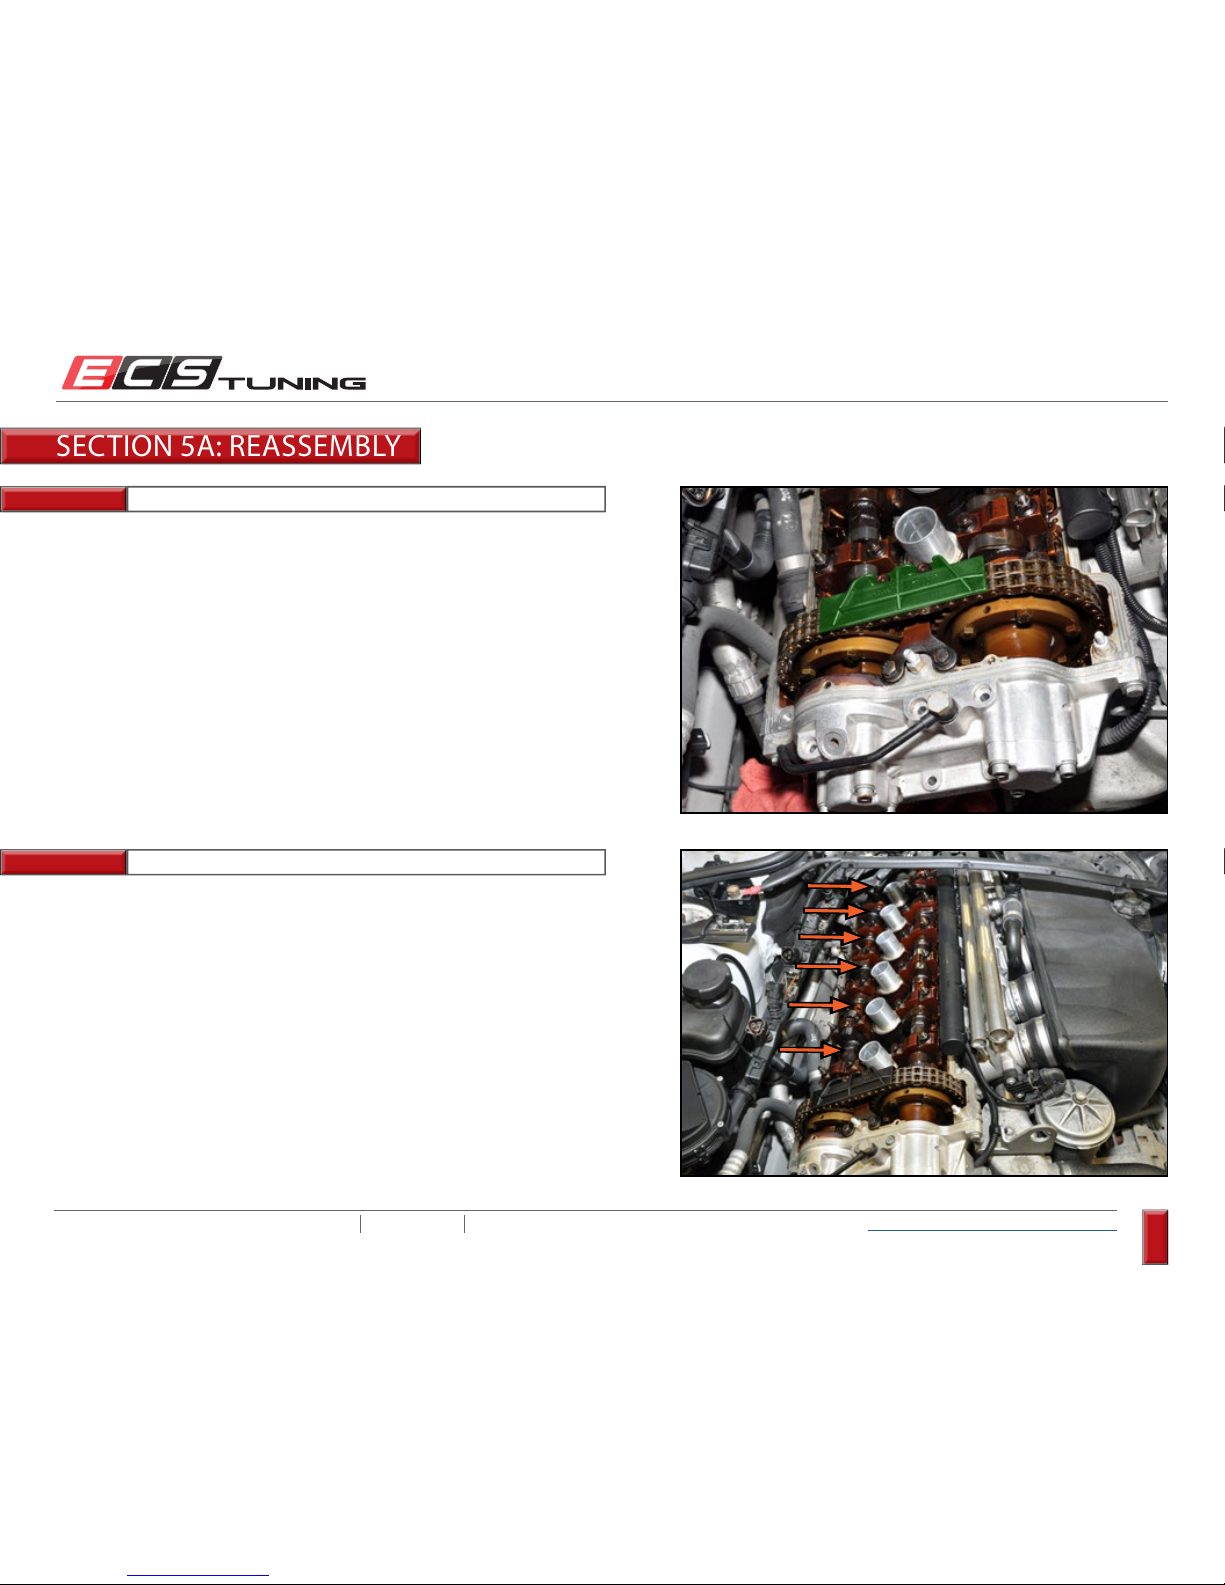
ECS TUNING 1000 SEVILLE RD. WADSWORTH, OH 44281 1.800.924.5172 WWW.ECSTUNING.COM
100
BMW S54 DUAL VANOS REBUILD
®
Return to Vanos Repair Table of Contents
Step 29:
Step 30:
Reinstall the spark plugs and torque them to 25 Nm (18 Ft-lbs).
Install the cam chain guide.
SECTION 5A: REASSEMBLY
 Loading...