

Page 1

Installation Procedures
B7 Rear View Camera
Installation Guide
This tutorial is provided as a courtesy by ECS Tuning.
Proper service and repair procedures are vital to the safe, reliable operation of all motor
vehicles as well as the personal safety of those performing the repairs. Standard safety
procedures and precautions (including use of safety goggles and proper tools and equipment)
should be followed at all times to eliminate the possibility of personal injury or improper
service which could damage the vehicle or compromise its safety.
Although this material has been prepared with the intent to provide reliable information, no
warranty (express or implied) is made as to its accuracy or completeness. Neither is any
liability assumed for loss or damage resulting from reliance on this material. SPECIFICALLY,
NO WARRANTY OF MERCHANTABILITY, FITNESS FOR A PARTICULAR PURPOSE OR ANY
OTHER WARRANTY IS MADE OR TO BE IMPLIED WITH RESPECT TO THIS MATERIAL. In
no event will ECS Tuning, Incorporated or its afliates be liable for any damages, direct or
indirect, consequential or compensatory, arising out of the use of this material.
Page 2

Rear View Camera Installtion for B7
Equipped with RNS-E Head Unit
Safety first:.
When working with your vehicles electrical system; always disconnect the
battery! Avoid shorting any circuits, or probing around wires. Failure to follow
these safety precautions, and all others, could result in irreversible damage to
your vehicles electrical system, failure to start, fire, and/or personal injury.
Before you undertake this installation, it is important that you read the following
instructions! Listed below are the necessary tools and skills required to complete
the job. If the installation of this product seems overwhelming, please contact a
qualified installer in your area.
Be aware that disconnecting your battery may require you to input your radio
anti-theft code, so make sure you have it handy.
Estimated Installation Time: 1.5 Hour
Tools Required: Parts Required:
• A 3/8 Socket Wrench - Kufatech 35542
• A 10mm socket - Kufatech 35676
• A Flat Head Screwdriver - Kufatech 35538
• Philips Head Screwdriver - Kufatech
• A HEX-CAN Cable & Driver - Audi 4L0 980 551
• VAGCOM
• Audi Specific Head Unit Removal Tool
Written by ECS Tuning
Rear View Camera Installation for the B7 equipped with the RMS-E Head Unit.
36136
1000 Seville Road, Wadsworth, OH 44281
Phone: 1.800.924.5172 www.ecstuning.com
ECS Tuning
Page 3
Rear View Camera Installtion for B7
Equipped with RNS-E Head Unit
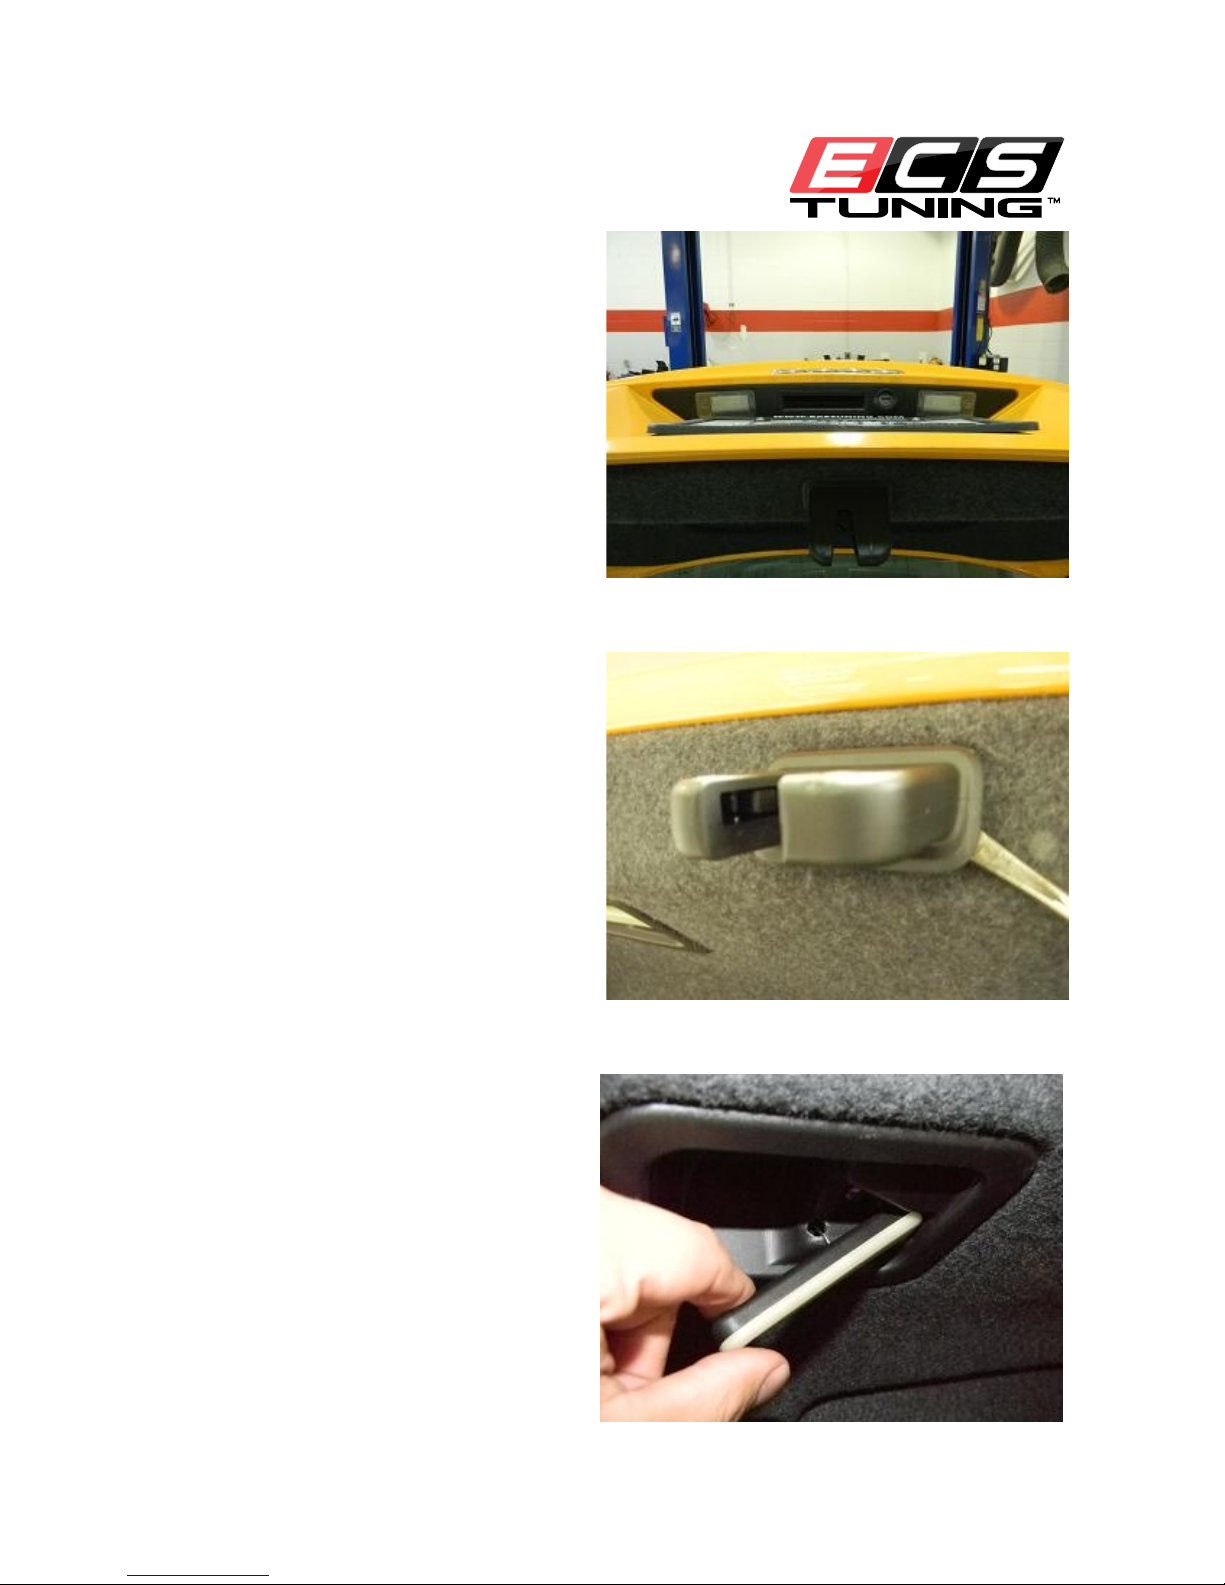
1. Start by opening your trunk.
2. Use a flat head screwdriver to pry off the
plastic cover from the latch lock.
3. Pull down on the emergency trunk release
and twist the lever to pop it out of the
ball joint on the right side.
1000 Seville Road, Wadsworth, OH 44281
Phone: 1.800.924.5172 www.ecstuning.com
ECS Tuning
Page 4
Rear View Camera Installtion for B7
Equipped with RNS-E Head Unit
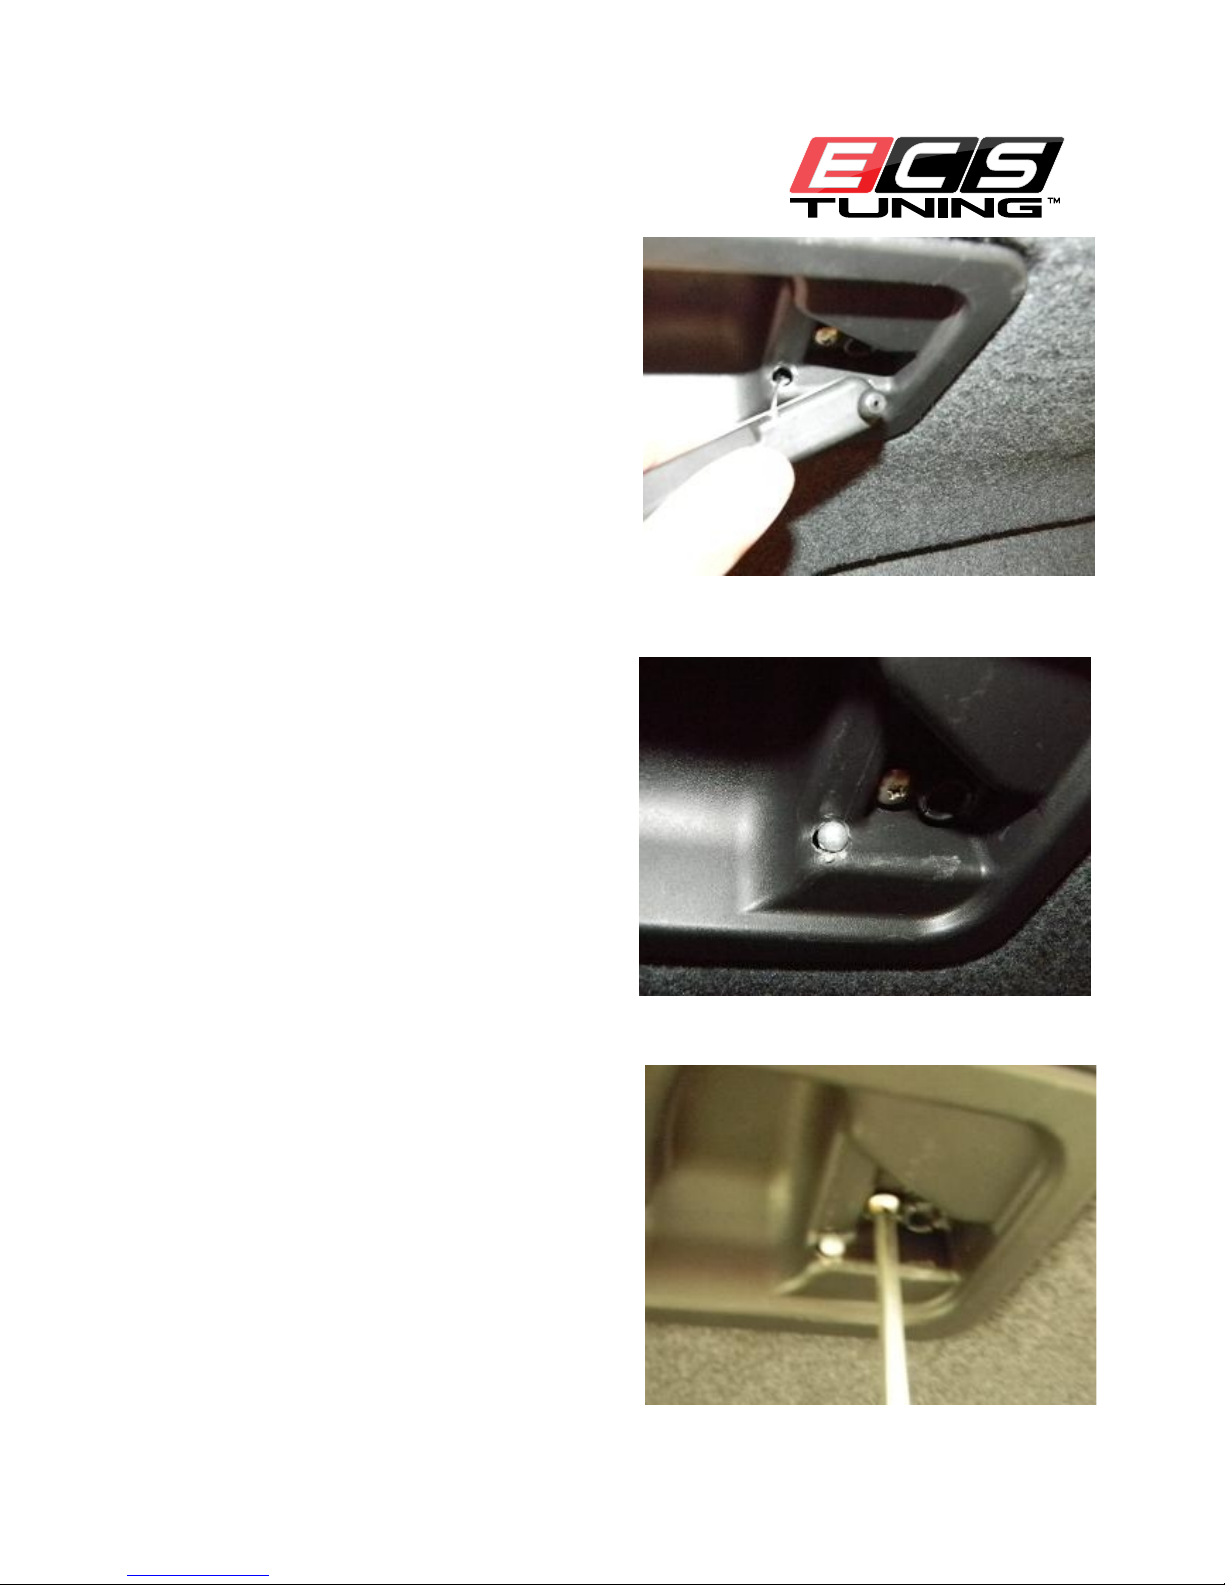
4. Use a flat head screwdriver to pry between
the side of the lever to split it in half. This
will allow you to free the cable from the
lever.
5. Push the release cable back into the plastic.
6. Remove the Philips head screw inside the plastic.
1000 Seville Road, Wadsworth, OH 44281
Phone: 1.800.924.5172 www.ecstuning.com
ECS Tuning
Page 5
Rear View Camera Installtion for B7
Equipped with RNS-E Head Unit
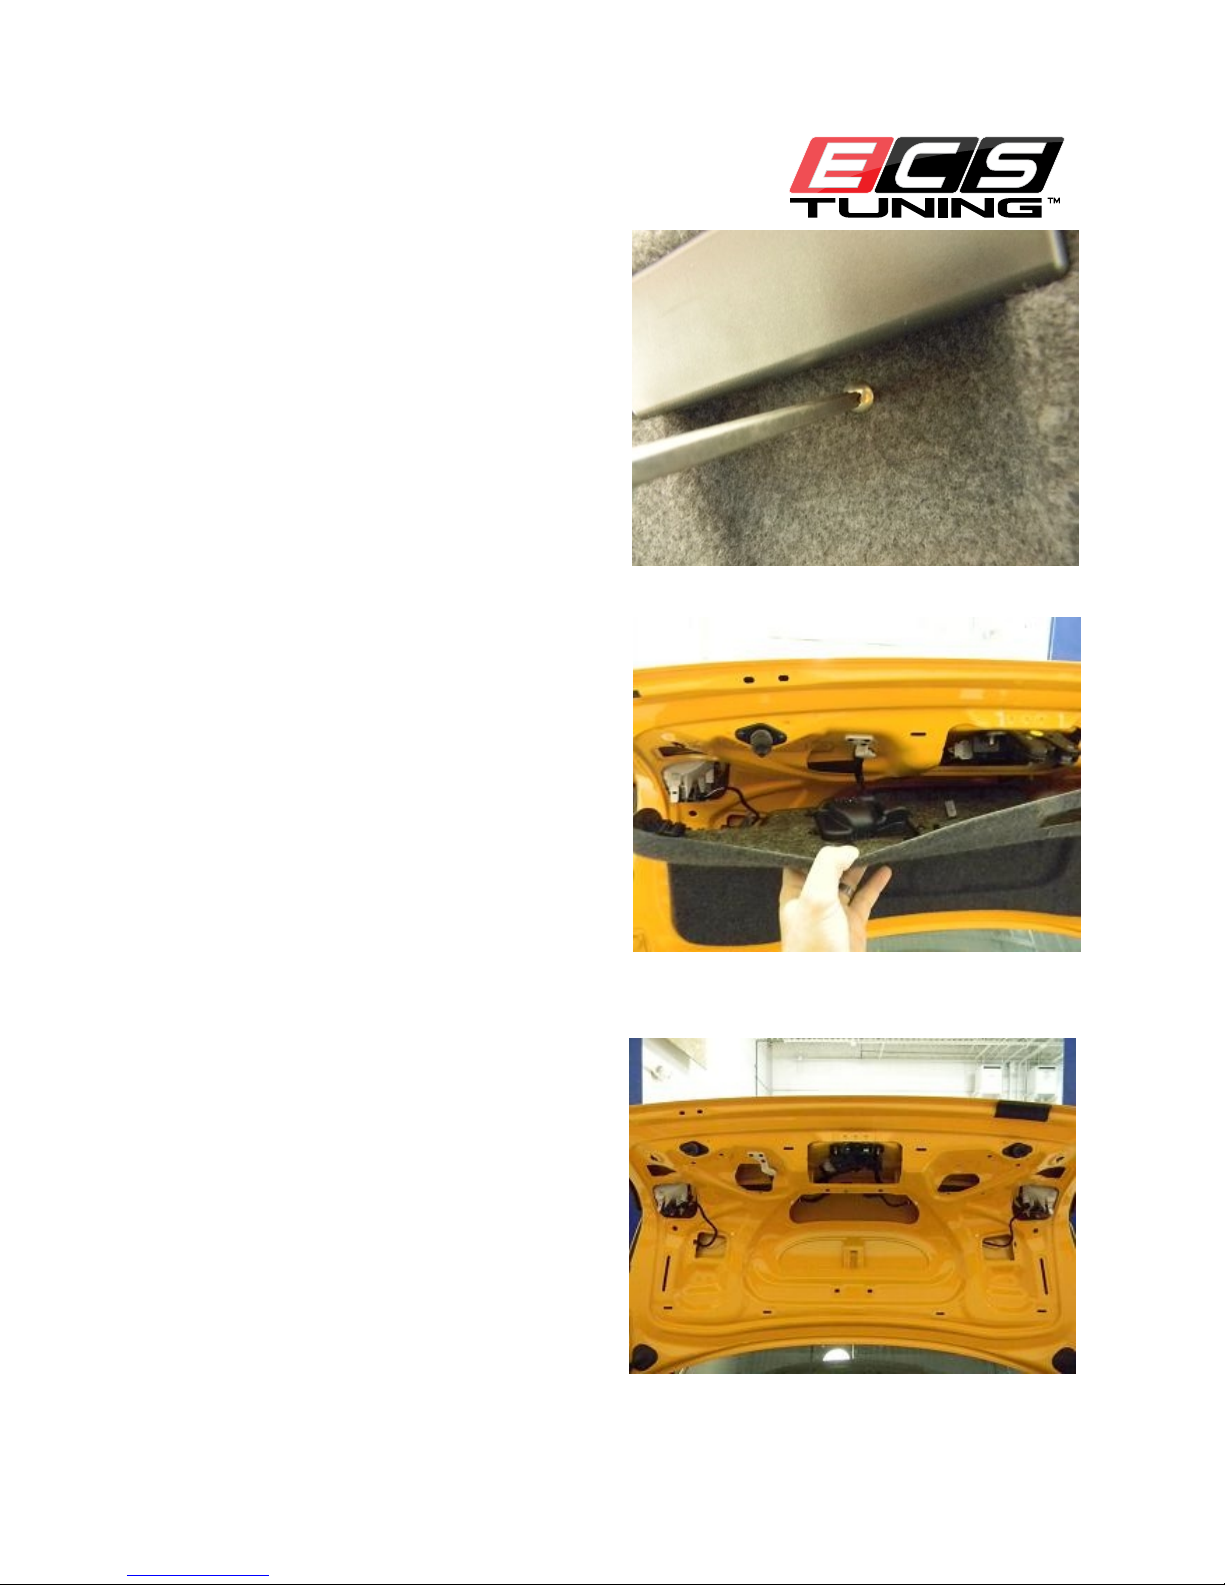
7. Remove the other Philips head screw that is
located in the same spot on the right side of
the trunk.
8. Now that you have all of the screws
removed, go around the trunk liner to pry
off all of the metal clips holding in the liner.
9. Remove the trunk liner.
1000 Seville Road, Wadsworth, OH 44281
Phone: 1.800.924.5172 www.ecstuning.com
ECS Tuning
Page 6
Rear View Camera Installtion for B7
Equipped with RNS-E Head Unit
10. Remove the 10mm nuts holding in both
license plate light brackets.
11. You can use a socket wrench or ratcheting
box wrench to remove the light brackets.
12. Set these aside so they can be reassembled
later.
1000 Seville Road, Wadsworth, OH 44281
Phone: 1.800.924.5172 www.ecstuning.com
ECS Tuning
Page 7
Rear View Camera Installtion for B7
Equipped with RNS-E Head Unit
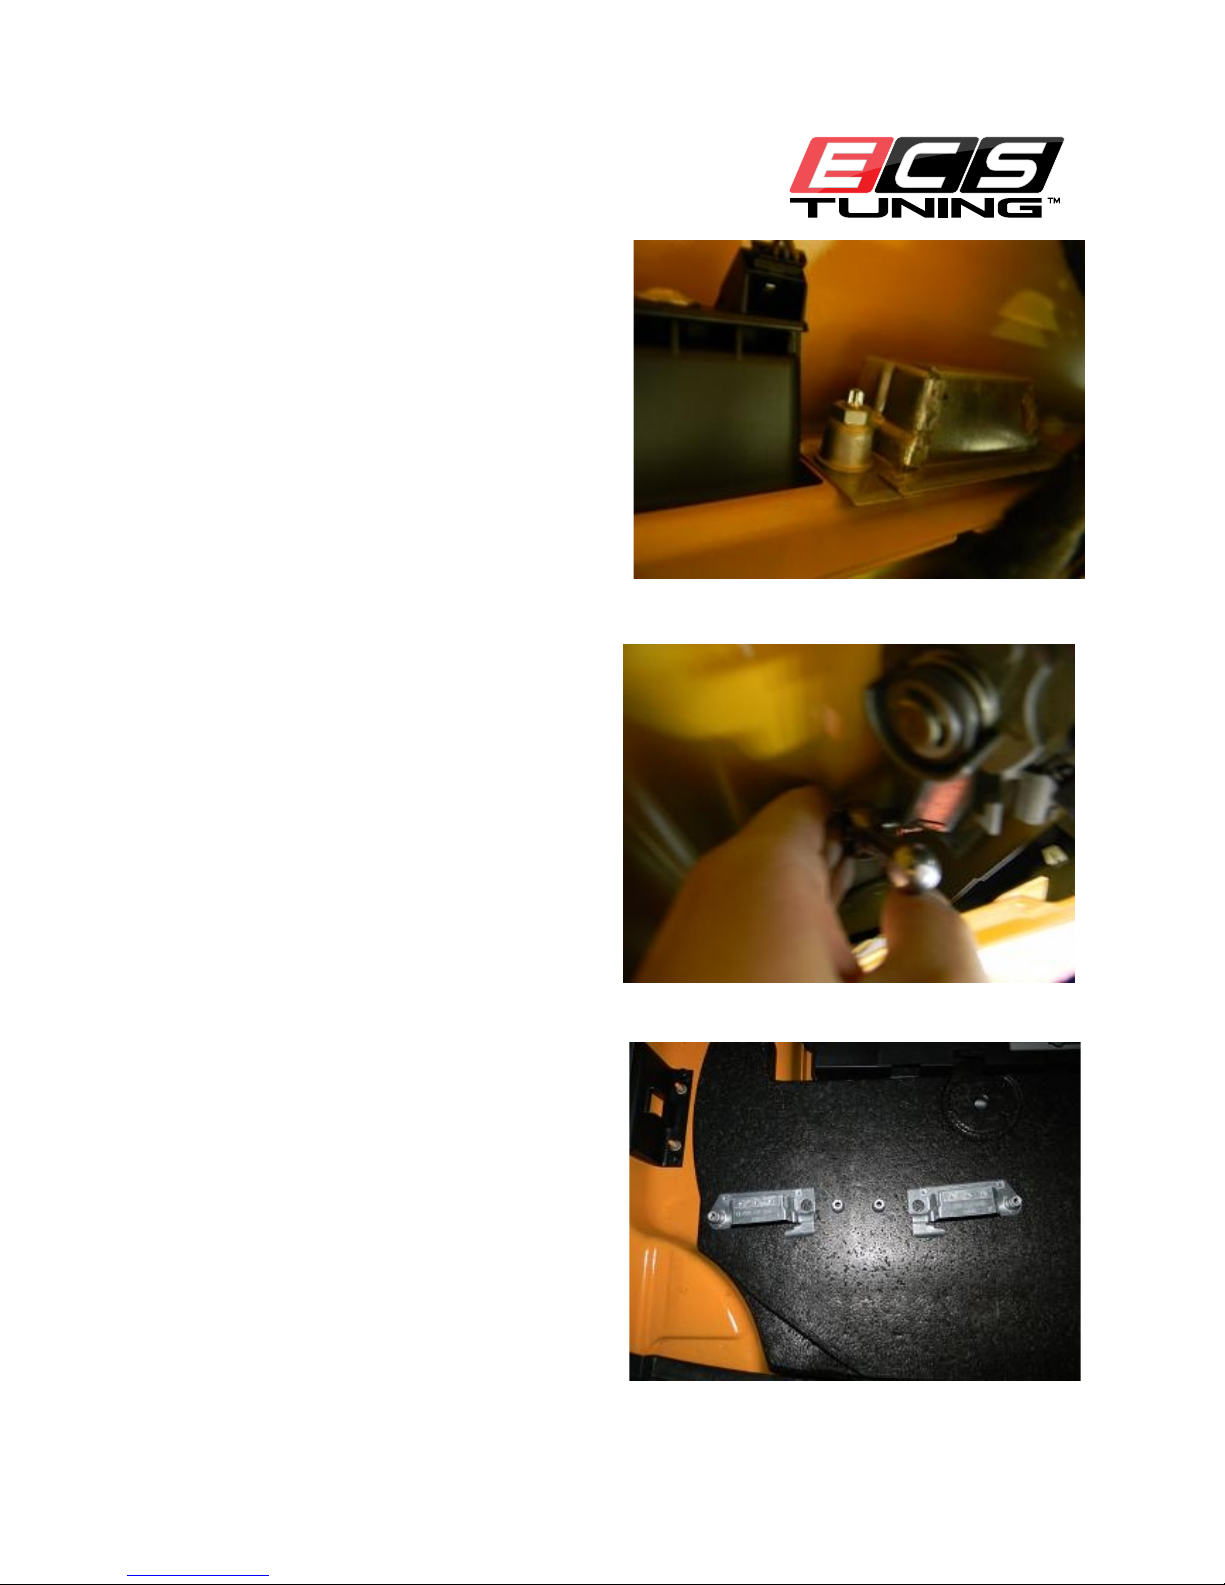
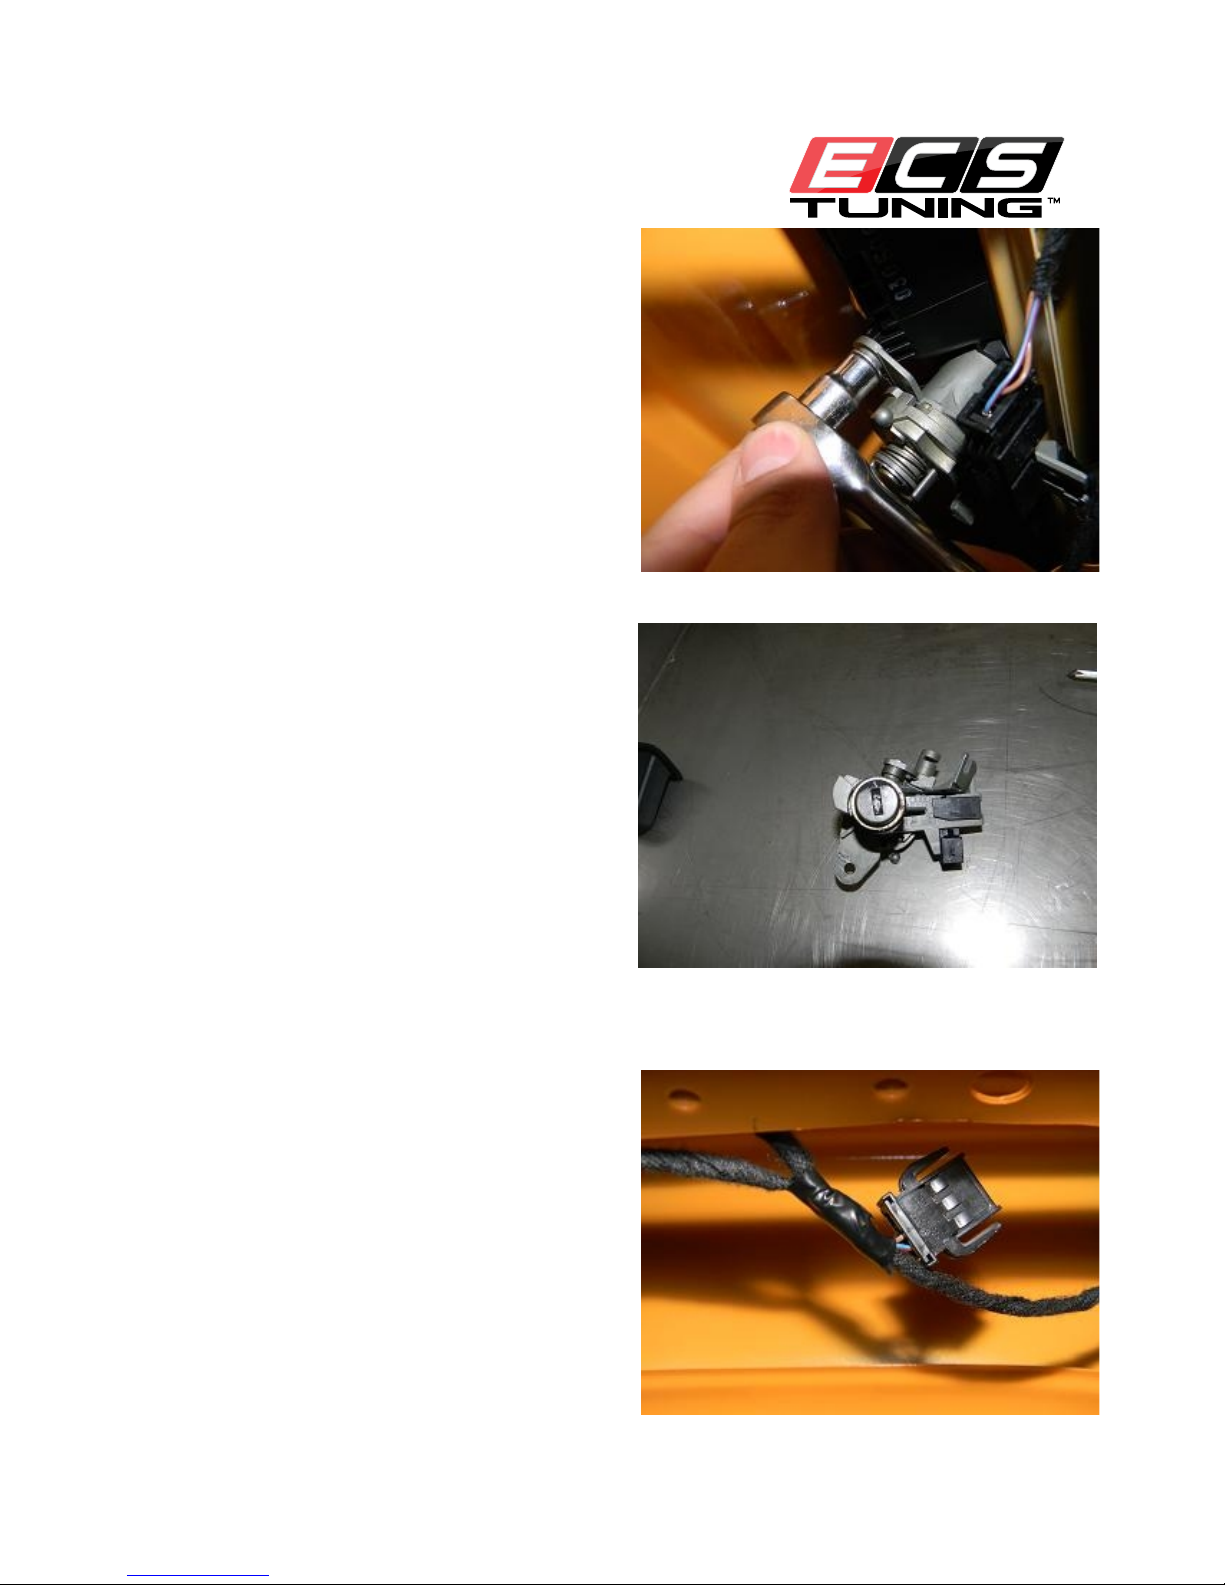
13. Unhook the two wire connector and remove
the 10mm nuts holding in the stock key
lock assembly.
14. You will no longer need this part. Save it
in a safe spot in case you decide to go back
to stock.
15. The connector you just removed will not
be used anymore.
1000 Seville Road, Wadsworth, OH 44281
Phone: 1.800.924.5172 www.ecstuning.com
ECS Tuning
Page 8

Rear View Camera Installtion for B7
Equipped with RNS-E Head Unit
16. Remove the black plastic assembly to
install your camera into the stock key
lock assembly spot.
17. Reinstall the black plastic assembly as
shown.
17A. Close up shot of what your camera
should look like as of this point.
1000 Seville Road, Wadsworth, OH 44281
Phone: 1.800.924.5172 www.ecstuning.com
ECS Tuning
Page 9

Rear View Camera Installtion for B7
Equipped with RNS-E Head Unit
18. Run the wires from the camera to this
open slot on the left side of the trunk lid.
19. Take the black plastic connector side of VAG to
IMA wiring harness (Kufatec 36136) and run it
through the stock rubber grommet that holds the
trunk electrical wires.
20. This is where the connector should appear
after you pull it through the rubber gromet.
1000 Seville Road, Wadsworth, OH 44281
Phone: 1.800.924.5172 www.ecstuning.com
ECS Tuning
Page 10

Rear View Camera Installtion for B7
Equipped with RNS-E Head Unit
21. Connect the matching wires from the
wiring harness to the camera and seal the
grommet back into position.
22. Run the wiring harness (Kufatec 36136) from
the trunk to behind the head unit of your
car.
23. Use a suitable tool to unlock your head
unit. You will need four of what is shown
in the picture.
23A. Profile picture of the removal tool.
1000 Seville Road, Wadsworth, OH 44281
Phone: 1.800.924.5172 www.ecstuning.com
ECS Tuning
Page 11

Rear View Camera Installtion for B7
Equipped with RNS-E Head Unit
24. Insert the removal tools into the slots
in your head unit. Push them in until you
feel them clip into place.
25. Pull evenly on all the clips and the
head unit should slide out easily. If it feels
hard to pull, reposition your unlocking
tools and try again.
26. To remove your tools, push in on the
tangs and pull it out.
1000 Seville Road, Wadsworth, OH 44281
Phone: 1.800.924.5172 www.ecstuning.com
ECS Tuning
Page 12

Rear View Camera Installtion for B7
Equipped with RNS-E Head Unit
27. Unlock your Quad-Lock connector
from your head unit by squeezing the
bottom tab.
28. Insert the one end of the trigger wire
(Kufatec 35676) into the empty slot
of C2. Please see page 13 to see a
diagram of the Quad-Lock wiring.
29. Insert the other end of the trigger wire
into slot number 3 of the IMA side of
the wiring harness that connects the
IMA and head unit (Kufatec 35542).
30. Also insert the black wire in the
harness your ran from the trunk to slot
number 5 in the same connector.
1000 Seville Road, Wadsworth, OH 44281
Phone: 1.800.924.5172 www.ecstuning.com
ECS Tuning
Page 13

Rear View Camera Installtion for B7
Equipped with RNS-E Head Unit
31. Flip the connector over and insert the
clear wire into slot number 14.
* In this picture, the clear wire was
replaced with a blue wire. This was
only done to make the wire more
visible for the instructions. Your wire
will be clear.
32. Insert the connector into the
appropriate black locking cover. There
is an arrow indicating the direction of
insertion.
33. Connect the harness to the IMA
module.
1000 Seville Road, Wadsworth, OH 44281
Phone: 1.800.924.5172 www.ecstuning.com
ECS Tuning
Page 14

Rear View Camera Installtion for B7
Equipped with RNS-E Head Unit
34. From the Kufatec 35542 wiring harness, there will be 4 white wires near the gray
connector.
If you look closely, there is scripting on each wire. Use the table below to show you which
wires you need to connect them to.
Can High – Tap into A9
Can Low – Tap into A10
Bauer plus – Tap into A15
Masse – Tap into A12
35. Now you should only have two wires left from the harness that was ran from the trunk.
They should be brown and red. Use the table below to show you which wires you need to
connect them to.
Red – Tap into A15
Brown – Tap into A12
1000 Seville Road, Wadsworth, OH 44281
Phone: 1.800.924.5172 www.ecstuning.com
ECS Tuning
Page 15

Rear View Camera Installtion for B7
Equipped with RNS-E Head Unit
36. This is what your wiring to the QuadLock should look like. As you can see,
inside the yellow wire clamp the Masse
and brown wire are being tapped into
wire A12.
37. Insert your gray connector from
Kufatec 35542 into your head unit.
This concludes the physical installation
of this kit. You will have some extra
wires on Kufatech 35542 that aren't used.
They don't need anything done with them.
Tuck all your wiring and IMA box away
behind the head unit and reassemble
everything.
38. Connect your HEX-CAN cable to the
OBD2 port and open VAG-COM.
Click the “Select Control Module”
button..
1000 Seville Road, Wadsworth, OH 44281
Phone: 1.800.924.5172 www.ecstuning.com
ECS Tuning
Page 16

Rear View Camera Installtion for B7
Equipped with RNS-E Head Unit
39. Click on the “Electronic 1” tab.
40. Click on the “56-Radio” button.
41. Click on the “Coding – 07” button.
1000 Seville Road, Wadsworth, OH 44281
Phone: 1.800.924.5172 www.ecstuning.com
ECS Tuning
Page 17

Rear View Camera Installtion for B7
Equipped with RNS-E Head Unit
42. Click on the “X” that pops up.
43. In the first section, change the second
digit to “1”.
44. Click on the “Do it!” Button.
1000 Seville Road, Wadsworth, OH 44281
Phone: 1.800.924.5172 www.ecstuning.com
ECS Tuning
Page 18

Rear View Camera Installtion for B7
Equipped with RNS-E Head Unit
45. This window should pop up, hit “ok”.
46. Click on the “Adaptation – 10”
button.
47. Click on the down arrow to open the
drop menu.
1000 Seville Road, Wadsworth, OH 44281
Phone: 1.800.924.5172 www.ecstuning.com
ECS Tuning
Page 19

Rear View Camera Installtion for B7
Equipped with RNS-E Head Unit
48. Click on the “Rear View Camera”
text.
49. Change the “New value” section to
“1”.
50. Click on the “Test” button
1000 Seville Road, Wadsworth, OH 44281
Phone: 1.800.924.5172 www.ecstuning.com
ECS Tuning
Page 20

Rear View Camera Installtion for B7
Equipped with RNS-E Head Unit
51. Click on the “Save” Button.
52. Click on the “Yes” Button.
53. Click the down arrow to re-open the
drop menu.
1000 Seville Road, Wadsworth, OH 44281
Phone: 1.800.924.5172 www.ecstuning.com
ECS Tuning
Page 21

Rear View Camera Installtion for B7
Equipped with RNS-E Head Unit
54. Click on the “System reset” text.
55. Change the “New value” to “1”.
56. Click on the “Test” Button.
1000 Seville Road, Wadsworth, OH 44281
Phone: 1.800.924.5172 www.ecstuning.com
ECS Tuning
Page 22

Rear View Camera Installtion for B7
Equipped with RNS-E Head Unit
57. You should see your head unit reboot
and when it turns back on it will display
the Lamborghini emblem.
58. Click on the “Done, Go Back” button.
59. Click on the “Close Controller, Go Back
-06” button.
1000 Seville Road, Wadsworth, OH 44281
Phone: 1.800.924.5172 www.ecstuning.com
ECS Tuning
Page 23

Rear View Camera Installtion for B7
Equipped with RNS-E Head Unit
60. Click on the “Go Back” button.
61. Click on the “Exit” button.
62. Cycle your car key once and then
start your car. When you put your car
in reverse, the screen should
automatically display the rear view
camera!
1000 Seville Road, Wadsworth, OH 44281
Phone: 1.800.924.5172 www.ecstuning.com
ECS Tuning
 Loading...