

Page 1
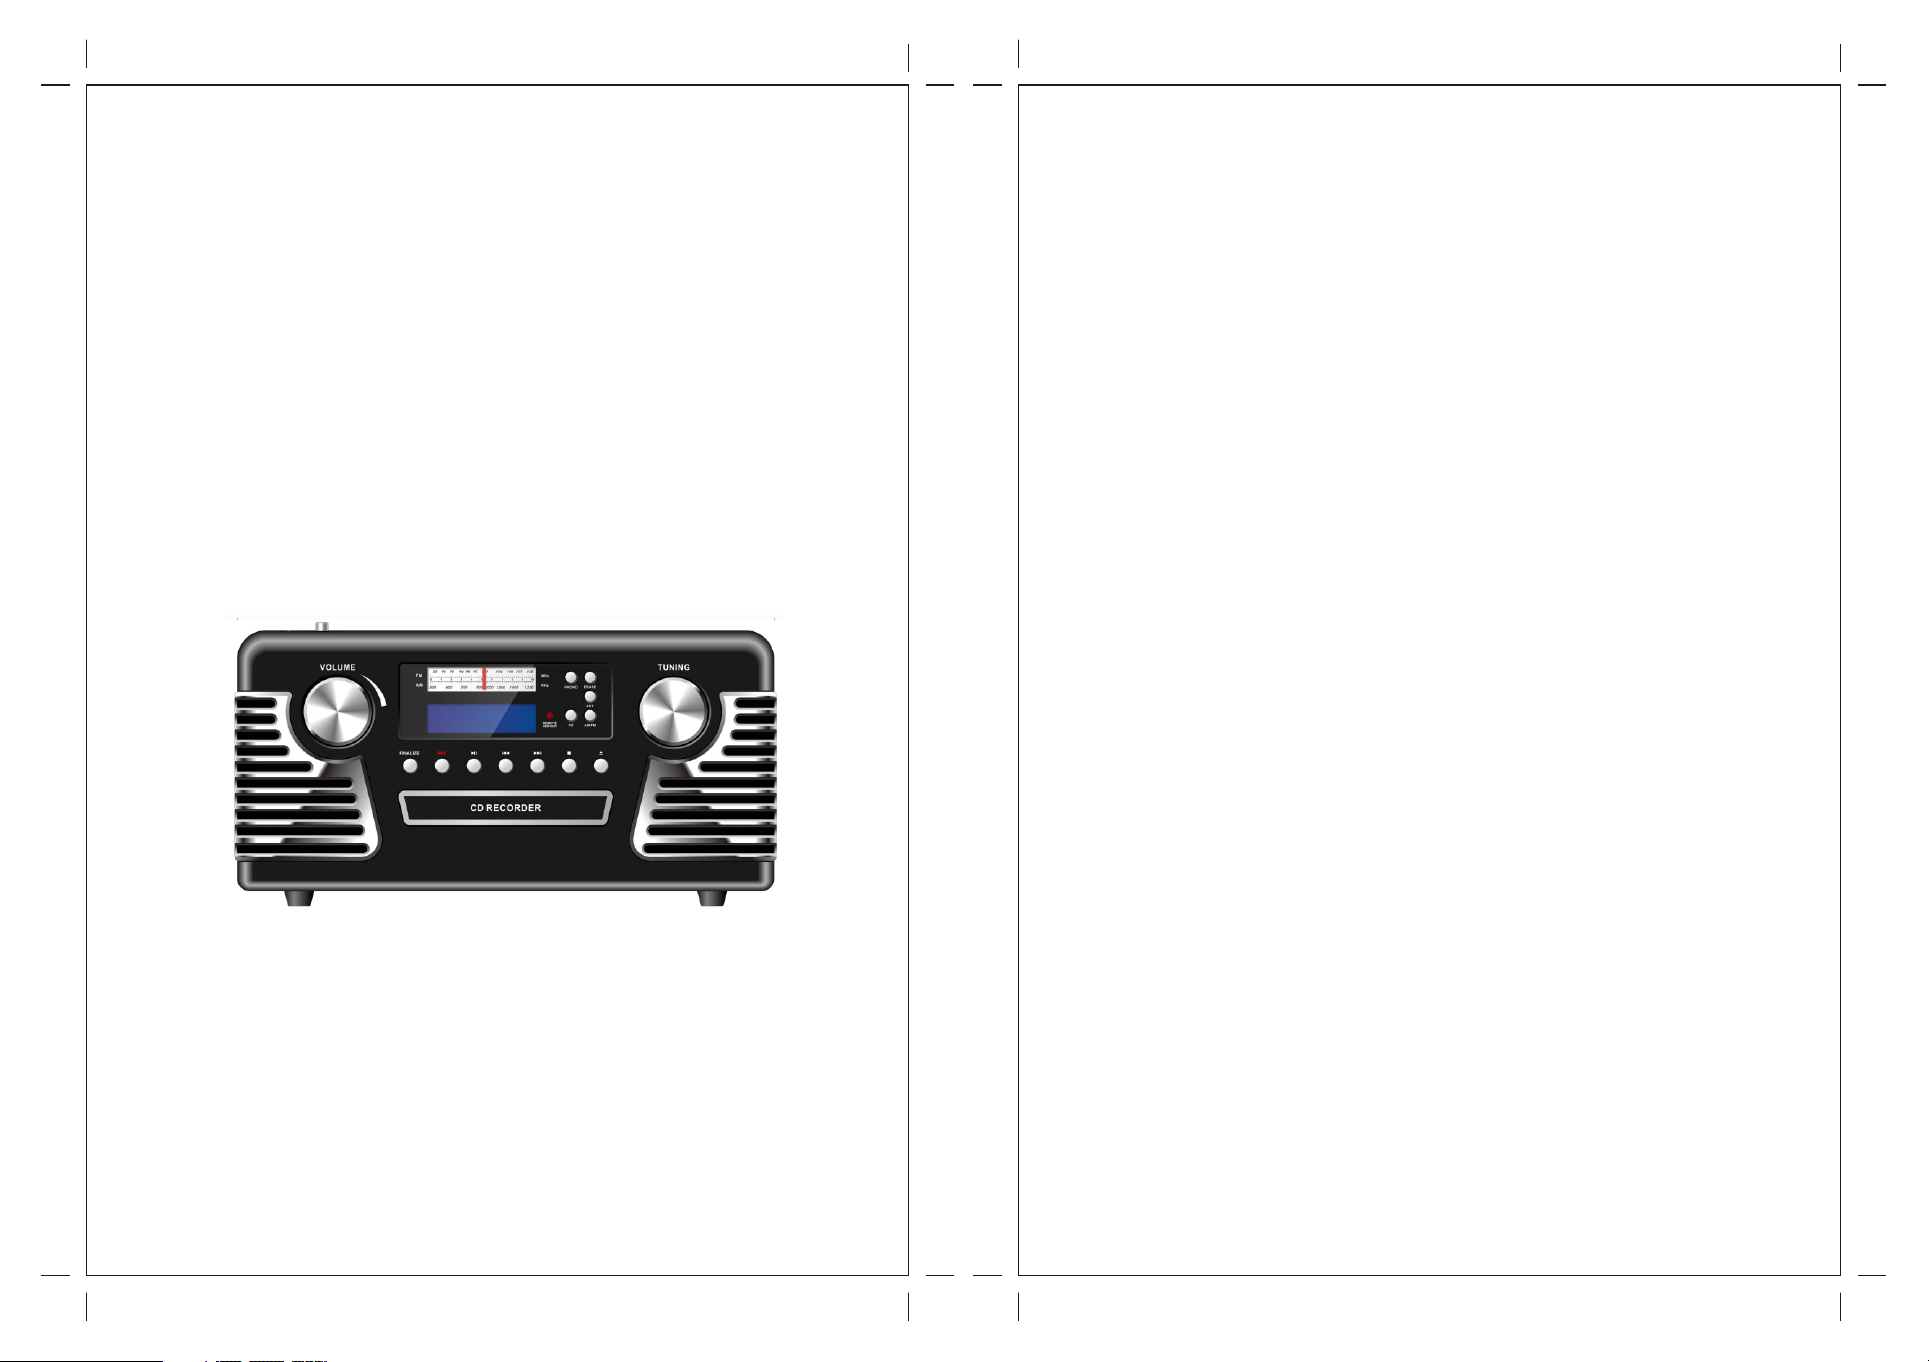
OPERATING MANUAL
MO DEL: GDI-C2CD RW
Turntable
an d AM/FM STE REO Ra dio
R0.0
wi th CD Recorder
IMPORTANT SA FETY INSTRUCTIONS
FOR AUDIO PRODUCTS-READ THOROUGHLY
When using electrical products, basic precautions should alwa ys be fol lowed i nclud ing:
1. Read Instructions - All the safety and operating instructions should be read befo re the
product is operated.
2. Retain Instructions - The s afety a nd oper ating i nstru ction s shoul d be reta ined fo r
future reference.
3. Heed Instructions - All warnings on the product and in the operating instructions
should be adhered to.
4. Foll ow Inst ructi ons - All operating an d user in struc tions s hould b e follo wed.
5. Cleaning - Un plug this product from the wall outlet before cleaning. Do not use liqu id
cleaners or aerosol cleaners. Use a dry cloth for cleaning.
6. At tachm ents - Do n ot use at tachm ents no t recom mende d by the pr oduct m anufa cture r
as they may cause hazards.
7. Wa ter and M oistu re - Do not u se this p roduc t near wa ter-f or exam ple, ne ar a bath t ub,
wash bowl, kitchen sink, or laundry tub, in a wet basement, or near a swimming poo l,
etc.
8. Ac cesso ries - Do n ot plac e this pr oduct o n an surf ace. The product may fall, causing
serious injury to a child or adult, and serious damage to the product. Use only wi th a
stand , bracket, or ta ble recommended by the manufacturer, or sold with the product. Any
mount ing of the product should follow the manufacturer's instructions, and should us e a
Mount ing accessory recommended by the manufacturer.
9. Transporting - This p roduc t shoul d be move d with ca re to avo id dama ge or inj ury.
10. Ventilation - Slots and openings in the cabinet are provided for ventilation, to e nsure
reliable operation of the product and to protect it from overheating. Th ese ope nings
must not be blocked or covered. The ope nings s hould n ever be b locke d by plac ing the
product on a bed, sofa, rug, or similar surface. This p roduc t shoul d not be pl aced in a
built-in installation such as a bookcase or rack unless proper vent ilati on is pro vided o r
the manufacturer's instructions have been adhered to.
11. Power Sources - This p roduc t shoul d be oper ated on ly from t he type o f power s ource
indicated on the marking label. If you are not sure of the type of power supply to your
home, consult your product dealer or local power company. For prod ucts in tende d to
operate from battery power, or other sources, refer to the operation instruction s.
12. Pow er - Cord Protection - Power-supply cords should be routed so that they are not
likely to be trapped in any way.
13. Lig htnin g - For add ed protection for this product during a lightning storm, or when it is
left unattended and unused for long periods of time, unplug it from the wall out let and
disconnect the antenna or cable system. Th is will p reven t damag e to the pr oduct d ue
to lightning and power-line surges.
14. Pow er Line s - An outside antenna system should not be located in the vicinity of
overhead power lines or other electric light or power circui ts, or wh ere it ca n fall in to
such power lines or circuits. When installing an outside antenna sy stem, e xtrem e care
should be taken to keep from touching such power lines or circuits as contact wi th
them might be fatal.
1
Page 2
Page 3
Before Use
1. Choose unit installation location carefully. Avoi d placi ng it in di rect su nligh t or close to a
source of heat. Also avoid locations subject to vibrations and excessive du st, col d or
moisture. Keep away from sources that hum, such as transformers or motors.
2. Do not open the cabinet as this might result in damage to the circuitry or electrical sh ock,
if a foreign object should get into the set, contact your dealer.
3. Be sure not to handle discs with dirty fingers. Never insert a disc that has a crack on the
surface.
4. When removing the power plug from the wall outlet, always pull direc tly on th e plug, n ever
pull the cord.
5. To keep th e laser p ickup c lean, d o not tou ch it, an d do not fo rget to c lose th e disc tr ay.
6. Do not attempt to clean the unit with chemical solvents as this might damage the finish.
Use a clean, dry cloth.
7. In ord er to shut off the p ower to t his pro duct co mplet ely, unplug t he powe r cord fr om the
wall outlet. Be sure to unplug the unit if you do not intend to use it for an extended period
of time, such as a vacation.
8. Keep this manual in a safe place for future reference.
Beware of Condensation
When the player (or a compact disc) is moved from a cold to a warm place or is used after a
sudden temperature change, there is a danger of condensation. Wate r vapor i n the air c ould
condense on the mechanism or the laser pickup. If droplets of water form on these parts,
correct playback will be impossible because the laser cann ot read t he info rmati on from t he
disc correctly. To pre vent th is, if yo u are goi ng to use t he play er in a con ditio n where
condensation could occur, you should leave the playe r for 1 or 2 ho urs aft er plug ging it i nto
an AC outlet depending on the amount of condensation. If this is done, the player w ill
stabilize at the temperature of its surroundings.
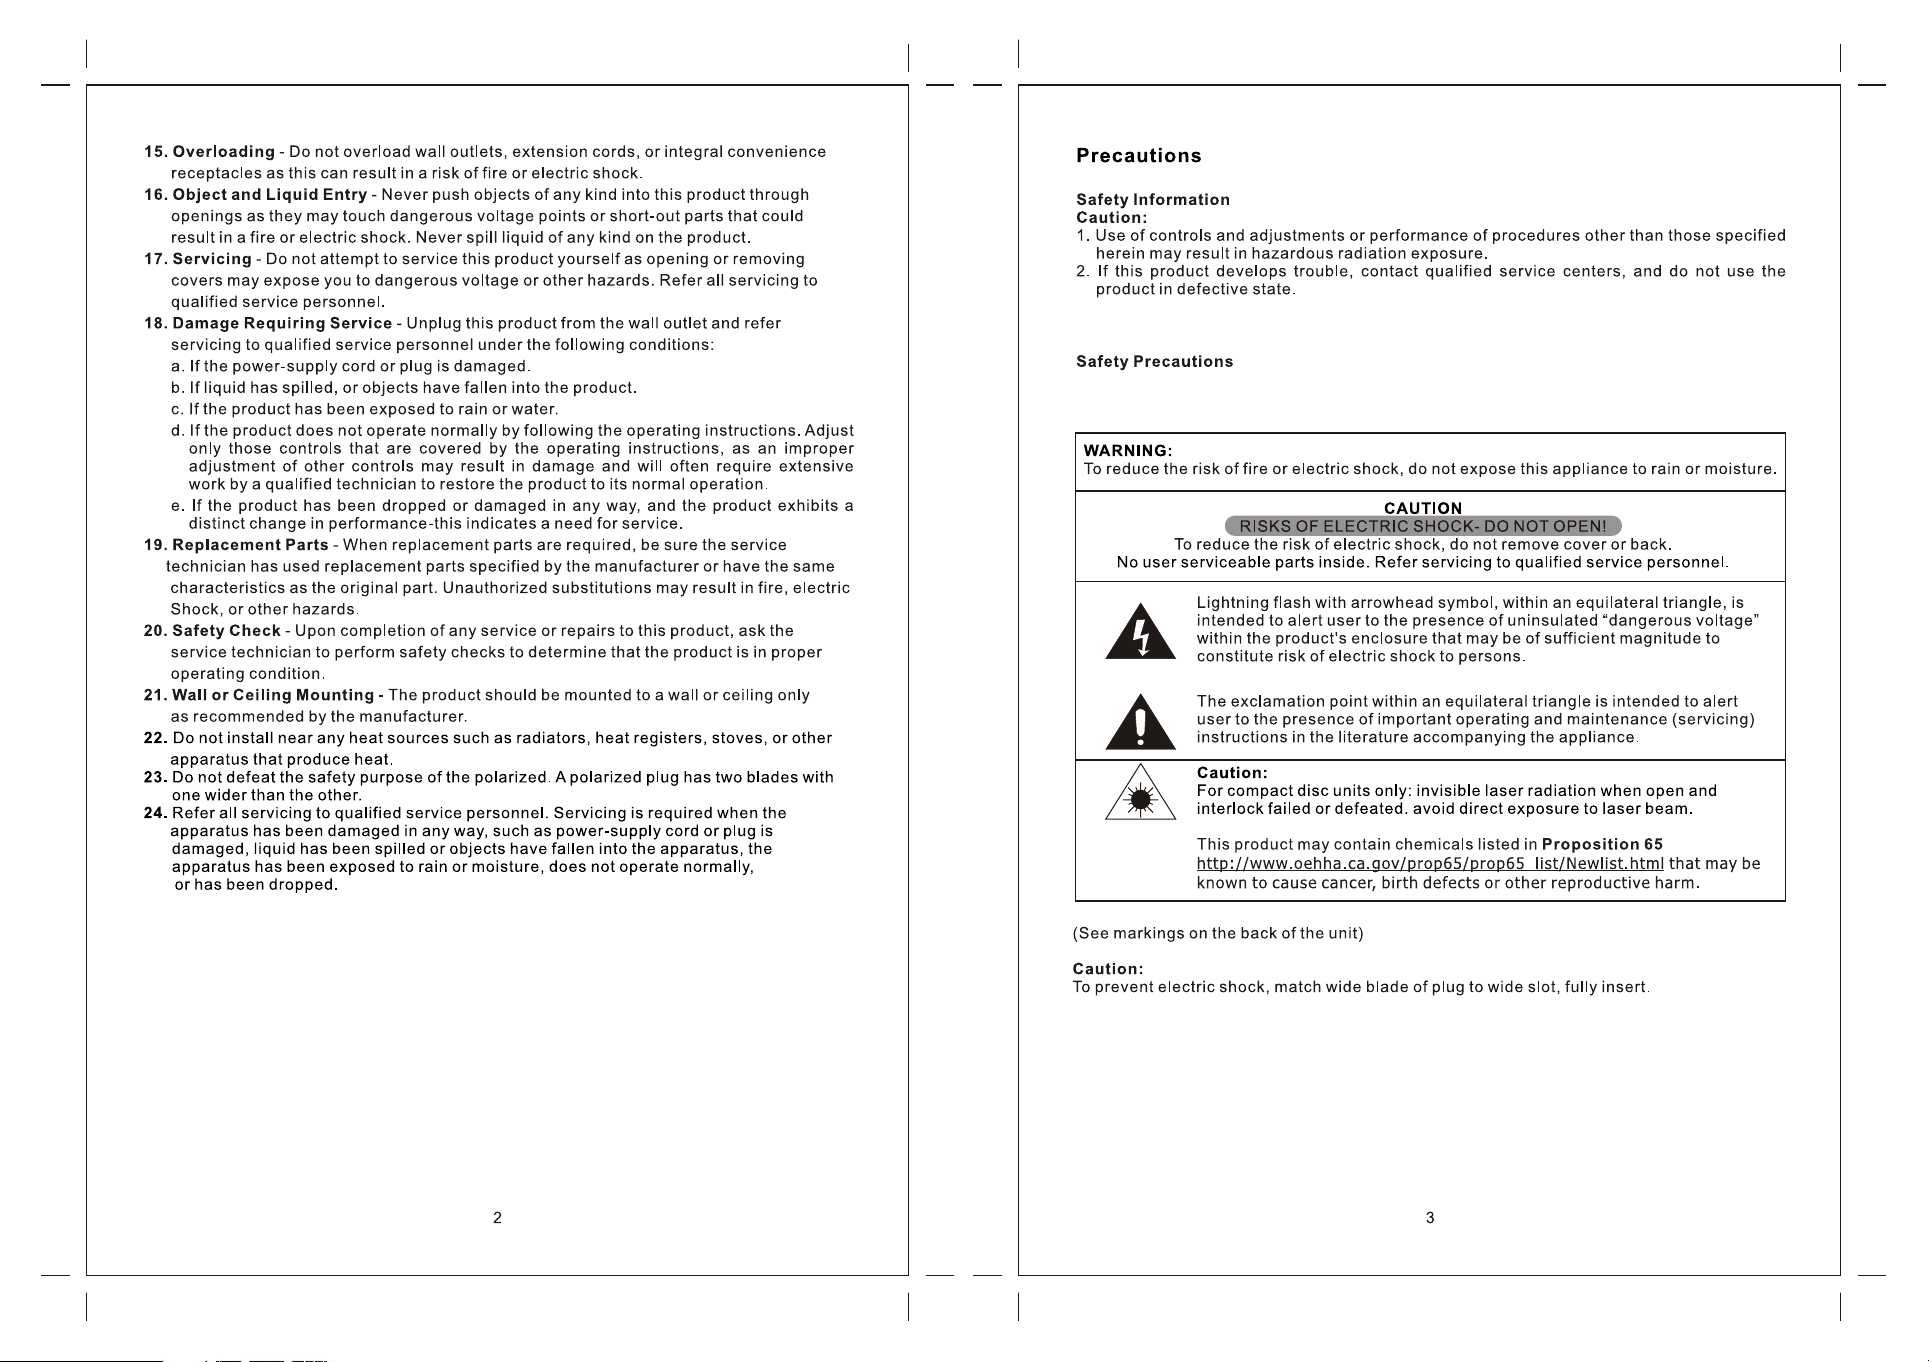
Handling Records
Do not to uch the record's grooves. Only handle records by the edges or the label with
clean hands. Grease or dirt can leave a residue on the record’s surfa ce that w ill gra duall y
deteriorate the quality of your record.
Use sof t anti- static cloth to gently wipe the record surface when the record has become
dirty when not in use.
Store r ecords upright on their edges. Flat storage can make it become curved.
Avoid pl acing i t in dire ct sunl ight or c lose to a s ource o f heat su ch as rad iator s, stov es.
Also avoid location subject to vibration and excessive dust, heat, cold or m oistu re.
How to Replace the Stylus
Caution:
Do not re move or bend the stylus.
Do not to uch the needle, which could injure your hand.
Turn off t he unit 's powe r befor e you rep lace th e stylu s.
Keep ou t of the re ach of children.
Avoid di rect su nligh t or othe r heat so urces .
Removing old s tylus
1. Set a sc rewdriver at the tip of the stylus and push
down to t he direction “A”.
2. Remove the stylus by pulling it forward and down.
Insta lling a n ew styl us
1. Hold the tip of the stylus and insert the other edge by
Press ing in the direction “B”.
2. Push up in the direction “C” until it locks at the tip.
4 5
Page 4
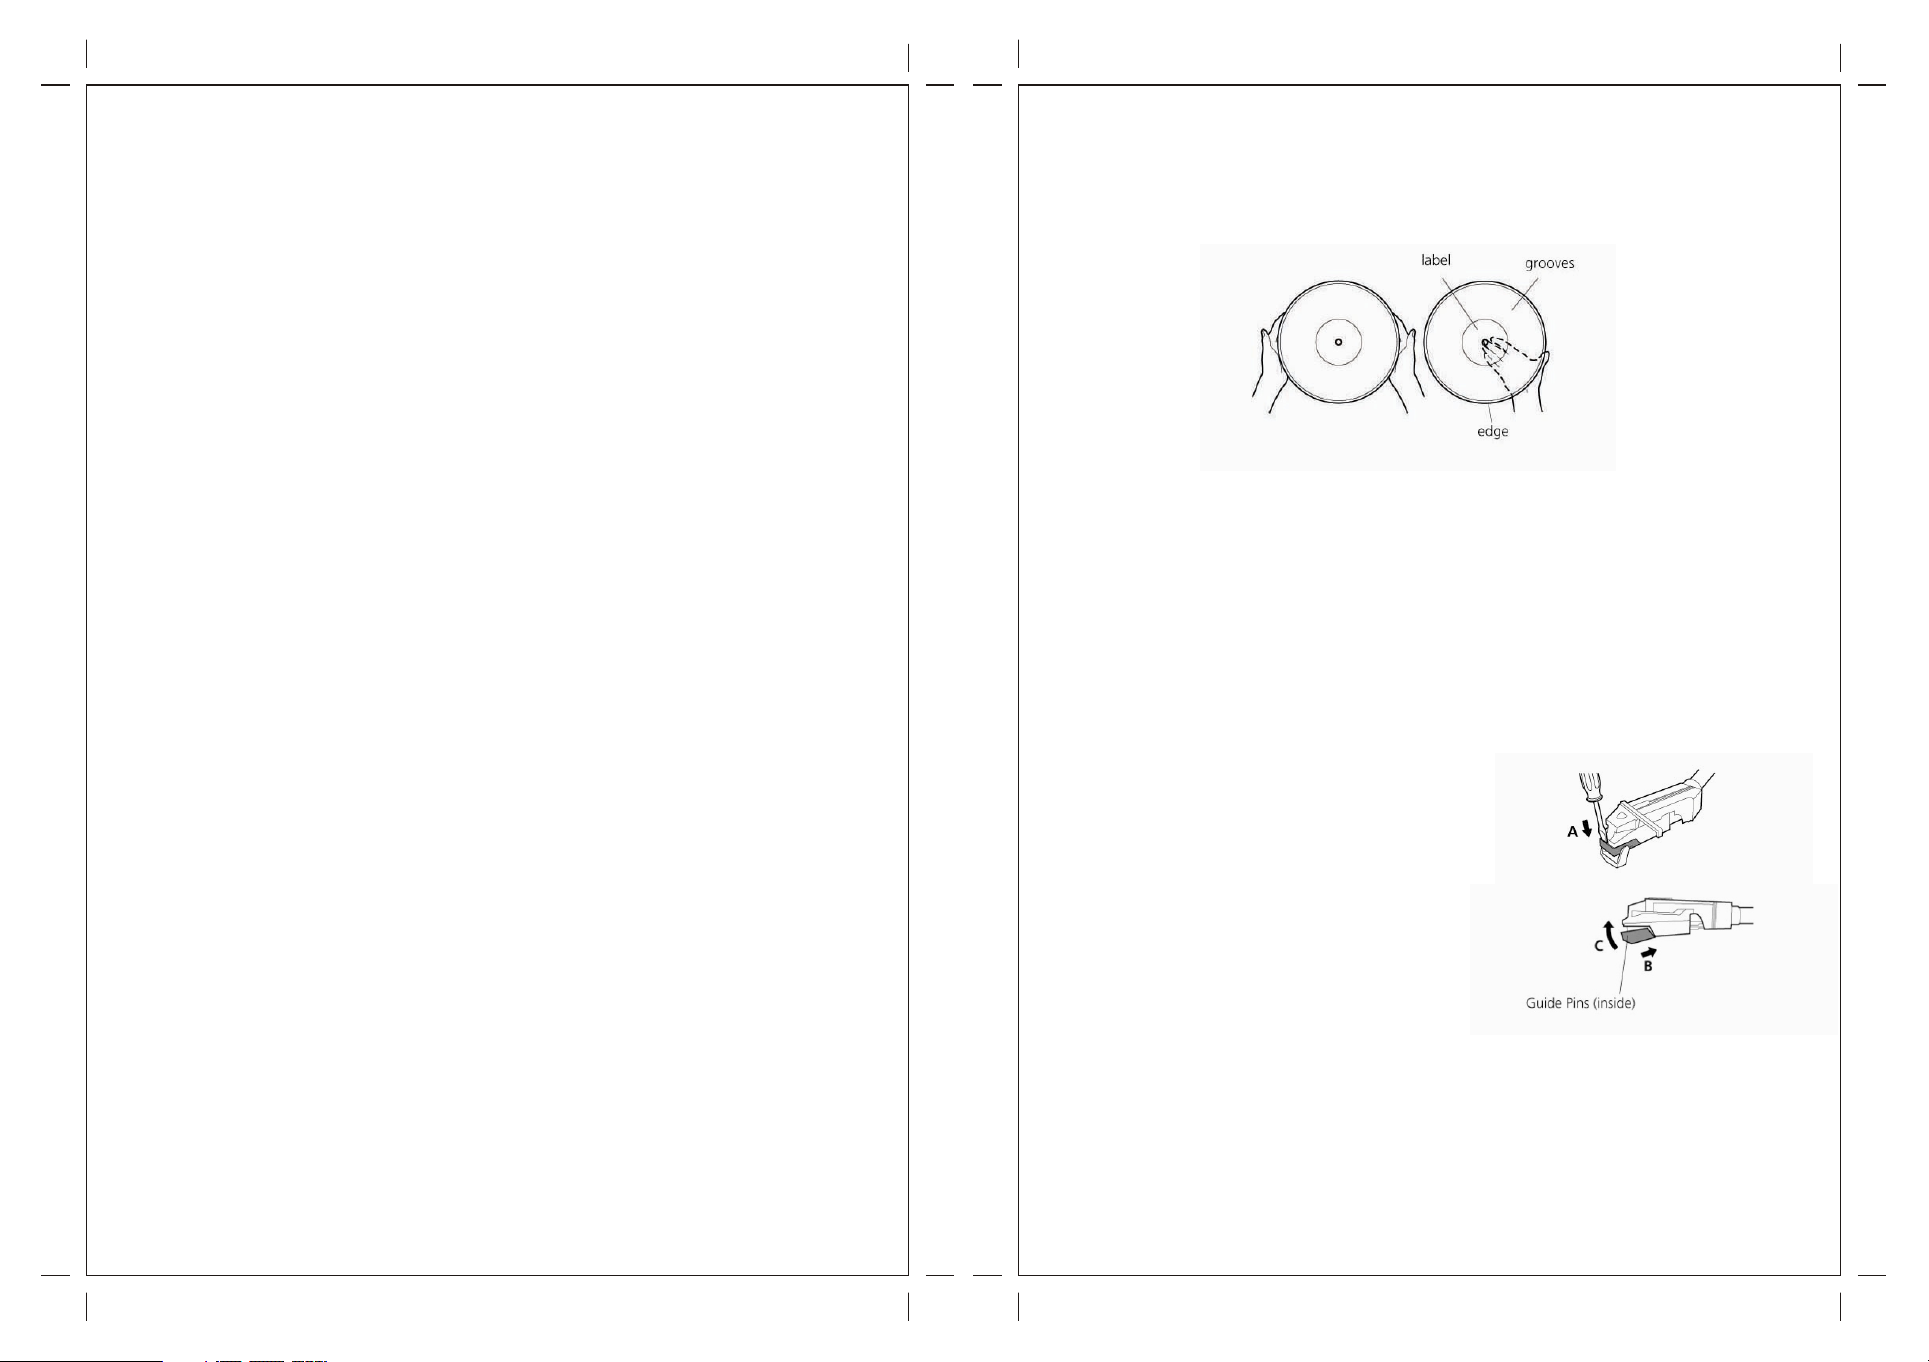
Discs
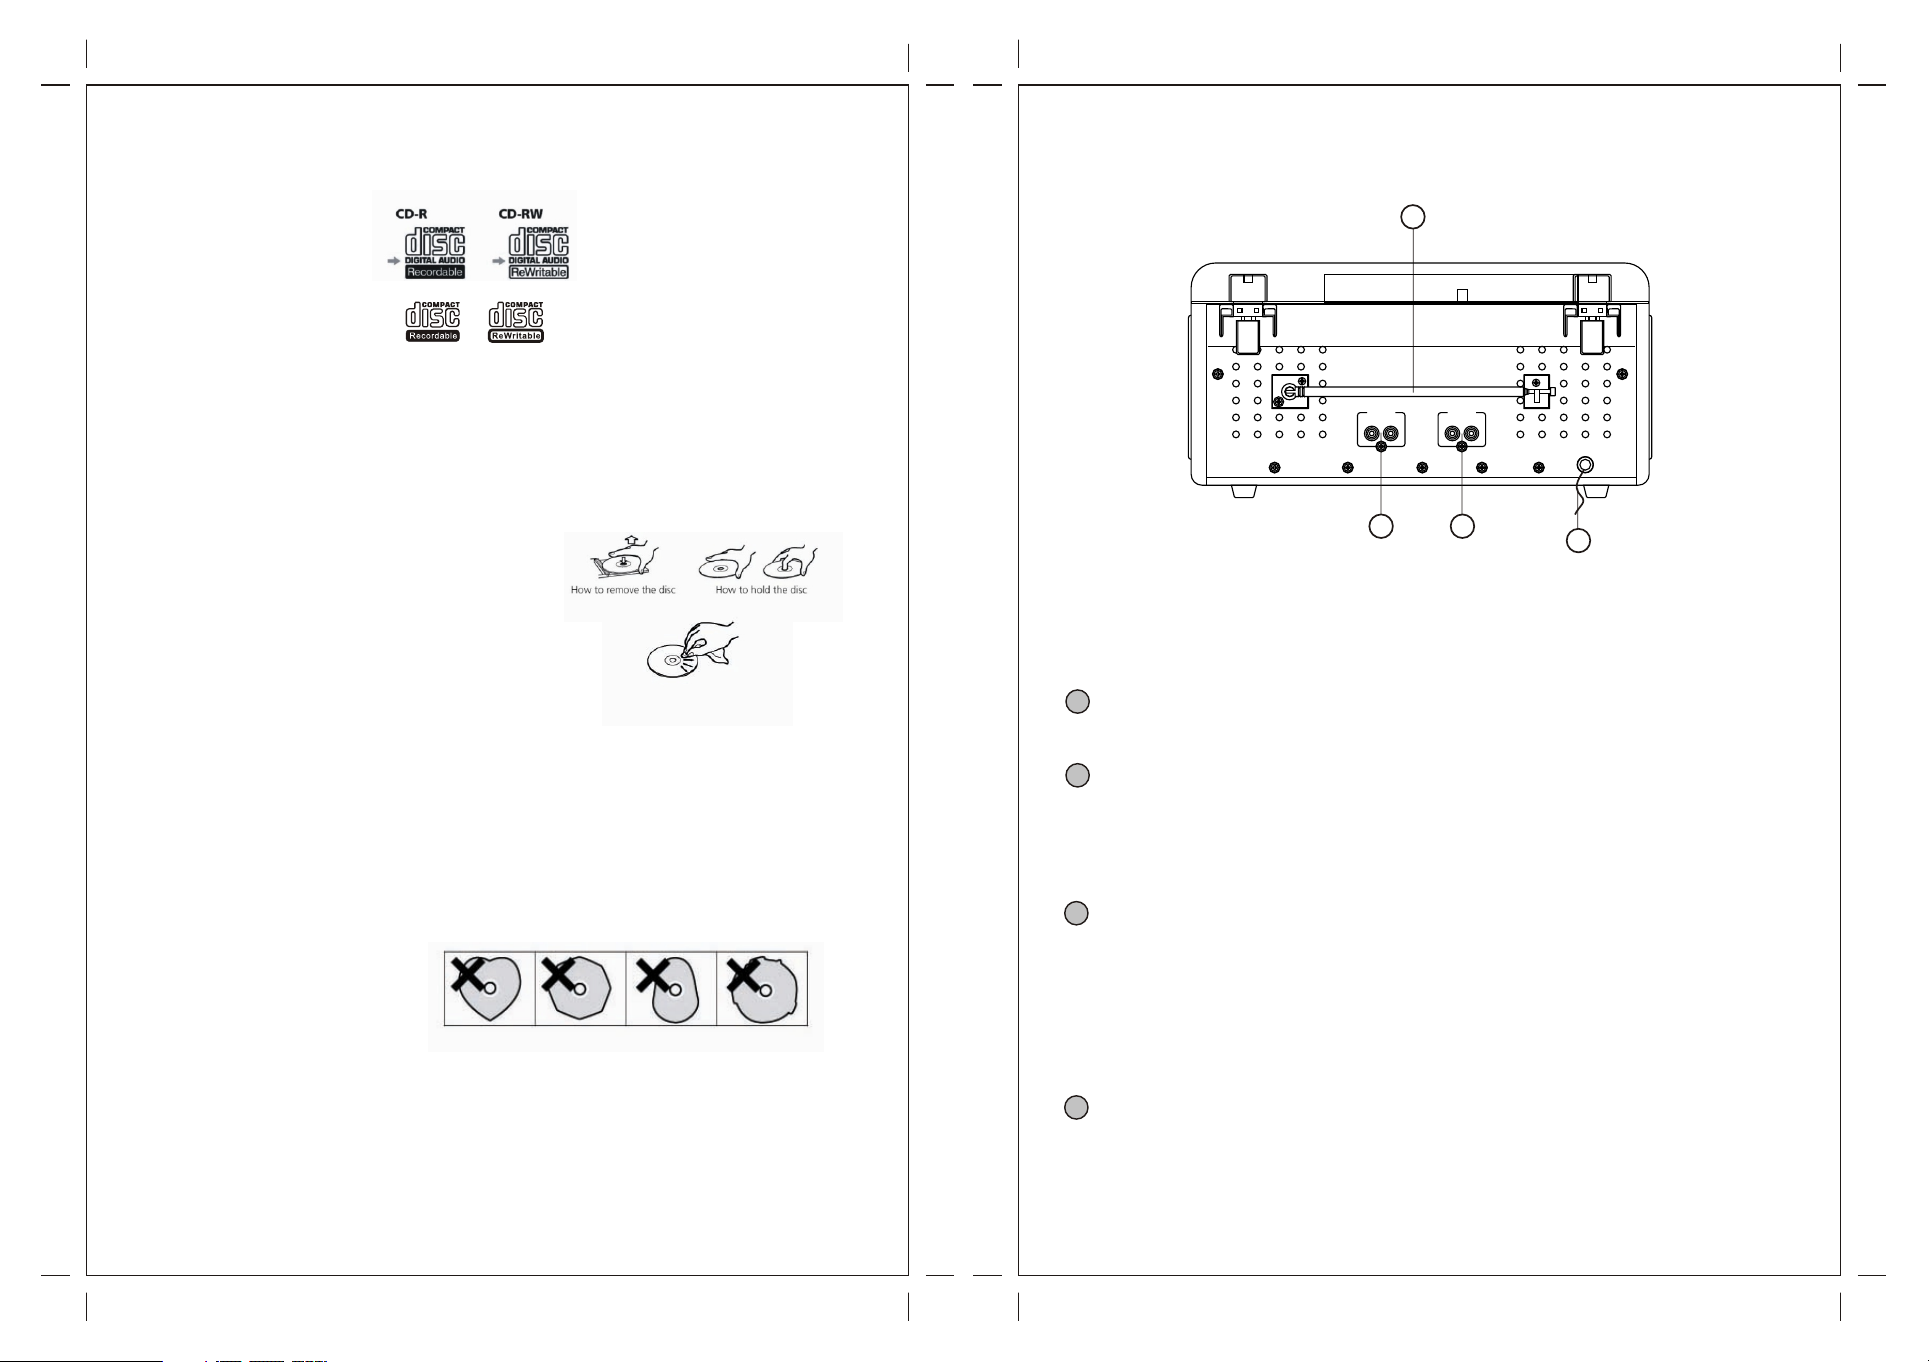
Connections
Depending on the quality of the disc a nd the condi tion o f the r ecord ing, s ome CD -R/CD -
RW disc s may not b e playa ble.
Alwa ys place the dis c on the di sc tr ay with the labe l side u pward (comp act discs can be
played or recorded only on one side)
To mov e a disc from its stora ge ca se, p ress down on the c enter of t he ca se an d lift the
disc out, holding it carefully by the edges.
If the di sc beco mes dirty, wipe t he surf ace fro m the cen ter
Hole outward towards the outer edge with a soft, dry cloth.
N ever use su ch chemi cals as rec ord spra y, antistatic sprays or fl uid, ben zine or thi nner
to c lean th e di scs. Su ch c hemic als will do i rreparable dam age to the disc's plas tic
surface.
D iscs sho uld be re turne d t o their c ases aft er use to av oid dust and scra tches that cou ld
cause the laser pick up “skip”.
Do not expose discs to direct sun light or high hum idity and tem perat ure for exten ded
periods. Long exposure to high temperatures will warp the disc.
Printable CD-R a nd CD-R W discs a re not reco mmend ed, as th e label sid e might b e stick y
and damage the unit.
Us e a so ft oil- based fel t-tip ped pen to write the information on the labe l side. Nev er use a
ball-point or hard-tipped pen, as this may cause damage to the record ed side .
Do not use CDs with an irregular sha pe(oc tagon al, heart sha ped, busi ness card size,
etc).CDs of this sort can damage the unit:
If you hav e an y do ubts abou t CD -R/CD -RW discs, read the prec autio ns s uppli ed w ith the
disc, or contact the disc manufacturer directly.
A
AUX IN
R
B C
Caution:
Switc h off the p ower to a ll equi pment b efore m aking c onnec tions .
Read th e instructions of each component you intend to use with this unit.
Be sure t o in sert e ach plug s ecure ly. To pr event hum and no ise, avoi d bund ling the s ignal
interconnection cables together with the AC power cord.
A
Ant enna
Tune in a st ation and extend the antenna to find the best position for the reception.
B
AUX I N
An exter nal (auxiliary) audio source (ie., personal CD player or MP3 p layer ) can be
connected to this unit and heard through the speakers.
(1) Plu g one end of cable (included) into the LINE IN socket on the back of the unit.
(2) Plu g the oth er end of the cable into the headphone or Line Out socket of the external
source.
C
LINE OU T
1) Plug t he RCA Cables into the Line Out jacks located at the rear of the unit making
sure that the red RCA Cable is inserted into the red jack and the white RCA Cable i s
inserted into the white jack.
2) Plug t he othe r ends of the RCA Cable into the auxiliary input (AUX) on your TV, home
entertainment receiver or other music system, again being sure that the correct color
coded jacks are used.
3) Turn th e unit on using the On/Off/Volu me Knob . Do not tu rn up the v olume o n your Un it.
Inste ad adjust the volume on your TV or h ome ent ertai nment r eceiv er.
D
AC Po wer Cor d
Plug th is power cord into an AC wall socket.
LINE OUT
L
L
R
D
6 7
Page 5

Parts of the Turntable
Unit Functions
AA
A Turntab le
B Tone arm h old
C Speed s elector
D Tone arm
E 45 RPM ad aptor
EE
1
2
3
DD
33
45
CC
78
FINALIZE
5
4
88 90 92 94 9 6 9 8 100 104 1 06 1 108
FM
AM
5
0
6
1 234
530 600 700 900 1000 0 14 171
REC
8
6
7
0
7
MHz
7
8 9
10
KHz
ERASE
PHONO
0
12
0
0
0
AUX
REMOTE
CD AM/FM
SENSOR
9
TUNI NGVOLU ME
10
11
12
BB
Remove the white plastic
needle guard before use
PHONE S
1
14
21
20
CD RE CORDE R
19
18
17
16
15
14
13
For private listening, first reduce the volume level to minimum. Then in sert th e plug fr om
your he adphones into the PHONES jack, and adjust the volume by turning the VOLUME
Knob. T he soun d from sp eaker s will be c ut off while t he head phone s are plu gged in .
2
POWER
Press this button to turn the unit on or off.
NOTE: I f you exp erience a malfunction during operation, you may power off
The uni t and re-start.
3
VOLUM E
Tur n this kn ob to adj ust the v olume s ound. (NOTE : The volume control level is from 00
to 32.)
4
AM/ FM SCAL E
5
Displ ay
6
Remot e Sensor
When operating the remote control unit, point it towards the REMOTE SENSOR.
7
PHONO
Press the PHONO button and select PHONO to play a record.
8
9
Page 6
8
ERASE
Use this button to erase a CD-RW d isc.
9
TUNIN G
In FM/A M mode, turn this knob to tune in a station.
10
AUX
Press the AUX button and select AUX to li sten to t he exte rnal so urce co nnect ed to the
AUX IN jacks.
11
AM/ FM
Press t he FM/A M butto n to listen to the radio.
12
CD
Press the CD button to play a CD.
13
DISC Tra y
14
Speak ers
15
OPEN/ CLOSE
In CD mode, use this button to open and close the disc tray.
16
STOP
Use this button to stop playback or recording.
17
FR
Press t he FR but ton onc e to go back to the start of the current track. Press the FR button
twice to go back to the start of the previous track.
18
FF
Press t he FF but ton onc e to go the s tart of t he next track.
19
PLAY/PAU SE
Use this button to start playback, pause, recording, finalizing and erasing.
Remote Control Unit
Remote Control Unit can operate the unit from a distance.
When operating the remote control unit, point it towards the front panel of the unit.
Even if the remote contro l unit is oper ated wit hin the effective range, remote control
operation may be impossibl e i f t here are an y o bstac les betw een the uni t a nd the remo te
control.
If the re mote c ontro l un it is operated n ear ot her appli ances which generate infra red ra ys,
or if other remot e control de vices usin g inf rared rays are us ed ne ar the unit, it may
operate incorrectly. Conv ersel y, the o ther ap plian ces may o perat e incor rectl y.
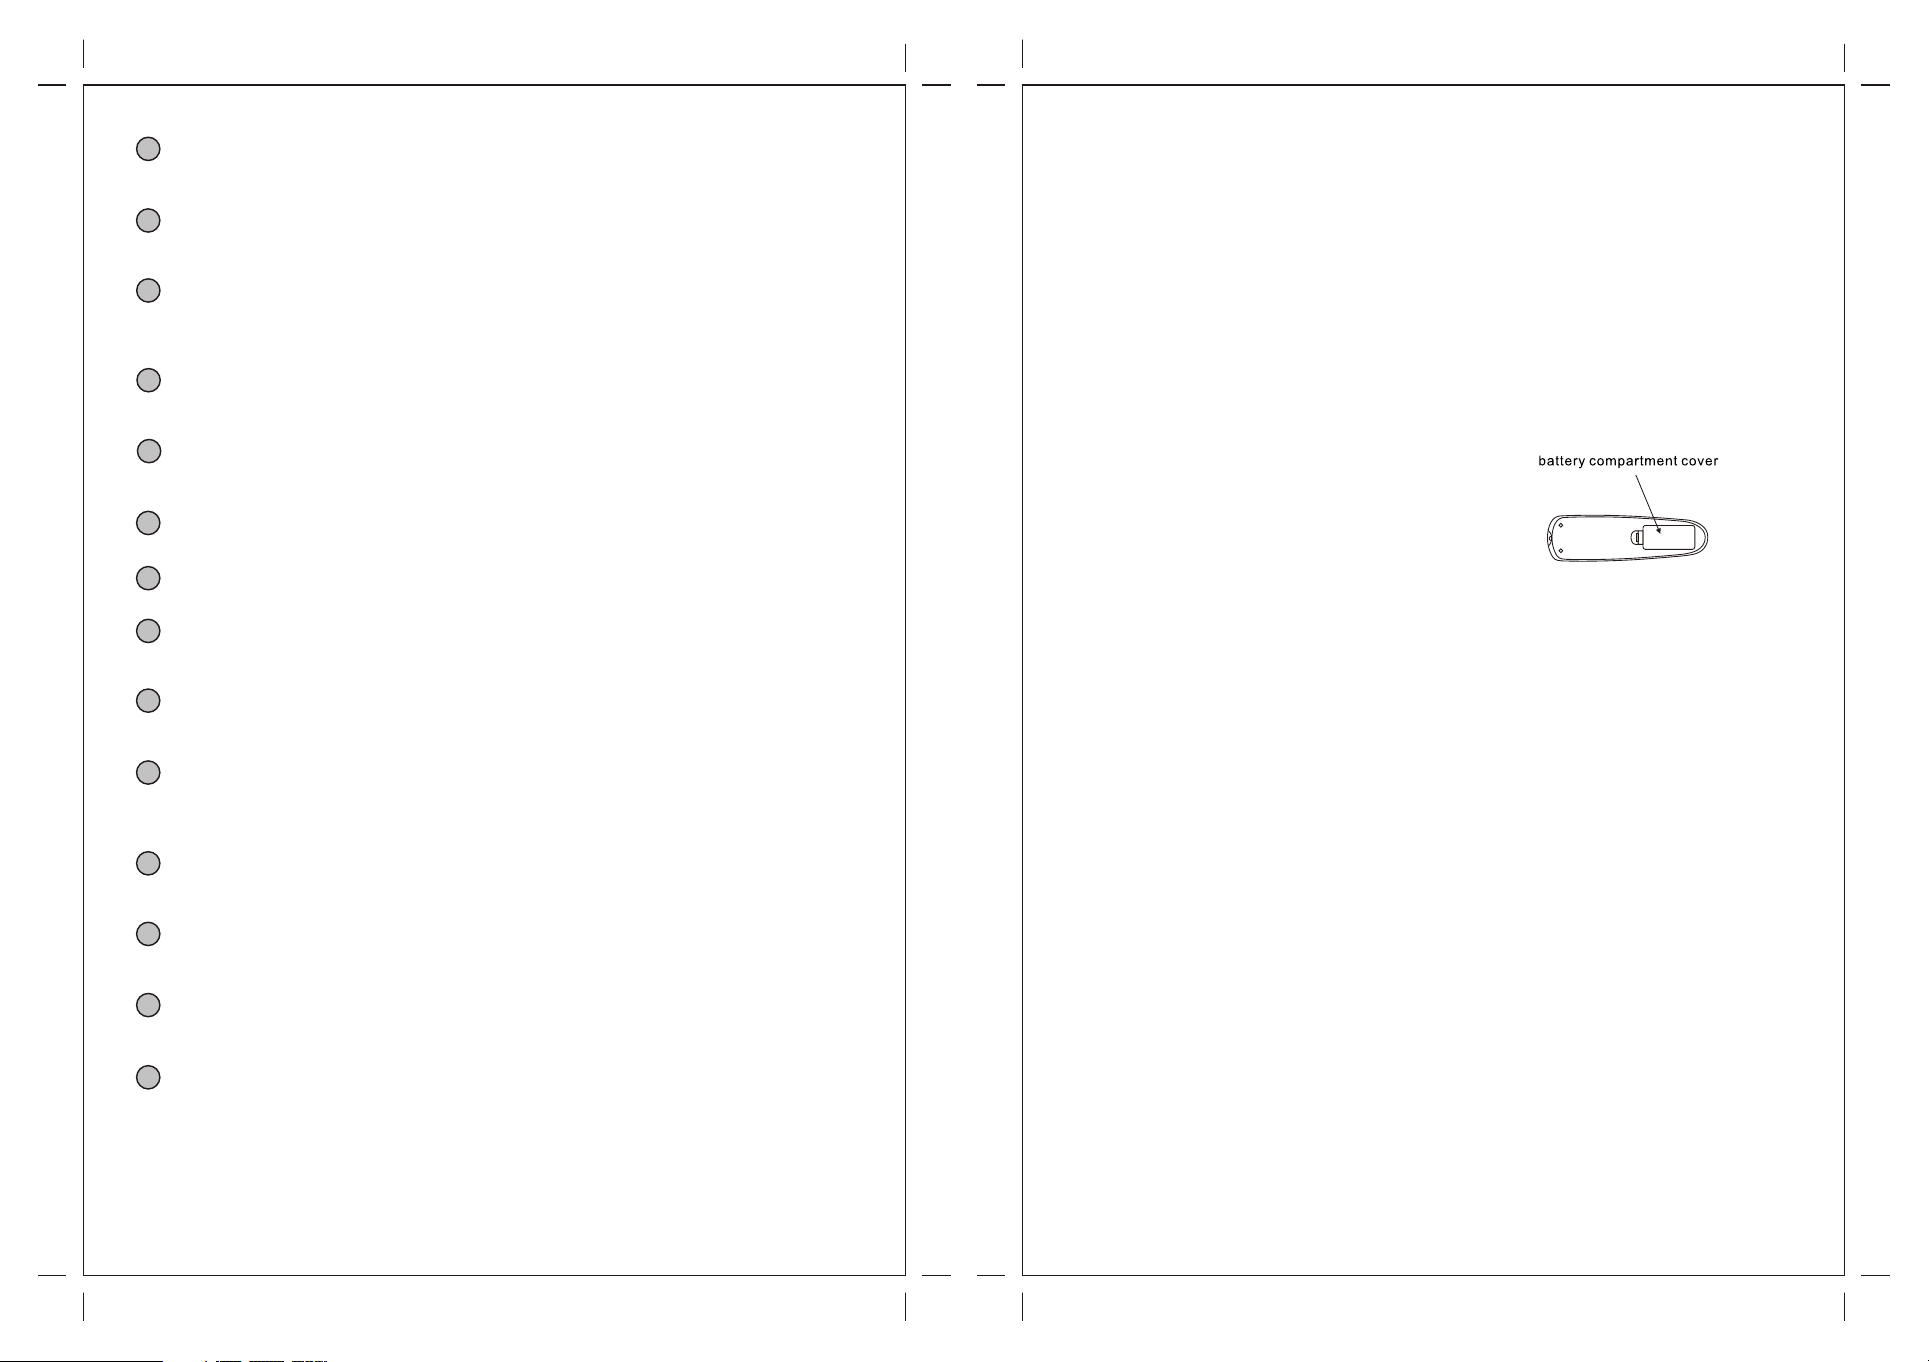
Battery Installation
1. Remove the battery compartment cover.
2. Ins ert tw o “AAA” ba tteri es. Ma ke sur e that the batte ries are i nsert ed wit h pola rity “+” a nd
“-” poles positioned correctly.
3. Close the cover.
Battery Replacement
If the di stance required between the remote control unit and main unit decre ases, t he
batteries are exhausted. In this case, please replace the batteries with new ones .
Precautions concerning batteries
Be sure t o insert the batteries with correct positive “+” and negative “-” polarities.
Use bat teries of the same type, never use diff erent t ypes of b atter ies tog ether.
Rechargeable and n on-re -char geabl e batt eries can be used. Re fer to the pr ecaut ions o n
their labels and do not mix together.
When the rem ote control un it is not to be us ed for a lon g time (mor e than a mon th),
remove th e batte ries from the remote contro l un it to preve nt them from leaki ng. If they
leak, wipe aw ay the liqu id insid e t he batte ry compa rtmen t and replace th e b atter ies with
new ones.
Do not heat or disas sembl e batteries and nev er d ispos e of old batte ries by throw ing them
in a fire.
20
REC
Use this button to enter record mode.
21
FINAL IZE
Use this button to finalize a CD-R/CD-RW dis c.
10 11
Page 7

Remote Control
A
OPEN/CLOSE
In CD,PHONO or AUX mod e, use th is butt on to
open and close the disc tray.Th is butt on does n ot
work In FM/AM mode.
B
CD
Press the CD button to play a CD.
C
REPEAT
In CD mode, use this button to select a repeat
Mode of CD.
D
PROGR AM
In CD mode, use this button to program tracks.
E
SHUFFLE
In CD mode, use this button for shuffle p layba ck.
F
DISPLAY
In CD mode, use this button to change the display.
G
TRACK INCREMENT
E
C
L
D
K
REPEAT
PROGRAM
FINALIZE
J
I
S
F
DISPLAY
SHUFFLE
CLEAR
ERASE
REC VOL- REC VOL+
VOL+
VOL-
A
M
OPEN/
CLOSE
PHONO
AUX
CD
RECORD
RADIO
MANUAL/
TRACK
AUTOINCREMENT INCREMENT
During recording, use this button to divide tracks.
H
MANUAL/AUTOINCR EMENT
Use this button to select the mode of track number assignment.
I
REC VOL+/REC VOL -
Use this button to adjust the record volume.
J
FINALIZE
Use this button to finalize a CD-R/CD-RW dis c.
K
ERASE
Use this button to erase a CD-RW d isc.
L
Clear
In CD mode, use this button to clear programmed tracks.
M
PHONO
Press the PHONO button and select PHONO to play a record.
N
AUX
Press the AUX button and select AUX to li sten to t he exte rnal so urce co nnect ed to the
AUX IN jacks.
O
Radio
Press the FM/AM button to listen to the radio.
P
RECORD
Use this button to record CD.
Q
MUSIC SKIP
In CD mode, use these buttons to skip tracks. Hold down these buttons to search for a
Part of a track.
R
VOL+/ VOL-
Use this button to adjust the volume
S
PLAY/PAUSE
Use this button to play/pause recording, finalizing and erasing .
T
STOP
Use this button to stop playback or recording.
Preparation for Use
1. Connect the AC powe r cord to AC o utlet .
N
B
2.Remove white protective needle cover by gently pulling toward s front o f unit.
O
P
G
H
R
Q
T
3. Re lease TONE A RM by gent ly pushing ho ld-do wn cl ip to the rig ht. This will unlo ck to ne
arm from its arm rest . Re-lock the hol d-dow n cl ip w hen movin g th e unit to anoth er
location.
Basic Operation
1. Press the POWER switch to turn the unit on.
Wai t until t he “--- busy ” di sappe ars on th e
display before next step.
2. Select the source by pressing the
Corre sponding button.
AM/ FMA M/FM
PHO NOPHO NO
CDCD
3. Rotate the VOLUME knob clockwise or counterclockwise
to
adjust the desired sound level.
VOL UME
4. Listening through Earphones/Headphones
(Not included).
4
1
MHz
10
KHz
0
REMOTE
SENSOR
ERASE
PHONO
AUX
CD AM/FM
EAR PHONE
TUNINGVOLUME
2
0
88 90 92 94 9 6 9 8 100 104 1 06 1 108
7
FM
5
7 8 9
0
6
1 234
AM
0
12
530 600 700 900 1000 0 14 171
0
3
AUXAUX
0
REC
FINALIZE
CD RECOR DER
12
13
Page 8

Listening to the Radio
1. Select AM or FM using the AM/FM b utton .
AM/ FM
2. Tune to the desired frequency.
TUN ING
Listening to a Record
1. Press the PHONO button once to select PHONO.
1
3
0
88 90 92 94 9 6 9 8 100 104 1 06 1 108
7
FM
5
7 8 9
0
6
10
1 234
AM
0
12
530 600 700 900 1000 0 14 171
0
0
0
REC
FINALIZE
CD RECOR DER
2
0
88 90 92 94 9 6 9 8 100 104 1 06 1 108
7
FM
5
7 8 9
0
6
1 234
AM
0
12
530 600 700 900 1000 0 14 171
0
TUNINGVOLUME
MHz
KHz
ERASE
PHONO
AUX
REMOTE
CD AM/FM
SENSOR
1
2. Gently open the dust cover.
Be not to pi nch your finger.
PHO NO
careful
0
REC
FINALIZE
CD RECOR DER
TUNINGVOLUME
MHz
10
KHz
ERASE
PHONO
0
AUX
REMOTE
CD AM/FM
SENSOR
Adapter
3. Rotate the VOLUME knob clockwise or counterclockwise
to
VOL UME
adjust the desired sound level.
33
45
44
78
55
3. Put th e record on the turntable.
When pl aying a 45 RPM record,use the included adapter.
4. Select the speed.
14 15
Page 9

5. Gently push the to the ri ght to release the tone arm.
clamp
Listening to a CD
1. Press the CD button.
6. Move the tone arm gently to the edge of the record (or the starting point of a track).
The tur ntabl e will be gin to tu rn.
33
45
78
0
88 90 92 94 9 6 9 8 100 104 1 06 1 108
7
FM
5
7 8 9
0
6
1 234
AM
0
12
530 600 700 900 1000 0 14 171
0
0
CD
REC
FINALIZE
CD RECOR DER
TUNINGVOLUME
MHz
10
KHz
ERASE
PHONO
0
AUX
REMOTE
CD AM/FM
SENSOR
“-- - - -- BU SY CD” bl inks fo r a few sec onds.
When no disc is set, “NO DISC” appears
On the display.
5
2. Press the OPEN/CLOSE button.
3. Place a disc on the tray with the printed label facing up.
Never p lace more than one disc on the tray.
Th e disc must be pl aced i n the cent er of the d isc tr ay. I f the disc is not cor rectl y load ed, it
may not be possi ble to open th e t ray agai n o nce it has closed, so you shou ld ensur e t he
disc is always centered on the tray.
6
Do not fo rce the t ray by hand during opening and closing operations.
4. Press the OPEN/CLOSE button to clo se the tray.
It takes a fe w sec onds for the unit to load the disc. No buttons will work during loading.
Wai t until t he tota l numbe r of the tr acks an d the tot al play t ime of th e disc ar e displ ayed.
CD
TR
The dis c type in dicat or show s the typ e of disc c urren tly loa ded.
16 17
CD
Page 10

5. Press the PLAY/PAU SE butt on ( ) to sta rt play back.
A
To suspen d playb ack tem porar ily (pa use mod e).
Press t he PLAY/ PAUS E butto n ( ) durin g playb ack. Pl aybac k stops a t the cur rent
posit ion.To resum e playb ack, pr ess the P LAY/ PAUS E butto n ( ).
B To skip to th e next or a p revio us trac k.
Du ring pl aybac k, repe atedl y press the S KIP button ( or ) unti l the desired track is
found.
The sel ected t rack wi ll be pla yed fro m the beg innin g.
In the sto p mode, p ress the SK IP butt on ( or ) repeatedly u ntil th e track you w ant
to hear is found, and press the PLAY/PAU SE bu tton ( ) to start playback from the
selected track.
Press ing the ( ) b utton o nce, it g oes to th e beginning of the previous track.
C
Searc h for a part of a trac k.
Durin g playback, hold down the SKIP button a nd rele ase it wh en the pa rt you wa nt to
Liste n to is fou nd.
D To stop pla yback
88 90 92 94 9 6 9 8 100 104 1 06 1 108
FM
0
1 234
AM
530 600 700 900 1000 0 14 171
REC
FINALIZE
5
7 8 9
6
12
0
CD RECOR DER
0
7
0
0
TUNINGVOLUME
MHz
10
KHz
ERASE
PHONO
0
AUX
REMOTE
CD AM/FM
SENSOR
Press t he STOP butt on ( ) to sto p playb ack.
Display
OPEN/
CLOSE
PHONO
Displa y
18 19
DISPLAY
AUX
SHUFFLE
CD
REPEAT
RECORD
RADIO
PROGRAM
CLEAR
MANUAL/
TRACK
ERASE
FINALIZE
AUTOINCREMENT INCREMENT
REC VOL- REC VOL+
VOL+
VOL-
Page 11

Each time the DISPLAY button is pressed, the display changes from CD to CD-R to
CD-RW a s follo ws:
Repeat Playback
CD REPEAT 1 ALL
TR
CD-R REPEAT 1 ALL
TR
CD-RW REPEAT 1 ALL
TR
Unfinalized CD-R/CD-RW, stopped
CD-R REPEAT 1 ALL
TR
CD-RW REPEAT 1 ALL
TR
During recording
CD
CD
CD
CD
CD
OPEN/
CLOSE
PHONO
DISPLAY
AUX
SHUFFLE
CD
Repeat
REPEAT
RECORD
RADIO
PROGRAM
CLEAR
MANUAL/
TRACK
ERASE
FINALIZE
AUTOINCREMENT INCREMENT
REC VOL- REC VOL+
VOL+
VOL-
Each ti me the RE PEAT button i s press ed, the r epeat m ode is ch anged a s follo ws:
REPEAT ALL (Repea t ALL the Tra cks)
Press the REPEAT but ton onc e durin g playb ack.
All the tracks of the disc will be played repeatedly.
REPEAT 1(Repe at )
ONE Track
Press the REPEAT but ton twi ce duri ng play back.
The track being played will be played repeatedly. If y ou pres s the MUS IC SKIP butt on
and select another track, the track you select will be played repeatedly.
It is also possible to select a track to be repeated in the stop mode. Press the
REPEAT butto n twice a nd then s elect t he trac k number by pressing the MUSIC SKIP
button. Press the PLAY butto n to star t playb ack.
If one of t he foll owing buttons is pressed, repeat mode will be cancelled:
OPEN/ CLOSE , AM/FM, P HONO, AU X
Repeat playback works with finalized discs only.
NO TOC CD-RW
REC
TR
AUTO TRACK
PHONO AUX
TAPE
-dB 30 12 6 3 0 OVER
L+R
NOTE: "NO TO C" stan ds for "N o Table of Contents" and indicates a CD that has
not been "finalized".
20 2 1
Page 12

Shuffle Playback
Shuffl e
Programmed Playback
Up to 32 tracks can be programmed in the desired order.
Inser t a disc an d select “CD” before beginning programming.
Shuff le play back do es not wo rk duri ng prog ramme d playb ack.
Progr ammed playback works with finalized discs only.
OPEN/
CLOSE
PHONO
DISPLAY
AUX
SHUFFLE
CD
REPEAT
RECORD
RADIO
PROGRAM
CLEAR
MANUAL/
TRACK
ERASE
FINALIZE
AUTOINCREMENT INCREMENT
REC VOL- REC VOL+
VOL+
VOL-
1 Press the PROGRAM button in th e stop mo de.
OPEN/
CLOSE
PHONO
DISPLAY
AUX
SHUFFLE
CD
REPEAT
RECORD
RADIO
PROGRAM
Pro gra m
CLEAR
MANUAL/
TRACK
ERASE
FINALIZE
AUTOINCREMENT INCREMENT
REC VOL- REC VOL+
VOL+
VOL-
NO TOC CD-RW
TR
CD
SHUFFLE
The tra cks can be played randomly. Pre ss the SH UFFLE b utton d uring p layba ck. (In t he
stop mode, press the SHUFFLE button and the PLAY but ton)
when the SHUFFLE playback of all the tracks has been finished, the unit stops and the
shuff le play back mo de is can celle d.
If you pres s the ( ) button during shuffle pl aybac k, next t rack will be rando mly sel ected
and play ed. If yo u p ress the ( ) bu tton, th e currently pl ayed tra ck will b e p layed from
the beginning. A track cannot be replay during shuffl e playb ack.
Shuff le play back do esn't w ork dur ing pro gramm ed play back.
If one of t he foll owing buttons is pressed, shuffle m ode wil l be canc elled :
SHUFF LE in the s top mode, OPEN/CLOSE, AM/FM, PHONO, AUX.
Shuff le play back wo rks wit h final ized di scs onl y.
NO TOC CD-RW
TR
CD
PROGRAM
“PROGRAM” indicator blinks, and “P-01” appears on the display.
2 Press the MUSIC SKIP bu tton ( or ) t o selec t a track .
OPEN/
CLOSE
PHONO
DISPLAY
AUX
SHUFFLE
CD
REPEAT
RECORD
RADIO
PROGRAM
CLEAR
MANUAL/
TRACK
ERASE
FINALIZE
AUTOINCREMENT INCREMENT
REC VOL- REC VOL+
VOL+
VOL-
NO TOC CD-RW
REC
TR
PROGRAM
CD
22 23
Page 13

3 Press the PROGRAM button.
Pro gra m
To check t he prog ramme d order
In the st op mode, press the MUSIC SKIP bu tton re peate dly to sh ow the tr ack num bers
that have been stored in memory.
OPEN/
CLOSE
PHONO
DISPLAY
AUX
SHUFFLE
CD
REPEAT
RECORD
RADIO
PROGRAM
CLEAR
MANUAL/
TRACK
ERASE
FINALIZE
AUTOINCREMENT INCREMENT
REC VOL- REC VOL+
VOL+
VOL-
OPEN/
CLOSE
PHONO
DISPLAY
AUX
SHUFFLE
CD
REPEAT
RECORD
RADIO
PROGRAM
CLEAR
TRACK
ERASE
FINALIZE
REC VOL- REC VOL+
VOL+
VOL-
MANUAL/
AUTOINCREMENT INCREMENT
CD-RW
TR
CD
NO TOC CD-RW
TR
CD
PROGRAM
The tra ck is programmed, and “P-02” is displayed.
Repeat steps 2 and 3 to program more tracks.
You can program up to 32 tracks.
To cancel t he prog ram mod e, pres s the STOP button ( ) .
4. When the selection of track numbers has been finished, press the PLAY bu tton ( ) to
Start p rogra m playback.
OPEN/
CLOSE
PHONO
DISPLAY
AUX
SHUFFLE
CD
REPEAT
RECORD
RADIO
PROGRAM
CLEAR
MANUAL/
TRACK
ERASE
FINALIZE
AUTOINCREMENT INCREMENT
REC VOL- REC VOL+
VOL+
VOL-
To add a tra ck to the e nd of the p rogra m
In the st op mode, press the PROGRAM button.
Select a track number by pressing the MUSIC SKIP butt on, and t hen pre ss the
PROGR AM button.
The tra ck is added to the end of the program.
To delet e the las t track f rom the p rogra m.
In the st op mode, press the CLEAR button to delete the last track from the program.
OPEN/
CLOSE
PHONO
Clear
DISPLAY
AUX
SHUFFLE
CD
REPEAT
RECORD
RADIO
PROGRAM
CLEAR
MANUAL/
TRACK
ERASE
FINALIZE
AUTOINCREMENT INCREMENT
REC VOL- REC VOL+
VOL+
VOL-
To clear t he prog ram
If one of the following buttons is pressed, the programmed contents will be cleared :
OPEN/CLOSE, AM/FM, PHONO, AUX, STOP in the st op mode .
24 25
Page 14

Recording Operation Steps
blank
Load an or non-
finalized CD-R or CD-RW
finalized CD-R or CD-RW
disc
disc
Select Auto/Manu al Tr ack
Select Auto/Manu al Tr ack
Increment Mode;
Increment Mode;
Set Auto Track Increment
Set Auto Track Increment
Sensitivity
Sensitivity
Select Recording SourceSelect Recording Source
Activate RecordingActivate Recording
Test and Adjust Recording
Test and Adjust Recording
Level
Level
Start RecordingStart Recording
blankLoad an or non-
Recording
FM
0
AM
530 600 700 900 1000 0 14 171
FINALIZE
9
About CD-R and CD-RW discs
CD-R discs can be recorded once only.O nce the y have be en used f or reco rding , they ca nnot
88 90 92 94 9 6 9 8 100 104 1 06 1 108
5
6
1 234
12
REC
CD RECOR DER
5
1
0
7
7 8 9
0
0
0
TUNINGVOLUME
MHz
10
KHz
ERASE
PHONO
0
AUX
REMOTE
CD AM/FM
SENSOR
2
3
be erased or re-recorded. However, if space is available on the d isc (an d the dis c has not
been finalized), additional material can be recorded.
By contrast, a CD-RW di sc can be u sed in mu ch the sa me way as a C D-R dis c, but th e last
track or tracks recorded can be erased, and the space on the disc can be re-used for other
recordings.
However, you should note that an audio CD created using a CD-RW d isc may n ot play b ack
satisfactorily on every audio CD-player.
CD-R, by contrast, may be played satisfactorily on the majority of audio CD players .
For thi s reason, CD-R discs are typically recommended for your recording s.
Audio f rom the P HONO, AUX sou rces ca n be reco rded on t he CD rec order.
1. To recor d from a re cord, s elect P HONO.
2. To recor d from an ext ernal source , press the AUX butto n and con nect th e cable to th e
AUX IN jacks at the back, Select AUX.
3. Load a recordable CD-R or CD-RW disc i nto the u nit.
Tra ck Divi sionTrac k Divis ion
Finalizing Recorded DiscFinalizing Recorded Disc
Please refer to the detailed operation instructions followed.
NOTE: a udio recorded to CD-R and CD-RW discs c an be pla yed on ot her CD pl ayers o nce
finalized. IF the recorded audio has not been finalized, the disc may not be pla yed and
listened to on other CD players.
26
27
Page 15

Press the OPEN/CLOSE button( ), place a disc on the disc tray with the printed
label side up, and then press the OPEN/CLOSE button( ) to close the disc tray.
The display w ill show “B usy CD” and th e disc i s r eadin g, wait unt il the reading is c omple te
before next step.
NOTE:Make sure “NO TOC” an d “CD-R ”(or “C D-RW') indicators lights on the dis play, or the
RECORD function will not work.
5. Press the RECORD button,“REC” and ( ) will appear on the display.
No button w ill work whil e “busy ” is displ ayed. Wait a few secon ds u ntil “bus y”
disappears from the display.
REC
4. Select the mode of track number assignment.
A.TRACK INCREMENT
Tra cks wil l not be di vided a utoma tical ly in TRACK INCREMENT mode . The U ser sho uld
press the TRAC K INCRE MENT butto n to set a tr ack at th e end of ea ch song a s desir ed . The
unit will record the next track each time you press the TRACK IN CREME NT bu tton. I F the
current track has not finished recording, and you press the TRACK I NCREM ENT button , the
unit will record the next track.
NO TOC CD-RW
REC
TR
PHONO AUX
-dB 30 12 6 3 0 OVER
L+R
B. AU TO MANUAL - se lect tr acks au tomat icall y
Press the AUTO MA NUAL button to select tracks automatically, using t he unit 's trac k
division assignment feature. When the recording signal's leve l drops b elow 20 db / 40db f or
more than 2 seconds, the unit automatically assigns a new track.
Record from a vinyl source in "20db" mode
Record from an auxiliary source in "40db" mode
Should the unit detect a delay greater than 2 seconds during a track's recordi ng, the u nit
may automatically begin and assign a new track.
NO TOC CD-RW
NO TOC CD-RW
TR
AUTO TRACK
TR
AUTO TRACK
PHONO AUX
-dB 30 12 6 3 0 OVER
L+R
PHONO AUX
-dB 30 12 6 3 0 OVER
L+R
REPEAT
PROGRAM
FINALIZE
DISPLAY
SHUFFLE
CLEAR
TRACK
ERASE
REC VOL- REC VOL+
VOL+
VOL-
OPEN/
CLOSE
PHONO
AUX
CD
RECORD
RADIO
AUTOINCREMENT INCREMENT
A
MANUAL/
B
6
6.If ne cessary, adju st the re cordi ng leve l using t he REC VO L- or REC V OL+ but ton, t
he
display will show from -70 to 00 to +7.
REC VOL- REC VOL+
NO TOC CD-RW
REC
TR
AUTO TRACK
PHONO
-dB 30 12 6 3 0 OVER
L+R
Play the source to be recorded and adjust the recording level so that the loudes t sound
does no t exceed the “OVER” indicator on the peak level meter.
7. If PHO NO is sel ected in step 1, gently lower the tone arm onto the edge of the record(or
the tra ck to be re corded).
8. If AUX (ext ernal source) was selec ted in ste p 1, pla y the
source to be recorded.
Wh en t he p layba ck o f th e source has b een finis hed, pres s th e
STOP ( ) butto n to stop r ecord ing.
When th e rotat ion of th e turntable stops, the recording will stop automatically.
But to preve nt unwant ed noise fr om the tone arm bei ng recorded, sto p th e recording
manually by using the STOP button .
9. Press the PLAY/ PAUS E butto n to star t recor ding.
28
29
Page 16

A To stop rec ordin g
Finalizing
Press t he STOP butt on ( ) to sto p recor ding.
The dis play wi ll show “ Busy” , after t he “Bus y”
disap pears, then press CD button The dis play
Will sh ow the record track time.
.
88 90 92 94 9 6 9 8 100 104 1 06 1 108
FM
0
1 234
AM
530 600 700 900 1000 0 14 171
REC
FINALIZE
5
7 8 9
6
12
0
CD RECOR DER
0
7
0
0
TUNINGVOLUME
MHz
10
KHz
ERASE
PHONO
0
AUX
REMOTE
CD AM/FM
SENSOR
AB
B To suspe nd reco rding t empor arily ( pause m ode)
Pre ss the PLAY/PAUSE button ( ) . “Bu sy” bri efly appears on the display, and the
recording is paused.
To restar t recor ding, p ress th e PLAY/PAUSE button ( ) .
You cannot restart recording while “busy” is displayed.
Remem ber that every time recording is paused or stopped, a new track number will
alway s be assigned. It is not possible to record in two “stages” within one track.
C Manua l track division
It is pos sible t o divide the recording into tracks while recording.
While r ecording is taking place, press the TRACK IN CREME NT bu tton. The current track
numbe r will be advanced by one.
OPEN/
CLOSE
PHONO
DISPLAY
AUX
SHUFFLE
CD
REPEAT
RECORD
RADIO
PROGRAM
CLEAR
MANUAL/
TRACK
ERASE
FINALIZE
AUTOINCREMENT INCREMENT
REC VOL- REC VOL+
VOL+
Tra ck Inc rem ent
VOL-
As has been explained earlier, in order for
A disc to become a s tanda rd CD, it m ust
have a Tabl e of Cont ents( TOC ) writt en to it.
This pr ocess i s known a s final izing .
1. Press the FINALIZE button in the sto p mode.
“FiN- d” appears on the display.
To cancel t he fina lizin g proce ss, pre ss the
STOP butto n ( ).
FINALIZE
2. Press the PLAY ( ) button to start finalizing.
The display will show "--- Busy" during finalize,
wait un til the busy disappears to complete the finalizing.
The fin alize t ime is su bject t o the con tents o f recor d,
it may ta ke few mi nutes in some cases.
When th e operation has been finished, the NO TOC
indicator turns off a nd the di splay r eturn s to the
track /time d isplay.
Durin g finalizing, no buttons work.
Never t urn the power off or unpl ug the po wer cor d.
Although finalized CD-R discs may be played on ordinary
CD players, remember that finalized CD-RW discs m ay not
play on ordinary CD players.
88 90 92 94 9 6 9 8 100 104 1 06 1 108
FM
0
1 234
AM
530 600 700 900 1000 0 14 171
REC
FINALIZE
5
6
12
CD RECOR DER
21
0
7
7 8 9
0
0
0
TUNINGVOLUME
MHz
10
KHz
ERASE
PHONO
0
AUX
REMOTE
CD AM/FM
SENSOR
The TRACK IN CREME NT button works regardless of the MANUAL/AUTO R EC sett ing.
This se ction d eals wi th the ac tions t aken af ter rec ordin g.
Once fi nalized, CD-R discs are truly final. No more tracks can be recorded on them. By
contr ast, CD -RW dis c can be “u nfina lized ”, and if t here is s pace, f urthe r mater ial can b e
recor ded on them.
30
Finalize discs in PHONO / AUX modes.
Disc tray will automatically eject once disc finalization is comp leted .
31
Page 17

Erase or Unfinalize a CD-RW
It is pos sible to erase the last recorded track, it is also possible to erase a whole disc.
Erase procedures are possible only on an unfinalized CD-RW disc . If a CD-RW dis c has
been finalized, unfinalize it prior to erasure. Remember that it is not poss ible to p erfor m any
Erase or unfinalize procedures on a CD-R disc.
1. Pres s the CD button to select “CD”.
CD
2. Load a r ecord ed CD-RW.
3. Pres s the ERASE button in the s top mod e.
ERA SE
(1). Wait un til “Bu sy” dis appea rs on the d ispla y.
(2). Pr ess the ( ) b utton t o begin e rasing the last track.
(3). Re peat to p ress Erase button to continue the next track.
Er All
Select this to erase all the tracks.
To cancel the erasing or unfinalizing process, press the STO P but ton ( ).
(1). Pr ess and hold the “Erase” button until the display shows “Erase All”.
4.
(2). Pr ess pla y ( ) butto n to begi n the erase process.
(3). Di splay will show 0000000 to confirm the disc is clear.
Th e remai ning time for the op erati on appears in the di splay. When the operat ion has
been finished, the display returns to the track/time display.
During erasing/unfinalizing, no buttons will work.
Never turn the power off nor unp lug the p ower co rd.
This o perat ion ca nnot b e undone. If you are go ing to era se a tr ack or track s, make su re
that th ey are recordings that you really want to erase.
A co pied C D-RW disc from anot her un it can 't b e eras ed one by o ne in this unit, you can
only erase entire disc.
“Er” and t he l ast tra ck number a ppear w hen the dis c hasn' t be en fina lized . Each time t he
ERASE button is pressed, the display changes as follows:
“Er” an d the num ber of th e last tr ack rec orded on the dis c
Selec t this to e rase th e last track on the disc.
This wi ll not ap pear wh en only o ne trac k is reco rded on t he disc .
32
33
Page 18

Specifications
Troubleshooting Guide
AMPLIFIER section
Output Power……………………………....1.8 W
Frequency Response………………….….60 to 20, 000 Hz
TUNER section
FM Sect ion
Frequency Range…………………….……87.5 to 108 MHz
AM Section
Frequency Range……………………..…..530 to 1710 KHz
CD PLAYE R secti on
Frequency Response………………….….60 to 20, 000 Hz +/-4 dB
Signal-to-Noise Ratio……………….….…55 dB (IEC-A)
RECORD PLAYER sect ion
Motor…………………………………..…....DC servo motor
Drive System………………………..….….Belt Drive
Speeds……………………………….…..…33-1/3 rpm, 45 rpm and 78 rpm
Wow &Fl utter …………… …………. ..….… Less th an 0.35 % (WTD)
S/N Ratio…………………………….……...More than 50 dB
Cartridge Typ e………… …………… ……..C erami c Stere o Cartr idge
Stylus………………………………………..402-M208-165
SPEAKER SYSTEM section
Type……………………………………...….1-way
Impedance…………………………..….....8 ohms
Input Power……………………………......Max. 10 W
GENERAL
Power Requirements……………….…..…AC 120 V~ 60 Hz
Power Consumption……………………....42 W
Dimensions(W x Hx D)………………...….''34''(L)x''35''(W)x''16''(H)(approx.)
Weigh t………… …………… ……….… ..... 2 9.1 Ibs . (appr ox.)
Standard Accessories……………...……..Operating Instruction Booklet
45 rpm Adapter
In case of trouble with the unit, please look through this chart and see if you can solve the
problem by yourself before calling your dealer.
Problem
Power does not come on when
the power switch is pressed.
No sound comes out of the
speakers.
The sound is noisy.
Cannot listen to any station, or
signal appears weak.
The sound is distorted.
CD stops immediately after
starting, or unit pauses or
stops during play.
No sound.
Specific CD is noisy, or
playback stops or skips.
Cause
Unit is unplugged.
The volume is turned down
(to MIN).
The input selector does not
match the playback source.
The unit is too close to a TV
set or another similar
appliance.
The station is not tuned-in
properly.
A TV set is being used
nearby and is interfering with
the radio reception.
The antenna is not oriented
properly.
The CD is inserted upside
down.
The CD is dusty or dirty or
there is condensation on the
CD.
The CD player is paused.
The CD is scratched,
damaged or warped.
The disc is very dirty.
Solution
Connect the unit to the AC
power supply.
Adjust the volume.
Re-select the desired
input source.
Turn off the TV or other
appliance, and relocate
the unit.
Properly tune-in the
desired station.
Turn-off the interfering TV
set.
Re-orient the antenna
until reception improves.
Insert the CD with the
printed side right-side up.
Carefully clean and dry
the CD.
Press the PLAY/PAUSE
button.
The CD should be
changed.
Carefully clean the CD.
34
Should you have a ny question s regarding you r
VICTORI A RETROWRITE R
please contac t a Customer Se rvice Represe ntative tol l free
Monday - Friday 8 :30 AM - 5:00 PM Pac ific Standard Ti me at
866-446-0 961
Grace Digit al Inc., San Dieg o, CA
35
 Loading...