

Ecovacs Robotics W950 Instruction Manual

EN
Instruction Manual
DE
Benutzerhandbuch
ES
Manual de instrucciones
FR
Mode d'emploi
IT
Manuale d’Istruzione
RU
Руководство по эксплуатации

EN
Instruction Manual
..............................................................2
DE
Benutzerhandbuch
ES
Manual de instrucciones
FR
Manuel d'instructions
IT
Manuale d'uso
RU
Руководство по эксплуатации
Declaration of conformity
Congratulations on the purchase of your ECOVACS ROBOTICS WINBOT!
We hope it brings you many years of satisfaction. We trust the purchase of your
new robot will help keep your home clean and provide you more quality time to
do other things.
Live Smart. Enjoy Life.
Should you encounter situations that have not been properly addressed in
this Instruction Manual, please contact our Customer Service Center where a
technician can address your specic problem or question.
For more information, please visit the ECOVACS ROBOTICS ocial website:
www.ecovacs.com
............................................................21
..................................................45
.......................................................67
...................................................................90
....................................113
....................................................136
The company reserves the right to make technological and/or design changes
to this product for continuous improvement.
Thank you for choosing WINBOT!

Contents
1. Important Safety Instructions.......................................................................2
2. Package Contents and Technical Specications.......................................5
2.1 Package Contents.....................................................................................5
2.2 Specications............................................................................................5
2.3 Product Diagram........................................................................................6
3. Operating WINBOT........................................................................................7
3.1 Notes before Cleaning...............................................................................7
3.2 Attach Cleaning Pad.................................................................................8
3.3 Assemble Power Adapter..........................................................................8
3.4 Install Safety Tether...................................................................................9
3.5 Place Safety Pod....................................................................................10
3.6 Spray Cleaning Solution..........................................................................11
3.7 Start.........................................................................................................11
3.8 Pause......................................................................................................13
3.9 Stop.........................................................................................................13
4. Maintenance.................................................................................................14
4.1 Cleaning Pad..........................................................................................14
4.2 Fan, Sensors and Squeegee...................................................................15
4.3 Driving Treads.........................................................................................16
5. Status Indicator Light and Sounds............................................................17
6. Troubleshooting..........................................................................................18
EN

1. Important Safety Instructions
When using an electrical appliance, basic precautions should
always be followed, including the following:
READ ALL INSTRUCTIONS BEFORE USING THIS APPLIANCE.
SAVE THESE INSTRUCTIONS
1. This appliance can be used by persons with reduced physical,
sensory or mental capabilities or lack of experience and
knowledge if they have been given supervision or instruction
concerning use of the appliance in a safe way and understand
the hazards involved. Children shall not play with the appliance.
The appliance is not to be used if it has been dropped, if there are
visible signs of damage or if it is leaking. Keep the appliance out
of reach of children when it is energized.
2. Do not use the Appliance in extremely hot or cold
environments (below 0˚C/32˚F or above 40˚C/104˚F, above
65% humidity). The Appliance can be used to clean outside
windows if it is properly tethered to the Safety Pod, winds are
calm, and it is not raining or snowing.
3. Please ensure the Appliance is plugged in while it is cleaning.
The Appliance has a Back-Up Battery that charges during use.
The Back-Up Battery powers the Appliance if it becomes
unplugged or the electricity fails.
4. Do not leave the Appliance unattended when it is plugged in.
5. For household use ONLY. Do not use the Appliance in
commercial or industrial environments.
6. Do not use the Appliance on cracked glass.
7. Only use accessories recommended or supplied by the manufacturer.
Only use the Power Adapter supplied by the manufacturer.
8. Please make sure your power supply voltage matches the
power voltage marked on the Power Adapter.
9. Do not use the Appliance on a framed window with a frame
smaller than 5mm (0.2 inches).
10. Do not use the Appliance on wet or greasy windows.
11. Store the Appliance away from heat and ammable materials.
12. Do not use the Appliance if it does not rmly attach to the glass or
has visible signs of damage.
13. To reduce the risk of electrical shock, do not put the Appliance
in water or other liquid. Do not place or store Appliance where
it can fall or be pulled into a tub or sink.
14. Do not touch power plug or the Appliance with wet hands.
15. Do not charge the Appliance in extremely hot or cold
environments, or it may aect battery life span.
2
EN

1. Important Safety Instructions
16. When charging the Appliance, do not place it on other
electrical appliances and keep it away from re and liquid.
17. Take care not to damage the power cord. Do not pull on or
carry the Appliance by the power cord, use the power cord as a
handle, close a window on the power cord, or put heavy weights
on the power cord. Keep power cord away from hot surfaces.
18. Do not use with a damaged power cord or receptacle. Do not
use the Appliance if it is not working properly, has been dropped,
damaged, or come in contact with water. It must be repaired by
the manufacturer or its service agent in order to avoid a hazard.
19. If the supply cord is damaged, it must be replaced by the
manufacturer or its service agent in order to avoid a hazard.
20. The plug must be removed from the receptacle before cleaning
or maintaining the Appliance. Do not unplug the Power Adapter
by pulling on the power cord.
21. The Back-Up Battery must be replaced by the manufacturer or
its service agent in order to avoid a hazard.
22. The Back-Up Battery must be removed and discarded according
to local laws and regulations before disposal of the Appliance.
23. The Appliance must be disconnected from the receptacle
before removing the battery for disposal of the Appliance.
24. Please dispose of used batteries according to local laws and regulations.
25. Do not incinerate the Appliance even if it is severely damaged.
The battery can explode in a re.
26. The Appliance must be used in accordance with the directions
in this Instruction Manual. The company cannot be held liable or
responsible for any damages or injuries caused by improper use.
27. WARNING:
the detachable supply unit EA10952 provided with this Appliance.
28. The robot contains batteries that are only replaceable by
skilled persons.
29. The Remote Control requires two non-rechargeable AAA R03
batteries. To replace the battery of the Remote Control, please
turn over the Remote Control, press and remove its Battery
Cover. Remove the batteries, and insert the new batteries with the
correct polarity. Reassemble the Battery Cover.
30. Non-rechargeable batteries are not to be recharged.
31. Dierent types of batteries or new and used batteries are not
to be mixed.
32. Batteries of the Remote Control are to be inserted with the
correct polarity.
For the purposes of recharging the battery, only use
EN
3

1. Important Safety Instructions
33. Exhausted batteries are to be removed from the Appliance
and safely disposed of.
34. If the Remote Control is to be stored unused for a long period,
the batteries should be removed.
35. The supply terminals are not to be short-circuited.
36. The plug and the Power Adapter must be used indoor.
For EU Countries
For EU Declaration of Conformity information, visit
https://www.ecovacs.com/global/compliance
Correct Disposal of this Product
This marking indicates that this product should not be disposed of
with other household waste throughout the EU. To prevent possible
harm to the environment or human health from uncontrolled waste
disposal, recycle it responsibly to promote the sustainable reuse of
material resources. To recycle your used device, please use the return
and collection systems or contact the retailer where the product was
purchased. They can safely recycle this product.
4
EN
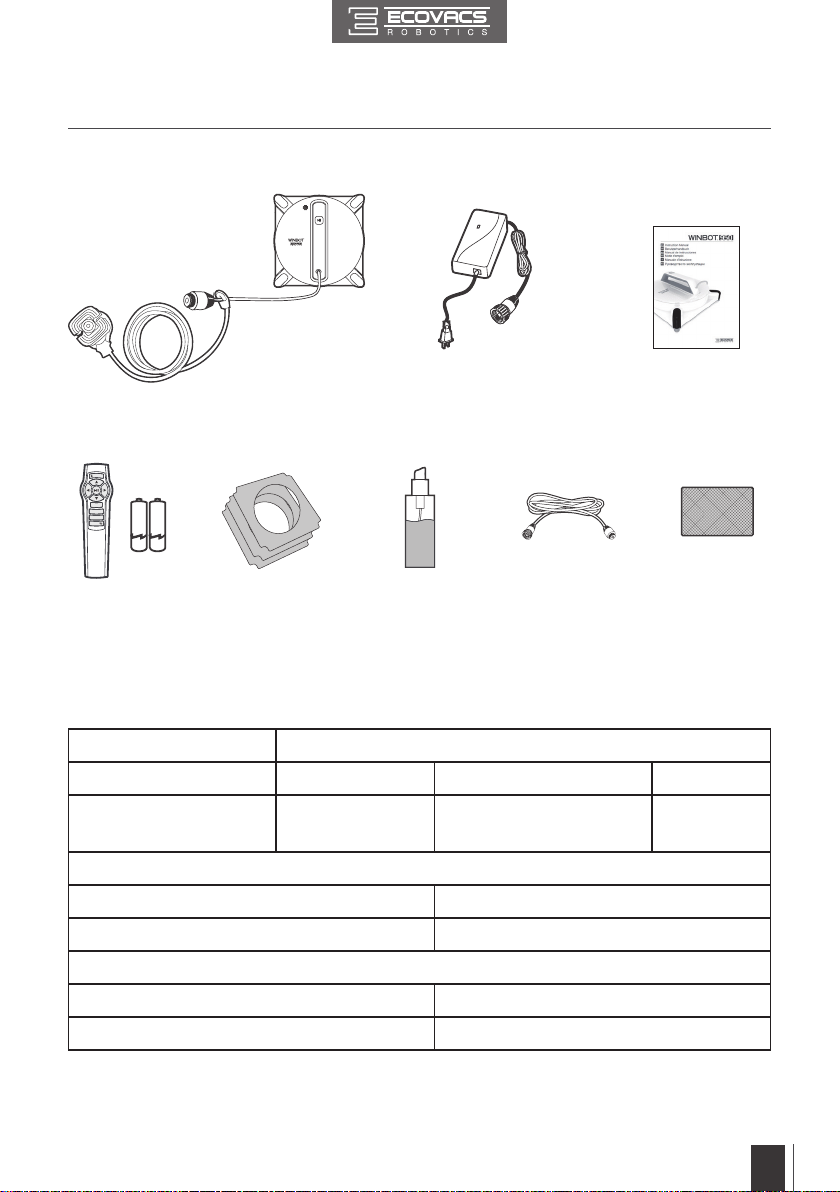
2. Package Contents and Technical Specications
2.1 Package Contents
WINBOT + Safety
Pod and Tether
Remote Control
with Batteries
Power Adapter
(3) Cleaning Pads Finishing Cloth(1) WINBOT
WINBOT
Cleaning Solution
Extension Cord
(1.5m/4’11”)
Instruction Manual
2.2 Specications
WINBOT model W950
Working Voltage 24V DC Rated Power 75W
Battery model S04-LI-148-650 Battery Specication
Remote Control
Remote Control Battery Model AAA R03
Rated output voltage of Remote Control battery 1.5V DC
Power Adapter: EA10952
Input: 100-240V AC 50-60Hz 1.5A Output: 24V DC 3.75A
O/Standby Mode Power Less than 0.50W
Lithium 14.8V,
650mAh
Output power of the wireless module is less than 100mW.
Technical and design specications may be changed in the course of continuous product improvement.
*
EN
5

2. Package Contents and Technical Specications
2.3 Product Diagram
WINBOT
1
2
3
4
5
10
11
12
13
14
15
16
17
6
7
8
9
1. Speaker
2. Status Indicator Light/START/PAUSE Button
3. Handle
4. Upgrade Port (for after-sale service)
5. Power Cord
6. Edge Detection Sensors
7. Cleaning Pad
8. Squeegee
9. Bottom Power Switch
Remote Control
RESET
10. Bottom Status Indicator Light
11. Suction Sensor
12. Fan
13. Driving Treads
14. Balance Wheel
15. Cleaning Pad Plate
16. Cleaning Pad Velcro
17. Side Rollers
1
2
3
4
1. RESET Button
2. Direction Control Buttons
3. START/PAUSE Button
4. Remote Control Pairing Button
6
EN

3.1 Notes Before Cleaning
45
45
3. Operating WINBOT
Do not use WINBOT on a framed window
with a frame smaller than 5mm (0.2”).
If WINBOT’s Status Indicator Light flashes
GREEN after powering ON, the Back-Up
Battery requires charging. Keep WINBOT
plugged in to charge the Back-Up Battery until
the Status Indicator Light flashes BLUE, and
WINBOT can now start cleaning. The BackUp Battery is fully charged when the Status
Indicator Light stops glowing.
WINBOT can clean framed or frameless glass,
larger than 45cm x 45cm (17.7’’ x 17.7’’).
If the window is covered with dirt, clean a
small area on the glass before use and place
WINBOT there.
EN
7

3. Operating WINBOT
WINBOT is intended to be used for maintenance cleaning on common windows. The product is
not designed to replace heavy-duty or rst time cleaning.
Please ensure there is a 15cm (5.9”) clearance between the glass and obstacles in the room like
curtains or furniture.
WINBOT can clean horizontally mounted glass but only when using the Direction Control
Buttons on the Remote Control.
WINBOT can clean glass mounted at an angle but may not operate normally; in such a case, a
person should be in the vicinity to assist should there be a problem.
Do not use WINBOT upside down.
Please refer to the glass manufacturer's care and cleaning instructions before using WINBOT on glass
with an uneven surface, such as frosted, textured, patterned, or coated glass. ECOVACS ROBOTICS
cannot be responsible for damage due to improper use on these surfaces.
3.2 Attach the Cleaning Pad(Pre-installed)
Turn WINBOT over and attach the Cleaning Pad
to the bottom of WINBOT smoothly. The white side
of the Cleaning Pad attaches to the Velcro, and
the gray microfiber side faces out. Make sure the
Cleaning Pad does not cover the Squeegee or Edge
Detection Sensors.
3.3
Assemble the Power Adapter
8
EN

3.4 Install the Safety Tether
3. Operating WINBOT
End A: WINBOT Power Cord
End B: Power Adapter Power Cord
Connect End A and End B and tighten.
* If the length of the power cord restricts WINBOT’s movement, a WINBOT Extension Cord can
be used. Disconnect End A and End B, and connect them with both ends of the Extension Cord
respectively and tighten.
* Only one Extension Cord can be used with WINBOT.
EN
9

3. Operating WINBOT
3.5 Place the Safety Pod
Wipe the surface of the Safety Pod’s suction cup
clean with the provided Finishing Cloth.
If WINBOT is being used to clean an inside window:
Press the Safety Pod FIRMLY on the top corner
of the inside window. Make sure the Safety Pod is
attached securely in place.
If WINBOT is being used to clean an outside
window: Press the Safety Pod FIRMLY on the inside
of the window being cleaned. Make sure the Safety
Pod is attached and securely in place.
10
EN

3. Operating WINBOT
3.6 Spray Cleaning Solution
* It is recommended to use WINBOT with WINBOT Cleaning Solution from ECOVACS. Using
tap water or other cleaners could have an adverse eect on cleaning performance. Using other
cleaning solutions could potentially nullify the warranty.
Spray the each side of the Cleaning Pad with
the provided WINBOT Cleaning Solution 8
times.
3.7 Start
Plug in WINBOT
1
* Do not unplug WINBOT while it is cleaning.
After spraying, wipe the bottom of WINBOT
with the provided Finishing Cloth.
EN
11

3. Operating WINBOT
Power ON
2
Move the Power Switch to the “ ” position.
WINBOT is powered ON when the Status
Indicator Light ashes BLUE.
* Keep objects away from WINBOT’s Fan to
avoid blockage.
Place on the Glass
3
Place WINBOT on the window at least 10cm
(4”) from window corners or other obstacles.
WINBOT has successfully attached to the
window when the Status Indicator Light glows a
continuous BLUE.
* Please ensure there is a 15cm (5.9”) clearance
between the glass and obstacles in the room
like curtains or furniture.
ON
12
Start
4
Start WINBOT by pressing the START/PAUSE
Button on the robot or on the Remote Control.
EN

3. Operating WINBOT
3.8 Pause
Pause WINBOT during cleaning by pressing
the START/PAUSE button on the robot or on
the Remote Control.
3.9 Stop
When WINBOT completes its cleaning cycle, it returns to the place it started and beeps.
Remove WINBOT Power OFF
1 2
Grasp the robot’s Handle. Press and
hold the START/PAUSE Button on the
robot for approximately 5 seconds and
the fan will stop. Remove WINBOT from
the window. Polish away any marks left
on the glass from the robot’s removal
with the provided Finishing Cloth.
Direct WINBOT to move forward, backward, left
and right using the Direction Control Buttons on
the Remote Control when Paused. WINBOT
cleans when the Direction Control Buttons are
used.
Move the Power Switch to the “
” position.
o
OFF
EN
13

3. Operating WINBOT
Remove the Safety Pod. Unplug WINBOT
3 4
Polish away any marks left on the glass
from the Safety Pod’s removal with the
provided Finishing Cloth.
Notes: If WINBOT has a problem and the indicator Light ashes RED, it can be reset by pressing the
RESET Button on the Remote Control. See “Troubleshooting” for details.
Before performing cleaning and maintenance on WINBOT, Power OFF and unplug WINBOT from
the receptacle.
4.1 Cleaning Pad
Turn WINBOT over and remove the Cleaning
Pad. Soak the Cleaning Pad in cool, clean
water for 2 minutes. Hand wash with mild
detergent and lay flat to dry. Allow it to dry
completely before re-attaching it to WINBOT.
* Do NOT use a wet Cleaning Pad on WINBOT or it may slip on the window.
* Washing the Cleaning Pad regularly can extend its service life.
* If the Cleaning Pad becomes worn or no longer ts exactly within the Velcro area, replace it with a
new one to achieve best cleaning performance.
14
EN

4.2 Fan, Sensors and Squeegee
Fan Side Rollers
Turn WINBOT over and wipe any debris from
the Fan with the provided Finishing Cloth to
maintain suction.
Edge Detection Sensors Squeegee
Turn WINBOT over and wipe the four Edge
Detection Sensors clean with the provided
Finishing Cloth to maintain their eectiveness.
Wipe the four Side Rollers with the provided
Finishing Cloth to maintain their eectiveness.
Turn WINBOT over and wipe the Squeegee
with the provided Finishing Cloth to maintain its
eectiveness.
4. Maintenance
EN
15

4. Maintenance
ON
4.3 Driving Treads
Plug WINBOT in. Turn WINBOT over and move
the Power Switch to “ ” position. Press and
hold the START/PAUSE Button for 5 seconds to
stop the Fan.
Inspect the Driving Treads by using the and
buttons on the Remote Control. Stop the
Driving Treads if dirt is seen on the Treads.
Move the Power Switch to the “O” position. Clean any dirt on the Driving Treads with the
OFF
* When the robot's battery is low, please make sure it is fully charged before use or storage.
* If WINBOT is stored for a long period, please make sure it is powered o. Charge it at least every half
year to keep WINBOT at the peak performance.
provided Finishing Cloth.
16
EN

5. Status Indicator Light and Sounds
Indicator Description
Status Indicator Light
ashes GREEN
Status Indicator Light
stops glowing
Status Indicator Light
ashes BLUE
Status Indicator Light
glows a continuous BLUE
Status Indicator Light
ashes RED
Status Indicator Light
glows a continuous RED
WINBOT emits beeps
Back-Up Battery is low and is charging. WINBOT will not clean until
the Back-Up Battery is properly charged.
The Status Indicator Light stops glowing when the Back-Up Battery
is fully charged. This is normal.
WINBOT is powered ON and ready to be placed on the glass.
WINBOT has successfully adhered itself to the glass and is ready
to clean.
WINBOT has a problem. Please refer to section 6, Troubleshooting,
for details.
WINBOT has been placed in Manual Override Mode. Please refer
to section 6, Troubleshooting, for details.
WINBOT beeps in following situations:
WINBOT is powered ON.
WINBOT nishes cleaning.
WINBOT has a problem.
EN
17

6. Troubleshooting
NO.
Malfunction Possible Causes Solutions
Remote Control
1
does not work
Status Indicator
Light ashes BLUE
2
after the product is
placed on the glass
WINBOT is cleaning. When
WINBOT is cleaning, only the
START/PAUSE Button works on
the Remote Control.
The Remote Control is not
paired with WINBOT.
WINBOT arrives from the factory
paired with its Remote Control.
If the Remote Control becomes
un-paired or is replaced, it can
be re-paired.
The batteries are not installed in
the Remote Control or need to
be changed.
If the Remote Control does not
work and the Status Indicator
Light ashes RED, WINBOT
may need to be reset.
The Cleaning Pad is attached
incorrectly and is covering the
Squeegee or the Edge Detection
Sensors.
Edge Detection Sensor
malfunction.
Fan malfunction.
Glass is too dirty for WINBOT to
adhere properly.
Pause WINBOT by pressing the
START/PAUSE button on the robot
or Remote Control. Other buttons
on the Remote Control will function
when WINBOT is paused.
Power ON WINBOT. At the same
time, press and hold START/PAUSE
Button on WINBOT and Pairing
button on the Remote Control.
Paring is complete when START/
PAUSE Button blinks RED, BLUE
and GREEN.
Install or replace the batteries in the
Remote Control.
Reset WINBOT by pressing the
RESET Button on the Remote
Control.
Remove the Cleaning Pad and reattach it making sure it is placed
exactly within its Velcro area and
does not cover the Squeegee or the
Edge Detection Sensors.
A. Remove the Cleaning Pad and
re-attach it making sure it will not
cover or aect the Edge Detection
Sensors.
B. Clean the Edge Detection
Sensors as described in section 4.
C. If the problem persists, please
contact Customer Service.
A. Clean the Fan as described in
section 4.
B. If the problem persists, please
contact Customer Service.
Clean a small area on the glass before
use and place WINBOT there, or clean
the window by hand rst and use
WINBOT for regular cleaning after that.
* WINBOT is intended to be used for
maintenance cleaning on common.
The product is not designed to replace
heavy-duty or rst time cleaning.
18
EN

6. Troubleshooting
NO.
Status Indicator
Light of the product
3
ashes RED
Malfunction Possible Causes Solutions
A. Connect WINBOT to the Power
Adapter and plug into the wall
receptacle. Press Start/Pause Button
on WINBOT or on the Remote Control.
Interruption of electricity while
WINBOT was cleaning due to
power failure, plug displacement,
or loose connection to the Power
Adapter.
WINBOT has moved over a
problem area and is losing suction.
The Cleaning Pad Plate turned
before WINBOT reached the edge
of the window.
Edge Detection Sensors are dirty.
Back-Up Battery is damaged. Please contact Customer Service.
WINBOT will resume cleaning.
B. In case of power failure, and the
above solution does not work, please
use the Direction Control Buttons on
the Remote Control to direct WINBOT
to a position on the window where you
can safely reach it, turn o the fan and
remove it from the window. If power
has resumed, place WINBOT on the
window again and restart.
A. Press the RESET Button on the
Remote Control. Use the Direction
Control buttons on the Remote
Control to move WINBOT away from
the problem area and at least 10cm/4”
from window corners and obstacles.
Restart WINBOT.
B. Press the RESET Button on
the Remote Control, then use the
Direction Control Buttons to direct
WINBOT to clean around the problem
area.
A. Remove WINBOT from the window
and power OFF. Spray additional
Cleaning Solution on the Cleaning
Pad, power ON and restart.
B. Remove WINBOT from the
window and power OFF. If the
Cleaning Pad Plate is not in a vertical
or horizontal position, grasp the
robot’s handle and turn it until it stops.
Power ON WINBOT and restart.
C. If the problem persists, please
contact Customer Service.
Wipe the four Edge Detection Sensors
clean as described in section 4. If
the problem persists, please contact
Customer Service.
EN
19

6. Troubleshooting
NO.
WINBOT moves in
an irregular pattern
4
during cleaning.
WINBOT is stuck
with Indicator Light
ashing, and cannot
move, be controlled
5
by the Remote
Control, or be reset
by pressing RESET.
Malfunction Possible Causes Solutions
A. Spray additional Cleaning Solution
on the Cleaning Pad.
B. Clean the Driving Treads as
described in section 4.
C. Replace the Cleaning Pad and
restart the cleaning cycle.
D. Use the Remote Control to control
There is too much dirt and debris
on the window.
Insucient suction or Edge
Detection Sensor signal abnormity.
the cleaning by pressing Direction
Buttons.
E. Clean the window by hand rst
and use WINBOT for regular cleaning
after that.
* WINBOT is intended to be used for
maintenance cleaning on common
windows. The product is NOT
designed to replace heavy duty or rst
time cleaning.
A. Press the RESET Button on the
Remote Control.
B. If WINBOT does not Reset, it
must be placed in Manual Override
Mode. Hold the RESET Button on
the Remote Control until the Status
Indicator Light glows a continuous
RED. In Manual Override Mode,
the Direction Control Buttons on the
Remote Control are activated. Use
the Direction Control Buttons to move
WINBOT to a position away from
edges and where you can safely
reach it. Remove WINBOT from the
window and power OFF. Power ON
and restart.
*When using the Manual Override
Mode, do not leave WINBOT attached
to the glass.
C. If the problem persists, please
contact Customer Service.
20
EN

Herzlichen Glückwunsch zum Kauf Ihres neuen WINBOT von ECOVACS ROBOTICS!
Wir hoen, dass er viele Jahre lang zu Ihrer vollen Zufriedenheit arbeiten wird.
Wir sind sicher, dass er Ihnen dabei helfen wird, Ihr Zuhause sauber zu halten,
während Sie Ihre wertvolle Zeit für die angenehmen Dinge im Leben nutzen.
Live Smart. Enjoy Life.
Sollten Sie mit einer Situation konfrontiert sein, die in dieser
Bedienungsanleitung nicht ausreichend behandelt wird, wenden Sie sich
an das Kundenservicecenter, damit sich ein Techniker mit Ihrem speziellen
Problem bzw. Ihrer Frage befassen kann.
Weitere Informationen finden Sie auf der offiziellen Webseite von ECOVACS
ROBOTICS: www.ecovacs.com
Das Unternehmen behält sich im Sinne einer kontinuierlichen Verbesserung
das Recht auf technische Änderungen und/oder Designänderungen an diesem
Produkt vor.
Vielen Dank, dass Sie sich für einen WINBOT entschieden haben.
DE
21

Inhalt
1. Wichtige Sicherheitshinweise....................................................................23
2. Lieferumfang und technische Daten.........................................................27
2.1 Lieferumfang...........................................................................................27
2.2 Technische Daten....................................................................................27
2.3 Produkzeichnung....................................................................................28
3. Gebrauch des WINBOT...............................................................................29
3.1 Vor der Reinigung....................................................................................29
3.2 Anbringen des Reinigungstuchs..............................................................30
3.3 Zusammensetzen des Netzteiladapters..................................................30
3.4 Anbringen des Sicherungsseils...............................................................31
3.5 Anbringen der Sicherheitshalterung........................................................32
3.6 Sprühreinigungslösung...........................................................................33
3.7 Start.........................................................................................................33
3.8 Pause......................................................................................................35
3.9 Stopp.......................................................................................................35
4. Wartung........................................................................................................36
4.1 Reinigungstuch........................................................................................36
4.2 Gebläse, Sensoren und Abzieher............................................................37
4.3 Antriebsprole..........................................................................................38
5. Statusleuchte und -töne .............................................................................39
6. Fehlerbehandlung.......................................................................................40
22
DE

1. Wichtige Sicherheitshinweise
Beim Gebrauch eines elektrischen Gerätes sind einige
grundlegende Sicherheitshinweise zu beachten. Dazu gehören
auch die folgenden Hinweise:
LESEN SIE ALLE ANWEISUNGEN VOR GEBRAUCH DIESES
GERÄTES.
BEWAHREN SIE DIESE ANWEISUNGEN AUF
1. Dieses Gerät ist zur Verwendung durch Personen mit
eingeschränkten physischen, sensorischen oder geistigen
Fähigkeiten oder fehlenden Erfahrungen und Kenntnissen
geeignet, sofern sie beaufsichtigt werden oder angeleitet
werden, wie das Gerät sicher zu handhaben ist, und die
damit verbundenen Gefahren verstehen. Kinder dürfen das
Gerät nicht als Spielzeug verwenden. Das Gerät darf nicht
verwendet werden, wenn es heruntergefallen ist, sichtbare
Beschädigungen aufweist oder ausläuft. Halten Sie das Gerät
von Kindern fern, wenn es in Betrieb ist.
2. Setzen Sie das Gerät nicht in sehr warmen oder kalten
Umgebungen ein (unter 0 °C oder über 40 ˚C, über 65 %
Luftfeuchte). Das Gerät kann zur Reinigung der Außenächen
von Fenstern verwendet werden, wenn es richtig an der
Sicherheitshalterung befestigt ist, kein starker Wind weht und
es nicht regnet oder schneit.
3. Stellen Sie sicher, dass das Gerät während der Reinigung an
die Stromversorgung angeschlossen ist. Das Gerät verfügt
über einen Reserveakku, der während des Gebrauchs
aufgeladen wird. Der Reserveakku versorgt das Gerät mit
Strom, wenn es vom Stromnetz getrennt wird oder der Strom
ausfällt.
4. Lassen Sie das angeschlossene Gerät nicht unbeaufsichtigt
stehen.
5. Verwenden Sie das Gerät AUSSCHLIESSLICH im Haushalt.
Setzen Sie das Gerät nicht in gewerblichen oder industriellen
Anwendungen ein.
6. Verwenden Sie das Gerät nicht an gesprungenen Glasächen.
7. Verwenden Sie ausschließlich empfohlene oder vom Hersteller
gelieferte Zubehörteile. Verwenden Sie nur den Netzteiladapter,
der vom Hersteller mitgeliefert wird.
8. Stellen Sie sicher, dass Ihre Netzspannung mit der auf dem
Typenschild des Netzteils angegebenen Netzspannung
übereinstimmt.
DE
23

1. Wichtige Sicherheitshinweise
9. Verwenden Sie das Gerät nicht an gerahmten Fenstern, wenn
der Rahmen kleiner als 5 mm ist (0,2 Zoll).
10. Setzen Sie das Gerät nicht in an nassen oder verschmierten
Fenstern ein.
11. Bewahren Sie das Gerät nicht in der Nähe von Wärmequellen
oder entammbaren Materialien auf.
12. Verwenden Sie das Gerät nicht, wenn es nicht fest am Glas
haftet oder sichtbar beschädigt ist.
13. Tauchen Sie das Gerät nicht in Wasser oder andere
Flüssigkeiten, um die Gefahr von Elektroschocks zu
minimieren. Stellen Sie das Gerät nicht an Orten ab, an denen
es in eine Wanne oder Spüle fallen oder gezogen werden
kann.
14. Berühren Sie das Netzkabel oder das Gerät nicht mit nassen
Händen.
15. Laden Sie das Gerät nicht in sehr warmen oder kalten
Umgebungen auf. Dies kann die Akkulebensdauer
beeinträchtigen.
16. Platzieren Sie das Gerät während des Aufladens nicht auf
anderen elektrischen Geräten, und lassen Sie es nicht in die
Nähe von Feuer und Flüssigkeiten kommen.
17. Achten Sie darauf, dass das Netzkabel nicht beschädigt
wird. Ziehen oder tragen Sie das Gerät nicht am Netzkabel,
verwenden Sie das Netzkabel nicht als Gri, klemmen Sie das
Netzkabel nicht im Fenster ein und stellen Sie keine schweren
Gegenstände auf das Netzkabel. Halten Sie das Netzkabel
von heißen Flächen fern.
18. Verwenden Sie das Gerät nicht, wenn das Netzkabel
oder die Steckdose beschädigt sind. Verwenden Sie das
Gerät nicht, wenn es nicht einwandfrei funktioniert oder es
heruntergefallen, beschädigt oder mit Wasser in Berührung
gekommen ist. Wenn das Netzkabel beschädigt ist,
muss es durch den Hersteller oder dessen Kundendienst
ausgewechselt werden, damit keine Gefahr davon ausgeht.
19. Wenn das Netzkabel beschädigt ist, muss es durch den
Hersteller oder dessen Kundendienst ausgewechselt werden,
damit es keine Gefahr darstellt.
20. Vor dem Reinigen oder Warten des Geräts muss der Stecker
aus der Steckdose gezogen werden. Ziehen Sie nicht am
Netzkabel, um den Netzteiladapter zu trennen.
24
DE

1. Wichtige Sicherheitshinweise
21. Der Reserveakku muss gegebenenfalls durch den Hersteller
oder dessen Kundendienst ausgewechselt werden, um
Risiken zu vermeiden.
22. Vor dem Entsorgen des Geräts muss der Reserveakku
entfernt und entsprechend den örtlichen Gesetzen und
Vorschriften entsorgt werden.
23. Vor dem Herausnehmen des Akkus zur Entsorgung des
Geräts muss der Stecker aus der Steckdose gezogen werden.
24. Gebrauchte Akkus sind entsprechend den örtlichen Gesetzen
und Vorschriften zu entsorgen.
25. Verbrennen Sie das Gerät nicht, auch wenn es stark
beschädigt ist. Die Akkus können im Feuer explodieren.
26. Verwenden Sie das Gerät immer gemäß den Anweisungen in
dieser Bedienungsanleitung. Das Unternehmen übernimmt
keine Haftung für Verletzungen und Schäden, die durch
unsachgemäße Verwendung entstehen.
27. WARNUNG:
ausschließlich das mit dem Gerät mitgelieferte abnehmbare
Netzteil EA10952.
28. Der Roboter enthält Akkus, die nur durch geschultes Personal
ausgewechselt werden dürfen.
29. Für die Fernbedienung werden zwei nicht wiederaufladbare
AAA-Batterien benötigt. Um die Batterien der Fernbedienung
auszutauschen, drehen Sie die Fernbedienung um und
drücken auf die Abdeckung des Batteriefachs, um diese zu
entfernen. Nehmen Sie die Batterien heraus, und setzen Sie
neue Batterien mit der richtigen Polzuordnung ein. Setzen Sie
dann die Batteriefachabdeckung wieder auf.
30. Nicht wiederaufladbare Akkus dürfen nicht aufgeladen
werden.
31. Verschiedene Batterietypen oder neue und gebrauchte
Batterien dürfen nicht gemeinsam verwendet werden.
32. Die Batterien der Fernbedienung müssen mit der richtigen
Polarität eingesetzt werden.
33. Leere Batterien müssen aus dem Gerät entfernt und sicher
entsorgt werden.
34. Wird die Fernbedienung längere Zeit nicht verwendet, so
sollten die Batterien herausgenommen werden.
35. Die Anschlussklemmen dürfen nicht kurzgeschlossen werden.
36. Der Stecker und der Netzteiladapter dürfen nur im
Innenbereich verwendet werden.
Verwenden Sie zum Wiederauaden des Akkus
DE
25

1. Wichtige Sicherheitshinweise
Für EU-Länder
Informationen zur EU-Konformitätserklärung erhalten Sie unter
https://www.ecovacs.com/global/compliance
Ordnungsgemäße Entsorgung dieses Produkts
Diese Kennzeichnung gibt an, dass das Produkt EU-weit nicht
mit dem Hausmüll entsorgt werden darf. Recyceln Sie das Gerät
verantwortungsvoll, um die nachhaltige Wiederverwendung
der Materialien zu unterstützen und mögliche Umwelt- oder
Gesundheitsschäden durch eine unkontrollierte Abfallentsorgung
zu vermeiden. Verwenden Sie zum Recyceln Ihres gebrauchten
Gerätes entsprechende Rückgabe- und Sammelsysteme, oder
wenden Sie sich an den Händler, bei dem Sie das Gerät gekauft
haben. Er kann das Produkt sicher entsorgen.
26
DE

2.1 Lieferumfang
2. Lieferumfang und technische Daten
WINBOT + Sicherheitshalterung
und Sicherungsseil
Fernbedienung
mit Batterien
(3) Reinigungstücher Poliertuch(1) WINBOT-
Netzteiladapter
WINBOT-
Reinigungslösung
Verlängerungskabel
Bedienungsanleitung
(1,5 m)
2.2 Technische Daten
WINBOT-Modell W950
Betriebsspannung 24 V (Gleichstrom) Nennleistung 75 W
Akkumodell S04-LI-148-650 Akku-Spezikation
Fernbedienung
Modell mit batteriebetriebener Fernbedienung AAA R03
Ausgangsnennspannung der
Fernbedienungsbatterie
Netzteiladapter: EA10952
Eingang: 100–240 V (Wechselstrom) 50-60 Hz
1,5 A
Stromverbrauch im ausgeschalteten
Zustand/Standby-Modus
Ausgang: 24 V (Gleichstrom) 3,75 A
1,5 V (Gleichstrom)
Weniger als 0,50W
Lithium 14,8 V,
650 mAh
Ausgangsleistung des WLAN-Moduls liegt unter 100 mW.
Technische Daten und Konstruktionsspezikationen können im Rahmen der kontinuierlichen
*
Produktverbesserung geändert werden.
DE
27

2. Lieferumfang und technische Daten
2.3 Produktzeichnung
WINBOT
1
2
3
4
5
10
11
12
13
14
15
16
17
6
7
8
9
1. Lautsprecher
2. Statusleuchte/START-/PAUSE-Taste
3. Gri
4. Aktualisierungsanschluss (für Kundendienst)
5. Netzkabel
6. Kantenerkennungssensoren
7. Reinigungstuch
8. Abzieher
9. Betriebsschalter auf der Unterseite
Fernbedienung
ZURÜCKSETZEN
10. Untere Statusleuchte
11. Saugsensor
12. Gebläse
13. Antriebsprol
14. Ausgleichsrad
15. Reinigungstuchplatte
16. Reinigungstuch-Klettverschluss
17. Seitenrollen
1
2
3
4
1. RESET-Taste
2. Richtungssteuerungstasten
3. START-/PAUSE-Taste
4. Kopplungstaste Fernbedienung
28
DE
 Loading...