

Page 1

Radion
LED LIGHTING
TM
Setup Guide
Page 2

Inside the Box......................
Installing Your Radion
..........
..............
............
.1
..2
Basic Mode.......................................4
ReefLink with Radion........................5
EcoSmart Live....................................6
Basic Mode Controls.........................8
EcoSmart Live Override Controls......
Troubleshooting
Indicator Lights....................
Limited Warranty................
Regulatory Information...........
.................
...........
............
............
........
9
.10
14
15
16
Inside the Box
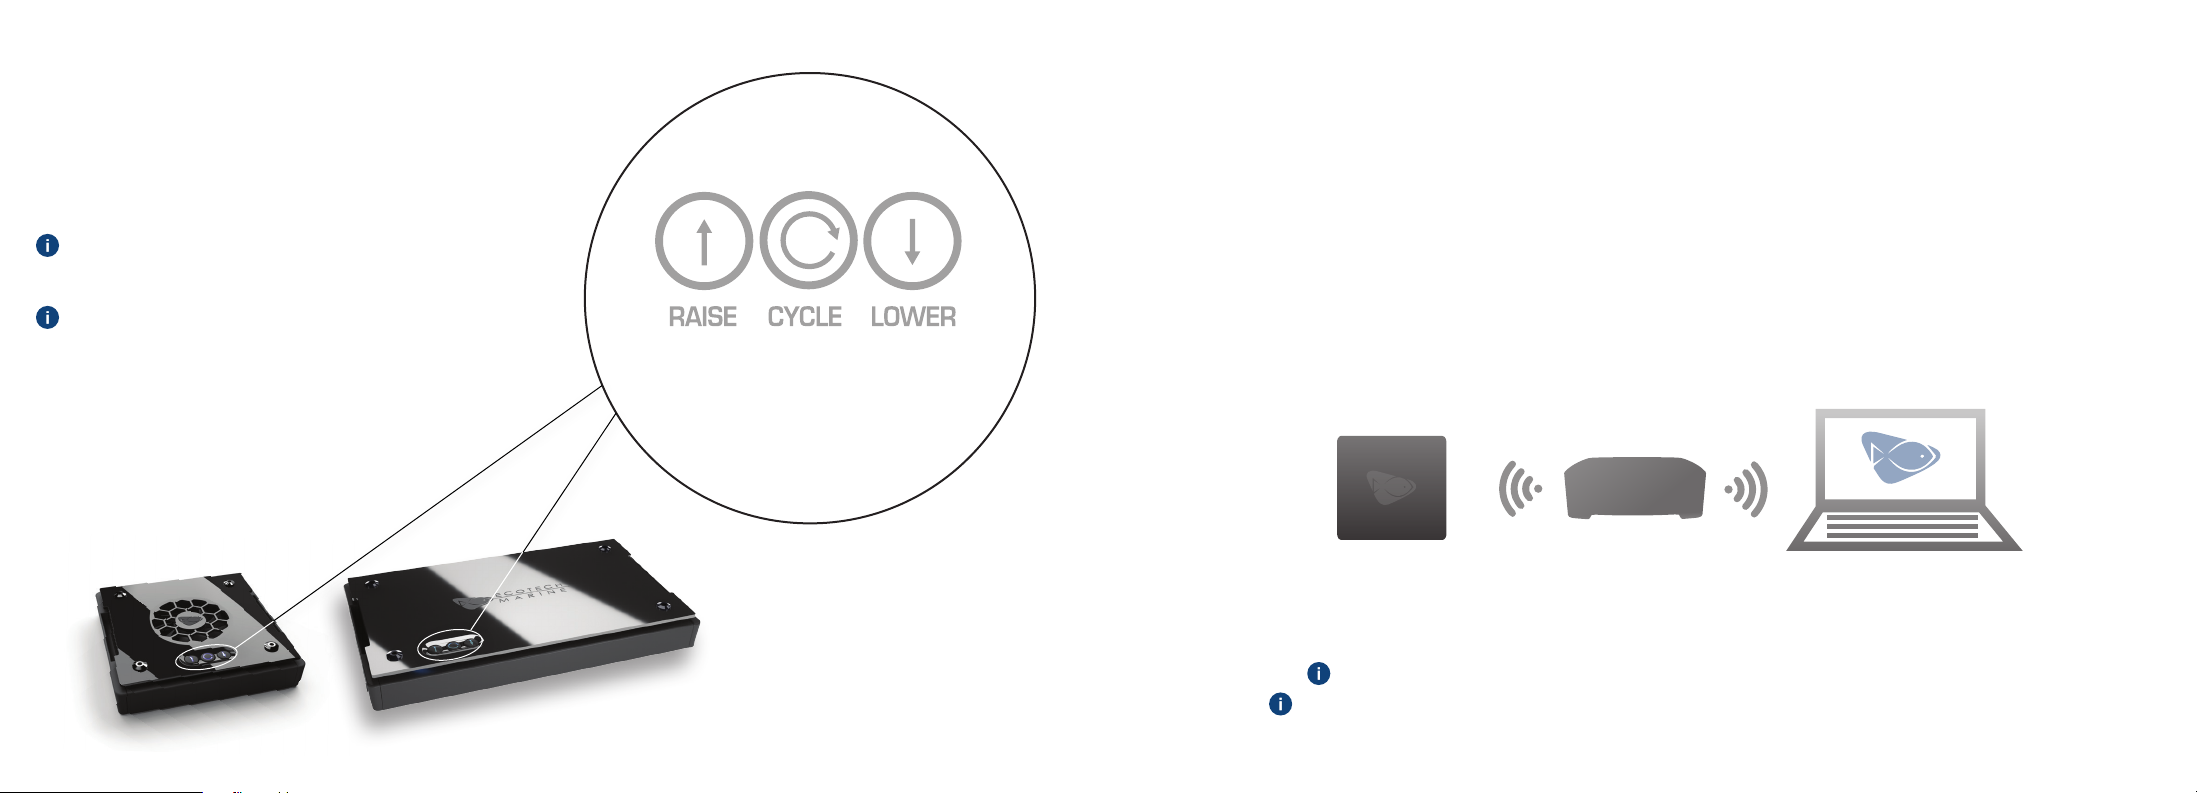
RADION LED LIGHTING SYSTEM
Three control buttons, Raise, Cycle and Lower make the Radion simple to use.
See pages 4 and 8 for more information.
MOUNTING EYELETS
Mounting eyelets enable easy and versatile mounting of the Radion light to best suit your needs. EcoTech Marine also
provides other mounting solutions (sold separately) that can be combined to group and hang multiple Radions easily.
See page 2 for more information.
USB CABLE
Out of the box, your Radion will operate in Basic Mode only. When connected to a PC or Mac via USB or using a
ReefLink, and then logged into EcoSmart Live online, your Radion can use one of the many preprogrammed lighting
modes - or you can create your own custom modes.
See page 5 for more information.
Customer Support
1-800-785-0338
service@ecotechmarine.com or
ecotechmarine.com/support
POWER SUPPLY
The sleek design of the Radion power supply compliments the beauty of the Radion model you have purchased.
See page 2 for more information.
1
Page 3
Installing Your Radion
TM
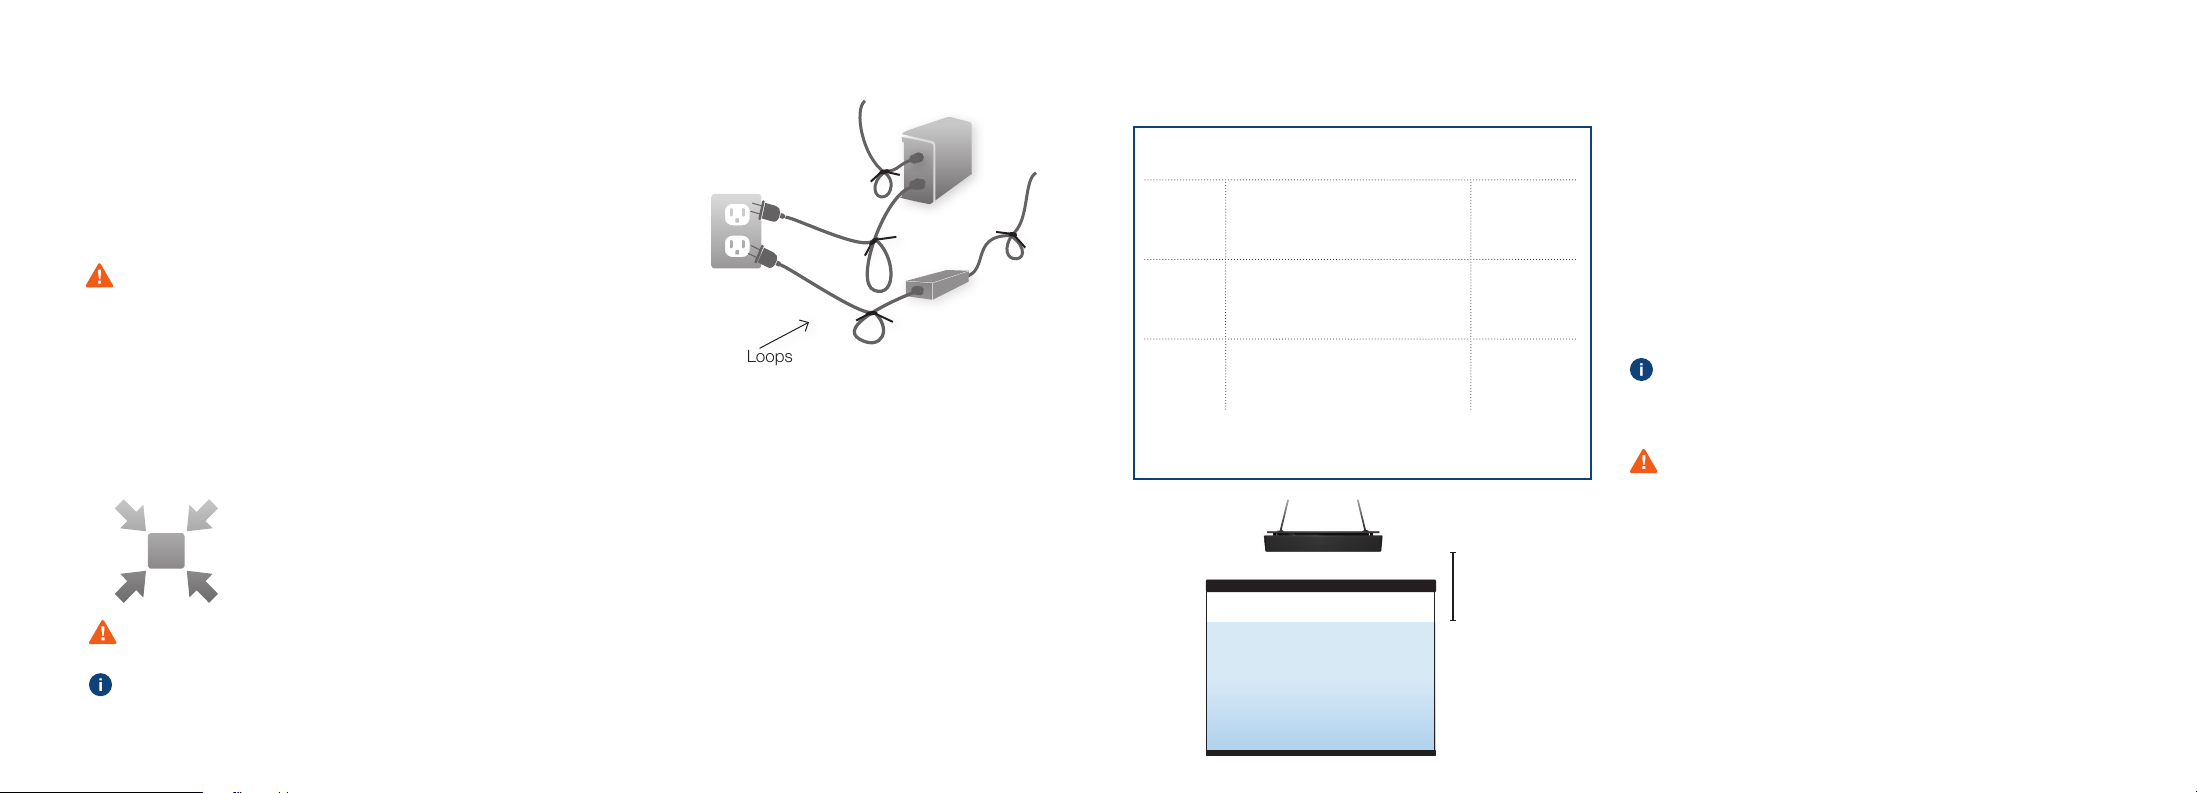
1. MOUNTING THE POWER SUPPLY (OPTIONAL)
XR15/XR30: Locate power supply where it will not be exposed to any
water or moisture.
XR30 Only: Mount power supply using mounting holes.
(Mounting hardware for power supply is not included)
Mount your power supply where it won’t get wet. Include a “drip loop” -
a tied loop of cord hanging down below the level of the electrical outlet.
That way, if water happens to run down the cord from the tank, it will
drip off onto the floor rather than into the outlet.
2. HANGING THE RADION
The higher you hang your Radion over the water, the wider the light spread - but the lower the light intensity. Wider and/or
deeper tanks may require hanging more than one Radion in order to provide sufficient light coverage. To hang your Radion:
1. Attach the four eyelet screws (included) to the corner mounting points of the Radion.
2. Attach hanging wire (not included) to the eyelets.
3. Secure the wire to the ceiling or other mount.
Use an 18-gauge stainless-steel wire, which has a 25-pound (11.3 kilo) working load.
EcoTech Marine also sells additional mounting hardware.
Visit ecotechmarine.com/parts-store for more information and to purchase.
Drip Loops
(XR30)
(XR15)
3. ESTIMATING LIGHT COVERAGE
Individual lighting needs will vary depending on your tank
inhabitants. Here is a rough guide to get you started:
HEIGHT OF RADION
ABOVE WATER LEVEL
XR15 XR30
8”
(20.3 cm)
11”
(27.9 cm)
13”
(33 cm)
*XR30 Light spread based on included Standard TIR lenses - additional spread may be
*XR15w Pro comes with Wide Angle TIR pre installed and optional Standard TIR in box.
9”
(22.9 cm)
11”
(27.9 cm)
13”
(33 cm)
*Useful coverage will depend on your aquarium size and setup.
obtained using the Wide Angle accessory.
24”
(61 cm)
24”-30”
(61 cm-76 cm)
30”-33”
(76 cm-84 cm)
LIGHT
SPREAD*
XR15 XR30
24”-30”
(61 cm-76 cm)
30”-33”
(76 cm-84 cm)
33”-36”
(84 cm-91 cm)
XR15
8 inches
or greater above
the water
XR30
9 inches
or greater above
the water
(20.3 cm)
(22.9 cm)
SPS tanks
As a rule of thumb, one XR30 provides coverage for 30x30
inches to a depth of 36 inches when hung 9 inches above the
water. A deeper or wider tank may require additional Radion lights
or Wide Angle accessory. One XR15 provides adequate coverage for
up to 24x24 inches.
LPS or sh-only tanks
May require less light than SPS tanks.
Additional Guidelines
If the USB port on your Radion will be difficult to reach after
hanging, consider leaving a USB cord plugged into the light
and accessible.
Ensure the Radion is securely fastened and will not fall or get wet.
Mounting the Radion XR30 less than 9 inches or XR15 less than
8 inches above the water may expose the fixture to excessive
moisture or contact with water.
Water damage is not covered under warranty.
The Radion has an internal fan to disperse heat. For
optimum performance, do not operate the Radion in a
completely enclosed hood.
2
3
Page 4
Basic Mode
Setting Up a Radion with ReefLink*
Your Radion operates in Basic Mode out of the box. In Basic
mode, the Radion will remain on unless manually powered off.
Current settings will remain even after powering off.
In Basic Mode, be sure to use an outlet timer (not included) to
schedule the light to turn on and off at the appropriate times.
See page 8 for an explanation of EcoSmart Live
button controls.
RADION CONTROLS
Increase
relative
light
intensity
Cycle color
and
temperature
Decrease
relative
light
intensity
1. If you already have a ReefLink and EcoSmart Live account, simply power on your Radion and add the new light
through EcoSmart Live.
2. If you just purchased a ReefLink and Radion light(s), set up the ReefLink first. After the ReefLink setup is complete
run the New Aquarium setup wizard through EcoSmart Live to set up your new lights (Settings > Aquarium Setup).
If you do not have a ReefLink, proceed with EcoSmart Live setup via USB on page 6.
Refer to the ReefLink quick start guide and the support section of our website for more information
regarding the operation of your ReefLink.
*XR15FW (Fresh Water) fixtures require an optional RF module to connect to ReefLink. RF Modules are
available at www.ecotechmarine.com
54
Page 5

TM
EcoSmart Live
EcoSmart Live is EcoTech Marine’s configuration platform that enables you to set
up your Radion(s) directly through a web browser on a PC or Mac.
To ensure proper setup of your Radion(s),
be sure to follow these steps in order!
If you are using more than one Radion,
configure ALL of your Radions as a group
at the same time.
XR15 Freshwater units may need to be
programmed individually.
without ReefLink
1
Visit
www.ecosmartlive.com using a
compatible browser and click the
“Need an Account” button.
Compatible browsers include Chrome, Safari, Firefox
and IE10.
2
Create an EcoSmart Live
account.
3
Connection Manager requires a recent version of JavaScript. If you receive an error upon trying to
run the Connection Manager, download and install the most recent version of JavaScript.
When prompted,
download the
Connection Manager
program onto the
computer.
4
Run the Connection
Manager program.
It will appear in
your system tray
when running.
5
Follow all prompts
until you see the
DONE button.
6
Plug ALL Radion lights
into an electrical outlet.
7 8
Connect ONLY ONE
Radion to your computer
via a USB cord.*
*XR15FW (Fresh Water) fixtures must be programmed individually. For multiple XR15FW fixture communication each fixture
requires installation of an optional RF Module. RF Modules are available at www.ecotechmarine.com
Using a compatible web
browser on your computer,
log into EcoSmart Live.
Run the
setup wizard
(Settings > Aquarium Setup).
9
The setup wizard
will walk you through
the programming of your
Radion(s).
Refresh your browser if the Aquarium
Setup Wizard doesn’t appear immediately.
76
Page 6

BASIC MODE CONTROLS
ECOSMART LIVE OVERRIDE CONTROLS
Result
Power the Radion ON or OFF
Cycle through the Radion’s different
preset color settings
Increase light intensity by 1%
Decrease light intensity by 1%
Increase light intensity rapidly
Decrease light intensity rapidly
Feed Mode
Initiates feed mode in any wirelessenabled EcoSmart VorTech Pumps
within range. This will not affect
light output.
Buttons
Action
HOLD all three buttons.
PRESS “Cycle” button.
PRESS “Raise” button.
PRESS “Lower” button.
HOLD “Raise” button.
HOLD “Lower” button.
HOLD “Raise” and “Lower” buttons.
Result Buttons Action
One-Day Power Off
Once your light has been programmed, this
will initiate a one-day power off. This is to help
newly introduced fish acclimate. The Radion will
turn back on when the next day cycle begins.
Override - Day
When in night mode, this button combination
will toggle day mode. Your Radion will stay in
day mode until the override period has elapsed,
or until you press the button combo again to
return to night mode.
Override - Night
When in day mode, this button combination will
toggle night mode. Your Radion will stay in night
mode until the override period has elapsed, or
until you press the button combo again to return
to day mode.
When in override mode, EcoSmart Live programming is put on hold. The control buttons will function as though the light
were in Basic Mode. After the override period has elapsed, the Radion will return to EcoSmart Live Mode.
HOLD “Raise,” “Cycle” and
“Lower” buttons.
HOLD “Cycle” and “Raise” buttons.
HOLD “Cycle” and “Lower” buttons
98
Page 7

Troubleshooting
Below are some common troubleshooting situations and their most common solutions.
If you have issues that you cannot solve, please contact EcoTech Marine Customer Service.
Online: ecotechmarine.com/support Phone: 1-800-785-0338
ALWAYS disconnect the Radion from your computer BEFORE turning your Radion on or off.
Issue
Light will not turn on.
Radion buttons are not responding,
OR they are triggering without input.
Resolution
• Check all cord connections on power supply.
• Make sure the Radion is plugged into power.
• Make sure the power outlet is working properly.
If this doesn’t solve the problem, then turn off the Radion and power it back
on without the USB cord plugged in.
If the Radion was previously programmed, do a factory reset.
• Make sure that no objects (metal or otherwise) are near the Radion buttons
• If interference continues, you may have external RF interference. You can
disable the Radion buttons to avoid this problem. To disable the Radion
buttons, right-click on the Connection Manager icon in the system tray and
disable the buttons for one or all Radion devices.
Issue
Radion will not connect to the
Connection Manager.
Connection Manager has become
unresponsive.
EcoSmart Live cannot nd my
Radion(s).
Resolution
• Make sure the USB cord is securely plugged into the Radion and computer.
• Ensure that only one Radion is connected via USB.
• Restart the computer.
If these options do not solve the problem, then:
1. Unplug the connected Radion FIRST from the computer and
THEN from power.
2. Reconnect the Radion to power.
3. Then reconnect the Radion to the computer using the USB cord.
4. Open the Connection Manager and reconnect.
1. Unplug the connected Radion FIRST from the computer and
THEN from power.
2. Restart the computer and restart the Connection Manager.
If this doesn’t work, reinstall the Connection Manager and reconnect the Radion.
1. Unplug the Radion that cannot be found FIRST from the computer and
THEN from power.
2. Reconnect the Radion to power.
3. Then reconnect the Radion that cannot be found to the computer using the
USB cord.
4. Right-click on the Connection Manager and select Factory Reset.
5. Repeat setup procedure.
10 11
Page 8

Troubleshooting
Issue
Cannot connect or not working as
expected with EcoSmart Live.
Connected VorTech pumps will not go
into Night Mode when Radion goes into
Night Mode.
Resolution
• Make sure your internet connection is working.
• Make sure that you have used the correct username and password to log
into EcoSmart Live.
• Make sure that you are using a compatible Web Browser - Google Chrome
or Safari.
• Refresh the web browser page.
• Make sure you are running the most up to date version of JavaScript, you
can update your version through your control panel.
• Make sure the Radion is connected to the Connection Manager.
1. If using USB and Connection Manager make sure that the Connection
Manager application is open and running in the system tray.
2. If connecting through the Connection Manager or a ReefLink make sure
that your firewall or anti-virus software is not blocking the connection.
3. If using the ReefLink make sure that you are not also trying to connect
using USB and the Connection Manager directly to your PC.
• Make sure that EcoSmart Participation is enabled in EcoSmart Live under
the Settings menu.
Issue
There is non-uniform LED illumination
under low intensity.
Full light and account Reset procedure.
Resolution
1. In EcoSmart Live, choose your light.
2. Then expand the wrench icon, choose Calibrate and follow the
on-screen instructions.
1. Disconnect via USB and power down all Radions for at least
30 seconds.
2. Log on to EcoSmart Live using Google Chrome or Safari.
3. Select the “Schedule Options” button then “Export Schedule”.
4. Select “Settings” then “New Profile” and “Yes”.
5. Log out of EcoSmart Live.
6. Connect via USB to a single Radion.
7. Right click the Connection Manager icon and select “USB Radion”
then “Factory Reset” and “Yes”.
8. Repeat step 6-7 for each light.
9. Log on to EcoSmart Live and program your lights using the
Aquarium Setup.
10. Re-import your saved scheduling using the “Schedule Options”
button.
11. Finally select the “Program All” button to save all changes.
Following this procedure, you will be able to save your current program schedule which can be re-imported, but all other
account light settings may be reset to factory default.
1312
Page 9

Indicator Lights
LED Indicator
Blinking white
Red & white
Red & yellow
Red & green
Any other color
combinations
14
Meaning
Radion is powered only through USB.
Firmware update in progress, or no
firmware is installed.
Radion overheating warning.
Driver over temperature error.
Hardware issue.
1-800-785-0338 Ext. 2 ecotechmarine.com/support
ECOTECH MARINE COMMUNITY
EcoTech Marine Community is another tool for users to ask questions, troubleshoot and learn
about EcoTech products. For additional information about your Radion, please visit us at
community.ecotechmarine.com
Remedy
• Unplug the connected Radion from the computer.
• Connect the Radion to power.
• Then connect the Radion to the computer using the USB cord.
• Wait for software update to complete.
• Reinstall firmware using firmware upgrade option through USB.
• To do this, right-click on the Connection Manager and select
USB Device > Firmware Upgrade.
• Ensure that the Radion has sufficient air flow and clearance.
If not, reposition the Radion in a better spot.
• If problem persists, contact EcoTech Marine Customer Support.
• Contact EcoTech Marine Customer Support.
IMPORTANT NOTICE: Read this entire Limited Warranty before purchasing, installing or using this product.
Limited Warranty
COVERED PRODUCTS. This Limited Warranty applies to the following Radion fixture (hereinafter referred to as the “Covered Products”). EcoTech Marine makes the following express limited warranties for the Covered Products purchased within the United States, subject to the conditions and limitations stated below. These limited warranties are the exclusive warranties for the Covered
Products. EcoTech Marine disclaims all warranties, express or implied, for other products.
LIMITED WARRANTIES. The Radion is warranted to be free from defects in material and workmanship under normal use for period of one (1) year from the date of original purchase. The LED bulb
clusters in the Radion are warranted to be free from defects in material and workmanship under normal use for period of two (2) years from the date of original purchase. This limited warranty is
extended to the original buyer of the Covered Products (the “Buyer”). EcoTech Marine disclaims all warranties, express or implied, to subsequent purchasers or users. If the Buyer gives EcoTech
Marine notice as required below of a defect in materials or workmanship, EcoTech Marine shall, at its sole option: (1) repair or replace the defective products or (2) refund the original purchase price.
Replacement products may not exactly match replaced products. EcoTech Marine shall not be held liable for damage to any aquarium, aquarium life forms or other personal objects due to improper
use of the Covered Products.
FAILURE TO COMPLY WITH THE INSTALLATION AND OPERATING INSTRUCTIONS VOIDS ALL WARRANTIES UNLESS THE BUYER ESTABLISHES THAT THE DEFECTIVE CONDITION IS NOT
RELATED TO SUCH NONCOMPLIANCE. This Limited Warranty does not extend to the use of the Covered Products under abnormal conditions, conditions that exceed the stated performance
parameters of the products as provided on the product labelling and in the manual or instructions provided with the Covered Products, or under conditions not reasonably foreseeable to, or beyond
the control of, EcoTech Marine. Buyer assumes all risk of any such use. Any attempts at self-repair shall void this limited warranty.
WHAT THIS LIMITED WARRANTY DOES NOT COVER. EcoTech Marine is not responsible for and makes no warranties as to the following: 1) product failures or damage due to normal wear and tear,
exposure to excessive heat or moisture, corrosive chemicals or substances, improper installation, defects or conditions of the existing structure, misuse, abuse, modifications and alterations; and 2)
minor imperfections that do not affect the Covered Product’s structural integrity or use.
DISCLAIMER OF IMPLIED WARRANTIES. Neither EcoTech Marine nor its authorized dealers make any other warranties, express or implied, including any implied warranties of merchantability or
fitness for a particular purpose. In the event this disclaimer is deemed limited or ineffective, the terms and limitations of any implied warranties shall be the same as the express limited warranties
contained herein.
LIMITATION OF LIABILITY. ALL WARRANTIES ARE VOID IF THERE IS DAMAGE TO THE COVERED PRODUCTS THAT IS NOT A RESULT OF A DEFECT IN THE MATERIALS OR WORKMANSHIP.
THE SOLE AND EXCLUSIVE REMEDY FOR ALL CLAIMS THAT YOU MAY HAVE ARISING OUT OF OR IN CONNECTION WITH YOUR USE OF THIS PRODUCT, WHETHER MADE OR SUFFERED
BY YOU OR ANOTHER PERSON AND WHETHER BASED IN CONTRACT OR TORT, SHALL BE REPAIR OR REPLACEMENT OF THE PRODUCT. IN NO EVENT WILL ECOTECH MARINE BE
LIABLE TO YOU OR ANY OTHER PARTY FOR ANY DIRECT, INDIRECT, GENERAL, SPECIAL, INCIDENTAL, CONSEQUENTIAL, EXEMPLARY OR OTHER DAMAGES ARISING OUT OF THE USE
OF OR INABILITY TO USE THE PRODUCT (INCLUDING, WITHOUT LIMITATION, DAMAGES FOR LOSS OF BUSINESS PROFITS, BUSINESS INTERRUPTION, LOSS OF INFORMATION OR ANY
OTHER PECUNIARY LOSS, DAMAGE TO YOUR AQUARIUM OR ANY AQUARIUM INHABITANTS, DAMAGE TO PLANTS OR LIVESTOCK) OR FROM ANY BREACH OF WARRANTY, EVEN IF
ECOTECH MARINE HAS BEEN ADVISED OF THE POSSIBILITY OF SUCH DAMAGES. IN NO CASE SHALL ECOTECH MARINE’S LIABILITY EXCEED THE AMOUNT YOU PAID FOR THE
PRODUCT. IF YOU DISAGREE WITH THESE TERMS AND CONDITIONS, DO NOT USE THE COVERED PRODUCTS.
NOTICE OF CLAIM. Buyer shall promptly notify EcoTech Marine of any claim under this Limited Warranty. EcoTech Marine reserves the right to deny any claims made by the Buyer more than
one (1) year after any defect or other basis of a claim covered by this Limited Warranty is discovered by the Buyer or should have been discovered by the Buyer.
CLAIM PROCEDURE. To obtain warranty service or technical support, please contact EcoTech Marine’s customer service department at (610) 954-8480. You will receive instructions on how to return
the product for repair or replacement. To take advantage of this Limited Warranty, you will be required to supply an original point of purchase receipt. Buyer shall be responsible for shipment and
insurance costs to send Covered Products to EcoTech Marine.
ENTIRE AGREEMENT. This Limited Warranty, and all of the terms and limitations contained herein, constitutes the entire agreement between EcoTech Marine and the Buyer. By purchasing,
installing or using the Covered Products, Buyer is not relying on any oral statements made by anyone, including its authorized dealers, which are in any way different or contrary to the terms
and limitations of this Limited Warranty. By purchasing, installing or using any of the Covered Products, Buyer acknowledges that authorized dealerships are not agents of EcoTech Marine and
any statements or representations made by authorized dealerships and their employees are not attributable to EcoTech Marine..
Some states do not allow the exclusion or limitation of incidental or consequential damages, so the above limitation may not apply to you. EcoTech Marine’s warranty is governed by the laws of
the Commonwealth of Pennsylvania, excluding its conflict of laws principles and excluding the provisions of the United Nations Convention on Contracts for the International Sale of Goods.
This warranty gives you specific legal rights, and you may also have other rights, which vary from state to state. If EcoTech Marine provides any of the remedies identified above (i.e., repair,
replace or return of the original purchase price), then Buyer agrees that this limitation of remedy shall not have failed the essential purpose of the Limited Warranty.
By purchasing, installing or using this product, you are acknowledging that this Limited Warranty is part of the sale terms.
15
Page 10

Regulatory Information
• DO NOT look directly at LEDs regardless of intensity.
• This product carries an ingress protection rating of IPX0 and must not be immersed in water.
• Danger: To avoid possible electrical shock, special care should be taken since water is employed in the use of aquarium equipment.
• DO NOT attempt repairs yourself; return the appliance to the manufacturer for service or discard.
• DO NOT immerse in water. If the appliance falls into the water, DON’T reach for it! First unplug it and then retrieve it. If electrical components of the
appliance get wet, unplug the appliance immediately (non-immersible equipment only).
• Carefully examine the appliance after installation. It should not be plugged in if there is water on parts not intended to be wet.
• The Radion is NOT WATERPROOF; water can permanently damage it. This damage IS NOT covered under warranty. Protect these components from
splashes, drips or other contact with water.
• Do not operate any appliance if it has a damaged cord or plug, if it is malfunctioning or if it is dropped or damaged in any manner. The power cord of this
appliance cannot be replaced: If the cord is damaged, the appliance should be discarded. Never cut the cord. DO NOT DROP. The Radion Light is fragile,
and a fall onto a hard surface can result in permanent damage. Damage from dropping IS NOT covered under warranty.
• Position the aquarium stand and tank to one side of a wall-mounted receptacle to prevent water from dripping onto the receptacle or plug. A “drip loop”
should be employed for each cord connecting an aquarium appliance to a receptacle. A “drip loop” is the part of the cord below the level of the receptacle
(or the connector if an extension cord) to prevent water from travelling along the cord and coming in contact with the receptacle. If the plug or receptacle
does get wet, DON’T unplug the cord. Disconnect the fuse or circuit breaker that supplies power to the appliance, then unplug and examine for presence
of water in the receptacle.
• Close supervision is necessary when an appliance is used by or near children. Keep out of reach of young children.
• Always unplug appliance from outlet and battery backup when not in use, before putting on or taking off parts and before cleaning.
• Never yank cord to pull plug from outlet. Grasp the plug and pull to disconnect.
• Do not use appliance for other than intended use. The use of attachments not recommended or sold by the manufacturer may cause an unsafe condition.
• Do not install or store the appliance where it will be exposed to weather or to temperatures below freezing.
• Make sure appliance is securely installed before operating it. Read and observe all the important notices on the appliance.
• If an extension cord is necessary, a cord with a proper rating should be used. A cord rated for less amperes or watts than the appliance rating may
overheat. Care should be taken to arrange the cord so that it will not be tripped over or pulled.
• Do not operate the Radion in an enclosure that does not allow for proper air circulation.
• Do not attempt to dismantle or modify LED arrays or driver board assemblies as this may result in injury and will void the warranty.
16
RF Module Important Information (Units including RF Module only):
The product you have purchased contains the EcoTech Marine RF Module, part number 10169. This module gives your product the ability to communicate
wirelessly to other EcoTech Marine products as well as certain other manufacturers’ products that were designed in compliance with the specifications for
our RF Module. Use of this module in products not consented by EcoTech Marine is prohibited. This product is for indoor usage only.
Français: Cet équipement est prévu uniquement pour un usage à l’intérieur des bâtiments.
English: This device is intended for indoor use only.
European Union – Disposal Information:
This symbol means that, according to local laws and regulations, your product should be disposed of separately from household waste. When this product
reaches its end of life, take it to a collection point designated by local authorities. Some collection points accept products for free. The separate collection
and recycling of your product at the time of disposal will help conserve natural resources and ensure that it is recycled in a manner that protects human
health and the environment.
FCC Compliance Statement:
This device complies with part 15 of the FCC rules. Operation is subject to the following two conditions: (1) This device may not cause harmful interference,
and (2) this device must accept any interference received including interference that may cause undesired operation. Any changes or modifications not
expressly approved by EcoTech Marine could void the user’s authority to operate the RF Module and/or the product that incorporates the RF Module. The
user is cautioned to maintain a 20 cm (8 inch) spacing from the product to ensure compliance with FCC regulations.
CE Declaration of Conformity:
The equipment complies with the RF Exposure Requirement 1999/5/EEC, Council Recommendation on the limitation of exposure of the general public to
electromagnetic fields (0-300 GHz). This equipment meets the following conformance standards:
EN 300 328, EN 301 489-17
(Units that contain RF Module only)
This device contains:
EcoTech Marine’s RF Module
Part Number: 10169
FCC ID: VKB271829
IC: 7349A-271829
Radion can be used in the following countries:
AT BG BE CY CZ DK
EE FI FR DE GR HU
IE IT LV LT LU MT
NL PL PT RO SK SL
ES SE GB IS LI NO
CH
Page 11

®
050114
 Loading...