

Page 1
QUIETDRIVE
User Manual
Page 2
Contents
Please read this entire setup guide before using your pump. By purchasing, installing or using this product, The information provided in this manual is
subject to change. For the most up to date information visit ecotechmarine.com/support
What is QuietDrive ...................... 1
QuietDrive Driver ......................... 2
Operational Modes ....................... 3-6
Mode Conguration ..................... 7-9
Multi-Pump Overview ................... 10
Master/Slave Setup ..................... 11-13
EcoSmart Modes ......................... 14-15
Maintenance ................................ 16
Troubleshooting .......................... 17
Customer Support
Many of the steps in this guide have corresponding how-to videos. View them on the EcoTech Marine website at
http://ecotechmarine.com/support-videos
The EcoTech Marine Community is another tool for users to troubleshoot and learn about our products. For additional information about your
VorTech QuietDrive Pump, please visit us at https://support.ecotechmarine.com/hc/en-us
UNITED STATES & CANADA
Contact EcoTech Marine directly for all warranty service and returns.
Visit https://support.ecotechmarine.com/hc/en-us
INTERNATIONAL
Contact your local distributor directly for all warranty service and returns.
Visit http://ecotechmarine.com/retailers
Customer Support
1-800-785-0338 ext. 2
service@ecotechmarine.com or
https://support.ecotechmarine.com/hc/en-us
®
Page 3
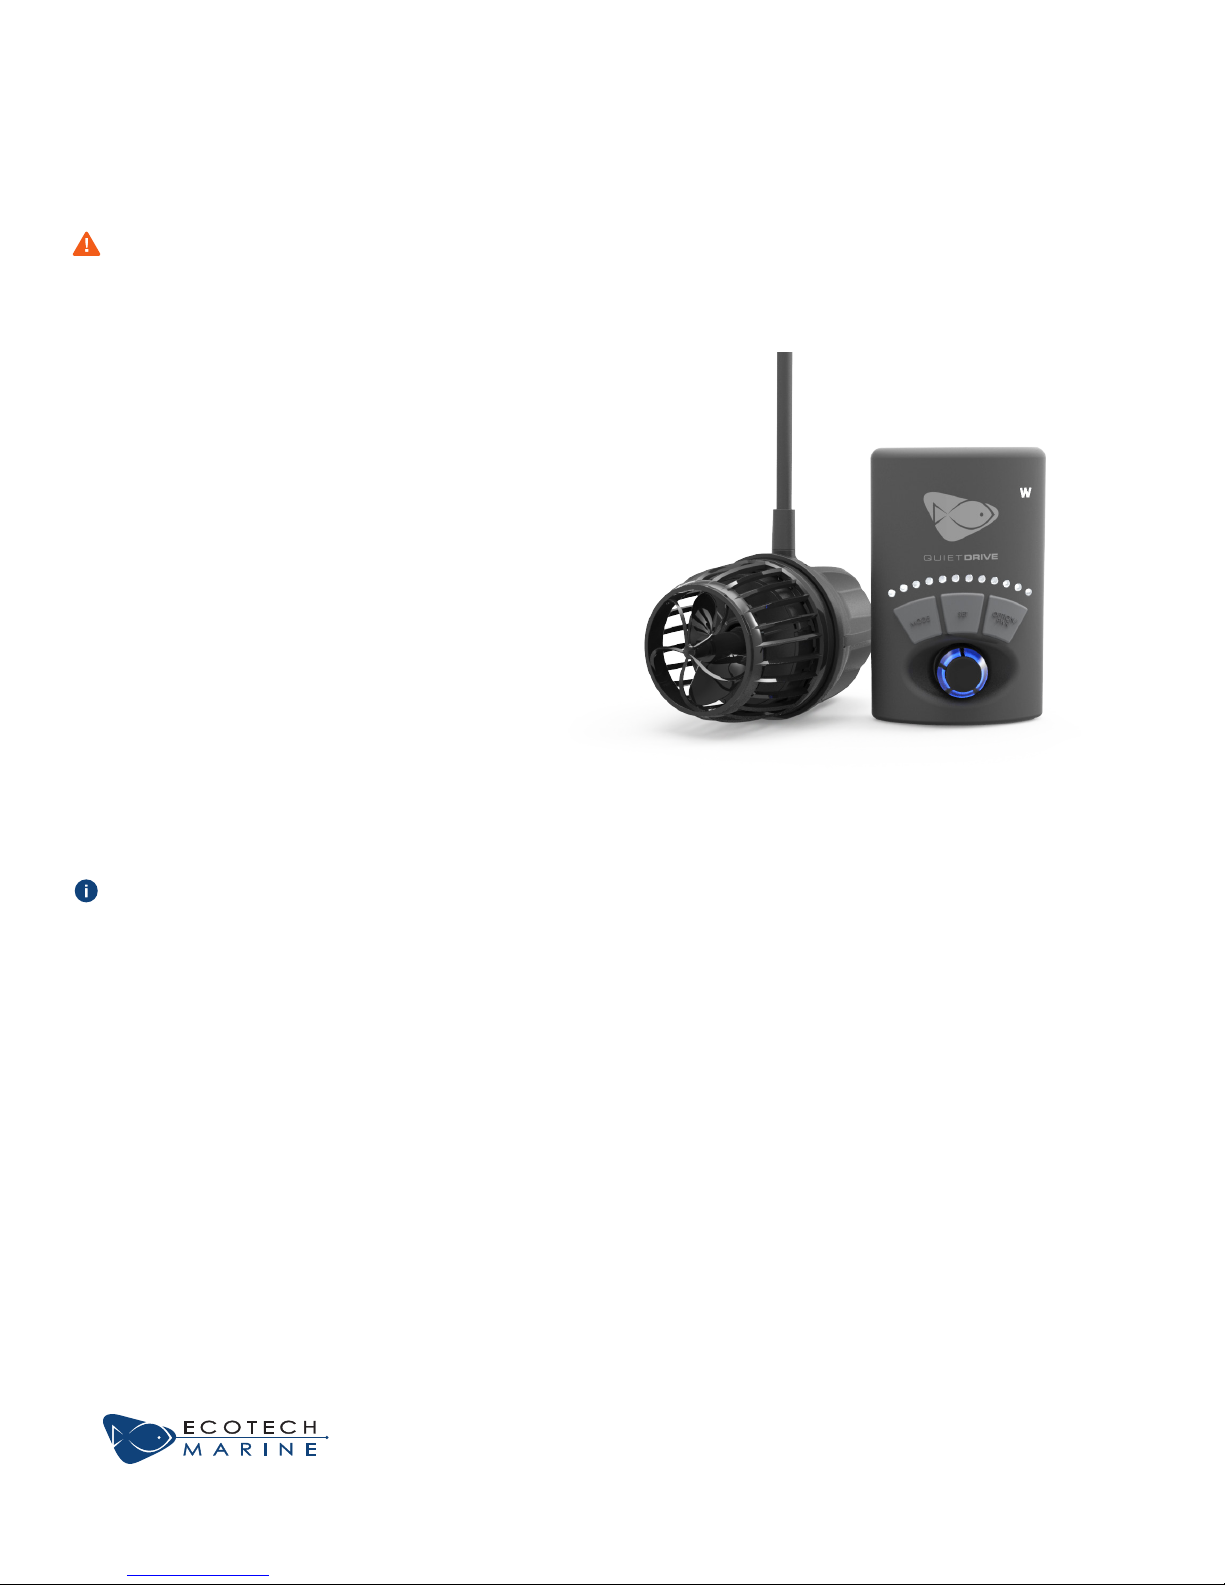
What is QuietDrive
The VorTech is no less amazing today than when it rst
revolutionized the aquarium hobby. Three generations
of pumps, over a decade of ow production, and tens
of thousands of healthy aquariums are a testament to
this uniquely designed power head. At the heart of the
VorTech’s success is its unique, patented, magnetically
coupled design and technically advanced motor driver and
rmware.
QuietDrive is the latest drive system that increases
eiciency and signicantly reduces motor noise. This
technology is incorporating the QuietDrive driver that
comes standard with the MP10, MP40 and MP60 VorTech
pump.
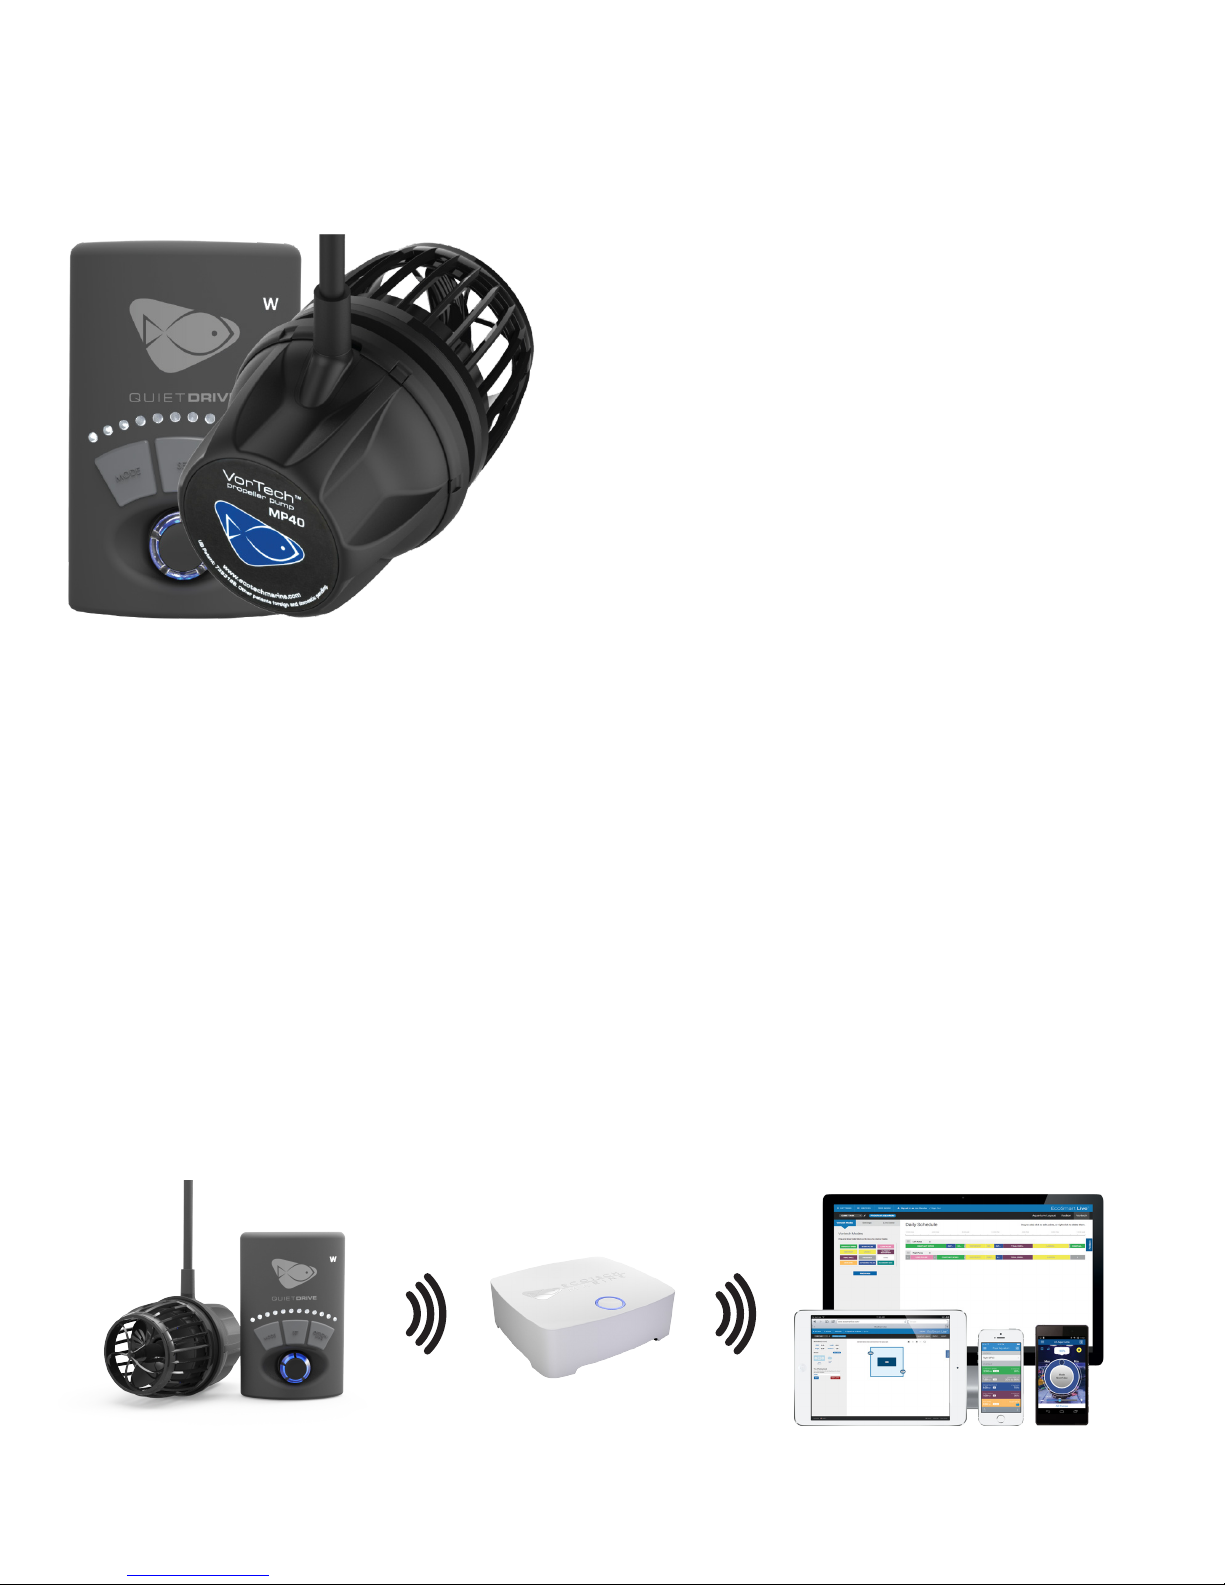
QuietDrive and EcoSmart Live
No matter where life takes you, with EcoSmart Live, your tank is right there with you. Paring your VorTech
pump with a ReefLink (sold separately), EcoSmart Live enables you to control your VorTech Quiet Drive pumps
from anywhere, any time using a compatible web browser or our dedicated Apple iOS app.
Enjoy the peace of mind that your reef and its inhabitants are cared for and safe. EcoSmart Live is cloudbased, so you can access it through a web browser on any computer, tablet with an Internet connection or
smartphone so the new features are installed automatically.
Your pumps communicate with your computer or device via our ReefLink which acts as an RF to WiFi bridge.
p. 1
Page 4
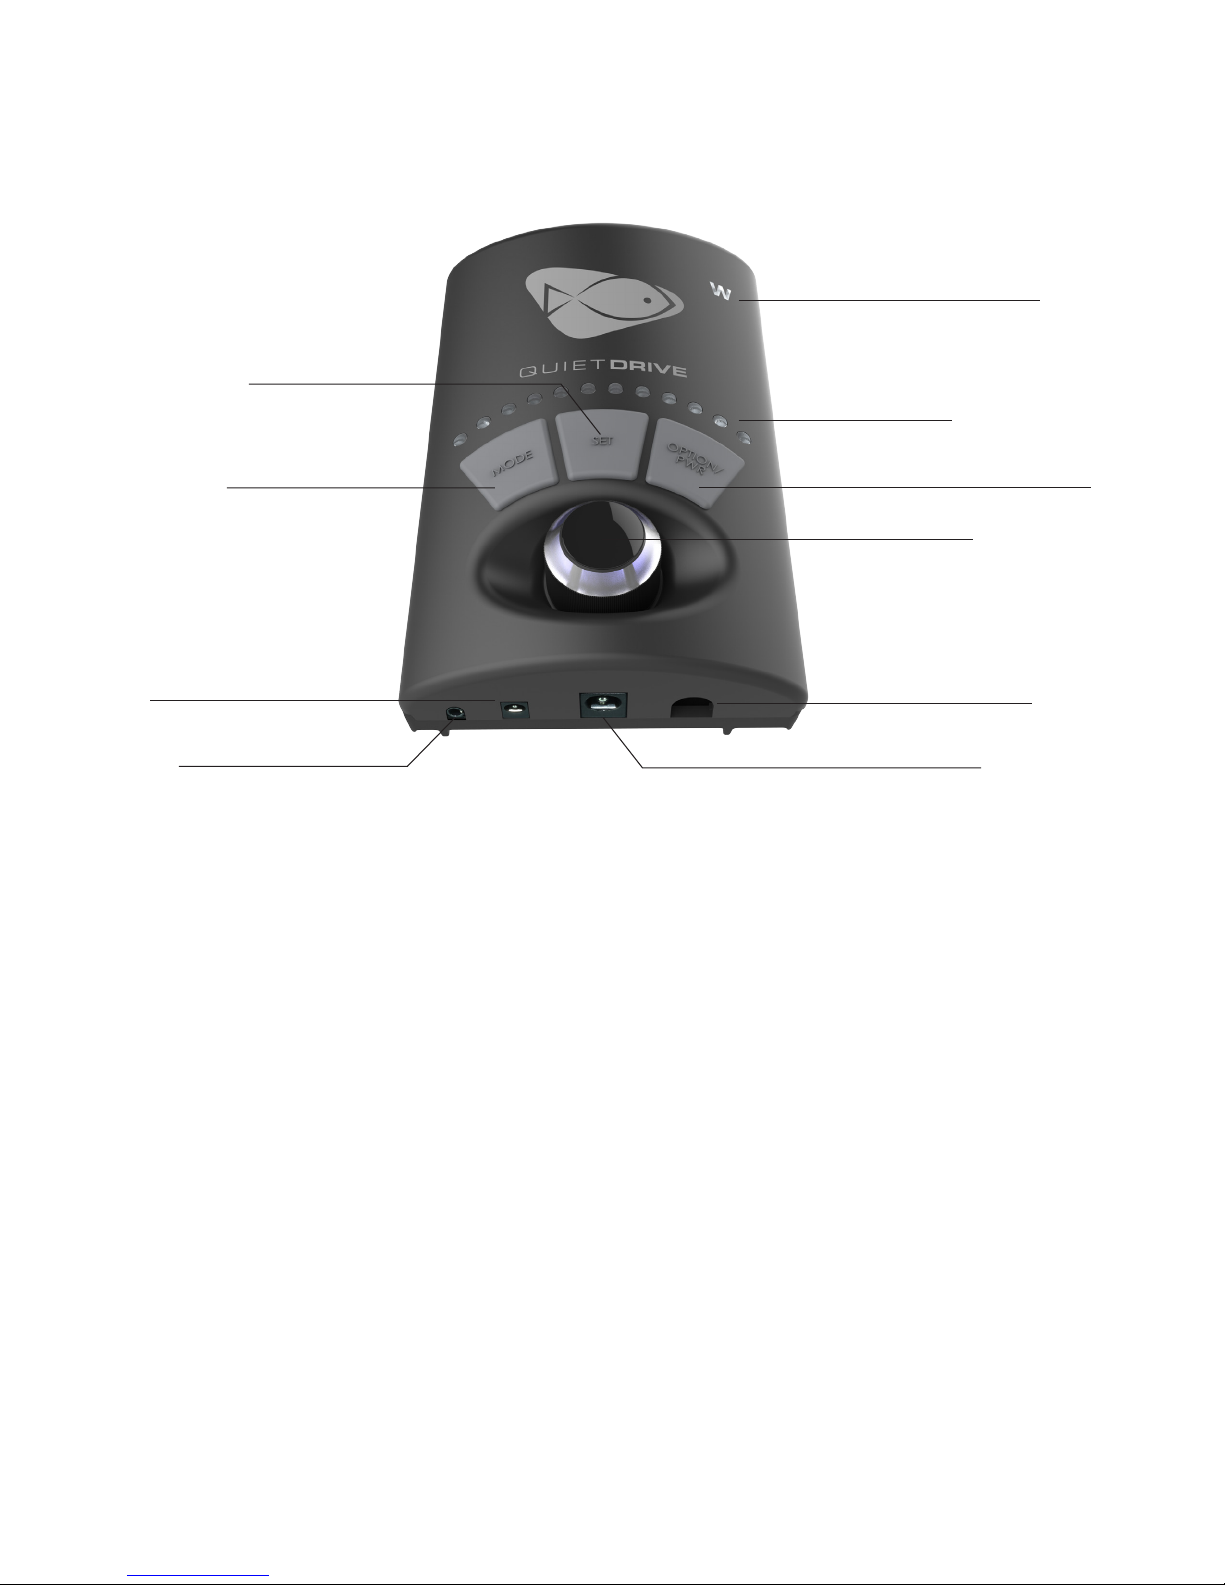
QuietDrive Driver
SET Button
Wireless Indicator
LED Strip
MODE Button
Battery Backup Input
Accessory Port
SET Button: Used to set dierent settings in each
operational mode.
MODE Button: Used to select between dierent
operational modes.
Battery Backup Input: Input jack for EcoTech’s Battery
Backup accessory for protection against power failures.
OPTION/Power Button
Control Dial
Pump Cable Slot
Power Input
Basic Setup
Please reference the Quick Start Guide that comes
provided with any VorTech pump (ecotechmarine.com/
documentation), Follow the instructions to properly mount
your VorTech pump. Once the VorTech is mounted per the
instructions, connect to outlet power.
Wireless Indicator: LED will illuminate when the
QuietDrive is communicating wirelessly.
LED Strip: LEDs will illuminate to indicate modes, speed,
time, etc.
Option/PWR Button: Used to select dierent options in
certain conguration modes and used to power device
on/o.
Control Dial: Used to change speeds, times and other
settings.
Pump Cable Slot: Input Slot for the pump cord. Note:
Cable comes attached to driver.
Power Input: Input jack for attaching the power supply
to the pump.
Specications
Wireless Enabled: ‘W’ versions only
Dimensions: Length: 5” (127mm)
Width: 3.5” (89mm)
Depth: 1.375” (35mm)
Power Input: 24 volt DC input
Battery Backup Input: 12 volt DC input
p. 2
Page 5
Operational Modes
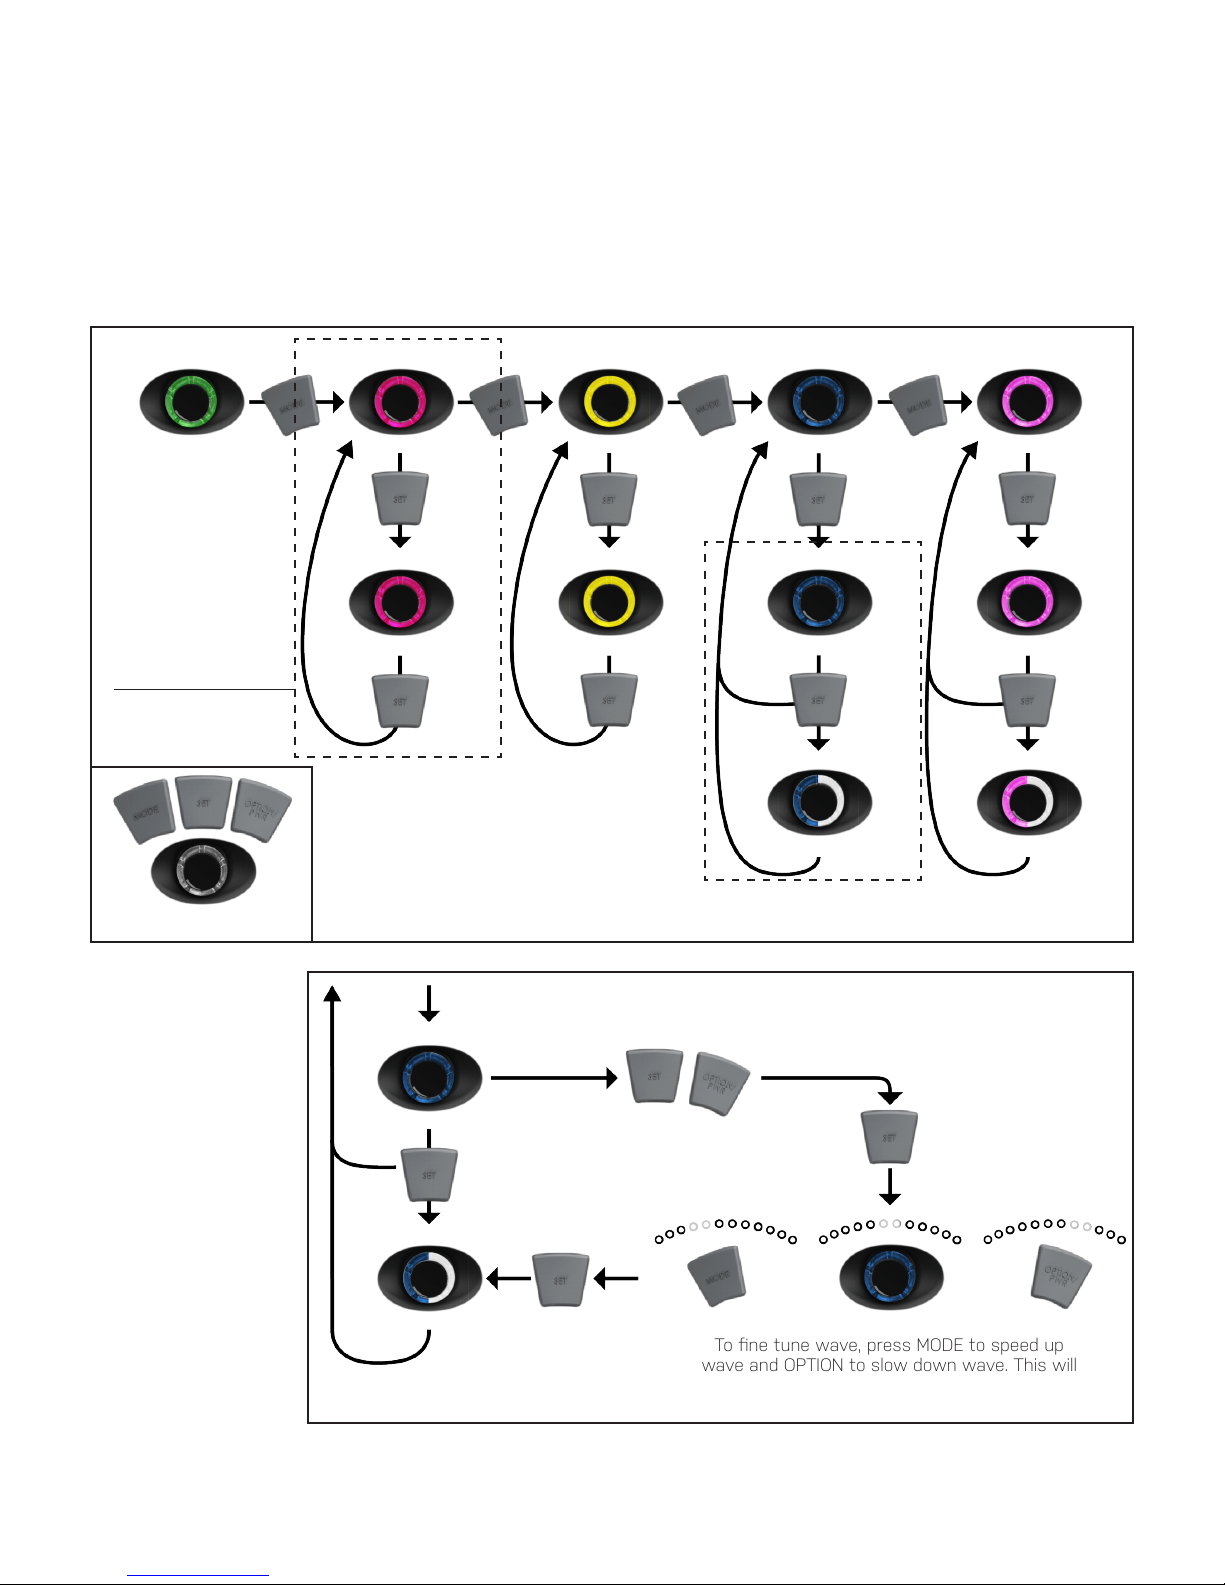
Navigating Between Modes
To navigate between the dierent modes, use the MODE, SET and OPTION buttons along with the control
dial. Modes will be distinguished by the color of the dial and/or the illumination of specic blue LED’s on the
LED strip. The following will guide you through navigating between each mode. For more information on
each specic mode, see the full description of each mode in the next section of the manual.
Constant
Speed
EcoSmart Modes
are designed for
multiple pump oper-
ation. See Pg. 14-15
for more information
OPTION
SET
MODE
Control Dial
PWR
EcoSmart* Random*
MODE
TSM
SET
EcoSmart*
NTM
SET SET SET SET
Hold (MODE) to enter Feed Mode
Hold (OPTION/PWR) to Power O/On
MODE
Short Pulse Gyre
MODE
Reef Crest
SET SET
Random*
Lagoon Freq. Set Freq. Set
See Below for Auto Tune
*Note: LED bar will indicate change between modes
Speed Set Speed Set
Short Pulse Gyre
(Hold to save,
Press to access)
Saved Saved
Wave Wave
MODE
SET
(Hold to save,
Press to access)
Note: In Pulse
Auto Tune
Modes, when
you save a wave,
the control dial
will blink green/
white twice to
indicate wave is
saved. The control
dial will then
breathe the color
corresponding to
the mode you were
Short Pulse
Freq. Set
SET
Saved
(Hold to save,
press to access
saved wave)
SET
OPTION
SET
PWR
Hold SET and Option
until Blue LEDs roll
back and forth slowly
MODE
Press SET when you
SET
see a desired wave
form in your tank.
OPTION
PWR
in.
Wave Press Press Press
To ne tune wave, press MODE to speed up
wave and OPTION to slow down wave. This will
be shown visually with the blue LED strip. When
satised, press SET again to save wave.
Note: You are not able to navigate into Night Mode from regular operation. This mode is automatic after you
congure it in Conguration Mode. For instructions on conguring Night Mode see pg. 6
p. 3
Page 6
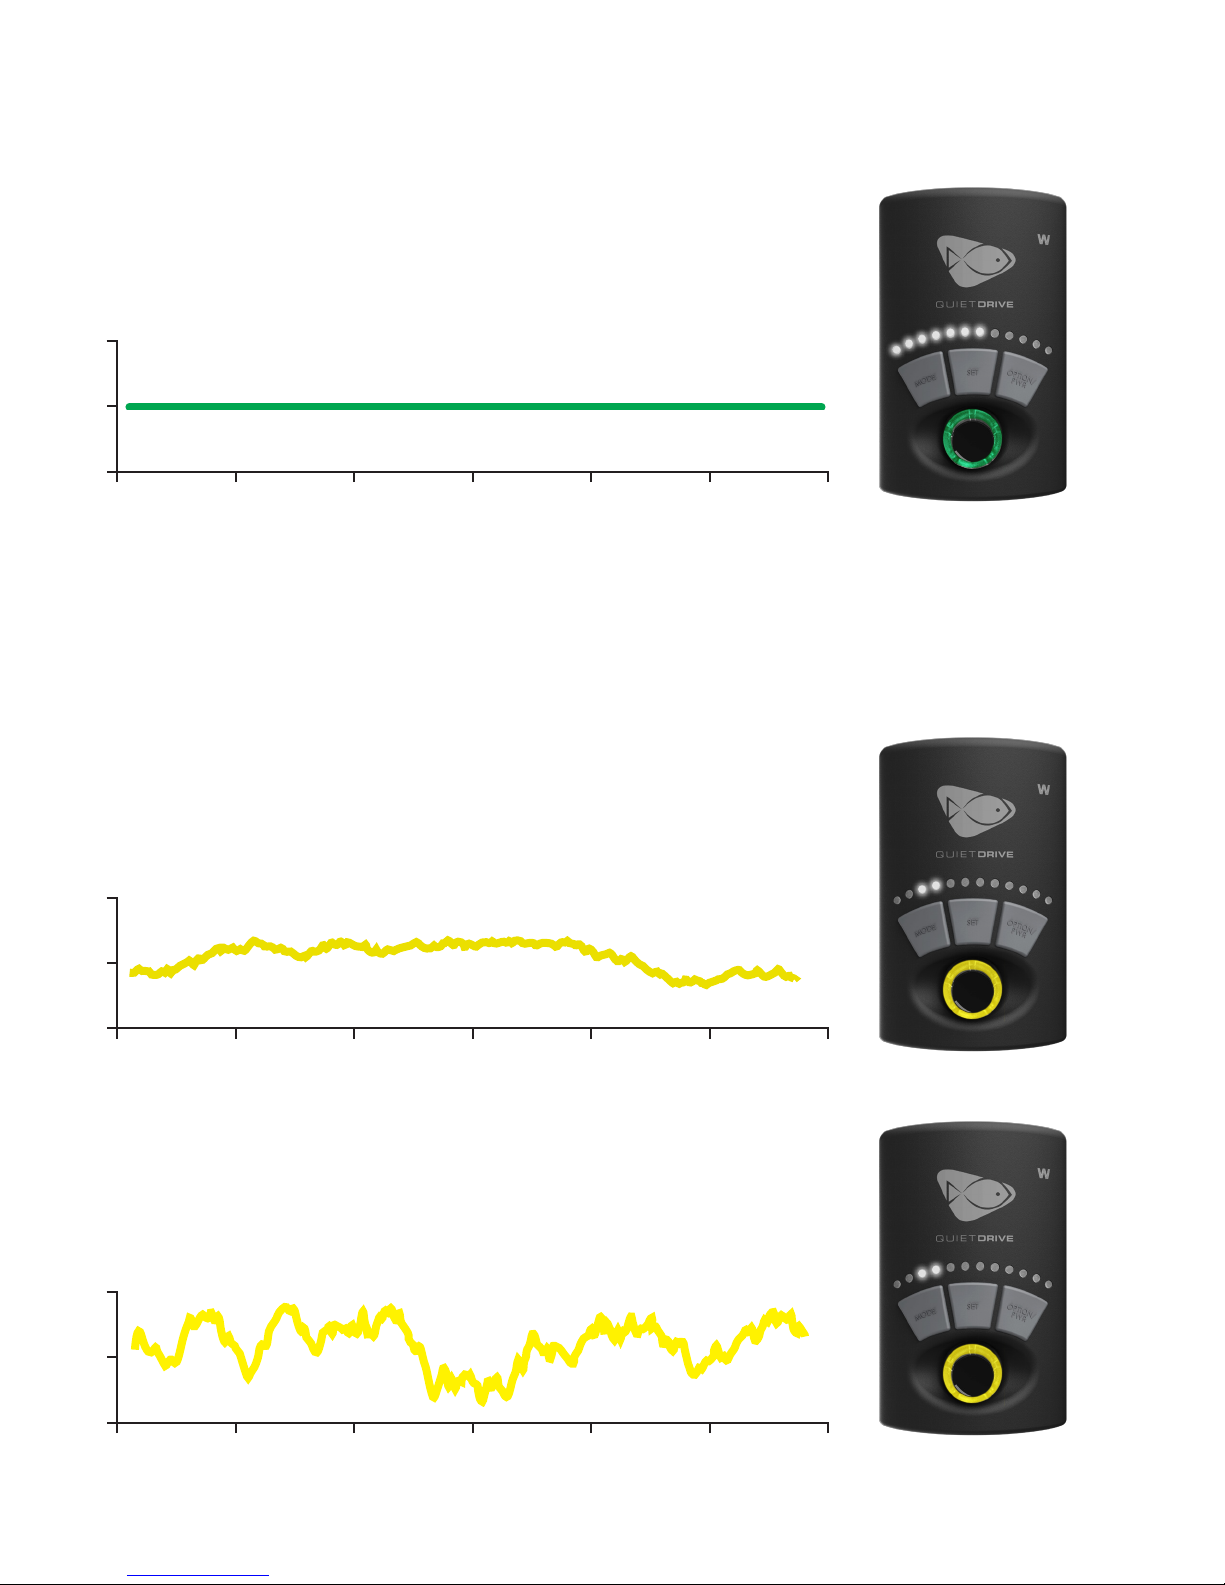
Constant Speed Mode
Constant Speed mode is the default mode of the VorTech, this
makes the pump produce ow at a constant speed that is
determined by the position of the dial.
% of
User
Set
Speed
Time
Random Modes
Random mode operates in two dierent settings, Lagoon and Reef Crest. These random modes are
used to simulate natural reef environments. To navigate to each of these modes, press MODE until the
control dial turns yellow. Then press set to switch between the two. The specic Random mode you
are in will be indicated by a pair of two blue LED lights brightly illuminated. The speed of these modes
will be indicated by dim LED lights.
Lagoon
% of
User
Set
Speed
% of
User
Set
Speed
Lagoon mode simulates a low-energy lagoon environment. The
speed of the pump is changed slowly to recreate the gentle
currents of a lagoon.
Time
Reef Crest
Reef Crest Random mode simulates a high-energy reef
environment. The pump will change speed frequently and
drastically to simulate crashing waves and surging tide. This is a
favorite of SPS coral.
Time
p. 4
Page 7

Short Pulse Mode
Short Pulse mode creates a ow pattern consisting of uniform high
and low levels pulsing at a selected interval between 0.2 seconds
and 2 seconds.
To use Short Pulse Mode, tap MODE until the LED turns blue. Now
by adjusting the knob you can change the maximum speed that
the pump achieves during Short Pulse Mode. Tap SET to save this
maximum speed and to begin tuning the frequency. When you adjust
the knob, you will see that the frequency changes corresponding to
the pulse frequency in the LED strip.
At this time you have two options, if you are happy with the wave
that you have manually created, you can hold SET to save this
wave. Your saved wave will be indicated by a breathing blue LED
instead of a constant one. The other option is to enter the auto-tune
function of the QuietDrive driver.
% of
User
Set
Speed
Time
Gyre Mode
Gyre mode creates a ow pattern consisting of uniform clockwise
and *counterclockwise ow levels pulsing at a selected interval
between two seconds and two hours.
To use Long Pulse Mode, tap MODE until the LED turns pink.
Now by adjusting the knob you can change the maximum speed
that the pump achieves during Long Pulse Mode, which will be
indicated by the LED strip. Tap SET to save this maximum speed
and to begin tuning the frequency. When you adjust the knob, you
will see that the frequency changes corresponding to the pulse
frequency in the LED strip.
You can now save this patter by holding SET. The LED knob will
blink and then start breathing pink, indicating that the pattern has
been saved.
The graph below represents the sequence of long pulses that the
VorTech pump will make when set to Long Pulse Mode.
*Alternating directional gyre requires multiple pumps.
% of
User
Set
Speed
Time
p. 5
Page 8

Auto-Tune
With the QuietDrive driver, making a wave form in your tank is made easy with Auto-Tune functionality. Follow
the sequence outlined in the diagram below to utilize the Auto-Tune function in simulating a wave in your reef
tank environment.
Once you have entered
into Short Pulse Mode,
adjust the speed to your
desired intensity then tap
SET. Now, typically you
would tune the frequency
of your pulse but if you
would like to enable the
Auto-Tune function, hold
SET and Option until the
LED’s roll back and forth.
The QuietDrive driver will
now start at the highest
pulse frequency, then
slowly move to slower and
slower frequencies. Once
you see your desired wave form in your aquarium, tap SET again to stop the Auto-Tune. You will now have the
ability to ne-tune your wave form by pressing MODE to go back one step, or OPTION to go forward one step.
This will be shown visually on the LED strip. Once you are happy with the wave form that you have created,
press SET again to save it. You will know it is saved because the LED knob will breath blue.
Short Pulse
OPTION
SET
PWR
Freq. Set
SET
(Hold to save,
press to access
Saved
Wave Press Press Press
saved wave)
Hold SET and OPTION
until Blue LEDs roll
back and forth slowly
SET
MODE
To ne tune wave, press MODE to speed up
wave and OPTION to slow down wave. This will
be shown visually with the blue LED strip. When
satised, press SET again to save wave.
Press SET when you
SET
see a desired wave
form in your tank.
OPTION
PWR
Wave Motion Warning
The generation of waves within your aquarium places additional stress on the aquarium glass and joints. Not
all aquarium tanks are designed to withstand this stress, and failure of the glass and/or joints could result.
You are encouraged, before generating waves, to consult with your aquarium tank manufacturer to determine
if the tank construction is adequate to withstand the additional stress generated by the wave motion. You
are also encouraged to assure that your aquarium stand or furniture is adequately stable to withstand the
additional stress resulting from wave generation. EcoTech Marine DISCLAIMS AND WILL NOT BE LIABLE FOR,
damage to aquarium tanks or their surroundings, water damage, or any other consequential damages resulting
from wave generation. MAKE WAVES AT YOUR OWN RISK.
Feed Mode
At the touch of the button, all VorTech wirelessly enabled pumps will temporarily pause their current mode and
idle allowing food to be added to the tank without being cycled into the overow and ltration. To enter Feed
Mode simply press and hold the MODE button.
Battery Backup Mode
The EcoTech Marine Battery Backup (sold separately) combined with your VorTech pump is a unique accessory
which greatly improves your likelihood of emerging from a power outage condition without any loss of
livestock. However, no single solution is guaranteed to work for all aquarium sizes and stocking levels. Larger
reef tanks with dense stocking levels of sh may require multiple VorTech’s and Battery Backups in order to
provide suicient ow to keep sh and corals alive in the absence of power. In the event of a power outage,
your VorTech pump will automatically pull power from the Battery Backup accessory and function in Battery
Backup Mode. While in Battery Backup Mode, your pump will operate at a reduced speed for as long as the
battery is able to provide power, or until power from the wall comes back.
Night Mode
Pumps can be enabled to run a gentler night time program simulating calmer ocean conditions for night time
hours. To access Night Mode press and hold the MODE and SET buttons, pause, and then press and hold the
MODE and SET buttons. The control dial will breathe white and spin at 50% power for 10hrs (default setting),
and then resume its set mode.
p. 6
Page 9

Mode Configuration
Conguration Mode is used to dene settings for the following: Battery Backup speed, Night Mode speed and
time, Feed Mode speed and time and Auto-Dim time. These modes operate automatically depending on the
settings that you dene.
The Conguration Menu is entered by pressing and holding all three buttons during any normal operational
mode. At this point the control dial led will blink orange and white and the rst two blue LED lights will
illuminate brightly. You are now in the conguration menu and can navigate between the following six dierent
conguration settings:
Battery Backup Speed
Night Mode Speed
Night Mode Time
In the conguration mode main menu, each of the six dierent settings will be indicated by a corresponding
pair of illuminated blue LED lights. Use the mode button to cycle through the dierent congurable settings.
Illustration above shows the driver in the conguration mode main menu sit-ting on Night Mode Speed (3rd and
4th Blue LEDs Illuminated).
Once the mode you want to modify is signaled by the LED bar, you can press the SET button to access that
modes values, at this point the control dial will blink a set of colors specic for each mode you are modifying.
These colors are:
Feed Mode Speed
Feed Mode Time
Auto-Dim Time
Driver shown in Conguration Mode Main
Menu, sitting on Night Mode Speed option.
• Battery Backup Speed: Orange and Blue
• Night Mode Speed: Orange and Green
• Night Mode Time: Orange and Purple
• Feed Mode Speed: Orange and Pink
• Feed Mode Time: Orange and Yellow
• Auto-dim functionality: Orange and Turquoise
Illustration above shows the driver in the Night Mode Speed conguration setting. It also is showing, by the
illuminated LEDs, what setting it is currently set to. The driver will also indicate, by the dim LEDs, what setting
is the default. Note: If there is only two brightly illuminated LEDs, that means that you are currently set to the
default setting.
Driver shown in Night Mode Speed Conguration
set to lowest speed and showing default speed is
setting 3.
p. 7
Page 10

Battery Backup Speed:
Setting 1: Lowest speed of pump
Setting 2: 10% speed of pump
Setting 3: 20% speed of pump
Setting 4: 30% speed of pump
Setting 5: 40% speed of pump
Setting 6: 50% speed of pump
Night Mode Speed:
Setting 1: Lowest speed of pump
Setting 2: 10% speed of pump
Setting 3: 20% speed of pump
(Default Setting)
(Default Setting)
Driver shown here in Battery Backup Speed
Conguration Mode Setting, showing that it is
set to the lowest speed of pump and default
being 20% speed of pump.
Setting 4: 30% speed of pump
Night Mode Time:
Setting 1: 6 hour night
Setting 2: 8 hour night
Setting 3: 10 hour night
Setting 4: 12 hour night
Setting 5: 14 hour night
(Default Setting)
Driver shown here in Night Mode Speed
Conguration Mode Setting, showing that it is
set to the lowest speed of pump and default
being 50% speed of pump.
Driver shown here in Night Mode Time
Conguration Mode Setting, showing that it
is set to a 6 hour night and default being a 10
hour night.
p. 8
Page 11

Feed Mode Speed:
Setting 1: Lowest speed of pump
Setting 2: 25% speed of pump
Setting 3: 50% speed of pump
Setting 4: 75% speed of pump
Feed Mode Time:
Setting 1: 6 hour night
Setting 2: 8 hour night
Setting 3: 10 hour night
Setting 4: 12 hour night
Setting 5: 14 hour night
(Default Setting)
(Default Setting)
Driver shown here in Feed Mode Speed
Conguration Mode Setting, showing that it is
set to barely spinning and default being 50%
lower than the lowest speed of pump.
Driver shown here in Feed Mode Time
Conguration Mode Setting, showing that it
is set to the 5 minutes and default being 10
minutes.
Auto-Dim Time:
Setting 1: 6 hour night
Setting 2: 8 hour night
Setting 3: 10 hour night
Setting 4: 12 hour night
Setting 5: 14 hour night
(Default Setting)
Driver shown here in Auto-Dim Time
Conguration Mode Setting, showing that it is
set to 1 minute and default being disabled.
p. 9
Page 12

Multi Pump Overview
Master/Slave/Independent
QuietDrive devices can work together to create an
innite variety of ow conditions. The QuietDrive
driver is set by default to Independent mode, the
QuietDrive driver does not broadcast wireless
signals for other pumps to hear (with the exception
of Feed Mode, which all pumps broadcast and all
pumps listen for). If running only one VorTech pump
this is the ideal mode. When adding additional
VorTech pumps, any QuietDrive driver is capable
of operating as either a master or a slave pump. A
Master pump broadcasts a wireless signal and the
slave pump(s) receive the signal. On any aquarium,
you can have up to six dierent master pumps
broadcasting on unique frequencies. Each of these
master pumps can be synced with an innite
number of slave pumps creating endless ow
possibilities.
Master
Slave
Slave
Slave
Independent
Independent in Constant Speed
Mode (Green Control Dial)
Master
Master in Constant Speed Mode
(Green Control Dial)
Slave mirrors the mode of master
Slave
(Orange Control Dial)
When a master pump is initiated and running in any
one of the normal modes (such as Constant Speed,
Random, Short Pulse, or Gyre), it sends out a signal
telling other pumps what mode it is operating and
what speed it is running at. VorTech pumps set to
operate as slaves will listen for the master pump’s
wireless signal and do either the same as the
master pump (Sync Mode), or the opposite (AntiSync Mode). Slave pumps set in Sync Mode will
perform exactly the same as the master pump and
will be indicated by a white LED on the QuietDrive
driver’s knob. Slave pumps set in Anti-Sync Mode
will perform exactly the inverse of the master pump
and will be indicated by the Control Dial illuminating
Orange.
For example, if the master pump is running at 80% speed, a slave pump in sync mode will run at 80% also. If
that same slave pump was operating in Anti-Sync Mode, it will run at 20% speed (this is the inverse speed of
80%). As the master pump slows down, a slave pump in Sync Mode will slow down with it and a slave pump in
Anti-Sync Mode will speed up.
To select between Sync and Anti-Sync Mode on a slave pump, simply tap the MODE button, the LED will
change color to reect which mode the pump is in.
p. 10
Page 13

Assigning Master/Slave Relationship
NOTE: When using a single VorTech pump, no master/slave conguration is necessary
When using two or more VorTech pumps, you
will want to establish pump groups to coordinate
the operation of multiple pumps. A pump group
consists of one master pump and at least one
slave pump. There can only be one master pump
per group which can include an unlimited number of
slave pumps. In order to set a pump as a master or
a slave, the aquarist must rst enter the VorTech
Pump’s conguration mode. Within conguration
mode one can do one of three dierent things:
Reset the pump’s memory back to independent mode
Set the pump as a master
Set the pump as a slave
HOLD MODE + SET HOLD MODE HOLD SET
Masters and slaves must be set as groups and
each group must be programmed separately. You
must perform the following steps in the order listed
to correctly program your QuietDrive driver. You
may setup a maximum of seven separate groups,
each having a unique master pump.
Clear Driver Memory - The internal memory of
each unit must be cleared before setting up a
group. Hold MODE and SET together until the
control dial blinks red/white/blue. Then hold MODE
until the dial blinks red/purple. Then hold SET until
the pump resets.
*After you hold MODE and SET
the Control Dial will blink red/white/blue.
Enter Setup Mode - All pumps in a group must
then be set into conguration mode before
the assignment of slave or master status. This
conguration must be performed with the drivers
in close proximity to ensure proper assignment.
Hold MODE and SET together until the drivers blink
red/white/blue.
*After holding MODE the
Control Dial will blink red/purple.
*Pump shown reset to consistent
Speed Mode (Green Dial).
HOLD MODE + SET
p. 11
Page 14

Assigning Master/Slave Relationship (cont.)
Assign the Master - Set the master pump by
pressing the MODE button. The control dial will
then blink blue and green. You are now ready to
assign slave pumps.
Assign the Slaves - Set the slave pump by
pressing the SET button on the driver. The
control dial will then blink blue and yellow. NOTE:
If the slave blinks blue and red, it was too far
away from the master driver and could not
communicate properly. Repeat this step for all
slaves you want to assign the master.
PRESS MODE
PRESS SET
Reset the Master - Hold the MODE button on the
master pump after completing ALL the master/
HOLD MODE
slave assignments. The pump will reset and
begin operation in the previous mode you had
programmed. You can then change modes with
the master pump like normal and the slave pumps
will operate according to what the master pump
denes. Slave pump speeds can be dened by
the master or can be locally dened, See Section
2.3: Assigning a Local Max Speed to a Slave.
*Pump shown reset to consistent
Speed Mode (Green Dial).
Begin Normal Operation - Use the controls on the Master Pump to operate all pumps in the group. Slave
pumps can only be set to sync or anti-sync modes, or the three options in EcoSmart modes. For more
information on operating slave pumps and conguration, see Chapter 5: Pump Conguration for EcoSmart
Modes.
Program Subsequent Groups - Now that the rst group is programmed, repeat these steps on the next
group of pumps, if so desired.
Unassign a Slave Pump - If you would like to unassign a pump as a slave and use it independently, follow
instructions for clearing driver memory and perform those steps on the slave pump which you would like to
unassign.
NOTE: The subsequent pump groups must be programmed near the original group. For example,
if running two dierent groups in separate areas of your house, the second group must be
programmed within 5 feet the rst group to ensure proper communication.
p. 12
Page 15

Assigning a Local Max Speed to a Slave
While normally you cannot change the speed of a slave pump, because the speed is determined entirely
by the master pump, with the EcoSmart driver you now have the ability to control the maximum speed
of individual slave pumps independently from the master. This will come in handy if your aquarium setup
requires higher ow in most areas but lower ows in other areas such as if a slave pump is used to
provide spot ow to a delicate coral, or if it is used on the back of a narrow tank. In the default setting, a
slave pump will always do exactly the same thing or the inverse of the master pump (based on whether
it is set to Sync or Anti-Sync), and therefore the maximum speed that a slave pump can achieve is
governed by the master pump.
To assign a unique maximum speed setting to an individual
slave pump, hold the SET button on the slave until a bright
LED shows on the LED strip. This LED represents the locally
assigned maxi-mum speed for this slave pump.
Next, turn the knob to adjust the maximum speed for that
particular slave pump, which will be indicated by the LED
strip.
To increase the maximum speed, turn the knob to the right.
To decrease the maximum speed, turn the knob to the left.
If you would like to restore the slave pump’s speed setting to
match the master pump’s speed setting, hold the SET button
until the brightly illuminated LED showing the max speed
goes dim. It will now revert back to always match the speed
input by the master pump.
p. 13
Page 16

Overview of Multi-Pump EcoSmart Modes
With QuietDrive, EcoTech Marine has taken the guess-work out of positioning and setting up your pumps and
automated the process of creating the best environment for your coral reef. All you need to do is follow our
recommendations on pump positioning and then select the EcoSmart mode of your choice; EcoSmart does
the rest, orchestrating your pumps to work together, providing the most eicient ow and wave conditions.
QuietDrive creates results that you will see in the form of less detritus accumulating within your aquarium and
increased coral growth.
Unlike conventional modes (Constant Speed, Random, Short Pulse, and Long Pulse), when a master pump is
set to an EcoSmart mode the slave pumps will not have Sync or Anti-Sync Mode options. Instead, they have
settings which correspond to the pump’s position on the aquarium. There are three EcoSmart slave modes
and they are:
White
(for a slave pump positioned on the
same side of the aquarium as the
master)
(for a slave pump positioned on the
opposite side of the aquarium as the
Orange Turquoise
(for a slave pump positioned on the
master pump)
back side of the aquarium)
In EcoSmart modes, the master pump will output a wireless signal telling the dierent slave pumps exactly
what to do in order to create ideal ow conditions. This system is more engineered than sync and anti-sync,
as pumps placed in various positions in your aquarium will run specic pro-grams to accomplish the goals
outlined in the EcoSmart mode’s description.
Achieving the benets of QuietDrive is as easy as setting up your pumps according to the recommendations
outlined below and forgetting about them. We have done the research and development for you in order to
create the most engineered ow system available.
The most important thing to remember is that when using EcoSmart modes, you assign slave pump modes
based specically on where they are positioned. If a pump is placed opposite the master pump, it goes in
the orange mode. If it is placed on the same side as the master, it goes in the white mode. If the pump is
placed on the back side of the tank, it goes in the turquoise mode. Master pumps should ideally be placed on
the left or right side of the tank. Examples of dierent aquarium congurations and our recommended pump
positioning for QuietDrive modes can be found below.
Use of QD drivers with an EcoSmart or Wireless Wave Driver (WWD)
Your QuietDrive driver is capable of communicating with a EcoSmart or WWD equipped MP40w. However, the
WWD equipped pump will not have the luxury of communicating with your QuietDrive or EcoSmart driver in
any of the QuietDrive modes. Therefore, your WWD equipped pump will not run in any of the QuietDrive or
EcoSmart slave modes outlined above. If you have a WWD equipped MP40w and wish to achieve the full
benet of using the EcoSmart modes, we recommend that you purchase an QuietDrive upgrade kit for your
pump, available through our online store at www.ecotechmarine.com.
However, your WWD and EcoSmart pump are capable of communicating with one another in any of the modes
except for EcoSmart modes, such as Constant Speed Mode, Random Modes, Short Pulse Mode, Long Pulse
Mode. Your WWD can also be told to go into Feed Mode or Night Mode by an EcoSmart driver.
p. 14
Page 17

EcoSmart Modes
Tidal Swell Mode
Tidal Swell mode (TSM) creates a harmonic balance reminiscent
of the changing ow conditions found in nature. Over the course
of several hours, the ow pattern will go from very chaotic to
calm, followed by a detritus-clearing surge at the very end of the
cycle. The ow direction will change direction every cycle. In this
mode your master driver will be purple and your slave driver will
ash white/orange/teal and indicate its speed by the LED strip.
% of
User
Set
Speed
Time
Nutrient Transport Mode
Nutrient Transport mode (NTM) creates circulation in a two-phase
program. The rst phase uses wave motion to stir up detritus.
The second phase follows with a surging motion to move the
detritus into the overow and out of the aquarium. This mode
promotes maximum health, nutrient export and increased growth
for sensitive corals such as SPS.
% of
User
Set
Speed
Time
p. 15
Page 18

Maintenance
Wireless Driver Firmware Upgrade
Note: QuietDrive drivers only upgrade other QuietDrive drivers. Any QuietDrive driver with newer rmware can
upgrade another QuietDrive driver regardless of the model number (i.e. MP10w ES can upgrade a MP40w ES).
EcoTech Marine is continually upgrading and making your QD Pump better. Because of this, your driver may not
have the latest rmware. Fortunately, EcoTech makes it easy to upgrade your drivers rmware. To complete
this process you will need a driver with the latest rmware along with the driver that you want to upgrade.
Follow the instructions and diagram below to upgrade your drivers rmware.
Note: During the rmware upgrade process, turn o all Wireless Wave Drivers, EcoSmart drivers and QD drivers
within 100 feet of the two that you will be doing the upgrade process with. Also, move the two drivers that
you will be working with to within 3 feet of each other.
Unplug your driver then hold MODE and SET simultaneously while plugging your driver in and continue holding
until the control dial has been red for approximately ten seconds. When the LED toggles between blinks red/
white, the driver is in Upgrade Mode. Release both the MODE and SET buttons. Repeat this step for second
driver.
Powered O
Now that both drivers control dials
are blinking red/white, indicating
they are in Upgrade Mode, press
and hold SET button on either
driver until the control dials blink
green/blue for driver receiving new
rmware and red/green/red/blue
for the driver sending rmware.
The pumps will automatically
detect which is the latest
rmware and act accordingly.
HOLD MODE + SET Blinking Red/White
Sending New Firmware
Press SET on Either Driver
Receiving New Firmware
p. 16
Page 19

Troubleshooting
Error Codes
Flashing Red LED
• Issue: Pump disconnect error
• Resolution: See section 6.0 of the full ES manual: Pump Disconnect Error Protection
Available at ecotechmarine.com/downloads
Flashing Red/Orange LED
• Issue: A component in the motor has gone bad
• Resolution: If you are under warranty, contact EcoTech Marine for a
replacement motor. If you are outside warranty, visit the parts store at
www.ecotechmarine.com to purchase a new motor.
Flashing Red/Yellow LED
• Issue: The pump has over heated
• Resolution: Clean the wetside and check that there are no obstructions
blocking the rotation of the wetside or dryside. If the problem persists,
contact EcoTech Marine to speak with a service representative.
Flashing Red/Green LED
• Issue: Stall error
• Resolution: Completely disassemble and clean the wetside then check that
there are no obstructions blocking the rotation of the wetside or dryside.
If the problem persists, contact EcoTech Marine to speak with a service
representative.
Flashing Red/White LED
• Issue: Wireless upgrade error
• Resolution: Re-attempt the upgrade process until it completes successfully.
Alternatively, you can use a normally functioning pump to re-ash the pump
with the red/white error code. If none of this works, contact EcoTech Marine
to speak with a service representative.
Solid Red LED
• Issue: Upgrade Error
• Resolution: Re-attempt the upgrade process until it completes successfully.
Alternatively, you can use a normally functioning pump to re-ash the pump
with the red/white error code. If none of this works, contact EcoTech Marine
to speak with a service representative.
Very fast ashing red, no LED at all when
powered up, or multiple random colors
• Issue: All of the earlier codes represent actual error codes programmed into
the driver. The error above however, reects that some damage to the pump
has occurred preventing it from functioning properly.
• Resolution: contact EcoTech Marine to speak with a service representative.
p. 17
 Loading...